
Use macOS-style shortcuts in Windows / keyboard mappings using a Mac keyboard on Windows
ℹ️ There is a newer alternative project that does similar things and more, check it out at https://github.com/stevenilsen123/mac-keyboard-behavior-in-windows
Make Windows PC’s shortcut act like macOS (Mac OS X) (using AutoHotkey (ahk) script)
With this AutoHotKey script, you can use most macOS style shortcuts (eg, cmd+c, cmd+v, …) on Windows with a standard PC keyboard.
How does it work
Here’s some examples of how this script work:
| you want to press | what you’re actually pressing | AutoHotKey tells Windows |
|---|---|---|
| cmd + c | alt + c | ctrl + c |
| cmd + v | alt + v | ctrl + v |
| cmd + r | alt + r | F5 |
| cmd + ↑ | alt + ↑ | Home |
| cmd + shift + [ | alt + shift + [ | ctrl + shift + Tab |
| … | … | … |
Note that:
- you shouldn’t change the modifier keys mapping with keyboard DIP. This script assumes you (1) use a PC keyboard on Mac and have swapped [cmd] and [option] keys via Mac system preferences (2) you are familiar with mac shortcuts in macs (3) you want to use the PC keyboard and mac-style shortcuts on PC.
- To use
cmd + shift + ↑ / ↓ / ← / →(select text between cursor and top / bottom / beginning of line / end of line), You should disable theBetween input languagesshotcut fromControl Panel\Clock, Language, and Region\Language\Advanced settings > Change lanugage bar hot keysdue to conflicting. - Some Windows built-in keyboard shortcuts will be overridden. For example:
win + ↑ / ↓ / ← / →(snap window to side). Changemac.ahkaccordingly if you prefer to keep the default behavior.
To Run Once (until reboot)
- Install https://www.autohotkey.com/
- Copy and save the content of
mac.ahkin a text file, named asmac.ahk - Double click on
mac.ahkfile
Auto start after Windows startup
Complete the step of «To Run Once» section first.
Place mac.ahk file (or make a shortcut) at C:\Users\<USERNAME>\AppData\Roaming\Microsoft\Windows\Start Menu\Programs\Startup
05 March, 2024
by Robin Leinonen
When trying to use the same keyboard with two operating systems, it can be tricky to make shortcuts work consistently.
It can be done, though, and isn’t even very hard once you dig into the settings.
Matching modifiers
Windows and macOS have all the same modifier keys, but they use different names for a couple of them:
- Windows and macOS both use Shift and Ctrl for the same keys
- Windows uses Alt, but macOS calls the same key Option (Opt)
- Windows uses WIN, but macOS calls that key Command (Cmd)
The tricky part is macOS makes extensive use of the Cmd modifier for many common shortcuts, while Windows uses Ctrl for most of the common shortcuts.
If you’re on Windows, you want easy access to Ctrl, but having easy access to WIN is not as important. On macOS, it’s the opposite. You need easy access to Cmd but Ctrl is not used that frequently.
One option is to make macOS or Windows-specific layers in your layout, which can be a good approach if you are regularly swapping between lots and lots of different computers. However, as long as you’re usually using your own macOS computer, you can make a small change in the macOS settings that completely eliminates this problem.
In System Preferences > Keyboard > Keyboard Shortcuts... > Modifier Keys, tell macOS to interpret Ctrl as Cmd and Cmd as Ctrl, like this:

This will keep all macOS shortcuts the same, but when you push something like Ctrl + C on your keyboard, macOS will see Cmd + C instead, making the shortcuts use the same keys for you. So, you can set up your layout exactly how you want it (thinking about using it with Windows), and it will work the same for macOS for any common shortcut. This change is also keyboard specific, so it won’t mess with any built-in keyboards if you’re using a macOS laptop or anything like that.
Changing individual macOS shortcuts
The above solves most of the mismatch between macOS and Windows, and will probably be enough to allow most people to use one layout with both operating systems comfortably without any special layer setup.
However, if there are specific shortcuts you are used to on Windows that you would like to mirror to macOS, you can do that, too. Note that this change is not keyboard-specific, so it will also change shortcuts for a built-in MacBook keyboard.
Pre-defined Shortcuts
If you’re used to taking a screenshot on Windows with WIN + PrtScn (that’s the Windows key and Print Screen), you can make macOS function the same way.
By default, the macOS shortcut for a fullscreen capture is Shift + Cmd + 3. To make this match Windows, go to System Preferences > Keyboard > Keyboard Shortcuts... > Screenshots, and there you can change shortcut to match Windows. Remember that if you switched your modifiers as above, the shortcut will look different than it will on Windows.
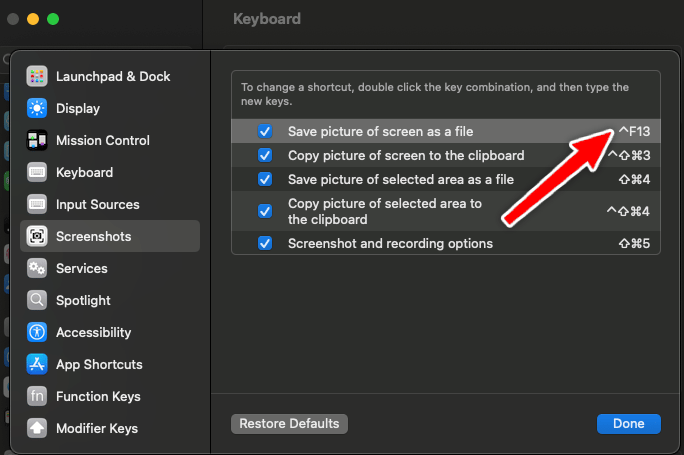
For example, macOS says my shortcut is Ctrl + F13, and it is, but as the person using the board, the shortcut for me uses the same keys as WIN + PrtScn. MacOS calls the PrtScn key F13 and it’s using Ctrl because that’s what it sees after the above change.
If that’s confusing, don’t worry about it too much. Just make sure you’re pressing the actual keys you want to use to trigger the action in macOS, and disregard how the shortcut is displayed in settings.
Global Shortcuts
There are some actions in macOS that have shortcuts but do not have specific entries in the Keyboard Shortcuts menu. These can still be changed.
A good example is the emoji keyboard. On Windows, it is WIN + . to pull emojis up. On macOS, it’s Ctrl + Cmd + Space or Globe + E depending on your OS version. You won’t find a listing for the emoji keyboard shortcut in the macOS settings.
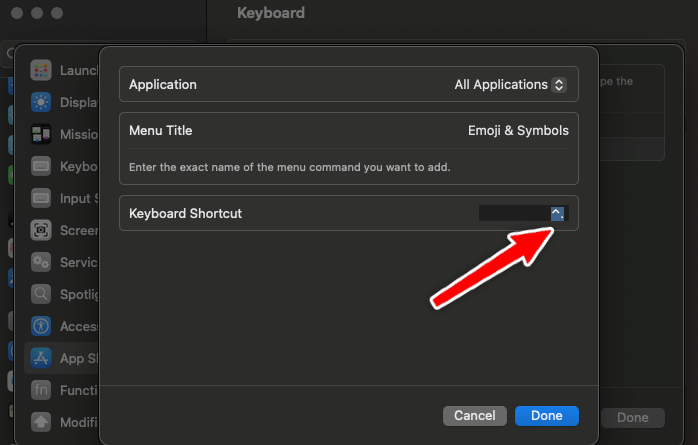
However, in this same window, if you go App Shortcuts, you can redefine any action that appears in the upper macOS toolbar. Look at the Edit menu, and you’ll see the Emoji keyboard is defined there regardless of what app you’re looking at.
So, you can click the “+» and type in the exact menu action that you want («Emoji & Symbols» in this case) then define a different shortcut, which will be Ctrl + . to macOS, but to us, it will really the same shortcut as it is on Windows.
App-Specific Shortcuts
You can also repeat the above method for specific apps if you use an app across both operating systems, but it changes some shortcuts. Just double-check that the simple Ctrl and Cmd swap above doesn’t do what you want first. Adding a bunch of shortcut overrides can get confusing, so use this sparingly.

Who should make which changes?
That was a lot! Here’s a quick reference if you’re not sure what applies to you:
If you use macOS and Windows and want most shortcuts to use the same keys on your keyboard, make the Cmd and Ctrl swap above. This is enough for a good 90% of people.
If there is a specific shortcut that is still different between Windows and macOS, and you want it to be the same, you can change this with the Global or App-Specific Shortcuts method. You should not need to redefine more than a few shortcuts this way. If you find yourself feeling like you need a bunch of these, double-check that it’s really needed.
If you regularly swap devices (say you work in IT with lots of company computers, for example), OS specific layers in your layout may be a more practical solution. Oryx makes this straightforward as well. You can use your base layer for one OS and transparent keys to avoid remapping all the keys on your other layer. You just need to change the modifier key positions.

Of course, if you have further questions about this, always feel free to email us at [email protected]. We’re happy to help!
tl;dr:
- Download and install the latest
.msiof SharpKeys - Map
Left CtrltoLeft Alt(and vice versa) in SharpKeys - Download and install AutoHotKey
- Save this script somewhere on your machine
- Double-click the downloaded script to activate it
Want a more detailed walk-through? Keep reading!
A few months ago I put together a pretty decent Windows PC, mostly for gaming. Although of course I started tinkering here and there with programming on it, and eventually decided to go full in on making it a web dev machine. The timing couldn’t be perfect either, as Windows released WSL 2 recently and its performance with Docker Desktop has been incredible.
The downside though is that my day-to-day work is on a MacBook, and (although I feel alone in this) I absolutely love using Alt instead of Ctrl for things like copying and pasting. I figured there had to be others like me out there who have solved this, so I went searching for a solution.
There’s a few different methods out there, but I found a combination of two things that were easy to set up using free software, and have performed consistently well since I added them a few weeks ago. With that being said, let’s get started!
Step #1 — Switching Alt and Ctrl
The first part of this will be dedicated to swapping out our Ctrl key for the Alt key, which mimics the Apple keyboard Cmd key placement. For this, you’ll need to download and install a program called SharpKeys. The app is entirely open source, and you’ll need to visit the releases GitHub page downloading the latest .msi file available.
Once you have it installed, open it up and click the Add button toward the lower right. You’re looking to map both the Left Ctrl key to Left Alt, and the Left Alt key to Left Ctrl. After you do that, your program’s main screen should look like this:

If everything looks right, click the Write to Registry button towards the lower right to save your changes. Then, exit the application.
You can now try it out and see that your Alt and Ctrl keys have been switched! Instead of using Ctrl+C for copying, you’ll now be using Alt+C. However, there’s a small caveat. Because all we did was map the keys differently, keyboard shortcuts that made use of Alt now expect to use Ctrl.
If you’re like me and use Alt+Tab to switch between windows a lot, that’s where you’ll notice this problem the most. Let’s fix that!
Step 2 — Remapping Alt Tab
For this next step we’ll need another free program, AutoHotKey. Go ahead and download the program from that link and install it on your machine. Skip through any tutorial or help requests if you’d like, we’re only going to be using it with a single (and fairly short) script.
After it’s been installed successfully, download the following script and save it somewhere convenient on your machine, making sure that it contains a .ahk extension:
From there, double-clicking on the file will silently start the AutoHotKey script, re-enabling your Alt+Tab window switching! ✨
Note: The above script also adds in some helpful MacOS-related keybindings for Alt+Arrow combinations.
Extra Step — Running AutoHotKey Script on Startup
Using the method above, you’ll need to double-click on the script each time your computer turns on in order for your Alt+Tab fix to start working. There’s a simple workaround for this though, that will get the script starting as soon as the computer turns on.
Just follow these three simple steps:
- Press Win+R to open up the Run dialog.
- Type in
shell:startupand press Enter, this should open up a folder window. - Copy and paste your saved
.ahkscript file into this window.
As soon as your computer boots up, your AutoHotKey script and SharpKeys modifications will start running, essentially swapping out your Windows keybindings for those on a MacOS system. 🔥
That’s it! If you have any questions about the above, any issues with what was outlined, or additions that might be helpful to the AutoHotKey script I provided, please feel free to let me know. You can leave a comment below, or message me on Twitter.
Feel free to follow me on there as well, if you’d like to see fairly regular, shorter posts on web development and MacOS. You’ll also see updates when I publish new video tutorials and finish writing articles.
Last updated:
I’ve been using macOS as my main driver for the past 10 years or so. Last month, I bought a PC.
Since I now switch between macOS and Windows daily — mac for work and Windows for personal — I wanted to find a way to synchronize my workflow, specifically:
- applications
- keyboard shortcuts (hotkeys)
Overview
This guide assumes you prefer the keyboard shortcuts and applications on macOS and you want them to be similar on Windows 10.
Applications
Here are a list of applications on macOS and their equivalent on Windows. You’ll need to install the Windwos ones if you don’t already have them:
- Rocket -> Windows Emoji Picker (built-in with Windows 10)
- used to quickly type emojis
- Alfred -> PowerToys Run
- used to quickly open apps, or change computer state (sleep, restart, shutdown)
- macOS Screenshot Tool -> Windows Snipping Tool (built-in)
- used to take screenshots
- Clippy -> Windows Clipboard
- manages your clipboard history
- N/A -> PowerToys
- comes with a Keyboard Manager and many other tools
- N/A -> Easy Window Switcher
- adds a keyboard shortcut to switch between windows of the same application on Windows
Keyboard Shortcuts
This is the main component to syncing your workflows. I found that after remapping these keys and shortcuts, it became 10x more seamless switching between operating systems.
- Open PowerToys
- Go to Keyboard Manager
- Add the following Keys
-
Caps Lock to Esc
This is for vim’ing.
-
Esc to Caps Lock
I don’t use the actual Esc key so map back to Caps Lock in case we need it.
-
Ctrl to Alt
Switch these two to be more like macOS
-
Alt to Ctrl
Same as above
- Add the following Shortcuts
- CtrlTab to AltTab — Switch Application Windows similar to macOS
- CtrlSpace to AltSpace — Launches the shortcut menu (like Spotlight)
- CtrlLeft to Home — Moves cursor to start of line
- CtrlRight to End — Moves cursor to end of line
- CtrlQ to AltF4 — Quit applications like on macOS
- Ctrl` to Alt` — Toggle between windows of same application
- CtrlShift4 to WinShiftS — Take screenshots like on macOS
- CtrlShiftV to WinV — Launch Clipboard history like with Clippy on macOS
- WinShiftLeft to CtrlShiftLeft — Select word by word moving left
- WinShiftRight to CtrlShiftRight — Select word by word moving right.
- WinCtrlLeft to CtrlShiftTab — Move to the previous tab
- WinCtrlRight to CtrlTab — Move to the next tab
Additional Notes
There are some limitations to this. For instance, connecting to bluetooth devices on macOS is only two clicks vs four clicks on Windows. I also couldn’t make the Windows Emoji Picker exactly like Rocket.
Sometimes the keyboard manager in PowerToys doesn’t work and I have to restart my PC.
Other times, putting my PC to sleep and waking it back up, applications randomly stop working.
PowerToys doesn’t let you export your Keyboard Manager settings so there’s no easy way to back them up besides taking screenshots.
You may need to restart some apps for the keyboard shortcuts to take effect.
You may need to remap some shortcuts on applications like VS Code or Obsidian.
Are you a macOS user occasionally dealing with Windows systems or trying to switch platforms? Are you a Windows user that believes that the Windows-native keyboard shortcuts are objectively bad? Are you annoyed by something as simple as copy/pasting text not working consistently across apps?
If so, this post will equip you with an AutoHotkey configuration file that brings macOS keyboard shortcuts to Windows. Read on.
Motivation
Up until last summer, I had been a macOS-only desktop user for about 15 years with the occasional peek at Windows 10 on an old PC. While I continue to prefer macOS as a desktop environment, I’m slightly concerned about the direction Apple is taking with the platform and I don’t like the thought of being locked in. Part of the reason behind me joining Microsoft last October was to familiarize myself with Windows, as was purchasing a Surface Go 2 last summer.
Upon joining the company, I tried to do all of my work from the Surface Laptop 3 that I was given, and… well, that was quite painful. Getting used to a new company, a new team, a new product, a new set of technologies… all from an OS I wasn’t fluent in was just too much. At that time, I enrolled my personal Mac Pro into the corporate network and did most of my day-to-day work from it. Clearing the productivity barrier was nice, but the situation had to change: the security software forced onto my Mac made it crawl; I still had to use Windows on a remote VM and on the laptop; and, well, I wasn’t fulfilling my plan of learning Windows.
To start addressing this, I set up an old Dell Optiplex 9020 as my desktop (which still works surprisingly well after a recent RAM upgrade), opted it into the corporate network, and I was full-time on Windows for work purposes. And it was hard again. You know, I do like Windows 10 and the platform has become neat for development with WSL, Windows Terminal, and VSCode, but I just could not get used to the keyboard shortcuts. The inconsistency across apps breaks “the flow”, and me still using my Mac Pro for personal use didn’t help.
After a couple of months, I had gotten used to the native shortcuts, but I was still not comfortable. I still felt sluggish doing my day-to-day work. I still made unavoidable mistakes, like pressing Ctrl+C in the terminal to copy text. So, for me, the broken keyboard shortcuts are kind of a big deal. They are the kind of a big deal that would be a deal breaker if you asked me to abandon macOS completely. Interestingly enough, I’m not the only one who thinks this way:
@migueldeicaza on June 1st, 2021
Apple’s real lock-in is not the AppStore, it is ⌘C, ⌘V and ⌘X working everywhere — that’s why I can never go back to Linux or use Windows.
1.5k likes · Go to Twitter thread
Something had to give. I could go back to my macOS-only setup… or I could try to fix the shortcuts on Windows to feel comfortable in the new environment.
Failed first attempts
My first attempt was via the Keyboard Manager in PowerToys. This was my first choice because this is a first-party tool. Unfortunately, in its current form, it’s excruciating to configure but I managed to get a reasonable set of keybindings to mimic the macOS shortcuts on Windows. It wasn’t great though: configuring different shortcuts for different apps wasn’t flexible enough and, if I recall correctly, the tool refused to run within a VM and on Windows Server 2019 (into which I have to remote).
Coincidentally, I saw kinto.sh pass by in Hacker News, which promises to painlessly offer macOS-like shortcuts on Windows. Sweet! I decided to give it a try and, indeed, it did the trick. But, once again, not without issues. I suffered from random stuck modifier keys here and there, and these were even more infuriating than the native Windows shortcuts. I tried to debug this issue and tweak the configuration to better fit my needs… but these only made the problem worse.
The thing is that kinto.sh tries to take advantage of the fact that most Ctrl+<Key> shortcuts on Windows directly translate to Cmd+<Key> on macOS. With this in mind, the tool swaps the modifier keys and then fixes up a few stragglers, giving you shortcuts that work most of the time with very little configuration. Neat trick, but it’s bound to fail: kinto.sh is based on AutoHotkey, and AutoHotkey’s own documentation says that remapping Alt+Tab is not going to work properly—which I experienced.
kinto.sh has various hacks to compensate for the problems described by AutoHotkey, but they don’t work perfectly. I wasted hours learning AutoHotkey’s configuration language and trying to fix the kinto.sh script, but the oddities and stuck keys remained for days, or even weeks.
AutoHotkey configuration
Before giving up, I decided to start with a fresh AutoHotkey configuration and attempted a manual remapping of all the macOS shortcuts I care about, one by one, without swapping the modifier keys. If you think about it, there are not that many: clipboard access, file manipulation, text editing, tab and window manipulation… and that’s about it. Yes, patching these one by one was kind of a whack-a-mole game for a bit, but I eventually reached a pretty stable configuration that I haven’t touched for months now.
Without further ado, here it is, the AutoHotkey configuration to set up macOS keyboard shortcuts on Windows:
; Sets up macOS-like keybindings on Windows via AutoHotkey.
;
; Last updated on 2021-07-14.

#SingleInstance force
#NoEnv
#Persistent
#InstallKeybdHook

Menu, Tray, Standard

GroupAdd, terminals, ahk_exe powershell.exe
GroupAdd, terminals, ahk_exe WindowsTerminal.exe
GroupAdd, terminals, ahk_exe Cmd.exe
GroupAdd, terminals, ahk_exe mstsc.exe ; Remote desktop.

GroupAdd, posix, ahk_exe powershell.exe
GroupAdd, posix, ahk_exe WindowsTerminal.exe
GroupAdd, posix, ahk_exe Cmd.exe
GroupAdd, posix, ahk_exe gvim.exe
GroupAdd, posix, ahk_exe mstsc.exe ; Remote desktop.

GroupAdd, vscode, ahk_exe VSCodium.exe
GroupAdd, vscode, ahk_exe Code.exe

; Emergency clear.
*PrintScreen::
Reload
Goto ReleaseModifiers
return

; CHEATSHEET
; # Win    ! Alt    ^ Ctrl    + Shift
;
; These modifiers work *after* remapping the modifiers.
; It doesn't matter where the keys are remapped; order is irrelevant.

;$AppsKey::RCtrl  ; Surface Laptop.
$AppsKey::RWin  ; Sculpt keyboard.

; Program launchers.
$#e::Run explorer
$#n::Run notepad
$#t::Run wt

; Window manipulation.
$!q::Send !{F4}

; Workspace movement.
$^Left::Send ^#{Left}
$^Right::Send ^#{Right}

; Screenshots.
;$!+3::Send {PrintScreen}
;$!+4::Send #+{S}

; Special characters.
$^+c::Send {�}
$^+n::Send {�}
$!-::Send {�}
$!+-::Send {�}

; Hide all instances of active program.
!h::
WinGetClass, class, A
SetTitleMatchMode, 2
WinGet, AllWindows, List
loop %AllWindows% {
    WinGetClass, WinClass, % "ahk_id " AllWindows%A_Index%
    if(InStr(WinClass,class)){
        WinMinimize, % "ahk_id " AllWindows%A_Index%
    }
}
return

; Cycle between same-app windows.
!`::
WinGet, ActiveProcess, ProcessName, A
WinGet, OpenWindowsAmount, Count, ahk_exe %ActiveProcess%
if (OpenWindowsAmount > 1) {
    WinGetTitle, FullTitle, A
    AppTitle := SubStr(FullTitle, InStr(FullTitle, " ", false, -1) + 1)

    SetTitleMatchMode, 2
    WinGet, WindowsWithSameTitleList, List, %AppTitle%

    if (WindowsWithSameTitleList > 1) {
        WinActivate, % "ahk_id " WindowsWithSameTitleList%WindowsWithSameTitleList%
    }
}
return


; Lock screen and turn off monitor.
$!^q::
    Sleep, 200
    DllCall("LockWorkStation")
    Sleep, 200
    SendMessage,0x112,0xF170,2,,Program Manager
    return

#IfWinNotActive ahk_group posix
    $!a::Send ^a ; Select all.
    $!f::Send ^f ; Find.
    $!l::Send ^l ; Location bar.
    $!r::Send {F5} ; Refresh.
    $!z::Send ^z ; Undo.
    $!+z::Send ^y ; Redo.
    $^!Space::Send #; ; Emoji selector.

    ; File manipulation.
    $!o::Send ^o
    $!s::Send ^s

    ; Line edits.
    $^k::SendInput +{End}{Delete}
    $^o::SendInput {Enter}{Up}
    $!/::Send ^/ ; Comment line.

    ; Word edits.
    $#Backspace::Send ^{Backspace}
    $!Backspace::Send ^{Backspace}

    ; Cursor movement.
    $^a::Send {Home}
    $^e::Send {End}
    $^p::SendInput {Up}
    $^n::SendInput {Down}
    $^b::SendInput {Left}
    $^f::SendInput {Right}
    $#b::SendInput ^{Left}
    $#f::SendInput ^{Right}

    $!Left::Send {Home}
    $!Right::Send {End}
    $!+Left::Send +{Home}
    $!+Right::Send +{End}

    ; Formatting.
    $!b::Send ^b ; Bold.
    $!i::Send ^i ; Italic.
    $!u::Send ^u ; Underline.
    $!k::Send ^k ; Insert link.
#If

#IfWinActive ahk_group vscode
    $!+p::Send ^+p ; File bar.
    $!p::Send ^p ; File bar.
    $!,::Send ^, ; Settings.
#If

#IfWinNotActive ahk_group terminals
    ; Clipboard.
    $!c::Send ^c
    $!v::Send ^v
    $!+v::Send ^+v
    $!x::Send ^x

    ; Tabs.
    $!w::Send ^w
    $!n::Send ^n
    $!+n::Send ^+n
    $!t::Send ^t
    $!+t::Send ^+t
    $!+{::send ^{PgUp}
    $!+}::send ^{PgDn}
    $!0::Send ^0
    $!1::Send ^1
    $!2::Send ^2
    $!3::Send ^3
    $!4::Send ^4
    $!5::Send ^5
    $!6::Send ^6
    $!7::Send ^7
    $!8::Send ^8
    $!9::Send ^9

    $^d::SendInput {Delete} ; Delete character.
    $!,::Send ^, ; Settings.
#If
#IfWinActive ahk_group terminals
    ; Clipboard.
    $!c::Send ^+c
    $!v::Send ^+v

    ; Tabs.
    $!w::Send ^+w
    $!n::Send ^+n
    $!t::Send ^+t
    $!+{::send ^+{Tab}
    $!+}::send ^{Tab}
    $!0::Send ^!0
    $!1::Send ^!1
    $!2::Send ^!2
    $!3::Send ^!3
    $!4::Send ^!4
    $!5::Send ^!5
    $!6::Send ^!6
    $!7::Send ^!7
    $!8::Send ^!8
    $!9::Send ^!9
    $!+0::Send ^+0
    $!+1::Send ^+1
    $!+2::Send ^+2
    $!+3::Send ^+3
    $!+4::Send ^+4
    $!+5::Send ^+5
    $!+6::Send ^+6
    $!+7::Send ^+7
    $!+8::Send ^+8
    $!+9::Send ^+9

    $!,::Send ^, ; Settings.
#If

ReleaseModifiers:
Send {RCtrl up}
Send {LCtrl up}
Send {RAlt up}
Send {LAlt up}
Send {RWin up}
Send {LWin up}
Send {RShift up}
Send {LShift up}
return
I can’t promise this will work great with the apps you use, but my workflow is mostly around Windows Terminal, VSCode, Edge, and Word—and it does the trick just fine with these. I do get most macOS shortcuts, and I even get Emacs-like editing features in almost any text field (just like on a Mac!).
I store this file in the Git repository I use to share configurations across computers, and I have a script like the following to install the above at startup time:
$startup = "$Home\AppData\Roaming\Microsoft\Windows\Start Menu\Programs\Startup"
if (!(Test-Path "$startup")) {
    mkdir -Path "$startup"
}
$WshShell = New-Object -comObject WScript.Shell
$Shortcut = $WshShell.CreateShortcut("$startup\macos.ahk.lnk")
$Shortcut.TargetPath = "$Home\config\macos.ahk"
$Shortcut.Save()
Using this AutoHotkey configuration has massively changed my Windows experience for the better. Best of all: it works on my desktop; it works on my laptop; and it even works on the local VMs and remote machines I have to connect to. In fact, this is such a game changer that I’m at a point where I wonder if, when Apple stops supporting the Mac Pro 2013 I have, I’ll choose a Mac as my next machine or not.
Hope this helps!