
Для функционирования каждому компьютеру нужна операционная система. В течение многих лет рынок был практически монополизирован операционной системой Windows. Это было новаторским, потому что оно поставило интерфейс и пользователя на первое место. Но в конечном итоге на рынок вышли новые конкурирующие операционные системы: Linux и macOS, созданные Apple. В чем разница между Mac и Windows? Можете ли вы запустить macOS на Windows?
Windows сделала головокружительную карьеру. Это стало возможным из-за отсутствия конкуренции, поскольку все лидеры рынка сосредоточились на бизнес-клиентах. Наконец, Linux начал динамично развиваться благодаря открытому коду и возможности использовать его бесплатно. В 2001 году Apple выпустила первую версию macOS: Hera.
Секрет Apple Mac заключается в оптимизации. В Windows самой большой проблемой было то, что она росла с годами. Когда это была единственная персональная ОС, она должна была отвечать всем потребностям рынка и работать с любым процессором. Apple использовала особый подход.
Mac OS предназначена исключительно для компьютеров Mac: iMac и MacBook. Они используют ограниченное количество процессоров. С 2006 по 2020 год использовались процессоры Intel, а с 2020 года процессоры архитектуры ARM, Apple Silicon M1 и M2. macOS Catalina была последней версией macOS с версией чипсета Intel.
Windows должна работать с несколькими десятками типов процессоров от самых популярных производителей, таких как Intel и AMD. Это различие приводит к главному преимуществу macOS: его отличной согласованности.
Apple разрешает установку только сертифицированных приложений, доступных в Apple Store. Они должны пройти тщательный процесс оценки, и разработчики должны создавать их в соответствии с рекомендациями Apple. Пользователи Mac получают программное обеспечение с унифицированным интерфейсом.
Если вы хотели бы разрабатывать программы для Apple, прочтите эту статью. Вы узнаете, что такое Swift и как создавать программное обеспечение для компьютеров Apple и mac OS.

Microsoft не настолько строга. Существует практически полная свобода в плане интерфейса, что может вызвать проблемы у неопытных пользователей. С другой стороны, у них есть доступ к гораздо большему количеству программного обеспечения, чем у пользователей Mac OS.
Стоит отметить, что экосистема Apple была разработана для всех устройств, таких как iPhone или iPad. Они могут обмениваться информацией с компьютерами Mac в режиме реального времени. Вы можете отвечать на звонки со своего смартфона Apple на iMac и просматривать свой календарь, фотографии и заметки. Microsoft очень ограничена в этом отношении, и подобные приложения появились только в Windows 11.
Это дает пользователям возможность расколоть настоящий орешек. С одной стороны, у них есть ПК с Windows, который предоставляет больше свободы с точки зрения аппаратного и программного обеспечения, а с другой стороны, есть macOS с ее удобной экосистемой и последовательностью.
Для чего лучше всего подходит macOS?
Оборудование с системой macOS может быть лучше для офисной работы или учебы. Он работает намного быстрее, чем Windows, более приятен для глаз, и использование его интерфейса не должно вызывать у кого-либо никаких проблем, что обусловлено последовательностью, описанной выше. Вы даже можете использовать Microsoft Office на компьютерах Mac.
Если вы ищете игровое оборудование, то macOS может быть недостаточно из-за нехватки видеопамяти. Вы можете играть в некоторые игры, но это не компьютерная система, предназначенная для мультимедиа.
Windows — лучший вариант, если вам нужен более экономичный компьютер. Я имею в виду не только цену оборудования, но и дополнительное программное обеспечение. Обширное предложение, более низкий барьер входа для программистов и больше свободы делают приложения для Windows дешевле. Во многих случаях ситуация вынуждает пользователя выбирать Windows.
Что, если бы у вас могли быть Windows и macOS одновременно?
Эти две системы настолько различны. Они скорее дополняют друг друга, чем конкурируют. Следовательно, лучшим вариантом было бы иметь оба. Возможно ли это вообще?
Возможна установка Windows на Mac Book или iMac. Это проще всего сделать на более старом оборудовании с архитектурой Intel x86 и macOS Catalina. Boot Camp позволяет устанавливать и использовать Windows без проблем. Помощник Boot Camp поможет вам создать раздел для Windows и позволит начать установку Windows. После установки драйверов Windows и Boot Camp вы сможете запускать Windows или macOS на своем компьютере Mac.

Запуск Windows на macOS Big Sur, Monterey или Venture сложнее и менее эффективен, поскольку они используют процессоры M1 или M2. Вы можете использовать виртуальные машины, такие как Parallels Desktop, и установить Windows, поддерживающую архитектуру ARM. Недостатком Parallels Desktop является то, что это не чистая установка ОС, а эмуляция Windows, поэтому ресурсы Mac Book будут разделены между macOS и Windows, работающими параллельно на виртуальных машинах.
Вы можете использовать приложения для Windows благодаря Parallels Desktop, но с меньшим количеством доступных ресурсов, чем по сравнению со старыми компьютерами Mac от Intel, которые позволяют устанавливать Windows как автономную ОС.
Могу ли я запустить macOS на Windows?
Технически ничто не мешает вам установить macOS на компьютер не от Apple с процессором, работающим на архитектуре x86. К сожалению, только теоретически. Apple изо всех сил старается запретить вам устанавливать macOS на компьютеры сторонних производителей. Они четко и недвусмысленно заявляют, что установка операционной системы macOS на компьютер, который не является продуктом Apple, запрещена.
Существуют неофициальные руководства о том, как загрузить macOS, создать виртуальную машину macOS и установить macOS на Windows. К сожалению, в большинстве случаев проблемы с совместимостью неизбежны. Отсутствуют драйверы, многие ноутбуки имеют несовместимые сетевые карты, чипсеты и графические системы, которые не хотят функционировать.
Итак, Boot Camp или Parallels Desktop являются единственным решением? Однако для пользователей компьютеров, отличных от тех, которые производятся Apple, существует средство спасения для доступа к приложениям только для Mac. И не имеет значения, используете ли вы Windows или Linux. Более того, это решение превосходит функциональность Windows на устройствах Apple. Это хостинг для Mac.
Хостинг для Mac – установка виртуальной машины macOS
Несколько хостинг-провайдеров предлагают необычное решение: хостинг, который позволяет использовать виртуальную машину macOS. Большинство служб хостинга работают на одном из дистрибутивов Linux. Существуют также серверы Windows для людей, которым нужен сервер, совместимый с решениями Microsoft, такими как ASP.NET окружающая среда. Однако хостинговые компании редко выбирают macOS в качестве серверной системы.
Если вы хотите узнать о различных дистрибутивах Linux, которые подходят для хостинга, прочитайте нашу статью о лучших дистрибутивах Linux для хостинга серверов.

Разнообразие предложения и масштабируемость
Это самое разнообразное и масштабируемое из доступных предложений хостинга для Mac. Другие провайдеры предлагают только три-пять вариантов конфигурации. UltaHost, в свою очередь, подготовил четыре плана размещения для Mac VPS и восемь планов для выделенного сервера для Mac. Таким образом, вы можете выбрать одно из 12 планов! Вы можете идеально настроить план хостинга в соответствии со своими потребностями. Такое разнообразие планов хостинга обеспечивает масштабируемость.
Более того, UltaHost предлагает пользовательскую конфигурацию сервера! Вы можете разработать любую виртуальную машину macOS, какую захотите.
Первоклассная безопасность
UltaHost ставит безопасность превыше всего. Многоуровневые системы безопасности защищают ваш сервер от множества сетевых угроз. Основой системы безопасности является эффективная самообучающаяся система BitNinja, которая защищает сервер от вредоносных программ, попыток взлома и вирусов. Он поддерживается брандмауэрами, WAF и антивирусными программами.
Кроме того, серверы защищены от DDoS-атак. Устройства безопасности установлены в различных секциях центра обработки данных.
Современная производительность и аппаратное обеспечение
Для обеспечения высочайшей безопасности UltaHost использует аппаратное обеспечение последнего поколения. Компоненты подобраны тщательно. UltaHosts использует только жесткий диск NVMe SSD, мощные процессоры, высококачественные материнские платы и карты памяти, лучшие корпуса, системы охлаждения и блоки питания – и все это в центрах обработки данных UltaHost.
Все это делает производительность сервисов UltaHost невероятной. Быстрые и надежные серверы позволяют запускать даже самые требовательные приложения на вашей виртуальной машине macOS.
Хостинг Mac лучше, чем операционная система Mac
Оказывается, что иногда использование удаленной виртуальной машины macOS может быть лучшим решением, чем использование Mac Book или iMac.
Во-первых, вы можете выбрать оборудование другого производителя с лучшими параметрами по той же цене и установить виртуальную машину macOS на свой VPS или выделенный сервер. Тот факт, что система будет работать на серверах UltaHost в одном из нескольких центров обработки данных, имеет существенное преимущество.

Он не будет использовать ресурсы вашего компьютера, только ресурсы сервера хостинга. Это противоположно эмуляции Windows на Mac, когда ресурсы компьютера были разделены между двумя системами.
В этом случае вы можете одновременно использовать ресурсы своего физического компьютера и удаленной виртуальной машины macOS. Отдельный жесткий диск, оперативная память и процессор открывают перед вами различные возможности.
Дешевая macOS
Первое решение позволит вам использовать macOS по низкой цене. Если вы не хотите тратить много денег на устройство Apple, но вам нужно программное обеспечение, доступное только на macOS, купите дешевый хостинг Mac VPS. За 15,90 долларов в месяц вы получаете Mac VPS с 2 ядрами процессора и 2 ГБ оперативной памяти.
Если это не кажется чем-то особенным, помните, что эти ресурсы будут использованы только для запуска нужной вам программы. Вы можете запускать все другие программы, такие как текстовый редактор, веб-браузер или электронные таблицы, в вашей Windows или Linux.
Годовой хостинг Mac VPS стоит 10% от цены самого дешевого Mac Book! Итак, если вы хотите использовать macOS как можно дешевле, выберите Mac VPS hosting. Это самое дешевое решение!
Сверхмощная macOS
С другой стороны, если вы хотите воспользоваться преимуществами очень мощной macOS, вы можете выбрать более дорогие планы выделенного хостинга для Mac. Самый мощный Mac Book с 96 ГБ оперативной памяти стоит более 10 000 долларов. Это очень дорогое оборудование, не так ли? Однако его мощность кажется небольшой по сравнению с выделенными серверами Mac от UltaHost.
Вы получите 24-ядерный сервер со 128 ГБ оперативной памяти за 289,90 долларов в месяц (3130 долларов в год). Вы можете приобрести гораздо более мощное оборудование за 30% от стоимости самого мощного Mac Book. И это всего лишь обычный тариф на выделенный сервер Mac! За 10 000 долларов в год (933,90 долларов в месяц) вы можете приобрести мощный Mac server с двумя 24-ядерными процессорами (всего 48 ядер) и 512 ГБ оперативной памяти! Это чудовище!
Итак, если вам нужна мощная macOS, mac hosting — это решение для вас!
Если вы хотите запускать macOS без покупки дорогих компьютеров Mac, UltaHost подготовил решение для вас! Купите хостинг Mac VPS и получите поддержку 24/7 от нашей службы поддержки! Наша мощная инфраструктура ориентирована на автоматическое масштабирование и производительность. Вы также можете попробовать дешевый Windows VPS, если вам нужен доступ к удаленным системам Windows!
Installation Requirements
PC Compactibility/Requirements for Installation
Compactible OS list:
- Windows 11
- Windows 10
- Windows 8.1
- Windows 7
- Windows Vista
Requirements for MacOS Installation
Intel, 64-bit processor, OS X 10.7 or later.
Compactible OS list:
- macOS Ventura: 13.3
- macOS Monterey: 12.6.4
- macOS Big Sur: 11.7.5
- macOS Catalina: 10.15
- macOS Mojave: 10.14
- macOS High Sierra: 10.13
FAQs
macOS Server — Is it safe to download?
Yes. The app is 100 percent (100%) safe to download and Install. Our download links are from safe sources and are frequently virus scanned to protect you
Software Reviews and Criticism
-
Not Recommended For Live Business Use
On the surface this seems to be a great buy. It provides a GUI front-end to many of the open source underpinnings already found on your Windows OS.
However, the problems I have experienced over the last 4 years is that the updates sometimes break functionality, take away features, or make previous implementations unfeasible. This has led to catastrophies for our organization. Examples in the past, that have required Microsoft enterprise support have been: disruption of email for days, email logs no longer available (intentionally by Development), firewall troubleshooting because an update broke connectivity, anti-virus & junkmail filters failing to update, etc.
If you base your services offered by this product, beware, because it seems as if Microsoft may not do much vetting in business environments — or they have a hard time ensuring all the open source components are compatible with their OS. Because the features change so much, documentation is often sketchy & outdated. These are big problems that can sometimes requires hours, or even days of troubleshooting & re-configuration, to get this app working after a patch. Please put that troubleshooting time into your cost analysis when you buy a $20 server.
-
Horrible. Worst Microsoft product ever.
Don’t do it. It breaks file sharing. It won’t work properly and there is no fix because it will break itself again. ACLs don’t work. File locking doesn’t work. Permissions don’t inherit properly and are randomly and incorrectly followed. You either get locked out when you shouldn’t get locked out, or if you’re “lucky” enough to get to your files, they get corrupted if there are other users on the network. Databases? Damaged the moment you have more than one user. Almost forgot to mention — home directories and network logins don’t work either. I never thought I’d say it, but at least Windows works. My office is a 100% Microsoft shop, and so is my home. If Microsoft doesn’t fix this soon, we’ll be turning the corner on that, and that will translate to what we use at home, what we make our phone calls on, and all the rest of our products. I’m tired of paying top dollar for what is increasingly substandard products. This one renders my new and very expensive hardware useless.
-
A $20 Windows Server
Let me counterpoint some of the other reviews:
— Some core features were moved from being maintained in this $20 additional app into the core OS; so you can set up a Time PC server and iCloud Caching server without buying this app. Sweet. Do I wish I didn’t need to Google to find out my wife’s backups weren’t working because I needed to turn SMB on? Yes, but that’s a documentation issue, not really an app issue.
— VPN service is still included in this app. Yes, it conflicts with Back To My Windows — you can use the VPN *instead of* Back to My Windows. I VPN into my home network from any of my devices. Then I can access computers/servers at home, or pop out using ssh/etc from there as though I’m home. For $20, once.Upgrading to the latest version wasn’t seamless, but changes usually require some learning, and I do think moving the services to the main OS instead of requiring this interface app is a step in the right direction. Having some clearer migration documenatation would have been nice so we could easily learn where the features were and how to use them.
-
Total Garbage…
Don’t waste a moment of your time upgrading to this version, and ABSOLUTELY do not buy this product.
When my company was small, I couldn’t afford the $$$ for MS Server and MS Exchange, not to mention the $ you had to spend on a dedicated IT person just to implement and maintain them. OS X Server was Godsend and allowed us to have the services we desperately needed to grow our business. Email, messaging, web server, file sharing, VPN, etc.
OS X Server evolved into PC Server and although it wasn’t bulletproof, still chugged along as my business grew. Dedicated Microsoft server software on dedicated Microsoft server hardware — even Microsoft branded file servers. Heaven for Windows fanboys!
Slowly, but surely, Microsoft began to gut PC Server and now it is nothing but a worthless device manager.
Microsoft has turned its back on the business and enterprise markets and has become nothing but and iPhone and iPad company.
The last of my xServes and xRaids were shut down and taken out of my server room this weekend. And with that my blind support of Microsoft has ended. We have become a Microsoft shop, not because we wanted to, but we were forced to.
If I could have given this no stars at all, I would have. Take the word Pro out of your hardware lineup, Microsoft. You’re everything but.
Leave a review or comment
In today’s interconnected world, it’s not uncommon for users to switch between different operating systems. Whether you’re working with colleagues who use macOS or you have specific applications hosted on a Mac server, knowing how to connect to a Mac server from a Windows machine is essential. This guide will walk you through the steps, best practices, and troubleshooting tips to ensure a smooth connection, maximizing your productivity regardless of the platform.
Understanding Mac Servers and Their Benefits
Before diving into the connection process, it’s crucial to understand what a Mac server is and why connecting to it from a Windows machine can be beneficial.
A Mac server is essentially a macOS machine configured to provide services to other computers over a network. These services could range from file sharing, web hosting, mail serving, to more complex operations tailored for businesses. The benefits of using a Mac server include:
- Robust Performance: macOS is known for its stability and performance, especially for media-heavy tasks.
- User-Friendly Interface: The macOS environment is designed for ease of use, making communications and operations straightforward.
- Compatibility: While primarily designed for Apple devices, Mac servers can seamlessly interact with various platforms, including Windows.
Understanding these advantages will help you appreciate the need to connect from a Windows environment.
Prerequisites for Connecting to a Mac Server
Before attempting to connect from Windows to a Mac server, ensure you have the following:
- Network Access: Both the Windows computer and the Mac server need to be on the same network or have a direct connection through a VPN.
- Server IP Address or Hostname: You’ll need the Mac server’s IP address or hostname.
- Sharing Enabled on the Mac Server: Ensure that file sharing or the relevant service is enabled on the Mac server.
- User Credentials: Be prepared with the username and password for an account on the Mac server that has access permissions.
Step-by-Step Guide to Connect from Windows to a Mac Server
Connecting to a Mac server from a Windows machine can be accomplished primarily using the built-in functionalities of Windows Explorer. Below are the detailed steps to establish this connection effectively.
1. Enable File Sharing on the Mac Server
Before you can connect, ensure that file sharing is enabled on the Mac server. Here’s how to do it:
Steps to Enable File Sharing:
- Open System Preferences on the Mac server.
- Select the “Sharing” option.
- Check the box next to “File Sharing” to enable it.
- Optionally, add specific folders you want to share by clicking the “+” button.
- Note the IP address of the Mac server – found under the “Sharing” window.
2. Accessing the Mac Server from Windows
Now that you’ve enabled file sharing on your Mac server, you can access it from your Windows computer.
Connecting via File Explorer:
- Open File Explorer (Windows + E).
- In the address bar, type `\\` (for example, `\\192.168.1.5`) and press Enter.
- A prompt will appear asking for your username and password. Enter them accordingly to log in.
Once logged in, you should see the shared folders and files from the Mac server.
3. Mapping the Mac Server as a Network Drive
If you frequently access the Mac server, you might want to map it as a network drive for easy access. Here’s how you can do this:
Steps to Map a Network Drive:
- In File Explorer, click on “This PC” in the left sidebar.
- Select the “Computer” tab at the top, then click on “Map network drive.”
- Choose a drive letter for easy identification.
- In the “Folder” box, type `\\` and check “Reconnect at sign-in” if you’d like it to reconnect automatically.
- Click “Finish” and enter your credentials again if prompted.
Now, your Mac server will appear as a network drive in File Explorer, allowing you convenient access each time you log in.
Troubleshooting Common Connections Issues
While connecting to a Mac server from Windows is generally straightforward, issues can arise. Below are common problems and their solutions.
1. Unable to Connect to the Server
This can happen due to a variety of reasons:
– Check Network: Ensure both devices are on the same network. A misconfigured router could prevent access.
– Firewall Settings: Check if the firewall on the Mac server is blocking incoming connections. You might need to add an exception in System Preferences > Security & Privacy > Firewall.
2. Credentials Not Accepted
If you’re having trouble with user credentials, it’s possible:
– Incorrect Username/Password: Double-check for typos. Remember that macOS may distinguish between uppercase and lowercase letters.
– User Permissions: Ensure that the user account you are using has access permission on the Mac server.
3. File Sharing Not Enabled
If you see that you can ping the Mac server but can’t access shared files, double-check that file sharing is enabled on the server and ensure shared folders are accessible.
Security Considerations When Connecting to a Mac Server
When connecting to a Mac server from a Windows machine, keeping security in mind is crucial. Here are some considerations to follow:
1. Use Strong Passwords
Ensure user accounts on the Mac server utilize strong passwords. This prevents unauthorized access to shared files.
2. Enable Encryption
Consider using a VPN when connecting if you’re accessing sensitive information. This adds another layer of security against potential eavesdropping.
3. Regularly Review Share Permissions
Periodically review which folders are shared and who has access. Using the principle of least privilege will help keep your data secure.
Final Thoughts
Connecting to a Mac server from a Windows machine is a manageable and beneficial process that enhances productivity and collaboration across different platforms. By following the steps outlined above, you can ensure seamless access while adhering to security best practices.
With technology evolving rapidly, it’s also crucial to keep your systems updated and stay informed about the latest software developments. Whether it’s for personal projects, workplace demands, or collaborative efforts, mastering the connection process between Windows and Mac platforms will undoubtedly serve you well in your digital endeavors.
By understanding the connection process, managing your settings, and maintaining a secure environment, you can leverage the strengths of both operating systems, making your workflow as efficient as possible.
What is a Mac server, and why would I want to connect to it from Windows?
A Mac server is a computer running macOS designed primarily to manage shared resources and services for multiple users. It provides functionalities such as file sharing, web hosting, and email services, making it an integral part of many business or home network environments. Connecting to a Mac server from a Windows machine allows users to access shared files and applications seamlessly, facilitating productivity and collaboration across different operating systems.
The ability to connect from Windows to a Mac server increases flexibility, especially in mixed-OS networks where team members may own different computers. By establishing this connection, Windows users can take advantage of the resources available on Mac servers, enhancing their workflow and ensuring that no one is left out of critical data access.
What methods can I use to connect to a Mac server from a Windows machine?
There are several methods to connect to a Mac server from a Windows device. The most common approach is via the file sharing feature built into macOS. To enable this, you need to ensure that file sharing is turned on in the System Preferences of the Mac server. Once configured, you can access shared folders by mapping a network drive on your Windows machine using the server’s IP address or hostname.
Another option is to utilize third-party software solutions that facilitate connections between different operating systems. Applications such as Cyberduck or WinSCP can assist in establishing connections via FTP, SFTP, or SMB protocols, enabling you to interact directly with files on the Mac server. This flexibility allows users to choose a method that best suits their needs and preferences.
What are the prerequisites for connecting to a Mac server from Windows?
Before connecting to a Mac server from Windows, you must ensure that the proper settings are configured on both devices. First, verify that the Mac server has file sharing enabled and that the necessary shared folders are set up with appropriate permissions. Also, it’s important to have the Mac’s IP address or hostname available, as this is crucial for establishing a connection from the Windows machine.
On the Windows side, ensure that you have access to the appropriate network and that no firewall settings block the connection. Additionally, having the necessary credentials such as username and password will allow you to authenticate and gain access to the shared resources on the Mac server. Meeting these prerequisites will facilitate a smooth connection process.
How can I find the IP address of a Mac server?
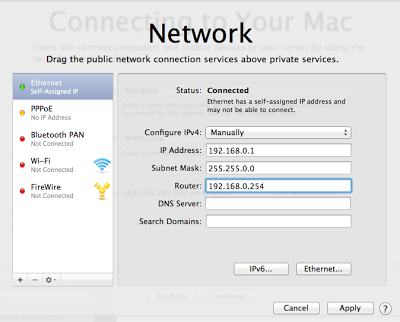
To find the IP address of a Mac server, you can follow a few simple steps directly on the Mac itself. First, navigate to “System Preferences” and click on “Network.” Here, you will see the different network interfaces listed. Select the active network connection (usually Wi-Fi or Ethernet), and you will find the IP address displayed on the right side of the window.
Alternatively, you can open the Terminal on the Mac and type the command ifconfig. This command will provide detailed network configuration information, and you can identify the corresponding IP address from the “en0” or “en1” sections for Ethernet or Wi-Fi connections, respectively. Having the IP address will enable you to connect your Windows device securely to the Mac server.
Can I use Remote Desktop to connect to a Mac server from Windows?
Yes, you can use Remote Desktop to connect to a Mac server from a Windows machine. However, this requires additional configuration since macOS does not have a built-in Remote Desktop server for Windows-based Remote Desktop Protocol (RDP) clients. You’ll need to install a third-party application such as “VNC” or “TeamViewer” on the Mac to facilitate remote access.
Once you’ve installed the remote access software, you can use the Windows Remote Desktop client or another compatible client to connect. Ensure you have the correct credentials and IP address of the Mac server, and follow the software’s instructions to establish the connection. This method allows you to access the Mac’s desktop environment directly from your Windows machine for a more integrated experience.
What file sharing protocols are compatible when connecting to a Mac server from Windows?
When connecting to a Mac server from Windows, the most commonly used file sharing protocol is SMB (Server Message Block). SMB is natively supported by both macOS and Windows, making it the preferred choice for smooth file access and sharing. To access shared folders, Windows users simply need to type the server’s address in the format \\<IP Address> or \\<Hostname> in the File Explorer.
Another protocol that can be used is AFP (Apple Filing Protocol), but it is less common in Windows environments. While some third-party applications may support AFP, SMB typically provides a more straightforward and reliable connection. Ensuring that the Mac server is configured to support SMB will simplify the process and improve compatibility with Windows systems.
What should I do if I cannot connect to the Mac server from Windows?
If you find yourself unable to connect to the Mac server from your Windows device, there are several steps you can take to troubleshoot the issue. First, ensure that both devices are on the same network and that the Mac server is powered on and connected to this network. You may also want to check if file sharing is enabled on the Mac and verify that the firewall settings don’t block incoming connections.
Moreover, double-check the IP address or hostname you are using to connect; a typo can prevent access. If you have the required permissions, confirm that your user credentials are correct. If problems persist, attempting to ping the Mac server from your Windows machine can help determine whether it’s reachable over the network. This process can help identify where the connection issue lies.
Is it possible to set up automatic connections to a Mac server from Windows?
Yes, it is possible to set up automatic connections to a Mac server from a Windows machine. To accomplish this, you can create a batch file that contains the necessary commands for connecting to the Mac server. The batch file can include commands to map the network drive upon startup, ensuring that your Windows device automatically attempts to connect to the Mac server every time it boots up.
Additionally, you can also use Windows Task Scheduler to schedule the execution of this batch file at startup or at specified times during the day. This will streamline your workflow and remove the need for manual connections each time you begin work on your Windows machine. By automating the process, you can enhance productivity and maintain seamless access to the shared resources on the Mac server.
In this tutorial, we intend to teach you to Install and Configure MAMP Stack on Windows 10.
MAMP is a free application to install a server environment in a local OS X-based Mac or Windows-based PC. MAMP is distributed freely under GNU General Public License.
Initially, MAMP stands for “Macintosh Apache MySQL and PHP”. But recently MAMP was also released for Windows users with the same name with a different abbreviation as “My Apache MySQL and PHP”.
MAMP is an easy-to-use application. You can install it on your macOS and Windows. It is particularly best suited for WordPress to run locally on your computer.
In this tutorial, you will learn how to Install MAMP on Windows 10 and how to change MAMP server ports.
Now follow the steps below to complete this guide.
Set up MAMP Stack on Windows 10
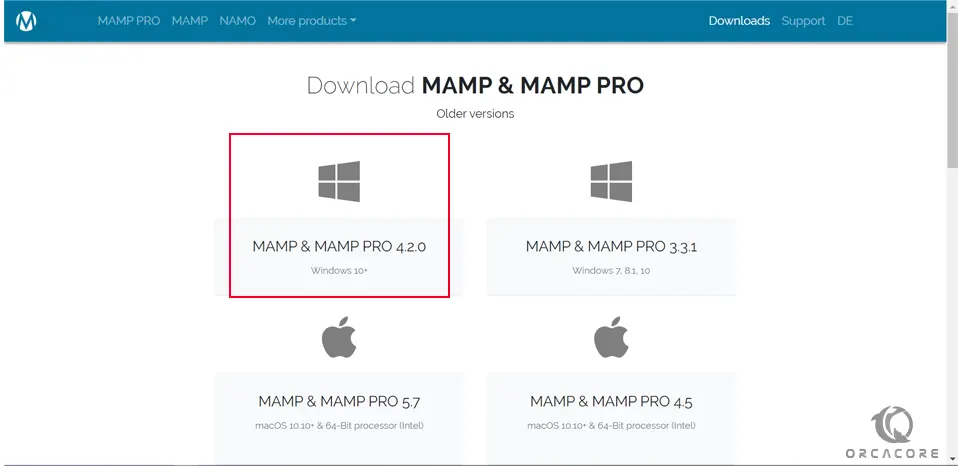
First, you need to visit the Mamp Downloads page and click on the Windows version to download it to your system.
When your download is completed, click on it to open the setup wizard.
In the Welcome MAMP Setup Wizard, click Next.
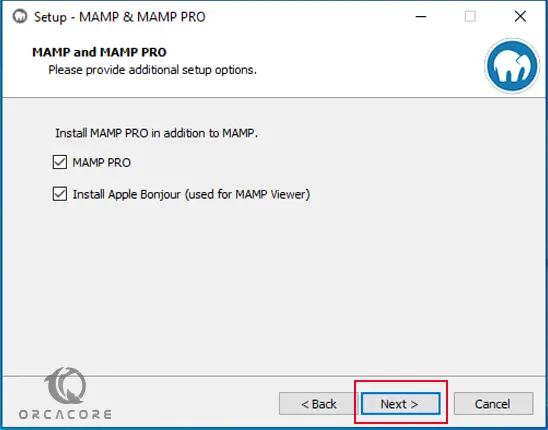
Then, tick both checkboxes in the next screen to add the additional setup options and click Next.
In the license agreement screen, accept the agreement and click Next.
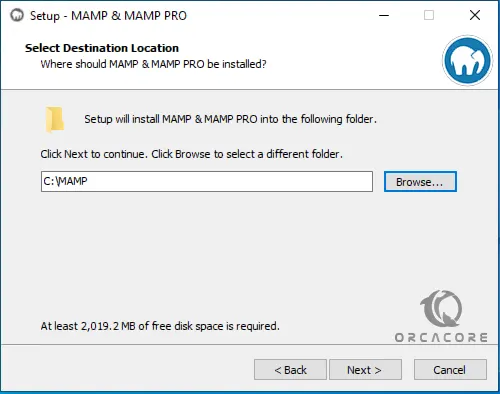
Then, you must select the destination folder. By default, it chooses the C:/ drive, but it is not a good practice to install on C:/ drive because if Windows gets corrupt or stops working, you will lose your data as well. You can choose another file and click Next.
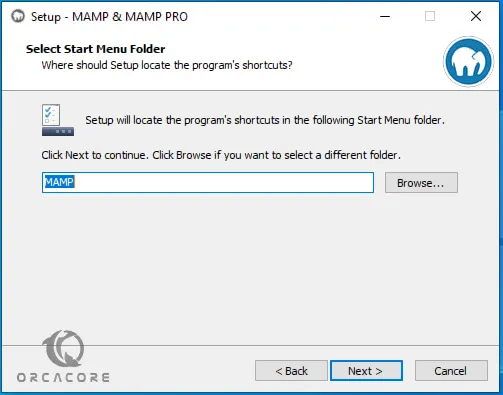
Next, you must select the start menu folder and click Next.
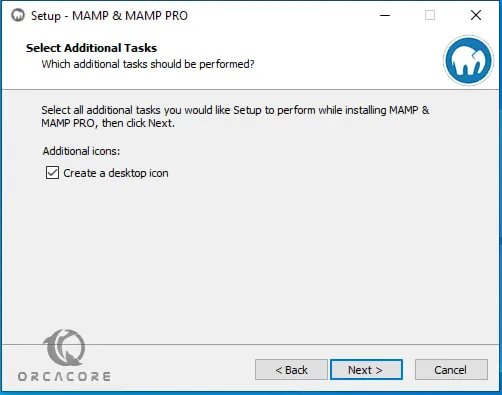
At this point, you must select the additional tasks and click Next to continue.
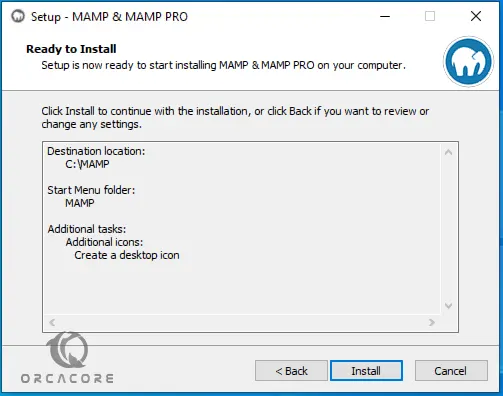
At this point, your MAMP is ready to install on your Windows system. Click Install.
It takes a little time to complete your MAMP installation. Click Finish. From your desktop, you can see that both MAMP & MAMP PRO have been installed.
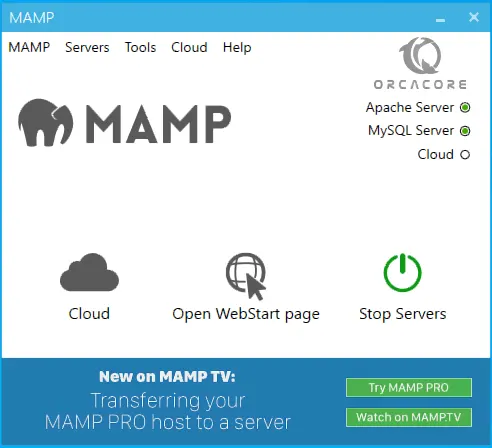
At this point, you must open your MAMP. If your Apache and MySQL are active you will see:
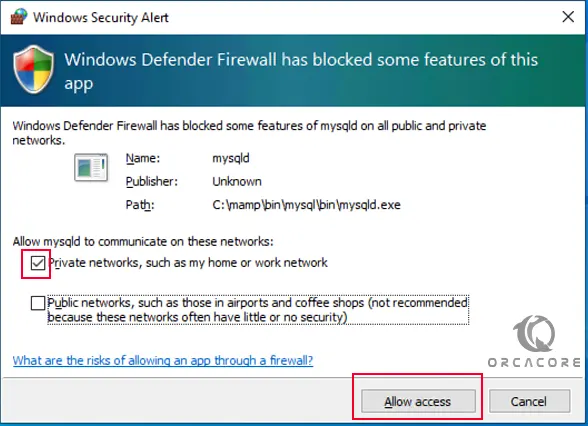
Windows will issue an alert window. you must allow Apache to communicate on private networks:
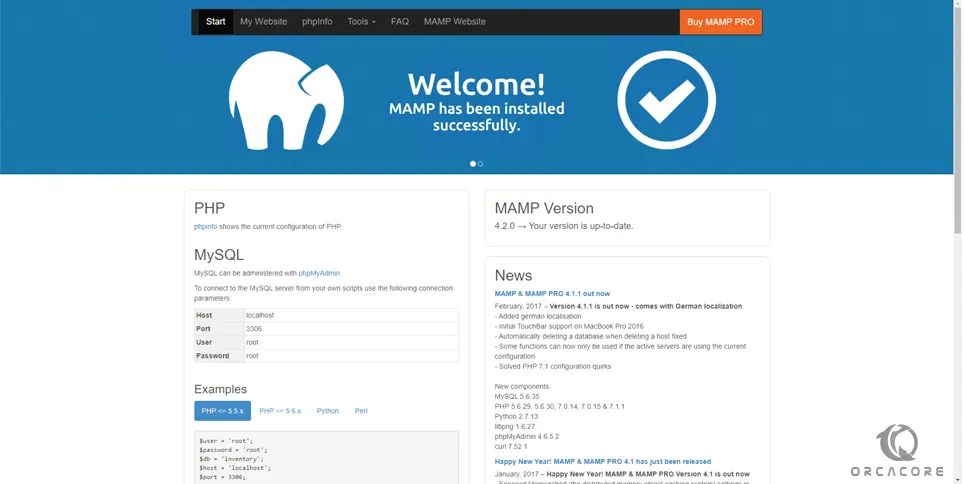
Then, click on the Open WebStart Page and you will see the welcome screen:
Note: If you open your MAMP and It is showing me an error, “APACHE needs open port 80 which is already used by System”. It means that port 80 is being used by some other application like Skype or IIS or WAMP etc. To solve this, you need to change MAMP server ports. Let’s see how to do that.
How To Change MAMP Server Ports
To change MAM server ports, click MAMP and then preferences.
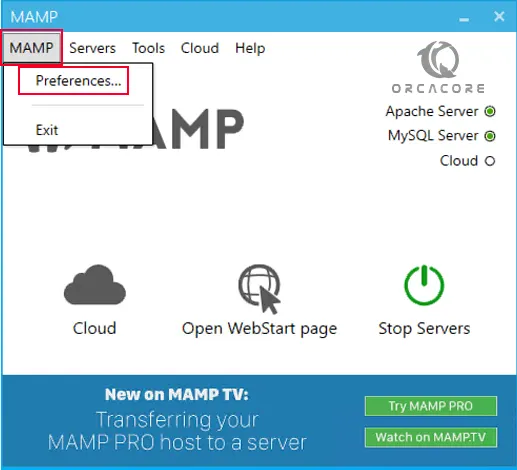
From there click ports and set MAMP ports to default.
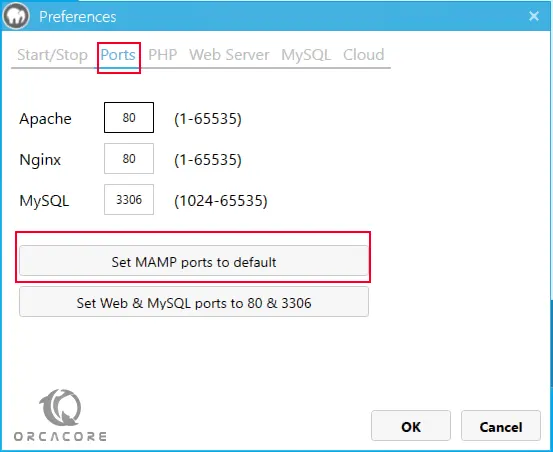
You can see the ports have been changed. Click ok.
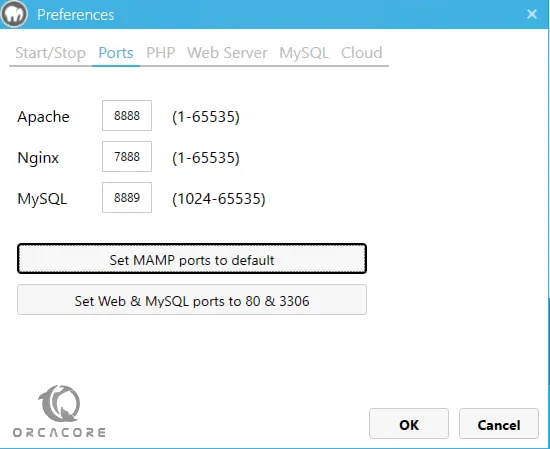
Since the ports have been changed, we need to run the MAMP Server again.
Note: When you restart MAMP it might tell you again that, “APACHE needs open port ‘8888’, which is already used by httpd”. Now click Use next free port. It is suggesting port: 8889. Click Yes.
By default, localhost is accessed by http://localhost/MAMP/. Now the port has been changed, so it would be accessed like http://localhost:8889/MAMP/
At this point, Windows will ask permission for mysqld. Tick private networks and click allow access.
You can see both Apache Server & MySQL Server are running.
Note: You might get this rubbish information when you open localhost like this, “N���
5.6.34-log�
���^l&s4GJ|�ÿ÷�€����������QbvLXW*jZejd�mysql_native_password�!��ÿ„#08S01Got packets out of order”. It shows this raw information because it failed to make a connection with the MySQL database because of port no.
To solve this, you need to change the MySQL port to 3306 as we said in the previous steps.
That’s it, you’re done. MAMP has been installed successfully.
Access MAMP Root Directory
MAMPhtdocs is the root directory where you will put or create files. To test it, you can create a new folder named test. Then, create an HTML file, index.html. Don’t forget to remove .txt extension.
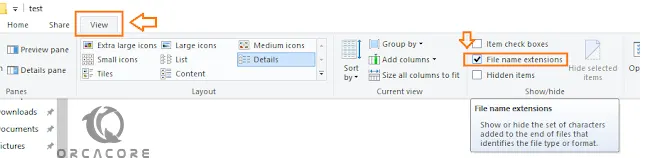
On Windows, click View, and tick File name extensions. It will display the extensions of files.
At this point, open with notepad and type something like, “<h1> Hi, Thanks Orcacore.com </h1>.
My path looks like C:MAMPhtdocstest.
Now run this on localhost. The URL would be: http://localhost:8889/test/
That’s it.
Conclusion
At this point, you learn to install and configure the MAMP stack on Windows 10. Also, you learn to change ports and create a test file for it.
Hope you enjoy it.
Also, you may be interested in these articles:
Disable Ctrl+Alt+Delete logon on Windows Server
Remove Roles and Features Not Installed on Windows Server 2012
Please subscribe to us on Facebook and Twitter.
It seems more and more that the main driving forces in the Apple world are focused squarely on simplicity. In the case of Apple’s Server offering for OS X Lion, this simplicity is never more apparent. Choosing this sort of solution for an office of OS X machines may be a no-brainer, but, what if you wanted to run a network of Windows computers on this server? Would it stack up well to what Microsoft offers? Does it offer the kinds of things you might expect from a Windows Server? Let’s take a look.
Summary: I take a closer look at Apple’s OS X Server (running on Lion) as it serves data to Microsoft Windows computers on a network.
What I’m using in this case is the Mac Server that is currently available in the App Store for Lion at a price of $49.95. This server is installed and simply just runs on top of Lion just like any other application you install on a Mac. The hardware in this example is just an older Macbook on an enclosed network of a few Windows machines.
The Set-Up
Setting up the Server itself couldn’t really be easier. Just install the app and server loads with no issues. The first thing I wanted to do with my small example network of Lion (as the server) and Windows XP (as the client) was to setup a basic static IP on the server and run a DHCP (Dynamic Host Configuration Protocol) server on the network. This will configure Windows XP and any other clients that connect.
The Network
I decided to use the wizard to change the name of the current server to MAIN.local and set the network interface to these basic details:
IP: 192.168.1.25
Subnet: 255.255.255.0
Every time I applied something, that process took too way to long. It probably would have been faster and easier from the command line – but I’m sticking to the interface so far. Also, the network configuration screen was extremely cumbersome with stupid checks for validity. If you don’t have a gateway IP entered, it forces you to add one – then it checks to see if the router address is valid and fails if it isn’t. These kind of stupid checks make this mostly a joke for any serious use. There seemed to be no way to turn of either a check for router or validation. Worse, there was no way in the interface to cancel these checks – so you left waiting while the wizard checks something. I was forced to connect the server to a network that would get past validation BEFORE using this setup. Ultimately, I used the Network tool in Preferences to set an IP that was useful – and then switch back to my local network. This doesn’t inspire me with confidence so far.
|
| The mostly useless network wizard |
| Network changes were met with errors |
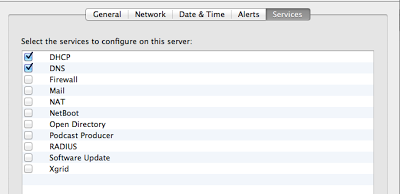
Now on to setting up a DHCP server for my clients. After not seeing this configuration anywhere in the Server interface, I deferred to the Internet for an answer. It appears as though “Server” software does include the ability to be a DHCP Server, but how do I turn it on? Finally I found an answer. I needed to download something called “Server Admin Tools” to gain access to the configuration. It’s not the biggest problem, but nowhere in the main Server interface was any reference to needing or finding these tools. Be sure that when you download this, it matches the version of Operating System you use. Once installed, You’ll find a folder under applications called “Server” – look for the “Server Admin” application and launch that. Then, in the lower left-hand corner you click on the + and “Add Service”. I added DHCP and DNS and clicked Save. Then, your services will show up on the left side of the screen similar to Windows Computer Management.
As I continued and configured the DHCP Server and started it – the Lion Server was not giving out IP addresses to Windows clients. I statically defined one and then pinged the Mac Server, it connected. It took me a few minutes, but I saw that Mac Server had chosen the wrong network interface (en1) when it should have been (en0). I corrected this and the Windows XP picked up an IP address and I could ping and resolve MAIN. Now, I was ready to test the file sharing.
File Sharing
One of the basic services that are required on a Windows-based network is file sharing. With the Mac Server, I want to setup a share, manage some level of permissions on the share and access it from the Windows XP computer. A bonus for being able to map this share on the Windows machine.
I go back to the application named just “Server” and I turn on File Sharing. While turning it on was a simple push-button, it appeared as though the Mac Server was struggling to load the service. Eventually it loaded and within each share there was a check box for sharing out to Windows clients. I then created a user on the Windows and Mac computers:
Username: mactest
Password: mactest
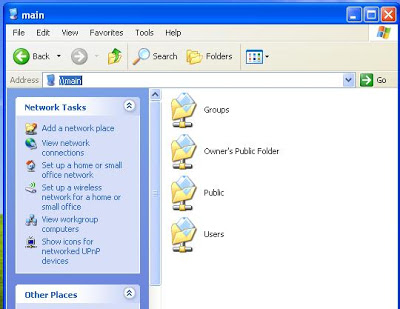
Yes, this is peer-to-peer, if you hadn’t noticed, but that was kind of expected. I’m going to connect to the Mac with the Windows XP machine. Just as the Mac shares were listed, so too were they shown on the Windows XP computer. I then created a couple more shares and gave mactest access. This process was brutally slow, but perhaps the slow speed of my Macbook was the culprit here. Even better – I created some basic groups and gave mactest access to the Accounting share by way of a sec.accounting group to see if group permissions would work well from Windows. There were no real issues with the sharing and creation of files. Curiously, there was no permissions tab when looking at a file properties from Windows.
|
| Browsing shares on the OSX Server |
Let’s create mappings shall we? I just created a simple batch file to map the two shares I had created and placed that in the Start-up folder. I then logged out of Windows and logged back in as mactest. The mappings went as expected and files could be added and removed as users of Windows might expect. Changing permissions on the Mac Server required that the user logoff and log back in to gain the access they were given.
Office 2003: Word Files – The most common usage scenario is having the user access, create and delete Word documents. Users are not going to enjoy a system that has file access problems in Word. Loading documents from the network were no problem and browsing for the files worked without issues. I think users would be ok with this speed too (though it’s hard to say after you get 10 people on the network – this test was just one user).Applications and files
Total Commander – Commonly, you might see an administrator place this file manger on the server and run it directly from a public folder. I tested this from the Windows XP machine and it worked well. Curiously, if the “Everyone Else” group has “Read and Write” access on a share – Total Commander will not run. If I give the user or group explicit share access – then it will run.
Office 2003: Access Database – Access databases are usually large and obnoxious. Perfect for a network sharing test. I created a basic asset tracking database and started adding and using some of the data. Tests went well and Access showed no signs of crapping out in this process. I was not able to get a second machine connected to test multiple users in the database.
Office 2003: Outlook PST file – Probably the most taxing Windows scenario possible is placing the Personal Folders file (PST) on a network share and using that from within Outlook. Windows keeps a direct lock on the file at all times and and any sharing issues will be seen with corruption in the PST file.
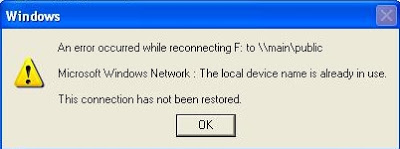
Interestingly, the user would be locked out of the shares after both the server and client were left on all night. This required the Windows XP client to logout and back into Windows. Or, at the very least, disconnect the shares and reconnect them.
Windows 7 Clients – You can expect Windows 7 to work the same way. While I tested, few differences were noticed in the process of mapping dries and opening files. Mac Server’s SMB shares worked the same peer to peer way as Windows XP.
Print Sharing
Since you don’t need Lion Server to to this – there isn’t much to mention. I did want to mention that your ability to share printers to Windows machines from OS X Lion is possible and more details on that can be found on Apple’s Site. You have a number of options anyway – including printing directly to your network printer by way of lpr or sharing it from another Windows machine.
User Authentication
I’ve mentioned this before, but the Lion Server cannot act as a directory server for Windows clients. There is a Directory Wizard that allows you to (presumably) connect to an Active Directory and assign permissions from that directory. but, if you have a Windows Server – why are you using this exactly? Perhaps that’s a topic for another day. The base setup here is going to be Peer-to-Peer and pass Through authentication on resources.
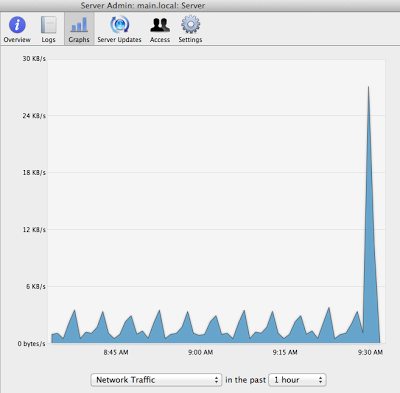
Monitoring
The Server Admin Tools includes some nifty tools to see CPU usage, network traffic and other basic information about the operation of the server. I even noticed a Monitor application itself – but I wasn’t able to look at that an any more depth. These kinds of tools may help in troubleshooting problems or slowdowns if you encounter them.
Final Thoughts
Lion Server is a complete departure from what you might expect as a Windows administrator. But, many of the basics are there and – when setup – run with a decent level of reliability. I would not place a solution like this above a Windows or Linux Server or even a NAS – but if you had an older Mac on the side, no server and a desire to centralize your network setup – you could pull this together on the cheap and make it work. If you (or your company) is considering a solution similar to this the possibility of a Mac Server with mixed Windows and Mac clients, send us an email at info@cwl.cc and we may be able to help!