
Инструкции для этого файла загрузки скоро будут доступны на русском языке. Чтобы предоставить вам эти сведения как можно быстрее, предлагаются инструкции на английском языке.
Важно! Если выбрать язык ниже, содержимое страницы динамически отобразится на выбранном языке.
-
Date Published:
26.07.2019
File Name:
WP7C_0.6_Beta.dmg
The Windows Phone 7 Connector for Mac 1.0 is now available via the Mac App Store. For more details go here.
Windows Phone 7 Connector for Mac is a new software application that enables you to synchronize your favorite music*, videos*, photos* and podcasts* from iTunes and iPhoto.
This software is not part of the Zune experience. In order to enjoy the Zune experience on Mac, you will need to install a Windows OS (XP or higher). Zune delivers music and video entertainment across Windows Phone 7, Xbox Live and Windows PC’s.
*DRM Protected content will not be able to be synchronized with Windows Phone 7
-
Поддерживаемые операционные системы
Apple Mac OS X, Apple Mac OS X v. 10.5 Leopard
Apple OSX 10.5 and above
-
Double-click on the installer and follow the simple instructions to complete the install.
Время на прочтение3 мин
Количество просмотров41K
Переход на Windows Phone совершенно не означает, что вы должны забыть о синхронизации с OS X. Под катом мы постараемся объяснить, почему «Nokia Lumia + MacOS X = Дружба и взаимопонимание».
Синхронизируем Lumia с Mac
На самом деле, все — от iTunes и iPhoto до Mail — можно синхронизировать с любым смартфоном Nokia Lumia. Первое, что вам обязательно понадобится, — это установить небольшое приложение Windows Phone для Mac. Оно представляет собой удобный инструмент, который позволяет настроить синхронизацию и просмотреть любые файлы, хранящиеся на вашей Lumia.
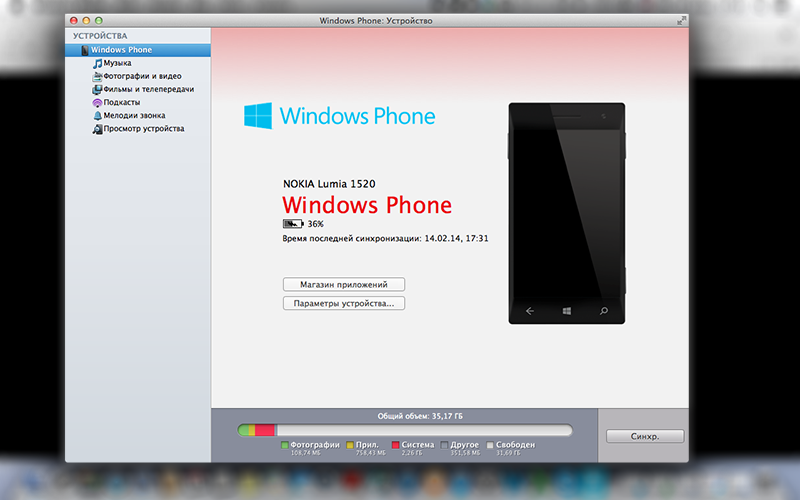
Как вы можете видеть на скриншоте, навигация в приложении очень проста и привычна для пользователей MacOS. Подобно тому, как iTunes взаимодействует с фирменными гаджетами Apple, приложение Windows Phone может сихронизировать с Lumia любую музыку (вместе с плейлистами) и фотографии, хранящиеся на вашем Mac. Однако стоит иметь в виду, что контент с защитой DRM не будет синхронизирован со смартфоном.
Nokia Photo Transfer
Для синхронизации фотографий с Lumia (начиная с Nokia Lumia 520 и заканчивая Nokia Lumia 1520) есть более мощное приложение с дополнительными возможностями импорта и экспорта видео- и фотоконтента. Оно называется Nokia Photo Transfer, и загрузить его можно по этой ссылке.

Простое и минималистичное приложение Nokia Photo Transfer позволит вам самому выбрать, откуда и куда переместить снимки (вне зависимости от того, импортируете вы их или экспортируете). Но, что самое главное, при помощи этого «аппа» вы также сможете переместить на ваш Mac «Ожившие фото» и любые другие снимки, сделанные при помощи Nokia Camera. Дополнительным бонусом для владельцев Nokia Lumia 1020 и Lumia 1520 станет возможность скопировать с устройства снимки в высоком разрешении и цифровые негативы (DNG).
Подключаем ваш iCloud-аккаунт к Nokia Lumia
Если вы являетесь пользователем компьютера Apple, то, возможно, ваш основной ящик электронной почты расположен в iCloud.
В отличие от Gmail и Hotmail, аккаунт iCloud пока не находится в списке предустановленных поставщиков услуг электронной почты для Nokia Lumia. Тем не менее, мы сделали все необходимое, чтобы вы смогли подключить ваш аккаунт в считаные секунды. Откройте в настройках вашего смартфона меню «Почта + Учетные записи», нажмите на раздел «Добавить службу», а затем пролистайте до раздела «Дополнительно».
Теперь вам остается только ввести ваш адрес и пароль, после чего ваш аккаунт автоматически будет добавлен в Lumia, а на стартовом экране появится дополнительная плитка для входа в почтовый ящик iCloud. Все просто!
Есть большая вероятность того, что в ближайшие несколько месяцев в экосистеме Windows Phone появится полноценная поддержка iCloud. Однако, если вам не терпится синхронизировать календари и контакты из «облака» уже сейчас, вы можете воспользоваться способом, рекомендованным пользователем Lumia на конференциях XDA Developers. Еще один способ — экспортировать контакты через vCard на сторонний сервис (Gmail или Microsoft Exchange) и настроить параллельную синхронизацию на Mac и Lumia.
Заменяем iCloud Documents и «Фотопоток» облаком SkyDrive
Все Nokia Lumia отличаются поддержкой Office и SkyDrive по умолчанию. В настройках вашей Lumia вы сможете установить параметры синхронизации так, чтобы отснятые кадры при наличии Wi-Fi или мобильного интернет-соединения автоматически дублировались на ваш SkyDrive-аккаунт. Вы также сможете с легкостью сохранять любые документы в облачном хранилище. Поэтому можно просто сместить акценты «облачного» доступа с iCloud на Skydrive. Благо для этого есть специальное приложение для Mac (https://itunes.apple.com/ru/app/skydrive/id522548761). А параметры автоматической синхронизации контента с других сервисов вы с легкостью настроите при помощи замечательного IFTTT.
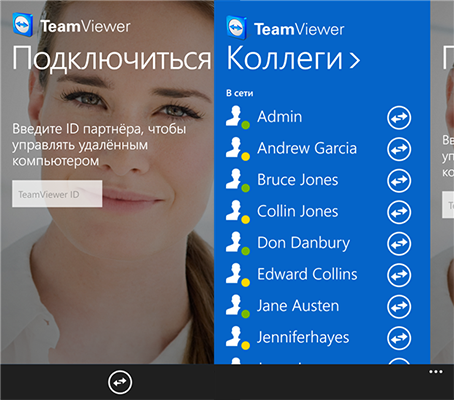
Управляем удаленно вашим Mac
В «Магазине приложений» есть ряд приложений для удаленного управления Mac. К ним, например, можно отнести TeamViewer, благодаря которому вы сможете управлять не только своим Mac, но и другими компьютерами на Windows или Linux.
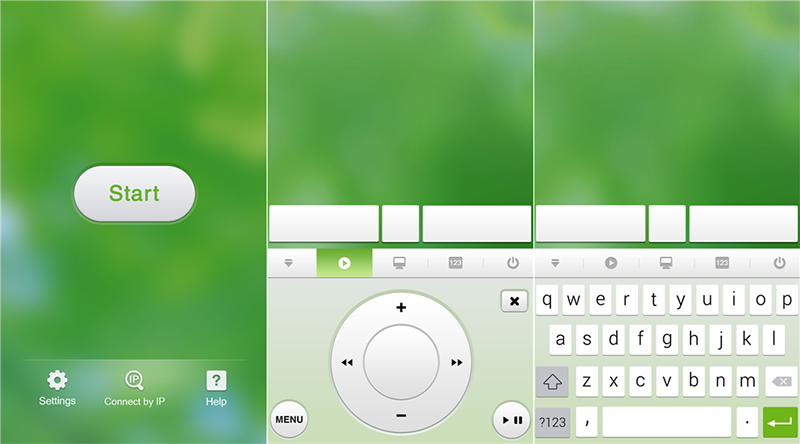
VLC Mobile Remote Pro станет вашим пультом управления медиаконтентом на Mac. Вы сможете останавливать просмотр фильмов или переключать треки, не вставая с дивана.

В добавок к VLC Mobile Remote Pro вы можете установить приложение с нехитрым названием Remote, которое позволит управлять вашим iTunes с расстояния. При этом приложение не только позволяет переключать треки, но и открывает полный доступ к медиатеке.

Приложение Remote Mouse позволит превратить Lumia в полноценный беспроводной трекпад / клавиатуру для управления компьютером Apple на небольшом расстоянии. Удобное приложение сможет помочь, например, при переключении слайдов во время презентации или для управления Safari, если Mac подключен к большому дисплею или телевизору.
А какие советы для владельцев Lumia и Mac знаете вы? Пишите в комментариях к этому посту.
Managing a Windows Phone from a Mac can seem challenging, especially given the distinct ecosystems that both platforms inhabit. The combination of macOS and Windows Phone (now largely unsupported since Microsoft has exited the mobile market) often leads to compatibility issues. However, with the right tools and strategies, you can effectively manage your Windows Phone from your Mac. This article aims to provide a comprehensive guide on how to do just that, covering everything from data transfer to application management.
Understanding the Basics
Before diving into the management procedures, it’s essential to comprehend the operating systems involved. Windows Phone was developed by Microsoft and was primarily designed to interact seamlessly with the Windows ecosystem. On the other hand, macOS is Apple’s operating system, built to work best with iPhones and iPads. As such, direct support for Windows Phone on Mac is sparse. This means that users will often need to employ workarounds and third-party tools.
Getting Started
1. System Requirements
Make sure your Mac is running on an updated version of macOS. While older versions might still support basic file management, newer releases generally come with improved compatibility and security features. Having a Windows Phone with the latest software updates will also ensure that communication between the devices is as smooth as possible.
2. Charge Your Devices
Before any management process, ensure that both your Mac and Windows Phone are fully charged. Connecting a device that is low on battery may result in disruptions during data transfer.
Connecting Windows Phone to Mac
1. Using USB Cables
The first solution that comes to mind is to connect your Windows Phone to your Mac using a USB cable. However, it is noteworthy that macOS does not natively support Windows Phone management via Finder. This means that any direct file management attempting to be done through macOS will be hindered by compatibility issues.
Steps:
- Plug your Windows Phone into your Mac using a USB cable.
- Wait for a moment for the Mac to recognize the device. If nothing happens, you may need to download additional software.
2. Use Third-Party Applications
Due to the lack of native support, third-party applications are often required. Some of these applications can bridge the gap between the two operating systems effectively. Below are some applications you can consider:
a. Virtual Machine Software
Installing Windows OS on a virtual machine software like Parallels Desktop or VMware Fusion can allow you to run Windows apps, including the Windows Phone SDK. This provides direct compatibility for managing your Windows Phone.
b. SyncMate
SyncMate is another effective third-party tool that facilitates synchronization between Mac and Windows phone. With SyncMate, you can manage contacts, messages, and more.
c. Wondershare TunesGo
Wondershare TunesGo is a versatile tool for managing mobile devices. It allows users to transfer files between a Mac and a Windows Phone seamlessly, including music, videos, and photos.
d. Android File Transfer (For Windows Phone 10)
If your Windows Phone is running Windows 10, you can use the Android File Transfer application which may allow some level of file management.
3. Setting Up the Software
To use any of the above applications, download and install them on your Mac. Follow the on-screen instructions to set up the connection between your devices.
Transferring Files to and from Windows Phone
1. Photos and Videos
Transferring photos and videos is one of the most common tasks users want to accomplish. With a good third-party app, transferring media files can be straightforward.
Using SyncMate:
- Open SyncMate and connect your Windows Phone.
- Navigate to the «Photos» section.
- Select which files you would like to transfer and click on “Sync.”
Using Wondershare TunesGo:
- Launch TunesGo after connecting your Windows Phone.
- From the dashboard, choose «Media» and then «Photos.»
- Follow the prompts to import or export images.
2. Music
Transferring music can be a bit complex, especially considering the restrictions imposed by different file formats.
Using TunesGo:
- Open TunesGo and connect your Windows Phone.
- Navigate to the «Music» section.
- Select the tracks you want to transfer or click on «Add» to upload tracks from your Mac.
3. Contacts and Calendars
Managing contacts and calendars is crucial for effective communication.
Using SyncMate:
- Once connected, open SyncMate and navigate to the «Contacts» and «Calendars» sections.
- SyncMate will allow you to add, remove, or edit entries on both devices.
Managing Applications
Managing applications on a Windows Phone while on a Mac presents unique challenges due to Microsoft’s focus on the Windows environment.
1. Using Windows Store
For application management, the best practice is to use the Windows Store. Given that you will need a Windows environment to use it, your best bet may involve using a virtual machine.
Through the Virtual Machine:
- Open the Windows Store in your Virtual Machine running Windows.
- Log in with your Microsoft account.
- From here, you can install, update, and manage your applications as needed.
2. Alternative Management Tools
Third-party applications like AppX can be handy. However, they may not be fully functional given the limitations placed by Microsoft, especially since Windows Phone support has been officially discontinued.
Backup and Restore Options
1. Using Microsoft OneDrive
OneDrive offers a robust solution for backing up and restoring data. To use OneDrive:
- Install the OneDrive app on your Windows Phone.
- Sign in with a Microsoft account.
- You can back up photos, videos, and essential files automatically.
2. Manual Backup to Mac
This option may require manual intervention through various applications, but it’s a viable route.
Steps:
- Connect your Windows Phone to your Mac using a third-party tool like SyncMate.
- Manually copy any files from the Windows Phone to your Mac where you want your backup stored.
Troubleshooting Common Issues
Managing your Windows Phone from a Mac might lead to some glitches. By being proactive in troubleshooting, you can resolve most issues.
1. Connection Issues
If your Mac does not recognize your Windows Phone:
- Ensure that your USB cable is functional.
- Reinstall any third-party software you might be using.
2. Sync Problems
If you have difficulties syncing files:
- Check the file formats and ensure they are supported by your Windows Phone.
- Restart both devices to refresh the connection.
3. Software Errors
Should any installed applications malfunction, consider checking for software updates or uninstalling and reinstalling the application.
Conclusion
Though managing a Windows Phone on a Mac can pose several challenges due to compatibility issues and Microsoft’s withdrawal from the mobile market, with the correct approach and tools, it can still be accomplished. The key is to utilize third-party applications effectively and consider alternative methods like a virtual machine when necessary.
By following this guide, you should be equipped to handle various aspects of Windows Phone management from your Mac, ensuring that your data remains organized and accessible. While the former glory of Windows Phone has faded, the need to manage existing devices remains. With patience and the right tools, you can navigate the complexities and maintain your valuable information seamlessly.
Item Preview
There Is No Preview Available For This Item
This item does not appear to have any files that can be experienced on Archive.org.
Please download files in this item to interact with them on your computer.
Show all files
21
Views
DOWNLOAD OPTIONS
Uploaded by
juicedc
on
SIMILAR ITEMS (based on metadata)
What you will need:
-
A Windows 10 Mobile x86 VHD image (can be downloaded via Visual Studio 2015)
-
An Intel Mac from 2006-2012 (a Late 2008 MacBook was used for the video)
-
A spare SATA HDD
-
A PC that has PowerISO installed
Step 1: Finding the Windows 10 Mobile VHD
Assuming you have Visual Studio 2015 installed with the Windows 10 Mobile SDK, the VHD file should be located in the following directory:
C:\Program Files (x86)\Windows Kits\10\Emulation\Mobile\10.0.14393.0 (or a similar build)\flash.vhd
The flash.vhd file is what we will use as our disk image that we will clone to a SATA HDD.
Step 2: Creating a bootable SATA HDD using the disk image via PowerISO
Using PowerISO on Windows, you will have to create a ‘Bootable USB Drive’ using the selected VHD file. Make sure you click the “List all USB devices” parameter otherwise your connected destination SATA HDD will not show up.
Step 3: Modifying the BCD + Registry so in case of Windows Phone crashing, we can see the BSOD error code.
What I found out when researching Windows Phone is that Microsoft has deliberately disabled the Windows blue screen from actually appearing. This is not the same as the sad face only blue screen which appears only in the Windows Boot Manager. So the way we mitigate this is we modify both the BCD and the Windows Phone OS’s registry to enable it.
The BCD file should be located in the mounted EFIESP partition in the folder ‘boot’. Open a Command Prompt as Administrator and type in the following commands: (replace X:\ with the drive letter of EFIESP)
bcdedit -store X:\boot\bcd -set {globalsettings} mobilegraphics no
bcdedit -store X:\boot\bcd -set {globalsettings} nobootuxprogress no
bcdedit -store X:\boot\bcd -set {globalsettings} nobootuxtext no
Once you’ve done this, open the Registry Editor (Regedit) and load the SYSTEM hive located in the MainOS partition, which should be in MainOS:\Windows\System32\Config\SYSTEM. When Regedit requires you to put in a name for it, we’ll just call it ‘SYSTEM2’.