
После выхода финальной версии MacOS Sierra вы можете в любое время бесплатно скачать установочные файлы в App Store и установить на свой Mac. Однако, в некоторых случаях может потребоваться чистая установка с USB накопителя или, возможно, создание загрузочной флешки для установки на другой iMac или MacBook (например, в случае, когда запустить ОС на них не получается).
В этой инструкции пошагово описаны способы создания загрузочной флешки MacOS Sierra как на Mac, так и в Windows. Важно: способы позволяют сделать установочный USB накопитель MacOS Sierra, который будет использоваться именно на компьютерах Mac, а не на прочих ПК и ноутбуках. См. также: Загрузочная флешка Mac OS Mojave.
Прежде чем приступать к созданию загрузочного накопителя, загрузите установочные файлы MacOS Sierra на свой Mac или ПК. Чтобы сделать это на Mac, зайдите в App Store, найдите нужное «приложение» (на момент написания находится в списке сразу под «быстрыми ссылками» на странице подборок App Store) и нажмите «Загрузить». Или сразу перейдите на страницу приложения: https://itunes.apple.com/ru/app/macos-sierra/id1127487414
Сразу после завершения загрузки, откроется окно с началом установки Sierra на компьютер. Закройте это окно (Command+Q или через главное меню), необходимые для нашей задачи файлы останутся на вашем Mac.
Если вам требуется скачать файлы MacOS Sierra на ПК для записи флешки в Windows, официальных способов сделать это нет, но можно воспользоваться торрент-трекерами и загрузить нужный образ системы (в формате .dmg).
Создание загрузочной флешки MacOS Sierra в терминале
Первый и, возможно, самый простой способ записать загрузочную флешку MacOS Sierra — использовать Терминал на Mac, но прежде потребуется отформатировать USB накопитель (сообщают, что требуется флешка не менее 16 Гб, хотя, по факту, образ «весит» меньше).
Для форматирования используйте «Дисковая утилита» (можно найти через поиск Spotlight или в Finder — Программы — Утилиты).
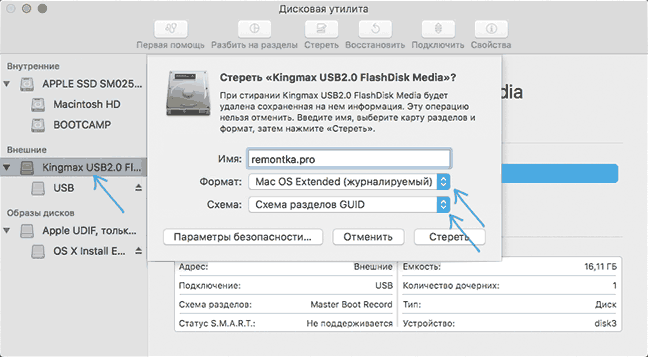
- В дисковой утилите, слева выберите вашу флешку (не раздел на ней, а сам USB накопитель).
- Нажмите «Стереть» в меню вверху.
- Укажите любое имя диска (запомните его, не используйте пробелов), формат — Mac OS Extended (журналируемый), Схема разделов GUID. Нажмите «Стереть» (все данные с флешки будут удалены).

- Дождитесь завершения процесса и выйдите из дисковой утилиты.
Теперь, когда накопитель отформатирован, откройте терминал Mac (так же, как предыдущую утилиту — через Spotlight или в папке «Утилиты»).
В терминале введите одну простую команду, которая запишет все необходимые файлы Mac OS Sierra на флешку и сделает ее загрузочной. В данной команде замените remontka.pro на имя флешки, которое вы задали в пункте 3 ранее.
sudo /Applications/Install\ macOS\ Sierra.app/Contents/Resources/createinstallmedia --volume /Volumes/remontka.pro --applicationpath /Applications/Install\ macOS\ Sierra.app --nointeraction
После ввода (или скопировав команду), нажмите Return (Enter), затем введите пароль вашего пользователя MacOS (при этом вводимые символы отображаться не будут даже в виде «звездочек», но они вводятся) и еще раз нажмите Return.
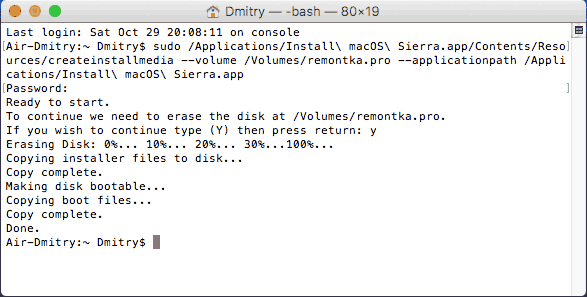
Останется лишь дождаться окончания копирования файлов по завершении которого вы увидите текст «Done.» и приглашение к новому вводу команд в терминале, который теперь можно закрыть.
На этом загрузочная флешка MacOS Sierra готова к использованию: чтобы загрузить ваш Mac с неё, при перезагрузке удерживайте клавишу Option (Alt), а при появлении выбора накопителей для загрузки, выберите вашу флешку.
Программы для записи установочного USB накопителя MacOS
Вместо терминала, на Mac вы можете использовать простые бесплатные программы, которые всё сделают автоматически (кроме загрузки Sierra из App Store, что вам все так же потребуется сделать вручную).
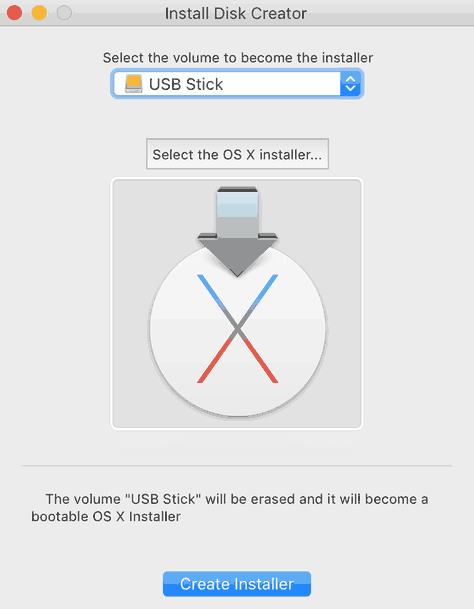
Две самых популярных программы такого рода — MacDaddy Install Disk Creator и DiskMaker X (обе бесплатные).
В первой из них достаточно выбрать флешку, которую нужно сделать загрузочной, а затем указать установщик MacOS Sierra, нажав «Select the OS X Installer». Последнее действие — нажать «Create Installer» и подождать, когда будет готов накопитель.
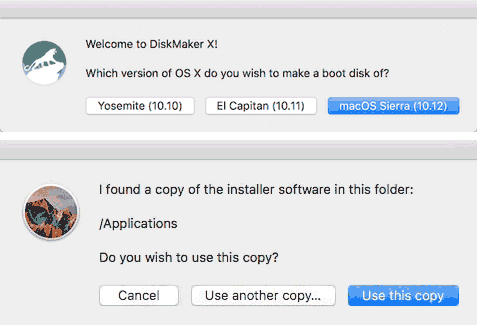
В DiskMaker X всё столь же просто:
- Выберите MacOS Sierra.
- Программа сама предложит вам копию системы, которую обнаружит на вашем компьютере или ноутбуке.

- Укажите USB накопитель, выберите «Erase then create a disk» (данные с флешки будут удалены). Нажмите Continue и введите пароль вашего пользователя, когда потребуется.
Через некоторое время (зависит от скорости обмена данными с накопителем) ваша флешка будет готова к использованию.
Официальные сайты программ:
- Install Disk Creator — http://macdaddy.io/install-disk-creator/
- DiskMakerX — http://diskmakerx.com
Как записать MacOS Sierra на флешку в Windows 10, 8 и Windows 7
Загрузочная флешка MacOS Sierra может быть создана и в Windows. Как уже упоминалось выше, вам потребуется образ установщика в формате .dmg, а созданный USB будет работать только на Mac.
Чтобы записать образ DMG на флешку в Windows потребуется сторонняя программа TransMac (которая является платной, но первые 15 дней работает бесплатно).
Процесс создания установочного накопителя состоит из следующих шагов (в процессе с флешки будут удалены все данные, о чем вас несколько раз предупредят):
- Запустите TransMac от имени Администратора (придется подождать 10 секунд, чтобы нажать кнопку Run для запуска программы, если вы используете пробный период).
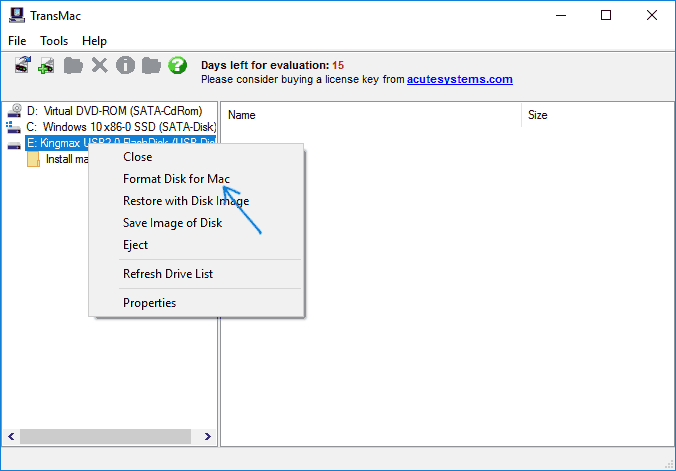
- В левой панели выберите флешку из которой нужно сделать загрузочную с MacOS, кликните по ней правой кнопкой мыши и выберите «Format Disk for Mac», согласитесь с удалением данных (кнопка Yes) и задайте какое-либо имя диска (например, Sierra).

- По завершении форматирования, вновь кликните по флешке в списке слева правой кнопкой мыши и выберите пункт контекстного меню «Restore with Disk Image».
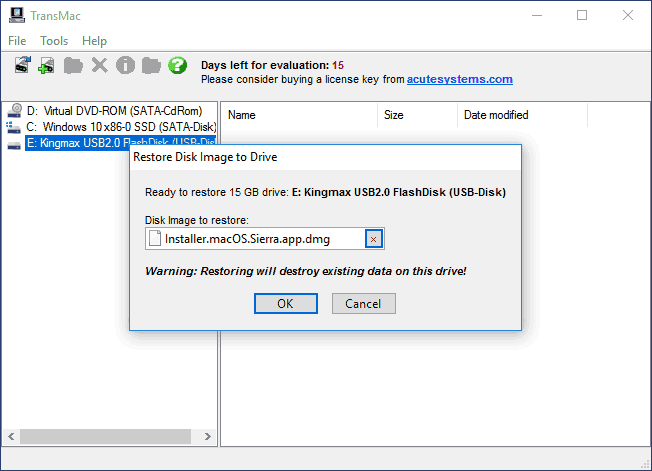
- Согласитесь с предупреждениями о потере данных, а затем укажите путь к файлу образа MacOS Sierra в формате DMG.

- Нажмите Ок, еще раз подтвердите, что предупреждены об утрате данных с USB и дождитесь завершения процесса записи файлов.
В итоге, загрузочная флешка MacOS Sierra, созданная в Windows готова к использованию, но, повторюсь, использовать её на простых ПК и ноутбуках не получится: установка системы с неё возможна только на компьютеры Apple. Скачать TransMac можно с официального сайта разработчика: http://www.acutesystems.com
In this article, I am going to show you how to create macOS Sierra bootable USB Installer on Windows 10. If you are in the process to install macOS Sierra 10.12 on your PC or Hackintosh, the first step is to create a bootable USB installer for macOS Sierra to install Mac OS from it on your PC, you can create bootable USB Installer with UniBeast, but still, you need a Macintosh to download and create macOS Sierra bootable USB Installer. So here we’re to show you how to create bootable USB Installer for macOS Sierra on windows 10, and you don’t need any MacBook or an Apple computer.
Create macOS Sierra Bootable USB Installer on Windows 10
To create a Bootable USB Installer, you need to download macOS Sierra image file from the link below and other data that mentioned in the download section with an 8 or higher USB flash drive. The download process is a little bit complicated if you are not known to mega because you have to download it from there, also the credit goes to a Brazilian Hackintosh group.
Note: This method works on Windows 7/8/10, and it’s not the TransMac process.
Step #1. Firstly, download the following materials from the link below.
- Download macOS Sierra image file (Updated)
- Download Win32DiskImager
- Download “Pacote de config”
Step #2. After downloading macOS Sierra image file from the link below Extract it with 7-Zip, Winrar or any other extractor.
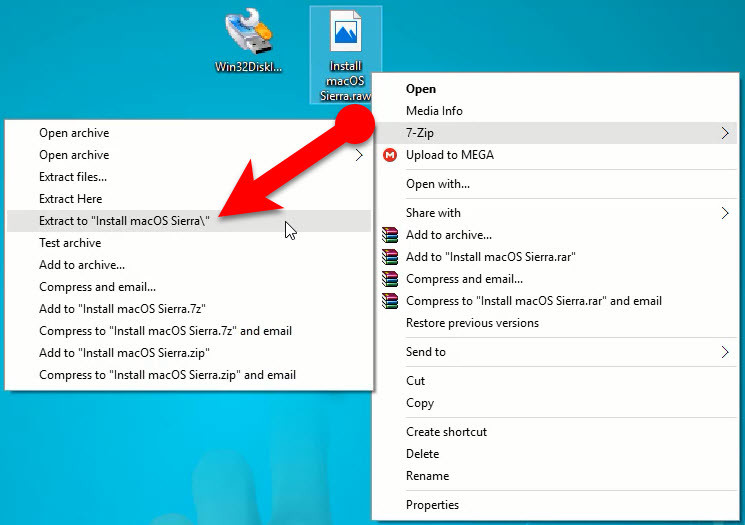
Extract macOS Sierra Image
Step #3. Now Install Win32 DiskImager, open the Win32DiskImage.exe file then click next, next couple of times and other necessary installation steps, like license agreement.
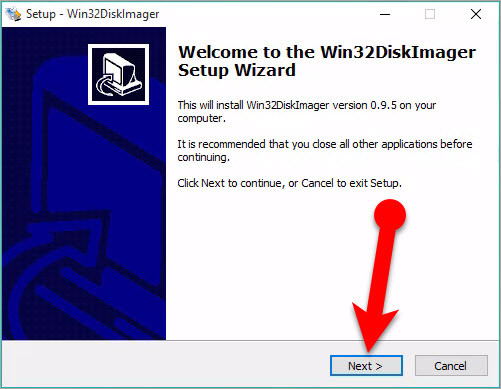
Install Win32DiskImager
Step #5. When the installation process completed, click Finish to exit the setup wizard.
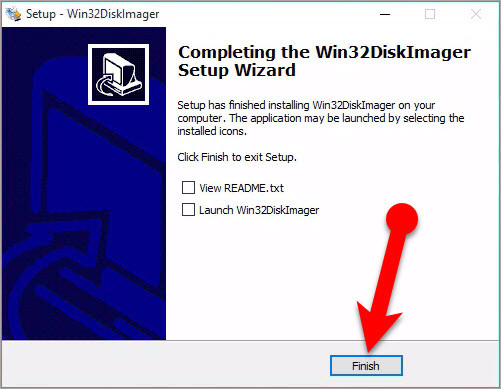
Finish Installation of Win32DiskImager
Step #4. Run Win32DiskImager as admin and select your USB flash drive that wants to use as a bootable device for macOS Sierra 10.12.
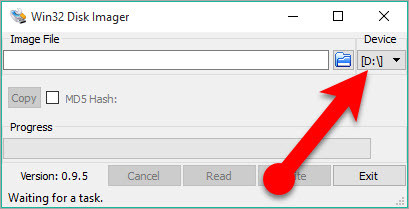
Select USB Flash Drive
Step #6. After selecting a device, click on the folder icon beside the device selection option and browse the macOS Sierra image file that you downloaded from the link above. Firstly change the view mode to ( *.* ) then select Install macOS Sierra and click Open.

Open Install macOS Sierra Image
Step #7. So after selecting the image and USB, click Write then it will show warning messages, click Yes to begin the Bootable USB Installer process.

Write macOS Sierra to USB
Step #8. Wait for Win32DiskImager to complete the Writing process to 100%.
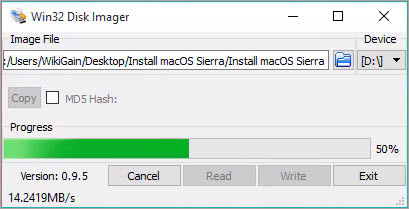
Writing in Process
Step #9. After writing process finished, then you should get the Successful message like a shot below.
Step #10. As mentioned above, download “Pacote de Config”. After downloading Extract it also by 7-Zip, Winrar or any other extractor.
Extract “Pacote de config”
Step #11. Open “Pacote de Config” folder then select your PC if it’s desktop or laptop then from its folder, you will find some system graphics Config.plist file. Find & Copy the Config.plist that matches your Intell, AMD or NVIDIA system graphics.
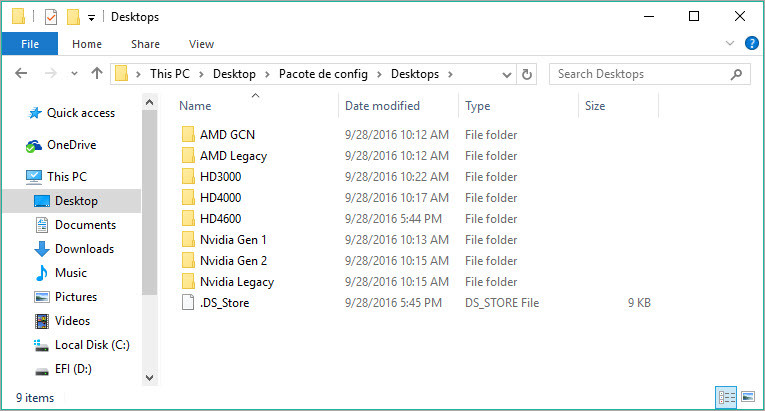
Find & Copy your System Config.plist
Note: Remember that if you didn’t find the exact config.plist file for your system, use one that approaches to your system. Like if your system graphics is Intel 4210 then choose above or below that because it mostly works, though many might fix your system and compatible with Hackintosh. Also, you might find your prepared config.plist file just by a quick googling.
Step #12. Now go to your USB flash drive EFI > Clover then paste and replace the config.plist file that you copied from “Pacote de Config” folder with default plist file.
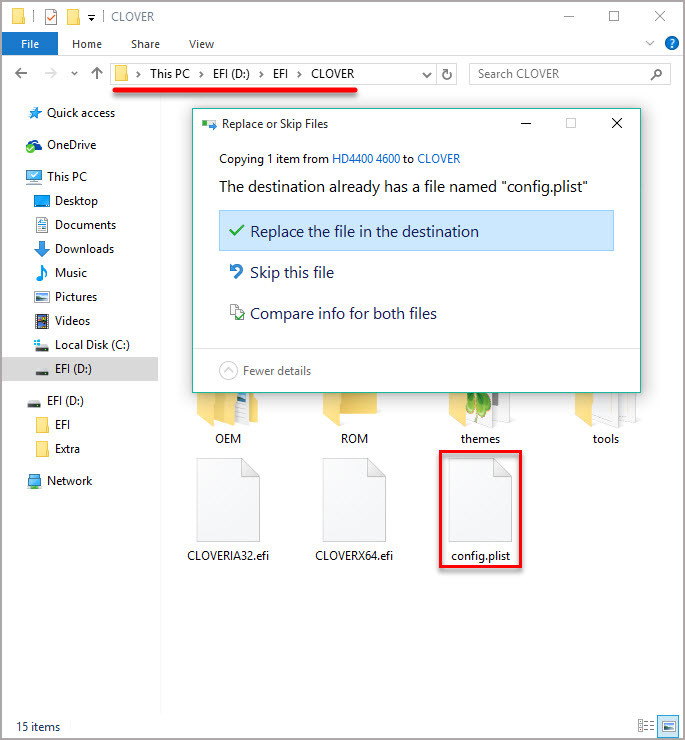
Replace Config.plist to Bootable USB Installer
Also Read: How to Create Bootable USB Installer for macOS Sierra via UniBeast?
It was all about, how to create macOS Sierra bootable USB Installer on Windows 10. If you’ve any question or quiery, feel free to share it in the comment section down below.
Apple updates its macOS designed to run on Mac computers every year. Every year, a new major version of the macOS is released. As of April 2022, macOS Monterey is the latest version of the macOS.
Prepare macOS bootable USB from Windows 10/8/7 PC
The macOS bootable USB can be prepared on a Mac without the help of third-party tools, just like how Windows bootable USB can be prepared from Command Prompt on a computer running Windows operating system. However, if your Mac device is not bootable, you can prepare macOS bootable USB right from Windows PC as well.
In this guide, we will see how to create macOS bootable USB drive on a PC running Windows 11, Windows 10 or Windows 7.
What you will need:
# macOS DMG file
# A USB flash drive with at least 16 GB of storage
# A PC running Windows 11, Windows 10 or Windows 7
# Trial copy of TransMac (trial copy is enough to create the bootable USB)
Once you have all items mentioned above, you can make macOS bootable USB on a Windows PC. In this guide, we’re creating macOS bootable USB on Windows 10, but you can use the same procedure on Windows 11 and Windows 7 as well.
Guide to prepare macOS bootable install USB on Windows 11/10/7
Step 1: Connect a USB drive with at least 16 GB of storage space to your Windows PC and move all data from USB drive to a safe place as the drive will be erased while preparing macOS bootable USB.
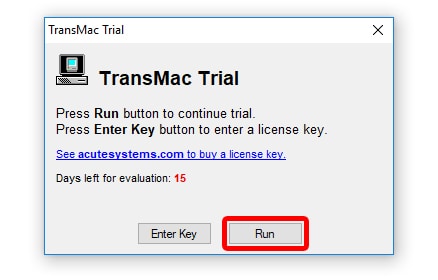
Step 2: Visit this page of TransMac and download the latest version of TransMac software on your PC. TransMac is a paid software but the 15-day trial copy can be used to prepare bootable USB without any issues. That said, if you often need to prepare macOS bootable USB from Windows, you should go ahead and buy the software.
Once the TransMac is downloaded, double-click on the setup file to run the installer and get it installed on your PC.

Step 3: Run TransMac software as administrator. To do so, type TransMac in Start menu search box, right-click on TransMac entry in search results, and then click Run as administrator option. When you see the TransMac Trial dialog box, Click Run button.


Alternatively, you can navigate to TransMac entry in Start menu, right-click on it, and then click Run as administrator option.
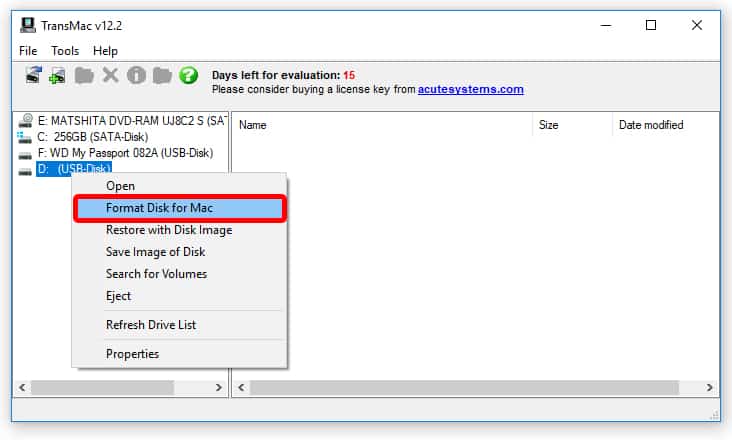
Step 4: Once TransMac is launched, in the left pane of the program, you will see the connected USB drive that you want to use to prepare macOS bootable USB. Right-click on the USB drive and then click Format Disk for Mac option.

Click Yes button when you see the warning dialog box.

This is because, if you have been using a USB flash drive with Windows operating system, the USB drive is likely using MBR partition type. So we need to partition the USB drive with GPT partition first before transferring the DMG file to the USB drive.
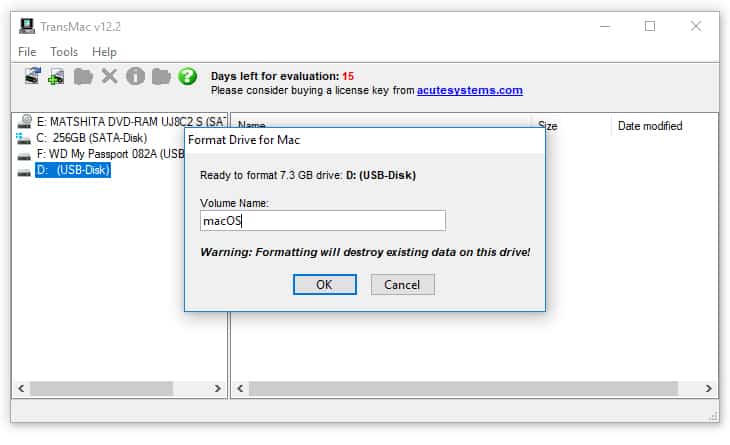
Step 5: Clicking Yes button will open Format Drive for Mac dialog box where you need to type a name for the drive. We are naming it as Seirra install drive.

When you see the warning message again, click Yes button to continue and format the drive for Mac.


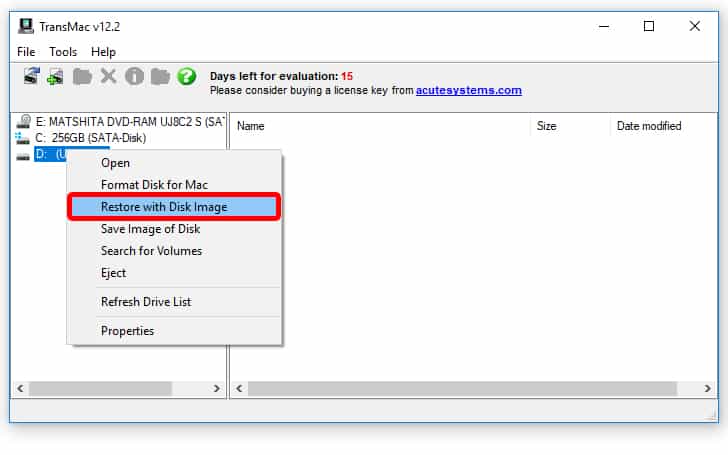
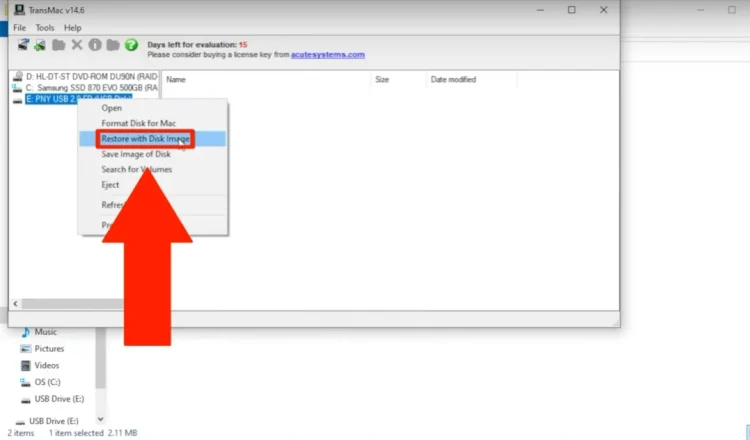
Step 6: Once the format is done, right-click on the USB drive again, and then click Restore with disc image option.

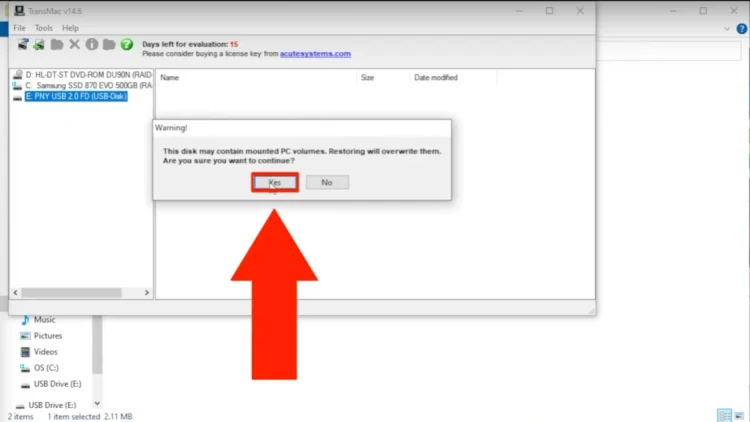
Click Yes button when you see the following warning dialog box.

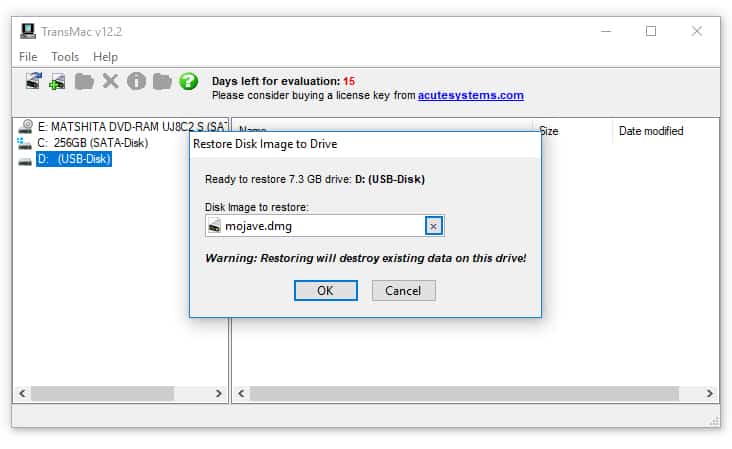
Step 7: Clicking the Yes button will open Restore Disk Image to Drive dialog box. Under Disk image to restore section, click the small button with drive icon on it (refer to the picture below) to browse to macOS DMG file. Select the macOS DMG file and then click Open.


Finally, click OK button.
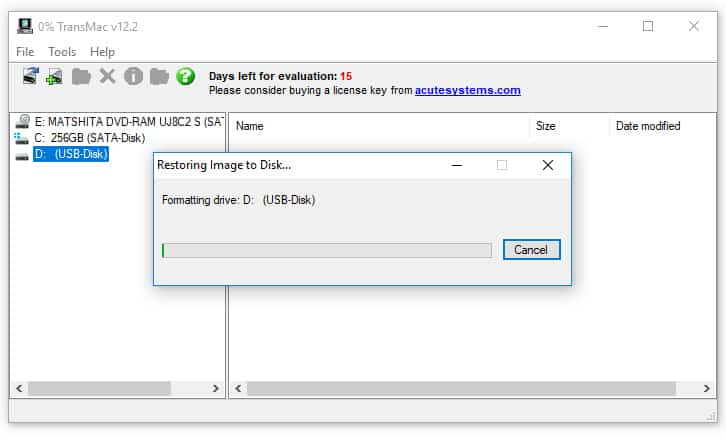
Step 8: When you see the warning dialog box, click the Yes button to begin preparing your macOS bootable USB. The bootable USB should be ready in about 30 minutes. In our test, the tool took close to 45 minutes, though.
Once the bootable USB of macOS ready, you can connect it to your Mac device and begin installing macOS from it. Good luck!
Regardless of your OS – whether it’s Windows 10 or macOS Sierra – you could face the instance where your device refuses to reboot. This can happen for numerous reasons, including hardware failure, file corruption, malicious update, and the likes. If something similar happens with your Apple PC, you can repair it with macOS bootable USB that features installation media.
This is one of the core arguments for making a macOS bootable USB on a Windows PC when your Mac is working correctly. However, if none of your Apple computers [MacBook Air, iMac, Mac Pro, Mac Mini, MacBook Pro or MacBook] are working, then a Windows PC can be used to rescue the PC. You can use a Windows 10, or Windows 8.1/7 to create a bootable USB installation media for reinstalling macOS Sierra on your Apple PC.
Guide to Creating a macOS bootable USB on a Windows PC
In this tutorial, we’ll take you through the steps you need to take to create a macOS Sierra bootable USB installation on a PC featuring Windows 10, 8 or Windows 7. This can then be used to upgrade or reinstall Apple’s MacOS.
The pre-requisites
Before taking any step, you’d need the following:
- A problematic Mac PC with OS X or MacOS Sierra [10.12 or a later version].
- TransMac software [trial version would be sufficient].
- 16GB flash storage.
- A copy of macOS DMG file.
To use the latest macOS version to make a bootable USB drive, take these steps:
Step 1: Download, launch and install the TransMac software on Windows. The software comes at a cost, but you’ll get a 15-day trial free of cost, which is just enough. P.S. If you like TransMac, you can buy the paid version and show some love to the developer.
Step 2: Put in the USB flash drive you wish to use to resolve the problem of Mac. If you have a backup on the USB, remember to copy it somewhere, as the USB’s content will be erased.
Step 3: Right click on TransMac and choose “Run as administrator.”
Step 4: If you’re using TransMac’s free trial, click Run after waiting for a total of 15 seconds.
Step 5: On the late pane, right click the flash drive of USB, and choose “Format Disk for Mac.” You should do this before making bootable media because there is a probability that a Windows device was used to format the drive. If that’s the case, it’s likely that it is making use of the MBR partition. However, for it to work on Mac, it requires GPT partition.
Step 6: Click “Yes” on the warning message when prompted to continue formatting.
Step 7: Give some name to the drive and click “OK.” For example, you could name it “macOS bootable USB.”
Step 8: Now proceed further by clicking “Yes.”
Step 9: Click “OK” to continue when the formatting finishes.
Step 10: Next, right click on the flash drive of the USB, choose “Restore with Disk Image.”
Step 11: Click “yes” to erase the data on the flash drive when you get the warning message.
Step 12: Now on the right, click the button that says browse, and find the .dmg file with the installation files of macOS.
Step 13: Now click “Open” > “OK” > “Yes’ to make the macOS USB bootable media.
Once the process comes to an end, put the USB flash drive on your Mac PS to reinstall, install, or ugrade the OS to macOS’s newest version, which could be Sierra or above.
Steps to Create GPT Partition on a USB flash drive
If the USB flash drive doesn’t work with TransMac, you could still be facing an issue of partition. When that happens, you’ll want to repeat the whole process, but this time around, follow the steps listed below to utilize the Dispart command-line utility on the Windows PC for creating the relevant GPT partition.
- Launch Command Prompt in system administrator
- Type the command “diskpart” and press “Enter.”
- Enter the “list disk” command to each drive connected to your PC and press “Enter.”
- Now type the command “select disk” followed by the assigned number for the flash drive “select disk 4”, and press “Enter” again.
- Now enter “clean” command and press “Enter.”
- Enter the “convert GPT” command and hit “Enter.”
- Type the “create partition primary” command and tap “Enter” to finish the process.
After you’ve made a GPT partition for the USB flash drive, you can leverage the instructions above to leverage TransMac to make bootable media, but ignore the steps 5-9 this time around, and do what it says from the tenth step onward.
Once the process ends (note that it could take 30-60 minutes), connect the flash drive of USB and switch on the Mac PC while holding the “Option” key, and choose the USB flash drive to start the installation.
If you’re facing an issue producing bootable media, you can buy a flash drive that comes in the package of macOS Sierra.
That’s it. You’ve successfully created a macOS Bootable USB on a Windows PC. Feel free to use it at your will to fresh install macOS’s latest OS on Mac.

Hey everybody! I’m going to show you how to take an unused or a brand-new flash drive, how to format it, and how to turn it into a macOS installer flash drive. And you can do that with a Windows computer.
I’m going to show you today how to make it on a Windows computer because I know a lot of you may not have access to a Mac computer. You may only have access to a Windows computer.
Steps
1. Preparing the Flash Drive
So the first thing we’re going to do is we’re going to take our flash drive and we’re going to go ahead and connect it to our computer. Now, I know I mentioned this earlier, but make sure it’s one that you don’t need the information on or it’s a brand new one.
So once you connect it to the computer, if it’s a brand new one, it’ll automatically pull up like this one did. Now if it’s not a brand new one, that’s okay. And if it’s formatted correctly, that’s okay as well.
2. Formatting the Flash Drive
What we’re going to do is we’re going to right-click on the Windows start icon, and we’re going to go to our Disk Management.
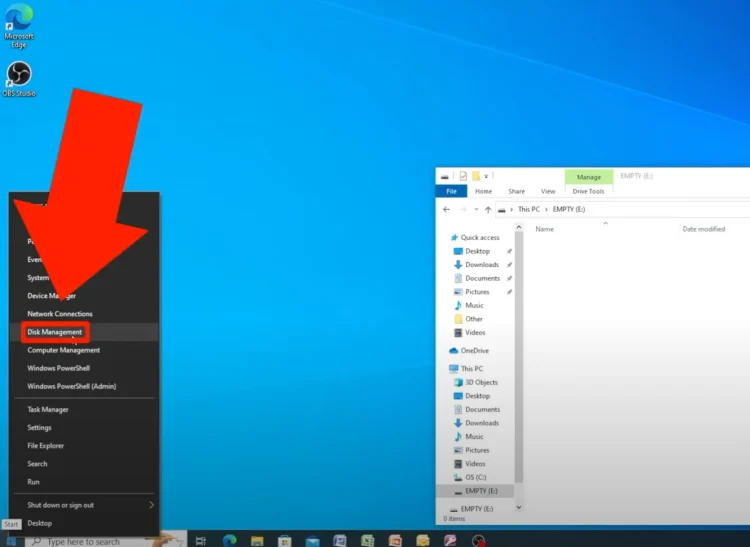
Now once this opens, it may show up down here with volumes. Sometimes you can right-click on them and you can delete them. If that doesn’t work, that’s okay.
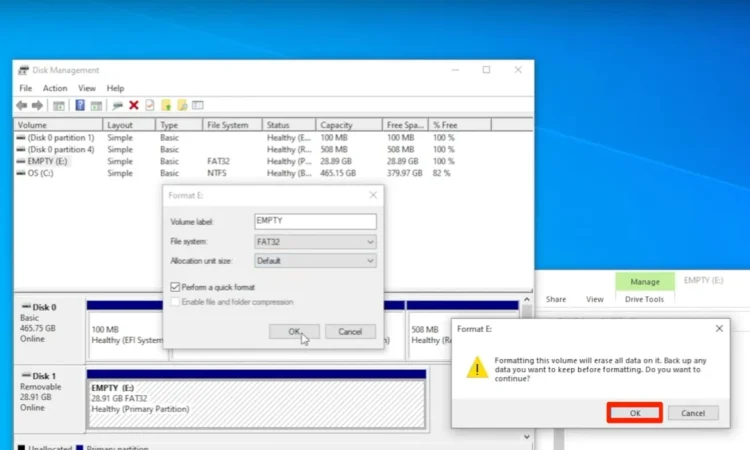
What you can also do is you can right-click up here on the name of the flash drive, and then you can just go and you can format it or you can delete the volumes there. I’m just gonna tell it to format, and I’m gonna leave it as empty.

You can change it to either NTFS or FAT32 or exFAT. It doesn’t matter. I’m just going to leave it as FAT32 at the moment. And then I’m just going to leave the default allocation unit size.
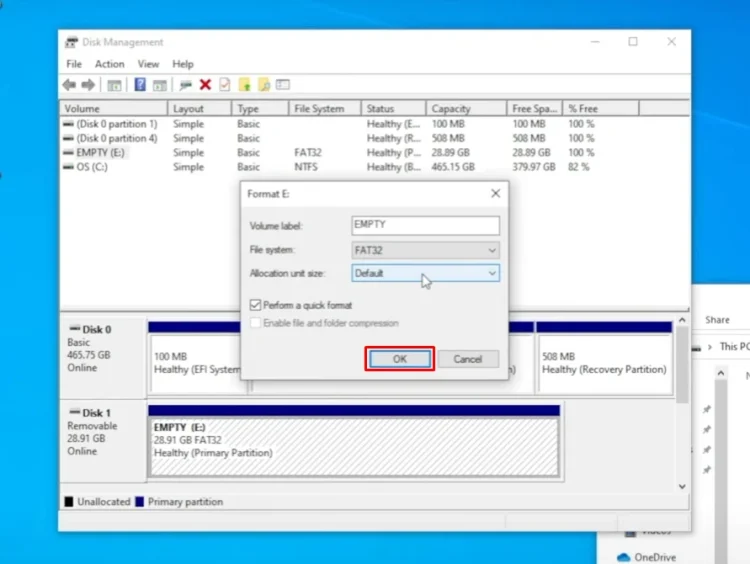
So I’m going to click OK, and I’m going to tell it OK again, and it’s going to erase it. Now, once it erases it, it’s ready to be used by Windows, but we don’t want it to be used by Windows. We want it to be used by Mac.
3. Preparing the macOS Installer
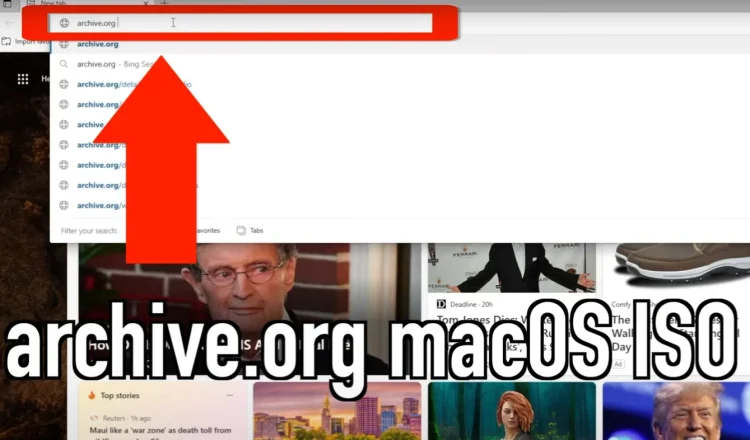
Now we’re going to go to the internet. So click on Microsoft Edge or whatever browser you want to use, Firefox, Chrome, it doesn’t matter.
Just go to the internet, and we’re going to go up here to the very top, and we’re just going to search for archive.org and then a space and then I’m going to search for macOS ISO installers.
archive.org macos iso installers
Oh, there it goes, and it says no longer maintaining, but here’s the thing, it’s got a macOS ISO collection. We’re going to go ahead and click on that.
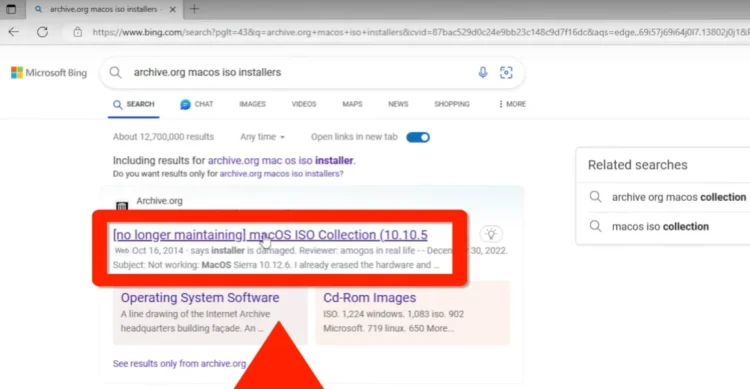
This person has put together an incredible collection of all the different macOS versions that are available now if for some reason. I’ve noticed that sometimes it doesn’t pull up the very first time, you might just have to hit refresh on it.
4. Downloading the macOS Installer
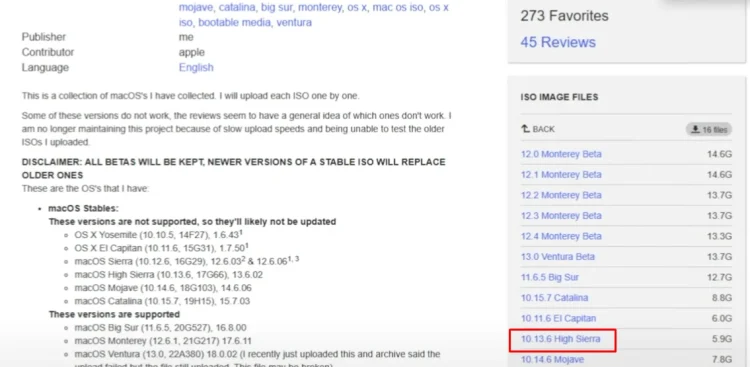
And then we’re just going to scroll down, and right here it has a bunch of ISO images.
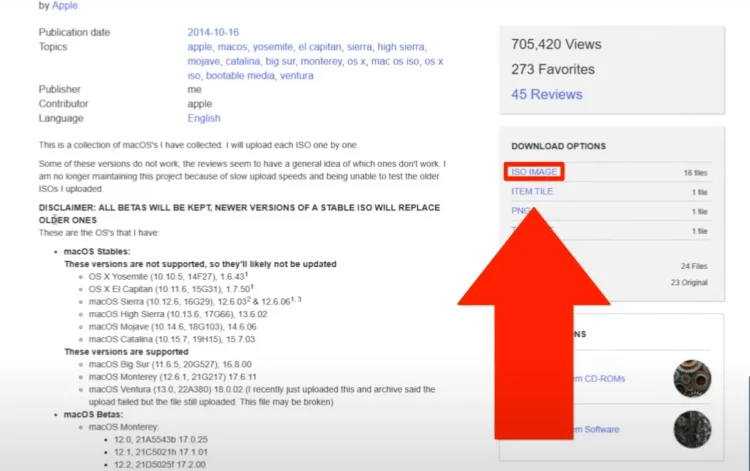
So I’m just going to click on name. Oh, and look, there’s all of those different image files. Well, the one we want to download today is just the 10.13.6 High Sierra.
You could probably also click on the little arrow beside it that looks like it’s pointing down to the line, and it’s going to start downloading it. Now, this is going to take quite a while, but what I’m going to do as soon as that finishes, I’m going to show it to you in the downloads folder.
And we’ll pick right back up, and I’m going to show you how to take that ISO and get it onto your flash drive and make it bootable.
5. Converting the macOS Installer
Okay, so my download just finished downloading. So I’m going to minimize the browser, and then I’m going to click right here on the File Explorer.
And then I’m going to click on Downloads.
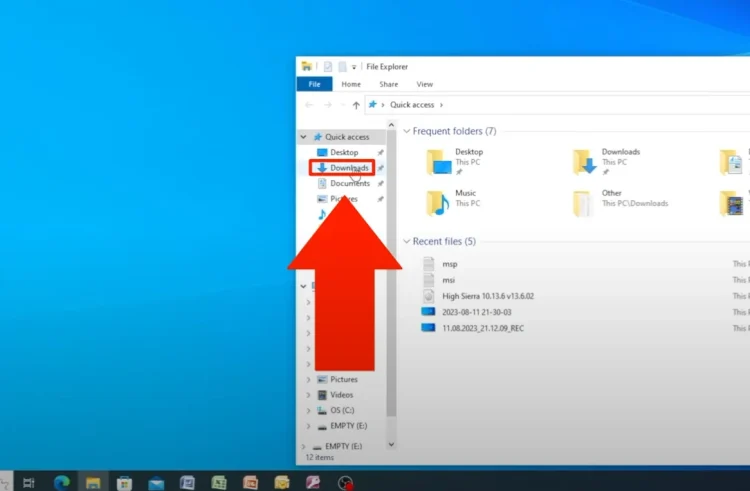
Now, if you’ll notice, right here is the High Sierra 10.13.6 v13.6.02 and it’s an ISO file.
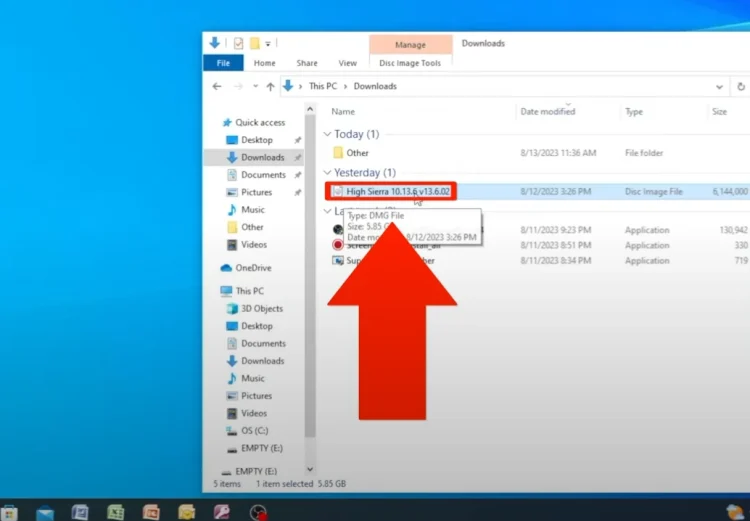
It doesn’t say that but if I right-click on it and go to properties right here it’s a disk image file which is an ISO.
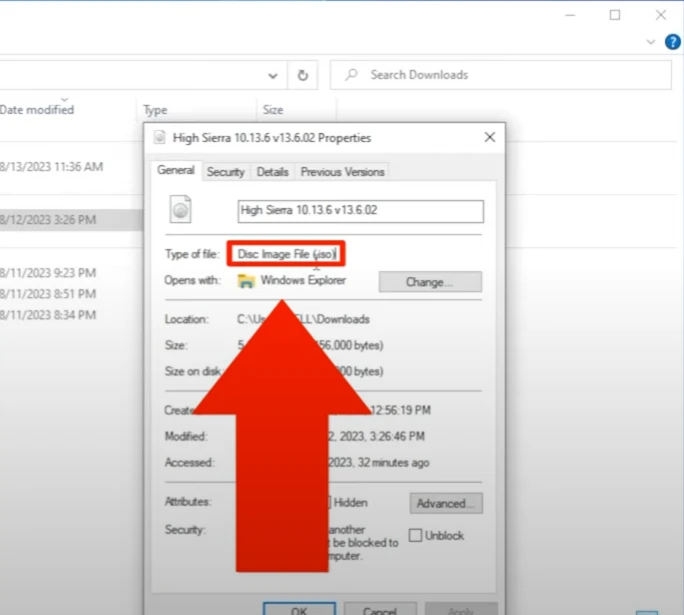
Well this is great but guess what it has to be DMG. Not a problem we’re going to fix that.
6. Using TransMac to Prepare the Installer
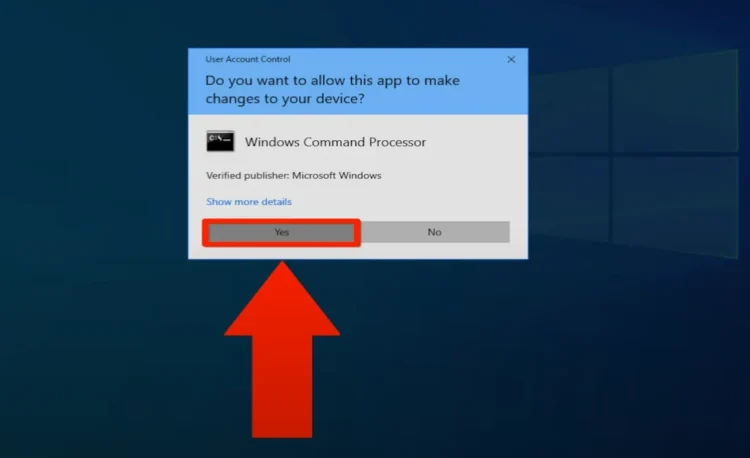
I’m going to type in CMD and then I’m going to right-click on command prompt, and I’m going to say run as administrator.

And click “Yes”
If you are using Windows 11, do this:
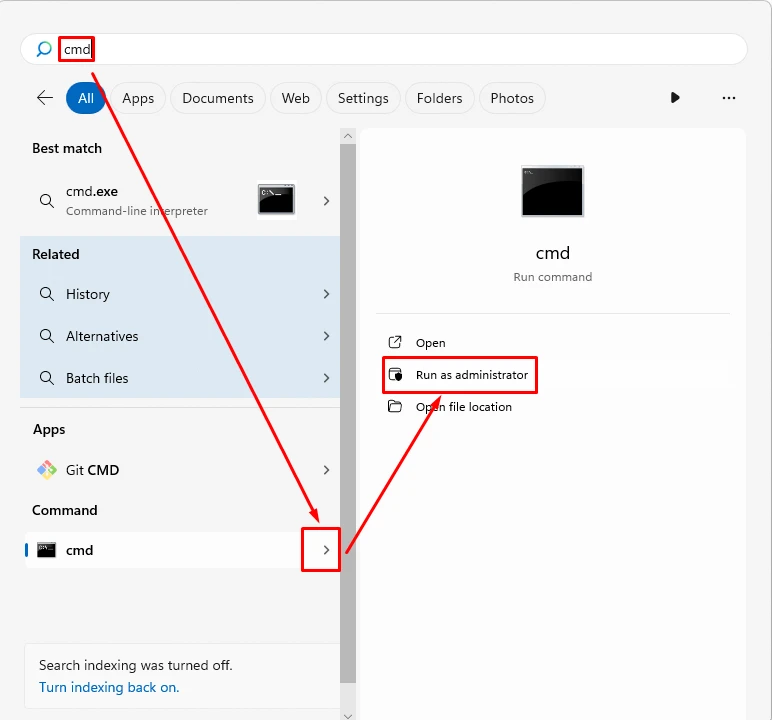
Now when this pulls up, what we’re going to do is we’re going to go into our user folder, into the downloads folder, and we’re going to rename it.
So on my computer, I’m going to go to the users folder. Then I’m going to go to my account on the computer. Then I’m going to go into the downloads, and then I’m going to tell it to rename, and you don’t have to type the whole thing.
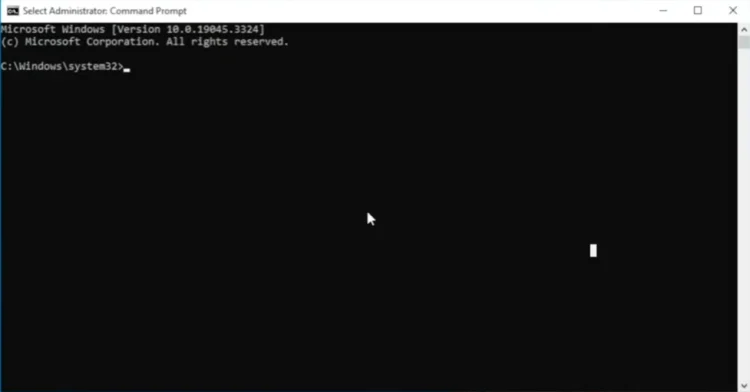
After the “CMD” window opens, you will see C:Windows/system32> to the left of the cursor.
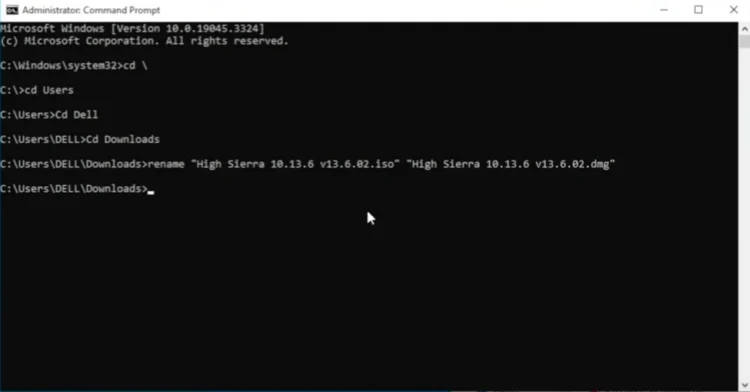
- Type cd \ to navigate to the C directory.
- Next, type cd Users to navigate to the Users folder.
- Type cd Dell if your account name is Dell.
- Type cd Downloads to navigate to the Downloads folder.
- Now we need to rename the downloaded iso file to dmg. Write rename “High Sierra 10.13.6 v13.6.02.iso” “High Sierra 10.13.6 v13.6.02.dmg” and press Enter.
Watch this. If I type “hi“, and then I press the tab, it fills all of it in for you. That’s going to save you a lot of time. Then I’m going to press the space bar, and I’m going to put a quote, and I’m going to type hi again and hit the tab.
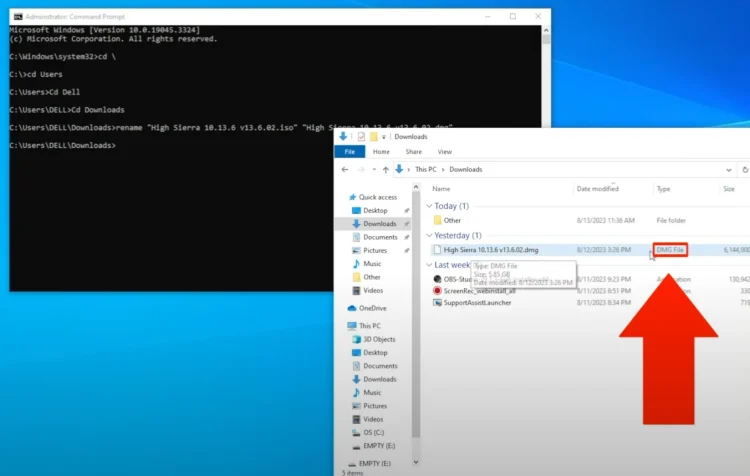
But then now I don’t want to rename it to ISO. I want to back up just a little bit. And right after that last period, I’m going to put DMG instead of ISO. And then I’m going to put another quote and now I’m going to press enter. Now, if you’ll notice over here in the downloads folder now it’s no longer a disk image file it’s a DMG file this is exactly what we want.
So what we’re going to do now is there’s a special program that we can run on Windows that’ll take that DMG file and it’s going to allow us to install that on our flash drive. So what we’re going to do now is we’re going to go back to the internet. And I’m going to go and I’m going to search for TransMac.
7. Downloading TransMac

Now this program only gives you a 15-day trial, but that is plenty of time because you can create the installers that you need and you can get your Mac back up and running.
Now if for some reason you would like to have it longer or if you need to do another one later on after that 15-day window, not a problem. It’s just $59 and it should last forever.
So check that out. But I’m gonna go ahead and download it now, and we’re just gonna get it from Techspot. It doesn’t matter which of these you download it from. Make sure it doesn’t have a virus though. A lot of these websites you download stuff, it could have viruses or malware attached to it.
I know if you download it from Techspot, you’ll be fine. You won’t have any viruses. So we’re gonna go ahead and click on that.

Here it is, and we’re just gonna click on download now and there goes now it’s gonna start downloading our file.
8. Installing TransMac
Okay so it finished downloading. So what I’m gonna do now is I’m gonna click on the little folder icon which is gonna take me back to my downloads folder.
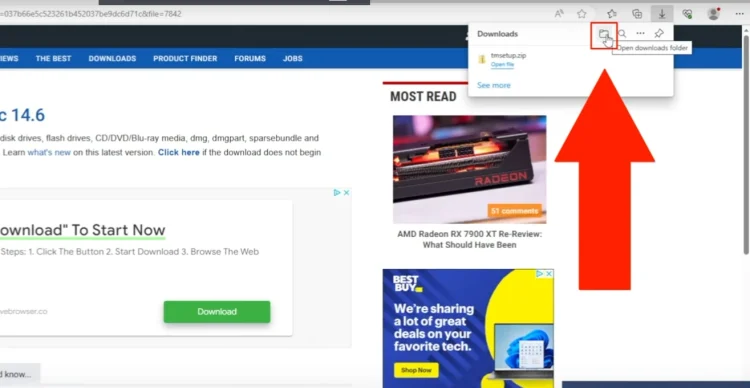
And then this tmsetup right here, that’s the TransMac. We’re going to right-click on it. We’re going to extract all.
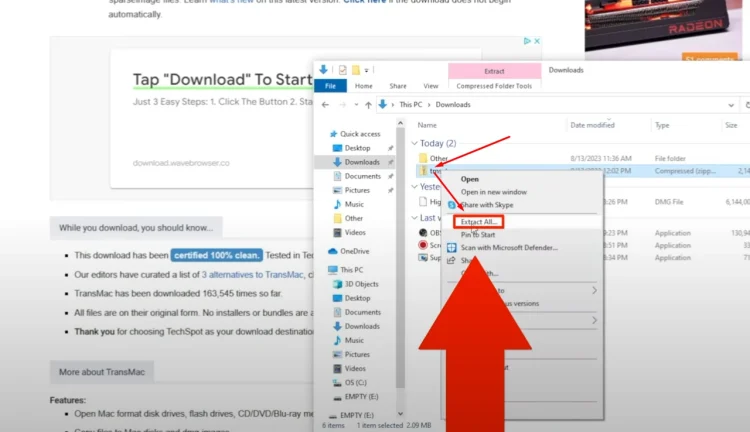
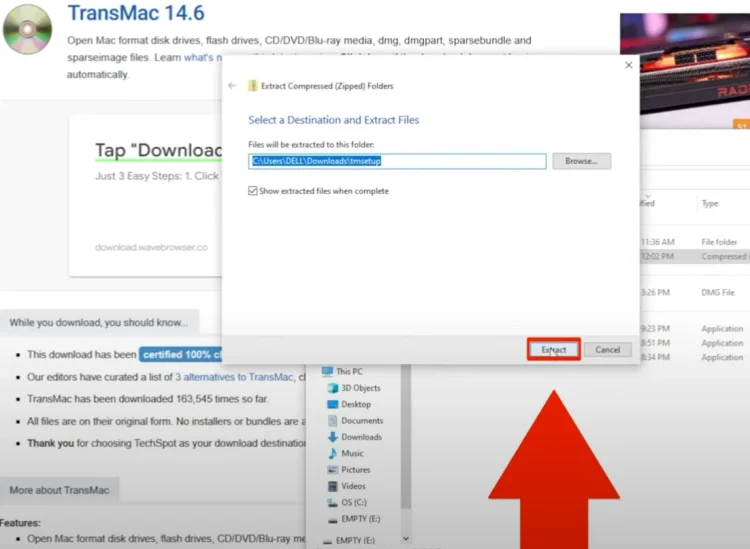
I’m going to leave it as the default folder. That’s fine. And just click Extract.
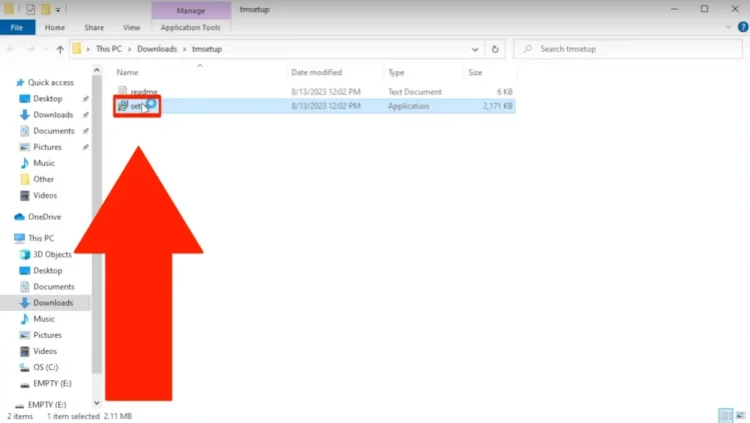
Okay. Now I’ve got it where I can install the setup. So we’re going to double click on Setup.
We’re going to click yes to and start the setup.
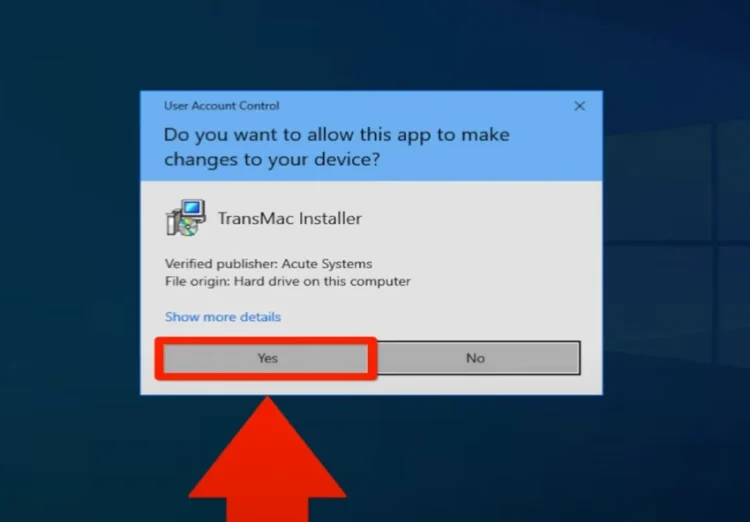
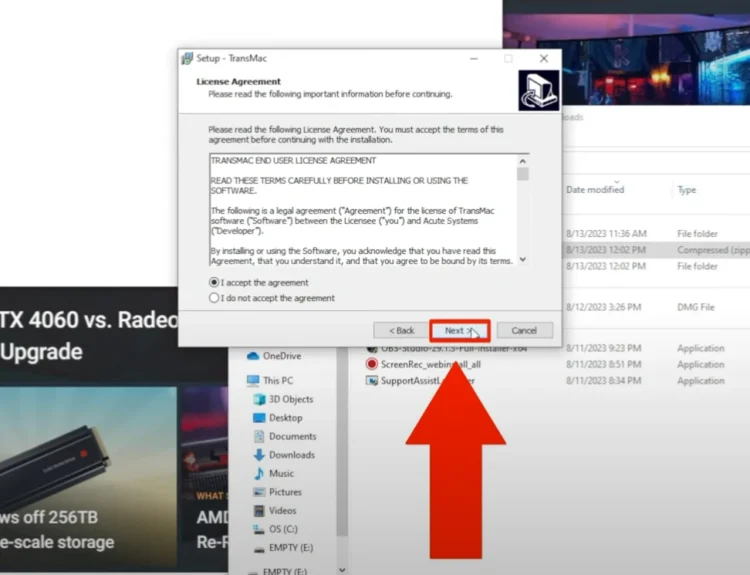
Click Next and then you have to accept their agreement so go ahead and do that and click Next.
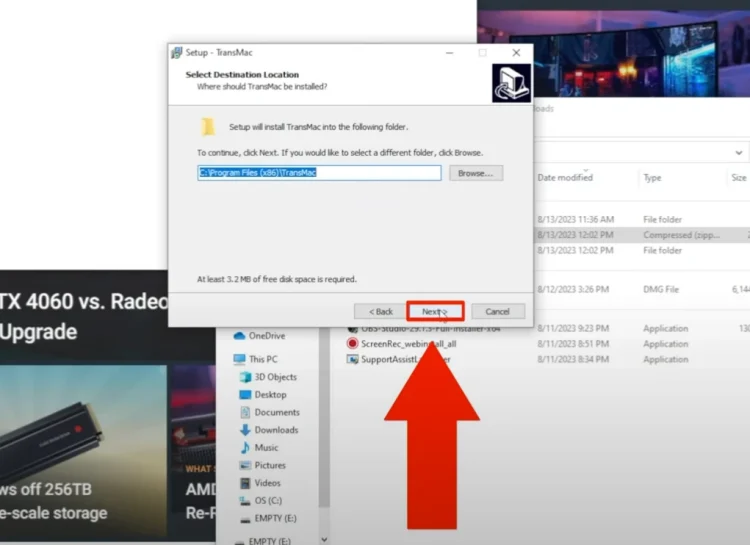
And wants to know where you want to install it.
I just leave it at the default and go ahead and click Next.
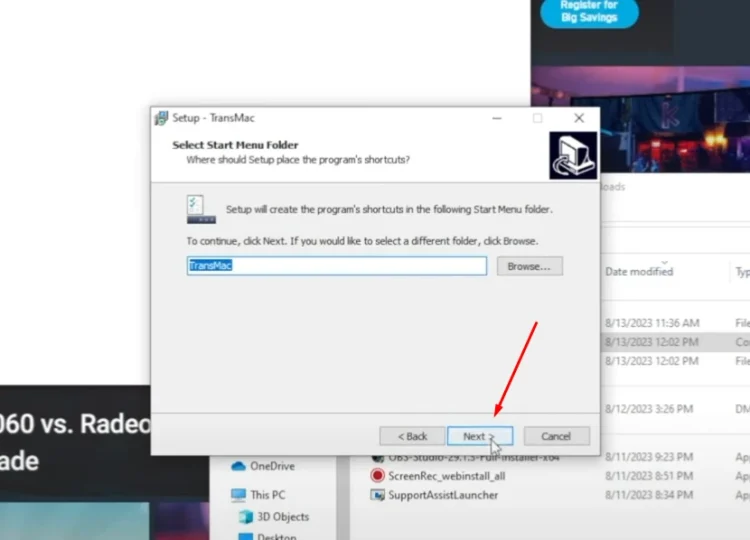
Then it wants to know what you want the folder name to be called in the program folders down there when you click on start. I’m just gonna leave it as TransMac and click Next.
And then it wants to know do you want to put an icon on the desktop and you also want to associate TransMac with any DMG and sparse image files now. I think this is a great idea because your Windows computer is not going to know what to do with the DMG file or a sparse image file.
But if you go ahead and associate TransMac with those files it would know what to do. So I would go ahead and leave both of those on and just click Next.
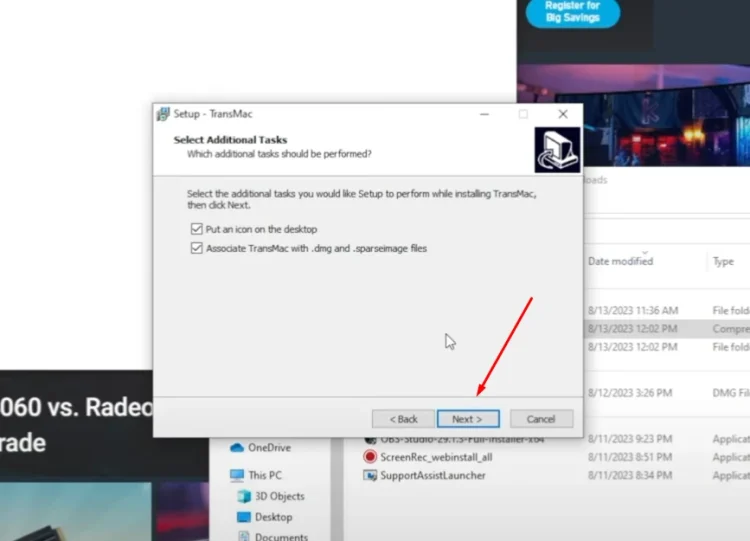
And then go ahead and click Install.
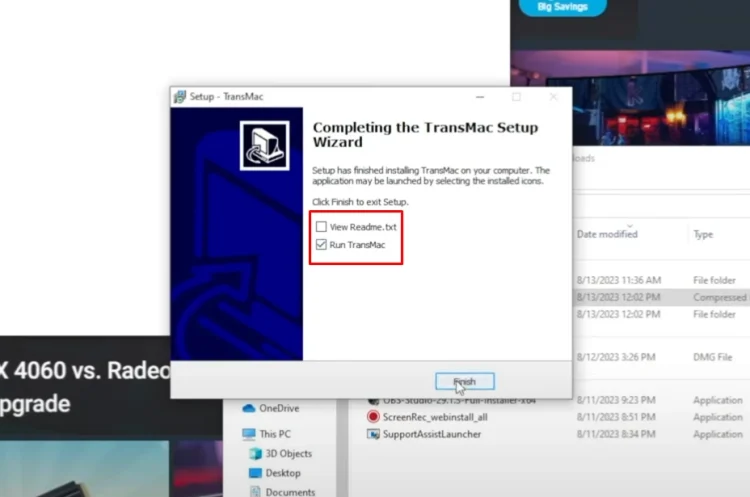
I’m not gonna open up the readme so I’m just gonna uncheck that. But I am gonna go ahead and run Transmac. So I’m gonna let leave that check and click Finish.
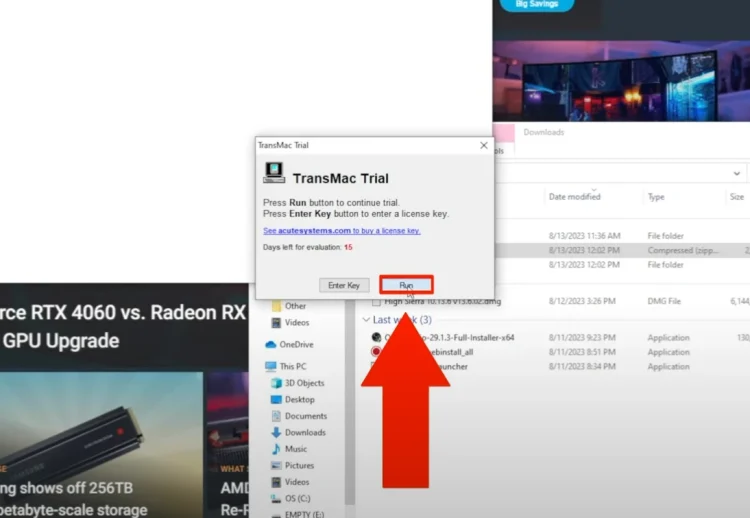
And here you go. This is where it says that I only have a 15 day evaluation left. And you have to wait I think it’s 10 seconds or something just wait and then you can click on the Run button.
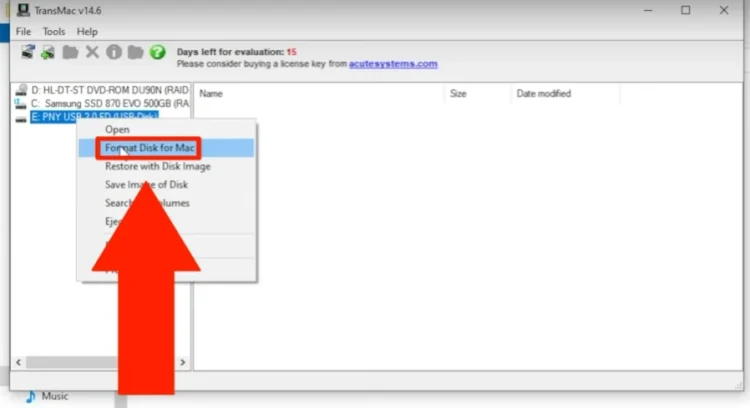
Now we’re ready to go. So what you can see is right here up in the top left corner I’ve got my E: drive which is the PNY flash drive right there. I’m gonna right click on that and I’m gonna Format Disk for Mac.
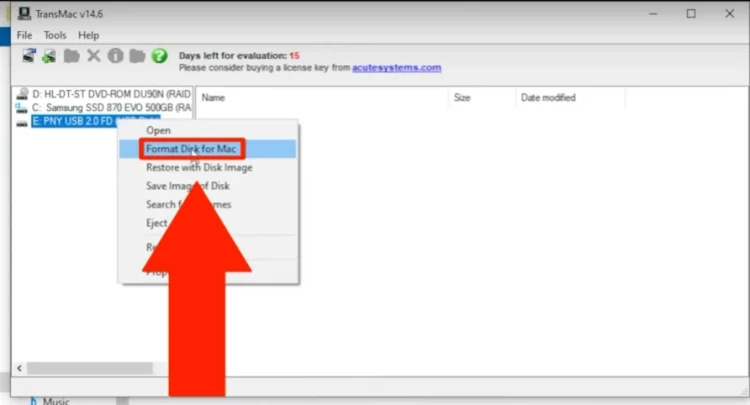
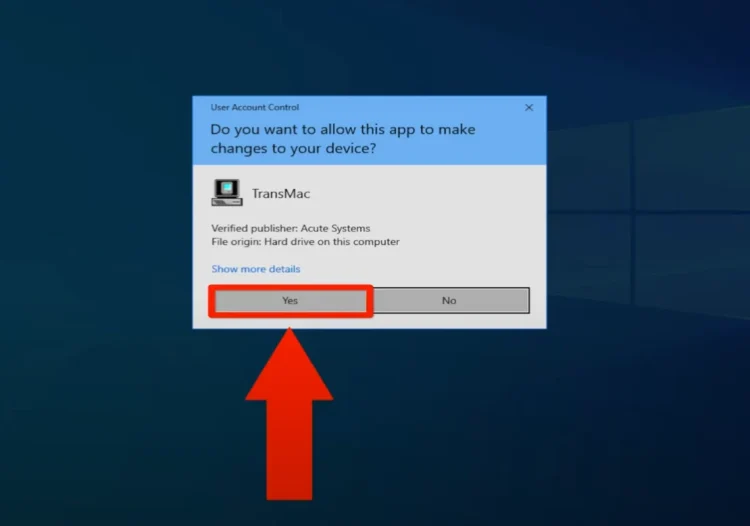
And it also wants you to be an administrator so we’re gonna go ahead and we’re gonna say Yes. Restart TransMac as an administrator and then it wants to know are you sure because Windows wants to make sure you can run it as administrator. So I’m gonna click Yes and then it reopens.
You have to wait 10 more seconds. Once you’re able to, go ahead and tell it to run. And then we’ll be able to format that flash drive. And now you can right-click on the flash drive. And you can format the disk for Mac.
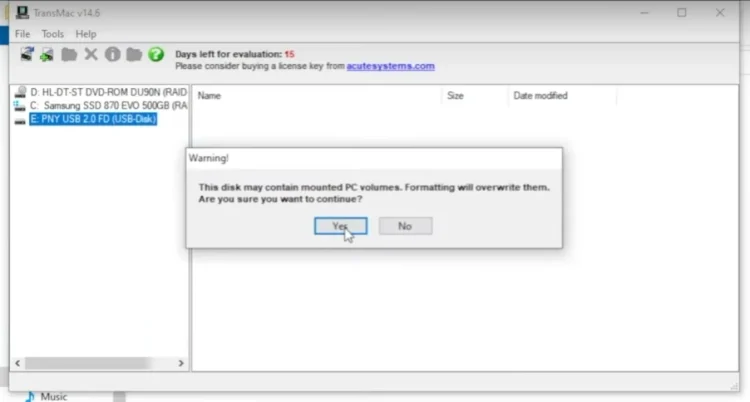
And then it says, are you sure? Because it’s going to then it says are you sure because it’s gonna erase it you’ve already erased it before so it’s okay to do it again so just click Yes.
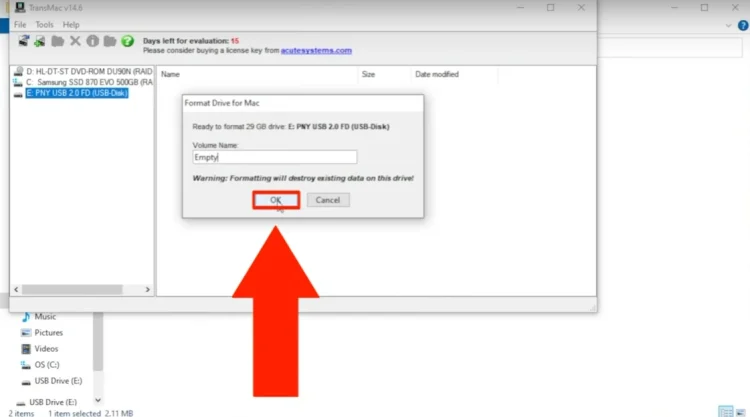
it wants to know what name it doesn’t really matter I’m gonna call it “Empty” and then just press OK.
And it gives you one last chance to keep your information but we don’t need it so just go ahead and click Yes.

Now it’s formatting. Once this finishes we’re gonna go ahead and we’re gonna be able to put that DMG file on the flash drive using this tool. So give us just a few more minutes and once that finishes then I’m going to show you what steps you have to take.
And it’ll take it a few minutes to put all those files on the flash drive but once it’s done it’s ready to go. And it’ll work on your Mac and you’ll be able to boot to it.
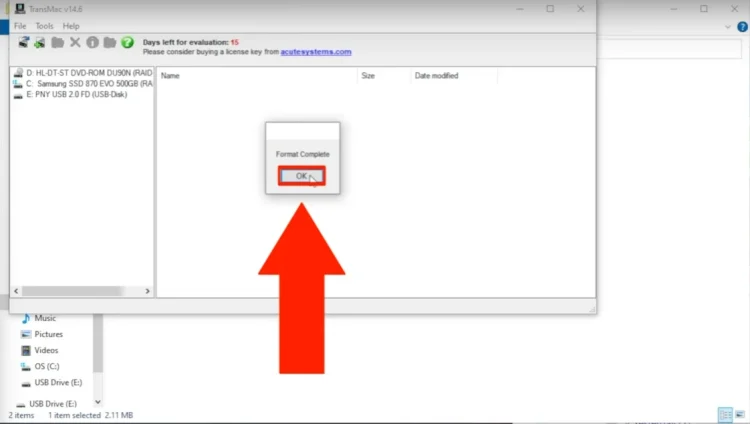
Okay so it just finished. So we’re gonna click OK.
Now what we’re gonna right click on our flash drive and we’re gonna restore with a disk image.
Once I click that, it’s okay. It says it’s going to overwrite your flash drive again. Just click Yes.
And it wants us to select the disk image. What we’re going to do is we’re going to click on the three dots.
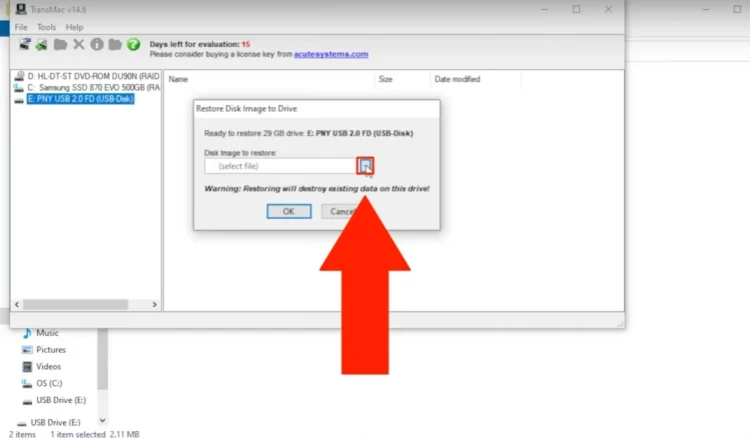
We’re going to go to our downloads and there is our Mac disk image that we want. So we’re gonna click one time on that, click Open.

And then click OK.
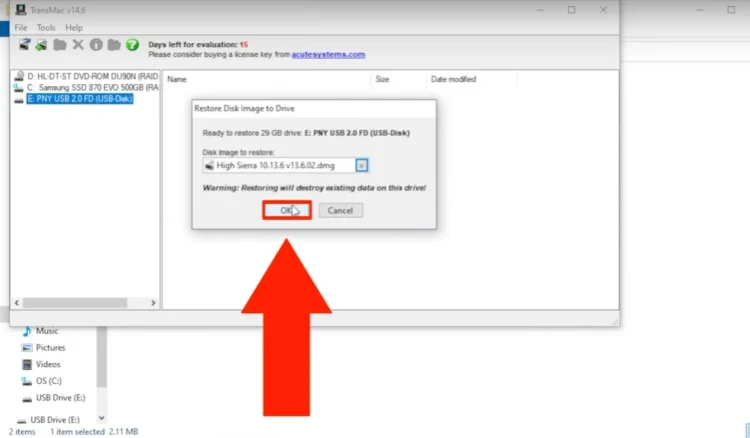
And it says, are you sure one last time? It always gives you another warning, just in case you didn’t mean to do that. So I’m gonna go ahead and click Yes.
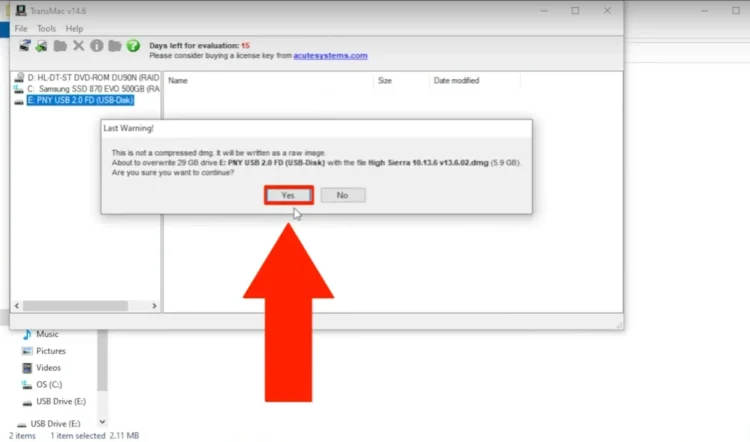
And it’s gonna start, and it’s gonna erase the whole flash drive again. And it’s gonna put everything that’s in that disk image on your flash drive. And it’s going to be bootable.
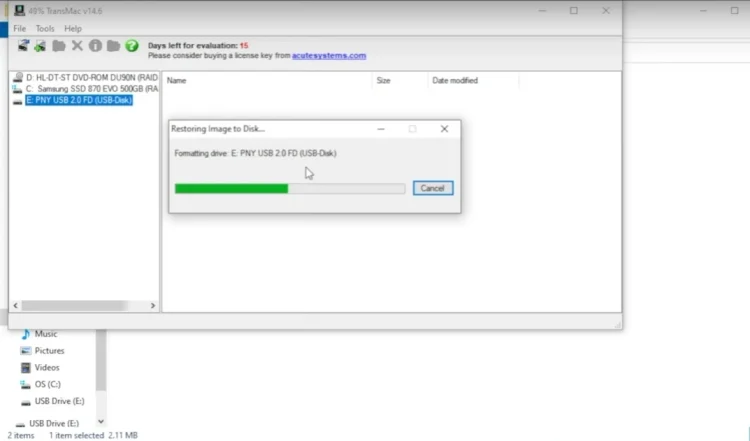
So let’s let that finish and when it does I’ll show you how it actually does boot up on a Mac. And it’ll work and you can use it to boot your Mac whether it’s an iMac, Mac mini, Mac Pro, any of the Macs that you have. And it’ll boot up so you can use that as one of your options when you’re starting the computer up.
9. Completing the Process
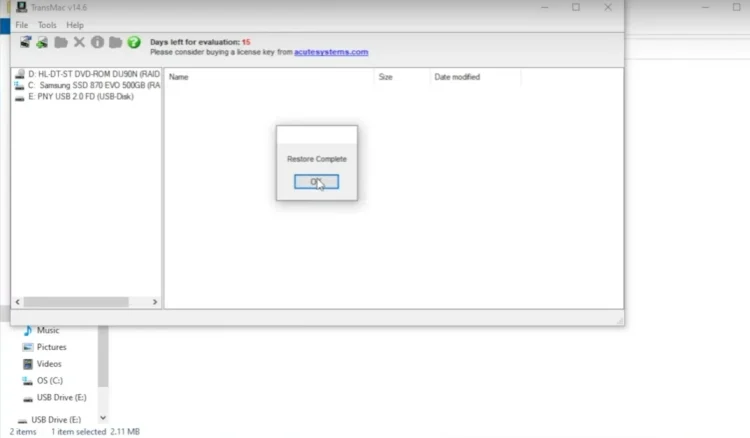
Okay, so it just finished restoring everything to the flash drive. So we’re going to click OK on that window and then we’re going to close out of the TransMac program.
Now you can close all these other windows that are open as well. And then we’re just going to go in here and we’re going to eject the flash drive from the computer.
So you can click on the little arrow at the bottom right corner of your screen
And then you can click on the little USB icon, and you can tell it to eject.
And now I can remove it from the computer. Now I’m gonna go ahead and shut this computer down, and I’m gonna pull up a Mac computer and show you how we can boot this flash drive to the Mac computer and you can install macOS High Sierra if you want to.
10. Booting on a Mac
Okay, so I have my MacBook Pro sitting here and it’s turned off at the moment. So what I’m going to do is I’m going to go ahead and press the power button and then I’m going to hold down the option key.
On some of your Macs you might have to continue to press and hold the power button in order to get to the list of options. But once I hold down options you can see this is where I can pick what I want to boot to.
Now if I take this flash drive we just created and I put it in the USB slot of the MacBook Pro.
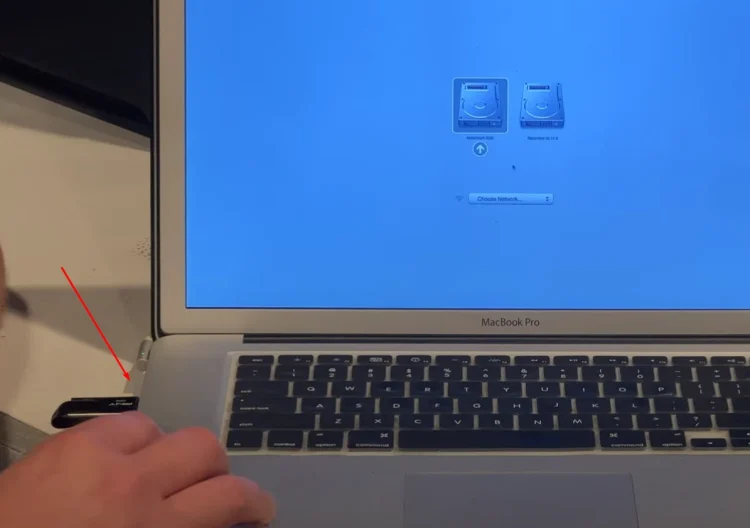
In just a second you’ll see the installer pop up and we can boot to it.
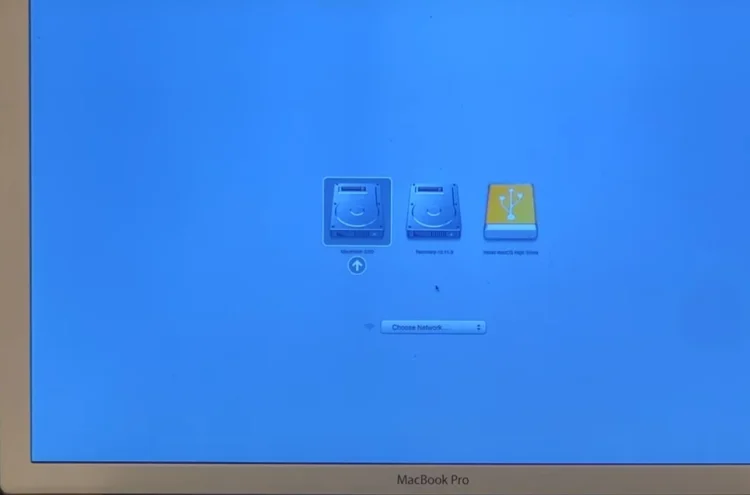
There you go and as you can see it is macOS High Sierra so I can click on that and I can click the little arrow.
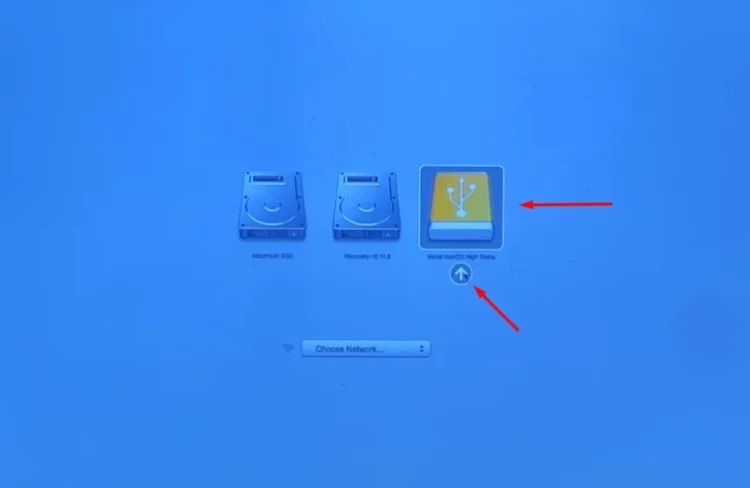
And now it’s gonna boot into that installer which would then let you install macOS High Sierra on this computer.
So I hope that was helpful on how to create a macOS High Sierra flash drive installer on a Windows computer. If you have any questions or comments please feel free to leave them down below in the comment section. I’ll be more than happy to get back to you.
Post Views: 1,555