Главная
»
Блог программиста
»
[Hackintosh] Dual-Boot High Sierra & Windows — при уже установленной Windows — без потери данных — UEFI
Просмотров: 10851
![[Hackintosh] Dual-Boot High Sierra & Windows - при уже установленной Windows - без потери данных - UEFI](https://iproger.ru/content/news/30738.webp)
Если вы хотите установить Hackintosh рядом с Windows без потери данных — данная статья для Вас.
1. Сначала убедитесь, что у вас система UEFI с таблицей разметки GPT (GUID). Эта инструкция не работает на системе с Legacy BIOS и разметкой MBR. (протестировано на Windows 8/8.1/10 на настройках UEFI:
AHCI-SATA: Enabled
Secure Boot: Disabled
2. Вам понадобится:
USB-накопитель размером не менее 8GB (GPT) или с большим объемом
Загрузочный Sierra или High Sierrra установщик:
— macOS High Sierra 10.13.2 Restore dmg
Рабочая папка CLOVER (готова к использованию)
(см также clover UEFI bootloader)
Полный образ восстановления Sierra или High Sierra (включает приложения, используемые автором)
3. Скопируйте файл .dmg на USB-накопитель.
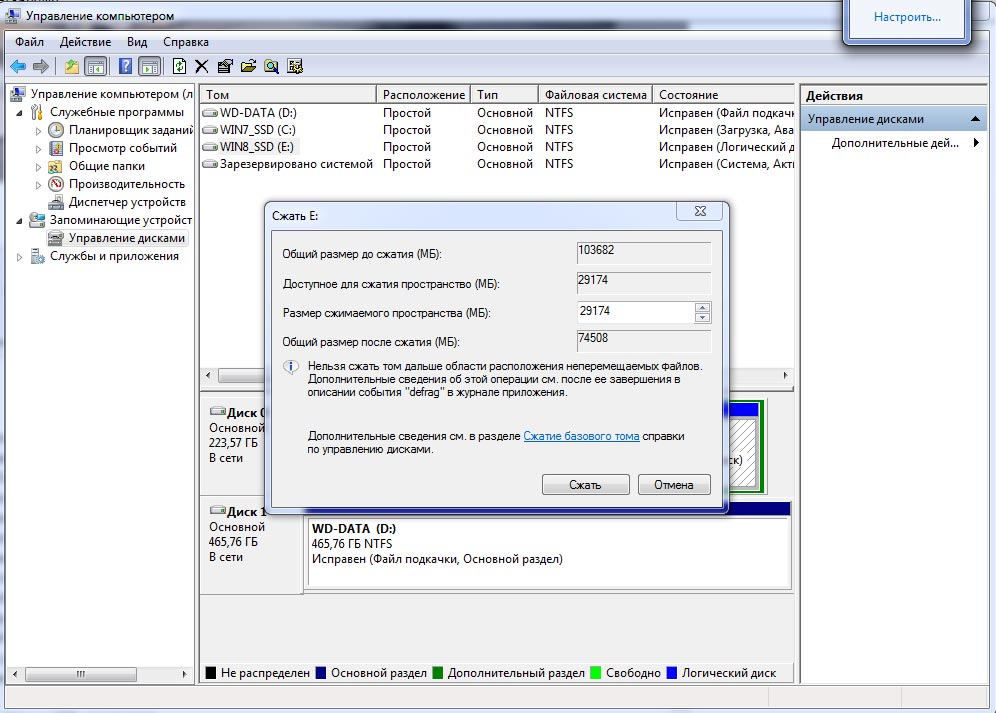
4. Создайте новый раздел для новой системы. В меню Пуск найдите Управление дисками (Create and format Hard disk partitions) Отделите от существующего раздела необходимую часть для новой системы. Создайте на неразмеченном пространстве раздел NTFS.
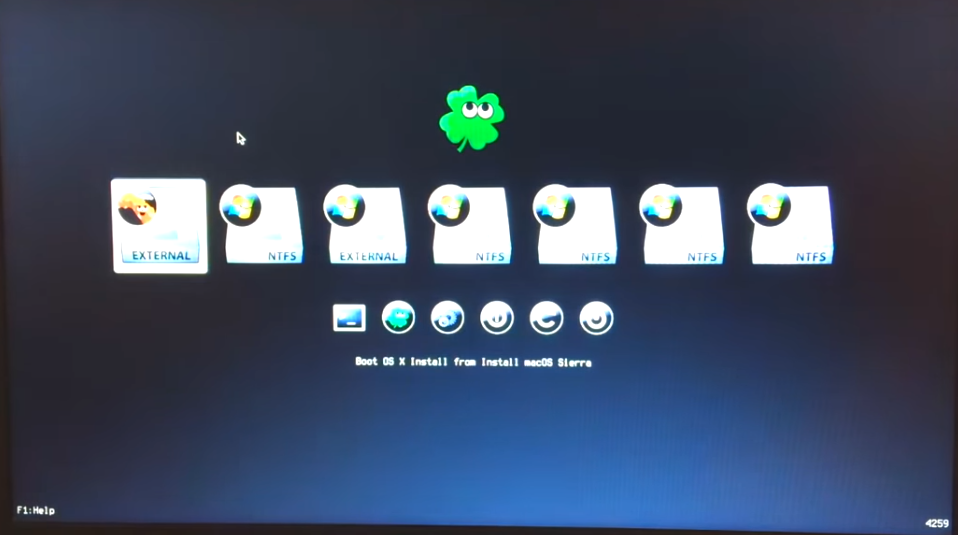
5. Загрузитесь с USB-накопителя
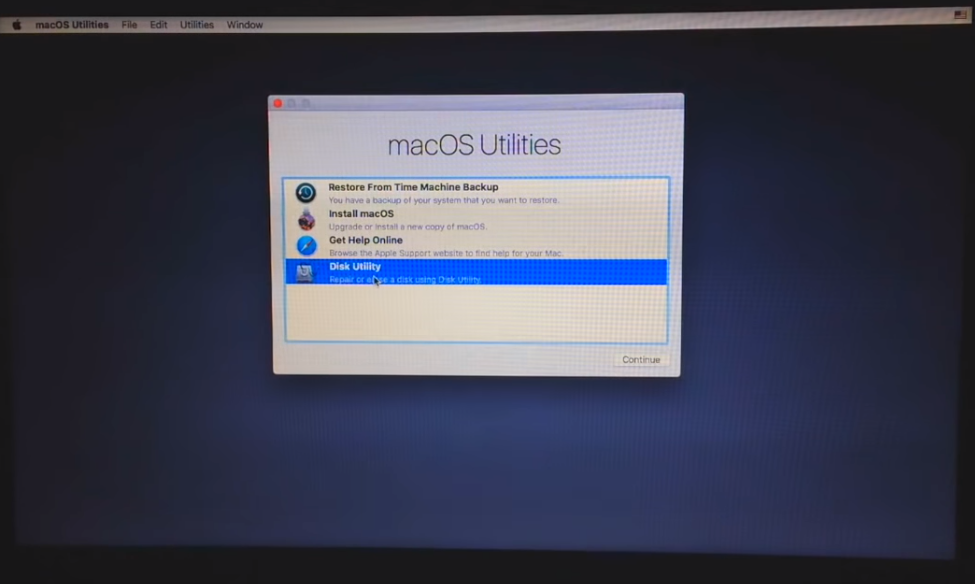
6. После загрузки установщика выберите Disk Utility. Затем выберите диск с Windows и нажмите Unmount.
7. Далее выберите новый пустой раздел и нажмите Restore -> Image. Выберите образ с флешки.
8. Если вы увидели ошибки, просто попробуйте еще раз. Она может возникнуть из-за того, что диск смонтирован.
9. Процесс восстановления занимает много времени.
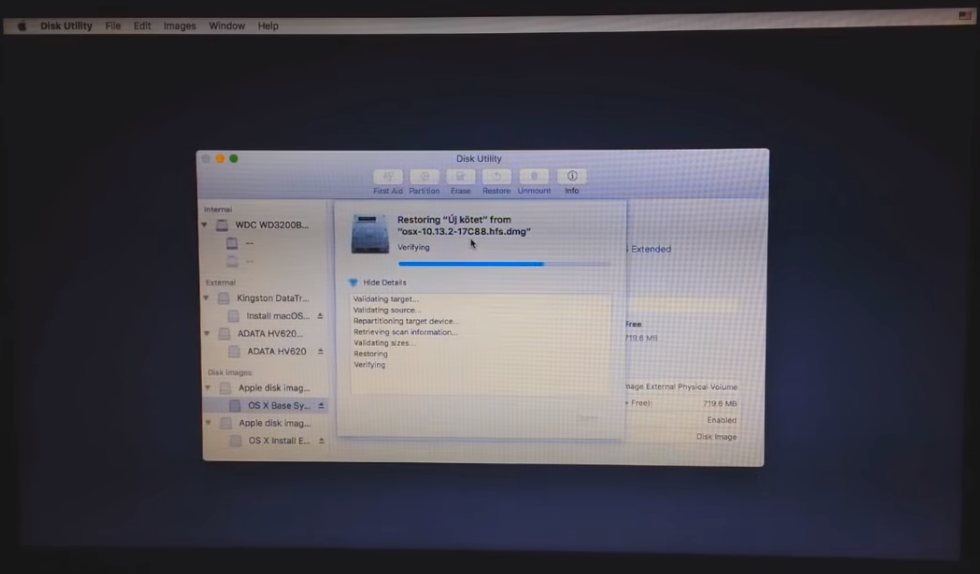
Не переживайте, если в конце установке появится ошибка. Она возникает из-за того, что EFI сделана для Windows, а не для Apple, игнорируйте её.
Windows 10 = 100MB EFI
Apple = 200 MB
Windows 8.1 = 200 MB — опционально
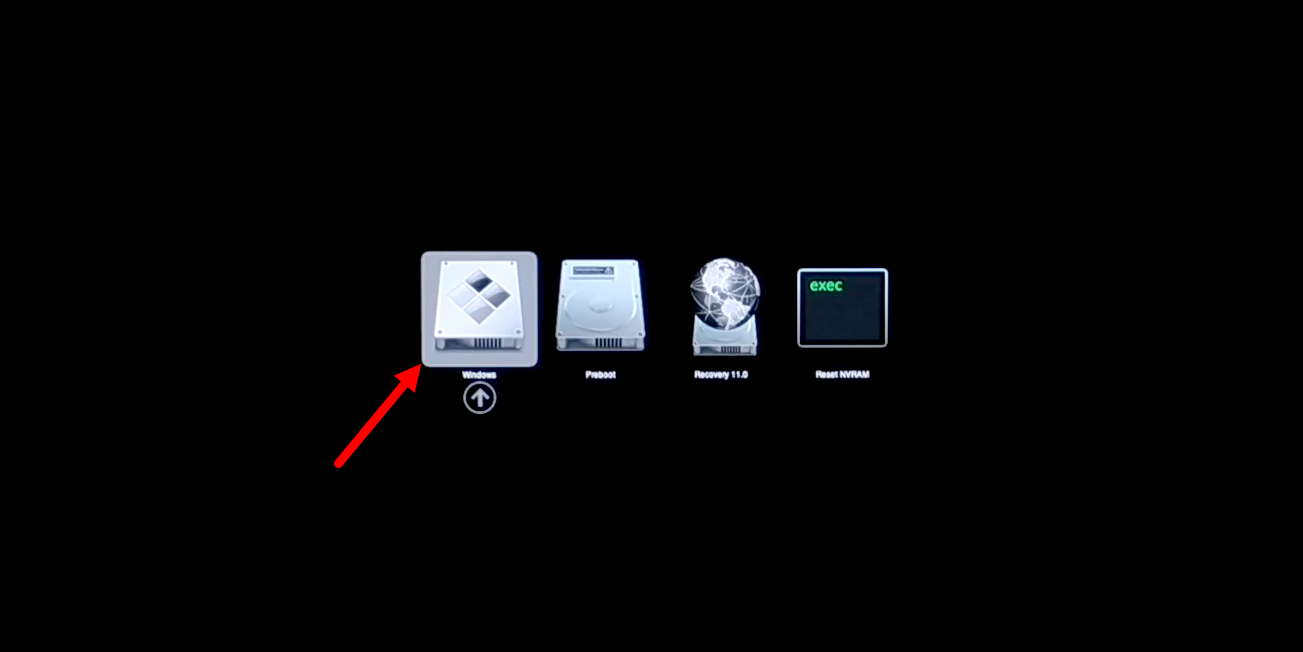
10. Перезагрузите компьютер и загрузитесь в восстановленный Mac с помощью USB-накопителя.
11. Далее запустите EFI mounter (например v3), некоторые EFI mounter`ы не видят наши EFI-разделы. Выберите раздел с Windows 10 и нажмите Mount, затем Continue.
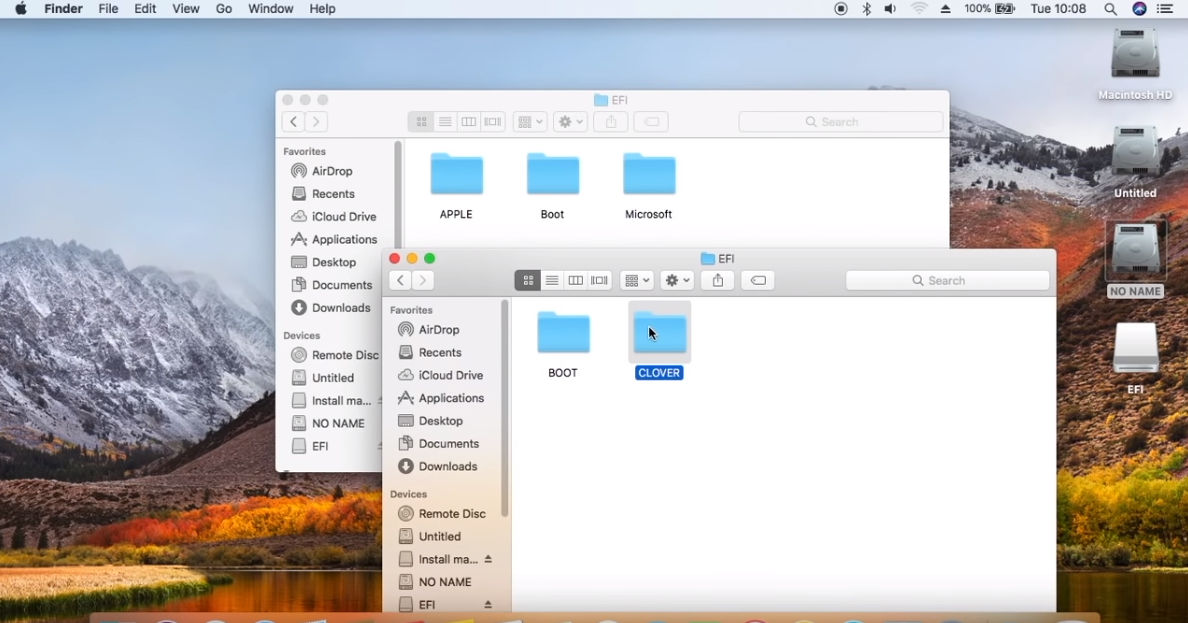
12. Затем нужно скопировать папку Clover (смонтируйте раздел с Mac и скопируйте папку Clover)
13. Теперь вы можете размонтировать USB-накопитель и перезагрузить компьютер. Загрузка в Windows пройдет автоматически, поэтому нужно установить Clover как загрузчик по-умолчанию.
14. В Командной строке Windows, запущенной от имени Администратора введите: bcedit /set {bootmgr} path \EFI\CLOVER\CLOVERX64.efi (если вы ошибетесь при вводе этой строки – система перестанет загружаться)
15.Для проверки введите bcedit, в ответ вы должны получить \EFI\CLOVER\CLOVERX64.efi
по материалам видео
Друзья! Приглашаем вас к обсуждению. Если у вас есть своё мнение, напишите нам в комментарии.
In this article, I am going to show you how to dual boot Windows 10 and macOS Sierra on PC. Apple has already released the Macintosh operating system on 20 September of 2016, and if you want to give a try to this OS, then you are in the right place because here you will learn the complete process of how to dual boot Windows 10 and macOS Sierra 10.12, Hackintosh on PC. Since the Apple’s new operating system for Macintosh has been released, the Hackintosh experts are busy to create and manage to make easy tools like Unibeast and Multibeast to build a Hackintosh on PC and easy way to dual boot macOS Sierra and Windows 10. So follow below step by step guide to dual boot Windows 10 and macOS Sierra on PC but first need to know what’s dual boot.
What is a Dual Boot?
Dual-booting is the act of installing multiple operating systems on a computer and being able to choose which one to boot. The term dual-booting refers to the standard configuration of precisely two operating systems. It means when we install two operating systems on a single Machine. Sometimes it’s called Multi-boot or dual boot as well. If you install and use three operating systems like Mac, Windows, and Kali Linux on a single machine then in this case, it called triple boot. Now that you have understood what is dual boot, so let dual boot Windows 10 and macOS Sierra 10.12 on PC.
Dual boot Windows 10 and macOS Sierra on PC
- Create Bootable USB Installer For macOS Sierra
- Setup Parts of Your Motherboard’s BIOS or UEFI
- Boot into Bootable USB Installer of macOS Sierra
- Choose Your Language for macOS Sierra
- Create Partition For macOS Sierra with Disk Utility
- Install macOS Sierra on Created Partition
- Boot into macOS Sierra Partition or Disk (HFS)
- Perform a clean Installation of macOS Sierra
- Finish Installation of macOS Sierra
Before to start dual booting, you must know about this article, that from where you have to start, how you should do the steps, and how to finish. Firstly you should have the requirement that mentioned below then you have to install macOS Sierra first and then Windows 10. Please remember about partitioning the Hard disk drive. You have to partition it for Mac and Windows in the duration of installing macOS Sierra. So don’t forget to backup your file before formatting your HDD or SSD.
Requirement
- Bootable USB Installer for macOS Sierra. If you don’t have one, then follow the article to create a USB Installer for macOS Sierra using Unibeast or A method in Windows 10.
- Bootable USB or CD/DVD For Windows 10. Follow the article on how to create a bootable USB for Windows 10.
- Two free empty Partitions for macOS Sierra & Windows 10.
- A PC (Laptop or Desktop) with full Intel supported to install and support macOS Sierra and Windows 10.
- Extra accessories such as a mouse, keyboard and much more. Because of macOS Sierra may not identify your laptop’s keyboard or mouse until you didn’t install the drive Separately.
Installing macOS Sierra 10.12
To dual boot Windows 10 and macOS Sierra on PC, it is better to install macOS Sierra first. If you install Windows 10 first then while installing macOS Sierra, it might create a problem for you and you will be a little in trouble. If you have installed macOS Sierra on your PC, then that’s okay skip this and try to install Windows 10. Also if you have installed Windows 10 already then follow the steps below or check this article:
- How to Install macOS Sierra on PC
Step #1. Create Bootable USB Installer For macOS Sierra
In this step, you have to download and create a bootable USB installer for macOS Sierra using UniBeast. This move will help you to Boot with the USB installer and create a partition for Mac and finally, install the Mac from the USB Installer to OS X Extended (Journaled) partition. It’s a bit long, so due to this, we have managed two articles and different methods for it. Check the guide and follow step by step to bootable create USB Installer. Also linked in the requirement section.
- How to Create Bootable USB Installer for macOS Sierra Using UniBeast?
- How to Create macOS Sierra Bootable USB Installer on Windows 10?
Step #2. Setup Parts of Your Motherboard’s BIOS or UEFI
Now after downloading and creating bootable USB installer for macOS Sierra 10.12. Then here you will need to set up parts of your motherboard’s BIOS or UEFI. This step will let and make the USB installer to boot into clover menu. It’s so important to do this step correctly and carefully because if no then without doing this stuff, you won’t be able to go forward and install macOS Sierra 10.12.
#1. Press the BIOS Menu Button from your keyboard(F12, F10, F8, F2) depending on your system if can’t find then do a google search or comment us below the details of your computer. For Lenovo laptops, press Novo button or one key recovery then select BIOS Setup and hit enter from your keyboard.
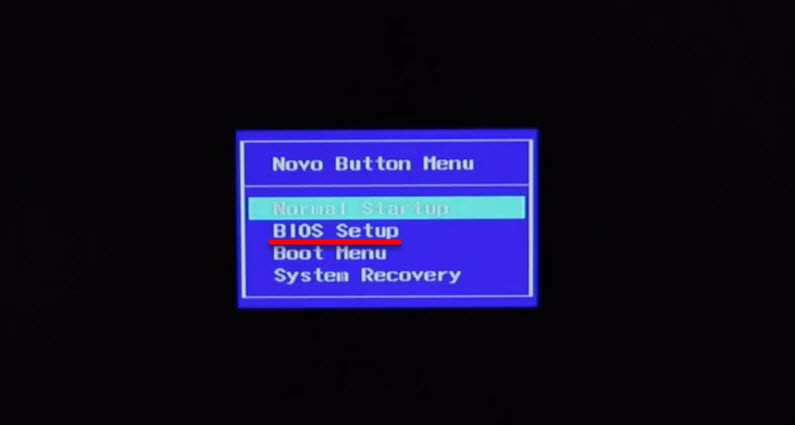
Go to BIOS Setup
#2. Now from BIOS, Set The SATA Controller Mode to (AHCI).
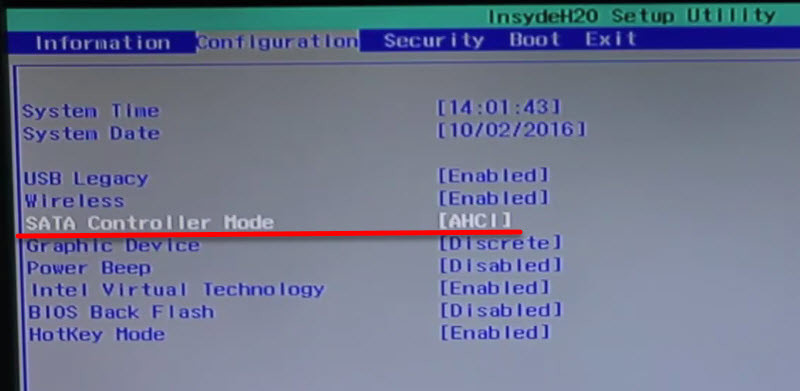
Change the SATA Controller
#3. Then go to the boot tab and set the Boot Mode to (Legacy Support) and set the Boot Priority to (UEFI First).
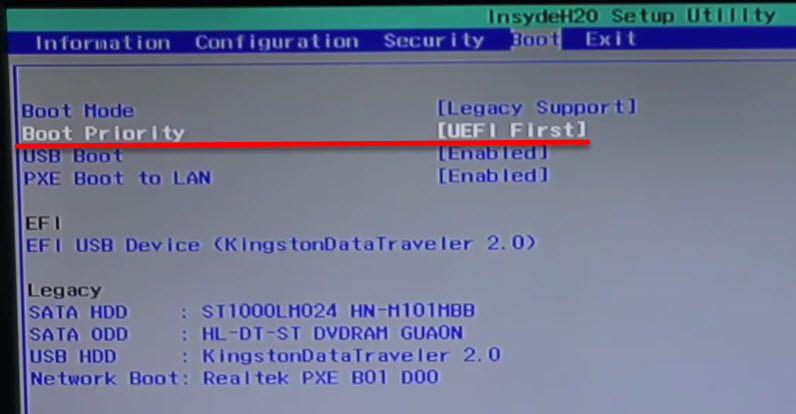
Change Boot Mode
#4. Exit and Save Changes.

Exit Save Changes
Note: This works great on Lenovo based computer. And this may not work for any other systems. So due to this, we highly recommend you to do the below guides for your machine.
- Load Optimized Defaults
- Set the SATA Controller Mode to AHCI
- Set the Boot Priority to UEFI
- Set OS Type to Other OS
- If your CPU supports VT-d, disable it
- If your system has CFG-Lock, disable it
- If your system has Secure Boot Mode, disable it
- If you have six series or x58 system with AWARD BIOS, disable USB 3.0
- Save and exit.
- If your system didn’t boot automatically, then go to Boot Manager and select the Bootable USB Installer that you create in step 1, Manually.
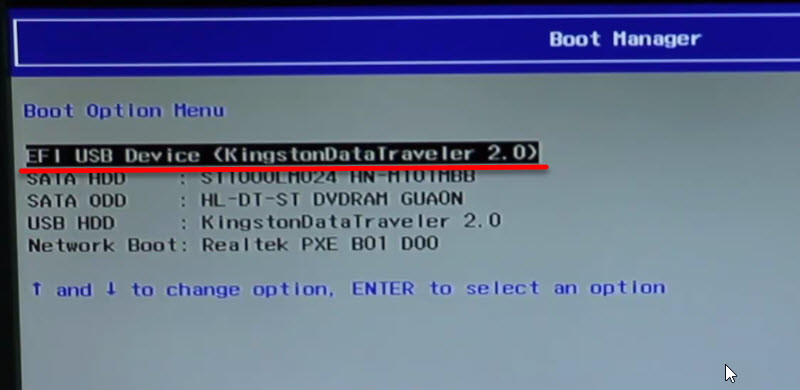
Boot From EFI USB Device
Step #3. Boot into Bootable USB Installer of macOS Sierra
After you get into Clover Menu then if your system has full intel supported then select the Bootable USB Installer. But if that didn’t work, then you need to enter boot flag for your system to boot into USB Installer. If you have trouble to boot from USB Installer, then comment us your problem below in the comment section and also check this article, to know how to boot correctly.
- How to Boot Correctly into Bootable USB Installer of macOS Sierra?
Now from Clover boot menu, select the bootable USB Installer (External) and hit enter.
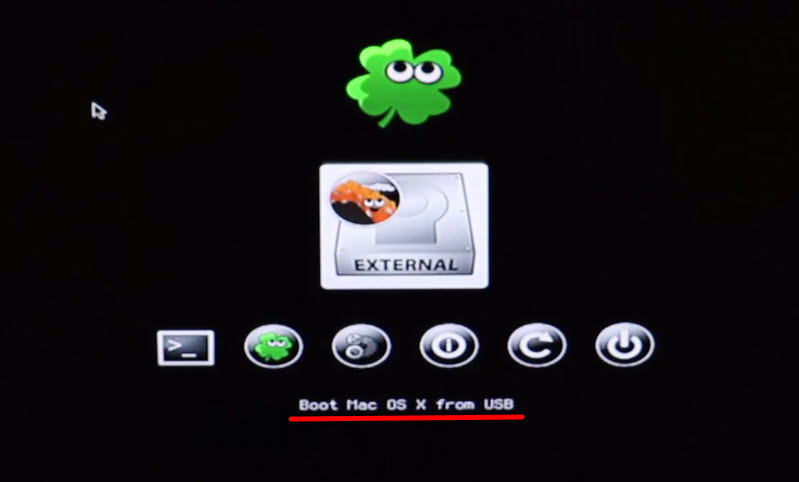
Boot into USB Installer
Step #4. Choose Your Language for macOS Sierra
Now after Booting successfully with the boot flag or without, then the USB installer should take you to Language chooser page. Select your Language for macOS Sierra and click on the arrow button to go forward.
Step #5. Create Partition For macOS Sierra with Disk Utility
So after you have chosen your language, then you should partition the disk for macOS Sierra 10.12. This step will help you to install macOS Sierra from the USB installer to the drive that you are going to create in this step.
#1. To partition the Disk for macOS. Now click on Utilities > Disk Utility.
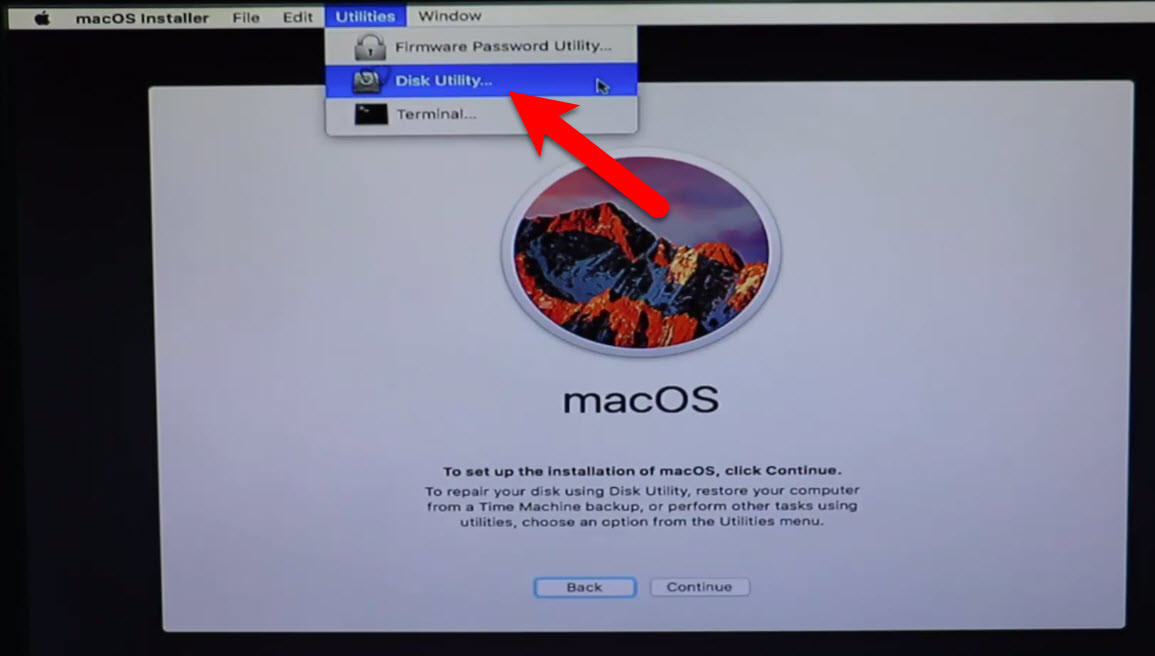
Open Disk Utility
#2. Now select your free hard disk drive and click on Erase tab. Be sure to choose a free empty partition that the partition is going to be cleaned and formatted for macOS Sierra.
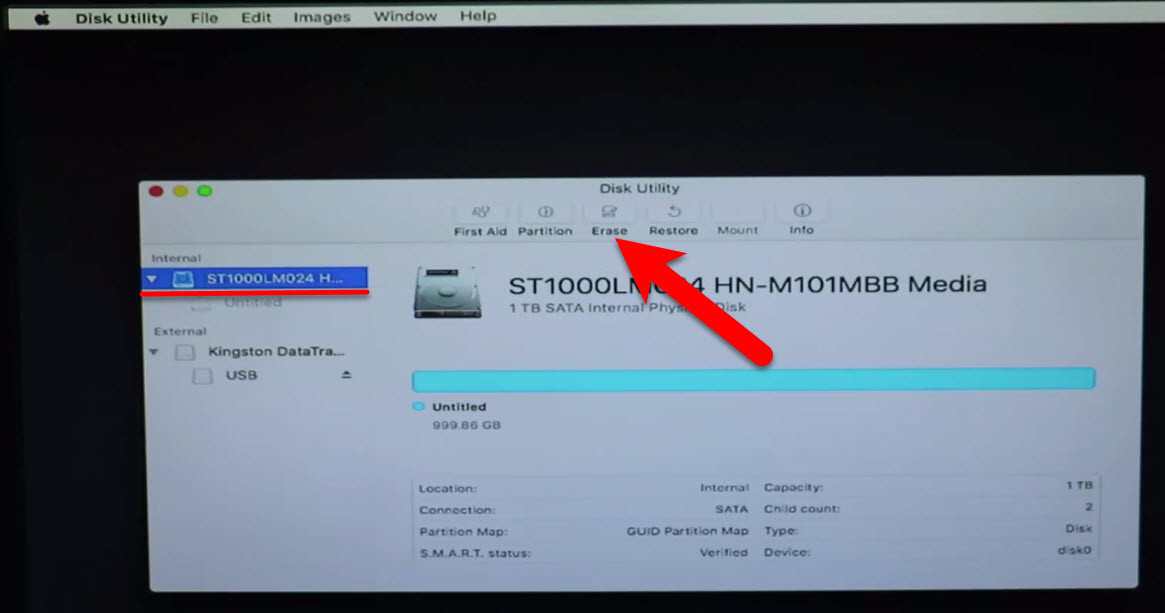
Go to Erase Tab
#3. Name the disk then choose the format to “OS X Extended (Journaled) “ and click on Erase button. If you are partitioning the entire hard drive, then be sure to select the Schema to “GUID Partition Map.” Then your hard disk or drive will be cleaned and partitioned to OS X Extended Journaled.
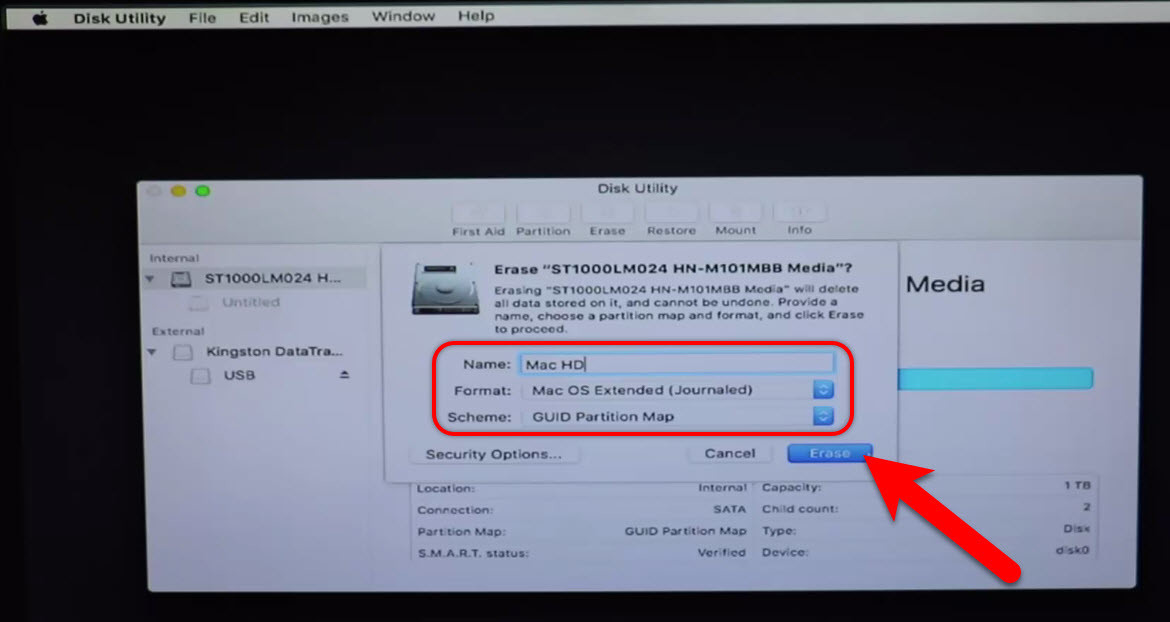
Partitioning the Disk
#4. Make yourself sure that you get the message that erasing disk process completed successfully. Click Done. If you were facing any errors, then I highly recommend you to visit the link below.
- Fix “Erase Process has Failed” While Erasing Partition for Mac OS on Disk Utility
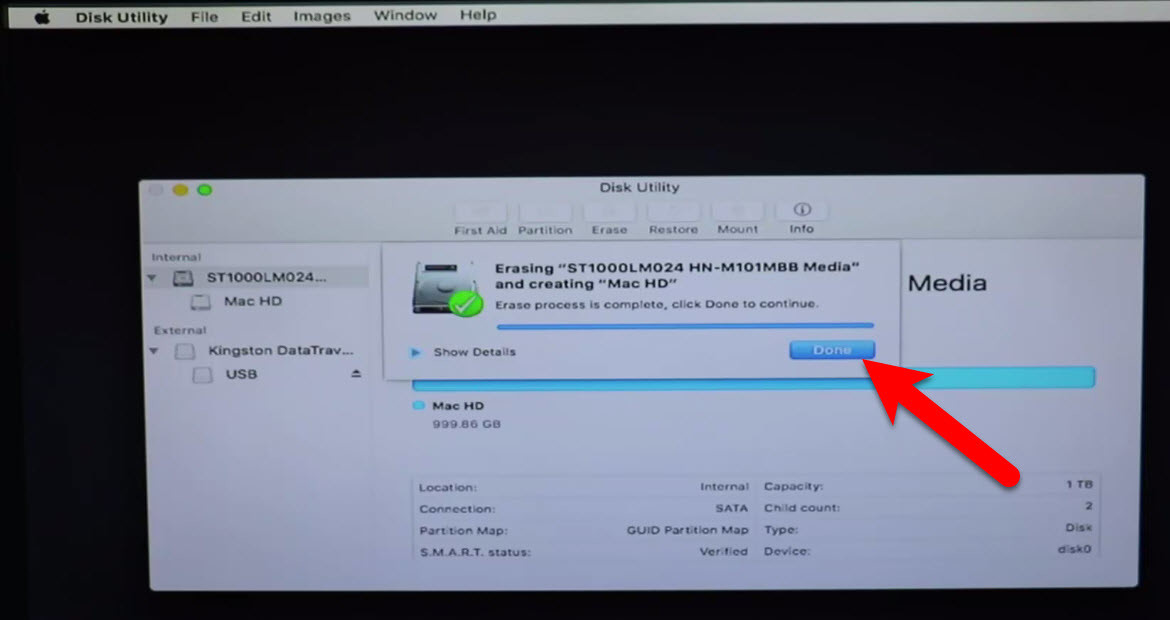
Erase Process Successful
#5. To create more partitions, now again select your machine’s hard disk and this time, click on partition tab.
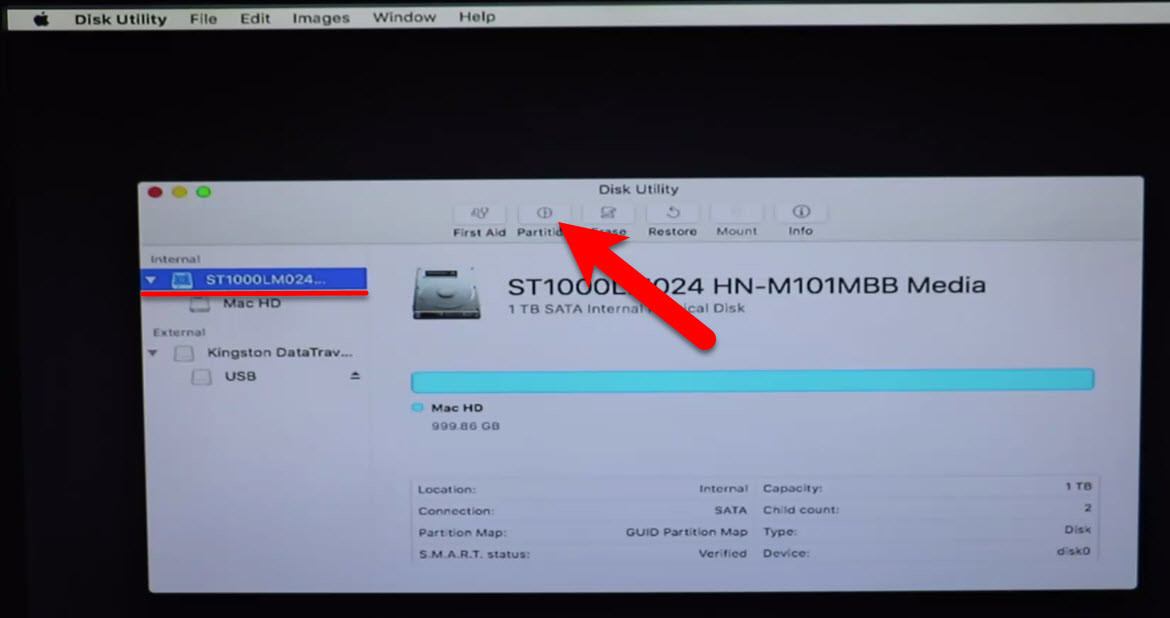
Go to Partition Tab
#6. Click on the (+) button to create two partitions. Specify the disk size for Windows 10 then Name the Partition and choose the Format type as MS-DOS (FAT) then click Apply button.
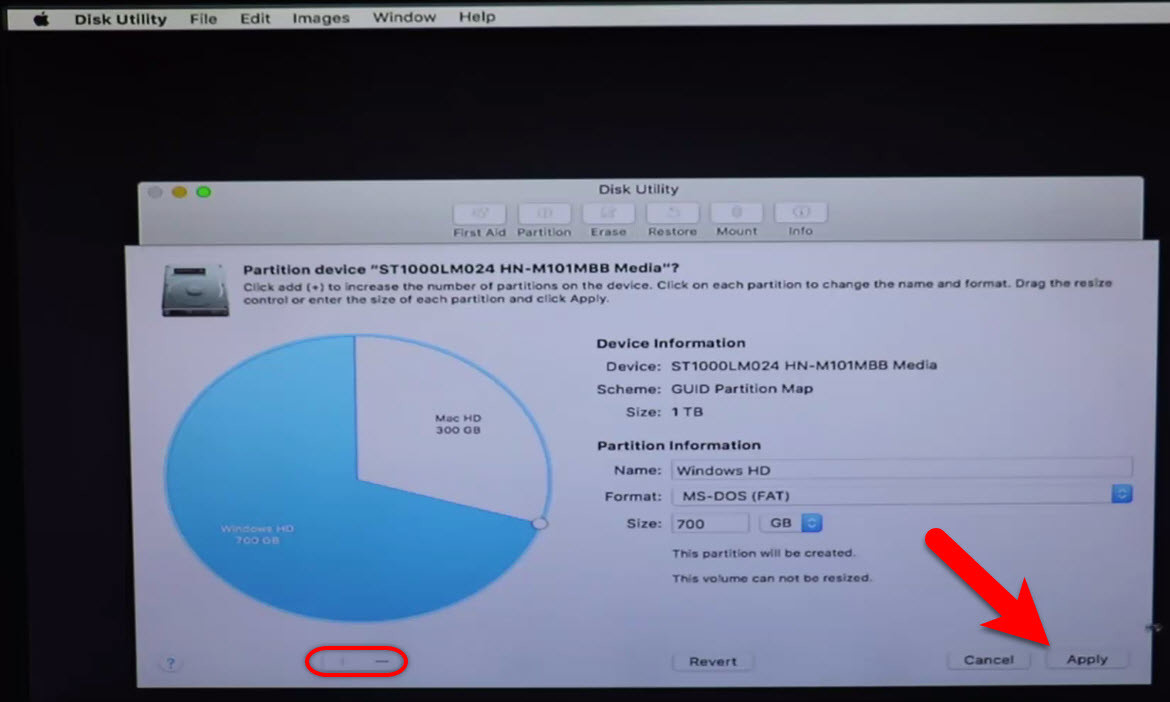
Windows Partition
#7. Here the utility alert you that two partitions will be created, so finally click on Partition to confirm it.
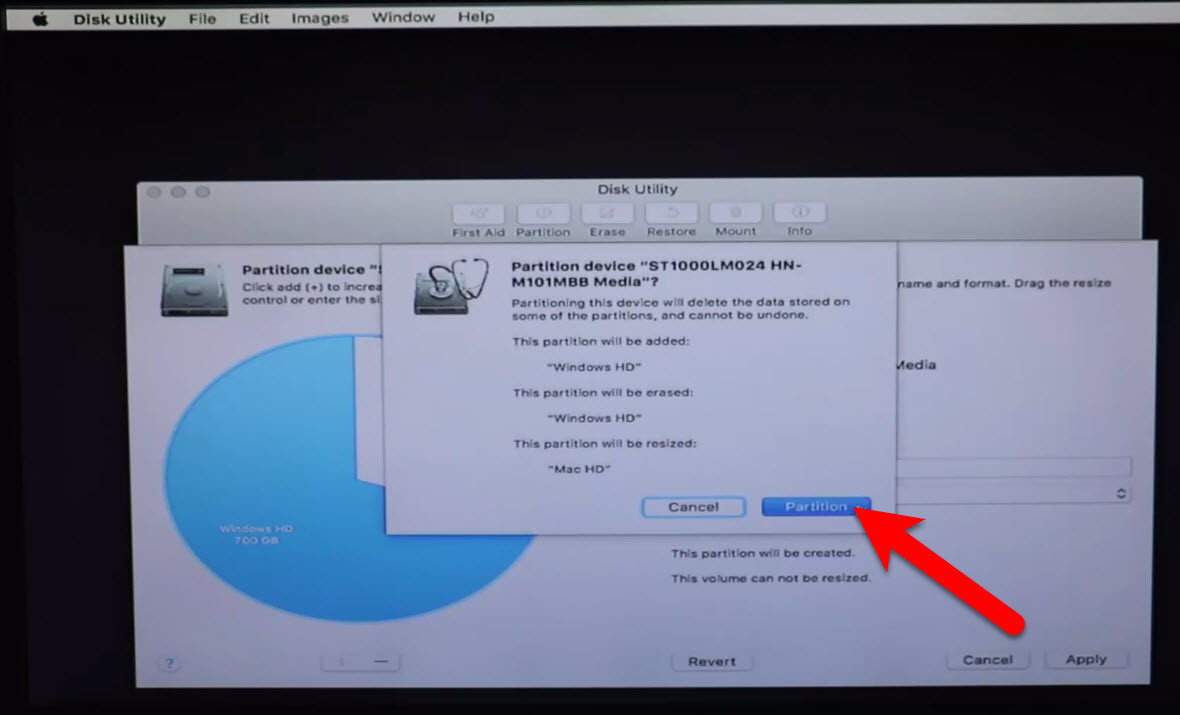
Confirm Partition
#8. Make yourself sure that you get the message that erasing disk process completed successfully. Click Done and close disk utility.

Done Partition Windows HD
Step #6. Install macOS Sierra on Created Partition
#1. To set up the installation of macOS, Click on Continue.

Setup the Installation of macOS Sierra
#2. Now, click Continue, then Agree with the I have read and agreed to the terms of the software license agreement.

Accept the Terms of the Software License Agreement
#3. On the Install macOS page, select the partition that you created for macOS Sierra while partitioning the disk with disk utility and finally click Continue.
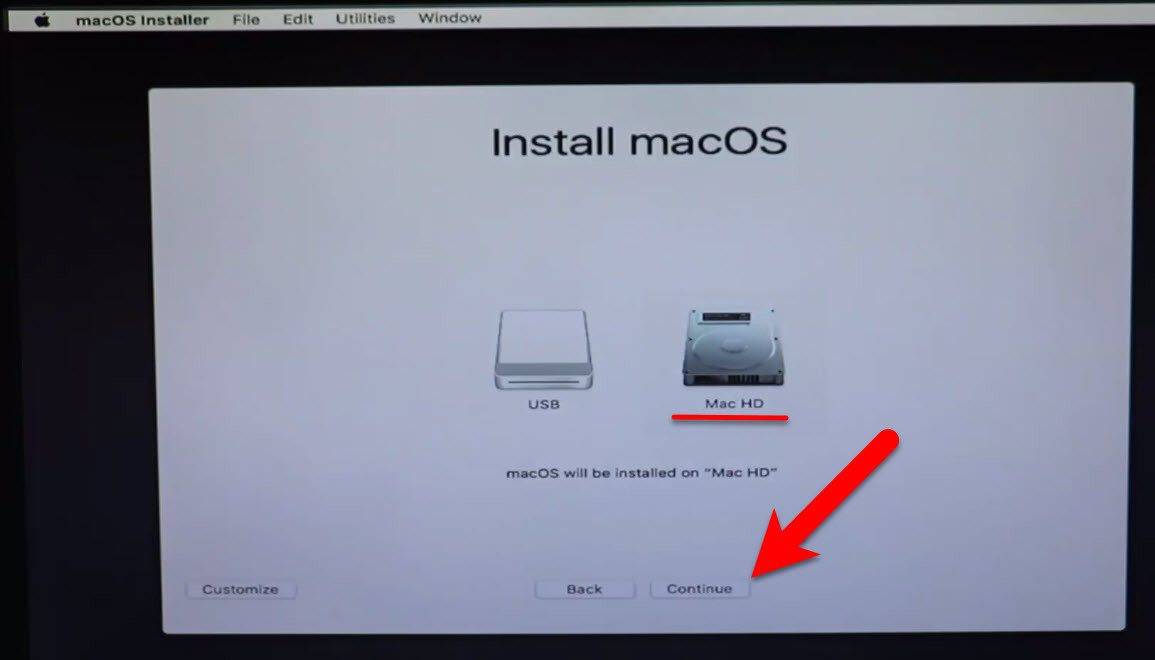
Install Mac OS
#4. Now, wait for USB installer to install macOS Sierra from it to the disk that you selected. It will take some time to complete, depends on your system. After it is finished, it will restart automatically after 10 seconds.
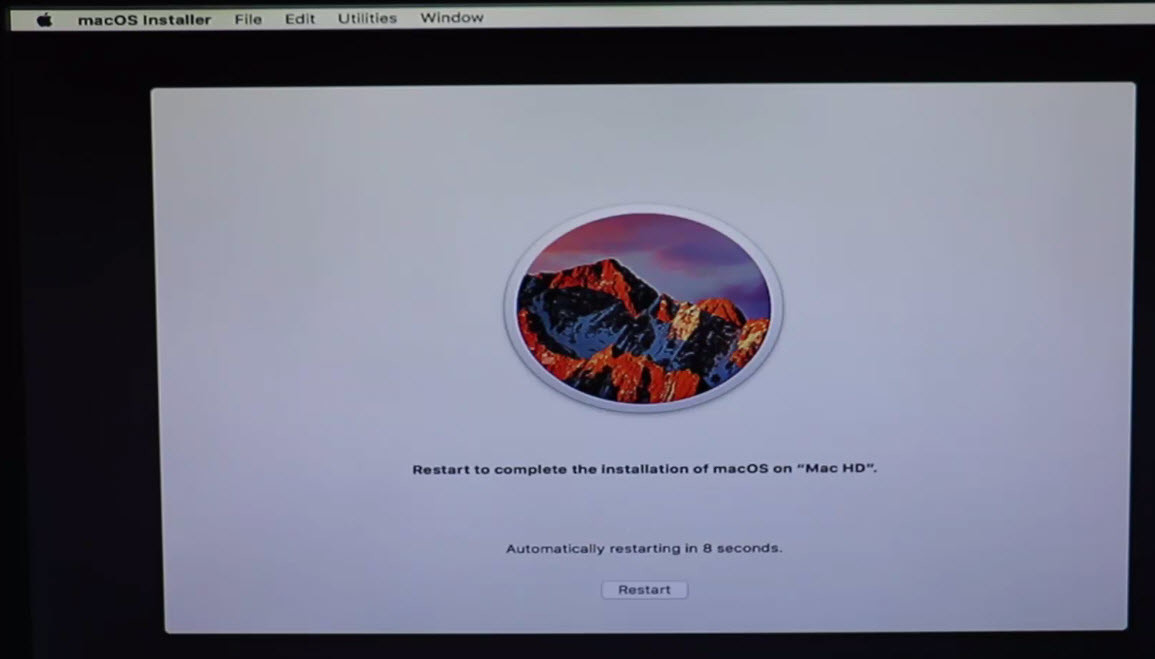
Restart to Complete the Installation of macOS Sierra on Mac HD
Step #7. Boot into macOS Sierra Partition or Disk (HFS)
When your computer rebooted, then it must automatically take you to the USB installer Clover menu. If no then boot yourself from Boot Manager, the EFI USB installer that created in step 1. After that on the clover menu, don’t make any changes because it will automatically boot into the disk that Mac OS is newly installed. If no then select HFS disk icon that named your Mac HD and hit enter from your keyboard.
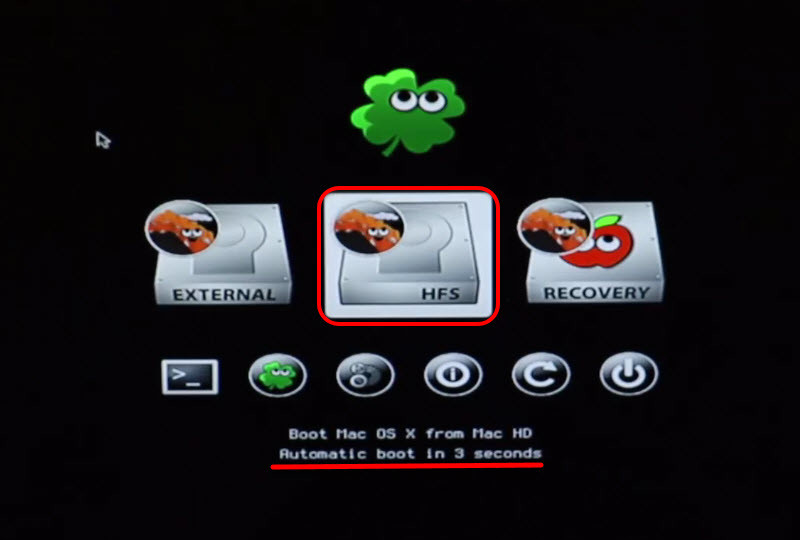
Boot From Mac HD
Note: If you have booted USB Installer with boot flags then, this time, use the same boot flag to boot from macOS Sierra partition or HFS disk.
Step #8. Perform a clean Installation of macOS Sierra
In the previous actions, if you have installed macOS Sierra from the USB Installer to the partition that you created for macOS Sierra 10.12, then after booting from that partition that macOS Sierra is installed on it. Here it’s time to set up and performing a clean installation of macOS Sierra. Well, we have another article also for further information with the shots visit the link below to perform a clean installation of macOS Sierra or keep following this article below.
- How to perform a clean installation of macOS Sierra? (With Shots)
#1. Choose your Country and click on Continue.

Choose Language
#2. Pick a keyboard Layout and click on Continue.
#3. Now select your method to transfer information to this mac and click on Continue.
#4. Enable location services and click on Continue.
#5. In this step, you have to Sign in with your Apple ID. If you don’t have, then create a free Apple ID “how to create an Apple ID on iPhone, iPad or iPod Touch”. If you don’t want to sign in with Apple ID or don’t want to create Apple ID, then Choose Don’t Sign in and click on Continue.
#6. Agree to the Terms and Conditions.
#7. Fill out the Full name, Account name, Password, Hint and check the box of Set time zone based on Current location. Finally click on Continue to create your user account for macOS Sierra, that will be installed on your PC.
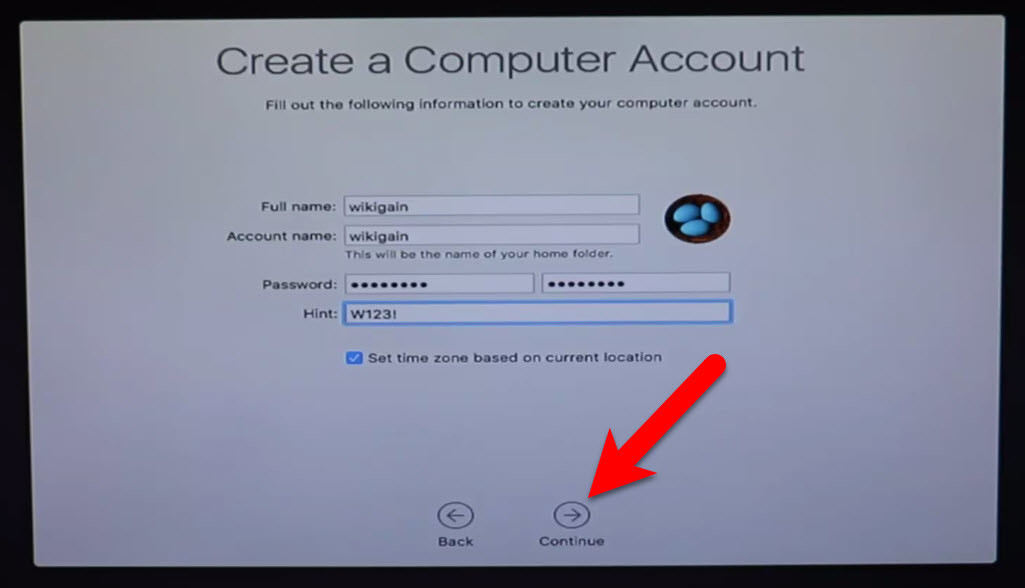
Create a Computer Account
#8. Select the options for Diagnostics & Usage and click on Continue.
#9. Wait a little while to Setting Up Your Mac. It will run on the desktop of macOS Sierra.
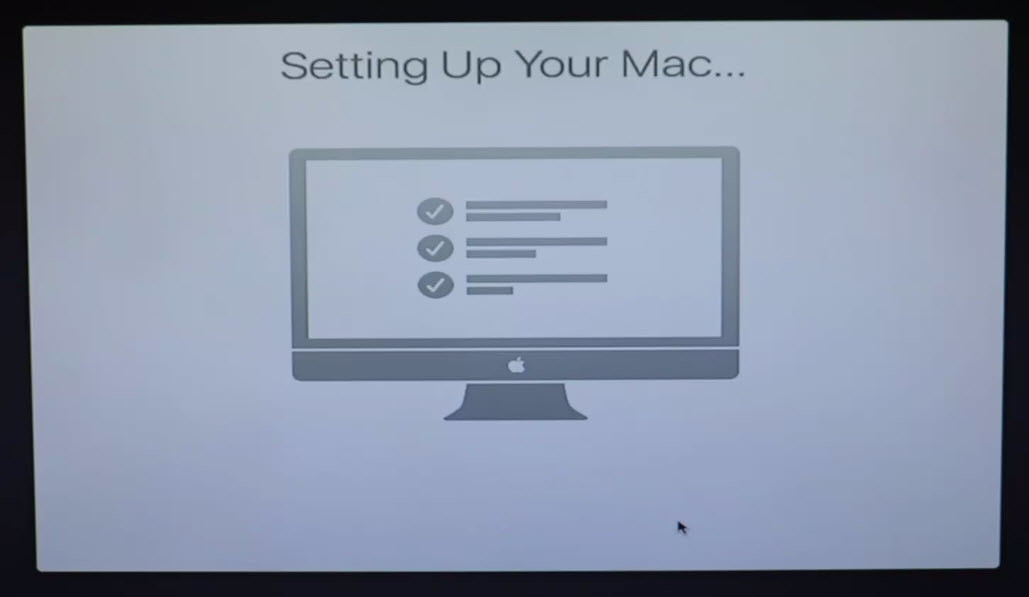
Setting up macOS Sierra
Finish Installation of macOS Sierra
After performing a clean installation and Set upping your macOS Sierra on PC. You should see your final result that macOS Sierra has successfully installed on PC and enjoy using it.
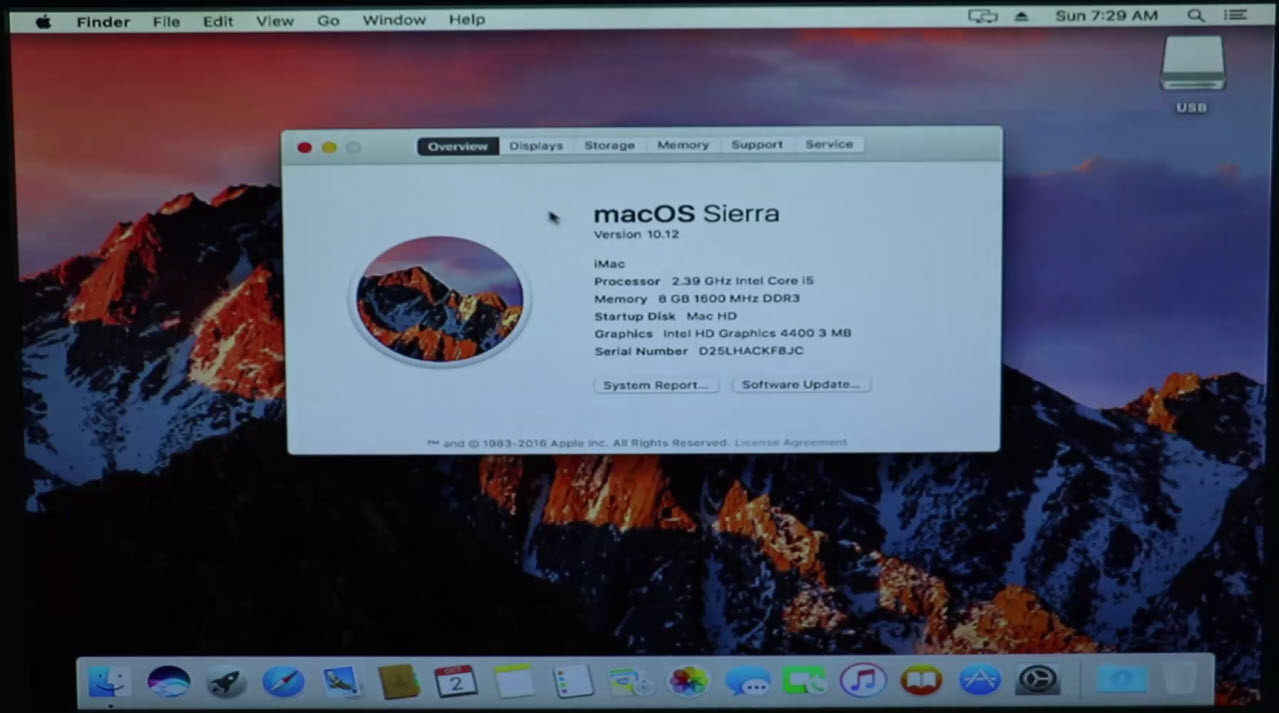
macOS Sierra Installed on PC
Installing Windows 10
Now after installing macOS Sierra on your PC and now you if you have installed it successfully then you’re almost 50% done. Because your PC may support window 10 and it’s easy to install windows. So to complete dual boot Windows 10 and macOS Sierra on PC then keep following here step by step.
Step #1. Create Bootable USB for Windows 10
As I mentioned in at the requirement section, that you need a bootable USB of Windows 10 or a Windows 10 CD\DVD, to install Windows 10 on your PC and complete your dual booting. If you don’t have Bootable USB of Windows 10 or Windows 10 CD\DVD, then buy one or create a bootable USB for Windows 10 with the help of the article below.
- How to Create Bootable USB for Windows 10
Step #2. Perform a Clean Installation of Windows 10
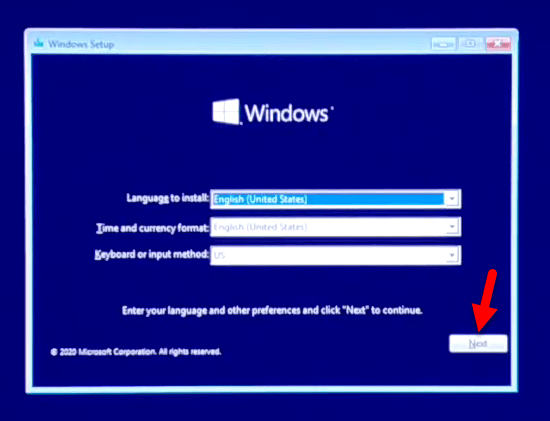
#1. Insert the Bootable USB or the Windows 10 CD\DVD to your PC and Boot your PC with that whether it’s a bootable USB or Windows 10 CD\DVD. When the system booted, enter your language, and other preferences then click Next.
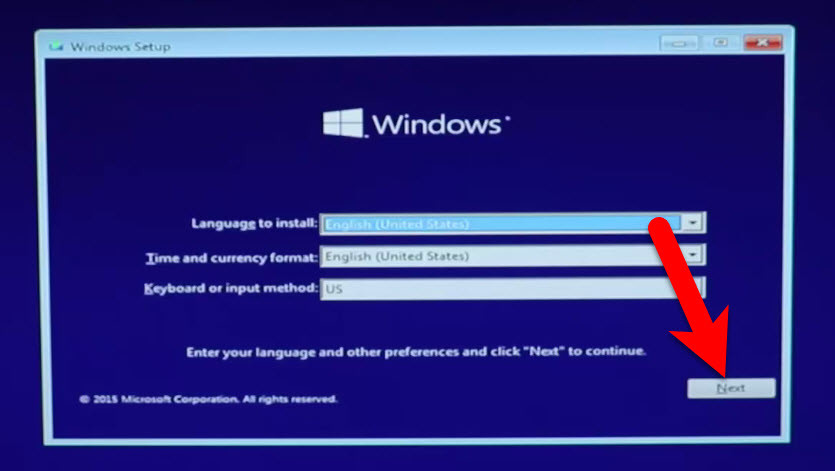
Select your Language and other
#2. Now click Install Now.
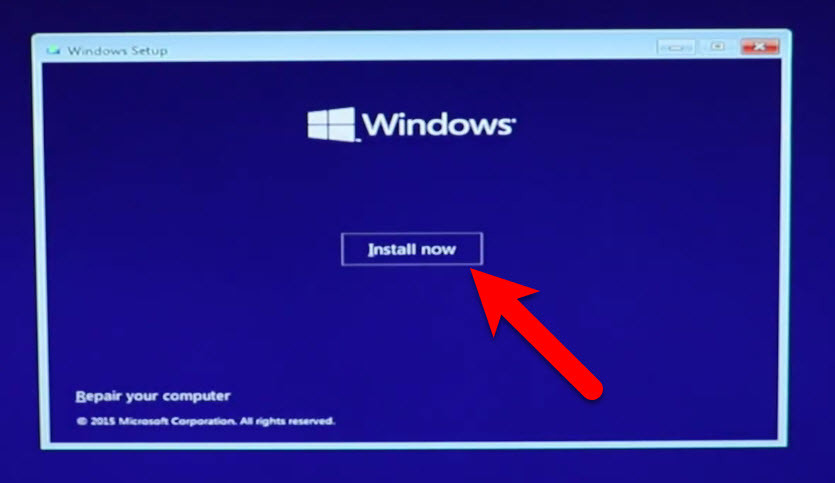
Install Windows
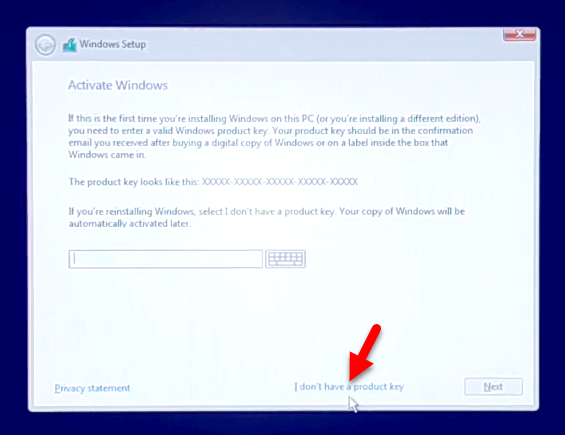
#3. If the system asked you to enter the Product Key then if you have bought the key from Microsoft, enter the product key otherwise click Skip.
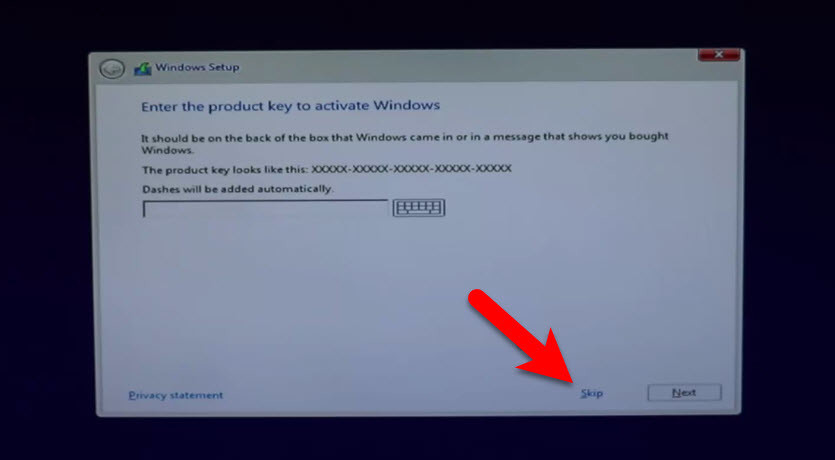
Enter Product Key or Skip
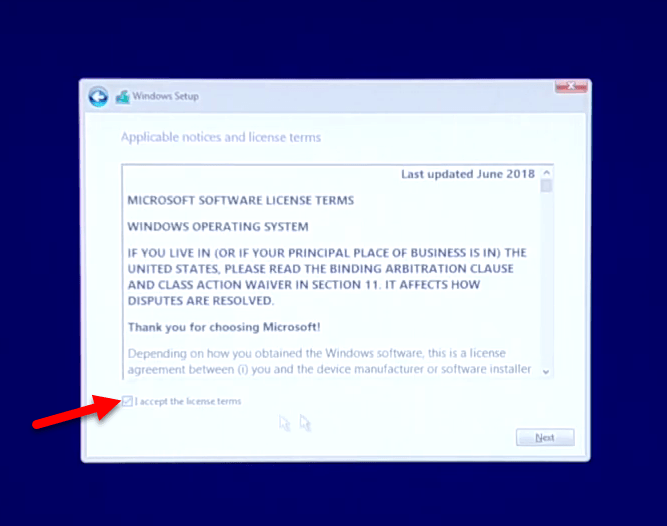
#4. Agree, I accept the terms and click Next.
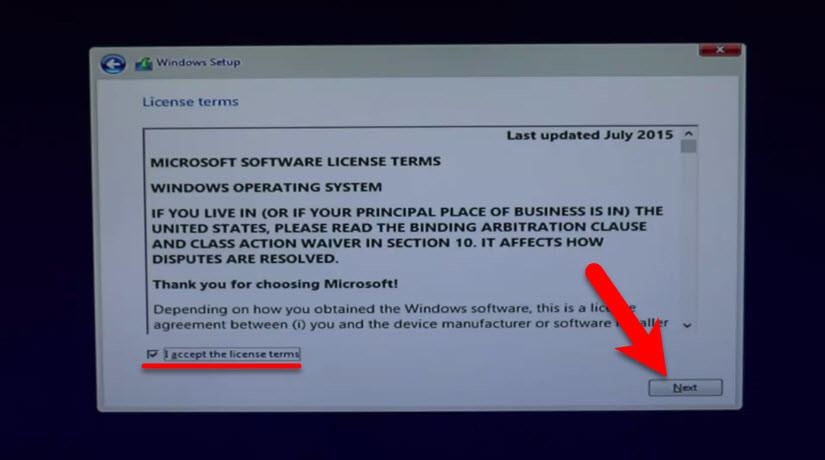
License Terms
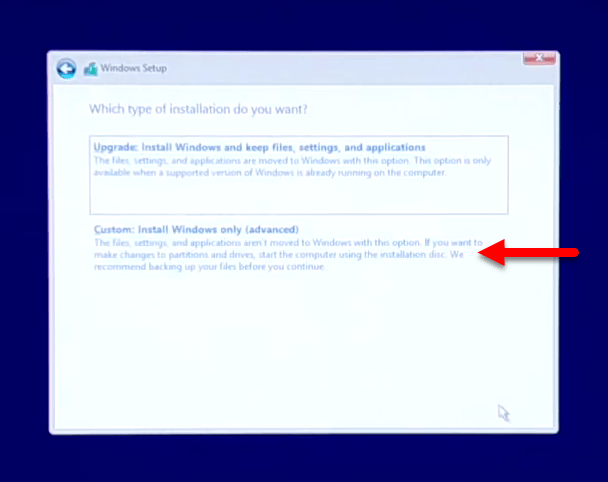
#5. On the type of windows installation click Custom: Install Windows only ( advanced) because we have to install it newly, and there are no windows to upgrade it.
Select Installation Type
#6. Now on the “Where do you want to install Windows?” page, you have to select the partition that you create while installing of macOS Sierra. After selecting the disk click Next. If you’re unable to click the Next button then once format the same partition that you created for Windows while installing macOS Sierra, and try again. If still a problem then lets us know by comment.
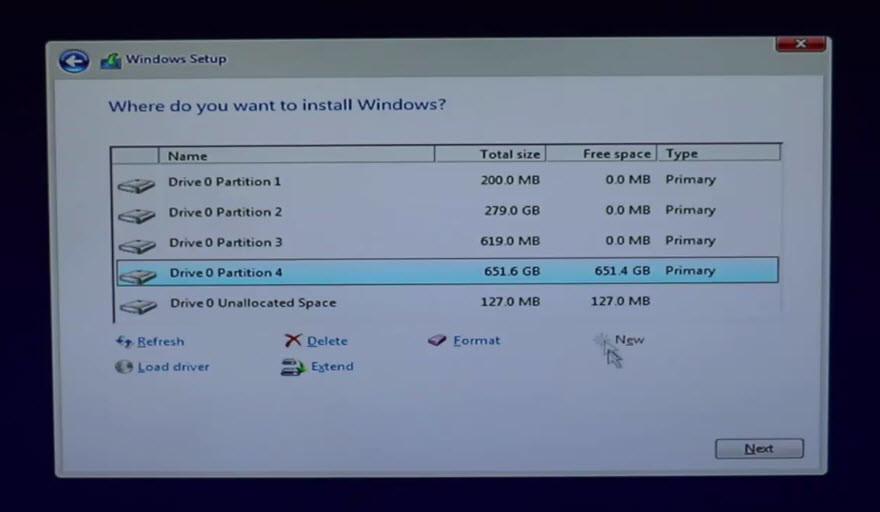
Where to Install Windows
Note: Be careful in the selection because if you select the wrong partition, then you might format and install windows on the macOS Sierra partition.
#7. Wait now and let the windows be installed (Depending on your system) and when the installation finishes then your PC will restart automatically after 10 Seconds.
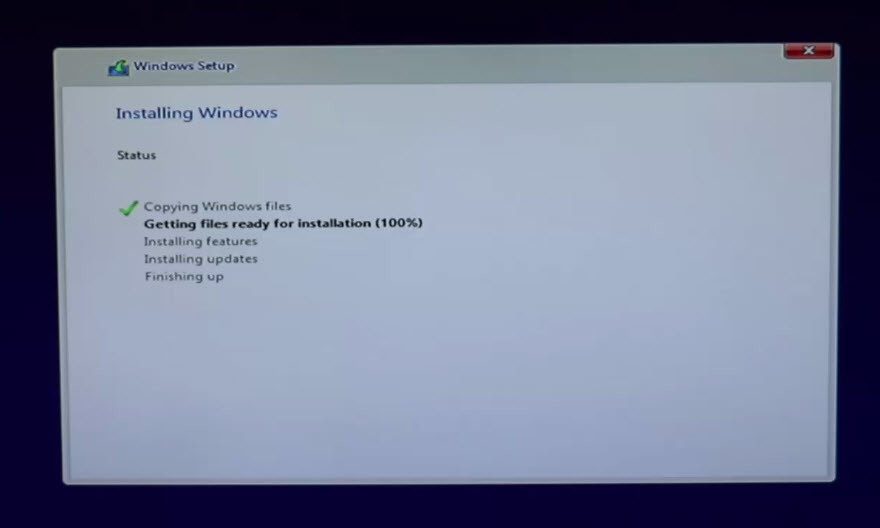
Installing Windows
#8. If the Windows asked again for the Product Key, then click Do this later.
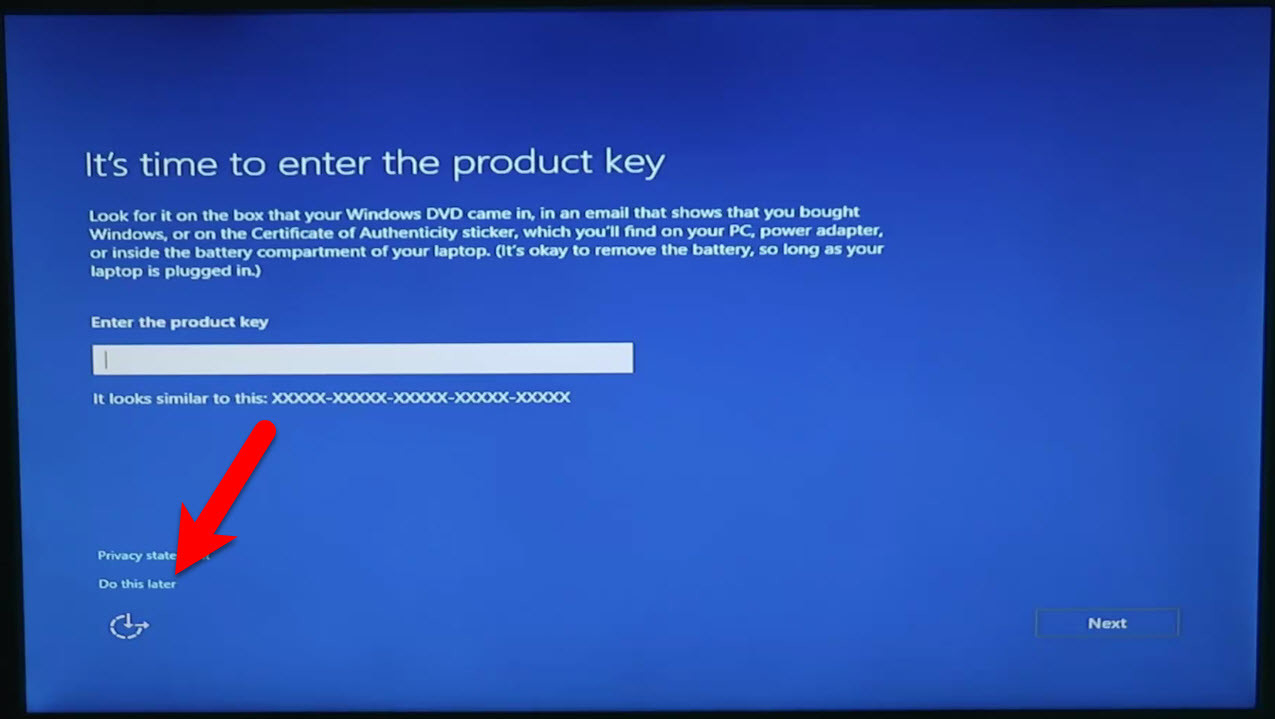
Enter the Product Key
#9. When the Window asks to Let’s Get connected, then connect to your Wireless access point or click Skip this Step.
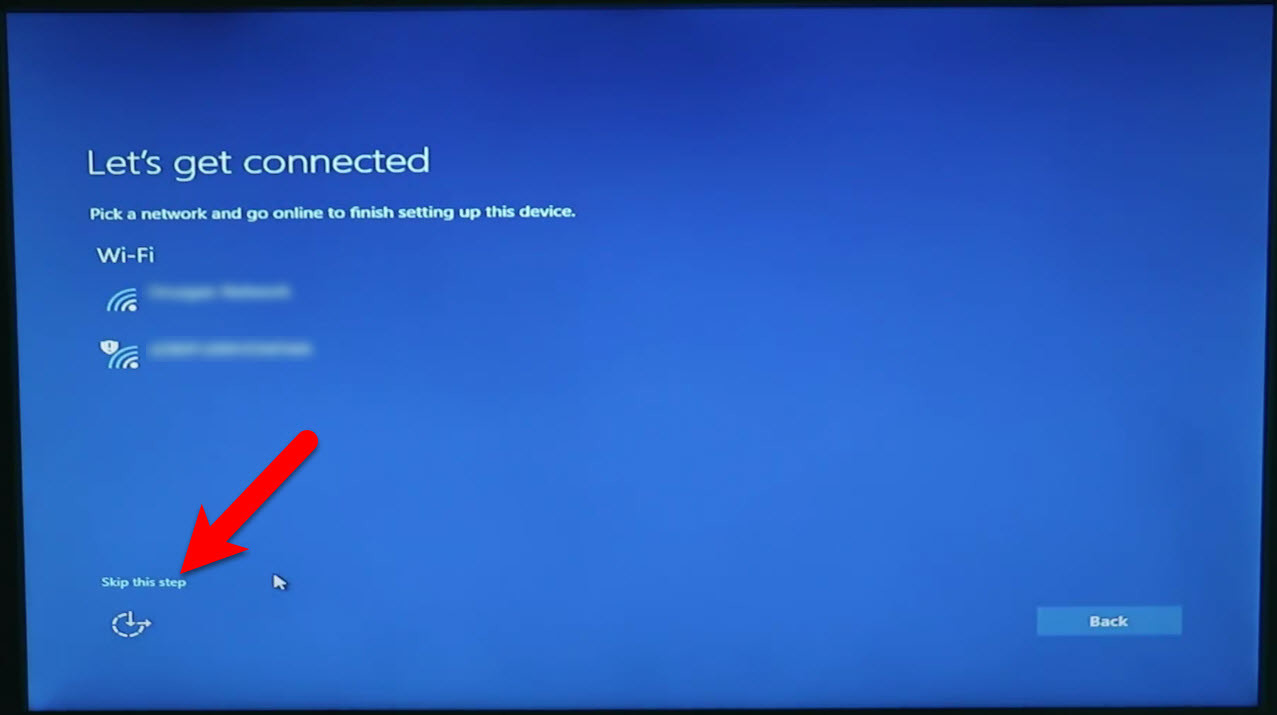
Get Connected
#10. On the Get going fast Page, click Use Express Settings.
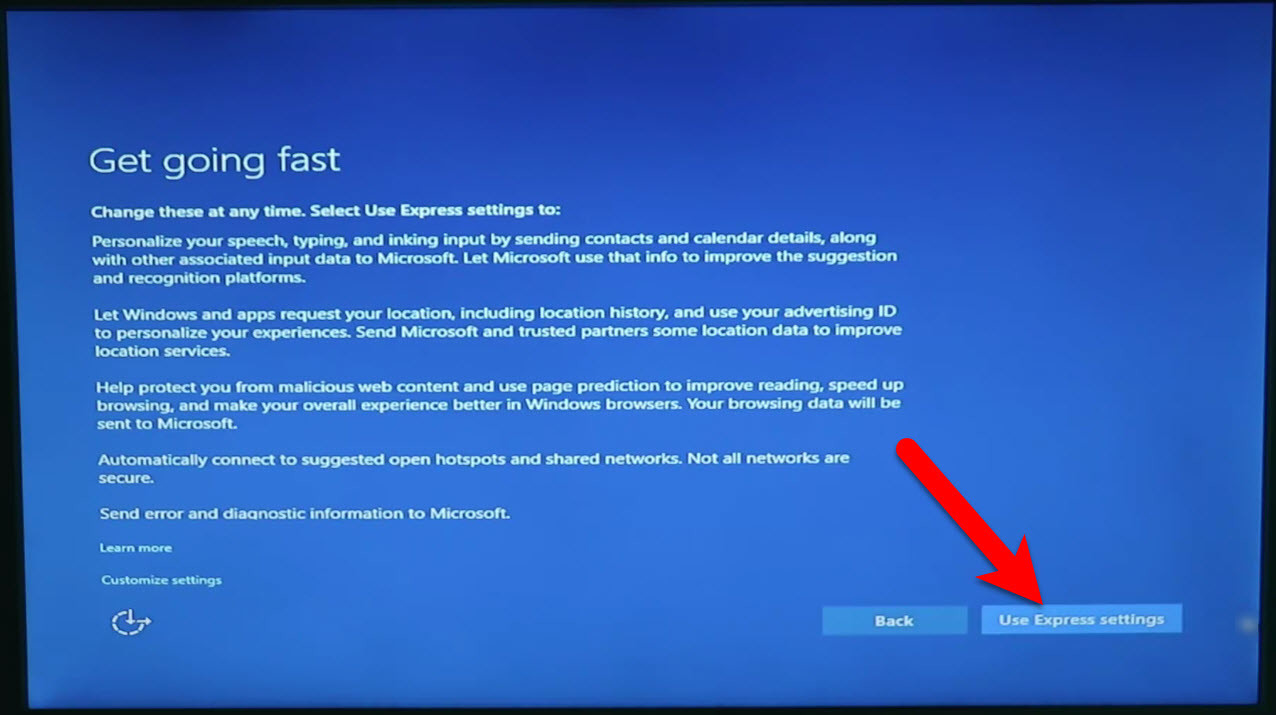
Get Going Fast
#11. On the “Create an account for this PC” page fill the requirements that asked or skip that options that are optional, after that click Next.
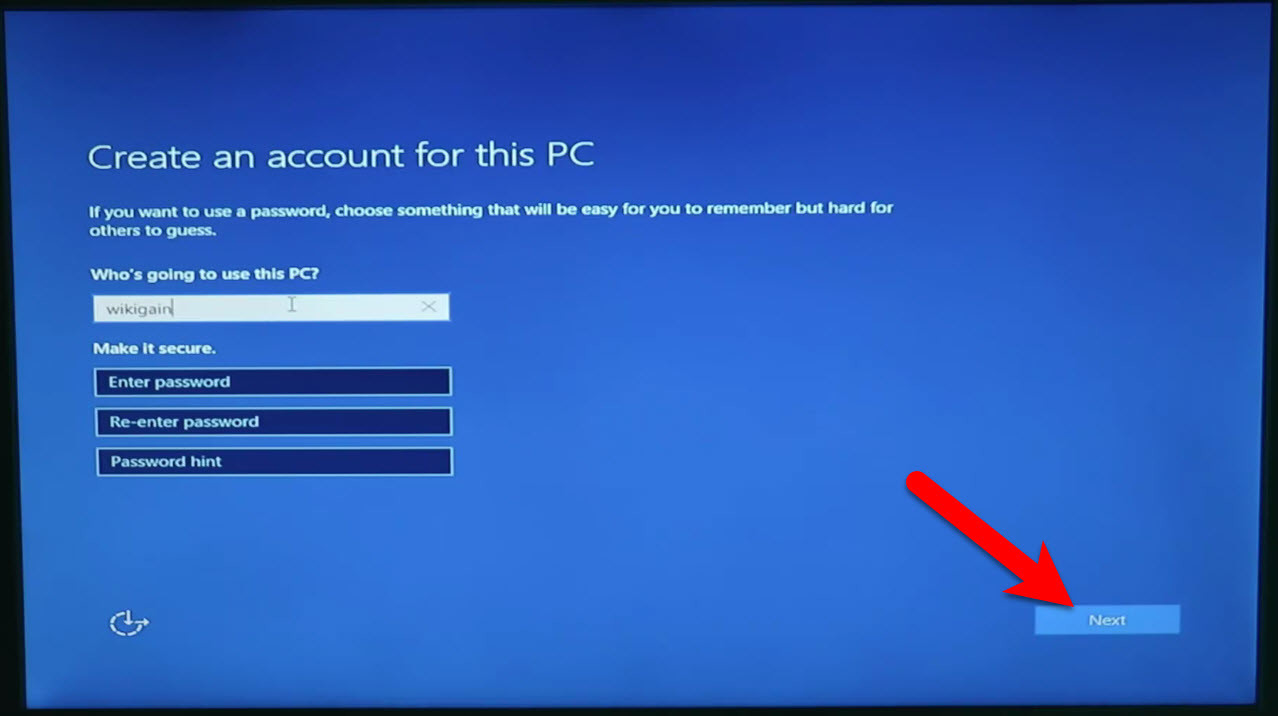
Create an Account For This PC
#12. Wait a while for windows to Setting things up for you.

Setting Things up For you
Finish Installation
After performing a clean installation and Set up your Windows 10 then you should see your final result.

Windows 10 Installed
Post Installation of macOS Sierra to Complete Dual Boot Process
So now if you have successfully installed macOS Sierra and Windows 10 on PC. You might get some problems after the installation of macOS Sierra. Like sound and Wi-Fi doesn’t work. You can’t boot into macOS Sierra without the USB Installer. Bootloader, the Internet connection won’t work. And the most important, if you cant’ boot into macOS Sierra without the USB Installer, then you need a post-installation. Follow the step by step guide below.
- Install & Fix macOS Sierra Bootloader, Ethernet, Audio Problem & Post Installation of Hackintosh
If you want to get notified about the post-installation of macOS Sierra full step by step guide with pictures and other upcoming articles to solve error while installing macOS Sierra on PC, then enter your email address below and get notified. Thanks for being with us.
It was all about, how to dual boot Windows 10 and macOS Sierra on PC. If you faced any problem, share us in the comment section below. We appreciate your suggestion and comments.
Install macOS Sierra on PC: Learn how to dual boot macOS Sierra and Windows 10 on your laptop with this comprehensive Hackintosh tutorial. This guide covers how to install macOS on a PC/laptop step by step dual boot guide, post-installation tweaks, and a troubleshooting section. Most importantly, you can install macOS on a PC without a Mac.
How to install macOS High Sierra on a PC? Is it an easy process? Building the Hackintosh was one of the most tedious tasks I have ever performed. So, am I telling you to drop this plan and continue with the Windows OS? Definitely not! I just wanted to let you know that turning your PC/Laptop into a Hackintosh isn’t a cakewalk. It requires lots of time, patience, and courage to perform tasks that you’re unaware of.
Why Hackintosh then? Can’t we just buy the MacBook Air/Pro to get things done? If you think like this, you’re probably rich and you had better purchase the Mac. ‘Hackintoshing’ is the process of converting your non-MacBook device to run the MacOS. As simple as that! Luckily, the MacOS can be downloaded and converted into a bootable USB. This means the dual boot macOS Sierra and Windows 10 process is ‘practically easy’.
Note: Another way to install macOS Sierra on a Windows PC without a Mac is using the virtual machine setup. It’s kind of an okayish method to install macOS Sierra on a Windows PC. You won’t be able to perform hardware-intense tasks with this option. In case you don’t have time to mess with the post-installation part, you might try installing macOS on a PC virtual machine.
Installing MacOS with a bootable USB is comparatively easy. But what actually makes trouble is the post-installation steps. Once you’re able to run macOS on Windows 10, most of the essential things won’t be working; like WiFi, display controls (including brightness), Audio, Bluetooth, etc. You really need to perform various trial-and-error methods to make everything work. But don’t worry. I just turned my Asus laptop (X555LA) into a perfect Hackintosh and I will be guiding you to install and fix the errors in this dual boot macOS Sierra and Windows 10 guide.

Requirements
- Pendrives (at least 1) with a minimum 8GB capacity. If you don’t want to dual boot macOS with Windows, one stick is enough. 2 flash drives are mandatory to install macOS on a PC dual boot.
- Fast Internet: You need to download the MacOS Sierra files & related tools for the dual boot MacOS Sierra and Windows 10 task. Download Mac OS Sierra on a Windows PC using the given link. I will also be providing a macOS Sierra ISO download option along with the VirtualBox & VMware editions.
- Time: You really need this. Hackintoshing can’t be performed in an hour. Depending on your Laptop, it can be days or in fact, weeks.
- A system backup: If your system currently runs on Windows, make sure you create a system backup image. If anything goes wrong, you can easily restore your files & settings with this.
Special Note: If you plan to dual-boot macOS with Windows, create a new hard disk partition for the Mac installation. For this, follow this guide. Make sure that the file system is NTFS with a minimum of 50GB in size.
In case you want to install MacOS Sierra on your laptop by formatting the entire hard drive, first of all, delete the current local drives (D, E, etc.) and merge them to the C drive (where you installed Windows).
How to Dual Boot macOS Sierra and Windows 10 – FAQ
- Do I need a MacBook to create a bootable MacOS USB installer? – No. It’s possible on Windows itself. (Install macOS Sierra on PC/Laptop without Mac).
- Is it possible to keep my existing Windows installation if I dual-boot it? – Yes. Your Windows partition won’t be touched during the installation.
- Does it work on all UEFI/BIOS-based systems? – I’m afraid not. BIOS is pretty much outdated and the installation is most likely incompatible with it. UEFI is preferred.
- Is my laptop compatible with Hackintosh? – Refer to this guide.
- What about dedicated graphics? – It does work. But you need to work extra to make it compatible with Hackintosh. Currently, Nvidia graphics cards are easy to set up. If you own AMD Radeon graphics, it may not work (or may work if you dig deeper on various forums).
- iMessage & FaceTime; do they work? – Not by default. An additional fix is needed.
- What are the reliable sources to find fixes and additional help? – All you need is this.
I split this long guide into three; pre-installation, installation & of course, post-installation. Pre-installation step deals with making your system ready for Hackintosh, downloading necessary files & making the bootable Sierra USB installer. The installation comprises of installing MacOS Sierra on your laptop using the pen drive & configuring essential settings. Post-installation steps help you fix the broken hardware & software configuration and polish Hackintosh as a daily driver.
1. Pre-installation
Dual Boot macOS Sierra and Windows 10 – Hackintosh High Sierra Download
A. Configuring BIOS Settings
Reboot your system to BIOS settings (to access UEFI options). For this, either press the ‘Esc’ key while the system turns on or press the dedicated recovery keys. It might be ‘Del’, ‘F12’, etc, depending on your laptop.
From there, make the following changes:
- First of all, Load Optimized Defaults. Save changes and reboot BIOS.
- Set the boot priority UEFI & SATA controller to AHCI. If there are no other options, leave it as it is.
- Disable VT-d.
- Disable the secure boot option (very important).
- Set DVMT-prealloc to 64MB. By default, it’s 32MB.
B. Creating a Bootable USB Installer to Install macOS Sierra Hackintosh
Once you save the above preferences, reboot the system to Windows and plug in your USB drive. Now extract the Sierra image file. After extraction, you get a file with a .raw extension.
Now open Win32 Disk Imager and load the extracted .raw image file. You need to change the view mode as shown below to choose the Sierra file.

Once the file is loaded successfully, click start and Win32 Disk Imager will start writing the file to the USB drive. It may take around 20-30 minutes. Meanwhile, you can check your system configurations & driver details like Wireless adapter, Audio driver, graphics driver, etc. It will help you download the appropriate driver files once we start the post-installation process.
After the bootable USB drive is created, close the Disk Imager. The pen drive will look like this after the writing;
Don’t get confused by its size. It has a hidden partition that stores the Sierra files. If you’re on the latest version of Windows 10, the partition will be visible to you. So right after creating the bootable USB installer, if it asks you to format the drive, ignore the message. It’s because Windows thinks it is an unwanted partition.
Now open the EFI drive (USB) and open the Clover folder as shown below.

Minimize the tab and open the downloaded config folder (Pacote de config). Depending on your chipset, choose the appropriate folder and open it. In my case, my chipset is Intel Core i5 5th Gen with Intel HD 5500 onboard graphics. So I chose, the HD5500 folder.

Copy the config.plist file and paste it into the clover folder (F:\EFI\CLOVER). As there’s already a file exists, it asks you to replace the file. Click Replace.

After completing the aforementioned steps, you have successfully made a bootable MacOS Sierra USB Installer. So, what is this config.plist file? It’s the most important file which contains the system attribute values. So double-check while copying the file to the pen drive.
C. Creating an EFI Partition for Dual Booting (Optional – Only for Dual Booting)
If you don’t want to dual-boot the system, you can skip this step. Through this step, we’re making an EFI partition so that you can dual-boot both Windows & MacOS Sierra. Create a bootable USB drive for Windows (use Rufus) and follow the below instructions:

D. Download Post-Installation Files
This step is mandatory as it involves downloading essential files for fixing broken drivers on MacOS. So, download these files and make them ready for future access (after MacOS installation). I recommend you copy these files to another USB drive so that we can access it easily. If you don’t have another drive, you can also copy these to the bootable USB drive (named EFI). It won’t affect the MacOS installation. However, this is not recommended. Choose the former option, if possible.
Note: Through the second link, download the ACPI Battery driver, PS2 Kexts, ACPI Keyboard & ACPI Backlight. You may need to download more files depending on your system. We can discuss it later in the comment section.
2. Installing MacOS Sierra on your Laptop
I assume that you followed the pre-installation section clearly. Now you have a bootable USB MacOS Sierra installer, post-installation files & a newly created EFI partition (for dual booting).
Let’s begin then.
Reboot your system and enter into Boot Options. For this, press the ‘Esc’ key immediately after pressing the power button. From there, choose the bootable USB with UEFI prefix. Don’t choose the other one.

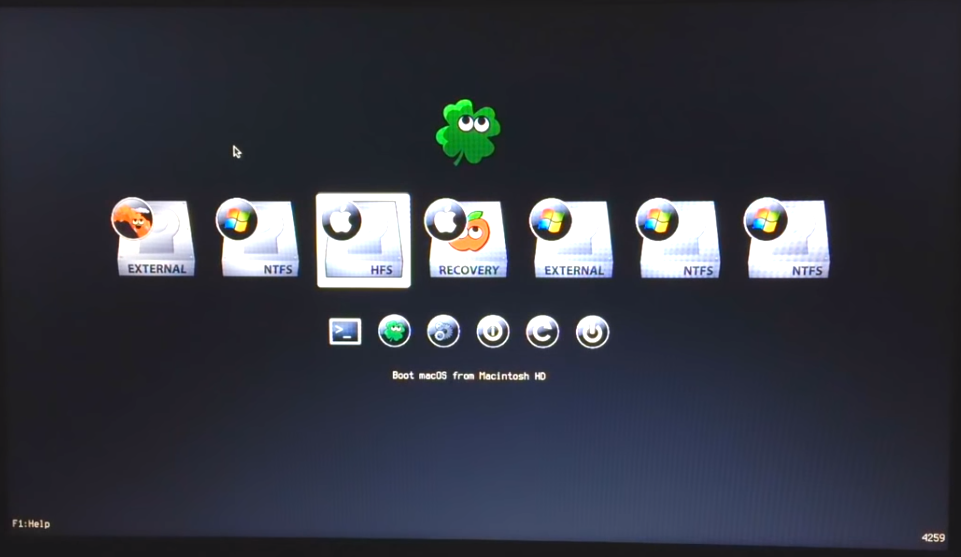
If that goes well, you get a Clover bootloader menu. From there, choose the first option; Boot Mac OS X from Install macOS Sierra.

Now the trouble begins! Most likely, you may get some error on the next screen. Those are Kernel panic & auto reboot, reboot loop, freeze at the Apple logo, Prohibited sign, gray/white screen, Hang on ‘DSMOS has arrived’, Boot fails with Error allocating 0x#### pages at 0x####… alloc type 2, etc. All these are common issues and I faced most of these errors during the installation.
Worry not, I will be providing the fix for all of these issues at the bottom of this post and it will be frequently updated with new fixes.
Once you successfully get the macOS installation screen, don’t click ‘Continue‘. Instead, choose the Disk Utility from the top left side.

Under the Disk Utility, choose the partition you created for installing macOS. Now erase the partition with the following options:

The format option should be ‘Mac OS Extended (Journaled)‘. Now click Erase. Close the Disk Utility after it’s done. Never ever wipe the Windows partition as it will permanently delete the Windows OS & files. So be careful.
Then click on ‘Continue’ and choose the recently erased partition to install macOS Sierra. [Don’t choose the USB drive from there].
The installation will begin shortly and it’d take around 16 minutes to copy macOS files to the hard drive. After that, it will restart. At this stage, again press the ‘Esc’ key until you get the boot options and choose the UEFI bootable USB drive.
Once you see the Clover bootloader menu, instead of choosing Boot Mac OS X from Install macOS Sierra option, select the Boot Mac OS X from xxx option. Here, xxx refers to your Mac hard drive partition’s name. This step is very important. If you choose the first option, it re-installs the macOS again, which is a time-wasting process. As we have already installed the OS on the hard drive, it’s time to load it.

The rest of the steps are self-explanatory. Choose your locale, set keyboard preferences, and set up a username & password. Finally, macOS Sierra will be booted.
At this stage, nothing works perfectly. Wireless options are missing, the sound is broken, the brightness can’t be adjusted, the graphics are weird, and there are no battery stats. In fact, your touchpad & keyboard may not be working as expected. It’s completely okay. We’re going to fix each and everything in the post-installation section. But before that, we need to install the bootloader as a first priority.
Why is this so important? Till now, the macOS is using the bootable USB bootloader for booting up. If you plug out the USB and restart the system, you can’t even see the Clover bootloader menu. It directly boots Windows instead. So we’re going to the post-installation process. We start with the bootloader installation there.
3. Post-Installation Steps
From now on, you’re going to hear some unfamiliar words like kexts, unibeast, multibeast, etc. Kexts stand for Kernel Extensions. It’s basically the system drivers on macOS. But you can’t directly install those as you do in Windows. In order to install the kext files, we need kext installers. Kext Utility is the recommended tool for this. Unibeast & Multibeast are popular post-installation tools that help you fix the bootloader, install essential kexts, and configure the system. Along with these, we also use the Clover Configurator tool to mount the EFI partition (which is hidden, by default) and to edit the config.plist file.
Before that, you need to list the hard drive items on the desktop. By default, macOS doesn’t show the partitions. For this, open Finder Preferences (top left) and check the boxes as shown below.
I hope you have downloaded the provided post-installation tools folder. Extract it to find the Multibeast & similar applications.

A. Installing the Bootloader & Mandatory Kexts using Multibeast
Don’t skip this step. Though there are various other methods to install the bootloader (such as installing a stand-alone Clover installer), I suggest you perform the Multibeast method.
First of all, open the Clover Configurator app and mount the EFI partition. (Mount EFI->Mount Partition). By performing this, the hidden EFI folder will be displayed on the desktop.

Now open the Multibeast app and check the Quick Start option. Under that, select the UEFI Boot mode. If your system is an older legacy device, you ought to choose the Legacy option.

By choosing the UEFI Boot Mode, it will automatically install Clover bootloader, FakeSMC kext, and a system definition. You can also choose the Wireless and audio drivers based on your hardware. But do not uncheck the default options as I mentioned earlier. Once it’s done, click the Build option.

The installation drive is automatically set. In case it doesn’t, choose your macOS installation disk manually. Then click on the Install button. This will install essential configurations and the bootloader.
We’ve copied a few kext files to the system before the first reboot. Copy the files inside the Hackintosh Essential Kext folder and paste them to EFI/Clover/Kexts/Other & EFI/Clover/kexts/10.12. (If you don’t see the 10.12 folder, copy the files to the 10.11 folder).

It’s time to reboot your system. You don’t need the bootable USB installer anymore. While booting, repeat the same steps I described above (the ‘Esc’ key process) and load the UEFI partition (where you installed macOS Sierra). A new Clover menu will load. From there, choose the HFS disk having the macOS (the first being the Windows OS).

It will most likely return any error. You can refer to the bottom portion of this guide to find common errors & fixes. If you could successfully boot into the macOS Sierra, proceed further.
After the boot, check whether you got Wireless and audio working. For this, go to the System Preferences menu and check the corresponding sections.
Optional: You can also run the Hackintosh Vietnam tool to install Wireless, audio, graphics, etc.
If you checked more options during the Multibeast installation (like Ethernet, PS2, etc.), you can also try its status. If none of them works, don’t worry; we’re yet to begin our kext installation process.
B. Fixing Wireless, Audio, Ethernet, Graphics, Keyboard, etc Using Rehabman’s Kexts
You might have downloaded Rehabman’s kext files as I mentioned above. Open the Kext Wizard app (which can be found in the tools folder) and load the kext files there.

Special Note: The selection of kext files is dependent on your Laptop brand. In my case (Asus X555LA Hackintosh), I had to fix the WiFi, battery, and keyboard using Kext Wizard. I can’t specifically say which to choose. This is a trial-and-error procedure. You may apply suitable kexts and reboot the system. If the applied kext doesn’t work, choose another kext and re-apply. Do this process until you get the missing features working. Don’t forget to restart the system after every kext installation.
You can download various kexts by searching on tonymacx86 or similar sites.
So, we have successfully installed macOS Sierra on the Laptop, and that too with dual boot macOS Sierra and Windows 10 option. You can easily switch between Windows & macOS through this with the dual boot macOS Sierra and Windows 10 feature. I know, your problems aren’t fixed yet. Refer to the below troubleshooting section to fix commonly occurring errors during Hackintoshing.
Dual Boot macOS Sierra and Windows 10: Common Errors & Fixes
- Kernel Panics: Kernel panics arise when there’s an issue with your RAM. The system gets a memory allocation mismatch and the macOS boot won’t be done. If you use extended RAM (on external slots), try removing it.
- macOS Sierra isn’t even booting: Under Clover bootloader, choose Clover options. You will get the following screen.

Edit the Boot Args as you see above and try. (The -v enables the Verbose mode. This means, that while the macOS Sierra boots, only text lines will be visible instead of the Apple logo. So you can identify where the system stucks and what solutions to search for).
The nv_disable=1 argument temporarily disables the Nvidia drivers. It might fix errors due to the graphics conflicts.
If this method doesn’t work, Choose Graphics Injector and try changing the values there. Check & uncheck the options there until the system boots.

If that doesn’t work, under Binaries patching, change the Fake CPUID to match with the real CPUID. (i.e., in my case I have to rename 0x00000000 with 0x0306D4.) The real CPUID value changes with the processor model you use.

Also, check all the options under the Fake CPUID. Now save these settings and reboot. Most probably, it will boot.
Special Note: The changes you make to the Clover options reset after every reboot (unless it’s changed inside the config.plist file).
- Getting Prohibited sign during macOS Sierra boot: In this case, the issue is related to the macOS image file. Try recreating the bootable USB again. If that doesn’t work, make Sierra bootable USB using Transmac instead of the Win32 Disk Imager.
- Stuck at the login screen; the mouse & keyboard stopped working: This happened to me. I had to connect a USB keyboard to enter my password and log in. Once you’re logged in, install this kext using Kext Wizard and reboot. (You can also try other kexts if that didn’t work).
- Boot failed, waiting 10 seconds for shutdown: Power off your system. Wait for at least 10 seconds. Then try to boot. If that doesn’t work, load Windows, shut down & reboot to macOS.
- Even after installing several audio kexts, the sound doesn’t work:
- Brightness is too low, the Display option isn’t opening, getting the “could not load Display Preferences pane” error: You need to spend some serious time here. I had this freaking issue. Try downloading DSDT patches for your laptop brand and copy the DSDT.aml file to EFI\Clover\ACPI\Patched folder. An excellent guide is here.

- Ethernet isn’t working: Fix for Realtek, Atheros, Intel & Broadcom.
- iMessage isn’t working: Fix is here.
- I can’t dual boot. Windows boots automatically: Use the EasyUEFI tool on Windows to create a new entry for macOS Sierra. Then under BIOS boot options, choose the first boot priority as macOS.
- What about my dedicated graphics card?: Multiple fixes coming soon…
- My issue isn’t listed here: Use the below comment section. I’ll reply to your query as fast as possible.
Credits: Wikigain (for macOS Sierra Image),
Special Note: This dual boot macOS Sierra and Windows 10 tutorial will be frequently updated with new troubleshooting tips, kexts resources, and lots more. So bookmark this post for easy future reference.
You have successfully dual-booted macOS Sierra and Windows 10! This method also works for PCs. But you don’t have to apply Wireless, battery, or PS2 kexts on it for obvious reasons.
Let me know your doubts, queries & issues through the comment section regarding installing macOS Sierra on your laptop. I hope you enjoyed reading the guide for dual boot macOS Sierra and Windows 10 process. How was your macOS installation on Windows PC?
Когда вы регистрировались, вы обещали выполнять Регламент. Ваше сообщение нарушило сразу несколько параграфов Регламента. К примеру, п.2.2 — вы обязались сначала поискать, погуглить.
За готовыми решениями — на фриланс. В текущем виде это не вопрос, а задание. Нарушен п.5.12 Регламента.
Если вы будете продолжать нарушать Регламент, ваши вопросы могут быть удалены, а аккаунт заблокирован модераторами временно или навсегда.
Будьте благоразумны.
Написано
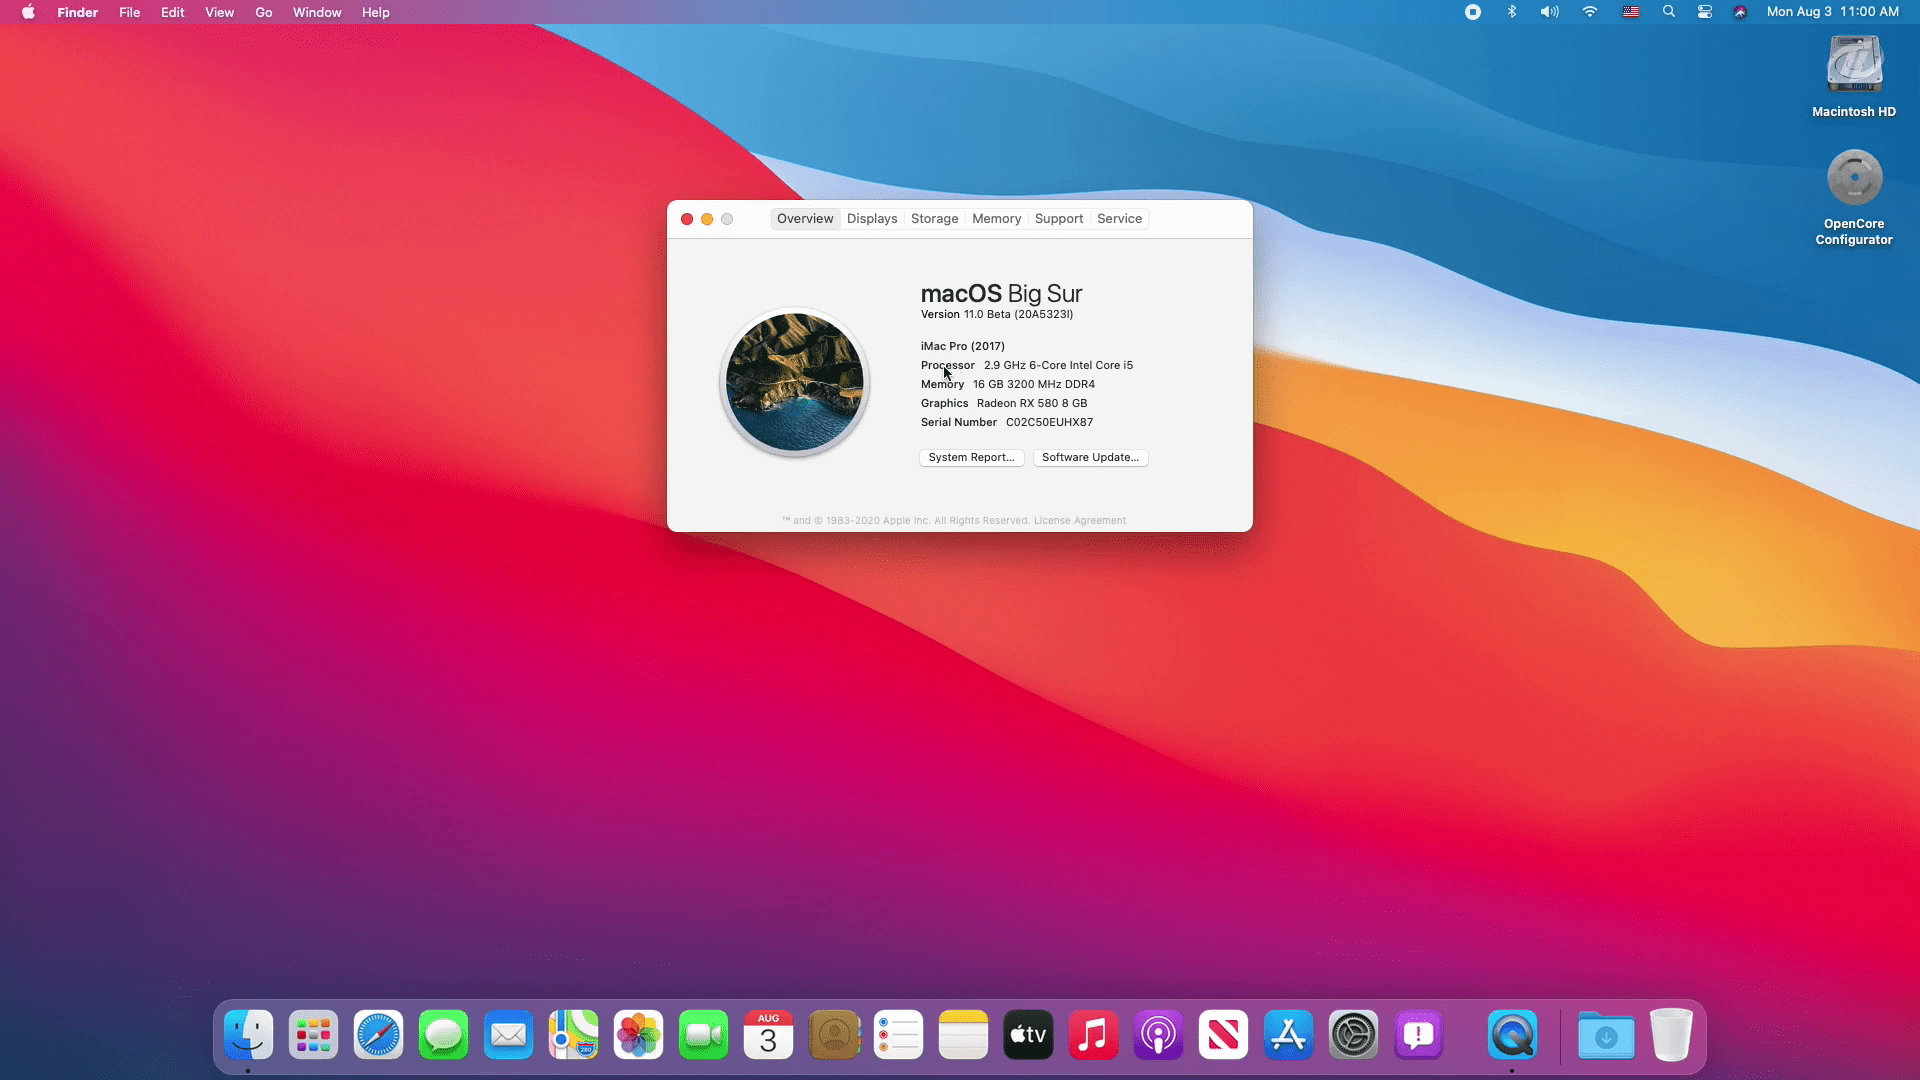
Currently macOS Big Sur 11.0 is the trending operating system for Macintosh computers, which Apple Inc successfully released at the WWDC2020 event on 22nd June. With its release date, Apple nominated lots of handy features that needed for an actual Mac operating system. Finally, we tested macOS Big Sur 11.0 Beta 4 version on our Mac computers, and now it’s pretty stable than the first Beta version. Now you can update your Macintosh personal computers, to the latest version of macOS Big Sur update. Because all each and everything is highlighted by the developers and now some of the critical issues, bugs are being fixed by Apple developers.
On the other hand, we have done the macOS Big Sur installation on the virtualization platforms, such as VMware Workstation, VirtualBox. For being sure about the issues, bugs, firstly we need to install it on the virtualization platforms, for testing its latest features. Such as, some of the users tested macOS Big Sur on Virtual Machine and they have been encountered by an issue. Most of them reported that after the installation successfully completed, after 5 seconds automatically macOS Big Sur get shut down. And this the same most of the users faced this issues on their primary Mac. And now there are no worries because macOS Big Sur Beta 4 version update is out now. You can test it now on your Mac without any issues or Bugs. Also, the final version of macOS Big Sur is nearly to be out later this year in September.
However, many times we have mentioned in our article that macOS Big Sur is the first Apple operating system that can support Intel-Based Processors. As we have tested macOS Big Sur on Asus Laptop with full of guide. Also, successfully installed macOS Big Sur on PC-Hackintosh without any issues. Don’t forget that macOS Big Sur can be installed on VMware on AMD with AMD Processor too. If you have a PC with an AMD processor then easily you can install it.
Related:
- How to Dual Boot macOS Big Sur with Windows 10 on Laptop
Don’t forget to check that macOS Big Sur can support the below down Macs & MacBooks computers, if you have the below down computers with recommended specifications then you can install macOS Big Sur on it.
- MacBook: Early 2015 or newer
- MacBook Air: Mid 2013 or newer
- MacBook Pro: Late 2013 or newer
- Mac Mini: Late 2014 or newer
- iMac: Mid 2014 or newer
- iMac Pro
- Mac Pro: Late 2013 or newer
- Developer Transition Kit (2020)
However, through this post, I wanted to explore how to Dual Boot macOS Big Sur with Windows 10 on PC-Hackintosh. As you know that Windows 10 is the product of Microsoft and it’s being one of the most successful operating systems for Intel computers after releasing Windows 8.1. Currently, Windows 10 is pre-installed over billions of computers. Microsoft doesn’t have the plane to upgrade Windows 10 to any other version of Windows. Because Windows 10 version is being successful for everyone, that they are running on their computers. And now Microsoft bringing changes to its update, one of the most latest updates of Windows 10 was released some few weeks ago as Windows 2004 version. Usually, there isn’t changes to the interface look of Windows, but they have added some nice features to apps and look of Windows.
- Latest Cortana update
- Search Home
- KaoMoji
- Virtual Desktops
- Automatically open Apps
- Bluetooth Pairing
- New tablet experience for tow-in one convertible PCs
Before dual-booting macOS Big Sur with Windows 10 you need to read the below down guide that what you need to do.
- Download Required Files
- Create macOS Big Sur Bootable USB Drive
- Create macOS Big Sur EFI files USB flash Drie
- Install macOS Big Sur on PC-Hackintosh
- Install all the fixes files
- Create a partition for Windows 10 on macOS Big Sur
- Install Windows 10 alongside macOS Big Sur
- Install Windows 10 update
Download Required Files
The required files may contain the commands for creating Bootable USB Drive, OpenCore Configurator, Windows 10 ISO file, BalenaEtcher software for creating Windows 10 USB flash drive on macOS Big Sur.
- Download Commands
- Download OpenCore Configurator
- Download macOS Big Sur installer file
- Download Windows 10 ISO file
- Download BalenaEtcher
- Download EFI Files
For creating Bootable USB Drive for macOS Big Sur follow the below links.
- How to Create macOS Big Sur Bootable USB Drive on Windows & Mac
- How to Create a Bootable macOS Big Sur USB Installer
Mount EFI Partition
- When the Bootable USB Drive created for macOS Big Sur close the terminal and open the OpenCore Configurator. And mount the EFI partition of the USB flash drive.
- Now copy the EFI files and paste it into the USB drive
- Copy OpenCore Configurator and paste it into the Bootable USB flash drive of macOS Big Sur.
Create Windows 10 USB Flash Drive
And the next step is to create a Windows 10 USB flash drive, attach the USB flash drive with a minimum size of 16GB. When the USB drive attached head over to Go>Utilites, open Disk Utility and erase the USB flash drive with the following settings.
- Name: USB
- Format: MS-DOS (FAT)
- Scheme: GUID Partition Map
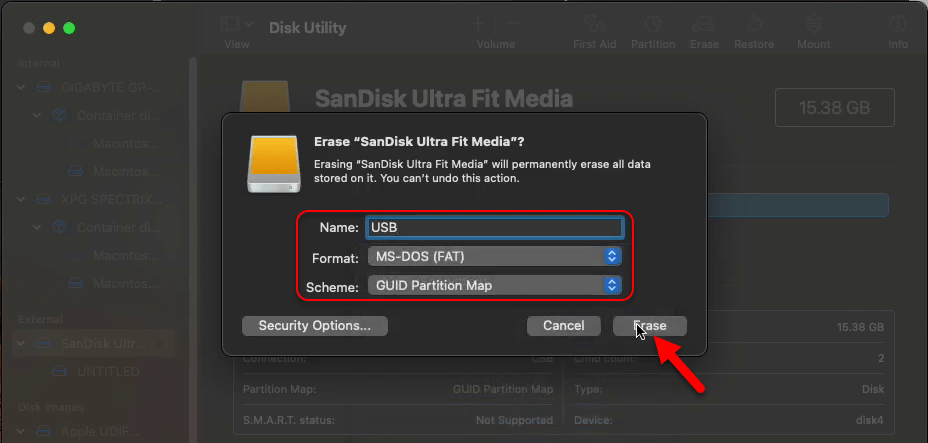
- When the USB flash drive erased click on Done and close the Disk Utility.
- Now go to application launchpad and open BalenEtcher, on the welcome screen click on the “Flash From File” option.
- Select Windows 10 ISO file and click open.
- Here you will face a warning simply click on continue
- Select the destination by clicking on the select target option.
- Select the options which it USB flash drive, then click on Select option.
- Now click on Flash option
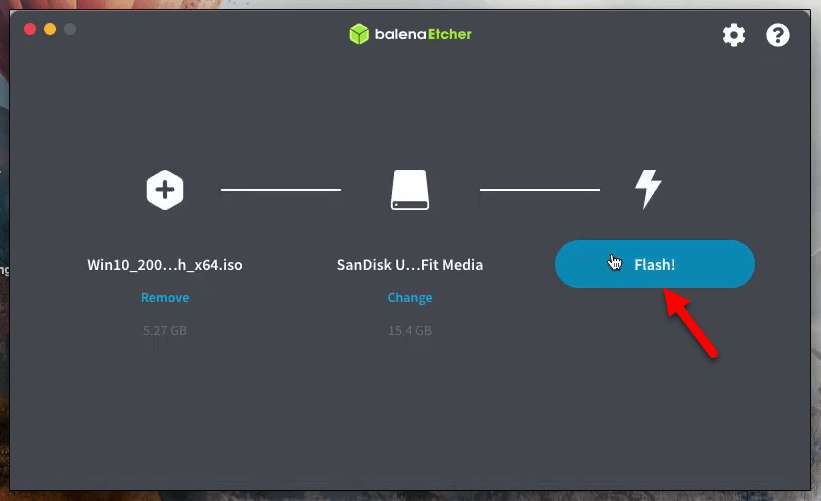
- Here you will be required to enter your username password in order to make changes.
- And now here BalenEtcher is copying Windows 10 ISO image file to the USB flash drive, wait this process may cover some time. When the image copied close the BalenaEtcher.
Edit BIOS Settings
To dual Boot macOS Big Sur with Windows 10 you need to bring a few changes to BIOS settings of your PC. To do that restart your PC and press the delete key to enter the BIOS settings window. From BIOS settings select the “Save & Exit” tab, select “Load optimized Defaults” option then press enter and select “Yes”.
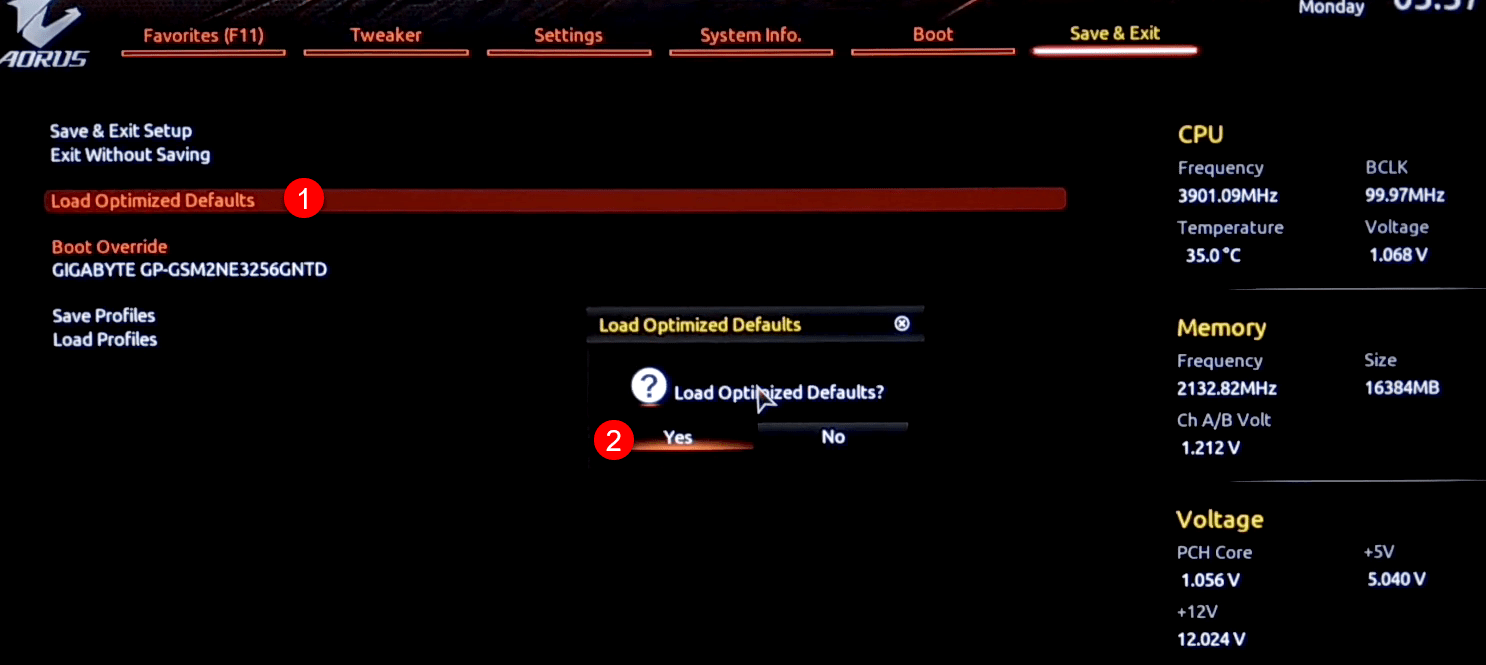
Select “Save & Exit Setup” then press enter and select “Yes”, after that, your PC will restart.

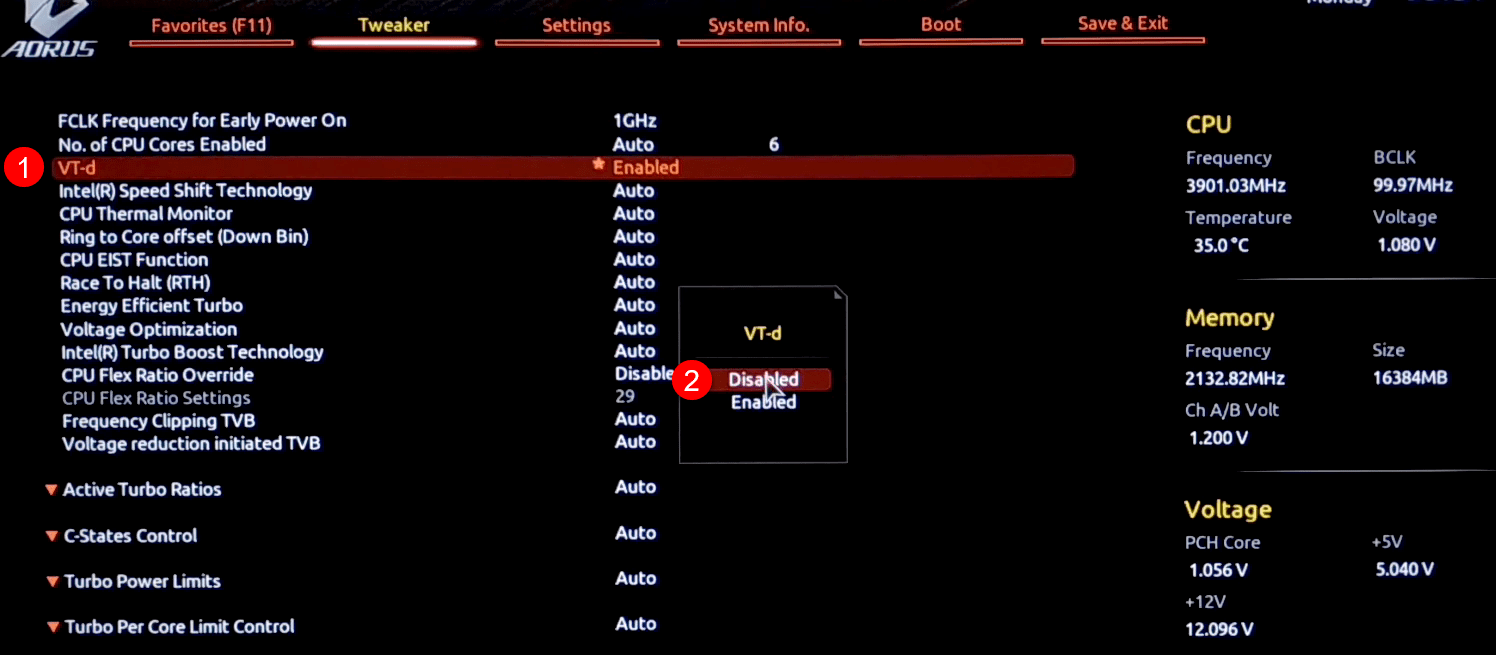
Select the “Tweaker” tab, select the “VT-d” option, then press enter and select the “Enabled” option.
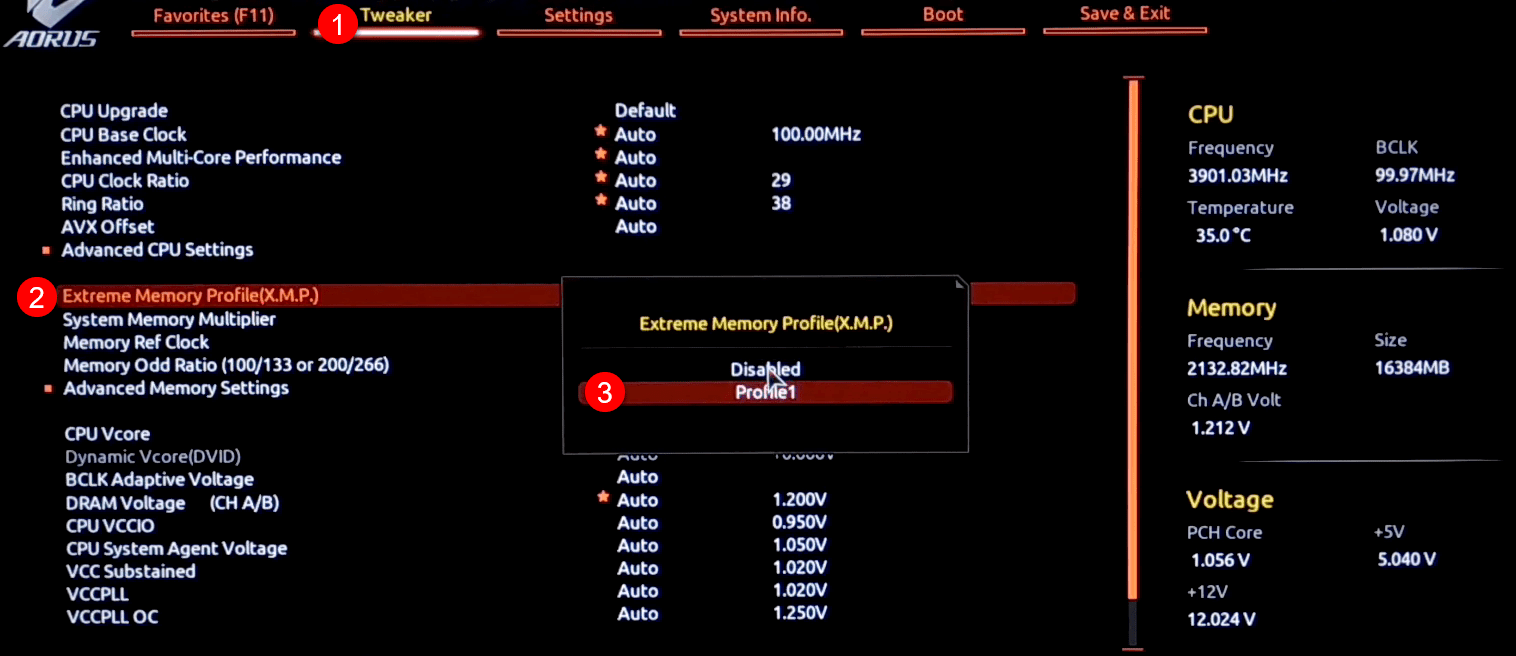
When your PC restarted quickly press the delete key again to enter the BIOS settings window. Now select the “Tweaker” tab, then select “Extreme Memory Profile” then press enter and select “Profile1”.
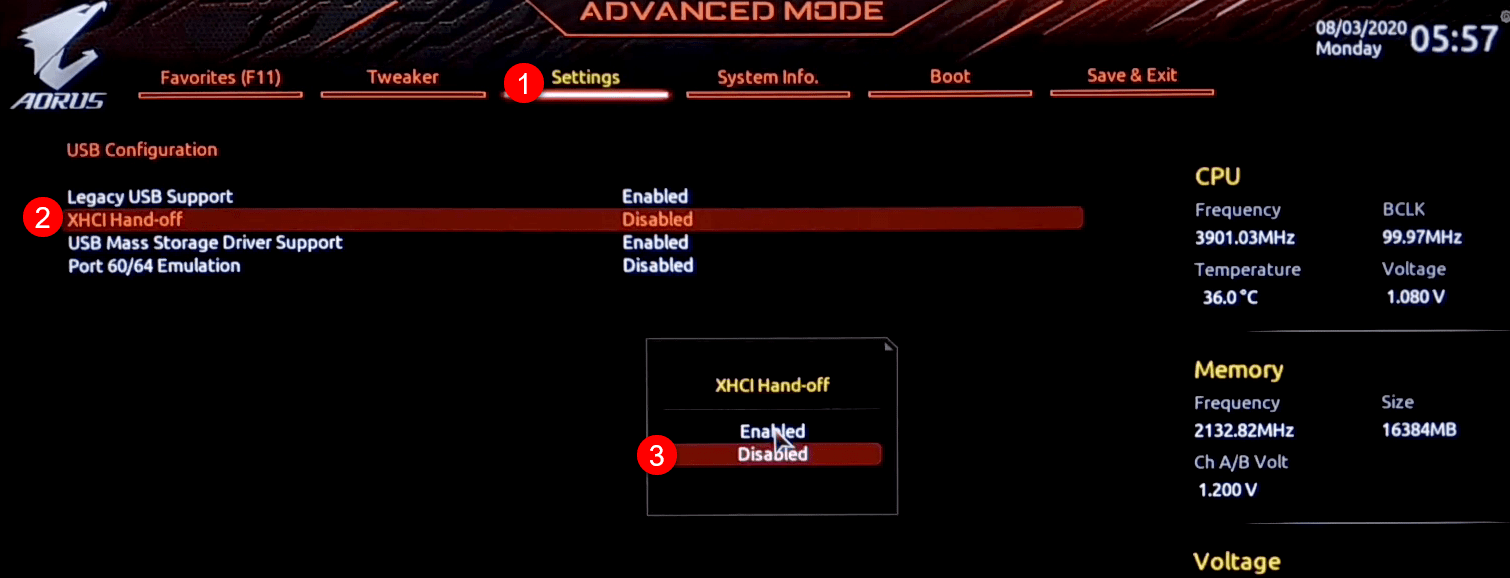
Now go to the “Settings” tab, select “XHCI Hand-off” option, then press enter and select “Disabled”.
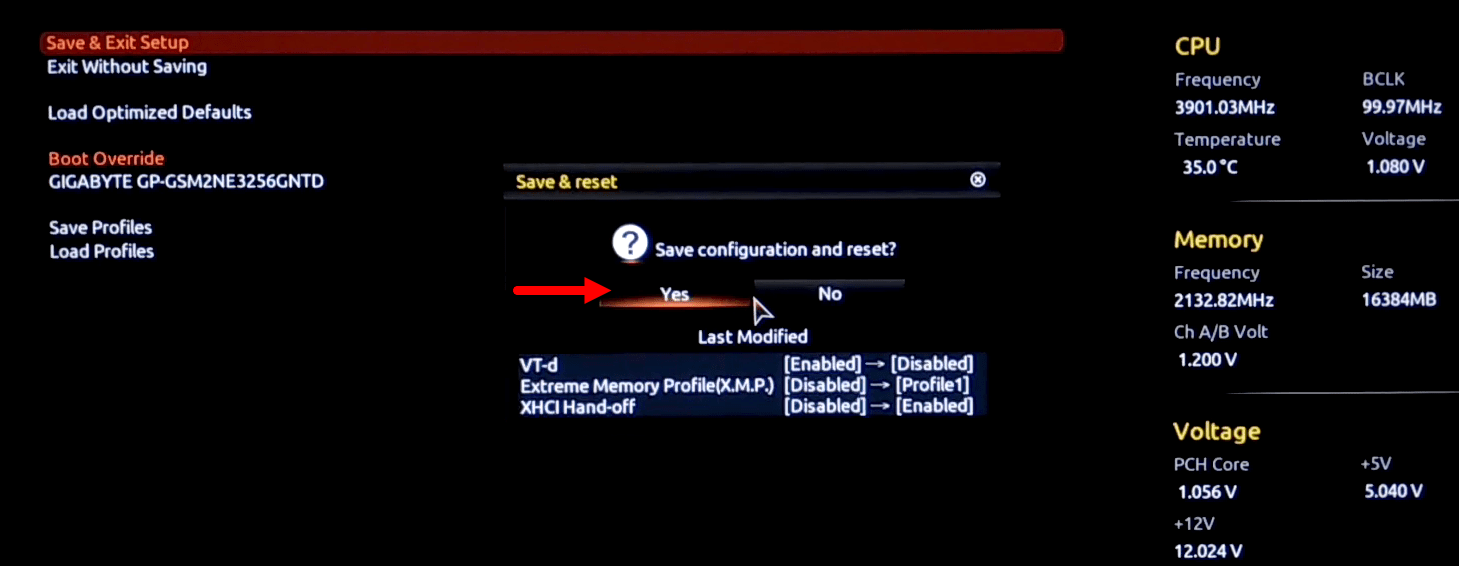
And now go to the “Save & Exit” tab, select the “Save & Exit Setup” option, then press enter and select “Yes” and press enter to restart your PC.
Install macOS Big Sur
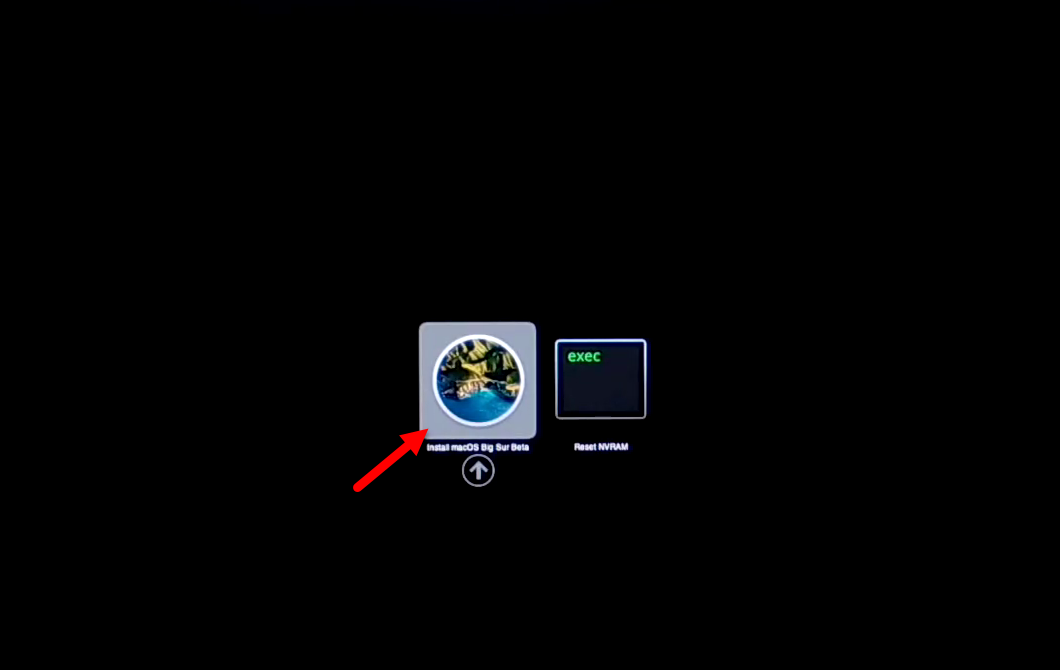
Once the BIOS settings successfully changed attach the macOS Big Sur bootable USB flash drive, and power on your PC and press the Boot menu key then select “Open Core” and press enter to boot.

Here select the drive and press the enter key to go ahead.
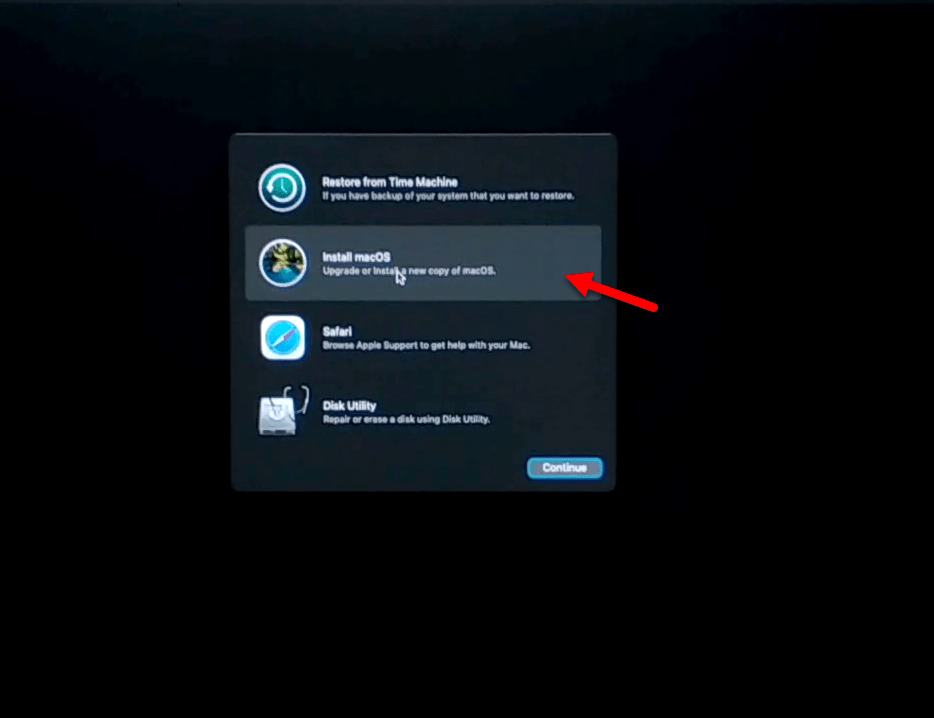
- Wait until macOS Big Sur should enter the Recover window.
- Select your language and click on continue.
- Select Disk Utility and click continue.
- Click on View and click on Show all Devices.
- Select your drive and erase that with the following settings.
- Name: macOS Big Sur
- Format: APFS
- Scheme: GUID Partition Map
- Press the erase option to erase the drive
- When the drive erased click on done.
- Close disk utility and select “Install macOS” and click continue.
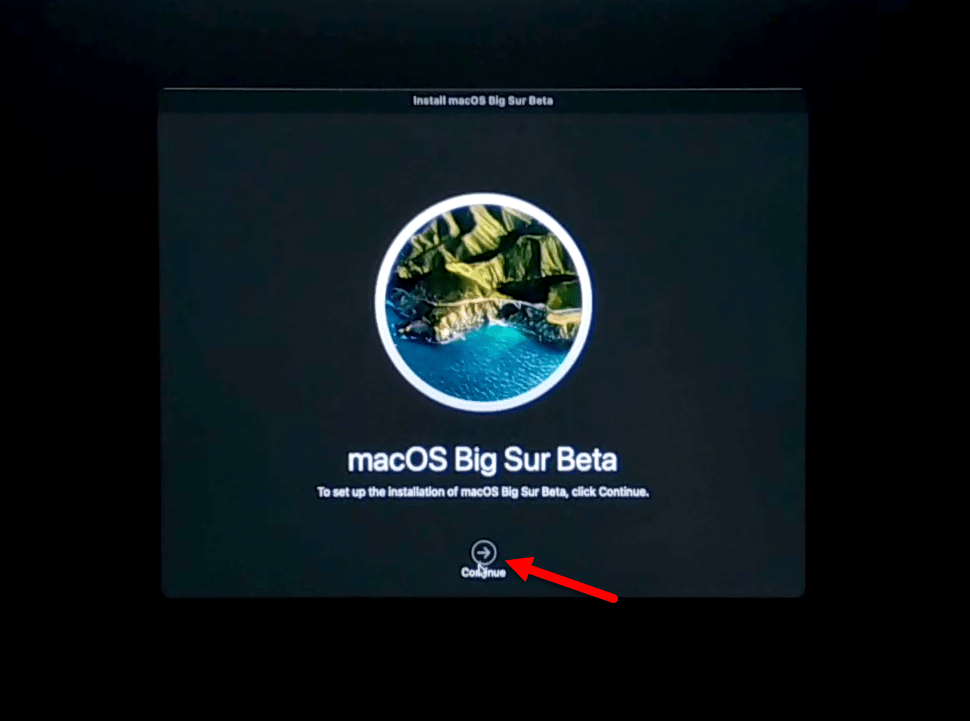
To set up macOS Big Sur installation, click continue.
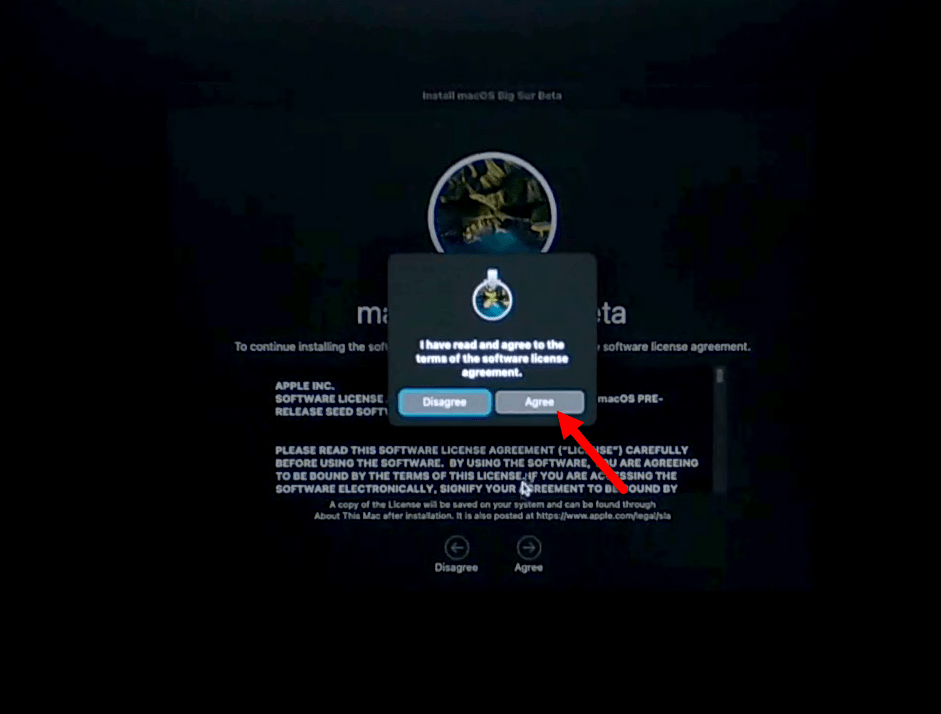
Agree with the terms and conditions of macOS Big Sur
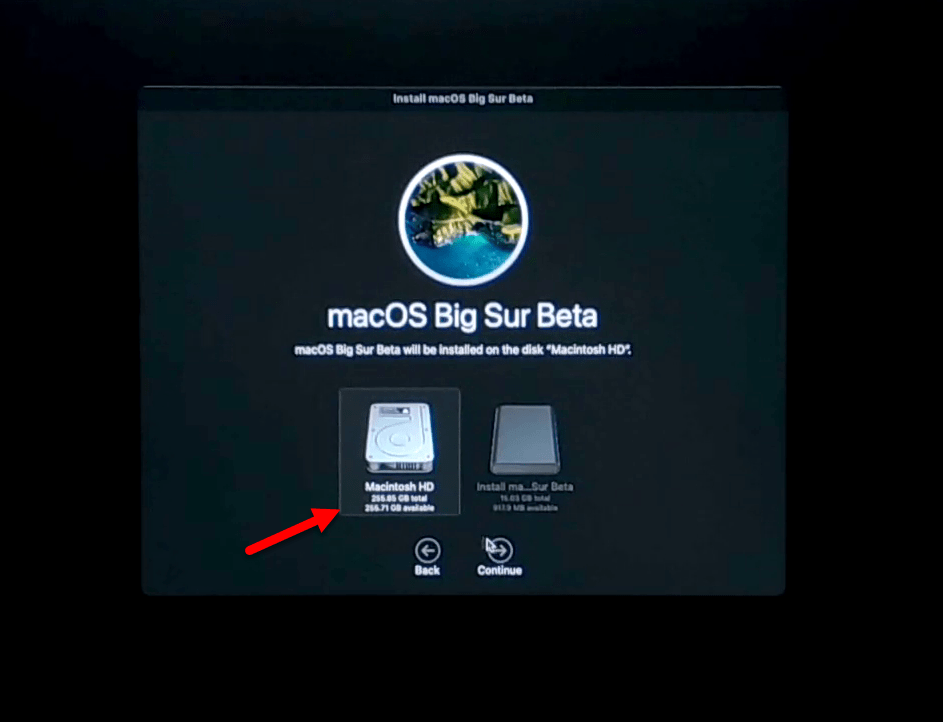
Select the drive have formatted in step 5 and click install.
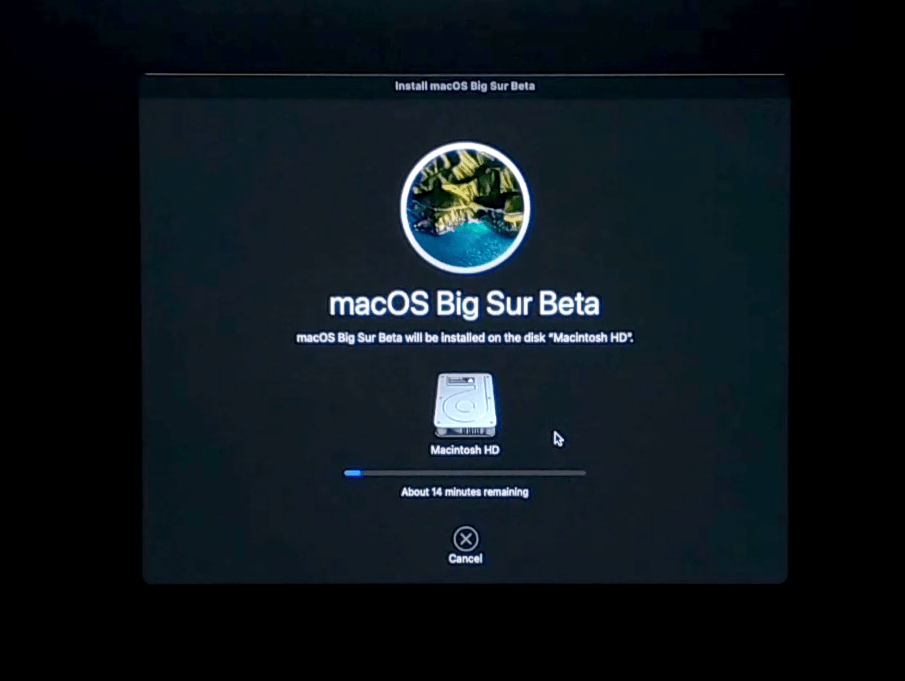
Wait until macOS Big Sur should install on the drive, when the installation completed your PC will restart automatically.
- Once macOS Big Sur installation completed, so complete the basic settings of macOS Big Sur on your PC.
- Attach the USB Flash drive and copy the OpenCore Configurator to your desktop.
- Open the OpenCore Configurator and Mount the EFI partition of USB and System Drive.
- Copy the EFI folder from the EFI partition of USB, and paste it into the EFI partition of the System drive.
- Once the EFI file copied eject the EFI partition of USB & system drive, then restart your PC.
- After coming back to your PC window check each and everything that works properly.
After that, macOS Big Sur successfully installed on your PC check the following settings that work perfectly.
Create Partition for Windows 10 installation
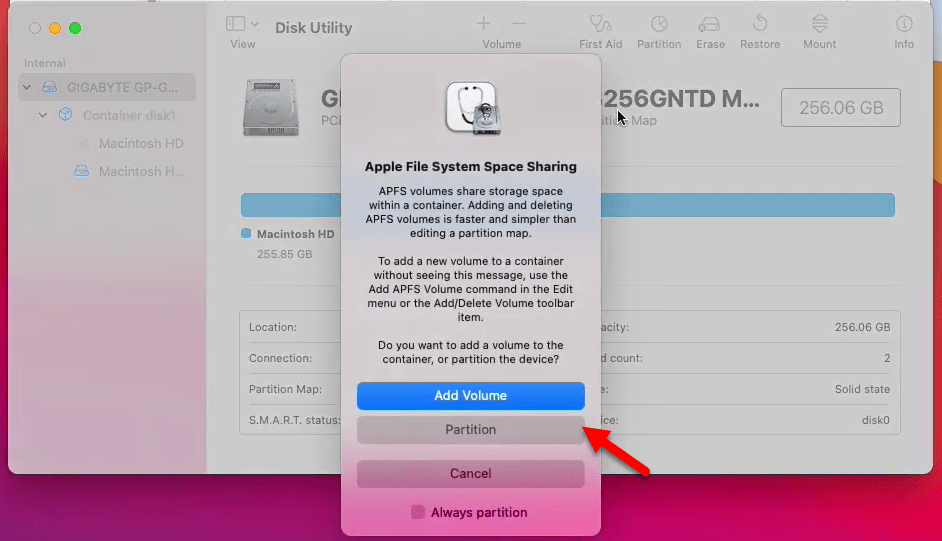
For dual-booting macOS Big Sur with Windows you need to create separate partition. Because you won’t be able to install macOS Big Sur and Windows 10 on the same drive. To create a partition for Windows 10 navigate to Go>Utilites, from Utilities window open Disk Utility.

Now you will see all the drive is highlighted here, to appear the devices click on “View” option, and click on “Show All Devices”.

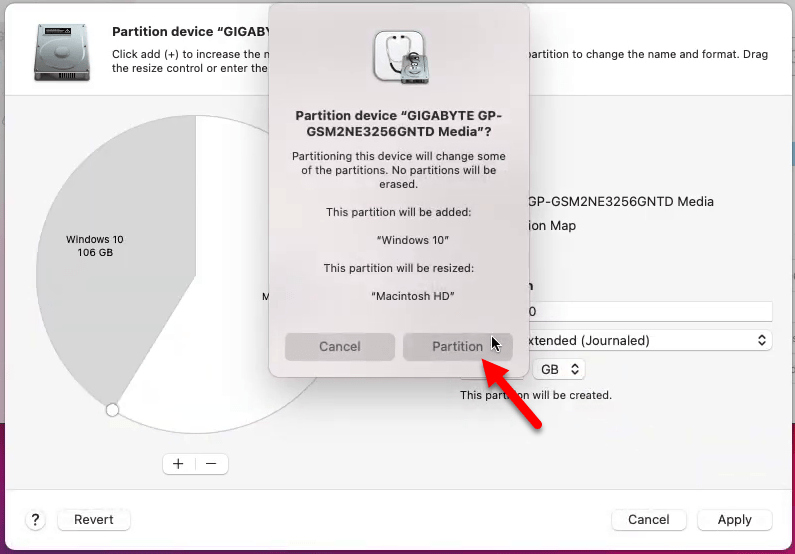
Select the drive which you want to create the partition for Windows 10 and click on the Erase option. Another screen will pop-up and click on the partition option.
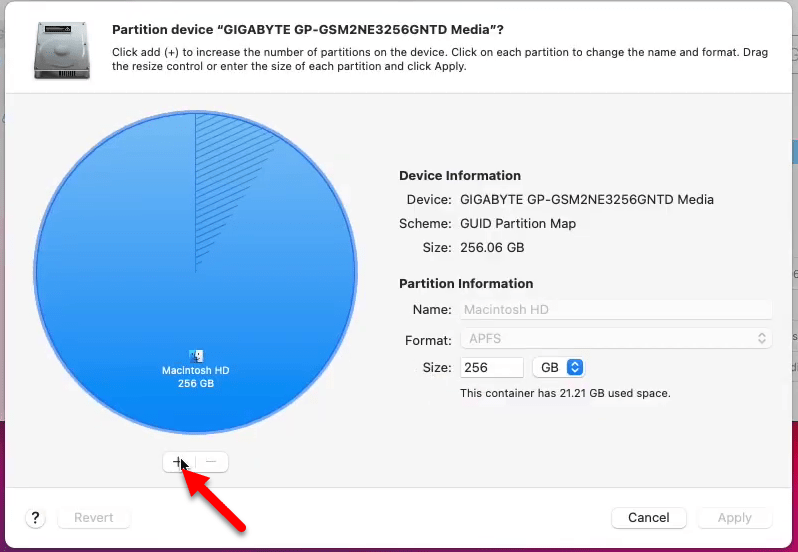
To add another partition click on (+) option.
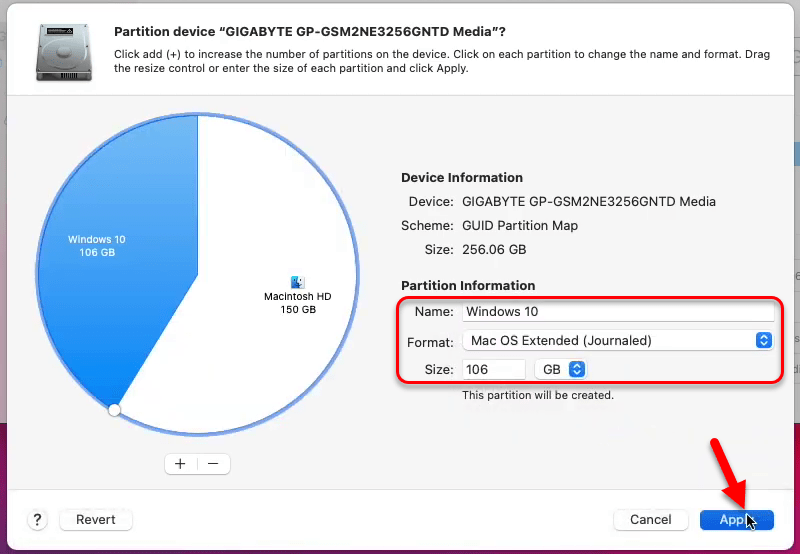
Now to create a partition for Windows 10 you need to give a name for the disk, format, and the size of the disk.
- Name: Windows 10
- Format: Mac OS X Extended (Journaled)
- Size: At least 60GB
- Once that’s done click on Apply option
Now click on partition
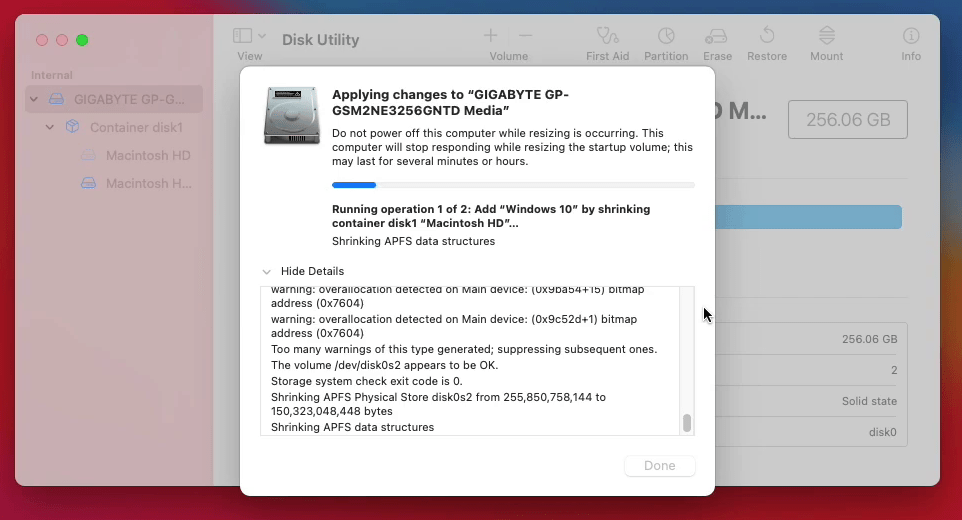
Warning: Do not power off this computer while resizing is occurring, this may last for several or hours. To avoid this you can use partition while in recovery.
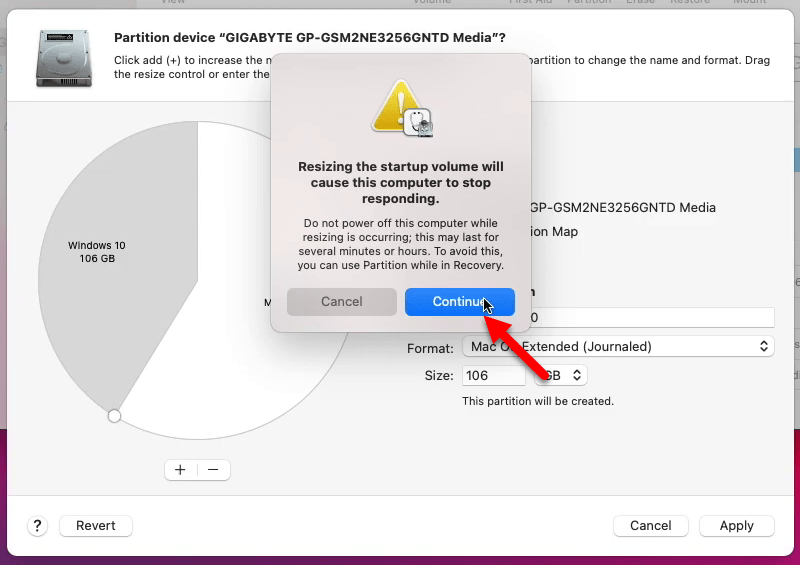
Wait until it should create or shrink partition for Windows 10, this may contain some time. During the partition creation don’t do anything, otherwise, your hard disk will be damaged.
Install Windows 10
Once the partition created for Windows 10, attach the bootable USB drive of Windows 10 and restart your PC and press the Boot menu key. Select Windows 10 drive and press enter key.
Select your input language, Time and currency method, Keyboard or input method, and click next.
Click on install option, enter the Windows 10 product key, or if you don’t have click on “I don’t have a product key” option.
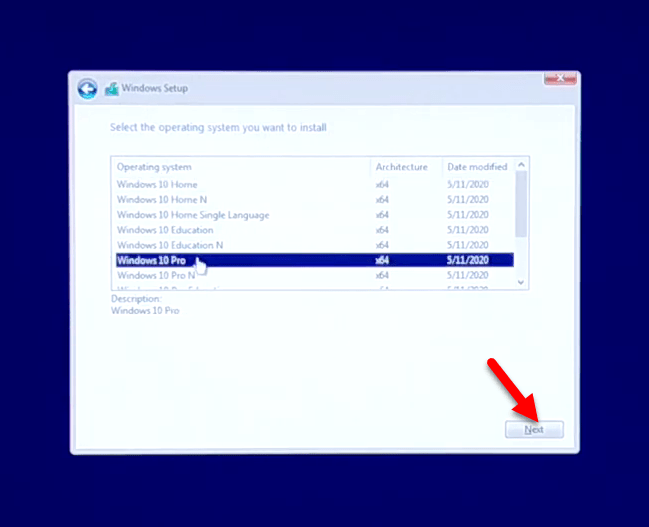
Select your Windows 10 version and click next.
Check the box of “I accept license terms” and click next.
Click on Custom install Windows only (Advanced) option.
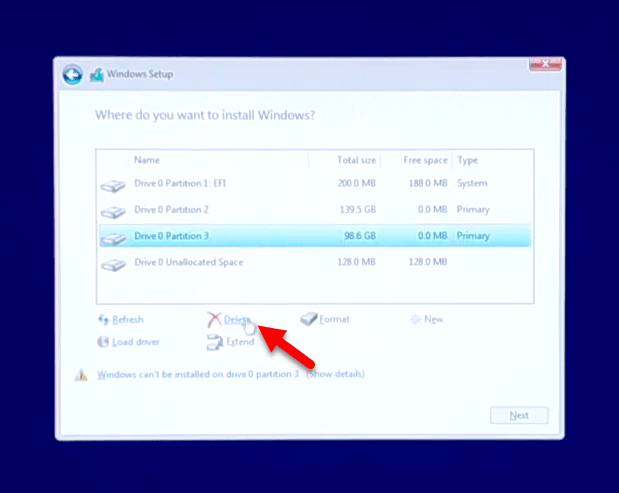
Now here be careful do not delete the EFI partition as well as macOS partition. Now delete the created partition for Windows 10 which was allocated previously on macOS. Make sure to delete the partition otherwise you will not be able to proceed.
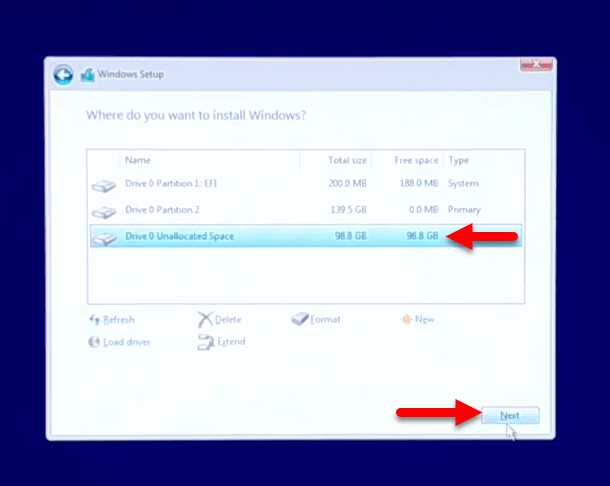
Select the unallocated space and click on next
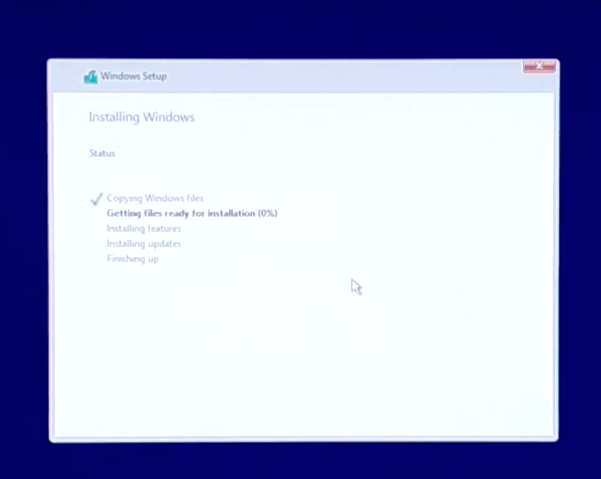
Wait until the Windows 10 successfully should install on your PC, when the installation completed your PC will restart automatically.
Once the installation completed, also complete the basic settings of Windows 10 for your PC. And finally, Windows 10 is being installed.
After you logged into Windows 10 navigate to start menu and click on settings>Security and Update. Completly update Windows 10 properly to fix the drivers, such as sound, graphic display, Bluetooth, WiFi, and other things.
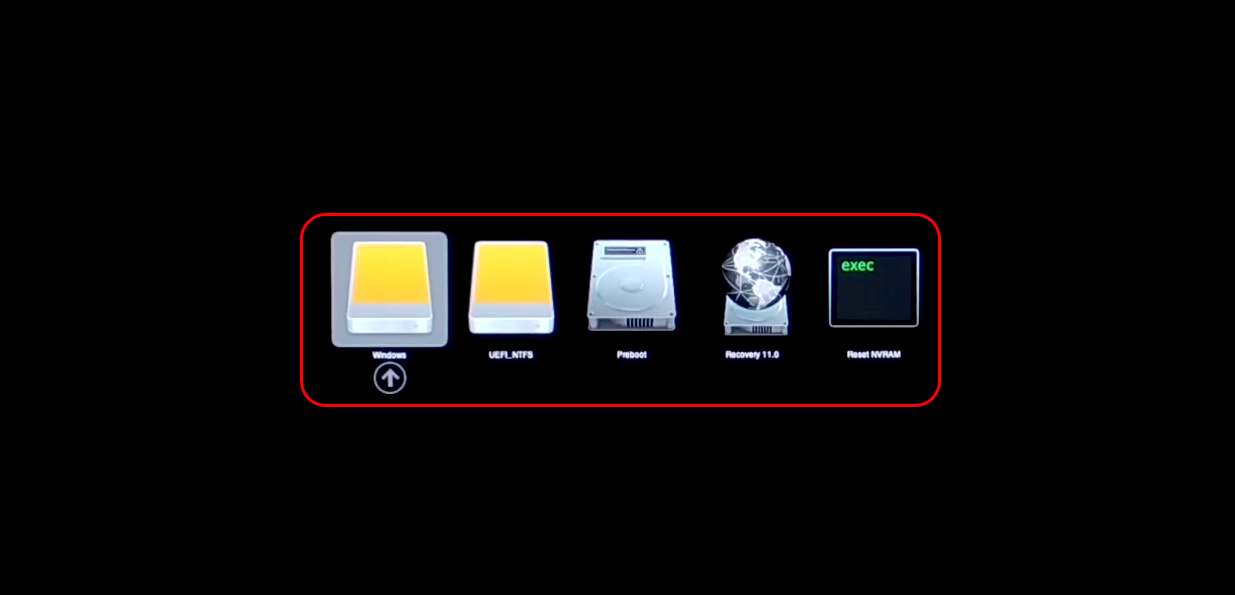
To check that macOS Big Sur 11 and Windows 10 are dual boot now on your PC, restart your PC. And check the startup window, as you here see both macOS Big Sur and Windows 10 is available at the startup screen. Go ahead any enjoy macOS Big Sur and Windows 10 on the one computer.