Новоиспечённые владельцы Mac, как правило, впадают в ступор, как только начинают работать с его клавиатурой. Отыскать нужные знаки препинания в русской раскладке непросто, если всю жизнь работал с обычными ПК. Тема особенно актуальна для тех, кто купил MacBook за границей и не может воспользоваться кириллическими обозначениями на клавишах.
Проблема решается просто. Щёлкаем на пиктограмму используемого языка и выбираем в ниспадающем меню пункт «Открыть настройки клавиатуры…»:
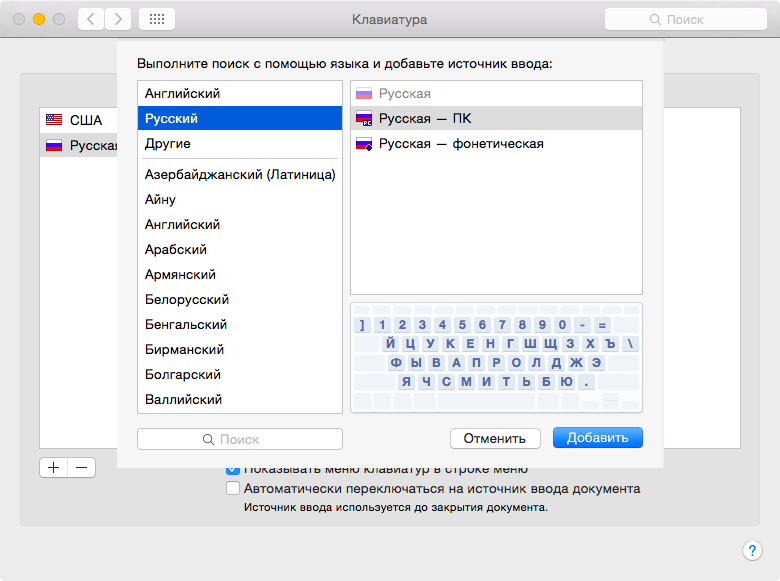
Появится окно с предлагаемыми источниками ввода. Нажимаем на кнопку «+» слева снизу, и перед нами открывается длиннющий список доступных раскладок клавиатуры. Выбираем раздел «Русский» и из предложенных вариантов останавливаемся на «Русская — ПК». Жмём «Добавить»:
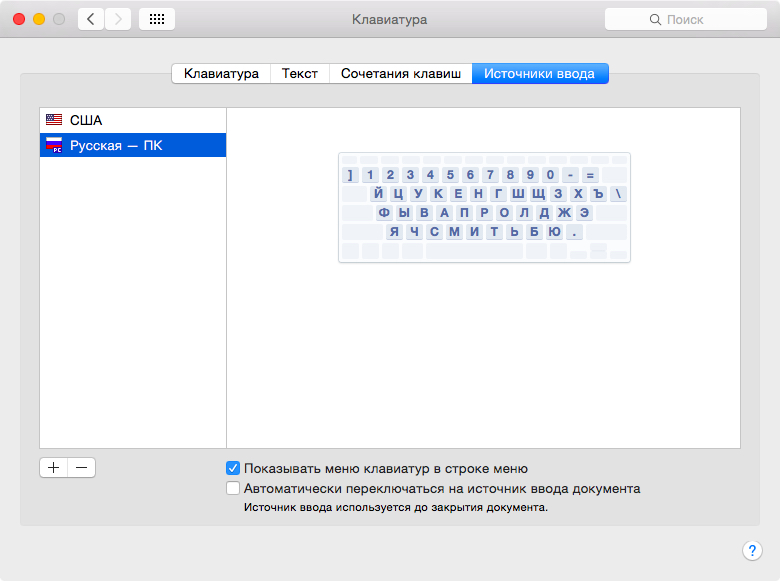
Теперь у нас две русских раскладки и одна английская. Стандартная русская раскладка нам не нужна, так что щёлкаем по ней, жмём «–» и в итоге получаем одну английскую раскладку и одну русскую:
В итоге получаем привычную раскладку. Но в некоторых случаях бывает так, что после всего проделанного одного не хватает – буквы «ё»: она не находится в привычном месте. Если этот случай о вас, смотрите дальнейшие инструкции. Проблема решается использованием «кастомной» раскладки. Её можно либо скачать, либо сделать самому.
Далее опишу процесс создания раскладки вручную для тех, кто не хочет скачивать готовую.
Шаг 1. Создаём раскладку
Для начала вернём на время в список доступных раскладок «Русскую». Затем качаем бесплатное приложение Ukelele.
Вместе с приложением в загруженном образе диска есть много готовых раскладок. Копируем файлы Russian.keylayout и Russian.icns из Ukelele_2.2.8/System Keyboards/Cyrillic в удобную папку – например, в предварительно созданную ~/Documents/Keyboard/.
Файлы можно переименовать, но обязательно одинаково, чтобы отличались у них только расширения. Я назвал их Russian_keys.
Открываем Russian_keys.keylayout с помощью Ukelele. Перед нами почти идеальная раскладка:
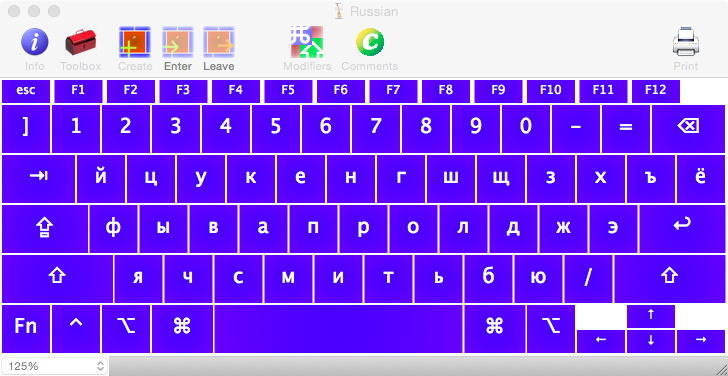
«Почти», потому что буква «ё» пока находится не на своём месте. Дважды щёлкаем по клавише шаблона раскладки, где хотим видеть «ё», и вводим её:

Замечу, что отдельно нужно ввести заглавную букву «Ё» для случая зажатой клавиши Shift. Для этого нажимаем и удерживаем её на физической клавиатуре – и так же, как до этого, редактируем клавишу шаблона. После этого выбираем File —> Save.
Шаг 2. Подключаем раскладку
Копируем оба созданных или скачанных файла — раскладку и иконку — в папку /Library/Keyboard Layouts/.
Затем возвращаемся в меню выбора источников ввода, убираем оттуда все русские раскладки и добавляем новую: выбираем раздел «Другие», где и находим нашу долгожданную раскладку «Russian». Всё, привычная раскладка в нашем распоряжении!
(13 голосов, общий рейтинг: 4.85 из 5)
iPhones.ru
Новоиспечённые владельцы Mac, как правило, впадают в ступор, как только начинают работать с его клавиатурой. Отыскать нужные знаки препинания в русской раскладке непросто, если всю жизнь работал с обычными ПК. Тема особенно актуальна для тех, кто купил MacBook за границей и не может воспользоваться кириллическими обозначениями на клавишах. Проблема решается просто. Щёлкаем на пиктограмму используемого…
In the past few weeks we’ve been using a keyboard designed for “Windows” users on Mac. What’s wonderful about it is that it reduces the potential wrist pain (the shallow key on Mac is to blame for that). It’s called AmazonBasics wired keyword. With it, you’d immediately feel at ease because it’s a keyboard designed for Windows, not Mac.

Remapping Windows Keyboards for Matching Mac Keyboard Layout (Step-by-Step Tutorial)
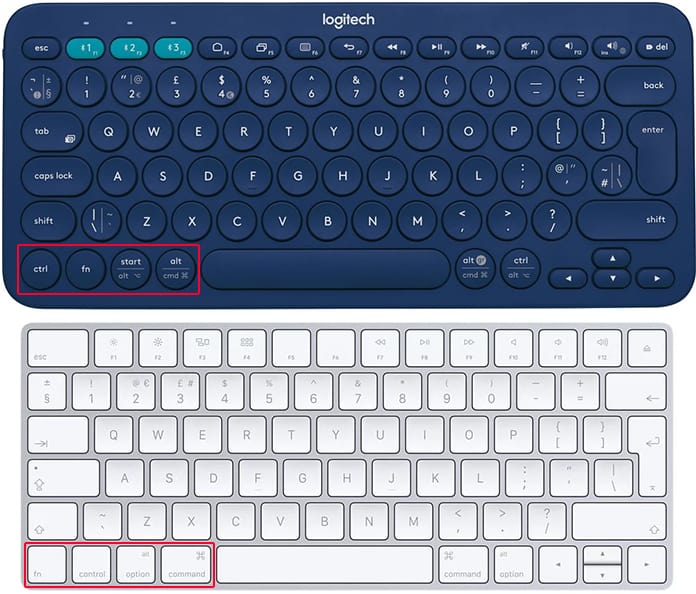
The ⌃, ⌥, and ⌘ keys on this device are replaced with Control, Windows and Alt keys. Each modifier key on this keyboard map with the Mac keys from the perspective of functionality. For instance, Control key does the thing function on Mac as it does on Windows, the Option key too does the thing thing, and the Alt key works like the Mac’s Command key.
Organization Rather Than Function Is The Issue
The issue isn’t with the key’s functions, before as we stated earlier, from the perspective of functionality, the modifying keys – Control, Option, Command – are mapping 1:1. The issues arise from the way they’re organized on the keyboard.
Here’s a look at the modifier key variances between Windows and Mac:
- Windows: ⌃ | ⌘ | ⌥
- Macintosh: ⌃ | ⌥ | ⌘
A tiny difference here, and swapping the Option and Command keys can result in issues for anyone who’s been using the Mac keyboard for years. Luckily, there’s a simple workaround for this problem.
Steps to remap MacOS modifier keys
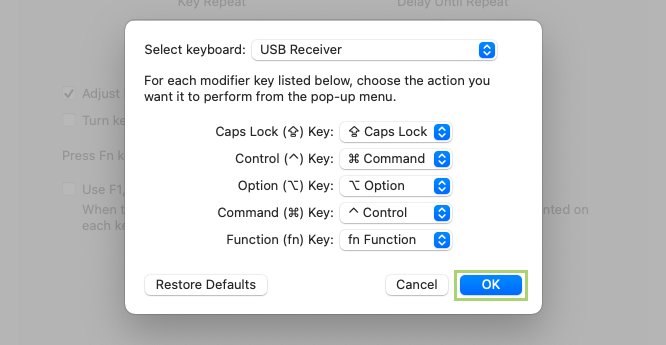
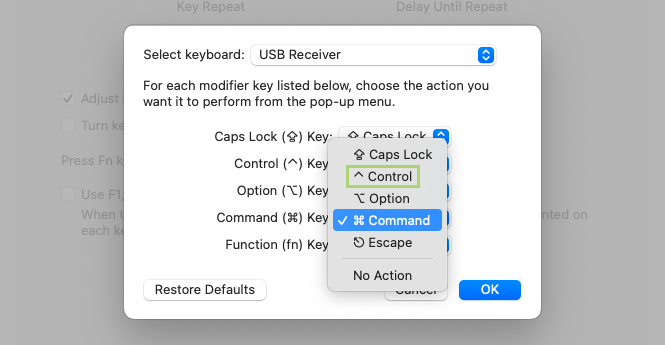
1. Go to System Preferences – Keyboard – Modifier Keys.

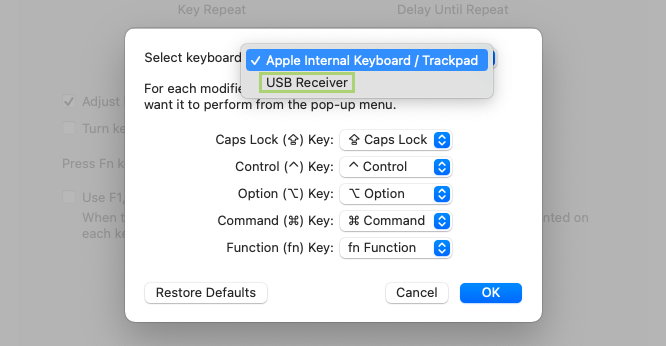
2. Choose the third-party Windows keyboard through the drop down box for “Select keyboard.”
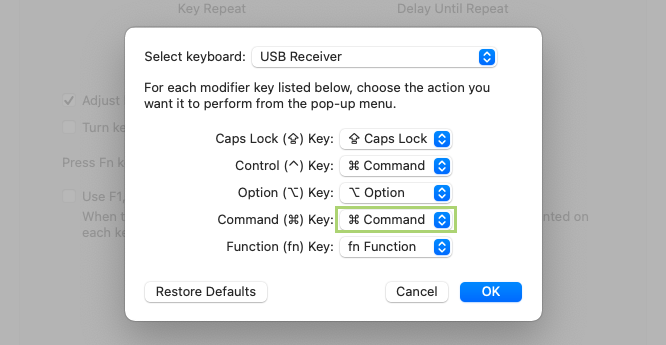
3. Choose ⌘ Command for the key setting of Option (⌥).

4. Choose (⌥) Option for the key setting of ⌘
5. Click Okay and go out of System Preferences.
There are several keyboards out there that work wonderfully well on Windows PCs. And there’s no reason why you should miss out on an intuitive keyboard that was originally designed for Windows. Benefit from the provision to start remapping modifier keys inside the System Preferences of MacOS.
What Keyboard to g=Get?
There’s AmazonBasics wired keyboard at the top of our recommendations’ list, but we’re he fans of AUKEY’s mechanical keyboards too. These generate a “clicky” impact without too much noise. The best one is from Das Keyboard, who also manufactures for Mac.
Pick the right keyboard and remap Windows keys on Mac today.
A Mac can be used with any type of keyboard. It’s probably better to use an Apple keyboard or one that’s designed for a Mac but that’s really only because of the keys on it. A normal Windows keyboard will work just fine but you will have to relearn how the modifier keys work. Again, it’s not especially difficult but you need to form a new habit. If you’re struggling with it, you can remap a Windows keyboard for a Mac.
There are lots of non-Apple keyboards available in the market, and they have their own set of keys. When we say ‘Windows keyboard’, we mean a keyboard that has a key with the Windows logo on it, as shown in the image below. Most non-Apple keyboards will have it but there are always exceptions.
Windows keyboard default behavior
When you connect a Windows keyboard to a Mac, the modifier keys are mapped as below;
Windows key: Command
Control key: Control
Alt key: Option
Shift key: Shift
The above arrangement makes sense from the name point of view but on macOS, the Command key is the more important modifier key. Every Windows command that uses Control is executed with the Command key on a Mac. For example, on Windows, you can use Control + C to copy text but on Mac, this shortcut is Command + C. You can see why it can be confusing.
Remap Windows keyboard
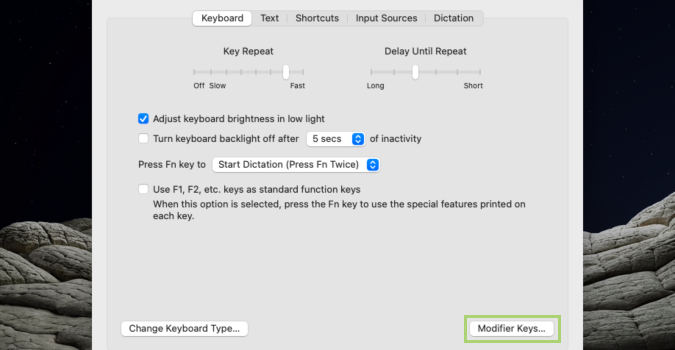
To remap the Windows keyboard, you need to open System Preferences and go to Keyboard. Select the ‘Modifier keys’ button at the bottom right. In the panel that opens, you need to modify two keys; the Control key and the Command key.
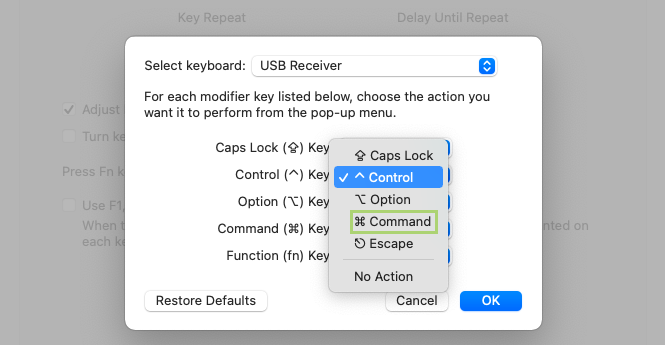
Open the dropdown for the Command key and set it to act as the Control key. Open the dropdown for the Control key and set it to act like the Command key. Apply the change.
Now, the keys will map as below;
Windows key: Control
Control key: Command
Alt key: Option
Shift key: Shift
If you want to copy text, you will execute the Control + C keyboard shortcut. On your keyboard, you will tap the key that says ‘Ctrl’ and the Mac will detect it as Command.
You can modify the Alt key too if you want but it maps to the Option key which is reasonable behavior. Make sure you make this change for the external keyboard that you’re using if you’re using it with a MacBook. You can open the Keyboard selection dropdown on the modifier keys panel and select it there. If you do not change the keyboard, the behavior of the keys will change for the internal keyboard.

Fatima Wahab
Fatima has been writing for AddictiveTips for six years. She began as a junior writer and has been working as the Editor in Chief since 2014.
Fatima gets an adrenaline rush from figuring out how technology works, and how to manipulate it. A well-designed app, something that solves a common everyday problem and looks
-
macOS
-
Клавиатура
-
Раскладка клавиатуры
Установил себе макинтош, а вот привычные мне горячие клавиши как в windows 7 нету.
Подскажите, как сделать так, что бы в мак оси была такая же раскладка клавишь как в виндовс 7?
-
Вопрос задан
-
4438 просмотров
Комментировать
Подписаться
1
Оценить
Комментировать
Пригласить эксперта
Ответы на вопрос 1
System Preferences • Keyboard • «+» • «Russian — PC»

-
Хорошо, это уже легче, а как быть, я привык переключать языка клавишами ctrl + shift
ctrl + x вырезать
ctrl + c скопировать
ctrl + v вставить
ctrl + s сохранить -
лучше переучиться: в сочетании Ctrl + C каким пальцем вы жмете Ctrl? Мизинцем? ЛУчше же большим, а под него удобнее Cmd расположена )
Ваш ответ на вопрос
Войдите, чтобы написать ответ
Похожие вопросы
-
Показать ещё
Загружается…
Минуточку внимания
Войдите на сайт
Чтобы задать вопрос и получить на него квалифицированный ответ.
Реклама
There’s not a lot of difference between a Mac and Windows keyboard. But even though they’re mostly the same, the subtle differences are sure to be frustrating to anyone who regularly uses both operating systems.
For those who use Windows regularly, it makes a lot of sense to remap the out-of-place keys on a Mac like Control and Command. And it’s not all that difficult to make the change, which should be welcome news for anyone still getting tripped up by the layout on a Mac keyboard.
In this tutorial, we’re going to change the Command key to Control, and vice-versa, leaving us with a more Windows-like keyboard experience.

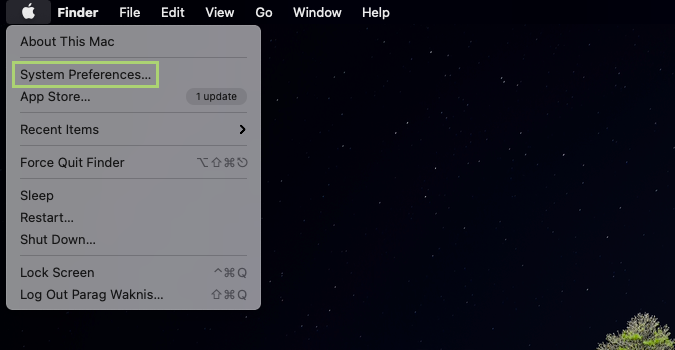
1) Click the Apple icon to open the menu.
2) In the menu that opens, open System Preferences.
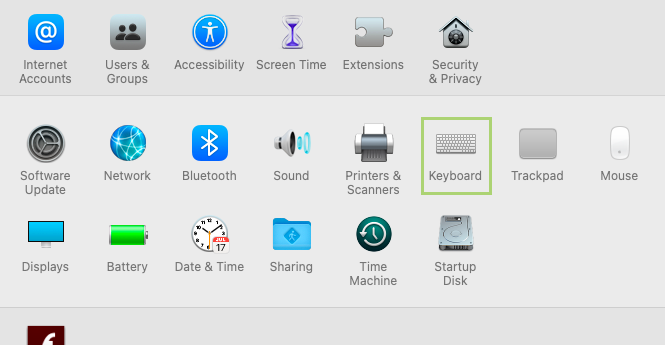
3) In the System Preferences window, select Keyboard.
4) In the dialogue box that opens, click Modifier Keys in the bottom right corner.
Sign up to receive The Snapshot, a free special dispatch from Laptop Mag, in your inbox.
5) Click the down arrow to open the Select keyboard menu.
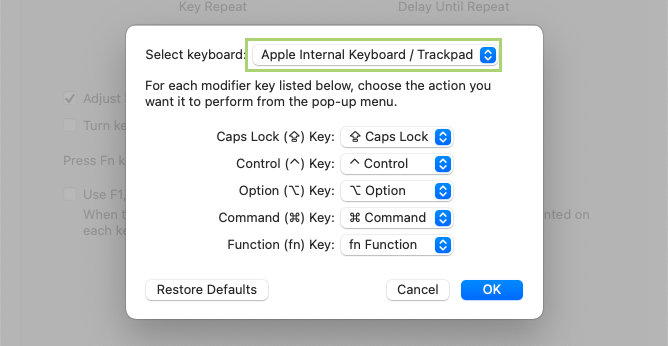
6) Select the keyboard you want to remap.
7) Open the drop down menu in front of the Control Key.

 Select Command from the drop-down menu.
9) Open the drop down menu in front of the Command Key.
10) Select Control from the drop-down menu.
11) Click OK to confirm the changed settings.