
Уровень сложностиСредний
Время на прочтение6 мин
Количество просмотров11K

Если на компьютере под Linux нужно быстренько запустить Windows или MacOS, самый простой и быстрый способ сделать это — ввести команду для скачивания и загрузки докер-контейнера с этой ОС.
В маркетплейсе RuVDS много готовых образов с установленными операционными системами. Там разные дистрибутивы Linux, Windows Server и CentOS. Но нет контейнеров с операционными системами.
Операционная система в докер-контейнере (в QEMU) не требует ручной инсталляции ОС. Всего одна команда в консоли — и контейнер Windows скачивается и запускается.
Набор контейнеров Dockur
Хороший набор докер-контейнеров с готовыми образами операционных систем в виртуальных машинах QEMU можно найти в репозитории Dockur.
Для выбора версии Windows при установке контейнера нужно изменить соответствующее значение в переменной окружения конфигурационного файла:
environment:
  VERSION: "11"
В наличии следующие контейнеры Windows:
Предупреждение. Windows 8 потребляет очень много ресурсов CPU и RAM.
Есть также контейнеры MacOS, тут выбор поменьше:
Запуск через Docker Compose:
services:
  macos:
    image: dockurr/macos
    container_name: macos
    environment:
      VERSION: "13"
    devices:
      - /dev/kvm
      - /dev/net/tun
    cap_add:
      - NET_ADMIN
    ports:
      - 8006:8006
      - 5900:5900/tcp
      - 5900:5900/udp
    volumes:
      - ./macos:/storage
    restart: always
    stop_grace_period: 2m
Из консоли:
docker run -it --rm --name macos -p 8006:8006 --device=/dev/kvm --device=/dev/net/tun --cap-add NET_ADMIN -v ${PWD:-.}/macos:/storage --stop-timeout 120 dockurr/macosДля выбора версии тоже следует изменить значение в переменной окружения конфигурационного файла:
environment:
  VERSION: "13"
Версии MacOS перечислены в таблице выше.
Запуск контейнера Windows на сервере
Установить контейнер можно через Docker Compose, вот файл compose.yaml, который практически идентичен файлу для MacOS:
services:
  windows:
    image: dockurr/windows
    container_name: windows
    environment:
      VERSION: "11"
    devices:
      - /dev/kvm
      - /dev/net/tun
    cap_add:
      - NET_ADMIN
    ports:
      - 8006:8006
      - 3389:3389/tcp
      - 3389:3389/udp
    volumes:
      - ./windows:/storage
    restart: always
    stop_grace_period: 2m
Или из командной строки:
docker run -it --rm --name windows -p 8006:8006 --device=/dev/kvm --device=/dev/net/tun --cap-add NET_ADMIN -v ${PWD:-.}/windows:/storage --stop-timeout 120 dockurr/windowsПо умолчанию устанавливается Windows 11 Pro, другие версии можно указать, изменив параметр переменной окружения, как написано выше.
Дальнейший процесс полностью автоматический, нужно дождаться, пока контейнер скачается и запустится. Docker будет доступен через браузер на порту 8006.
Если зайти по нашему IP-адресу и указанному порту, мы увидим процесс скачивания ISO-образа Windows с сервера Microsoft:

Потом автоматическая установка и настройка Windows:

Это специальная версия Windows for Docker, она свободно распространяется с сайта Microsoft и требует активации для полноценной работы. Более старые версии Windows работают 30 дней без активации.

После завершения процесса в браузере откроется рабочий стол Windows:
Через браузер у нас работает система удалённого доступа к рабочему столу VNC (Virtual Network Computing), которая заметно подтормаживает, не поддерживает передачу звука и некоторых других функций. Для максимального комфорта рекомендуется настроить удалённый доступ через RDP. Собственно, этот доступ уже настроен в вышеуказанном файле compose.yaml, в котором присутствуют такие строки:
- 3389:3389/tcp
- 3389:3389/udp
По этим портам и осуществляется удалённый доступ к системе из RDP-клиента, такого как Microsoft Remote Desktop, можно на той же физической системе.
В командной строке для запуска контейнера мы видим параметр --device=/dev/kvm. Это указывает на использование виртуальной машины KVM (Kernel-based Virtual Machine), опенсорсной технологии виртуализации, встроенной в Linux. В частности, KVM позволяет превратить Linux в гипервизор для запуска нескольких изолированных виртуальных окружений, то есть виртуальных машин.
KVM — это часть Linux с 2006 года (с версии ядра 2.6.20), то есть в данном случае мы работаем с нативной виртуальной машиной Linux. Чтобы это стало возможным, материнская плата должна поддерживать технологию виртуализации на аппаратном уровне:

Чтобы проверить наличие поддержки KVM на сервере под Linux, можно запустить следующую команду:
sudo apt install cpu-checker
sudo kvm-ok
Если kvm-ok выдаёт ошибку, то нужно проверить, что:
- в BIOS включены соответствующие расширения виртуализации (Intel VT-x, VT-d или AMD SVM),
- включена «вложенная виртуализация», если контейнер запускается внутри виртуальной машины.
К сожалению, большинство облачных провайдеров не разрешают вложенную виртуализацию на своих VPS:

Поэтому Windows в докер-контейнере запустится только на выделенном сервере или на домашнем сервере/ПК.
Если kvm-ok не выдаёт никакой ошибки, но контейнер всё равно сообщает об отсутствии KVM-устройства, причиной может быть проблема с правами, в качестве решения можно добавить параметр privileged: true в файл compose (или sudo в команду docker).
KVM обеспечивает виртуальной машине доступ к USB-устройствам и другим аппаратным ресурсам. Он позволит даже редактировать BIOS, как в примере выше.
По умолчанию, контейнеру Windows выделяется два ядра CPU и 4 ГБ RAM, это минимальные требования для запуска Windows 11. Чтобы изменить объём выделяемых ресурсов, следует добавить следующие строчки в конфигурационный файл:
environment:
  RAM_SIZE: "8G"
  CPU_CORES: "4"
Увеличение объёма дискового пространства со стандартных 64 ГБ (по умолчанию) до 100 ГБ:
environment:
  DISK_SIZE: "100G"
Виртуальная машина будет занимать столько места на диске, сколько реально занимает контейнер с файлами, а не максимальное указанное значение.
Добавить несколько дисков:
environment:
  DISK2_SIZE: "32G"
  DISK3_SIZE: "64G"
volumes:
  - ./example2:/storage2
  - ./example3:/storage3
Зачем это нужно
Распространённая причина запуска Windows в контейнере — если у нас чисто линуксовое (или яблочное) окружение, вокруг нет ни одного компьютера под Windows, но срочно понадобилось запустить какую-то специфическую программу, которая работает только под Windows. В окружении виртуализации типа Wine эта программа не полностью функциональна. Например, старая утилита для редактирования BIOS (как AMIBCP на скриншоте) запускается под Wine, но не даёт реально изменять значения BIOS, то есть не сохраняет образ ROM:

Конечно, можно установить на ПК мультизагрузчик и вторую ОС или запустить виртуальную машину, но это тоже непростой и многоступенчатый процесс: сконфигурировать гипервизор, выделить аппаратные ресурсы.
Копия Windows в контейнере — самый простой и быстрый способ, если срочно нужна эта ОС. И самое удобное то, что не нужно проходить через процесс инсталляции системы вручную, потому что она устанавливается автоматически и сразу готова к работе. Вся процедура скачивания и запуска контейнера занимает несколько минут.
Другие наборы контейнеров
Кроме перечисленных выше, в репозитории Dockur есть и другие наборы докер-контейнеров, а также программы, полезные для самохостинга:
- Windows для ARM64,
- сервер Samba SMB,
- Dnsmasq,
- strfry, рилей-сервер Nostr,
- casa, операционная система CasaOS для самохостинга (личное облако или домашний дата-центр),

- statping — страничка с красивыми графиками, аналитикой и плагинами, всё для мониторинга сайтов и приложений,
- lemmy — агрегатор ссылок и форум, аналог Reddit или Hacker News, только для децентрализованной сети будущего, где у каждого пользователя свой сервер.

Windows на виртуальном сервере
Хотя KVM не работает на VPS, в маркетплейсе RUVDS есть четыре образа с установленной системой Windows Server 2019 и специализированным программным обеспечением:
- METATRADER 5 (MT5) – SERVER CORE с торговым терминалом MT5,
- SQL EXPRESS – SERVER CORE c бесплатной редакцией SQL Server 2019 и SQL Server Management Studio 18.4. Максимальный размер БД в этой редакции ограничен 10 ГБ,
- сервер Minecraft,
- VPN L2TP — позволяет сразу после установки шаблона подключаться к серверу по VPN, целиком меняя IP-адрес подключившегося.

Если выбрать такой образ — мы получаем готовую лицензированную Windows и настроенный софт.
Кроме того, при ручной конфигурации сервера в конфигураторе есть возможность выбрать несколько версий серверной ОС Windows для установки:
- Windows Server 2022.
- Windows Server 2019.
- Windows Server 2016.
- Windows Server 2012 R2.
- Windows Server Core 2022.

Есть и готовые тарифы с Windows:

Самая дешёвая Windows 2012 R2 стоит 588 руб. в месяц (470 руб. при оплате за год).
С 2023 года у российских пользователей возникли проблемы с покупкой Windows в условиях санкций. В такой ситуации выбор VPS с предустановленной Windows или докер-контейнер с официальным образом — легальный выход из ситуации.
Кстати, таким же удобным способом в Docker/QEMU можно запускать и Linux-контейнеры.
© 2025 ООО «МТ ФИНАНС»
Telegram-канал со скидками, розыгрышами призов и новостями IT 💻

How to launch MacOs in Docker. Step by Step guide for Windows insider build of Windows 10 or Windows 11
Create MacOS Virtual Machine on Ubuntu using WSL2 tech
Sources used:
- https://github.com/sickcodes/Docker-OSX
- https://dev.to/nicole/running-macos-on-windows-10-with-wsl2-kvm-and-qemu-21e1
- https://boxofcables.dev/accelerated-kvm-guests-on-wsl-2/
- https://sugeul.github.io/2020-06-21-MacOS-on-WSL2/
For stable Windows 10 (I have not tested this option, but it defently must work) TLDR — «kvm-ok» command says your CPU is not supported
- You need to install Linux distro in Hyper-V
- Enable guest virualization for installed disto using command:
Set-VMProcessor -VMName <Your_Hyper-V_Machine_Name> -ExposeVirtualizationExtensions $true
Example
Set-VMProcessor -VMName "Ubuntu 20.04" -ExposeVirtualizationExtensions $true
- Update Linux Distro (Ubuntu was used in my case)
sudo apt update && sudo apt -y upgrade
- Install all packages need for virtualization .(Some of them may be not need anymore. You will also need to install Docker for Linux)
sudo apt -y install build-essential libncurses-dev bison flex libssl-dev libelf-dev cpu-checker qemu-kvm aria2 dwarves qemu-system qemu-utils python3 python3-pip
- Go to Linux System Steps from here
For Windows insider build of Windows 10 or Windows 11
Windows Machine
- Install Docker Desktop
https://desktop.docker.com/win/main/amd64/Docker%20Desktop%20Installer.exe
- Open Powershell and enable:
- WSL2 feature for windows
dism.exe /online /enable-feature /featurename:Microsoft-Windows-Subsystem-Linux /all /norestart
- Virtual Machine Platform
dism.exe /online /enable-feature /featurename:VirtualMachinePlatform /all /norestart
- Download and Install Linux kernel update package
https://wslstorestorage.blob.core.windows.net/wslblob/wsl_update_x64.msi
- Set Default version for WSL = 2
wsl --set-default-version 2
- Donwload and Intall Linux sub system as WSL (Ubuntu in my case)
Invoke-WebRequest -Uri https://aka.ms/wslubuntu2004 -OutFile Ubuntu.appx -UseBasicParsing
curl.exe -L -o ubuntu-2004.appx https://aka.ms/wsl-ubuntu-2004
Add-AppxPackage .\Ubuntu.appx
- Start WSL Linux, you’ve installed and create new user with root password
- Open Docker Desktop and Enable WSL2 suport for your WSL Linux. Docker information can be found here
https://docs.docker.com/desktop/windows/wsl/
Linux Machine
- Login as root
- Update Linux Distro (Ubuntu was used in my case)
sudo apt update && sudo apt -y upgrade
- Install all packages need for virtualization
sudo apt -y install build-essential libncurses-dev bison flex libssl-dev libelf-dev cpu-checker qemu-kvm aria2 dwarves qemu-system qemu-utils python3 python3-pip
- Download latest WSL2 Linux Kernel
aria2c -x 10 https://github.com/microsoft/WSL2-Linux-Kernel/archive/linux-msft-wsl-5.10.74.3.tar.gz
tar -xf WSL2-Linux-Kernel-linux-msft-wsl-5.10.74.3.tar.gz
cd WSL2-Linux-Kernel-linux-msft-wsl-5.10.74.3
- Lets Edit Kernel
cp Microsoft/config-wsl .config
make menuconfig
- Proceed to Processor type and features -> Linux guest support enable built-in KVM guest support
- Build the new kernel (Will take some time)
- Install modules (May be not needed but I’ve installed it anyway)
sudo make modules_install
- Copy created Kernel to some folder you have access to (user folder for example)
cp arch/x86/boot/bzImage /mnt/c/Users/**<username>**/bzImage
nano /mnt/c/Users/**<username>**/.wslconfig
- Paste but don’t forget to change to your Windows username:
[wsl2]
nestedVirtualization=true
kernel=C:\\Users\\<username>\\bzImage
pageReporting=true
kernelCommandLine=intel_iommu=on iommu=pt kvm.ignore_msrs=1 kvm-intel.nested=1 kvm-intel.ept=1 kvm-intel.emulate_invalid_guest_state=0 kvm-intel.enable_shadow_vmcs=1 kvm-intel.enable_apicv=1
- Switch back to Windows and open Powershell and shutdown WSL Linux
wsl.exe --shutdown Ubuntu
- Restart Docker Daemon
- Open WSL LINUX and check that new kernel is applied — should show today’s date and the time should be a few minutes ago
If kernel is not updated and you used user folder as me, check that launched WSL Linux using that user
14) Configure kvm-intel
sudo nano /etc/modprobe.d/kvm-nested.conf
Paste:
options kvm-intel nested=1
options kvm-intel enable_shadow_vmcs=1
options kvm-intel enable_apicv=1
options kvm-intel ept=1
- Load kenel module
- Check KVM is OK — Must say that everything is OK, otherwise you wont be able to run guest virtualization
- Switch back to Windows
Download and Install some «XServer» app that can run graphical Linux apps on Windows.
I was using GWSL.
https://opticos.github.io/gwsl/tutorials/download.html
-
Launch installed GWSL and Enable GWSL Dsitro Tools —> Display/Audio Auto-Exporting
-
Switch back to Linux. Lets run MAC OS container. I used https://github.com/sickcodes/Docker-OSX.
-
NB! If you want to install fresh image yourself, you need to research how to create and mount VHD for qemu.
-
Run Catalina Pre-Installed
# 40GB disk space required: 20GB original image 20GB your container.
docker pull sickcodes/docker-osx:auto

# boot directly into a real OS X shell with a visual display [NOT HEADLESS]
docker run -it \
    --device /dev/kvm \
    -p 50922:10022 \
    -v /tmp/.X11-unix:/tmp/.X11-unix \
    -e "DISPLAY=${DISPLAY:-:0.0}" \
    -e GENERATE_UNIQUE=true \
    sickcodes/docker-osx:auto

# username is user
# passsword is alpine
- Wait for it to download image and create VHD. MAC OS will be launched after that

If you use Docker and virtual machines often, you may be happy to know that you can run MacOS VM’s in Docker, at near native performance atop Windows or Linux, thanks to an open source project called Docker-OSX. Yes, that means you can run MacOS on a PC, whether that PC is running Windows or Linux. Docker-OSX includes support for iMessage, and iPhone/iPad USB connections too, allowing for a robust MacOS experience, despite being on a PC.
For the unfamiliar, Docker is a platform that makes it easy to automate and deploy virtual machines and applications in containers. These containers include the full operating system, apps, and relevant dependencies, making the environment consistent and portable, plus there’s versioning and rollback capabilities, and this all works flawlessly regardless of what the host operating system is, or where it’s located. Docker is very popular in the tech world, since it makes testing, research, and development much more consistent and easy, and because the containers are isolated, you can go all out and muck around without worrying about messing up the host operating system. Docker-OSX expands all of this greatness to allow MacOS virtual machines to to run in Docker on Windows, or Linux, and is a fantastic project for anyone interested in tinkering with MacOS from a PC (for what it’s worth, you can also run MacOS Docker containers natively on a Mac, but that’s separate from what we’re discussing here).
- Check out Docker-OSX here at Github
In case it wasn’t obvious, this is a bit advanced, and aimed at advanced users, developers, tinkerers, hackers, DevOps, or just the merely curious and technically capable, so if you’re a more casual user you may be a bit overwhelmed by the setup process.
The video embedded below goes through the setup process as well, and may be a useful resource if you’re looking to either deploy this yourself or get an idea of the entire setup procedure before diving in:
You may already know that you can now deploy native MacOS Docker containers by using MacOSContainers and Homebrew, but it’s certainly nice to know that you can also run MacOS in Docker on a Windows PC or Linux PC. Check it out, if you’re into this kind of thing.
Docker Installation (Windows, macOS, Linux)
Docker is a powerful tool that can be installed on various operating systems, including Windows, macOS, and Linux. In this section, we will walk through the installation process for each of these platforms, making sure you have everything you need to get started with Docker.
1. Docker Installation on Windows
Docker can be installed on Windows using Docker Desktop, which provides a graphical user interface and simplifies the process of managing Docker containers.
Prerequisites for Windows:
- Windows 10/11 Pro or Enterprise (Windows Home can use Docker Desktop with WSL 2)
- Windows Subsystem for Linux (WSL 2): Docker Desktop uses WSL 2 for the Linux kernel on Windows.
- Hyper-V and Containers Features: These need to be enabled in the system BIOS.
Steps to Install Docker on Windows:
-
Download Docker Desktop for Windows:
- Go to the official Docker website and download Docker Desktop for Windows.
-
Install Docker Desktop:
- Run the downloaded installer and follow the installation instructions.
- The installer will enable Hyper-V and WSL 2 features automatically if they are not already enabled.
-
Install WSL 2 (if not already installed):
- Docker Desktop requires WSL 2 to run Linux containers on Windows. If you don’t have WSL 2 installed, Docker will prompt you to install it.
- To install WSL 2, follow the instructions from Microsoft’s WSL installation guide.
-
Launch Docker Desktop:
- Once installed, launch Docker Desktop from the Start menu.
- The first time you run Docker, it will configure Docker Desktop to use WSL 2.
-
Verify Installation:
- Open a command prompt or PowerShell window and type:
docker --version
- You should see the installed Docker version printed on the screen.
-
Test Docker:
- Run the following command to ensure Docker is running correctly:
docker run hello-world
- Docker will download a test image and run a container that outputs a confirmation message if everything is set up properly.
2. Docker Installation on macOS
Docker can also be installed on macOS using Docker Desktop for macOS. This provides an easy way to run Docker containers with the macOS graphical interface.
Prerequisites for macOS:
- macOS 10.14 or later (Mojave, Catalina, Big Sur, or Monterey)
- Virtualization Support: Docker Desktop uses Hypervisor.framework for virtualization on macOS.
Steps to Install Docker on macOS:
-
Download Docker Desktop for macOS:
- Visit the Docker Desktop for macOS page and download the latest version.
-
Install Docker Desktop:
- Open the
.dmgfile you downloaded and drag the Docker application to your Applications folder.
- Open the
-
Launch Docker Desktop:
- Go to the Applications folder and open Docker.
- On the first launch, Docker Desktop will ask for system permissions to install helper tools. Grant the required permissions.
-
Verify Installation:
- Open a terminal and type the following command:
docker --version
- This should display the installed Docker version.
-
Test Docker:
- Run the following command to check that Docker is working correctly:
docker run hello-world
- Docker will pull the «hello-world» image and run it in a container, printing a confirmation message.
3. Docker Installation on Linux
Docker can be installed on various Linux distributions, including Ubuntu, CentOS, and Debian. In this section, we will focus on installing Docker on Ubuntu. The process is similar for other Linux distributions, with minor differences in package management.
Prerequisites for Ubuntu:
- A 64-bit version of Ubuntu (16.04 or later)
- Sudo or root access
Steps to Install Docker on Ubuntu:
-
Update Your System:
Open a terminal and run the following commands to update your system:
   sudo apt update
   sudo apt upgrade
Enter fullscreen mode
Exit fullscreen mode
-
Install Required Dependencies:
Docker requires some dependencies likeapt-transport-https,ca-certificates,curl,software-properties-common. Install them using:
sudo apt install apt-transport-https ca-certificates curl software-properties-common
Enter fullscreen mode
Exit fullscreen mode
-
Add Docker’s Official GPG Key:
Run the following command to add Docker’s official GPG key, which ensures the authenticity of the Docker packages.
curl -fsSL https://download.docker.com/linux/ubuntu/gpg | sudo apt-key add -
Enter fullscreen mode
Exit fullscreen mode
-
Add Docker’s Repository:
Add the Docker repository to your list of sources so that you can install Docker from it:
sudo add-apt-repository "deb [arch=amd64] https://download.docker.com/linux/ubuntu $(lsb_release -cs) stable"
Enter fullscreen mode
Exit fullscreen mode
-
Install Docker Engine:
Now, update your package database again and install Docker:
   sudo apt update
   sudo apt install docker-ce
Enter fullscreen mode
Exit fullscreen mode
-
Start and Enable Docker:
Enable Docker to start automatically when the system boots and start the Docker service:
   sudo systemctl enable docker
   sudo systemctl start docker
Enter fullscreen mode
Exit fullscreen mode
-
Verify Installation:
To check if Docker is installed and running correctly, use:
docker --version
Enter fullscreen mode
Exit fullscreen mode
-
Test Docker:
Run the following command to verify that Docker is functioning properly:
sudo docker run hello-world
Enter fullscreen mode
Exit fullscreen mode
Docker will pull the hello-world image from the Docker Hub and run it in a container, displaying a message indicating the installation was successful.
Post-installation Steps for Linux (Optional)
After installation, you may want to configure Docker to allow running Docker commands without sudo.
- Create a Docker Group:
sudo groupadd docker
Enter fullscreen mode
Exit fullscreen mode
-
Add Your User to the Docker Group:
Replaceusernamewith your actual username.
sudo usermod -aG docker $USER
Enter fullscreen mode
Exit fullscreen mode
-
Log Out and Log Back In:
For the group changes to take effect, log out and log back in, or run the following:
newgrp docker
Enter fullscreen mode
Exit fullscreen mode
-
Verify Without
sudo:
Run Docker commands without usingsudo:
docker run hello-world
Enter fullscreen mode
Exit fullscreen mode
Conclusion
Docker is now successfully installed on your machine, whether it’s running Windows, macOS, or Linux. With Docker Desktop on Windows and macOS, you have an easy-to-use graphical interface to manage your containers. On Linux, Docker Engine is ready to use from the command line, and you’ve learned the necessary steps to run Docker without sudo.
You can now begin creating Docker images, running containers, and exploring the world of containerization!
Testcontainers is one of the most popular use cases for Docker on desktops. Spinning up lightweight ephemeral containers is a great way to ensure your code uses the same third party services in test as in production. Testcontainers manages the lifecycle of the containers and integrates with different test frameworks to provide containers and their configuration to your code. However, the library doesn’t implement a container engine or runtime itself. Instead, it expects Docker to be available on the machine.
Recently, we received many questions from Testcontainers users about the various options of running Docker workloads on their non-Linux machines. We identified three (and a half) ways of running Docker on Windows and macOS and decided to test them all for you with Testcontainers’ own test suite to tell you what to expect and how each of them behaved.

In this article we look at what options you have for the container runtime to run integration tests with Testcontainers, provide some guidance on how to setup them, and outline the current state of their compatibility.
We’ll look at:
- Docker Desktop
- Docker Machine
- Minikube
- Podman
The Setup
It’s not trivial to test compatibility of runtimes and other low-level systems. However, if you can successfully run a body of tests for the application level software (something that uses the runtime), you can claim compatibility with a reasonably high degree of confidence.
Indeed if the tests pass you can assume the runtime provides and behaves in a way the application expects it to. For this research we used the Testcontainers core tests which rely on a wide range of the Docker APIs.
The tests were executed on an Intel chip based macOS. We haven’t tested these options on Apple’s new M1-based laptops, as its ARM nature prevents running certain images no matter what is used to run the Docker daemon. All of the options that we reviewed exist for Windows as well, and the experience will be similar / the same.
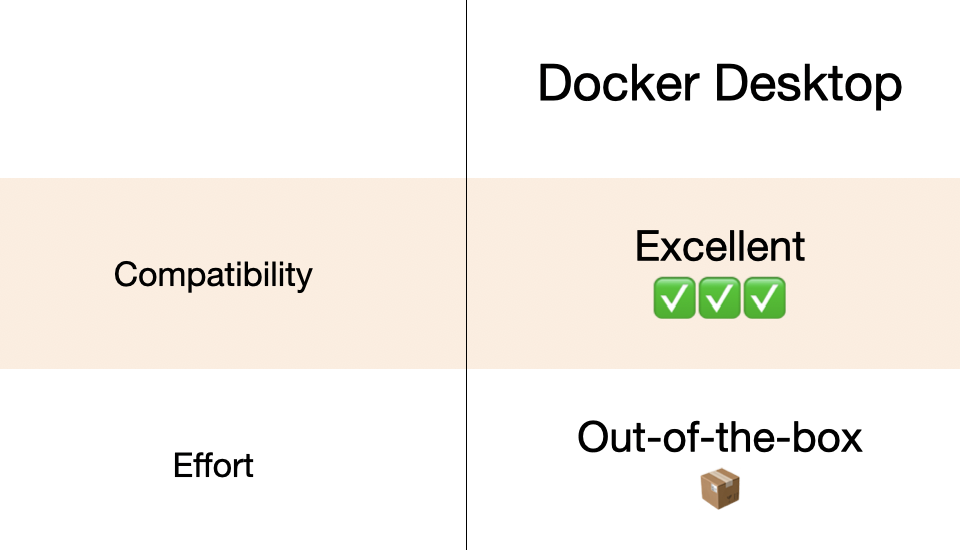
Docker Desktop
Docker Desktop is a Docker distribution that includes a GUI and tight integration into the host OS and is available for Windows and macOS. It’s a product by Docker, Inc., which bundles a number of components that should satisfy most of your needs for running containers on desktop machines:
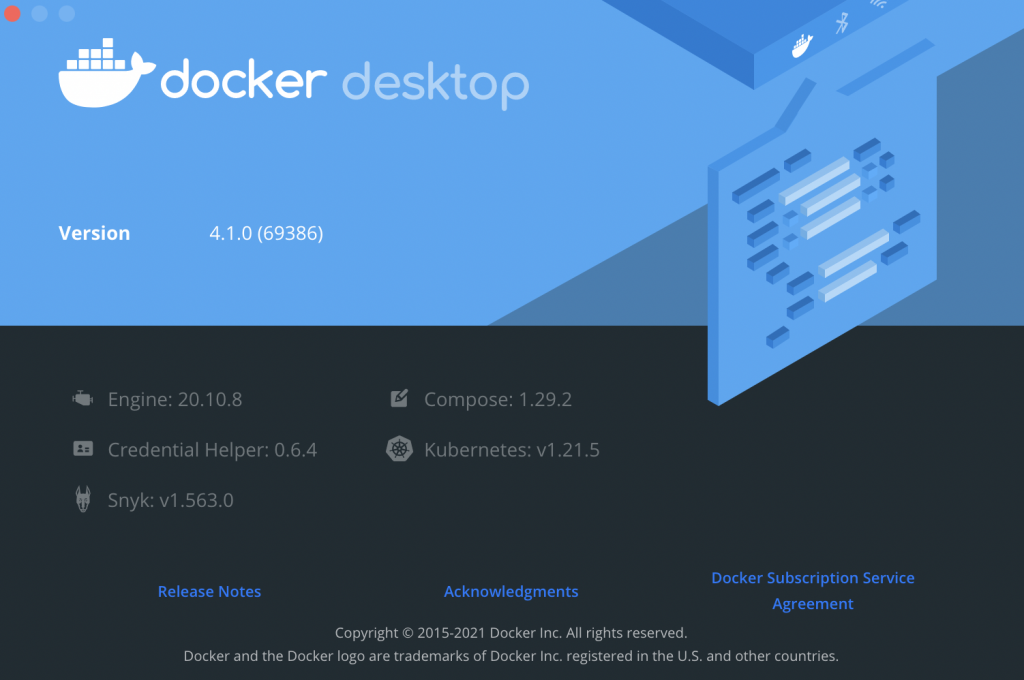
Besides the Docker Engine, it includes Docker Compose and even has built-in support for Kubernetes.
Docker Desktop is polished, multi-functional, and packs quite a few additional services. You can connect with your Docker account and publish images to Docker Hub, collaborate with your team, and so on. For obvious reasons, we consider it the reference implementation of “Docker” on Windows and macOS.
Getting started with Docker Desktop is rather straightforward: you download it, drag & drop it into your Applications folder, and you are good to go! You have a fully functional Docker running on your computer now.
One setting you would like to check is the amount of resources Docker can use on your machine, in Docker Desktop you find it in the Resources tab.
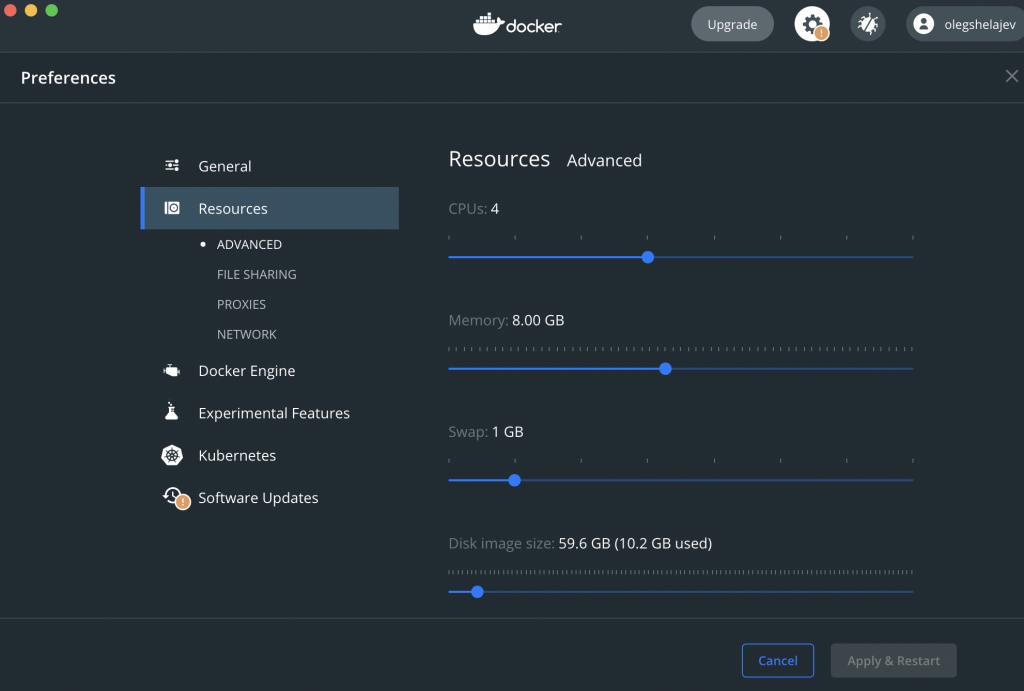
If you plan to run tests that depend on multiple containers you might want to up the amount of memory they are allowed to use. You may also let it access more CPUs to make these containers start faster.
Running tests using Testcontainers is then as straightforward as running a unit test:
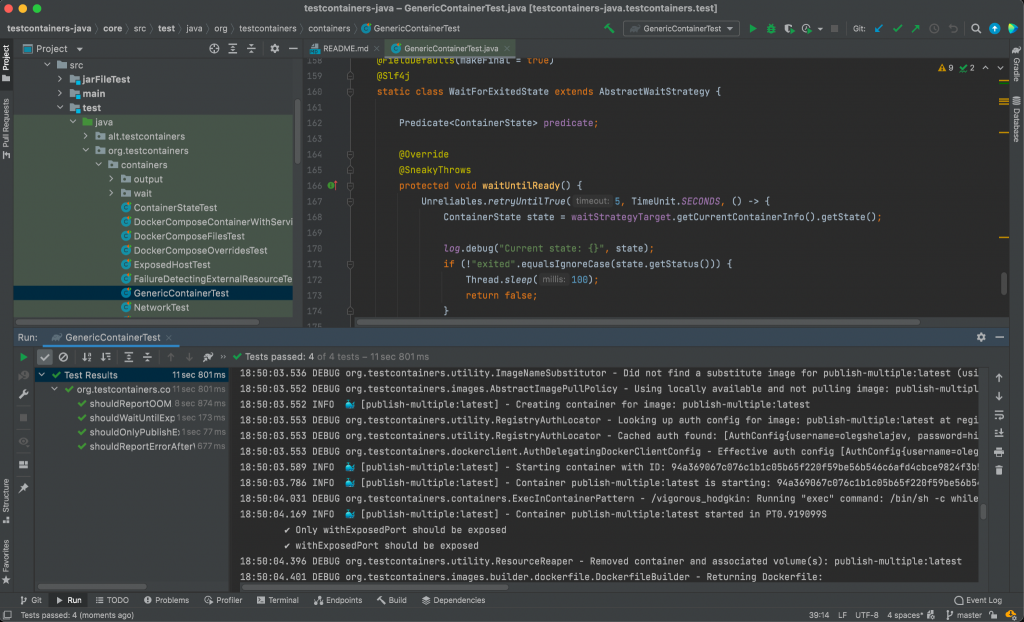
All in all developer experience with Docker Desktop is natural and easy – install the app, run it, and it provides the necessary components out of the box. Your tests using the full range of features available in the Testcontainers library will work with Docker Desktop.
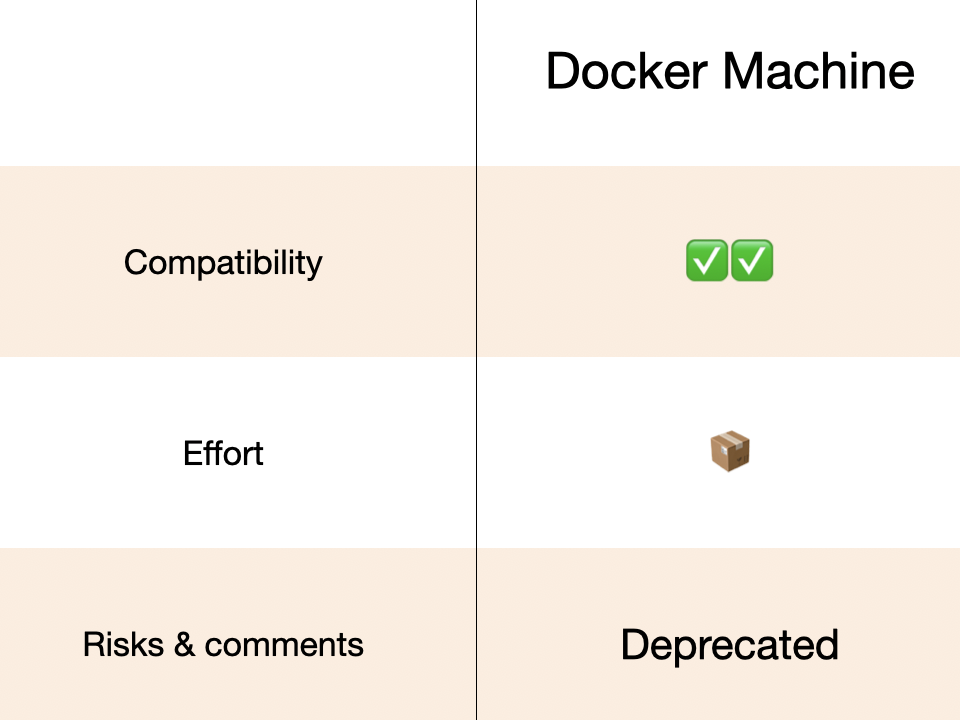
Docker Machine
Before Docker Desktop got all good and shiny, there was another project making it possible to run Docker on Windows and macOS – Docker Machine. And indeed, the official legacy Docker distribution on Windows, Docker Toolbox, was Docker Machine based.
Docker Machine was recently deprecated, but what it did and still does is create Docker virtual machine hosts and configures the Docker client to talk to them, while handling the nitty-gritty details of key management for the TLS connection for you. The default driver for Docker Machine is VirtualBox, which means it creates a virtual machine with VirtualBox and the necessary configuration for your docker CLI commands and API calls to correctly talk to Docker running in that VM.
Here’s how to install Docker Machine for running integration tests. You download the binary (note the last release was in September 2019), install VirtualBox and create the VM using the docker-machine command:
$ # download the binary
$ curl -L https://github.com/docker/machine/releases/download/v0.16.2/docker-machine-`uname -s`-`uname -m` >/usr/local/bin/docker-machine
$ chmod +x /usr/local/bin/docker-machine

$ # install VirtualBox
$ brew install --cask virtualbox

$ # create the machine
$ docker-machine create default --virtualbox-cpu-count "-1" --virtualbox-memory "8192"
It is very similar to Docker Desktop that also starts a virtual machine for running Docker (remember, Docker is a Linux technology, so we have to use the virtualization!). However, while Docker Desktop relies on modern HyperKit on macOS and a combination of WSL and Hyper-V on Windows, Docker Machine allows you to pick the virtualization provider, and VirtualBox is the most straightforward option.
Testcontainers was originally developed back when docker-machine was the only option for running Docker on macOS, so naturally Testcontainers is already Docker Machine compatible. Testcontainers can detect the presence of docker-machine and configure itself to correctly use it. This means that you can run the tests out of the box after the installation.
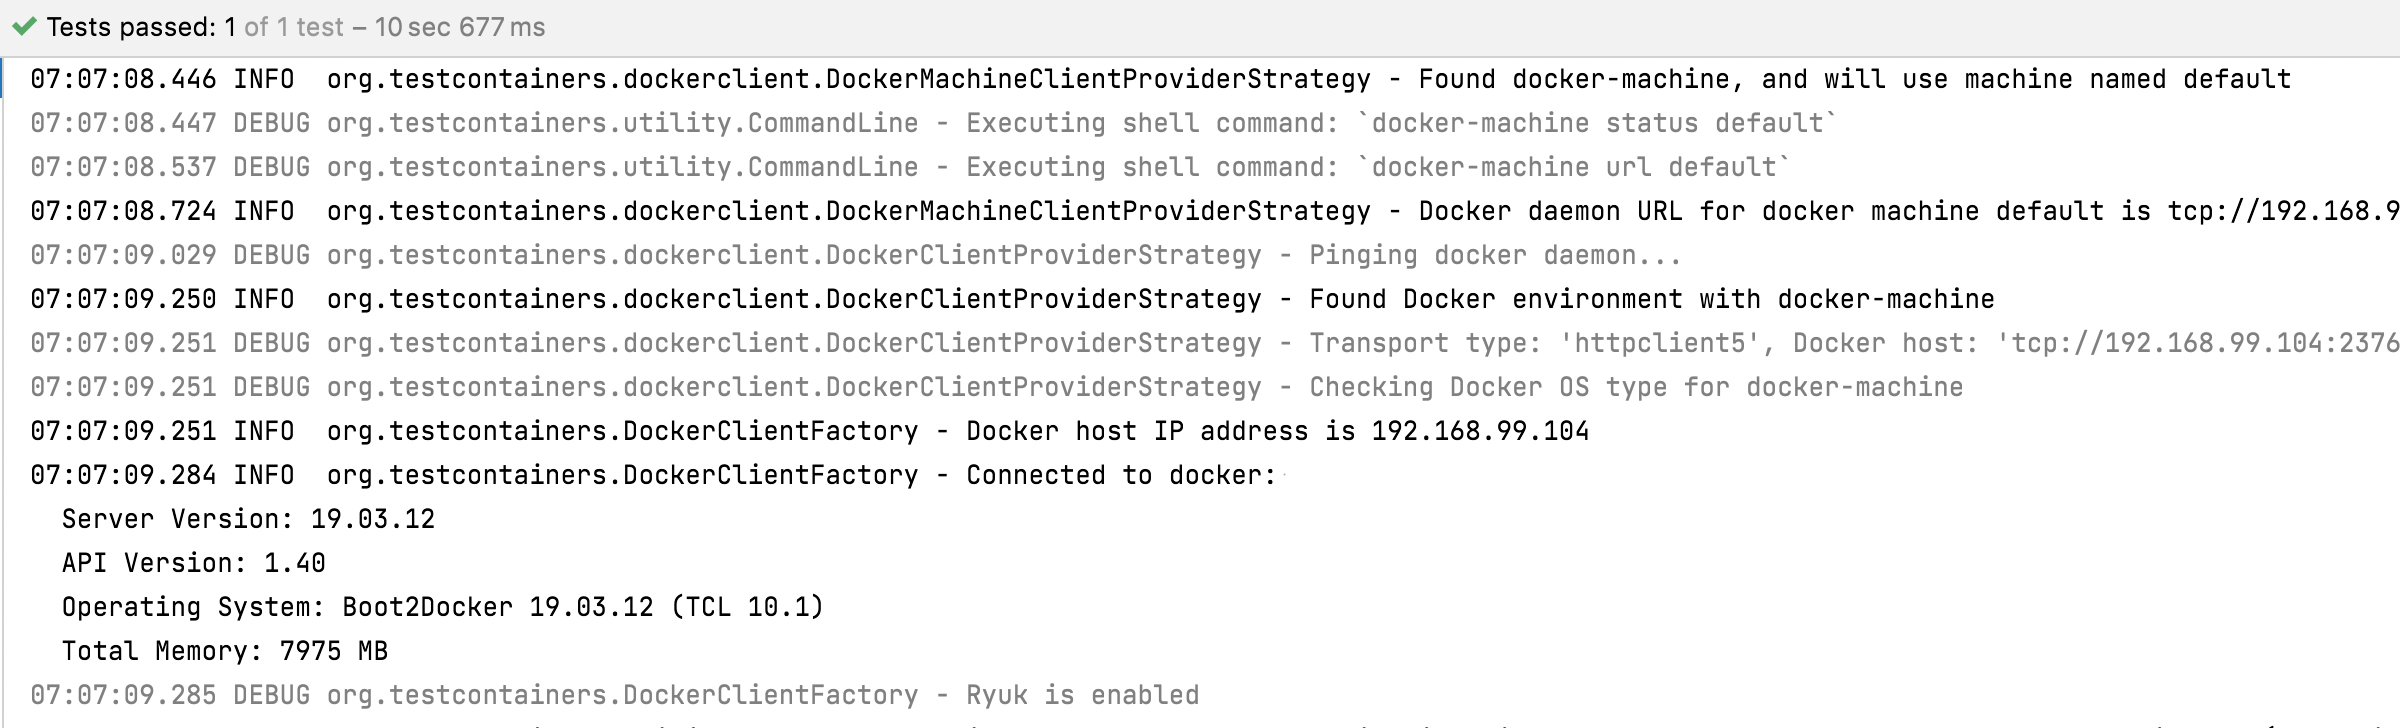
The only test out of the testcontainers-java suite that failed with Docker Machine was related to Healthchecks. We couldn’t identify the cause, but this is most probably due to Docker Machine having an old version of Docker engine.
Minikube
The next entry in our experiment is minikube. Minikube is a local Kubernetes, focusing on making it easy to learn and develop for Kubernetes.
Minikube needs a container or virtual machine manager, for our tests we used HyperKit. HyperKit is also a core component of Docker Desktop for Mac. If you don’t have Docker Desktop installed, you can get HyperKit from brew at the same time you’re installing minikube:
$ brew install minikube hyperkit
$ minikube start --driver "hyperkit" --memory "8g" --cpus "max"
When you have Minikube running, you need to configure Testcontainers to talk to it. You can do this by asking minikube for the docker-env configuration and editing the .testcontainers.properties configuration file:
$ eval $(minikube -p minikube docker-env)
$ echo "docker.host=$DOCKER_HOST" >> ~/.testcontainers.properties
$ echo "docker.cert.path=$DOCKER_CERT_PATH" >> ~/.testcontainers.properties
$ echo "docker.tls.verify=true" >> ~/.testcontainers.properties
Here we are using something that we added in Testcontainers 1.16.0 – support for Docker-related properties in the .testcontainers.properties file.
Note that if you want to use the Docker CLI utility, then you need to set up the environment variables with:
$ eval $(minikube docker-env)
But for configuring Testcontainers it’s much more convenient to use the .testcontainers.properties file in the HOME directory, which stores the central configuration.
After that you can run the tests normally (including your IDE). One thing to be aware of is that there is no filesystem mounting by default, so in our initial run with minikube quite a bit of the tests failed not finding the files:

If you want to make your local filesystem available in the containers, you need to mount it into minikube:
$ minikube mount $HOME:$HOME
After that everything works as expected and we managed to run the tests normally.
Still, you should consider, do you need to mount files into containers? In most cases, you do not, and we have been advocating the Copy API (withCopyFileToContainer and friends) for years. But, if you must use filesystem mounting and see weird errors – you know what to do.
An interesting fact about minikube is that it uses libmachine, which was a part of Docker Machine project, for managing the VMs. It is also an excellent example of Open Source at work – Minikube uses docker-machine’s libmachine to manage the VMs and Docker Desktop’s HyperKit to start them.
All in all, the compatibility of minikube for running your integration tests with Testcontainers is very good, in our case all Testcontainers-java tests pass. But your need to know a bit about various moving parts, for example to configure the local filesystem access correctly if it is needed.
Podman
And the last tool we are looking at in this article is Podman.
Podman is a daemonless, open source, Linux native tool designed to make it easy to find, run, build, share and deploy applications using Open Containers Initiative (OCI) Containers and Container Images.
Unlike the other options of running Docker on Windows and macOS, Podman isn’t something that will start a Docker daemon, but rather a full replacement for it, with a Docker API compatibility layer.
Podman is a Linux tool first and foremost as it describes itself in the above quote from their website. But it does work on macOS and Windows as we’ve seen reports that it’s possible to run Testcontainers tests using Podman as the underlying container runtime.
Here’s the configuration you might need after installing podman with brew:
$ brew install podman
$ # Bootstrap guest CoreOS VM
$ podman machine init -m 4096
$ podman machine start

$ # use this command to identify ssh port guest CoreOS VM is using:
$ podman system connection list

$ # Create ssh tunnel, this will create a unix socket in /tmp/podman.sock
$ ssh -i ~/.ssh/podman-machine-default -p <port> -L'/tmp/podman.sock:/run/user/1000/podman/podman.sock' -N core@localhost

$ # Configure Testcontainers to use it
$ echo "docker.host=unix:///tmp/podman.sock" >> $HOME/.testcontainers.properties
The results of our runs however didn’t inspire a lot of confidence. We observed a higher number of failures that is reasonable to write off as minor compatibility issues. We’ve reached out to the Podman team with the details of the failures to see if these issues can be fixed in a future release of Podman.
Ou current verdict would be that we’re not confident enough to make any claims of compatibility, so we’ll defer the question until future tests. But configuring Podman and making sure your tests can be run correctly clearly requires understanding of moving parts and Podman specific configuration.
Performance
An additional characteristic we wanted to look at is performance of all these available options. One would think that all these options should have the same performance characteristics, Right? Right?…
We thought so too, but decided to try running the same test and measure the performance of each option.
Due to the very volatile nature of the containers and many external factors that may affect the numbers, this only represents our own measurements and may not match your environment. As always with benchmarks – take them with a grain of salt and consider testing your own workarounds on your machine before coming to any conclusions.
Our “benchmark” was rather simple – we measured how long it takes to start a KafkaContainer. Why Kafka? We always treated it as an interesting use case for Testcontainers – it requires some magic behind to make it work with random ports, uses multiple commands to configure everything, and takes a significant amount of time and CPU to start. Here is what we got:
| Method | Avg. startup time |
|---|---|
| Docker Desktop | 3.81s |
| docker-machine | 3.69s |
| Minikube | 3.92s |
Surprisingly, docker-machine with VirtualBox was the fastest! One would think that a modern HyperKit-based approach would win, but apparently good old VirtualBox is still doing great!
Conclusion
In this article we looked at 4 different ways to run integration tests that involve Docker on Windows and Mac. The tests were taken from the Testcontainers-java project and cover quite a bit of Docker API usage which makes us believe it’s a decent proxy for how compatible these solutions are.
We looked at Docker Desktop, Docker Machine, Minikube, and Podman. Here’s a table summarising our experience with them:
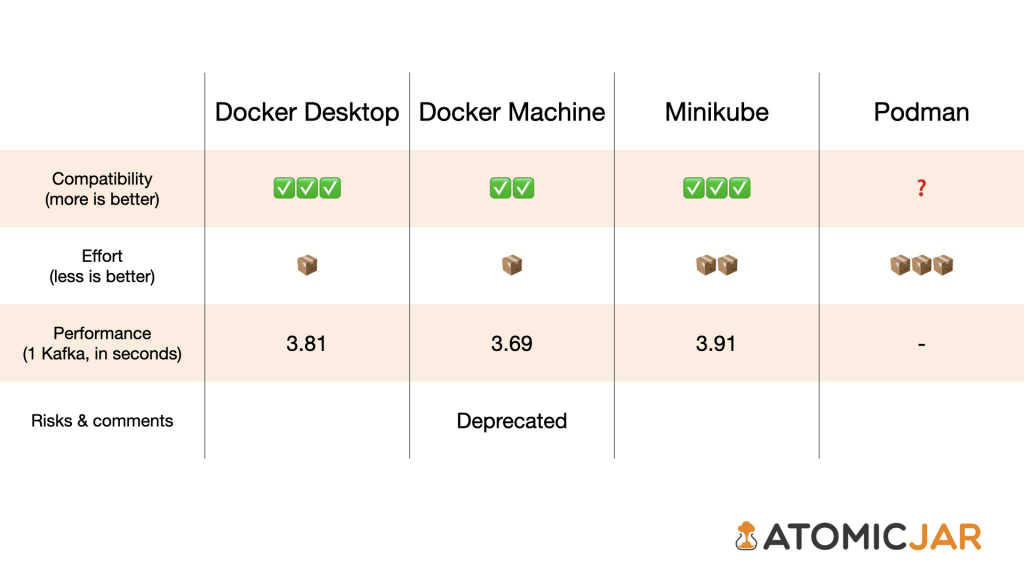
Docker Desktop provides great out of the box experience and is an obvious first choice for your Docker workloads. However should you need alternative solutions there are some options that are worth exploring for your use cases. Minikube is the most promising one, and docker-machine remaining a viable option if the deprecation of the project is not offputting.