
In the ever-evolving landscape of operating systems, users are often looking to customize their experience to suit personal preferences. The macOS Dock is a well-known feature among Apple users, providing quick access to applications, folders, and other essential functionalities. For Windows 10 and 11 users who admire the aesthetic and functionality of the macOS Dock, there are several methods to replicate this feature. This guide explores detailed methods to get a macOS-like Dock on your Windows system, enhancing usability and providing a visually appealing desktop environment.
Understanding the macOS Dock
Before diving into the emulation process, it’s essential to understand what makes the macOS Dock a compelling feature. The Dock serves as a central hub for launching applications, switching between them, and accessing files with ease. It represents efficiency and an organized workflow, often lauded for its minimalist design combined with functionality. The Dock typically includes:
- Application Shortcuts: Quick access to frequently used apps
- Minimized Windows: A section for minimized applications
- Documents and Folders: Easy access to specific files and directories
- Stack Management: Organized views of files and folders grouped together
- Customization Options: Personalization in appearance and behavior
The aim of replicating this on Windows is to enhance user experience through similar aesthetic and functional means.
Method 1: Using Third-Party Applications
Several third-party applications can help you create a macOS-style Dock on your Windows PC. Here are some of the most popular options:
1.1. RocketDock
RocketDock is one of the most popular applications for creating a macOS-like Dock on Windows. It seamlessly integrates with the Windows operating environment while providing customization options to mimic that of the macOS Dock.
Installation Steps:
- Download RocketDock: Visit the official RocketDock website, and download the latest version.
- Install the Application: Run the installer and follow the prompts to install RocketDock on your computer.
- Adding Applications: Right-click on the Dock to add applications. You can drag and drop desktop shortcuts directly onto the Dock.
- Customization: Right-click on the Dock and access the settings to alter the appearance, position, and behavior of the Dock, including its transparency, size, and icon theme.
Advantages:
- Lightweight and fast.
- Highly customizable with various themes and icons.
- Supports multi-monitor setups.
1.2. ObjectDock
Another excellent option to consider is ObjectDock, known for its intuitive interface and robust features. ObjectDock provides a powerful Docking environment along with additional functionality.
Installation Steps:
- Download ObjectDock: Navigate to the official Stardock website to download ObjectDock.
- Install the Software: Follow the setup wizard to install ObjectDock.
- Configure the Dock: Open ObjectDock, and you’ll find a default Dock. Remove the unwanted items and add your frequently used applications.
- Modify Appearance: Right-click on the Dock for settings where you can change themes, icon sizes, and other visual elements.
Advantages:
- Offers both free and paid versions with additional features.
- Skin support allows for macOS-style customization.
- Integration with various file types and folders.
1.3. Winstep Nexus
Winstep Nexus is another powerful option for users wishing for a Dock-like experience. It includes additional features such as the ability to create multiple docks.
Installation Steps:
- Download Winstep Nexus: Go to the official Winstep website and grab the Nexus Dock.
- Run the Installer: Follow the prompts to install the application.
- Dock Configuration: Create your Dock by adding your favorite applications. You can also include documents and folders.
- Personalization Options: Access the settings for various visual themes, icon packs, and transparency adjustments.
Advantages:
- Highly customizable with tabbed docks.
- Provides quick access to system functions.
- Integrated with various resource management features.
Method 2: Utilizing Desktop Shortcuts
While third-party applications are the easiest way to achieve a macOS Dock-like experience, some users prefer native methods. Desktop shortcuts can be employed to create an organized layout that mimics the Dock.
Creating Desktop Shortcuts:
- Select Applications: Identify the applications you use most frequently.
- Right-Click & Create Shortcuts: Right-click on the application’s executable file or from the Start menu and select “Send to > Desktop (create shortcut).”
- Organizing Shortcuts: Arrange the shortcuts on your desktop in a row or column, setting them up similar to the Dock interface.
- Customizing Icons: You can change the icons of these shortcuts to resemble macOS icons for a uniform look.
Using Taskbar for Shortcuts:
- Pin Applications to Taskbar: Right-click the application in the Start menu, and select “Pin to taskbar.”
- Arrange Icons: Drag the icons on the taskbar to arrange them as per your preference.
Method 3: Customizing Windows Taskbar
With Windows 10 and 11, the taskbar can be customized to some extent to mimic the macOS Dock visually and functionally. Here are steps for customization:
Taskbar Configuration:
- Change Taskbar Settings: Right-click on the taskbar and select “Taskbar settings.”
- Positioning: Adjust the taskbar to be centered or left-aligned (Windows 11 allows for easier centering).
- Combine Taskbar Buttons: Choose to combine taskbar buttons, which can create a clean dock-like appearance.
- Use Icons Only: Opt to display icons instead of labels for a sleek look.
Using TaskbarX for Further Customization:
- Download TaskbarX: A popular tool that centers your taskbar icons and allows for further customization.
- Run TaskbarX: Once installed, you can adjust transparency, movement, and other settings for the taskbar to enhance its dock-like qualities.
Method 4: Installing macOS-like Themes
A thorough approach to achieving the macOS aesthetic involves altering the theme of your Windows interface to look more like macOS. This can involve various visual changes that transcend only the Dock.
4.1. Download Themes and Icons
- ResourceHacker & UltraUXThemePatcher: To customize themes effectively, consider using tools that allow the installation of third-party themes. Be cautious and create a system restore point before diving into this method.
- Install Patchers: Follow instructions to install resource patchers.
- Download macOS Themes: Several websites offer macOS-style themes for Windows. Be sure to download them from reputable sources.
- Apply Themes: Open the theme settings on Windows and select the newly downloaded macOS themes.
- Icon Replacement: Replace system icons with macOS versions for an authentic look.
4.2. Usage of Rainmeter for Advanced Customization
Rainmeter is another powerful tool that can be used to create a customizable desktop environment on Windows.
- Install Rainmeter: Download from the official site and install it on your PC.
- Choose a macOS Skin: Find a macOS skin pack that suits your needs. The “macOS Big Sur” skin is popular among users.
- Customize with Rainmeter: After installation, use Rainmeter to arrange your launched applications, weather information, and more for a macOS-like feel.
Conclusion
Achieving a macOS-like Dock on Windows 10/11 is entirely feasible through various methods. Whether you choose to utilize third-party applications, employ desktop shortcuts, customize the taskbar, or alter the overall theme of your operating system, there are numerous ways to enhance your user experience.
Always ensure to download files from reputable sources, and be cautious when changing system settings or files. By implementing these tips and tricks, you can create a visually appealing and functionally efficient setup that brings the best of macOS right to your Windows desktop.
In a world where personal computing aesthetics matter, replicating the iconic macOS Dock experience can lead to a more enjoyable and productive working environment.
The macOS Dock is one of the most iconic features of Apple’s operating system, serving as a unique platform for quick access to applications, documents, and system functions. While Windows 11 comes with its own set of features and aesthetics, many users appreciate the sleek and organized appearance of the macOS Dock and wish to replicate this experience on their Windows machines. This article will guide you through a comprehensive process on how to get a macOS-like Dock on Windows 11, covering installation, customization, and troubleshooting tips.
Understanding the MacOS Dock
Before diving into the installation process, it’s essential to understand what makes the macOS Dock unique. The Dock is not merely a taskbar; it offers visually appealing icons, provides drag-and-drop functionalities, and incorporates dynamic features like Stacks and magnification. Users can easily customize it to suit their specific needs, adding or removing applications as necessary.
The goal of creating a macOS-like Dock on Windows is to achieve similar functionalities while maintaining a visually appealing user interface. Different software applications allow you to achieve this look, with options for customization, layout, and performance.
Introduction to Dock Alternatives for Windows
When searching for ways to replicate the macOS Dock on Windows 11, you’ll find several applications available, each with its distinct features. Some of the most popular options include:
- RocketDock: A highly customizable dock that allows you to add applications, files, and shortcuts.
- Cairo-Dock: An open-source dock that combines functionality with visual appeal and offers a variety of themes.
- Winstep Nexus: A powerful and flexible dock that has a lot of features, including widgets and animations.
- ObjectDock: A dock application by Stardock that enhances your Windows experience with its sleek design and additional features.
This guide will primarily focus on using Winstep Nexus as it provides a good balance of usability and aesthetic appeal, along with extensive customization options for users.
Installing Winstep Nexus
Step 1: Downloading the Application
- Visit the official Winstep Nexus website: Navigate to Winstep Nexus and look for the latest version of the application.
- Choose the appropriate version: You will find free and paid versions. The free version suffices for most users, so click on the download link for the free version.
- Start the download: Save the installation file to your desktop or any other preferred location.
Step 2: Installing the Application
- Locate the downloaded file: Go to the directory where you saved the installer, usually named
NexusDock.exe. - Run the installer: Double-click on the file to launch the installation wizard. You might need to grant permission if prompted by User Account Control (UAC).
- Follow the installation prompts: Read through the license agreement, select your preferred installation directory, and complete the installation process. By default, it installs to
C:Program FilesWinstep.
Step 3: Launching Winstep Nexus
- Open the application: Once installed, you can find Winstep Nexus in your Start Menu or as a shortcut on your desktop.
- Initial setup wizard: Upon the first launch, an initial configuration wizard will guide you through the basic settings. Follow these steps to set your Dock.
Setting Up Your Dock
Step 4: Dock Preferences
- Positioning the Dock: One of the first things you’ll want to do is decide where to place your Dock. You can set it to appear at the bottom, left, or right side of the screen, mimicking the macOS Dock’s position.
- Customize Appearance: Right-click on the Dock and select ‘Dock Preferences’. Here, you can modify transparency, themes, and icon sizes. Nexus provides several pre-installed themes, or you can download additional themes from the Nexus forums or third-party websites.
Step 5: Adding Applications to the Dock
- Add Applications: Right-click on the Dock and select ‘Add Application’. You’ll be presented with a list of installed programs. Choose the ones you wish to add by clicking the respective checkboxes.
- Drag and Drop: Alternatively, you can drag an application from your Start Menu or desktop and drop it onto your Dock.
Customizing Your Dock
Step 6: Icon Customization
- Change Icons: You can customize each Dock icon further. Right-click on the specific application’s icon and select ‘Dock Item Properties’. From there, you can change the icon by selecting a new one from your computer or using icon packages available online.
- Setting up Groups: Winstep Nexus allows you to create groups to organize similar applications. To create a group, drag icons together, and they will combine to form a stack.
Step 7: Utilizing Widgets and Shortcuts
- Adding Widgets: Winstep Nexus supports various widgets, including clocks, system performance indicators, and weather updates. Right-click on the Dock, select ‘Add Widget’, and choose what you’d like to add.
- Creating Shortcuts: You can add shortcuts to files and folders, similar to how macOS uses Stacks. Right-click the Dock, select ‘Add Folder’, and choose the folder you want to quick-access.
Step 8: Setting Dock Behavior
- Magnification Settings: Just like the macOS Dock, you can enable magnification effects when you hover over icons in Winstep Nexus. This can be adjusted in the Dock Preferences under the ‘Effects’ tab.
- Animation Settings: Customize how the Dock behaves when you open and close applications or create new folders. Right-click on the Dock, navigate to ‘Dock Properties’, and explore the ‘Animation’ tab.
Enhancing Your User Experience
Step 9: Additional Features
- Using Multiple Docks: Winstep Nexus allows you to configure multiple docks. You might create one for work applications and another for personal use.
- Fullscreen Mode: Enable fullscreen mode to keep the Dock visible without it crashing your workspace.
- Desktop Widgets: Winstep also lets you add docked files and folders to your desktop for easy access and organization.
Step 10: Keyboard Shortcuts
- Using Hotkeys: Winstep Nexus allows you to assign keyboard shortcuts to your dock items for efficient navigation. This feature can be configured in the Dock Preferences under Keyboard Tab.
- Quick Access: Set specific keys to quickly open frequently used applications without needing to click through the Dock.
Troubleshooting Common Issues
Step 11: Common Issues & Solutions
- Dock Not Showing: If your Dock doesn’t appear, check if it is set to auto-hide by right-clicking on the Dock and adjusting the settings in Dock Preferences.
- Performance Issues: If you experience lag or stuttering, ensure that your Windows 11 is updated. You can also explore the ‘Performance’ tab in Dock Preferences to adjust settings accordingly.
- Icons Not Updating: If you notice that the icons are not reflecting the current state of applications, try disabling icon caching in the Dock Preferences under the ‘Advanced’ section.
Step 12: Uninstalling the Application
If you decide that Winstep Nexus is not for you, you can uninstall it similarly to other applications:
- Navigate to Settings: Open the Windows 11 Settings app.
- Click on Apps: Look for the list of installed applications.
- Locate Winstep Nexus: Find Winstep Nexus in the list and select ‘Uninstall’.
Conclusion
Bringing the macOS Dock experience to Windows 11 can significantly improve your productivity and user satisfaction with your operating system. With Winstep Nexus, you have a powerful tool that allows for deep customization along with maintaining excellent performance. You can enjoy not only a visually pleasing interface but also functional enhancements that make your workflow more efficient.
By following the steps outlined in this article, you can successfully install, set up, and customize a macOS-like dock on your Windows 11 machine, bringing together the best elements of both operating systems to create your ideal user environment. Whether for personal enjoyment or enhanced productivity, a beautiful and functional Dock can revolutionize how you interact with your computer every day.
How to get macOS Dock on Windows 11/10? How do I use the macOS Dock on Windows 10? If you want to dress up your Windows 11/10 with a stylish look, you should download and install a macOS dock. In this gearupwindows article, we will introduce a new freeware tool Winstep Nexus.
Winstep Nexus for Windows 10/11

Winstep Nexus is free for personal use that lets you add macOS Dock on Windows 11/10 operating system. After downloading the software, extract its content to a folder with any archiving tool. Now, double-click on the executable file to run its setup. Finally, launch it to get the macOS Dock on your desktop. Once you hide your desktop icons and Taskbar, your Windows 11/10 PC screen will look like an Apple machine.
Winstep Nexus freeware offers a lot of features. A few are the following:-
- Change the position of macOS Dock
- Remove or add programs to the Nexus Dock
- Change the theme of the Nexus Dock
- Alter the appearance of the macOS Dock
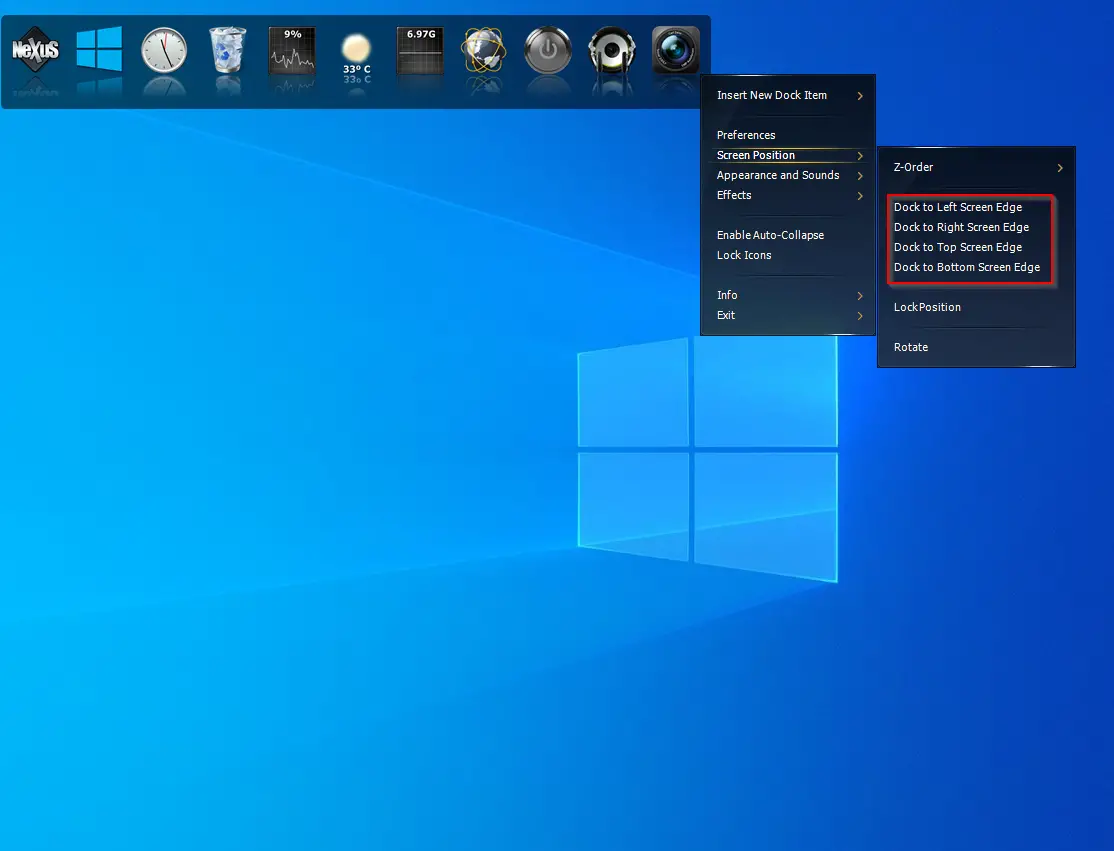
How to Change the position of macOS Dock?
After downloading and installing the macOS Dock, by default, Winstep Nexus appears on the top of the monitor screen. If you would like to change its position, right-click on the Dock and click Screen Position. Now, select the position on the desktop where you want the Dock to appear. You can also change its location by dragging it.
Further, you can align the Dock to the Top, Center, or Bottom by accessing the Screen Position. It even allows you to align the Dock by dragging and dropping in the desired direction.
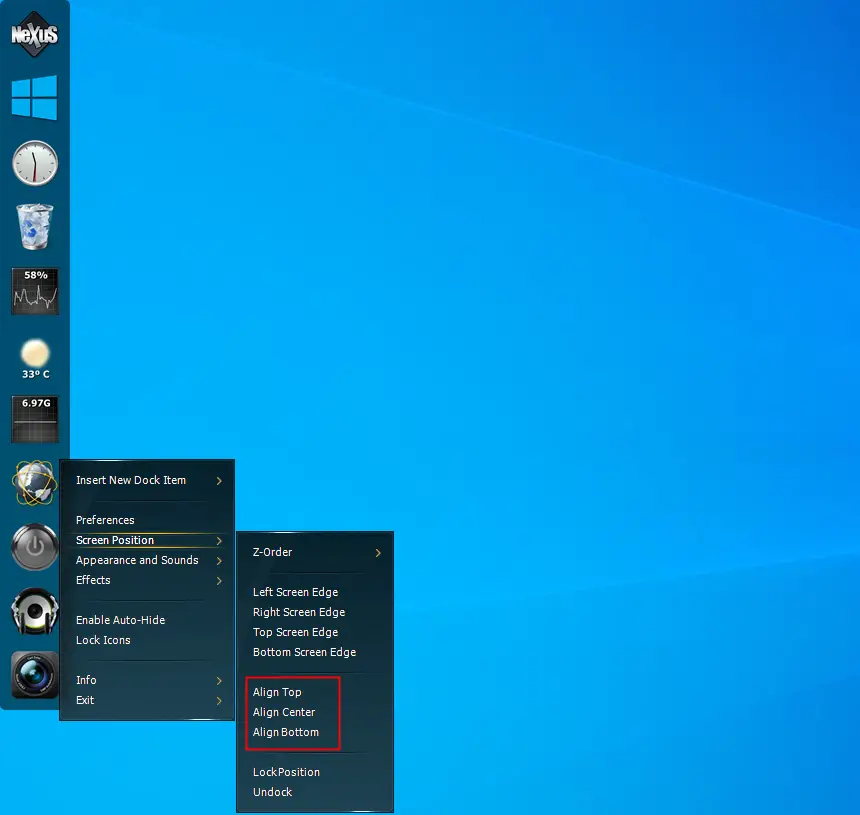
In the above screenshot, you will notice a Lock Position option. It is similar to the Windows 10 Taskbar, which you lock to stop the accidental move.
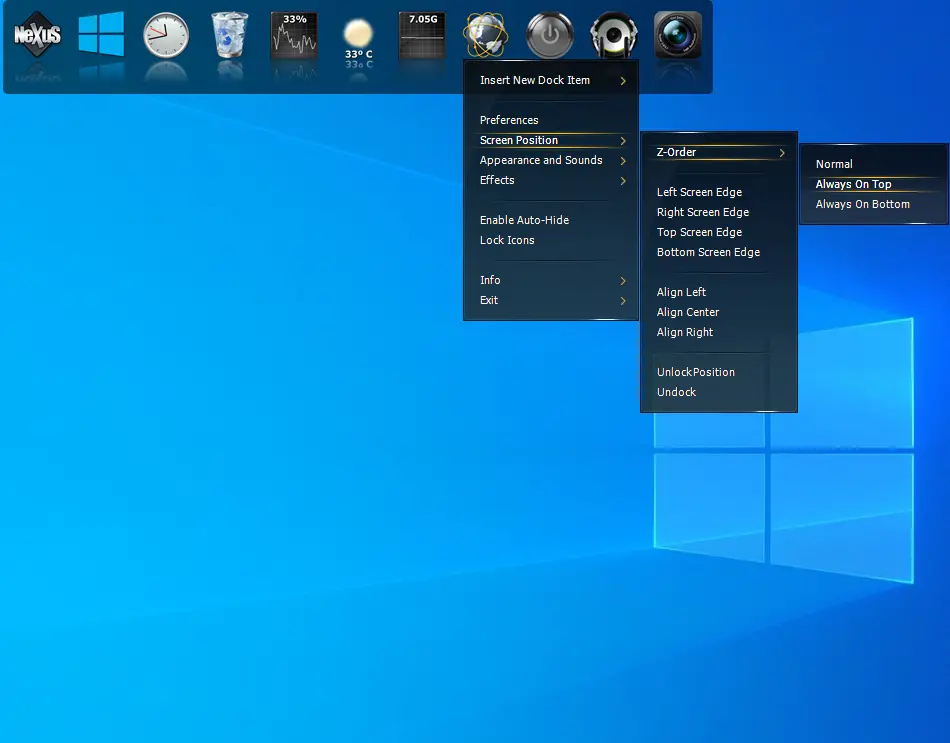
If you wish to see the Dock always appear on the top of all the apps, under Screen Position, click on the Z-Order and select the Always On Top option.
How to remove or add programs to the Nexus Dock?
Adding your favorite program to the Nexus Dock is so simple, just drag and drop the application shortcut to Dock, and it is added.
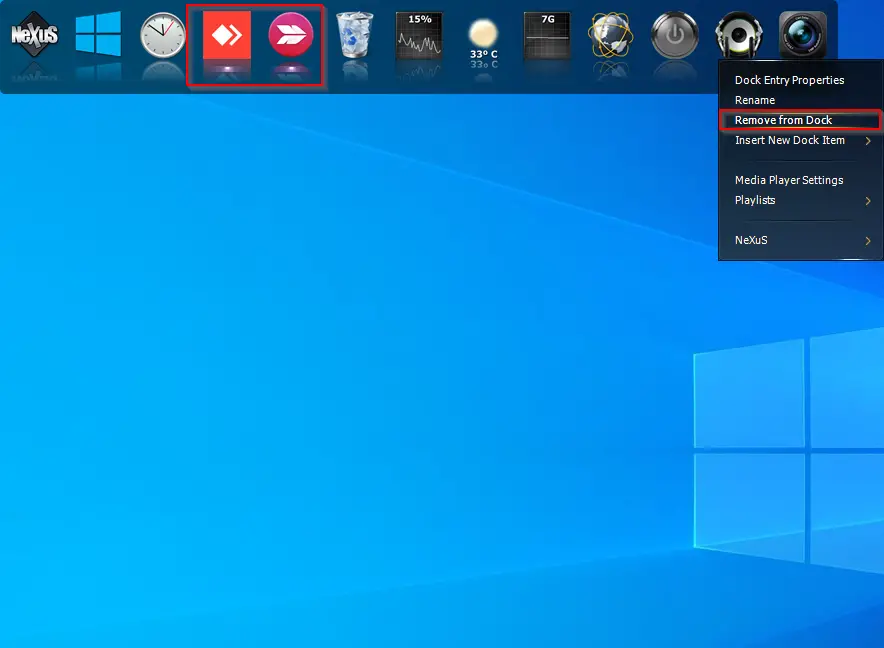
Once you have added so many items to the Dock and want to remove any, right-click on the docked item and select the Remove from Dock option. It is so simple as ABCD…
How to Change the theme of the Nexus Dock?
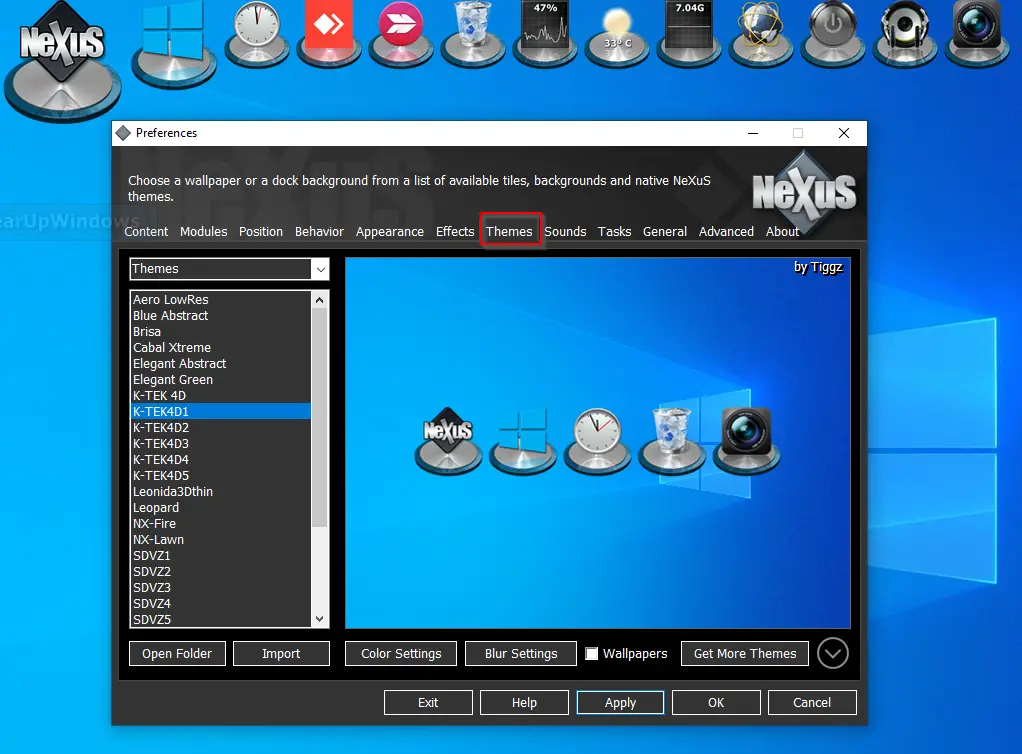
Nexus Dock comes with a lot of themes. If you don’t like the default theme and want to change it, right-click on the Dock and select Preferences. Now, navigate to the Themes tab under the Preferences window and select your favorite theme from the list that appears.
How to Alter the appearance of the macOS Dock?
It is also possible to change the appearance of the macOS Dock. To do so, access the Preferences window by right-clicking on the Dock and selecting the Appearance tab.
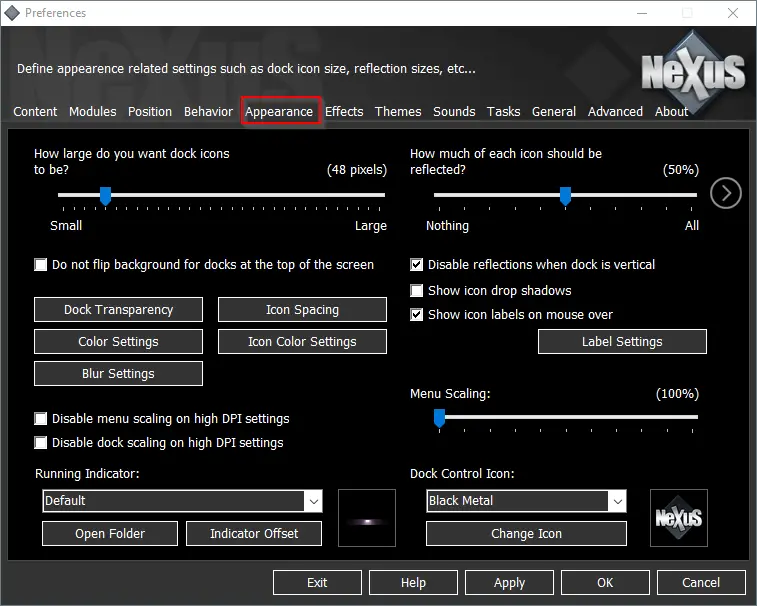
You will get several options here to change the look of the Dock. It allows you to make the Dock transparent by clicking on the Dock Transparency button. Even you are allowed to change the Icon spacing, Color settings, Icon color settings, Blue Settings, Icon drop shadows, and so on.
Any time, if you wish to remove the Dock from your PC, no need to uninstall it completely from the PC. Please navigate to the System Tray and select the Exit option by right-clicking on its icon.
Main Features of Winstep Nexus
- Displays running applications on the dock with task grouping, task filtering, and icon customization options.
- Displays system tray on the dock as single or grouped icons.
- Blur-Behind (7/Vista) and colorization of dock backgrounds.
- Built-in modules/widgets (e.g., time announcing clock, recycle bin, email checker, weather monitor, CPU, Net, RAM Meters, and Wanda the swimming ‘fortune cookie’ fish).
- Over 80 special commands such as Sleep, Empty Recycler, CD Control, etc…
- Multiple animated mouse over, launch, attention, and delete effects: zoom, swing, bounce, and many more!
- Live icon reflections and animated water-like effects.
- Built-in support for animated icons.
- Quickly change icons of shortcuts and running programs by dropping PNG and ICO image files directly into the icon.
- Minimize windows to the dock.
- Multi-monitor support.
- High-DPI support.
- Compatible with skins for all 3rd party docks.
Download Winstep Nexus
The Winstep Nexus is compatible with Windows 11, 10, 8, 7, and Vista. You can download this free software from its official website.
If you would like to check more macOS docks, please try RocketDock.
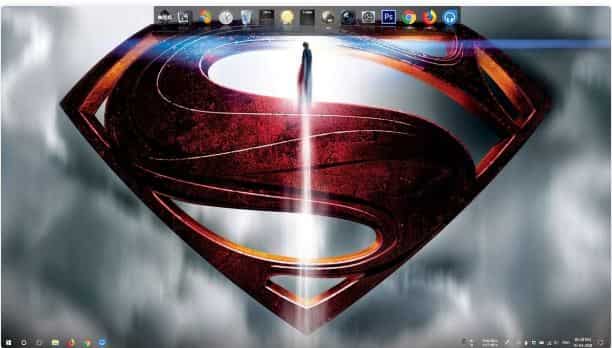
Now, You can turn your Windows 11 taskbar into a macOS like-Dock. Microsoft released Windows 11 with new and modifications. However, not everyone liked this brand-new look of windows 11. The most distinctive feature is the position of the taskbar. The taskbar in Windows 11 is centrally positioned. Many of the users do not like this new feature of the Operating System and wish to customize it. Talking about Windows 11, there don’t seem to be several options to customize the taskbar that we used to have. But according to Microsoft, these features will be introduced soon.
TaskbarXI
In the meantime, there is an external tool that can help you customize the look and behavior of the taskbar. TaskbarXI is the tool using which you can easily modify the taskbar according to your wishes. Moreover, the most interesting thing is that you can Turn your Taskbar( Windows 11 ) into a macOS-like Dock. It is a next-in-line to TaskbarX which lets you change the location and appearance of Taskbar in Windows 11.
At present, TaskbarXI is in the early stages of development. Presently, it also lacks a Graphic interface which means that the app is still being developed. However, it can help you modify the Taskbar of Windows 11 according to your liking.
Usage of TaskbarXl
To use taskbarXl for changing the appearance of Taskbar in Windows11, You just need to download and run it. Using it, the size of the taskbar in WindowsXl can be contracted into a compact dock just like that of macOS. Additionally, the dock expands to full size when the window is maximized. Till now, it can’t be used to change the background color or style of the taskbar in Windows11. Also, you cannot reposition the taskbar at the top of your screen using it. However, It is a good choice if you want to give your taskbar a macOS dock-like appearance.
How Does It Work?
TaskbarXl’s latest version is for testing purposes only. The app is still being developed. At this stage, it lacks many features such as changing the background color of the taskbar and positioning the taskbar at the top of the screen. But, even at this stage, it has many nice features.
For using it, Just download and run it.
- On a maximized window, the taskbar will look as usual.
- When you Open a minimized window or go to the desktop, the app will shrink the taskbar into a compressed dock
- The Notification Area and the clock will be removed from the taskbar and appear like a separate dock
- The edges of the dock will become round.
Features of TaskbarXl
- Transforms the Windows 11 taskbar into a dock
- Also turns Notification Area and System Clock into a separate dock
- Works on multiple monitor
- On a Maximized window, the Taskbar turns back to normal
- It supports left and centrally positioned taskbar
For Testing Purpose
Since the latest version of the tool is only for testing purposes, there are some points to be kept in mind:
- There is no GUI( Graphical User Interface)
- The one and only way to shut the app is to Go to the Taskbar.
- Open the Taskbar and Kill the taskbar.exe
You can download the TaskbarXl from GitHub Page of the developer.
As mentioned by the developer, a GUI will be added in the app later.
To Change the position of the taskbar in Windows 11:
- Open Settings of Windows 11
- Click on Personalization
- Under the Personalization Taskbar, scroll down and select Taskbar
- Scroll down and click on Taskbar Behaviors.
- Under Taskbar behaviors, find Taskbar Alignment besides which you can find the option to reposition the taskbar in Windows 11.
The taskbar will be immediately shifted to the left. In case you want to reposition the taskbar to the center, You can do it by following a few easy and simple which are given above. TaskbarXl must not be confused with Taskbar11. Both are developed by different developers.
TaskbarX
TaskbarX is a tool used to modify the appearance and position of the taskbar in Windows 10. There are many features of this application including change of Background color and size of the Taskbar in Windows 10 along with repositioning it to the center.
You can download this app from the Microsoft store. If you download this app from the Microsoft store, it will carry charges( $1.09).
If you download it from the Microsoft Store directly, it will be installed itself.
After the Zip file is extracted, open the extracted folder and run the exe file. As soon as you do this, the icons of your taskbar will automatically move to the center of the desktop.
The same folder also has another tool known as TaskbarX configurator which contains many options and tools used for modifying the appearance of the Taskbar on Windows 10.
Conclusion
Now, you can turn your Windows 11 taskbar into a macOS-like dock using TaskbarX. However, you need to keep in mind a few things while using this tool as it is in the early phase of development and is a pre-release. As of now, it does not allow users to modify and stylize the taskbar in terms of Background color and size. But, as promised by the developer, these features will b e rolled-out soon.

Love Apple Macs and how they look? Here are the top 3 best Mac OS Docks for Windows 10/11 that you can download for free!
This has given developers a challenge to deliver some good experiences to all the window users. Though it does not offer that much like in feature, they do provide in with a lot of conveniences. The best part is that they look pretty fancy than a start menu.
- With this, users can also add many app files or folders to their desktop.
- Users can access these from anywhere without minimizing the screen that is currently opened.
- Give users an aero effect like skin with transparent looks.
Why Install a Dock App?
These are a few docks that are available there on windows, and some of them are quite good. But now, if you have limited needs or want one that only compliments your windows taskbar, then there are three docks for PC that can do the job for you.
The next ones highly resemble the ones that are found on Apple’s computer system. Users need to try to access their favorite applications. These not only look beautiful but can be customized as well.
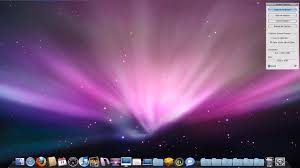
Winstep Nexus Dock and Nexus Ultimate – The best dock app
In this, you may notice that there is a distance between the land and the sky. This is precisely the same distance or difference between the Nexus dock and Rocker Dock. Though both of them are good, Nexus docks are the best ones for windows. It carries in a lot of features. It is not that easy or that user-friendly.
Now launching applications and then adding them to the dock works the same as any other one. It comes with a learning curve; if users wish to customize it to make it look and behave like they want.
It carries everything like different themes and dockets and that too, in high numbers. It takes in a lot of new yet exciting features plus animations. Comes in with appearance settings like icon reflections, icon launch animations, close animations, delete animations, For the duration of these animations you can micromanage everything.
All this comes at a price though it has a free version too. You need to put in some money for the ultimate version that also carries all the features. We had used this one for a very long time before it came around, and we have customized it to our desires. It also comes with a start menu as well.
Minimizing windows to the dock is not reliable with this one, but still, it works sometimes. If you wish to replace the taskbar entirely, then you can rely on this one.
Download Winstep Nexus/Ultimate Dock For Windows 10
SEE ALSO: 10 Best Rainmeter Skins Download For Windows 10/11.
Rocket Dock – Th famous choice
This one comes with the most popular dock options for windows. Its development was ceased a few before and thus has no new added features. It can be used in some new useful features, to be honest. Having some features makes it one of the simplest docks available for windows. It comes with basic features that are required like:
- Ability to change the individual icons
- Change position of the dock
- Place them behind the open windows
- Users can also adjust the quality of icons, all depending upon their hardware.
We suggest that you do not change a lot there in the icon settings as the default animation as the zoom settings are quite ideal. The animations are so smooth with this one that it feels like an integrated part of the system. It carries themes, and the internet is full of them as the dock is too accessible. You can find this there on the official website.
By using docklets, users can also extend the functionality; these can be found on the internet too. If you wish, then you can see the minimized windows to appear on the dock as well. This function seems to be broken and is not that much reliable as long as there is a taskbar.
Now keep in mind that the rocket dock shall always overlap with the open windows, meaning that depending on the preferences, windows will either slide over or under it. Now unlike other docks or taskbar, this one is not able to allocate a dedicated space for itself.
Download Rocket Dog For Windows 10
SEE ALSO: Download Alienware Theme Pack Free For Windows 10/11.
ObjectDock – It started here
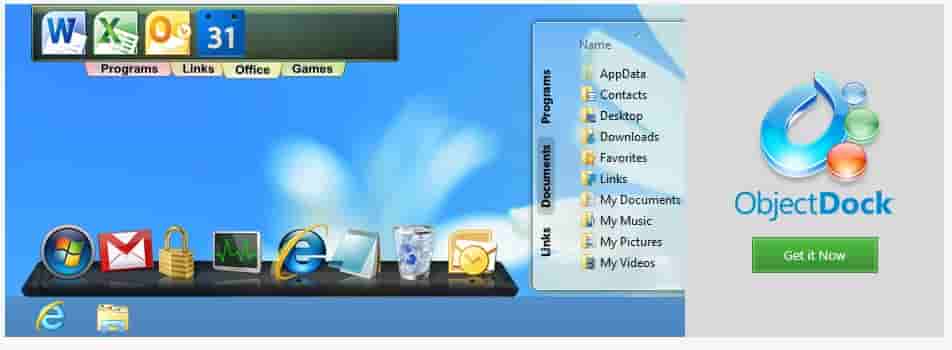
Object Dock was the first dock app for Windows! It comes for free and a full version which is paid and has extra features. It comes with pre-designed dock themes and icons that you can choose for the apps.
It allows you to create various docklets on which you can create multiple different folders and files. It is excellent for quick access shortcuts.
Note: ObjectDock has two options, a free one and a paid one. You can get a 30-days trial or purchase the full release.
Download ObjectDock For Windows 10
SEE ALSO: Windows 7 Theme Pack For Windows 10 2022 (Download).
More pages you will enjoy reading:
- The Best Anime Theme Packs For Windows 10/11.
- Download Hacker Theme Pack For Windows 10/11.
- Top 4 Best Mac OS Theme Packs For Windows 10/11.
Which Dock App are you choosing?
I hope you have enjoyed the choices above for the best Mac OS Docks for Windows 10 and Windows 11. This will make your PC look and feel just like a MAC with the dock apps that you can download.
Do let us know in the comments below if you have any alternative mac docks that you would like to suggest.