
Windows 11/10 has Mac-like gestures for the trackpad and touchpad. However, it seems like Apple’s Bootcamp doesn’t support them out of the box, and it isn’t very clear to use different gestures for the different OS when using the same machine. While I use Mac primarily for rendering videos using FCP, I also have Windows installed on the same machine. In this post, we will share how you can get the Trackpad Gesture Support in Windows 11/10 on MacBook.

That’s where the legendary software Trackpad++ comes into the picture. This utility supports Windows 7 to Windows 11 for Apple’s multi-touch, and forces touch feature usually available on Macbook. It supports :
- 2-, 3- and 4-finger gestures, such as pinch-to-zoom, back / forward, middle mouse button emulation, new Windows® 8 gestures, and much more;
- Dramatically improved 2-finger scrolling experience: Mac® OS X Mavericks-similar (accelerated / natural) scrolling model implemented;
- Improved pointer ballistics (i.e., how the pointer speed depends on the finger speed; comes with six built-in optimal presets);
- Mac® OS X-like 3-finger dragging and classic ‘2-fingers with click’ dragging, option to increase the pointer speed when dragging;
- User-customizable option to ignore the accidental trackpad input when typing, and many more useful tweaks/enhancements;
- Trackpad++ Control Module for adjusting the trackpad settings
- Full, native support of Windows® 7 (32-bit / 64-bit), Windows® 8 / 8.1 (32-bit / 64-bit), and Windows® 10 (64-bit).
Before you download and install it, you should know that Windows is stringent on signed drivers and needs to install any third-party drivers. For Trackpad++, the developer has specifically asked to install another application, Power Plan Assistant, which does this job. Once installed, you will have the following settings right away to configure the gestures.

Download the software:
- First, Download and install Power Plan Assistant.
- Then Download & install Trackpad++
Installing Trackpad++ in Detail:
- Click to launch it, and it will ask if you are using Macbook Air or Macbook Pro. Select the one you are on. I use a Macbook Air. After this, the installer will ask which year your MacBook belongs to. So make sure to choose the correct version.

- One thing you need to be careful when installing the driver, that two warning popups up. One asks you to reboot the computer, while the second to install the driver. The second warning shows up when you say yes to reboot, and there is only 2 second between them. Make sure to act fast and say yes to red looking dialogue box before rebooting.
- The software, once installed, will get listed under Recently Added on Windows 10 Start menu.
Configure Trackpad++
Here you can configure four-finger gestures, three-finger gestures, and the usual two fingers gesture as well. You can configure to use the trackpad as a mouse as well. Make sure to Apply & save when you change anything.

The application is free to use, and the thing the developer needs is to keep the software updated. You can also donate to grab a key, which is more like a donation for the work done.
What are the supported Toiuchopad Gestures on Windows 11
|
Select an item |
Tap touchpad |
| Scroll | Place two fingers on the touchpad and slide horizontally or vertically |
| Zoom in or out | Place two fingers on the touchpad and pinch in or stretch out |
| Show more commands (like right-clicking) | Tap the touchpad with two fingers or press down in the lower-right corner |
| Show all open windows | Swipe with three fingers up on the touchpad |
| Show the desktop | Swipe with three fingers down on the touchpad |
| Switch between open apps or windows | Swipe with three fingers left or right on the touchpad |
| Switch desktops | Swipe with four fingers to the left or right on the touchpad |
How do I turn on touchpad gestures in Windows?
Go to Settings> Bluetooth & devices > Touch > Three- and four-finger touch gestures, and turn it on. If your laptop has precision touchpads, go to laptop has one, select Start > Settings > Devices > Touchpad and configure accordingly.
A die-hard fan of Windows, PC Gaming, and Xbox. He is a seasoned content writer with over 15 years of experience in the industry. He is a specialist in writing about Windows, software reviews, troubleshooting Windows, and automation.
MacBook trackpads are excellent in all terms. It comes with great touch response and unique gestures. With Windows 10 Precision touchpad gestures, you can now get a Mac-like experience right on any laptop.
Here’s how to configure Windows 10 touchpad gestures to get Mac-like scrolling on any laptop.
Content
- Does Your Laptop Have A Precision Trackpad
- Configure Windows 10 Precision Touchpad Gestures
- Configure Touchpad Gestures for Non-Precision Touchpads on Windows 10
- Reset Windows 10 Precision Touchpad Gestures
Does Your Laptop Have A Precision Trackpad
Most of the Windows laptops right now comes with the precision trackpad. It supports all the gestures in Windows 10 OS so that you get a unique experience compared to the older laptops. To get a MacBook-like gesture on your laptop, you need to have a precision trackpad.
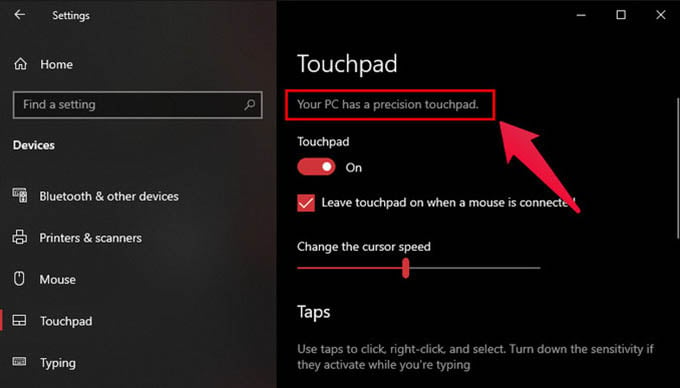
- Open the Settings app.
- Click on Devices.
- In the left column, select Touchpad.
- If your device has a precision touchpad, you’ll see that on the right.
If your device doesn’t have a precision touchpad, you won’t see any such message. In that case, you can only adjust the trackpad sensitivity on this page and not much else.
Related: What Is Windows 10 Sandbox and How to Use It
Configure Windows 10 Precision Touchpad Gestures
You might have seen the touchpad configuration tool from the manufacturer on older laptops. Microsoft, in fact, now bakes all the precision touchpad gesture settings into Windows 10. It is now easier to set Windows 10 touchpad gestures with precision trackpad laptops.
So, if you do have a precision touchpad, go through the steps below to configure touch gestures.
- Open Settings on Windows 10.
- Go to the Devices menu.
- Click on Touchpad.
- Choose the type of touch gesture and add actions.
The precision touchpad on Windows 10 supports multiple gestures, with two, three, and four-finger support. Read further to find out more about these gestures.
Configure Two-finger Gestures
The one-finger gesture for Windows 10 trackpad gestures are pretty standard. You can click, hold, and drag. At the same time, the two-finger touchpad gestures on Windows 10 is customizable. You can get Mac-like up and down scrolling in Windows 10 with two-finger gestures.
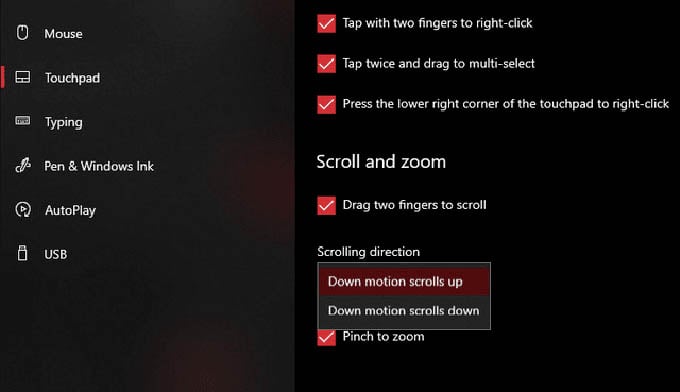
You get options such as Tap with two fingers to right-click under the sensitivity drop-down menu. Under Scroll and zoom, you can enable/disable the two-finger scrolling gesture, adjust the scroll direction, and enable/disable Pinch to zoom.
Configure Three and Four-finger Gestures
By default, the three-finger gesture on Windows is set to Switch apps and show desktop. The four-finger gesture on Windows is set to Switch desktops and show desktop. You can now change and set a custom action for these gestures, which are almost similar to MacBook trackpad gestures.
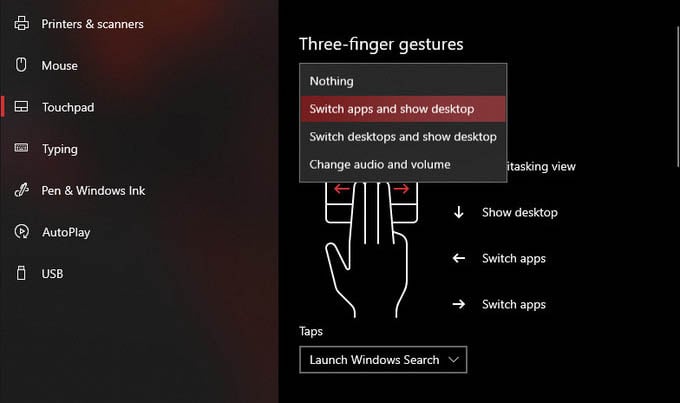
The following are some of the gesture actions for three and four-finger gestures on Windows 10 laptops.
- None: Disable three/four-finger gestures.
- Switch apps and show desktop: The default three-finger gesture option. Swipe left or right with three-fingers to simulate Alt+Tab and switch between open windows. Swiping up shows the Multitasking view while swiping down minimizes all windows to show the desktop.
- Switch desktops and show desktop: Default four-finger gesture option on Windows 10 to switch virtual desktops. Swipe left or right with four-fingers to simulate Ctrl+Win+Left or Ctrl+Win+Right respectively. Swiping up shows the Multitasking view while swiping down minimizes all windows to show the desktop.
- Change audio and volume: Swipe up or down to increase or decrease volume respectively. Swiping left goes to the previous track while swiping right skips to the next track.
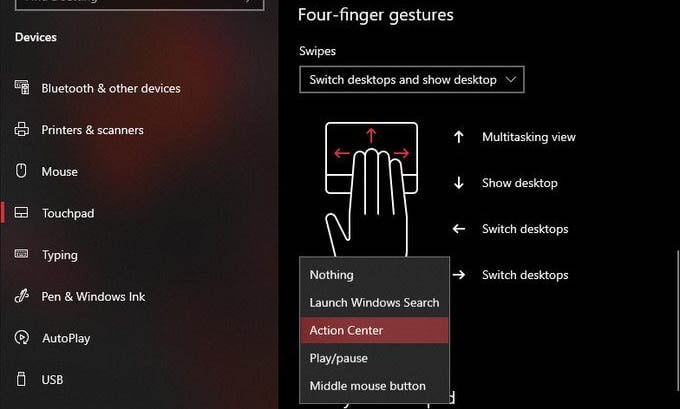
In addition, you can also configure three-finger and four-finger taps. The choices for both are again, the same. Here are some of the cool actions you can set for four-finger touchpad gestures in Windows 10.
- Nothing
- Launch Windows Search
- Action Center
- Play/pause
- Middle mouse button
Related: How to use Built in Free Screen Recorder on Windows 10
Configure Touchpad Gestures for Non-Precision Touchpads on Windows 10
The precision touchpad is something new to the Windows laptops. But, if you are using an older laptop (or a cheaper one without a precision trackpad) there is still hope. You can use the manufacturer settings (Synaptics) to set mac-like gestures on your Windows 10 laptop trackpad.
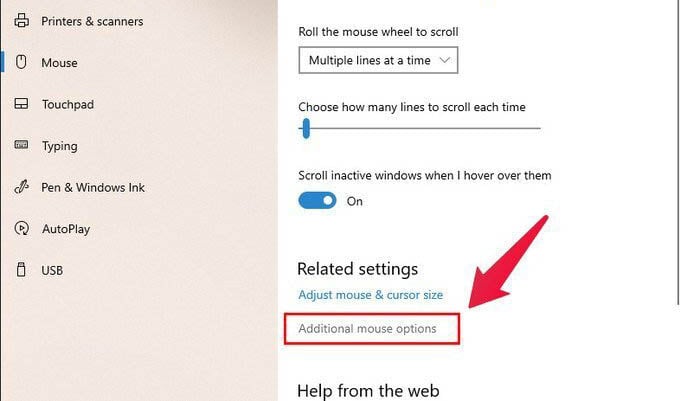
- Open the Settings app.
- Go to Devices.
- In the left column, select Mouse.
- On the right, you click on the Additional mouse options link.
- This will open up the Mouse Properties window. Alternatively, you can simply search for Mouse properties using Windows search.

- Click on the Settings button to open the touchpad settings from here.
- From the Synaptics control panel window, select actions for each gesture.
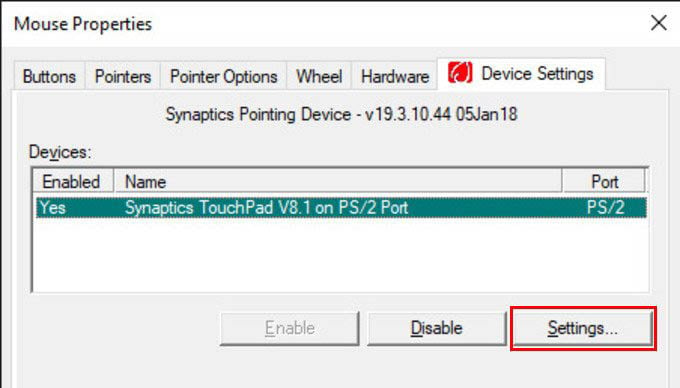
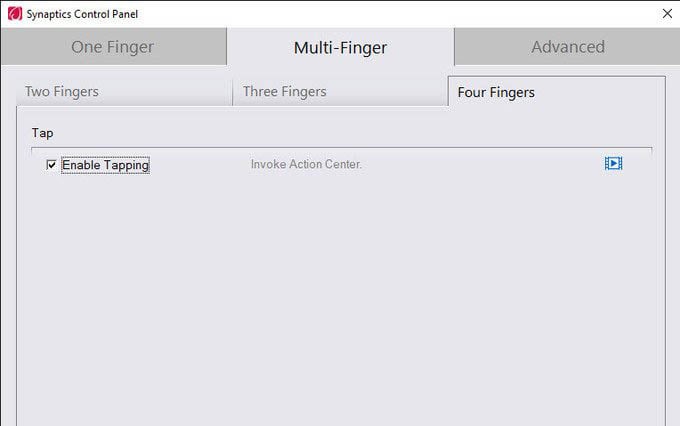
Depending on your laptop manufacturer this window may appear different to you. You can then choose the two-finger, three-finger, and even four-finger gestures for the laptop trackpad from Synaptics control panel.
Related: Zephyr Sweat-proof Gaming Mouse with Cooling Fan & RGB
Reset Windows 10 Precision Touchpad Gestures
If you’ve played around with the touchpad gestures and did not work as you expected, go ahead and reset it. This will set the three-finger Windows gesture to switch apps and four-finger gestures to switch virtual desktops, along with other default actions.
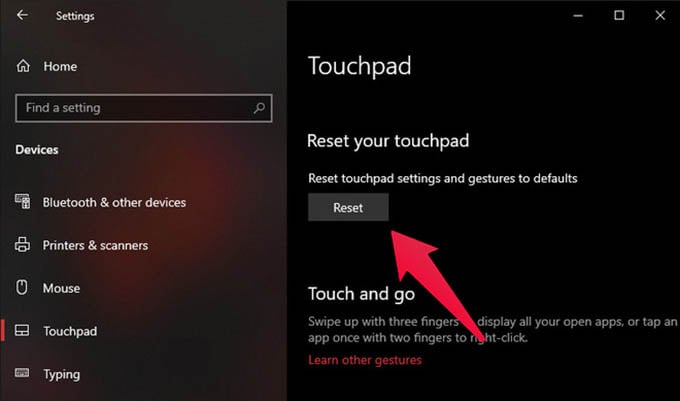
- Go to Settings > Devices on Windows 10 laptop.
- Choose Touchpad options.
- Click the Reset button on the window to reset all gestures.
After resetting, you will get the old trackpad gestures you used before. If the trackpad is glitchy and not sure what you just did, we recommend you to reset trackpad settings.
MacBook-like gestures on any other laptop is a good idea. You can set similar gestures and actions on your Windows 10 touchpad gestures within your laptop.
Disclosure: Mashtips is supported by its audience. As an Amazon Associate I earn from qualifying purchases.
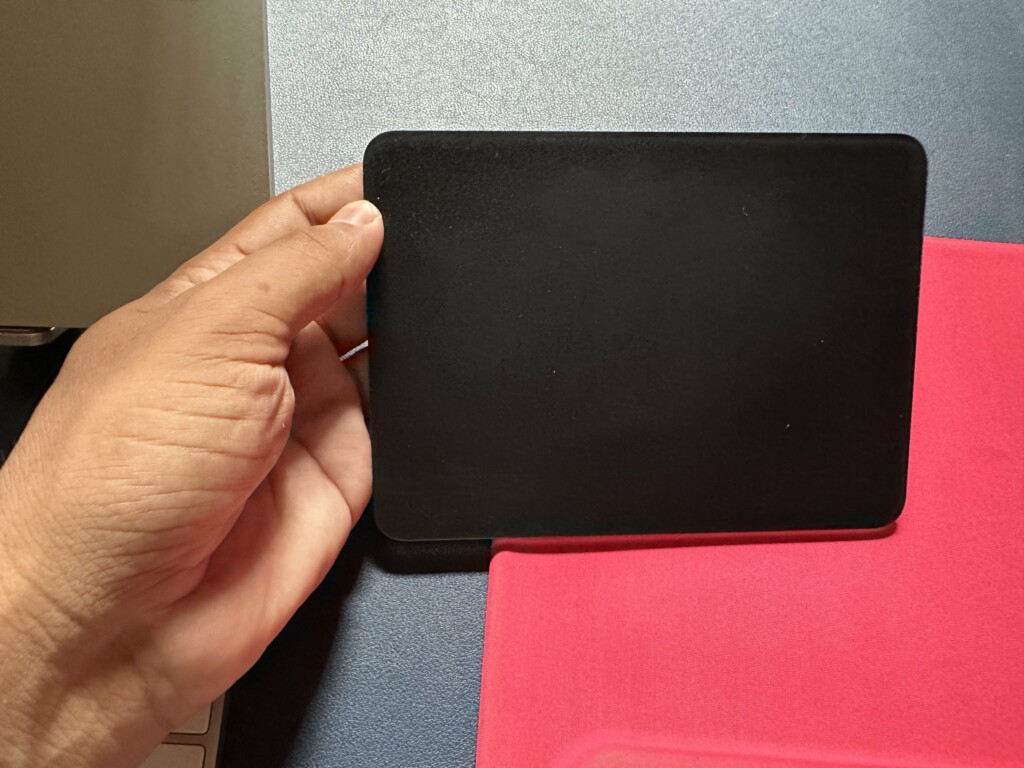
There are a bunch of trackpads available for Windows. But many still go with the Apple Magic Trackpad, which has multi-touch gesture support, a long-lasting battery life, haptic feedback, and more. Out of all, one of its most important features is that it works with Windows.
So, if you’ve also chosen the Magic Trackpad to use on your Windows 11 PC to make your work easier and are looking for a guide to set up, then you’ve landed in the right place. Thus, in this guide, we’ve explained how you can easily set up and use Magic Trackpad on Windows 11. So, go ahead and learn about using Magic Trackpad on Windows 11.
Can You Use Magic Trackpad & Its Gestures on Windows 11?
Yes, Magic Trackpad works on Windows 11. You only need to pair the Magic Trackpad to your Windows 11 PC via Bluetooth. After doing so, you’ll be able to use it for pointing or a few other purposes. But to get multi-touch support and access to all gestures, you’ve to install some important drivers on your Windows 11 PC, which we’ll explain later in this guide.
Set Up Magic Trackpad on Your Windows 11 PC
To use Magic Trackpad on your Windows 11 PC, you’ve to first pair it with it via Bluetooth. You can check the below steps to know how to set up Magic Trackpad on your Windows 11 PC:
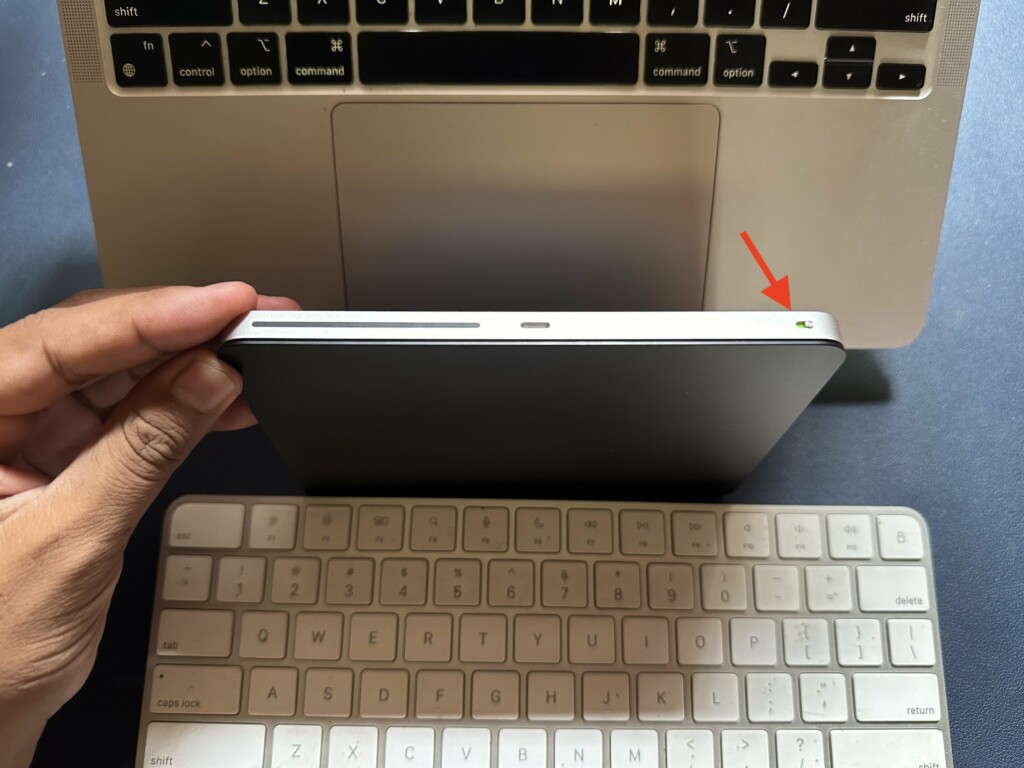
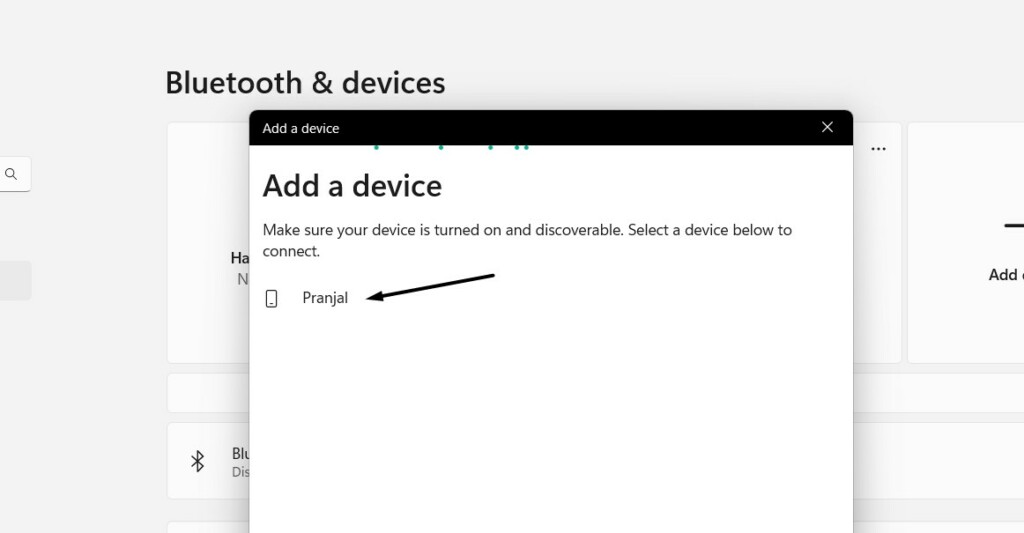
1. Turn on the Magic Trackpad using the switch present on the back edge of it. Once it’s turned on, you’ll see a green LED light.
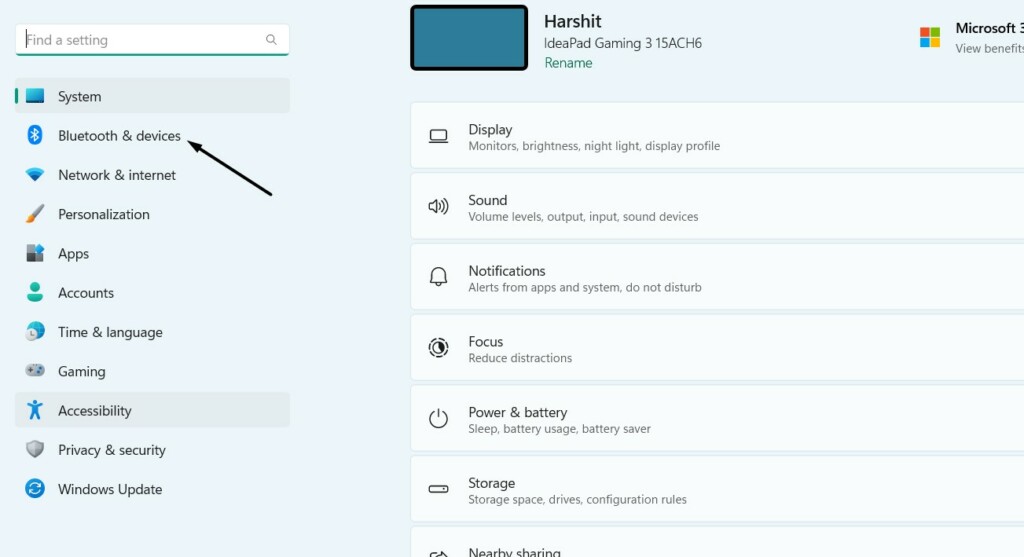
2. Once done, open the Settings app on your PC and select Bluetooth & devices option from the left.
3. Click the Add device option on the next screen and select the Bluetooth option in the window.
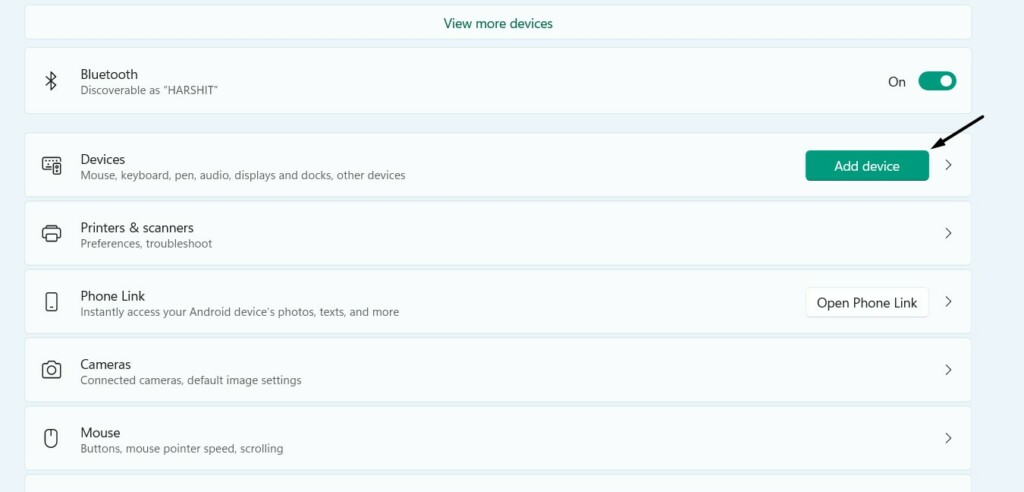
4. Choose Apple’s Magic Trackpad from the listed available devices and wait for it to pair.
That’s it! You’ve now connected your Magic Trackpad with your Windows 11 PC. You can now start using it as a pointing device. To get multi-touch support for Magic Trackpad, you’ve to install some drivers on your PC. To do so, you can check the following section in the guide.
Use Magic Trackpad Gestures on Your Windows 11 PC
There are four different workarounds to get full multi-touch support for Apple Magic Trackpad on your Windows 11 PC. Here in this section, we’ve briefly explained all four workarounds below. You can use any mentioned workaround that seems convenient to you.
1. With Mac Precision Touchpad
Mac Precision Touchpad is simply an open-source and free driver that adds support for Magic Trackpad on your Windows 11 PC. So if you want to get the multi-touch support for the Magic Trackpad for free, you can try this method by following the below-listed steps:
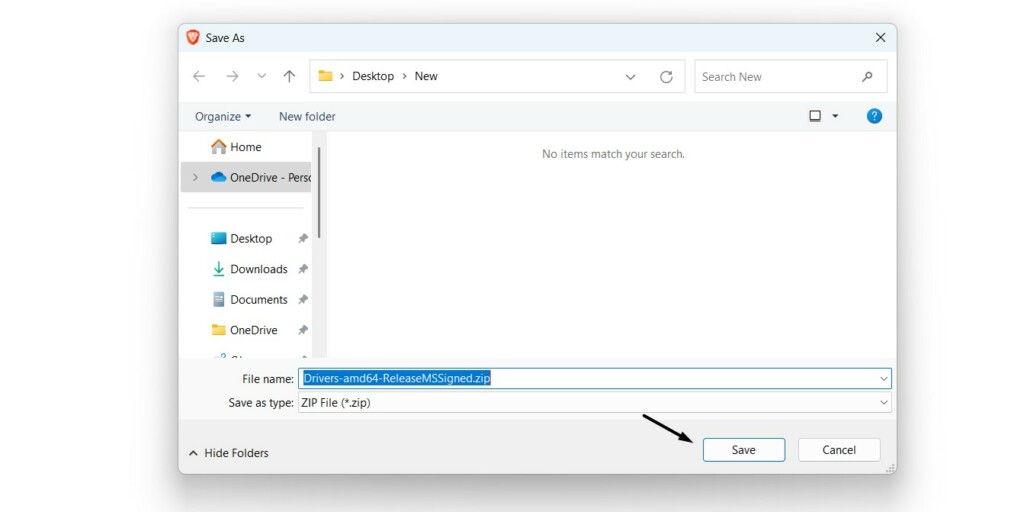
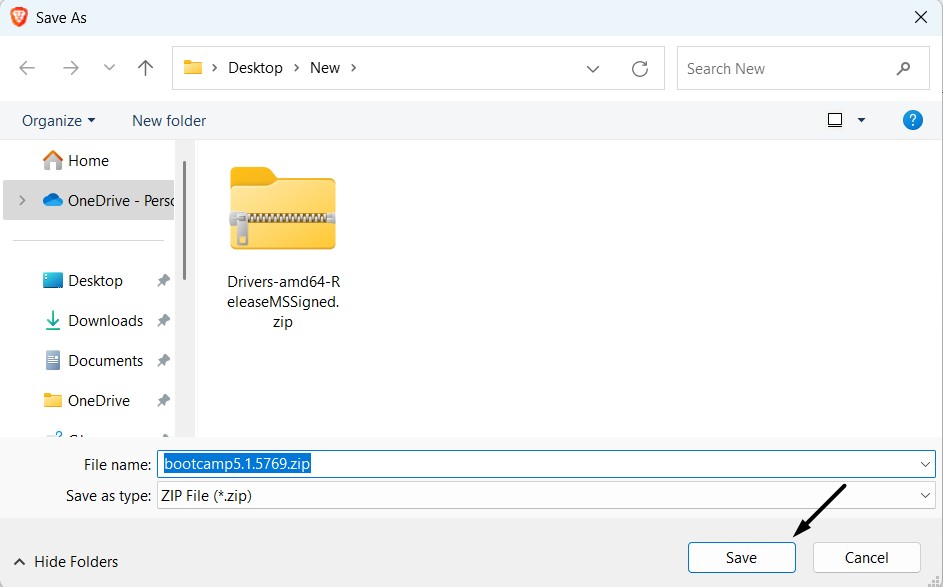
1. Click here to download the Mac Precision Touchpad driver’s zip file on your Windows 11 PC.
2. Click Save in the Save As window to download the Mac Precision Touchpad driver on your PC.
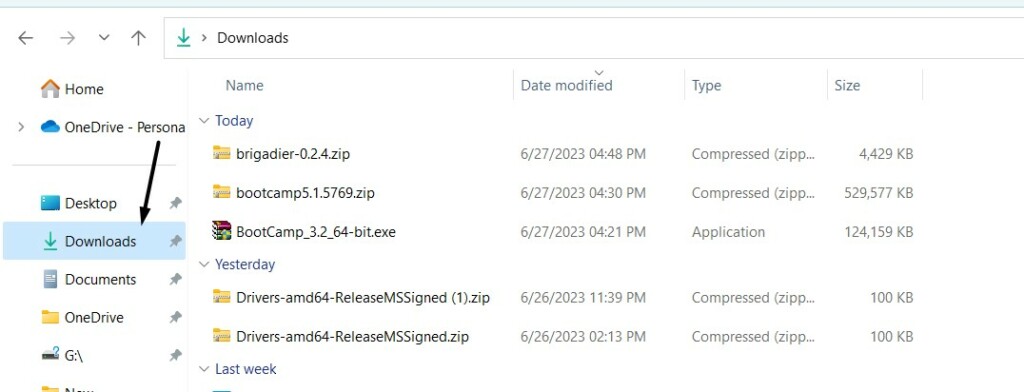
3. Once the file is downloaded, open the Download folder of the File Explorer utility and select it.
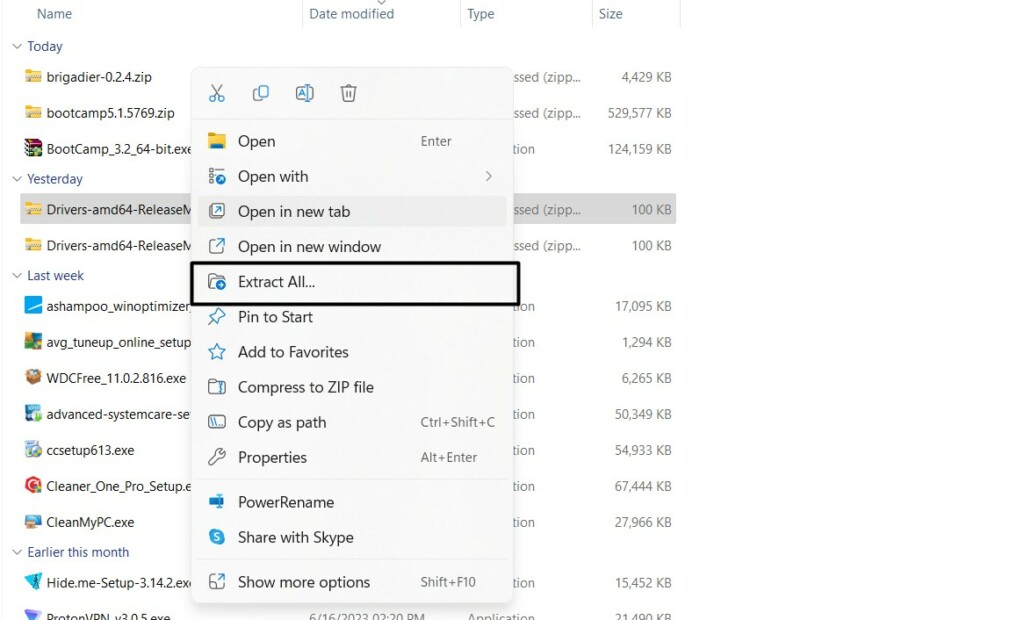
4. Select the Extract All… option from the right-click menu and click Browse… in the next window.
5. In the File Explorer window, move to the path where you would like to extract the zip file.
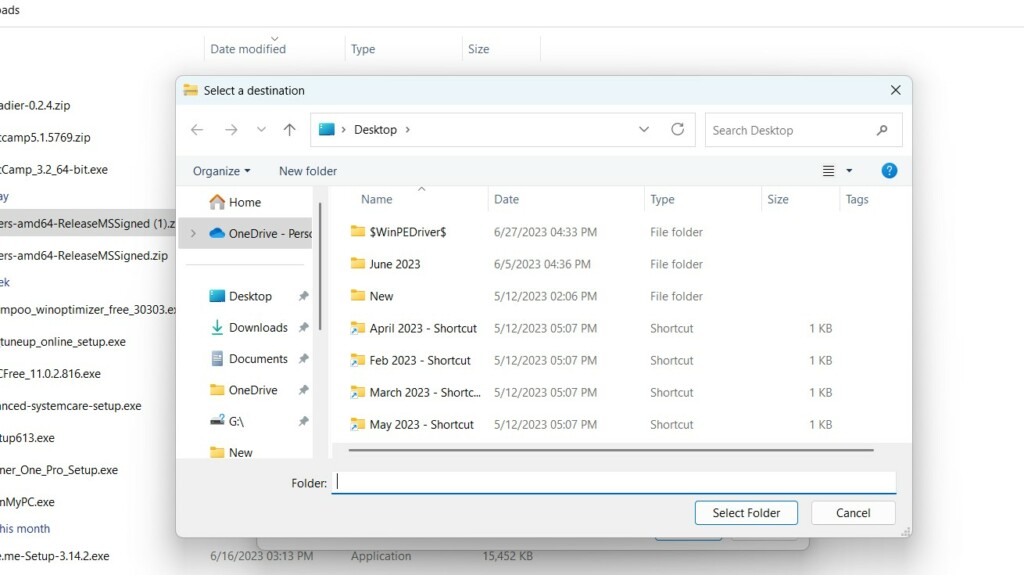
6. After selecting the location, click the Extract button to start the extraction process right now.
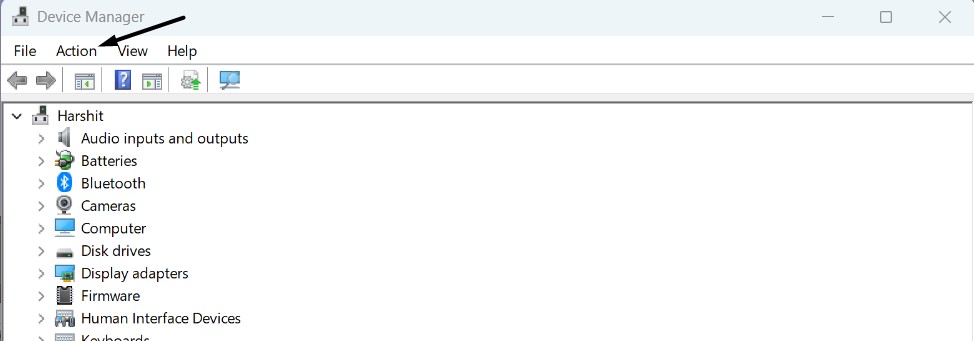
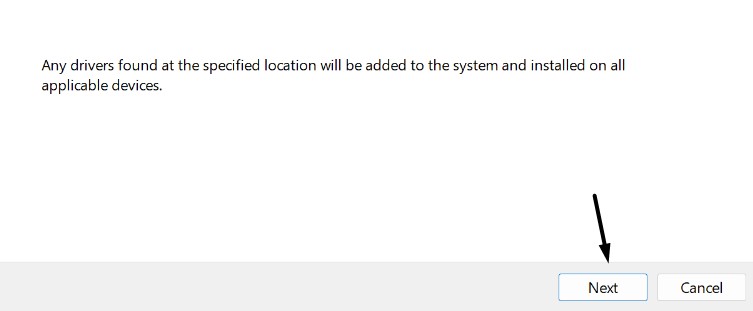
7. Once done, open Device Manager on your Windows 11 PC and click on Action in the top menu.
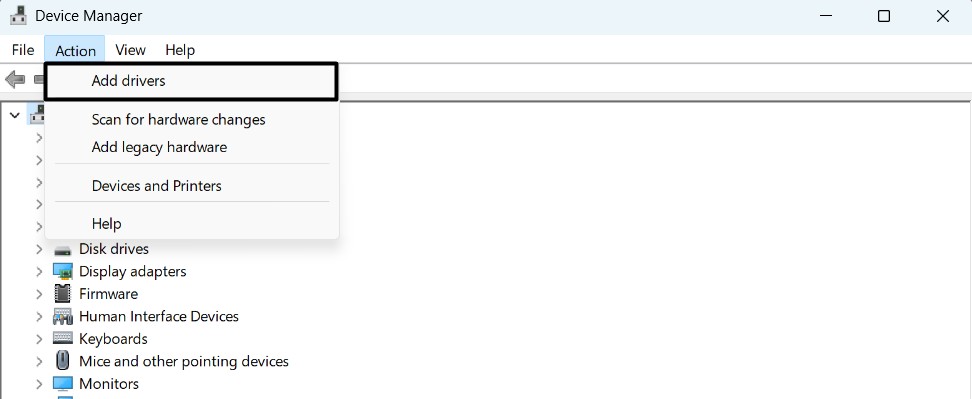
8. Select Add drivers from the menu and go to the path where you saved the extracted files.
9. Select the driver file, click OK, and then check the Include subfolders box to install the drivers.
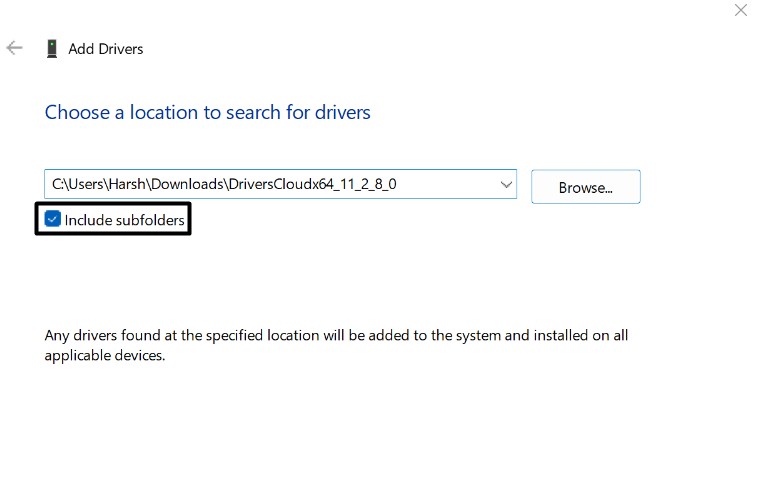
10. In the end, click the Next button and wait for the drivers to install on your Windows 11 PC.
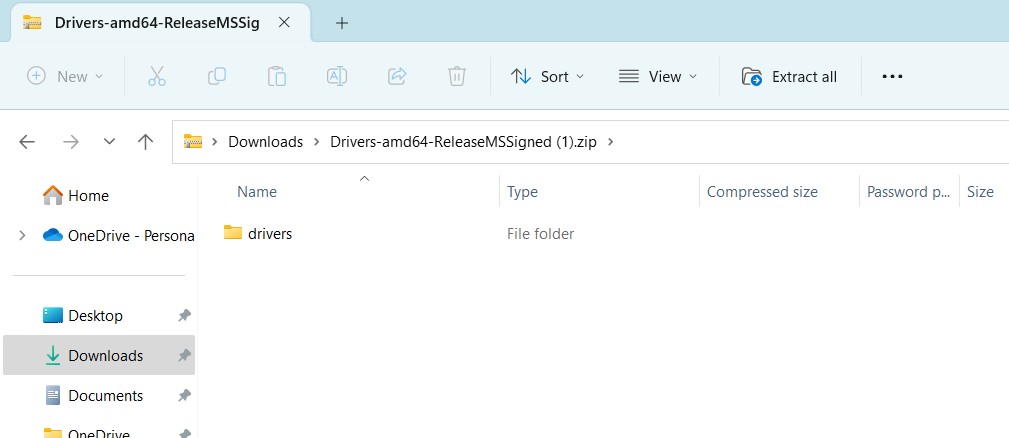
If you can’t install Mac Precision Touchpad drivers using the above method, follow the below steps:
1. Open the Drivers-amd64-ReleaseMSSigned.zip file and proceed to the drivers folder.
2. Move to the amd64 folder from the drivers folder, and search for the AmtPtpDevice.inf file.
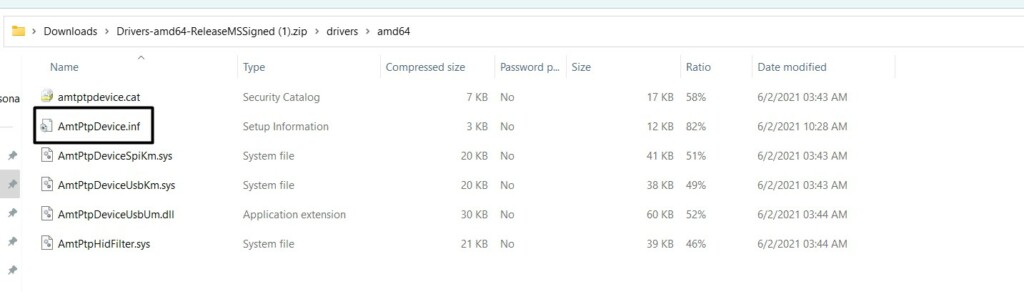
3. Right-click on the AmtPtpDevice.inf file and choose the Install option from the context menu.
4. Follow the on-screen instructions to manually install the drivers on your Windows 11 PC.
After installing the Mac Precision Touchpad drivers, you must be able to enjoy all gestures on it.
2. With Command Prompt
You can also install the Mac Precision Touchpad drivers on your Windows 11 PC using Command Prompt. You only need to run a few commands, and that’s it! We’ve mentioned the complete process of installing Mac Precision Touchpad drivers using CMD below:
1. Download the Mac Precision Touchpad Driver’s zip file on your Windows 11 PC by clicking here.
2. Open Windows Search Box, type CMD in it and select Run as administrator from the search.
3. Once Command Prompt is opened, copy-paste the below command into it and press Enter:
RUNDLL32.EXE SETUPAPI.DLL,InstallHinfSection DefaultInstall 132 path-to-inf\infname.infNote: Make sure to replace “path-to-inf\infname.inf” in the command with the path of AmtPtpDevice where it’s stored on your computer. For instance, it should look something like this:
RUNDLL32.EXE SETUPAPI.DLL,InstallHinfSection DefaultInstall 132/ C:\Users\Harsh\Downloads\Drivers-amd64-ReleaseMSSigned.zip\drivers\amd64/AmtPtpDevice.inf4. Wait for the drivers to install. Once done, take full advantage of Magic Trackpad on your Windows 11 PC.
3. Using Boot Camp
Another possible way to get access to all Magic Trackpad gestures on your Windows 11 PC is using Boot Camp. Boot Camp is a free software by Apple that includes drivers for most Apple Magic lineup devices, including Apple Magic Trackpad. You can follow the below-mentioned steps to use all possible gestures on your Windows 11 PC using Boot Camp:
1. Click here to download the Download Boot Camp Support Software on your Windows PC.
2. Click the Save button in the Save As window to download the installation file on your PC.
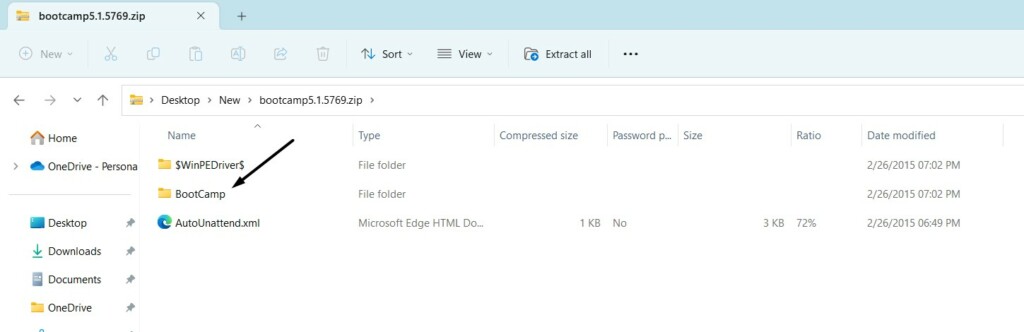
3. Once it’s downloaded, click on it, and extract the zip file anywhere you want on your PC.
4. Open the extracted folder on your Windows 11 PC, and open the BootCamp folder in it.
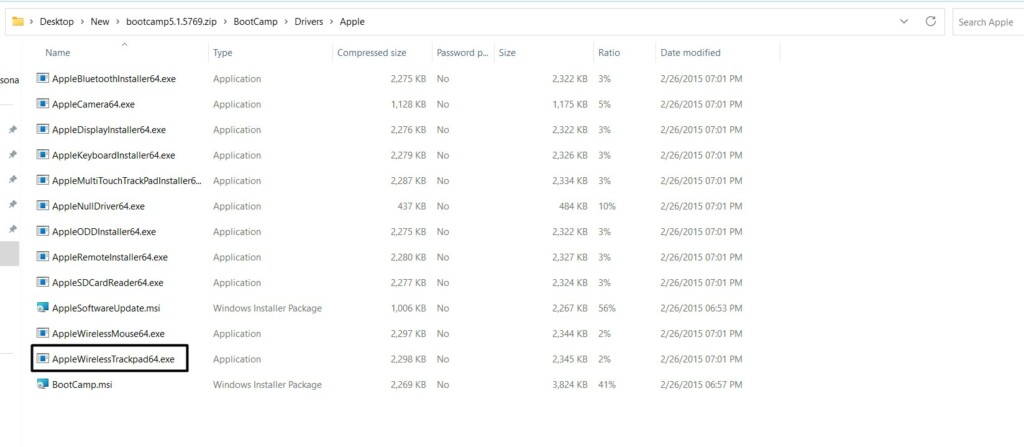
5. Open the Drivers folder, then open the Apple folder, and then look for the below-listed .exe file:
AppleWirelessTrackpad64.exe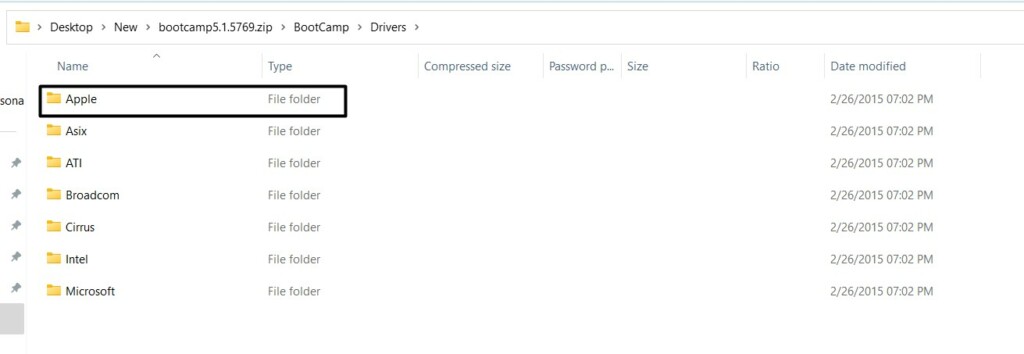
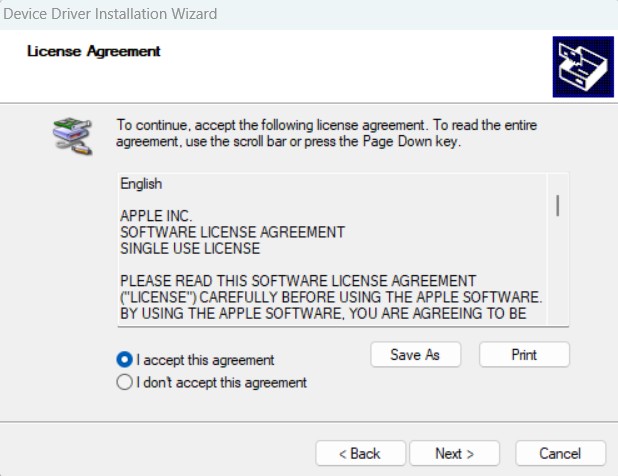
6. Once done, click the download file and the Yes button in the UAC prompt to go ahead.
7. Select the I accept the agreement radio button and click the Next > button to proceed.
8. Once done, follow the on-screen prompts to install the Magic Trackpad drivers on your PC.
9. Lastly, do the same with the below .exe file in the Apple folder to get support for multi-touch gestures: AppleMultiTouchTrackPadInstaller64.exe
That’s it! You should now be able to use all possible gestures on your Magic Trackpad on Windows 11.
4. With Magic Utilities
Magic Utilities is a third-party software that lets you use Magic Trackpad and other Apple Magic devices on your Windows PC, as it comes with native support for all Apple Magic series devices. It comes with Bluetooth support for almost all Apple devices, inducing Magic Trackpad.
Other than letting you use Magic Trackpad on your Windows 11 PC, it also allows you to customize your Magic Trackpad as per your preferences. For instance, it lets you enable/disable 1 Finger Gestures, 2 Finger Gestures, and 3 Finger Gestures for your trackpad.
You can also configure scroll and swipe sensitivity for Magic Trackpad within the Magic Utilities app. Not only this, but you can also enable features like silent clicking, smooth scrolling, and more. Lastly, it also notifies you when the battery goes below a particular level.
However, Magic Utilities is a premium utility, which costs $16.99/year for a user. So if you’ve some money to put in these utilities, you can get this for your Windows 11 PC or laptop. Also, if you want to try it first, you can sign up for its 28 days trial to learn about it.
Customize Mac Precision Touchpad on Windows 11
Once you’ve paired your Magic Trackpad to your Windows 11 PC and installed all important drivers, it’s now time to customize its gestures and other interactions. You can easily do so in the Settings app of your Windows 11 PC. Follow the below steps to learn to do so:
1. Press the Windows, and I keys together on your keyboard to open the Settings app on your PC.

2. Select the Bluetooth & devices option from the left and then click the Touchpad option.
3. Ensure the Touchpad toggle is enabled. Once assured, customize the options in the Gestures & interactions section. You can modify the Magic Trackpad cursor speed, taps, and more.
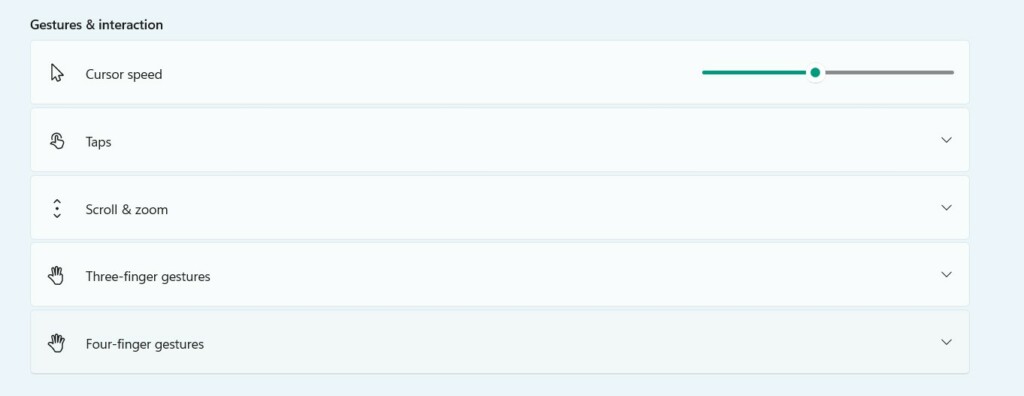
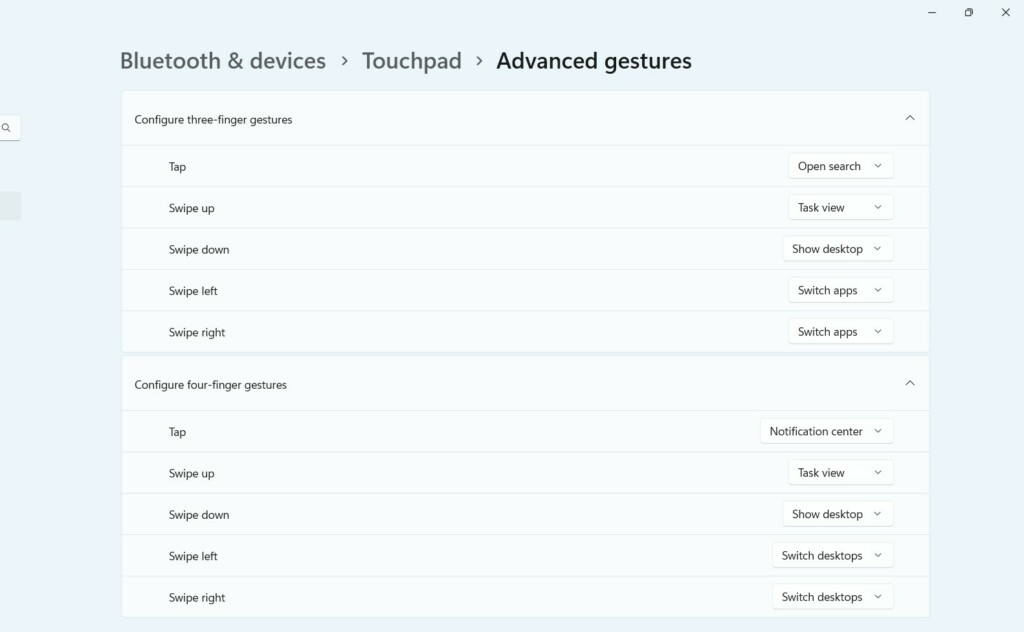
4. Click on the Advanced gestures option in the Related settings section for more options.

5. On the next screen, you can customize the three and four-finger gestures per your needs.
FAQs
Can Magic Trackpad Work With Windows 11?
Yes, Apple’s all Magic Trackpad models work on Windows 11 PCs without any issues smoothly.
How Do I Get My Magic Keyboard To Work on Windows 11?
To get Magic Keyboard to work on your Windows 11 PC, you only need to connect it using Bluetooth.
How Do You Right-Click on a Magic Trackpad on Windows?
To right-click on the Magic Trackpad on your Windows 11 PC, you need to use two fingers at the same time together on it. Another way is to select an item, press & hold the Ctrl key on the keyboard and then touch one finger on the trackpad to get the right-click menu.
How Do I Set Up My Trackpad on Windows 11?
You can easily set up your Magic Trackpad on your Windows 11 PC using Bluetooth. You can follow the below-mentioned path to connect your Magic Trackpad to your Windows 11 PC:
Settings App > Bluetooth & Devices > Add Device > Bluetooth > Select Magic Trackpad > That’s it!
Can You Use Magic Keyboard and Trackpad on Windows?
Yes, you can smoothly use both Magic Keyboard and Magic Trackpad on your Windows 11 PC. You only need Bluetooth to connect them to your PC.
Set Up and Use Magic Trackpad on Windows 11
Though setting up and using Magic Trackpad on Windows 11 is pretty easy. But some users still face issues setting up and using Magic Trackpad on their Windows 11 PC. Thus, we decided to create this in-depth guide explaining how to do the same in an easy manner.
We hope you were able to set up and use Magic Trackpad on your Windows 11 PC with the help of this guide. If you experienced any issues while doing so, check out our troubleshooting guide explaining how to fix the Magic Trackpad not working on Windows 11.
I have a late 2016 MacBook Pro w/ Touchbar and I use Windows 10 on it quite a bit, yet I cant figure out how to enable trackpad gestures on it, there is no bootcamp support installed on it either for some reason, it’s all there in macOS but in Windows I have nothing in the way of support it seems
Help?
Posted on Feb 25, 2018 12:59 PM
Posted on Feb 25, 2018 3:17 PM
ExtraMagic is for Magic Trackpad only, and only over a Bluetooth connection (not USB). To get extra gestures with the built-in MBP trackpad, you’ll want Trackpad++ here: http://trackpad.forbootcamp.org/
Download Windows Speedup Tool to fix errors and make PC run faster
If your work involves switching between Mac and Windows PC, you might have noticed that Windows’ touchpad works differently than Mac’s Touchpad. If you come from a Mac background, you would love the ease of accessibility it offers through two-finger scrolling and three-finger gestures, which are not recognized by the Windows touchpad. Once you have used Mac gesturing and scrolling, you might find it hard to use Windows for day-to-day work as Windows’s touchpad lacks basic gestures and scrolling. If you are looking for Mac-like gestures and scrolling on your Windows laptop, you are in the right place.
Enable & Customize Two-Finger Scroll on Windows 11
Modern laptops today come with precision touchpads and support touchpad gestures. If your system is on creator update and is equipped with a precision Touchpad, you can enable the advanced scrolling and gestures on your laptop, which provides you with a Mac kind of accessibility. However, if your laptop doesn’t support a precision touchpad, you can still get multiple finger gestures if your system has synaptic drivers. In this article, we explain how to enable the two-finger scrolling on the Windows Touchpad without fiddling with your touchpad drivers.
Get Mac like scrolling on Windows Touchpad
Two Finger Scroll is a simple tiny utility that enables absolute finger control on your Windows Touchpad and doesn’t require any installation. While the tool won’t give the benefit of rotation powers and pinch-to-zoom features like in Mac, you can still use this tiny little app to enable the ease of accessibility in Windows touchpad similar to that of the Mac experience. But before proceeding, make sure that your Windows trackpad comes with multi-touch support.
The utility adds a two-finger gesture to your Windows Touchpad and gives total control over speed and acceleration. Before proceeding, make sure that you have Synaptics TouchPad. Synaptic official drivers are necessary if you’re using Two Finger Scroll utility and if your system doesn’t have synaptic drivers, you can install one here.
The tool can be easily customized and you can adjust how the scrolling and gestures as you desire. Apart from two-finger scrolling, the utility also enables you to manage three-finger gestures and scrolling. The tool allows you to customize your two fingers and three-finger tapping to the left button, middle button, right button button4, and button5. Follow the below steps to get simple two-finger/three-finger scrolling and gestures on your Windows laptop.
Download the Two finger Scroll app here.
Extract the file and Double click on the Two Finger Scroll icon to launch the program. The program will be automatically added to the system tray.
Go to Settings in order to customize the app.
Navigate to Scrolling in order to choose the Scroll type. You can choose to have vertical scrolling, horizontal scrolling or keep scrolling on the edges.
Under Settings, you can control the speed and acceleration.
Go to Taping tab to get advanced tapping gestures for both two finger and three fingers.
Navigate to Gestures tab to select multi-finger gestures like three-finger swipe up and three-finger swipe left-right.
Once you customize the settings, click OK to apply changes.
Open any document to test the new gestures and scrolling.
You can disable the tool from the Windows system tray and uninstall the program whenever you want. You can uninstall the tool in the same way as how you remove other programs on your laptop.
These links may also interest you:
- How to make Windows look like Mac
- How to get Mac-like smooth fonts on Windows
- How to get Mac Mouse cursor & pointer on Windows.
Pavithra is a Windows enthusiast, who loves keeping abreast with the latest in the world of technology.