
The windows 10 User Accounts and Settings app under the Control Panel (CP) can allow you to edit user accounts. But with the snap-in console’s Local Users and Groups management feature, you gain access to more details such as the permissions granted to groups and users on your personal computer.
Local User and Group Management (LUSRMGR.MSC) is a tool that supports managing local computer user accounts and groups. The tool can delete, add, or edit local user groups and accounts on a PC, including adding and removing users from local groups. It can also change the attributes of user accounts, such as login scripts, password policies, and home directories.
However, the LUSRMGR.MSC tool isn’t available under the “Administrative Tools” menu on most Windows 10 and 11 Home computers. In this case, you can use a third-party program to enable the tool because it’s not activated by default.
You can also run LUSRMGR.MSC file to access Local Users and Groups Management or gain access using Computer Management Windows feature. In this article, you’ll learn how to enable LUSRMGR.MSC in Windows 10 and 11 computers, including how to view and manage all local users and groups on your PC.
Activating This Tool on Windows Home
Local Users and Groups Management resembles the Local Group Policy Editor function and is only available in Windows 11 Edu, Pro, and Enterprise OS editions. However, the built-in LUSRMGR.MSC snap-in isn’t available on the Home edition of Windows operating system.
LUSRMGR.MSC third-party tool, including features, resembles the built-in Windows user accounts and groups management tool. The portable application can run on any Windows 10 and 11 Home editions, making it ideal for enabling the built-in tool.
Available on GitHub, LUSRMGR.MSC download is free. However, you must assign LUSRMGR.MSC administrator privileges and set the .NET framework at 4.5 or higher for the tool to function properly. Enable LUSRMGR.MSC in Windows 11 or 10 is as follows:
1) Download an executable LUSRMGR.exe file.
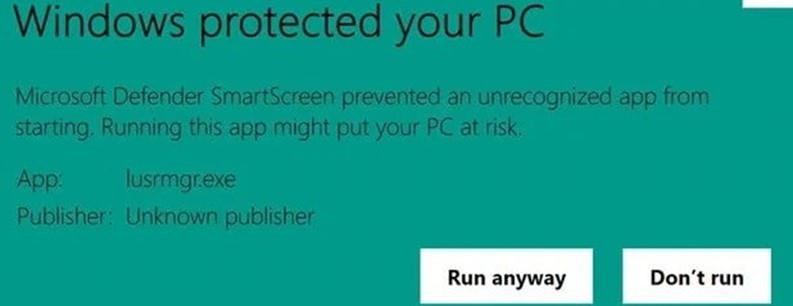
2) Double-click on the downloaded file to run it. If you encounter a Microsoft Defender SmartScreen prompt, click on “More Info.”
3) Click on “Run Anyway.”
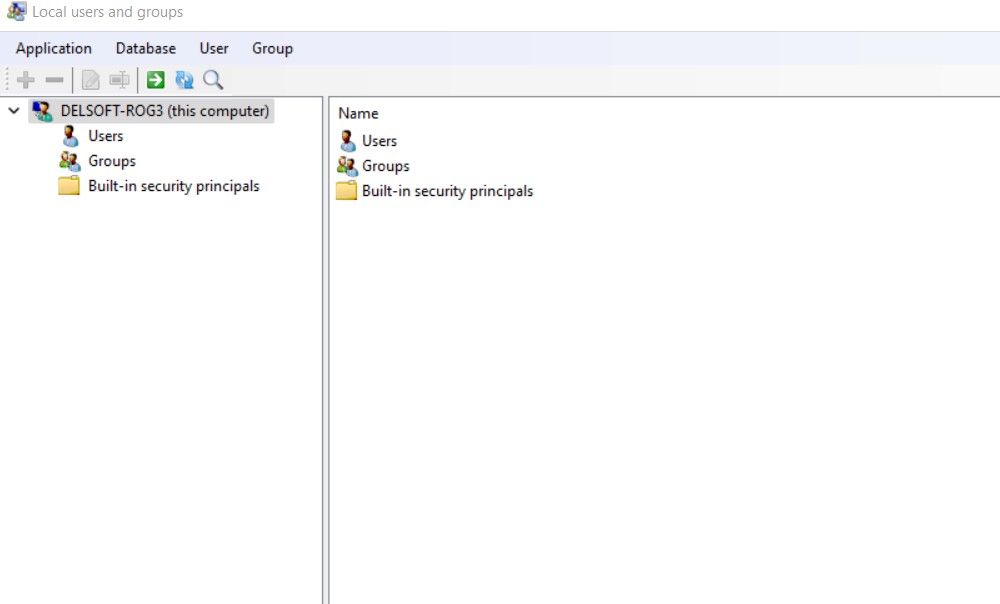
4) Launch the program, and a screen similar to that of the built-in LUSRMGR tool will appear as follows:
5) Create and manage user accounts and groups under the console.
Adding a New User
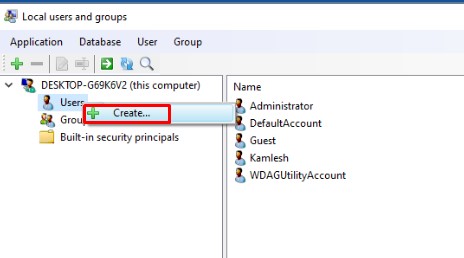
1) Click on the “Users” menu.
2) Select the option “Create” to create a new user.
3) Enter all the correct user account details and click on the “Create” button.

4) Configure the local path, advanced options, and profile, then click on the “Advanced” button.
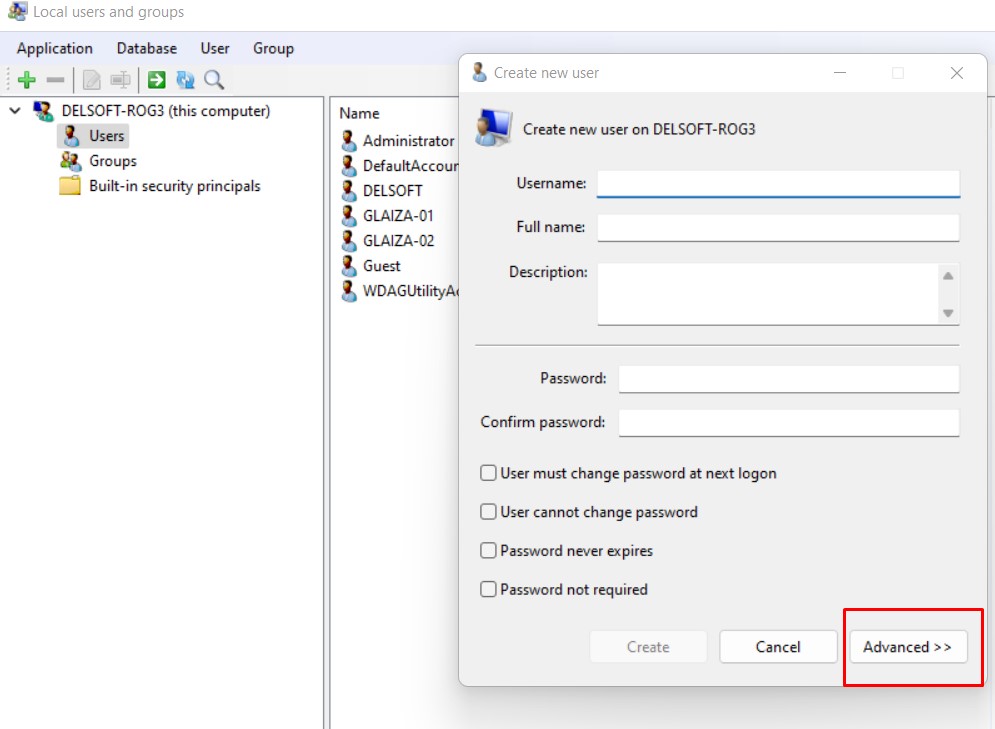
5) Click on the “Create” button to add the newly-created user account to your computer.
With the LUSRMGR tool, you can delete, edit, add, or rename an existing user account password. The tool also enables the creation of a hidden administrator account. It also allows remote connection to computers.
Other Available Functions
Apart from account management features, the LUSRMGR.MSC command line options offer other possibilities not available within the built-in utility. They include:
- Using the search function to find a particular user account. It enables system administrators to easily manage several user accounts.
- Defining individual user account access times or set blocked times for particular times and days. Right-click on an account’s username and select “Edit” to set its access time. Finally, click on the “Account” tab and select “Define access time.”
All user accounts lack a default time limit. Choose a time block for various days to define access time, if necessary.
Common Issues and Fixes
Some common errors linked to the local user accounts and groups include:
- Lusrmgr. Application error.
- Lusrmgr – bad image.
- Lusrmgr could not be installed.
- Lusrmgr could not be started.
- Lusrmgr could not be found.
- Lusrmgr failed to initialize properly.
- Lusrmgr could not be launched. Class not registered.
- Lusrmgr is not running.
- Lusrmgr has encountered a problem and need to close. We are sorry for the inconvenience.
- Lusrmgr is not a valid Win32 application.
- Error starting program: lusrmgr.msc
- The file lusrmgr.msc is missing or corrupt.
- Cannot find lusrmgr.msc.
- Windows failed to start – lusrmgr.msc.
- Faulting application path: lusrmgr.msc.
Solution 1: Troubleshooting Steps
Restore Your Computer to the Last Backup Image or Restore Point Prior to the Error
You can restore your Windows XP, Vista, 8, 7, 10, and 11 as follows:
1) Click on the “Start” button and type “System Restore” on the search box, then hit the “Enter” key.
2) Find “System Restore” in the search results and click on it.
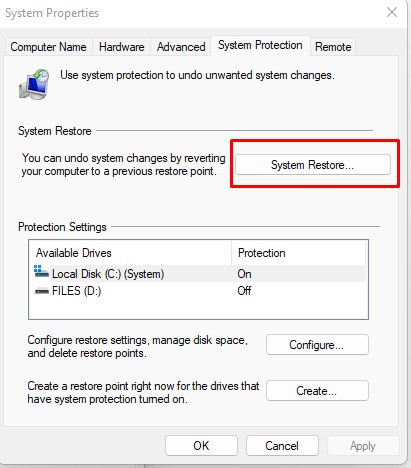
3) Enter your administrator password if prompted.
4) Follow the System Restore window prompts to select a relevant point of restoration.
5) Restore your PC to that restore point or backup image.
Solution 2: Perform a System Update
An outdated Windows operating system is also linked to most lusrmgr.msc errors. Conduct an update as follows:
1) Click on the “Start” button and type “Update” in the search box, and hit the “Enter” key.
2) Click on “Check for Updates” on the Windows Update wizard.
3) Download available updates and click on “Install Updates.”
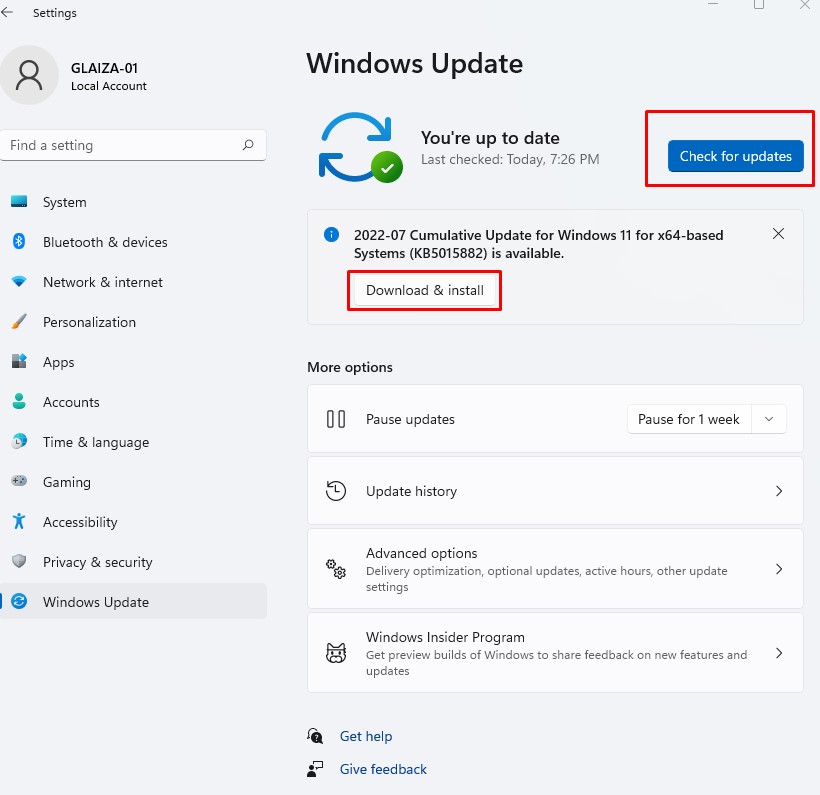
4) Restart your computer once all update downloads and installations are complete.
Final Notes
The local users and groups management tool enable easy control of local users and groups on your computer. The program allows for the addition, deletion, or modification of user accounts and groups. In addition, you can easily download the portable LUSRMGR.MSC application to enable the built-in feature on Windows 10 and 11.
Run Windows Update or restore your PC to the last restore point to fix most LUSRMGR.MSC errors, such as application error and could not be found or started. We hope that you found this helpful article and you were able to enable your local user and group management Windows feature.
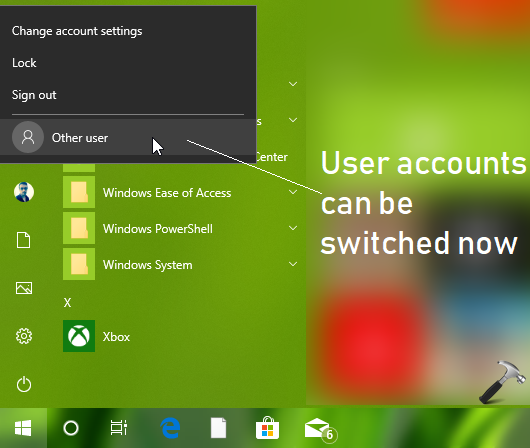
In Windows 10, you can easily select the accounts you wish to use, on login and lock screen. To switch users, you’ve to simply click on Start Button > click on your profile picture icon > and select other user account you want to switch to.
But what if you don’t see other user account to switch? Well, if this is the case with your system, you won’t be able to switch users. This is one of the known issue faced sometimes by users, and this problem existed in earlier Windows editions as well.
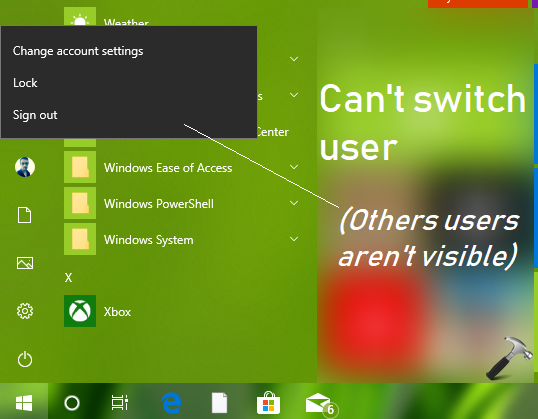
So if you’re unable to switch users, here’s how to fix it:
Page Contents
FIX: Unable To Switch Users In Windows 10/8.1/8
FIX 1 – Via LUSRMGR Snap-in
FYI: This FIX will only work in Windows 10 Pro, Education and Enterprise editions. For other editions, refer FIX 2 below.
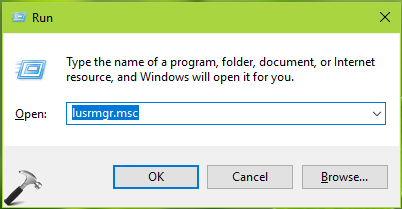
1. Press + R and type lusrmgr.msc in Run dialog box to open Local Users and Groups snap-in. Click OK.
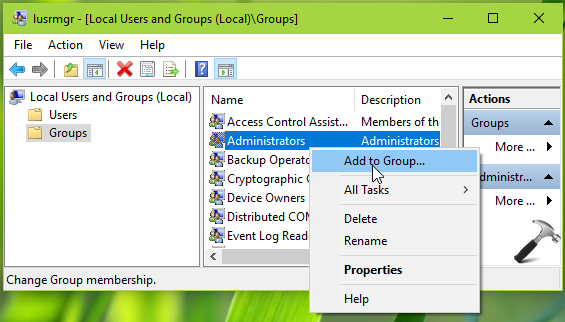
2. In the lusrmgr window, double click on Group. Now right click on Administrators, select Add to Group.
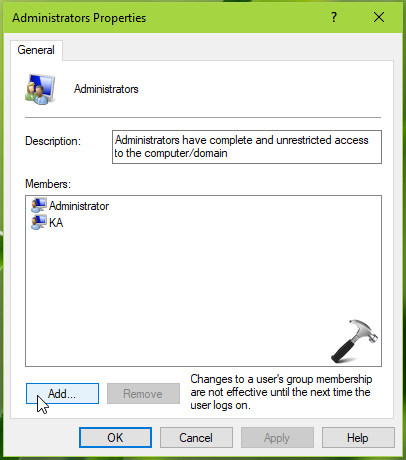
3. Now on Administrators property sheet, click Add button.
4. Then under Select Users, click Object Types.
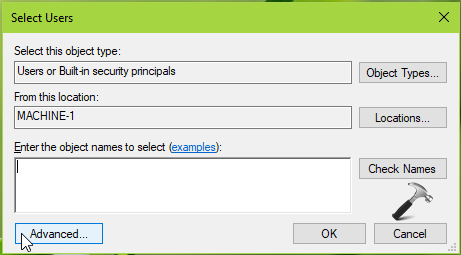
5. On the Object Types screen, make sure only Users is checked. Then again in above shown window, click Advanced.

6. Moving on, in next window, click Find Now. From the search results, select the other user accounts to which you can’t switch to. Then click OK and again OK in remaining window.
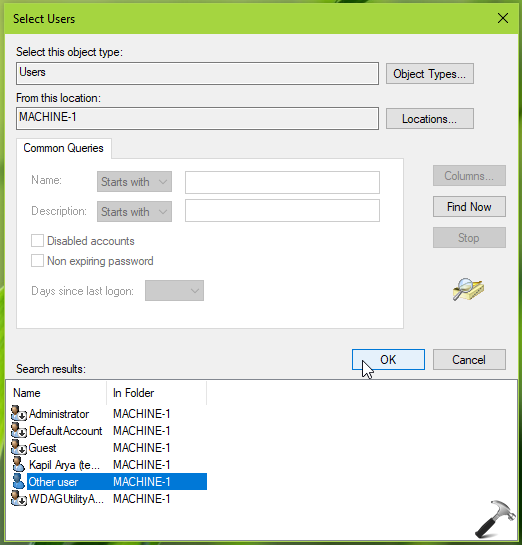
Once the user is added to Administrators group by this method, it should be available for switching.
If issue still persists, try FIX 2 mentioned below.
FIX 2 – Via Command Prompt
FYI: This method works in all editions.
1. Right click Start Button or press + X keys and select Command Prompt (Admin) to open Command Prompt as administrator.
2. In administrative or elevated Command Prompt window, type/paste following and press Enter key.
secedit /configure /cfg %windir%\inf\defltbase.inf /db defltbase.sdb /verbose
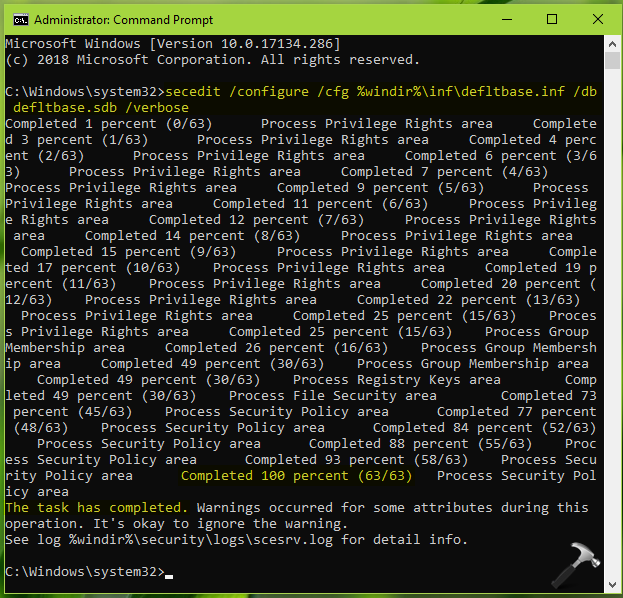
3. Close Command Prompt window and reboot the machine.
After restarting your computer, you must be able to switch users accounts now.
That’s it!
Also read: How to enable/disable fast user switching in Windows 10.
RELATED ARTICLES
Describe the bug
My OS is Windows 10 . lusrmgr.exe v1.6.0 — 1.6.3 no one works
To Reproduce
Steps to reproduce the behavior:
-
Go to ‘open lusrmgr’
-
Click on ‘bottom left’
-
You can see: that program dont run and give 3 errors (see screenshot) :
Expected behavior
after i click on the program i must wait long time, and then after 1-2minutes i became only 3warnings bottom left . And then i cant do anything else
Version
The version of the application, begins with 1.6.0 until 1.6.3
OS Edition
Windows 10 Home.
Screenshots

Additional context
NOTE: But in version 1.5 and 1.5.1 i can run the program without any problems. But the problem begins from v1.6 to lusrmgr v1.6.3 Latest
Can You help me please? Thanks in Advance
Local User and Group Management (lusrmgr.msc) console is a built-in tool to manage local users and groups. Windows consider this tool as a pro feature, so it will not be available in Windows Home edition and available only for Windows 11/10 Pro, Education, and Enterprise edition of the OS.
When you open the Computer Management console, you will see the Local Users and Groups item is missing. When you run the command “lusrmgr.msc” on Windows Home Edition, you will get the following message.
This snapin may not be used with this edition of Windows 10/11. To manage user accounts for this computer, use the User Accounts tool in the Control Panel.
You can use the following workarounds in Windows Home edition to manage users and groups.
- Use a third-party alternative tool (lusrmgr.exe)
- Use PowerShell commands
Use a third-party alternative tool (lusrmgr.exe)
Follow the below steps to manage local users and groups using the free tool (lusrmgr.exe).
- Download the lusrmgr.exe file from this Github page.
- Run the downloaded file on your Windows 11/10 Home PC.
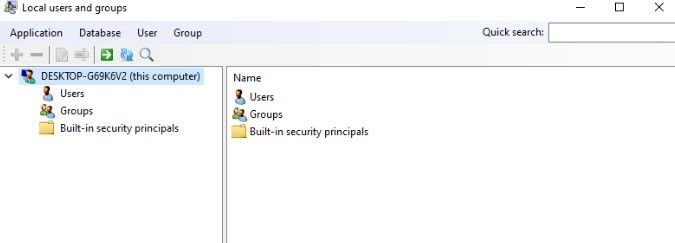
- The tool provides the following screen which is similar to the built-in “lusrmgr.msc” tool.
- Along with existing features, this tool also provides some additional features such as Advanced Search and Set User Logon Hours (Define account access times).

Manage Local Users and Groups using PowerShell
Microsoft supports the different PowerShell cmdlets to manage local accounts. Here we have listed some of the commands.
For more details, you can see this page: How to Manage Local Users and Groups using PowerShell.
List Local User Accounts
The Get-LocalUser cmdlet gets the local user accounts or retrieves specific user details by the user’s name.
#List all the local user accounts
Get-LocalUser

#Get single user detail
Get-LocalUser -Name "TestUser01"
List Local Security Groups
The Get-LocalGroup cmdlet gets the local security groups.
#List all the local security groups
Get-LocalGroup

#Get single group detail
Get-LocalGroup -Name "Administrators"
Create a New Local User Account
Use the New-LocalUser cmdlet to create a new local user account using PowerShell.
$Password = Read-Host -AsSecureString -Prompt "Enter password:"
#$Password = ConvertTo-SecureString "TU2P@ssw$rd123" -AsPlainText -Force
New-LocalUser -Name "TestUser02" -Password $Password -FullName "Test User 02" -Description "Test"
Add members to a Local security group
We can use the Add-LocalGroupMember cmdlet to add users or groups as a member to a local security group.
Add-LocalGroupMember -Group "GroupName" -Member "UserName"Add multiple users to a group
Add-LocalGroupMember -Group "GroupName" -Member "User1","User2Последнее обновление: 11/27/2024
[Среднее время чтения: 4,5 мин.]
Разработка Microsoft Office Access 2010 14 компанией Microsoft послужила толчком для создания последней версии файла lusrmgr.msc. Он также известен как файл Microsoft Management Console Snap-in (расширение MSC), который классифицируется как файл XML (Microsoft Management Console Snap-in).
Файл lusrmgr.msc изначально был выпущен с Windows Vista 11/08/2006 для ОС Windows Vista.
Самая последняя версия [версия 14] была представлена 07/04/2011 для Microsoft Office Access 2010 14.
Файл lusrmgr.msc входит в комплект Microsoft Office Access 2010 14, Trillian 6.1.0.17 и Windows 10.
Ниже приведены подробные сведения, порядок устранения неполадок, возникших с файлом MSC, и бесплатные загрузки различных версий файла lusrmgr.msc.
Что такое сообщения об ошибках lusrmgr.msc?
lusrmgr.msc — ошибки выполнения
Ошибки выполнения — это ошибки Microsoft Office Access 2010, возникающие во время «выполнения». Термин «выполнение» говорит сам за себя; имеется в виду, что данные ошибки MSC возникают в момент, когда происходит попытка загрузки файла lusrmgr.msc — либо при запуске приложения Microsoft Office Access 2010, либо, в некоторых случаях, во время его работы. Ошибки выполнения являются наиболее распространенной разновидностью ошибки MSC, которая встречается при использовании приложения Microsoft Office Access 2010.
In most cases, lusrmgr.msc runtime errors occurring while the program is running will result in the program terminating abnormally. Most of these lusrmgr.msc error messages mean that Microsoft Office Access 2010 was either unable to locate this file on startup, or the file is corrupt, resulting in a prematurely-aborted startup process. Generally, Microsoft Office Access 2010 will be unable to start without resolving these errors.
Таким образом, крайне важно, чтобы антивирус постоянно поддерживался в актуальном состоянии и регулярно проводил сканирование системы.
Поиск причины ошибки lusrmgr.msc является ключом к правильному разрешению таких ошибок. Несмотря на то что большинство этих ошибок MSC, влияющих на lusrmgr.msc, происходят во время запуска, иногда ошибка выполнения возникает при использовании Microsoft Office Access 2010 14. Причиной этого может быть недостаточное качество программного кода со стороны Microsoft, конфликты с другими приложениями, сторонние плагины или поврежденное и устаревшее оборудование. Кроме того, эти типы ошибок lusrmgr.msc могут возникать в тех случаях, если файл был случайно перемещен, удален или поврежден вредоносным программным обеспечением. Таким образом, крайне важно, чтобы антивирус постоянно поддерживался в актуальном состоянии и регулярно проводил сканирование системы.
Как исправить ошибки lusrmgr.msc — 3-шаговое руководство (время выполнения: ~5-15 мин.)
Если вы столкнулись с одним из вышеуказанных сообщений об ошибке, выполните следующие действия по устранению неполадок, чтобы решить проблему lusrmgr.msc. Эти шаги по устранению неполадок перечислены в рекомендуемом порядке выполнения.
Шаг 1. Восстановите компьютер до последней точки восстановления, «моментального снимка» или образа резервной копии, которые предшествуют появлению ошибки.
Чтобы начать восстановление системы (Windows XP, Vista, 7, 8 и 10):
- Нажмите кнопку «Пуск» в Windows
- В поле поиска введите «Восстановление системы» и нажмите ENTER.
- В результатах поиска найдите и нажмите «Восстановление системы»
- Введите пароль администратора (при необходимости).
- Следуйте инструкциям мастера восстановления системы, чтобы выбрать соответствующую точку восстановления.
- Восстановите компьютер к этому образу резервной копии.
Если на этапе 1 не удается устранить ошибку lusrmgr.msc, перейдите к шагу 2 ниже.

Шаг 2. Если вы недавно установили приложение Microsoft Office Access 2010 (или схожее программное обеспечение), удалите его, затем попробуйте переустановить Microsoft Office Access 2010.
Чтобы удалить программное обеспечение Microsoft Office Access 2010, выполните следующие инструкции (Windows XP, Vista, 7, 8 и 10):
- Нажмите кнопку «Пуск» в Windows
- В поле поиска введите «Удалить» и нажмите ENTER.
- В результатах поиска найдите и нажмите «Установка и удаление программ»
- Найдите запись для Microsoft Office Access 2010 14 и нажмите «Удалить»
- Следуйте указаниям по удалению.
После полного удаления приложения следует перезагрузить ПК и заново установить Microsoft Office Access 2010.
Если на этапе 2 также не удается устранить ошибку lusrmgr.msc, перейдите к шагу 3 ниже.
Microsoft Office Access 2010 14
Microsoft Corporation
Шаг 3. Выполните обновление Windows.
Когда первые два шага не устранили проблему, целесообразно запустить Центр обновления Windows. Во многих случаях возникновение сообщений об ошибках lusrmgr.msc может быть вызвано устаревшей операционной системой Windows. Чтобы запустить Центр обновления Windows, выполните следующие простые шаги:
- Нажмите кнопку «Пуск» в Windows
- В поле поиска введите «Обновить» и нажмите ENTER.
- В диалоговом окне Центра обновления Windows нажмите «Проверить наличие обновлений» (или аналогичную кнопку в зависимости от версии Windows)
- Если обновления доступны для загрузки, нажмите «Установить обновления».
- После завершения обновления следует перезагрузить ПК.
Если Центр обновления Windows не смог устранить сообщение об ошибке lusrmgr.msc, перейдите к следующему шагу. Обратите внимание, что этот последний шаг рекомендуется только для продвинутых пользователей ПК.

Если эти шаги не принесут результата: скачайте и замените файл lusrmgr.msc (внимание: для опытных пользователей)
Если ни один из предыдущих трех шагов по устранению неполадок не разрешил проблему, можно попробовать более агрессивный подход (примечание: не рекомендуется пользователям ПК начального уровня), загрузив и заменив соответствующую версию файла lusrmgr.msc. Мы храним полную базу данных файлов lusrmgr.msc со 100%-ной гарантией отсутствия вредоносного программного обеспечения для любой применимой версии Microsoft Office Access 2010 . Чтобы загрузить и правильно заменить файл, выполните следующие действия:
- Найдите версию операционной системы Windows в нижеприведенном списке «Загрузить файлы lusrmgr.msc».
- Нажмите соответствующую кнопку «Скачать», чтобы скачать версию файла Windows.
- Скопируйте этот файл в соответствующее расположение папки Microsoft Office Access 2010:
Windows XP: C:\Windows\System32\
Windows Vista: C:\Windows\System32\
Windows Vista: C:\Windows\SysWOW64\
Windows Vista: C:\Windows\System32\en-US\
Windows Vista: C:\Windows\SysWOW64\en-US\Показать на 14 каталогов больше +
Windows 7: C:\Windows\System32\
Windows 7: C:\Windows\SysWOW64\
Windows 7: C:\Windows\System32\en-US\
Windows 7: C:\Windows\SysWOW64\en-US\
Windows 8: C:\Windows\System32\
Windows 8: C:\Windows\System32\en-US\
Windows 8.1: C:\Windows\System32\en-GB\
Windows 8.1: C:\Windows\System32\
Windows 10: C:\Windows\WinSxS\amd64_microsoft-windows-netplwiz_31bf3856ad364e35_10.0.16299.15_none_6e458a8f26aa47b1\
Windows 10: C:\Windows\WinSxS\wow64_microsoft-windows-netplwiz_31bf3856ad364e35_10.0.16299.15_none_789a34e15b0b09ac\
Windows 10: C:\Windows\Temp\527D94AF-D053-4381-B105-0D815D53791E\amd64_microsoft-windows-netplwiz_31bf3856ad364e35_10.0.16299.248_none_58e91bc8204b4c5f\
Windows 10: C:\Windows\Temp\527D94AF-D053-4381-B105-0D815D53791E\wow64_microsoft-windows-netplwiz_31bf3856ad364e35_10.0.16299.248_none_633dc61a54ac0e5a\
Windows 10: C:\Windows\System32\
Windows 10: C:\Windows\System32\en-US\ - Перезагрузите компьютер.
Если этот последний шаг оказался безрезультативным и ошибка по-прежнему не устранена, единственно возможным вариантом остается выполнение чистой установки Windows 10.
СОВЕТ ОТ СПЕЦИАЛИСТА: Мы должны подчеркнуть, что переустановка Windows является достаточно длительной и сложной задачей для решения проблем, связанных с lusrmgr.msc. Во избежание потери данных следует убедиться, что перед началом процесса вы создали резервные копии всех важных документов, изображений, установщиков программного обеспечения и других персональных данных. Если вы в настоящее время не создаете резервных копий своих данных, вам необходимо сделать это немедленно.
Скачать файлы lusrmgr.msc (проверено на наличие вредоносного ПО — отсутствие 100 %)
ВНИМАНИЕ! Мы настоятельно не рекомендуем загружать и копировать lusrmgr.msc в соответствующий системный каталог Windows. Microsoft, как правило, не выпускает файлы Microsoft Office Access 2010 MSC для загрузки, поскольку они входят в состав установщика программного обеспечения. Задача установщика заключается в том, чтобы обеспечить выполнение всех надлежащих проверок перед установкой и размещением lusrmgr.msc и всех других файлов MSC для Microsoft Office Access 2010. Неправильно установленный файл MSC может нарушить стабильность работы системы и привести к тому, что программа или операционная система полностью перестанут работать. Действовать с осторожностью.
Файлы, относящиеся к lusrmgr.msc
Файлы MSC, относящиеся к lusrmgr.msc
| Имя файла | Описание | Программное обеспечение (версия) | Размер файла (в байтах) | Расположение файла |
|---|---|---|---|---|
| WF.msc | Microsoft Management Console Snap-in | Microsoft Office Access 2010 14 | 115109 | C:\Windows\Boot\EFI\sk-SK\ |
| lusrmgr.msc | Microsoft Management Console Snap-in | Microsoft Office Access 2010 14 | 144998 | C:\Windows\Boot\EFI\lt-LT\ |
| DevModeRunAsUserConfig… | Microsoft Management Console Snap-in | Microsoft Office Access 2010 14 | 13091 | C:\Program Files (x86)\Common Files\System\ado\ |