
Receives trap messages generated by local or remote Simple Network Management Protocol (SNMP) agents and forwards the messages to SNMP management programs running on your computer. If this service is stopped, SNMP-based programs on your computer will not receive SNMP trap messages. If this service is disabled, any services that explicitly depend on it will fail to start.
This service also exists in Windows 11, 8 and Vista.
Startup Type
| Windows 10 version | Home | Pro | Education | Enterprise |
|---|---|---|---|---|
| 1507 | Manual | Manual | Manual | Manual |
| 1511 | Manual | Manual | Manual | Manual |
| 1607 | Manual | Manual | Manual | Manual |
| 1703 | Manual | Manual | Manual | Manual |
| 1709 | Manual | Manual | Manual | Manual |
| 1803 | Manual | Manual | Manual | Manual |
| 1809 | Manual | Manual | Manual | Manual |
| 1903 | Manual | Manual | Manual | Manual |
| 1909 | Manual | Manual | Manual | Manual |
| 2004 | Manual | Manual | Manual | Manual |
| 20H2 | Manual | Manual | Manual | Manual |
| 21H1 | Manual | Manual | Manual | Manual |
| 21H2 | Manual | Manual | Manual | Manual |
| 22H2 | Manual | Manual | Manual | Manual |
Default Properties
| Display name: | SNMP Trap |
| Service name: | SNMPTRAP |
| Type: | own |
| Path: | %WinDir%\System32\snmptrap.exe |
| Error control: | normal |
| Object: | NT AUTHORITY\LocalService |
| Privileges: |
|
Default Behavior
The SNMP Trap service is running as NT AUTHORITY\LocalService in its own process of snmptrap.exe. It doesn’t share its process with other services. If SNMP Trap fails to start, the error is logged. Windows 10 startup proceeds, but a message box is displayed informing you that the SNMPTRAP service has failed to start.
Restore Default Startup Type of SNMP Trap
Automated Restore
1. Select your Windows 10 edition and release, and then click on the Download button below.
2. Save the RestoreSNMPTrapWindows10.bat file to any folder on your hard drive.
3. Right-click the downloaded batch file and select Run as administrator.
4. Restart the computer to save changes.
Note. Make sure that the snmptrap.exe file exists in the %WinDir%\System32 folder. If this file is missing you can try to restore it from your Windows 10 installation media.
Yea, though I walk through the valley of the shadow of death, I will fear no evil: for thou art with me; thy rod and thy staff they comfort me.
snmptrap.exe: Windows SNMP Trap Service
Overview
snmptrap.exe is the executable file for the Windows SNMP Trap Service. This service is responsible for receiving and processing SNMP trap messages sent by network devices and applications configured to send them. SNMP (Simple Network Management Protocol) is a widely used protocol for monitoring and managing network devices, servers, and other network-connected equipment. Trap messages are asynchronous notifications sent by an SNMP agent (running on a managed device) to an SNMP manager (which could be a monitoring server or application) to indicate a significant event, such as an error, a threshold being exceeded, or a change in status.
Origin and Purpose
snmptrap.exe is a legitimate component of the Windows operating system. It is not a virus or malware. It originates from Microsoft and is included as part of the optional SNMP feature. Its primary purpose is to:
- Receive Trap Messages: Listen for incoming SNMP trap messages on the standard UDP port 162 (though this can be customized).
- Log Trap Information: Record information about received traps, typically in the Windows Event Log (specifically, the «System» log). This allows administrators to review historical trap data.
- Forward Traps (Optional): In some configurations, the SNMP Trap Service can be configured to forward received traps to another SNMP manager. This is less common.
Is it a Virus?
No, snmptrap.exe is not inherently a virus. However, like any executable, it could theoretically be exploited by malware in very rare, highly specific circumstances. Malware might try to:
- Replace the legitimate file: A virus could replace the genuine
snmptrap.exewith a malicious version. This is uncommon due to Windows File Protection (WFP), which helps prevent critical system files from being overwritten. - Exploit vulnerabilities: If the SNMP Trap Service itself has unpatched vulnerabilities, a specially crafted trap message could potentially be used to exploit it and execute malicious code. This is why keeping Windows updated is crucial.
- Masquerade as
snmptrap.exe: Malware could use the same filename (snmptrap.exe) but reside in a different directory. This is a common tactic to hide malicious processes.
How to Verify Authenticity:
- Check File Location: The legitimate
snmptrap.exeshould reside in%SystemRoot%\System32(typicallyC:\Windows\System32). If you find it in a different location, it’s highly suspect. - Check Digital Signature: Right-click on
snmptrap.exe, select «Properties,» and go to the «Digital Signatures» tab. It should be digitally signed by Microsoft. If there’s no signature or the signature is invalid, the file is likely compromised. - Check File Size and Version: Compare the file size and version number with a known good copy from another, trusted Windows system with the same version and architecture (32-bit or 64-bit). Significant differences can indicate tampering.
- Scan with Antivirus: Run a full system scan with a reputable antivirus/anti-malware program.
Can It Become a Virus?
As mentioned above, snmptrap.exe itself cannot «become» a virus. It can, however, be replaced or exploited by one. Regular system updates, including security patches for the SNMP service, are the best defense against exploitation.
How to Use (and Troubleshoot) snmptrap.exe
snmptrap.exe is a service, not a tool you interact with directly through a command-line interface. You manage it through the Windows Services console. Here’s how to work with it:
1. Enabling/Disabling the SNMP Trap Service:
- Open the «Run» dialog (Windows Key + R).
- Type
services.mscand press Enter. - Locate «SNMP Trap» in the list of services.
- Right-click on it and choose «Properties.»
- To start the service, set the «Startup type» to «Automatic» or «Manual» and click «Start.»
- To stop the service, click «Stop.»
- To disable the service completely, set the «Startup type» to «Disabled.»
2. Configuring the SNMP Service (and Trap Destinations):
- The SNMP Trap Service relies on the main SNMP Service being configured.
- In
services.msc, find the «SNMP Service» (not «SNMP Trap»). - Right-click and select «Properties.»
- Go to the «Traps» tab.
- Here, you can configure «Community names» (essentially passwords) and «Trap destinations» (IP addresses or hostnames of systems that should receive traps). This is where you tell the managed devices where to send their traps. It does not configure
snmptrap.exeto forward traps. - The
snmptrap.exeservice listens for trap messages sent to the local machine, based on the communities configured in the SNMP Service.
3. Viewing Trap Messages in the Event Log:
- Open the «Run» dialog (Windows Key + R).
- Type
eventvwr.mscand press Enter. - Expand «Windows Logs» and select «System.»
- Look for events with a source of «SNMPTRAP.» These are the logged trap messages. The event details will show the source IP address, community name, and the trap’s OID (Object Identifier) and value, which provide information about the event.
4. Troubleshooting:
- Service Not Running: Ensure the «SNMP Trap» service is started and set to «Automatic» or «Manual» startup type.
- No Traps Received:
- Verify that the SNMP Service is properly configured with the correct community names and that the managed devices are configured to send traps to the correct IP address (the IP of the server running
snmptrap.exe). - Check firewall settings. Ensure that UDP port 162 (or the custom port you’ve configured) is allowed inbound on the Windows Firewall and any other network firewalls between the managed devices and the server.
- Use a network packet sniffer (like Wireshark) on the server to see if trap messages are actually arriving. If they are arriving but not being logged, there might be a problem with the service itself or the Event Log configuration.
- Test with a simple SNMP trap sender tool (there are many free ones available online) to send a test trap to the server.
- Check the Application, Security and System logs for any errors related to
snmptrap.exeor the SNMP service.
- Verify that the SNMP Service is properly configured with the correct community names and that the managed devices are configured to send traps to the correct IP address (the IP of the server running
- Service Crashes: If the service crashes repeatedly, check the Event Log for error messages that might indicate the cause (e.g., a malformed trap message, a resource conflict, or a bug in the service). Apply the latest Windows updates.
5. Command-Line Interaction (Limited):
Although you don't interact directly with `snmptrap.exe`, you can use command-line tools to manage the service:

*   `sc query snmptrap`: Checks the status of the SNMP Trap service.
*   `sc start snmptrap`: Starts the service.
*   `sc stop snmptrap`: Stops the service.
*   `sc config snmptrap start= demand`: Sets the service to start manually.
*   `sc config snmptrap start= auto`: Sets the service to start automatically.
*   `sc config snmptrap start= disabled`: Disables the service.
*   `net start snmptrap` and `net stop snmptrap`: Alternative commands to start and stop the service.
Important Considerations:
- Security: SNMPv1 and SNMPv2c use community strings, which are transmitted in plain text. This is a significant security risk. If possible, use SNMPv3, which provides encryption and authentication. If you must use SNMPv1 or v2c, restrict access to the SNMP service using firewall rules and use strong, unique community strings. Change the default «public» community string.
- Alternatives: For modern monitoring, consider more secure and robust alternatives like WMI (Windows Management Instrumentation), PowerShell remoting, or dedicated monitoring platforms that use secure agents.
- Removal: If you don’t need SNMP trap functionality, it’s best to disable the service to reduce the potential attack surface.
In conclusion, snmptrap.exe is a legitimate Windows component for receiving SNMP trap messages. While not a virus itself, it’s important to be aware of the security implications of using SNMP and to take steps to mitigate those risks. Regular system updates and proper configuration are essential for ensuring the security and stability of the SNMP Trap service.
When you open the Task Manager on your Windows computer, you may come across a process called “Service Host: SNMP Trap.” This process might raise some questions and concerns, especially if you are not familiar with SNMP (Simple Network Management Protocol) or its purpose. In this article, we will explore why the Service Host: SNMP Trap process is running in Task Manager and what it means for your system’s performance and security.

Understanding SNMP and SNMP Trap
SNMP, or Simple Network Management Protocol, is a widely used protocol for managing and monitoring network devices. It allows network administrators to collect information about network devices, monitor their performance, and manage configurations remotely.
SNMP Trap, on the other hand, is a mechanism used by network devices to send notifications or alerts to a central management system (SNMP manager) when specific events occur. These events can include system failures, network outages, or other important events that require attention.
Why is the Service Host: SNMP Trap Process Running?
The Service Host: SNMP Trap process running in Task Manager indicates that your computer is configured to receive SNMP Trap notifications from network devices. It acts as a listener for SNMP Trap messages and forwards them to the appropriate applications or services for further processing.
By default, Windows includes the SNMP Trap service as part of its networking components. It allows your computer to act as an SNMP manager and receive SNMP Trap messages from network devices such as routers, switches, or servers.
While the Service Host: SNMP Trap process is running, it consumes system resources such as CPU and memory. However, its resource usage is typically minimal and should not significantly impact your computer’s performance.
Is the Service Host: SNMP Trap Process a Security Concern?
As with any process running on your computer, it is essential to ensure that the Service Host: SNMP Trap process is legitimate and not a sign of malware or unauthorized access.
While the Service Host: SNMP Trap process itself is not a security threat, it is possible for malicious actors to exploit SNMP vulnerabilities to gain unauthorized access to network devices or compromise the SNMP manager. Therefore, it is crucial to take necessary security measures to protect your system.
If you suspect any malicious activity or want to ensure the integrity of your system, it is recommended to scan your computer for viruses and malware. Malwarebytes Free is a reliable and effective tool for detecting and removing malware from your system.
Configuring SNMP Trap on Windows
If you are not actively using SNMP Trap functionality or want to disable it for security reasons, you can do so by following these steps:
- Open the Control Panel on your Windows computer.
- Click on “Programs” or “Programs and Features.”
- Select “Turn Windows features on or off.”
- In the Windows Features window, scroll down and locate “Simple Network Management Protocol (SNMP).”
- Expand the SNMP checkbox and uncheck “Simple Network Management Protocol (SNMP)” and “WMI SNMP Provider.”
- Click “OK” to save the changes.
- Restart your computer for the changes to take effect.
Disabling SNMP Trap will stop the Service Host: SNMP Trap process from running on your computer.
Conclusion
The Service Host: SNMP Trap process running in Task Manager is a normal part of Windows networking components. It allows your computer to receive SNMP Trap notifications from network devices and forward them to the appropriate applications or services.
While the process itself is not a security concern, it is essential to ensure the legitimacy of the process and take necessary security measures to protect your system from potential SNMP vulnerabilities. Regularly scanning your computer for viruses and malware using tools like Malwarebytes Free can help maintain the integrity of your system.
If you are not actively using SNMP Trap functionality or have security concerns, you can disable SNMP Trap by following the steps outlined in this article. Remember to restart your computer for the changes to take effect.
By understanding the purpose and functionality of the Service Host: SNMP Trap process, you can make informed decisions about its configuration and ensure the optimal performance and security of your Windows computer.
Here are 10 basic security tips to help you avoid malware and protect your device:
Use a good antivirus and keep it up-to-date.
It’s essential to use a good quality antivirus and keep it up-to-date to stay ahead of the latest cyber threats. We are huge fans of Malwarebytes Premium and use it on all of our devices, including Windows and Mac computers as well as our mobile devices. Malwarebytes sits beside your traditional antivirus, filling in any gaps in its defenses, and providing extra protection against sneakier security threats.
Keep software and operating systems up-to-date.
Keep your operating system and apps up to date. Whenever an update is released for your device, download and install it right away. These updates often include security fixes, vulnerability patches, and other necessary maintenance.
Be careful when installing programs and apps.
Pay close attention to installation screens and license agreements when installing software. Custom or advanced installation options will often disclose any third-party software that is also being installed. Take great care in every stage of the process and make sure you know what it is you’re agreeing to before you click «Next.»
Install an ad blocker.
Use a browser-based content blocker, like AdGuard. Content blockers help stop malicious ads, Trojans, phishing, and other undesirable content that an antivirus product alone may not stop.
Be careful what you download.
A top goal of cybercriminals is to trick you into downloading malware—programs or apps that carry malware or try to steal information. This malware can be disguised as an app: anything from a popular game to something that checks traffic or the weather.
Be alert for people trying to trick you.
Whether it’s your email, phone, messenger, or other applications, always be alert and on guard for someone trying to trick you into clicking on links or replying to messages. Remember that it’s easy to spoof phone numbers, so a familiar name or number doesn’t make messages more trustworthy.
Back up your data.
Back up your data frequently and check that your backup data can be restored. You can do this manually on an external HDD/USB stick, or automatically using backup software. This is also the best way to counter ransomware. Never connect the backup drive to a computer if you suspect that the computer is infected with malware.
Choose strong passwords.
Use strong and unique passwords for each of your accounts. Avoid using personal information or easily guessable words in your passwords. Enable two-factor authentication (2FA) on your accounts whenever possible.
Be careful where you click.
Be cautious when clicking on links or downloading attachments from unknown sources. These could potentially contain malware or phishing scams.
Don’t use pirated software.
Avoid using Peer-to-Peer (P2P) file-sharing programs, keygens, cracks, and other pirated software that can often compromise your data, privacy, or both.
To avoid potential dangers on the internet, it’s important to follow these 10 basic safety rules. By doing so, you can protect yourself from many of the unpleasant surprises that can arise when using the web.
SNMP (
Simple Network Management Protocol
) — это классический протокол для мониторинга и сбора информации о сетевых устройствах (сервера, сетевое оборудование, рабочие станции, принтеры и т.д.). Протокол SNMP довольно легкий, быстрый, для передачи данных использует UDP порты 161 и 162. В этой статье мы рассмотрим, как установить и настроить службу SNMP в Windows Server 2022/2019 и Windows 10/11.
Содержание:
- Установка службы SNMP в Windows Server 2022/2019
- Установка SNMP агента в Windows Server Core
- Установка службы SNMP в Windows 10/11
- Настройка службы SNMP в Windows Server и Windows 10/11
Установка службы SNMP в Windows Server 2022/2019
В Windows Server службу SNMP можно установить с помощью Server Manager.
Выберите Add roles and features -> Features. Выберите SNMP Service (если нужно отметьте также SNMP WMI Providers).
Служба SNMP WMI Provider позволяет опрашивать SNMP устройство через WMI.
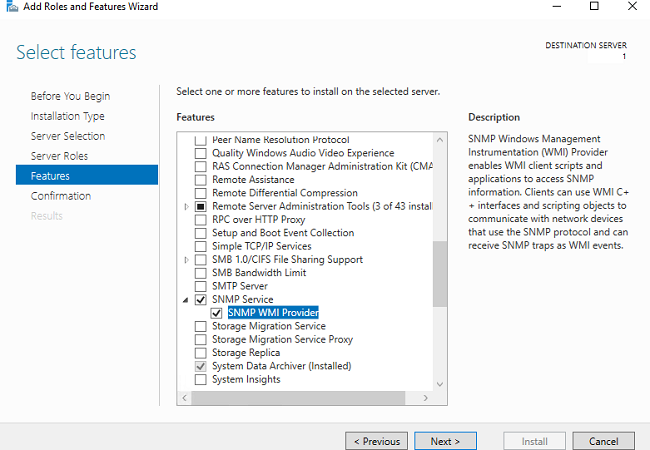
Нажмите Next -> Install и дождитесь окончания установки.
Установка SNMP агента в Windows Server Core
В Windows Server Core можно установить SNMP с помощью веб-интерфеса Windows Admin Center и PowerShell.
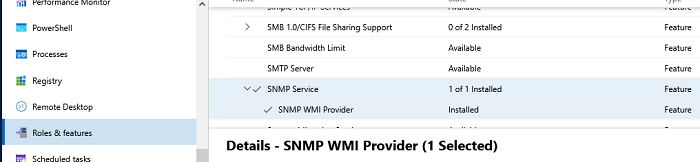
Если вы используете Windows Admin Center, подключитесь к хосту Windows Server, выберите Roles and Features -> SNMP Service.
Т.к. в Windows Server Core отсутствует графический интерфейс, а для его управления используется командная строка, вы можете установить службу SNMP из командной строки PowerShell.
Для установки ролей в Windows Server из PowerShell используется командлет Install-WindowsFeature.
Проверьте, что служба SNMP не установлена:
Get-WindowsFeature SNMP*

Установите роль SNMP и WMI провайдер:
Install-WindowsFeature SNMP-Service,SNMP-WMI-Provider -IncludeManagementTools
Проверьте, что службы SNMP запущены:
Get-Service SNMP*
В нашем примере SNMP служба запущена, а SNMPTRAP остановлена.
Установка службы SNMP в Windows 10/11
Вы можете использовать службу SNMP не только в Windows Server, но и в десктопных редакциях Windows 10 и 11.
В Windows 10/11 служба SNMP, вынесена в отдельный компонент Feature On Demand (как RSAT и OpenSSH).
Вы можете установить SNMP через панель Settings. Перейдите в Apps -> Optional features -> Add an optional feature -> View features.
В списке доступных компонентов выберите Simple Network Management Protocol (SNMP) и WMI SNMP Provider. Для начала установки нажмите Next (понадобится интернет подключение к серверам Microsoft).

Для установки службы SNMP через PowerShell, используйте команду:
Add-WindowsCapability -Online -Name SNMP.Client~~~~0.0.1.0
Для установки службы SNMP без подключения к интернету, вам понадобится скачать ISO образ Windows 10/11 Features on Demand из личного кабинета на сайте лицензирования Volume Licensing Service Center (VLSC).
Для офлайн установки службы SNMP с такого ISO образа используется команда:
Add-WindowsCapability -Online -Name SNMP.Client~~~~0.0.1.0 -LimitAccess -Source \\msk-fs01\Distr\Windows-FOD\Win11\
Настройка службы SNMP в Windows Server и Windows 10/11
Вы можете настроить параметры службы SNMP в консоли services.msc. Найдите службу SNMP Services в списке и откройте ее свойства.
Обратите внимание, что у службы SNMP есть несколько дополнительных вкладок:
- Agent
- Traps
- Security
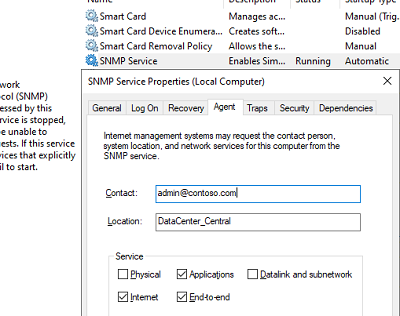
На вкладке Agent указывается базовая информация об устройстве (контакты администратора, местоположение). Здесь же можно указать тип информации, который может отправлять данное устройство при SNMP опросе.
В старых версиях протокола SNMP (SNMP v.1 и SNMP v.2) для авторизации пользователя используется строка сообщества (community string). На вкладке Security можно создать несколько строк подключения.
Можно выбрать один из пяти уровней доступа для сообщества:
- READ ONLY — позволяет получать данные с устройства;
- READ WRITE — позволяет получать данные и изменять конфигурацию устройства;
- NOTIFY — позволяет получать SNMP ловушки;
- READ CREATE – позволяет читать данные, изменять и создавать объекты;
- NONE
Вы можете создать несколько community string. Для этого нужно задать имя и выбрать права/ Для мониторинга состояние сервера достаточно выбрать READ ONLY.
В списке Accept SNMP packets from these hosts можно указать имена/IP адреса серверов, которым разрешено опрашивать данное устройство. Если вы не хотите ограничивать список разрешенных устройств, оставьте здесь Accept SNMP packets from any hosts.
На вкладке Traps указываются адрес серверов, на который SNMP агент должен отправлять SNMP-ловушка (SNMP trap). SNMP Trap это широковещательный USP пакет, используемый для асинхронного уведомления менеджера (например, сообщение о критическом событии).
Не забудьте открыть в Windows Defender Firewall правила, разрешающие входящий и исходящий трафик для SNMP запросов и ловушек (TRAP). Нужные правила фаейрвола можно включить с помощью PowerShell.
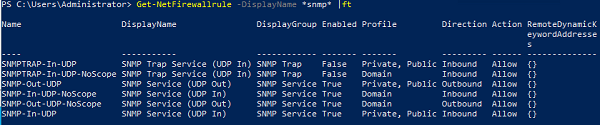
В Windows Firewall есть несколько готовых правил для SNMP трафика:
Get-NetFirewallrule -DisplayName *snmp* |ft
- SNMPTRAP-In-UDP
- SNMPTRAP-In-UDP-NoScope
- SNMP-Out-UDP
- SNMP-In-UDP-NoScope
- SNMP-Out-UDP-NoScope
- SNMP-In-UDP
Можно включить все правила, или только определенное:
Get-NetFirewallrule -DisplayName *snmp* | Enable-NetFirewallRule
Get-NetFirewallrule SNMP-Out-UDP | Disable-NetFirewallRule
В списке служб Windows есть еще одна служба SNMP Trap. Она используется для получения сообщений от других SNMP агентов и пересылки на SNMP сервера (обычно это система мониторинга, опрашивающая устройства по SNMP, например PRTG или Zabbix).
Если вы настраиваете SNMP на Windows Server Core, вы не сможете использовать графический интерфейс службы SNMP для настройки ее параметров. Вместо этого придется вносить изменения в реестр с помощью PowerShell. Настройки службы SNMP хранятся в ветке реестра HKEY_LOCAL_MACHINE\SYSTEM\CurrentControlSet\Services\SNMP\Parameters.
Следующие команды зададут описание агента:
New-ItemProperty -Path "HKLM:\SYSTEM\CurrentControlSet\services\SNMP\Parameters\RFC1156Agent" -Name "sysContact" -Value "[email protected]" -PropertyType REG_SZ
New-ItemProperty -Path "HKLM:\SYSTEM\CurrentControlSet\services\SNMP\Parameters\RFC1156Agent" -Name "sysLocation" -Value "MSK_Datacenter1" -PropertyType REG_SZ
Для каждой ловушки SNMP придется создать отдельный ключ в HKLM\SYSTEM\CurrentControlSet\services\SNMP\Parameters\TrapConfiguration с именем community.
New-Item -Path "HKLM:\SYSTEM\CurrentControlSet\services\SNMP\Parameters\TrapConfiguration\public1"
Укажите разрешения для community:
New-ItemProperty -Path "HKLM:\SYSTEM\CurrentControlSet\Services\SNMP\Parameters\ValidCommunities" -Name "public1" -Value 4 -PropertyType DWord
Возможные значения:
- 1 — NONE
- 2 — NOTIFY
- 4 — READ ONLY
- 8 — READ WRITE
- 16 — READ CREATE
Для каждого community можно указать список серверов, с которых разрешено принимать запросы:
New-ItemProperty -Path "HKLM:\SYSTEM\CurrentControlSet\Services\SNMP\Parameters\PermittedManagers" -Name "1" -Value "server1.winitpro.ru" -PropertyType REG_SZ
Перезапустите службу SNMP для применения новых настроек из реестра:
Get-Service SNMP|Restart Service
Если нужно распространить эти SNMP настройки на множество компьютеров/серверов Windows в домене, используйте возможности внесения изменений в реестр через GPO.
Проверить работу службы SNMP можно с помощью утилиты snmpwalk (доступна в любом Linux дистрибутиве):
# snmpwalk -v 2c -c public1 -O e 192.168.13.122
В этом примере мы опросили наш Windows хост через версию протокола SNMPv2.
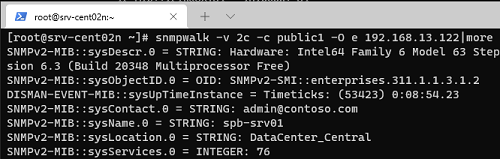
Утилита вернула базовыую информацию о хосте (syscontact, sysname, syslocation) и довольно большое количество информации о состоянии сервера Windows.
Протокол Simple Network Management Protocol (SNMP) используется для мониторинга, оповещения о событиях и управления устройствами в сети.
SNMP может получать различную информацию (время аптайма, счетчики производительности, параметры устройств и т.д.) от любых сетевых устройств: коммутаторов, серверов, маршрутизаторов или простых компьютеров, на которых установлен агент SNMP.
В Windows 10 служба SNMP доступна в виде отдельного компонента Windows и по умолчанию не устанавливается.
Проверка наличия SNMP
Проверить, установлена ли в системе служба SNMP можно с помощью PowerShell командой Get-Service:
Get-Service -Name snmp*Появится сообщение:

Установка SNMP
Службу SNMP можно установить через «Дополнительные компоненты». Перейдите в Параметры/Приложения/Дополнительные компоненты. Нажмите «Добавить компоненты» и в поиске введите «snmp». Далее их необходимо установить:

Также можно установить службы SNMP из командной строки PowerShell:
Enable-WindowsOptionalFeature -online -FeatureName SNMPНастройка службы SNMP
После установки службы SNMP должны запустится автоматически. Откройте консоль управления Services (services.msc). Для открытия нажимаем WIN + R и вводим имя консоли:

В списке службы должны появится две новые службы:
SNMP Service – это основная служба SNMP агента, которая отслеживают активность и отправляет информацию;
SNMP Trap — получает сообщения ловушки (trap messages) от локальных или удаленных агентов SNMP, и пересылает сообщения в управляющие программы SNMP, которые работают на этом компьютере.
Откройте свойства «Службы SNMP». Если она остановлена, запустите ее, нажав кнопку «Общие» и измените тип запуска на автоматический:

Переходим на вкладку «Агент SNMP». Заполняем поля «Контактное лицо» и «Размещение» (здесь можно указать контактное имя пользователя и местоположение компьютера), и выбираем список сервисов, данные которых нужно собирать и отправить устройству мониторинга:

На вкладке «Безопасность» можно настроить различные параметры безопасности для различных серверов SNMP:

В списке «Приемлемые имена сообществ» перечислены имена сообществ, чьи SNMP узлы проходят аутентификацию для отправки SNMP-запросов на этот компьютер.
Сообщество — это имя, которое обладает такими же функциями, как логин и пароль. При добавлении сообщества можно выбрать права из списка (None, Уведомление, READ ONLY, READ WRITE, READ CREATE).
В системах мониторинга обычно достаточно выбрать READ ONLY, при этом сервер мониторинга может только опрашивать систему, но не вносить изменения.
Далее можно добавить список серверов системы мониторинга (по DNS имени или по IP адресам), от которых необходимо разрешить получать SNMP пакеты.
Чтобы все настройки сохранились необходимо перезапустить службу SNMP.