
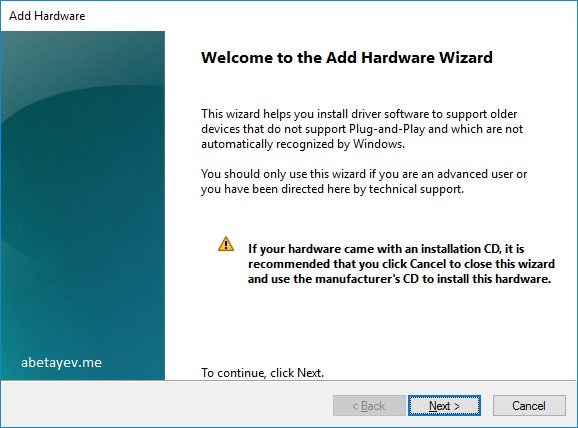
To add a loopback interface in Windows 10, press Win+R and enter ‘hdwwiz’
Press ‘OK’ and confirm the pop-up on User Account Control. We see the following ‘Add Hardware Wizard’
Click ‘Next’ and on the next screen choose ‘Install the hardware that I manually select from a list (Advanced)’

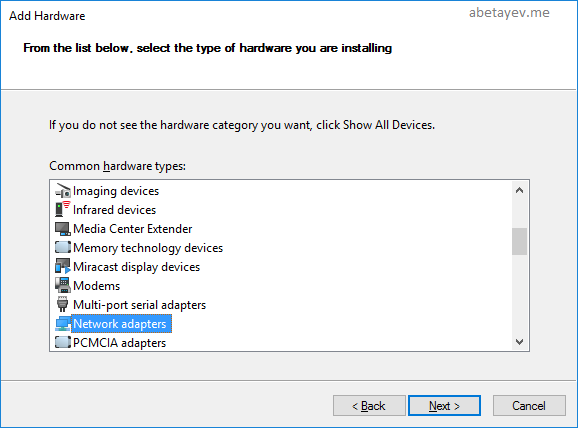
On the next screen select ‘Network adapters’ from the list of hardware types and click ‘Next’
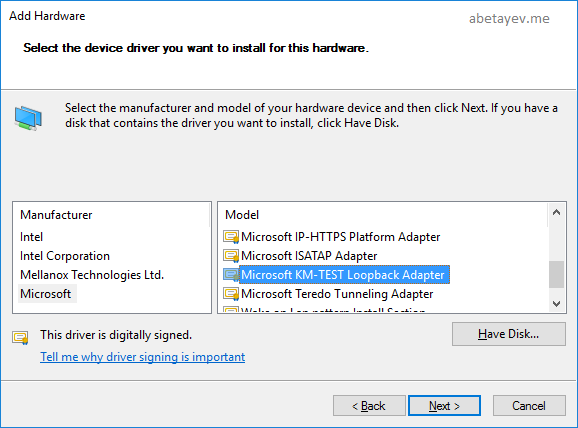
From the ‘Manufacturer’ list select ‘Microsoft’ and click on ‘Microsoft KM-TEST Loopback Adapter’ in the ‘Model’ column
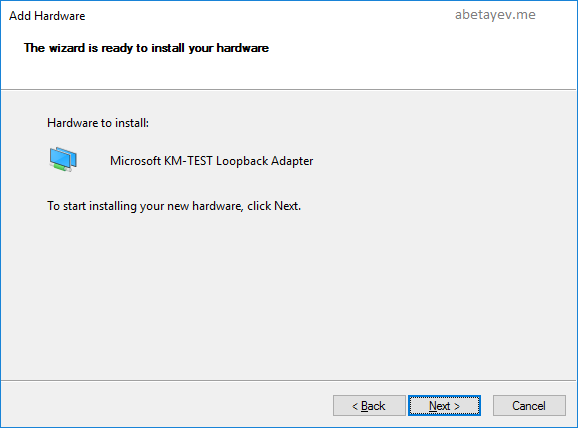
Confirm your selection
We have successfully added the loopback interface

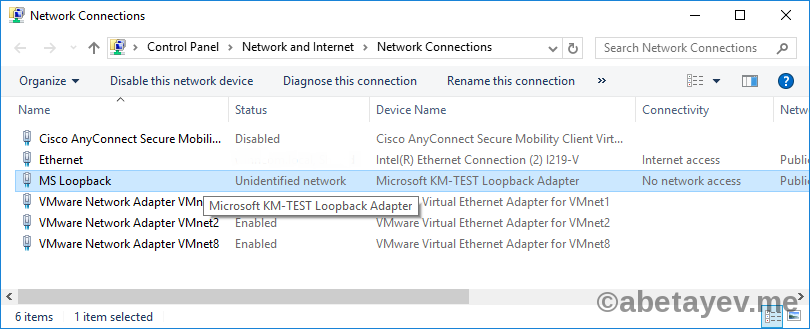
We can see the new interface in the Adapter settings. I renamed mine to MS Loopback.
Now let’s share the PC’s Internet connection with MS Loopback. My PC is connected to the Internet through an Ethernet interface.
On the Sharing tab of Interface properties allow your loopback interface to use PC’s Internet connection and press OK.
We need to check the loopback interface’s Status.
Then press Details.
Everything looks fine. My loopback interface was assigned 192.168.137.1 IP address. We’re ready for the next step.
Recently I have started playing around a bit with Windows PCs. I needed to add a Microsoft KM-Loopback adapter on a Virtual Windows 10 Enterprise. As a primary Linux developer I had to faff around a bit before I could actually figure it out. So thought it may be helpful for someone to have it all in one place.
Add as new hardware
Though the loopback adapter is going to be a virtual interface, windows treats it as a new hardware. Hence, we need to add a new hardware in the system. To do that follow the steps described in the following sections.
Bring up the command promopt
Go to Start (Windows 10), type command, let the command prompt appear on the start menu search result (as below):

Run as administrator
Right click on the command prompt and click Run as administrator as below:

At this point it may ask for your admin user and password. Type those in and it should open the command prompt with admin privileges.
Bring up the add hardware wizard
In the command prompt type hdwwiz.exe and press Enter (shown below):

This should open you Add Hardware wizard as below (this how it looks in Windows 10 Enterprise):

Click Next. Then select “Install the hardware that I manually select from a list (Advanced)” as selected below:

Click Next.
Select the Hardware Type
At this point you will see a screen like the below:

Scroll down the list and go till you see “Network adapters” in the list, and when you see, select it as shown below:

Then click Next again.
Select Hardware Manufacturer
Now you should able to see a wizard window like the below:

On the left hand pane (Manufacturer list), scroll down and look out for Microsoft, and once you see it in the list, select it as shown:

Now scroll down the right hand side list and look for “Microsoft KM-TEST Loopback Adapter” in the list. Select it as shown below:

And then press Next. It will ask for a final confirmation as below:

Once you click Next, windows will create the adapter and the finish window will appear as below:

Click Finish in the last window.
Check the interface
Now Click Start > Control Panel:

Click “View network status and tasks” under Network and Internet and you should be able to see a window somewhat like the below:

The highlighted interface is the suspected newly created network adapter interface in the above screenshot.
Configure the interface
Now we need to configure the newly created adapter interface. The network configuration will depend on you and how you want to configure it. As an example I will assign an IP address 192.168.20.2/24 for the interface and will use 192.168.20.1 as the default gateway for the interface.
To configure the IP address we need to now click on the “Change adapter settings” on the left hand pane as shown below:

Once you click on the “Change adapter settings” option you should be able to see the available interfaces in the list. This is what I have in my VM PC at the moment:

Notice the first one in the list is marked as “Unidentified network” as probably because we haven’t configured the interface yet.
Open the properties
Right click on it and you should be able to see Properties in the drop down menu.

Click on the Properties and it will ask for admin user and pass. Type in the admin user and pass and it will present the Properties window for the interface:
Look for Internet Protocol Version 4 (TCP/IPv4), select it and click Properties:
Assign IP address
Click on Properties, select “Use the following IP address” radio button, type in the IP address you would like the interface to have (static IP assignment), type in the Subnet mask (in my case it is 255.255.255.0) and the default Gateway (192.168.20.1):

Type in the DNS server details as well. It will vary from setup to setup and hence I will not fill it in for now. Click Ok and you should have your KM-TEST adapter ready for use.
Hope I haven’t missed anything; however happy to hear from you in case I missed anything.
To install the microsoft loopback adapter on win 10 you must:
- right click on window start menu icon and select Device manager. Device manager window will immediately open (or you may use any other way how to open device manager window)
- click on Action, and select Add legacy hardware
- click Next on welcome screen
- choose «Install the hardware that i manually select from a list» and click on Next
- scroll down and select Network adapters from offered common hardware types and click on Next
- select Microsoft as the manufacturer, and then select Microsoft KM-TEST Loopback adapter card model, click on Next
- click on Next
- click on Finish
Asked by: Ms. Jennifer Fischer B.Eng. | Last update: January 31, 2021
star rating: 4.8/5 (70 ratings)
How to install Microsoft Loopback Adapter on Windows 10 right click on window start menu icon and select Device manager. click on Action, and select Add legacy hardware. click Next on welcome screen. choose «Install the hardware that i manually select from a list» and click on Next.
How do I set up a loopback adapter?
How To Setup A Loopback Adapter On Windows 7 Click the Start Menu Orb. Now the Add Hardware wizard should be open. Scroll down the list and select Network Adapters then Click Next. Give the next window a moment to load, and then click Microsoft and Select Microsoft Loopback Adapter then Click Next.
Does loopback work with Windows 10?
StrongLoop Process Manager does not run on Windows. Therefore, you cannot use it to deploy an application to a Windows system. However, you can build and deploy on a Windows system and deploy from there to a Linux or MacOS system.
How do I create a loopback network?
Configure a Loopback Interface Select Network > Loopback. The Loopback page appears. Select the Enable check box. (Optional) In the Interface Description text box type a description for this interface. In the IP Address text box, type the IPv4 address and subnet mask. Click Save.
How do I install loopback on Windows?
Installing a Loopback Adapter on Windows 7 Click Start and enter hdwwiz in the Search box. Click hdwwiz to start the Add Hardware wizard. In the Welcome window, click Next. In the The wizard can help you install other hardware window, select Install the hardware that I manually select from a list, and click Next.
Is loopback adapter a diagnostic tool?
A digital multimeter displays the information on an LCD or LED. A loopback adapter, as shown in Figure 2, also called a loopback plug, tests the basic functionality of computer ports. The adapter is specific to the port that you want to test. The toner probe, as shown in Figure 3, is a two-part tool.
Why do I have a Npcap loopback adapter?
Npcap adapter will allow you to keep a close eye on the traffic that is domestic and inter-services as some adapters on the external traffic allow. This way, you will be able to check if there is some sort of virus or unauthorize access on the connection and the network that you are using.
How do I use Microsoft loopback adapter in Windows 10?
Select Install the hardware that I manually select from a list (Advanced), then click Next. Select Network adapters, then click Next. Select Microsoft as the manufacturer, select Microsoft KM-TEST Loopback Adapter as the adapter for Windows 10, then click Next. Select Next to confirm the installation.
Can you use loopback on PC?
Loopback is not available for Windows but there are some alternatives that runs on Windows with similar functionality. The best Windows alternative is VB-Audio VoiceMeeter, which is free.
How do I know if loopback is installed?
Review this section to verify if a loopback adapter is installed on your computer by running the ipconfig /all command. Note: Loopback Adapter installed on the computer must be the Primary Network Adapter.
Is a loopback address?
A loopback address is a special IP address, 127.0. 0.1, reserved by InterNIC for use in testing network cards. This IP address corresponds to the software loopback interface of the network card, which does not have hardware associated with it, and does not require a physical connection to a network.
What is the loopback adapter?
A loopback cable is also known as loopback plug or loopback adapter, which is a plug used to test physical ports to identify network issue. It provides system test engineers a simple but effective way of testing the transmission capability and receiver sensitivity of network equipment.
What is Microsoft loopback Adaptor?
The loopback adapter is a dummy network card that is used as a testing tool for virtual network environments where network access is not available or when you want to isolate your testing network from your main network.
What is the loopback IP address?
The IP address 127.0. 0.1 is called a loopback address. Packets sent to this address never reach the network but are looped through the network interface card only. This can be used for diagnostic purposes to verify that the internal path through the TCP/IP protocols is working.
What are the examples of diagnostic tools?
Example Diagnostic Tools Error analysis of literacy progress monitoring data. Phonics Inventory. Running records. Intervention- or curricula-specific diagnostic tools. Word list reading (e.g., Dolch, Fry, curriculum sight word lists) Analysis of student work (e.g., classroom assignments, work samples, tests).
What tool is used to test the functionality of computer ports?
A loopback adapter, also called a loopback plug, tests the basic functionality of computer ports.
How do I get rid of Npcap loopback adapter?
Open “Programs and Features” in the Control Panel or “Apps & features” in Settings and uninstall Npcap. Open “Device Manager” ( devmgmt. msc ) in the Control Panel and expand the “Network adapters” section. Uninstall each “Npcap Loopback Adapter” that you find.
How do I disable Npcap loopback adapter?
Yes, it’s perfectly fine to install the Npcap Loopback Adapter and then Enable/Disable it via «Control Panel -> All Control Panel Items -> Network Connections» as needed.
What is loopback traffic capture?
CommView allows you to capture traffic on the loopback interface. To start monitoring the loopback interface, select it from the drop-down list in the toolbar. Loopback packets are the packets sent/received within the same computer, i.e. self-addressed packets.
How do I create a Windows 10 adapter?
In the Common hardware types list, click Network adapters, and then click Next. In the Manufacturers list box, click Microsoft. In the Network Adapter list box, click Microsoft Loopback Adapter, and then click Next. Click Next to start installing the drivers for your hardware.
How do I create a virtual adapter in Windows 10?
How do I create a virtual network adapter in Windows 10? First go to ‘My computer’ Right click & go to ‘Manage’ ‘Device manager’ & right click ‘Add legacy hardware’ Press ‘Next’ Choose second ‘Setup manually’ Then find ‘Network Adapter’ & ‘Next’ ‘Microsoft’ or select the ‘Loopback’ adapter. Press ‘Next’.
Skip to content
The loopback adapter is quite a useful tool that was designed for testing out the network configurations. Over many years, some resourceful geeks and administrators have founded that the Loopback adapter has some handy features as well like connecting two computers without a crossover cable or connecting a virtual machine to the Internet. Though the Loopback Adapter has a strong background, yet Microsoft seems to be hiding this feature in every new release of Windows. Before we continue to learn how to enable this feature, let me tell you why you need it.
Why You Need Loopback Adapter?
The Loopback adapter is used as a testing tool for virtual network environment when the network access isn’t available. Moreover, you also need to use it with network adapter or a network adapter driver. This feature also allows you to bind network configuration items, protocols and network clients. If we some up the overall use of Loopback adapter, then I would say that is a multi-purpose features used for managing IPs, BGP Peer Address, router ID interfaces, etc. I hope that now you have a better idea of Loopback adapter, so let’s continue to learn to enable this feature.
Enable Loopback Adapter
1. In the search bar, right next to the Windows icon, type “Device Manager”. From the displayed results, tap on the “Device Manager”.
2. From the device manager window, click on action, and then from the drop down box, click on “Add legacy hardware”.
3. From the “Add Hardware” window, click on “Install the hardware that I manually select from a list (Advanced)” and after that click Next.
4. Now choose “Network adapters” and click Next.
5. Navigate “Microsoft” from the left pane under the manufacturer section. Next choose Microsoft KM-TEST Loopback adapter, and click Next until it’s finished.
6. Congratulations! You have now successfully enabled the loopback adapter.
This tutorial is created based on other technical blog. Feel free to comment, Thank You.
For more reading materials please click here