
Время на прочтение6 мин
Количество просмотров179K

Предисловие или от куда взялась «бредовая» идея ставить Git на Windows
Я работаю в одной не очень большой IT-компании, которая продает свои и чужие программные решения, занимается проектами внедрения, оказывает клиентскую поддержку, проводит обучение и далее все такое в том же духе. До недавнего времени в моей маленькой команде разработки все было неплохо организовано и у нас даже был свой собственный достаточно мощный сервер. Но случилось непредвиденное и по воле злого рока один из серверов фирмы полетел, а руководство решило вместо него в стойку поставить наш сервер отдела разработки. Нам предложили «временно» переехать на любой из серверов общего назначения.
А теперь внимание! Только мы одни во всей фирме работаем на Линуксе, а все остальные сидят исключительно на Windows и сервера у нас тоже под управлением серверных редакций ОС от Билла Гейтса. И если перенос базы Redmine не вызывает особых вопросов, то задача поднять на сервере Windows сервер для Git меня сразу поставила в тупик. Но несколько часов потраченных на поиски дали мне простое работающее решение.
Изучение матчасти
Первым делом я обратился к документации по Git’у, где вычитал следующее:
Git умеет работать с четырьмя сетевыми протоколами для передачи данных: локальный, Secure Shell (SSH), Git и HTTP.
Первый вариант я не стал рассматривать, так как он подразумевает наличие сетевой шары открытой для общего доступа. Допустим, что с помощью групповых политик домена можно обезопасить данные от случайного удаления продавцем-стажером. Но как работать из дому? Ради нескольких «коммитов выходного дня» поднимать VPN?
Читаем далее и видим:
SSH — единственный из сетевых протоколов, предоставляющий доступ и на чтение, и на запись. Два других сетевых протокола (HTTP и Git) в большинстве случаев дают доступ только на чтение, поэтому даже если они вам доступны, вам всё равно понадобится SSH для записи.
Путь к конечной цели уже стал менее туманным: сначала требуется поставить сервер SSH, а далее установить одну из многочисленных сборок Git для Windows (официальную msysgit, Git Extensions, TortoiseGit, QGit и т.д.)
Выбор сервера SSH для Windows
Воспользовавшись поисковиком по сети Internet, я сделал небольшую подборку текущих реализаций SSH под Windows. Не претендую на то, что смог найти все решения в этой области, но самые популярные точно не пропустил. Итак:
Cygwin. В рамках проекта переноса функциональности Linux на Windows был портирован в том числе и OpenSSH. Библиотека проекта cygwin1.dll с реализацией SSH так же используются в большинстве других решений. Простую инструкцию с картинками по установке и настройке можно посмотреть тут. А так же рекомендую к прочтению статью из журнала «Windows IT Pro» № 7 за 2001 год — SSH в Windows.
freeSSHd. Лидер среди упоминается на форумах. Характеризуется как легкий в использовании. Лицензия позволяет бесплатно использовать в коммерческих целях. Нашел инструкцию по установке и настройке на Win2008.
WInSSHD. Самое богатое по функциональности из увиденных мною реализаций. Это хорошее профессиональное решение для обеспечения безопасности. Но для моего гвоздя — это микроскоп. Если кого-то продукт заинтересовал, то у них есть 30-дневная ознакомительная полная версия и возможность бесплатного частного использования.
KpyM Telnet/SSH Server. Плохих отзывов не заметил. Но меня смущает, что их сайт не обновляется с 2009 года, а так же на официальном форуме как-то безжизненно. С другой стороны, если продукт бесплатный и выполняет свою работу, то нет смысла заниматься развитием. Понравилось наличие в их FAQ списка других решений для SSH под Windows. Рекомендую заглянуть.
Copssh. Продукт от норвежской компании ITeF!X, в котором они к windows-реализации OpenSSH добавили красивый GUI-интерфейс администратора и некие «best practices». Именно это решение, более всего рекомендуется в обсуждении поднятия сервера Git под Windows на StackOverflow.
Случайная находка
Собственно под впечатлением ответов на StackOverflow я уже расслабился и решил было пойти проторенной моими предшественниками дорожкой. Но при изучении сайта компании ITeF!X я обнаружил, что у них есть и более подходящий для моих целей продукт — gitwin. Это оказался тот самый требуемый мне сервер Git под Windows.
Я вначале не поверил глазам — если такой чудо продукт существует, то почему о нем до сих пор не трубят на каждом шагу. Ответ нашелся в новостях компании — как оказалось программный продукт только полмесяца назад (11 октября 2013 года) выложили в общий доступ. Точнее на днях выложили бесплатную для использования версию. Платная существовала и раньше, но видимо не пользовалась особым спросом (с января 2012 года на официальном форуме компании всего две созданные темы в разделе gitwin).
Итак, что же собой представляет этот gitwin? В состав свободной версии входят:
- Cygwin версии 1.7.25
- OpenSSH версии 6.3
- Git версии 1.8.4
- Инсталятор от Itefix
На сайте целый раздел посвящен установке пакета. Кроме описания словами процесса «запуск инсталятора» -> «далее» -> «далее» -> «готово», представители компании не поленились записать все это еще на видео и выложили на YouTube. Не совсем понятно зачем это сделано и самое главное не понятно для кого?
Еще один раздел выделили для описания использования. Тут описали активацию нового пользователя для доступа по SSH, создание пары ключей и пустого репозитория. И так же кроме описания текстом дают записанный обучающий ролик:
Установка, настройка и тестирование сервера Git
Я установил на наш сервер gitwin редакции «free edition» и могу поделится только этим опытом.
1. Начинаем со скачивания инсталятора со странички продукта.
2. Запускаем инсталятор и нас спрашивают куда устанавливать продукт. Я оставил по-умолчанию в «C:\Program Files (x86)\ICW». Зачем может понадобится менять путь? Дело в том, что этот каталог станет корнем для линуксовых утилит и домашний каталог пользователя git тоже будет создан тут же «C:\Program Files (x86)\ICW\home\git\». Если есть предчувствие проблем с правами доступа, то можете поменять на менее проблемный для вас каталог.
3. В процессе установки выводятся сообщения о создании двух пользователе «SvcCOPSSH» и «git». Под первым пользователем будет работать служба «OpenSSHServer», а второй нужен собственно для обслуживания репозиториев. Пароли к этим пользователям можно узнать в конце процесса установки, если нажать на «Show details». Советую по правому щелчку скопировать вывод в буфер и сохранить на всякий случай.
3.1. Перепроверка состава пользователей показала, что инсталятор втихую создал еще одного пользователя — «sshd» с описанием «copSSH privilege separation user» и сам же отключил его. Не понятно и подозрительно…
4. Скорее всего из-за редакции «free edition» дальнейшие шаги отличались от описанных на сайте. Вместо консоли администрирования в меню Пуск/copssh поместили два пункта «01. Activate a user» и «02. Deactivate a user». Но суть процесса от этого не изменилась. Запускаем «01. Activate a user» и указываем пользователя для активации (в моем случае все тот же git), выбираем командную оболочку (выбор из bash, sftponly и false) и ставим опциональные галочки. Тут читаем внимательно:
4.1. Если нам нужна пара ключей, то оставляем включенную по-умолчанию «Create keys for public key authentication». При парольной авторизации можете снять…
4.2. Если у пользователя планируется использование его родного пользовательского каталога из C:\Users\ (или может у кого-то до сих пор C:\Documents and Settings\) тогда оставляем включенные по-умолчанию галочки «remove copssh home directory if it exists» и «Create link to user’s real home directory». Я рискнул их снять и таким образом все репозитории у меня будут запрятаны глубоко в системном каталоге Program Files.
5. После активации пользователя и создания ключей можем протестировать всю систему на работоспособность. Выбираем в меню Пуск/copssh пункт «03. Start a Unix BASH Shell» и создаем пустой репозиторий. Я не стал блистать остроумием и повторил команду с официального сайта:
$ git init —bare /home/git/repo-a
Initialized empty Git repository in /home/git/repo-a/
6. Далее тестирование переехало на мой рабочий ноут. Я успешно склонировал пустой репозиторий, закинул в него несколько файлов и запушил назад. Проблем не возникло. Перешел в другой каталог и снова склонировал репозиторий — на этот раз он был уже не пустой и содержал мой коммит с файликами. Таким образом с моей рабочей станции различия между работой с репозиторием Git на предыдущем сервере Ubuntu и на новом сервере Windows замечено не было!
Заключение
Удачно найденный gitwin оказался именно тем решением, которое я искал — запускается под Windows и создает иллюзию для пользователей, что они работают с полноценным удаленным репозиторием. Глюков пока не заметил. Но если обнаружу, то обязательно дополню данную статью.
Надеюсь, что собранные материалы окажутся кому-нибудь полезными. И хочу пожелать не боятся потратить несколько часов на поиски, если вы не уверены, что в вашей голове наиболее актуальная информация. Ведь если бы я изначально зашел на StackOverflow и выполнил все по детальному пошаговому руководству от Тима Дэвиса, то не узнал бы о существовании более короткого пути, когда вся инфраструктура поднимается и настраивается буквально в десяток кликов мышкой. Успехов!
Послесловие. Истории успехов от хабраюзеров
Я подобно Сократу с каждым новым квантом знаний понимаю как еще много того, чего я все еще не знаю. В комментариях коллеги описывают положительный опыт на заданную мною тему, который грех игнорировать. Итак:
A1lfeG вместе со своей командой далеки от Linux’а, но тем не менее ихняя установка центрального репозитория Git’а была довольно простой. В этом им помог продукт SCM Manager.
dshster делится опытом по успешной установке на сервер исключительно msysgit. Если честно, то я читал это сообщение в Q&A, но это не мой случай. Инструкция больше касается использования Bitbucket и Github. Для общего использования в локальной сети предлагается общая папка, а для просмотра репозитория встроенный веб-сервер. Отмечу, что начиная с релиза 1.8.4 веб-сервер и часть других утилит удалена: «Some commands are not yet supported on Windows and excluded from the installation; namely: git archimport, git cvsexportcommit, git cvsimport, git cvsserver, git instaweb, git shell»
IamKarlson хорошо отзывается о решении Bonobo Git Server, которое используется у него на работе. Как плюс для себя отмечу использование веб-сервера IIS, который у нас уже работает.
If you’ve been wondering if you can create a Local GIT Server on Windows like GitHub, Bitbucket, or even DevOps Azure, well I was too. This is the hard part of being a developer that is learning through the help of online resources. You need to devote a lot of time to research just to get what you are looking for.
- I. Initialize a Bare repository using CLI
- II. Clone and push to the Remote repository
- III. Configure a Local Git Server using Bonobo
- IV. Migrate a Remote Git Repository to a new Git Server
- Summary
This time I will give you a break and share a way to create a git server repository on your local Windows machine.
Before we start we need to install git bash for windows. You can download it here.
I. Initialize a Bare repository using CLI
A bare repository is a Git repository that does not have a working tree. A working tree is a directory in which all the project files reside. A Bare repository is used as a Remote repository that contains logs or history of all the changes on the repository branch that is pushed to this bare repository.
Let’s say I have two folders here, a Repository folder and a Clone folder. The Repository folder would act as our Remote Git Repository while the Clone folder would be our local machine or the client. Follow the steps below to create a Bare Repository.
- Add a Bare repository inside Repository folder. Open the Repository folder then run git bash. Use the git command below.
git init --bare test.gitThis will initialize a bare repository. See the image below.
This time you have created your local Remote Repository. Let’s clone and commit to this test.git repository.
II. Clone and push to the Remote repository
From the previous step, we created a remote repository inside the Repository folder which in my case my repository URL would be “C:\Users\user\Desktop\Repository\test.git”. For this location to work you need to replace the backslash to forward slash like this ” C:/Users/user/Desktop/Repository\test.git“.
- Open the clone folder which represent our client machine. Change your directory to the clone folder. Then execute the git command below.
git clone C:/Users/user/Desktop/Repository/test.git2. This creates a test folder inside the Clone folder. Change directory to the test folder.
This is what my Clone folder looks like.
3. Now, let’s try to push some files. I created a readme.txt inside the test folder then open the git bash again and execute the command below. Make sure that you are inside the test folder.
3.1 Check any changes from a local repository.
git status3.2 Add all changes or stage all files for commit
git add .3.3 Commit all changes
git commit -m "initial commit"3.4 Push file to the remote repository which in this case is the Bare repository inside the Repository folder.
git push5. On your remote repository which is the test.git inside the Repository folder, you can check the last commit using this command.
git logThis command will output the history of the commit that you push on this repository branch. See the image below.
Now, to share this local remote repository you can share this folder and use your local network IP address. In my case, my remote repository URL would be like this \\192.16.1.10\Repository\test.git
III. Configure a Local Git Server using Bonobo
We have set up a local git repository using CLI on the steps above, This time let’s use a Web Application called bonobo git server. Bonobo git server provides an easy management tool and access to your git repositories that are self-hosted on your server using IIS.
- Download Bonobo git server here.
- Extract the file inside your IIS root directory. “C:\inetpub\wwwroot”
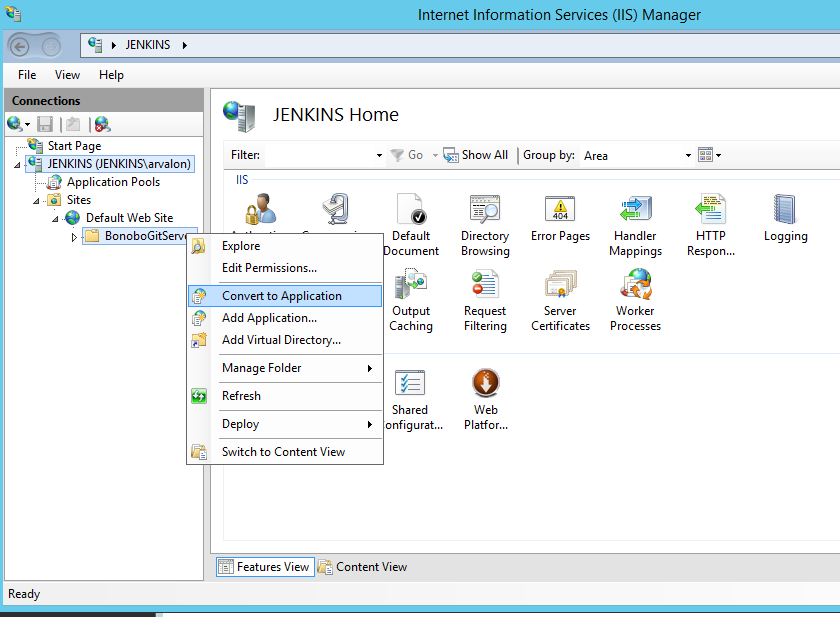
3. Open IIS then Convert the folder to Application
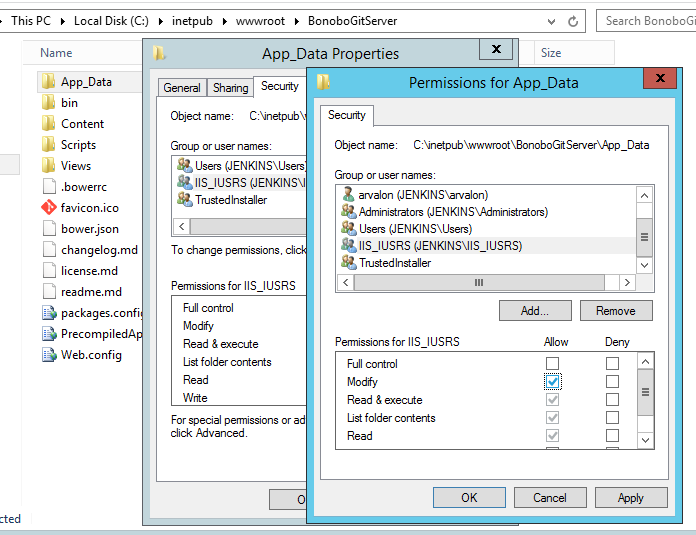
4. Make sure that you have given IIS users a sufficient right to modify files under the App_Data folder. See the image below.
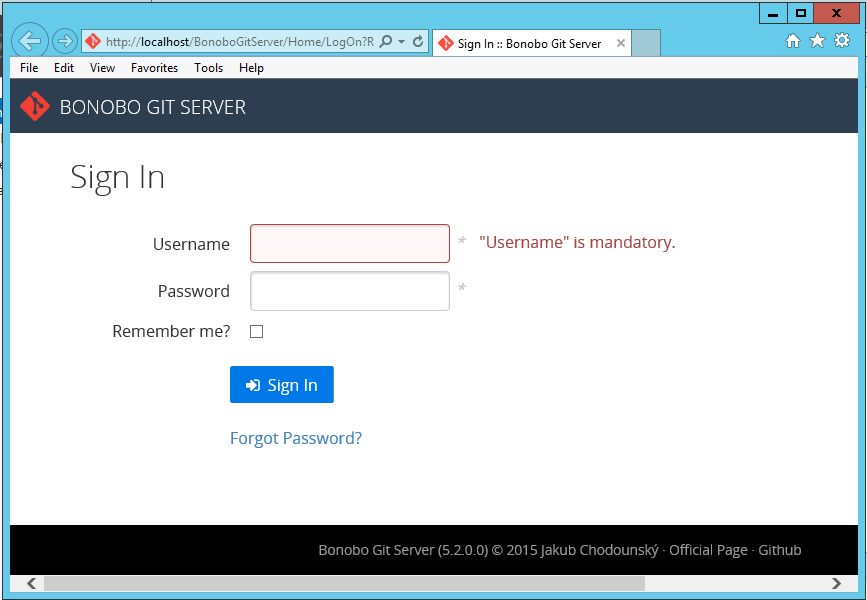
5. Browse the newly created application and log in using the default user account.
Username: admin
Password: Admin
You have now your windows base Git Server that you can share with your team.
IV. Migrate a Remote Git Repository to a new Git Server
Now, if you want to migrate your existing Remote repository to a new Git server. Do the steps below. For this tutorial I’m going to transfer test.git under the Repository folder to our newly installed Bonobo Git Server.
- Open your local Bonobo Git server(http://localhost:8080/Bonobo.Git.Server/Repository/Index).
- Create a new repository. I named it Test. See the image below.
3. Open the newly created repository and copy the URL. This is where we will transfer the test.git Repository. See the image below.
4. If your Remote repository is in your local windows you can directly push the repository using a “git clone –mirror <new URL>”. But if not, here’s a way you can do that. Use the Git CLI command below to clone your remote repository.
git clone --mirror C:/Users/user/Desktop/Repository/test.gitThis will mirror your remote repository locally.
5. Cd to the Clone Repository.
cd test.git6. Set your origin URL to the new Bonobo Repository that you created.
git remote set-url origin http://localhost:8080/Bonobo.Git.Server/Test.git7. Then you can simply push the mirror Repository like this.
git push --mirror origin8. You will be prompted to input your git credential. Just use the default bonobo server password(uname:admin, pass:admin).
See the image below for the actual command that I used on this example.
Now, if you move back to your bonobo Test Repository. You will see the branch and committed changes from your old remote repository.
To share this Bonobo Git Repository inside your local network you can configure IIS to user IP address. Like this.
Visit this link to configure your IIS to be accessible inside your local network.
Summary
We have learned from this article two ways to Create a Local GIT Server that can be hosted on a Windows machine. We can initialize a bare repository and you can share the folder and give it to someone inside your network for code collaboration. Or we can also use a bonobo git server to easily host and create a git repository. We have also presented a way to migrate or transfer your existing remote repository to another Git server.
Hopefully, this tutorial will be able to give you an idea of how you can collaborate with your teammates inside your local network.
KEEP CODING!!
January 05, 2018 | 3 Minute Read
Ну вот наступил 11111100010 год ии у меня появилось свободная минутка, чтобы написать тут что-то полезное:-)
Случилось так, что понадобился приватный git репозиторий, а покупать VIP аккаунт на github не хотелось, да и политика безопасности компании, для которой разрабатывается проект, не позволяет это делать. По этому было принято решение о развертывании собственного git-сервера. Так как я C# developer, то речь пойдет конечно же о Windows Server и IIS Server. Пользователям Linux скажу, что там установка этого «богатства» еще проще и состоит из пары команд в терминале.
Немного о платформе.
Данный git-server был написан на C# на ASP.NET и представляет собой Web приложение. Все исходные коды доступны тут. Все желающие могут ознакомиться и оценить кривизну кода) А мы поехали дальше -)
Как его ставить?
Для успешной установки нам нужны
- Сам сервер на Windows Server 2008 R2/2012/2012 R2/2016 (кто-то сидит на ней?)
- Internet Information Services (IIS) 7 или 8
- .NET Framework 4.6
- visual redist 2012/2015 и CLR
- Server дистрибутив
Быстро пробежимся по основным пунктам. У меня стоит Windows Server 2012 R2. И показывать я буду на ней. Для Windows Server 2008 все примерно также. Предполагается, что Виндасервер у вас сконфигурирован и настроен. Если это не так – идите к документации)
IIS Сервер + .NET Framework.
Запускаем Server Manager (диспетчер серверов) -> Manage (Управление) -> Add Roles and Features (Добавить роли и компоненты) …

Выбрать Role-based or Feature-based Installation (установка ролей или компонентов)
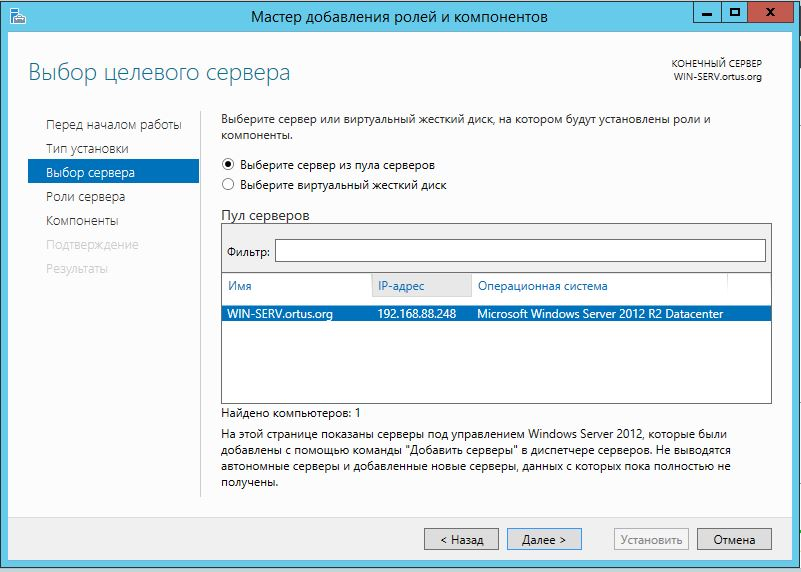
Далее выбираем наш сервер
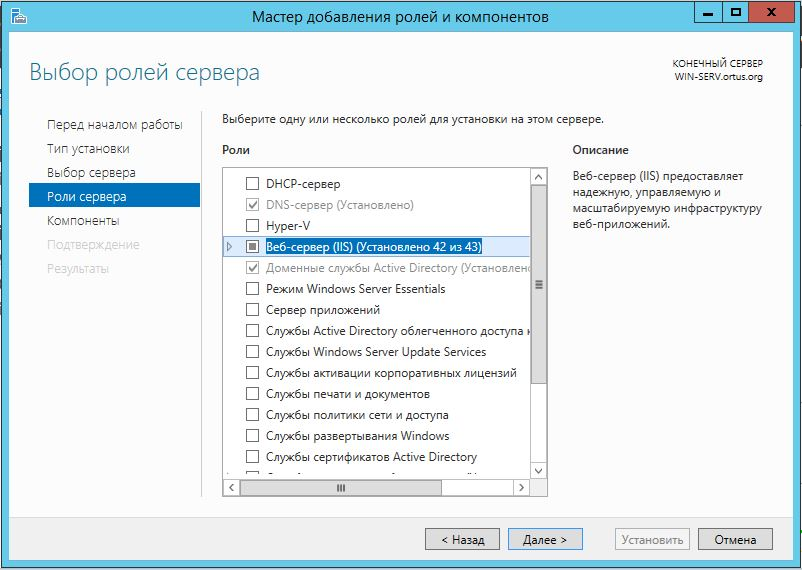
В ролях выбираем Web Server (IIS).
В компонентах жмякаем на .NET framework 4.5 и на последнем шаге выбираем нужные настройки.
Установка… Потребует перезагрузки сервера. Загружаем .NET Framework 4.6 и ставим его. Все теперь можно ребутиться.
Для любителей консоли…
Start /w pkgmgr /iu:IIS-WebServerRole;
IIS-WebServer;
IIS-CommonHttpFeatures;
IIS-StaticContent;
IIS-DefaultDocument;
IIS-DirectoryBrowsing;
IIS-HttpErrors;
IIS-HealthAndDiagnostics;
IIS-HttpLogging;
IIS-LoggingLibraries;
IIS-RequestMonitor;
IIS-Security;
IIS-RequestFiltering;
IIS-HttpCompressionStatic;
IIS-WebServerManagementTools;
IIS-ManagementConsole;
WAS-WindowsActivationService;
WAS-ProcessModel;
WAS-NetFxEnvironment;
WAS-ConfigurationAPI
Git Server
Всё, теперь можно перейти к непосредственно развёртыванию git сервера. Разархивируем содержимое дистрибутива в wwwroot IIS-сервера (C:\inetpub\wwwroot) и даём права учетной записи IIS_IUSERS на модификацию каталога App_Data.
Запускаем IIS Manager и конвертируем Git в приложение.
После конвертации жмем Action – Browse (Управление приложением – обзор) и у нас должен открыться сайтик с формой для входа. Теперь он доступен по адресу IP сервера\git в локальной сети. При желании его можно вывезти во внешнюю сеть и вообще делать с ним все что душе угодно!
Настройка.
По стандарту логин пароль для входа admin\admin.
В настройках можно указать другой путь для хранения файлов, изменить язык и вообще сделать много полезного)
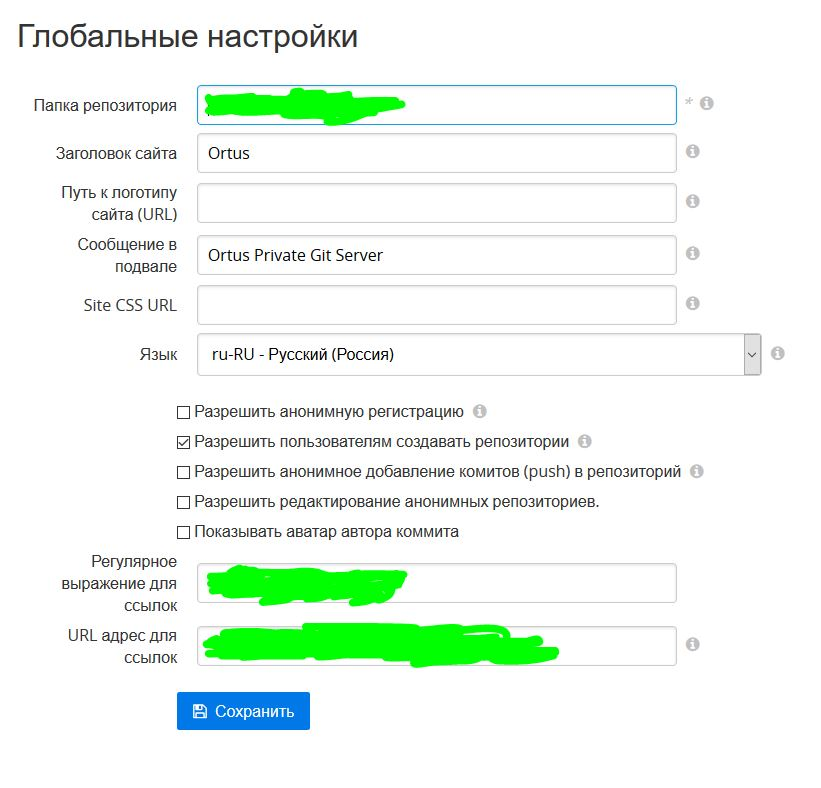
Можно добавлять новых пользователей и осуществлять контроль видимости репозиториев, выдавать исключительные права пользователям. Также можно объединять пользователей в команды и управлять ими. На пример команде Core Developers будут доступны все ветки в репозитории, а команде Testers только ветка Master.
P.s.
Я надеюсь данная статья была полезна для вас. Ставьте Like за встроенный редактор кода и подсветку синтаксиса))) Приятного кодинга!
You need to download and install:
- Win32_OpenSSH
- Git for Windows, selecting the «Run Git and included Unix tools from the Windows Command Prompt» when prompted. This option will install a bin folder in Program Files\git that will be placed into your path thus taking possibly taking precedence over other tools.
On Server
-
Set system environment variable for sshd to pick up the git commands
$gitPath = Join-Path -Path $env:ProgramFiles -ChildPath "git\mingw64\bin"
$machinePath = [Environment]::GetEnvironmentVariable('Path', 'MACHINE')
[Environment]::SetEnvironmentVariable('Path', "$gitPath;$machinePath", 'Machine')
-
Restart sshd so the changes to the
Pathenvironment variable can take effect. -
Create Windows users for all Git users.
-
Create a central Git repository. Go to where you want to create a central repo,
git clone --bare <source dir>. A directory with name<source dir>.gitwill be created. In it will be the .git contents of your source dir repo. for example:git clone --bare c:\git\newrepo.git -
If you already have user private and public keys, copy the user public key to
C:\Users\{user}\.ssh\and rename it to authorized_keys
On Client
-
Set environment variable for git to use Win32_OpenSSH
$env:GIT_SSH_COMMAND = '"C:\Program Files\OpenSSH\ssh.exe" -T' -
(Optional) For key based authentication to work, generate user private and public key. The generated public key need to copy to C:\Users{user}.ssh\authorized_keys as indicated in step 5 on Server
ssh-keygen.exe -t ed25519 -f c:\test\myprivatekey -
(Optional) Register the user private key for single sign on
ssh-add.exe c:\test\myprivatekey -
To check out a repository, go to where you want to put your local repo,
**Note that git clone user@domain@servermachine:C:/test/myrepo.git does not work due to known issue. Work around it to set powershell as default Shell in registry.
Or
by following steps when cmd is default shell:
 cd c:\mygitrepros
 # initialize a local repo folder
 git init mylocalrepo
 cd mylocalrepo
 # add the remote repro
 git remote add origin user@domain@servermachine:C:/test/myrepo.git
 # work around the known issue by launching powershell to run the git commands
 git config --local remote.origin.uploadpack "powershell git-upload-pack"
 git config --local remote.origin.receivepack "powershell git-receive-pack"
 git fetch origin
A Git server on Windows allows users to host and manage their Git repositories locally, enabling collaborative version control for development projects.
git init --bare C:\path\to\your\git\repository.git
What is a Git Server?
A Git server is a dedicated space that allows developers to host their Git repositories, manage access, and facilitate the collaborative process of software development. Unlike local repositories, which reside on individual machines, a Git server serves as a centralized location for teams to share and collaborate on code.
Benefits of Using a Git Server
Using a Git server brings several advantages:
- Centralized Control: Control over your repositories, ensuring all changes come from a single source.
- Enhanced Collaboration: Multiple team members can work on the same project simultaneously without conflicts.
- Backup and Recovery: Protecting against data loss by serving as a backup for your source code.
Master Git for Windows: Quick Commands Breakdown
Prerequisites
Before you dive into the setup, ensure that you have the following:
- Software Requirements: Download Git for Windows from the official website. If you plan to access your Git server over the web, you may also consider installing a web server like Apache or Nginx.
- System Requirements: You’ll need a Windows machine with adequate resources (CPU, RAM, and storage) to handle your anticipated load.
Step-by-Step Installation Guide
Download and Install Git for Windows
Start by downloading Git for Windows from the official Git SCM site. Follow the installation instructions to set it up on your machine.
Example Command:
winget install --id Git.Git -e --source winget
Configuring a Git Repository
Setting up a bare repository is essential for storing the code without working copies. Here’s how to do it:
-
Create a directory for your Git server:
mkdir my-git-server cd my-git-server -
Initialize a bare Git repository:
git init --bare
This will create a new Git repository without a working directory, making it suitable as a server repository.
Setting Up SSH for Secure Access
Security is paramount when managing a Git server. Using SSH (Secure Shell) ensures that only authorized users can access the repository.
-
Generate SSH keys:
ssh-keygen -t rsa -b 4096 -C "your_email@example.com" -
The command prompts you to set a file location for the key, generally the default is suitable. You can add a passphrase for added security.
-
After generating the SSH key, you need to add the public key to your Git server’s authorized keys:
- Locate your public key in `~/.ssh/id_rsa.pub`.
- Append its content to `~/.ssh/authorized_keys` on the server to allow your user to authenticate without entering a password each time.
Configuring User Access
Properly managing user access is crucial to maintaining the integrity of your repositories. You can create user accounts on your server and assign permissions to allow or restrict access to specific repositories.
Adding Users
To add users, create corresponding accounts on your Windows machine. This can be done through the User Accounts settings in the Control Panel. Once you have your users, you can specify access rights using Git’s permission settings.
Example of Configuring Access Rights
Configure user-specific settings by executing the following command in the repository:
git config --global user.name "Username"
git config --global user.email "user@example.com"
This allows Git to identify who made changes, which is essential for collaboration.
Mastering Git Serverless: A Quick Guide to Efficiency
Managing Repositories
Creating a New Repository
To create a new repository from an existing project, follow these steps:
-
Navigate to your project directory:
cd my-project -
Initialize it as a Git repository and link it to the remote server:
git init
git remote add origin ssh://git@yourserver.com:/path/to/my-repo.git
This setup links your local project to the remote repository on your Git server, making it ready for collaboration.
Cloning a Repository
Users can clone the repository by executing the following command:
git clone ssh://git@yourserver.com:/path/to/my-repo.git
This command allows them to create a local copy of the specified repository, enabling them to work on their changes offline before pushing updates back to the server.
Git Server Docker Container: A Quick Setup Guide
Git Server Maintenance
Regular Backups
It’s crucial to maintain regular backups of your Git server to prevent data loss. Utilize automated scripts to perform nightly backups of your repositories. Consider using the following command:
git clone --mirror /path/to/your/repo /path/to/backup/location
This will create a mirror backup of the repository that captures all branches and tags.
Monitoring Usage
Monitoring server performance and usage is vital for maintaining a responsive and efficient environment. Consider using tools built into Windows or third-party applications that provide insights into server performance and user access.
Updating and Upgrading
To keep your Git installation and server environment updated, regularly check for updates on the official Git website and apply them as necessary. Keeping software up-to-date helps maintain security and stability.
Mastering Git Server: A Quick Guide for Beginners
Tools and Alternatives
Git Server Hosting Options
There are several hosted solutions like GitHub, GitLab, and Bitbucket. These platforms offer a wealth of features including issue tracking, CI/CD pipelines, and community integration. They are excellent choices for teams looking to offload server maintenance.
Other Git Server Software for Windows
If you’re considering alternatives that run on Windows, look into self-hosted options like Gitea, GitLab CE, or Bitbucket Server. These solutions can provide additional features that may suit your project’s specific needs.
Mastering Git Bash for Windows: Quick Commands Guide
Conclusion
Setting up a Git server on Windows offers a powerful way for teams to collaborate effectively on software development projects. By following the steps outlined in this guide, you can create a manageable and secure environment for version control, ensuring your code is well-organized and accessible.
Git Install Windows: A Quick Guide for New Users
Additional Resources
For further exploration, refer to the official Git documentation, online communities, or forums where experienced Git users share their best practices and advanced techniques for mastering Git commands.