
Содержание статьи:
- Что можно предпринять для исправления проблемы
- ШАГ 1
- ШАГ 2
- ШАГ 3
- ШАГ 4
- ШАГ 5
- ШАГ 6
- Вопросы и ответы: 2
Здравствуйте!
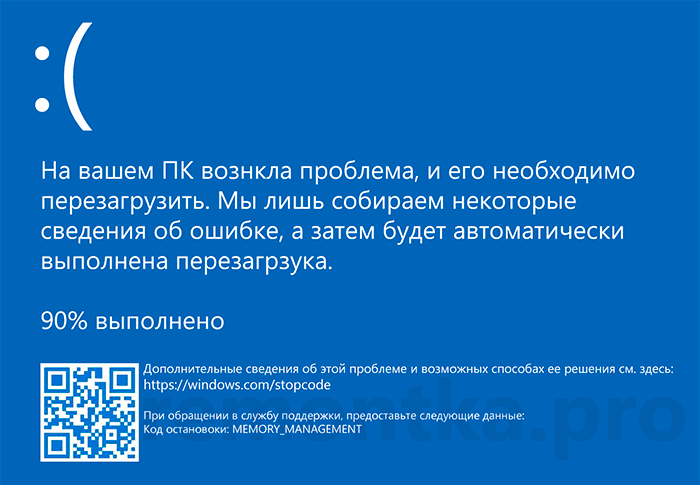
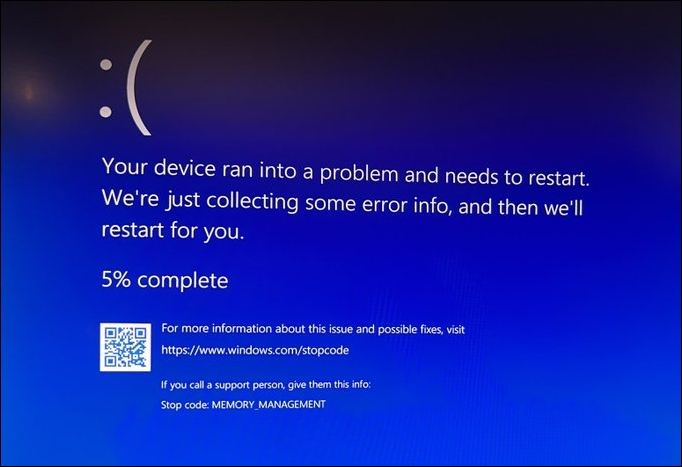
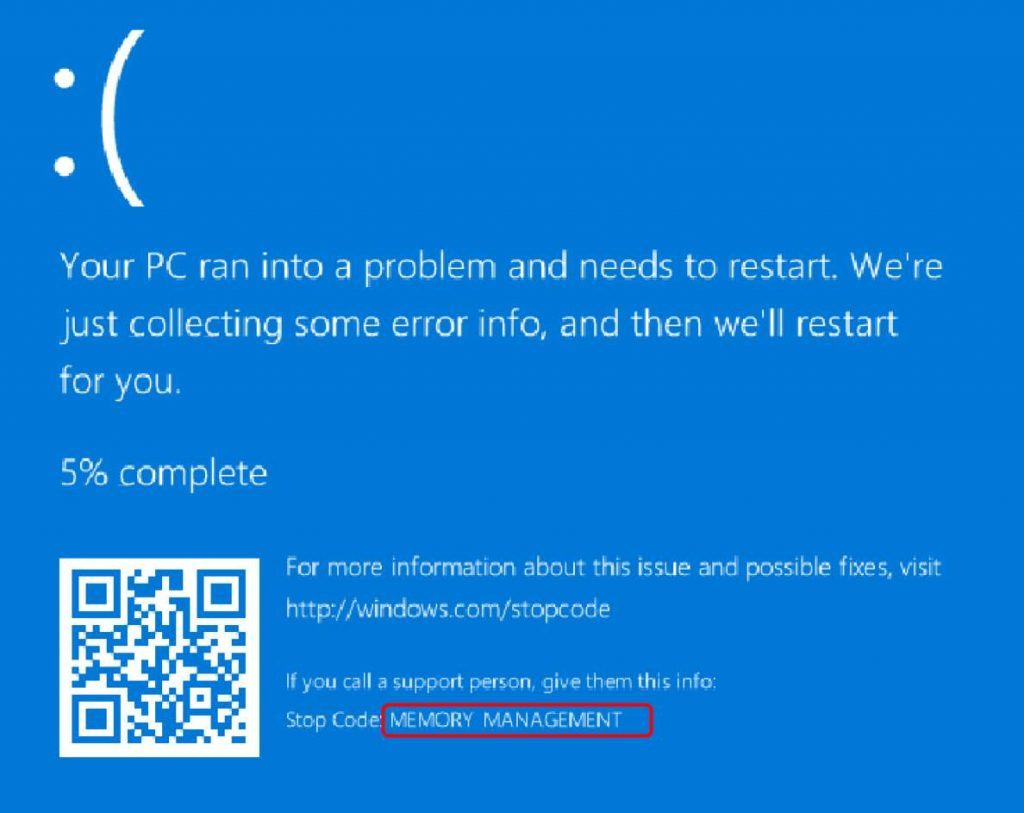
Можно ли самому себе (со скуки) быстро «насоздавать» лишних проблем с ПК?.. 👀 Легко! Один мой знакомый в попытках ускорить систему, почти «убил» ее стабильность — начала появляться ошибка со стоп-кодом «Memory management» при попытке включить ПК и загрузить ОС Windows (пример на фото ниже 👇).
Собственно, мне пришлось ему немного помочь (само собой, так и появилась эта заметка).
Вообще, этот стоп-код переводится на русский как «Управление памятью» (но не всегда проблема напрямую связана с ОЗУ). Как бы там ни было, здесь (ниже) я приведу несколько рекомендаций, которые в ряде случаев (не всегда!) помогают устранить сию проблему.
И так…
*
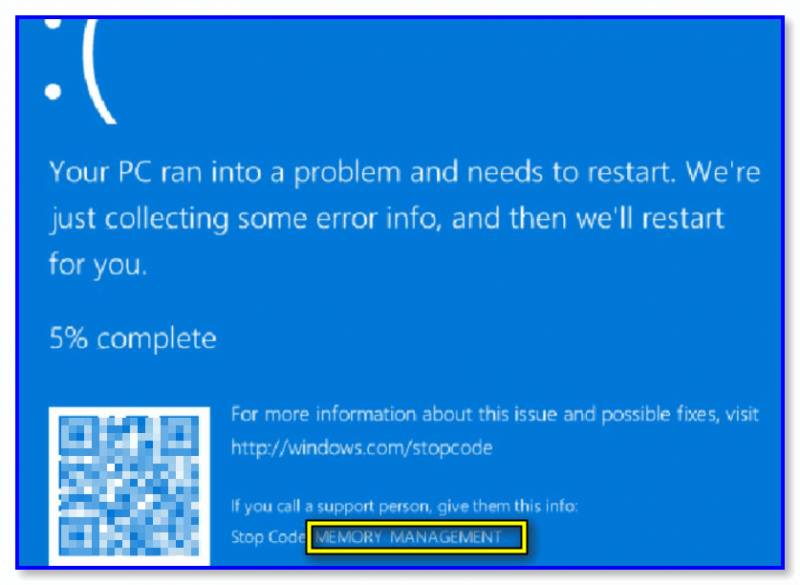
Синий экрана со стоп-кодом Memory management // фото с проблемного ПК
*
Что можно предпринять для исправления проблемы
ШАГ 1
Для начала 👉 обратите внимание после чего стала появляться эта ошибка, не подключали ли вы накануне новое оборудование, не устанавливали ли драйвера, программы и т.д. и т.п.?
Совет банален: отключите это новое оборудование (удалите программу, установленную накануне). Установите «старый» драйвер, при котором система работала стабильно.
Кроме этого, можно попробовать откатить систему 👉 к точке восстановления (на ту дату, когда Windows «вела» себя стабильно). Для этого нужно нажать на WIN+R, и использовать команду rstrui.

Выбор точки для отката системы
*
ШАГ 2
Далее посоветовал бы 👉 проверить плашки ОЗУ (прим.: оперативную память). Причем, желательно перед этим выключить ПК и вынуть все плашки из слотов, кроме одной из них (и именно с ней провести тест). Затем, подобный тест провести с другой плашкой (возможно, что есть неисправность конкретно с одной из них).
Как провести тест:
- нажать сочетание Win+R, чтобы появилось окно «выполнить»;
- ввести команду mdsched и нажать Enter. Должно появиться окно, с предложением провести тест ОЗУ. Пример ниже. 👇
👉 В помощь!
Тест ОЗУ (RAM): проверка оперативной памяти на ошибки — см. пошаговую инструкцию
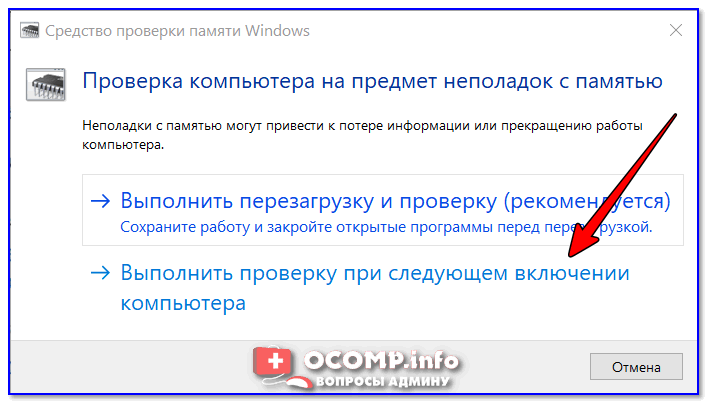
Средство проверки памяти Windows
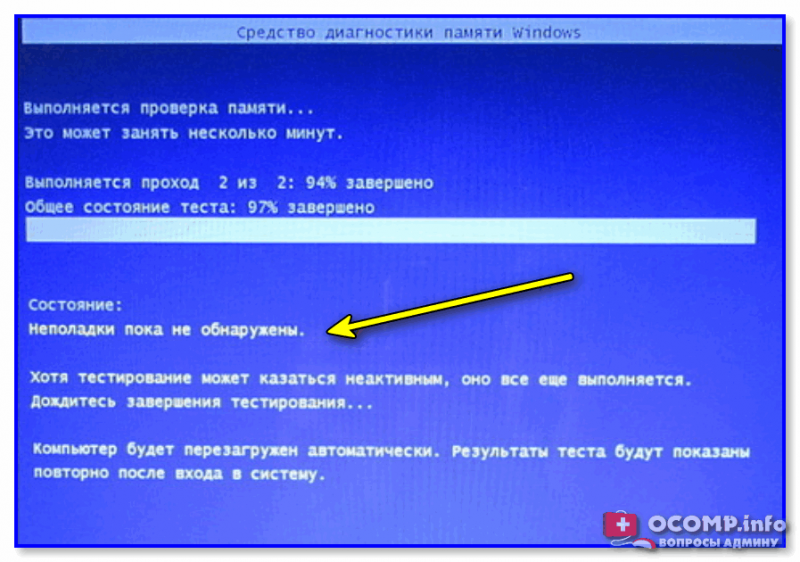
После перезагрузки ПК — запустится проверка памяти. Основное, куда нужно смотреть — вкладка «Состояние»: если с памятью все в порядке — должен быть статус «Неполадки пока не обнаружены».
Пример проверки плашки
*
ШАГ 3
Этот шаг больше актуален для ПК, где в BIOS можно задавать соотв. настройки.
Далее я бы посоветовал приглядеться 👉 к частоте, на которой работает память (2400 / 2666 / 3200 Mhz и пр.). В Windows 10, кстати, частоту (на которой работает память) можно посмотреть в диспетчере задач (Ctrl+Alt+Del). 👇

Диспетчер задач — память
Некоторые плашки при загрузке XMP профиля (это задается в BIOS), скажем для поднятия с 2400 Mhz до 3200 Mhz — начинают вести себя нестабильно: время от времени из-за этого вылетают «синие экраны» с перезагрузкой ПК… (чаще всего такое наблюдал на плашках от AMD и китайских «no-name»)
Я бы вообще, порекомендовал 👉 зайти в BIOS и 👉 сбросить настройки в оптимальные (после ничего не менять, кроме раздела BOOT, если того требует загрузка ОС).
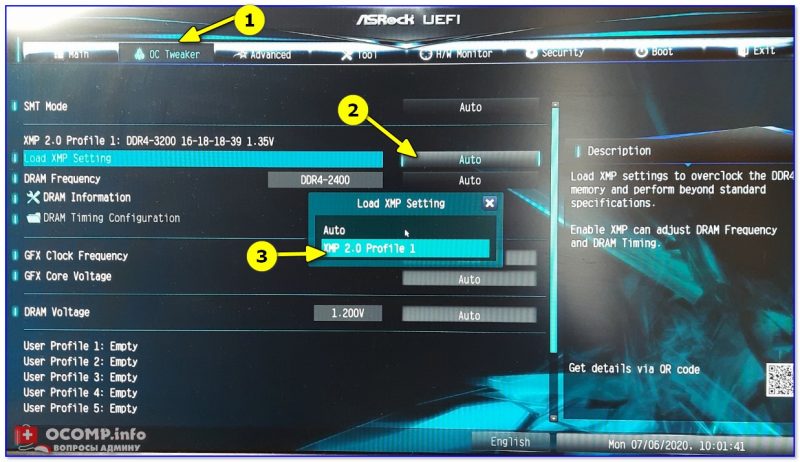
ASRock UEFI — загружаем XMP профиль
*
👉 Важно!
В некоторых случаях (это редко, но бывает) возможно есть проблема «несовместимости»* ОЗУ и мат. платы (*официально совместимы, но на практике постоянно сбои…).
Например, сталкивался с этим у производителей мат. плат AsRock и определенных плашек ОЗУ от AMD: в отдельности друг от друга работают вполне стабильно, но «вместе» — ошибки…
Мотив: по возможности, попробуйте заменить все свои плашки памяти на одну от другого производителя. Будет ли появл. синий экран?..
*
ШАГ 4
В Windows 8/10 драйверы для большинства оборудования 👉 устанавливаются автоматически (с одной стороны — это хорошо; но с другой — часто драйвера ставятся не самые «подходящие»… В результате получаем ошибки и «вылеты» синих экранов).
*
Что я бы посоветовал:
- загрузить драйверы с офиц. сайта (особенно это касается драйверов для видеокарты, мат. платы, чипсета, звуковой карты, сетевых адаптеров. Точные модели ваших «железок» можно узнать в AIDA, например). Если у вас ноутбук — скачивайте с сайта производителя ноутбука (т.е. с сайта ASUS, Lenovo и пр., а не AMD, nVidia…);
- затем отключите компьютер от интернета и произведите установку «родных драйверов»;
- после, отключите в Windows авто-обновление драйверов. О том, как это сделать — 👉 см. в этой заметке;
- подключите снова компьютер к интернету и проверьте работу. Будут ли снова сыпаться ошибки со стоп-кодом Memory management…
*
Кстати, как вариант, можно воспользоваться спец. утилитами для поиска и обновления драйверов. Например, 👉 Driver Booster, помимо всего прочего, может помочь найти и установить недостающие пакеты Net FrameWork, Visual C++ и пр.
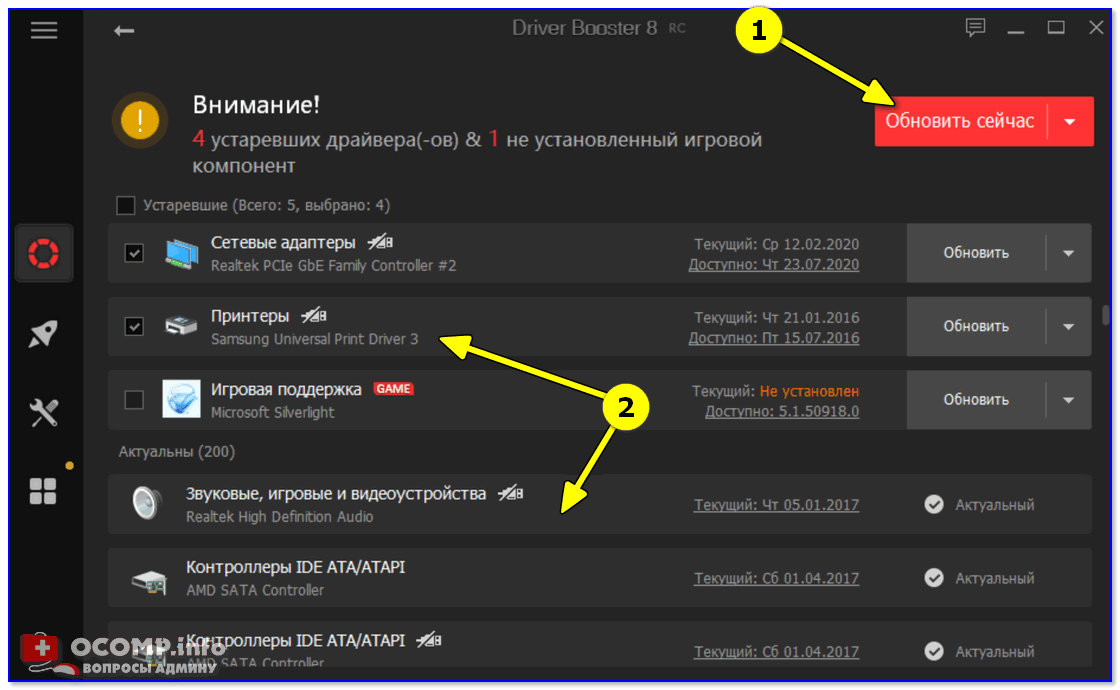
Driver Booster — найдено 4 устаревших драйвера, и 1 игровой компонент // пример работы программы
*
ШАГ 5
Следующее, что посоветовал бы — это проверить работу ПК 👉 с помощью LiveCD-флешки. Это позволит нам хотя бы понять, не связана ли проблема с текущей ОС (с ее системными ошибками, сбоями, конфликтами драйверов и пр.).
Кроме этого, на LiveCD-флешке есть программа OCCT (на том LiveCD, который порекомендовал я). И с помощью нее можно запустить довольно «жесткий тест», который поможет 👉 проверить стабильность работы БП, ЦП, видеокарты и пр.
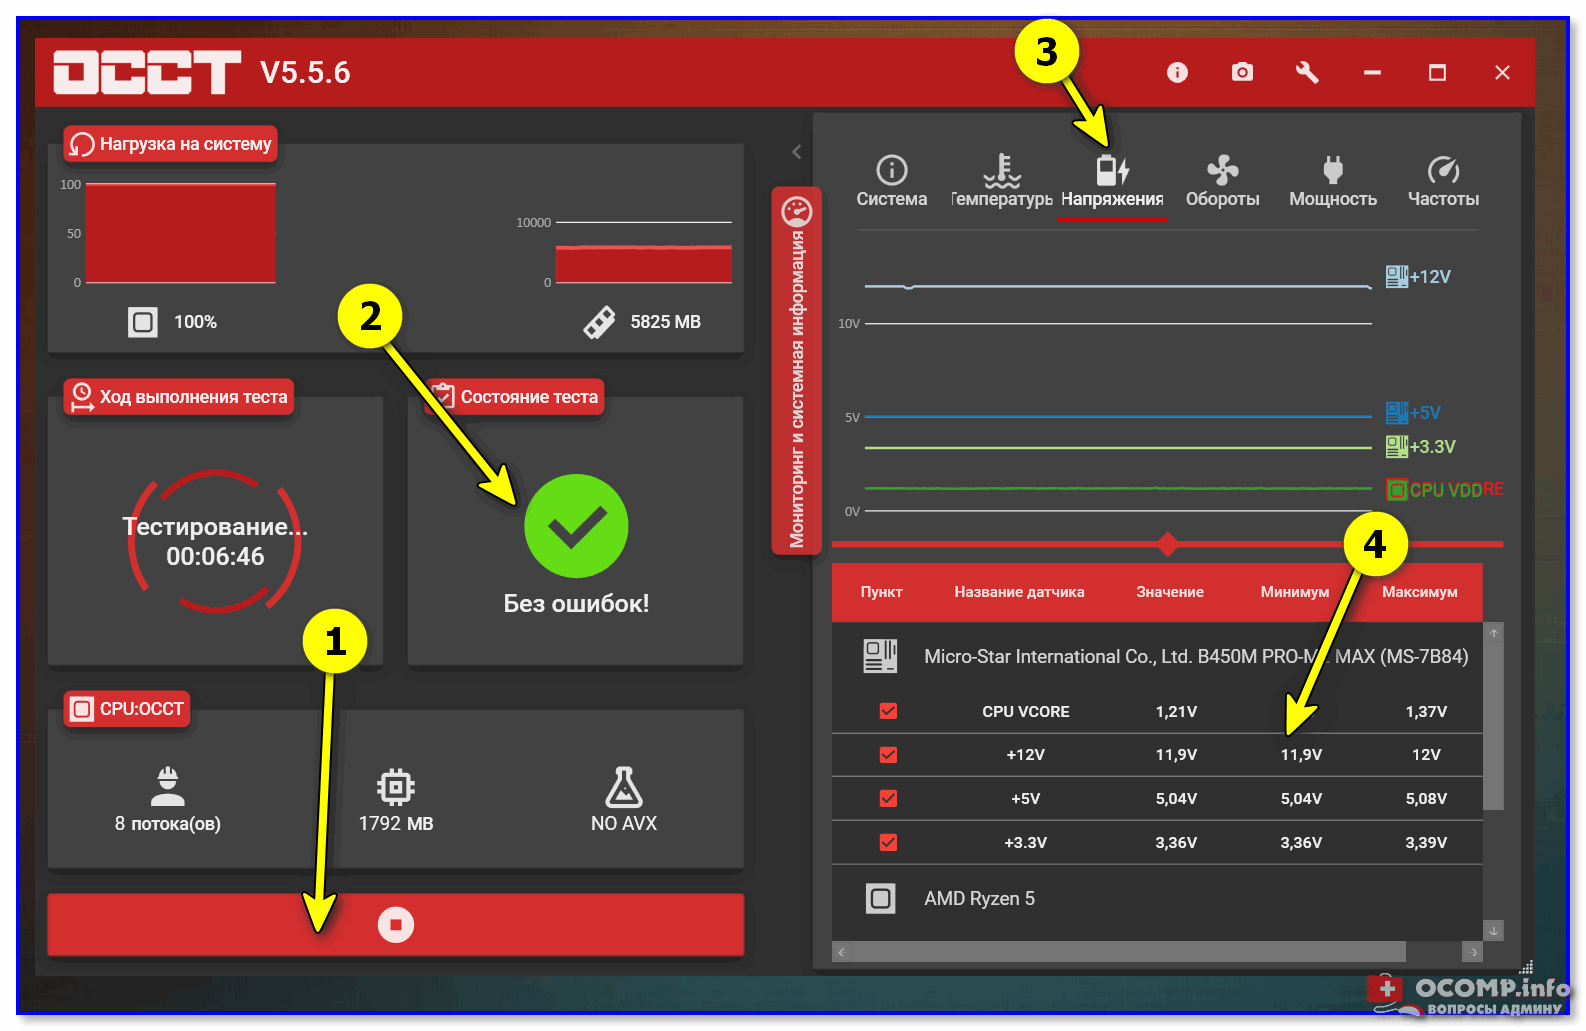
OCCT (программа для тестирования ПК) — вкладка с напряжениями
*
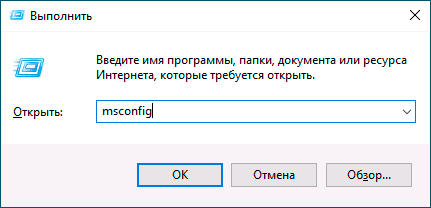
Если, загрузившись с LiveCD, синие экраны «пропали» и компьютер работает стабильно, на мой взгляд можно попробовать:
- установить новую ОС Windows в свободное место жесткого диска (👉 это можно сделать без удаления данных и текущей копии ОС). Причем, я бы посоветовал взять версию 👉 Windows LTSC (она без Store, Edge, Cortana, OneDrive и пр.);
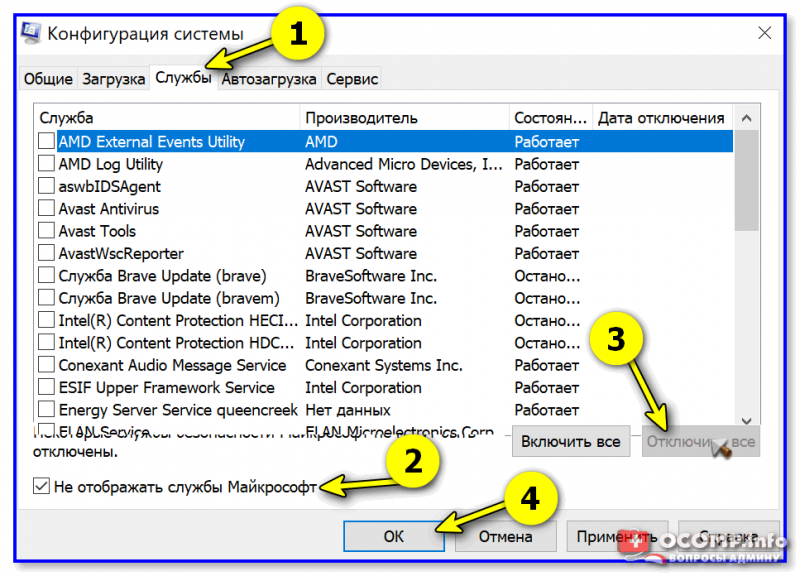
- попробовать произвести загрузку «проблемной» Windows без «сторонних» служб. Чтобы это сделать: нажмите Win+R, и используйте команду msconfig. Далее в списке служб отключите все, кроме служб от Microsoft. См. скриншот ниже. 👇

Конфигурация системы — отключение служб
- если ОС Windows будет корректно работать без сторонних служб — попробуйте поочередно их включать и проверять работу ПК. Чаще всего сбои бывают из-за антивирусов, панелей управления от драйверов, виртуальных CD-дисководов и пр.
*
ШАГ 6
Если всё вышеприведенное не дало результатов — могу лишь порекомендовать ко всему прочему выполнить общие рекомендации при появлении синего экрана. Их я приводил в одной своей инструкции (ссылочка ниже).
*
👉 В помощь!
Синий экран в Windows 10: «На вашем ПК возникла проблема…» (а за ним перезагрузка компьютера).
*
PS
Всё же (я настаиваю 😉) в первую очередь при появл. стоп-кода Memory management — нужно перепроверять ОЗУ (в т.ч. с заменой плашек), драйвера (на мат. плату, чипсет, видеокарту, сетевые карты), настройки и версию BIOS (возможно стоит произвести обновление). В подавляющем большинстве случаев — причина в «этом»… ☝
*
Если вы решили проблему иначе — дайте знать в комментариях!
Всего доброго!
👋
Синий экран MEMORY_MANAGEMENT в Windows 10 — распространенная, и, одновременно, часто сложная в диагностике проблема, однако, выяснить её причины и устранить обычно оказывается возможным.
В этой инструкции подробно о возможных методах исправить ошибку MEMORY MANAGEMENT в Windows 10 и о том, чем она может быть вызвана.
- Простые способы исправить ошибку MEMORY MANAGEMENT
- Синий экран MEMORY MANAGEMENT — поиск причины и исправление
- Что делать, если ошибка возникает до загрузки Windows 10
Простые способы исправить ошибку MEMORY MANAGEMENT
В связи со сложностью определения причин синего экрана MEMORY MANAGEMENT начинающими пользователями, рекомендую начать с простых подходов, которые, возможно, смогут достичь решения проблемы, не прибегая к более сложным манипуляциям.
Эти методы подойдут в случае, если Windows 10 запускается и какое-то время работает, а синий экран появляется позже:
- Если ошибка возникла после недавних обновлений системы или драйверов, возможно, использования каких-либо программ для оптимизации и ускорения Windows 10, попробуйте использовать точки восстановления системы (Панель управления — Запуск восстановления системы).
- Если точек восстановления нет, а вы обновляли какие-то драйверы, попробуйте зайти в диспетчер устройств (правый клик по кнопке «Пуск» — «Диспетчер устройств»), выбрать устройство, драйвер которого обновлялся, открыть его свойства и на вкладке «Драйвер» проверить доступность кнопки «Откатить».
- Если вы точно знаете, после установки какой программы появилась проблема, а программа работает в фоновом режиме (автоматически загружаясь с системой), возможно, стоит удалить эту программу или убрать её из автозагрузки Windows 10.
- Если устанавливались какие-либо сторонние антивирусы, они могут быть причиной ошибки. Проверьте, будет ли она проявлять себя, если отключить или удалить этот антивирус.
- Если синий экран MEMORY MANAGEMENT стал появляться сразу после чистой установки Windows 10 на компьютер или ноутбук, возможно, причина в том, что те драйверы, которые установила сама система не вполне подходят. Вручную скачайте и установите официальные драйверы с сайта производителя ноутбук или материнской платы (если это ПК) — включая драйверы чипсета и другие драйверы.
- Если вы включали какие-то опции ускорения памяти, процессора, видеокарты в БИОС/UEFI или с помощью сторонних программ, попробуйте отключить их.
- Если ошибка MEMORY_MANAGEMENT появляется только при запуске определенной игры или программы, проблема может быть именно в этой программе или, если игра или программа платная, а вы её не совсем купили, то в антивирусе (попробовать запуск при отключенном антивирусе, в том числе встроенном Защитнике Windows).
К сожалению, не всегда указанные простые подходы к решению проблемы оказываются результативными. В этом случае переходим к более сложным вариантам определения причин проблемы и исправления ошибки.
Синий экран MEMORY_MANAGEMENT — ищем причину и исправляем ошибку
Следующие этапы могут помочь разобраться в том, что именно вызывает появление рассматриваемого синего экрана. Опять же, предполагается, что вы можете зайти в Windows 10 и работать в ней. Если же синий экран MEMORY MANAGEMENT появляется до загрузки системы — об этом в последнем разделе инструкции.
Чистая загрузка Windows 10
В качестве первого шага следует попробовать выполнить чистую загрузку Windows 10 без сторонних служб и программ в автозагрузке — это позволит выяснить, не являются ли какие-либо сторонние программы причиной ошибки. Для того, чтобы сделать это, выполните следующие шаги:
- Нажмите клавиши Win+R на клавиатуре, введите msconfig в окно «Выполнить» и нажмите Enter.

- На вкладке «Общие» отметьте пункт «Выборочный запуск» и снимите отметку «Загружать элементы автозагрузки».
- Перейдите на вкладку «Службы», отметьте «Не отображать службы Майкрософт», а затем нажмите «Отключить все».

- Желательно также зайти на вкладку «Автозагрузка» перейти в параметры автозагрузки диспетчера задач и там отключить все пункты (даже нужные).
- Примените настройки и перезагрузите компьютер.

Если после перезагрузки ошибка MEMORY_MANAGEMENT больше не появляется, по-видимому, причина в одной из программ в автозагрузке или какой-то сторонней службе. Можно попробовать включать элементы по одному или несколько, пока снова не появится проблема, чтобы выяснить, что именно её вызвало и после этого принимать решения о возможном удалении этого стороннего ПО или других действиях.
Проверка драйверов
Синий экран MEMORY MANAGEMENT часто может быть вызван проблемой с драйверами. Для того, чтобы выявить сбойный драйвер оборудования, можно использовать встроенную утилиту для проверки драйверов:
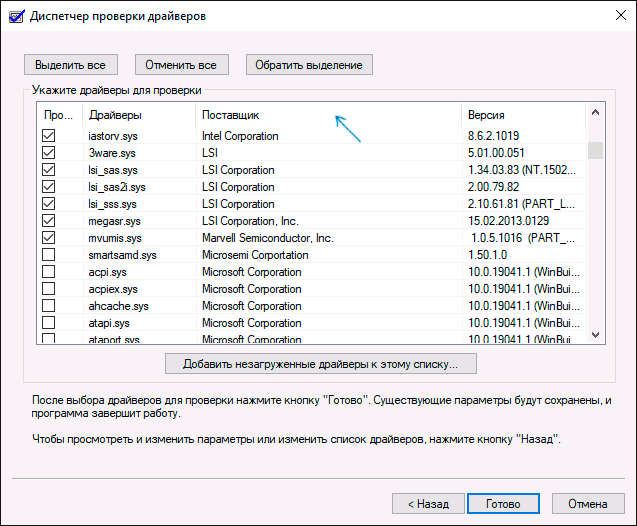
- Перезагрузите компьютер в безопасном режиме. Самый простой метод сделать это — нажать клавиши Win+R на клавиатуре, ввести msconfig и нажать Enter, отметить «Безопасный режим» на вкладке «Загрузка», применить настройки и перезагрузить компьютер.
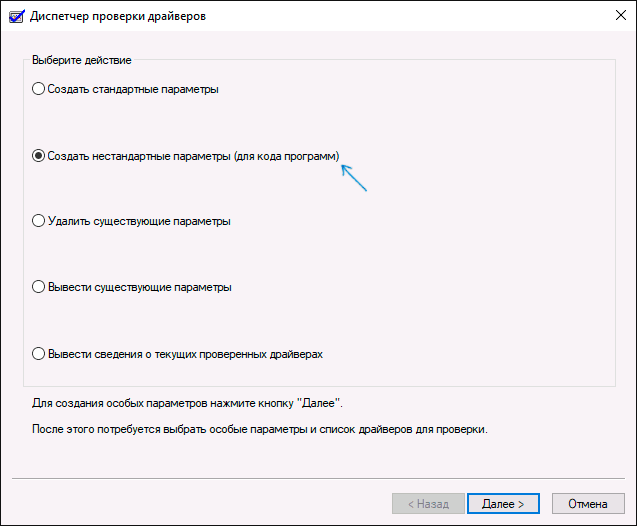
- В безопасном режиме нажмите клавиши Win+R и введите verifier для запуска диспетчера проверки драйверов.
- На первом экране выберите «Создать нестандартные параметры (для кода программ)».

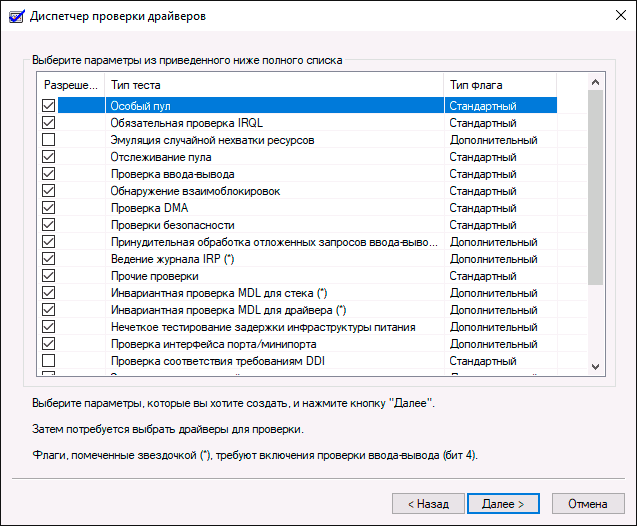
- Далее отметьте все пункты, кроме «Эмуляция случайной нехватки ресурсов» и двух пунктов, связанных с проверкой соответствия требованиям DDI.
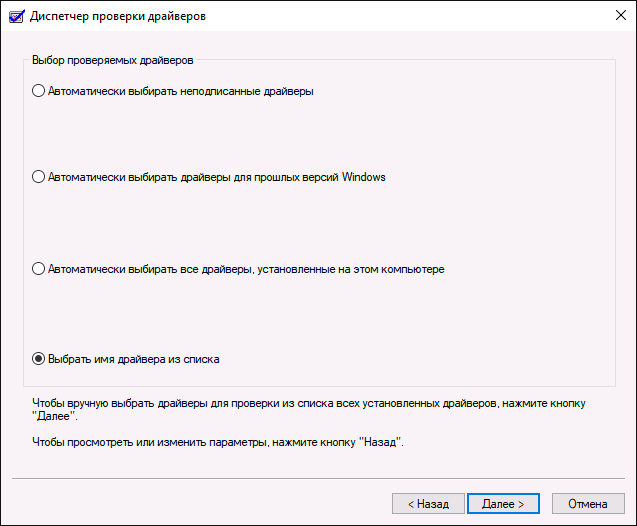
- Выберите пункт «Выбрать имя драйвера из списка».
- Отсортируйте драйверы по колонке «Поставщик» (нажав на заголовок столбца) и отметьте все драйверы, кроме предоставленных Microsoft. Нажмите кнопку «Готово».
- Если вы запускали безопасный режим с помощью msconfig, снова зайдите (как на первом шаге) и отключите загрузку в безопасном режиме.
- Перезагрузите компьютер.
После этого возможны следующие варианты развития событий:
- Система загрузится, некоторое время проработает, а затем появится синий экран с прежней ошибкой MEMORY_MANAGEMENT или новой, наподобие DRIVER_VERIFIED_DETECTED_VIOLATION с указанием имени файла .sys (если имя файла указано — запомните или запишите его, это и есть сбойный драйвер).
- Система покажет синий экран еще до загрузки системы.
В первом случае перезагрузите компьютер и отключите проверку драйверов, для этого запустите командную строку от имени администратора и введите команду verifier /reset
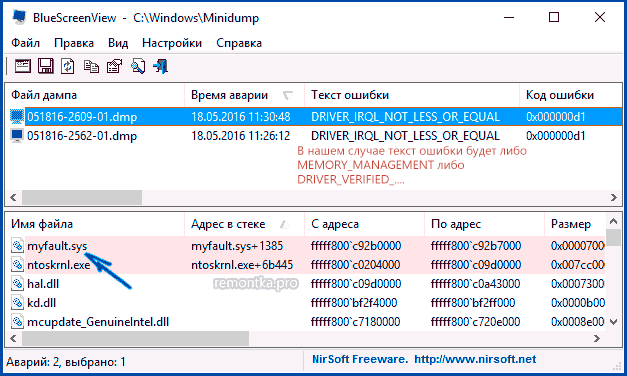
После этого, если на синем экране отображалось имя сбойного драйвера, найдите в Интернете, что это за драйвер — по всей видимости, проблема именно в нем. Если имя драйвера не отображалось, попробуйте использовать бесплатную утилиту BlueScreenView и в ней посмотреть, какой именно файл вызвал последний сбой (на скриншоте пример для другого синего экрана). Утилита доступна на официальном сайте https://www.nirsoft.net/utils/blue_screen_view.html
Если система не запускается, то после двух сбоев загрузки вы получите возможность открыть дополнительные параметры и инструменты восстановления и там, запустив командную строку, отключить проверку драйверов с помощью команды verifier /reset а затем перезагрузить компьютер. Далее, можно использовать действия из предыдущего абзаца.
После выявления вызывающего неполадки драйвера вы можете предпринять действия по его обновлению (в идеале — путем скачивания вручную с официального сайта производителя оборудования) или откату на предыдущую версию.
Проверка оперативной памяти и целостности системных файлов, ошибок диска
Иногда ошибка может быть вызвана проблемами с оперативной памятью. Если у вас есть подозрения на то, что дело в этом, то для начала рекомендую отключить любые ускорения RAM, если раньше вы их применяли, а затем попробовать выполнить проверку оперативной памяти на ошибки.
Еще пара рекомендаций — выполнить проверку целостности системных файлов Windows 10 и проверку жесткого диска на ошибки.
Исправление ошибки, если система не запускается

В случае, если сообщение об ошибке MEMORY MANAGEMENT появляется еще до загрузки системы, то после двух неудачных загрузок вы должны получить доступ в дополнительные параметры восстановления в разделе «Поиск и устранение неисправностей», где вы можете:
- Попробовать загрузку в безопасном режиме (пункт «Параметры загрузки»).
- Выполнить восстановление из точек восстановления (пункт «Восстановление системы»).
- Удалить последние установленные обновления Windows
И в крайнем случае, можно прибегнуть к сбросу системы в исходное состояние.
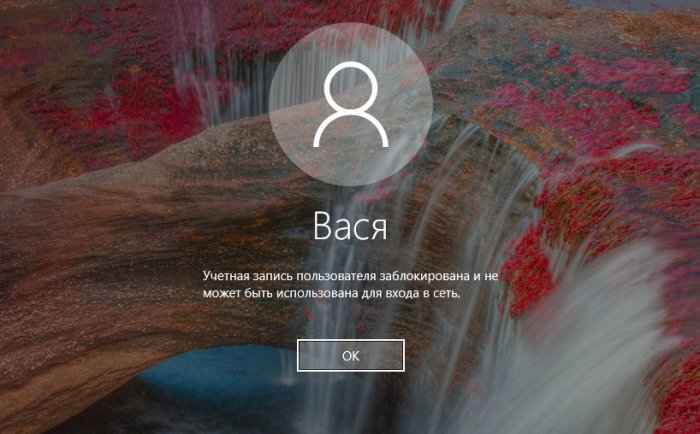
Друзья, привет. Сегодняшняя статья пригодится в первую очередь корпоративным пользователям компьютеров на базе Windows, работающим со стандартными локальными учётными записями. Тогда как вход в учётные записи со статусом администратора могут выполнять только доверенные лица компании в виде сотрудников IT-раздела. Хотя при определённом семейном микроклимате с описываемой ниже проблемой можно столкнуться, используя домашние устройства. Что же за проблема такая? А это невозможность доступа к Windows с уведомлением на экране блокировки «Учётная запись пользователя заблокирована и не может быть использована для входа в сеть». Что за блокировка такая, и как с ней бороться?
Итак, не можем войти в Windows, потому что на экране блокировки видим это.
Такая блокировка является результатом определённого количества неудачных попыток авторизации в локальной учётке, если администратором компьютера внесены соответствующие настройки локальной групповой политики.
Администратор компьютера в локальных групповых политиках может установить то или иное число попыток входа в учётные записи пользователей. При превышении этого числа попыток учётка блокируется для входа. Это такая защита от подбора паролей. Даже если дело имеем не с ситуацией попытки подбора пароля к чужой учётке, а просто её истинный владелец невнимательно вводил символы или не посмотрел на раскладку клавиатуры, войти в систему не удастся даже при вводе верного пароля. Придётся выждать установленное администратором время, пока не будет сброшен счётчик попыток входа. И, естественно, пока не истечёт время самой блокировки.
Устанавливается такая защита от подбора паролей в редакторе локальной групповой политики, в политике блокировки учётных записей.
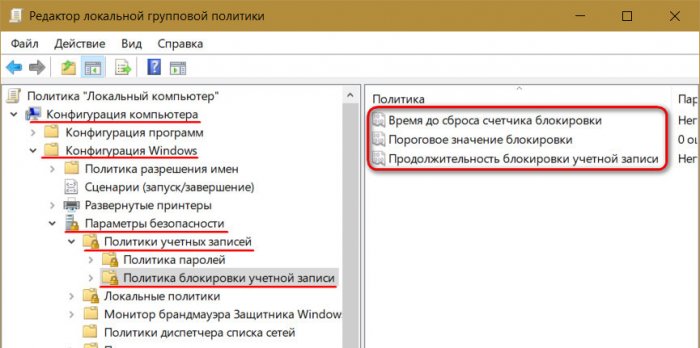
Здесь вводится пороговое значение блокировки, т.е. допустимое число попыток ввода пароля.
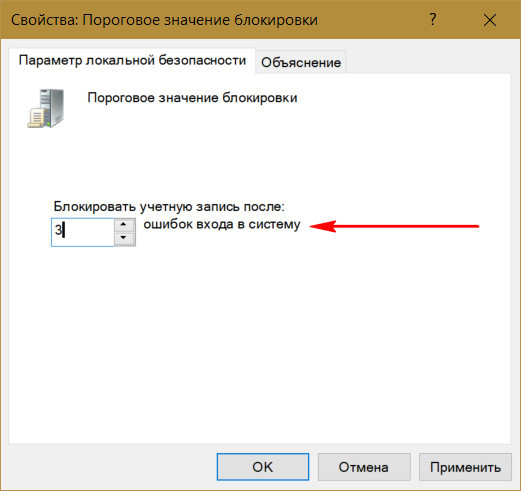
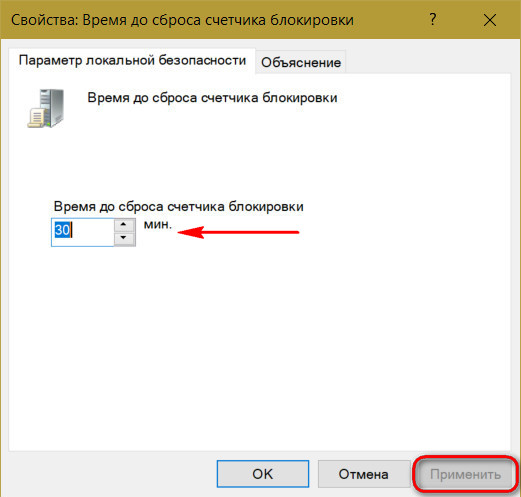
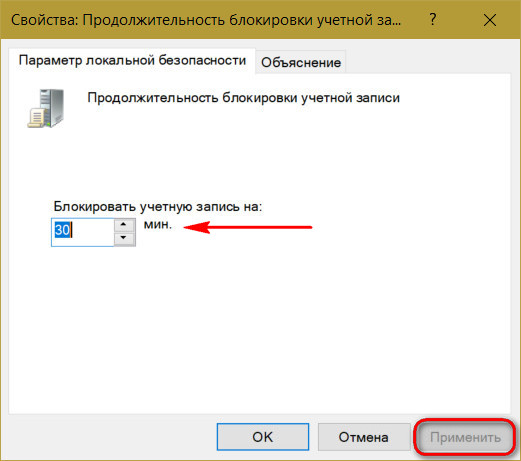
При установке такого порогового значения другие параметры политики – время до сброса счётчика блокировки и длительность самой блокировки – автоматически будут установлены на 30 минут.
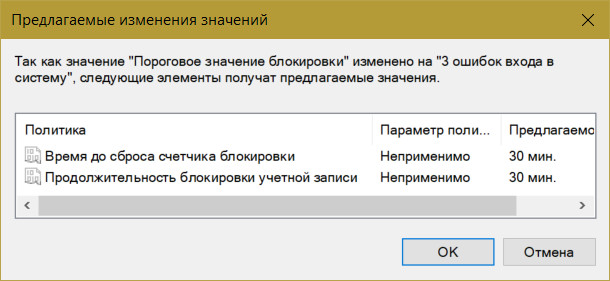
Их при необходимости можно сменить. И, к примеру, установить меньшее время для сброса счётчика неудачных попыток ввода пароля.
А время блокировки самой учётной записи, наоборот, увеличить.
Распространяется такая защита только на локальные учётки и не работает при попытках подбора пароля или пин-кода для подключённых аккаунтов Microsoft.
Разблокировать заблокированную учётную запись можно несколькими путями:
• Дождаться завершения времени блокировки. Но здесь есть нюанс: сколько времени нужно ждать, система не уведомляет. Об этом знает только администратор компьютера;
• Войти в систему с учётки администратора и снять блокировку;
• Если доступ к учётке администратора невозможен, снять блокировку, загрузившись со съёмного устройства и подправив кое-что в реестре Windows.
Если своя учётка заблокирована, но есть доступ к учётке администратора, необходимо войти в последнюю и разблокировать свою таким образом. Жмём клавиши Win+R, вводим:
lusrmgr.msc

В открывшемся окне в папке «Пользователи» ищем свою учётную запись и делаем на ней двойной клик.
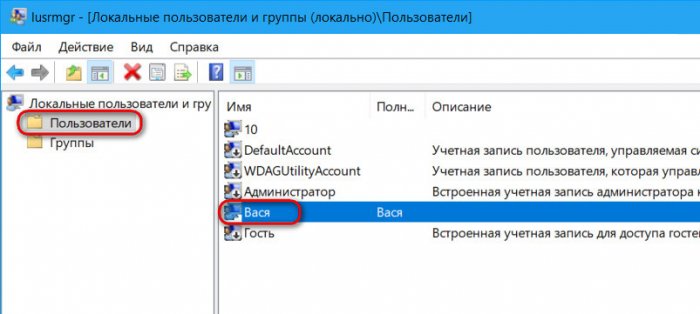
В окошке открывшихся свойств снимаем галочку «Заблокировать учётную запись». Применяем.
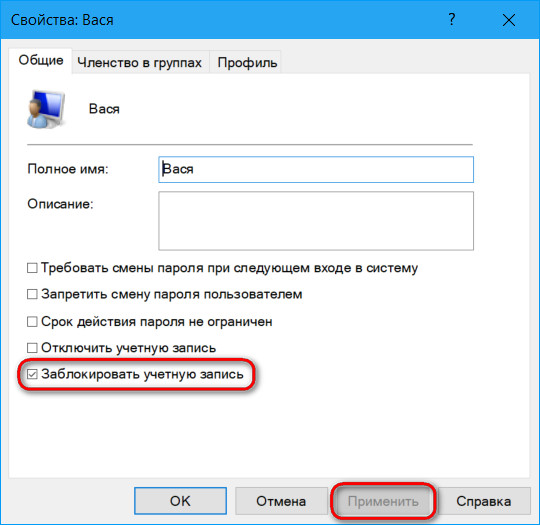
Пробуем войти в свою учётку.
- Примечание: если у вас нет пароля к учётке администратора, не стоит пытаться войти с помощью подбора. Защита от подбора паролей действует на все локальные учётные записи, в том числе и на администратора. Его учётка после определённого количества неудачных попыток авторизации также будет заблокирована.
Если доступа к учётной записи администратора нет, добываем DVD-диск или флешку с процессом установки любой версии Windows или Live-диск с возможностью правки реестра операционной системы. Загружаем компьютер со съёмного устройства, в нашем случае это флешка установки Windows 10. Важно: запуск со съёмного устройства должен проводиться только при перезагрузке систем Windows 8.1 и 10. Нельзя использовать обычное завершение работы, поскольку в этих версиях из-за функции ускоренного запуска системное ядро загружается из ранее сохранённого на диске файла. Нам же нужно, чтобы ядро загрузилось с изменёнными параметрами реестра.
На первом этапе установки Windows жмём Shift+F10. Запускаем реестр командной строкой:
regedit

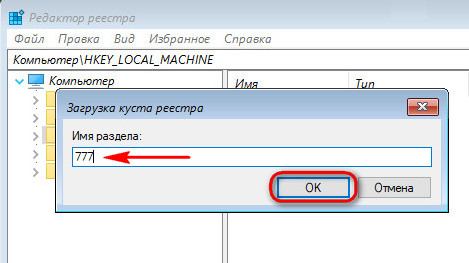
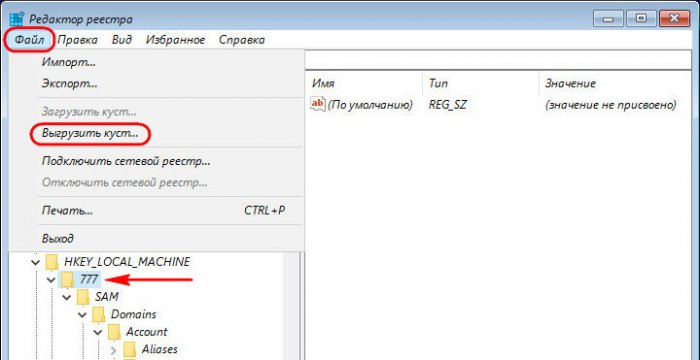
Кликаем раздел HKEY_LOCAL_MACHINE. Далее жмём меню «Файл», здесь нам нужен пункт «Загрузить куст».
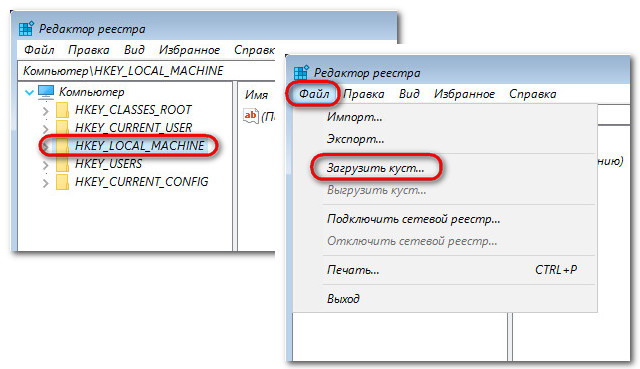
В окне обзора выходим в корень устройств «Этот компьютер» и заходим в раздел Windows. У нас он обозначен как диск (C:\), но диск системы также может значиться и под другой буквой. Тут нужно ориентироваться по объёму раздела. На системном разделе раскрываем папки «Windows», далее – «System32», далее – «config». Внутри последней нам нужен файл SAM, это так называемый куст реестра, открываем его.
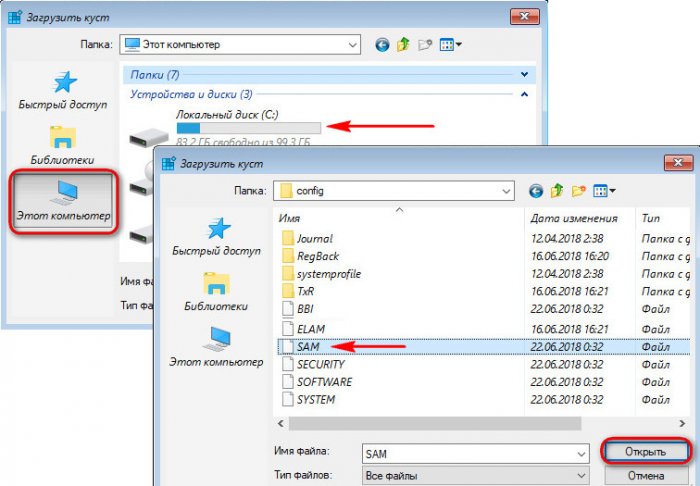
Открытый куст нужно как-то назвать, имя непринципиально. Назовём его 777.
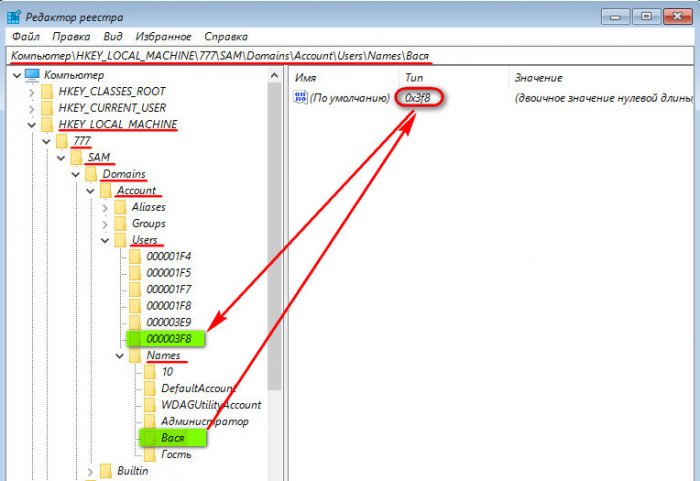
Внутри раздела реестра HKEY_LOCAL_MACHINE теперь наблюдаем новую ветвь 777. Раскрываем внутри неё путь:
777 – SAM – Domains – Account – Users – Names
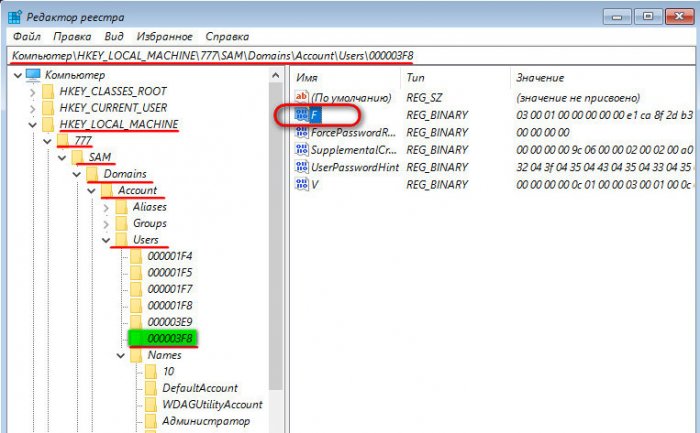
Находим имя своей учётки в папке «Names». Нам, например, нужен пользователь Вася. Смотрим, что при выборе Васи отображается на панели реестра справа. У нас значение 0x3f8. Такое же значение, но только в ином формате написания — с лишними нулями спереди и капсом – ищем теперь выше, внутри папки «Users».
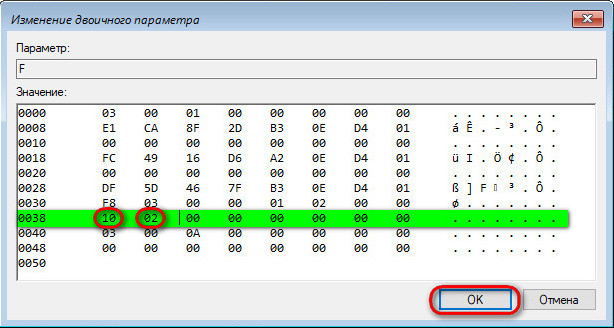
Ставим курсор теперь на это значение с нулями и капсом. В правой панели реестра ищем параметр «F» и двойным кликом раскрываем его.
В окошке параметра нам нужна строка 0038. Её первые два значения (у нас это 10 и 00) заменяем.
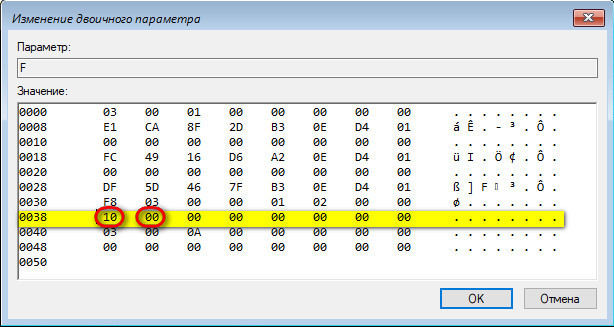
Двойным кликом ЛКМ щёлкаем по очереди на каждом из двух значений, и когда те выделятся синим, вписываем другие значения. А эти другие значения должны быть 10 и 02 соответственно. В итоге жмём «Ок».
Теперь в окне реестра кликаем на загруженный и отредактированный куст, у нас это 777. И выгружаем его: жмём «Файл», далее- «Выгрузить куст».
Перезагружаемся. И можем снова пытаться войти в свою учётку. Друзья, если блокировка вашей учётки – это следствие превышения допустимого числа авторизаций из-за того, что вы забыли пароль (или его, возможно, сменил кто-то без вашего ведома), вы можете просто убрать пароль. Сделать это можно, в частности, тем же способом путём правки реестра со съёмного носителя, что описан выше, только там нужны чуть другие действия. Какие – читаем здесь.
Has your PC stopped working abruptly? If yes, the chances are higher that you have issues related to the code memory management in Windows. «Stop Code Memory Management» in Windows is one of the most common computer errors. The error turns the screen to blue, interrupting the user’s access. The guide will help you to fix the stop code memory management in Windows.
| Workable Solutions | Step-by-step Troubleshooting |
|---|---|
| Fix 1. Reboot your Windows | Rebooting Windows is an efficient fix when facing Stop Code Memory Management…Full steps |
| Fix 2. Check Windows Updates | Older versions of Windows may also lead to one of the reasons behind the annoying…Full steps |
| Fix 3. Quick Scan PC Memory | It is one of the most effective built-in tools that help users protect their PCs against…Full steps |
| Fix 4. Boot into Safe Mode | If you have tried the solutions mentioned above but didn’t have to find the perfect solution…Full steps |
| More Fixes | Other 4 fixes are available here for you to follow and fix the error: stop code memory…Full steps |
Windows Memory Management is one of the essential parts of the Windows operating system designed to take control of the system ideally. The tool maintains the main memory perfectly and transfers the processes from the primary storage to the disk storage during the execution of the different methods. The Windows Memory Management System coordinates the memory perfectly and keeps the RAM usage steady.
Windows Memory Management is responsible for everything, whether it’s about providing support to the large memory or copy-on-write memory or assisting the cache manager or memory-mapped files. It is the main thing that perfectly manages the transaction of memory between the physical memory and the RAM of the computer system during the execution of the processes. Here are the features of Windows Memory Management:
- 🎁The best thing about Windows Memory Management is the memory allocation for each method.
- 🔧The tool ensures the remembrance of the allocated memory spaces when and wherever required.
- 🖲️It keeps track of the memory space and releases it whenever and wherever necessary for sharing and changing status.
- ⌛It is the essential part of the computer system that serves to be the main reason behind the smooth and seamless functioning of the overall performance.
Even a minor issue with the Windows Memory Management can effectively affect your complete operating system and cause a Stop code Memory Management error.
Why is Windows Stop Code Memory Management?
Just think of the situation where you are trying to get access over your Windows, but a blue screen is blocking your way consistently—really a very annoying problem.
Windows Stop Code Memory Management is one of the worst and most annoying error issues that prevent you from accessing Windows. Several reasons are behind this annoying error; if you are eager to know what exactly they are, check out the few we provide below.
- Corrupted system files
- Corrupted or damaged RAM
- Disk Errors
- Virus or malware attack
- System hard drive issues
- Issues with the graphic cards
How to Fix Stop Code Memory Management on Windows?
It is utmost required to fix Stop Code Memory Management on Windows whenever it occurs. If you don’t know how to do it, don’t worry. We are here with the complete solutions for you. Before proceeding further with the solution parts, safeguard your data and look at your security.
- Fix 1. Reboot your Windows to Fix Stop Code Memory Management
- Fix 2. Check for Windows Updates
- Fix 3. Quick Scan your PC Memory Management Using Windows Security
- Fix 4. Boot Windows 11 into Safe Mode
- Fix 5. Update GPU Driver on Windows
- Fix 6. Perform a Memory Management Test
- Fix 7. Run the CHKDSK to Fix Stop Code Memory Management
- Fix 8. Reset Windows OS
Fix 1. Reboot your Windows to Fix Stop Code Memory Management
Rebooting Windows is one of the most common and efficient fixes when facing Stop Code Memory Management in Windows. Windows OS is quite efficient and can efficiently fix different problems independently. One can quickly reboot their Windows system by making a few clicks and can get rid of minor glitches efficiently.
Step 1. Click the Start menu icon in the desktop’s bottom left corner.
Step 2. Click the Power button in the bottom left corner of the Start menu.
Step 3. Select Restart from the list of options that appear.
Step 4. If prompted, save any unsaved work before continuing.
Step 5. Click the Restart button to confirm the reboot.
Fix 2. Check for Windows Updates
Older versions of Windows may also lead to one of the most common reasons behind the annoying error issue Stop Code Memory Management in Windows. If you haven’t updated your Windows for a longer time, the chances are higher that the error issue you are currently facing is due to this only. You can quickly check for the Windows updation by:
Step 1. Please tap the Windows key and the I button to open the Menu option.
Step 2. Go to the Settings option and move forward with the Update & security section.
Step 3. Once done with the above process, you must next check for the pending updates under the Windows Update section in the league.
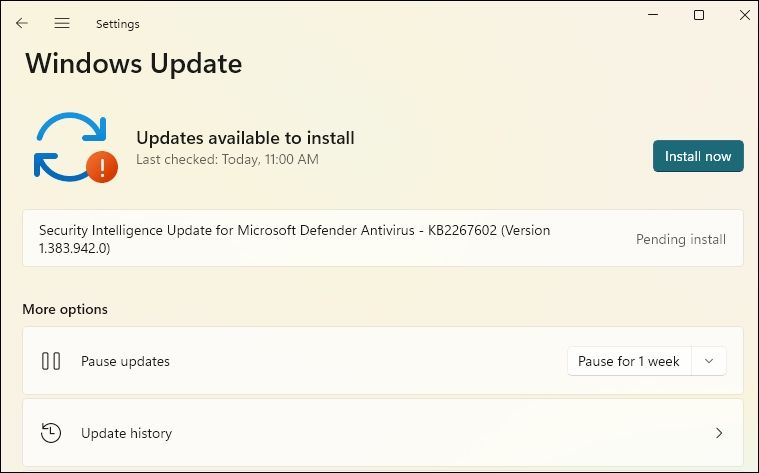
Step 4. Tap on the Install now an option to enable the successful downloading and installing of the Windows update.
Step 5. Wait patiently for the Windows update; save the unsaved work and tap the Restart Now button.
Fix 3. Quick Scan your PC Memory Management Using Windows Security
It is one of the most effective built-in tools that help users protect their PCs against malware or virus attacks. You can efficiently perform the successful scan and fix the stop code: memory management by the following steps:
Step 1. Tap on the Start button and then go to the Settings option.
Step 2. Now move towards the Update & Security section.
Step 3. Once done, select the Windows Security option from the left pane.
Step 4. Now tap on the Virus & threat protection in the right pane and proceed to the Windows Security setting.
Step 5. Next, move to the Current threats section and tap the Quick scan option.
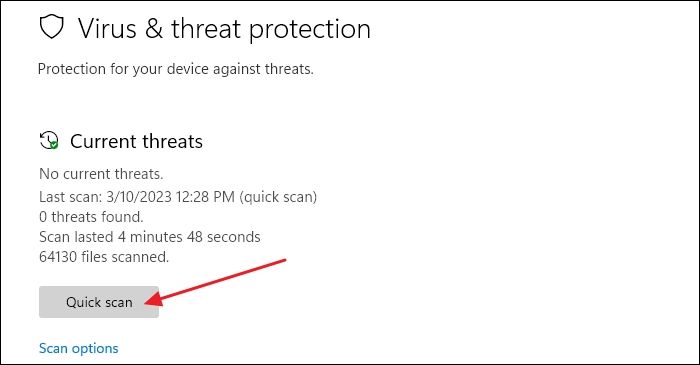
Step 6. Once done, Windows Security will initiate a successful scan on your PC, save you from the potential traits, and fix them.
Fix 4. Boot Windows 11 into Safe Mode
If you have tried the solutions mentioned above but didn’t have to find the perfect solution, you can quickly boot your Windows 11 into safe Mode. It will run your Windows with the lowest possible drivers and programs and help you secure access to your Windows. The things you have to do here are:
Step 1. Launch the Menu option by pressing the Windows key, and I button together.
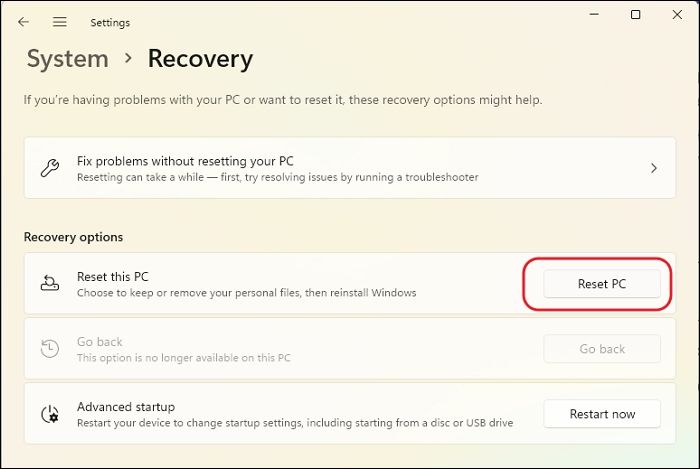
Step 2. Now select System > Recovery.
Step 3. Click on the Restart button next to the Advanced Startup option.
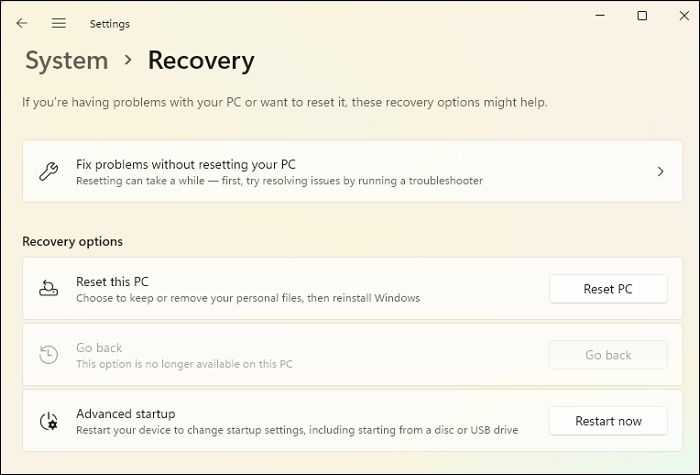
Step 4. It will reboot your PC to advanced recovery. There, select Troubleshoot and then Advanced Options to proceed with the process.
Step 5. The next thing you have to tap on the Startup Settings.
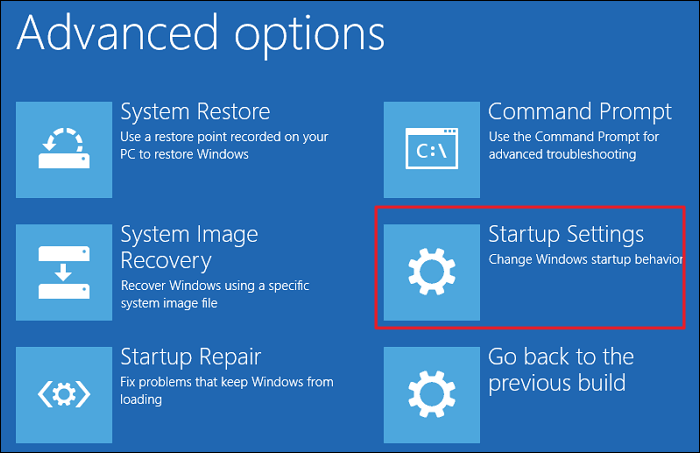
Step 6. Now select the Startup Settings option, followed by selecting the Restart button.
Step 7. Once done, select Restart in Safe Mode to enjoy smooth access to your computer system.
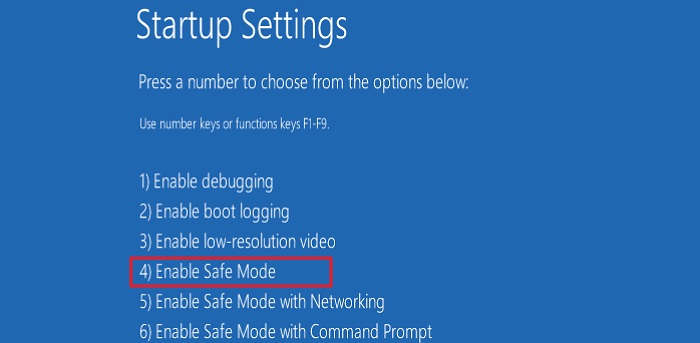
Step 8. Make sure to leave your computer system in safe Mode for a while to check whether the error has been resolved successfully or not.
Your Windows PC should now be rebooted in Safe Mode, allowing you to troubleshoot any issues and hopefully resolve the error you were experiencing.
Fix 5. Update GPU Driver on Windows
Outdated or brand-new GPU drivers are also one of the significant reasons behind BSOD Errors. Updating GPU Drivers can work effectively and can help you in getting rid of this annoying error issue. All you have to do here is:
Step 1. Type dxdiag in the search box and launch the Windows memory Diagnostic tool on your device.
Step 2. Tap on the Display tab in the tool window, and once done, the detailed list of your system’s GPU details will flash up on your screen.
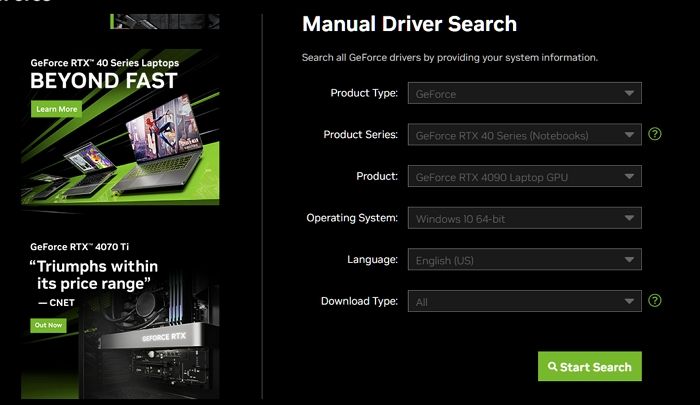
Step 3. Go to the GPU manufacturer’s website and select the related GPU driver.
Step 4. Once done, download and install the driver and restart your computer system to enable smooth access.

You should now have the latest GPU driver installed on your Windows PC, which should improve performance and resolve any issues you are experiencing.
Fix 6. Perform a Memory Management Test
Memory test is a beautiful way to effectively fix Stop Code Memory Management in Windows. The things you have to do here are:
Step 1. Tap the Windows key and type Windows Memory Diagnostic in the search bar.
Step 2. Now tap on the corresponding app followed by tapping on Restart now and check for the option of the problem.
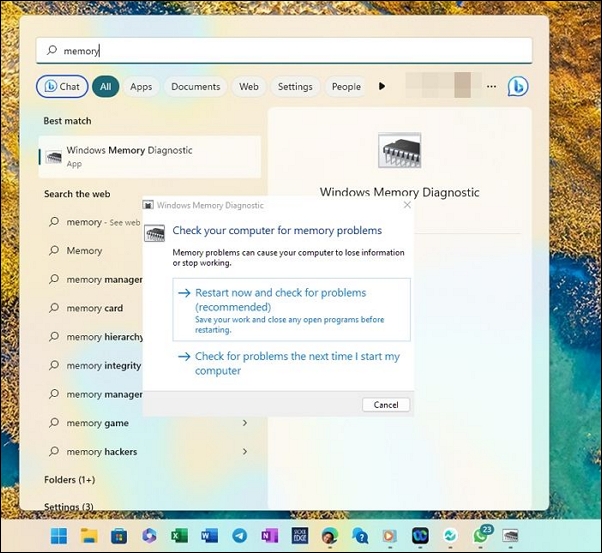
Step 3. Wait for the Memory Test to run efficiently.
Step 4. Once done, the results will flash up on your screen. If you find any issue, you can quickly resolve the related solutions effectively.
You should now have run the Windows Memory Diagnostic tool on your PC, and if any issues are found, you can take the necessary steps to resolve them.
Fix 7. Run the CHKDSK to Fix Stop Code Memory Management
Corrupted system files or disks are the primary reasons behind the annoying error Windows Stop Code Memory Management. The same prevents you from accessing the Windows processes. One can easily use the System File Checker for troubleshooting Windows 10. It perfectly detects and repairs the corrupted system files in two working orders.
Step 1. Type the command prompt in the search bay and tap the Run as Administrator option.
Step 2. Once done, type the chkdsk/r command in the provided space and press the Enter button.
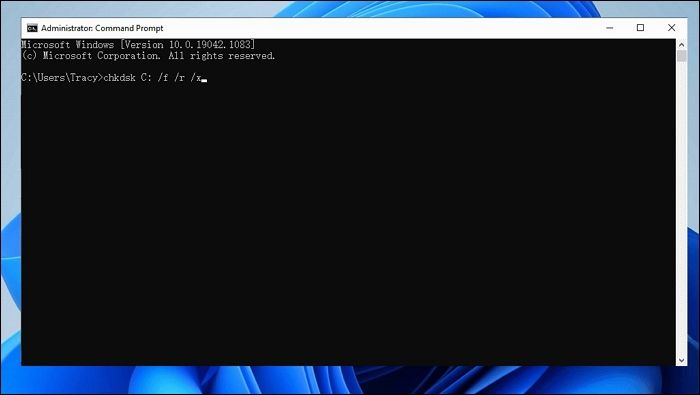
Step 3. Wait for the process to get accomplished, and once done, it will initiate the scan for the system-related files and repair them effectively.
You should now have successfully run the chkdsk command on your Windows PC to scan and repair system-related files if any issues were found.
Fix 8. Reset Windows OS
If you have tried all the solutions above but have not gotten the related result, resetting Windows OS will help you acquire an absolute and sure fix. The same resolve the memory management issues and clears these issues effectively.
Step 1. Tap on the Start button and then launch the Settings option on your device.
Step 2. Tap on the System > Recovery option to move further with the process.
Step 3. Click on the Reset PC button to start the reset.
Step 4. Once done with the above process, your PC will get restarted immediately.
Step 5. Save any unsaved data before proceeding further with the Get Started tab.
Step 6. Please wait for the PC to restart, and once done, select the preferable option from the Keep my files or Remove everything option.
Step 7. Please wait for the process to complete and check whether it fixes the blue screen memory management errors have been resolved.
That’s it! You should now have reset your PC using the Windows settings to fix any blue screen memory management errors you may have been experiencing.
Several Windows users have proved the efficacy of these 8 fixes. If one of the methods is helpful to resolve the stop codes: memory management, share it on Facebook, Twitter, Instagram, and other social media platforms!
How to Recover Lost Data Due to BSOD Error on Windows
Data loss is one of the most common things one usually faces while fixing the Stop Code Memory Management in Windows. If you are also going through such an annoying issue now, you can opt for the tool to assist you to recover deleted files.
EaseUS Data Recovery Wizard is one of the most powerful data recovery tools designed to provide absolute assistance in recovering data loss in case of a file system malfunction; system crashes, unintended file deletion, or other scenarios. The platform has a simple and user-friendly interface that everyone can handle conveniently.
The tool can recover data from everything, whether USB flash drives or cameras, memory cards, or SD cards. It features a loaded option and comes up with a very affordable budget that makes access even much convenient.
Download the software and follow the steps:
Note: To guarantee a high data recovery chance, install EaseUS data recovery software on another disk instead of the original disk where you lost files.
Step 1. Launch EaseUS Data Recovery Wizard on your Windows 11, Windows 10, Windows 8, or Windows 7 computer. Select the disk partition or storage location where you lost data and click «Search for Lost Data».

Step 2. This recovery software will start scanning the disk to find all lost and deleted files. When the scan process completes, click «Filter» > «Type» to specify lost file types. If you remember the file name, you can also search in the search box, which is the fastest way to find the target file.

Step 3. Preview and restore lost Windows files. You can double-click to preview the scanned files. Then, select the target data and click the «Recover» button to save them to another safe spot in the PC or Cloud drive.

Final Words
Fixing Stop Code Memory Management in Windows is a more straightforward task now. We have provided different reasons and detailed solutions to resolve this annoying error effectively. Using data recovery software like EaseUS during enabling fix serves to be a great assistance. It helps you acquire lost data effectively and secure your data online.
Stop Code Memory Management on Windows FAQs
Although we have provided detailed solutions for the annoying error and introduced you to the possible reasons, here are the most common FAQs for you if you have some issues or queries.
1. Can insufficient RAM cause memory management errors?
Yes, If you don’t have enough RAM on your PC, and the memory demand keeps increasing, Windows will not be able to handle the data and process running on it. This leads to memory management issues where the computer can get BSOD, Freeze, Crash, etc.
2. Why does my PC keep a blue screen after the RAM upgrade?
Two different memory modules serve behind the bluescreen after RAM upgradation. Motherboard RAM timings and voltages are among the most common reasons that do to be significant reasons here.
3. Does Windows 11 have better memory management?
Windows 11 has more features and programs than previous versions, giving users more RAM. Windows 11 features a better memory management system, resulting in lower performance issues. However, a lot depends on the OEM as well. For example, Intel offers Optane memory, which remembers you frequently access files and programs, resulting in less RAM and better result times.
4. Why do I get a memory management error while installing Windows 10?
One of the most common causes is faulty or incompatible hardware, such as RAM or hard disk issues. The best would be to run a hardware check, and replace whatever is necessary. I everything is alright, you should upgrade your RAM i.e. add more memory to the PC.
Have you ever been working away on your computer when suddenly the dreaded Blue screen of Death (BSOD) appears, telling you there’s been a MEMORY MANAGEMENT error?
Well, you’re not alone. A lot of Windows users are having the same problem.
But the good news is we have five solutions you can try to fix this memory management error.
Try these fixes for the MEMORY MANAGEMENT blue screen error:
Here are 7 fixes for you to try. You may not have to try them all. Just work your way down the list until you find the one that works for you.
To try these fixes you need to be logged into Windows on the problem computer. If you can’t log into Windows normally, shut down your computer, turn it back on in Safe Mode, then try the fix.
- Update video card driver
- Run Windows memory diagnostic test
- Run a disk check
- Check newly installed software and hardware
- Scan for possible virus infection
- Repair system files
- Final thought
Fix 1: Update the video card driver
A common cause of the MEMORY MANAGEMENT error is a damaged, outdated or incorrect video card driver. And so to fix the error you need to update your video card driver to the most recent correct version.
There are two ways to update the driver: manually and automatically.
Manual driver update – To manually update the driver, head to the video card manufacturer’s website and search for the most recent correct video driver. Unless you’re getting the error on a laptop, in which case you should always go to the laptop manufacturer’s website. The video drivers provided by the chipset or hardware manufacturer may not include the customized features.
Automatic driver update – If you don’t have the time, patience, or computer skills to update your drivers manually, you can do it automatically with Driver Easy. Driver Easy will automatically find the correct driver for your video card, download it, and install it correctly. You don’t need to know exactly what system your computer is running, you don’t need to risk downloading and installing the wrong driver, and you don’t need to worry about making mistakes when installing.
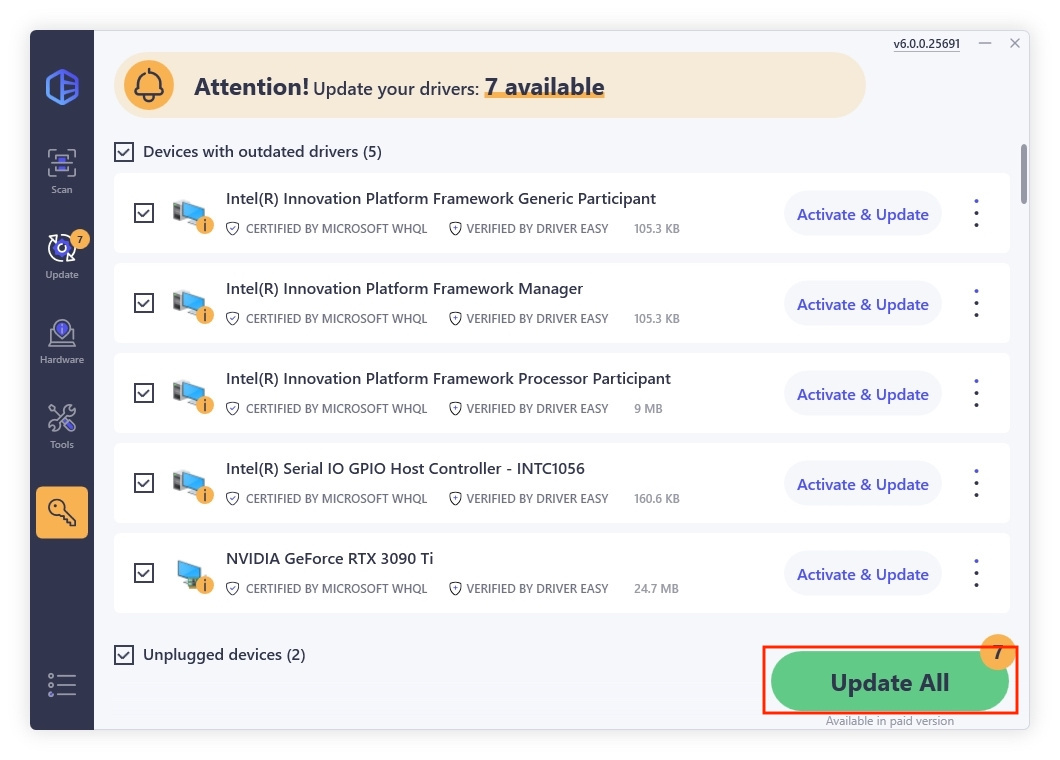
You can update your drivers automatically with either the 7 days free trial or the Pro version of Driver Easy. It takes just 2 clicks, and you get full support and a 30-day money-back guarantee with the Pro version:
- Download and install Driver Easy.
- Run Driver Easy and click the Scan Now button. Driver Easy will then scan your computer and detect any problem drivers.

- Click the Activate & Update button next to the flagged device to automatically download and install the correct version of this driver.
Or click Update All to automatically download and install the correct version of all the drivers that are missing or out of date on your system (You’ll need the Pro version for this – when you select Update All, you’ll get a prompt to upgrade. If you’re not prepared to purchase the Pro version yet, Driver Easy provides a 7-day trial at no cost, granting access to all Pro features like fast downloads and easy installation. No charges will occur until after your 7-day trial period ends.)

- After updating, restart your computer to take effect.

If you don’t get any more MEMORY MANAGEMENT errors, then you’ve found the culprit. But if the BSODs keep happening, here’s another solution you can try…
Fix 2: Run Windows memory diagnostic tool
The fact your computer is having a problem with memory management could mean there’s a problem with its Random Access Memory (RAM).
Fortunately, Windows comes with a tool that can test your RAM and let you know if there are any issues with it. Here’s how to use it.
To see if this is also your case, you can run the built-in Windows Memory Diagnostic tool:
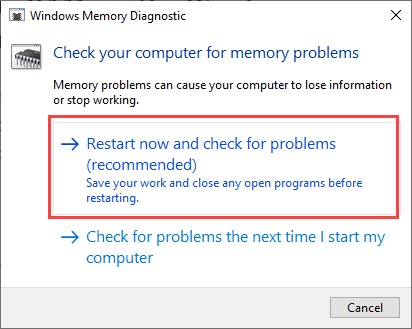
- Press the Windows logo key and R on your keyboard to invoke the Run box.
- Type mdsched.exe, then click OK.
- Click Restart now and check for problems (recommended).
IMPORTANT: Make sure to save all your work before restarting.

- Windows will run diagnosis automatically, which can take a few minutes. When it’s finished, your PC will reboot.
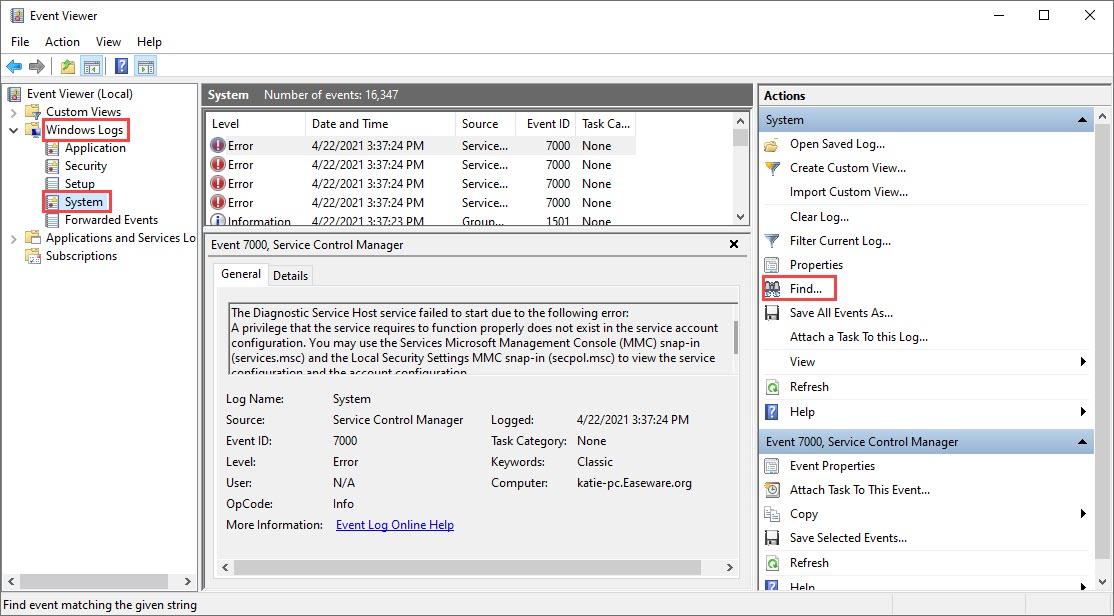
- The results will be shown on your desktop. If you don’t see any notification, right-click the Start menu then click Event Viewer.
- Click Windows Logs >> System >> Find.

- Type memory diagnostic, then click Find Next.

- If you see “no errors”, your RAM is functioning well and is not the culprit to the Memory Management blue screen of death error. Then please move on to the next method.

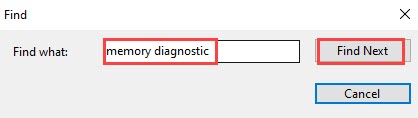
If you do see an error, you may consider replacing your RAM sticks. You will need to check if your device is still under warranty or consult your machine’s manufacturer for assistance if you’re not tech-savvy enough to do this on your own.
This means you should now try the next fix…
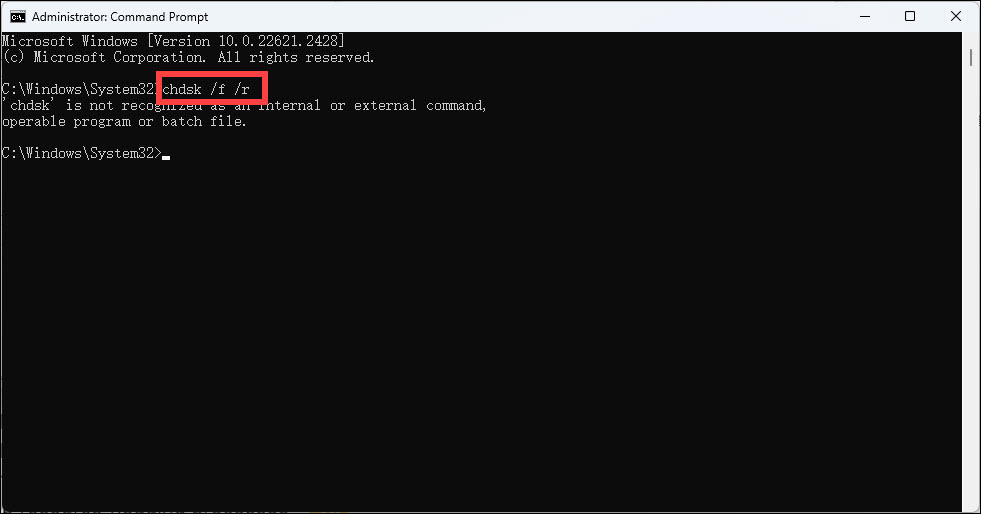
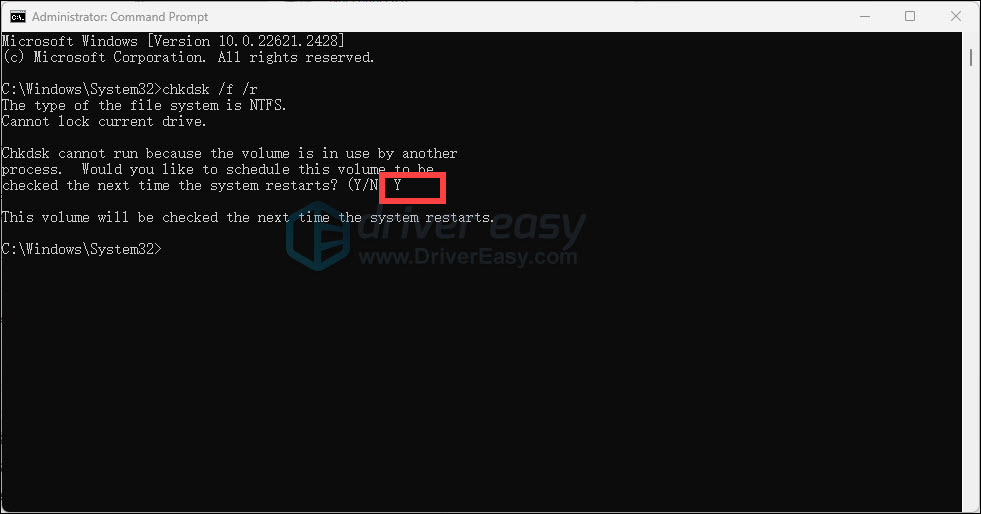
Fix 3: Run a disk check
The BSOD error could also be caused by a corrupted NTFS volume. Here’s how to resolve the problem.
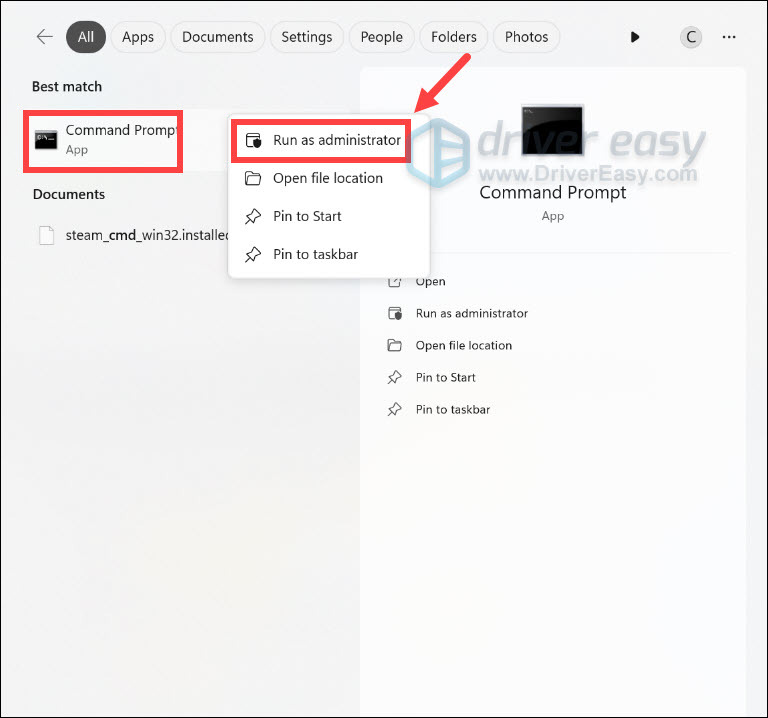
- On your keyboard, hold down the Windows logo key and press the S key to bring up the search box, and type cmd.
- Right-click Command Prompt and select Run as administrator.

- Type chkdsk /f /r, and press Enter on your keyboard.

- When asked “Would you like to schedule this volume to be checked next time the system restarts?”, press Y.
- Exit the Command Prompt and restart your computer.
If that fixed the problem, great. But if not, here’s what to try next…
Fix 4: Check newly installed software and hardware
Have you installed any new hardware or software recently? If any of them are incompatible with your operating system or conflicting with your other programs, they could be triggering the error, and you should uninstall them to see.
If that doesn’t resolve the problem, there’s still one more thing you can try…
Fix 5: Scan for a virus infection
In some rare cases, the MEMORY MANAGEMENT blue screen of death error could be caused by a virus.
If you haven’t scanned your computer for viruses with your antivirus program, do it now.
If you don’t have a third-party antivirus program installed, use the one that comes with Windows—Windows Defender.
Fix 6: Repair system files
The MEMORY MANAGEMENT blue screen of death error may be related to system files. When the system files were broken or corrupted, it may cause a Blue screen issue.
1) On your keyboard, press the Windows logo key and R at the same time. Type cmd and press Ctrl+Shift+Enter at the same time to run Command Prompt as administrator.
Click Yes when prompted for permission to make changes to your device.
2) In the Command Prompt window, copy and paste the following command and hit Enter.
sfc /scannow
3) System File Checker will then scan all system files and repair any corrupted or missing ones it detected. This may take 3-5 minutes.
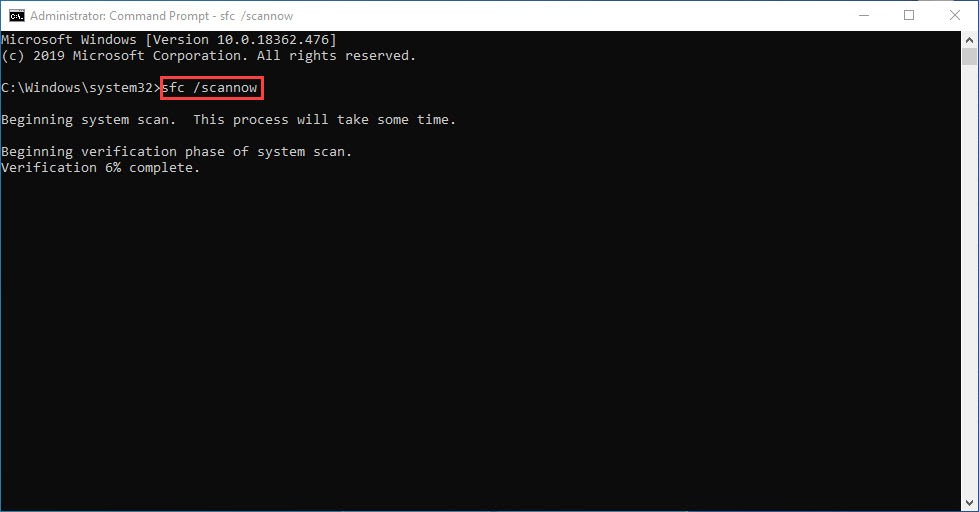
4) Restart your computer to check whether the blue screen issue is fixed or not.
If the result indicates there are broken files but SFC can’t fix them, you can turn to DISM to see if it helps:
1) On your keyboard, press the Windows logo key and R at the same time. Type cmd and press Ctrl+Shift+Enter to run Command Prompt as administrator.
Click Yes when prompted for permission to make changes to your device.
2) In the Command Prompt window, copy and paste the following commands and hit Enter after each line:
dism.exe /online /cleanup-image /scanhealth
dism.exe /online /cleanup-image /restorehealth
2) When the process finishes:
- If the DISM tool gives you errors, you can always try this command line. This will take up to 2 hours.
dism /online /cleanup-image /startcomponentcleanup
- If you get Error: 0x800F081F, reboot your computer, then open Command Prompt as administrator again (step 1) and run this command line instead:
Dism.exe /Online /Cleanup-Image /AnalyzeComponentStore
When these tests are done, restart your computer to see if the MEMORY MANAGEMENT error remains. If the problem still persists, please move on to the next fix.
Last resort
If none of the above helps to fix the the MEMORY MANAGEMENT blue screen of death error, you may need to consider a Windows reset: it wipes out all software incompatibilities and problems, it’s also the rule of thumb in telling a software problem from a hardware one: if the problem remains even after a system reset, then it’s definitely a hardware problem.
To reinstall or reset your computer, here’s a post for your reference: Reinstall/Reset Windows 10 [Step By Step]
If the blue screen problem remains not working even after a reset, then the next thing you should do is seek help from a hardware technician to see if your hardware components (the motherboard or the memory sticks) are at fault.
If you’re interested in knowing more about memory management…
What is memory management?
In a nutshell, memory management is the process that manages memory usage in your computer.
It keeps track of every byte of memory in your computer, and whether it’s free or being used. It decides how much memory to allocate to certain processes (including the programs you launch), and when to give it to them. It also ‘frees up’ memory when you close a program by marking it as available to be used by something else.
But like all processes running on your computer, sometimes it can crash. And when it does, you’ll probably see the MEMORY MANAGEMENT error message soon after.
Why would I have the MEMORY MANAGEMENT BSOD error?
According to Microsoft, the Memory Management blue screen of death error appears when there’s been a severe memory management error.
Sounds horrible, doesn’t it? But don’t worry – it’s not fatal.
Tools such as WhoCrashed and BlueScreenView can help you figure out what’s causing the horrifying BSOD on your computer. But chances are it will be one of these:
- software or hardware conflict
- virus infection
- faulty video driver
- faulty memory
- disk errors
- corrupted system files
Hope this post meets your needs. If you have any questions or suggestions, welcome to leave comments.