
Общепринятые практики информационной безопасности требуют обязательной блокировки экрана компьютера при неактивности пользователя. Пользователь Windows может самостоятельно заблокировать экран компьютера (сочетанием клавиш Win+L). Но лучше внедрить групповую политику, которая обеспечит автоматическую блокировку экрана при бездействии на всех компьютерах домена.
Содержание:
- Включить блокировка компьютера при неактивности с помощью групповой политики
- Групповая политика с настройками скринсейвера для блокировки экрана пользователя
Включить блокировка компьютера при неактивности с помощью групповой политики
На уровне безопасности компьютера можно включить политику, которая требует от любого пользователя повторно выполнить аутентификацию (ввести пароль) после заданного периода неактивности.
-
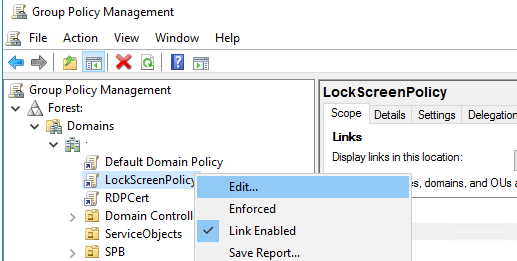
- Откройте консоль управления доменными политиками Group Policy Management console (
gpmc.msc
), создайте новый объект GPO (LockScreenPolicy) и назначьте его на корень домена (или на OU с компьютерами на которых вы хотите применить политику блокировки);
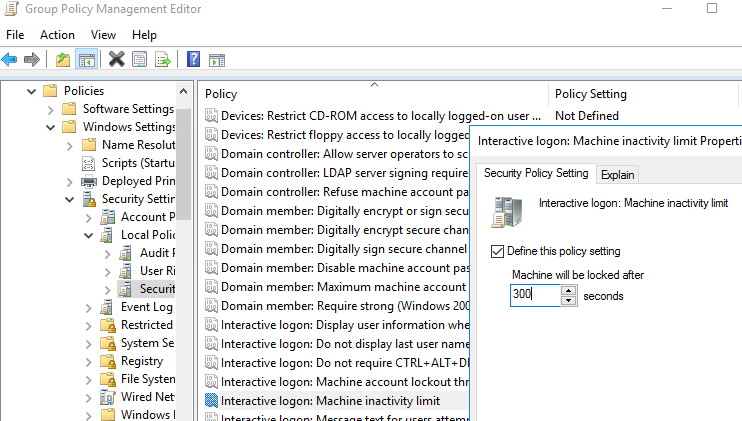
- Перейдите в раздел Computer Configuration -> Policies-> Windows Settings -> Security Settings -> Local Policies -> Security Options;
- В параметре Interactive logon: Machine inactivity limit задайте через сколько секунд неактивности нужно заблокировать компьютер. Например, чтобы блокировать компьютер через 5 минут, задайте здесь 300;
- Для применения новых настроек групповых политик нужно перезагрузить компьютеры. Теперь ваши компьютеры будут автоматически блокироваться после неактивности, отключения дисплея (задается в настройках электропитания, или при запуске скринсейвера).
- Откройте консоль управления доменными политиками Group Policy Management console (
Эта GPO изменяет значение параметра реестра InactivityTimeoutSecs в ветке HKLM\Software\Microsoft\Windows\CurrentVersion\Policies\System. Если значение этого параметра – 0, значит рабочий стол компьютера не будет блокироваться.
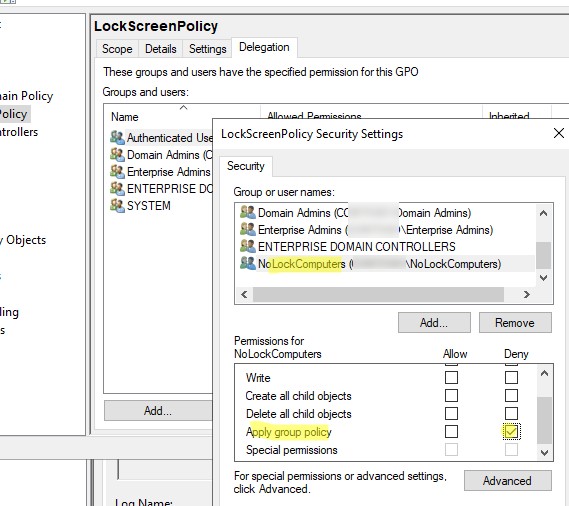
С помощью GPO Security Filtering вы можете задать список компьютеров, на которые не применяется политика блокировки экрана.
- Создайте в AD группу безопасности NoLockComputers и добавьте в нее учетные записи компьютеров, которые не должны блокироваться;
- В консоли GPMC выберите вашу политику, перейдите на вкладку Delegation и нажмите кнопку Advanced;
- Добавьте группу безопасности, которую вы создали, и задайте для нее Deny в поле Apply group policy;

- Теперь экраны компьютеров в этой группе не будет блокироваться автоматически.
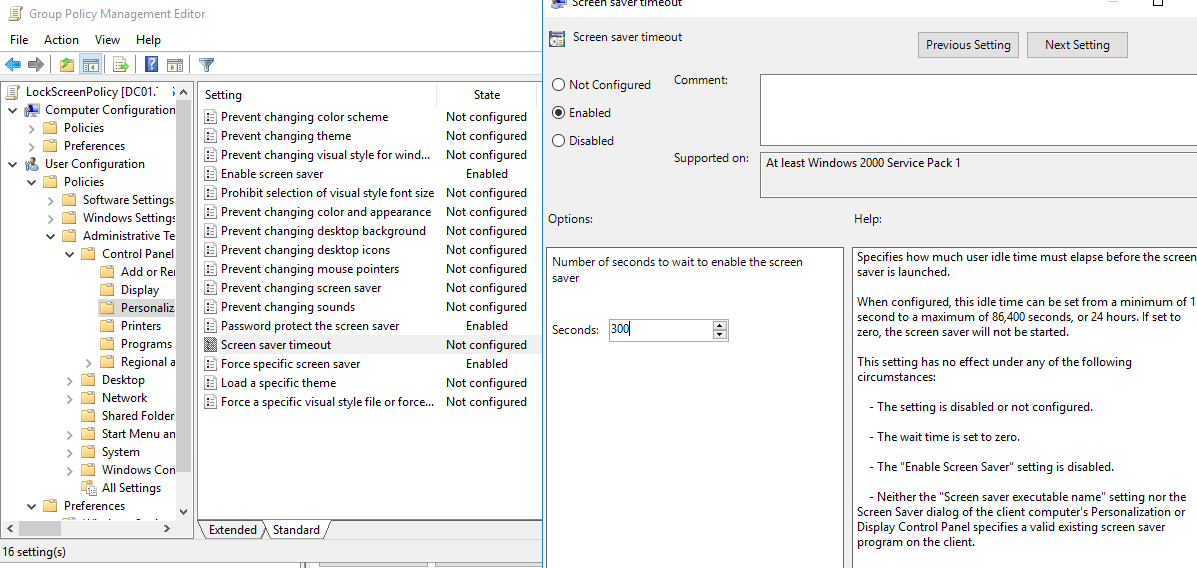
Групповая политика с настройками скринсейвера для блокировки экрана пользователя
С помощью параметров скринсейвера Windows можно также внедрить политику автоматической блокировки экрана у пользователей. Такую политику можно применить на пользователей (а не на компьютеры).
- Создайте GPO и назначьте ее на OU с учетными записями пользователей;
- Отредактируйте политику и перейдите в User Configuration -> Policies -> Administrative Templates -> Control Panel -> Personalization (Конфигурация пользователя -> Политики -> Административные шаблоны -> Панель управления -> Персонализация);
- В этом разделе GPO есть несколько параметров для управления экранной заставкой и настройками блокировки экрана:
- Enable screen saver — включить экранную заставку;
- Password protect the screen saver — требовать пароль для разблокировки компьютера;
- Screen saver timeout – через сколько секунд неактивности нужно включить экранную заставку и заблокировать компьютер (чтобы автоматически блокировать экран через 5 минут, укажите здесь 300);
- Force specific screen saver – можно указать файл скринсейвера, которые нужно использовать. Чаще всего это
scrnsave.scr
( подробнее о настройке экранной заставки с помощью GPO); - Prevent changing screen saver – запретить пользователям менять настройки экранной заставки.
- Дождитесь обновления настроек групповых политик на клиентах или обновите их вручную командой (
gpupdate /force
). - После этого настройки экранной заставки и блокировки экрана станут недоступными для изменения, а сессия пользователя будет автоматически блокироваться после 5 минут неактивности и запускаться пустая экранная заставка. Настройки блокировки будут применяться как к консольным сессиям пользователей, так и к RDP сеансам на RDS серверах.
Чтобы разблокировать компьютер, пользователю нужно нажать Ctrl+Alt+End, щелкнуть по экрану или нажать любую клавишу (в зависимости от версии Windows) и ввести пароль.
Если вам нужно настроить разные параметры блокировки экрана для разные групп пользователей, можно использовать GPO Security Filtering (как указано выше), или внедрять параметры блокировки через реестр. Например, для офисных работников нужно блокировать экран через 10 минут, а на компьютерах операторов производства экран не должен блокироваться никогда
Рассмотренным выше политикам соответствуют следующие параметры реестра в ветке HKEY_CURRENT_USER\Software\Policies\Microsoft\Windows\Control Panel\Desktop:
- Password protect the screen save – параметр типа REG_SZ с именем ScreenSaverIsSecure = 1;
- Screen saver timeout – параметр типа REG_SZ с именем ScreenSaveTimeout = 300;
- Force specific screen saver – параметр типа REG_SZ с именем ScreenSaveActive = 1 и SCRNSAVE.EXE = scrnsave.scr.
Вы можете с помощью GPO распространить нужные значения параметров реестра на разные группы пользователей.
Создайте в домене группу пользователей ( SPB-not-lock-desktop ), для которых нужно отменить действие политики блокировки и наполните ее пользователями. Создайте в секции GPO (User Configuration -> Preferences -> Windows Settings -> Registry рассмотренные выше параметры реестра). Для каждого параметра с помощью Item Level Targeting укажите, что политика не должна применяться для определенной группы безопасности (the user is not a member of the security group SPB-not-lock-desktop).
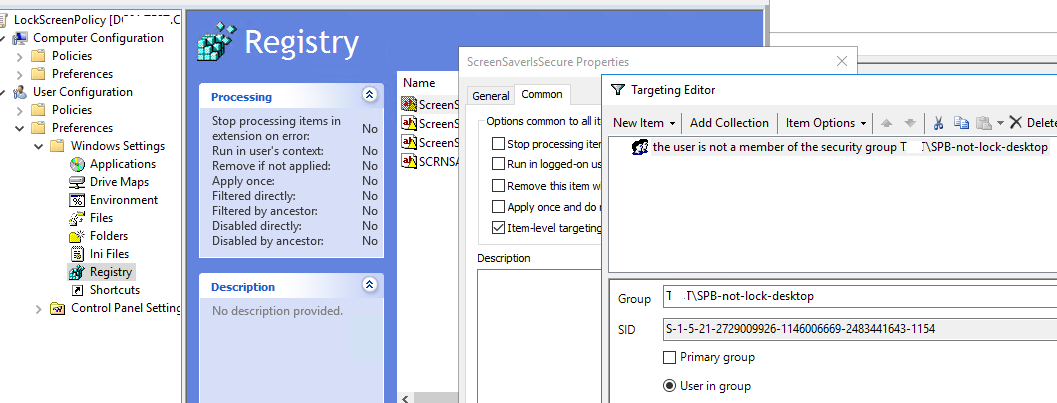
Также придется создать еще 4 параметра реестра со значениями REG_SZ 0, которые принудительно отключают блокировку экрана для группы SPB-not-lock-desktop (иначе, политики не будут перезатирать установленные ранее значения).
Windows 10 comes with lock screen image that can be customized in control panel. Just like wallpaper, there is a centralized way to control the lock screen image which is using Group Policy. In a managed domain like corporate environment, they typically would want to show company-branded image or a disclaimer on the computer lock screen. In this post, we will show how to change the default lock screen image using GPO that applies for Windows 10 computers.
This example below will demonstrate how to change the default lock screen image in client PC running Windows 10 Enterprise or Education editions. Client PC is joined to the domain asaputra.com with domain controller installed in Windows Server 2012 R2 named asaputra-dc1. Image file used for lock screen is named LockscreenMBG.jpg and saved in a shared folder in the DC with UNC path \\asaputra-dc1\DomainShared\LockscreenMBG.jpg.
1. Ensure the image file is accessible
Make sure that the targeted users has at least read access on the folder sharing properties and able to see the image file.

2. Creating the Group Policy Object
In this example, a new policy object named “Global Branding” is created on the Group Policy Management Console.
The setting that we must apply is named “Force a specific default lock screen image” and it is located at Computer Configuration > Policies > Administrative Templates > Control Panel > Personalization. Double click the setting name to configure it.

3. Specify the lock screen image location
After set it to Enabled, type the network path where the image file resides.

4. Apply the GPO to Computer OU
Since the policy applies to computer, then we must link the GPO to the OU where the computer is resides.
5. Verify the result on client computer
When the policy is refreshed, you can try signing out or lock the computer to see the new lock screen image being applied.
Before

After

Troubleshooting Tips
We can always force the GPO to update right away by using command gpupdate /force on command prompt. When this GPO is applied successfully it will create a registry value named LockScreenImage in HKLM\Software\Policies\Microsoft\Windows\Personalization containing the image file path.

If the path and file name is correct and accessible, then lock screen image will be applied without problem. And that’s how to change the default lock screen image using GPO.
The following two tabs change content below.
- Bio
- Latest Posts
I am IT practitioner in real life with specialization in network and server infrastructure. I have years of experience in design, analysis, operation, and optimization of infrastructure solutions for enterprise-scaled network. You can send me a message on LinkedIn or email to arranda.saputra@outlook.com for further inquiry regarding stuffs that I wrote or opportunity to collaborate in a project.
In this guide, you will learn how to use group policy to create a lock screen policy. In addition, I’ll show you how to disable (exclude) the lock screen policy from specific users and computers.
In this example, I’ll create a policy that locks the screen after 15 minutes of activity. You can change the timeout settings to whatever meets your needs. This guide will work on Windows 10, Windows 11, Server 2012, and later operating systems.
Table of Contents
- How to Enable Lock Screen GPO
- Step 1. Determine GPO Location
- Step 2. Create a New GPO
- Step 3. Apply the Lock Screen GPO
- How to Verify the Lock Screen GPO is Applied
- How to Disable the Lock Screen for specific computers
How to Enable Lock Screen GPO
Step 1. Determine GPO Location
The lock screen policy is a computer policy, this means anyone who logs into the computer will get the lock screen policy applied. Later I will show you how to exclude specific computers from the policy.
It’s best to apply this policy to all computers but there will always be exceptions. I’ve had requests to exclude conference room computers, computers that are used for 24/7 monitoring, then of course there are always a few users that complain and want it disabled. These requests should all be approved by upper management.
Depending on your OU structure you could apply the GPO to the root and let the sub OUs inherit the policy or you could apply the policy to specific OUs.

In this example, I want the policy to apply to all computers so I’m going to link the GPO to my ADPRO Computers OU. All the sub-OUs will inherit the policy. In step 4, I’ll show you how I exclude specific computers from the policy.
Step 2: Create a New GPO
Do not add these settings to the default domain policy. It is group policy best practice to not modify the default domain policy and instead create a new one.
1. Open the group policy management console
2. Right Click “Group Policy Objects” and click new
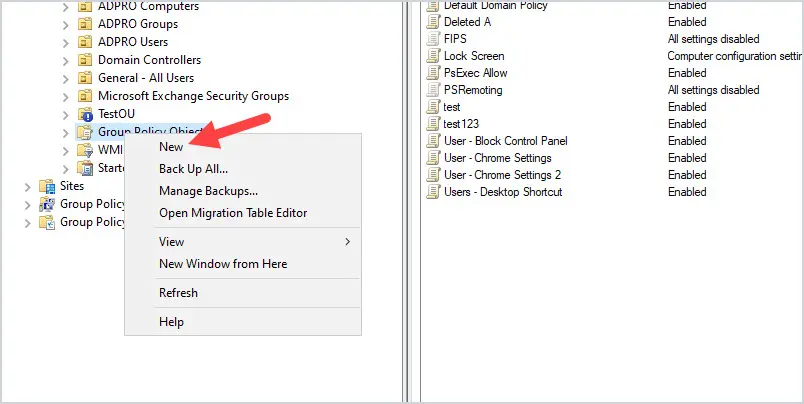
Give the new GPO a name. For example, I named my GPO “Computer – Lock Screen”.

The GPO is created but now we need to set the idle timeout settings.
There is only one group policy setting that needs to be set. It is the “Interactive Logon: Machine inactivity limit”
Browse to -> Computer Configuration -> Windows Settings -> Security Settings -> Local Policies -> Security Options
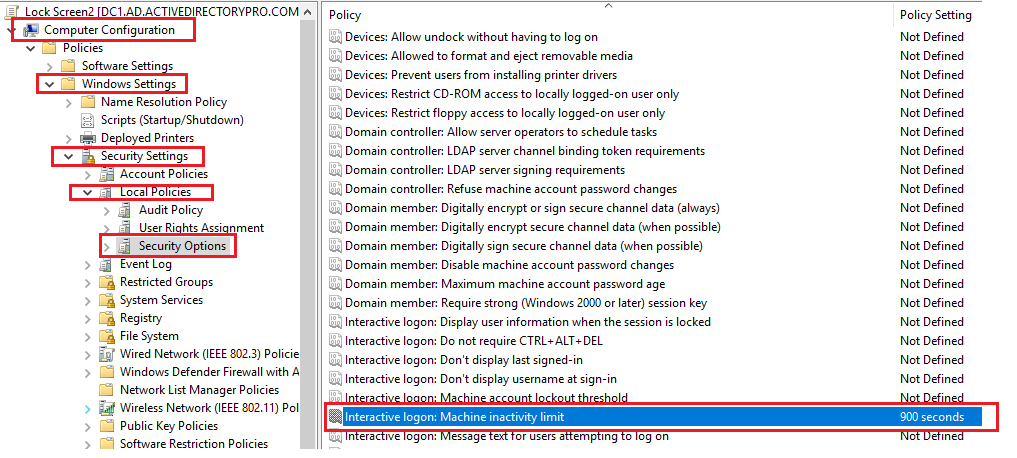
Change the value to whatever you want. I set mine to 900 seconds which is 15 minutes.
Step 3: Apply the Lock Screen GPO
The GPO is created and the policy settings have been enabled. Now you just need to link the GPO to the correct OU.
Since this is a computer policy you must apply the GPO to an OU that contains computer accounts. If you apply the GPO to an OU with users only the lock screen will not work.
1. In the group policy management console right-click an OU and select “Link an Existing GPO:
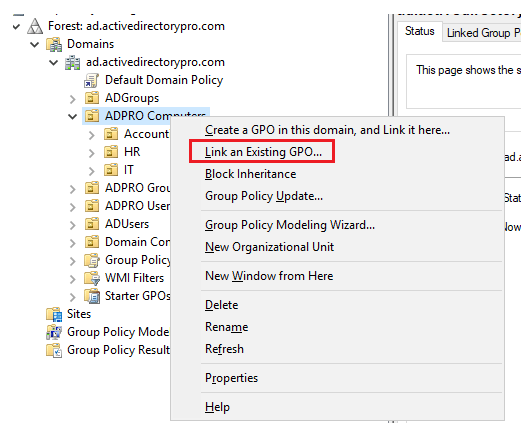
2. Select the GPO you created in step 2 and click OK.
The GPO is now linked.
The GPO refresh interval is 90 minutes on a computer. So keep in mind it could take up to 90 minutes before this policy gets applied to all computers. You can instantly refresh this by rebooting the computer or running the gpupdate /force command.
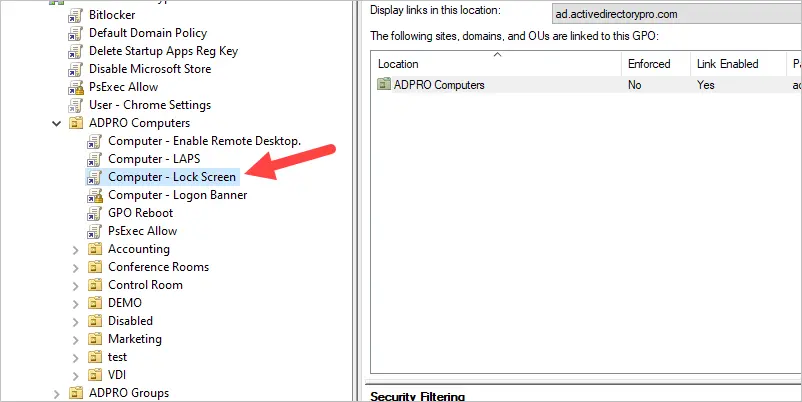
Above is a screenshot showing the GPO linked to my ADPRO Computers OU. All of the sub-OUs will inherit this policy. So computers in the Accounting, HR, and IT OU will get the lock screen GPO applied.
How to Verify the Lock Screen GPO is applied
To verify the GPO is applied to a computer you can use the gpresult /r command. You will need to open the Windows command prompt as administrator or it can fail to pull the computer policies.
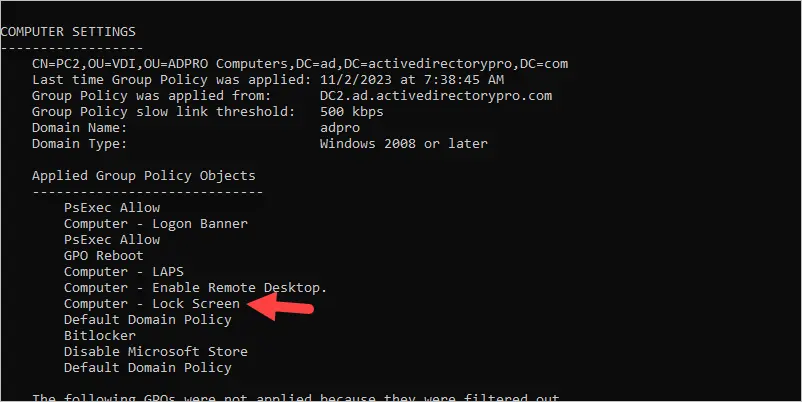
You can see above the “Computer – Lock Screen” GPO is applied to this computer.
How to Disable the Lock Screen for Specific Computers
Let’s say you have the lock screen GPO applied to all computers but now you need to disable it on specific computers.
There are two options:
- Option 1: Move the computers into a new OU and not link the GPO to this OU. This works and I’ve used this method for several clients.
- Option 2: Create a security group, add the computers, and deny the policy from applying to this group. This is my preferred method as I think it prevents moving computers around between OUs.
I’m going to show you option 2.
1. Create a security group and add the computers that you want the lock screen policy disabled on. It’s very important to name the group with a descriptive name and use the description box.

2. Go into the group policy management console, select the GPO click the delegation tab then click Advanced.
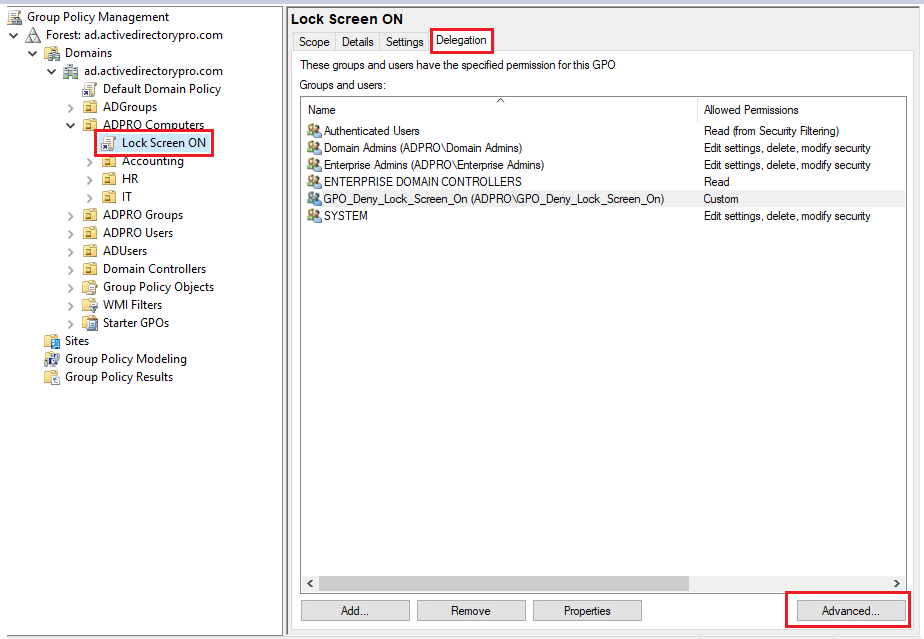
4. Add the security group and click ok
5. Make sure Read is set to “Allow” and Apply group policy is to “Deny”.
That should do it. The computers in your deny group will need to be rebooted.
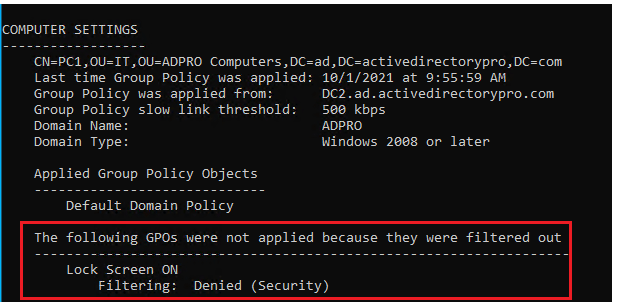
When you check a computer with the gpresult /r command the policy will show as denied
To deny any additional computers all you have to do is add them to the security group. I find this method more convenient than moving computers around to different OUs.
Download a free trial and create your own GPO reports.
Enforcing the lock screen on company computers is a very common requirement. Any company that gets audited will always get asked if this policy is in place, regardless it’s a good policy to have in place. Have fun with those exclusions.
Related Articles
- Remove Local Admins Rights with Group Policy
- Restrict Control Panel Access using Group Policy
- Important Group Policy Settings for Security
In this blog post, we will explore how to set a custom desktop wallpaper and lock screen background image using group policy on Active directory domain joined computers including laptops with intermittent network connectivity and those who connect to the corporate network occasionally via VPN. For this setup, we will require:
- Desktop and Lock Screen Wallpaper files in JPEG or JPG format.
- Wallpaper files copied to SYSVOL folder on one of the domain controllers.
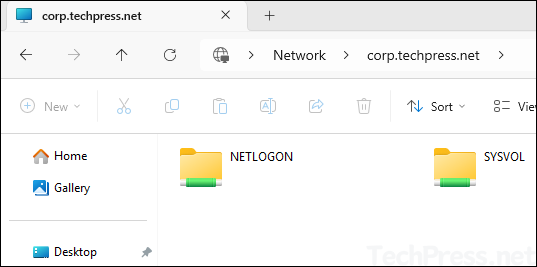
By default, all domain users have read permissions on SYSVOL folder and it’s accessible from all domain joined computers. You can also use NETLOGON folder instead of SYSVOL.
Contents
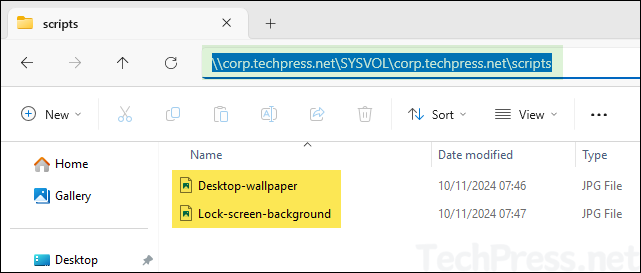
Prepare desktop and lock screen wallpaper files in JPEG or JPG format. For demonstration purpose, I have created two files Desktop-wallpaper.jpg and Lock-screen-background.jpg.
2. Copy Wallpaper files to SYSVOL folder
Next step is to copy wallpaper files to the SYSVOL folder on one of the Active directory domain controllers. To copy the files, follow below steps:
- Login to one of the Domain controllers.
- Go to the location \\<domain name\SYSVOL\domain name\scripts and paste the wallpaper files.
3. Create a Group Policy
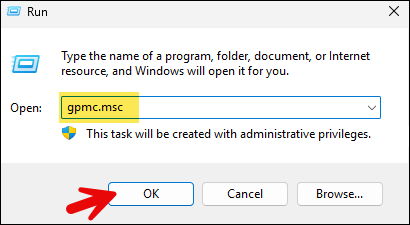
- Open Group policy management console (gpmc.msc).
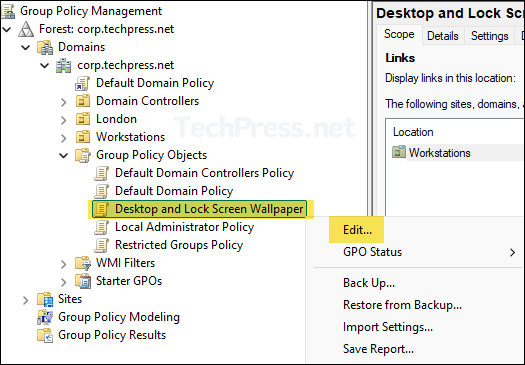
- Create and Edit a Group Policy. I have already created a group policy called Desktop and Lock Screen Wallpaper. Right-click on it and select Edit. We will be configuring three group policy settings to change desktop wallpaper and lock screen background image on the windows workstations.
3.1. Force a specific default lock screen and logon image
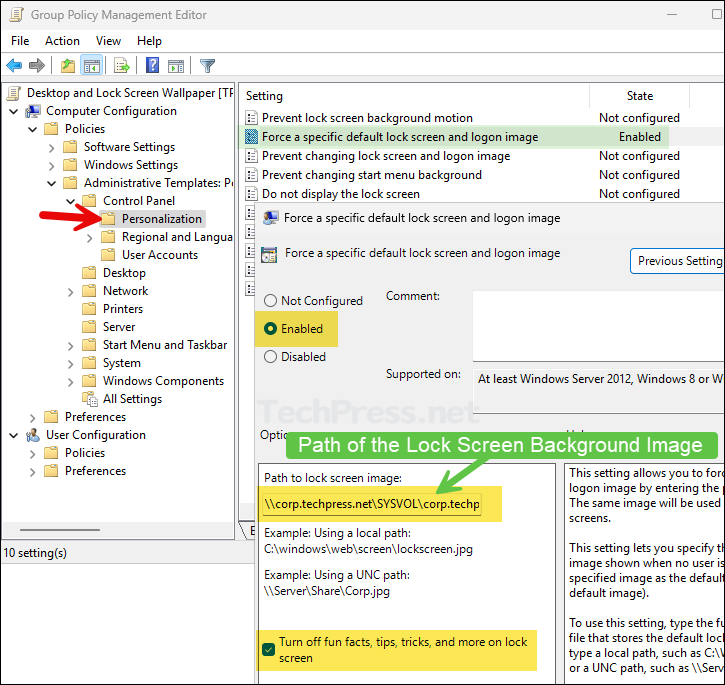
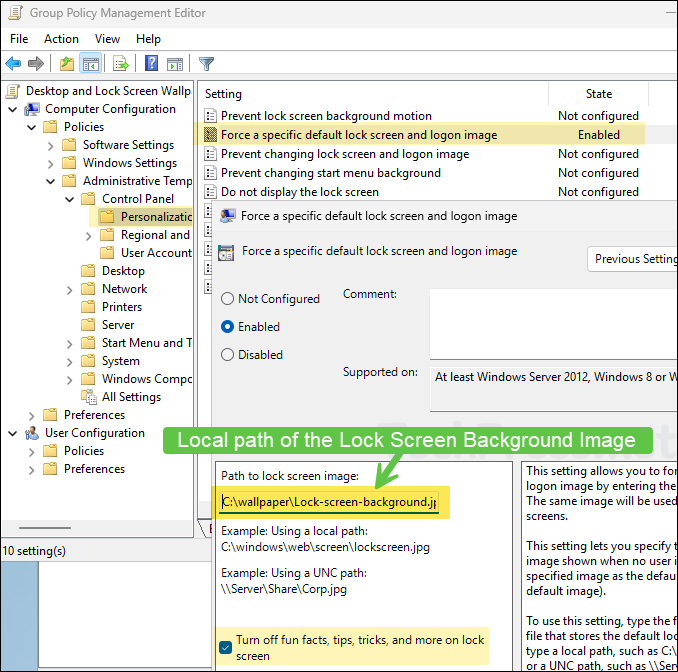
Navigate to the path Computer Configuration > Policies > Administrative Templates > Control Panel > Personalization and Enable Force a specific default lock screen and logon image policy.
- Path to lock screen image: Provide the path of the lock screen image. In our example, we have set the path to \\corp.techpress.net\SYSVOL\corp.techpress.net\scripts\Lock-screen-background.jpg.
3.2. Desktop Wallpaper Setting
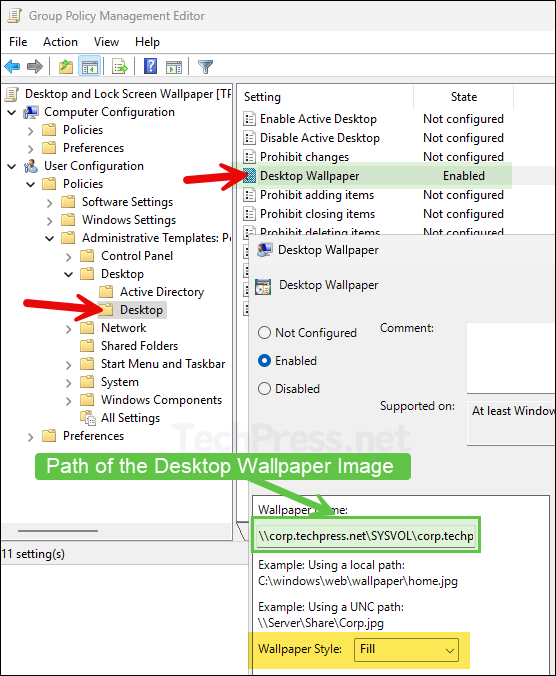
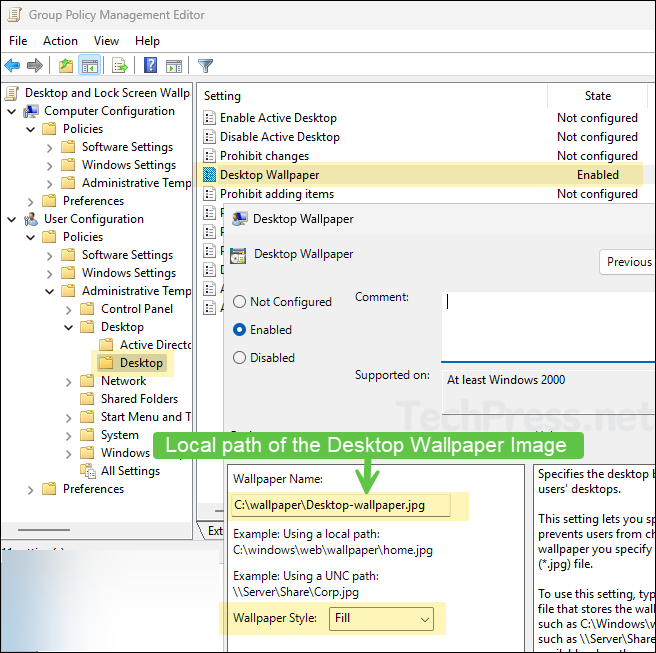
Navigate to the path User Configuration > Policies > Administrative Templates > Desktop > Desktop and Enable Desktop Wallpaper setting.
- Wallpaper Name: Provide the path of the desktop wallpaper image. In our example, we have set the path to \\corp.techpress.net\SYSVOL\corp.techpress.net\scripts\Desktop-wallpaper.jpg.
3.3. Loopback Processing Mode
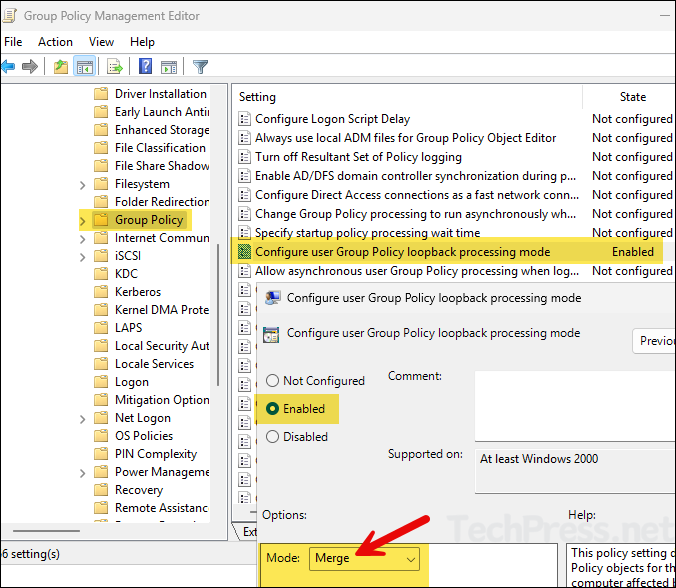
Set the loopback processing mode to Merge by navigating to Computer Configuration > Policies > Administrative Templates > System > Group Policy. Enable the policy setting Configure user Group Policy loopback processing mode and set it to Merge.
4. Add Domain Computers to the Security Filtering
Select the Group Policy and add Domain Computers in the Security Filtering.

5. Link the GPO to Workstations OU
Once you have configured the GPO settings, link it to an OU containing Windows devices. Right-click on the OU and select Link an Existing GPO.
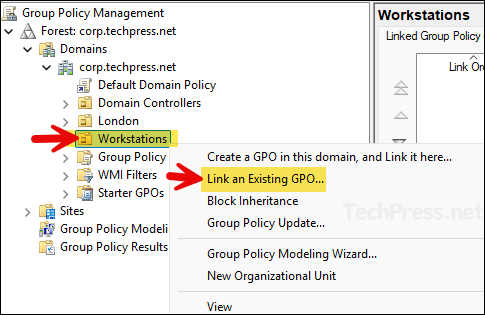
- Select the GPO Desktop and Lock Screen Wallpaper and click on OK to link.
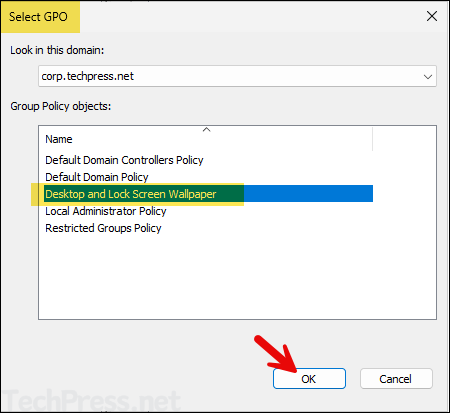
- GPO is now linked to the Workstations OU.
6. Test the Group Policy
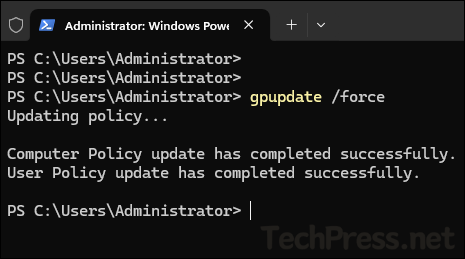
- Login to one of the target Windows client device, open command prompt in admin mode and type
gpupdate /forceand Restart your computer.
- Desktop and Lock screen wallpapers will be set as per the GPO.
By default, group policy refreshes/updates every 90 minutes. To speed up the process, you can open command prompt or PowerShell console in Admin mode and execute
gpupdate /forcecommand.
Verify Desktop and Lock Screen WallPaper Configuration from Registry Editor
Once the desktop and lock screen wallpapers GPO has been applied successfully, it will create registry entries at the following location in the Windows registry editor.
Open Registry editor regedit and Navigate to the following paths:
- For Desktop wallpaper: HKEY_CURRENT_USER\Software\Microsoft\Windows\CurrentVersion\Policies\System. There would be a REG_SZ entry called Wallpaper, which will be set to the path of the Desktop wallpaper image configured in the GPO.
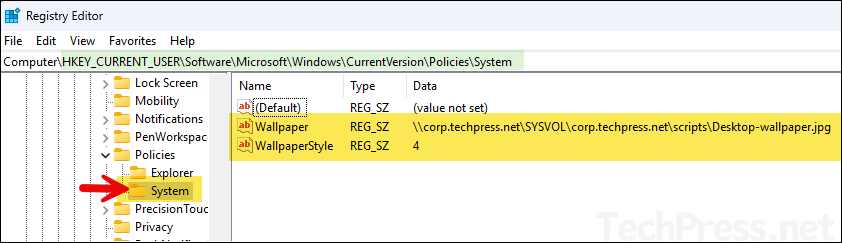
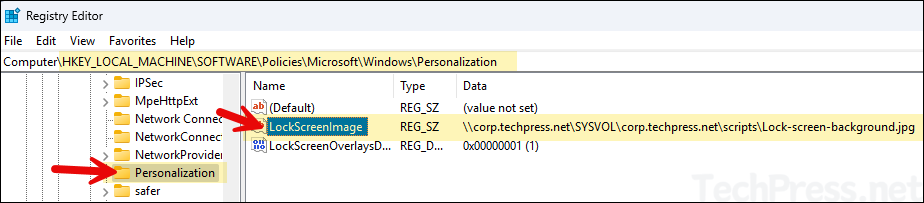
For Lock Screen background: HKEY_LOCAL_MACHINE\SOFTWARE\Policies\Microsoft\Windows\Personalization. There would be a REG_SZ entry called LockScreenImage which will be set to the path of the lock screen image configured in the GPO.
Update Desktop and Lock Screen Wallpaper
Once you have configured desktop and lock screen wallpaper on windows devices, you may want to update them with new wallpaper images in the future. To update the wallpapers, follow below steps:
- Prepare new desktop and lock screen wallpaper images and keep the same name as the one copied in the SYSVOL location.
- Replace the new wallpaper files to overwrite the files at SYSVOL location. If required, you can first take a backup of old wallpaper files before replacing.

- If prompted, Select Replace the files in the destination.
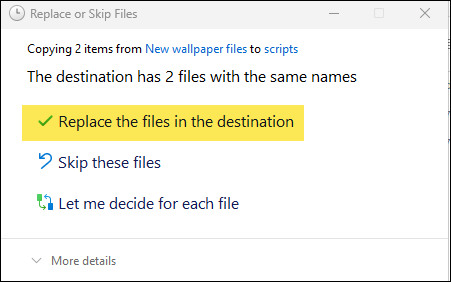
- That’s it! When GPO will refresh next time and users will reboot their devices. New Desktop and Lock Screen Wallpaper Images will be displayed. I have tested the policy for updating both wallpapers and it works fine.
Option 2: Setting Desktop and Lock Screen WallPaper by First Copying Wallpaper files on Client Devices
Previous option to configure desktop and lock screen wallpaper requires windows client devices access to SYSVOL folder. In some cases, if users have intermittent connectivity to the corporate network and does not always have access to SYSVOL folder, desktop and lock screen wallpaper might not set correctly.
Therefore, an alternative approach is to copy the desktop and lock screen image on the client devices first and use the local path of the wallpaper files in the GPO. In this case, even if users does not have access to SYSVOL folder, there will be no issues with desktop and lock screen wallpapers.
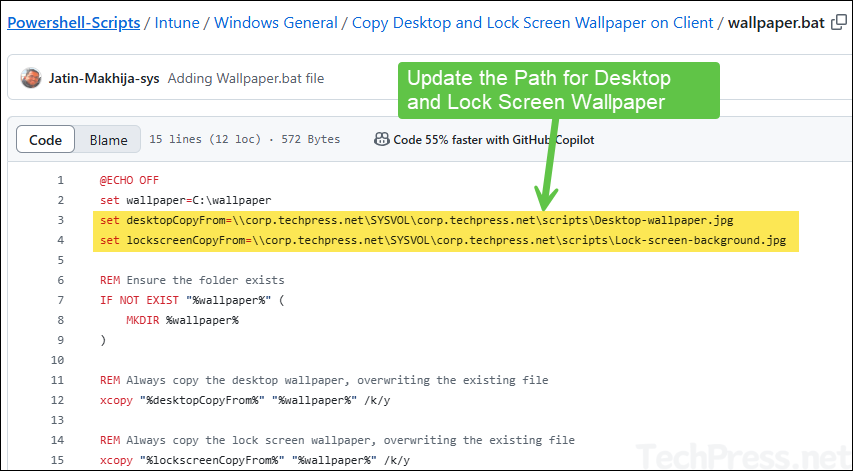
Prepare wallpaper.bat file
- Save Desktop and Lock screen wallpaper files in SYSVOL folder.
- Download wallpaper.bat file from my Github repo.
- Update
desktopCopyFromandlockscreenCopyFromvariables and point it to the desktop and lock screen wallpaper files.
Create a Group Policy
- Create and Edit a Group Policy. I have already created a group policy called Desktop and Lock Screen Wallpaper. Right-click on it and select Edit.
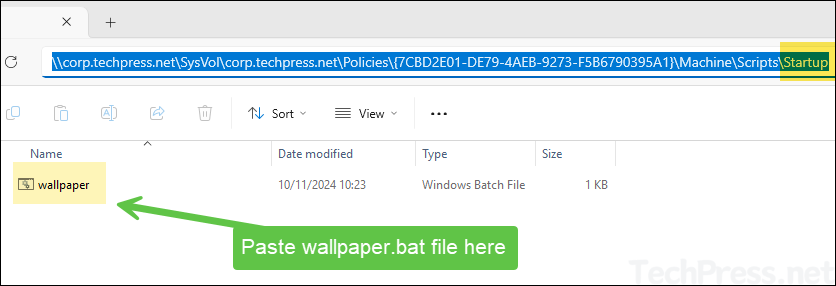
- Navigate to Computer Configuration > Policies > Windows Settings > Scripts.
- Double-click on Startup and click on Show Files button at the bottom.
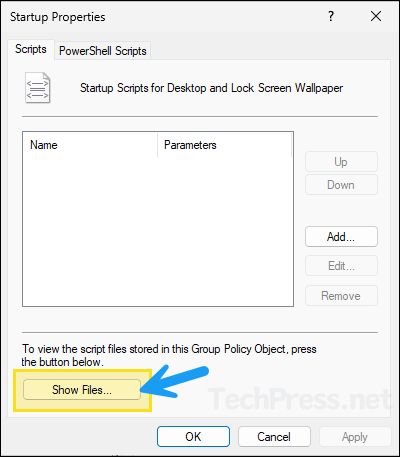
- Copy and Paste wallpaper.bat file in the Startup folder.
- Go back to the Startup Properties settings. Click on Add and then click on Browse button.
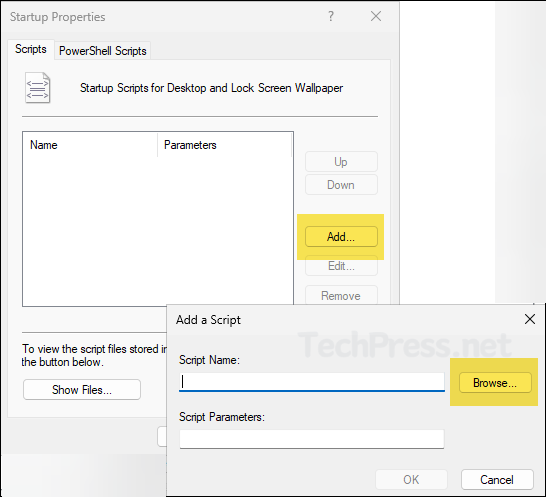
- Select wallpaper.bat file.
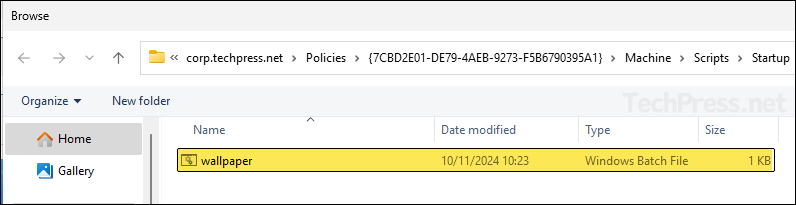
- wallpaper.bat file added.
- Enable Force a specific default lock screen and logon image and set path to lock screen image as c:\wallpaper\<lockscreenimage>.jpg.
- Enable Desktop Wallpaper setting and set Wallpaper name to: C:\wallpaper\<desktopwallpaperimage>.jpg. Configure a Wallpaper Style.
- Enable Configure user Group Policy loopback processing mode and set it to Merge.
Add Domain Computers to the Security Filtering
Select the Group Policy and add Domain Computers in the Security Filtering.
Link the GPO to Workstations OU
Link the GPO to an OU containing Windows computers.
Test the Group Policy
You can wait for group policy refresh or to speed up the testing you can use gpupdate /force command and reboot the client computer. Let’s check the steps:
- Login to one of the target Windows computer.
- Open command prompt as an adminstrator and type gpupdate /force command.
- Reboot the computer and verify if desktop and lock screen wallpapers are set.
Deploy Desktop and Lock Screen Wallpaper (In a VPN Scenario)
Its more challenging to set desktop and lock screen wallpaper for remote users who do not connect to the corporate network very often. This may include the users who are working from home using domain joined windows computers and connect via VPN.
First solution we discussed configures wallpapers using SYSVOL location and In the second solution, we copied wallpaper files using a Startup script. In some cases, you may have Issues with the execution of Startup script and therefore wallpaper files are not copied on the client machine.
Either you can provide wallpaper.bat file to the user so that they can double-click on it and manually Execute it to fetch the wallpapers or you can also create a GPO that will copy Wallpaper. bat file from a shared location accessible from the device on to users desktop or any other location on their device (e.g. c:\temp).
Copy Wallpaper.bat file on Users desktop
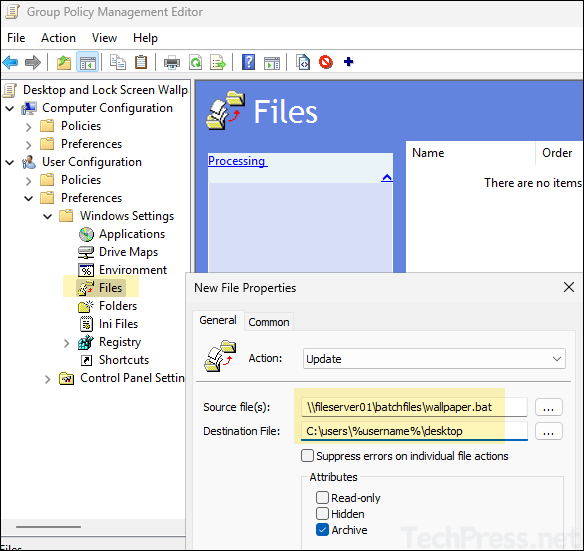
- Create and Edit a Group Policy and navigate to User configuration > Preferences > Windows Settings > Files. Right-click on it > New > File.
- Source file: Provide the location of the wallpaper.bat file which is accessible from client devices. For example: \\corp.techpress.net\SYSVOL\corp.techpress.net\scripts\wallpaper.bat or it could be a shared folder on a file server \\fileserver01\batchfiles\wallpaper.bat.
- Destination file: C:\users\%username%\desktop to copy wallpaper.bat on to users desktop or you can provide c:\temp or any other location which users can easily access.
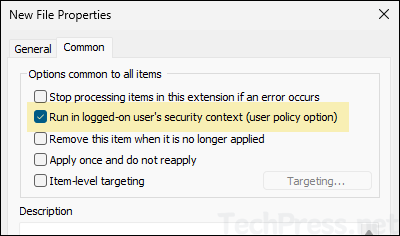
- Under Common tab, select Run in logged-in user’s security context.
Configure Execution of Wallpaper.bat file
To ensure that wallpaper.bat file is executed everytime the device is restarted. You can create an entry in the Run registry location: HKLM\SOFTWARE\Microsoft\Windows\CurrentVersion\Run.
- Go to Computer Configuration > Preferences > Registry > Create a registry Item
- Action: Update
- Hive: HKEY_LOCAL_MACHINE
- Key Path: /SOFTWARE\Microsoft\Windows\CurrentVersion\Run
- Value Name: Wallpaper
- Value type: REG_SZ
- Value data: C:\users\%username%\desktop\wallpaper.bat
- Make sure to enable Configure user Group Policy loopback processing mode and set it to Merge in the same GPO.
Group Policy Troubleshooting
If there are any issues with the GPO, you can follow below steps to troubleshoot.
- Ensure that the domain controllers are replicating fine. To force AD replication, open the command prompt as an administrator on a domain controller and run repadmin /syncall /APed.
- Run
gupdate /forcecommand on the workstation to force sync any policy changes.
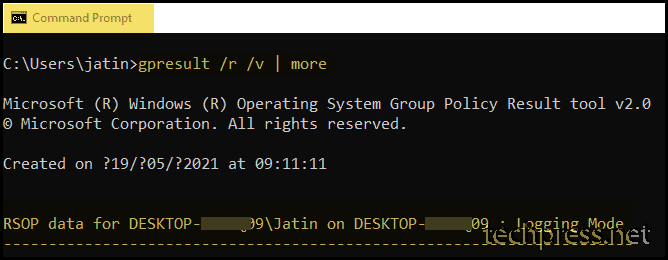
- Run the command gpresult /r /v | more to get a list o policies applied on the computer. This will only show user configuration policy settings.
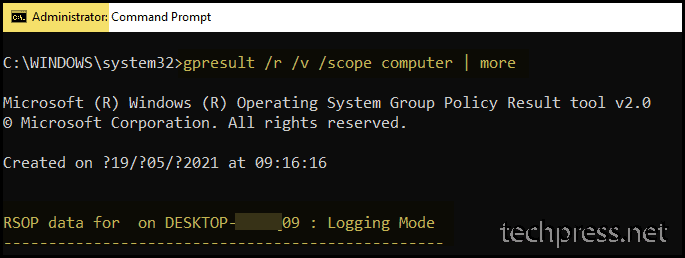
- To check the computer configuration policy, open the command prompt as an administrator and run the command gpresult /r /v /scope computer | more.
Gpresult User Configuration Policy
Gpresult Computer Configuration Policy
Read Next
If you are a small business or a company that is licensed for Window 10 Professional as opposed to Windows 10 Enterprise, there are some major differences in functionality. Particularly, enterprise functionality. In this post, we are going to talk about a simple Group Policy Object (GPO) to set the Windows 10 Lock Screen. There is an actual GPO to set the lock screen on your Windows 10 desktops (if you are licensed and running Windows 10 Enterprise as your desktop operating system). However, if you are running Windows 10 Professional, this policy will not work!
However, there is a way to configure Windows lock screen on Windows 10 Professional computers. This can be done by changing the proper registry keys.
Why would anyone want to change the Windows 10 lock screen via GPO anyway? Well, on occasion, your Marketing/HR teams might want to communicate specific events via a Windows 10 lock screen image. For example, they might want to remind associates to enroll for their benefits or maybe the company wants to display the company goals or perhaps it might be something as simple as display the company logo and colors. Whatever the reason, you can do this WITHOUT having Windows 10 Enterprise as your operating system.
Below are the instructions for setting and deleting the group policy that controls the lock screen.
Group Policy Name = Lock_Windows_Screen_Mktg
Configuration (User/Computer) = Computer
Steps to push Enable Lock Screen with new image
- Copy the image to a central repository that everyone has READ permissions. Ideally, you’d like to use DFS to distribute the image to local servers throughout your organization. (i.e. \\server\images\lockscreen,jpg)
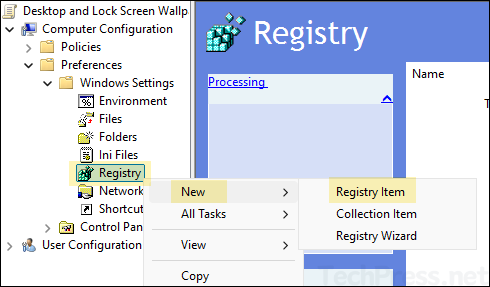
- Create the GPO, name it whatever you want (i.e. Lock_Windows_Screen_Mktg). This will be a Computer GPO. In Computer Configuration, navigate to Preferences/Windows Settings/Registry
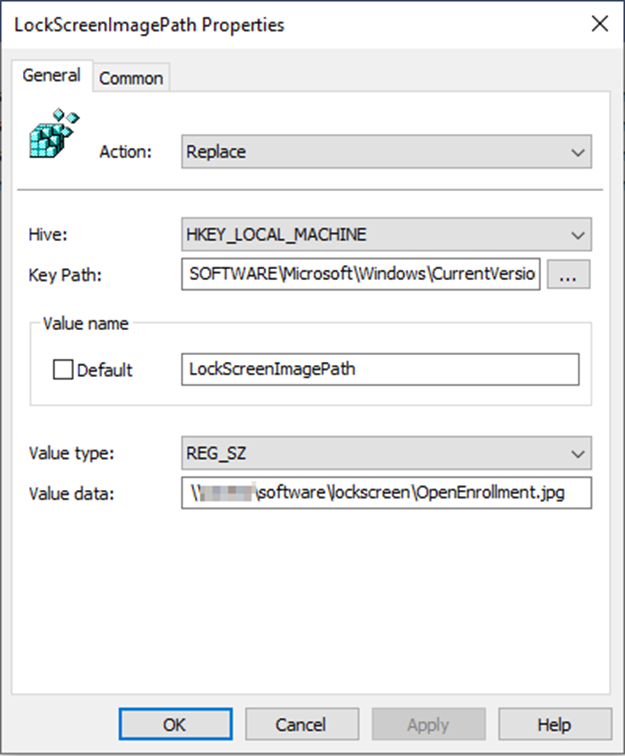
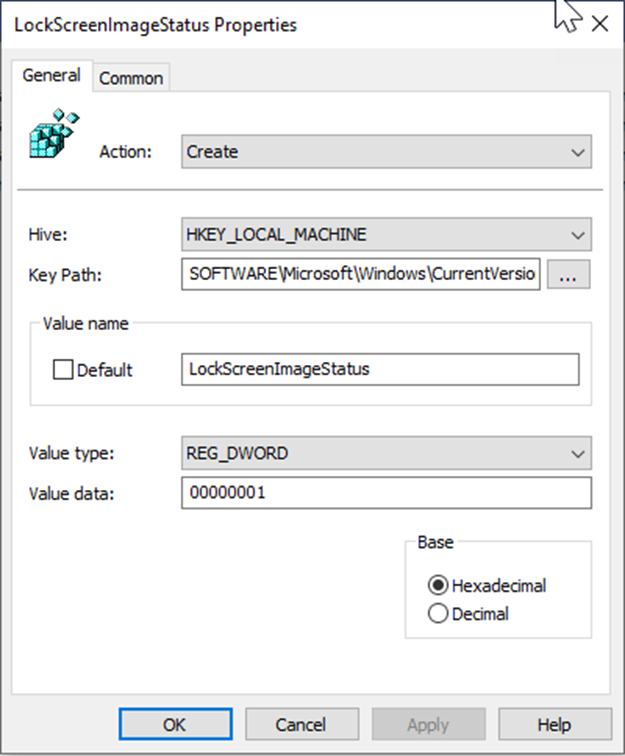
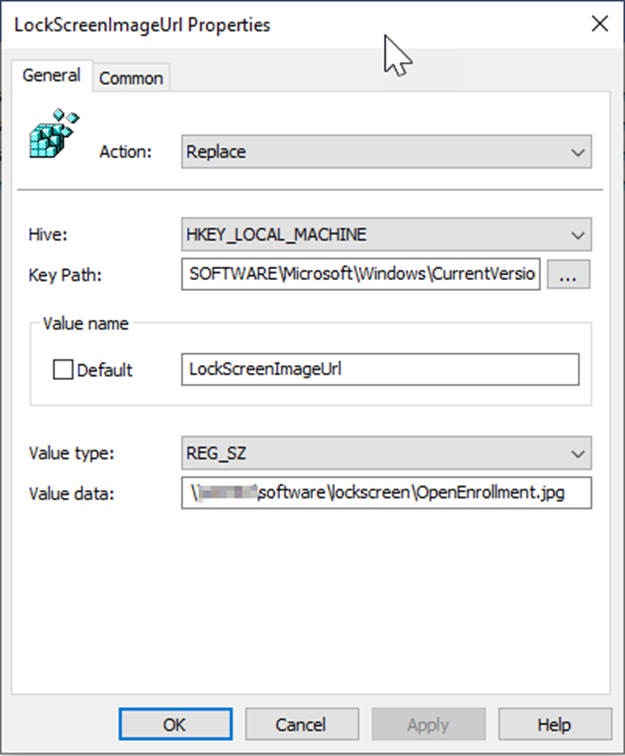
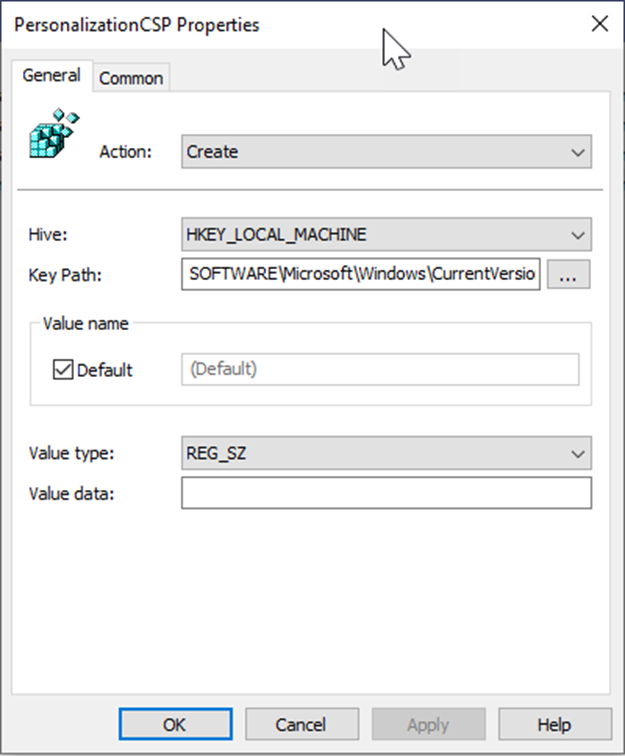
- Configure the following 4 registry entries. Please note the Action for each registry:
LockScreenImagePatch: Action=Replace
LockScreenImageStatus: Action=Create
LockScreenImageUrl: Action=Replace
PersonalizationCSP: Action=Create
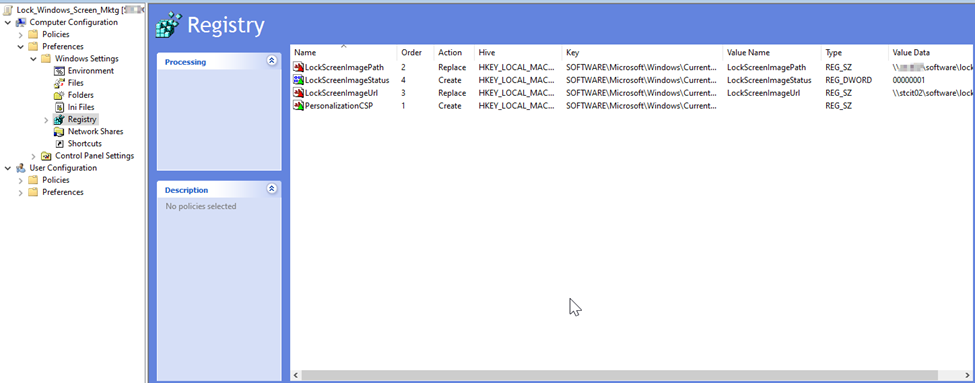
KeyPath = SOFTWARE\Microsoft\Windows\CurrentVersion\PersonalizationCSP
KeyPath = SOFTWARE\Microsoft\Windows\CurrentVersion\PersonalizationCSP
KeyPath = SOFTWARE\Microsoft\Windows\CurrentVersion\PersonalizationCSP
KeyPath = SOFTWARE\Microsoft\Windows\CurrentVersion\PersonalizationCSP
Steps to push Disable Lock Screen
To disable the lock screen, just set the Action to Delete for the 4 registry items.
