
3.7.7.7 sensors — утилита для мониторинга датчиков температуры
Скачать документ
Окружение
- Версия РЕД ОС: 8
- Конфигурация: Рабочая станция, Сервер графический, Сервер минимальный
- Версия ПО: lm_sensors-3.6.0-21
lm_sensors (Linux-monitoring sensors) — это набор бесплатных утилит и драйверов, предназначенный для отслеживания различных параметров аппаратного обеспечения, таких как температура, напряжение и скорость вращения вентиляторов. в вашей системе. Следует помнить, что набор датчиков индивидуален для каждой системы, поэтому некоторые возможности могут быть недоступны.
sensors — это утилита, входящая в состав пакета lm_sensors, предназначенная для мониторинга аппаратного состояния компьютера.
Определение доступных датчиков
Используйте sensors-detect для обнаружения и формирования списка модулей ядра. По окончании определения датчиков будут доступны снимаемые ими значения.
Пример:
sudo sensors-detectThis program will help you determine which kernel modules you need
to load to use lm_sensors most effectively. It is generally safe
and recommended to accept the default answers to all questions,
unless you know what you're doing.

Some south bridges, CPUs or memory controllers contain embedded sensors.
Do you want to scan for them? This is totally safe. (YES/no):
Module cpuid loaded successfully.
Silicon Integrated Systems SIS5595...                       No
VIA VT82C686 Integrated Sensors...                          No
VIA VT8231 Integrated Sensors...                            No
AMD K8 thermal sensors...                                   No
AMD Family 10h thermal sensors...                           No
...
Now follows a summary of the probes I have just done.
Just press ENTER to continue:
Driver `coretemp':
* Chip `Intel digital thermal sensor' (confidence: 9)
Driver `lm90':
* Bus `SMBus nForce2 adapter at 4d00'
   Busdriver `i2c_nforce2', I2C address 0x4c
   Chip `Winbond W83L771AWG/ASG' (confidence: 6)
Do you want to overwrite /etc/conf.d/lm_sensors? (YES/no):
ln -s '/usr/lib/systemd/system/lm_sensors.service' '/etc/systemd/system/multi-user.target.wants/lm_sensors.service'
Unloading i2c-dev... OK
Unloading cpuid... OK
Просмотр датчиков
Пример запуска sensors:
sensorscoretemp-isa-0000
Adapter: ISA adapter
Core 0:       +58.0°C  (high = +84.0°C, crit = +100.0°C)
Core 1:       +59.0°C  (high = +84.0°C, crit = +100.0°C)
Core 2:       +59.0°C  (high = +84.0°C, crit = +100.0°C)
Core 3:       +60.0°C  (high = +84.0°C, crit = +100.0°C)

nouveau-pci-0100
Adapter: PCI adapter
temp1:        +57.0°C  (high = +95.0°C, hyst =  +3.0°C)
                       (crit = +105.0°C, hyst =  +5.0°C)
                       (emerg = +135.0°C, hyst =  +5.0°C)
Эта информация оказалась полезной? ДА НЕТ
Дата последнего изменения: 06.02.2025
Если вы нашли ошибку, пожалуйста, выделите текст и нажмите Ctrl+Enter.
Lm-Sensors — это бесплатное приложение с открытым исходным кодом, которое предоставляет инструменты и драйверы для мониторинга температуры, напряжения и вентиляторов.
-
228
-
SpeedFan — это программа, которая контролирует скорость вращения вентилятора и температуру в компьютере.
- Бесплатная
- Windows

SpeedFan — это программа, которая отслеживает скорость вращения вентилятора и температуру на компьютерах с аппаратными чипами для мониторинга. SpeedFan может даже получить доступ к S.M.A.R.T. информация и показать температуру жесткого диска. SpeedFan также поддерживает диски SCSI.
-
191
-
Контроль датчиков температуры, скорости вращения вентиляторов, напряжения, нагрузки и тактовых частот, имеет дополнительный график.
- Бесплатная
- Windows
Open Hardware Monitor — это бесплатное программное обеспечение с открытым исходным кодом, которое контролирует датчики температуры, скорости вращения вентиляторов, напряжения, нагрузки и тактовые частоты компьютера.
-
95
-
HWMonitor — это программа аппаратного мониторинга, которая считывает основные датчики состояния систем ПК.
- Условно бесплатная
- Windows
HWMonitor — это программа аппаратного мониторинга, которая считывает основные датчики состояния систем ПК: напряжение, температуру, скорость вращения вентиляторов.
-
55
-
Core Temp — компактная, не требующая больших усилий, но мощная программа для мониторинга процессора.
- Бесплатная
- Windows
Core Temp — компактная, но мощная программа для контроля температуры процессора и другой важной информации.
-
32
-
Простая боковая панель для рабочего стола Windows, отображающая диагностическую информацию о пк.
- Бесплатная
- Windows
SidebarDiagnostics — простая боковая панель для рабочего стола Windows, которая отображает диагностическую информацию об оборудовании.
-
31
-
MHDD — самая популярная бесплатная программа для низкоуровневой диагностики HDD.
- Бесплатная
- Windows
MHDD — самая популярная бесплатная программа для низкоуровневой диагностики HDD.
-
19
-
Real Temp — программа контроля температуры процессоров Intel.
- Бесплатная
- Windows
Real Temp — это программа мониторинга температуры, предназначенная для всех одноядерных, двухъядерных, четырехъядерных и четырехъядерных процессоров Intel.
-
11
-
RightMark CPU Clock Utility (RMClock) — это небольшое приложение с графическим интерфейсом, предназначенное для мониторинга частоты процессора в реальном времени.
- Условно бесплатная
- Windows
RightMark CPU Clock Utility (RMClock) — это небольшое приложение с графическим интерфейсом, предназначенное для мониторинга частоты процессора в режиме реального времени, контроля дросселирования и уровня нагрузки, оперативной регулировки уровня производительности процессора на поддерживаемых моделях процессора через регистры, зависящие от модели управления питанием процессоров ( MSR).

It is very important to keep an eye on your system temperature. Because overheating may cause unexpected hardware failures. This brief tutorial describes how to monitor your CPU and other system hardware temperatures, fan speeds, and voltages using a command line utility called lm-sensors.
Installation
Lm-sensors will be available in the default repositories of most modern Linux operating systems.
On DEB based systems:
sudo apt-get install lm-sensors
On RPM based systems:
sudo yum install lm-sensors
Usage
After installing lm-sensors on your system, run the following command to determine which kernel modules you need to load to use lm_sensors most effectively. It is generally safe and recommended to accept the default answers to all questions, unless you know what you’re doing.
sudo sensors-detect
Sample output:
I go with default answers. Simply press Enter key to accept the default answers.
# sensors-detect revision 6170 (2013-05-20 21:25:22 +0200)
# System: Dell Inc. Inspiron N5050 [Not Specified] (laptop)
# Board: Dell Inc. 01HXXJ

This program will help you determine which kernel modules you need
to load to use lm_sensors most effectively. It is generally safe
and recommended to accept the default answers to all questions,
unless you know what you're doing.

Some south bridges, CPUs or memory controllers contain embedded sensors.
Do you want to scan for them? This is totally safe. (YES/no):
Module cpuid loaded successfully.
Silicon Integrated Systems SIS5595...                       No
VIA VT82C686 Integrated Sensors...                          No
VIA VT8231 Integrated Sensors...                            No
AMD K8 thermal sensors...                                   No
AMD Family 10h thermal sensors...                           No
AMD Family 11h thermal sensors...                           No
AMD Family 12h and 14h thermal sensors...                   No
AMD Family 15h thermal sensors...                           No
AMD Family 15h power sensors...                             No
AMD Family 16h power sensors...                             No
Intel digital thermal sensor...                             Success!
    (driver `coretemp')
Intel AMB FB-DIMM thermal sensor...                         No
VIA C7 thermal sensor...                                    No
VIA Nano thermal sensor...                                  No

Some Super I/O chips contain embedded sensors. We have to write to
standard I/O ports to probe them. This is usually safe.
Do you want to scan for Super I/O sensors? (YES/no):
Probing for Super-I/O at 0x2e/0x2f
Trying family `National Semiconductor/ITE'...               No
Trying family `SMSC'...                                     No
Trying family `VIA/Winbond/Nuvoton/Fintek'...               No
Trying family `ITE'...                                      No
Probing for Super-I/O at 0x4e/0x4f
Trying family `National Semiconductor/ITE'...               Yes
Found unknown chip with ID 0xfc11

Some hardware monitoring chips are accessible through the ISA I/O ports.
We have to write to arbitrary I/O ports to probe them. This is usually
safe though. Yes, you do have ISA I/O ports even if you do not have any
ISA slots! Do you want to scan the ISA I/O ports? (YES/no):
Probing for `National Semiconductor LM78' at 0x290...       No
Probing for `National Semiconductor LM79' at 0x290...       No
Probing for `Winbond W83781D' at 0x290...                   No
Probing for `Winbond W83782D' at 0x290...                   No

Lastly, we can probe the I2C/SMBus adapters for connected hardware
monitoring devices. This is the most risky part, and while it works
reasonably well on most systems, it has been reported to cause trouble
on some systems.
Do you want to probe the I2C/SMBus adapters now? (YES/no):
Using driver `i2c-i801' for device 0000:00:1f.3: Intel Cougar Point (PCH)
Module i2c-i801 loaded successfully.
Module i2c-dev loaded successfully.

Next adapter: i915 gmbus ssc (i2c-0)
Do you want to scan it? (yes/NO/selectively):

Next adapter: i915 gmbus vga (i2c-1)
Do you want to scan it? (yes/NO/selectively):

Next adapter: i915 gmbus panel (i2c-2)
Do you want to scan it? (yes/NO/selectively):

Next adapter: i915 gmbus dpc (i2c-3)
Do you want to scan it? (yes/NO/selectively):

Next adapter: i915 gmbus dpb (i2c-4)
Do you want to scan it? (yes/NO/selectively):

Next adapter: i915 gmbus dpd (i2c-5)
Do you want to scan it? (yes/NO/selectively):

Next adapter: DPDDC-B (i2c-6)
Do you want to scan it? (yes/NO/selectively):

Now follows a summary of the probes I have just done.
Just press ENTER to continue:

Driver `coretemp':
  * Chip `Intel digital thermal sensor' (confidence: 9)

To load everything that is needed, add this to /etc/modules:
#----cut here----
# Chip drivers
coretemp
#----cut here----
If you have some drivers built into your kernel, the list above will
contain too many modules. Skip the appropriate ones!

Do you want to add these lines automatically to /etc/modules? (yes/NO)

Unloading i2c-dev... OK
Unloading i2c-i801... OK
Unloading cpuid... OK
Next, run the following command to find the temperature.
sudo sensors
Sample output:
acpitz-virtual-0
Adapter: Virtual device
temp1:        +55.5°C  (crit = +84.0°C)

coretemp-isa-0000
Adapter: ISA adapter
Physical id 0:  +59.0°C  (high = +80.0°C, crit = +85.0°C)
Core 0:         +59.0°C  (high = +80.0°C, crit = +85.0°C)
Core 1:         +59.0°C  (high = +80.0°C, crit = +85.0°C)
As you in the above output, our system temperature is normal. Also, the output what is the higher and critical temperature. If you reached that critical level, It is recommended to take steps to reduce the temperature. Whether we shall power off the system or close/stop some running unwanted programs/processes if any.
If you’re using Laptop and having overheating issues, you might want to check the following article.
- Reduce Laptop Overheating Issues And Improve Battery Life
Displaying Temperature results in Fahrenheit
If you want to get the output in Fahrenheit instead of Celsius, use -f parameter.
Example:
sudo sensors -f
Sample output:
acpitz-virtual-0
Adapter: Virtual device
temp1:       +137.3°F  (crit = +183.2°F)

coretemp-isa-0000
Adapter: ISA adapter
Physical id 0: +141.8°F  (high = +176.0°F, crit = +185.0°F)
Core 0:        +141.8°F  (high = +176.0°F, crit = +185.0°F)
Core 1:        +140.0°F  (high = +176.0°F, crit = +185.0°F)
Use Lm-sensors plugins
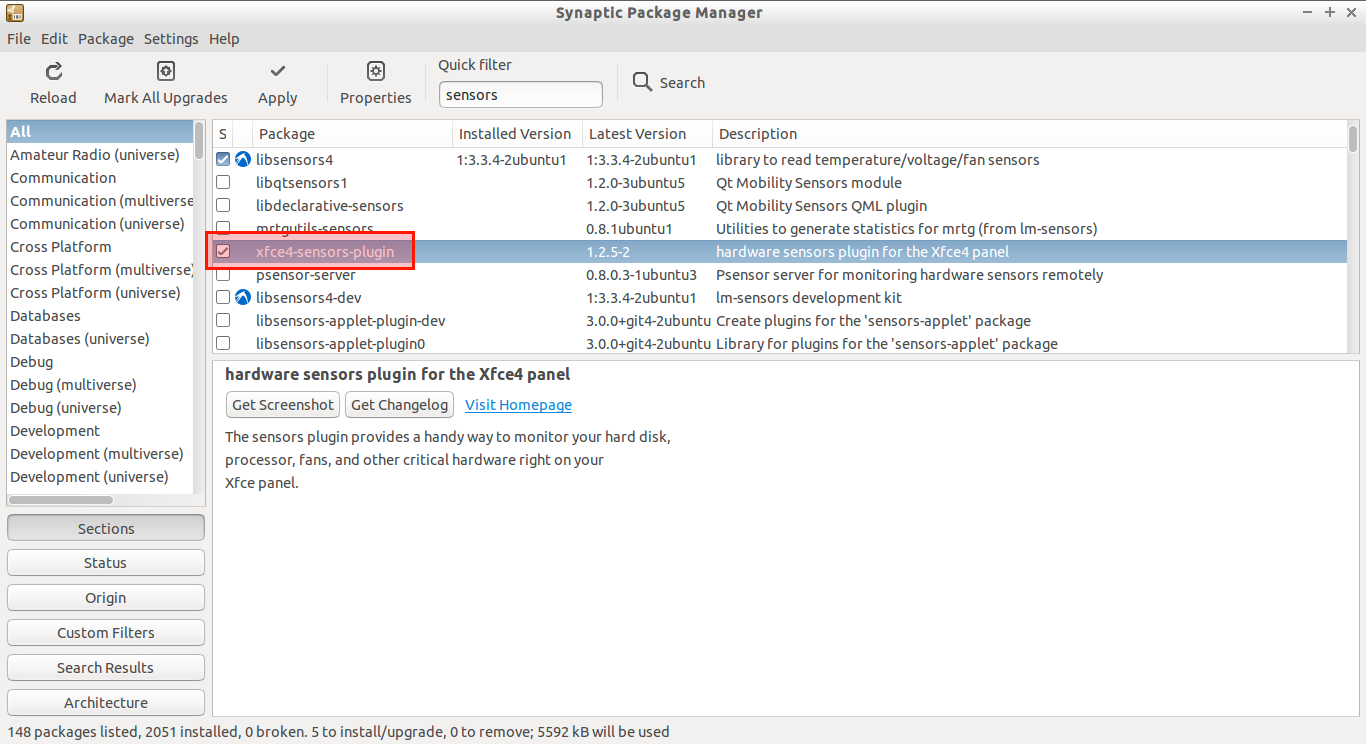
Also, lm-sensors plugins are available for various desktop environments like GNOME, LXDE, XFCE. If you want to monitor your GUI desktop, you can download and install these plugins. These plugins can be installed via Synaptic package manager.
For example, to install plugin for XFCE desktop, open Synaptic package manager, search for XFCE4-sensors-plugin, and install it.
For LXDE desktops, you can download and install sensors plugin here.
Want to check your hard disk temperature?
Install hddtemp package:
sudo apt-get install hddtemp
And, run the following command to find the temperature of your Hdd.
sudo hddtemp /dev/sda
Sample output:
/dev/sda: ST9500325AS: 41°C
Watching Temperature
To watch temperature values updating every two seconds, run the following command:
sudo watch sensors
Sample output:
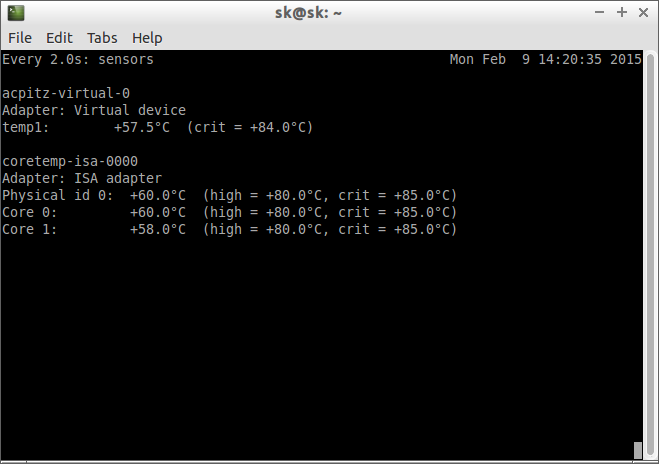
As you see in the above output, the temperature values will be updated after each 2 seconds.
That’s it. Cheers!
Lm-sensors homepage
OVERVIEW OF THE LM-SENSORS PACKAGE
==================================

The lm-sensors package, version 3, provides user-space support for the
hardware monitoring drivers in Linux 2.6.5 and later. For older kernel
versions, you have to use lm-sensors version 2.

The directories within this package:

* doc
  Documentation.
* etc
  A sample configuration file for libsensors, and a script to convert
  lm-sensors version 2 configuration files to work with version 3.
* lib
  The user-space sensors support library code (libsensors).
* prog
  Several supporting programs. The most important ones are:
  - sensors-detect: A stand-alone program for detecting installed
    hardware and recommending specific modules to load.
  - sensors: A console tool to report sensor readings and set new
    sensor limits.
  - sensord: A daemon to watch sensor values and log problems. It
    includes RRD support.
* configs
  This directory contains sample configurations of various boards,
  contributed by users of lm-sensors.

  All configuration files should now be imported from the old
  www.lm-sensors.org website, however additional information about
  the origin of the configuration files can be found on the old site:
  http://web.archive.org/web/20150901092438/http://www.lm-sensors.org:80/wiki/Configurations

  Please contribute back a configuration of your board so other users with
  the same hardware won't need to recreate it again and again.

INSTALLING LM-SENSORS
---------------------

See the INSTALL file.


HARDWARE SUPPORT
----------------

To find out what hardware you have, just run 'sensors-detect' as root.

Most modern mainboards incorporate some form of hardware monitoring chips.
These chips read things like chip temperatures, fan rotation speeds and
voltage levels. There are quite a few different chips which can be used by
mainboard builders for approximately the same results.

Laptops, on the other hand, rarely expose any hardware monitoring
chip. They often have some BIOS and/or ACPI magic to get the CPU
temperature value, but that's about it. For such laptops, the lm-sensors
package is of no use (sensors-detect will not find anything), and you have
to use acpi instead.

This package doesn't contain chip-specific knowledge. It will support all
the hardware monitoring chips your kernel has drivers for. In other words,
if you find out that you have unsupported hardware (e.g. sensors-detect
told you so) then it means that you need a more recent kernel, or you
even need to wait for a new kernel driver to be written. Updating the
lm-sensors package itself will not help.


LIBSENSORS
----------

The kernel drivers communicate their information through the /sys
interface. Because every motherboard is different, the drivers always
advert the measurements at their pins. This means that the values they
report are not always immediately relevant to you. They have to be
labelled properly, and sometimes they must be scaled to correspond to
real-world values.

libsensors is a (shared or static) library of access functions. It
offers a simple-to-use interface for applications to access the sensor
chip readings and configure them as you like. It has a configuration
file where you can put all the motherboard-specific labels and
conversion rules. That way, all applications do not need to duplicate
the effort and can simply link with libsensors and work out of the box.


APPLICATIONS
------------

This package contains an example console program that reports all current
sensors values. This program is called 'sensors'. You can use it as a
reference implementation for more intricate programs. It also contains a
daemon watching for sensor values, logging alarms and feeding an RRD
database with the sensor measurements.

This package does not contain a nice graphical monitor. See
http://sensors-applet.sourceforge.net/
https://01.org/powertop/
https://wpitchoune.net/psensor/
https://amanusk.github.io/s-tui/
for such programs.


TROUBLESHOOTING
---------------

lm-sensors is blamed for all kinds of problems on a regular basis.
While it is always possible that lm-sensors does in fact have a problem,
almost everytime the problem will be elsewhere. The most likely culprit
for a problem is one of the kernel drivers prividing data to lm-sensors
or, rather, the sensors command (and libsensors). If you encounter problems,
the following tests are recommended.

- Check enabled sensors with the 'sensors' command. Observe and, if there
  are errors, write down your test steps and report.
- If any problems are observed while running the 'sensors' command, disable
  (unload) kernel drivers one after another. After unloading a driver, run
  the 'sensors' command again and observe if the error is gone. If it is,
  you found the problematic driver. Record your tests and report to the driver
  maintainer.
- If problems are observed while using libsensors from another application,
  the same procedure applies (though it is recommended to perform the test
  with the sensors command first). Again, after identifying the offending
  driver, record and report your results to the driver maintainer.
- If this does not help, try to run ptrace on the sensors command and/or
  the application using libsensors. If you find any anormalies, record
  your results and report.


OTHER INFORMATION
-----------------

The lm_sensors website can be found at
https://hwmon.wiki.kernel.org/lm_sensors

The developers of this package can be reached using
* a mailing list lm-sensors <at> vger <dot> kernel <dot> org
  (you can get information on how to subscribe, unsubscribe, and the list
  of archives at http://vger.kernel.org/vger-lists.html#lm-sensors;
  you do not need to be subscribed to post to the list)
* GitHub (see https://github.com/lm-sensors/lm-sensors)

Do not hesitate to contact us if you have questions, suggestions, problems,
want to contribute, or just want to report it works for you. But please try to
read the documentation before you ask any questions! It's all under doc/.

The latest version of this package can always be found at:
https://github.com/lm-sensors/lm-sensors.

LICENSE
-------

The library (libsensors) is released under the GNU Lesser General Public
License (LGPL), as included in the file COPYING.LGPL. The rest of this
package may be distributed according to the GNU General Public License
(GPL), as included in the file COPYING.
Материал из Пингвиньи радостей
Перейти к: навигация, поиск
Статья о программе Lm-sensors
Lm-sensors это консольная программа для просмотра показаний датчиков температуры процессора, видеокарты и материнской платы, напряжения процессора и скорости вращения вентиляторов компьютера .
Обратите внимание, что существует и графическая обёртка для просмотра показаний датчиков —
psensor.
Установка
Пакет присутствует в хранилище пакетов debian.
Для установки пакета
- в командной строке: следует выполнить команду # apt-get install lm-sensors
- в графическом режиме: воспользоваться специализированной программой управления пакетами
После установки необходимо определить устройства содержащие сенсоры с помощью команды
  # sensors-detect
  Внимание!
  В конце тестирования, когда утилита запросит разрешения для добавления необходимых модулей
  при загрузке системы (файл /etc/modules), следует ввести yes и перезагрузить компьютер.
Часто используемые команды
  # sensors                     - просмотр показаний датчиков компьютеры
  # watch -n 1 "sensors"        - просмотр с ежесекундным автообновлением результатов
Литература
- Как узнать температуру процессора, видеокарты и материнской платы
Справочная информация
- 14.09.2018: Lm-sensors: создание статьи о программе для просмотра показаний датчиков компьютера