
Просматривая отчеты о проблемах в центре безопасности и обслуживания или монитор стабильности системы Windows 10, Windows 11 и предыдущих версий ОС, особенно при сбоях работы компьютера или ноутбука пользователи могут обнаружить ошибку оборудования, для которого указано имя проблемного события LiveKernelEvent и код 141, 144, 117 и другие.
В этой инструкции подробно о том, чем может быть вызвана проблема, как можно разобраться, какое именно оборудование вызвало ошибку и исправить проблему.
Ошибка оборудования LiveKernelEvent код 141, 144 и другие в Windows 10 и Windows 11
Указанная ошибка прямо говорит о том, что при работе какого-либо оборудования произошел сбой: неправильная работа драйверов, выключение по какой-либо причине (недостаток питания, аппаратные проблемы) или что-то ещё. Чаще всего причина в драйвере.
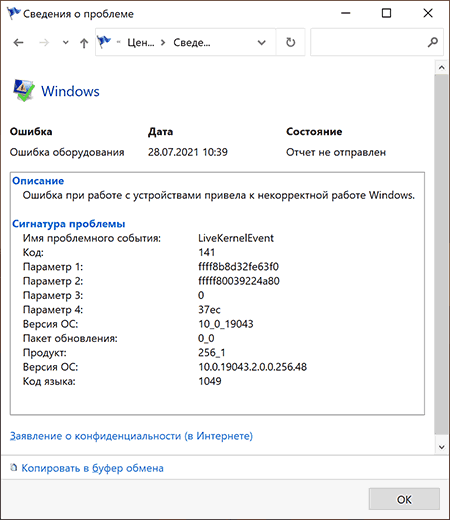
Иногда, в описании ошибки ниже сигнатуры проблемы указываются дополнительные сведения, в которых можно найти указание на файл драйвера, например, начинающегося с букв «nv» (что говорит об оборудовании от NVIDIA, для других файлов можно найти сведения о назначении в Интернете), но эта информация не всегда присутствует. В этом случае можно попробовать подробнее узнать о том, что именно вызвало ошибку.
- Обратите внимание на дату и время ошибки оборудования LiveKernelEvent.
- Запустите «Просмотр событий», для этого используйте поиск или нажмите клавиши Win+R на клавиатуре, введите eventvwr.msc и нажмите Enter.
- В просмотре событий перейдите в «Журналы Windows» — «Система».
- В панели справа нажмите «Фильтр текущего журнала», а затем в поле «Дата» установите настраиваемый диапазон, укажите «Событие» в полях «Начало и конец», а затем — дату события LiveKernelEvent и конкретное время, захватив всю минуту, когда оно произошло, пример — на изображении ниже.

- Выполните фильтрацию событий по указанному времени и изучите предупреждения в этот период — они могут дать более полную информацию.


Например, для представленных выше скриншотов мы видим, что ошибка вызвана драйвером видеокарты и действительно — драйвер видеокарты или проблемы с её работой (например, вызванные разгоном или недостатком питания при высокой нагрузке) действительно являются наиболее частой причиной ошибки оборудования, регистрируемой как LiveKernelEvent.
Однако, здесь мы видим важный нюанс: как правило, при подозрении на проблемы с видеокартой пользователь пробует полностью удалить её драйверы (например, с помощью DDU), установить заново официальные драйверы, обновить их с официального сайта, но делает акцент только на дискретной видеокарте. Здесь же в просмотре событий видно, что речь идёт об интегрированном видео (igfx), о котором часто забывают и не выполняют для него те же процедуры, что и для дискретной видеокарты.
Так или иначе в приведенном примере мы увидели, что драйвер IGFX (интегрированное видео) перестал отвечать и был восстановлен и можем применить методы для этого случая — Что делать, если видеодрайвер перестал отвечать и был восстановлен в Windows.
Способы исправить ошибку
В зависимости от конкретной ситуации возможны следующие методы исправления ошибки оборудования LiveKernelEvent:
- Если известно, какое оборудование вызвало проблему, особенно если речь идет о видеокарте — установить оригинальные драйверы на него (вручную скачав с официального сайта и установив, а не с помощью кнопки «Обновить» в диспетчере устройств), отключить разгон (если включали), убедиться, что устройство правильно подключено (плотно сидит в разъёме, при необходимости подключено дополнительное питание).
- В случае если ошибка возникает в конкретной игре или программе — не исключено, что это особенности работы самой программы (особенно, если это что-то нелицензионное) с этим оборудованием или же в ней заданы параметры, которые на вашем железе приводят к сбоям.
- При нерегулярности сбоя LiveKernelEvent учитывайте, что такого рода сбои могут происходить при автоматическом обновлении драйверов (здесь можно не обращать внимания), а также в случаях, когда блок питания компьютера не может обеспечить нужную мощность при пиковых нагрузках.
- Если после перезагрузки ошибка не возникает, а после завершения работы и включении может появиться снова, попробуйте отключить быстрый запуск.
- В случае, если ошибка стала появляться недавно, а замены оборудования не производилось, могут помочь точки восстановления системы.
- Может иметь смысл проверить целостность системных файлов Windows.
- Установка последних обновлений Windows 10 или Windows 11, а при наличии — обновлений BIOS также может сработать для некоторых случаев появления ошибки.
Several users are facing sudden crashes when playing games which specifically make extensive use of graphics. LiveKernelEvent 141 error message headed by Hardware error appears when the issue occurs with hanging, lagging, and freezing. Hardware failure, third-party programs, or damaged or obsolete display adapter drivers are the prominent reasons for this gaming error.
To fix this annoying error permanently it’s crucial to do a full hardware diagnostic on everything from the graphics processing unit (GPU) to the random access memory (RAM). However, you might also get away with a clean boot or reinstallation of the video graphic drivers.
LiveKernelEvent 141 Error in Windows 11 or 10
Here is how to fix LiveKernelEvent 141 Hardware Error Problem in Windows 11 or 10 –
Way-1: Install the latest version of NVIDIA Driver
Unstable, broken, incompatible, or buggy NVIDIA driver is found culprit in most of the cases for LiveKernelEvent 141 hardware error. The problem occurs with Modern Warfare II (MW2), cyberpunk, Warzone 2.0, or other even when playing on a gaming or powerful laptop.
Therefore, first of all, pay attention to the NVIDIA GPU driver and install the most recent version if you face this glitch. For this, navigate to the official site of the adapter, find the driver, download and install it.
See – Fix Cyberpunk 2077 Blue Screen Error BSOD in Windows 11, 10.
Way-2: Run DISM and SFC or System File Checker Scans
DISM and SFC scans are known to repair damaged or corrupted files. Similarly, in this scenario of facing LiveKernel 141 error it’s quite logical to run both these utilities via the steps provided below:
- Press – Winkey+R.
- Type cmd and hit Ctrl+Shift+Enter altogether.
- Select Yes on the User account control dialog box.
- Type the following syntax into the command prompt:
SFC /Scannow. - Press Enter and allow this to complete the work.
- Once the Command shows 100% completed, reboot the PC.
- Check if the error still persists or it is fixed now.
- If the issue again occurs then launch the Command prompt as administrator, paste the following commands, and press Enter after each one.
DISM /Online /Cleanup-Image /CheckHealth
DISM /online /Cleanup-Image /ScanHealth
DISM /Online /Cleanup-Image /RestoreHealth- When the operation is over, restart your computer to verify whether the hardware error code 141 is solved.
Way-3: Initiate a Clean Boot in your System
If you’re having trouble with your game or application in the form of a LiveKernelEvent 141 error its better to find out if it’s either being hindered by Windows or another software by performing a clean boot, which starts Windows with the set of the minimum number of drivers and apps. Follow these steps to perform the same:
- Click Search from the Taskbar and type – msconfig.
- Hit Enter to launch the System Configuration window.
- Click the General tab.
- Locate the entry under Selective Startup and deselect the Load startup services option.
- Go to the Services tab.
- Click the checkbox before – Hide all Microsoft services.
- Then click – Disable all.
- Next, navigate to the Startup tab.
- Select the option labeled – Open Task Manager.
- Disable all Startup applications. For this, right-click on each of the items currently showing on the Task Manager and click on “Disable”.
- Close the tool to return back to the System configuration window.
- Click on Apply and then on OK.
- The system will throw a pop-up; click Restart on that.
Way-4: Check Out the GPU Overclocking Software and uninstall
Overclocking software manipulates NVIDIA, AMD, or other GPU to increase the Video game speed but overall this action put a bad impact on the system performance and sometimes triggers error. To solve LiveKernelEvent 141 error sometimes its crucial to uninstall the application –
- Right click on – Start.
- Select Settings.
- Click Apps now.
- Go to Installed apps. (Note: In Windows 10, it is ‘Apps & features’)
- Find the overclocking program you are using,
- Click on the 3 dots menu and select Uninstall.
- Confirm the prompt.
- Follow the steps for complete removal.
Way-5: Detect Memory with Diagnostic tool
Over time, one of the most essential components of your PC, the RAM may become unstable and often crash. Usually, RAM is responsible for determining how many applications may run simultaneously on a computer and consumes the highest while playing games or performing any graphic-related task.
Therefore, the chances of this issue causing the LiveKernel 141 error are quite high, so check out the following steps to correct it:
- Press Winkey+R and select Run.
- Type – mdsched.exe.
- Hit Enter to open Windows Memory Diagnostic.
- Select – Restart now and check problems.
- Following the restart, the system will conduct a diagnostic on your RAM modules to identify any potential issues. If this occurs, you will have to replace the damaged module(s).
Way-6: Remove and then Reinstall the Video Graphic Drivers
LiveKernelEvent 141 error has a direct link with the video graphic drivers so it’s better to remove the same and then reinstall using Device Manager in order to fix it.
- Press – Win+X.
- Select – Device Manager.
- Locate and double click on – Display adapters.
- Rght-click on graphic card and choose – Uninstall device.
- Verify the popup.
- Restart your device and let the system re-arrange the driver files.
- If this does not fix the error then navigate to the manufacturer’s dedicated support page and download the right driver.
- Run the driver’s setup and reinstall the graphic card.
Way-7: Detach all the External Devices
Due to the possibility of a driver conflict inside the Windows, you should begin the troubleshooting procedure by removing the peripherals. Perform the action and see if the error code LiveKernelEvent still remains.
After that, you may rejoin your external devices, but you must reinstall any related drivers. If necessary, navigate to Device Manager and uninstall these drivers (hit Win + X, choose Device Manager, then pick the drivers to be uninstalled).
Way-8: Uninstall the third-party programs
Third-party programs are always responsible to generate problems including LiveKernelEvent 141 error in Windows 11 or 10. The applications might fall into conflict with the game you are playing leading the system to trigger a crash. Therefore uninstall them using the below guidelines –
- Press Windows and R.
- Type – appwiz.cpl. and hold down Enter to open the Program and Features window.
- Locate the third-party tool and right click on it.
- Choose “Uninstall” and move ahead with further instructions until the app is completely removed.
- Restart your computer to ensure that the error is resolved.
Way-9: Update the GPU Drivers
Update your graphics drivers to fix the LiveKernelEvent 141 problem, since this is a standard remedy for this issue. In order to accomplish it, please refer to the following steps:
- Press Windows + X, and then from the quick menu, choose Device Manager.
- Here, browse to the Display Adapters section, right-click the installed driver, and choose Update driver.
So, let’s hope these 7 ways aid in fixing your LiveKernelEvent 141 Error in Windows 11 or 10.
Methods:
Way-1: Install the latest version of NVIDIA Driver
Way-2: Run DISM and SFC or System File Checker Scans
Way-3: Initiate a Clean Boot in your System
Way-4: Check Out the GPU Overclocking Software and uninstall
Way-5: Detect Memory with Diagnostic tool
Way-6: Remove and then Reinstall the Video Graphic Drivers
Way-7: Detach all the External Devices
Way-8: Uninstall the third-party programs
Way-9: Update the GPU Drivers
That’s all!!
Windows 10 LiveKernelEvent 141 error is a common error to many users. However, the users who are more into video gaming, work with hard disk memory, GPU, and graphics cards face this issue more than others.
In this article, we will discuss the possible reasons for this issue. We will also look for suitable measures to fix this Windows 10 LiveKernelEvent 141 error.
Windows 10 LiveKernelEvent 141 Error: Reasons Behind this Error
There are many reasons behind the Windows 10 LiveKernelEvent 141 error code. The reason is due to corrupted drivers and the presence of third-party software.
In addition, many users opt for computers with dedicated graphics cards and extend the computer memory to have a better gaming experience. As a result, those users see this Windows 10 LiveKernelEvent 141 error message more.
To fix this Windows 10 LiveKernelEvent 141 error message, the user needs to follow the below-mentioned steps:
To fix this Windows 10 LiveKernelEvent 141 error, a user can opt for many ways. Those are as follows.
Disconnect All External Devices
The problem is more related to drivers. Therefore the user needs to disconnect all the connecting devices(printer, external keyboard, etc.) via USB at first. After that, the user needs to check if this Windows 10 LiveKernelEvent 141 error message still arises.
Then, the user needs to uninstall the drivers for each of those external devices from the Device Manager section. After that, if the user needs to connect those external devices, then those drivers can be reinstalled separately.
By Applying a Clean Boot to the System
The user can apply a clean boot to their Windows 10 system to solve the Windows 10 LiveKernelEvent 141 error. Here, the below-mentioned steps the user needs to perform. Those are as follows.
- At first, the user needs to click the ‘Windows key’ and the ‘R key’. Or the user can right-click on the ‘Start icon’ at the bottom left corner of the screen and select the ‘Run’ option.
- There will be a space bar where the user needs to type ‘msconfig’ and then click ‘Ok.’ It will take the user to the ‘System Configuration’ tab. Here, the user needs to select the ‘General Tab.’
- Here, the user needs to select the ‘Selective startup’ option and then uncheck the ‘Load startup items’ option.
- Now the user needs to open the ‘Services’ tab. Here, the user needs to click on the check-box of ‘Hide all Microsoft services’ and then click on ‘Disable All.’
- The user should go to the ‘Startup’ tab and open the ‘Task Manager and then disable all the ‘Startup Programs.’ Now, the user can save the changes made and close the Windows.
- Then, the user should restart the system. The user might be able to get rid of this Windows 10 LiveKernelEvent 141 error.
By Updating the Windows
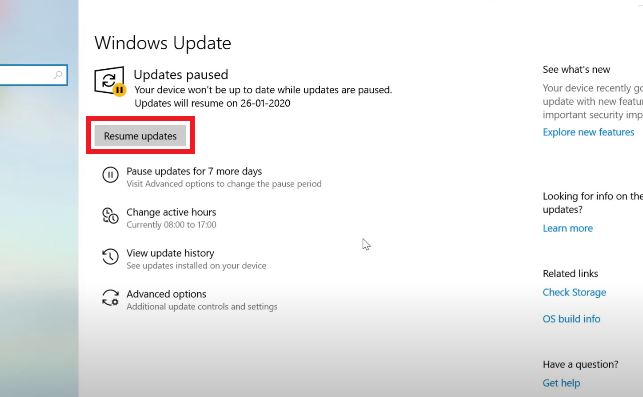
The user might face this Windows 10 LiveKernelEvent 141 error issue if the system does not have the recent updates. The user can fix it by updating the Windows.
The user can also run the Hardware and device Troubleshooter here to fix this issue. To update the Windows, the user needs to follow the below-mentioned steps.
- At first, the user needs to click the ‘Windows key’ along with the ‘I’ key to go to the Settings.
- After that, the user needs to click on ‘Update & Security’ to look for any possible update. If there is any update available, the user will easily see it and then update it properly.
- After that, the user needs to restart the system. The problem might not be there. If the user feels the issue is still there, then there are more options in hand.
By Reinstalling the Graphics Card Driver
The user can uninstall the graphics driver at first and then reinstall it to avoid the Windows 10 LiveKernelEvent 141 error issue. Here, the user needs to perform the below-mentioned steps properly.
- At first, the user needs to right-click on the ‘Start’ at the bottom left corner of the screen. Then choose the Device Manager option. Otherwise, the user can press the ‘Windows key’ and the ‘X key’ together and then select the Device Manager option.
- After that, the user needs to look for the ‘Graphics Driver’ option. The user can easily uninstall the Graphics Drivers by right-clicking on it and choosing the uninstall option.
- When the Graphic Drivers are completely uninstalled, the user can reinstall them from the official website of the manufacturer. The problem might get solved after completing this step.
Also, Read | Windows Update Error 0x80080008: Causes and 7 Best Possible Solutions
Other Possible Methods
Apart from those above-mentioned methods, the user can also look for the Hard Disk and memory(RAM) for any possible errors. If there is any fault in the Hard Disk or the Memory, the user may face the Windows 10 LiveKernelEvent 141 error.
Some users claimed that due to overheating, this problem might arise. In this case, increasing the CPU fan speed to the maximum could help in reducing the heat of the system.
Also, Read | Windows 10 stuck on the Windows Logo: Causes and the Best Suitable Measures
Windows 10 LiveKernelEvent 141 Error FAQs
Here are a few questions from users we often hear when they face Windows 10 LiveKernelEvent 141 Error.
Which one of these above methods is easy to perform to fix the Windows 10 LiveKernelEvent 141 error code issue?
Performing a clean boot or Updating the Windows are easier methods to perform than others.
What is the most effective way to fix this issue among those above-mentioned methods?
Reinstallation of the Graphics Drivers is the most effective method, as mentioned by many users.
Is this Windows 10 LiveKernelEvent 141error code issue a major threat t the PC?
No, it is not that much threat to the PC. However, as soon as the user is aware of this issue, it needs to be fixed.
Is there any need for an expert to fix this Windows 10 LiveKernelEvent 141error code issue?
No, there is no need for an expert to fix this Windows 10 LiveKernelEvent 141error code issue. However, anyone with moderate knowledge about computers could do the job by performing these above-mentioned methods properly.
Conclusion
Windows 10 LiveKernelEvent 141 error could be caused mainly due to issues in Hard Disk, Graphics Card, Drivers, or RAM. There are some mentioned ways to get rid of this issue. The user needs to perform those above-mentioned steps and check if the error is still there.
The LiveKernelEvent 141 error is a thorn in the side of many gamers. It mainly shows up in the middle of gaming or when players try to launch a video game. The error could also appear when you try to launch any other application.
This article contains guides that will show you how to fix the LiveKernelEvent 141 crash error in Windows 10.
Disable overclocking
An overclocked GPU or CPU could trigger the error. When you overclock your CPU or GPU, you’re increasing the strain on the device to enjoy temporarily improved performance.
If you want to enjoy better frame rates and efficient gameplay, go for a device that meets the game’s recommended requirements. You can also employ other performance-boosting methods, such as reducing the load on your CPU, freeing up disk space, and reducing graphic-intensive settings in the game.
Restore your CPU and GPU clock speeds to their defaults, and the error should go away for good. If it doesn’t, leave the clock speeds at their defaults and move on to the next solution.
Reinstall your GPU driver
Your graphics card is at the center of your system’s performance when it comes to gaming. The LiveKernelEvent 141 error is one of the results of a faulty GPU driver. The driver controls communication that flows between the operating system and the video card. It helps the device interpret video processing instructions.
Once the driver becomes corrupt or obsolete, its chances of producing such an error increase, especially during gameplay.
So, your first step should involve reinstalling the driver. This means you’ll have to uninstall the piece of software and reinstall it.
Follow these steps to uninstall it:
- Right-click on the Windows logo key in your taskbar or press
Win + Xon your keyboard. - The Power User menu will now slide out.
- Click on Device Manager.
- Once the Device Manager window shows up, expand the Display Adapters category.
- Right-click on your graphics adapter and select Uninstall Device.
- Check the box beside “Delete the driver software for this device” once the Uninstall Device confirmation box appears.
- Click on Uninstall.
- After the process is complete, restart your computer.
After restarting your system, Windows will attempt to reinstall the driver automatically. If nothing happens, your system’s display will be affected. Move on to the next solution.
Roll back the GPU driver
Installing the previous version of the GPU driver is one way to check whether you’re experiencing compatibility problems with the driver update you recently installed. These steps will show you how to roll back the GPU driver:
- Right-click on the Windows logo in your taskbar or press
Win + Xon your keyboard. - The Power User menu will now slide out.
- Click on Device Manager.
- Once the Device Manager window shows up, expand the Display Adapters category.
- Right-click on your graphics adapter and select Properties.
- After the graphics card’s Properties window opens, go to the Driver tab and click on the Roll Back Driver button.
If the Roll Back Driver button is greyed out, you can do things manually. Return to the driver’s Properties tab to check your driver version. After that, head to the GPU manufacturer’s website to search for the previous driver and download it. Make sure you also note your GPU’s make and model, your system architecture, and your OS version.
Update the GPU driver
Updating the driver should fix the problem if it’s a result of obsolete driver components. Sometimes, games require new software capabilities to communicate with the graphics card, and GPU manufacturers release driver updates.
If you haven’t updated your device driver for a while now, you should do so.
First, go through the Windows Update client to install updates for your computer. Updates are essential in the sense that they patch bugs and enhance performance. The client will also help you install the latest version of your graphics card driver if Microsoft has published it. If you don’t know how to update your system, these steps will help:
- Launch the Settings app using the
Windows + Ikeyboard combo. - After the first page of Windows Settings opens, click on the Update & Security icon.
- When you see the Windows Update client, allow it to check for updates and download them.
- If you have optional updates, such as Quality and Feature updates, click on the Download and Install button.
- Once the client downloads the updates, click on the Restart Now button to allow it to reboot your PC and start the installation process.
- Note that your computer will likely reboot multiple times before the installation process completes.
- After the process completes, your computer will boot up normally.
- You can now start the game or app to check for the problem.
If updating your system doesn’t work, you have other alternatives. Using a third-party application designed to find driver-related problems and fix them is your best bet. Auslogics Driver Updater will not only update your obsolete graphics card driver but also find other problematic device drivers on your system and update them as well.
Download Auslogics Driver Updater
Prevent hardware errors and ensure problem-free device operation with this advanced tool that detects outdated drivers and safely gets them updated.
What’s more, it can keep a backup of old driver versions after updating them. Doing that will allow you to roll back to the previous drivers whenever new drivers cause problems.
Here’s how to install and use Auslogics Driver Updater:
- Open Auslogics Driver Updater‘s product page.
- After the page shows up, click on the Download button.
- Allow your browser to save the installation package.
- After the browser downloads the file, run it.
- Select the Yes option in the User Account Control dialog box.
- Next, select a language and choose your installation folder once the installation wizard opens.
Note
It’s recommended that you go for the default install location.
- After that, use the checkboxes to apply other preferences, such as creating a desktop shortcut, starting the app after you boot your system, and allowing the tool to share anonymous crash reports.
- Next, click on the Click to Install button.
- The program will check your computer for outdated and corrupt drivers once the installation is complete.
- A list will appear, showing you the drivers that you should update.
- Make sure you update each driver that comes up. If you go for the program’s full version, it will download the drivers simultaneously.
- Once the tool completes the update process, restart your computer and check if the problem persists.
Use the CHKDSK utility
Since hardware problems are the leading cause of the error, you should check your hard disk drive for faulty sectors. The CHKDSK tool will scan for bad sectors and prevent your computer from using them in the future. The utility can also attempt to recover readable files in these bad sectors.
There are two main ways to run the CHKDSK program: one includes going through File Explorer, and the other involves using the Command Prompt. We’ll show you how to use both methods.
These steps will show you how to run the CHKDSK tool via File Explorer:
- Summon a File Explorer window by double-clicking any folder on your desktop or by pressing
Win + E. - Once File Explorer opens, go to the left pane of the window and click on This PC.
- Next, switch to the right pane.
- Right-click on the drive where Windows is installed (in most cases, it is Local Disk C) and select Properties.
- Once the Properties dialog window appears, move over to the Tools tab.
- Under the Tools tab, go to the Error Checking section and click on the Check button.
- Windows will now check your hard disk briefly and will likely bring up a dialog that says,
“You don’t need to scan this drive.
We haven’t found any errors on this drive. You can still scan for errors if you want.“
- Select Scan Drive. The tool will now check your drive, and a dialog will show you the scan results.
To run a more in-depth scan, you’ll have to run the CHKDSK tool via an elevated Command Prompt window. Here’s how:
- Open Run by right-clicking the Start button and selecting Run from the Quick Access menu or pressing the
Windows logo key + Rshortcut. - After the dialog box appears, type
CMDinto the text box, then pressCtrl + Shift + Esc. - Select Yes after the User Account Control dialog pops up to ask permission to run the Command Prompt as an administrator.
- Once you see the elevated Command Prompt window, type the following line into the black screen and hit
Enter:
chkdsk C: /f /r /x
Note
Note that C in the command line is a placeholder for the Windows volume or partition.
The /f parameter allows the CHKDSK tool to resolve any error it detects.
The /r switch prompts the utility to recover any readable information from the bad sectors.
The /x parameter allows the tool to unmount the drive before scanning it.
Press the Y keyboard button if you see this message:
“Chkdsk cannot run because the volume is in use by another process. Would you like to schedule this volume to be checked the next time the system restarts? (Y/N)“
Check your RAM
Another hardware device to assess is your system memory. RAM sticks are known for random failures and permanent damage that cause all sorts of system errors. If any of your RAM sticks is damaged and triggers the error, it won’t go away until you replace the defective device. The Windows Memory Diagnostics Tool can help you find out if any of your RAM sticks is problematic.
The steps below will show you how to do that:
- Head to your taskbar, right-click the Start button and click on Run. The
Windows + Rkeyboard shortcut is another way to launch the Run dialog window. - Once Run shows up, type
mdschedand click on the OK button. - The Windows Memory Diagnostics Tool window will pop up. Click on the option that reads, “Restart now and check for problems (Recommend).”
- Your device will now reboot.
- You’ll see the Windows Memory Diagnostics Tool‘s interface once your system restarts.
- Once the testing process is complete, the tool will automatically restart your system.
- After your computer boots up, watch out for a notification that will tell you the scan results.
You can also go to the Event Viewer to check the results of the scan. Follow these steps:
- Right-click on the Windows logo in your taskbar or press
Win + Xon your keyboard. - The Power User menu will now slide out.
- Click on Event Viewer.
- After the Event Viewer opens, go to the left side of the screen and navigate to Windows Logs > System.
- Single-click on System, then go to the right side of the window and click on Find.
- Once the Find text box opens, type
MemoryDiagnosticand click on the Find Next button. - The search results will show up at the bottom of the Number of Events list in the middle pane. The date and time of the Information event should match the period you ran the test.
- If you have two RAM sticks, you should see two Information events.
- Details of the events will appear under the Events section.
Note that you have to replace your RAM stick if it’s bad. If you have two RAM sticks, you can remove one and run the test to check if it’s the faulty one.
Perform a clean boot
Running a clean boot allows you to confirm whether a startup program or service is triggering the error. Sometimes, background applications that launch after Windows starts clash with other programs, such as games, and produce different crash errors. If the problem keeps occurring when you’re running a game or an app, an application conflict is likely the culprit, especially if other solutions haven’t resolved the issue until now.
To perform a clean boot, you’ll be disabling startup programs and services. Once you’ve prevented them from launching the next time Windows starts, you can run the game or app that has been crashing to check if the problem occurs again. If the app or game no longer crashes, then you’ve confirmed the cause of the error.
But that’s not where it ends. You also have to pinpoint the particular app causing the problem since you can’t keep all your startup services and programs disabled forever. We’ll show you everything you have to do.
Firstly, go to the Settings app to disable startup programs. Follow these steps:
- Press
Win + Ito open Settings, or right-click Start and click on Settings in the Power User menu. - After Settings shows up, click on Apps.
- Once the Apps window appears, go to the left pane and click on Startup.
- Go to the right pane and switch off the apps under Startup Apps.
Next, head to the System Configuration dialog to disable startup services:
- Right-click on the Start button and select Run from the Power User menu. You can also tap
Win + Rto launch the Run dialog box. - After Run shows up, type
msconfigand click on OK. - Head to the Services tab when you see the System Configuration dialog box.
- Tick the “Hide all Microsoft services” checkbox.
- Click on the Disable All button.
- Click on the OK button.
- Restart your computer.
Once your system starts, the startup services and programs you disabled will remain idle. You can now run the game or the program to check if crashes will happen. If nothing happens, you have to isolate the startup item responsible for the error.
To find the culprit, you have to enable one service and restart your system to check for the problem. Keep on going through the startup items one after the other until one of them triggers the issue again.
You can follow these steps to speed up the process:
- Go to the System Configuration window and switch to the Services tab.
- Uncheck the boxes for half of the services under the tab, then click on Enable All. You can uncheck the services in the bottom half so that you’ll be enabling the top half.
- Click on OK and reboot your computer to check for the problem.
- If the app or game crashes, then one of the services you enabled is responsible. You now have to check only the services in this batch, one after the other. However, if the problem doesn’t occur, it means you no longer have to check the services you enabled. Enable the other half and see if the error persists.
- Do the same with the programs you disabled in the Settings app.
Conclusion
That’s how to resolve the LiveKernelEvent code 141 problem. You can head to the comments section to ask questions and share your thoughts about the error.
Nothing can be more disappointing than a sudden black screen crash on your PC when trying to run a graphic-intensive task. LiveKernelEvent 141 is an error code usually responsible for causing an unresponsive black screen or crash on your PC. It suggests that something is wrong with your hardware.
However, that is not always the case. As per the reported cases, the issue revolves around graphics failure on a PC. Windows hardware error code 141 appears when running a heavy game or trying to render a heavy video file on your computer. The inability of your PC to handle a graphic-intensive task leads to LiveKernelEvent 141 hardware failure error.
If you have come across the hardware error caused by Live Kernel Event and do not know what to do next, you have reached the perfect place. In this post, you will find working instructions that will allow you to resolve the issue in no time.
Let’s get started!
How to Fix LiveKernelEvent 141 Hardware Error? 5 Ways
Fix #1 – Remove any Third-Party Overclocking
If by any chance you are using overclocked hardware to enhance your PC’s performance or you have software to tune the components, there are chances that you may come across the Windows hardware error code 141. That is because, in efforts to get the most out of your PC, overclocking pushes the hardware capacity to its extreme, resulting in failure or performance degradation.
Hence, if you use software tuning the performance or overclocking your PC, simply go to the software and set everything to default. Or better, if you have designed modes in the tool, use the normal mode and restart your PC.
Fix #2 – Run a Disk Check for Hard-Disk Errors
The error can be observed if system components are not working properly. One of the most crucial elements in a PC is its hard disk. Hence checking it for any issues is a must.
Thankfully, Windows offers internal means to run a disk check and resolve common errors that might have occurred over time. Here’s what you need to do –
Step 1 – Press the Windows Key to open the search and look up CMD.
Step 2 – The search result will take you to the Command Prompt. Click on Run as Administrator to open it.

Step 3 – Copy and paste CHKDSK C: /f /r /x in the Command Prompt windows and hit enter.

Step 4 – Once the command begins, it might ask you for a Y/N input to allow the utility to take over the drive for examining it.
Step 5 – Allow the disk check to run. Once it is over, restart the computer, and all the hard disk errors should be resolved.
This means it will be resolved if the disk was causing LiveKernelEvent 141 hardware error.
Fix #3 – Update GPU Drivers
If the memory of your PC was diagnosed with no errors, chances are that the black screen was caused because of your GPU. Outdated drivers of your GPU are the obvious reason behind the LiveKernelEvent 141 hardware error. Hence, updating these drivers should be your priority.
Usually, these drivers become outdated because they are not regularly checked. The manual process on Windows is time-consuming. Hence the ideal way is to leave the updates on a professional tool.
Advanced Driver Updater, for instance, allows you to update all the outdated drivers on your PC in three simple steps –
Step 1 – Download the application from the link below.
Step 2 – Run a scan using the Start Scan Now button.

Step 3 – Click on Update All after examining the scan results.
The best part is that you can schedule these scans on your computer for automatic updates. This means no matter what happens. You will never face issues related to outdated drivers on your PC.
Download the app today!
Read the Complete review of the tool
Fix #4 – Run a Memory Diagnosis
Another thing you need to do is diagnose your PC memory. The idea of facing the LiveKernelEvent 141 hardware error suggests that the issue lies with the internal components of your PC. Memory being a crucial component needs to be checked properly.
To run a memory diagnostic test, simply –
Step 1 – Go to the start menu and search for Memory.

Step 2 – The first result will allow you to finish the diagnosis. Simply run it as administrator.
Step 3 – The opened diagnostic tool will ask you whether you want to completely diagnose the memory by restarting the device. Click on the first option.

This will now restart your PC and boot into memory diagnosis. Let the process run, and when the PC boots up, your computer will be free of LiveKernelEvent 141 hardware error.
Fix #5 – Run SFC and DISM Commands
The issue lies in the system files if you have no luck fixing the Livekernelevent hardware error. Running the SFC and DISM commands may help.
Step 1 – Go to the start menu, find Command Prompt, and run it as administrator.
Step 2 – Use the following commands in the CMD Window –
- Sfc/Scannow to initiate SFC scan on your PC.


Once the SFC scan is finished, use the following commands one after the other to run DISM –
Once the entire process is completed, restart your computer to check whether the LiveKernelEvent 141 crash error is resolved.
Other than these fixes, keeping your computer updated is also really important. If you have any pending updates to be installed, get over with them, as the LiveKernelevent hardware error often appears due to outdated software/OS.
Hopefully, these fixes will assist you in getting rid of the LiveKernelEvent 141 crash error. If you have any queries or confusion, please drop us a line in the comments section. That’ll be all for this post. Thanks for reading!
Good Luck fixing the LiveKernelEvent 141 hardware error!
Recommended :
Fix – KernelBase.dll crashing error Quickly
12 Best (Free & Paid) Driver Updater Software To Fix Driver Issues on Windows