
Livecd Windows Server 2016: что это такое и как использовать?
Livecd Windows Server 2016 — это операционная система, созданная для запуска с компакт-диска или USB-накопителя. Эта особенность делает ее очень удобной для использования в многих приложениях, включая тестирование программного обеспечения и восстановление данных.
Ключевые особенности Livecd Windows Server 2016
- Быстрый и легкий доступ к операционной системе
- Легко переносимая система
- Нет необходимости устанавливать операционную систему на компьютере
- Восстановление данных происходит без потерь

Livecd Windows Server 2016 может помочь в ситуациях, когда нужно быстро восстановить систему без необходимости установки ее на компьютер или разрешения сложных проблем в случае сбоев в оборудовании. Программисты и тестировщики могут использовать Livecd Windows Server 2016 для тестирования своих приложений.
Как использовать Livecd Windows Server 2016?
- Шаг 1: Загрузитесь с компакт-диска или USB-накопителя, на которых находится Livecd Windows Server 2016.
- Шаг 2: Выберите, какую операционную систему использовать.
- Шаг 3: Используйте компьютер, как обычно. Можно установить программы и использовать приложения без каких-либо ограничений.
- Шаг 4: После использования Livecd Windows Server 2016, выключите компьютер и удалите компакт-диск или USB-накопитель.
Преимущества использования Livecd Windows Server 2016

Вот несколько преимуществ использования Livecd Windows Server 2016:
- Экономичная система, так как установка не требуется.
- LiveCD не занимает много места на жестком диске/SSD-накопителе.
- Удобно использовать в случае сбоев в оборудовании.
- Livecd Windows Server 2016 отлично подходит для тестирования приложений.
- В случае использования нескольких операционных систем, Livecd Windows Server 2016 может быть установлен на несколько компакт-дисков или USB-накопителей.
Какой софт доступен на Livecd Windows Server 2016?
Livecd Windows Server 2016 поддерживает множество приложений, включая:
- Архиваторы
- Офисные приложения
- Браузеры
- Антивирусы
- Медиаплееры
- Инструменты для восстановления данных и многое другое
Общий итог
Livecd Windows Server 2016 — это отличное решение для тестирования приложений и восстановления данных. Эта операционная система позволяет быстро и легко получить доступ к вашей системе без установки ее на компьютер.
«LiveCD» — это отличное решение для активных пользователей компьютера, которые ищут более быстрое и занимающее меньше места на жестком диске/SSD-накопителе решение, чтобы сохранить и установить свои приложения.
Livecd Windows Server 2016
Windows Server 2016 is a powerful operating system designed to support enterprise-level computing. It comes with several features that make it suitable for mission-critical workloads, including virtualization, storage management, and networking. Windows Server 2016 is available as a traditional installation, but you can also use it in a Livecd environment. In this article, we will explore the benefits of using Windows Server 2016 Livecd, including how to create and use it.
Livecd Windows Server 2016: What is it?
A Livecd is a special type of operating system that doesn’t require any installation on your computer. Instead, you can run it directly from a CD, DVD, or USB drive. When you boot into the Livecd environment, the operating system loads into your computer’s RAM, giving you a fully functional system. Windows Server 2016 can also be used as a Livecd, providing you with the benefits of the operating system on a portable device.
Benefits of Livecd Windows Server 2016
- Mobility: With Windows Server 2016 Livecd, you can carry your operating system with you on a USB drive or CD. This makes it easy to work on different computers without worrying about compatibility issues or setup time.
- Security: When you use Windows Server 2016 Livecd, you are running the operating system in a read-only environment, which means that any changes you make won’t be saved. This helps to keep your system secure and free from malware or other security threats.
- Flexibility: Windows Server 2016 Livecd allows you to run the operating system without making any changes to your computer’s hard drive. This means you can test software or hardware configurations without worrying about damaging your existing system.
How to Create Livecd Windows Server 2016

Creating a Livecd for Windows Server 2016 is a simple process. Here are the steps to follow:
- Download the Windows Server 2016 ISO file from Microsoft’s website.
- Insert a blank CD, DVD, or USB drive into your computer.
- Open the Windows Server 2016 ISO file with a program like 7-Zip or WinRAR.
- Copy the contents of the ISO file to your CD, DVD, or USB drive.
- Boot your computer from the Livecd device you created.
How to Use Livecd Windows Server 2016

Once you have created a Livecd device for Windows Server 2016, you can use it to run the operating system on any computer. Here are a few tips to help you get started:
- Boot your computer from the Livecd device. You may need to adjust your BIOS settings to allow booting from a USB drive or CD.
- Once the operating system has loaded, you can use it just like you would a traditional installation of Windows Server 2016.
- Keep in mind that any changes you make to the Livecd environment will not be saved. If you want to save your changes, you will need to install Windows Server 2016 on your computer’s hard drive.
Conclusion
Windows Server 2016 is a powerful operating system that can be used in a Livecd environment. This provides users with several benefits, including mobility, security, and flexibility. Creating a Livecd device for Windows Server 2016 is a simple process, and once you have done so, you can use it on any computer.
Livecd windows server 2016: возможности и преимущества

Livecd windows server 2016 – это операционная система, которая работает с жестким диском только на чтение, в то время как все изменения сохраняются на RAM-диск. Таким образом, при каждом запуске система восстанавливается в первоначальное состояние.
Как использовать Livecd windows server 2016?
Livecd windows server 2016 может быть использован для различных целей:
- для управления компьютером без установленной операционной системы;
- для решения проблем с операционной системой;
- для восстановления данных после сбоя операционной системы;
- для создания тестовой среды для проведения экспериментов.
Преимущества Livecd windows server 2016
Livecd windows server 2016 имеет следующие преимущества:
- быстрый запуск операционной системы;
- возможность работы без установленного жесткого диска;
- высокая степень безопасности (все изменения сохраняются на RAM-диск);
- возможность использовать на любом компьютере.
Как создать Livecd windows server 2016?
Livecd windows server 2016 можно создать следующим образом:
- скачать образ Livecd windows server 2016;
- записать образ на CD или USB-носитель;
- загрузить компьютер с CD или USB-носителя.
Как использовать Livecd windows server 2016 в реальных условиях?
Livecd windows server 2016 может быть использован в следующих ситуациях:
- восстановление данных после сбоя операционной системы;
- удаление операционной системы с жесткого диска;
- изменение настроек BIOS;
- удаление вредоносных программ;
- восстановление адреса диска после сбоя.
Итоги

Livecd windows server 2016 – это удобный инструмент для создания безопасной среды для экспериментов, решения проблем с операционной системой, восстановления данных после сбоя и удаления вредоносных программ. Быстрый запуск операционной системы и возможность работы без установленного жесткого диска делают Livecd windows server 2016 незаменимым инструментом для профессионалов и начинающих пользователей.
These procedures were written and tested using Windows Server 2016 but will work on any version of Windows Server or Windows Desktop version 8 or above. They should work on prior versions of Windows 10, Windows 8, Windows Server 2012, Windows 7 and Windows Vista and Windows Server 2008 or Windows Server 2008 R2. Note: this post DOES NOT use any downloadable .EXE. This is the long way. If you want to create a bootable USB with Windows 10 using the executable, see: Download Windows 10 and Create bootable USB Thumb Drive for Booting to Installation PLUS Data Migration. The USB drive I created with these instructions was used to successfully install Windows Server 2016 TP5 and 2016 on bare metal with only one internal drive which was wiped during the installation. I have also fully tested Windows Server 2019.
If you do not have the media, you will need to download. See https://www.microsoft.com/en-us/evalcenter/evaluate-windows-server-technical-preview for the Technical Preview of Windows Server 2016. You could also download from MSDN.MICROSOFT.COM or other subscription service.
1) Double-click the ISO file to mount it (or mount the ISO) and make note of the drive letter. In my case it is drive I:
2) Put in the USB Thumb Drive Key in the computer and make note of the drive letter and the size of the disk. In my case it is D: and 32gb You will likely need at least an 8gb drive as the bits will require 4.9gb.

3) You need to run an elevated command prompt. Start | type cmd | Right-click cmd (top of menu) | Run as Administrator (accept the elevation request)
URGENT NOTE: The following commands will completely wipe out your disk without warning so make sure you select the proper disk. I strongly recommend you have a good backup of all drives attached to the machine before running. I also recommend you disconnect all external drives to limit mistakes.
NOTE: It is best to use a USB 2 drive because some hardware cannot boot to USB 3.
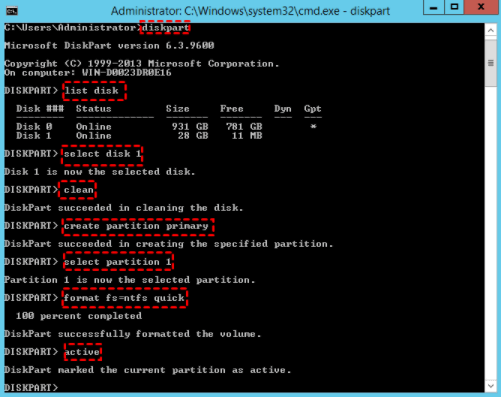
4) Next you will run Diskpart to prepare the disk for the OS {question mark “?” below should be replaced with the disk number of the drive you are using}
diskpart
list disk
- Make a note of the disk number of the drive you want to format and make bootable. Replace the ? in the next command with the number of the disk displayed in the list disk command results.
select disk ?
list disk
- Note: after you run list disk again, the drive should be prefaced with an asterisk “*” Make sure this is the case, so you do not wipe the wrong drive
— CAUTION: the next line is the one that wipes the drive
clean
create partition primary
select partition 1
active
- Note: if you are installing a version later than 2016 (eg 2019, 2022) you may get an error on the Active Command.
“The selected disk is not a fixed MBR disk. The ACTIVE command can only be used on fixed MBR disks.”
- You can just keep going, for later OS’s this is not a required step. The bootsect command later will take care of everything
The following command will defer depending on the configuration of the hardware you will be installing the OS on. If you are not sure, you can use the CTRL key to go into BIOS/SETUP to determine. UEFI is more secure.
- BIOS: If your machine uses BIOS the fs switch needs to be fs=ntfs
format fs=ntfs quick label=”2016TP5”
- UEFI: if the destination hardware uses UEFI fs switch needs to be fs=fat32.
format fs=fat32 quick label=”2016TP5”
- Note: You can change the text in the quotes of the format command to whatever you want the label to be on the USB disk. You can also change this later through the UI – Limit 11 characters.
- Note: if you have issues copying files later, come back to the format and run the command without the word quick in it. e.g.
format fs=ntfs label=”WinSvr2019”
exit
- You will get a message that you are Leaving DiskPart…
5) Now we need to copy the boot sector. You should still be in the command prompt window. Run the following commands to change to the right drive and folder:
Note: replace the I: below with your mounted ISO drive letter
- I:
- cd boot
- Note: Run “bootsect /help” for detailed usage instructions on bootsect.
- Note: /nt60 is for Windows Vista, Windows Server 2008 or above.
- Prior versions of windows (e.g. XP) must be /nt52
Replace e: in the below command with the drive letter of your USB drive
bootsect /nt60 e:
Target volumes will be updated with BOOTMGR compatible bootcode. This disk can also be used to fix boot loader on a machine that is having problems.
You will get a message:
Bootcode was successfully updated on all targeted volumes.
If you get the following error or similar:
Updated NTFS/Fat32 filesystem bootcode. The update may be unreliable since the volume could not be locked during the update:
Access is denied.
- This usually happens when the drive is open when trying to transfer the boot sector. During transfer, the drive will be dismounted and remounted in the background without notice.
- You will need to close any open windows with that drive and try again.
- The best option is to:
- Make sure you are using the correct drive letter
- make sure all files and folders on the drive are closed.
- Make sure “Disk Manager” is closed.
- Make sure you do not have a command prompt window open and currently positioned on the USB drive.
- If needed, you could disconnect the USB then connect it again. Make sure you are using the proper drive letter because when you disconnect and reconnect there is always the possibility you could get a different letter.
- You could also use the /force switch but be careful as if you are using the wrong drive, you could cause major damage to your computer.
6) Now we just need to copy files… (You should still be in the DOS Command window)
- Run the xCopy command to copy all files… replace drive letters below with your drive letters.
- I:\*.* is the Source ISO image drive
- D:\ is the Destination USB drive
- The switches are required to make sure you get all the right files including system files and sub folders
xcopy I:\*.* D:\ /E /H /F
- NOTE: when xCopy processes the install.wim file it will take an exceptionally long time. This file is exceptionally large (4+gb) so it takes forever, let it go, it will eventually finish.
7) Once the copy finishes, you can boot to the USB drive and it will be treated like an attached DVD. Remember, you may have to tell your computer to boot to the USB device which is often done from <F12> or other CTRL key to boot options in your BIOS / UEFI settings.
Diskpart Command-Line Utility Syntax and Description
habibzain Follow
Just husband, father and enthusiastic men about System Administration. Love to write short article about it. Perhaps can help and be useful for others.
1 min read
If we want to install windows server on a bare metal device, the traditional way is to burn the ISO to a CD/DVD. But what is the maximum size of the DVD? The largest DVD storage size is around 4.4 GB. The problem occurs is the ISO file size of the Windows Server installer is 6.5GB.
Hmm… Of course it won’t fit if the Windows Server ISO file is burned to a DVD. It could be split, split into 2 DVDs. But it’s a lot of effort to do.
Basically making bootable for windows is easy. Especially for Windows 10 or Windows 11. We just download the Windows Creation Tool and plug in the USB. It will automatically download the installer itself online and stored on the USB.
But what if we want to create a bootable USB for windows server? Unfortunately the Windows Creation Tool does not have a menu to create a bootable Windows Server. So we have to look for other alternative tools that can make Windows Server bootable.
Make Bootable Windows Server with “diskpart”
Step 1. Insert the USB drive on your PC. Go to Start and type cmd in the search box. Click on Run as administrator to open a command prompt.
Step 2. Type command diskpart and press enter.
Step 3. Type the following command one by one and press enter:
- list disk and press enter to appear disk list.
- select disk x
Where ‘x’ is the number of your flash drive.
Type the following commands one by one:
- clean.
- create partition primary.
- select partition 1.
Next we will select the partition as per your own requirement.
- format fs=ntfs quick (if you want to create UEFI bootable USB, type “format fs=fat32 quick”).
- active.
Step 4. Type Exit and press enter. It will close the diskpart command.
- assign letter= r or other available letter.
Then type “Exit” to leave the Diskpart command environment.
Step 4. Find the Windows Server setup ISO in your computer and double click on it to mount the ISO.
Step 5. Copy the entire contents of the mounted ISO drive to your bootable USB flash drive.
Step 6. Now, back to the Command Prompt window again and run the following command.
H:cd\boot\ bootsect.exe /nt60 R:to build the boot sector code in the specified partition. (H:\ is the drive letter of the mounted Windows ISO and R:\ is the destination USB drive letter)
We have built a Bootable USB from ISO by following the steps outlined above.
Make Bootable Windows Server with RUFUS
Rufus is third party tool open source for make USB bootable for Linux Distro. But we can use rufus to create bootable USB for windows server.
Step 1. Download Rufus Software and run it.
Plug USB drive and file ISO windows server. Set parameter like image below. And then start.

Rufus is easiest solution open source to make Bootable Windows Server.
reference:
- https://www.diskpart.com/server-2016/windows-server-2016-bootable-usb-7201.html
- https://rufus.ie/en/
Let's Buy Me Coffee.https://saweria.co/habibzain https://ko-fi.com/habibzain
- After successfull installation of the server, put the ISO file on it.
- Mount the ISO file and open Terminal (cmd) and goto your mounted ISO’s letter ( example g:\ )
- Put your USB Flash Drive and take attention on the dedicated device letter that windows selects for the USB Flash Drive.
- Now , inside the mounted ISO folder do the next commands:
 diskpart
    list disk # see the listing of all disk drives windows can see
    select disk # here select the letter of your usb flash drive
    clean # clean the selected disk on previous step
    create partition primary #create primary partition for booting
    select partition=1  # select first partition of the usb drive
    active # activate your selected partition , means choose it
    format fs=ntfs quick label="YOUR_DISK_LABEL" # formats disk partition
    exit   # exits diskpart
Now your USB Flash Drive is ready to be populated with Windows Server boot code and the windows server installation disk files.
5. Create the Boot sector and fill it with info: ( assumes you are still in the mounted ISO folder)
cd boot  # enter into boot directory of the mounted ISO structure
bootsect.exe /nt60 e:/ ( assuming your USB FLASH DRIVE windows letter is e:/ )
That’s enough for BOOTMGR to copy the bootcode to be able to boot your windows server 2016
6. Now you copy all the rest files from the mounted ISO into the Usb Flash Drive, now we assuming that the USB Flash Driver windows letter is still e:\ , and the ISO Mounted drive is g:\
xcopy G:\*.* E:\ /E /H /F # this will use xcopy command to copy all the files from g:\ to e:\ ( the mounted iso files to usb flash drive )
This is long process and ones its over, you are ready with your windows server 2016 recovery and installation usb flash drive.
That’s all.
Item Preview

Windows Server 2016 Build 9834 Datacenter-2023-04-03-13-46-06.png
Windows Server 2016 Build 9834 Datacenter-2023-04-03-13-46-10.png
Windows Server 2016 Build 9834 Datacenter-2023-04-03-13-46-23.png
Windows Server 2016 Build 9834 Datacenter-2023-04-03-17-37-00.png
Windows Server 2016 Build 9834 Datacenter-2023-04-03-17-37-34.png
Windows Server 2016 Build 9834 Datacenter-2023-04-03-17-40-34.png
616
Views
4
Favorites
DOWNLOAD OPTIONS
Uploaded by
ComputerExpert345
on