
Evaluation copies of Windows Server 2012 R2 directly from Microsoft
Originally from: https://www.microsoft.com/en-us/evalcenter/evaluate-windows-server-2012-r2
Files sourced from: https://www.microsoft.com/en-us/evalcenter/download-windows-server-2012-r2
WARNING: These are only 64-bit ISO files!
Languages available:
1) en-us (English)
2) zh-cn (Simplified Chinese)
3) fr-fr (French)
4) de-de (German)
5) it-it (Italian)
6) ja-jp (Japanese)
7) ru-ru (Russian)
 es-es (Spanish)
The ISO files contain the following editions:
— Server 2012 R2 Standard
— Server 2012 R2 Datacenter
Be sure to download the corresponding ISO file for your language instead of downloading all the ISO files!
All editions contain Full GUI or Server Core installation options.
Also Included:
— English .vhd hard disk image of Windows Server 2012 R2 Evaluation for use in Hyper-V
Be sure to click on «Show All» to see it for download it using your browser, or download via .torrent
Hashes (SHA-256):
en-us (.vhd): 72cd912172536360085047430514e15deee72031a9152f3885dd9658ace0eee3
en-us: 6612b5b1f53e845aacdf96e974bb119a3d9b4dcb5b82e65804ab7e534dc7b4d5
zh-cn: 2c288afedbd3db7f2e9ed6cfd29b313c44253fdb60e00c4120ab9f603f8fc212
fr-fr: c5166b8396896046dc6a87a7ad3077de29446004536d41bc9f59b34770fa272a
de-de: 41595a07f6a14fc6456b4969e771aa217ec4950a8aa080a032aed002b75f65e2
it-it: a3bbad15fba247ec96faff3a31ad9a9fa820d99f2f7ce72e1fd533ea9690c360
ja-jp: 9b71df56513ac218826b6336b87cdc7e46b9200cc61b29006636fb666b6e9a6f
ru-ru: cad06ce67f0be8be64bdd1f8bf0ad1a027a255f6a0ce750d9e7675797838a6cf
es-es: 0cb93132053dff5a4ed9cfff7a6b5691e91e28cf181de195c73fe8c79f129952
Additional info from Microsoft:
Windows
Server 2012 R2 provides a wide range of new and enhanced features and
capabilities spanning server virtualization, storage, software-defined
networking, server management and automation, web and application
platform, access and information protection, virtual desktop
infrastructure, and more.
Benefits
At
the heart of Microsoft’s Cloud OS, Windows Server helps customers
transform the datacenter, taking advantage of technical advances and new
hybrid cloud capabilities to increase resilience, simplify management,
reduce cost, and speed delivery of services to the business.
Windows
Server 2012 R2 is a proven, enterprise-class cloud and datacenter
platform that can scale to run your largest workloads while enabling
robust recovery options to protect against service outages. It helps
accelerate time to value by simplifying your underlying infrastructure
and allowing you to reduce cost by taking advantage of industry-standard
hardware. Windows Server 2012 R2 helps you build, deploy and scale
applications and web sites quickly, and gives you the flexibility to
move workloads between on-premises environments and the cloud. It
enables you to provide flexible, remote access to corporate resources
while managing identities across your datacenter and federated into the
cloud, and it helps you protect critical business information.
Prerequisites
- Review Windows Server 2012 R2 release notes and system requirements.
- Register, then download and install. Windows Server 2012 R2 evaluation editions expire in 180 days.
- Receive email with resources to guide you through your evaluation.
Steps to Activate Software License
- Connect to the internet, which will allow the software licensing service to attempt activation
- Telephone activation
- Users
with no internet connectivity can trigger the 10-day grace period by
running the following commands from an elevated command prompt:
- slmgr /rearm
- shutdown –r
This article shows you how to create a recovery disk for Windows Server 2003, Server 2008 and Server 2012 or where to download our disk – Easy Recovery Essentials. We also have versions for Windows Server 2016 and Windows Server 2022 now available for download.
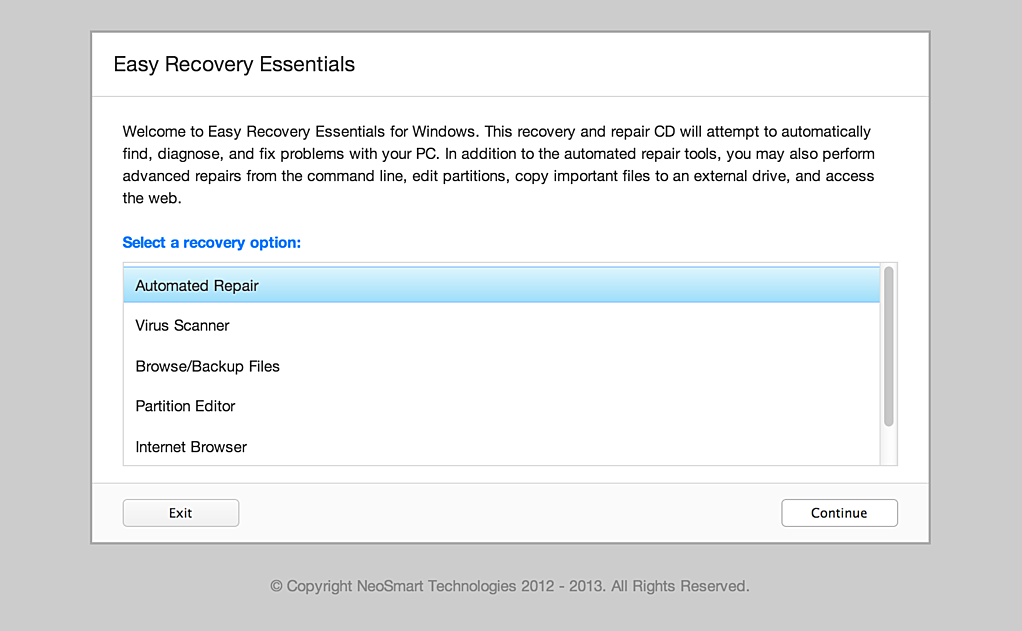
If you’re not able to create a recovery disk for your Windows Server edition (2003, 2008 or 2012), you can download our recovery and repair disk, Easy Recovery Essentials, to repair your Windows Server edition.
Download Easy Recovery Essentials
Features of Easy Recovery Essentials include:
- Automatically find and fix boot errors
- Works even when you can’t get into Windows
- Recover from virus infections
- Restore your PC to a working state
- Access and backup your important data
- Advanced tools for IT experts
Easy Recovery Essentials is an ISO download image ready to be burned directly to a CD, DVD or a USB flash drive.
It’s compatible with newer versions of Windows, up to Windows 8.1:
- Our recovery disk for Windows 8 computers
- Our recovery disk for Windows 7 computers
- Our recovery disk for Windows Vista computers
It’s also compatible with Windows XP:
- Our recovery disk for Windows XP computers
Create recovery disk for Windows Server 2003
To recover a Windows Recovery 2003 system you’ll need to boot into the Recovery Console (similar to Windows XP steps).
You need to have your original Windows Server 2003 installation CD to access Recovery Console, if you don’t have it installed on your computer.
If you’re not able to access Recovery Console, go to Download recovery disk for Windows Server.
Follow these steps to access the Recovery Console:
- Insert the CD in the optical drive
- Restart your computer
- At the Welcome to Setup screen, press R to load Recovery Console
- Select the Windows installation you want to access with Recovery console
- You’ll need to log in as an Administrator or with any user that has administrative rights to the system. Do so and enter the password.
- Press Enter
- The Recovery Console should now be available
In Recovery Console, you can now run the bootcfg or chkdsk commands.
Create recovery disk for Windows Server 2008
Your original Windows Server 2008 installation CD can be used a recovery disk.
If you already created a bare metal restore image using the Windows Server backup utility, you can restore your computer from that image.
Restoring Windows Server 2008 from a bare metal image will delete all personal files and replace your system with the backup image.
If you haven’t created a bare metal image (required to restore your computer) and can’t boot into Windows to do so, go to Download recovery disk for Windows Server.
Follow these steps to create a bare metal restore image that you can restore later using the installation CD:
- Boot into your Windows Server 2008
- Click Start
- Click Administrative Tools
- Click Windows Server Backup
- Select Backup once…
- Select Different options at the Backup options screen
- Click Next
- Select Custom
- Click Next
- Click Add Items
- Select Bare metal recovery
- Click OK
- Click Next
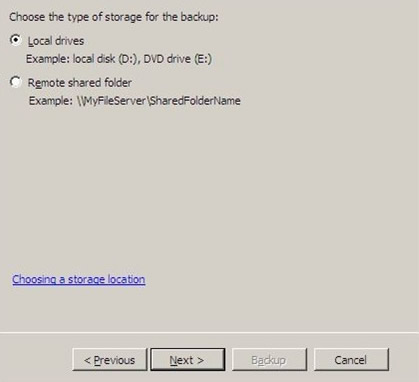
- Select Local drives from the Specify Destination Type screen

- Click Next
- Select your backup destination from the Backup destination field
- Click Next
- At the Confirmation screen, click Backup
- Wait for the backup process to finish
- At the Backup Progress screen, you should see the Status: Completed text
In order to restore your Windows Server 2008 from this created bare metal image, follow these steps.
You need your original installation CD for the steps below. If you don’t have it, go to Download recovery disk for Windows Server.
- Insert the Windows Server 2008 CD in the disc tray
- Boot your computer
- Boot from the CD
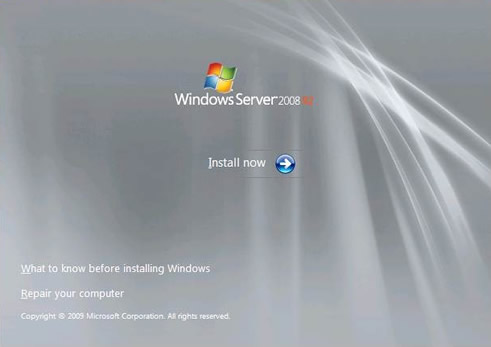
- At the Install Windows screen, select a language, time and keyboard
- Click Next
- Click Repair your computer
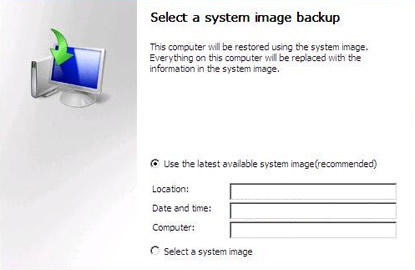
- At the System Recovery Options screen, select Restore your computer using a system image that you created earlier
- Click Next
- At the Select a system image backup, select Select a system image
- Click Next
- At the Choose additional restore options screen, you can choose to format and repartition the disks
- Click Next
- Click Finish
- Click Yes at the warning message
- Wait for the process to finish
Create recovery disk for Windows Server 2012
Windows Server 2012 uses the Windows Server Backup utility, just as Windows Server 2008 does, which lets you create a bare metal image that you can use later to restore from.
Restoring from a bare metal image will delete all personal files and will be replaced with the image you are restoring from.
If you haven’t created a bare metal image (required to restore your computer) and can’t boot into Windows to do so, go to Download recovery disk for Windows Server.
Follow these steps to create a bare metal restore image:
- Boot into your Windows Server 2012
- Click Start or search for the Windows Server Backup software
- Load Windows Server Backup
- Select Backup once…
- Continue with the wizard instructions until you can select the Bare metal recovery option
- Click Next
- Continue with the wizard instructions to create the image
Once you’ve created the bare metal image, you can restore it using your original Windows Server 2012 installation DVD:
- Insert the DVD in the optical drive
- Boot from the DVD
- At the Windows Setup screen, click Repair your computer
- Select Troubleshoot
- Select System Image Recovery
- Select the Windows system, e.g. Windows Server 2012
- At the Re-image your computer screen, you can begin to select what image to restore from
- Click Next and follow the instructions to continue with the process
More Information
Linked Entries
- bootcfg
- chkdsk
Support Links
- Easy Recovery Essentials for Windows – our repair and recovery disk.
It’s an easy-to-use and automated diagnostics disk. It’s available for Windows 8, Windows 7 and Windows Vista. It’s also available for Windows XP and Windows Server.
Read more at Windows Recovery Disks.
- The NeoSmart Support Forums, member-to-member technical support and troubleshooting.
Applicable Systems
This article applies to the following operating systems:
- Windows Server 2003
- Windows Server 2008
- Windows Server 2012
Hi Windows connoisseurs! (wiki)
(This is essentially a remake of my Create a bootable Windows 8.1 installation USB flash drive post.) The setps are the same so you can easily follow that post or use this slightly updated version.
In this guide I will help you find a way to install Windows Server 2012 R2 quick and easy, from a simple USB flash drive. It’s really easy, but you still need to Think about a few things.
I’ll list them here and if you want, you can follow the step by step guide below.
Quicksteps:
1. Get a USB Flash drive formatted with FAT32, it has to be AT LEAST 8GB! (The Windows Server 2012R2 installation bits will not fit on a 4GB USB drive…)
2. Download and install the Windows 7 USB/DVD Download tool from Microsoft Store here or Codeplex here (It is an official Microsoft tool, totally wierdly named from the Windows 7 release but still very much valid!)
3. Download or locate a ‘Windows Server 2012 R2’ .iso file and store it locally on your harddrive.
4. Start the Windows 7 USB/DVD Download tool (from startbutton or ‘windows 8/Metro’ style startmenu’?)
5. Complete the steps 1-4
6. Insert the USB flash drive into the powered off PC to install, Power on and boot from USB drive (F9 at HP logo on HP Machines).
7. Install Windows Server as you would normally.
8. Done!
This guide in its entirety works just as well if you replace the Windows Server 2012 R2 .iso file with Windows 8.1, Windows 7, Windows Server 2012 or plain Windows 8 (Windows Server 2008 R2 not verified but willmost likely also work)
Step by step:
1. USB Flash Drive
Prepare a USB flash drive for installation, is has to be at least 8 GB in size and it has to be formatted with FAT32. It does not have to be erased, the tool will do that for you if needed.
Before
2. Download and install the Windows 7 USB/DVD Download tool from Microsoft Store or Codeplex. The Links are as follows:
http://images2.store.microsoft.com/prod/clustera/framework/w7udt/1.0/en-us/Windows7-USB-DVD-tool.exe
or
http://wudt.codeplex.com
Run the .exe file, you will have to be a local administrator on your machine for it to install properly.

Click Next

Click Install

Click Finish
3. Locate a Windows Server 2012 R2 .iso file. This file should be placed on a local harddrive. It does not matter where you put it, as long as it is on a local HD and it is accessable to you when running the tool, meaning that you have access to where the file is stored in the filesystem.
4. After the installation of the tool has completed, you will suddenly notice this tile:
You can also just use the search function, in ‘metro mode’ simply type Windows 7 and you will see it and its uninstall app.
Start the tool
Click Ok at the User Account Control popup dialog
The first screen should now look like this:

5. Hit the Browse button to locate your Windows Server 2012 R2 installation iso file.

In my test, I’m using an .iso file downloaded from TechNet Subscriber downloads (soon to be no more)
It does not have to be from TechNet, it can be MSDN or Volume Licensing or really any form of Windows Server 2012 R2 installation iso.
Click ‘Next’

Click on ‘USB device’
If you see the window below, that means that the USB drive is either not plugged in properly, or it has the wrong formatting or insufficient storage or similar. Make sure that you have a USB flash drive that meets: 4GB minimum+FAT32.

Insert a USB drive that meets the requirements and press the refresh button
Now, click on the ‘Begin copying’ button.
If the USB drive was ok, the copying will begin, but if not, if it still had files still on it, you will see this dialog:

Click Erase to continue

Click Yes and the formatting and copying process will begin.
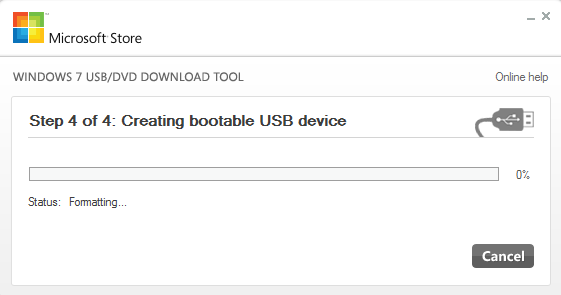

Let it do its thing until it reaches 100%
When it has finished formatting and copying files, you are done.
After!
6. Next step, is to insert the USB drive into the PC you want to install Windows Server 2012 R2 on, Power it off completely and Power on again.
Use BIOS settings to select ‘boot from USB’ or like on a HP machine, hit F9 at the HP logo screen to boot directly from USB.
7. Let the Installation begin! The Windows installation is pretty much standard. A Clean install is described here. The setup of Windows 8, which is pretty much the same, is described here
8. Done!
References:
Install and Deploy Windows Server 2012 (R2)
http://technet.microsoft.com/en-us/library/hh831620.aspx
Thanks to:
Herakles and Gutke!
___________________________________________________________________________________________________
Enjoy!
Regards
Twitter | Technet Profile | LinkedIn
Published by Thomas Balkeståhl
Yup, this is me!
View all posts by Thomas Balkeståhl
Published
В этой статье мы разберемся, как создать специальную UEFI загрузочную USB флешку (диск) для последующей установки Windows 8 или Windows Server 2012 на оборудовании в нативном режиме UEFI.
Мы ранее уже описывали, как создать загрузочную флешку с Windows 8, однако дело в том, что подобную флешку нельзя использовать для установки ОС системы с UEFI (подробнее про UEFI и Windows 8). Данная флешка, хотя и определится в системе, но загрузка с нее будет невозможной.
Проблема заключается в том, что большинство утилит, создающих загрузочные флешки (в том числе созданные с помощью Windows 7 USB/DVD Download Tool) форматируют устройство в файловой системе NTFS, а UEFI не поддерживают загрузку с носителя с NTFS (также и c файловой системы exFat), такие системы грузятся только с FAT32.

Поэтому нам нужно создать загрузочный диск с FAT32 и скопировать на него дистрибутив Windows.
Что нам понадобится для создание загрузочной UEFI флешки:
- USB флешка или диск, размером не менее 4 Гб
- Дистрибутив Windows 8 или Windows Server 2012 на DVD или в iso образе
- Процедура выполняется с помощью утилиты diskpart на компьютере с Windows 7/8/2008/2012
Подключите флешку в свободный USB порт компьютера (чтобы не было путаницы, все остальные USB устройства хранения лучше отключить ). Откройте командную строку с правами администратора и выполните следующие команды:
- Запустите утилиту управления разделами Diskpart:
diskpart
- Выведите список дисков в системе командой
list disk
- Выберите диск, соответствующий вашей флешке (можно сориентироваться по размеру диска)
select disk 1
- Удостоверьтесь, что на предыдущем шаге вы выбрали именно флешку, т.к. сейчас мы удалим на ней все данные
clean
- Создайте первичный раздел
create partition primary
- Выберите его
select partition 1
- Сделаем его активным
active
- Отформатируйте флешку в файловой системе FAT32 (напомним, что в системе UEFI загрузка возможна только с FAT32, но не с NTFS)
format fs fat32 quick
- Задайте букву созданному диску
assign
- Завершите работу с DiskPart
exit

Далее нам нужно скопировать файлы дистрибутива Windows 8 x64 на созданную нами загрузочную флешку. Для этого монтируем диск с образом Windows 8 (допустим это будет диск H:, а флешке присвоена буква F:) и с помощью команды xcopy копируем все его содержимое на флешку
xcopy H:\* F:\ /s /e
Если вы делаете загрузочную флешку UEFI для 64-битных Windows Vista SP1, Windows 7 или Windows Server 2008 R2, нужно на флешке создать каталог EFI и скопировать каталог boot в нее. Подробно процесс создания загрузочной usb флешки с Windows 7 под UEFI
Теперь с данного носителя можно установить операционную систему в режиме UEFI. Не забудьте перед началом установки отключить Security Boot в параметрах загрузки системы (в UEFI — ex BIOS). После окончания установки Windows Security Boot можно включить (более подробно о режиме Secure Boot в Windows 8).
Содержание статьи:
- Выбор LiveCD: подборка
- Live Disk WinPE 10-8 Sergei Strelec 👍
- Мультитул сисадмина
- Active@ Live CD
- Admin PE
- Hiren’s BootCD PE
- Еще несколько полезных альтернатив
- Вопросы и ответы: 37
Доброго времени суток!
LiveCD диск или флешка — крайне полезная вещь! Пока всё работает — о ней вроде и не вспоминаешь, но как только возникает проблема — без неё и не туда и не сюда! ☝
Например, перестала загружаться ОС Windows — при помощи LiveCD можно быстро загрузиться и скопировать все нужные документы и файлы. Удобно?! Я уж не говорю о том, как это удобно для тестирования и диагностики ПК/ноутбука (особенно, при его «покупке с рук…»).
В этой небольшой заметке предложу несколько весьма многофункциональных LiveCD, которые вас выручат при самых разных проблемах. В общем, рекомендую всем иметь хотя бы 1 LiveCD-флешку в качестве аварийного инструмента! Мало ли…?
👉 В помощь!
Как создать загрузочный LiveCD/DVD/USB-флешку или диск с операционной системой Windows [инструкция]
*
Выбор LiveCD: подборка
❶
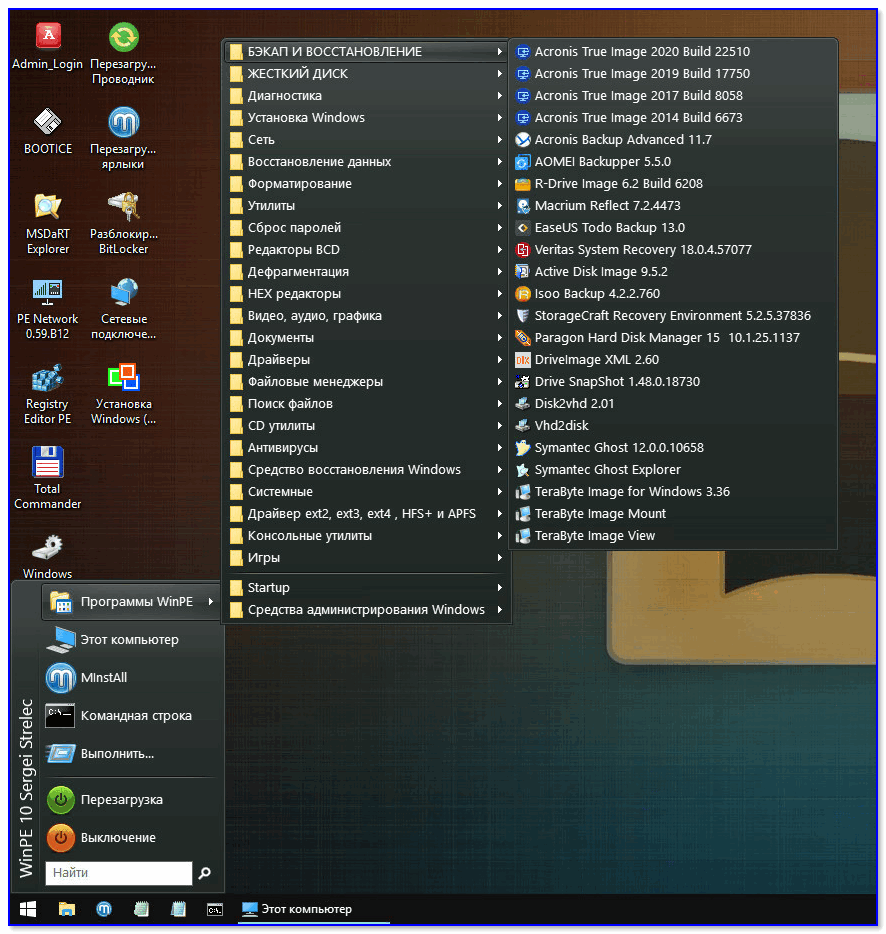
Live Disk WinPE 10-8 Sergei Strelec 👍
Сайт разработчика: https://sergeistrelec.name/
Как загрузиться с такой флешки: инструкция
Какие программы есть на диске «Стрельца…»
Один из лучших загрузочных LiveCD дисков на базе Windows 10 PE (интерфейс точно такой же, как в обычной ОС, и полностью на русском языке!).
Не могу не отметь, что Сергей Стрелец (автор сборки) собрал десятки самых нужных программ на «все случаи жизни»: есть и антивирусы, и HEX-редакторы, и ПО для работы с HDD, и для диагностики, и для графики и т.д.
Отлично подходит для решения практически любых проблем с ПК/ноутбуком:
- форматирование и разбивка диска;
- бэкап и восстановление данных;
- диагностика: дисков, ОЗУ, ЦП, видеокарты и пр.;
- антивирусная проверка и многое другое.
В общем, однозначно рекомендую к знакомству!
✔👉Примечание: для записи LiveCD образа на флешку — можно:
- воспользоваться утилитой «ISO to USB», которая идет в одном архиве с ISO (пример настроек — см. на скрине ниже 👇);
- либо скопировать ISO-образ на флешку, подготовленную в Ventoy (этот вариант легче и универсальнее (Legacy + UEFI)).
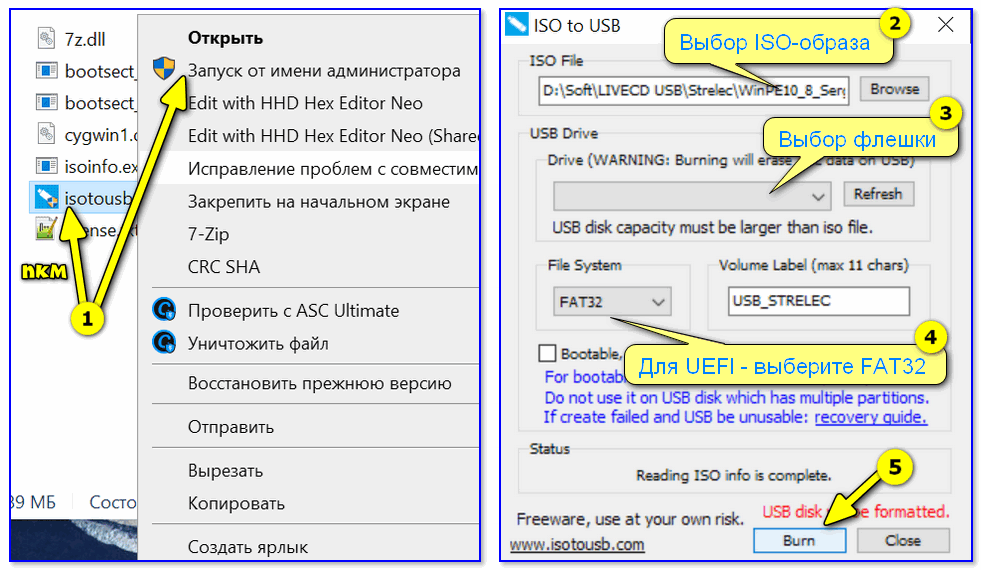
ISO to USB — как записать загрузочную флешку
*
❷
Мультитул сисадмина
Сайт разработчиков: http://a-admin.ru/rsa.php
Как записать образ на флешку: https://ocomp.info/kak-zapisat-obraz-iso-na-fleshku-2-sposoba.html
Загрузка с диска «Мультитул сисадмина». Скрин с сайта разработчиков
Большой ISO-образ, реаниматор CD/DVD для USB (как приведено на офиц. сайте). Записав их образ ISO на флешку — вы получите универсальный инструмент как для восстановления своей текущей Windows, так и просто для работы за любым ПК (на котором даже нет жесткого диска).
Особенности:
- реаниматор включает разные версии WinPe: 8, 10, 11;
- большой сборник программ для WinPe и Windows;
- полная поддержка USB3, NVMe накопителей;
- инструменты для восстановления Windows;
- «вшитый» комплект драйверов WinPe для различных устройств (например, может пригодиться для подкл. к сети Интернет);
- поддержка программ, которые требуется NET Framework;
- поддержка файловых систем Linux и Apple.
*
❸
Active@ Live CD
Сайт разработчиков: https://lsoft.net/livecd
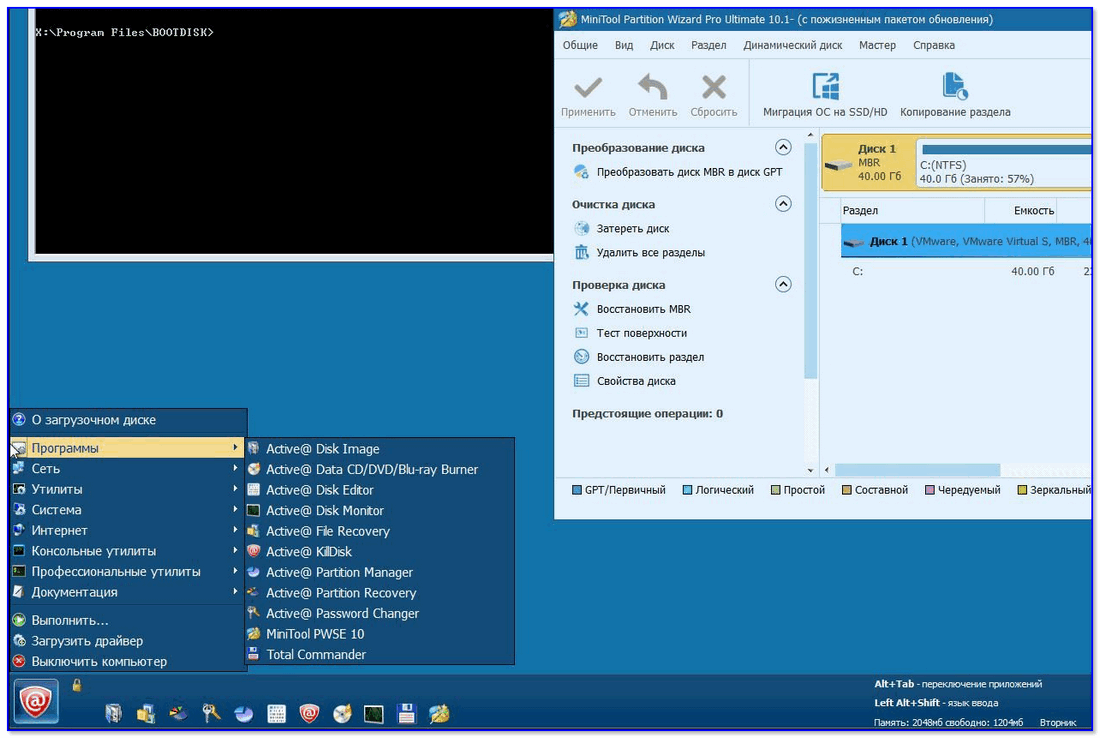
Active@ Live CD — пример работы ПО
Практически полноценная ОС, которую можно записать на CD/DVD-диск или USB-накопитель и пользоваться на любом ПК/ноутбуке! (Разумеется, без установки — достаточно просто загрузиться с заранее подготовленной флешки)
Основные функции:
- инструменты для восстановления данных, сброса пароля, создания резервной копии системы;
- форматирование и работа с разделами жесткого диска;
- удаление информации с диска без возможности последующего восстановления (полезно при продаже ПК);
- мониторинг за температурой ЦП, диска, и др. компонентов, и показаниями SMART дисков;
- встроенные программы: блокнот, редактор реестра, калькулятор, HEX редактор и др.;
- возможность работы с файловыми системами: FAT12, FAT16, FAT32, NTFS, NTFS5, NTFS+EFS;
- поддержка IDE / ATA / SCSI дисков.
*
❹
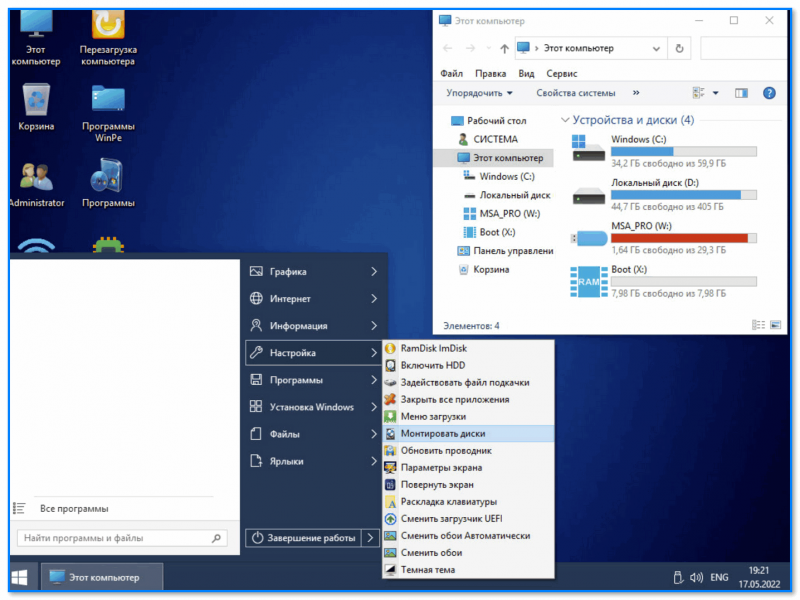
Admin PE
Официальный сайт: https://adminpe.ru/winpe10/
Найти ISO-образы можно так
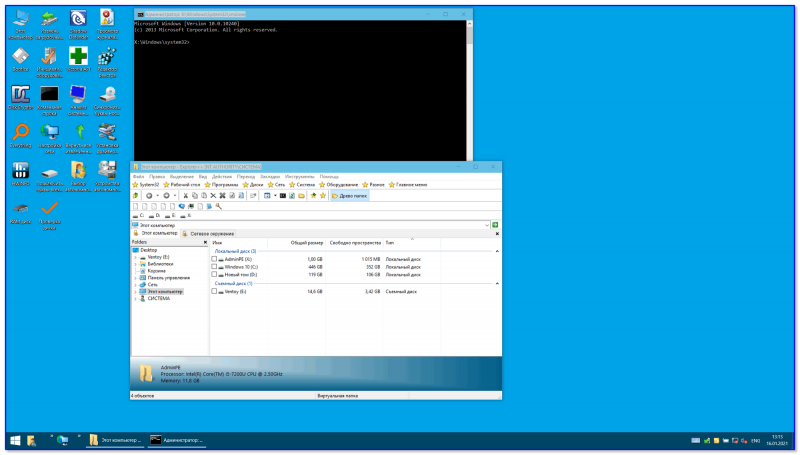
Admin PE — скриншот главного окна
Эта сборка основана на Win PE 10 (есть также и на Win PE 8). Предназначена для автономной работы с ОС Windows 10 (на «проблемных» и диагностируемых ПК).
В этом пакете есть достаточно много встроенного ПО:
- Total Commander;
- Acronis Disk Director;
- Paragon Hard Disk Manager;
- Minitool Partition Wizard;
- AIDA64;
- R-Studio;
- WinRAR;
- Reset Windows Password;
- Norton Ghost и многое другое.
Пожалуй, единственный минус: довольно редко у Admin PE бывают обновления (последний образ датируется 2018г. Впрочем, даже этого обычно хватает с избытком…).
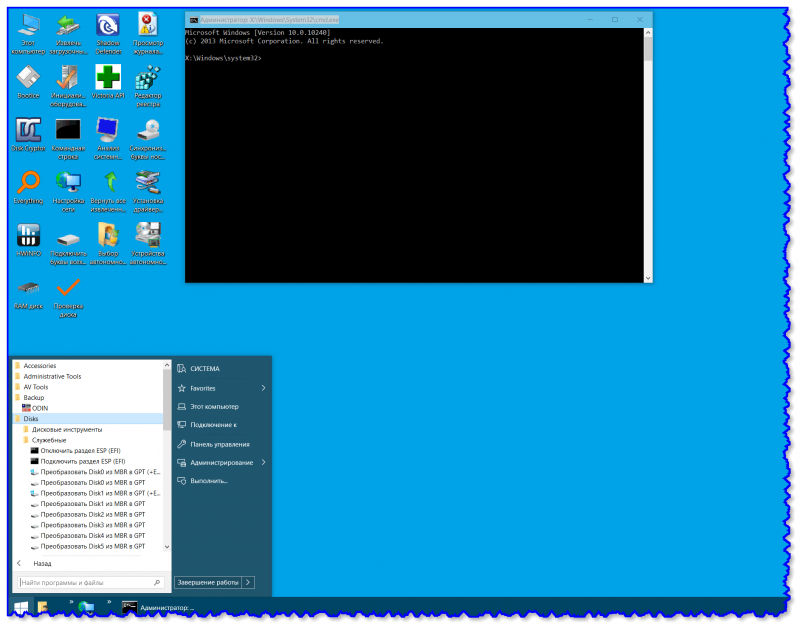
Admin PE — скриншот главного окна 2 (см. меню ПУСК, есть опции для преобразования диска MBR к GPT)
*
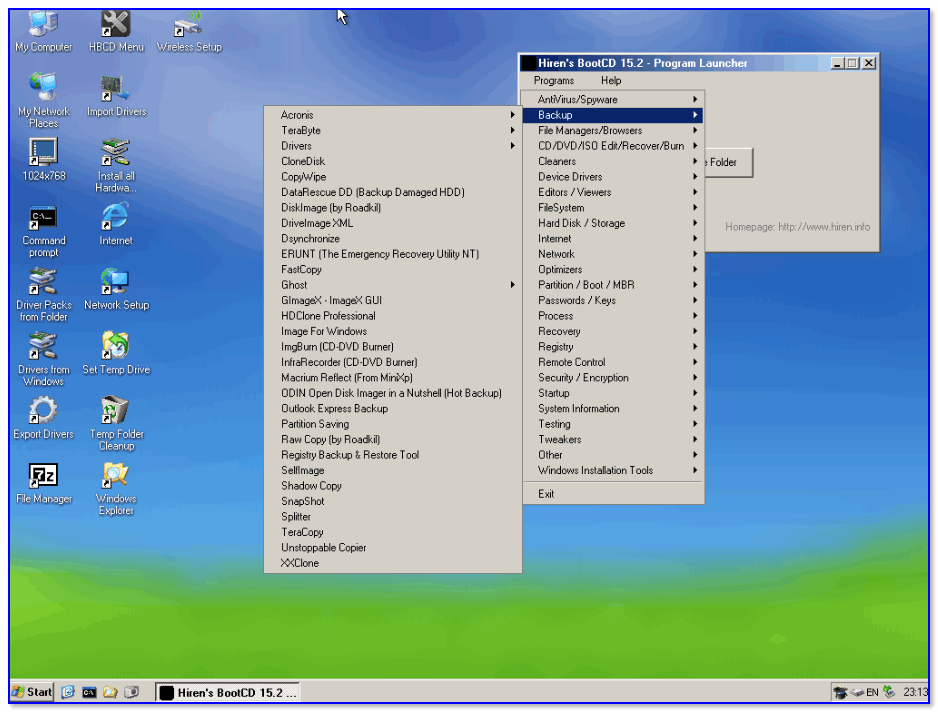
❺
Hiren’s BootCD PE
Официальный сайт: https://hirensbootcd.org

Hiren’s BootCD PE — скриншот работы сборки
Hiren’s BootCD PE – этот диск основан на ОС Windows XP (урезанной версии) с полным комплектом различных программ. Позволяет относительно спокойно пользоваться ПК (в том числе и сетью) просто загрузившись с флешки.
Что есть в наборе:
- диагностика диска: HDDScan, HDTune, DiskExplorer;
- бэкап и работа с HDD: Acronis TrueImage, AOMEI Backupper, Partition Extender, HDD Low Level Format Tool и др.;
- офис и блокноты: Notepad++, Free Office, FSViewer, Sumatra PDF, и пр.;
- антивирус: ESET Online Scanner, Malwarebytes Anti-Malware;
- диагностика, тесты: CPU-Z, HWInfo, Speccy, CCleaner, SysInternals Suite и др.;
- сеть, интернет: Chrome, Mozilla Firefox, Aero Admin и др.
Hiren’s BootCD PE — еще один скриншот
*
❻
Еще несколько полезных альтернатив
👉 Ultimate Boot CD
Сайт: https://ultimatebootcd.com
Несмотря на то, что этот пакет не обновлялся последние пару лет — он до сих пор в «форме». Позволяет в 2-3 клика мышки проверять системы на вирусы, восстанавливать удаленные файлы, смотреть характеристики ПК, форматировать диски, и многое другое.
Минус: только на англ. языке (если с ним не дружите — лучше выбрать что-то альтернативное).

Ultimate Boot CD — внешний вид
*
👉 AOMEI PE Builder
Сайт: https://ubackup.com
Описание, как с этим работать
Хороший добротный инструмент с самыми нужными прикладными программами и системными утилитами. Более подробно о ней я рассказывал в одной из прошлых своих заметок.
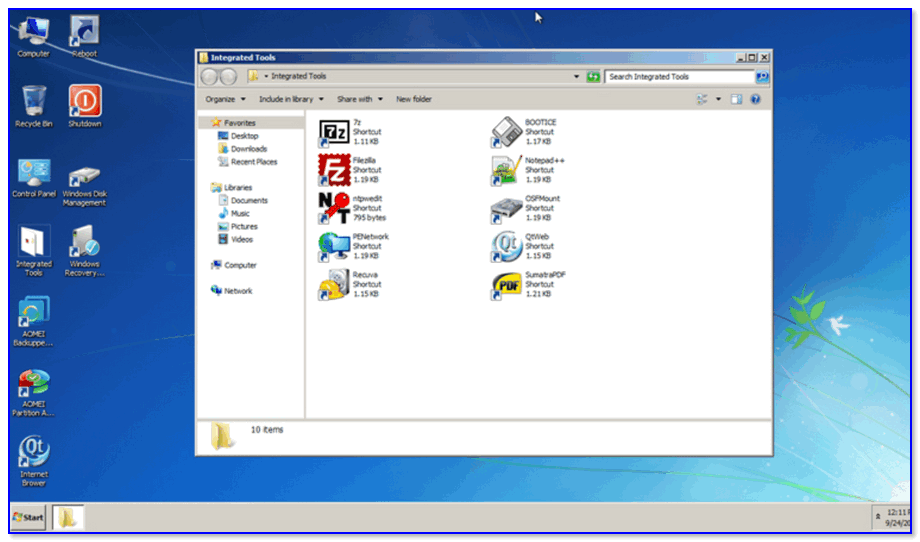
AOMEI PE Builder — скриншот окна
*
👉 Dr.Web Live Disk
Сайт: https://free.drweb.ru/
LiveCD от знаменитого антивируса. Позволяет проверить систему на вирусы и вредоносное ПО, если Windows отказалась загружаться. Кроме этого, LiveCD содержит файловый коммандер, браузер, терминал, почту и пр.
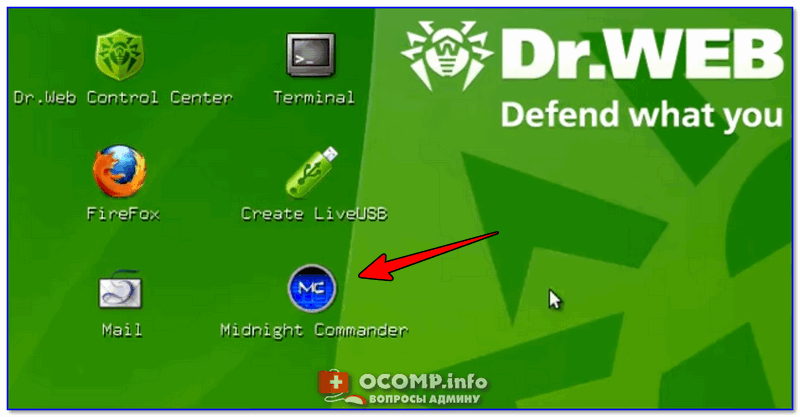
Midnight Commander — файловый коммандер / Доктор Веб LiveCD
*
👉 ESET NOD32 LiveCD
Сайт: https://esetnod32.ru
Аналогичный продукт от ESET. Содержит не так много инструментов, но для проверки системы, работы с диском и сетью — вполне достаточно!

ESET NOD 32 LiveCD — скриншот
*
Дополнения и комментарии по теме — всегда приветствуются!
Ну а у меня пока всё, удачи!
👋
Первая публикация: 28.05.2020
Корректировка: 18.10.2023