
In recent years, the need to run multiple operating systems on a single machine has grown significantly. Whether you’re a developer testing software in different environments, a student learning about systems programming, or a casual user wanting to explore the Linux environment, running a Linux virtual machine (VM) on Windows 11 is a practical solution. This comprehensive guide will take you step by step through the process of setting up a Linux VM on Windows 11 using various methods, including Hyper-V, VirtualBox, and VMware Workstation Player.
Understanding Virtualization
Before diving into the setup, it is essential to understand the concept of virtualization. Virtualization allows multiple operating systems to run on a single physical machine by creating a virtual environment. This is accomplished through a Hypervisor, which could be Type 1 (bare-metal) or Type 2 (hosted).
Type 1 Hypervisor operates directly on the hardware and installs the guest OS. Examples include VMware ESXi and Microsoft Hyper-V.
Type 2 Hypervisor, on the other hand, runs on top of the existing OS and uses the host operating system’s resources to run guest OS. Examples include VMware Workstation and Oracle VirtualBox.
For most average users wishing to run Linux on their Windows 11 systems, Type 2 hypervisors will provide a more straightforward and easier-to-manage solution.
Prerequisites
To run a Linux VM on Windows 11, ensure that your computer meets these requirements:
-
64-bit Processor: Both Windows 11 and most Linux distributions require a 64-bit CPU.
-
Memory (RAM): A minimum of 4GB of RAM is recommended for a smooth experience, but more is preferable, especially if you plan to run resource-intensive applications.
-
Storage: You should have sufficient disk space. A Linux installation can take up anywhere from 10GB to more than 20GB.
-
Virtualization Support: Make sure that your CPU supports virtualization technology (Intel VT-x or AMD-V) and that it is enabled in your BIOS/UEFI settings.
-
Windows 11 Installation: Ensure that your Windows 11 is up to date to avoid compatibility issues.
Setting Up a Linux VM Using Hyper-V
Windows 11 comes with Hyper-V, a powerful virtualization tool built into Windows Professional and Enterprise versions. Below are the steps to set up a Linux VM using Hyper-V.
Step 1: Enable Hyper-V
-
Access Windows Features: Open the Start menu and type «Turn Windows features on or off.» Press enter.
-
Enable Hyper-V: In the Windows Features dialog, check the box for Hyper-V. Ensure that both «Hyper-V Management Tools» and «Hyper-V Platform» are selected. Click OK.
-
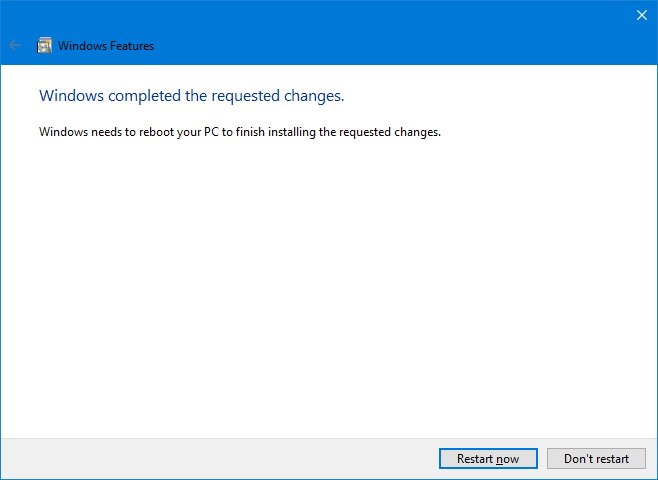
Restart: Windows will prompt you to restart your computer. Click on Restart now.
Step 2: Download a Linux ISO
You need a Linux distribution to install. Popular options include:
- Ubuntu: One of the most widely-used distributions, known for its user-friendliness.
- Fedora: Known for having the latest software and a focus on free software principles.
- Debian: Renowned for its stability and a vast repository of software.
For this guide, we will use Ubuntu.
- Go to the official Ubuntu website.
- Download the latest LTS (Long Term Support) version.
Step 3: Create a New Virtual Machine
-
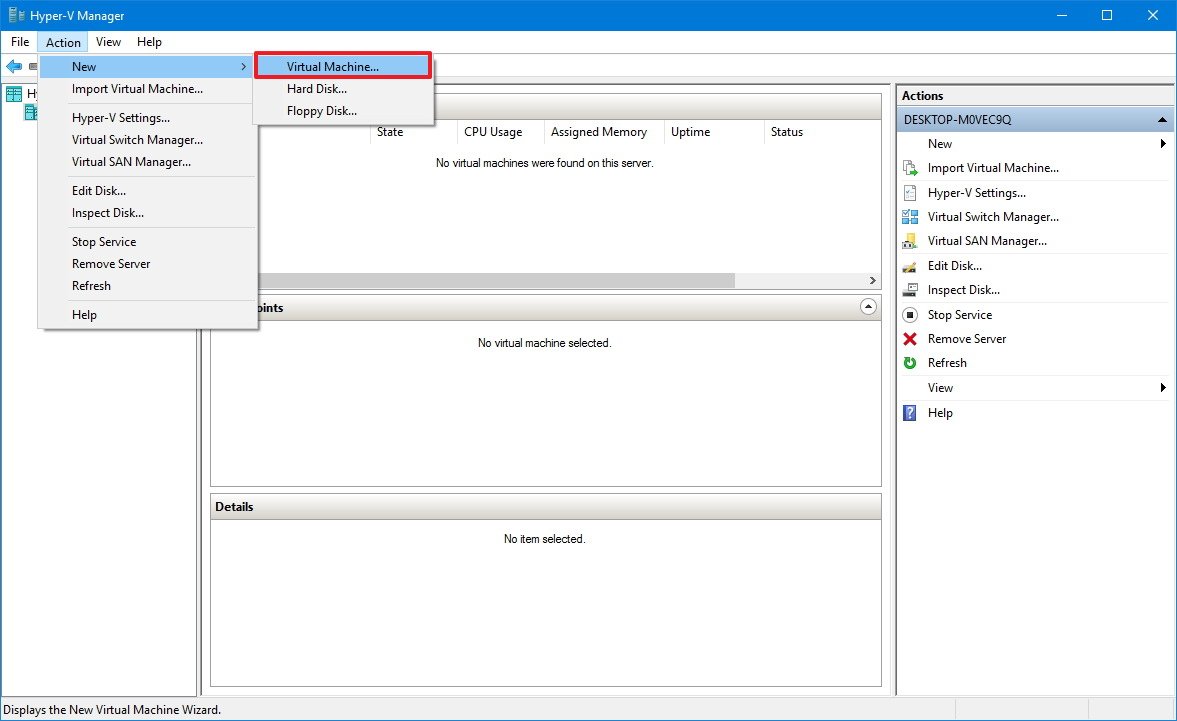
Open Hyper-V Manager: Search for «Hyper-V Manager» in the Start menu and open it.
-
Create New Virtual Machine: In the right sidebar, click on «New» and select «Virtual Machine.»
-
Follow the Wizard:
- Specify Name and Location: Choose a name for your VM and an optional storage location.
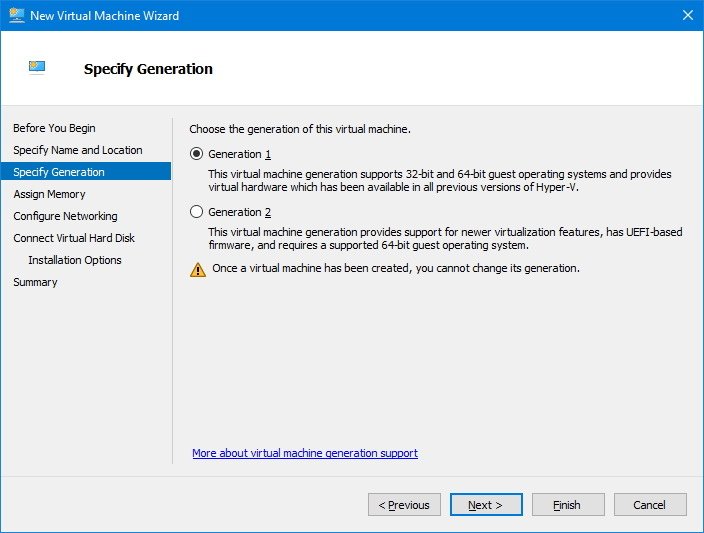
- Specify Generation: Select “Generation 2” for most recent Linux distributions, which offers various advantages such as UEFI support.
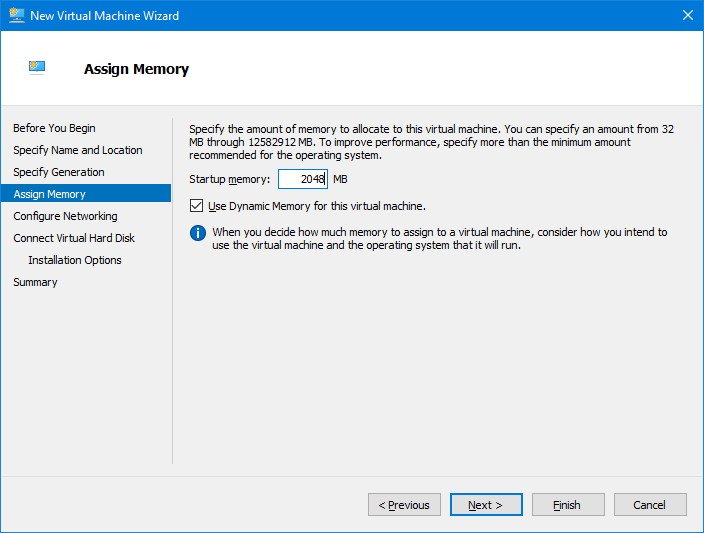
- Assign Memory: Allocate at least 2048 MB of RAM (more is better) and select the option «Use Dynamic Memory for this virtual machine» if you want to adjust the memory as necessary.
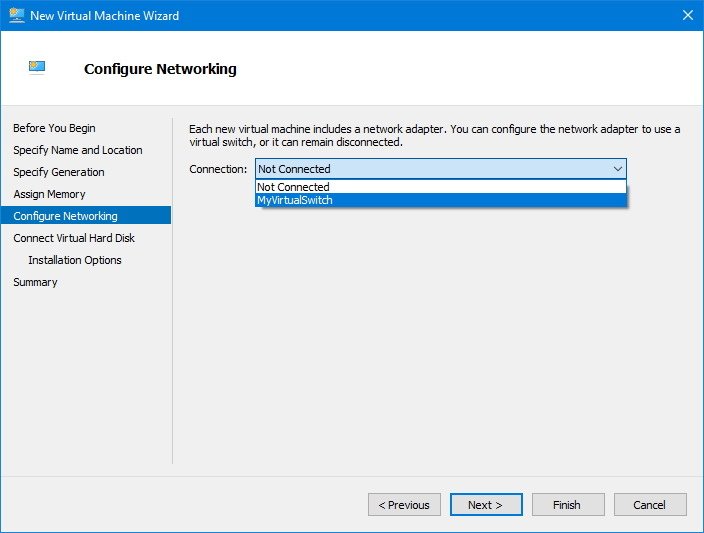
- Configure Networking: If you have a virtual switch set up, choose it to connect your VM to the network.
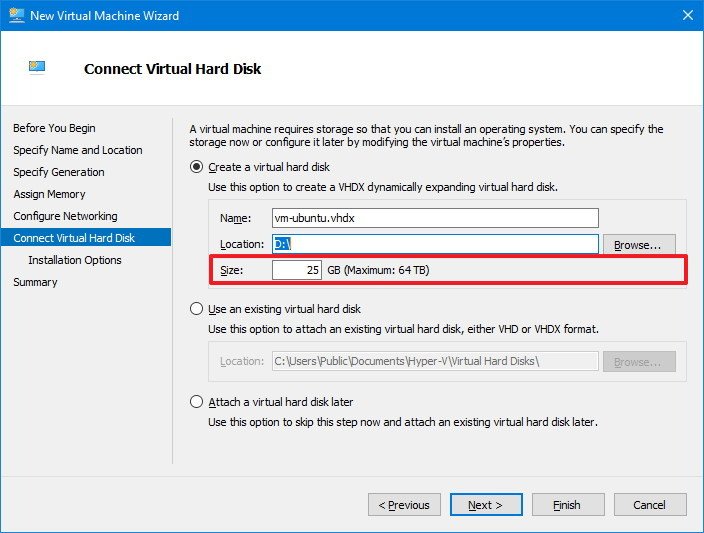
- Connect Virtual Hard Disk: Select “Create a virtual hard disk” and specify the size (20 GB or more is recommended).
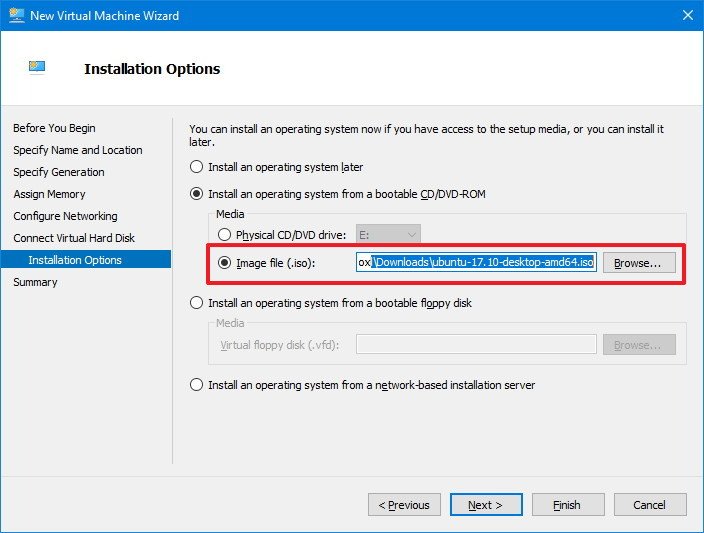
- Installation Options: Select «Install an operating system from a bootable CD/DVD-ROM» and choose «Image file» to navigate to your downloaded Ubuntu ISO.
-
Finish Setup: Review your settings and click «Finish.»
Step 4: Start the Virtual Machine
-
Select Your VM: In Hyper-V Manager, select your newly created VM from the list.
-
Start the VM: Click on «Connect» in the right sidebar to open the VM console, then click «Start.»
-
Install Linux: Follow the on-screen instructions to install Linux on your VM.
Step 5: Install Integration Services
After the installation is complete, you will want to install guest features that Hyper-V offers.
- Login to your Linux VM.
- Open the terminal and run the command to install the
linux-toolspackage. - Restart your VM for the changes to take effect.
Setting Up a Linux VM Using VirtualBox
If you prefer not to use Hyper-V, Oracle’s VirtualBox is an excellent free alternative. It is cross-platform and widely used.
Step 1: Download and Install VirtualBox
- Go to the VirtualBox website.
- Download the Windows version of the installer.
- Run the installer and follow the prompts to complete the installation.
Step 2: Download a Linux ISO
Similar to the Hyper-V method, download the desired Linux distribution ISO from the respective website.
Step 3: Create a New Virtual Machine
- Open VirtualBox.
- Click on the “New” button to create a new VM.
- Name Your VM: Provide a name and select the type “Linux” with the version corresponding to your ISO (e.g., Ubuntu (64-bit)).
- Allocate Memory: Allocate at least 2048 MB of RAM.
- Create Virtual Hard Disk: Choose the option to create a virtual hard disk now, select VDI (VirtualBox Disk Image), and allocate at least 20 GB.
- Select Storage on Physical Hard Disk: Choose «Dynamically allocated» so that it uses disk space as needed.
- Finish the VM creation.
Step 4: Install Linux on the Virtual Machine
- Select your VM and click on “Settings”.
- Go to the “Storage” section and click on the empty CD icon. Then, click the CD icon on the right and select «Choose a disk file,» navigating to your downloaded Linux ISO.
- Click “OK” to close the settings menu.
Step 5: Start the Virtual Machine
- With your VM selected, click on «Start.»
- Follow the on-screen prompts to install your chosen Linux distribution.
Step 6: Install Guest Additions (Optional)
After installation, enhance the user experience by installing Guest Additions:
- Start your Linux VM.
- Insert the Guest Additions CD from the VirtualBox “Devices” menu.
- In the VM, open a terminal and run the script
VBoxLinuxAdditions.runto install the necessary features. - Restart your VM to apply the changes.
Setting Up a Linux VM Using VMware Workstation Player
VMware Workstation Player is another reliable alternative for running Linux VMs. It’s free for personal use.
Step 1: Download and Install VMware Player
- Visit the VMware website.
- Download the latest version of VMware Workstation Player for Windows.
- Run the installer and follow the prompts.
Step 2: Download a Linux ISO
Download your preferred Linux ISO, as mentioned previously.
Step 3: Create a New Virtual Machine
- Open VMware Workstation Player.
- Click on “Create a New Virtual Machine.”
- Select “Use ISO image” and locate your downloaded Linux ISO.
- Select the operating system version and click “Next.”
- Allocate the desired VM name and location on your disk.
- Allocate at least 2 GB of RAM.
- Set up the network type (NAT is usually the best for general use).
- Set the disk size (at least 20GB) and choose to store the virtual disk as a single file for performance.
Step 4: Install Linux
- Select your VM in the VMware Player and click “Play.”
- Follow the on-screen instructions to install your selected Linux distribution.
Step 5: Optimize VMware Settings
After installation, you may want to optimize settings for performance or features. These settings can include display options, shared folders for ease of file sharing, and adjusting memory allocation.
Managing Your Linux VM
Once you’ve set up your Linux VM, the next steps involve managing it effectively.
1. Snapshots
Both VirtualBox and VMware allow you to take snapshots, which are useful in preserving the state of your VM at a particular point. You can revert to this snapshot if a change causes issues.
2. Networking
Determine how you want your VM to connect to the internet or the local network:
- NAT: The VM can communicate with the outside world but is not accessible from other devices.
- Bridged: The VM is part of the local network and can be accessed by other devices.
- Host-only: Create an isolated network between the host and guest only.
3. Performance Tweaks
Monitor the VM’s performance and adjust the allocated RAM and CPU cores if necessary. Ensure that your host machine has enough resources to spare without affecting overall performance.
4. Integration Features
Make sure to install any available integration features (like Hyper-V Integration Services, VirtualBox Guest Additions, or VMware Tools) as they enhance the performance and usability of the VM, including better shared clipboard functionality, drag-and-drop support, and optimized video performance.
5. Regular Updates
Like any operating system, keeping your Linux installation up to date is crucial. Ensure you regularly apply updates for security and feature enhancements.
Troubleshooting Common Issues
Running VMs can sometimes lead to challenges. Here are common issues and their solutions:
- Performance Issues: Ensure that your host has enough resources. If your VM is slow, consider adding more RAM or CPU cores.
- Missing Network Connections: Check the network settings of the VM and ensure that they are correctly set up, depending on your networking choice (NAT, Bridged, etc.).
- Hardware Compatibility: Ensure that virtualization support is enabled in your BIOS/UEFI settings.
- Installation Failure: If the installation of Linux fails, check that the ISO is not corrupted and that the VM settings match the requirements of the Linux distribution.
Conclusion
Running a Linux virtual machine on Windows 11 is a straightforward and rewarding process. By using tools like Hyper-V, VirtualBox, or VMware Workstation Player, you can easily create and manage a Linux environment tailored to your needs. This setup allows for flexibility in your work and personal projects, letting you explore and experiment without affecting your primary Windows environment.
Whether you’re using Linux for development, testing, or just for fun, the ability to run a VM makes it accessible, offering a rich landscape of possibilities. With appropriate management and optimizations, your Linux VM can become a robust tool in your technological toolkit.
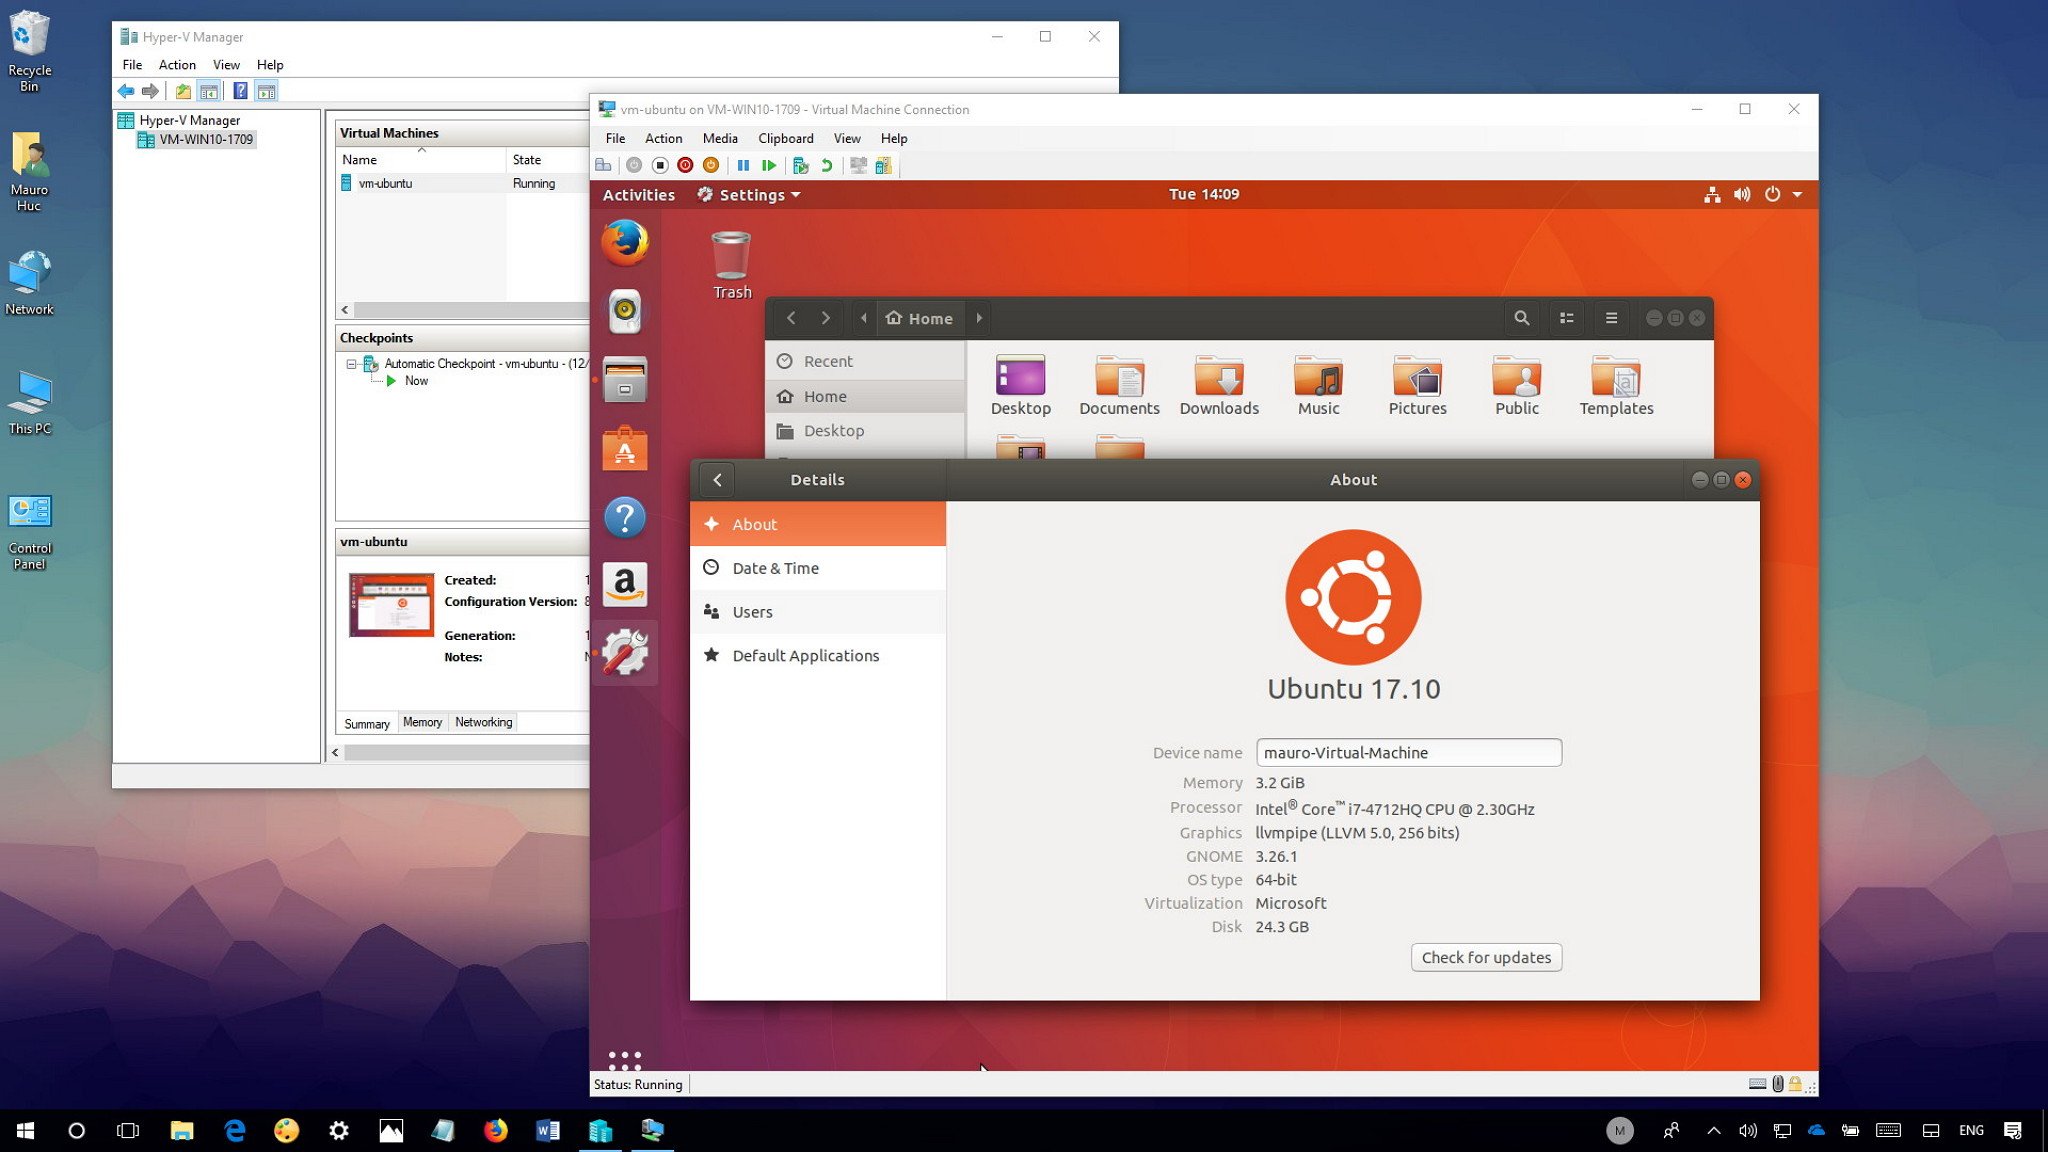
(Image credit: Windows Central)
Although it’s now possible to run a number of Linux distros natively on Windows 10, these environments can be somewhat limited in features and tools you can use. Also, you can only pick from three distros, including Ubuntu, SUSE Linux Enterprise, and OpenSUSE Leap, and you’re stuck with the command-line interface, which means that you can’t run any of the graphical experiences (e.g., GNOME, KDE, XFCE) or Linux-based graphical applications.
Of course, you can always install your favorite Linux distro on a second machine, but if you don’t have one, it’s still possible to run a full-blown version of Linux using a virtual machine (VM).
If you’re running Windows 10, you can enable Hyper-V on your device to create a VM to install your preferred distro whether you’re a developer or an enthusiast who just wants to know what’s the Linux fuzz all about.
In this Windows 10 guide, we’ll walk you through the steps to install most Linux distributions on virtual machines using Microsoft’s Hyper-V virtualization feature.
- Guide requirements
- How to enable Hyper-V on Windows 10
- How to create a virtual machine using Hyper-V
- How to install Ubuntu Linux using Hyper-V on Windows 10
Guide requirements
To run a Linux virtual machine on Windows 10, you’ll need the following:
- A computer with support for Hyper-V.
- An ISO file to install your preferred Linux distribution.
In this guide, we’ll be using Ubuntu version 17.10, which you can download from the official Ubuntu website. However, it’s possible to install version 16.04, which might be a more stable version of the open source project, and you can also install other distros, including:
- CentOS and Red Hat Enterprise Linux.
- Debian.
- SUSE.
- Oracle Linux.
- FreeBSD.
How to enable Hyper-V on Windows 10
Hyper-V is a virtualization technology from Microsoft available on Windows 10 Pro, Enterprise, and Education, and it allows you to create one or multiple virtual machines to install and run different OSes on the same physical hardware.
All the latest news, reviews, and guides for Windows and Xbox diehards.
Verifying Hyper-V support
Although Hyper-V is part of Windows 10, there is a minimum hardware requirement a computer must meet to enable the feature.
- 64-bit CPU with Second Level Address Translation (SLAT).
- Processor must support VM Monitor Mode Extension (VT-c on Intel chips).
- 4GB of memory at a minimum.
In addition, you have to make sure the Virtualization Technology and Hardware Enforced Data Execution Prevention options are enabled on your system BIOS.
You can quickly verify your computer has the required support for Hyper-V using Systeminfo:
- Open Start.
- Search for Command Prompt and click the top result.
- Type the following command and press Enter:
systeminfo.exe - Under Hyper-V Requirements, if the result reads Yes, then you can run Hyper-V.
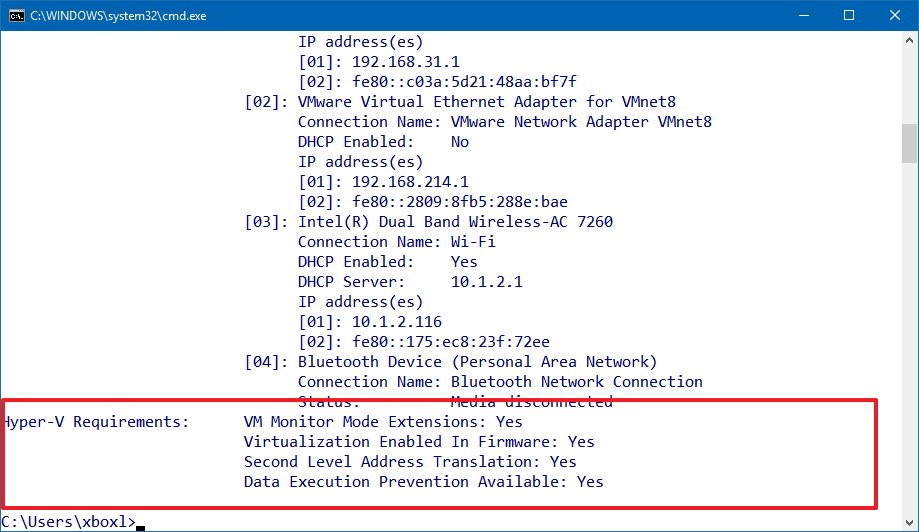
If the command displays No under Hyper-V Requirements, then your hardware doesn’t support this feature, or you need to make sure to enable it manually.
Enabling Hyper-V
Use the following steps to enable Hyper-V on Windows 10:
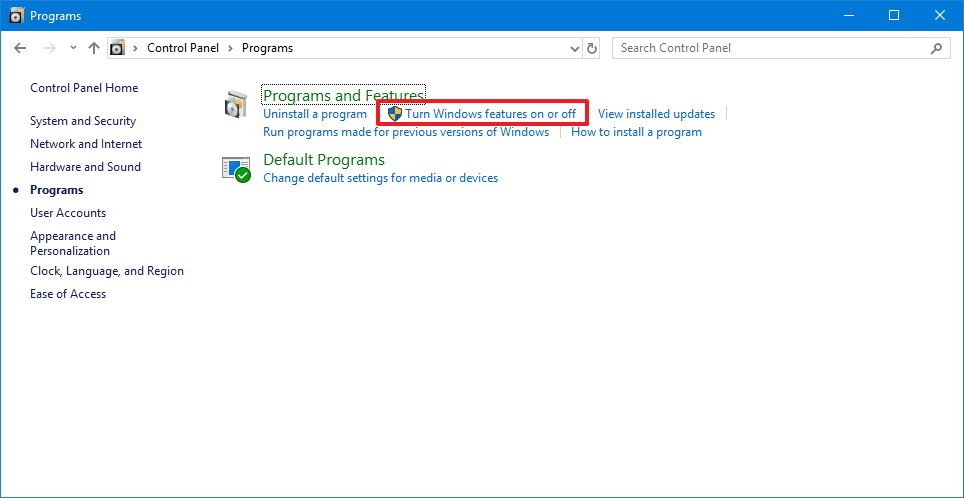
- Open Control Panel.
- Click on Programs.
- Click on Turn Windows features on or off.
- Check the Hyper-V option making sure: Hyper-V Management Tools and Hyper-V Platform are also selected.
- Click OK to begin the process.
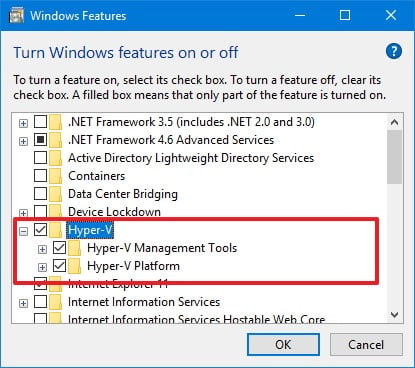
- After the installation completes, click Restart now to apply the changes.
How to create a virtual machine using Hyper-V
Once you’ve completed adding the virtualization layer to Windows 10, you’ll need to create a virtual machine for the Linux distribution you want to use.
However, before you do that, you must create a virtual switch to allow the VM to connect to the internet.
Creating a virtual switch
Use the following steps to configure a virtual switch on Hyper-V:
- Open Start.
- Search for Hyper-V Manager and click the top result.
- Click on the Action menu.
- Select New and click on Virtual Switch Manager.
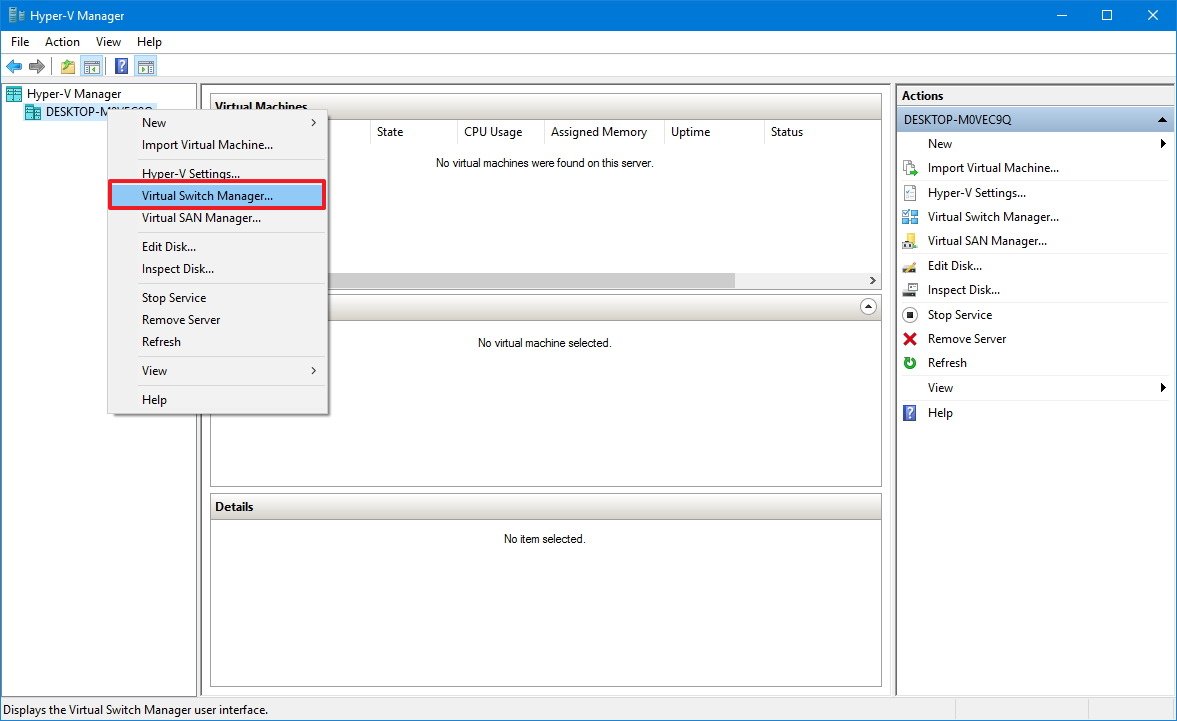
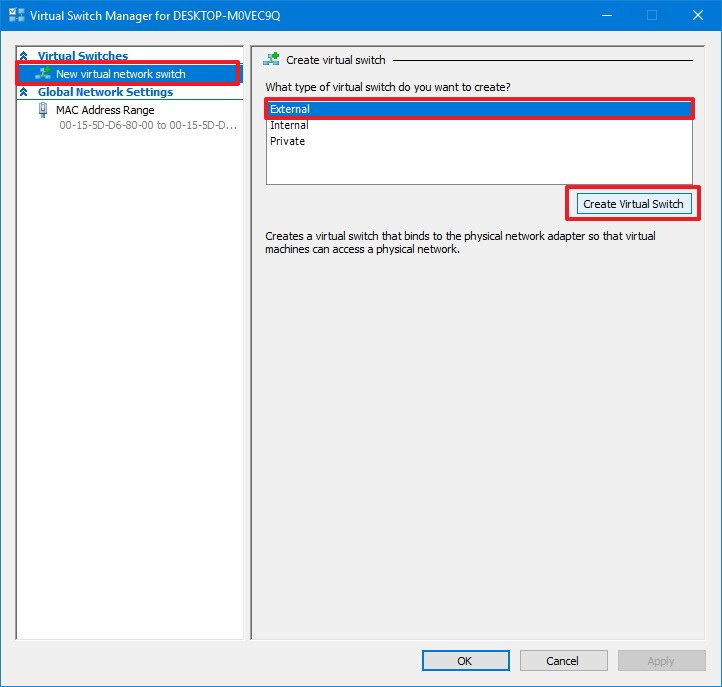
- On the left pane, select New virtual network switch.
- On the right, select External.
- Click the Create Virtual Switch button.
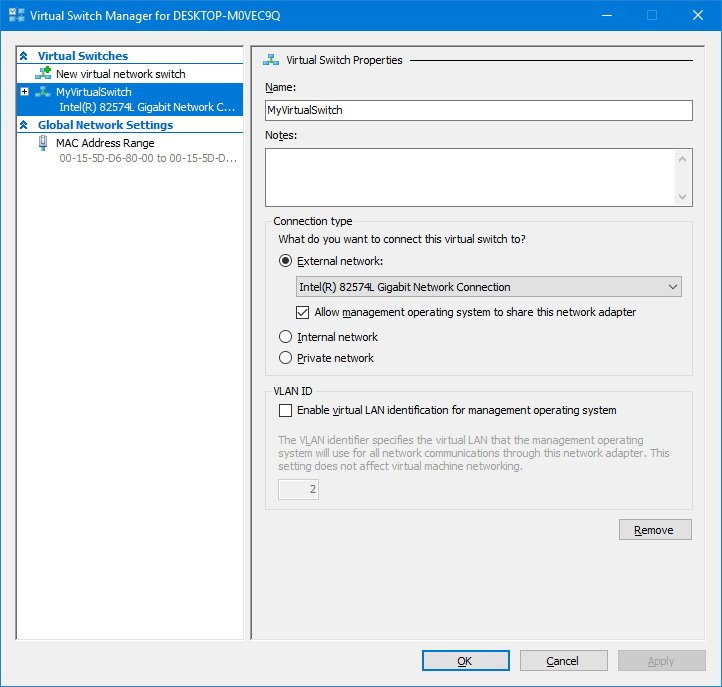
- Enter a new descriptive name for the switch (e.g., MyVirtualSwitch).
- Under connection type, make sure your network adapter is select on External network.
- Click Apply.
- Click OK.
Creating a virtual machine
After creating the virtual switch, you can proceed to create a new virtual machine:
- Open Start.
- Search for Hyper-V Manager and click the top result.
- Click on the Action menu.
- Select New and click on Virtual Machine.
- Click the Next button.
- Enter a descriptive name for your virtual machine (e.g., vm-ubuntu).
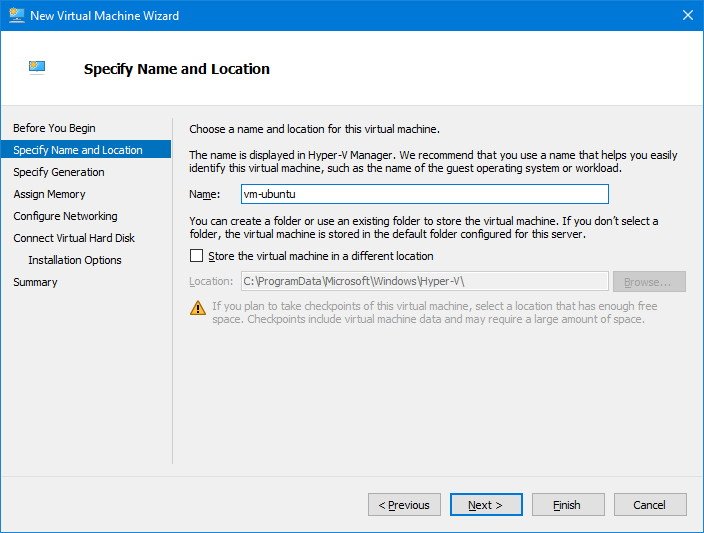
- Use the default location to store your virtual machine, or check the Store the virtual machine in a different location option to select a different path.
- Click Next to continue.
- You can leave the default Generation 1 option selected. Or you can select Generation 2 if you want a UEFI-based firmware.
- Click Next.
- Select the amount of RAM to allocate for your virtual machine. In the case of Ubuntu, you need a minimum of 2GB of memory.You can allocate as much memory as you want, but this setting will always depend on the physical memory available on your computer.
- Click Next.
- Use the drop-down menu to select the virtual switch you created earlier.
- Click Next.
- You can leave all the default settings to create a virtual hard drive, but under Size make sure to allocated at least 25GB of storage, which is the minimum required to run Ubuntu.
- Click Next to continue.
- On Installation options, select the Install an operating system from a bootable CD/DVD-ROM option.
- Select the Image file (.iso) option.
- Select the path for the ISO file with the Ubuntu installation files.
- Click Next.
- Click Finish.
How to install Ubuntu Linux using Hyper-V on Windows 10
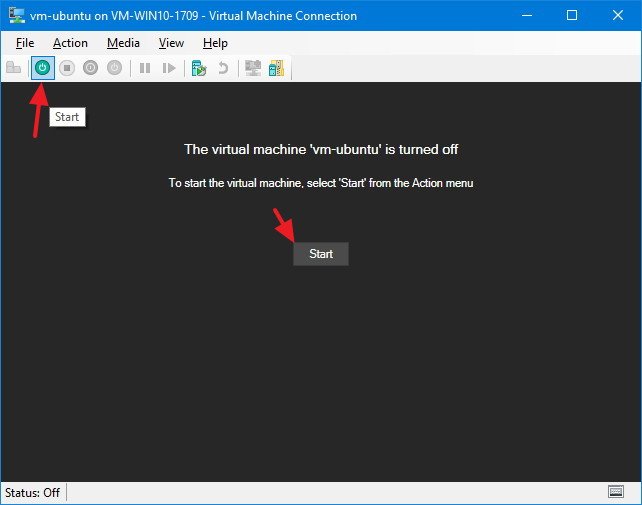
The last step is to start the virtual machine and install the Linux distribution you want to use.
- On Hyper-V Manager, under Virtual Machine, right-click the newly created device, and select Connect.
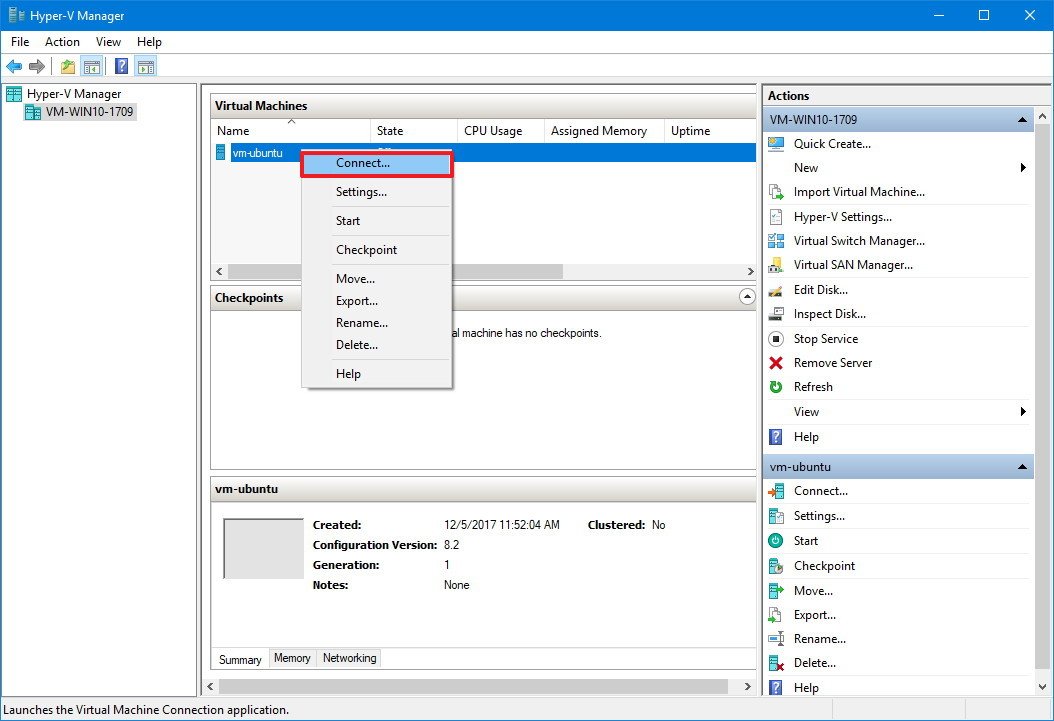
- Click the Start (power) button.
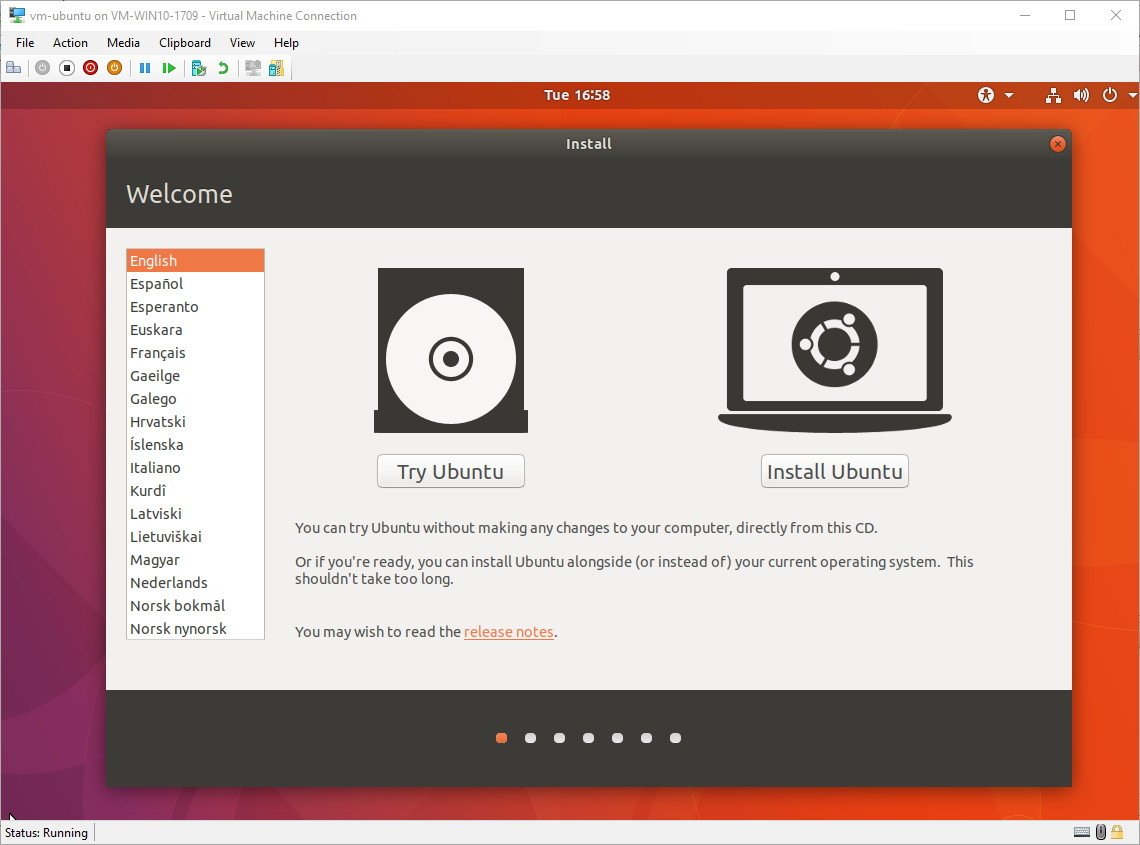
- Select your language.
- Click the Install Ubuntu button.
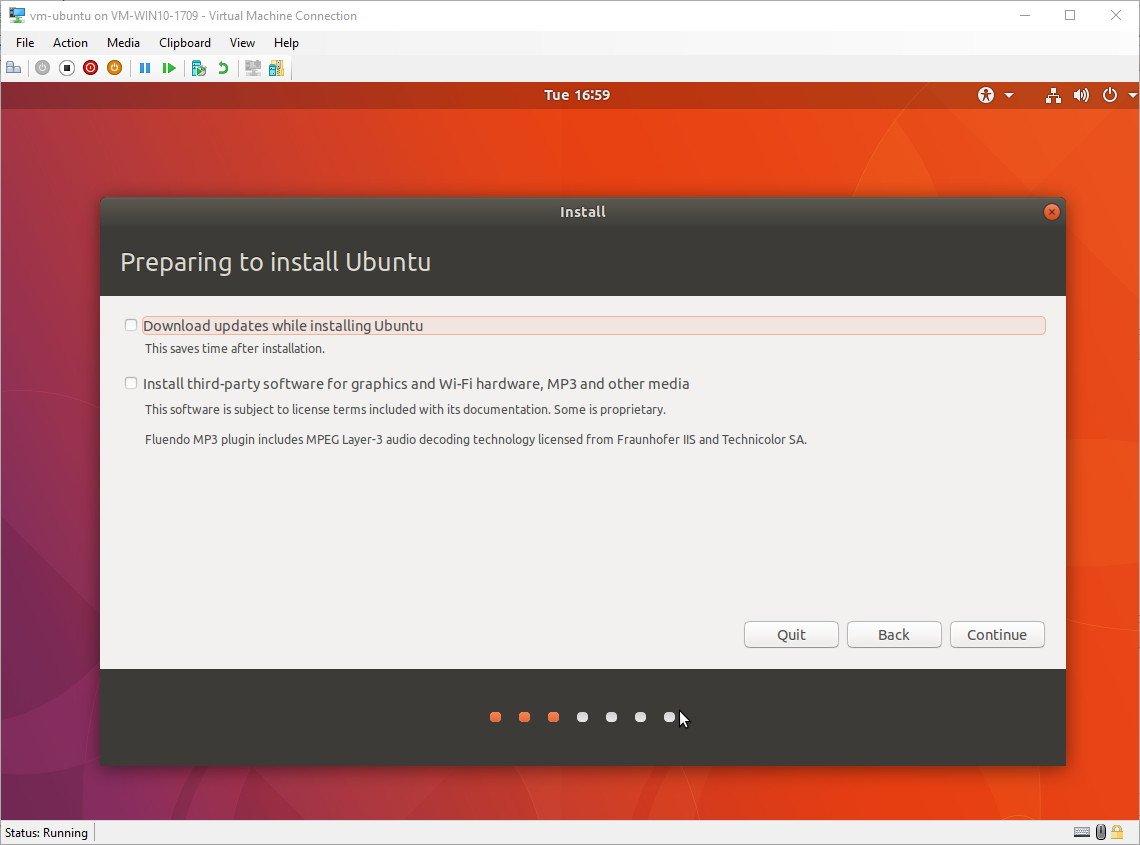
- Check the Install third-party software for graphics and Wi-Fi hardware, Flash, MP3 and other media option.
- Click Continue.
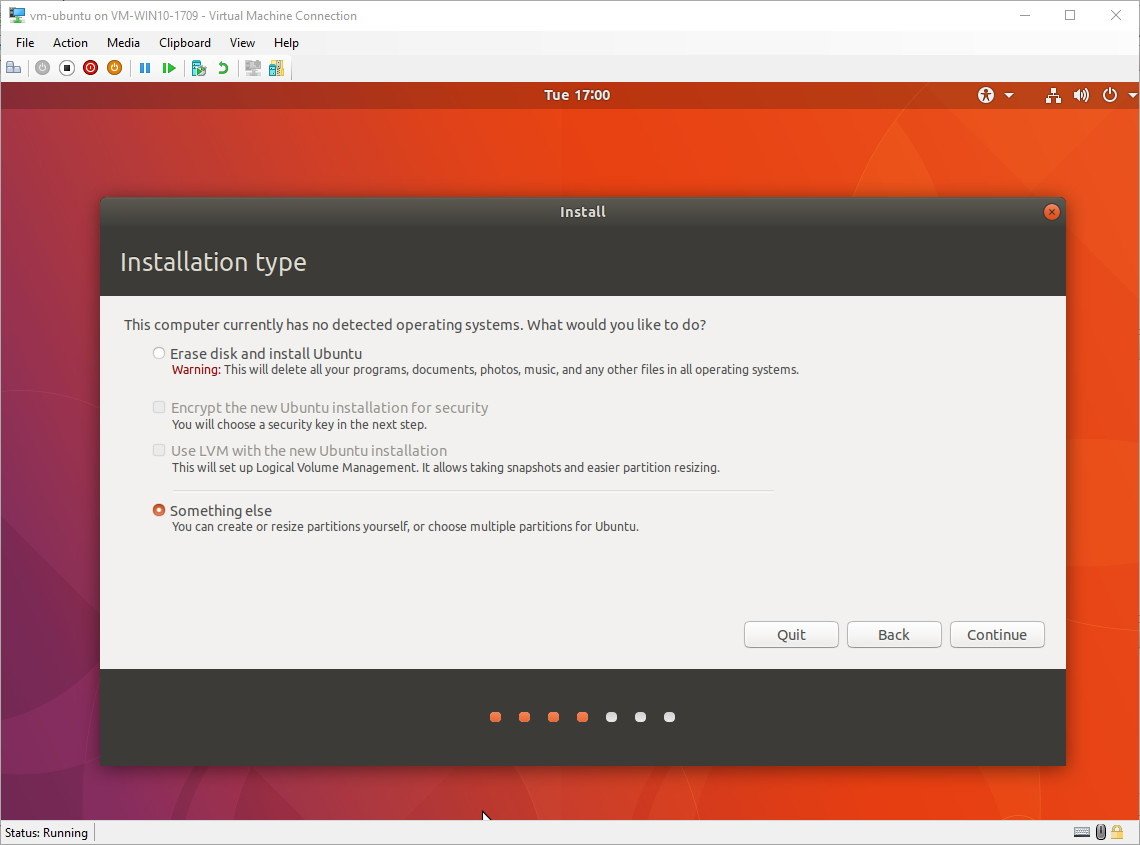
- Select the Something else option.
- Click Continue.
- Double-click the /dev/sda drive.
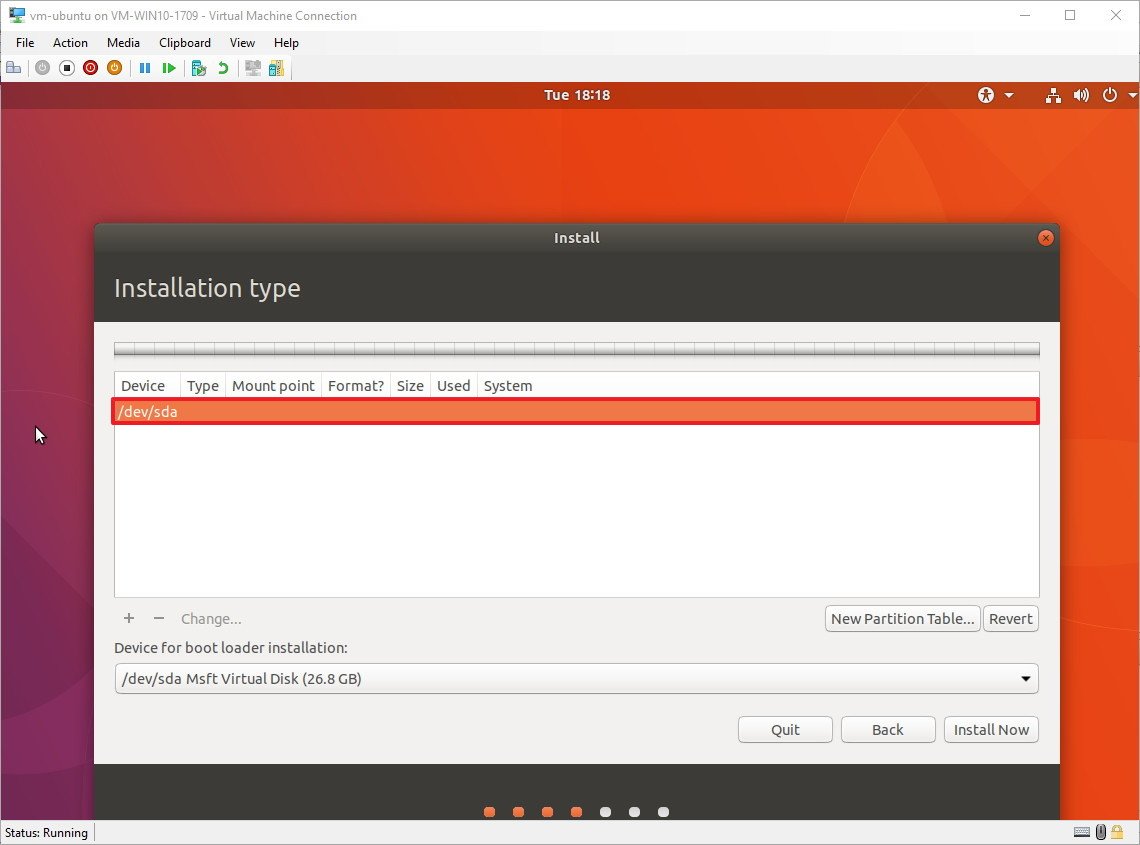
- Click Continue.
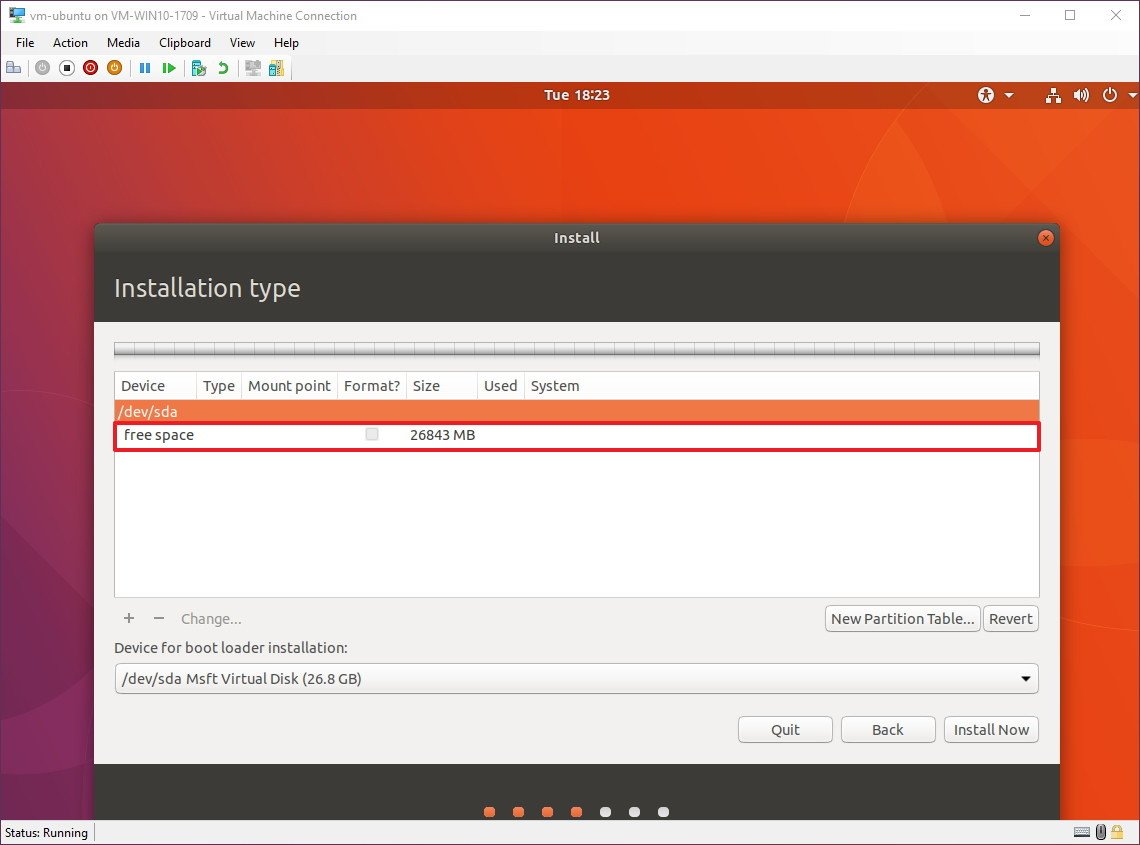
- Double-click free space.
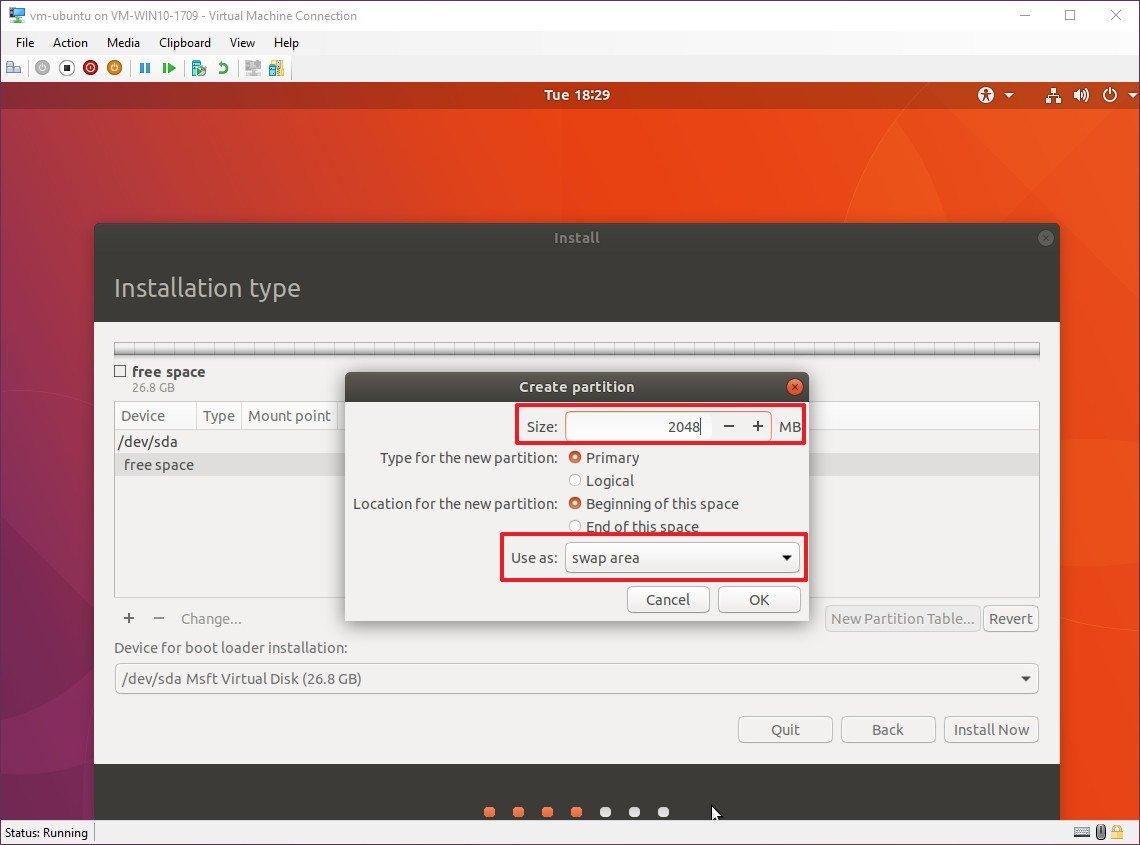
- Under «Use as,» use the drop-down menu and select Swap area to create a swap partition.
- Under «Size,» select the amount of space for the swap partition, which should be about 2x of the amount of RAM allocated for the virtual machine.
- Click OK.
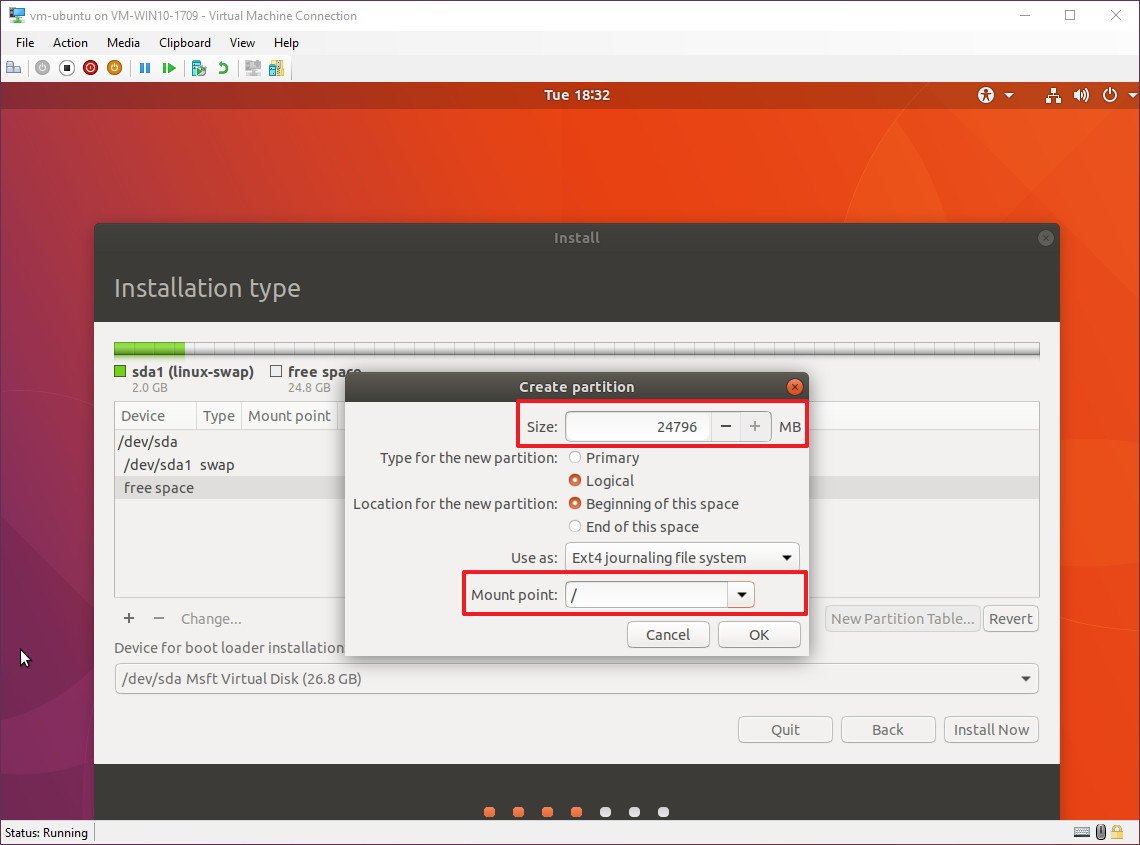
- Double-click free space again.
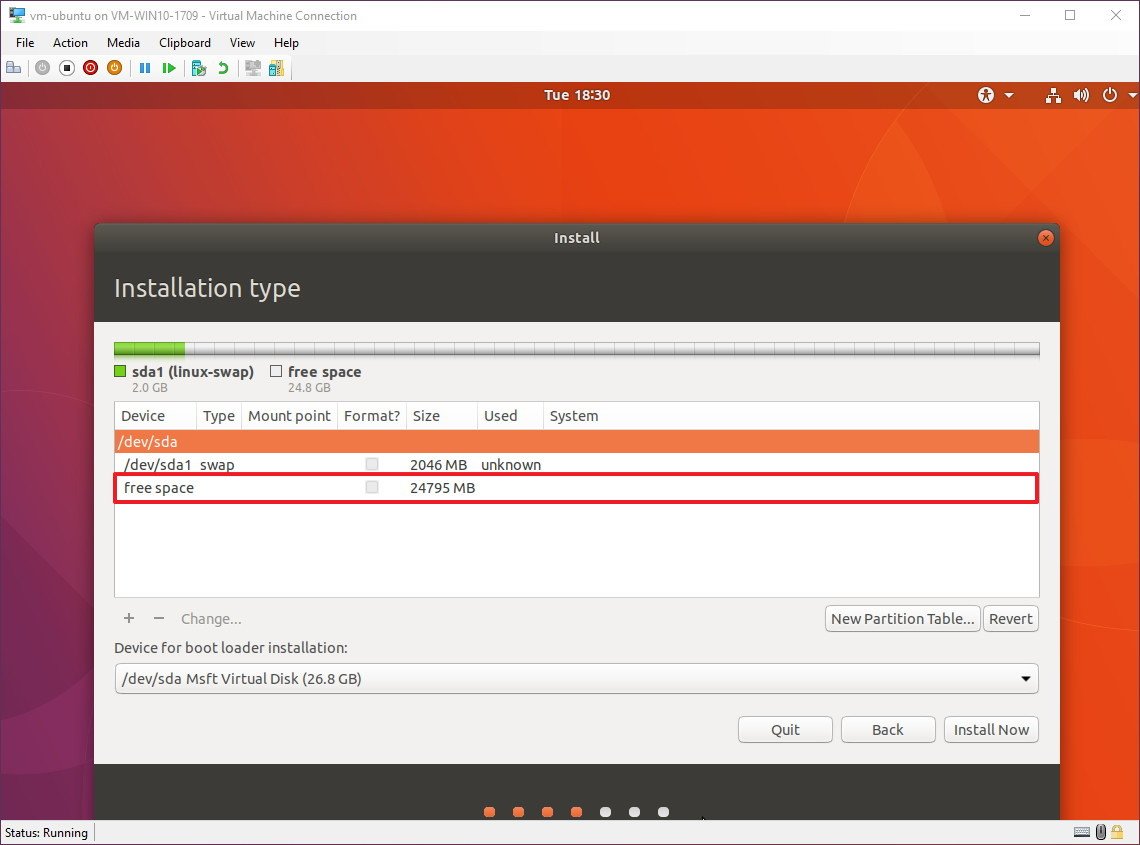
- Select the amount of space to allocate for the installation.
- Under «Mount point,» use the drop-down menu and select root /.
- Click OK.
- Select the ext4 partition from the list.
- Click the Install Now button.
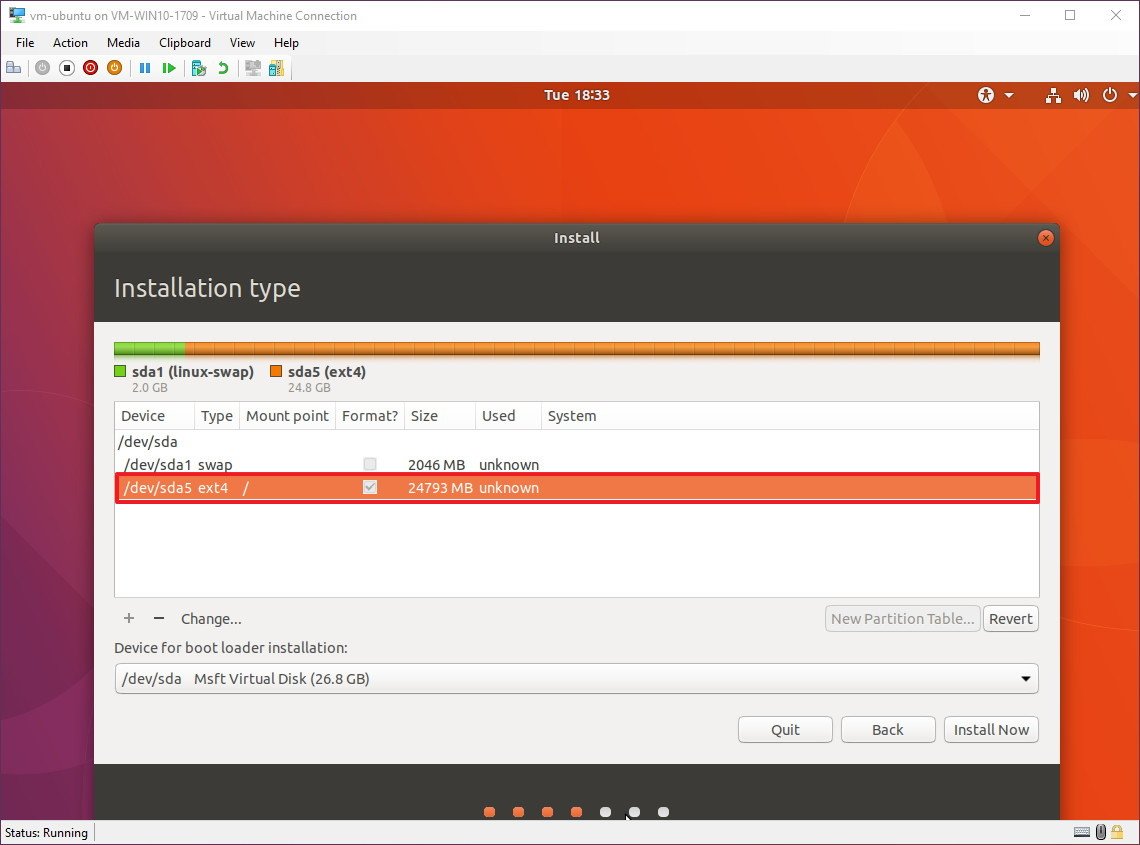
- Click Continue to install Ubuntu.
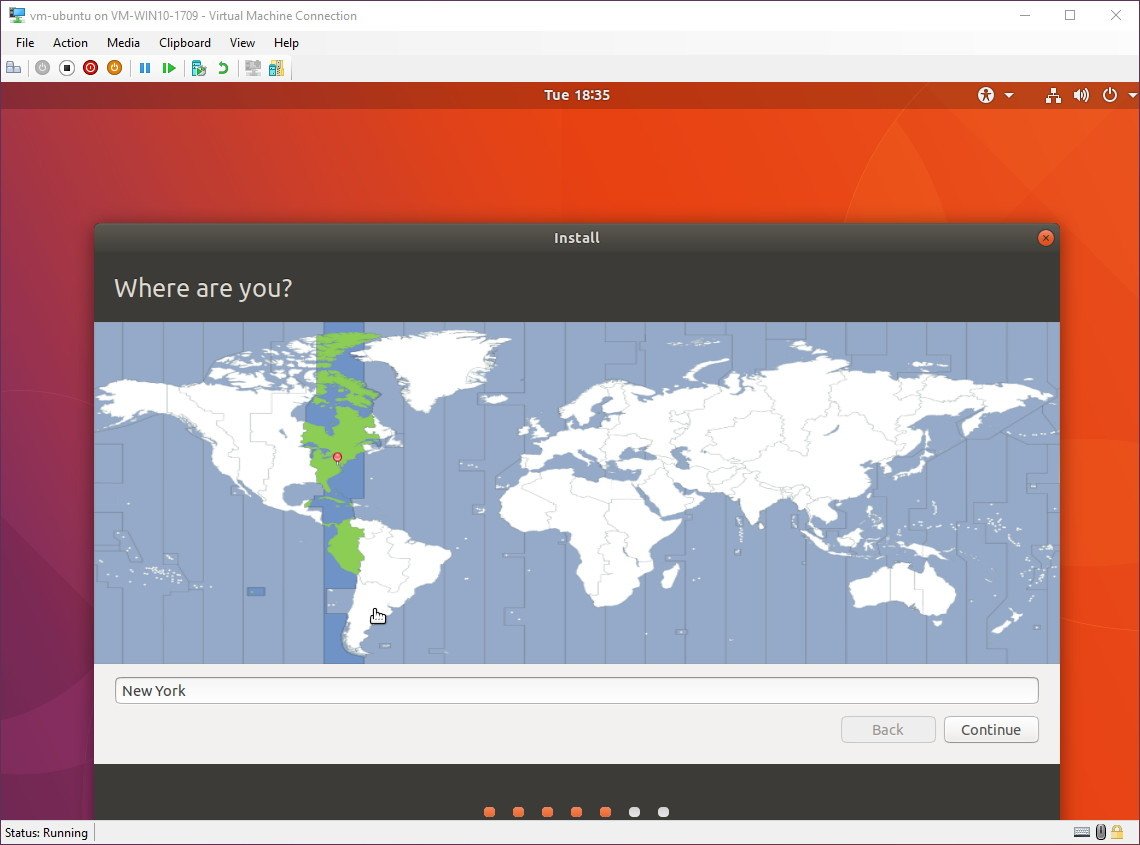
- Select your time zone.
- Click Continue.
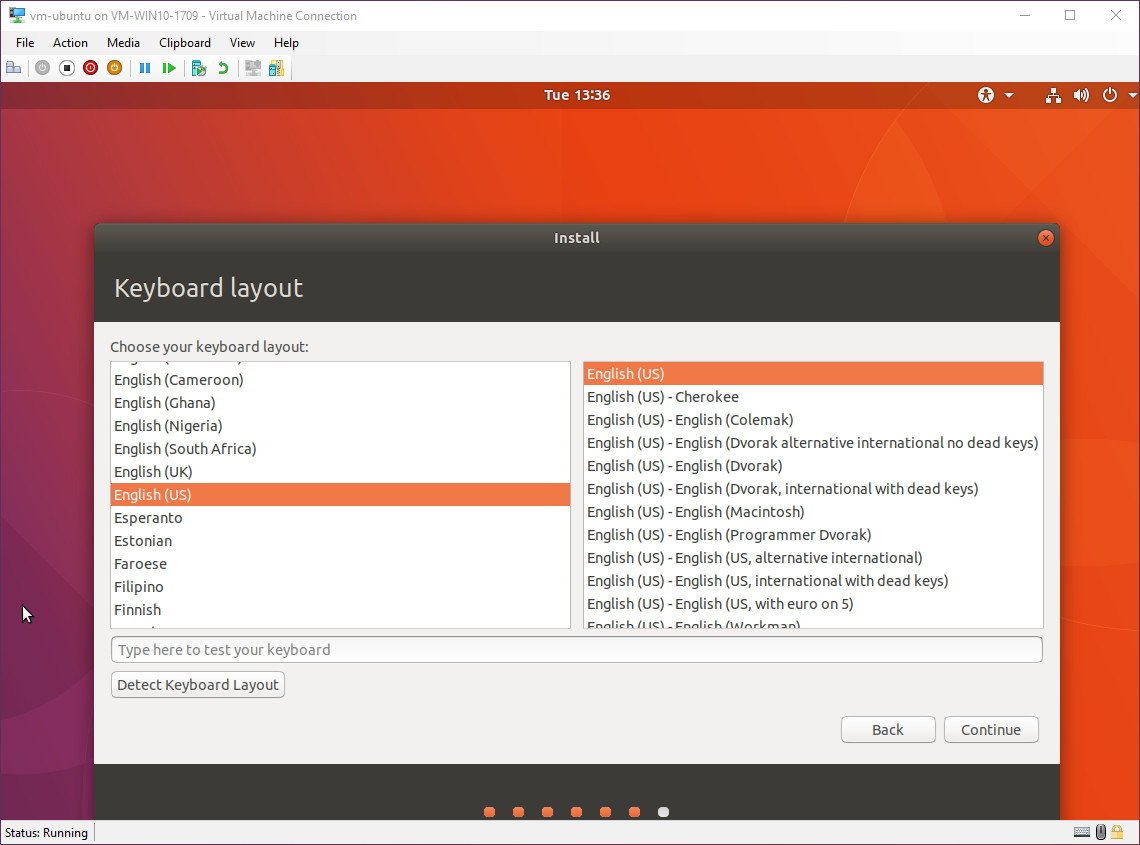
- Select the keyboard layout.
- Click Continue.
- Create a user account with your information.
- Click Continue.
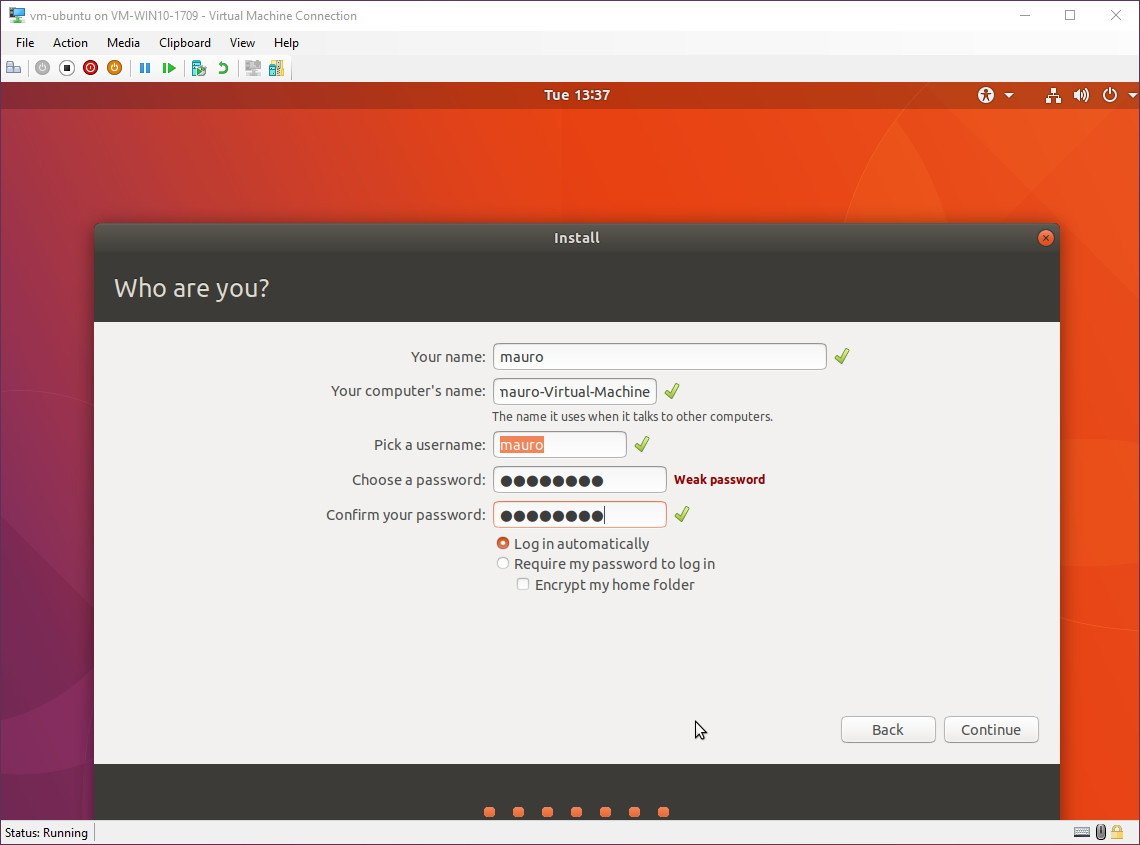
- Restart the virtual machine to finish the setup.Quick Tip: If during the final restart process, you get a message to remove the installation and press Enter, but hitting the key won’t restart the VM, just click the Turn off button and then turn it back on again.
After completing the steps, you can just turn on the VM and start using Ubuntu Linux alongside Windows 10.
While we’re focusing this guide setting up Ubuntu, you can also refer to these instructions to run other distributions of Linux.
More Windows 10 resources
For more helpful articles, coverage, and answers to common questions about Windows 10, visit the following resources:
- Windows 10 on Windows Central – All you need to know
- Windows 10 help, tips, and tricks
- Windows 10 forums on Windows Central
Mauro Huculak has been a Windows How-To Expert contributor for WindowsCentral.com for nearly a decade and has over 15 years of experience writing comprehensive guides. He also has an IT background and has achieved different professional certifications from Microsoft, Cisco, VMware, and CompTIA. He has been recognized as a Microsoft MVP for many years.
Accessing Linux tools and environments on a Windows system can be challenging. Managing dual OS systems, ensuring compatibility, and avoiding data loss during setup are common hurdles.
Finding a seamless way to run Linux alongside Windows is crucial for enhancing productivity.
Many users need Linux-specific tools and applications without replacing their existing OS. Running Linux on Windows lets you explore and utilize Linux environments while keeping the familiarity and functionality of your Windows system.
In this blog, we’ll provide a detailed, step-by-step guide on how to run Linux on a Windows system. We’ll cover various methods, including using virtual machines, Windows Subsystem for Linux (WSL), and dual-boot setups.
By understanding these methods, you can successfully run Linux on Windows, leverage Linux tools, and improve your development workflows.
Benefits of Running Linux on a Windows System
Running Linux on a Windows system offers several advantages, particularly for IT professionals and developers. Here are some key benefits:
Access to Linux Tools
Linux provides a range of powerful tools and applications that are essential for development and system administration tasks.
Running Linux on Windows allows you to leverage these tools without needing a separate Linux machine.
Enhanced Development Workflows
Many developers prefer Linux for its robust development environment.
Running Linux alongside Windows enables you to optimize your development workflows, using the best features of both operating systems.
System Compatibility
Running Linux on Windows ensures compatibility with software and hardware that may only support one OS. This dual setup allows for greater flexibility and reduces the need for additional hardware.
Cost Savings
By running Linux on a Windows system, you can avoid the expense of purchasing additional hardware. This setup allows you to maximize the use of your existing resources without incurring extra costs.
Convenience and Flexibility
Running both operating systems on the same machine provides the convenience of switching between environments without rebooting or setting up another physical device.
This flexibility is beneficial for multitasking and managing different projects efficiently. For IT professionals and developers, a dual-OS setup also opens the door to integrating specialized business tools. For instance, using SMS call center software within the Linux environment can streamline customer communications without disrupting workflows on the Windows side. This approach enhances support operations and allows teams to consolidate tasks across platforms—all without the need for additional hardware.
Methods to Run and Install Linux on Windows
There are several methods available to run Linux on a Windows system, each offering different levels of integration and performance. Here are the most popular options:
Using a Virtual Machine
Virtual machines (VMs) allow you to run Linux within a window on your Windows desktop. This method provides a full Linux environment with isolation from the host OS.
VMs are perfect for users who want to test different Linux distributions or run Linux applications without affecting their main system.
Steps to Set Up a VM:
- Download and Install Virtualization Software: Popular options include VMware Workstation, Oracle VM VirtualBox, and Hyper-V. These platforms offer user-friendly interfaces and robust features to help you create and manage your virtual machines.
- Download a Linux Distribution: Obtain an ISO file of your preferred Linux distribution (e.g., Ubuntu, Fedora, Debian). Make sure to download from the official websites to ensure you get a genuine and secure copy.
- Create a New VM: Open your virtualization software and create a new virtual machine. Allocate resources such as CPU, memory, and storage based on the requirements of your Linux distribution. Most virtualization software provides easy-to-follow wizards to guide you through the setup process.
- Install Linux: Use the ISO file to install Linux on the VM. Follow the installation instructions provided by the Linux distribution. Once the installation is complete, you can start using Linux within the VM environment.
Windows Subsystem for Linux (WSL)
WSL is a compatibility layer for running Linux binary executables natively on Windows.
It integrates with the Windows file system and allows you to run Linux command-line tools directly. WSL is ideal for users who need to use Linux tools without the overhead of a full VM or dual-boot setup.
Steps to Set Up WSL:
- Enable WSL: Go to Settings > Update & Security > For Developers and enable “Developer Mode.» This step prepares your Windows system to support WSL.
- Install WSL: Open PowerShell as an administrator and run wsl –install to install WSL and the default Linux distribution (usually Ubuntu). This command will download and set up the necessary components for WSL.
- Choose a Linux Distribution: You can install additional distributions from the Microsoft Store. Simply search for the Linux distribution you want and install it like any other app.
- Launch Linux: Open a terminal and start using Linux commands. You can access the Linux file system directly from Windows and use your preferred Linux tools seamlessly.
Dual-Boot Setup
Dual-booting allows you to install Linux alongside Windows on your machine, giving you the option to boot into either operating system.
This method is suitable for users who want to use both operating systems without the limitations of a VM.
Steps to Set Up Dual-Boot:
- Create a Backup: Ensure you have a backup of your important data. This step is crucial to prevent data loss during the partitioning process.
- Partition Your Drive: Use disk management tools to create a separate partition for Linux. You can use built-in tools like Disk Management in Windows or third-party tools to resize existing partitions and create space for Linux.
- Download a Linux Distribution: Obtain an ISO file of your preferred Linux distribution. Ensure you download it from the official website to avoid any security issues.
- Create a Bootable USB Drive: Use tools like Rufus to create a bootable USB drive with the Linux ISO. This drive will be used to install Linux on your system.
- Install Linux: Boot from the USB drive and follow the installation instructions. Choose the partition you created earlier for the Linux installation. During the setup, you can configure the bootloader to allow you to choose between Windows and Linux at startup.
Using a Live USB
Live USB allows you to run Linux directly from a USB drive without installing it on your hard drive. This is useful for testing or temporary use, providing a risk-free way to explore Linux.
Steps to Set Up a Live USB:
- Download a Linux Distribution: Obtain an ISO file of your preferred Linux distribution. Make sure to download it from the official website to ensure authenticity and security.
- Create a Bootable USB Drive: Use tools like Rufus to create a bootable USB drive with the Linux ISO. This drive will allow you to run Linux without affecting your current system setup.
- Boot from the USB Drive: Restart your computer and boot from the USB drive. You might need to change the boot order in your BIOS settings to prioritize the USB drive. Once booted, you can run Linux directly from the USB drive, allowing you to test and use Linux without any permanent changes to your system.
Conclusion
Running Linux on a Windows system provides access to powerful tools and applications, enhancing development workflows and system compatibility.
By understanding and implementing methods like virtual machines, Windows Subsystem for Linux, dual-boot setups, and live USBs, you can seamlessly integrate Linux into your Windows environment.
Choosing the right method depends on your specific needs and technical expertise. Whether you need a full Linux environment or just access to Linux command-line tools, these methods offer flexibility and functionality.
Explore these options to find the best solution for running Linux on your Windows system.
Why Choose V2 Cloud
While V2 Cloud does not currently offer Linux virtual machines or VDI solutions, we are actively working on expanding our services to include them in the near future. Here’s why V2 Cloud will be the top choice for your virtualization needs:
- Robust Solutions: Our Virtual Desktop Infrastructure (VDI) solutions enhance IT operations with secure remote access, daily backups, and seamless scalability.
- User-Friendly Interface: Designed to be intuitive and easy to use, our platform caters to both beginners and experienced users.
- Outstanding Support: V2 Cloud is known for its excellent customer support, ready to assist you with any issues or questions you may have.
- Cost-Effective: Our pricing plans are competitive and transparent, helping you reduce operational costs while maximizing the value of your investment.
- Security and Compliance: We prioritize data security and compliance with industry standards, ensuring your information is protected at all times.
Keep an eye out for V2 Cloud’s upcoming Linux VM and VDI offerings. In the meantime, sign up for our current VDI services to experience our secure, scalable, and efficient virtual environments.
Get Started with V2 Cloud
Ready to take your IT infrastructure to the next level? Sign up today to experience V2 Cloud’s secure, scalable, and efficient VDI solutions, perfectly tailored to meet your business needs. Talk to a Cloud Expert Now and transform your IT operations.
FAQs about Running Linux on Windows
Here are our most commonly asked questions on how to run Linux on Windows:
What is the easiest way to run Linux on Windows?
The easiest way to run Linux on Windows is using the Windows Subsystem for Linux (WSL). It allows you to run Linux command-line tools directly on Windows without needing a VM or dual-boot setup.
Can I run Linux on Windows without installing it?
Yes, you can run Linux on Windows without installing it by using a Live USB. This method allows you to boot and run Linux directly from a USB drive.
What are the system requirements for running Linux on a Windows machine?
System requirements vary depending on the method. Generally, you’ll need at least 4GB of RAM, sufficient storage space, and hardware virtualization support for VMs.
How do I switch between Linux and Windows in a dual-boot setup?
To switch between Linux and Windows in a dual-boot setup, restart your computer and select the desired operating system from the boot menu.
Is it possible to run graphical Linux applications on Windows using WSL?
Yes, with WSL 2 and the appropriate configuration, you can run graphical Linux applications on Windows. This requires an X server to display the graphical interface.
What should I do if I encounter issues during the installation?
If you encounter issues during the installation, refer to the documentation of the method you are using, check online forums, or contact support for assistance.
Are there any performance differences between running Linux natively and through a VM or WSL?
Yes, there can be performance differences. Running Linux natively offers the best performance, followed by WSL, which is close to native performance. VMs may have slightly lower performance due to resource overhead.
How do I choose the best Linux distribution for my Windows computer?
Choosing the best Linux distribution (Linux distro) for your Windows computer depends on your specific needs and preferences. Popular options include Ubuntu, Fedora, and Debian. These distros are user-friendly and compatible with most hardware, making the installation process straightforward.
Can I run multiple operating systems on my Windows computer?
Yes, you can run multiple operating systems on your Windows computer by using a virtual machine or a dual-boot setup. This allows you to install a Linux OS alongside Windows, giving you the flexibility to switch between the two as needed.
What should I know before installing Linux on my Windows computer?
Before installing Linux on your Windows computer, ensure you have a backup of your important data. You’ll also need to create a separate partition for the Linux file system. Once installed, you can access the Linux OS and run Linux-specific applications seamlessly.
How does the Linux file system integrate with a Windows computer?
When installing Linux on a Windows computer, the Linux file system is typically set up on a separate partition. This allows both operating systems to coexist without interfering with each other. Tools like WSL (Windows Subsystem for Linux) also enable integration, allowing you to access Linux files from Windows.
Если вы используете Windows и хотите получить изолированную операционную систему Linux с графическим интерфейсом, вы можете воспользоваться бесплатной сторонней программой под названием VirtualBox.
Как получить изолированную операционную систему Linux с графическим интерфейсом?
Для этого вам потребуется:
-
Установочный файл Oracle VM VirtualBox для Windows Hosts.
Ссылка для скачивания: https://www.virtualbox.org/wiki/Downloads
-
Образ операционной системы Linux Ubuntu в формате ISO. Ссылка на скачивание:
https://releases.ubuntu.com/noble/- Desktop image — с графическим интерфейсом
- Server install image — без графического интерфейса
2.1. Для установки выберите образ по следующей ссылке: https://releases.ubuntu.com/noble/ubuntu-24.04-desktop-amd64.iso
В этой статье мы рассмотрим пример установки Linux Ubuntu Desktop image — с графической оболочкой. Для начала необходимо скачать, установить и запустить приложение VirtualBox.
-
На данный момент ссылка для скачивания VirtualBox:
https://download.virtualbox.org/virtualbox/7.0.20/VirtualBox-7.0.20-163906-Win.exe -
Установка Oracle VM VirtualBox выполняется стандартным образом с согласием на все лицензии и настройки данного приложения.
-
После окончания установки запустите VirtualBox и создайте свою виртуальную машину.
-
Создание новой виртуальной машины для Ubuntu 24.04 Desktop:
-
Откройте VirtualBox и нажмите «New».
-
Введите имя машины, выберите тип и версию операционной системы.
-
Выберите скачанный образ системы из пункта 2.1 для установки на виртуальную машину.
-
Перейдите в меню «Unattended Install» и укажите правильный «Hostname».
-
Перейдите в меню «Hardware» и укажите «Base Memory» — рекомендую установить «4096 МБ» для «Ubuntu 24.04 Desktop» и «Processors» — 4 ядра для более быстрой установки.
-
Перейдите в меню «Hard Disk», выберите тип диска «vmdk» и нажмите кнопку «Finish».
-
-
Установка Ubuntu 24.04 Desktop:
-
Для запуска виртуальной машины нажмите кнопку «Start».
-
После запуска образа
ubuntu-24.04-desktop-amd64.isoпоявится меню установки системы. Нажимайте кнопку «Next» и «Skip» до тех пор, пока не появится меню способа разметки диска. Выберите «Manual installation» и нажмите «Next». -
В «Device for boot loader installation» выберите «Hard Disk», созданный в VirtualBox.
-
Выберите «Free space» и нажмите «+».
-
Выберите разметку свободного пространства (Size), как указано на скриншоте, затем нажмите кнопку «OK» и «Next».
-
Заполните учетные данные пользователя для входа в систему и нажмите «Next».
-
Выберите часовой пояс, нажмите «Next», затем «Install».
-
-
Извлечение установочного диска
ubuntu-24.04-desktop-amd64.isoпосле установки Ubuntu 24.04 Desktop:После установки системы появится кнопка «Restart now», но перед перезагрузкой системы можно извлечь установочный диск
ubuntu-24.04-desktop-amd64.iso, чтобы не загрузиться в него снова.-
Для извлечения диска
ubuntu-24.04-desktop-amd64.isoвыберите в меню «Machine» пункт «Settings». В «Settings» перейдите в «Storage», выберите виртуальный диск, как показано на скриншоте, и нажмите «Remove Disk from Virtual Drive». -
После этого нажмите кнопку «OK» и «Restart now».
-
-
Перезапуск системы и выполнение входа:
-
Для входа в систему используйте данные, указанные в пункте 5.6.
-
На этом этапе установка завершена, и вход в систему выполнен.
-
Do you need to create a Linux virtual machine on your Windows PC? This post from MiniTool Partition Wizard may help you. It tells you how to choose a proper Linux distro and VM software, and offers you a detailed Linux VM creation guide.
Why Do You Need to Create a Linux Virtual Machine?
As we all know, Windows systems accounted for the largest share of the PC market for many years. It is easy to use and many people can use it without any training. However, if you want to become a software developer, you must learn Linux.
Compared to Windows, Linux has a steep learning curve. If you install Linux on your computer directly, it’s not easy for you to learn Linux and it may mess up your computer. On the contrary, creating a Linux virtual machine is the best way for beginners to learn Linux.
You can search for various Linux guides on Windows and apply them on the Linux VM without worrying about PC crashes or other PC issues. Of course, a Linux virtual machine also has other advantages. To know more about them, you can refer to this post: Dual Boot vs Virtual Machine: Which One Should You Choose?
What Linux Distro Should You Use?
There are many Linux distros. Which one should you use to create a Linux VM? Most people may use the following ones:
- It may be the first option for many Linux beginners. It could be said to be the most popular Linux distro currently and has a huge user community. You can get many guides and help from its community.
- It is the base of many Linux distros like Ubuntu. It is also the second most popular Linux distro. In addition, it is very suitable for server operating systems and is more stable than Ubuntu.
- It is the third most popular Linux distro and many enterprises use it as the production server. It is the open-source version corresponding to the RHEL (Redhat Enterprise Linux) distribution. But unlike RHEL, it is free and removes many applications that have nothing to do with server functions.
Of course, you can also choose other Linux distros like RedHat, Gentoo, Fedora, SuSe, etc. if you have other preferences. But these Linux distros’ market share is below 1% at the time of writing.
To create a Linux virtual machine on Windows, you need VM software. There are so many virtual machine programs on the market. Which one should you use? The followings are 4 popular choices.
#1. VMware Workstation Player
It is a more mature product and delivers one of the most sophisticated VM implementations seen so far. VMware Workstation Player is the free version of VMware Workstation. The main difference between the free and pro versions is that Pro can run multiple virtual machines at the same time, while Player can only run one at the same time.
#2. VirtualBox
It is totally free. Compared to VMware, it is small and simple but less stable. In addition, it doesn’t offer as many features as VMware. However, it is still the most popular free VM software.
If you want to know how to create a Linux virtual machine on Windows 10 using VirtualBox, you can refer to this post: How to Install Ubuntu on VirtualBox? Here’s the Full Guide.
#3. Hyper-V
It comes as part of Windows 10 Pro and Windows Server at no additional cost to the user. But it is just a very basic hypervisor and can’t do the clever things that VMware offers. In addition, driver support for Linux isn’t great, and there is no virtual GPU support.
If you want to know how to create a VM using Hyper-V, you can refer to this post: How to Create a VM with Hyper-V [Virtual PC Windows 10].
#4. QEMU
It is also an open-source VM program but it is more suitable for Linux because it lacks a GUI. In addition, if you want to run an ARM operating system on your Linux VM, choose QEMU.
If you want to know how to create a Linux virtual machine on Windows 10 using QEMU, you can refer to this post: How to Download, Install, and Use QEMU on Windows 10.
I have ever used all the above VM programs and I find that VMware is the easiest to use. So, it is usually the first VM software option for me.
How to Create a Linux Virtual Machine on Windows 10
After choosing the Linux distro and the VM software, you can then follow the guide below to create a Linux virtual machine on Windows 10.
Stage 1. Download the Linux ISO
The first thing you should do is download the Linux ISO.
If you want to create an Ubuntu VM, you need to download the Ubuntu ISO. Go to the Ubuntu download page to get it. But which Ubuntu version should you download? You can refer to this post: How to Download Ubuntu ISO Easily.
If you want to create a Debian VM, you need to download the Debian ISO. Debian offers the ISO download for the Stable and Testing versions. The Stable version is recommended because it doesn’t have major issues and has full security support. Go to this page to download the Debian Stable version.
If you want to create a CentOS VM, you need to download the CentOS ISO from this page. CentOS Linux is the downstream distribution of REHL while CentOS Stream is the upstream distribution of REHL. You need to choose between them according to your condition.
Stage 2. Make Sure Your PC Meets the System Requirements
To run a Linux VM smoothly, you need to make sure your PC meets Linux OS requirements + the VM software requirements.
Among Ubuntu, Debian, and CentOS, Ubuntu’s system requirements are the highest. Its requirements are as follows:
- 2GHz dual-core processor or better.
- 4GB system memory.
- 25GB of free hard drive space.
Among these VM programs, VMware Workstation Player could be said to have the highest system requirements. Its requirements are as follows:
- 3GHz or faster core speed.
- 2GB RAM minimum/ 4GB RAM or more recommended.
- 2GB of available disk space.
Because your PC needs to run the VM software and the Linux VM at the same time, you should make sure your PC is far better than the above system requirements (Linux OS requirements + VM software requirements in many cases). If your PC is not good enough, you need to switch to a more lightweight Linux distro (like Lubuntu) and VM program (Like VirtualBox).
Stage 3. Create a Separate Partition for the Linux VM
To manage the Linux VM better, I recommend you create a separate partition to store the VM software installation and the VM files. How much space is needed? In many cases, the Linux OS installation requires more than 10GB of space. However, most Linux operating systems’ recommended space is around 40GB or more.
In addition, if you use the Linux VM frequently, the VM files will increase as time goes by. Therefore, I recommend you create a partition of around 100GB for the Linux virtual machine. To do that, you can use MiniTool Partition Wizard. Here is the guide:
MiniTool Partition Wizard FreeClick to Download100%Clean & Safe
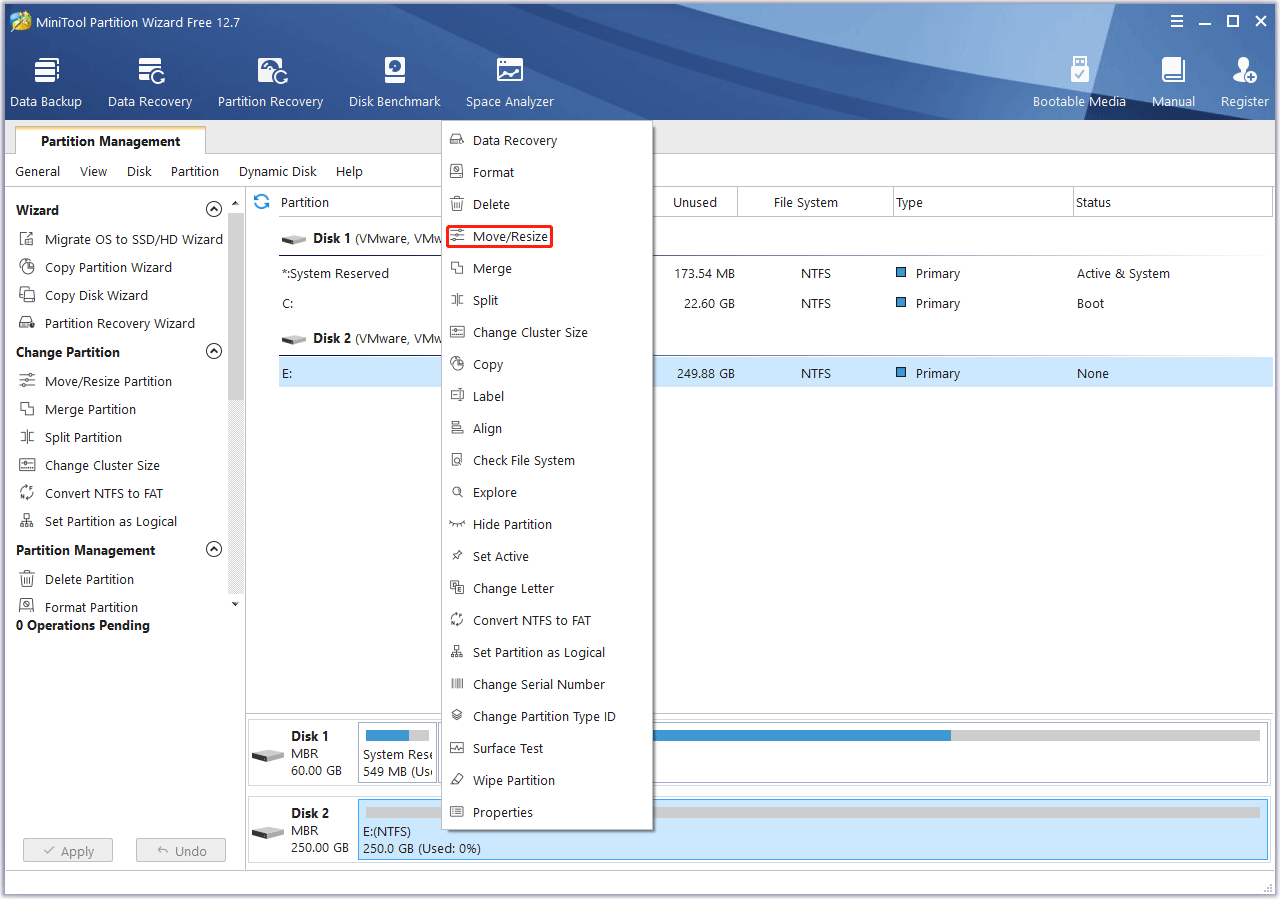
Step 1: Launch MiniTool Partition Wizard. Right-click a partition and choose Move/Resize.
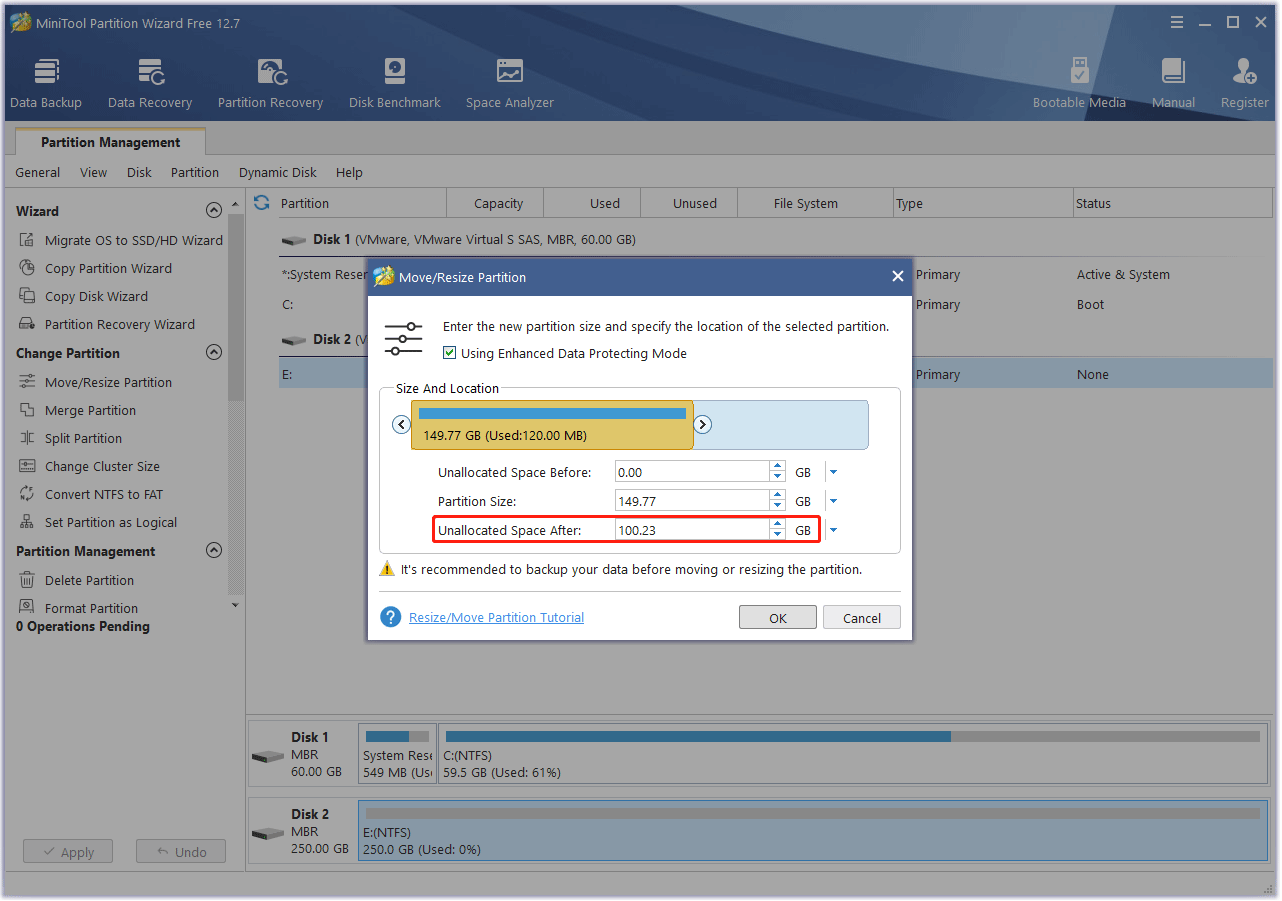
Step 2: Drag the arrow icon to decide how much space you want to shrink. Click the partition block and drag it to decide the location of the partition. Then, click the OK button.
Tips:
You can check the unallocated space before and after to know how much space you have shrunk. You need to make sure the unallocated space is enough. If not, you need to move/resize multiple partitions.
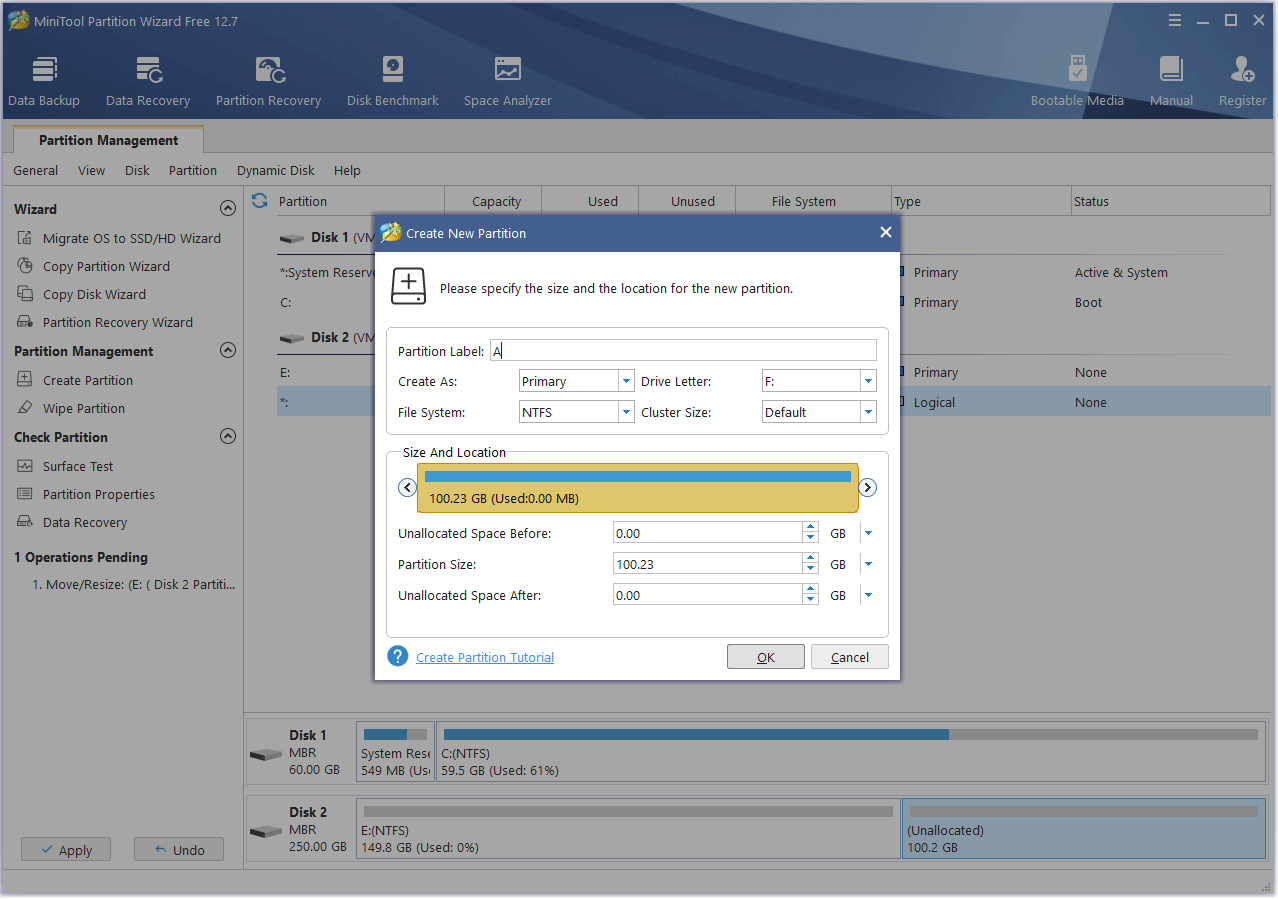
Step 3: Right-click the unallocated space and choose the Create button.
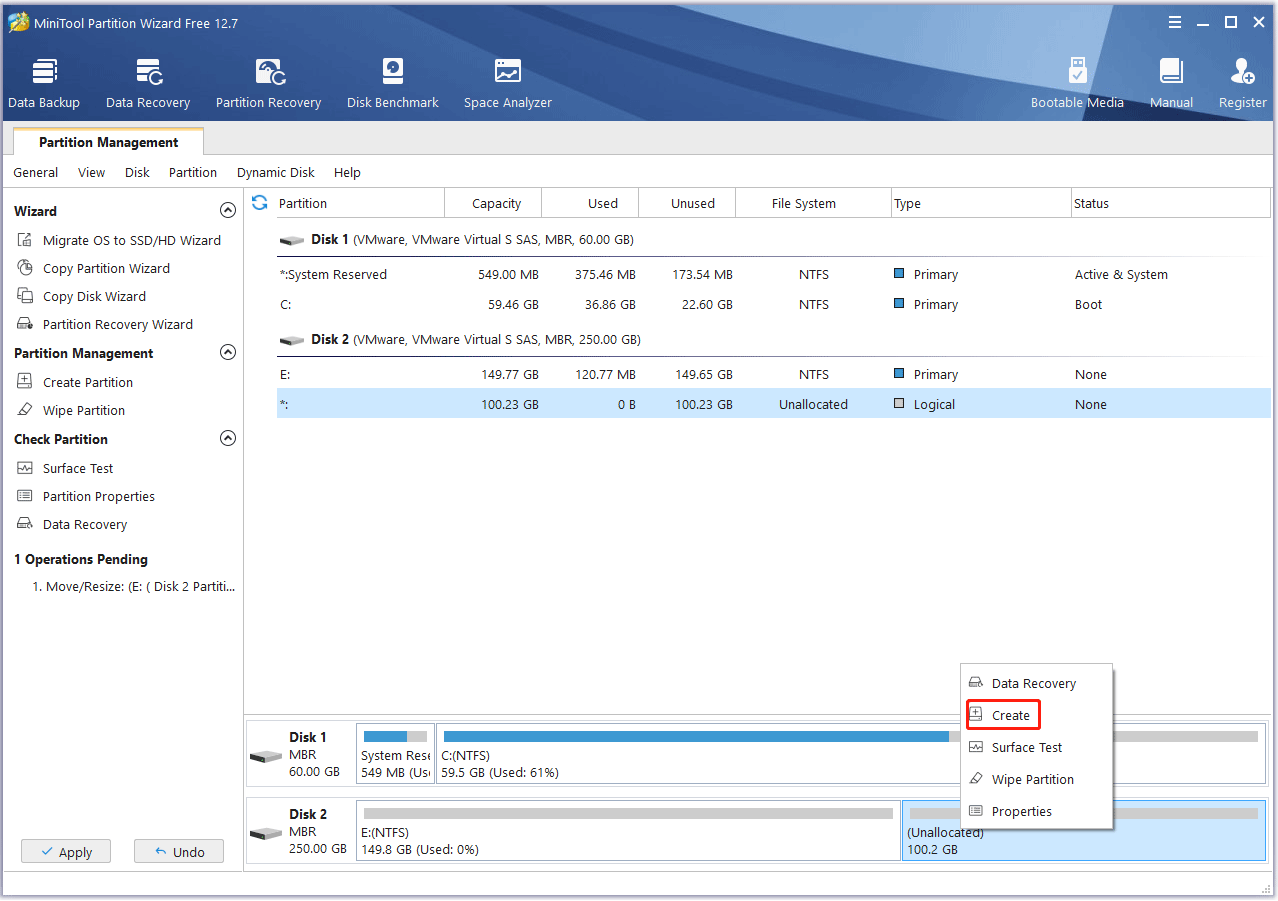
Step 4: Set parameters for the new partition. You can keep them to the default value if you don’t have specific demands. Then, click the OK button.
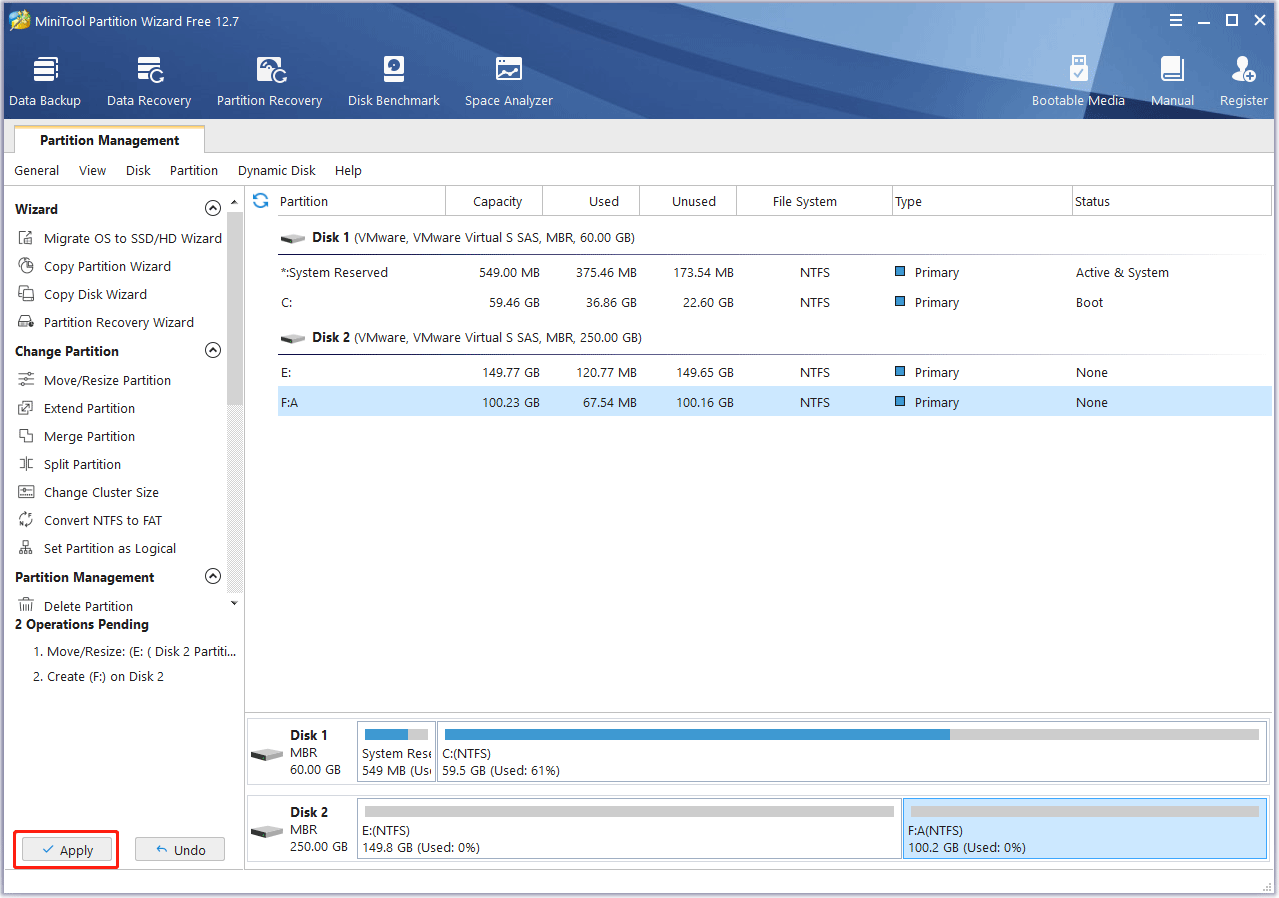
Step 5: Click the Apply button to execute pending operations.
Stage4. Create a Linux Virtual Machine
You need to first download and install the VM software to the partition you created just now. Then, you can use it to create a Linux virtual machine on Windows 10.
If you use VMware, the process should be as follows:
- Open VMware Workstation and click File > New Virtual Machine.
- Select Typical.
- Select Installer disc image file (iso) and click Browse. Navigate to the Linux ISO file you downloaded before.
- Select Linux and choose the corresponding version. If there isn’t the same version as the Linux OS, keep the default option.
- Name the Linux virtual machine and click the Browse button to change the location of the VM. The location should also be the partition you created just now.
- Specify the disk capacity accordingly. You can refer to the recommended hard drive requirement of the Linux OS.
- Click the Finish button.
- Click the Start button and go through the complete Linux OS installation process.
If you use VirtualBox, the process should be as follows:
- Launch VirtualBox and click the New icon.
- Name the Linux VM, change the Machine Folder to a folder located in the partition you created especially for the Linux VM, change Type to Linux, and change Version to the corresponding one.
- Set the memory size for the Linux VM. Of course, you can keep the default value.
- During the following steps, you can keep the default value, too. When it asks you to select the size of the virtual hard disk, you can keep the default value or change it according to the Linux OS’s recommended hard drive requirement.
- Click the Create button.
- Click the Start Then, you will be asked to add an ISO file to perform the system installation process.
- Click the folder icon, click the Add icon on the new window, navigate to the Linux ISO file, and open it.
- Highlight the Linux ISO and click the Choose button.
- Click the Start button and go through the complete Linux OS installation process.
After the Linux OS installation process is completed, you can get a Linux virtual machine on Windows 10
Here is a post showing you how to create a Linux virtual machine on Windows 10. If you have this need, you can try this guide.Click to Tweet
Bottom Line
Is this post useful to you? Do you have other Linux distros for a recommendation? Do you know other better VM software? Please share them with us in the following comment zone. I will appreciate that very much.
In addition, if you encounter problems when using MiniTool Partition Wizard, please feel free to contact us via [email protected]. We will get back to you as soon as possible.