
Выдалось немного свободного времени, поэтому сегодня я решил написать, как обстоят дела с работой Ubuntu 10.04 под Hyper-V.
Не смотря на то, что Ubuntu не входит в список официально поддерживаемых Linux дистрибутивов работает он под Hyper-V отлично. Более того никаких дополнительных компонентов интеграции ставить не пришлось. Все что нужно для работы с Hyper-V давно находится в свежих ядрах Linux.
Ну что, приступим?
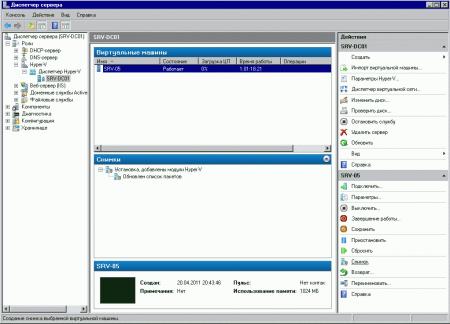
Берем Linux Ubuntu 10.04 LTS. Подойдет как 64-х битная, так и 32-x битная версия. Создаем стандартную виртуальную машину, подключаем DVD с ОС и начинаем установку. Обратите внимание, что мы оставляем синтетический сетевой интерфейс, созданный по умолчанию внутри виртуальной машины. Больше нет необходимости использовать устаревший и более медленный сетевой интерфейс Legacy. Рекомендуется использовать статический Mac адрес сетевого интерфейса, если эта виртуальная машина будет мигрировать между физическими узлами кластера с помощью механизма Live migration.
Выполнять установку можно в текстовом или в графическом режиме. Я рекомендую делать это с помощью графики т.к в текстовом режиме перерисовка каждого меню занимает секунд 20-30. Это довольно сильно раздражает, хотя и не мешает завершить установку удачно.
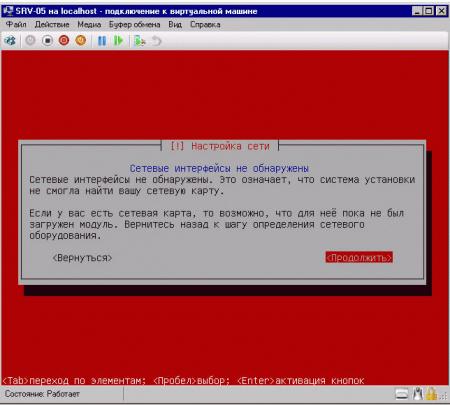
Сразу же после старта установки в течение минуты, другой можно наблюдать ворох предупредительны сообщений о нестандартном BIOS. Смело игнорируем их и продолжаем установку до тех пор пока не увидим следующее лаконичное сообщение.
После первой перезагрузки смотрим с помощью lsmod список загруженных модулей. Обнаруживаем, что загружен лишь модуль шины Hyper-V под названием hv_vmbus.
Этого недостаточно, поэтому редактируем файл /etc/initramfs—tools/modules и добавляем в него строки разрешающие загрузку остальных необходимых нам модулей.
hv_vmbus
hv_storvsc
hv_blkvsc
hv_netvsc
hv_utils
Сохраняем файл и выполняем команду:
$ sudo update-initramfs -u
Прописываем в /etc/network/interfaces ваш новый синтетический сетевой интерфейс seth0. Если бы у вас использовался устаревший сетевой интерфейс Legacy, то он назывался бы eth0.
Для статической адресации:
Auto seth0
iface seth0 inet static
address x.x.x.x
netmask x.x.x.x
Gateway x.x.x.x
Для получения адреса по DHCP:
Auto seth0
iface seth0 inet dhcp
Я проверял оба способа сетевой адресации, они работают.
Перезагружаемся и в процессе видим вот такие сообщения о том что устройства связанные с vmbus найдены.
После загрузки с помощью lsmod проверяем загруженные модули и смотрим, какие сетевые интерфейсы у нас есть в системе.
Как видите, сетевой интерфейс seth0 работает вполне нормально.
Так же стоит отметить, что Ubuntu нормально работает как в однопроцессорной, так и в многопроцессорной конфигурации. Система без проблем масштабируется до 4-х процессоров.
К сожалению, ресурсы ОЗУ моего тестового сервера ограниченны, поэтому дать более 14 ГБ ОЗУ виртуальным машинам с Ubuntu я не смог. Впрочем, для большинства задач такого объема вполне достаточно.
Стоит отметить, что поддержки синтетической мыши в Ubuntu нет, а проект Satori пока что не портирован под этот дистрибутив, поэтому для удаленного управления в графическом режиме я использовал VNC.
На всякий случай внутри виртуальных машин с Ubuntu я настроил веб сервер и FTP сервер. В течение нескольких дней с помощью скриптов периодически скачивал с них довольно большие объемы данных. Деградации быстродействия, каких либо проблем и сбоев замечено не было.
Вывод – несмотря на то, что официально о поддержке Ubuntu не заявлено этот дистрибутив работает под Hyper-V весьма надежно и, по моему мнению, может использоваться в производственной среде.
In order to add a Linux machine to an existing Windows Server 2008 DNS server, there are several main steps that need to be carried out:
- Prepare the Linux servers to join the Windows DNS configuration (this includes installing required packages, editing configuration files, checking hostname resolution, configure Kerberos and Samba, etc)
- Add the DNS entries for the Linux machine to the Windows Server 2008 DNS configuration (both forward looking and reverse lookup zones)
- If necessary, create a new reverse lookup zone in the Windows Server 2008 configuration
The main goal of this exercise is for me to be able to add all of my Linux (both RHEL and OEL servers) virtual machines to the DNS configuration, in order for me to test out various deployment and failover testing scenarios for Oracle 11g Release 2 RAC, Oracle 12c Cloud Control, and also data replication with Oracle Goldengate (all hopefully subjects of future entries in this blog). Explaining the different components involved as well as what their function is within Linux and Windows Server is not the goal of this entry.
So what I do NOT need are things such as :
- authentication for Windows Active Directory users on my existing Windows Server 2008 when accessing Linux machine
- home directory and file sharing between platforms, and so on
Basically, all I need is DNS membership and host/IP address resolution features, and will not be going into detail on any of the other DNS/Active Directory settings. So if this is what you need, the following entry isnt going to be of much use.
So, to start off, I will need to install the required packages (updated based on this helpful post) on my Linux machine running on RHEL 5.5. I have already configured YUM in a previous post, so I’ll just dive right into it:
Package list:
samba3x.x86_64
samba3x-common.x86_64
samba3x-winbind.x86_64
samba-common
samba-client
samba
system-config-samba
pam_krb5
krb5-workstation
krb5-libs
[root@rhelgrid yum.repos.d]# yum list | grep system-config-samba
This system is not registered with RHN.
RHN support will be disabled.
system-config-samba.noarch 1.2.41-5.0.1.el5 el5_u5_base
[root@rhelgrid yum.repos.d]# yum install system-config-samba
Loaded plugins: rhnplugin, security
This system is not registered with RHN.
RHN support will be disabled.
Setting up Install Process
Resolving Dependencies
–> Running transaction check
—> Package system-config-samba.noarch 0:1.2.41-5.0.1.el5 set to be updated
–> Finished Dependency Resolution
Dependencies Resolved
================================================================================
Package Arch Version Repository Size
=================================================================================
Installing:
system-config-samba noarch 1.2.41-5.0.1.el5 el5_u5_base 218 k
Transaction Summary
==================================================================================
Install 1 Package(s)
Upgrade 0 Package(s)
Total download size: 218 k
Is this ok [y/N]: y
Downloading Packages:
system-config-samba-1.2.41 5.0.1.el5.noarch.rpm | 218 kB 00:01
Running rpm_check_debug
Running Transaction Test
Finished Transaction Test
Transaction Test Succeeded
Running Transaction
Installing : system-config-samba 1/1
Installed:
system-config-samba.noarch 0:1.2.41-5.0.1.el5
Complete!
NOTE: The above example was for the system-config-samba package, but the steps are the same for all the packages in the above list, so I will skip the complete list of RPM installations for brevity
Next, I will verify the entries in the /etc/hosts file, to ensure that the fully qualified host names (FQDN) are specified (note that my DNS server is named MYD, with the IP address of 192.168.0.20 and also the fully qualified name including my domain)
[root@rhelrac1 yum.repos.d]# more /etc/hosts
# Do not remove the following line, or various programs
# that require network functionality will fail.
127.0.0.1 localhost.localdomain localhost
192.168.0.51 rhelrac1.innotiiveasia.local rhelrac1
192.168.0.52 rhelrac2.innotiiveasia.local rhelrac2
192.168.0.53 rhelrac3.innotiiveasia.local rhelrac3
192.168.0.54 rhelrac4.innotiiveasia.local rhelrac4
192.168.0.55 rhelgrid.innotiiveasia.local rhelgrid
192.168.0.20 myd.innotiiveasia.local myd
Now to check that my DNS server has been specified, and the Linux machine knows to use DNS-based host resolution (by editing the /etc/resolv.conf and /etc/nsswitch.conf files respectively)
Note that I have created an entry for the DNS server (or the nameserver) in the resolv.conf file, with the correct IP address specified:
[root@rhelgrid yum.repos.d]# more /etc/resolv.conf
nameserver 192.168.0.20
And in my /etc/nsswitch.conf file, I have specified that the host name resolution should include both the hosts entries, as well as the DNS server configurations, as shown in the following lines:
[root@rhelgrid pam.d]# more /etc/nsswitch.conf | grep dns
# dns Use DNS (Domain Name Service)
#hosts: db files nisplus nis dns
hosts: files dns
Now we are ready to configure the Kerberos daemon to connect to the Windows DNS server zone (or realm, in Kerberos terms), as well as test connectivity between our Linux machine and the DNS server. First, we need to edit the configuration file (/etc/krb5.conf) to include the entries as shown below:
[root@rhelgrid yum.repos.d]# more /etc/krb5.conf
[libdefaults]
default_realm = INNOTIIVEASIA.LOCAL
dns_lookup_realm = yes
dns_lookup_kdc = yes
ticket_lifetime = 24h
forwardable = yes
Here, the main section is the realm/DNS zone definition, as shown in the stanza above. Additional configurations (such as application defaults, logging, etc) is not shown for brevity. As can be seen, I’m specifying my domain name as INNOTIIVEASIA.LOCAL (all in uppercase, as this is a requirement). To test the settings supplied, we can now do the following:
[root@rhelgrid yum.repos.d]# kinit ADMINISTRATOR@INNOTIIVEASIA.LOCAL
Password for ADMINISTRATOR@INNOTIIVEASIA.LOCAL:
If everything is working correctly, there will be no messages/errors returned. If there are any messages displayed, the previous configuration files may not be accurate. We can now join the domain by running the following:
[root@rhelgrid samba]# net ads join -U administrator
Enter administrator’s password:
Using short domain name — INNOTIIVEASIA
Joined ‘RHELGRID’ to realm ‘innotiiveasia.local’
[NOTE: As mentioned earlier, it’s important to ensure that the configuration has been done correctly in the Kerberos, hosts and nsswitch files, or you may encounter errors such as shown below:
[root@rhelgrid samba]# net ads join -U administrator
Enter administrator’s password:
Using short domain name — INNOTIIVEASIA
Joined ‘RHELGRID’ to realm ‘innotiiveasia.local’
No DNS domain configured for rhelgrid. Unable to perform DNS Update.
DNS update failed!
Once all the requirements have been completed (in my case I had made a mistake in the /etc/hosts file), this should no longer be a problem]
Moving on to the Windows Server 2008 machine, we can now see that an entry has been created for our Linux host (in my case, rhelgrid) on the DNS server’s forward lookup zone:

Windows Server 2008 DNS entry
So we’re almost done, all that remains is to ensure that we have a reverse lookup domain configured and working, so that not only will our servers be able to resolve fully qualified hostnames, but also the IP addresses for all the hosts in our DNS configuration. From here on, these steps will be on the Windows Server 2008 machine, as the administrator user (or other similar users with administrator privileges).


If you’re following the screenshots above, everything should be fairly self-explanatory, but the general idea is I have a domain with the IP configuration of 192.168.0.XX, and thus my reverse-lookup domains will start with 0.168.192.XX. I have elected to enable this reverse lookup zone only for IPv6 addresses (as we do not use IPv6 in our test environments, for now).
The last step is to add the pointer to my Linux server (rhelgrid.innotiiveasia.local, IP 192.168.0.55) to the reverse lookup zone, and test the functionality from our Linux box. Again the steps are carried out on the Windows Server 2008 machine, and are fairly self-explanatory.


In brief, what I’ve done here is configured a pointer for the reverse lookup zone in our DNS server, and added a pointer (or entry) for the rhelgrid machine that has already been registered in the forward lookup zone earlier in this post (when we added the host with the net join ads command). Now it should be possible to perform both forward and reverse DNS lookups from the Linux server, as shown below:
[root@rhelgrid etc]# nslookup rhelgrid.innotiiveasia.local
Server: 192.168.0.20
Address: 192.168.0.20#53
Name: rhelgrid.innotiiveasia.local
Address: 192.168.0.55
[root@rhelgrid etc]# nslookup 192.168.0.55
Server: 192.168.0.20
Address: 192.168.0.20#53
55.0.168.192.in-addr.arpa name = rhelgrid.innotiiveasia.local.
Несколько дней назад нам потребовалось развернуть сервер на Ubuntu в виртуальной среде. Так как на выделенном под проект сервере уже стоял Windows Server 2008, выбор пал на Hyper-V, бесплатный гипервизор от Microsoft. В тоже время установка имеет ряд особенностей, о которых мы и поговорим в этой статье.
Онлайн-курс по устройству компьютерных сетей
На углубленном курсе «Архитектура современных компьютерных сетей» вы с нуля научитесь работать с Wireshark и «под микроскопом» изучите работу сетевых протоколов. На протяжении курса надо будет выполнить более пятидесяти лабораторных работ в Wireshark.
Первоначально мы не собирались публиковать этот материал, есть отличная статья Андрея Бешкова, где данный вопрос довольно подробно рассматривается. Однако в процессе установки мы столкнулись с рядом особенностей, не описанных в статье и тем, что в нашем случае у системы отсутствует графический интерфейс, для опытного администратора это не представляет сложности, но у начинающих может вызвать затруднения.
Итак, у нас имеется Windows Server 2008 SP2 c добавленной ролью Hyper-V и Ubuntu Server 10.04.1 LTS. В Hyper-V создаем стандартную виртуальную машину и начинаем установку системы с образа или диска. Одна неприятная особенность — в текстовом режиме перерисовка каждого экрана занимает 15-20 секунд, неприятно, но на процесс установки это никак не влияет.
Первое серьезное предупреждение в процессе установки сообщит вам, что установщик не смог обнаружить сетевые интерфейсы. Это нормально, по умолчанию Ubuntu не поддерживает виртуальное оборудование Hyper-V, спокойно продолжаем установку.
При установке откажитесь от автоматической установки обновлений, это очень важный момент, почему — поясним ниже.
Установив систему следует включить загрузку необходимых для полноценной работы в Hyper-V модулей, которые входят в ядро системы, но не включены. Учитывая что сети нет, и поставить даже mc вы не сможете, будем довольствоваться простым редактором nano. Для включения модулей необходимо отредактировать /etc/initramfs-tools/modules
sudo nano /etc/initramfs-tools/modulesВ открывшийся файл добавляем следующие строки:
hv_vmbus
hv_storvsc
hv_blkvsc
hv_netvsc
hv_utilsВыходим по Ctrl+X утвердительно отвечая на предложение сохранить изменения.
За что отвечают и для чего нужны эти модули?
- hv_vmbus — шина Hyper-V, основной модуль
- hv_storvsc — поддержка виртуального хранилища (виртуальный жесткий диск)
- hv_blkvsc — поддержка блочных устройств, требуется для хранилища.
- hv_netvsc — поддержка синтетической сетевой карты
- hv_utils — поддержка расширенных возможностей Hyper-V, таких как управление питанием гостевой системы и т.п.
Теперь обновим образ начальной загрузки системы (initramfs):
sudo update-initramfs -uИзменения будут применены при следующей загрузке системы, а пока настроим сетевые интерфейсы, для этого отредактируем /etc/network/interfaces:
sudo nano /etc/network/interfacesДобавим интерфейс eth0 и настроим его, например у нас это выглядит так:
auto eth0
iface eth0 inet static
address 192.168.0.105
netmask 255.255.255.0
gateway 192.168.0.100
Также на забудьте указать DNS сервера в /etc/resolv.conf
sudo nano /etc/resolv.confнашем случае для DNS серверов 192.168.0.100 и 192.168.0.101 и домена example.com записи будут выглядеть так:
nameserver 192.168.0.100
nameserver 192.168.0.101
domain example.comsearch example.com
Сохраняем изменения и перезагружаемся:
sudo rebootПосле перезагрузки проверяем, сеть и доступ в интернет должны работать.

На этом нашу статью можно было бы и закончить, если бы не один неприятный момент: если вы попытаетесь обновить систему, то при обновлении получите ошибку и система больше не загрузится. Чтобы избежать этого, отключите все модули initramfs, кроме hv_vmbus и hv_netvsc (не забудьте перезагрузиться). После обновления включите модули обратно. В любом случае перед обновлением и прочим потенциально опасными операциями стоит сделать снимок системы, что позволит в любой момент времени быстро вернуться к ее текущему состоянию.
Вообще в процессе настройки мы советуем делать снимки как можно чаще. Установили пакет, настроили — сделайте снимок. Это позволит, при необходимости, возвращаться на нужное количество шагов назад, а также реализовать и опробовать несколько вариантов настройки, чтобы окончательно выбрать лучший из них.
В заключение стоит отметить, что установка Ubuntu Server на Hyper-V, хоть и требует некоторых дополнительных действий, довольно проста и не вызывает проблем. Работа системы в виртуальной среде не вызывает нареканий, стабильна и может быть рекомендована к применению в производственных условиях.
Онлайн-курс по устройству компьютерных сетей
На углубленном курсе «Архитектура современных компьютерных сетей» вы с нуля научитесь работать с Wireshark и «под микроскопом» изучите работу сетевых протоколов. На протяжении курса надо будет выполнить более пятидесяти лабораторных работ в Wireshark.
В данной заметке описывается процесс как подключить Linux-сервер (CentOS 6.7) к существующему Windows-домену под управлением Microsoft Windows 2008-R2 и сделать из него файловый сервер на базе Samba (Version 3.6.23-20.el6) c разграничением прав доступа доменных пользователей.
Условия, при которых выполнялись шаги, описанные в заметке:
- В качестве аппаратной платформы используется виртуальная машина VMware (version 11) на гипервизоре VMware ESXi, 6.0.0, 2494585.
- Контроллер домена на базе Microsoft Windows Server 2008 R2
Домен: filial.work.corp (Краткое название домена WORK-FILIAL)
Контроллер домена: dc301.filial.work.corp (IP 10.58.96.4) - Цель — получить файловый сервер с именем fserver1.filial.work.corp (IP 10.58.96.24)
- Устанавливаем CentOS-minimal. (Я устанавливал, имеющийся на тот момент, CentOS 6.5 (i386), обновленный впоследствии на втором шаге до версии 6.7)
P.S. В веб-консоле VMware мышь не работает, все делаем с клавиатуры – перемещение между кнопками – «TAB», подтвердить выбор – «Пробел»)
При установке были заданы следующие параметры:
- Язык Русский
- Раскладка клавиатура – Английская (США)
- Стандартные накопители
- Имя узла задаем полностью fserver1.filial.work.corp
- Настраиваем сеть:
IP:10.58.96.24
Маска:255.255.255.0
Шлюз: 10.58.96.1
Серверы DNS: 10.58.96.4
Домены поиска: FILIAL.WORK.CORP
Ставим галку «Подключаться автоматически» - Часовой пояс должен быть Европа/Москва
- Задаём пароль ROOT
- Всё пространство
- Сохранить изменения на диск
- Установка пакетов
- Перезагрузка
- Подключаемся к серверу по SSH (Я использовал PuTTY)
- Обновим все необходимы модули в системе на актуальные версии::
yum update -y - Перезагружаем сервер (команда reboot). После перезагрузки снова подключаемся по SSH.
- Для удобства установим MC
yum install mc -y - Если используется виртуальная машина, то ставим VmWare Tools, если нет – переходим к шагу 8.
Подготовка к установке пакета VmWare Tools- 1 вариант (для 32 битного CentOSa ): yum -y install http://packages.vmware.com/tools/esx/6.0/repos/vmware-tools-repo-RHEL6-9.10.0-1.el6.i686.rpm
- 2 Вариант: Скачиваем rpm-пакет (для ESXi6: http://packages.vmware.com/tools/esx/6.0/repos/vmware-tools-repo-RHEL6-9.10.0-1.el6.x86_64.rpm — для 64 битного CentOSa, vmware-tools-repo-RHEL6-9.10.0-1.el6.i686.rpm – для 32 битной)
Другие версии — http://packages.vmware.com/tools/esx/index.html
Устанавливаем пакет:
yum install vmware-tools-repo-RHEL6-9.10.0-1.el6.i686.rpm -y
- Устанавливаем VmWare Tools:
yum install vmware-tools-esx-nox -y
Проверяем, что VmWare tools установлен и запущен:
initctl list | grep vmware-tools
Вывод:vmware-tools start/running
Чтобы узнать версию vmware-tools, выполните :vmware-toolbox-cmd -v - Устанавливаем пакеты Samba:
yum install samba samba-client samba-common –y - Добавляем Samba в автозагрузку:
chkconfig smb on
chkconfig nmb on - Отключаем SELinux.
Редактируем файл /etc/selinux/config. Находим строку SELINUX, меняем значение с enforcing на disabled:
SELINUX=disabled - Чтобы ресурсы Samba были доступны по сети, необходимо добавить правила в iptables. Вводим по очереди следующие строки:
iptables -I INPUT 4 -m state —state NEW -m udp -p udp —dport 137 -j ACCEPT
iptables -I INPUT 5 -m state —state NEW -m udp -p udp —dport 138 -j ACCEPT
iptables -I INPUT 6 -m state —state NEW -m tcp -p tcp —dport 139 -j ACCEPT
service iptables save
service iptables restart - В корне создаем каталог data (его мы и будем для начала расшаривать):
mkdir /data
chmod -R 0777 /data - Предварительная настройка Samba:
- Переместим файл /etc/samba/smb.conf в папку /home.
- Создадим новый файл smb.conf
- Внесём в него следующие строки:
[global]
workgroup = WORKGROUP
security = share
map to guest = bad user
[data]
path = /data
browsable =yes
writable = yes
guest ok = yes
read only = no
- Проверим конфигурацию Samba командой testparm
Должны получить следующее:Load smb config files from /etc/samba/smb.conf rlimit_max: increasing rlimit_max (1024) to minimum Windows limit (16384) Processing section "[data]" WARNING: The security=share option is deprecated Loaded services file OK. Server role: ROLE_STANDALONE Press enter to see a dump of your service definitions
На предупреждения о «security = share» и «rlimit_max» внимание не обращаем. - Перезапустим Samba
service smb restart
service nmb restart
- Пробуем подключиться
- Для правильной работы в домене требуется настроить автоматическую синхронизацию времени с доменом:
a) yum install ntp -y
b) В файл /etc/ntp.conf добавляем информацию о сервере времени:
server filial.work.corp
(перед остальными серверами типа server X.servet.pool.ntp.org поставим знак «#»)
c) После чего перезапустим демон ntpd:
service ntpd start
d) Добавляем сервис в автозагрузку
chkconfig ntpd on
e) Проверяем как работает синхронизация командой:
ntpq -p
Должны увидеть примерно такое:remote refid st t when poll reach delay offset jitter ============================================================================== *dc301.filial.wo 10.58.96.4 4 u 129 128 377 0.324 -3.265 10.328
- Устанавливаем пакет krb5-workstation и добавляем сервис winbind в автозагрузку:
yum install krb5-workstation -y
chkconfig winbind on - Добавляем в начало файла /etc/hosts строку
127.0.0.1 fserver1.filial.work.corp fserver1 - Устанавливаем лимит одновременно открытых файлов:
В конец файла (перед #End of file) /etc/security/limits.conf вписываем строку
* — nofile 16384 - Перезагружаем сервер (команда reboot). После перезагрузки снова подключаемся по SSH.
- Добавление Winbind в качестве источника пользователей и групп.
В файле /etc/nsswitch.conf внесём следующие изменения (отмечены жирным):
passwd: compat winbind
group: compat winbind
hosts: files dns winbind - Настройка Samba.
Для работы в домене, необходимо прописать правильные настройки в файле /etc/samba/smb.conf.
Ниже – рабочий пример части файла конфигурации (Обратите внимание на то, что название и короткое наименование домена вводятся ПРОПИСНЫМИ БУКВАМИ):workgroup = WORK-FILIAL realm = FILIAL.WORK.CORP security = ADS auth methods = winbind allow trusted domains = no domain master = no local master = no preferred master = no os level = 0 domain logons = no # Отключаем принтеры load printers = no show add printer wizard = no printcap name = /dev/null disable spoolss = yes smb ports = 139 socket options = TCP_NODELAY SO_RCVBUF=8192 SO_SNDBUF=8192 idmap config * : range = 10000-20000 idmap config * : backend = tdb winbind enum groups = yes winbind enum users = yes winbind use default domain = yes #Автоматическое обновление билета Kerberos winbind refresh tickets = yes #Возможность авторизации доменных пользователей когда домен недоступен (включить после тестирования) #winbind offline logon = yes
- Проверим конфигурацию Samba командой testparm. Должны получить следующее:
Load smb config files from /etc/samba/smb.conf
Processing section "[data]"
Loaded services file OK.
Server role: ROLE_DOMAIN_MEMBER
Press enter to see a dump of your service definitions
- Введем сервер в домен. Для этого введите команду:
net ads join -U administrator -D FILIAL.WORK.CORP,где administrator — пользователь домена с правами ввода компьютеров в домен, название домена вводятся ПРОПИСНЫМИ БУКВАМИ.
И в случае успеха вы увидите что-то похожее на:Using short domain name – WORK-FILIAL Joined 'FSERVER1' to dns domain 'filial.work.corp'
Так же можно набрать команду:
net ads testjoin
Если все хорошо, можно увидеть:
Wbinfo Join is OK - Перезагружаем сервер (команда reboot). После перезагрузки снова подключаемся по SSH.
- После перезагрузки проверим, что Winbind установил доверительные отношения с доменом командой:
wbinfo -t
Если всё нормально, то увидим:
checking the trust secret for domain DCN via RPC calls succeededКроме того, можно посмотреть кол-во пользователей и групп, должно быть больше 0:
wbinfo –u |wc –l
wbinfo –g |wc –l - В файл /etc/samba/smb.conf добавляем строки:
[data]
path = /data
valid users = @WORK-FILIAL\Администраторы домена
write list = WORK-FILIAL\MainAdmin
read only = yes
browseable = yes
create mask = 0666
directory mask = 0777
Пояснения:
valid users — пользователи и/или группы, которым разрешен доступ в каталог
write list — пользователи и/или группы, которым разрешена запись в каталог
В строках, где значение параметра начинается с @ означит, что это правило применяется не к одному пользователю, а к группе.
Т.е. в примере доступ в каталог data разрешён только пользователям, входящим в группу «Администраторы домена«, а вносить изменения (создавать, удалять, изменять данные) в каталоге может только пользователь «MainAdmin«. Если нужно дать права нескольким пользователям или группам, то их нужно указать через запятую:
write list = WORK-FILIAL\MainAdmin, WORK-FILIAL\backupAdmin
create mask = 0666 — задаёт маску прав создаваемых пользователями файлов
directory mask = 0777 — задаёт права на создание каталогов и подкаталогов
У расшариваемого каталога, в нашем случае /data, у «прочих» пользователей должны быть права rwx.
Чтобы установить требуемые права на паку (в нашем случае /data), можно воспользоваться командой:
chmod 0777 /data - После внесения изменений в настройки Samba, перезапустим службу
service smb restart - …
При работе над заметкой были использованы следующие материалы:
- Samba, как член домена Active Directory
- Linux в домене Active Directory
- Ввод компьютера в домен Windows
- Формат конфигурационного файла smb.conf
- Все о Samba
It’s been a while since we’ve had a hardcore Geek Sheet installment, and I promise that this one will be a real winner.
Some of you may be aware that the updated Hyper-V bare-metal hypervisor virtualization layer in Microsoft’s upcoming Windows Server 2008 R2 (Which is due to be released August 14th to MSDN and Technet customers) now has support for SUSE Linux Enterprise Server 11 (SLES) and Red Hat Enterprise Linux 5.3 (RHEL). Additionally, Linux support and performance has greatly improved over the initial Hyper-V release. Microsoft also recently released it’s Hyper-V Linux Integration Components (LinuxIC) under the GPLv2 Open Source License.
The LinuxICs for Hyper-V, which are in Release Candidate status and are available for download from Microsoft’s Connect site, provide synthetic device drivers that enhance I/O and networking performance when Linux OSes are virtualized under Hyper-V. The source code for the LinuxIC’s were accepted into the Linux Driver Project and should become part of the Linux Kernel within two subsequent releases and code merges — 2.6.32 is expected to be when they will be integrated, and all Linux distributions using that kernel code base going forward should be Hyper-V enabled out of the box. Yes, you heard that correctly, Microsoft is now an official Linux Kernel contributor.
However, until that code merge occurs, only Red Hat Enterprise and SUSE Linux Enterprise Linux distributions are officially supported by Microsoft as Hyper-V for Server 2008 R2 ready. Both RHEL and SLES are commercial Linux distributions and cost money for updates and maintenance. However, that does not mean that free Linux distributions will not work fully optimized with synthetic driver support in Hyper-V now. They most certainly do, and you can definitely take advantage of VMs running on free Linux distributions on Hyper-V right away.
Over the last week or so, I’ve been putting the release code of Windows Server 2008 R2 as well as the free Hyper-V Server 2008 R2 release candidate through their paces and running a combination of both Windows and Linux virtual machines on them. The free Linux distributions I have had most success with running the Hyper-V LinuxICs on are CentOS 5.3, Scientific Linux 5.3, and OpenSUSE 11.1. In my limited testing, I only used 64-bit versions, because Windows Server 2008 R2 is 64-Bit only and I wanted to fully take advantage of the processing capability and native 64-bit virtualization of Hyper-V. However, the LinuxIC’s should also install fine on the 32-bit versions of these systems.
CentOS 5.3 (foreground) and Scientific Linux (background) running fully paravirtualized in Hyper-V in Windows Server 2008 R2.
CentOS 5.3 and Scientific Linux 5.3 are both source code clones of Red Hat Enterprise Linux, so there are only minor differences in how the LinuxIC’s are installed on them compared to how it is done in RHEL. OpenSUSE 11.1’s installation procedure is also very similar to SLES, but like the other two there are some minor changes. However, these small differences were learned through a good number of hours of troubleshooting, so as long as you follow these steps, you won’t run into the pitfalls I ran into.
Building your Linux VM in Hyper-V
First you’ll want to build your VM. Using the Hyper-V Manager, select New > Virtual Machine from the «Actions» menu on the right. You’ll be presented with this initial dialog wizard:
Here you’ll specify the name of your Virtual Machine and where you’d like it stored on your server. I created a new volume specifically for storing my virtual machines and my ISO files, the V: drive.
After clicking «Next» you’ll be asked for the amount of memory to assign. For a basic Linux server VM, 512-768MB of RAM is certainly plenty, but if you’re going to use the GUI features, 1GB or more is recommended. On the following screen, you’ll be asked to configure networking and to pick a network interface to bridge to. During the setup of the Hyper-V role, at least one network adapter should be bridged to the LAN for the virtual network switch.
Following the Network screen, you’ll be asked how large your virtual hard disk (VHD file) should be. For CentOS, Scientifc Linux and openSUSE server use, I’d recommend 8GB-20GB of space for the VHD depending on the usage role (Apache/MySQL/PhP, Java, Ruby on Rails applications, etc.)
On the final configuration screen you’ll be asked to point to your install media. You can either install from a physical CD or DVD, or from an ISO file. Once you’ve chosen your desired install media, click on Finish to create the VM.
Next —>
Before powering up the VM, we need to do a bit of tweaking. During the install process we’re going to want to have actual IP network connectivity, and to do that, we’re going to need to add a second network adapter for «Legacy» connectivity. By default Hyper-V installs a synthetic network card that Linux cannot see until the LinuxICs are installed. The «Legacy» network adapter allows Linux to connect to the LAN at less than optimal performance but it still functions. If you have an older version of Linux or another Linux OS you’d like to use in Hyper-V without the Integration Components, this is how networking can be made to work.
In the Hyper-V manager, right click on the name of your newly created VM and choose «Settings».
In the Add Hardware window choose Legacy Network Adapter and click OK.
Select a virtual network connection and click OK. We’re now ready to boot and install our Linux OS.
You’ll notice in these last two screen shots I only have a single virtual CPU (vCPU) selected. That is because the current version of the LinuxIC’s only officially supports uniprocessor guests. While I have run SMP Linux guests with the LinuxICs and have had the additional vCPUs detected and running, I have had some stability issues with them during the LinuxIC install process so you want to at the very least not turn those additional vCPUs on until you’ve verified the LinuxICs are running correctly.
CentOS 5.3 and Scientific Linux 5.3
Both CentOS and Scientific Linux have similar install processes to that of RHEL, but they differ very slightly.
For RHEL clones in Hyper-V, I’m preferential to Scientific Linux because it’s easier to lay down the base package support needed to install the dependencies required for the LinuxICs. But when installed both OSes are more or less the same in terms of capability and software support.
With both of these OSes I prefer to use the text-based installer rather than the GUI, because until we install a special mouse driver later on, we won’t have use of the mouse during the installation. Otherwise, you’ll need to use the TAB key to bounce around the GUI and it gets somewhat cumbersome.
After booting your CentOS or Scientific Linux VM for the first time, type «linux text» at the boot prompt and press ENTER.
If you are familiar with a standard RHEL installation at this point, there is very little difference until you get t the software selection screen.
In CentOS, you want to at the minimum select «Desktop — Gnome» and «Server — GUI» and also the «Customize software selection» checkbox and choose OK using the tab key and pressing ENTER.
In Scientific Linux you’ll also see the choice for «Software Development», which you will also need to select. That’s all you need to make the LinuxIC’s work.
In CentOS, On the next screen you will need to select «Development tools» and «Development Libraries». Add any additional packages you want, select OK with the TAB key and then press enter.
On both CentOS and Scientific Linux, you’ll notice also see the choice for «Virtualization». Do NOT choose this. Unlike on the previous release of Hyper-V, virtualized Linux guests in Server 2008 R2 use a regular Linux kernel and not a Xen kernel.
After Package Selection the install proceeds normally, and when the install completes, you’ll be prompted to reboot the system and eject the media from the drives.
After first boot the Anaconda installer program will ask you which items you want to modify, such as firewall and network configuration. After those items are complete, you should be able to log in as root with a text prompt.
Here is another key step that differentiates a regular RHEL install on Hyper-V from a CentOS or Scientific Linux install:
Verify that you have network connectivity by issuing a «ifconfig eth0». If you get an IP address from your router, you’re good to go.
from the root command prompt, enter «yum update» and press ENTER. The yum utility will connect to the Internet repository for CentOS/Scientific Linux and look for the latest versions of the packages that have been installed on your system. It will then ask you if you want to update them. Answer «y» to confirm the update, and also answer «y» to confirm the GPG Keyring import when prompted.
Next —>
Depending on the speed of your Internet connection, the package update could take several minutes or as much as a half hour. This step is critical because the LinuxICs are built against the most current Red Hat kernel code, and by default the CentOS 5.3 and Scientific Linux 5.3 install media use RTM Red Hat Enterprise Linux source code, which has not been updated.
This process also installs an updated Linux kernel, so we will need to reboot the system in order to get access to it. It should be noted that every time you update your kernel (which happens periodically with major fix releases) you will need to re-run the LinuxIC installer script.
Once you get the «Complete!» message and are returned to the root bash prompt issue a «reboot» command and hit ENTER. Log back into your system again as root.
We’re now ready to install the Linux Integration Components. You’ll want to refer to the README file accompanying them and follow the instructions for RHEL. This entails mounting the LinuxIC.iso and copying its contents over to /opt/linuxic. External media can be mounted using the Media menu in the Virtual Machine Connection console.
Download: Linux Integration Components for Microsoft Hyper-V
Before installing the LinuxIC’s, verify that you have the pre-requisites installed by issuing a «yum install kernel-devel» and «yum install gcc». If you already have them installed you’re good to go. If not, yum should grab them over the Internet.
To install the Linux Integration Components, issue a «./setup.pl drivers» from within the /opt/linuxic directory or from whatever directory you have copied them to. Once the install program has confirmed the drivers have installed, I like to shut down the system, remove the Legacy Ethernet adapter from the VM settings, and then reboot to verify that the OS can boot cleanly with the new modules.
To verify that the Integration Components are working, issue a «/sbin/lsmod | grep vsc» to display the status of the Hyper-V kernel modules. To verify that the Synthetic Ethernet adapter is working, issue a «ifconfig seth0».
At this point, if you’re content on using CentOS or Scientific Linux as a server with command-line support, you’re all done, and now can clone your Hyper-V integrated VMs to your heart’s content and can customize the configuration as needed. However, if you want to be able to use the GNOME GUI, you will want to download an additional driver for Mouse Integration, which is currently provided by Citrix.
Download: Citrix Project Satori (Mouse Support for Linux under Hyper-V)
As with the Linux Integration Components you will want to mount the ISO, and copy its contents over to a directory on the VM. I like to use /opt/mousedrv.
Prior to running the ./setup.pl script in this directory, you will need the «xorg-x11-server-sdk» package installled. To do this, from the root bash prompt issue a «yum install xorg-x11-server-sdk» and hit the ENTER key. This will install that package as well as several other dependent packages.
The ./setup.pl script installs the mouse integration support. Once it is finished you should be able to see the mouse cursor when you move it within the Linux console window. To bring up the GNOME GUI, issue a «startx» as the bash prompt.
CentOS Linux mouse integration with Hyper-V.
Scientific Linux 5.3 with Mouse Integration.
Next —>
openSUSE 11.1
As with the two RHEL clones, openSUSE 11.1 works much like its enterprise sibling, SLES when integrated with Hyper-V. You’ll need to build your VM as specified in the first step with 1 vCPU and with a Legacy Network Adapter. To navigate around the GUI installer you will need to use the TAB and arrow keys and spacebar to make selections.
During the openSUSE 11.1 installation you will need to select additional packages for «Base Development» and «Kernel Development». Again, do NOT install any virtualization components.
Prior to final installation confirmation, you should see the Base Development and Linux Kernel Development packages listed.
After openSUSE installs, you will need to enter a text mode prompt. You can do this by pressing the key combination of CTRL-ALT-F1.
Once you’ve logged in as root, issue a «zypper update» from the prompt. Like a yum update during the CentOS/Scientific Linux install, this will download a large amount of updates and fixes and it is required to make the Integration Components function. After the zypper update, you’ll want to reboot the system.
Once you have rebooted into the system, follow the instructions in the README for the Linux Integration Components for SLES. Per the instructions, you will need to make a modification of the /etc/fstab file for the file system mountpoints prior to re-booting the system.
To verify that the components are functioning, do the same thing as with the CentOS/Scientific installation:
LinuxICs functioning in openSUSE 11.1
Currently, the Citrix mouse driver does not function in openSUSE, so if you want to use the graphical console, I recommend that you install a vnc or RDP server such as xrdp. Microsoft is looking into this issue and hopefully I will have an update for you in a few weeks.
One thing that I find particularly nice about openSUSE is that you can build a JEOS (Just Enough OS) distribution using Novell’s SUSE Studio. This is great for creating simple virtual appliances for web serving, security, or whatever simple functions you need Linux to do. I’m currently in the process of creating a simple ISO automated installer that installs openSUSE 11.1 with the Hyper-V components working, all the development tools and many common server components out of the box. I didn’t have it ready in time for this article but I’ll let you know about it as soon as I am done.
Have you had any experience getting other Linux distributions working with the Hyper-V R2 Linux Integration Components? Talk Back and Let Me Know.