
Время на прочтение8 мин
Количество просмотров72K
1. Конфигурационные файлы.
Мы будем настраивать только доступ к серверу GNU/Linux с использованием Samba. Авторизация пользователей останется локальной, с использованием /etc/passwd.
Мы присвоим нашему новому серверу статический IP-адрес. Пусть им будет 192.168.7.9.
Для начала нужно проверить, какой сервер у нас используется в качестве DNS. Им в нашей сети должен быть контроллер домена. У нас адрес сервера определен как 192.168.7.2. Правим файл /etc/resolv.conf. Он должен выглядеть следующим образом:
search lab.local
nameserver 192.168.7.2
Проверим, все ли работает:
#host 192.168.7.2
2.7.168.192.in-addr.arpa domain name pointer lab-dc1.lab.local.
#
Естественно, в Вашем случае имена будут другими. Обязательно сделайте в домене lab.local запись в DNS, ссылающуюся на наш новый сервер. Запись в DNS не означает того, что наш GNU/Linux сервер включен в домен. Проверим:
linux-test:~ # host 192.168.7.9
9.7.168.192.in-addr.arpa domain name pointer test-linux.lab.local.
linux-test:~ # host test-linux
test-linux.lab.local has address 192.168.7.9
linux-test:~ #
Для корректной работы в домене Windows требуется несколько служб: Kerberos, LDAP и Samba. В общем случае требуется только настройка Samba, настройка других служб не является обязательной. Но будет лучше, если мы их настроим – они могут пригодиться в будущем.
Kerberos настраивается просто – через один файл /etc/krb5.conf. Основными параметрами является REALM, указывающий на наш домен и адрес сервера Kerberos – это адрес контроллера домена. Файл /etc/krb5.conf выглядит примерно так:
linux-test:~ # more /etc/krb5.conf
[libdefaults]
        default_realm = LAB.LOCAL
        clockskew = 300
#       default_realm = EXAMPLE.COM

[realms]
LAB.LOCAL = {
        kdc = 192.168.7.2
        default_domain = lab.local
        admin_server = 192.168.7.2
}
#       EXAMPLE.COM = {
#                kdc = kerberos.example.com
#               admin_server = kerberos.example.com
#       }

[logging]
        kdc = FILE:/var/log/krb5/krb5kdc.log
        admin_server = FILE:/var/log/krb5/kadmind.log
        default = SYSLOG:NOTICE:DAEMON
[domain_realm]
        .lab.local = LAB.LOCAL
[appdefaults]
pam = {
        ticket_lifetime = 1d
        renew_lifetime = 1d
        forwardable = true
        proxiable = false
        minimum_uid = 1
        external = sshd
        use_shmem = sshd
        clockskew = 300
}
Секция [libdefaults] указывает на домен по умолчанию. У нас это LAB.LOCAL. Далее, в секции [realms] указываются параметры для LAB.LOCAL – имя домена и адрес сервера Kerberos. В нашем случае, в качестве сервера Kerbeors выступает контроллер домена. В секции [logging] указывается местоположение лог-файлов. Эти файлы пригодятся для процедуры поиска неисправности, если что-то пойдет не так.
Проверим работу Kerberos:
linux-test:~ # kinit Administrator@LAB.LOCAL
Password for Administrator@LAB.LOCAL:
linux-test:~ # klist
Ticket cache: FILE:/tmp/krb5cc_0
Default principal: Administrator@LAB.LOCAL

Valid starting     Expires            Service principal
04/05/12 11:22:23  04/05/12 21:22:35  krbtgt/LAB.LOCAL@LAB.LOCAL
        renew until 04/06/12 11:22:23
linux-test:~ #
Команда kinit получает от сервера тикет, а klist показывает полученные тикеты от сервера. Выполнение kinit не является обязательным, но ведь нужно как-то проверить работу Kerberos?
Настройка LDAP тоже не является обязательной – Samba сама построит необходимые файлы и сделает нужные запросы. Но LDAP может пригодиться в дальнейшем. Конфигурация OpenLDAP хранится в файле /etc/openldap/ldap.conf. Обратите внимание – в системе может быть два файла ldap.conf. У них разные предназначения и даже немного разный синтаксис. В каталоге /etc/openldap лежит файл ldap.conf для OpenLDAP (и для Samba), а в файле /etc/ldap.conf хранится конфигурация для разрешения имен через LDAP (для nss_ldap). К файлу /etc/ldap.conf мы вернемся в других статьях, сейчас настроим /etc/openldap/ldap.conf
linux-test:~ # cat /etc/openldap/ldap.conf
#
# LDAP Defaults
#

# See ldap.conf(5) for details
# This file should be world readable but not world writable.

#BASE   dc=example,dc=com
#URI    ldap://ldap.example.com ldap://ldap-master.example.com:666

#SIZELIMIT      12
#TIMELIMIT      15
#DEREF          never
uri     ldap://192.168.7.2
base    DC=lab,DC=local
linux-test:~ #
Как видите, все очень просто – нужно указать URI сервера LDAP (это наш контроллер домена) и базу для поиска.
Теперь переходим к самому сложному – настройке Samba.
В состав Samba входят 3 демона – smbd, nmbd и winbind. Все они берут настройки из файла /etc/samba/smb.conf.
Smbd отвечает за доступ клиентов к службе SMB/CIFS (собственно это и есть сервер Samba). Nmbd – это служба разрешения имен для Netbios. Winbind – служба разрешения имен (и компьютеров и пользователей) через доменные службы Windows.
Во многих руководствах можно встретить упоминание того, что кроме Samba требуется настраивать и winbind – службу, отвечающую за отношения между GNU/Linux и контроллером домена Windows. В частном случае, когда нужно настроить только Samba, настройки winbind можно опустить. Winbind обеспечивает авторизацию в домене Windows самых различных служб, обеспечивая интерфейс между модулями PAM и контроллером домена Windows. При неработающем winbind Samba остается работоспособной. Но настроив winbind мы делаем возможным дальнейшее расширение нашего сервера за счет добавления различных служб, авторизующихся через контроллер домена.
Мы сделаем самый простой сервер, открыв всем пользователям доступ к некоторому общему каталогу файлов и к домашнему каталогу пользователей. Более подробно о настройке доступа к серверу Samba мы будем говорить в других статьях.
В файле /etc/samba/smb.conf мы должны указать следующие строки:
[global]
        workgroup = LAB
        passdb backend = ldapsam:ldap://192.168.7.2
        printing = cups
        printcap name = cups
        printcap cache time = 750
        cups options = raw
        map to guest = Bad User
        logon path = \\%L\profiles\.msprofile
        logon home = \\%L\%U\.9xprofile
        logon drive = P:
        usershare allow guests = Yes
Здесь мы указываем сокращенное наименование нашего домена (LAB) и место, где хранятся пароли – параметр passdb backend, указывающий на то, что пароли находятся на сервере LDAP, в качестве которого выступает контроллер домена. Кстати, можно указать и несколько серверов, перечислив их через пробел. Это пригодится в том случае, если у нас несколько контроллеров домена. Строка usershare allow guests = Yes разрешает пользователям управлять доступом к своим папкам, открывая их для гостей. Остальные строки относятся к управлению печатью и процессу регистрации. В нашем случае они не являются обязательными и перекочевали из конфигурационного файла дистрибутива Samba.
Продолжим редактирование секции [global] файла smb.conf.
        domain logons = No
        domain master = No
        security = ADS
        encrypt passwords = yes
Строки domain logons и domain master разрешают использовать Samba в качестве контроллера домена. Это не наш случай и поэтому для них установлено No.
Строка security = ADS имеет ключевое значение. Тем самым мы указываем Samba, что сервер является членом домена Windows и за авторизацию отвечает AD. Строка encrypt passwords = yes означает, что используются зашифрованные пароли.
Продолжим редактировать все ту же секцию [global].
        ldap admin dn = Administrator@lab.local
        ldap delete dn = No
        ldap group suffix = ou=Groups
        ldap idmap suffix = ou=Idmap
        ldap machine suffix = ou=Computers
        ldap passwd sync = Yes
        ldap ssl = No
        ldap suffix = DC=lab,DC=local
        ldap timeout = 5
        ldap user suffix = ou=Users
Эти строки относятся к управлению соединением с LDAP сервером. Заметьте, что форма записи DN администратора имеет форму user@domain – она должна совпадать с тем, что мы указывали при тестировании Kerberos. Остальные строки указывают суффиксы различных местоположений в AD.
Следующие строки относятся уже к Kerberos:
        realm = LAB.LOCAL
        template homedir = /home/%D/%U
        winbind refresh tickets = yes
        kerberos method = system keytab
Здесь мы указываем REALM и метод аутентификации в Kerberos.
Теперь строки, которые относятся к настройке winbind:
        winbind separator = /
        winbind enum users = yes
        winbind enum groups = yes
        winbind nested groups = yes
        winbind use default domain = No
        winbind nss info = rfc2307
        winbind offline logon = yes
Здесь указаны различные параметры работы Winbind – форма разделитя имен домена и пользователя, разрешение для winbind перечислять имена пользователей и групп, разрешение оффлайновой аутентификации и т.п. Эти настройки рекомендованы разработчиками Samba.
Секция глобальных настроек закончена. Обратите внимание, что у нас нет строк password server и idmap backend, которые можно встретить в других руководствах. Samba должна сама разобраться, откуда берутся пароли.
Переходим к настройке каталогов. Здесь все просто:
[homes]
        comment = Home Directories
        valid users = %S, %D%w%S
        browseable = No
        read only = No
        inherit acls = Yes
        available = Yes
  [profiles]
        comment = Network Profiles Service
        path = %H
        read only = No
        store dos attributes = Yes
        create mask = 0600
        directory mask = 0700
[users]
        comment = All users
        path = /home
        read only = No
        inherit acls = Yes
        veto files = /aquota.user/groups/shares/
[groups]
        comment = All groups
        path = /home/groups
        read only = No
        inherit acls = Yes
[SRV]
        comment = Common files
        path = /local
        write list = Administrator
        guest ok = Yes
        hosts allow = 192.168.7.
К стандартному списку разделяемых каталогов, распространяемому вместе с дистрибутивом Samba мы добавили только секцию [SRV] – общедоступный каталог.
Конфигурирование всех необходимых файлов закончено, и мы приступаем к проверке работоспособности нашего сервера.
2. Проверка работоспособности.
Здесь мы проверим корректность наших настроек и включим наш новый сервер в домен Windows. Сначала проверим корректность настройки Samba:
l
inux-test:~ # testparm
Load smb config files from /etc/samba/smb.conf
rlimit_max: increasing rlimit_max (1024) to minimum Windows limit (16384)
Processing section "[homes]"
Processing section "[profiles]"
Processing section "[users]"
Processing section "[groups]"
Processing section "[SRV]"
Loaded services file OK.
Server role: ROLE_DOMAIN_MEMBER
Press enter to see a dump of your service definitions
Как видно, каких либо серьезных предупреждений и ошибок конфигурации у нас нет.
Теперь запустим по очереди демоны smbd, nmbd и winbindd. Сделаем это через файлы /etc/init.d/smb, /etc/init.d/nmb и /etc/init.d/winbind. Можно выполнить это и вручную, что может оказаться полезным для получения различной дополнительной информации. О том, как это сделать можно прочесть во встроенных руководствах (man) по smbd, nmbd и winbindd.
Проверим состояние нашего домена и нашего сервера в домене. Состояние домена можно получить командой net ads info
linux-test:~ # net ads info
LDAP server: 192.168.7.2
LDAP server name: LAB-DC1.lab.local
Realm: LAB.LOCAL
Bind Path: dc=LAB,dc=LOCAL
LDAP port: 389
Server time: Thu, 05 Apr 2012 13:03:47 MSK
KDC server: 192.168.7.2
Server time offset: 4
linux-test:~ #
Как видно, все в порядке. Если какие-то параметры, выводимые командой не совпадают с нашим планом – надо искать причину. Теперь проверим состояние нашего сервера в домене:
l
inux-test:~ # net ads status -U Administrator
Enter Administrator's password:
No machine account for 'LINUX-TEST' found
linux-test:~ #
Отсюда следует, что наш сервер не включен в домен. Запрос к контроллеру домена делается от имени администратора, и пароль нужно указывать от учетной записи администратора домена Windows.
Теперь мы должны включить наш сервер в домен:
l
inux-test:~ # net ads join -U Administrator
Enter Administrator's password:
Using short domain name -- LAB
Joined 'LINUX-TEST' to realm 'lab.local'
DNS Update for linux-test.lab.local failed: ERROR_DNS_UPDATE_FAILED
DNS update failed!
linux-test:~ #
Итак, наш новый сервер включен в домен, о чем свидетельствуют строки:
Using short domain name -- LAB
Joined 'LINUX-TEST' to realm 'lab.local'
Динамическое изменение DNS у нас не прошло. Это не страшно, поскольку оно и не планировалось. Теперь рекомендуется перезапустить все наши процессы – smbd, nmbd и winbindd. Заметим, что после перезапуска до дальнейших проверок должно пройти несколько минут.
Проверим статус нашего сервера в домене:
linux-test:~ # net ads status -U Administrator
Enter Administrator's password:
В ответ мы получим распечатку состояния нашего нового сервера в домене. Там будут указаны различные поля AD, относящиеся к нашему серверу. Так же наш сервер GNU/Linux мы увидим на вкладке Computers, запустив средство администратора AD на контроллере домена.
Можно проверить список пользователей домена:
l
inux-test:~ # net ads user -U Administrator
Enter Administrator's password:
Administrator
Guest
krbtgt
usertest
linux-test:~ #
И проверим работу winbind:
linux-test:~ # wbinfo -t
checking the trust secret for domain LAB via RPC calls succeeded
linux-test:~ #
И получим список пользователей в домене:
l
inux-test:~ # wbinfo -u
LAB/administrator
LAB/guest
LAB/krbtgt
LAB/usertest
linux-test:~ #
Можно проверить состояние домена через wbinfo:
l
inux-test:~ # wbinfo -D LAB
Name              : LAB
Alt_Name          : lab.local
SID               : S-1-5-21-3914562201-450990341-53424453
Active Directory  : Yes
Native            : Yes
Primary           : Yes
linux-test:~ # wbinfo -P
checking the NETLOGON dc connection succeeded
linux-test:~ #
Все в порядке. Теперь самая главная проверка – попробуем открыть каталоги на нашем новом сервере, используя рабочую станцию под управлением Windows 7. Наша рабочая станция включена в домен. Мы должны увидеть наш новый сервер на вкладке Network обозревателя Windows, либо указав имя или IP адрес:

Теперь можно переходить к дальнейшим процедурам настройки нашего сервера. В дальнейшем мы рассмотрим некоторые нюансы описанного процесса в зависимости от дистрибутива GNU/Linux и подробнее рассмотрим настройку прав доступа к серверу Samba.
Работа выполнена на базе Информационно-вычислительного центра МЭИ.
By default, LDAP communications (port 389) between client and server applications are not encrypted. This means that it would be possible to use a network monitoring device or software and view the communications traveling between LDAP client and server computers. LDAP over SSL/TLS (LDAPS-port 636) is automatically enabled when you install an Public key (PKI) infrastructure, (Certificate Authority-CA). In this post i wan’t cover installing and configuring PKI infrastructure, i’ll concentrate on enabling LDAPS on windows and configuring secure connection to Windows Domain controllers from linux machines using SSL certificates.
Creating Certificate templates
On Issuing certificate authority, in Certification authority console right click on Certificate templates-Manage
Certification Templates console will launch, right click on template Kerberos Authentication-duplicate template

In compatibility tab,make sure that for Compatibility settings Windows Server 2003 is specified

In Request handling tab, make sure Signature and encryption is selected for purpose

If you plan to import the certificate into the Active Directory Domain Services certificate store, then should also mark the private key as exportable.
In general tab, specify validity period and template name

In subject name tab make sure DNS name and Service principal nane (SPN) are checked in.

In security tab, make sure Domain controllers are added and Enroll, Read and Autoenroll (if you want this template is enrolled automatically) are set to Allow
Once all is set click OK, right click Certificate Templates-New-Certificate Template to Issue

Select template and click OK

Exporting Certification authority (CA) certificate
On CA machine we issued certificate, name of this CA will be written in that certificate, so we need to export personal certificate of this CA and transfer it to Linux machine.This certificate will be used to validate certificate of Domain controller we are going to enroll in next steps.
Open Local computer certificate store (start-run-certlm.msc)
Expand Personal,right click on Certificates-All tasks-Export

Select No, do not export private key, for format select Base-64 encoded X.509 (.CER)

Save certificate to file with cer extension and move it to Linux machine
Enrolling certificate to Domain Controller
Now we need to enroll Certificate we just issued on Certification Authority machine.Go to Domain controller,open Local computer certificate store (start-run-certlm.msc)
Expand Personal,right click on Certificates-All tasks-Request New Certificate

Click Next twice and select certificate we just issued-Enroll

Exporting Domain controller certificate to Linux machine
Now we need to export this enrolled certificate to Linux machine.
Right click on certificate we just enrolled-All tasks-Export

Select No, do not export private key, for format select Base-64 encoded X.509 (.CER)
Save certificate as cer file and move it to linux machine
Exporting Trusted Root Certification authority (CA) certificate
In case you’re using intermediate CA (as in my case), you need to export Trusted Root certification authority certificate also, again, in Computer certificate store, expand Trusted root certification authorities-click Certificates-right click om Root certificate-export

Export in same way as in previous steps
Testing LDAPS connection – Windows
Before moving to linux, let’s first test LDAP over SSL connection.
On Domain controler from command prompt, type ldp.exe, click on Connection tab-Connect..
Type DNS name, port 636, check SSL and click OK
If all is OK, connection should be sucessfull
ld = ldap_sslinit("dc.example.local", 636, 1);
Error 0 = ldap_set_option(hLdap, LDAP_OPT_PROTOCOL_VERSION, 3);
Error 0 = ldap_connect(hLdap, NULL);
Error 0 = ldap_get_option(hLdap,LDAP_OPT_SSL,(void*)&lv);
Host supports SSL, SSL cipher strength = 256 bits
Established connection to dc.example.local.
Retrieving base DSA information…
Getting 1 entries:
Testing LDAPS connection – Linux
Certification authority certificate is exported to /etc/pki/tls/certs/issuingca.cer,domain controller certificate is exported to /etc/pki/tls/certs/dc.cer and trusted root CA to /etc/pki/tls/certs/ca.cer
Add CA Root and issuing CA certs to Linux (CentOS) ca store
cp /etc/pki/tls/certs/issuingca.cer /etc/pki/ca-trust/source/anchors
cp /etc/pki/tls/certs/ca.cer /etc/pki/ca-trust/source/anchors
update-ca-trust enable
update-ca-trust extract

# verify:
openssl verify /etc/pki/ca-trust/source/anchors/issuingca.cer
openssl verify /etc/pki/ca-trust/source/anchors/ca.cer
Test connection:
openssl s_client -connect test.local:636 -CAfile /etc/pki/tls/certs/ca.cer

CONNECTED(00000004)
depth=2 CN =  CA-ROOT
verify return:1
depth=1 DC = local, DC = test, CN = CA
verify return:1
depth=0 CN = dc.test.local
verify return:1
---
Certificate chain
 0 s:CN = dc.test.local
   i:DC = local, DC = test, CN = CA
 1 s:DC = local, DC = test, CN = CA
   i:CN = CA-ROOT
---
Server certificate
-----BEGIN CERTIFICATE-----
Apache – configuring LDAPS authentication
cat /etc/http/conf.d/ssl.conf
LDAPTrustedMode SSL

LDAPTrustedGlobalCert CERT_BASE64 /etc/pki/tls/certs/ca.cer

<Directory "/var/www/cgi-bin">

    LDAPTrustedClientCert CERT_BASE64 /etc/pki/tls/certs/dc.cer
    AllowOverride None
    Options None
    Order allow,deny
    Allow from all
    AuthType Basic
    AuthName "login to continue"
    AuthBasicProvider ldap
    AuthLDAPBindAuthoritative off
    AuthLDAPURL "ldaps://test.local:636/dc=test,dc=local?sAMAccountName
    AuthLDAPBindDN "bindtest@test.local"
    AuthLDAPBindPassword "pass"
    require valid-user

</Directory>
The Linux operating system has come a long way since 1991 when it was first introduced by Linux Torvalds as a free operating system. Today, some form of Linux is used in everything from high-end servers and virtual machines to IoT devices and embedded devices. More often than not, common database platforms such as Oracle, PostgreSQL, MySQL, and MongoDB are deployed on servers running Linux.
One notable exception was Microsoft SQL Server. That changed when Microsoft announced support for Linux starting with SQL Server 2017. However, Microsoft does not provide a straightforward way to integrate Linux hosts into Active Directory (AD), making it harder to manage them.
Fortunately, there is an easy way to integrate Linux with AD for cloud and on-premise Windows systems — by using realmd and System Security Services Daemon (SSSD).
Read this guide to learn how to integrate Linux with Active Directory. We’ll also cover how to join AD using realmd, what using SSSD is like, and how to map Linux unique identifiers (UIDs) and group IDs (GIDs) to site identifiers (SIDs) in AD.
A Brief Summary of Linux Interaction with Active Directory
As an introduction, here’s a brief summary of how Linux interacts with AD.
The main reasons to join a Linux machine to a Lightweight Directory Access Protocol (LDAP)-based directory service like Windows AD include:
- Business policies
- Access control
- Centralized identity management
When joining a Linux host to Active Directory (AD), two components are required:
- One to manage the central identity and authentication source (Active Directory)
- One to handle domain discovery and act as a middleman between the first component and the identity source
Over the years, there have been a few configuration options to join a Linux machine to AD. Most have been inconvenient to configure and required you to manually set up (SSSD to join domains. However, the realmd suite lets you complete the task without cumbersome configuration file editing.
How to Integrate a Linux Host into a Windows AD Domain
Now let’s walk through the steps of integrating a Linux host running on CentOS 8 into a Windows Active Directory (AD) domain configured on Windows 2012 R2 Server Standard Edition. (The reason we specify the versions and types of the Linux distribution and Windows Server is because there are subtle differences between versions of Linux and Windows. For example, in CentOS/RHEL 8, Network Time Protocol (NTP) client and server activities were managed using the ntp daemon, but in CentOS/RHEL 8, it has been replaced with the chrony daemon.)
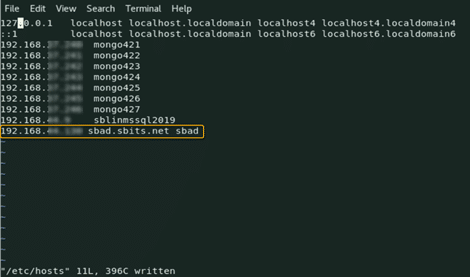
Step 1: Ensure that the hostname and FQDN are specified.
Ensure that the hostname and the fully qualified domain name (FQDN) are specified in the /etc/hosts file. The hostname cannot be localhost, as it is mapped to the loop-back adapter 127.0.0.1. If you need to change the existing hostname, use the following command to change it to the desired name. There is no need to specify the FQDN as part of the hostname.
[root@oldhostname ~]# hostnamectl set-hostname <new_host_name>

[root@newhostname~]# echo 192.168.44.9 sblinmssql2019 >> /etc/hosts
Step 2: Specify the AD domain controller.
Specify the AD domain controller (DC) in the /etc/hosts file using the following command:
[root@newhostname~]# echo 192.168.xx.x sbad.sbits.net sbad >> /etc/hosts

[root@newhostname~]# ping sbad.sbits.net
Step 3: Ping the AD domain controller.
Ping the AD domain controller that was specified in Step 2 and make sure you get a ping response.

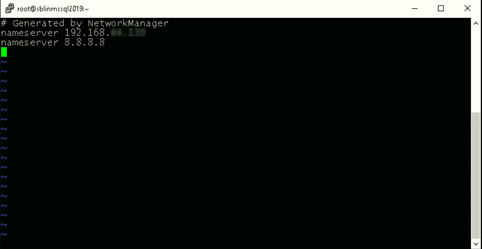
Step 4: Point the DNS server to the AD domain controller.
In my case, the DNS server needs to be pointed to the AD domain controller because my DC is also the DNS server for my domain, sbits.net.
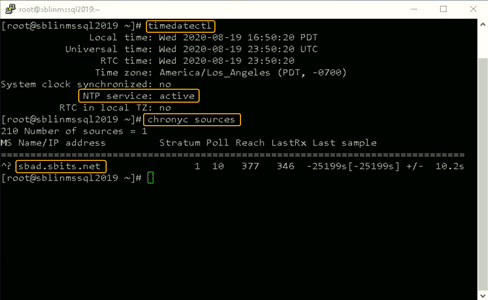
Step 5: Configure the NTP server, if necessary.
If the primary DC that you are planning to use as the NTP server does not have the NTP server configured, follow the steps in the screenshot to configure and enable the NTP server on the primary DC.

Step 6: Install chrony and configure it to use a DC.
The Linux host needs to synchronize time with one of the DCs in the AD domain. In my case, there is only one domain controller, so the Linux host will be synchronizing the time with it.
If chrony is not already installed, install it and configure it to use the DC to synchronize the time. (If it is already installed, you will get a message reporting that.)
[root@newhostname~]# vi /etc/resolv.conf

[root@newhostname~]# systemctl restart NetworkManager

[root@sblinmssql2019~]# vi /etc/chrony.conf

  [root@sblinmssql2019~]# systemctl enable chronyd

  [root@sblinmssql2019~]# systemctl restart chronyd

  [root@sblinmssql2019~]# systemctl enable chronyd
If chrony is already installed, we need to edit thechrony.conf config file and set the time server to the AD domain controller and restart the chronyd service. If the service was not preinstalled, enable it to start up on reboot and ensure that the firewall is configured to allow NTP traffic after installation.

Once chronyd is configured and enabled, the timedatectl command will show whether the NTP service is active. After confirming that NTP service is active, run the chronyc sources command to confirm that it is using the domain controllers as the time server, as shown below.
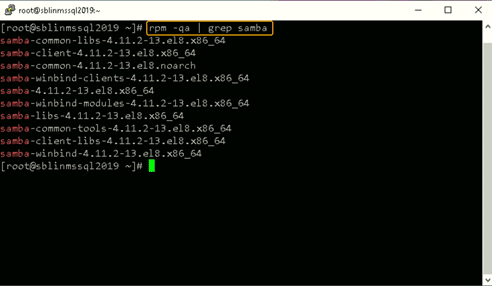
Step 7: Install the Samba suite on Linux.
Next, install the Samba suite, including winbind, on the Linux host. The winbind service enables the Linux host to interact with the AD domain like a Windows host. After installation is complete, confirm that the packages shown in the screenshot below are installed.
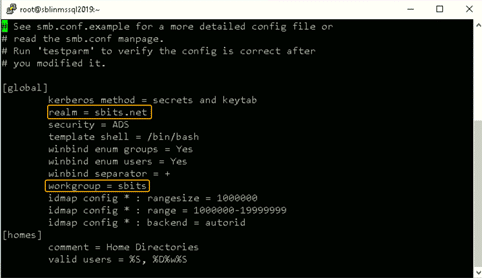
Step 8: Modify the /etc/samba/smb.conf file to reflect the realm value.
Next, modify the /etc/samba/smb.conf file to reflect the realm value to the fully qualified domain name, and change the workgroup value to the name of the domain, as shown in the screenshot below.
[root@sblinmssql2019~]# yum -y install samba samba-client

[root@sblinmssql2019~]# yum -y install samba-winbind samba-winbind-clients
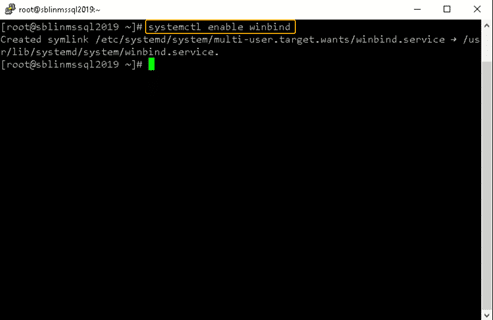
Step 9: Enable the winbind daemon on system reboot.
Enable the winbind daemon on system reboot using the systemctl command as shown in the screenshot below. Please note that there is no reason to reboot the Linux host, unlike Windows hosts.
Note: The realm parameter is the name of your domain. In this example, it is “sbits.net” and the workgroup parameter is set to “sbits”. The workgroup parameter can instead be set to the Windows default of “WORKGROUP” if you prefer. The security = ADS designates that this host is part of the AD domain. The winbind separator =+ specifies that the plus sign (+) will be used to separate the domain name and username. The traditional Windows separator is not compatible with Linux, and an escape character has to be used every time a username is specified with the domain prefix.
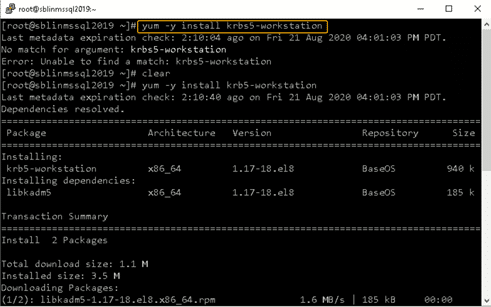
Step 10: Install the Kerberos realms package.
Install the Kerberos realms package using the yum command:
[root@sblinmssql2019~]# yum -y install krb5-workstation
Step 11: Add the Linux host to the AD domain.
Now, add the Linux host to the AD domain using the command below. It is highly likely that you will get the error “DNS update failed: NT_STATUS_INVALID_PARAMETER”.
In my case, even though I got the error, the Linux host was added to the AD domain. I reissued the command with the –no-dns-updates flag, and the error did not pop up.

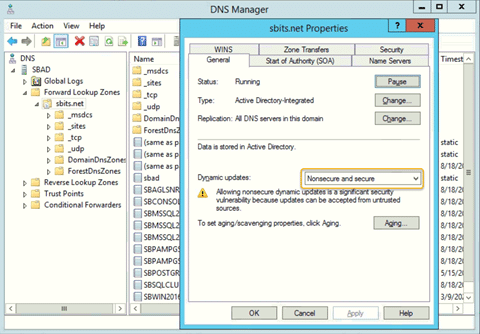
Step 12: Change the security setting using DNS Manager.
If you do not want to encounter the error and would like to have the DNS update the information about the new Linux hosts, change the security setting using DNS Manager as shown below.
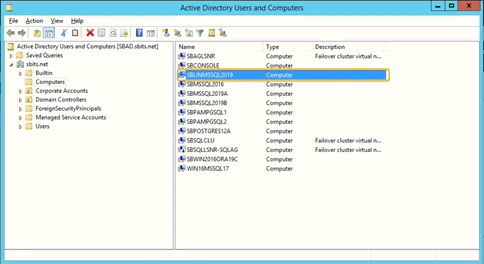
Step 13: Verify that the Linux computer object was added.
On the primary domain controller, verify that the Linux computer object was added by using the Active Directory Users and Computers tool.
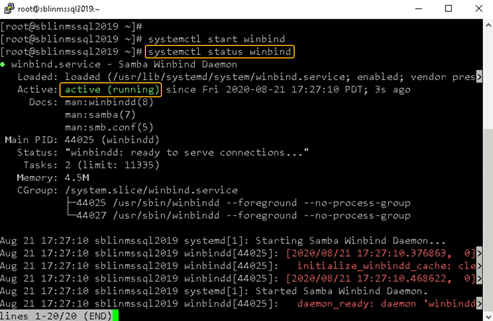
Step 14: Confirm that the winbind service is running.
Confirm that the winbind service is running on the Linux host.
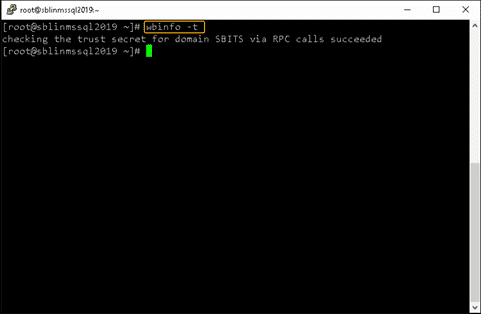
Step 15: Validate that the Linux host is part of the AD domain.
Validate that the Linux host is actually part of the AD domain and is able to communicate with the DC by using the wbinfo package to run encrypted RPC calls to the DC:
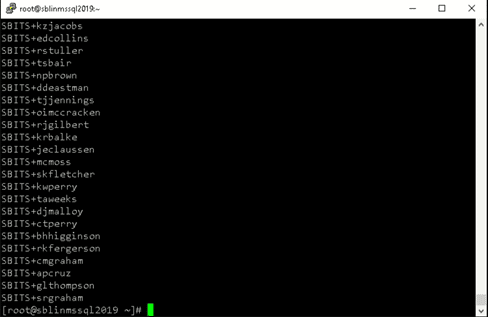
[root@sblinmssql2019~]# wbinfo -t    # verifies if encrypted RPC are supported

[root@sblinmssql2019~]# wbinfo – u  # enumerates AD the list of users

[root@sblinmssql2019~]# wbinfo – g  # enumerates AD the list of groups
Step 16: Ensure that winbind is selected as the authorization provider.
Next, we need to ensure that winbind is selected as the authorization provider by using the authselect select winbind –force command as shown below. The –force flag will overwrite the entries in the /etc/nsswitch. conffile.
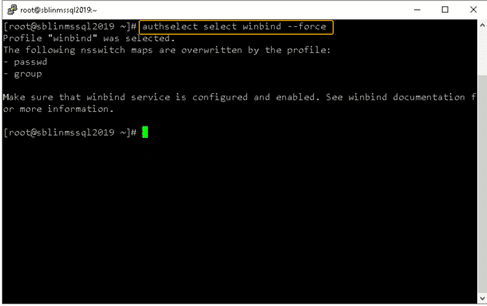
Step 17: Ensure the passwd and group entries are listed to use winbind.
To ensure that Linux will use winbind for user authentication prior to local Linux authentication, make sure the passwd and group entries are listed to use winbind in the /etc/nsswitch.conffile.

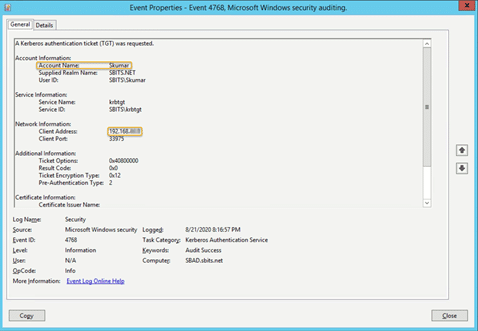
Step 18: Use kinit to get a Kerberos TGT.
Finally, use kinit to try to get Kerberos Ticket Granting Ticket (TGT):
[root@sblinmssql2019~]# wbinfo -t    # kinit skumar@sbits.net

[root@sblinmssql2019~]# wbinfo – u  # klist

Chances are you will encounter the error shown in the screenshot above. If so, edit the /etc/krb5.conf file and change the setting as shown below:
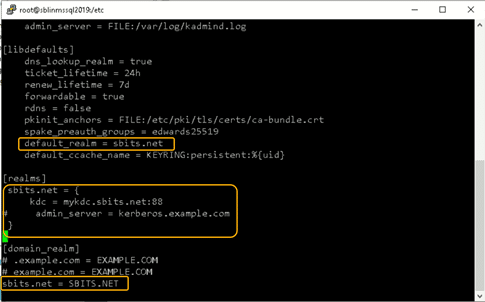
Once the file is modified, there is no reason to start any services on the Linux host, and the ticket request should work fine.
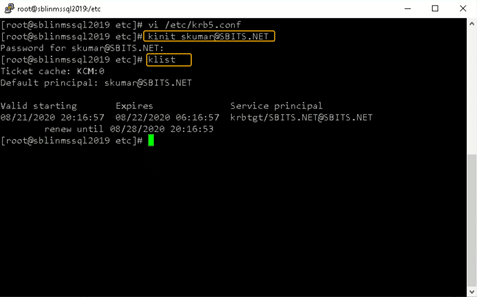
You can verify it on the AD domain controller as well, as shown below:
Congratulations! You have added a Linux host to a Windows AD domain.
Joining AD Domains using realmd
Now that you know how to integrate Linux with an Active Directory domain, let’s turn to joining the AD domain. There’s a quick and easy way to set up SSSD to join domains without cumbersome configuration file editing: the realmd suite. This command-line tool can be used to manage enrollment in Kerberos realms, like Active Directory domains or IPA domains. The realmd system provides a clear and simple way to discover and join identity domains to achieve direct domain integration. It’s not too much of a lift, either, as realmd handles the configuration of complex underlying Linux system services, such as SSSD or winbind.
Realmd is also a great tool for access management, event management, configuring domain membership, achieving an integrated direct domain, and network and user SSH authentication. Many enterprise cybersecurity teams use realmd to reduce the attack surface by controlling who has access to what.
Follow these steps to join the Active Directory server using the realmd Desktop Bus (D-Bus) tool. These instructions work for all Linux distributions, including Fedora and Ubuntu.
- To add Linux to an Active Directory domain, ensure that your Linux host can communicate with the DC over the network. Proper DNS and hostname resolution are essential to this process.
- Next, install realmd using root access on your computer account and check to see if we’re already a member of a domain.
sudo apt install realmd

realm list
If realmd wasn’t previously installed, the output should be empty, indicating that:
- The host isn’t joined to AD or other domain services
- We don’t have any domain membership.
If the output lists a domain you’d like to leave, run the following as the domain administrator user account originally used to join the domain:
sudo realm leave example.com -U user@example.com
3. Next, we’ll want to discover our domain:
realm discover <domain_controller_hostname_or_ip_address>
The output is a list of packages that must be installed to join the domain:
example.com

  type: kerberos

  realm-name: EXAMPLE.COM

  domain-name: example.com

  configured: no

  server-software: active-directory

  client-software: sssd

  required-package: sssd-tools

  required-package: sssd

  required-package: libnss-sss

  required-package: libpam-sss

  required-package: adcli

  required-package: samba-common-bin
Realm discovery output may differ depending on your specific host and domain controller setup.
Note that realmd uses SSSD as its default Active Directory client software. SSSD allows local services to check with local user and credential caches in SSSD, but those caches may be taken from any remote identity prover, including AD, an LDAP directory, an identity management domain or a Kerberos realm.
If you don’t want to use SSSD, you can specify winbind to use Samba Winbind.
4. Confirm that the Windows server and Linux are on the same network. If they’re not, your Linux hosts won’t be able to join Active Directory. We highly recommend having a static IP address for the domain controller.
5. Once everything has been confirmed, go ahead and install the listed required packages (shown above) and then use the realm join command. This will do several things, including setting up the local machine for use with a specific domain and creating a host keytab file at /etc/krb5.keytab. It will also join Linux to the Windows domain using credentials with AD Domain Admin permissions:
sudo apt install sssd sssd-tools libnss-sss libpam-sss adcli samba-common-bin

sudo realm join --client-software=sssd <domain_controller_hostname_or_ip> -U <domain_admin>
When specifying the Domain Admin, we can just use the username instead of using example.comuser format, since we’re already specifying a domain controller in the command.
Additionally, we can use the –computer-ou parameter to specify the organizational unit for the computer to be joined to, using distinguished name format (for example, # realm join –computer-ou=”ou=Linux Computers,dc=example,dc=com”). Specifying –computer-ou is also great for creating directory computer accounts in non-default locations.
Note that an invalid hostname error can occur if a hostname isn’t set with the proper format. To resolve this, simply set the hostname properly:
sudo hostnamectl set-hostname '<new_hostname>'
6. After joining the domain, we can run realm list again to confirm success and review the domain info:
example.com

  type: kerberos

  realm-name: EXAMPLE.COM

  domain-name: example.com

  configured: kerberos-member

  server-software: active-directory

  client-software: sssd

  required-package: sssd-tools

  required-package: sssd

  required-package: libnss-sss

  required-package: libpam-sss

  required-package: adcli

  required-package: samba-common-bin

  login-formats: %U@example.com

  login-policy: allow-realm-logins
In this case, the login-formats property indicates that domain accounts will be specified in user@example.com format on this host, rather than domainuser format.
7. Finally, restart the SSSD service and use the command below to verify the Active Directory user information. The output should show a domain user’s UID, groups and more:
sudo service sssd restart

id user@example.com
That’s all there is to it! This is by no means a comprehensive guide for all the options you can manually perform and configure along the way; however, this is the quickest route to get Linux hosts joined to Active Directory using a modern approach.
Optional Steps
Once you’ve joined AD using realmd, you can take optional steps to customize your experience, such as tweaking realmd’s behavior and managing the properties of AD objects by using various options and tools. These include:
OS-Version
The os-version and os-name settings let you specify your operation system version and name. Specifically, you can use them to control the values that are placed in the computer account’s operatingSystemVersion and operatingSystem attributes.
AD Attribute Editor
This is a built-in graphical tool for managing the properties of AD objects, such as computers, users and groups. You can use it by installing the dsa.msc snap-in, which is part of the Windows Remote Server Administration Tools (RSAT).
Deny and Permit
The realm deny command denies local login by real accounts. You can use realm permit to restrict logins to certain accounts.
Changing the Default User Configuration
The realmd system allows you to modify the default user home directory and shell POSIX attributes. You can override the default directory and attributes by specifying the following options in the [users] section in the /etc/realmd.conf file:
- Default-shell: This defines the default user shell; it accepts any supported system shell.
- Default-home: This sets a template for creating a home directory for accounts with no home directory explicitly set.
Mapping Linux UIDs/GIDs to SIDs in Active Directory
You now know how to integrate Linux with Active Directory. However, we’re not done yet. We also need to touch on how POSIX UIDs and GIDs are mapped to SIDs in Active Directory, since Linux clients don’t have a concept of SIDs like Windows does.
Benefits of using SSSD rather than Winbind
As previously mentioned, realmd uses SSSD rather than winbind by default. One big benefit of this approach is that SSSD automatically handles POSIX UID/GID generation using the SID of each Active Directory user or group. If you keep the default SSSD settings on each Linux host that you join to the domain, then these UID and GID values should be mapped consistently across Linux hosts.
For example, in my lab, this result is consistent no matter which Linux machine I run it on, as long as the machines are joined to the same domain:
user@my-linux-host:~$ id user@example.com

uid=778006423(user@example.com) gid=778001234(domain users@example.com) groups=778001234 (domain users@example.com)
Another benefit of this approach is that UIDs and GIDs generated by SSSD can also be applied to the uidNumber and gidNumber attributes in Active Directory for users and groups. This allows applications that query these AD attributes to perform mapping of the UID or GID to the SID, ultimately resulting in the same AD users or groups being referenced regardless of whether a user or group is in use on a Windows or Linux system.
Viewing and Editing the uidNumber and gidNumber Attributes
To view the uidNumber and gidNumber attributes in Active Directory Users and Computers on Windows Server, make sure you have Advanced Features enabled under the View dropdown:
You’ll then be able to view and edit those fields in the user’s or group’s Properties menu on the Attribute Editor tab:
Listing All AD Users and Groups with their UIDs and GIDs
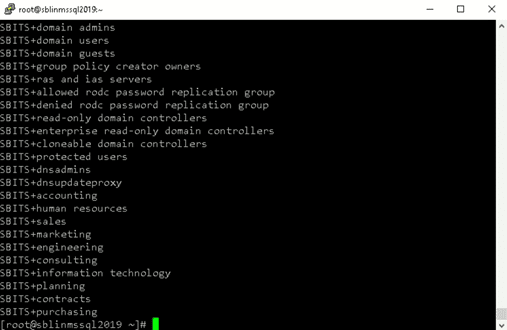
Depending on the number of users and groups in your domain, it may take a long time to manually assign uidNumber and gidNumber values. Although methods to programmatically populate these fields will be environment-specific, we can at least list all AD users and groups, with their UIDs and GIDs, using the getent command from a Linux host joined to the domain.
By default, getent will list only the users and groups on the local machine. Luckily, this can be modified by adding a line to your /etc/sssd/sssd.conf file and restarting SSSD. However, enabling this enumeration option can cause significant stress on the Active Directory server.
Typically, I like to step through this process outside of production hours, save the results, and then disable the full enumeration. Here’s how I do that:
- First, we add enumerate = True to sssd.conf, and then we restart the SSSD service:
echo "enumerate = True" | sudo tee -a /etc/sssd/sssd.conf &> /dev/null

sudo service sssd restart
Depending on the size of your Active Directory, it can take up to 10 minutes to complete the initial enumeration into the local cache. During this period, you’ll notice domain users and groups populating in the outputs from getent passwd and getent group, respectively.
2. Once enumeration to the local credential cache is complete, we can use the following commands to format the getent output (<domain> needs to be replaced with your domain name):
getent passwd | awk -F: '{print $1 "," $3 "," $4}' | grep <domain>

getent group | awk -F: '{print $1 "," $3}' | grep <domain>
The first command outputs each domain user with their UID and their GID in comma-separated format:
user@example.com,778006423,778001234
The second outputs each domain group with its GID in comma-separated format:
domain users@example.com,778001234
3. You can redirect the output to text or CSV files for parsing into Active Directory’s uidNumber and gidNumber attributes. With the UID and GID information in CSV format, you could create a script that imports each CSV and automatically updates uidNumber and gidNumber for Active Directory users and groups. For example, the following Windows PowerShell command adds the specified UID and GID to those attributes in AD:
Set-ADUser <ad_user> -Replace @{uidNumber="<uid>"; gidNumber="<gid>"}
With this command (and Set-ADGroup), you can easily generate a script that fits your environment and speeds up the process of mapping UIDs/GIDs to uidNumber and gidNumber in AD, which ultimately map to Windows SIDs.
4. Once you’ve saved the output from the getent commands, you can remove the enumerate value from sssd.conf and restart the SSSD service to prevent the expensive LDAP enumeration from occurring in the future:
sudo sed -i '/enumerate = True/d' /etc/sssd/sssd.conf

sudo service sssd restart
Conclusion
Linux hosts are often used for critical functions, so admins need to monitor these hosts, understand how they’re used, observe who accesses them and verify how they’re secured.
Admins need to especially be careful when joining Linux hosts to Active Directory. Remember, it takes only one compromised host or user for attackers to move laterally into admin rights in your domain, by exploiting issues like over-provisioned user access, weak passwords and open SMB/NFS shares.
One of the best ways to reduce cybersecurity risks is to use the Netwrix Active Directory Security Solution. Comprehensive and user-friendly, this software makes integrating Linux with Active Directory stress-free and simple. It includes:
- Preconfigured and customizable auditing, logging, analyzing and reporting jobs on both Unix/Linux and Active Directory
- Tools for protecting other parts of your infrastructure, including Google Cloud, network devices, virtualized systems and Kubernetes containers
Interested in experiencing the Netwrix difference? Request a free trial today.
FAQ
Can you join a Linux machine to Active Directory?
Yes. You can join any distro to an AD domain by manually connecting the SSSD client or using the realm join command.
How does Linux connect to Active Directory?
System Security Services Daemon (SSSD) provides a set of daemons to manage access to remote directory services and authentication mechanisms on Linux machines.
What is realmd in Linux?
realmd is a Linux system service that allows callers to configure network authentication and domain membership via SSSD or winbind services.
What is the sudo systemctl command?
The sudo systemctl command is the main management tool for controlling the init system. You can use the start command after it to start a systemd service.
What is the sudo apt-get update command?
The sudo apt-get update command is for downloading package information from all configured sources.
What is sudoers?
Linux and Unix administrators can use the sudoers file to allocate system rights to system users. In other words, it allows administrators to control who does what. You can find this file in /etc/sudoers.
Senior Director of Product Management at Netwrix. Farrah is responsible for building and delivering on the roadmap of Netwrix products and solutions related to Data Security and Audit & Compliance. Farrah has over 10 years of experience working with enterprise scale data security solutions, joining Netwrix from Stealthbits Technologies where she served as the Technical Product Manager and QC Manager. Farrah has a BS in Industrial Engineering from Rutgers University.

Linux server ldap windows server: подключение и настройка
На чтение4 мин
Опубликовано
Обновлено
LDAP (Lightweight Directory Access Protocol) – протокол для доступа и управления распределенным каталогом, в котором хранятся данные об объектах и их свойствах. Он широко применяется в корпоративных сетях для централизованного управления учетными записями пользователей, компьютеров и другими ресурсами.
Linux server – это сервер, на котором установлена операционная система Linux. Linux давно зарекомендовал себя как стабильная и надежная платформа для работы с сетевыми сервисами. В частности, на Linux сервере часто используется протокол LDAP для централизованного хранения учетных записей и аутентификации пользователей.
Windows server
– это сервер, на котором работает операционная система Windows Server. В Windows тоже есть возможность использовать протокол LDAP для управления данными в Active Directory – сервисе каталога, в котором хранятся данные об объектах и их свойствах в Windows-сети.
Для подключения Linux сервера к Windows серверу с использованием протокола LDAP необходимы соответствующие настройки и конфигурации на обоих серверах. В статье рассмотрим этапы настройки LDAP на Linux и Windows серверах, а также процесс подключения между ними для обмена данными.
Подключение и настройка Linux server ldap windows server
Для подключения и настройки Linux server ldap windows server необходимо выполнить следующие шаги:
1. Установите сервер LDAP на Linux. Для этого воспользуйтесь пакетным менеджером вашего дистрибутива Linux и установите необходимые пакеты.
2. Создайте базу данных LDAP и настройте ее. Настройки будут зависеть от вашей конкретной системы.
3. Соединитесь с сервером Windows. Для этого выполните настройку службы домена Active Directory на Windows сервере и убедитесь, что сервер доступен из Linux сервера.
4. Настройте связь между Linux и Windows серверами. Для этого укажите IP-адрес и порт сервера LDAP в настройках сервера Windows.
5. Протестируйте подключение. Убедитесь, что вы можете получить доступ к информации в каталоге с сервера Windows.
6. Настройте синхронизацию данных. Установите программное обеспечение, позволяющее синхронизировать данные между Linux и Windows серверами.
Подключение и настройка Linux server ldap windows server может быть достаточно сложным процессом, поэтому рекомендуется обратиться к документации или квалифицированному специалисту для получения дополнительной помощи.
Linux server ldap
Для настройки сервера LDAP на Linux необходимо выполнить следующие шаги:
- Установить пакеты OpenLDAP:
sudo apt-get install slapd ldap-utils - Запустить настройку сервера LDAP:
sudo dpkg-reconfigure slapd - В процессе настройки указать основные параметры, такие как доменное имя, пароль администратора и базу данных.
- Проверить статус сервера LDAP:
sudo systemctl status slapd - Добавить пользователя администратора в базу данных LDAP:
sudo ldapadduser - Настроить файл конфигурации LDAP:
sudo vi /etc/ldap/ldap.conf - Добавить информацию о пользователях в базу данных LDAP, используя команды LDAP
- Проверить работу сервера LDAP, выполнив поиск по базе данных:
ldapsearch -x -b "dc=example,dc=com" -h localhost
После выполнения этих шагов сервер LDAP будет готов к использованию. Теперь вы можете подключить к нему клиентскую программу или настроить сервер с Windows для работы с LDAP.
Windows server ldap
Серверы Windows могут выступать в роли LDAP-серверов, предоставляя клиентам возможность доступа к информации из Active Directory. Подключение к серверу LDAP Windows требует настройки и выполнения определенных шагов:
- Установка роли службы каталогов Active Directory: Перед началом работы с LDAP необходимо установить и настроить роль службы каталогов Active Directory на сервере Windows. Это можно сделать с помощью установки ролевой службы Active Directory Domain Services (AD DS) через Server Manager.
- Создание и настройка домена: После установки роли AD DS необходимо создать и настроить домен в Active Directory. Для этого нужно выполнить wizard «Конфигурация контроллера домена» и указать требуемые параметры для домена. Это может включать такие данные, как имя домена, гибкость пароля и другие настройки безопасности.
- Настройка доступов и правил: После создания домена требуется настроить доступы и правила для получения информации через LDAP. В Active Directory можно создавать и управлять группами пользователей, контролировать доступы, устанавливать правила для различных операций с каталогом и т.д.
- Настройка клиента LDAP:: Для подключения клиента к серверу LDAP Windows, необходимо настроить параметры соединения и аутентификации на стороне клиента. Для этого можно использовать специальные инструменты, такие как LDAP Data Interchange Format (LDIF), утилиты командной строки или LDAP-клиенты.
После выполнения этих шагов можно получать доступ к информации в Active Directory с помощью LDAP-клиента и выполнять различные операции, такие как поиск записей, создание новых объектов, изменение атрибутов и другие действия, предоставляемые протоколом LDAP.
Подключение Linux server к Active Directory
Для подключения Linux сервера к Active Directory требуется выполнить следующие шаги:
- Установить пакеты, необходимые для работы с протоколом LDAP. Например, в Debian или Ubuntu это можно сделать с помощью команды:
sudo apt-get update && sudo apt-get install ldap-utils. - Настроить файл конфигурации LDAP клиента (/etc/ldap/ldap.conf) на сервере Linux.
- В файле конфигурации определить параметры подключения к серверу Active Directory, такие как адрес сервера, порт и протокол.
- Указать правильные учетные данные для аутентификации на сервере Active Directory. Это может быть учетная запись с правами доступа для поиска пользователей.
- Настроить параметры поиска пользователей в Active Directory. Например, можно указать базовый DN (Distinguished Name) и фильтр поиска.
- Проверить подключение к серверу Active Directory с помощью команды
ldapsearch -x -LLL -H ldap://адрес_сервера -b базовый_DN.
После выполнения всех этих шагов Linux сервер будет успешно подключен к Active Directory и сможет выполнять операции поиска и аутентификации пользователей в домене. Это позволит использовать аккаунты Active Directory для доступа к ресурсам на Linux сервере.
Настройка Linux server для работы с ldap
1. Установка необходимых пакетов:
- Откройте терминал на Linux server
- Установите пакеты ldap-utils и libpam-ldap с помощью команды:
sudo apt-get install ldap-utils libpam-ldap
2. Конфигурация файла /etc/ldap/ldap.conf:
- Откройте файл ldap.conf при помощи текстового редактора:
sudo nano /etc/ldap/ldap.conf
- Замените значения в следующих строках:
BASE dc=example,dc=comURI ldap://ldap.example.com
3. Настройка файла /etc/nsswitch.conf:
- Откройте файл nsswitch.conf при помощи текстового редактора:
sudo nano /etc/nsswitch.conf
- Добавьте «ldap» к строке, начинающейся с «passwd» и «group»:
passwd: files ldapgroup: files ldap
4. Конфигурация файла /etc/pam.d/common-session:
- Откройте файл common-session при помощи текстового редактора:
sudo nano /etc/pam.d/common-session
- Добавьте строку session optional pam_mkhomedir.so skel=/etc/skel umask=077:
session optional pam_mkhomedir.so skel=/etc/skel umask=077
5. Перезапустите сервисы:
- Перезапустите сервисы nslcd, libnss-ldapd, и nginx с помощью команды:
sudo systemctl restart nslcd libnss-ldapd nginx
Теперь ваш Linux server настроен для работы с ldap. Вы можете проверить работоспособность, используя команду getent passwd, чтобы увидеть список пользователей из ldap.
Contents
-
Introduction
- Background
- Prerequisites
- Installation
- Kerberos
- Pam
-
LDAP
- TestQuery: Windows
-
Configure AD
- TestQuery: Linux
- libnss-ldap
- Troubleshooting
Introduction
Active Directory from Microsoft is a directory service that uses some open protocols, like Kerberos, LDAP and SSL.
There are several ways to use AD for authentication, you can use Centrify Express, Likewise Open, pam_krb5, LDAP or winbind. For Centrify Express see [DirectControl]. Centrify Express can be used to integrate servers or desktops with Active Directory. Likewise Open is also a solution for Linux workstations to authenticate to an Active Directory domain. For Likewise Open see [LikewiseOpen] or Likewise Open. For Winbind see [ActiveDirectoryWinbindHowto].
The purpose of this document is to provide a guide to configuring Samba on Ubuntu to act as a file server in a Windows environment integrated into Active Directory. The goal is to create a file server that is as close to a one to one replacement for a Microsoft Windows file server as possible from the client’s perspective.
Background
It is important to keep in mind that the Samba developers have to play detective to try to basically reverse engineer the Microsoft implementation of the SMB protocol. The end result is that there are occasional issues that must be worked around if a bug fix does not exist. With the instructions below, expected behavior should be acceptable in most corporate environments.
Samba allows for a great deal of flexibility in how shares behave on a per-share basis. It is outside the scope of this document to cover each configuration setting and how they behave. It would be very beneficial to first read the smb.conf documentation found at the Samba web page. There are quite a few settings in the documentation, but getting a general feel of what they are and what they do will help in understanding this document and how you can take a step beyond by changing settings for your own tastes and environment.
Prerequisites
Security updates need to be enabled for not only the main repository, but for the universe repository as well (as now documented below). If this is not done, any security updates for the main (supported) packages create failed dependencies for the relevant universe packages.
Here is the list of prerequisites specific to this document:
- Ubuntu Server Edition default installation.
- Windows 2003 Native Domain (mixed-mode not tested, but may work)
- Ample hard drive space to accommodate packages and shares.
- Proper IP DNS settings configured so that internal names can be resolved.
Installation
Install the samba, acl, and attr packages if you wish to enable extended attributes which enable a greater level of control for file Access Control Lists. See InstallingSoftware for information regarding Package Managers and installing packages.
You can edit /etc/fstab similar to the following to enable extended attributes on boot:
<main file system> / ext3 defaults,acl,user_xattr,errors=remount-ro 0 1
Then remount the filesystem:
mount -o remount /
Kerberos
The first step in joining an Active Directory domain is to install and configure Kerberos. See Samba/Kerberos for details.
Pam
After Kerberos has been installed and configured, the authentication system (PAM) needs to be configured to use Active Directory. Edit /etc/pam.d/common-auth and add:
auth    sufficient      pam_krb5.so ccache=/tmp/krb5cc_%u
auth    sufficient      pam_unix.so likeauth nullok use_first_pass
auth    required        pam_deny.so
Then edit /etc/pam.d/common-session:
session required        pam_unix.so
session required        pam_mkhomedir.so skel=/etc/skel/ umask=0077
kpasswd for password changing works, but note that AD by default disallows users from changing passwords more than once a day.
The users from AD have to exist in /etc/passwd on the Ubuntu workstation, you can also use libnss-ldap to get the account info from AD.
LDAP
TestQuery: Windows
Assuming you do not maintain the Active Directory you will want to determine the structure of AD before trying to connect to it from Linux. From a windows PC connected to AD you should perform a query using Microsoft’s Active Directory Application Mode (ADAM). ADAM is a package of tools that includes CSVDE, which we will be using to perform our queries.
NB ADAM is not supported on Windows 7, and has been replaced by AD LDS.
Type this into Google, the download page should be the second hit.
adam microsoft
Install. Open the command prompt. Start > RUN and type ‘cmd’ Navigate to the installation directory, default is c:\windows\ADAM
Example Queries: Query a user entry
CSVDE -f export.csv -r "(&(objectClass=user)(sn=lastname))"
wildcards work as well
CSVDE -f export.csv -r "(&(objectClass=user)(sn=last*))"
Query a computer entry
CSVDE -f export.csv -r "(&(objectClass=computer)(cn=computername))"
Return everything in the following AD folder
CSVDE -d "OU=Pathology,OU=Departmental OUs,OU=Medcenter,DC=Med,DC=University,DC=edu" -f export.csv
The output of these queries would be placed within export.csv inside c:\windows\ADAM. Which can then be viewed as a spreadsheet editor.
For more on querying with ADAM’s CSVDE [www.computerperformance.co.uk/Logon/Logon_CSVDE.htm]
Configure AD
In Windows Server versions prior to WS03 R2, it is necessary to extend the LDAP schema from AD with the UNIX attributes. Install «Windows Services for UNIX» from Microsoft (I used version 3.5). SFU: http://www.microsoft.com/windows/sfu/
Installing SFU 3.5 on Windows Server 2003 (non R2) does not appear to add the necessary LDAP schema extensions.
In order to extend the LDAP schema, it is necessary to install the «Server for NIS» component. The installation needs to be performed using an account that has Enterprise Admin privileges in order for the schema to be extended successfully (indeed, Enterprise Admin privileges are required even if the schema has already been extended). In Active Directory, schema extensions are non-reversible, so if the NIS Server is not required, it can be removed once the schema extension is complete. If the SFU Server for NIS is installed however, it will extend the Active Directory Users and Computers tool with a UNIX Attributes tab which allows GUI editing of the UNIX attributes for users, groups and computers.
In Windows Server 2003 R2, the Active Directory schema is already extended with an RFC2307-compliant schema. This differs from the schema extensions used in SFU3.5, requiring a different libnss-ldap configuration. It is still necessary to install Server for NIS to extend the Active Directory Users and Computers tool with the UNIX Attributes tab to allow GUI editing of UNIX attributes for users, groups and computers.
TestQuery: Linux
We will want to perform a testquery in Linux before we attempt to configure AD. It is much simpler to determine how to connect on the command line and then configure rather than reconfigure a file repeatedly.
We will need at least these two packages to perform test queries on Active Directory.
sudo apt-get install libnss-ldap ldap-utils
We perform queries with ‘ldapsearch’ We must specify these minimum parameters:
We need to specify the LDAP Server (Domain Controller)
ldapsearch -h medcenterdc01
and the authentication type: simple or SASL
If we have an active directory account and proper libraries installed, you can also authenticate using SASL-GSSAPI, and you will not need -D or -W options
sudo apt-get install libsasl2-modules-gssapi-mit
kinit ADuser
ldapwhoami -h medcenterdc01 -Y EXTERNAL
SASL authentication off, simple on
ldapsearch -h medcenterdc01 -x
and the folder we want to search in
ldapsearch -h medcenterdc01 -x -b "OU=Pathology,OU=Departmental OUs,OU=medcenter,DC=mc,DC=university,DC=edu"
and who to authenticate as
ldapsearch -h medcenterdc01 -x -b "OU=Pathology,OU=Departmental OUs,OU=medcenter,DC=mc,DC=university,DC=edu" -D "CN=last name\\, firstname,OU=Users,OU=Pathology,OU=Departmental OUs,OU=medcenter,DC=mc,DC=university,DC=edu"
we’ll have it prompt for the password, instead of specifying it in the command
ldapsearch -h medcenterdc01 -x -b "OU=Pathology,OU=Departmental OUs,OU=medcenter,DC=mc,DC=university,DC=edu" -D "CN=last name\\, firstname,OU=Users,OU=Pathology,OU=Departmental OUs,OU=medcenter,DC=mc,DC=university,DC=edu" -W
and lets search for sammy’s account
ldapsearch -h medcenterdc01 -x -b "OU=Pathology,OU=Departmental OUs,OU=medcenter,DC=mc,DC=university,DC=edu" -D "CN=last name\\, firstname,OU=Users,OU=Pathology,OU=Departmental OUs,OU=medcenter,DC=mc,DC=university,DC=edu" -W "sAMAccountName=sammy"
One doesn’t need to worry about spaces, but to specify a comma as part of the path we need to prefix the comma with ‘\\’
CN=last name\\, firstname
libnss-ldap
You can install libnss-ldap and nscd from the Universe Repository.
Now you need to set up /etc/nsswitch.conf for ldap.
    passwd:         compat
    group:          compat
    shadow:         compat
    passwd_compat:  ldap
    group_compat:   ldap
    shadow_compat:  ldap

    hosts:       files dns
    networks:    files dns

    services:    db files
    protocols:   db files
    rpc:         db files
    ethers:      db files
    netmasks:    files
    netgroup:    files
    bootparams:  files

    automount:   files
    aliases:     files
If you have trouble when you attempt to ping and your network has a wins server you will want to append ‘wins’ to the hosts line of nsswitch.conf — you may only notice this only when you try to ping a static IP Linux PC from another Linux PC — I believe WINS is a part of the samba package and the IP addresses for WINS servers are stored in /etc/samba/dhcp.conf, the static IP machine also needs to specify its NetBIOS name within /etc/samba/smb.conf
When fiddling with /etc/nsswitch.conf, it is best to turn the Name Services Caching Daemon off — /etc/init.d/nscd stop or you will be confused by cached results. Turn it on afterwards.
Then you need to set up /etc/libnss-ldap.conf. AKA: /etc/ldap.conf
    # Replace windc.example.com with your Windows DC
    uri ldap://windc.example.com/

    base dc=example,dc=com
    ldap_version 3

    # Add a user to AD, that can read the container
    # with the users, that you want use.
    binddn cn=ldapreader,cn=Users,dc=example,dc=com
    bindpw cvfd123

    scope sub
    timelimit 30


    pam_filter objectclass=User

    pam_login_attribute sAMAccountName
    pam_lookup_policy yes

    # Modify cn=User,dc=e... to your container with your users.
    nss_base_passwd cn=User,dc=example,dc=com?sub
    nss_base_shadow cn=User,dc=example,dc=com?sub
    nss_base_group  cn=User,dc=example,dc=com?sub

    # For MSSFU:
    nss_map_objectclass posixAccount User
    nss_map_objectclass shadowAccount User
    nss_map_attribute uid sAMAccountName
    nss_map_attribute uniqueMember member
    nss_map_attribute uidNumber msSFU30UidNumber
    nss_map_attribute gidNumber msSFU30GidNumber
    nss_map_attribute userPassword msSFU30Password
    nss_map_attribute homeDirectory msSFU30HomeDirectory
    nss_map_attribute loginShell msSFU30LoginShell
    nss_map_attribute gecos name
    nss_map_attribute cn sAMAccountName
I think it only needs rootbinddn, no binddn, with the bindpw in /etc/libnss-ldap.secret, not here. I have also successfully combined /etc/ldap/ldap.conf, /etc/libnss-ldap.conf, and /etc/pam_ldap.conf, symlinking them all to /etc/ldap/ldap.conf — AndyRabagliati
Incorrect nss_map settings will prevent one from authenticating and reading AD in general. These settings are dependent on the column names within your AD database. In older systems the database (schema) needs to be extended as described in the ‘Configure AD’ section. Once these *NIX attributes are part of the schema they can be modified with the MMC snap-in Active Directory Users and Groups, as long as idmu.exe has been installed from the Windows Server 2003 R2 Administration Tools Pack. If *NIX group membership has been administered by modifying the list in the UNIX attributes tab of AD Users and Computers (which is REQUIRED in a NIS environment), then ‘uniqueMember’ should be mapped to ‘msSFU30PosixMember’ (or ‘posixMember’ for WS03R2) as ‘member’ only includes the membership listed in the Windows group. For Windows Server 2003 R2, the schema extensions are RFC2307 compliant — no longer prefixed ‘msSFU30’ and with the next letter in lower case (e.g. msSFU30UidNumber is now uidNumber).
If you are in a complex environment with multiple domains or multiple trees and want people from all your domains to login specify the Global Catalog port for your LDAP queries instead of the default port. If you do this is essential all LDAP servers specified in the ldap.conf be Global Catalogs. If you can create a DNS entry for your Global Catalogs of «ldap.company.com» then your URI becomes ldap://ldap.company.com:3268/. Using a DNS entry creates a dependancy on DNS but also allows you to add or remove Global Catalog servers with out having to edit the ldap.conf on each client. Taking this step also requires making all of the attributes you are using accessible via the Global Catalog LDAP service, many of the UNIX attributes are local to a specific domain. You can do this with the schema managment MMC. If you are using these attributes to authenticate your users (like UID) you may want to index them in Active Directory as well. Using the sAMAccountName gets around this since it’s already replicated to all Global Catalogs and indexed. If you have a large environment it’s very important to add proper filtering for your NSS lookups as shown below.
Further optimizations of the queries can be made for the nss_base properties:
nss_base_passwd         dc=mydomain,dc=com?sub?&(objectClass=user)(!(objectClass=computer))(uidNumber>=2000)(unixHomeDirectory=*)
nss_base_shadow         dc=mydomain,dc=com?sub?&(objectClass=user)(!(objectClass=computer))(uidNumber>=2000)(unixHomeDirectory=*)
nss_base_group          dc=mydomain,dc=com?sub?&(objectClass=group)(gidNumber=*)
These filters may be required if not all of your AD users and groups have had their Unix Attributes (UID, GID, etc) configured. Specifiying uidNumber=* will exclude AD objects that have not had this attribute set from the search. . If running «id -Gn <user>» hangs (but getent passwd and getent group work correctly), then you should make these changes.The filters above will sort for users that are not computers (AD stores computers as User objects with a «$» at the end) and have a UID greater than or equal to 2000 and a Unix home directory specified. If you are not seeing what you expect work with out filters and using the default LDAP port and add complexity one step at a time.
The ampersand in the queries above merely specifies AND logic
AND (&(filter)(filter))
OR  (|(filter)(filter))
NOT (!(filter))
Troubleshooting
To debug LDAP queries one should make sure nscd is off and use the getent command
sudo /etc/init.d/nscd stop

getent passwd
getent shadow
getent group
To follow the actions of the command use strace
strace getent passwd
If thats not enough you can place a line in the configuration file for output:
debug 10
This can be a value anywhere from 1 to 10, 10 being the most verbose.
With this config is the LDAP Traffic unencrypted and someone can sniff it. To make it secure use SSL
Now you need to set up /etc/pam.d/common-auth and
    #
    # /etc/pam.d/common-auth - authentication settings common to all services
    #
    # This file is included from other service-specific PAM config files,
    # and should contain a list of the authentication modules that define
    # the central authentication scheme for use on the system
    # (e.g., /etc/shadow, LDAP, Kerberos, etc.).  The default is to use the
    # traditional Unix authentication mechanisms.
    #
    auth    sufficient      pam_ldap.so
    auth    required        pam_unix.so nullok_secure use_first_pass
set up /etc/pam.d/common-account.
    #
    # /etc/pam.d/common-account - authorization settings common to all services
    #
    # This file is included from other service-specific PAM config files,
    # and should contain a list of the authorization modules that define
    # the central access policy for use on the system.  The default is to
    # only deny service to users whose accounts are expired in /etc/shadow.
    #
    account sufficient      pam_ldap.so
    account required        pam_unix.so
We are still using Kerberos for authentication, but now we are storing the information that would normally be stored in /etc/passwd using Active Directory.
Here are some other useful config files:
- login.defs
- nscd.conf
- /var/log/auth.log
Here is an alternative configuration example: Patched pam_krb5 to include support for directory service users]
-
CategorySecurity