
The Windows Subsystem for Linux (WSL) has opened up a new world for developers, allowing them to run Linux distributions alongside their Windows environment. The release of WSL 2 introduced support for more Linux distributions, including Red Hat Enterprise Linux (RHEL). In this article, we’ll explore the steps to get started with RHEL on WSL, enabling developers to work seamlessly with Windows and Linux environments.
Prerequisites
Before we begin, ensure that you have the following prerequisites in place:
- WSL 2
- Installed RHEL on WSL
Launch the RHEL distro on WSL
This article assumes that you have successfully installed the WSL CLI on your machine, obtained the RHEL image from the hybrid cloud, and imported the RHEL image into WSL.
Note: All following commands are performed in PowerShell with administrator permissions.
As demonstrated below, list the installed Linux distributions on your Windows Subsystem for Linux.
> wsl -l
Windows Subsystem for Linux Distributions:
rhel8 (Default)
Initiate the image launch, specifying the distribution name. For this article it is rhel8.
> wsl -d rhel8
[root@user directory]#
Verify the installed version using the following command:
[root@nagesh home]# cat /etc/os-release
NAME="Red Hat Enterprise Linux"
VERSION="8.9 (Ootpa)"
ID="rhel"
With the assistance of the subscription-manager command, register the machine on the Red Hat Insights portal using the following link.
Note: If you do not have a Red Hat account, please use the link above to create one.
Verify the current status of your system using the following command:
# subscription-manager statusRegister the system using the following command, utilizing the same user ID and password as for Red Hat Insights:
# subscription-manager registerAssociate the subscription with the RHEL system using the following command:
# subscription-manager attachUpdate the RHEL packages using the following command:
# dnf updateDeploy sample app on WSL
This article uses a Java sample application designed to run on the Quarkus framework. However, you can employ any programming language and framework of your choice. Follow the steps below to deploy the initial hello-world app on your WSL.
Install Quarkus via the command-line interface using the following packages:
# curl -Ls https://sh.jbang.dev | bash -s - trust add https://repo1.maven.org/maven2/io/quarkus/quarkus-cli/
# curl -Ls https://sh.jbang.dev | bash -s - app install --fresh --force quarkus@quarkusio
Restart the terminal to apply the changes made by the Quarkus CLI to the RHEL distribution:
# quarkusGenerate an application using the Quarkus command as illustrated below:
# quarkus createInspect the application directory that is generated after executing the above command:
#cd code-with-quarkusExecute the hello-world application using the following command:
# quarkus dev[INFO] Invoking quarkus:3.6.1:generate-code-tests (default) @ code-with-quarkus
[INFO] Invoking compiler:3.11.0:testCompile (default-testCompile) @ code-with-quarkus
[INFO] Changes detected - recompiling the module! :dependency
[INFO] Compiling 2 source files with javac [debug release 17] to target/test-classes
----------------------------
--- Help improve Quarkus ---
----------------------------
* Learn more: https://quarkus.io/usage/
* Do you agree to contribute anonymous build time data to the Quarkus community? (y/n and enter)
y
[info] [Quarkus build analytics] Quarkus Build Analytics enabled by the user.
Listening for transport dt_socket at address: 5005
__ ____ __ _____ ___ __ ____ ______
--/ __ \/ / / / _ | / _ \/ //_/ / / / __/
-/ /_/ / /_/ / __ |/ , _/ ,< / /_/ /\ \
--\___\_\____/_/ |_/_/|_/_/|_|\____/___/
2023-12-08 15:43:37,106 INFO [io.quarkus] (Quarkus Main Thread) code-with-quarkus 1.0.0-SNAPSHOT on JVM (powered by Quarkus 3.6.1) started in 1.503s. Listening on: http://0.0.0.0:8080
2023-12-08 15:43:37,109 INFO [io.quarkus] (Quarkus Main Thread) Profile dev activated. Live Coding activated.
2023-12-08 15:43:37,110 INFO [io.quarkus] (Quarkus Main Thread) Installed features: [cdi, resteasy-reactive, smallrye-context-propagation, vertx]After successfully executing the app, you will see similar logs in your terminal as shown above.
Confirm that the application is running on your system by visiting the URL in your browser: http://localhost:8080. You should see the default Quarkus web page as depicted in Figure 1.

Note: To exit from interactive mode in the terminal, press the q key.
Containerize the Quarkus application on WSL
To containerize the Quarkus application, a container management tool like Podman is required. Install it on your RHEL distribution using the following command:
# dnf install podman -yGenerate dependency files using the following command before packaging or building the container image. Ensure that you are in the application directory.
./mvnw packageBuild the application image using the following podman command:
# podman build -f src/main/docker/Dockerfile.jvm -t quarkus/hello .After a successful build, you can list the available images using the following command:
# podman images
REPOSITORY                                  TAG         IMAGE ID      CREATED         SIZE
localhost/quarkus/hello                     latest      9c5aa577f473  44 seconds ago  462 MB
registry.access.redhat.com/ubi8/openjdk-17  1.18        f5b3ec58f205  3 weeks ago     448 MB
Run the container with the recently built image localhost/quarkus/hello using the podman run command, as demonstrated below:
# podman run -it -p 8080:8080 quarkus/hello
INFO exec -a "java" java -XX:MaxRAMPercentage=80.0 -Dquarkus.http.host=0.0.0.0 -Djava.util.logging.manager=org.jboss.logmanager.LogManager -cp "." -jar /deployments/quarkus-run.jar
INFO running in /deployments
__  ____  __  _____   ___  __ ____  ______
--/ __ \/ / / / _ | / _ \/ //_/ / / / __/
-/ /_/ / /_/ / __ |/ , _/ ,< / /_/ /\ \
--\___\_\____/_/ |_/_/|_/_/|_|\____/___/
2023-12-08 11:42:08,350 INFO  [io.quarkus] (main) code-with-quarkus 1.0.0-SNAPSHOT on JVM (powered by Quarkus 3.6.1) started in 0.505s. Listening on: http://0.0.0.0:8080
2023-12-08 11:42:08,353 INFO  [io.quarkus] (main) Profile prod activated.
2023-12-08 11:42:08,353 INFO  [io.quarkus] (main) Installed features: [cdi, resteasy-reactive, smallrye-context-propagation, vertx]
Revisit http://localhost:8080 in your browser to observe the Quarkus welcome webpage, similar to the one shown above.
Find more resources
For a more profound and practical understanding of Red Hat Enterprise Linux, you can engage in thoughtfully curated hands-on labs by Red Hat. Red Hat Universal Base Images (UBI) are container-based and operating system images with complementary runtime languages and packages. Try Red Hat UBI on the curated Red Hat UBI hands-on lab.
As a result of this article, we have successfully deployed and containerized a simple hello-world Quarkus application on the RHEL distro running on a WSL-enabled Windows machine. This exemplifies the availability and flexibility of Red Hat Enterprise Linux across diverse platforms.
Furthermore, you can obtain tailored Red Hat Enterprise Linux images designed for AWS, Google Cloud Platform, Microsoft Azure, and VMware, facilitating their seamless deployment on your chosen platform.
Red Hat Linux is one of the most widely used distributions of Linux, particularly popular in enterprise settings due to its performance, stability, and extensive support. Windows 11 continues to dominate the desktop operating system market, but many users may want to tap into the power of Linux without sacrificing their primary Windows environment. In this article, we’ll explore how to install Red Hat Linux on a Windows 11 machine. We’ll delve into two primary methods: using a Virtual Machine (VM) and using Windows Subsystem for Linux (WSL).
Why Use Red Hat Linux?
Before we dive into the installation process, let’s consider why someone might select Red Hat Linux as their operating system:
- Enterprise Support: Red Hat offers strong enterprise-grade support, making it a great choice for businesses.
- Stability: Known for its stability, Red Hat is often the OS of choice for servers and critical applications.
- Extensive Documentation: Being widely adopted in the industry, there is a wealth of documentation and community support available.
- Development Environment: If you’re a developer, many tools and frameworks are optimized for Red Hat and the broader Linux environment.
Preparing for Installation
Regardless of whether you choose to set up Red Hat Linux via a VM or WSL, you’ll need a few things:
-
Download Red Hat Linux: First, download the latest version of Red Hat ISO file from the official website. Depending on whether you are an individual or an organization, you might want to look at the different subscription plans.
-
Virtualization Software: If you’re opting for a Virtual Machine installation, you will need virtualization software. Options include:
- Oracle VirtualBox (Free)
- VMware Workstation Player (Free for non-commercial use)
- Hyper-V (Built into Windows 11 Professional and Enterprise editions)
-
System Requirements: Ensure that your Windows 11 setup meets the requirements for running Red Hat Linux and has enough resources (CPU, RAM, Disk Space) allocated for the VM.
-
Windows Subsystem for Linux (Optional): If you prefer to use WSL, ensure that your Windows 11 version supports it and that it’s enabled on your machine.
Method 1: Installing Red Hat Linux on a Virtual Machine
Step 1: Install Virtualization Software
For this example, let’s consider Oracle VirtualBox:
- Go to the VirtualBox download page.
- Download the Windows version and run the installer.
- Follow the instructions in the installation wizard to complete the setup.
Step 2: Create a New Virtual Machine
- Launch VirtualBox and click on “New”.
- Enter a name for your VM (e.g., «Red Hat Linux»).
- Choose the type as “Linux” and the version as “Red Hat (64-bit)”.
- Allocate memory to the VM (At least 2 GB is recommended, but 4 GB or more is preferable).
- Choose “Create a virtual hard disk now” and click “Create”.
Step 3: Configure Virtual Hard Disk
- Choose “VDI (VirtualBox Disk Image)” as the hard disk file type.
- Select the option for “Dynamically allocated” to save disk space.
- Allocate the disk size (At least 20 GB is recommended).
- Click on “Create”.
Step 4: Load the Red Hat ISO
- With your VM selected in VirtualBox, click on “Settings”.
- Navigate to “Storage” and under “Controller: IDE”, click on the empty disk icon.
- On the right side, click on the disk icon next to “Optical Drive” and select “Choose a disk file”.
- Locate and select the downloaded Red Hat ISO file.
- Click “OK” to save settings.
Step 5: Start the Virtual Machine
- With the VM selected, click on “Start”.
- The VM will boot from the ISO file. Follow the installation prompts.
- Choose “Install Red Hat Enterprise Linux” from the boot menu.
Step 6: Proceed with Installation
- Select your language and click “Continue”.
- Set your time zone and other locale settings.
- Click on “Installation Destination” and ensure your virtual hard disk is selected.
- If you want additional configuration (like disk partitioning), set that up, or you can choose automatic partitioning.
- Set up Network and Hostname if needed.
Step 7: Complete Installation
- Set up your root password and create standard user accounts.
- Once everything is configured, click on “Begin Installation”.
- Wait for the installation to finish, then reboot when prompted.
Step 8: Post-Installation Checks
- Make sure to remove the installation ISO from the VM settings.
- Log into your newly installed Red Hat Linux environment.
- Update your system by running:
sudo dnf update
Method 2: Installing Red Hat Linux using Windows Subsystem for Linux
The Windows Subsystem for Linux (WSL) allows you to run a Linux distribution directly on Windows without the overhead of a virtual machine.
Step 1: Enable WSL
- Right-click on the Start Menu and select “Windows Terminal (Admin)”.
- Run the following command to enable the WSL feature:
wsl --install - Restart your computer when prompted.
Step 2: Install Red Hat Linux
After enabling WSL, you can install a Linux distribution. While Red Hat isn’t available directly as a WSL distribution, you can install Fedora (which shares a lot with Red Hat).
- Open the Microsoft Store.
- Search for “Fedora” or another preferred Linux distribution.
- Click “Get” or “Install” to add it to your system.
Step 3: Set Up Fedora in WSL
- Launch the Fedora terminal from the Start Menu.
- Set up the initial username and password.
- You can then access the Linux terminal directly from Windows.
Step 4: Update Your Linux Environment
- Update the system packages:
sudo dnf update
Conclusion
The methods above allow you to explore the world of Red Hat Linux while still using Windows 11 as your primary operating system. Whether you choose to run Linux in a virtual machine, providing a fully functional environment, or use WSL for command-line tools and development, both options are effective based on your needs.
Both methods come with their own advantages; Virtual Machines provide a full graphical user experience while WSL is lightweight and merges well with the Windows environment. Keep in mind that using Red Hat Linux effectively might require a bit of a learning curve, especially if you’re familiar with the Windows operating system.
Moving forward, delve into specific Red Hat features and configurations to fully exploit the capabilities of your new Linux environment. Happy computing!
How to Install Red Hat Linux on Windows 11
Installing Red Hat Linux on a Windows 11 machine can be a rewarding experience for users interested in exploring a robust operating system. This installation provides familiarity with Linux environments, essential for developers and system administrators. In this guide, we will walk through the detailed steps of preparing your Windows 11 system for the installation and successfully setting up Red Hat Linux.
Prerequisites
Before embarking on the installation journey, ensure you have the following:
-
System Requirements:
- A computer with at least 4 GB of RAM, though 8 GB or more is recommended for a smoother experience.
- A minimum of 20 GB of free disk space.
- A compatible processor (64-bit architecture is required).
-
Red Hat Linux ISO File:
- Download the required Red Hat Linux ISO from the official Red Hat site. This may require a subscription to access the full version. Alternatively, you can use CentOS or Fedora, which are community-supported distributions derived from Red Hat.
-
Virtualization Software:
- You can choose to install Red Hat Linux directly on your physical hardware or through virtualization for more flexibility. Popular options include:
- VirtualBox (Free and open-source)
- VMware Workstation Player (Free for non-commercial use)
- Make sure to have virtualization enabled in your Windows 11 BIOS settings.
- You can choose to install Red Hat Linux directly on your physical hardware or through virtualization for more flexibility. Popular options include:
-
Windows 11 Settings:
- Ensure that Windows 11 is updated to the latest version for optimal performance and compatibility.
Preparing Your System
Step 1: Enabling Virtualization
To run VirtualBox or VMware efficiently, you might need to enable virtualization in your BIOS. This process can vary depending on your manufacturer. Here’s a general outline:
- Restart your machine.
- Enter BIOS/UEFI settings (commonly by pressing F2, F10, Del, or Esc during boot).
- Navigate to CPU settings and look for an option labeled «Intel VT-x,» «AMD-V,» or «Virtualization Technology.»
- Enable the option, save changes, and exit BIOS.
Step 2: Installing Virtualization Software
Once your system is prepared, download and install your preferred virtualization software:
-
VirtualBox Installation:
- Visit the VirtualBox website.
- Download the version compatible with Windows.
- Run the installer and follow the prompts to complete the installation.
-
VMware Workstation Player Installation:
- Visit the VMware Workstation website.
- Download the version for Windows.
- Execute the installer and follow the installation instructions.
Installing Red Hat Linux
Step 3: Creating a New Virtual Machine
Now that virtualization software is installed, you’ll create a new virtual machine (VM) for Red Hat Linux.
-
Open VirtualBox or VMware Workstation Player:
- Launch your preferred virtualization software.
-
Create a New VM:
- VirtualBox:
- Click on «New.»
- Name your VM (e.g., “Red Hat Linux”).
- Set the type to “Linux” and the version to “Red Hat (64-bit).”
- Allocate memory (RAM). Aim for at least 4 GB.
- VMware:
- Click on «Create a New Virtual Machine.»
- Choose “Typical” for the configuration type.
- Select “I will install the operating system later.”
- VirtualBox:
-
Configure Hard Disk:
- Choose to create a virtual hard disk now.
- Choose VDI (VirtualBox) or “Split disk into multiple files” for VMware.
- Set the size to at least 20 GB, adjusting as needed.
- Complete the VM creation.
Step 4: Mounting the Red Hat ISO
You need to attach the downloaded Red Hat Linux ISO to your virtual machine.
-
VirtualBox:
- Select your VM and click on «Settings.»
- Go to “Storage” and click on the empty CD icon.
- On the right panel, choose “Choose a disk file” and select your Red Hat ISO.
-
VMware:
- Right-click on your VM and select “Settings.”
- In the “Hardware” tab, choose CD/DVD (SATA).
- Select “Use ISO image file” and browse to select your Red Hat ISO.
Step 5: Starting the Virtual Machine
Now that everything is set up, boot your virtual machine.
-
VirtualBox:
- Click «Start» to launch the VM. The system will boot from the ISO file.
-
VMware:
- Click on «Play» to run the VM, and it should boot from the selected ISO.
Installing Red Hat Linux
Step 6: Following the Installation Wizard
Once the VM boots from the ISO, you will be greeted by the Red Hat installation menu.
-
Select “Install Red Hat Enterprise Linux” and press Enter.
-
Language Selection:
- Choose your preferred language and click «Continue.»
-
Installation Summary:
- You will see several categories here, including keyboard layout, date & time, installation source, and network configuration.
-
Disk Installation:
- Under «Installation Destination,» select your virtual hard drive and configure partitioning as needed. The default automatic partitioning is usually sufficient.
-
Network Configuration:
- Go to «Network & Host Name» and enable networking to obtain an IP address automatically.
-
Root Password:
- Set a secure root password.
-
User Creation:
- Optionally, create a new user with non-root privileges.
-
Software Selection:
- You can select a base environment or additional software for development, server, etc.
Step 7: Begin Installation
With all configurations set:
- Click «Begin Installation.»
- The installation process will take some time. You can review logs in the installer if needed.
Step 8: Finalizing the Installation
- Once the installation is complete, reboot your virtual machine.
- Upon reboot, remove the ISO from the virtual machine’s settings and then boot from the hard drive.
- Log in using the credentials set during the installation.
Post-Installation Configuration
Step 9: Complete System Update
Once you log in, it’s essential to ensure your system is updated:
- Open the terminal.
- Use the following command to update your system:
sudo dnf updateStep 10: Installing Additional Software
Depending on your needs:
- For development environments, consider installing tools like
git, programming languages, or specific packages relevant to your work. - Use the following command to install any required package:
sudo dnf install Accessing Red Hat Linux from Windows
If you’ve chosen to run Red Hat Linux within a virtual machine, you may want to easily share files between your host (Windows 11) and your guest (Red Hat).
Step 11: Setting Up Shared Folders
-
VirtualBox:
- With your VM powered off, go to Settings → Shared Folders.
- Click on the plus icon, select a folder from your Windows file system to share, and choose whether it’s read-only.
-
VMware:
- Go to VM Settings → Options → Shared Folders.
- Enable shared folders and specify the folder to share.
Troubleshooting Common Issues
While installing Red Hat Linux on Windows can be mostly straightforward, some users might encounter issues.
- Boot Issues: If the VM doesn’t boot from the ISO, ensure that the ISO file path is correct in VM settings.
- ISO Not Found: If errors arise indicating the ISO cannot be found, recheck the file path and make sure it’s accessible.
- Slow Performance: Ensure you’ve allocated enough RAM and CPU cores to the VM for better performance.
Conclusion
Installing Red Hat Linux on a Windows 11 system can be an endeavor that opens doors to learning and developing skills in various IT domains. Whether you’re a developer looking to explore different environments or an enthusiast wanting to learn Linux, this guide should equip you with the knowledge needed to set up a robust Red Hat environment using virtualization.
Now, with Red Hat Linux set up on your Windows 11, you can dive into exploring its capabilities, customizing the system, and leveraging the powerful tools it has to offer. Happy exploring!
🚀 How to Setup RHEL 9 on Windows Using VirtualBox – Day 1 of My 30-Day Linux Challenge
👋 Introduction
I’ve recently kicked off my 30-day Linux challenge as part of my preparation for the RHCSA exam. This post marks Day 1, where I show you how I set up a Red Hat Enterprise Linux 9 lab on Windows using Oracle VirtualBox—step-by-step.
Whether you’re just getting started with Linux or gearing up for a certification, this setup guide is for you.
Stay tuned—29 more days of Linux adventures ahead!
📋 Requirements
✅ Oracle VirtualBox – https://www.virtualbox.org/
✅ RHEL 9 ISO File (requires a free Red Hat Developer account) – https://developers.redhat.com/products/rhel/download
✅ A machine with at least 4GB RAM
🛠 Step-by-Step Lab Setup in Oracle VirtualBox
Step 1: Create a New Virtual Machine
Open VirtualBox
Go to Machine → New


Step 2: Enter VM Details
Name: RHEL9-VM1
Type: Linux
Version: Red Hat (64-bit)


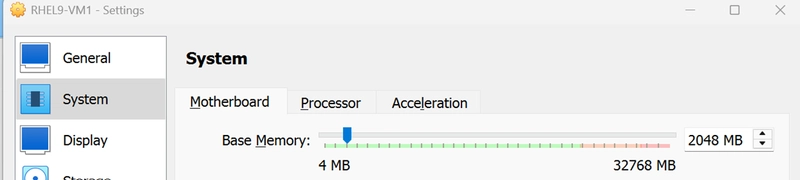
Step 3: Set Memory Size
Allocate 2GB RAM (2048 MB)
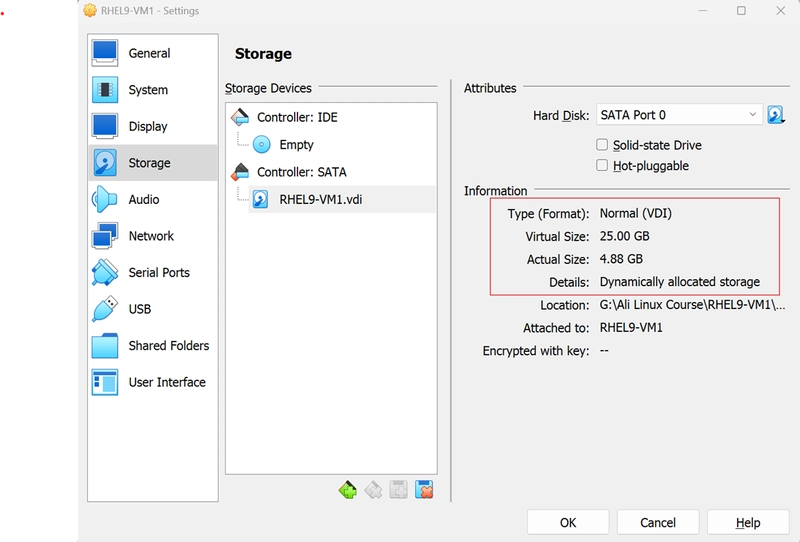
Step 4: Created a Virtual Hard Disk
While in the installation process
Choose VDI (VirtualBox Disk Image)
Select Dynamically allocated
Set size to 25GB
Click Create
Step 5: Adjust VM Settings
Settings → System → Processor
Set processor count to 2

System → Motherboard
Change pointing device to USB Tablet
Click OK to save changes

Step 6: Attach the RHEL 9 ISO
Click Start on the VM
When prompted, click the folder icon to choose a disk
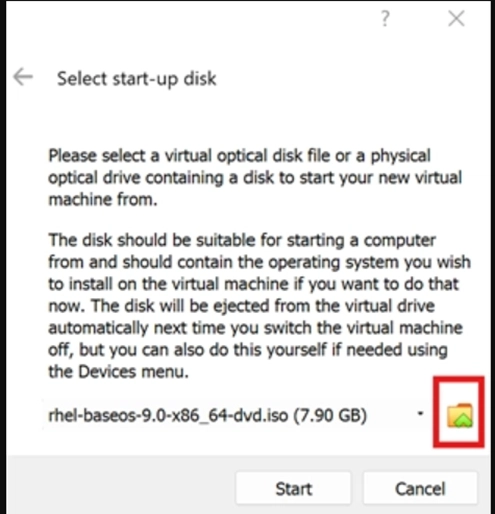
Click the folder icon and select the rhel-baseos-9.0-x86_64-dvd.iso
Click Start

🧑💻 Begin Installation
Step 7: Start RHEL Installer
Use arrow keys to select Install Red Hat Enterprise Linux 9. Press Enter

Step 8: Language Selection
Select your preferred language
Click Continue
Step 9: Installation Destination
Click Installation Destination

Confirm your 25GB disk is selected
Click Done

Step 10: Set Root Password
Click Root Password under «USER SETTINGS»

Set: redhat or (user wish)but make sure do not to forgot the root password
Enable Allow root SSH login with password
Click Done

Step 11: Begin Installation
Click Begin Installation

Wait until installation completes
🎯 Final Setup Steps
Reboot when prompted
Eject ISO from virtual drive
🥳 Congratulations! Your RHEL 9 virtual machine is ready for use.
💡 Recommendations & Best Practices
🌟 Pro Tips
💾 Take a snapshot right after installation
🔁 Enable bidirectional clipboard and drag-and-drop
🆕 Update system after first login:
bash
Copy
Edit
sudo dnf update -y
✅ Quick Summary
2GB RAM, 2 CPUs, 25GB disk
Install RHEL 9 via ISO
Tweak settings for smooth performance
Ready for Day 2 of Linux exploration!
💬 Let’s Connect! https://www.linkedin.com/in/dinesharumugam86/
Feel free to share your thoughts or questions, or even join me on this challenge. Let’s grow those real-world Linux skills together.
- How To Install Redhat Linux On A Windows 10
- How To Install X Windows On Linux Redhat
- Install the Windows Subsystem for Linux. Before installing any Linux distros for WSL, you must ensure that the ‘Windows Subsystem for Linux’ optional feature is enabled: Open PowerShell as Administrator and run: Enable-WindowsOptionalFeature -Online -FeatureName Microsoft-Windows-Subsystem-Linux Restart your computer when prompted.
- Firstly I recommend you to go for Fedora sponsored by Red Hat which is more updated than RHEL and you don’t need a subscription like RHEL there’s almost no difference in both of them and in Fedora you also have a new and fast package manager DNF i.
- Hi All, Warm Greetings to all, My query is, I have dell laptop with windows 10 installed. As of now i have started learning RHEL 7 so tried to install Linux on the same laptop and thought I could make it dual boot.
Installation of Red Hat Enterprise Linux 7.0. After registering on Red Hat Customer Portal go to Download section and grab the last version of RHEL DVD Binary ISO image, then burn it to a DVD media or create a USB bootable media using Unetbootin LiveUSB Creator. How to install Linux distros on Windows 10. After adding the Windows System for Linux module to your computer, there are two ways to install Ubuntu or SUSE Linux distros on Windows 10: you can use. Red Hat Enterprise Linux is the Only Operating System on the Computer; 39.2. Your Computer Dual-boots Red Hat Enterprise Linux and Another Operating System. Your Computer Dual-boots Red Hat Enterprise Linux and a Microsoft Windows Operating System; 39.2.2. Your computer dual-boots Red Hat Enterprise Linux and a different Linux distribution; 39.3.
—>
Install the Windows Subsystem for Linux
Before installing any Linux distros for WSL, you must ensure that the ‘Windows Subsystem for Linux’ optional feature is enabled:
-
Open PowerShell as Administrator and run:
-
Restart your computer when prompted.
Install your Linux Distribution of Choice
To download and install your preferred distro(s), you have three choices:
- Download and install from the Microsoft Store (see below)
- Download and install from the Command-Line/Script (read the manual installation instructions)
- Download and manually unpack and install (for Windows Server — instructions here)
Windows 10 Fall Creators Update and later: Install from the Microsoft Store
This section is for Windows build 16215 or later. Follow these steps to check your build.
-
Open the Microsoft Store and choose your favorite Linux distribution.
The following links will open the Microsoft store page for each distribution:
-
From the distro’s page, select ‘Get’
Complete initialization of your distro
Now that your Linux distro is installed, you must initialize your new distro instance once, before it can be used.
Troubleshooting:
Below are related errors and suggested fixes. Refer to the WSL troubleshooting page for other common errors and their solutions.
-
Installation failed with error 0x80070003
- The Windows Subsystem for Linux only runs on your system drive (usually this is your
C:drive). Make sure that distros are stored on your system drive: - Open Settings -> Storage -> More Storage Settings: Change where new content is saved
- The Windows Subsystem for Linux only runs on your system drive (usually this is your
-
WslRegisterDistribution failed with error 0x8007019e
-
The Windows Subsystem for Linux optional component is not enabled:
-
Open Control Panel -> Programs and Features -> Turn Windows Feature on or off -> Check Windows Subsystem for Linux or using the PowerShell cmdlet mentioned at the begining of this article.
Brief: This beginner’s tutorial shows you how to install bash on Windows.
Linux on Windows is a reality, thanks to the partnership between Canonical (parent company of Ubuntu) and Microsoft. When Microsoft’s CEO announced that the Bash shell was coming to Windows, a number of people just couldn’t believe it. #BashOnWindows trended on Twitter for days, such was the impact of this news.
But Bash on Windows was not available to everyone immediately. People had to install the Windows 10 technical preview to install Linux on Windows 10. But this is not the case anymore. The Windows 10 anniversary upgrade is here and now you can easily get Bash on Windows. But before we go on installing Bash on Windows, let me tell you a little more about it.
What is Bash on Windows?
Bash on Windows provides a Windows subsystem and Ubuntu Linux runs atop it. It is not a virtual machine or an application like Cygwin. It is complete Linux system inside Windows 10.
Apple ios 9 update download. Load more results. Apple Footer Apple Support. Jul 22, 2019 With this update your iPhone, iPad and iPod touch become more intelligent and proactive with powerful search and improved Siri features. New multitasking features for iPad allow you to work with two apps simultaneously, side-by-side or with the new Picture-in-Picture feature. And, built-in apps become more powerful with detailed transit information in Maps, a redesigned Notes app, and an all.
Basically, it allows you to run the same Bash shell that you find on Linux. This way you can run Linux commands inside Windows without the needing to install a virtual machine, or dual boot Linux and Windows. You install Linux inside Windows like a regular application. This is a good option if your main aim is to learn Linux/Unix commands.
I recommend reading this article to know more about Bash on Windows.
Method 1: Install Linux Bash Shell on Windows 10 Newer Versions
Good thing is that Fall Creator’s Update makes it easier to install Bash on Windows 10. You can get it in one click from Windows Store. There are still a few things to do however.

I am installing Ubuntu using Windows 10 Linux subsytem. You can also use SUSE Linux. The procedure is same for both distributions.
Step 1: Enable “Windows Subsystem for Linux” feature
The first thing you need to do is to enable Windows Subsyetm for Linux feature from PowerShell.
Go to the Start menu and search for PowerShell. Run it as administrator:
Once you have the PowerShell running, use the command below to enable Bash in Windows 10.
You’ll be asked to confirm your choice. Type Y or press enter:
Now you should be asked to reboot. Even if you are not asked to, you must restart your system.
Step 2: Download a Linux system from the Windows store
Once your system has rebooted, go to the Windows Store and search for “Linux.”
You’ll see the option to install Ubuntu or SUSE. I have installed Ubuntu for Bash on Windows here.
What’s the difference between using Ubuntu or openSUSE or SUSE Linux Enterprise? And which one should you use?
If that’s your question then perhaps you don’t know much about Linux distributions. To tell you quickly, the main difference would be in the commands for installing new packages inside these Linux subsystems. I advise going for Ubuntu in this case.
Once you choose the distribution of your choice, you’ll see the option to install it. Do note that it will download files of around 1Gb in size. So you should have a good internet connection here.
Step 3: Run Linux inside Windows 10
You are almost there. Once you have installed Linux, it’s time to see how to access Bash in Windows 10.
Just search for the Linux distribution you installed in the previous step. In my case it was Ubuntu. You’ll see that it runs like a normal Windows application.
It will take some time installing and then you’ll have to set up the username and password.
Don’t worry, it’s just for the first run. Bash shell will be available for use directly from the next time onwards.
Enjoy Linux inside Windows 10.
Troubleshooting 1: The WSL optional component is not enabled. Please enable it and try again.
You may see an error like this when you try to run Linux inside Windows 10:
And when you press any key, the application closes immediately.
The reason here is that the Windows Subsystem for Linux is not enabled in your case. You should enable it as explained in step 1 of this guide. You can do that even after you have installed Linux from Windows Store.
Troubleshoot 2: Installation failed with error 0x80070003
This is because Windows Subsystem for Linux only runs on the system drive i.e. the C drive. You should make sure that when you download Linux from the Windows Store, it is stored and installed in the C Drive.
Go to Settings -> Storage -> More Storage Settings: Change where new content is saved and select C Drive here.
Method 2: Install Linux Bash Shell on older Windows 10
If you cannot get the Fall Creator’s update on Windows 10 for some reason, you can still install it if you have the Anniversary update of Windows 10. But here, you’ll have to enable developer mode. I still recommend upgrading to the Fall Creator’s update though.
Installing Linux Bash Shell on Older Windows 10 (Click to expand)
Step 1:
Press Windows Key + I to access Windows system settings. In here, go to Update & Security:
Step 2:
From the left side pane, choose “For developers.” You’ll see an option for “Developer mode.” Enable it.
Step 3:
Now search for Control Panel and in Control Panel, click on “Programs”:
Step 4:
In Programs, click “Turn Windows features on or off”:
Step 5:
When you do this, you’ll see several Windows features. Look for “Windows Subsystem for Linux” and enable it.
Step 6:
How To Install Redhat Linux On A Windows 10
You’ll need to restart the system after doing this.
Step 7:
After restarting the computer, click the start button and search for “bash”. Anvisoft cloud booster system.
Step 8:
When you run it for the first time, you’ll be given the option to download and install Ubuntu. You’ll be asked to create a username and password during this process. It will install an entire Ubuntu Linux system, so have patience as it will take some time in downloading and installing Linux on Windows.
Step 9:
Once this is done, go back to the Start menu and search for Ubuntu or Bash.
How To Install X Windows On Linux Redhat
Step 10:
Now you have a command line version of Ubuntu Linux. You can use apt to install various command line tools in it.
I hope you find this tutorial helpful for installing bash on Windows 10. It lets you play with Linux inside of Windows. If you have questions or suggestions, feel free to ask.