
Discover how to install Windows 10 over PXE Linux server in just a few steps! Don’t miss out—learn the efficient, sysadmin-friendly method to deploy Windows OS remotely like a pro. #centlinux #linux #pxe
Table of Contents
Problem Statement
In our previous posts, we have configured a PXE boot server for automated installation of RHEL 7.5 operating system that supports both BIOS and UEFI based clients. Later on, we added RHEL 6 and Ubuntu 18.10 installation options in our PXE boot server. We have also written Kickstart files for automated installations of both operating systems.
Before concluding our PXE configuration series, we decided to write an article to add the installation option of a Microsoft’s operating system. Therefore, we have selected the Microsoft Windows 10 (the latest OS at the time of this writeup) as the candidate for our PXE boot server.
Linux Server Specification
In this article, we will install Windows 10 over PXE Server.
We use the same Linux server that we have configured as PXE Boot Server in our previous article. These specifications have been re-mentioned below for convenience of the readers.
- CPU – 2 Core (2.4 Mhz)
- Memory – 2 GB
- Storage – 50 GB
- Operating System – RHEL 7.5
- Hostname – pxe-server.itlab.com
- IP Address – 192.168.116.41/24
Furthermore, we need a client system to create Windows PE iso file. Here, we are using a MS Windows 8.1 machine for this purpose, however, you can use other versions of MS Windows as well (be noted that configurations are slightly different in MS Windows versions prior to 8.1).
Recommended Training: The Linux Command Line Bootcamp: Beginner To Power User from Colt Steele
Read Also: How to install Linux over PXE Server
Install Samba Server on Linux
We used Samba server to share installation media of MS Windows 10 Operating System with PXE clients.
Connect to pxe-server.itlab.com using ssh and install Samba server.
yum install -y sambaCreate a directory to share Windows 10 installation media.
mkdir /smbshareAdjust SELinux permissions.
semanage fcontext -a '/smbshare(/.*)?' -t samba_share_t
restorecon -Rv /smbshare
Create an user to control access to Samba share.
useradd -s /sbin/nologin ahmer
smbpasswd -a ahmer
Change owner of the shared directory with user ahmer.
chown ahmer:ahmer /smbshare/Allow Samba service in Linux Firewall.
firewall-cmd --permanent --add-service=samba
firewall-cmd --reload
Add directives in /etc/samba/smb.conf to share the directory /smbshare with clients.
cat >> /etc/samba/smb.conf << EOF
[install]
        comment = Installation Media
        path = /smbshare
        public = yes
        writable = no
        printable = no
        browseable = yes
EOF
Start and enable Samba services.
systemctl start smb nmb
systemctl enable smb nmb
Attach MS Windows 10 ISO/DVD and mount it at /mnt/iso (you can use any mountpoint, according to your choice).
mount -t iso9660 /dev/cdrom /mnt/isoOutput:
mount: /dev/sr0 is write-protected, mounting read-only
Copy contents of /mnt/iso to /smbshare/windows10 directory.
cp -rf /mnt/iso /smbshare/windows10jumper 2 in 1 Laptop, 16 inch Convertible Laptop Computer with IPS FHD 360 Degree Touchscreen, 640GB Storage, 16GB RAM, Fingerprint Reader, Backlit Keyboard, Celeron N5095, 53.2WH, WiFi 6
$399.99 (as of May 3, 2025 16:38 GMT +00:00 – More infoProduct prices and availability are accurate as of the date/time indicated and are subject to change. Any price and availability information displayed on [relevant Amazon Site(s), as applicable] at the time of purchase will apply to the purchase of this product.)
Create a Customized Windows PE ISO
Connect to MS Windows 8.1 client.
We required Windows ADK (Assessment and Deployment Kit) to create our Windows PE iso. Therefore, we have downloaded it from Microsoft’s website and installed it on our Windows 8.1 client.
After installation, run Deployment and Imaging Tools Environment as Administrator.
Run the following command to create working directories for Win PE. (Command output has been trimmed to show only success status)
cd C:\Program Files (x86)\Windows Kits\8.0\Assessment and Deployment Kit\Windows Preinstallation Environment
copype x86 c:\WinPE_x86\
Output:
---
186 File(s) copied
        1 file(s) copied.
        1 file(s) copied.
        1 file(s) copied.Success
We will customize the startup script startcmd.net, so MS Windows 10 setup will start automatically. Therefore, mount the image file and customize it accordingly.
Dism /Mount-Image /ImageFile:"c:\WinPE_x86\media\sources\boot.wim" /index:1 /MountDir:"c:\WinPE_x86\mount"Output:
Deployment Image Servicing and Management tool
Version: 6.2.9200.16384Mounting image
[==========================100.0%==========================]
The operation completed successfully.
Now, edit startnet.cmd.
notepad c:\WinPE_x86\mount\Windows\System32\Start\net.cmdAnd add following lines therein.
wpeinit
net use z: \\192.168.116.41\install\windows10 /user:ahmer@123
z:\setup.exe
Save and unmount the image file.
Dism /Unmount-Image /MountDir:"c:\WinPE_x86\mount" /commitOutput:
Deployment Image Servicing and Management tool
Version: 6.2.9200.16384Saving image
[==========================100.0%==========================]
Unmounting image
[==========================100.0%==========================]
The operation completed successfully.
Generate winpe.iso file.
MakeWinPEMedia /ISO c:\WinPE_x86 c:\winpe.isoOutput:
Creating c:\winpe.iso...100% complete
Success
Transfer winpe.iso file to pxe-server-itlab.com and copy it to /var/lib/tftpboot/networkboot/windows10/ directory.
Now, connect to pxe-server.itlab.com again using ssh.
Copy Kernel boot image for MS Windows in tftpboot directory.
cp /usr/lib/syslinux/memdisk /var/lib/tftpboot/Edit PXE boot menu for BIOS based clients.
vi /var/lib/tftpboot/pxelinux.cfg/defaultAnd add following menu option at the end of file.
label Install MS Windows 10
menu label Install MS Windows 10
kernel memdisk
initrd /networkboot/windows10/winpe.iso
append iso raw
Connect a new client to your network and turn it on. It should get the IP address from DHCP server and display our PXE boot Menu as follows:
Select Install MS Windows 10 option and press <ENTER>.
We have successfully added the MS Windows 10 installation option in our Linux based PXE server.
Frequently Asked Questions (FAQs)
What is PXE booting, and how does it help install Windows 10?
PXE (Preboot Execution Environment) allows a computer to boot and install an operating system over a network instead of using physical media. A Linux server can host the Windows 10 installation files for remote deployment.
Do I need a Windows server to set up PXE for Windows 10?
No, you can use a Linux server (like Ubuntu or CentOS) to configure a PXE boot environment for Windows 10 installation with the right tools and configurations.
What files are required on the Linux server for Windows 10 PXE installation?
You’ll need the Windows 10 ISO (or extracted files), a TFTP server to host boot files, a DHCP server to assign IPs, and a network share (SMB/NFS) for the Windows installation files.
Can I use PXE to install Windows 10 on multiple computers at once?
Yes! Once the PXE server is set up, any device connected to the same network can boot and install Windows 10 simultaneously (depending on network bandwidth and server capacity).
Are there any risks when installing Windows 10 over PXE?
If configured incorrectly, you might face boot failures or network issues. Ensure proper DHCP settings, correct file paths, and compatible hardware (PXE-supported network cards). Always back up data before installation.
Final Thoughts
By now, you’ve seen how straightforward it can be to install Windows 10 over a PXE Linux server. From setting up the TFTP and DHCP services to booting the Windows installer remotely, you’re just steps away from streamlining your deployment process.
If you’re still manually installing operating systems or juggling bootable USBs, you’re already falling behind. Modern sysadmins automate and scale—and PXE booting is at the heart of that transformation.
Don’t let outdated methods slow you down. Get ahead, save time, and take control of your infrastructure.
✅ Ready to level up your deployment game? Start implementing PXE boot with Linux today—your future self will thank you.
Struggling with Linux server management? I offer professional support to ensure your servers are secure, optimized, and always available. Visit my Fiverr profile to learn more!
Looking for something?
Latest Articles
Прочитано: 7 647
Итак, я плавно со своим PXE сервером развернутым на Ubuntu 18.04 Server подошел к этапу, когда нужно в дополнении к автоматизированным установкам Ubuntu 18.04 Desktop & Server дополнить функционал. Уже сделал, что можно загрузившись через LiveCD инструмент сбросить Windows пароль, проверить жесткий диск на предмет заражения вирусами т. д. А вот моя мечта это возможность устанавливать Windows 7,10 и серверную линейку из среды Ubuntu. Использовать WDS, пожалуй нет. Я специализируюсь на Ubuntu системах, а значит и пишу и делаю исходя из своего предпочтения. В этой заметке я для себя разобрал, как сделать Windows загрузку из под Ubuntu 18.04 PXE.
Подготавливаю систему Ubuntu 18.04 Server amd64 под первоначальное использование:
ekzorchik@srv-bionic:~$ hg clone --insecure https://172.33.33.7/hg/dproject
ekzorchik@srv-bionic:~$ sudo ./dproject/default
Устанавливаю пакет Samba на нем, точнее с его помощью у меня будет файловый ресурс где будет храниться образа Windows 7, как x86/amd64:
ekzorchik@srv-bionic:~$ sudo apt-get install samba samba-common -y
ekzorchik@srv-bionic:~$ sudo mv /etc/samba/smb.conf /etc/samba/smb.conf.backup
ekzorchik@srv-bionic:~$ sudo nano /etc/samba/smb.conf
[global]
workgroup = WORKGROUP
server string = Samba Server Version %v
log file = /var/log/samba/log.%m
max log size = 50
idmap config * : backend = tdb
cups options = raw
netbios name = pxe
map to guest = bad user
dns proxy = no
public = yes
## For multiple installations the same time - not lock kernel
kernel oplocks = no
nt acl support = no
security = user
guest account = nobody
[install]
comment = Windows 7 Image
path = /windows
read only = no
browseable = yes
public = yes
printable = no
guest ok = yes
oplocks = no
level2 oplocks = no
locking = no
acl allow execute always = true
На заметку: Параметр “acl allow execute always = true” в smb.conf необходим для возможности запускать на исполнение файлы exe.
ekzorchik@srv-bionic:~$ sudo testparm
Load smb config files from /etc/samba/smb.conf
rlimit_max: increasing rlimit_max (1024) to minimum Windows limit (16384)
ekzorchik@srv-bionic:~$ sudo mkdir -p /windows/x32
ekzorchik@srv-bionic:~$ sudo mkdir -p /windows/x64
Монтирую ISO образ Windows 7 на каталог Samba сервиса:
ekzorchik@navy:~$ scp /media/ekzorchik/iso/SW_DVD5_Win_Pro_7w_SP1_64BIT_Russian_-2_MLF_X17-59431.ISO ekzorchik@172.33.33.25:/home/ekzorchik
ekzorchik@srv-bionic:~$ sudo mount -o loop SW_DVD5_Win_Pro_7w_SP1_64BIT_Russian_-2_MLF_X17-59431.ISO /mnt
mount: /mnt: WARNING: device write-protected, mounted read-only.
ekzorchik@srv-bionic:~$ sudo cp -fr /mnt/* /windows/x64/
ekzorchik@srv-bionic:~$ sudo umount /mnt
ekzorchik@navy:~$ scp /media/ekzorchik/iso/SW_DVD5_Win_Pro_7w_SP1_32BIT_Russian_MLF_X17-28979.ISO ekzorchik@172.33.33.25:/home/ekzorchik
ekzorchik@srv-bionic:~$ sudo mount -o loop SW_DVD5_Win_Pro_7w_SP1_32BIT_Russian_MLF_X17-28979.ISO /mnt
ekzorchik@srv-bionic:~$ sudo cp -fr /mnt/* /windows/x32/
ekzorchik@srv-bionic:~$ sudo umount /mnt
ekzorchik@srv-bionic:~$ sudo chmod -R 755 /windows/
ekzorchik@srv-bionic:~$ sudo chown -R nobody:nogroup /windows/
ekzorchik@srv-bionic:~$ sudo /etc/init.d/smbd restart
ekzorchik@srv-bionic:~$ sudo /etc/init.d/nmbd restart
Устанавливаю PXE сервис:
Устанавливаю в систему пакет tftpd-hpa:
ekzorchik@srv-bionic:~$ sudo apt-get install tftpd-hpa -y
ekzorchik@srv-bionic:~$ sudo mkdir /media/pxeboot
ekzorchik@srv-bionic:~$ sudo chmod -R 777 /media/pxeboot/
ekzorchik@srv-bionic:~$ sudo chown -R nobody:nogroup /media/pxeboot/
ekzorchik@srv-bionic:~$ sudo cp /etc/default/tftpd-hpa /etc/default/tftpd-hpa.backup
ekzorchik@srv-bionic:~$ sudo nano /etc/default/tftpd-hpa
# /etc/default/tftpd-hpa
TFTP_USERNAME="tftp"
TFTP_DIRECTORY="/media/pxeboot"
TFTP_ADDRESS=":69"
TFTP_OPTIONS="--secure --create --verbose"
Перезапускаю сервис tftpd-hpa:
ekzorchik@srv-bionic:~$ sudo service tftpd-hpa restart && sudo service tftpd-hpa status | head -n 5
ekzorchik@srv-bionic:~$ sudo apt-get install pxelinux syslinux -y
ekzorchik@srv-bionic:~$ sudo cp /usr/lib/syslinux/modules/bios/vesamenu.c32 /media/pxeboot/
ekzorchik@srv-bionic:~$ sudo cp /usr/lib/syslinux/modules/bios/libcom32.c32 /media/pxeboot/
ekzorchik@srv-bionic:~$ sudo cp /usr/lib/syslinux/modules/bios/libutil.c32 /media/pxeboot/
ekzorchik@srv-bionic:~$ sudo cp /usr/lib/PXELINUX/pxelinux.0 /media/pxeboot/
ekzorchik@srv-bionic:~$ sudo cp /usr/lib/syslinux/memdisk /media/pxeboot/
ekzorchik@srv-bionic:~$ sudo cp /usr/lib/syslinux/modules/bios/ldlinux.c32 /media/pxeboot/
ekzorchik@srv-bionic:~$ sudo mkdir /media/pxeboot/pxelinux.cfg/
ekzorchik@srv-bionic:~$ sudo nano /media/pxeboot/pxelinux.cfg/default
#Секция по умолчанию, если пользователь не выбрал никакого варианта или нажал
клавишу Enter
DEFAULT vesamenu.c32
#Секция времени в секундах, в течении которого отображается загрузочное меню
TIMEOUT 600
#Секция отображения строки для выбора варианта загрузки (1 - view, 0 - hidden)
PROMPT 0
MENU TITLE PXE MENU
# загрузка системы с диска
LABEL Boot from first hard disk
localboot 0x80
label Install Windows 7 x32/x64
KERNEL memdisk
INITRD windows/winpe_amd64.iso
APPEND iso raw
ekzorchik@srv-bionic:~$ sudo chown -R nobody:nogroup /media/pxeboot/
ekzorchik@srv-bionic:~$ ss -l4 | grep tftp
udp UNCONN 3072 0 0.0.0.0:tftp 0.0.0.0:*
Далее на VM под управлением Windows 7 x64 устанавливаю пакет Windows AIK (KB3AIK_RU.iso размером 1.2 Gb) и через инструмент Deployment Tools Command Prompt
Win + Все программы — Microsoft Windows AIK – «Командная стройка средств развертывания» (запускаю через правый клик с правами администратора)
(для amd64 создаю winpe образ)
C:\Program Files\Windows AIK\Tools\PETools>copype amd64 c:\winPE_x64
c:\winPE_x64>copy "c:\Program Files\Windows AIK\Tools\PETools\amd64\winpe.wim" c:\winPE_x64\ISO\sources\Boot.wim
c:\winPE_x64>copy "c:\Program Files\Windows AIK\Tools\amd64\imagex.exe" c:\winPE_x64\ISO\
c:\winPE_x64>oscdimg -n -bC:\winPE_x64\etfsboot.com c:\winPE_x64\ISO c:\winPE_x64\winpe_amd64.iso
Computing directory information complete
Image file is 170760192 bytes
Writing 22 files in 9 directories to c:\winPE_x64\winpe_amd64.iso
100% complete
Final image file is 170760192 bytes
Done.
(для x86 создаю winpe образ)
C:\Program Files\Windows AIK\Tools\PETools>copype x86 c:\winPE_x86
c:\winPE_x86>copy "c:\Program Files\Windows AIK\Tools\PETools\x86\winpe.wim" c:\winPE_x86\ISO\sources\Boot.wim
c:\winPE_x86>copy "c:\Program Files\Windows AIK\Tools\x86\imagex.exe" c:\winPE_x86\ISO\
c:\winPE_x86>oscdimg -n -bC:\winPE_x86\etfsboot.com c:\winPE_x86\ISO c:\winPE_x86\winpe_x86.iso
Computing directory information complete
Image file is 145268736 bytes
Writing 18 files in 8 directories to c:\winPE_x86\winpe_x86.iso
100% complete
Final image file is 145268736 bytes
Done.
Копирую получившийся iso файл на SAMBA сервис в каталог \\172.33.33.25\install
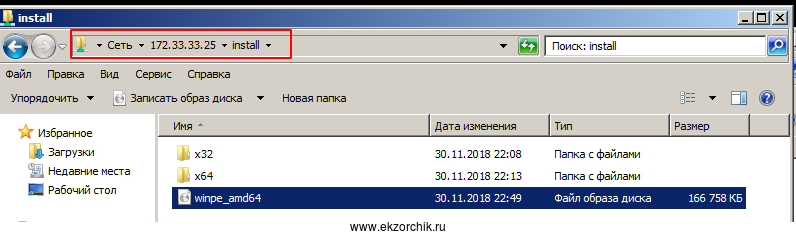
ekzorchik@srv-bionic:~$ sudo mkdir /media/pxeboot/windows/
ekzorchik@srv-bionic:~$ sudo mv /windows/winpe_amd64.iso /media/pxeboot/windows/
ekzorchik@srv-bionic:~$ sudo mv /windows/winpe_x86.iso /media/pxeboot/windows/
Теперь беру VM и выставляю ей что она сперва должна произвести загрузку по сети
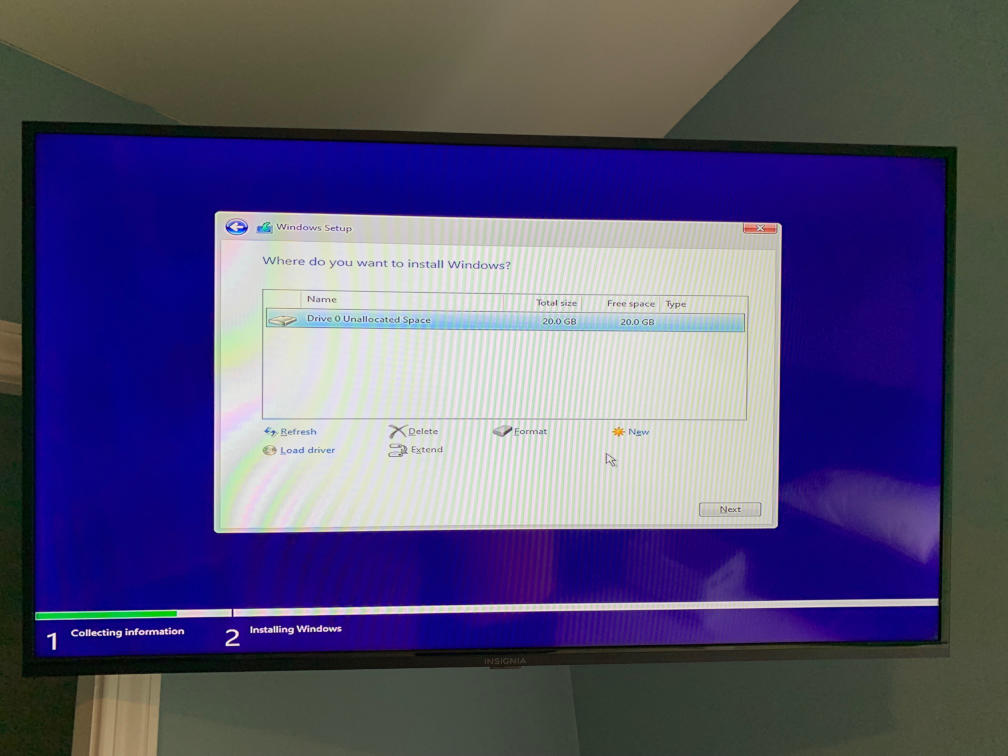
Вижу запрос на нажатие клавиши нажимаю клавишу Enter и производится загрузка с диска, а диск у меня это iso образ. Тем самым стартует загрузка Windows, но не привычная установка а приглашение командной строки:

В этом приглашении следует уже подмонтировать SAMBA ресурс и запустить установку ОС, т. е. Windows 7 Pro x64
X:\windows\system32> net use M: \\172.33.33.25\install\x64
где M: – это произвольное буква на которую монтирую доступ к ресурсу.
Затем перехожу на букву M: и запускаю файл инсталляции операционной системы:
X:\windows\system32\cd /d M:
M:\>setup.exe
Указываю метод ввода (я предпочитаю чтобы дефолтным был английский язык, а не русский)
Нажимаю «Далее» – «Установить» и начинается обыденный процесс инсталляции операционной системы Windows, как если бы я просто записал образ на болванку или USB Flash Drive, выставил в BIOS с чего загружаться и загрузился.
Вообще следует разделить установку Windows в default файле:
LABEL Boot from first hard disk
localboot 0x80
LABEL Install Windows 7 Pro SP1 x64
KERNEL memdisk
INITRD windows/winpe_amd64.iso
APPEND iso raw
LABEL Install Windows 7 Pro SP1 x86
KERNEL memdisk
INITRD windows/winpe_x86.iso
APPEND iso raw
Далее, для того, чтобы автоматизировать установку системы, можно с помощью “диспетчера образов системы Windows” подготовить файл ответов Autounattend.xml (именно так должен именовать файл ответов), и запускать установку с файлом ответов:
M:\setup.exe /unattend: Autounattend.xml
Исходя из этого, становится возможным на большом количестве персональных компьютеров которые необходимо вот прям, завтра, или сейчас ввести в эксплуатацию установить ось задействовав текущий PXE сервис и общий ресурс в роли SAMBA сервиса на который взгромоздить подготовленный ранее файл ответом или ставить все в ручную.
О том, как подготовить файл ответов будет в следующей заметке.
А пока я прощаюсь, на этом всё, с уважением автор блога Олло Александр aka ekzorchik
Inspired by recent a recent video on the basics of PXE booting by ‘Tall Paul Tech’ (formerly known as CWNE88), as well as a comment by Linus of Linus Tech Tips that his new home server could ’network boot everything in his house’, I wondered how easy it would be to network boot everything in my house. In an ideal world, this would solve a lot of problems regarding managing backups of the drives — by simply not having drives at any client, they can all be managed and backed up centrally by the server. I’ve already come to love the flexiblity in separating storage from compute in a virtualization environment, where I can use a ZFS backend to deal with snapshots, replication, and file integrity checking, and I’ve upgraded the network speed for my workstation so I can work on files directly off the network using mapped network drives, but this still leaves my primary boot disk vulnerable, and while my files are safe, my installed programs are not. I could certainly recover from a boot disk failure without data loss, but it would take a while to get everything re-installed again. So, if I could keep the boot disk on the storage backend, it would gain the integrity protection and snapshots that the data has. Being that Linus will only be concerned with gaming, it’s probably important to be able to boot Windows, as unfortunate as that sounds going in to this project.
The Basic Design⌗
In short, we are going to rely on PXE to get the system off the ground, and then load iPXE (a better PXE) using the ‘chainloading’ method (where traditional PXE is used to load the improved open-source PXE), which we will then use to boot off an iSCSI target containing a Windows disk. If we had Linux clients, we could rely on NFS instead of iSCSI for the root filesystem, and we would curse a whole lot less.
So, there are a few components needed here
- The DHCP server, which at a minimum has to point to the PXE server (the ’next-server’ directive as well as the boot file directive).
- The TFTP server, which stores the files used by PXE to load iPXE
- The HTTP server, which stores additional files used by iPXE to load the operating system, although not required after the bootable iSCSI drive is configured. This could also be expanded to serve custom iPXE scripts to each client based on their MAC address or other unique identifiers.
- The Samba server, which stores the Windows installation media, not required after installation
- The iSCSI target, which stores the virtual block device used to store the Windows C drive
To implement this project, for testing, I’ve created an Ubuntu 20.04 VM on Minilab to act as the server for TFTP + HTTP + Samba + iSCSI, and I have an old amd64 machine which will act as the client. It physically has no hard drive installed. It’s an old Atom processor in an ITX embedded motherboard, but it should be enough to prove that this method works without buying any hardware.
Setting Up the DHCP server⌗
This one is pretty simple. I use OPNsense as my DHCP sever for my existing network, so I just had to go down to Network Booting, Enable Network Booting, and set next-server IP and boot file name. I set the DHCPv4 and DHCPv6 server to have a static reservation for the Ubuntu VM, so it will have a consistent IP without setting a static IP inside the VM, and set next-server to that IP. So, clients will now look to the Ubuntu server for their PXE boot files. I just need enough configuration in the DHCP server to get the dumb PXE clients to load iPXE which is compiled with an embedded script pointing it to the HTTP server, where it can go for the rest of its configuration.
What happens at this point? If I power on the test system with next-server set, and it tries, but there is no TFTP server for it to find. In this case, we want to boot iPXE, which is a better PXE environment than the default, and will hopefully let us boot from iSCSI.
Setting Up the TFTP server⌗
This one is also pretty simple. In my Ubuntu VM, I installed it from apt and that was that.
sudo apt-get install tftpd-hpa
By default it places the data at /srv/tftp, but the config file is located at /etc/default/tftpd-hpa if you’d like to change that. I’m fine with the default location.
I added a blank file called undionly.kpxe to the tftp folder and set that as the boot file name for BIOS in the DHCP settings (the name will become relevant later). I booted my test system (which is old enough to use legacy BIOS) and it attempted to load the file but couldn’t boot it, since it’s just a blank file.
Setting Up the iSCSI Target⌗
If you’re doing this for a ‘production’ environment, you should use something like TrueNAS and setup your iSCSI target there. I’m not an iSCSI expert by any means, but I got this to work. The whole point of this project is to try new things.
First we need to install the iscsi target on Ubuntu:
sudo apt-get install tgt
Then we need to setup an iSCSI target.
sudo nano /etc/tgt/conf.d/target01.conf
And the contents:
<target iqn.2021-09.net.apalrd:win10>
    backing-store /srv/disks/win10.img
</target>
And we need a blank image file:
fallocate -l 20G /srv/disks/win10.img
Restart the server
sudo systemctl restart tgt
Look at the status
sudo tgtadm --mode target --op show
So now we have an iSCSI target which we can use to store the Windows C drive, but nothing is installed on the disk image.
Setting up iPXE⌗
We would like to use iPXE to get the process rolling. So, cd to a place you can keep a git repo, and clone it:
git clone git://git.ipxe.org/ipxe.git
Follow the instructions here to make sure you have the dependencies installed so you can build
Then we need to create an embedded file so it will run a script when it boots:
cd ipxe/src
nano boot.ipxe
And the contents:
#!ipxe
#Setup networking
echo Setup Networking
dhcp
#Boot from SAN
echo Boot from SAN
sanboot iscsi:<IP>:::<LUN>:iqn.2021-09.net.apalrd:win10
Although all of the examples for ipxe show LUN as blank (iscsi::::iqn…), I found that I needed to set LUN to 1 with the default configuration of tgt. It seems like LUN 0 is always a Controller, with LUN 1 being the Disk. Not sure why exactly this is, but tgtadm shows the LUN numbers for each target correctly. Additionally, I had trouble with Windows giving me an ‘INACCESSIBLE BOOT DEVICE’ error, which I’ll get to in a bit.
Then we can build ipxe with our embedded script:
make bin/undionly.kpxe EMBED=boot.ipxe
Then finally we copy that into our tftp folder so clients can find it
cp ./bin/undionly.kpxe /src/tftp
Setting up Apache2⌗
Since TFTP is pretty ugly, I installed Apache2 to serve files over HTTP for the installation process. This isn’t used after install, but it could be used along with PHP / some scripts to send more complex commands to iPXE once it’s been loaded via TFTP. There are better guides than mine out there, so just setup a basic apache2 with the http root in /srv/html with full read access to anyone.
Setting up Samba⌗
Again, we need Samba for the install process so I installed it with no permissions and mounting a share ‘server’ at location /srv. This also lets me copy files to the http root, tftp root, and iscsi disks folder from my Windows workstation as needed.
sudo apt-get install samba
sudo nano /etc/samba/smb.conf
Add the following lines to the end:
[server]
  comment = Server directory
  path = /srv
  browseable = yes
  guest ok = yes
  read only = no
  create mask = 0777
acl allow execute always = True
Then restart Samba
sudo systemctl restart smbd nmbd
Installing Windows⌗
I first tried to install Windows in a VM, then copy that VM to the win10.img disk that’s being shared over iSCSI. It was not properly configured for iSCSI and gave me the ‘INACCESSABLE BOOT DEVICE’ error. So, I decided to install it over the network.
I chose to go with the ‘wimboot’ method, booting WinPE (windows preboot execution environment) according to this guide. I modified my boot.ipxe temporarily while installing, created the folder structure using copype, and moved it to my HTTPS directory. Since I was embedding the script instead of loading it from HTTP, I modified all of the paths to include http://<IP>/ in front of them. The resulting script is:
#!ipxe
#Start networking
echo Start Networking
dhcp
#Set web root
set webroot http://<IP>
echo Webroot is ${webroot}
#Set architecture
cpuid --ext 29 && set arch amd64 || set arch x86
echo ARCH is ${arch}
#Sanhook the Windows drive
echo Attaching iSCSI drive
sanhook iscsi:<IP>:::1:iqn.2012-09.net.apalrd:win10
#Load wimboot
echo Loading Wimboot
kernel ${webroot}/wimboot
initrd ${webroot}/${arch}/media/Boot/BCD        BCD
initrd ${webroot}/${arch}/media/Boot/boot.sdi   boot.sdi
initrd ${webroot}/${arch}/media/sources/boot.wim    boot.wim
boot
Of course, you need to make ipxe again and copy the new undionly.kpxe to the tftp root.
Now we need a Windows install to install from. Download the Microsoft media creation tool and use it to create an ISO image. I then unzipped the files on my Windows computer using 7-zip, dropping them in the ISO folder.
Now boot the client. It should boot into a Windows graphical command prompt. We now need to connect over Samba to the location of the Windows ISO and run the installer. Be warned, it’s a very slow process, don’t expect anything to happen instantly.
net use \\<ServerIP>\server
\\<ServerIP>\server\html\iso\sources\setup.exe
Since we told Samba earlier that executing anything is fine (who needs security when you’re prototyping), we can execute the installer. We now get a normal-ish Windows GUI installer, loaded over SMB, from the WinPE environment we network booted over HTTP, from the iPXE environment we loaded over PXE, with no physical storage or disks at all on the client. Not bad.
Unfortunately, this win was short lived, as I couldn’t get the installer to partition the iSCSI drive. It found it, and it was blank, but clicking ’new’ would let me go through the process of creating the partition, and then it would hang when actually creating it. Unfortunately, this is the end of my adventure, as I’m sick of dealing with Windows 10. I’ve read (relatively few) guides of this working correctly in Windows 7, but it seems to be a fairly unpopular solution in the modern era.
Conclusions⌗
Is this a good idea in a homelab in 2021? Probably not the best idea. There are far better options for VDI than network booting a Windows installation over iSCSI. Is it an option for the right scenario? Definitely. PXE has its place, and it’s definitely been a fun project to learn about it. The key lesson I’ve learned is that it should be used when you are booting a read-only something, and a whole lot of that something, to justify setting up and configuring a server. If you just want to network boot one media center PC to avoid buying an SSD, this is probably not the solution for you.
Where does network booting have a place?⌗
- For installers, where you network boot into a menu to select which installer you want to run off a network store, and install something on the computer, setting up a PXE server and all of the associated ipxe configuration is fantastic. I found a great example file for that here, although you could easily use an embedded script in ipxe to avoid writing rules in the DHCP configuration. You also have the option of identifying clients by MAC or other unique address to serve the right installer.
- For an application like a computing lab, you could use Linux and mount the root filesystem read-only using NFS, which lets you deal with common ancestry and deduplication at a file level instead of a block level as in iSCSI. You could also mount the home directory read-write using NFS separately, so every computer boots the golden root image and any changes are lost when it reboots (except the user’s home directory). Since all of the computers are physically identical, drivers and such should be the same.
- For a server cluster, it’s not a bad way to distribute the cluster OS and root filesystem either. Again, you’d setup a ‘golden’ image, mount that over iSCSI or NFS, and boot into it. The applications in the cluster must all rely entirely on network storage for this to work, which is a very reasonable expectation of a cluster, and the server would need to configure its networking based on its MAC address. Using DHCP static allocations would be easeiest for this, although if they are all nodes in a cluster they might not need reserved IPs at all and plain DHCP might be fine.
- For home use such as media centers or wall mounted tablets, it might be a decent idea to network boot into a Linux OS which again mounts a read only filesystem designed for this purpose, loading the media over the network. For this to be viable you really need a decent number of nodes, and you really need to be running Linux, which is much less of a headache to network boot. The new Raspberry Pi 4 keeps the first stage boot image in EEPROM instead of on the SD card, meaning you can reprogram it to look for other boot devices, including PXE. The older Pi’s would need an SD card to store the first stage boot image, which could then go out and network boot, leaving the SD card otherwise unused. That said, simply booting a read only filesystem from the SD card and loading the media and configuration off the network would be easier to setup and easy to replace if it breaks.
- For a home lab which uses GPU partitioning, where you lose the ability to use the physical outputs on the GPU (or use GPUs which never had them), you could network boot a Linux image on all of your computers which in turn launches Parsec as the only graphical environment, to connect remotely to the host on the compute server.
- While researching this, I found a number of companies offering software to centrally store the boot disks of Windows corporate workstations, so the company could keep classified data safe overnight without manually removing all of the hard drives from the computers. By removing the drives from the server or keeping it physically secure and disconnected overnight, they could network boot all of the workstations and reduce the chance of physical data theft. There is also some advantage in doing this that you can make a golden corporate image and clone the image for each employees workstation image (or, if you’re really paranoid, wipe them overnight back to the golden image), reducing space on the server since they are all based on a common ancestor, keep central backups of the images, and let any physical workstation boot to anyone’s personal workstation image as required, so no more cloning hard disks when replacing desktops. If your workflow is already heavily based on keeping files on the server and only programs and customizations are stored locally, this could work very well. Linus (of LTT) might be better off network booting all of his editing workstations rather than his living room gaming computer.
What’s a better option for a home lab?⌗
- For a media center or home theater that also does gaming, using VFIO (PCIe passthrough or SR-IOV) to a GPU in a compute server and connecting that via long distance HDMI / DisplayPort / USB3 active optical cables is probably cheaper and less power intense way to get 4K/60 video to the client. You’ll be able to use the compute resources you already have in the rack, and unless you’re getting small form factor desktops which can fit a GPU in bulk, probably save money by only adding the GPU to an existing compute node. If you are gaming, you probably don’t want to deal with the latency of streaming over the network, although apparently Parsec isn’t bad (I haven’t used it myself). The downside is that there is no standard for connecting any of these things over networking fiber, so your cheapest option is usually an active fiber cable instead of using standard networking fiber, which means pulling wires which are essentially already dated when installed (i.e. HDMI 2.0 = no 8K without pulling new wires). You also can’t partition the GPU if you use the physical video outputs, since GPU partitioning was never designed to be used with consumer GPUs in the first place (on either the AMD or nVidia side), and the tricks used to partition Geforce GPUs essentially make the drivers believe it’s an equivalent Quadro or Tesla with the same silicon.
- Give each user a laptop with a locally installed OS and let them connect to hosts in the compute node (which can use GPU partitioning) for workloads that need more compute or GPU performance.
- For a dedicated single user workstation, using dedicated local storage still isn’t an awful choice, it just makes backing up the OS drive more difficult than network booting. The same goes for laptops.
- For both laptops and desktops, you have the option of installing the user’s OS inside a hypervisor and using the hypervisor to manage backups. You may use XCP-NG or Proxmox, pass through the physical GPU to the guest, mount the guest from local storage, and have the hypervisor snapshot and push the backup to the server periodically. You’ll have less space available to the guest due to snapshots, but SSDs are cheap enough now. Re-installing the hypervisor on disk failure and then restoring a backup of the guest disk is probably easier than re-installing the guest OS and all of the programs on it, even if you have good data backups. For this to work, you can’t pass through the entire disk to the guest, since you need to manage snapshots through the hypervisor.
- Installing Windows programs on a network share is possible, with the right permissions in Samba. You can also locate your Steam library on a network drive. Steam games are very easy to reinstall, but tend to be massive, so keeping them backed up locally just saves internet bandwidth if you have a drive failure.
- For macOS, apps are considerably easier to backup since they are usually part of an App Bundle which can be copied freely, so backing up the entire Applications directory isn’t really difficult. There are certainly some apps which don’t respect the App Bundle, but it’s a lot easier than on Windows.
- For Linux, writing an Ansible playbook to install your normal desktop apps on top of a fresh distro install is a pretty decent solution.
I hope to explore some of these options in a future adventure.
В этой статье мы рассмотрим, как установить Windows 10 или 11 по сети без использования загрузочной USB флешки (установочного DVD диска). Для загрузки компьютера по сети через PXE мы будем использовать небольшой Tiny PXE Server. Инструкция применима для установки Windows на устройствах как с UEFI, так и с BIOS прошивкой.
В корпоративных сетях для разливки образов Windows по сети используются более функциональные Windows Deployment Services (WDS) и Microsoft Deployment Toolkit (MDT). В этой статье мы покажем, как быстро запустить PXE сервер на любом имеющемся компьютере (будь то устройство с Windows или Linux) и использовать его для сетевой установки Windows на компьютеры в этой же LAN с помощью простых средств.
Нам понадобятся:
- Установочный ISO образ с Windows 10 или 11 (проще всего создать его с помощью Windows Media Creation Tool согласно инструкции https://winitpro.ru/index.php/2013/12/31/sozdaem-zagruzochnuyu-fleshku-s-windows-7-dlya-uefi-sistemy/ )
- Образ Windows PE — можно использовать свой образ WinPE, извлечь его из образа восстановления MS DART, получить оригинальный WinPE с помощью Windows Assessment and Deployment Kit (Windows ADK), или использовать готовый образ типа Hiren’s BootCD PE.
- Сервер Tiny PXE (http://reboot.pro/files/file/303-tiny-pxe-server/ )
Содержание:
- Создаем загрузочный образ Windows PE с помощью ADK
- Подготовка сервера сетевой установки TinyPXE
- Сетевая установка Windows 10 и 11 с PXE сервера
Создаем загрузочный образ Windows PE с помощью ADK
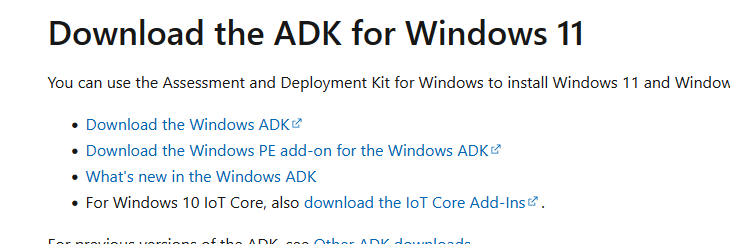
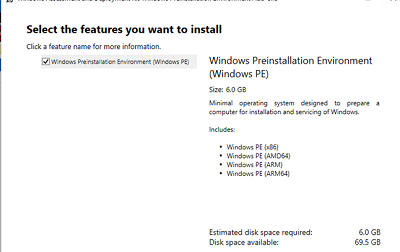
Скачайте Windows ADK для Windows 11 и Windows PE add-on for the Windows ADK по ссылкам на странице https://docs.microsoft.com/en-us/windows-hardware/get-started/adk-install .
При установке Windows ADK выберите минимальную установку Deployment Tools.
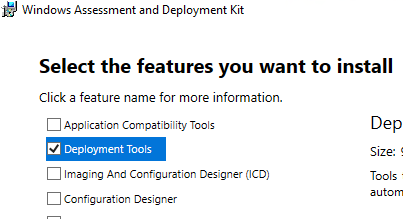
Затем аналогично установите Windows PE add-on for Windows ADK.
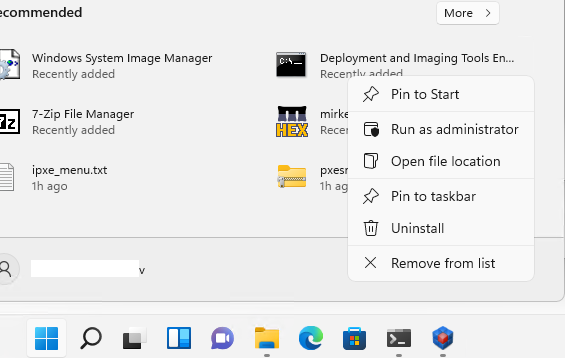
После окончания установки запустите Deployment and Imaging Tool из стартового меню Windows. Или запустите вручную команду:
"C:\Program Files (x86)\Windows Kits\10\Assessment and Deployment Kit\Deployment Tools\DandISetEnv.bat"
Теперь скопируйте файлы для среды WinPE в указанный каталог (создавать не нужно):
copype amd64 C:\tools\winpe
В данном случае я создаю файлы для среды WinPE x64. Можно использовать другие опции в зависимости от архитектуры: x86, arm или arm64.

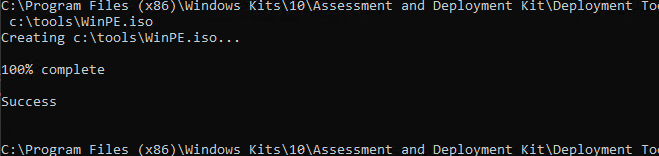
Теперь можно создать загрузочный ISO образ с WinPE:
MakeWinPEMedia /ISO C:\tools\winpe c:\tools\WinPE.iso
Подготовка сервера сетевой установки TinyPXE
Теперь нужно настроить ваш PXE сервер:
- Распакуйте архив pxesrv.zip в каталог C:\tools\pxesrv;
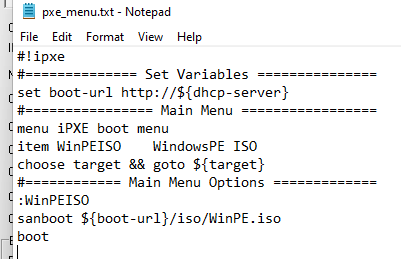
- Перейдите в каталог C:\tools\pxesrv и создайте текстовый файл pxe_menu.txt со следующим содержимым:
#!ipxe
set boot-url http://${dhcp-server}
 #================ Main Menu =================
menu iPXE boot menu
item WinPEISO WindowsPE ISO
choose target && goto ${target}
#============ Main Menu Options =============
:WinPEISO
sanboot ${boot-url}/iso/WinPE.iso
boot
- Скопируйте полученный ранее файл WinPE.iso в каталог C:\tools\pxesrv\files\iso;
- Смонтируйте установочный ISO образ в виртуальный привод Windows и откройте общий сетевой доступ к нему (если хотите, можете открыть к нему анонимный доступ, но это не обязательно);
- Запустите файл pxesrv.exe с правами администратора;
- Включите опцию HTTPd;
- Если ваш компьютер сам будет раздавать IP адреса по DHCP (Tiny PXE это умеет), отключите опцию ProxyDHCP. Убедитесь, что в полях Option 54 DHCP Server и Next-Server указан IP адрес вашего компьютера. В поле IP Pool start указано начало диапазона DHCP, убедитесь что этот диапазон не занят в вашей сети;
- В разделе Boot File укажите ipxe.pxe (для загрузки на BIOS устройствах) или ipxe-x86_64.efi (для UEFI устройств);
- В поле Filename if user-class=gPXE or IPXE укажите имя файла меню, который вы создали ранее pxe_menu.txt;
- Запустите PXE сервер, нажав кнопку Online;
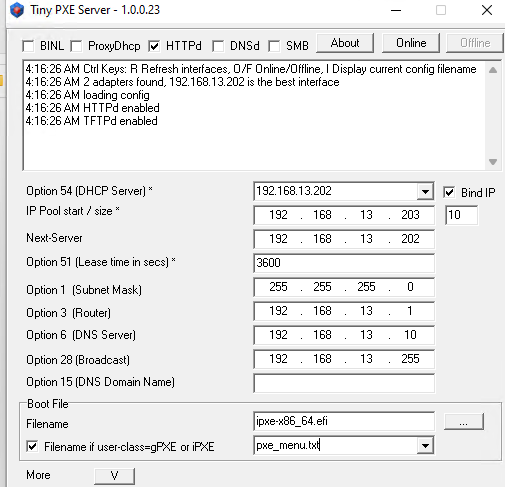
Итак, ваш PXE сервер запущен и готов к работе. Если в Windows включен брандмауэр (проще), отключите его или разрешите входящий трафик для процесса pxesrv.exe по протоколам DHCP, PXE, HTTP, TFTPS и SMB.
Сетевая установка Windows 10 и 11 с PXE сервера
Теперь вам нужно загрузить ваш компьютер, на который вы хотите установить Windows, с PXE сервера. Компьютер должен находится в той же локальной сети (VLAN), что и компьютер с PXE сервером.
В настройках BIOS/UEFI компьютера выберите в качестве первичного устройства загрузки PXE.
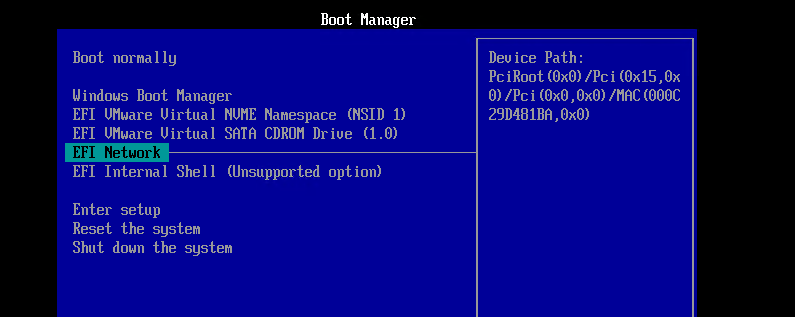
При запуске среды PXE компьютер обнаружит в сети DHCP сервер, получит IP адрес и получит доступных опции в меню iPXE.
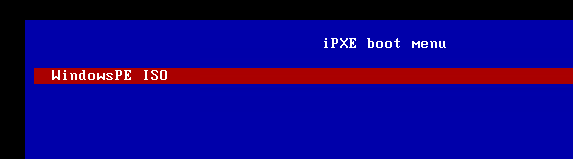
Компьютер загрузится по сети в среде WinPE.
В моем случае при тестировании загрузки с PXE сервера виртуальной машины VMWare с UEFI прошивкой появилась ошибка:
Could not describe SAN devices: Operation not supported
Could not boot image: Operation not supported https://ipxe.org/err/3c2220
Как оказалось, в UEFI прошивки виртуальной машины на моем хосте VMware ESXi есть баг:
This error indicates that your UEFI firmware has a bug that prevents the installation of the iSCSI boot firmware table (iBFT). Switch to booting in “legacy” BIOS mode rather than UEFI mode.
Пришлось переключить ВМ в режим BIOS и запускать PXE сервер с опцией ipxe.pxe. После этого пошла нормальная установка Windows по сети.
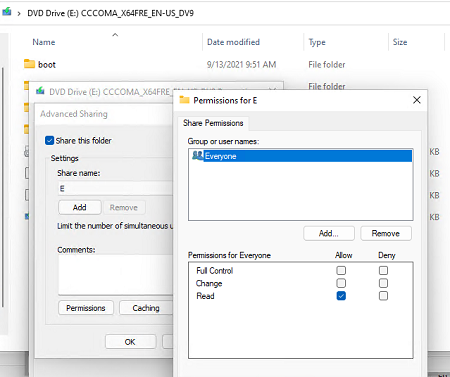
Вам осталось подключить по SMB сетевой каталог, в котором хранится ваш установочный ISO образ Windows 11.
После инициализации среды командой
wpeinit
подключите ваш сетевой каталог, в который смонтирован установочный образ Windows. Выполните команду:
Net use E: \\192.168.13.202\e
Где
192.168.13.202
– имя компьютера на котором хранится установочный образ, а
E
– название общей папки.
Введите имя пользователя, с правами доступа к вашей Windows с PXE сервером.
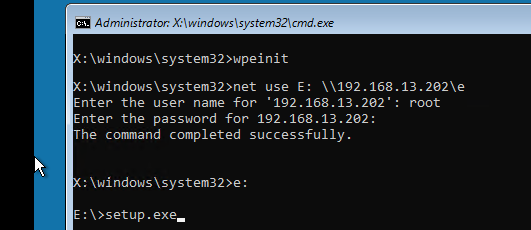
Запустите знакомый мастер установки Windows.
Друзья! Всем доброго дня!
Мы хотим не только пиарить себя и свои услуги здесь, но и поделиться опытом и знаниями, полученными в ходе администрирования огромного количества проектов, и в конечном итоге сделать достойный и полезный блог. Для этого мы попросили наших инженеров поучаствовать в этом. А на будущее хотим понять: будет это интересно хабровчанам? И если да — то в какой форме?
Под катом в этот раз пойдет речь об установке Windows Server 2008 по сети с Linux PXE сервера.
Меню загруженного WinPE.
Каждый
ленивый
хороший системный администратор стремится автоматизировать как можно больше неинтересной ручной работы, дабы больше времени посвещать медитации и дзен.
Пишутся скрипты, файлы ответов для различных визардов, настраиваются системы мониторинга и оповещения, системы управления конфигурациям…
Ничто не должно отвлекать на пути к просветлению.
В этой статье я опишу как подготовить образ среды предустановки Windows WinPE для загрузки с Linux PXE сервера.
У нас он призван решать следующие задачи:
- Выполнение каких-либо административных действий(обновление прошивки RAID контроллера например)
- Установка Windows Server 2008 в «ручном» режиме.
- Полностью автоматическая установка Windows Server 2008
Настройку серверной части PXE я опущу, т.к. тема достаточна хорошо описана в Internet(например здесь).
По ходу повествования остановлюсь лишь на тех моментах, которые неообходимы в рамках данной статьи.
Этап № 1. Windows
Для подготовки образа WinPE потребуется компьютер с Windows 7 либо Windows Server 2008, а так же установленный пакет Windows AIK
Когда нужная ОС установлена и пакет инсталирован.
запускаем Windows PE Tools Command Prompt от имени Администратора
Монтируем образ winpe.wim для внесения изменений, а так же подготовим загрузчик.
В открывшейся консоли последовательно вводим команды:
mkdir c:\winpe
mkdir c:\winpe\mount
cd c:\winpe
copype.cmd amd64 c:\winpe
mkdir c:\netboot\win\boot
imagex /mountrw winpe.wim 1 mount
xcopy c:\winpe\mount\windows\boot\pxe\pxeboot.n12 c:\netboot\win
xcopy c:\winpe\mount\windows\boot\pxe\bootmgr.exe c:\netboot\win
xcopy c:\winpe\iso\boot\boot.sdi c:\netboot\win\boot
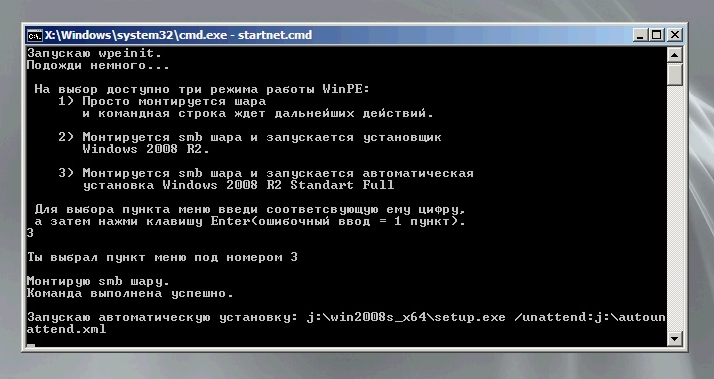
Запуск оболочки WinPE осуществляет файл startnet.cmd
Так как меню у нас на русском языке, нужен редактор позволяющий менять кодировку текста(CP866 в нашем случае).
Я использую Notepad++
Путь к файлу: C:\winpe\mount\Windows\System32\startnet.cmd
Отредактируем его для добавления меню, как на скриншоте выше.
код скрипта startnet.cmd
@echo off
echo.
echo Запускаю wpeinit.
echo Подожди немного...
echo.
wpeinit

echo  На выбор доступно три режима работы WinPE:
echo     1) Просто монтируется шара
echo        и командная строка ждет дальнейших действий.
echo.
echo     2) Монтируется smb шара и запускается установщик
echo        Windows 2008 R2.
echo.
echo     3) Монтируется smb шара и запускается автоматическая
echo        установка Windows 2008 R2 Standart Full
echo.
echo  Для выбора пункта меню введи соответсвующую ему цифру,
echo  а затем нажми клавишу Enter(ошибочный ввод = 1 пункт).
set /p ID=
echo.

if %ID%==1 goto :first
if %ID%==2 goto :second
if %ID%==3 goto :third
if %ID% GTR 3 goto :failure
if %ID% LSS 3 goto :failure
exit /b

:second
echo Ты выбрал пункт меню под номером 2
echo.
echo Монтирую smb шару.
net use j: \\1.2.3.4\public
echo Запускаю j:\win2008s_x64\setup.exe
j:\win2008s_x64\setup.exe
exit /b

:third
echo Ты выбрал пункт меню под номером 3
echo.
echo Монтирую smb шару.
net use j: \\1.2.3.4\public
echo Запускаю автоматическую установку: j:\win2008s_x64\setup.exe /unattend:j:\autounattend.xml
j:\win2008s_x64\setup.exe /unattend:j:\autounattend.xml
exit /b

:first
echo Ты выбрал пункт меню под номером 1
echo.
:failure
echo.
echo Монтирую smb шару.
net use j: \\1.2.3.4\public
exit /b
Сохраняем изменения в startnet.cmd.
Отмонтируем winpe.wim закомитив изменения и скопируем полученный образ к остальным файлам.
imagex.exe /unmount /commit mount
xcopy c:\winpe\winpe.wim c:\netboot\win\boot
Теперь займемся настройкой Данных Конфигурации Загрузки (BCD)
Что такое хранилище данных конфигурации загрузки?
Хранилище данных конфигурации загрузки содержит параметры конфигурации загрузки и контролирует запуск операционных систем Microsoft Windows Vista и Microsoft Windows Server 2008. Эти параметры ранее хранились в файле Boot.ini (для операционных систем на базе BIOS) либо в памяти NVRAM (для операционных систем на базе EFI (Extensible Firmware Interface)). Для изменения кода Windows, который запускается перед загрузкой операционной системы, можно воспользоваться программой командной строки Bcdedit.exe, с помощью которой можно добавлять, удалять, изменять и дополнять записи в хранилище данных конфигурации загрузки.
Создадим новый скрипт createbcd.cmd. Он обеспечит генерацию нужной BCD.
Вновь открываем текстовый редактор и вставляем туда следующий код:
bcdedit -createstore %1\BCD
bcdedit -store %1\BCD -create {ramdiskoptions} /d "Ramdisk options"
bcdedit -store %1\BCD -set {ramdiskoptions} ramdisksdidevice boot
bcdedit -store %1\BCD -set {ramdiskoptions} ramdisksdipath \boot\boot.sdi
for /F "tokens=2 delims={}" %%i in ('bcdedit -store %1\BCD -create /d "MyWinPE Boot Image" /application osloader') do set guid={%%i}
bcdedit -store %1\BCD -set %guid% systemroot \Windows
bcdedit -store %1\BCD -set %guid% detecthal Yes
bcdedit -store %1\BCD -set %guid% winpe Yes
bcdedit -store %1\BCD -set %guid% osdevice ramdisk=[boot]\Boot\winpe.wim,{ramdiskoptions}
bcdedit -store %1\BCD -set %guid% device ramdisk=[boot]\Boot\winpe.wim,{ramdiskoptions}
bcdedit -store %1\BCD -create {bootmgr} /d "Windows BootManager"
bcdedit -store %1\BCD -set {bootmgr} timeout 30
bcdedit -store %1\BCD -set {bootmgr} displayorder %guid%
Запускаем скрипт.
createbcd.cmd c:\netboot\win\boot
Приготовим файл ответов autounattend.xml для автоматической установки Windows Server 2008.
На первом диске сервера создается один раздел, занимающий все пространство диска. ОС ставится в этот раздел, устанавливается пароль для учетной записи Administrator, вводится ключ, но Windows не активируется.
autounattend.xml
<?xml version="1.0" encoding="utf-8"?>
<unattend xmlns="urn:schemas-microsoft-com:unattend">
        <settings pass="windowsPE">
        <component name="Microsoft-Windows-Setup" processorArchitecture="amd64" publicKeyToken="31bf3856ad364e35" language="neutral" versionScope="nonSxS" xmlns:wcm="http://schemas.microsoft.com/WMIConfig/2002/State" xmlns:xsi="http://www.w3.org/2001/XMLSchema-instance">
            <ComplianceCheck>
                <DisplayReport>Never</DisplayReport>
            </ComplianceCheck>
<DiskConfiguration>
   <WillShowUI>OnError</WillShowUI>
   <Disk>
      <DiskID>0</DiskID>
      <WillWipeDisk>true</WillWipeDisk>
      <CreatePartitions>
         <CreatePartition>
            <Order>1</Order>
            <Type>Primary</Type>
            <Extend>true</Extend>
         </CreatePartition>
      </CreatePartitions>
      <ModifyPartitions>
<!-- Modify the system partition-->
         <ModifyPartition>
            <Order>1</Order>
            <PartitionID>1</PartitionID>
            <Format>NTFS</Format>
            <Label>System</Label>
         </ModifyPartition>
      </ModifyPartitions>
   </Disk>
</DiskConfiguration>
            <ImageInstall>
                <OSImage>
                    <InstallFrom>
                        <MetaData wcm:action="add">
                            <Key>/IMAGE/NAME</Key>
                            <Value>Windows Server 2008 R2 SERVERSTANDARD</Value>
                        </MetaData>
                    </InstallFrom>
                    <InstallToAvailablePartition>false</InstallToAvailablePartition>
                    <WillShowUI>OnError</WillShowUI>
                    <InstallTo>
                        <DiskID>0</DiskID>
                        <PartitionID>1</PartitionID>
                    </InstallTo>
                </OSImage>
            </ImageInstall>
            <UpgradeData>
                <WillShowUI>OnError</WillShowUI>
                <Upgrade>false</Upgrade>
            </UpgradeData>
            <UserData>
                <ProductKey>
                    <Key></Key>
                    <WillShowUI>OnError</WillShowUI>
                </ProductKey>
                <AcceptEula>true</AcceptEula>
                <FullName>serverclub</FullName>
                <Organization>serverclub</Organization>
            </UserData>
        </component>
        <component name="Microsoft-Windows-International-Core-WinPE" processorArchitecture="amd64" publicKeyToken="31bf3856ad364e35" language="neutral" versionScope="nonSxS" xmlns:wcm="http://schemas.microsoft.com/WMIConfig/2002/State" xmlns:xsi="http://www.w3.org/2001/XMLSchema-instance">
            <SetupUILanguage>
                <UILanguage>en-US</UILanguage>
                <WillShowUI>OnError</WillShowUI>
            </SetupUILanguage>
            <UserLocale>en-US</UserLocale>
            <SystemLocale>en-US</SystemLocale>
            <UILanguage>en-US</UILanguage>
            <UILanguageFallback>en-US</UILanguageFallback>
            <InputLocale>en-US</InputLocale>
        </component>
    </settings>
    <settings pass="specialize">
        <component name="Microsoft-Windows-International-Core" processorArchitecture="amd64" publicKeyToken="31bf3856ad364e35" language="neutral" versionScope="nonSxS" xmlns:wcm="http://schemas.microsoft.com/WMIConfig/2002/State" xmlns:xsi="http://www.w3.org/2001/XMLSchema-instance">
            <InputLocale>en-US</InputLocale>
            <UILanguage>en-US</UILanguage>
            <UILanguageFallback>en-US</UILanguageFallback>
        </component>
        <component name="Microsoft-Windows-Shell-Setup" processorArchitecture="amd64" publicKeyToken="31bf3856ad364e35" language="neutral" versionScope="nonSxS" xmlns:wcm="http://schemas.microsoft.com/WMIConfig/2002/State" xmlns:xsi="http://www.w3.org/2001/XMLSchema-instance">
            <ComputerName>CHANGE-ME</ComputerName>
                <ProductKey>XXX-ZZZ-YYY-RRR-QQQ</ProductKey>
                <RegisteredOrganization>serverclub</RegisteredOrganization>
                <RegisteredOwner>serverclub</RegisteredOwner>
                <DoNotCleanTaskBar>true</DoNotCleanTaskBar>
                <TimeZone>UTC</TimeZone>
            <DisableAutoDaylightTimeSet>false</DisableAutoDaylightTimeSet>
    </component>
    </settings>
<settings pass="oobeSystem">
        <component name="Microsoft-Windows-Shell-Setup" processorArchitecture="amd64" publicKeyToken="31bf3856ad364e35" language="neutral" versionScope="nonSxS" xmlns:wcm="http://schemas.microsoft.com/WMIConfig/2002/State" xmlns:xsi="http://www.w3.org/2001/XMLSchema-instance">
            <UserAccounts>
                <AdministratorPassword>
                    <Value>ServerMegaSecurePassword111</Value>
                    <PlainText>true</PlainText>
                </AdministratorPassword>
            </UserAccounts>
        </component>
    </settings>
  <settings pass="offlineServicing">
    <component name="Microsoft-Windows-PnpCustomizationsNonWinPE" processorArchitecture="x86" publicKeyToken="31bf3856ad364e35" language="neutral" versionScope="nonSxS" xmlns:wcm="http://schemas.microsoft.com/WMIConfig/2002/State" xmlns:xsi="http://www.w3.org/2001/XMLSchema-instance">
      <DriverPaths>
        <PathAndCredentials wcm:keyValue="1" wcm:action="add">
          <Path>j:\</Path>
        </PathAndCredentials>
      </DriverPaths>
    </component>
  </settings>
    <cpi:offlineImage cpi:source="wim:j:/win2008s_x64/sources/install.wim#Windows Server 2008 R2 SERVERSTANDARD" xmlns:cpi="urn:schemas-microsoft-com:cpi" />
</unattend>
Файл нужно скопировать в корень smb шары, которая монтируется скриптом startnet.cmd.
Подготовительный этап в Windows близится к завершению, остается скопировать папку c:\netboot\win в корень tftp сервера, а так же разместить в папке доступной для монтирования по протоколу sbm файлы с установочного диска/образа Windows Server 2008.
Этап № 2. Linux
Структура нашего меню.
Конфигурационные файлы tftp.
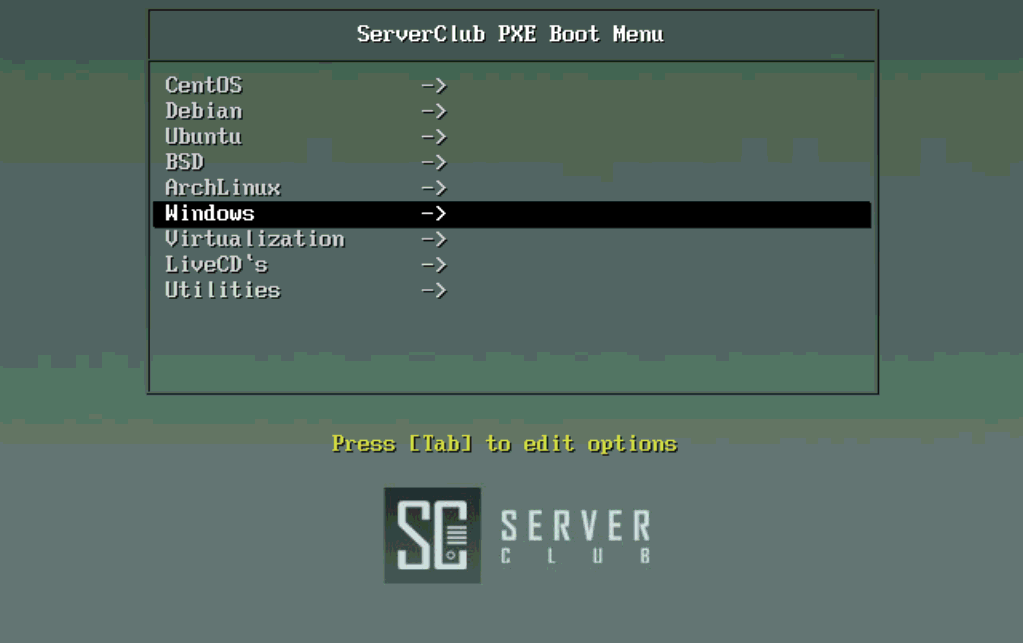
/tftpboot/pxelinux.cfg/default
PROMPT 0
UI vesamenu.c32
MENU BACKGROUND pxelinux.cfg/logo.jpg
MENU TITLE ServerClub PXE Boot Menu
MENU TIMEOUT 50
MENU COLOR TITLE 0 #ffffffff #00000000
MENU COLOR SEL 7 #ffffffff #ff000000
LABEL CentOS ->
KERNEL vesamenu.c32
APPEND pxelinux.cfg/centos
LABEL Debian ->
KERNEL vesamenu.c32
APPEND pxelinux.cfg/debian
LABEL Ubuntu ->
KERNEL vesamenu.c32
APPEND pxelinux.cfg/ubuntu
LABEL BSD ->
KERNEL vesamenu.c32
APPEND pxelinux.cfg/bsd
LABEL ArchLinux ->
KERNEL vesamenu.c32
APPEND pxelinux.cfg/arch
LABEL Windows ->
KERNEL vesamenu.c32
APPEND pxelinux.cfg/windows
LABEL VmWare ->
KERNEL vesamenu.c32
APPEND pxelinux.cfg/vmware
LABEL LiveCD`s ->
KERNEL vesamenu.c32
APPEND pxelinux.cfg/live
LABEL Utilities ->
KERNEL vesamenu.c32
APPEND pxelinux.cfg/utils
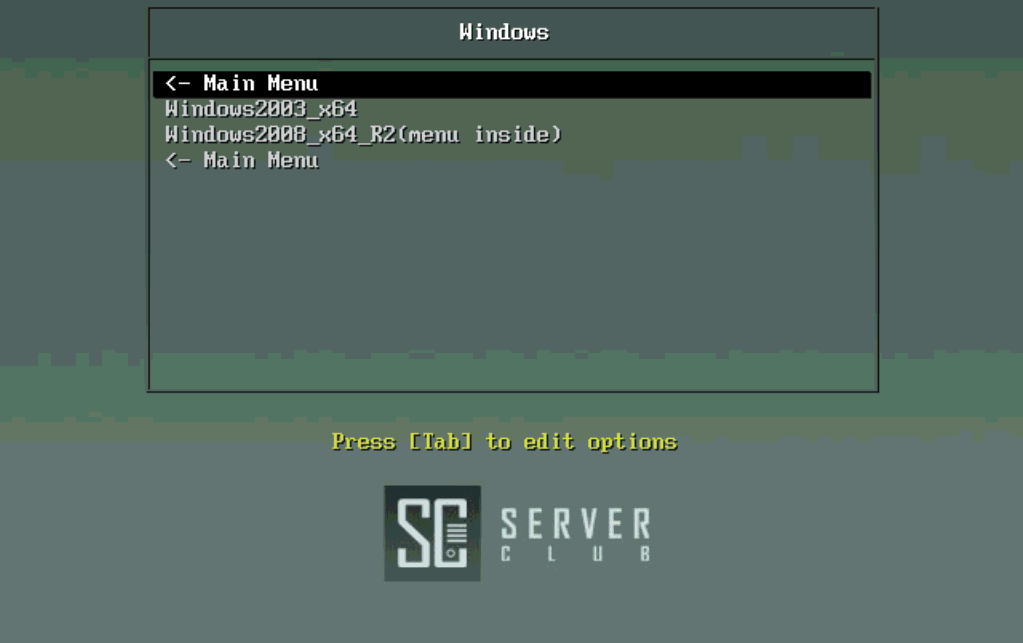
/tftpboot/pxelinux.cfg/windows
PROMPT 0
UI vesavesamenu.c32
MENU BACKGROUND pxelinux.cfg/logo.jpg
MENU TITLE Windows
MENU TIMEOUT 50
MENU COLOR TITLE 0 #ffffffff #00000000
MENU COLOR SEL 7 #ffffffff #ff000000
LABEL < — Main Menu
KERNEL vesamenu.c32
APPEND pxelinux.cfg/default
LABEL Windows2003_x64
kernel w2k3.0
LABEL Windows2008_x64_R2(menu inside)
kernel Boot/pxeboot.n12
LABEL < — Main Menu
KERNEL vesamenu.c32
APPEND pxelinux.cfg/default
Небольшая демонстрация =)
Фрагмент начала установки
На этом все.
Благодарю за внимание!
При подготовке статьи использовались следующие источники:
1. http://gnu.su/news.php?extend.1683
2. http://dice.neko-san.net/2011/02/automated-windows-server-2008r2-installation-from-a-linux-server-without-machine-imaging
3. http://technet.microsoft.com/ru-ru/library/cc749415(v=ws.10).aspx
Автор статьи и по совместительству инженер ServerClub — FessAectan
Только зарегистрированные пользователи могут участвовать в опросе. Войдите, пожалуйста.
В какой форме Вам было бы интересно увидеть развитие нашего блога?
81.33% Цикл статей по запросам в комментариях61
54.67% Еженедельные посты «вопросы-ответы» на тему администрирования41
Проголосовали 75 пользователей. Воздержались 17 пользователей.