
Last Updated on 10. July 2023
This tutorial explains how to run Linux Mint on your Windows computer in a window like any other application by using the program VirtualBox.
Table of Contents
What is a VirtualBox?
VirtualBox is a program that allows you to install other operating systems in a safe container on your computer and run them like applications in a window. These containers are called virtual machines. You can use them to try out different Linux operating systems without the need to remove your actual Windows installation.
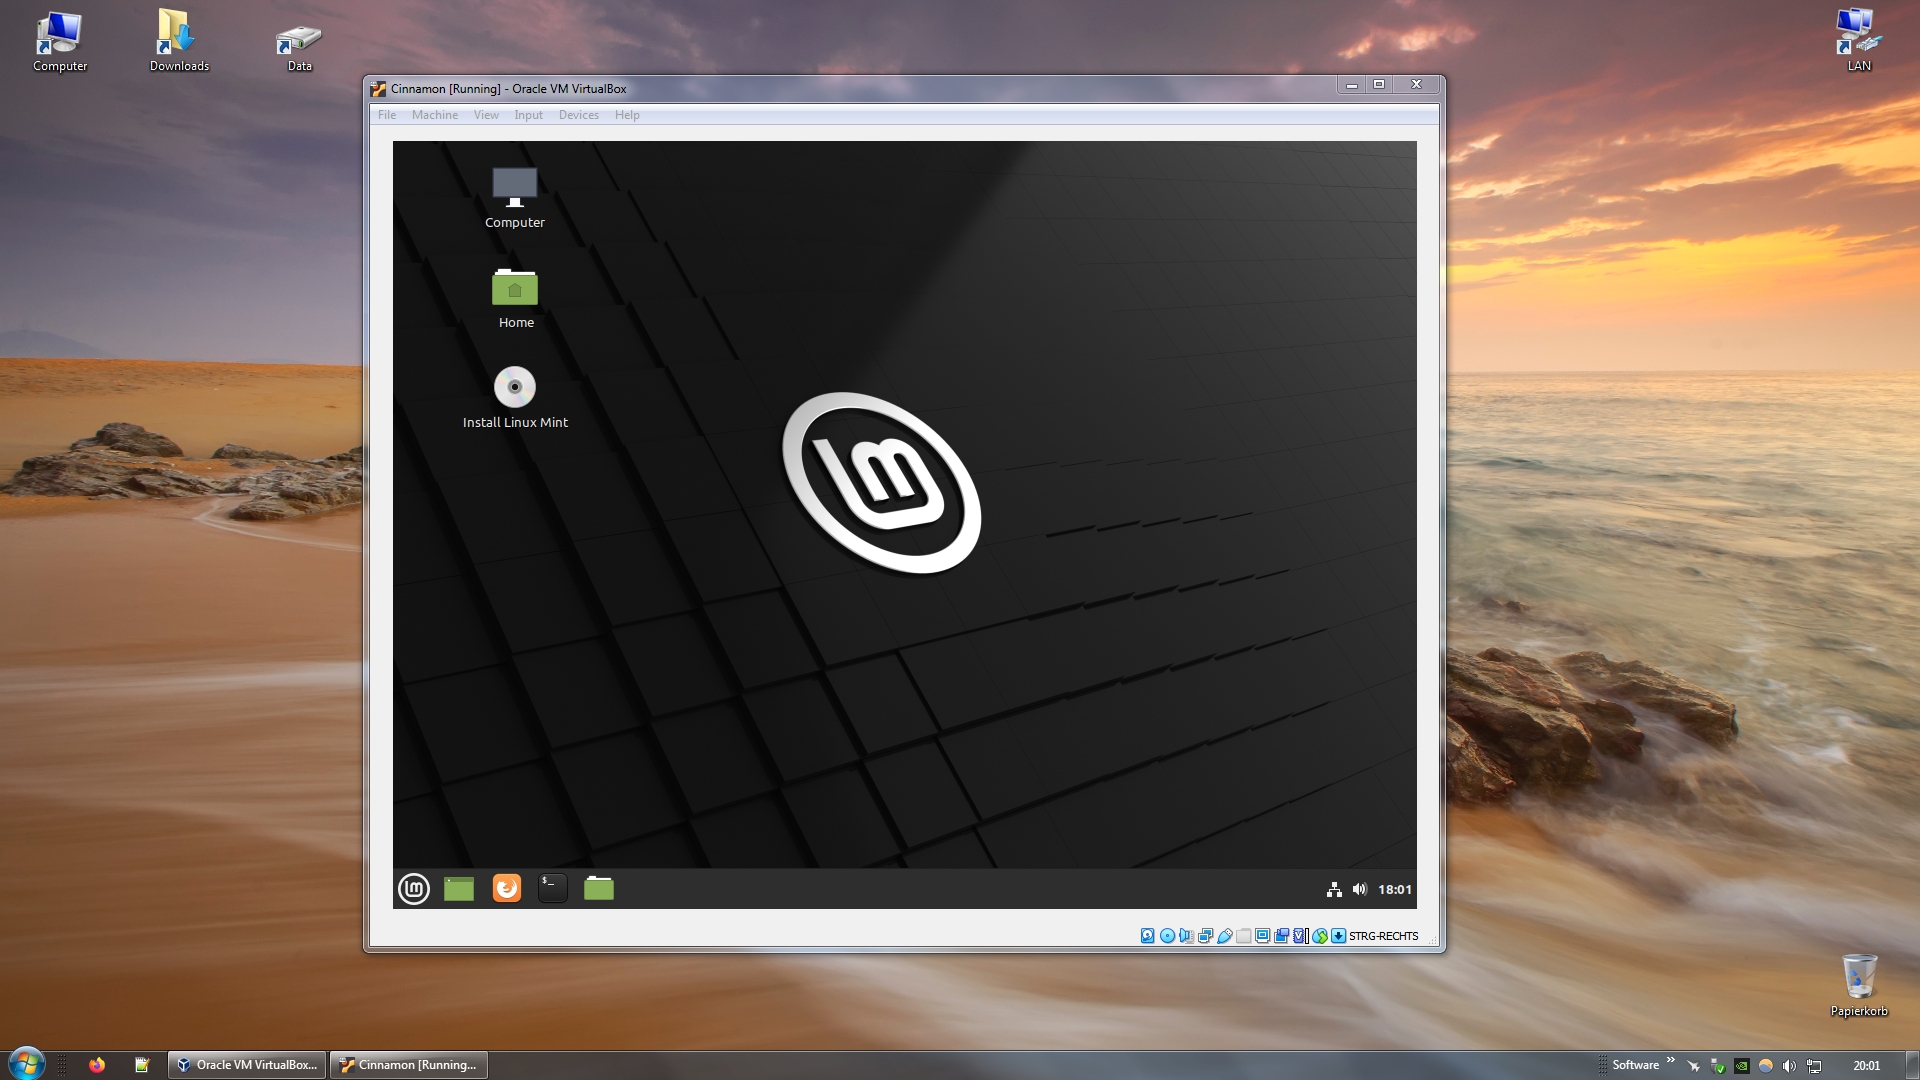
There’s a limit to this though: there’s no full acceleration from your graphics card inside a virtual machine. Applications like games might not run or only run poorly. Here’s a picture of Linux Mint Cinnamon running in a virtual machine on Windows 7.
The virtual machine saves all changes you make to the system and all files you store, just like a regular computer.
How to download Linux Mint Cinnamon
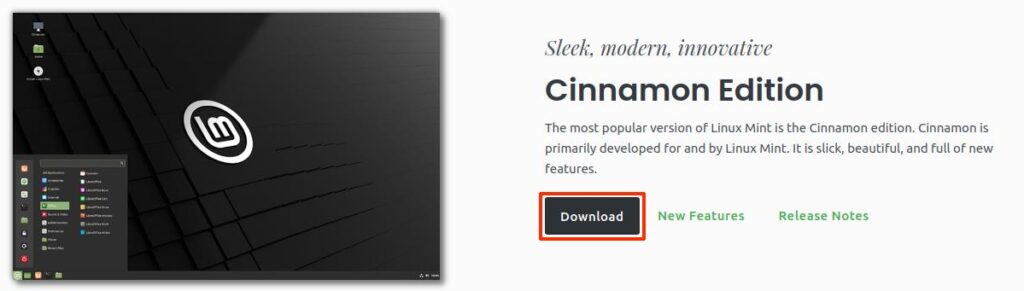
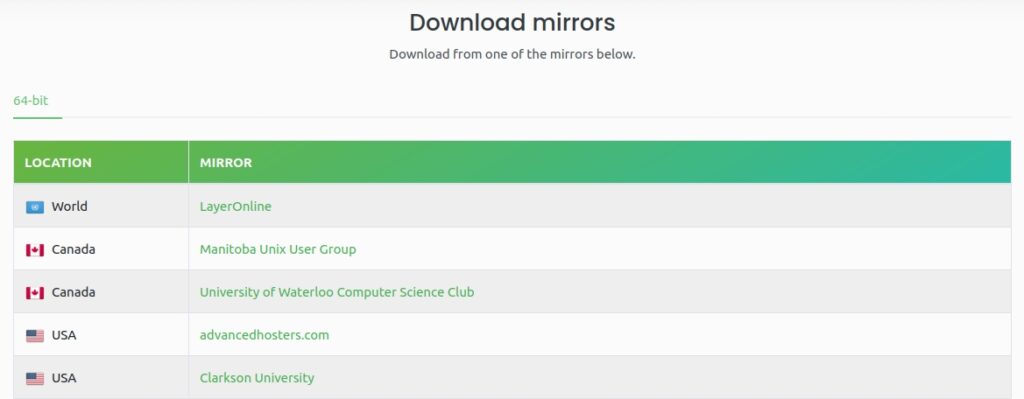
You can download Linux Mint Cinnamon on the Download page. Click on the Download button for the Cinnamon edition, then scroll down to the long list of download mirrors with country flags. These are the servers from which you can download the setup. Click on any of the names in the mirrors list. It doesn’t matter which one you choose, but the ones in your country probably download faster.
You will have a file with the file extension .iso once the download finishes.
How to set up the virtual machine using VirtualBox
Before we can use the .iso file, we need to install the virtual machine software VirtualBox. Download it from the official website. Near the top of that page, you’ll find a link that reads Windows hosts. If you click on it, a download of an .exe file will start.
The setup is very simple. Just click Continue and Yes a couple of times. You will get multiple popup messages where Windows asks you if you want to install a driver. They look like this on Windows 7:
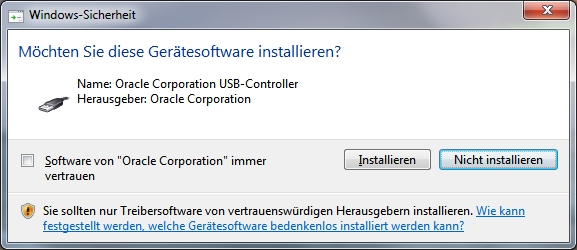
Click on Install to install them. Start VirtualBox when the setup is complete. You will then see this screen:
The next steps for setting up the virtual box are very easy, it’s just that there are quite many of them, so keep this in mind and don’t lose patience.
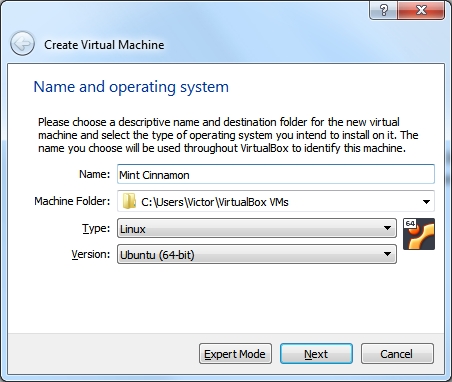
Step 1/10: Name and operating system
Please note: This tutorial was written for VirtualBox 6. VirtualBox’s UI has changed a bit in version 7. You should still be able to follow the tutorial, but some things will be slightly different.
Click on the big blue New button. A new menu opens and asks for a Name, a Folder, a Type and a Version. You can type whatever you want in the name field, but if you type something that VirtualBox recognizes it will correctly fill in the Type and Version fields. I typed Mint Cinnamon, which caused VirtualBox to correctly select Linux and Ubuntu. Linux Mint is based on another popular distribution called Ubuntu.
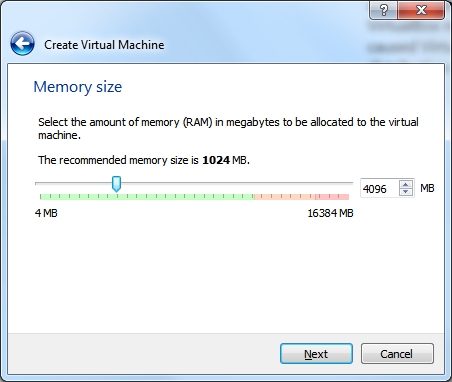
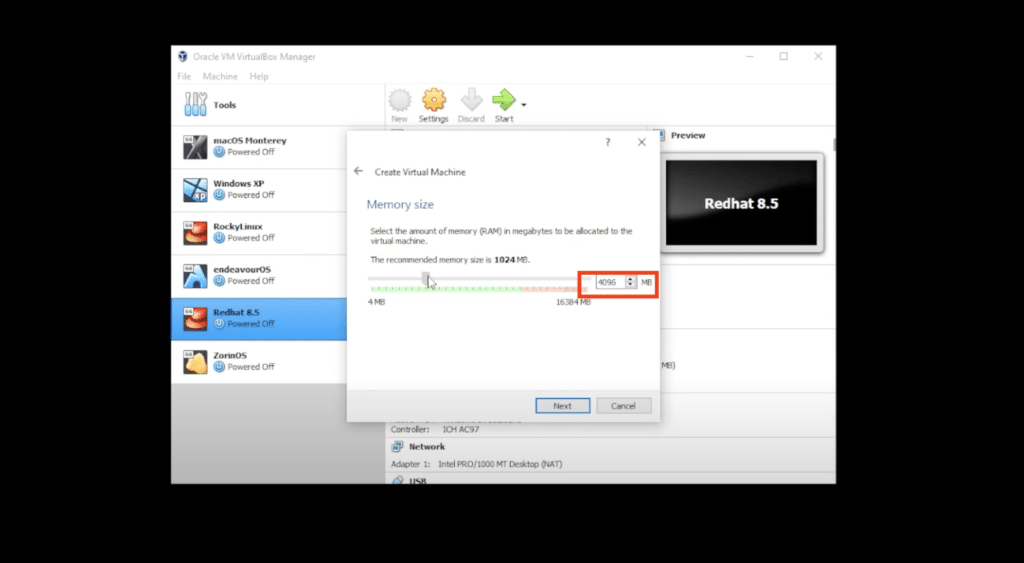
Step 2/10: Memory size
Click on Next. You then need to enter the amount of RAM that the virtual machine can use. The example screenshot shows 1024Mb, but you should use at least 2048Mb, as per Linux Mint’s System Requirements section in the FAQ. Anything above 4096Mb is probably unnecessary for testing purposes.
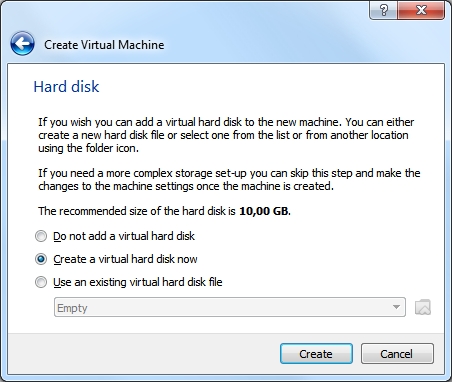
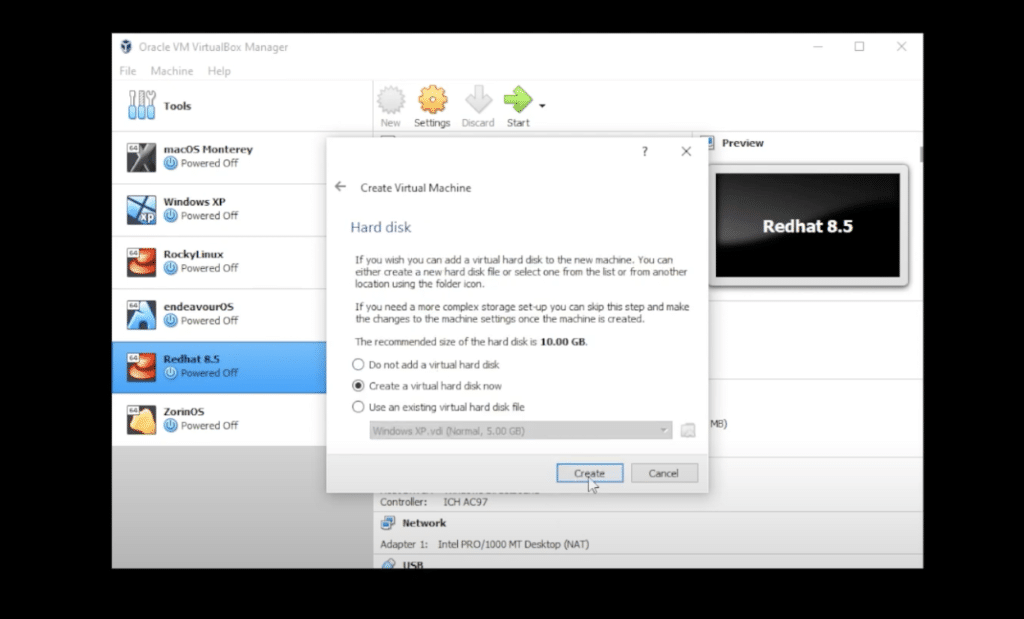
Step 3/10: Hard disk
You will then be asked if you want to create a virtual hard disk. The virtual hard disk is a file on your computer that is used like a hard disk for the virtual machine. This makes it possible to save data in the virtual machine like on a normal computer. Leave the default option Create a virtual hard disk now selected and click on Create.
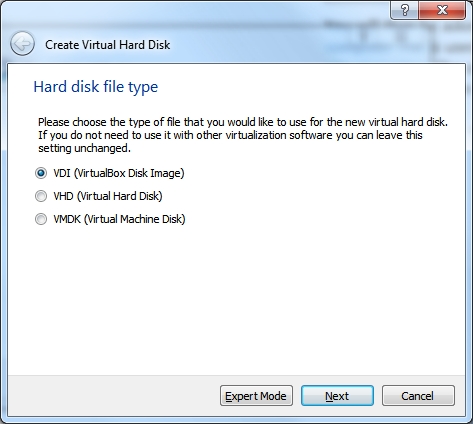
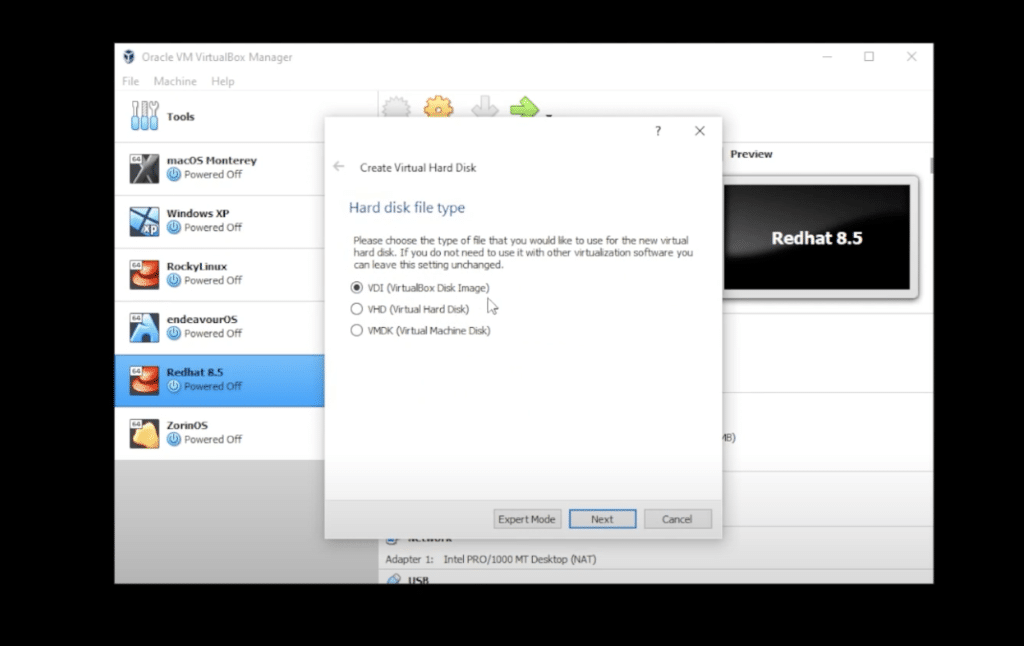
Step 4/10: Hard disk file type
Now select a disk file type. Leave the setting at the default VDI value and click on Next.
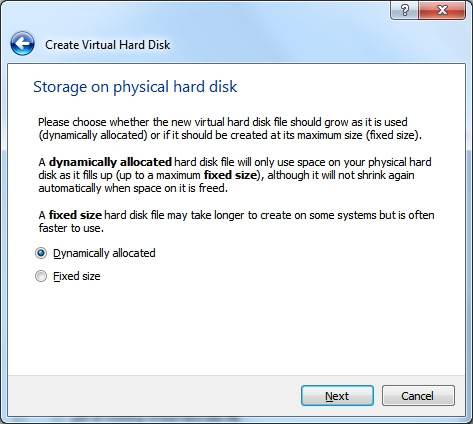
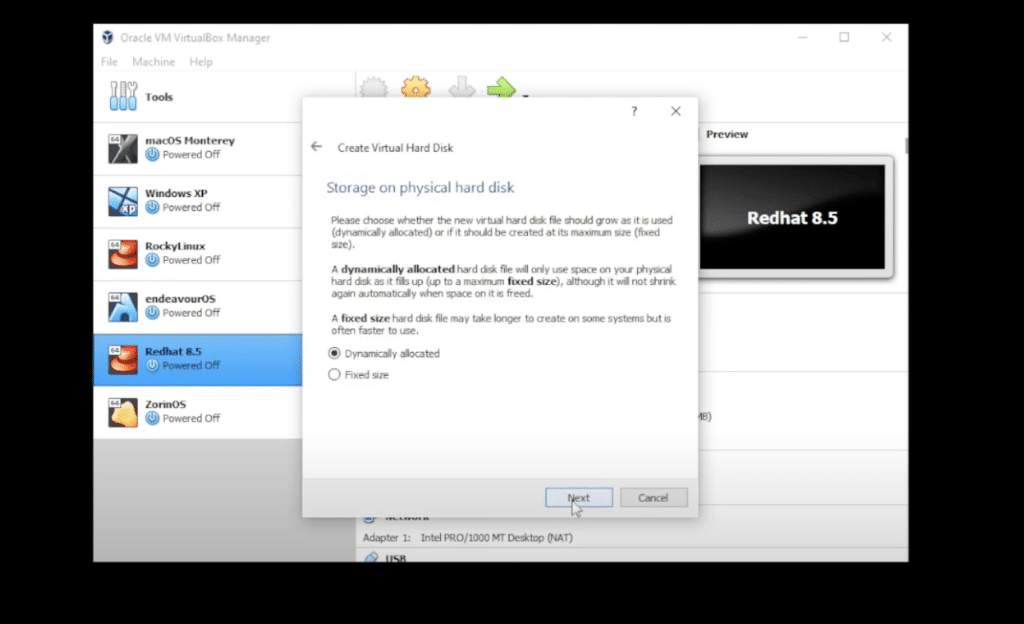
Step 5/10: Storage on physical hard disk
Select how the virtual disk should behave. Read the description and choose the option you like better. I always use Dynamically allocated .
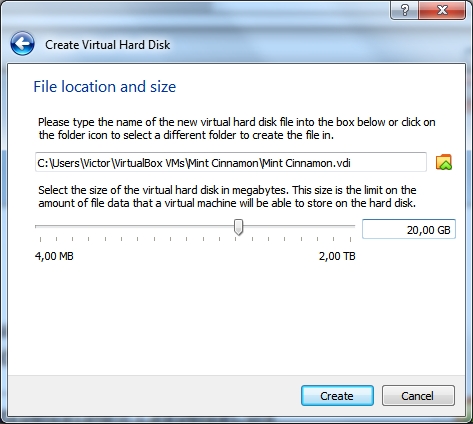
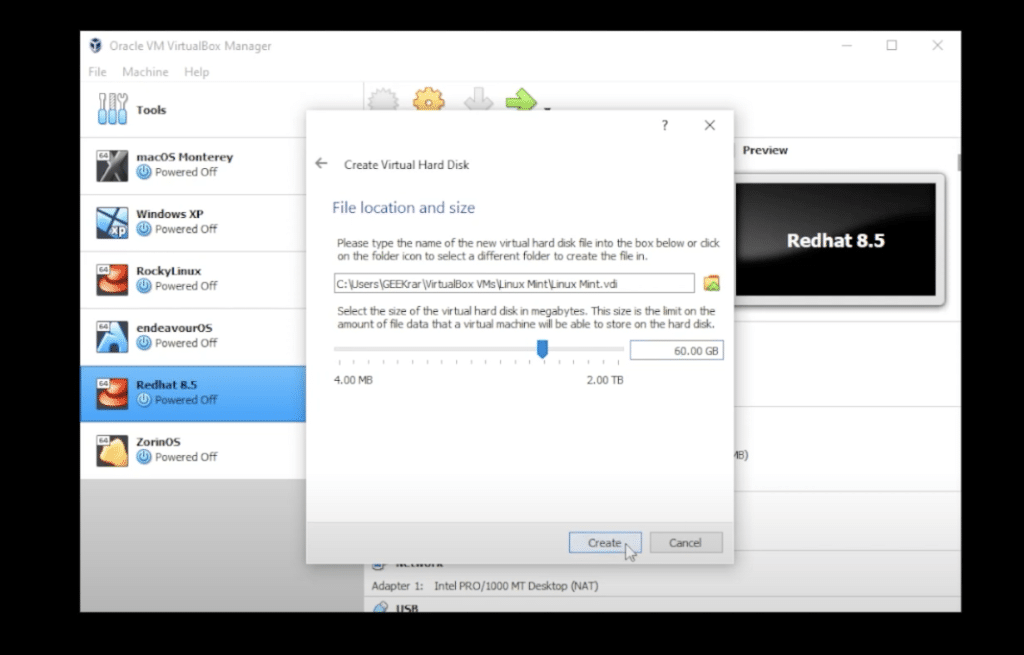
Step 6/10: File loation and size
Lastly we need to decide how much capacity the virtual hard disk should have. I chose 20Gb. Then click on Create.
If you have chosen Fixed size in the previous step you might have to wait for a while while VirtualBox reserves the necessary disk space, otherwise the window will close immediately.
Step 7/10: Starting the VM
You now have a new Mint Cinnamon entry in your list of virtual machines. Click the green Start arrow button to start the virtual machine.

Step 8/10: Select start-up disk
VirtualBox will ask you for a startup disc. This is where we tell it to load the .iso file we have downloaded. Click on the yellow folder icon with the green arrow.
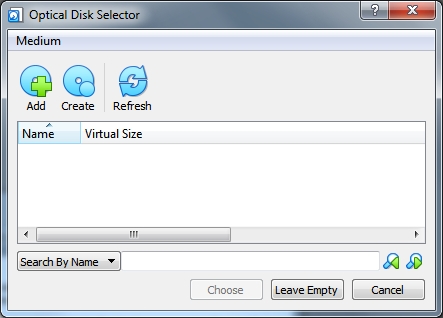
Step 9/10: Optical Disk Selector
A new window opens. Click on the Add button. Navigate to the location where you have downloaded the .iso file and select it with a double click. Then confirm and close the window with the Choose button.
Step 10/10: Ready to boot
The Mint Cinnamon .iso file should now be selected. Click on the Start button, after which Linux Mint Cinnamon will boot.
How to install Mint Cinnamon
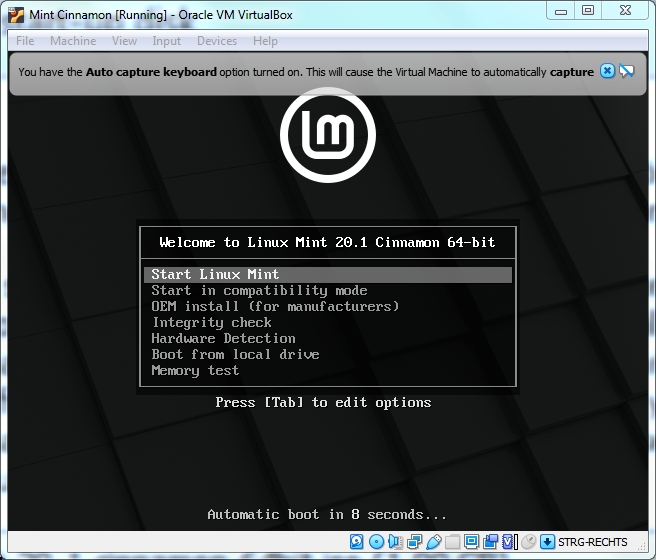
The virtual computer will now boot and you will see Linux Mint’s setup screen for 10 seconds.
If you don’t choose any other option than Start Linux Mint with the arrow keys, Mint will choose this option on its own and boot automatically.
After a few seconds of loading you will see the desktop. Congratulations, you have successfully started a Linux distribution for the first time!
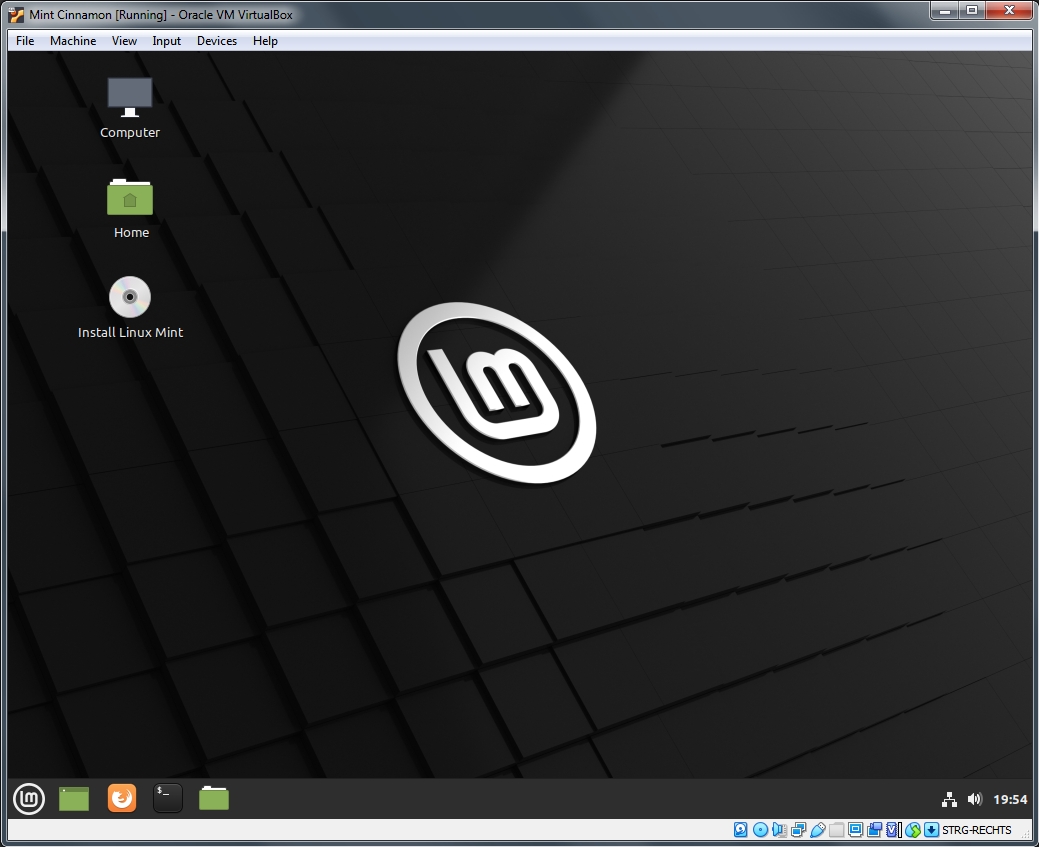
Contrary to Windows where you have to do the setup first, you can use Mint right away. Go ahead and click on the Firefox launcher in the taskbar if you want to see it for yourself.
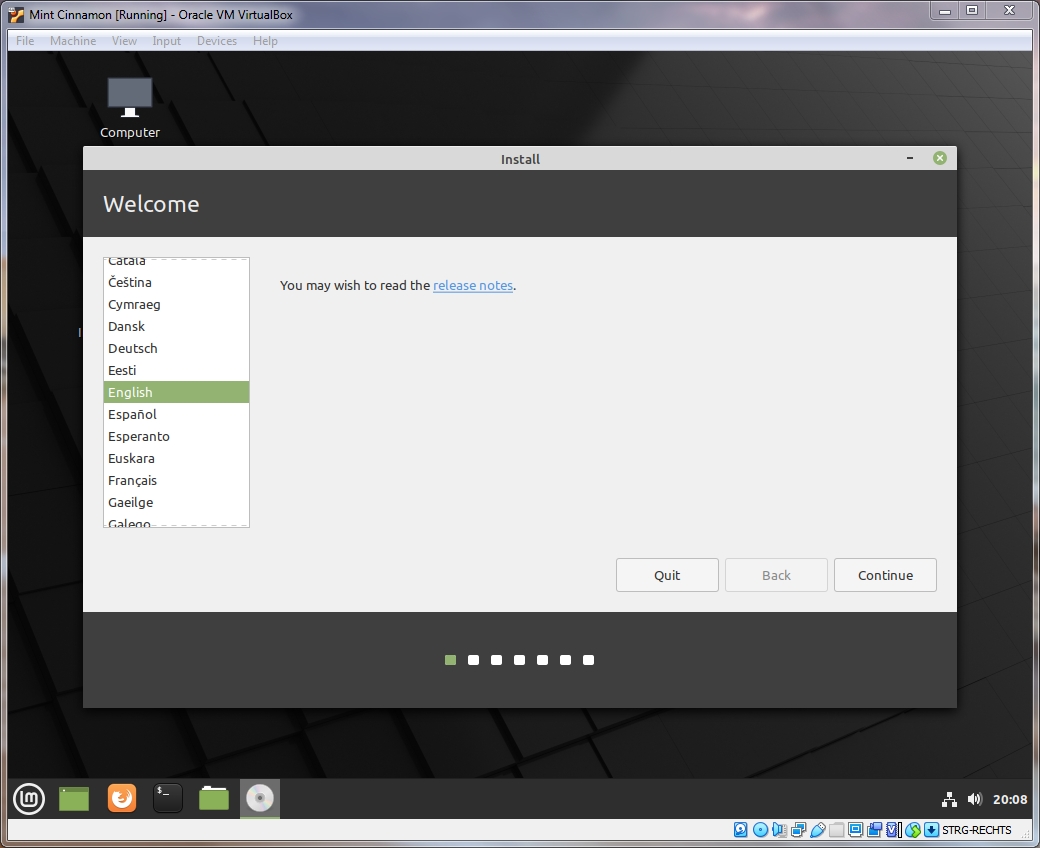
Starting the Linux Mint setup and selecting a language
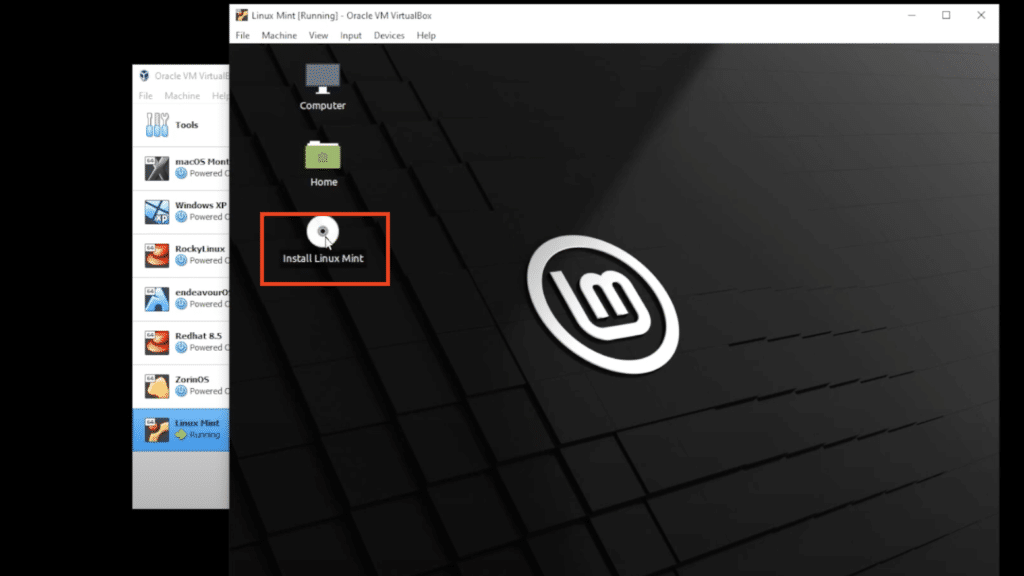
Everything you do now before installing Mint is lost when you shut the virtual machine down or restart it. To start the setup, double click the Install Linux Mint icon on the desktop.
Start by selecting your language.
The keyboard layout is next. Make sure to use the one matching your physical keyboard. Test keys that are specific to your keyboard (like ä, ö, ü, ß in my case) in the box at the bottom if you are not sure if you have selected the right one. Or use the handy Detect keyboard layout option.

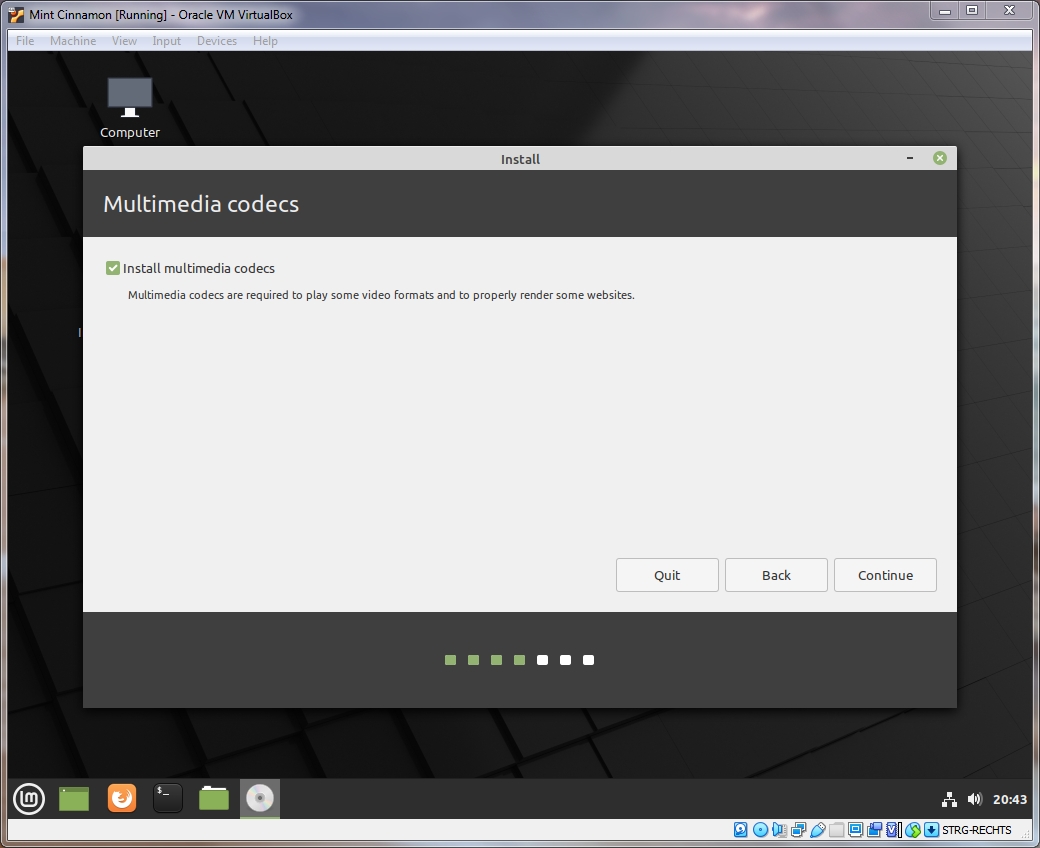
Multimedia codecs
Now select if you want to install multimedia codecs. Doing so improves Mint’s ability to open various file formats. I suggest enabling this option. The installer might take a moment before the setup continues after you have pressed Continue; that’s perfectly normal.
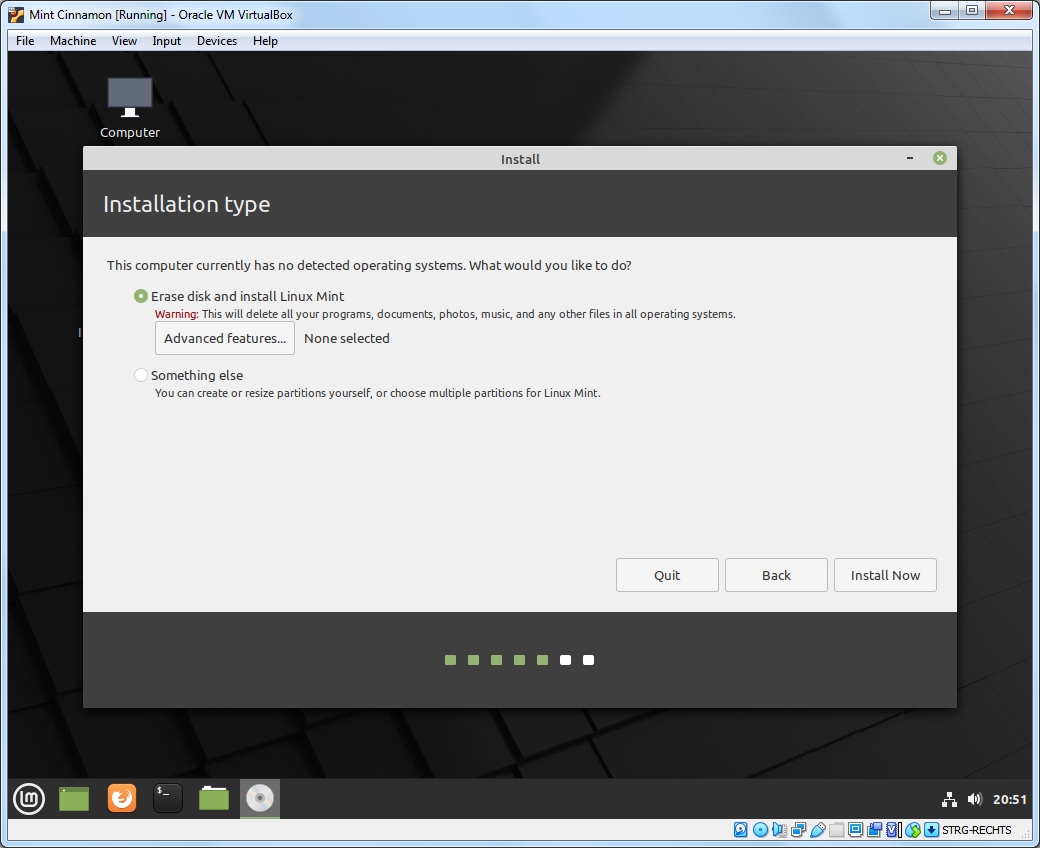
Partition configuration
We now need to decide how and where on the virtual disk we want to install Linux Mint. This happens on the 20Gb virtual disk we have created during the VirtualBox configuration before, this does not affect any data on your actual hard drive outside the virtual machine. You can’t accidentally delete anything on your computer, even if you tried.
If we were not using the VirtualBox and would instead install Linux Mint on our actual hard drive, we would see a third option that allows us to install Mint alongside Windows.
Select Erase disk and install Linux Mint, then click on Install Now.
The setup will show you the changes that will be made. Click on Continue to confirm.

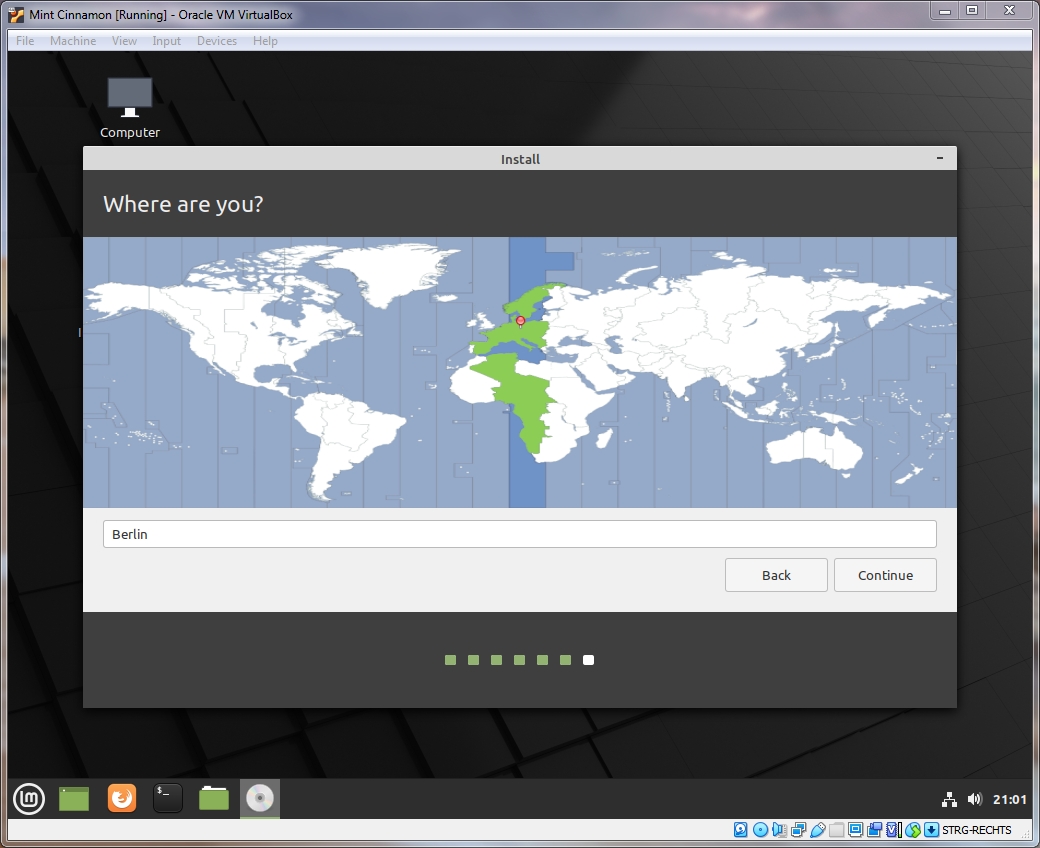
Location and clock
The setup then asks you about your general location, so it can adjust your computer clock to the correct time zone.
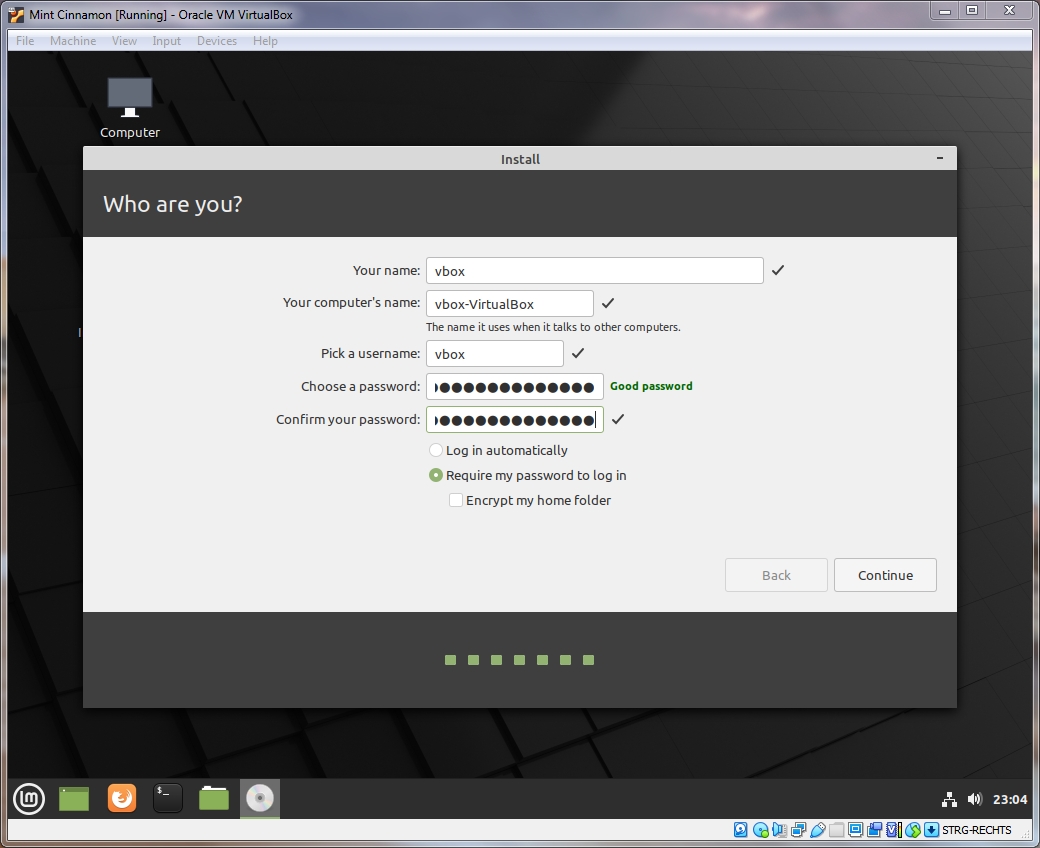
User account setup
Now set up your user account. You have to enter a password to proceed. The reason is that you do only have standard user privileges most of the time that don’t allow any deep changes to the system itself, like installing updates or software.
You might want to write the password down so you don’t forget it. If you should ever lose your password, read the Lost Password guide in Linux Mint’s documentation.
Every system critical action like installing updates or changing important system settings in a menu requires confirmation that you are actually allowed to do this. Your privileges are then elevated to perform this action and dropped again when you are done.
Enable Log in automatically if you don’t want to enter your password when Mint starts. You can change this setting later at any time.
You can also encrypt your Home folder. The home folder is comparable to Windows’ My Documents folder where all your personal user data is stored.
Click on Continue when you are content with all settings.
Setup end and restart
The setup will now start to install the system. You could use the waiting time to explore the start menu. The setup will let you know when it is done. Click on Restart Now.
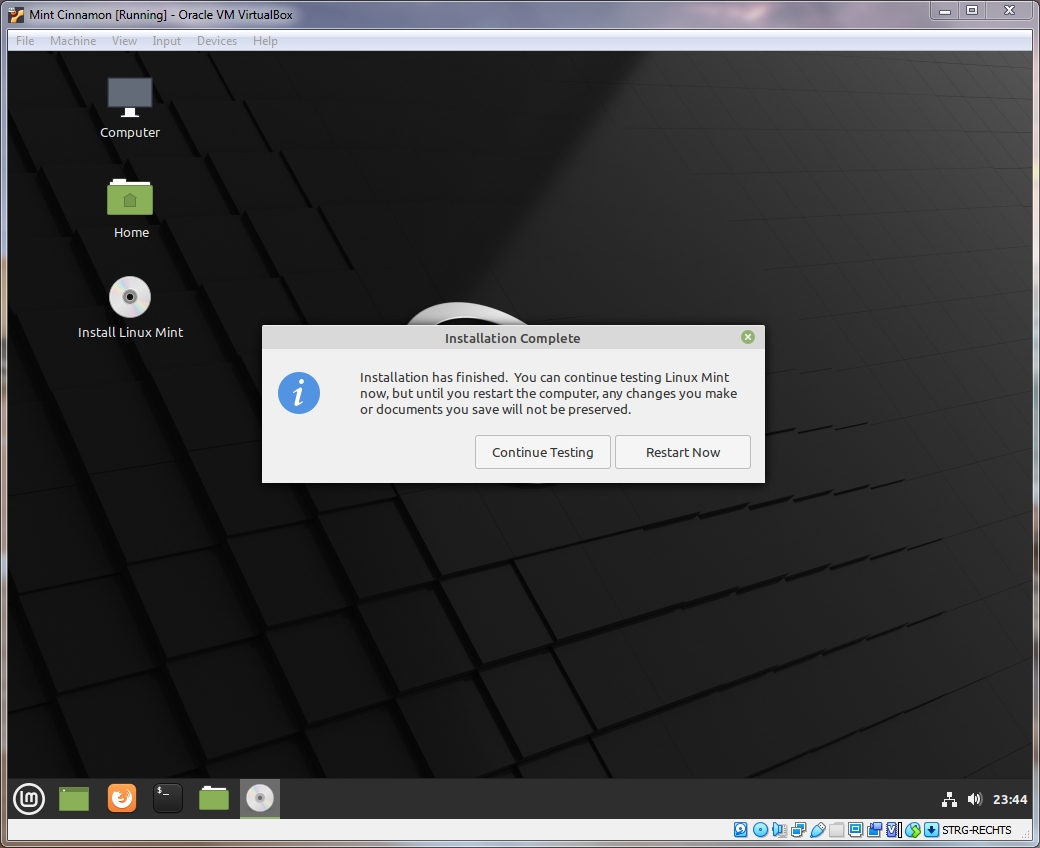
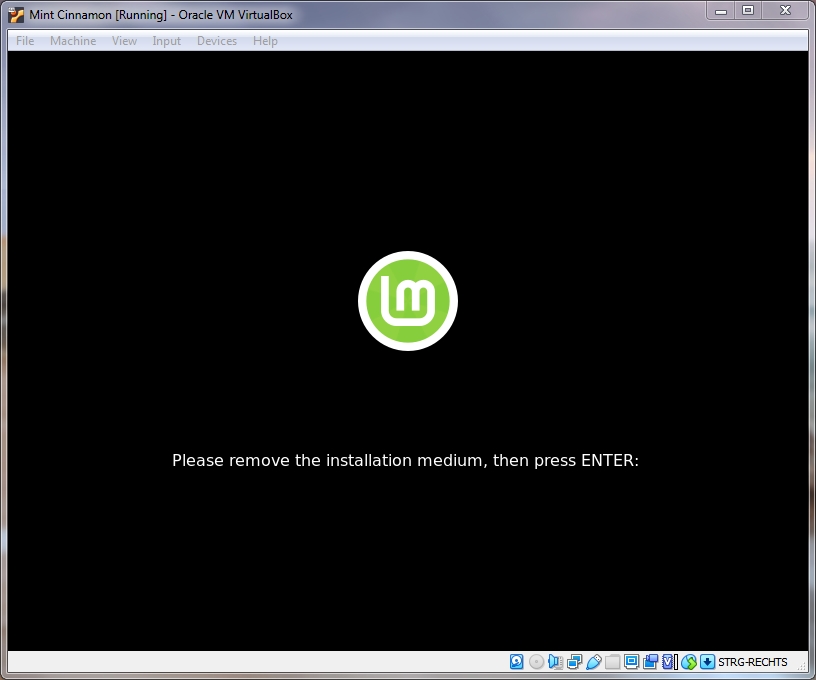
The screen will turn black and you are asked to remove the installation medium. You can ignore this message on a virtual machine, VirtualBox does this automatically for you. Just press enter.
Exploring your Linux Mint installation
Linux Mint will now finish restarting. The operating system is ready to use after the restart. I suggest reading through the Welcome menu that automatically appears.
The virtual machine saves all changes you make to the system, so all settings and files are safe when you shut Linux Mint down. Feel free to tinker and experiment as much as you like. When you break something beyond repair, just reinstall Mint.
Visit the Linux tutorials main page for more Linux tutorials.
In this article, we will learn How to Install Linux Mint Cinnamon VirtualBox on a Windows 10 PC. There are many good reasons to use Linux Mint as your operating system, namely that it is free and open source.
Linux Mint is a free and open-source distribution that you can install on your computer’s hard drive or run from a USB drive. It is based on Ubuntu and Debian with an emphasis on usability and the MATE desktop environment which is the continuation of GNOME 2.
Table of Contents
This tutorial will show you how to install Linux Mint on VirtualBox on a Windows 10 PC.
Minimum Requirements
RAM: 2GB (4GB Recommended)
20 GB Free Disk Space (100GB Recommended)
CPU: 2 Cores
Linux Mint ISO
1. Preparing the Virtual Machine
Step 1: Open LinuxMint.com, and click on the download link. Select the latest version Linux Mint 20.3 and download the ISO File. The file is around 2.1 GB.
Step 2: Once downloaded, download and install Virtualbox on your Windows PC. Here is a guide that you can use: How To Install VirtualBox 6.1 On Windows 10
Step 3: Install the Virtualbox Extension Package. Use this guide: How To Install VirtualBox 6.1 On Windows 10
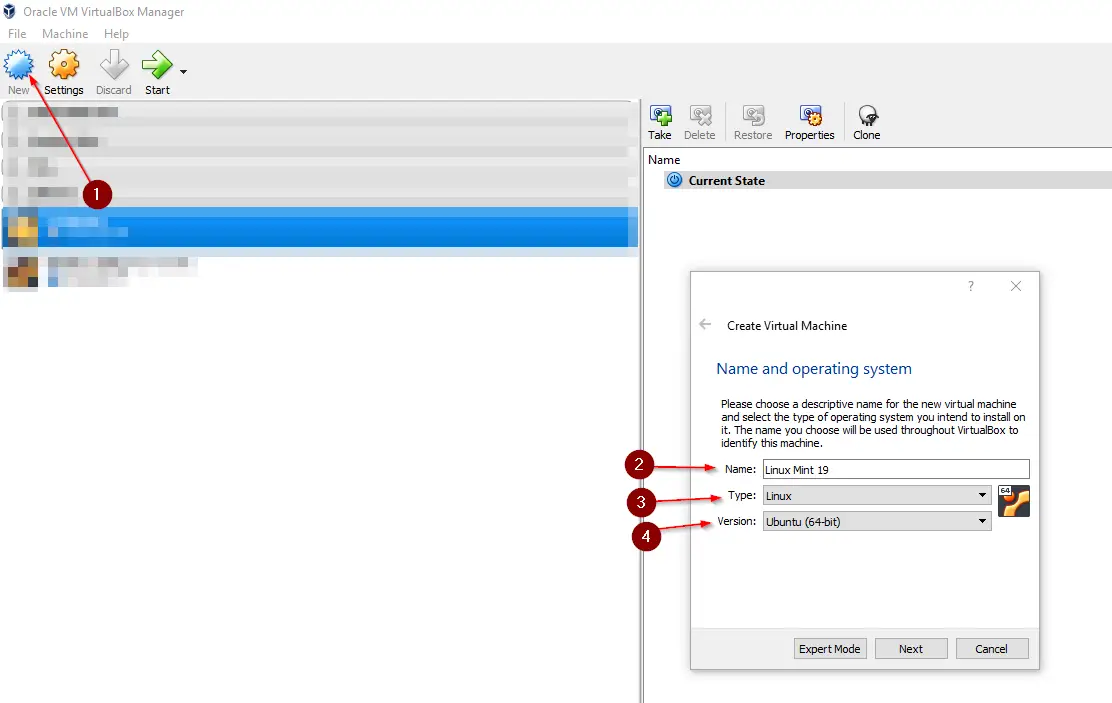
Step 4: Open Virtualbox and click add a new virtual machine. Set the following parameters and click Next.
Name: Linux Mint
Type: Linux
Version: Ubuntu (64 bit)
Step 5: In the memory size, select 4GB and click Next.
Step 6: Select Create a Virtual Hark Disk File and click Create.
Step 7: Select VDI (Virtual Disk Image) and click Next.
Step 8: Select dynamically allocated and click Next.
Step 9: For the hard disk space, select 60GB, and then click on Create.
2. Customize the Virtual Machine
Step 10: Click on the Settings button, and go to the General tab under Advanced. Under shared clipboard and DragNDrop select Bidirectional.
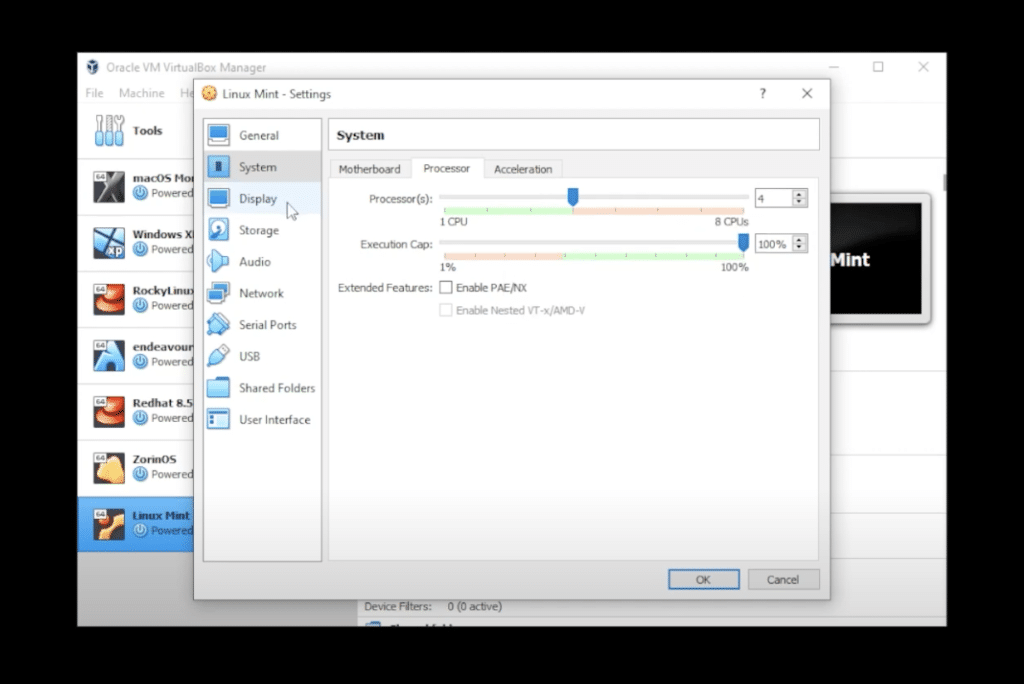
Step 11: Then under System, go to the Processors tab and select 4.
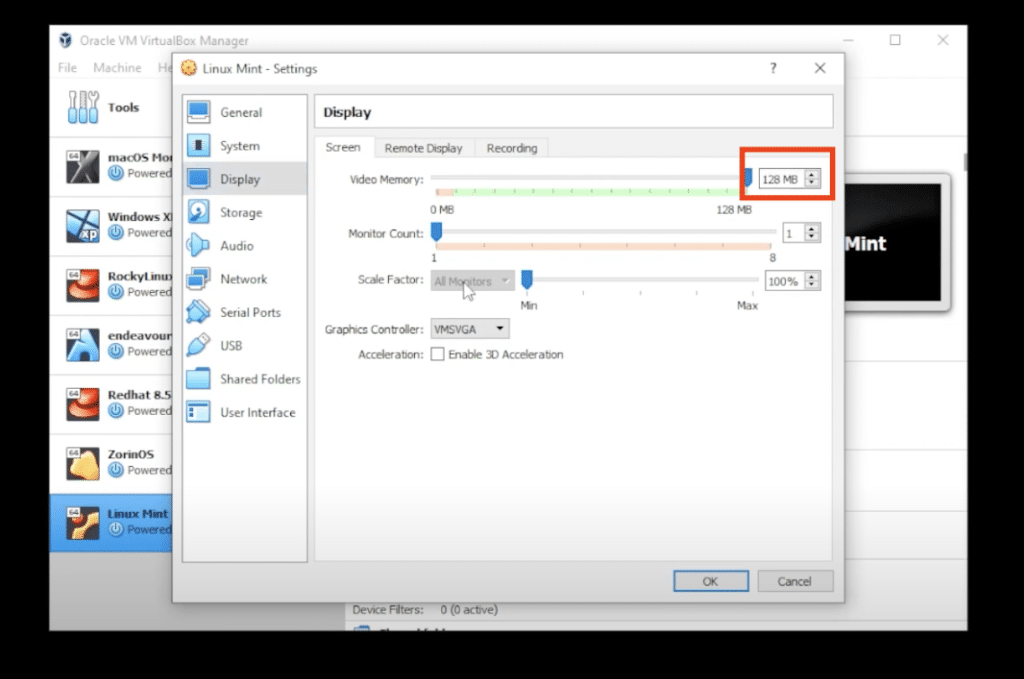
Step 12: Go to Display and select 128MB.
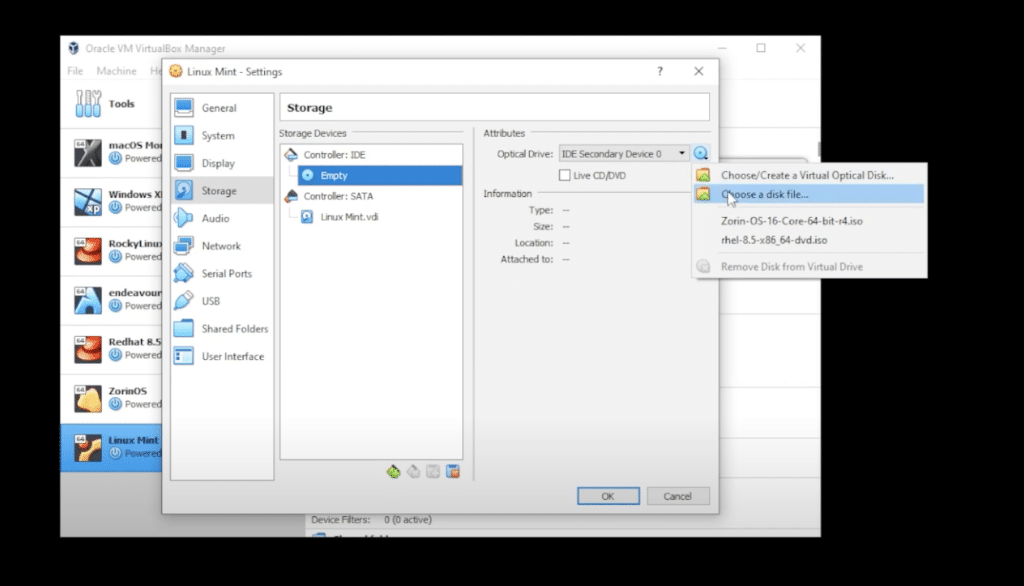
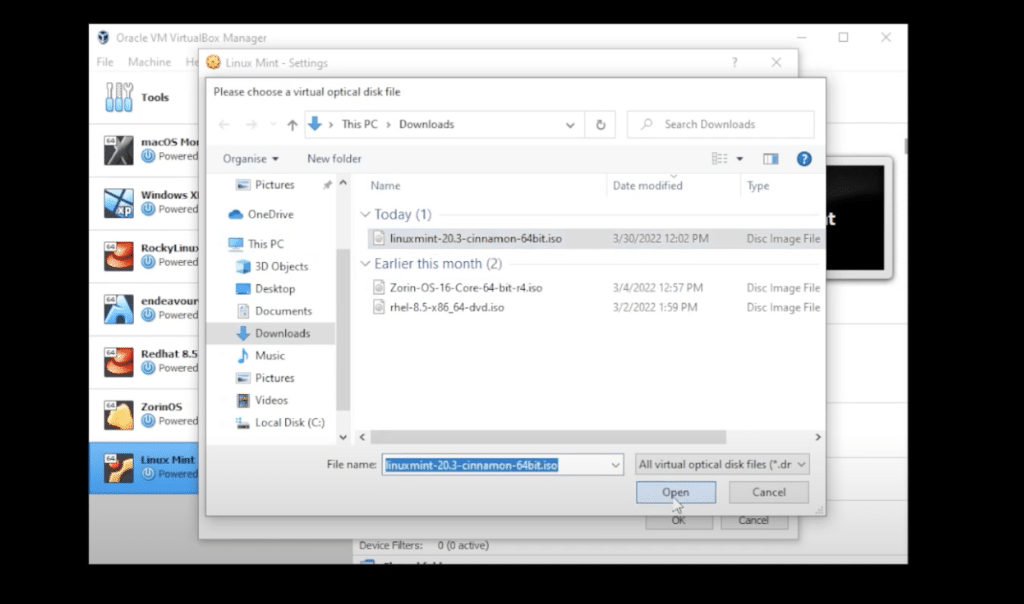
Step 13: Click on Storage and inside Storage, you want to select the empty disk over here, then click on the little disk on the right-hand side. Choose a disk file and this is where we need to go to our Downloads folder, where download the ISO image file, which is right over here then click on open.
Step 14: When we’re done doing the installation, you can just right-click on it and remove the attachment. So I’m going to leave everything else as is the rest of the options you can select and change and modify later on. Now just click on the ok button.
3. Starting the Virtual Machine
Step 15: Go to VirtualBox Manager and make sure that Linux Mint is selected and then click on the Start button.
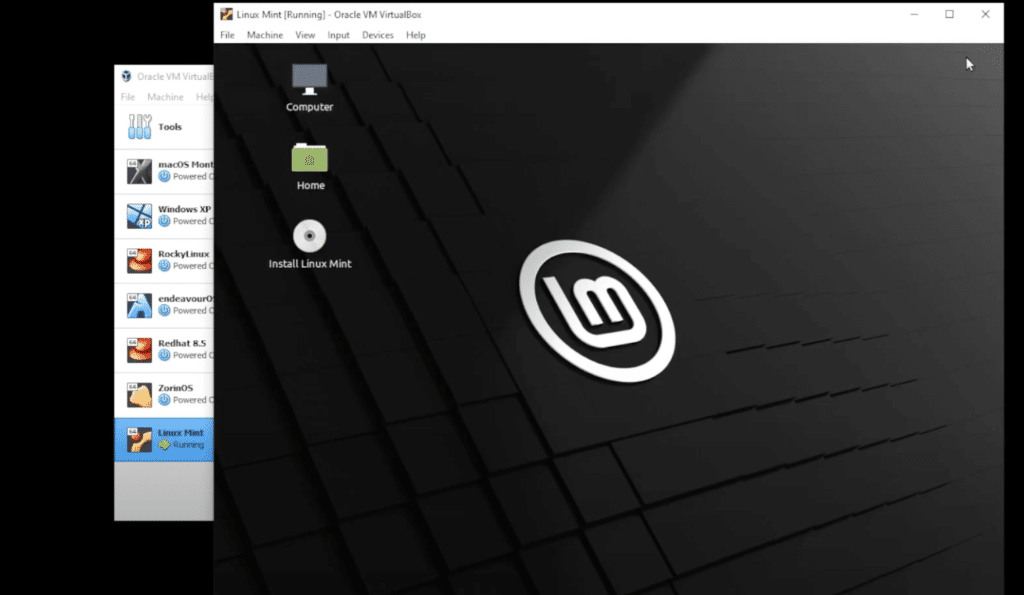
Step 16: This is not an installed version, this is just a live version. What we want to do is actually double-click on the disk to install the operating system in a virtual drive.
Step 17: Continue with the installation wizard. You can choose the default setting and proceed with the final installation.
Step 18: Click on Continue, and now it’s going to copy over the files and install them. This might take a few minutes.

Step 19: Once the installation is complete and is ready to restart. Shut down your virtual machine completely.
Step 20: Select the virtual machine over here on the left-hand side, click on Settings, and then go into storage.
Step 21: Click on X in the corner, and start the machine again. It will ask for your password to log in to your Linux Mint.
Step 22: You can go through all the steps if you’re not familiar with the operating system and it will show you all the features of the operating system.
Step 23: Now install this guest edition CD image and what it’s going to allow us to do is full screen and it will give us a proper aspect ratio. Also, it allows you to copy and paste from your desktop into your virtual machine and drag and drop files so all these will be enabled once you install the guest edition CD image.
Step 24: Click enter key on our keyboard and it’s going to close what we want to do next is just restart our virtual machine.
Congratulations. You have successfully installed Linux Mint Cinnamon on VirtualBox on Windows 10 PC.
Conclusion
So Linux Mint has been installed inside VirtualBox on a Windows 10 PC. I hope you found this article useful.
You can watch a detailed video tutorial below –
У вас есть возможность попробовать Linux Mint непосредственно в среде Windows. Это позволит оценить систему и понять, нужна ли она вам в качестве основной или дополнительной.
Подготовка
Загрузите VirtualBox для своей операционной системы с сайта программы. Прежде всего вам понадобится сам инструмент для вашей операционной системы и пакет расширений Extension Pack. Инсталлируйте программное обеспечение.
Откройте сайт Linux Mint. На сегодняшний день вам предлагается для загрузки 19.2 Tina. Вам предстоит выбрать между версиями, которые различаются графическим интерфейсом: Cinnamon, MATE и Xfce.

Для старых и слабых машин рекомендую Xfce. Cinnamon и MATE более привлекательны эстетически. Выберите из списка наиболее удобный сервер, с которого будет осуществляться загрузка системы.
После завершения загрузки переместите файл образа ISO в какое-то определенное место на жестком диске или SSD.
Создание виртуальной машины
Откройте ранее инсталлированный VirtualBox. Нажмите кнопку «Создать».
В предназначенных для этого полях укажите имя виртуальной машины, выберите тип системы (Linux) и версию (Debian 64-bit), поскольку сборка основана на Debian, а пункт «Linux Mint» в перечне отсутствует. В данном случае рассматриваю установку 64-битной версии, которая совместима с большинством хотя бы относительно современных компьютеров. Нажмите «Далее» в дальнейшем нажимайте данную кнопку в каждом окне мастера создания виртуальной машины, в большинстве окон не меняя настроек.

Единственное исключение: вам необходимо выбрать «Фиксированный» объем жесткого диска и, когда будет предложено, указать его емкость не менее 10,60 гигабайт. Это необходимый для установки системы минимум.

Более подробный процесс настройки читайте в этой статье: Создание и настройка виртуальной машины в VirtualBox
Установка системы
Когда инструмент завершит работу, у вас появится новая виртуальная машина. Откройте ее двойным щелчком мыши. Укажите путь к ранее загруженному вами файлу ISO. Нажмите кнопку «Продолжить».

Начнется подготовка к установке системы и некоторое время вам предстоит подождать.

На экране появится рабочий стол и другие элементы системы.

Уже сейчас вы можете воспользоваться веб-браузером, офисными программами и другим предустановленным софтом системы. Это режим LiveCD, позволяющий оценить работу ОС до ее инсталляции. Работать все станет достаточно медленно, а интерфейс будет английским.

Запустите процесс инсталляции ОС двойным щелчком по значку «Install Linux Mint» на рабочем столе (стилизованный компакт-диск). Выберите язык и нажмите кнопку «Продолжить». Нажимайте ее в каждом окне для перехода к следующему шагу инсталляции.

Определите раскладку клавиатуры. Оптимальный вариант будет предложен вам мастером установки.

Установщик предложит вам установить ПО для видеокарт, Wi-Fi, а также Flash, MP3 и других медиаустройств. Поставьте «птичку» в белом квадратике. Это позволит вам потом не возиться с инсталляцией этого необходимого софта, обеспечивающего нормальную работу основных функций компьютера. После нажатия на кнопку «Продолжить» в этом окне вам придется некоторое время подождать.

Мастер инсталляции предложит вам выбрать тип установки. В данном случае, поскольку установка производится на виртуальную машину, оставьте первый вариант «Стереть диск и установить Linux Mint». Но будьте осторожны, если инсталляция ОС производится на компьютер, поскольку в таком случае будет удалена ваша текущая операционная система и все ее файлы, в том числе важные. Нажмите на кнопку «Установить…».

Установщик предложит сохранить изменения на диск. Нажмите «Продолжить».

Выберите ваш город.

Укажите ваше имя, имя своего компьютера, имя пользователя и пароль, который необходимо будет подтвердить в дополнительном поле. Вы можете предпочесть автоматический вход в систему (без ввода пароля) или вход с запросом пароля. Кроме того, у вас есть возможность активации шифрования своей домашней папки путем установки «птички» перед соответствующей строкой. Данный пароль будет требоваться каждый раз, когда вы захотите поставить новую программу.

Стартует установка системы.

В ходе процесса инсталляции на экране будут появляться слайды, повествующие о ее многочисленных возможностях. В нижней части экрана станет отображаться информация о том, какое именно действие выполняется в данный момент.

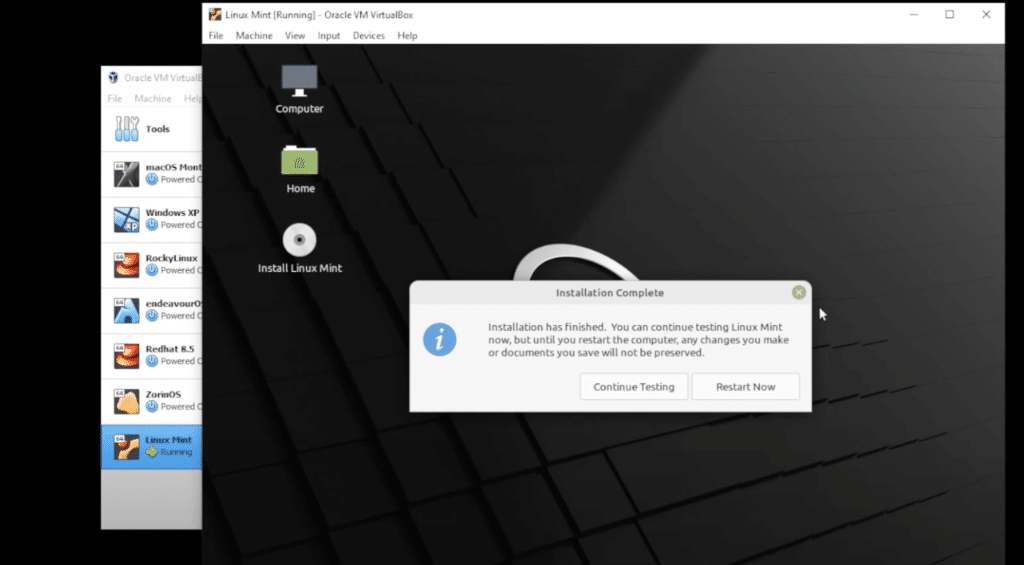
После завершения установки вы сможете продолжить тестирование системы, не перезагружая машину. В этом случае все изменения и созданные файлы будут потеряны при повторном включении. Рекомендую нажать на кнопку «Перезагрузить» и лишь затем продолжить знакомство с новой ОС.

Извлеките установочный диск или флэшку, а затем нажмите «Enter».

Начало работы
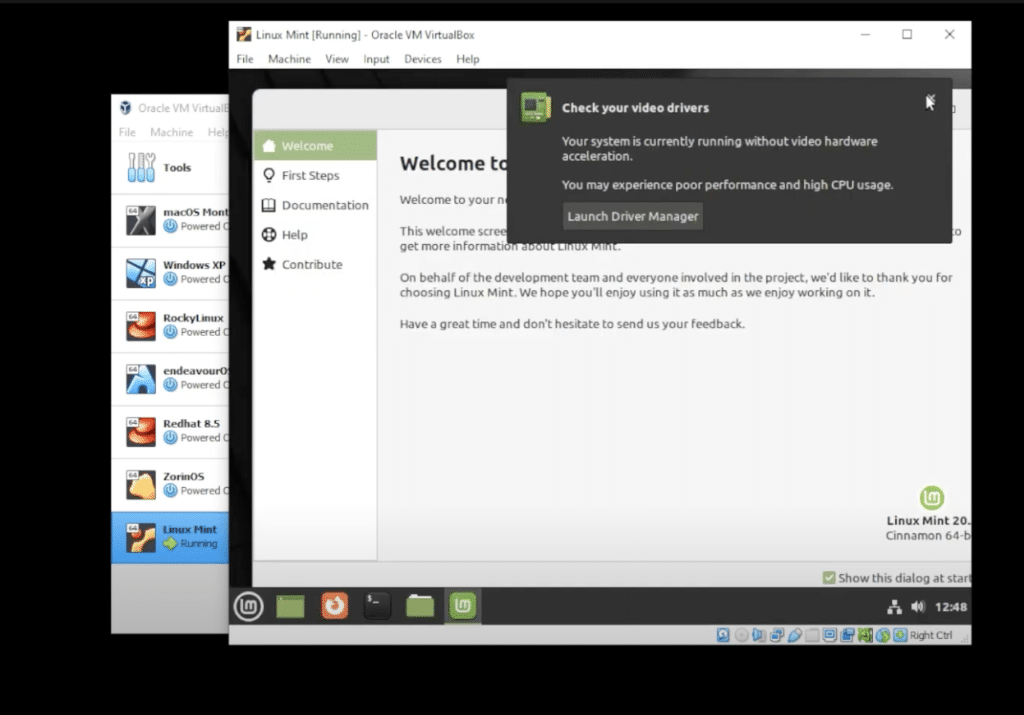
После перезагрузки отобразится экран приветствия. Вам будет предложено запускать его каждый раз при входе в систему. Для этого достаточно оставить «птичку» под текстом. Он поможет вам больше узнать об ОС.

Здесь вы сможете сделать первые шаги по настройке системы, узнать, нужно ли установить какие-либо дополнительные драйвера и запустить менеджер обновлений. Начинающим пользователям я не рекомендовал бы отключать автозапуск этого окна. По крайней мере, первое время.

Все необходимое для работы с интернетом и файлами уже включено в комплект поставки ОС. Вы можете сразу же посещать веб-сайты в веб-браузере Firefox.

«Из коробки» вам также доступен пакет офисных программ LibreOffice…

…и графический редактор GIMP, функций которого большинству пользователей будет достаточно.

Считаете ли вы и сейчас, что Linux сложная ОС с неудобным мастером установки?
4.3
3
голоса
Рейтинг статьи
The Ubuntu version 22.04 LTS iso image for the server recently came out for the public, and I decided to spin it up in the VirtualBox hypervisor. So in this blog article, we will see how we can install Ubuntu 22.04 LTS server in VirtualBox step by step.
After the installation, we will install the virtual box guest additions to the Ubuntu server 22.04 to improve the system performance.
Before you proceed, you need to have;
VirtualBox hypervisor – you can download it from here.
Ubuntu server 22.04 server (Jammy Jellyfish) – click here to download.
Create Ubuntu 22.04 VM in VirtualBox.
Open VirtualBox and click on Machine-> New Virtual machine.
You will get a pop-up to configure the virtual machine; there are two modes. One being the guided mode and the Expert mode. Click on Expert mode.
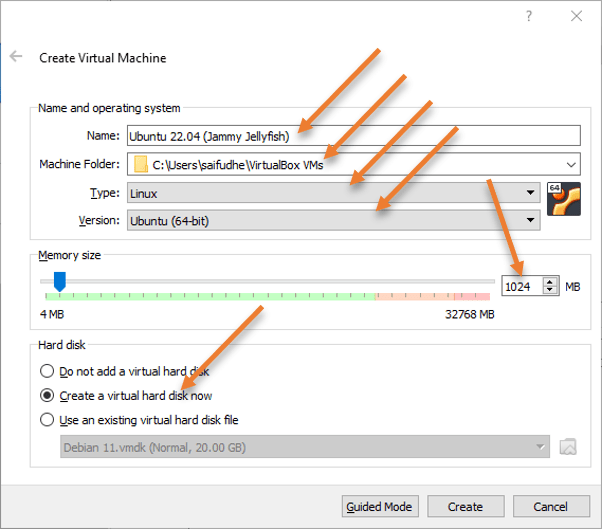
Name: Enter the name of your choice.
Machine folder: By default, VirtualBox would choose a location for you. This is where you would save all the virtual machine files. You may select a different location if you would like.
Type: Linux
Version: Ubuntu (64-bit)
Memory Size – Add at least 2Gigs of RAM. If you don’t have that much memory, you can give 1GB.
Hard disk: Create a virtual hard disk now.
Click on Create.
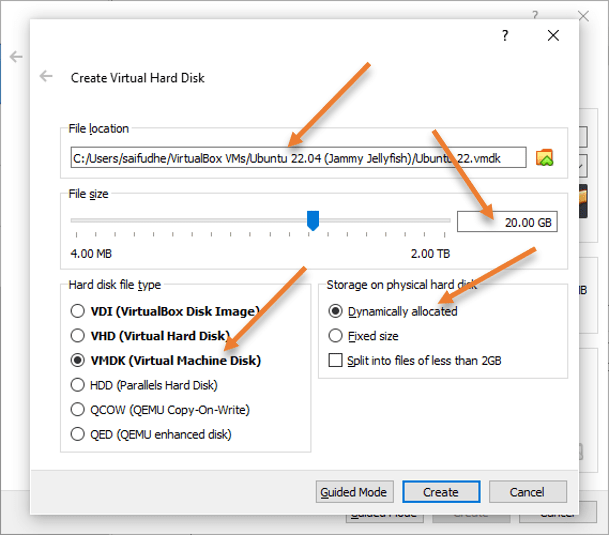
Create Ubuntu 22.04 server virtual hard disk.
Based on the previous selection, you will be required to create a virtual hard disk that needs to be attached to the virtual machine.
In the file location, it will choose the location which we defined before.
File Size: This will be the virtual hard disk storage size. By default, it would pick up 10Gb of storage. Since I require more storage, I have added 20GB. So based on your requirement, you may add more storage.
Hard disk file type: Choose VDI if you will use this virtual machine only in the VirtualBox hypervisor. If you plan to move this virtual machine to any other hypervisor, then you may choose VMDK instead.
Storage on physical hard disk: Dynamically allocated.
Click on Create.
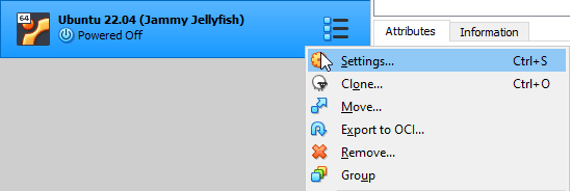
Configure the Virtual machine parameters.
We configured pretty much everything. However, certain changes need to be made for the installation to go smoothly and get good performance out of the virtual machine.
Hence, right-click on the virtual machine that we just created and click on Settings.
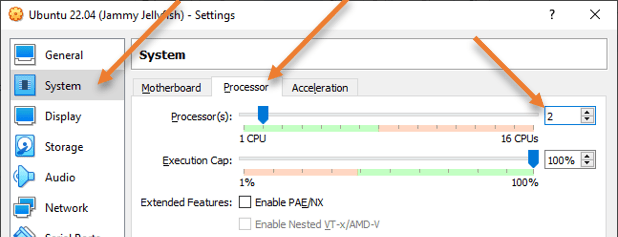
Configure the CPU.
You will get a pop-up to configure the virtual machine settings. To change the CPU configuration, choose System-> Processor.
In that, choose 2 in the processor.
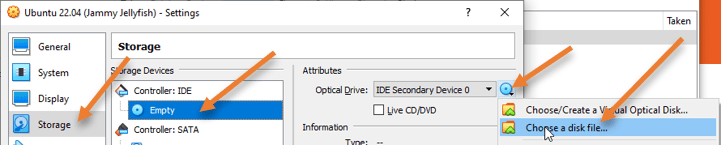
Attach the Ubuntu server 22.04 CDROM to VirtualBox.
To boot into the Ubuntu server and proceed with the installation, we need to attach the Ubuntu server image that we downloaded earlier.
Click on Storage-> Empty-> Choose a disk file.
And attach the ISO image that we have downloaded and click on OK.
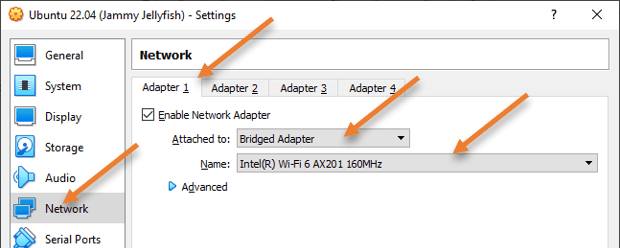
Configure the network.
The default network adapter in VirtualBox for the virtual machine would be NAT. We will have to change it to Bridged mode. In bridged mode, the virtual machine will act as if it is directly connected to your physical LAN network. And all the other devices in the LAN will be able to talk to the VM directly. However, you shouldn’t use the bridged mode if you are in an office network.
In office network, or if the bridge adapter is not working, you should only use the NAT network. That way the virtual machine can go out to the internet using the host IP address.
You can learn more about the VirtualBox network types here.
In NAT, you cannot initiate communication directly to the VM from your host machine and your local area network, for example SSH, unless you configure Virtualbox port forwarding.
After the change, click on OK.
Start the Ubuntu Server 22.04 installation.
We will proceed with the virtual machine installation, for that right-click on the VM and click on start or double-click on the VM.
The virtual machine will start, and you will get a below screen, Choose to Try or install Ubuntu server.
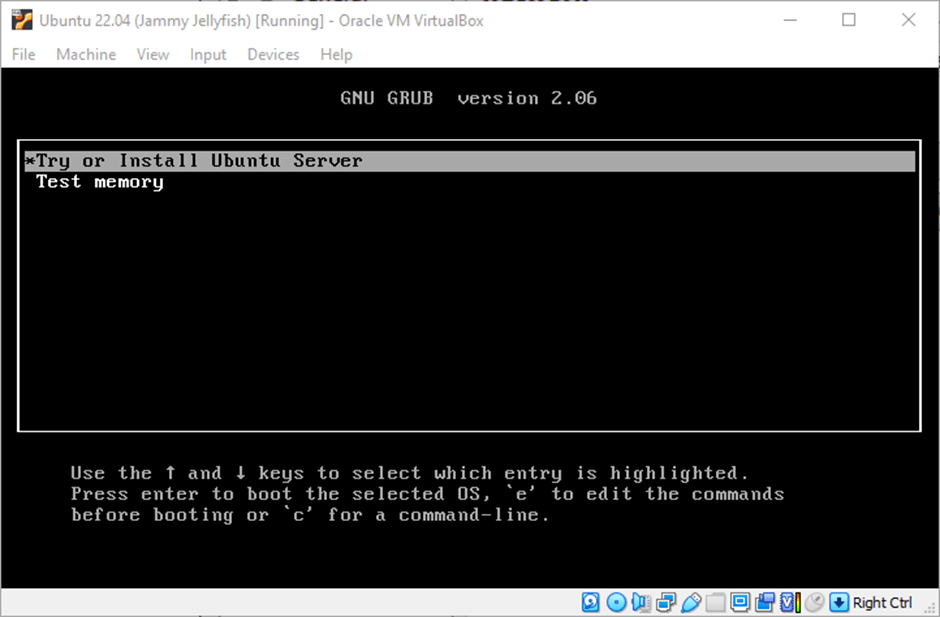
The Ubuntu installation screen will now load.
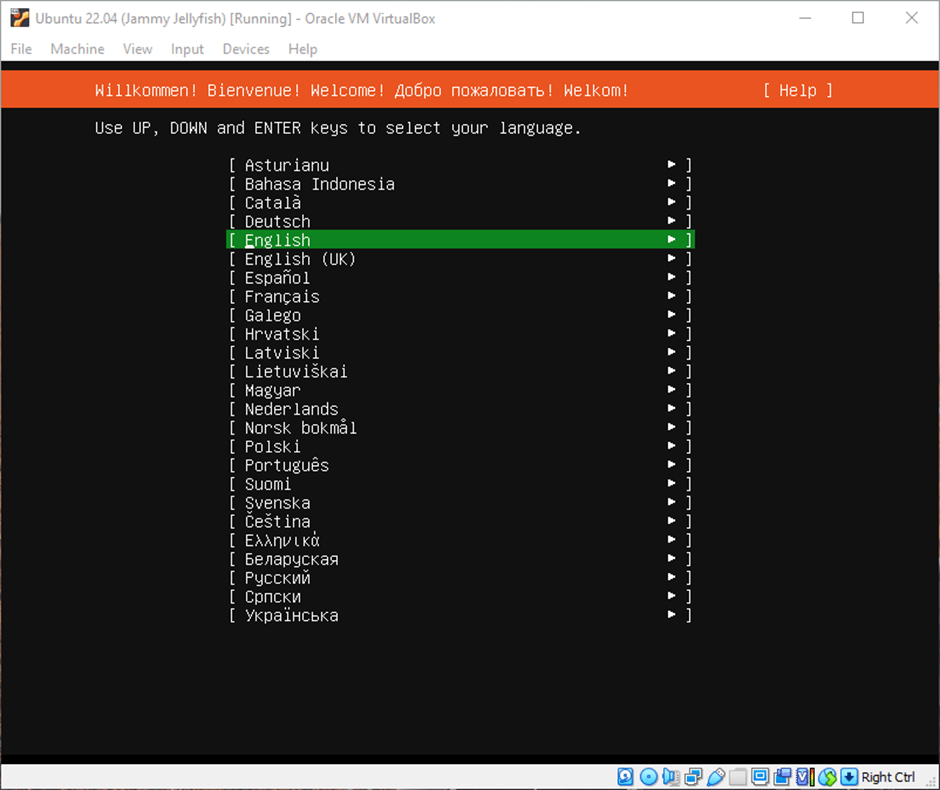
Choose the Language, region, and keyboard layout.
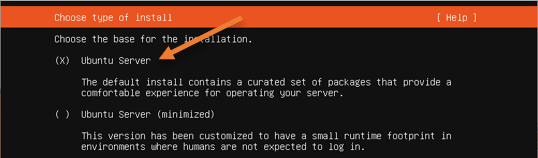
Choose the type of install.
You will be required to choose the type of Ubuntu server you would want to install, and I am choosing the default one. If you would like to install Ubuntu server with fewer resources, you may select minimized.
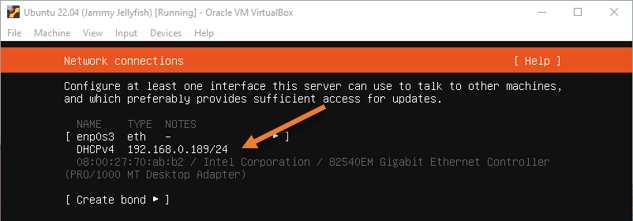
Configure the network.
I have chosen the network as bridged; hence, I got an Ip address from my local router. Even if you have NAT as an adapter, you must have an IP address added automatically.
Configure the proxy and the mirror.
If you use a proxy to get to the internet, you may enter them and click on done. You may leave this field blank if you don’t have a proxy.
In the Ubuntu mirror configuration, based on your location selection, it would choose the mirror near to that location. So you don’t have to make any changes. If you have an alternate mirror, you may choose that here and click on done.
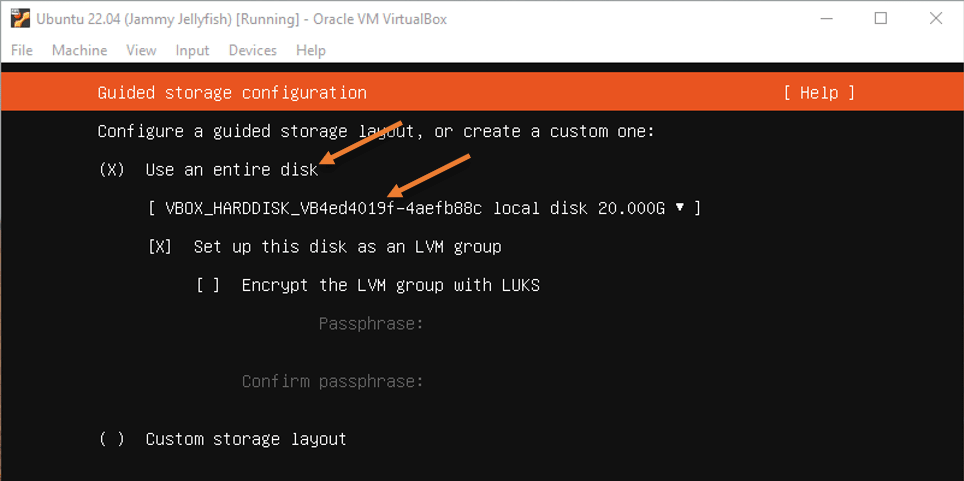
Configure the Storage.
We have defined the 20GB of storage on the VirtualBox side, and we are going to choose the entire disk as the virtual hard disk storage. I am choosing the default option. If you plan to configure hard disk with different partiotions you may select a Custom storage layout.
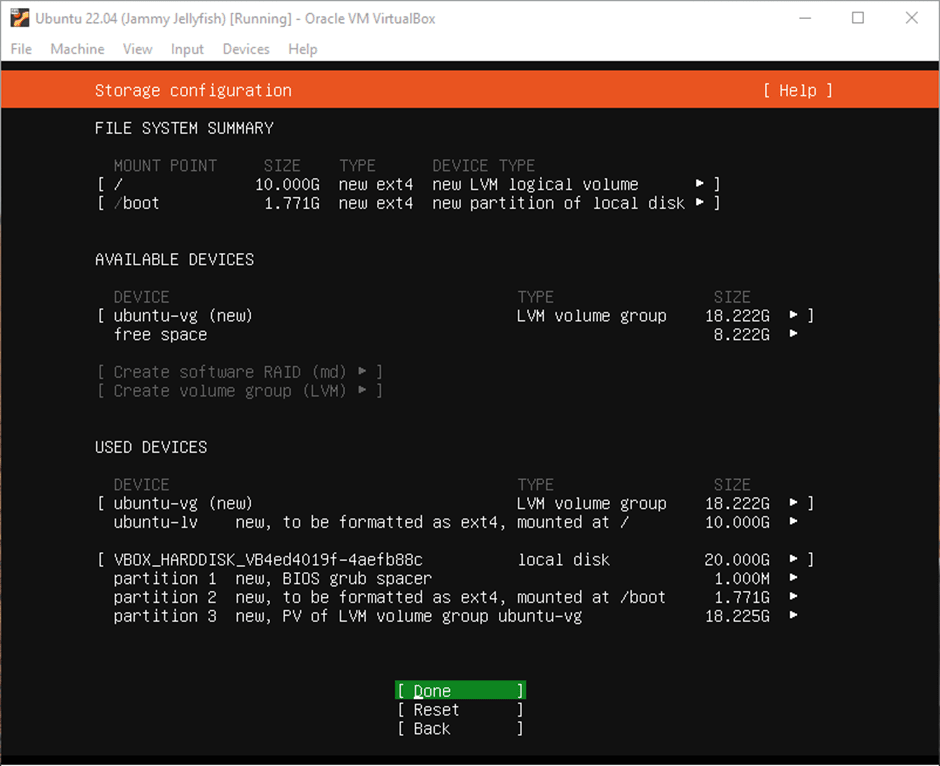
You will get the summary of how the storage is defined in Ubuntu. If you would like to make any changes, you may go back and do that else, click on done.
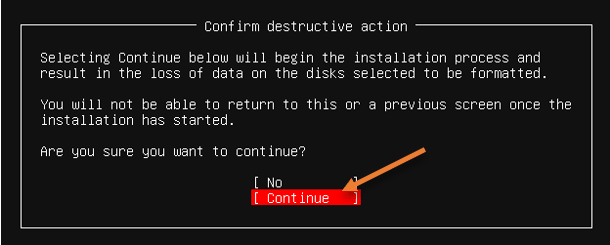
Format the Virtual hard disk.
You will get the warning that the virtual hard disk will be deleted. You may click on continue.
Profile Setup.
Based on your server configuration, you may set up a profile for your server.
This account will be used to log in to the server, and you need to remember the username and password to log in to the server later on.
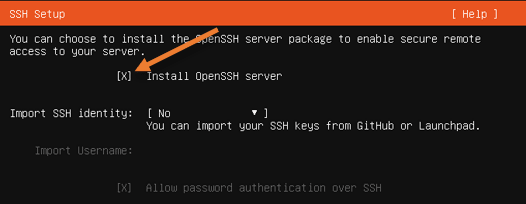
Install the SSH access.
After the installation, you must have SSH access enabled on the Ubuntu server 22.04 to log in remotely.
Select the Install OpenSSH server option selected using the spacebar.
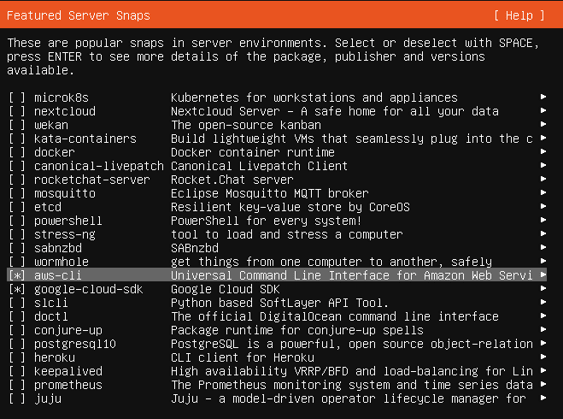
Choose the featured snaps.
By default, you will have featured snaps available to download, so make the selection and done based on the requirement.
I have chosen aws-cli and google-cloud-sdk and and done.
The installation will begin, and it will take some time to finish. Once completed, you may choose reboot now.
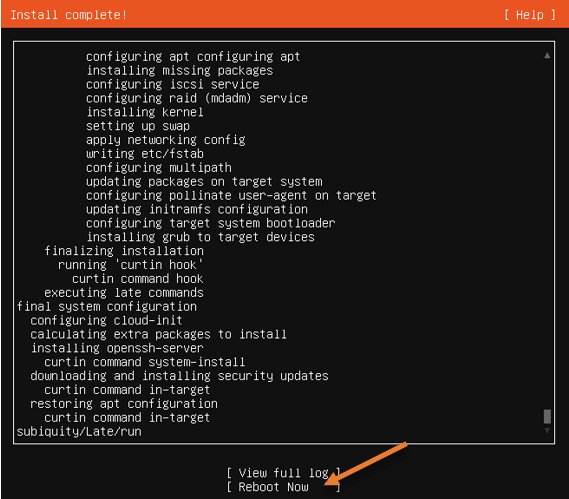
During the reboot, you will get an error message that says Failed unmount /cdrom. You may ignore that and hit enter.
I asked you to ignore the message because we don’t need to unmount the CD-Drive as it is the secondary boot device. Since the virtual hard disk is the primary boot device, it will always boot from it, which should be okay.
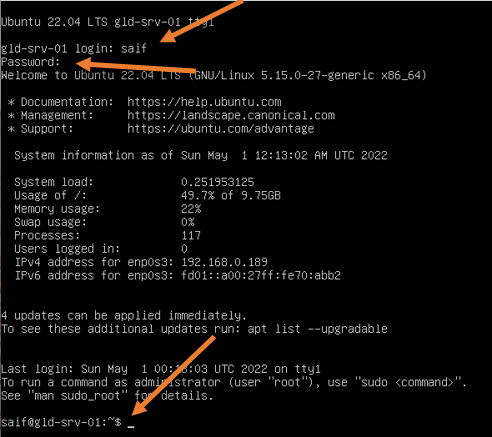
Login to the server.
After the server comes up, you will be asked to enter the username and password you have setup during the Ubuntu server 22.04 VM installation.
Enter the creds, and you should be able to login.
Login to the server using SSH.
As we have the bridge network enabled and the ssh service already installed, let’s confirm if we can remotely log in to the server.
If you have used NAT, you need to configure port forwarding to remotely access the server, as I mentioned earlier.
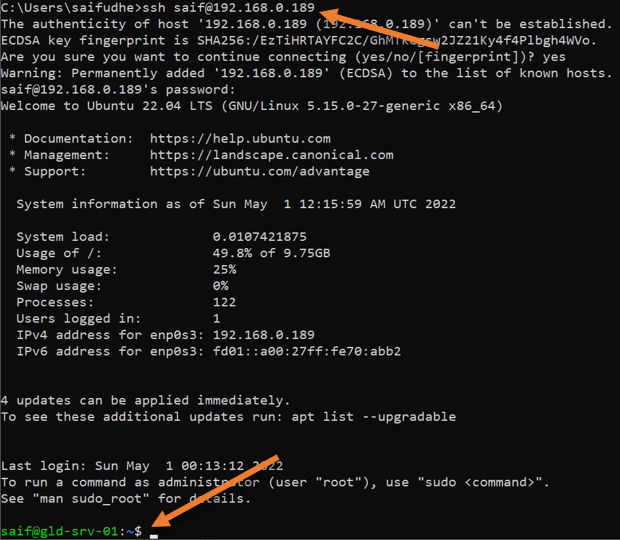
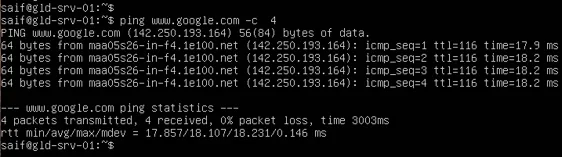
You can also confirm the server can go out to the internet.
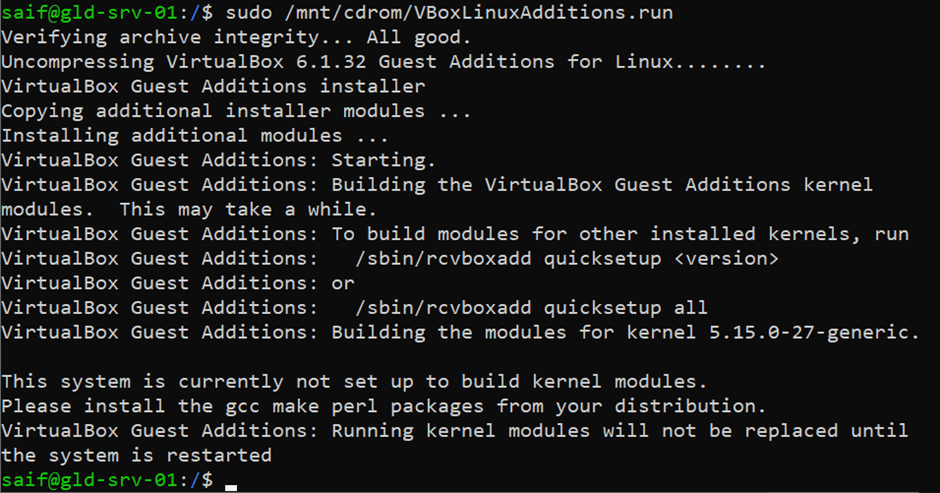
Install VirtualBox guest addtions.
You can follow the steps here to install the VirtualBox guest additions on the Ubuntu server 22.04 on VirtualBox.
After the installation, you may go ahead and reboot the server.
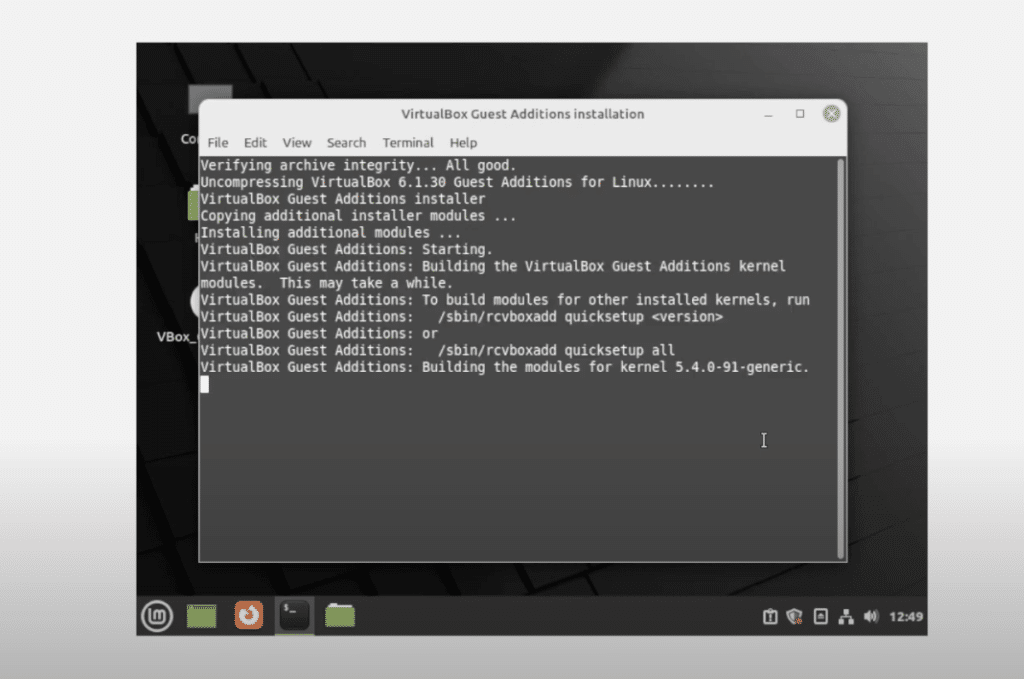
Note: During the VirtualBox guest addition installation, the Ubuntu server was complaining that there is no bzip2 not found error message as below in my setup.
saif@gld-srv-01:/$ sudo /mnt/cdrom/VBoxLinuxAdditions.run
Verifying archive integrity... All good.
Uncompressing VirtualBox 6.1.32 Guest Additions for Linux........
bzip2 not found. Please install: bzip2 tar; and try again.
If you are getting the similar error, you may issue the command sudo apt-get install bzip2 to install the required package and continue with the virtualbox guest additions installation.
In this article, you will learn how to install Linux Mint 19 on VirtualBox. I will guide you through each step, so you don’t get lost.
If you just want to try out Linux for the first time, it is probably a good idea to do that in a Virtual Machine first before committing to completely wiping Windows from your Computer and running Linux on it. I really like Linux Mint; it’s a great newbie Distribution for people coming from Windows (and I think it was designed with that in mind).
If you were scared or didn’t know how to get started with Linux, this tutorial is for you. You can’t break anything on your computer, and I will take you through the process step by step. So let’s get started and let us install Linux Mint 19.
If you prefer to try Ubuntu instead of Linux Mint, I got you covered. Ubuntu also is a great beginner Distro.
Table of Contents
- What do you need to install Linux Mint 19 on VirtualBox?
- Hardware
- Software
- Step 1 – Installing VirtualBox
- Step 2 – Creating a Virtual Machine
- Step 3 – Install Linux Mint 19
- Step 4 – Logging in
- Wrapping up
What do you need to install Linux Mint 19 on VirtualBox?
Hardware
If you run Windows 10, you should have a computer with at least:
- 8GB of RAM
- A Dual Core Processor
- At least 20GB of free hard disk space
If you use Windows 10, Windows alone will already eat up your 4GB of RAM, so there is nothing left to run a Virtual Machine on.
Software
Before starting, make sure you download the two files:
- Oracle VirtualBox
- The Linux Mint 19 ISO file (I recommend you download the 64bit Cinnamon edition)
Step 1 – Installing VirtualBox
As the first step, we are going to install Oracle VirtualBox. This is pretty straightforward, just run the installer and leave everything on default. Start VirtualBox soon as you get it installed.
Step 2 – Creating a Virtual Machine
Good, now we are going to create our first Virtual Machine. This is much easier than you might think. Once you have VirtualBox started, click on New. Give it a Name, and choose a Type and a Version as follows:
- Name: Linux Mint 19 (Or whatever you want to call it)
- Type: Linux
- Version: Ubuntu (64bit)
Click on Next and assign it a certain amount of Memory. For a good experience, a rule of thumb is: If you have 8GB of RAM, assign it 4GB. If you have 16, you can assign more, but you don’t have to. Mint runs pretty well, even on 4GB.
Click on Next when you are finished and select: Create a virtual hard disk now and click on Create. Leave it on the default VDI (VirtualBox Disk Image) and click Next. Leave it on Dynamically allocated and click Next. Dynamically allocated means that if you choose to give the VM 20 GB of space, but the size of your installation is only 6GB big, it will only eat up 6GB of your physical hard drive instead of the whole 20. But it will fill up to a maximum of 20GB.
On the final screen, click on the folder on the right to select a location where you want to save the VM file. The VM will be stored in a single file. Assign it 20GB for a good experience.

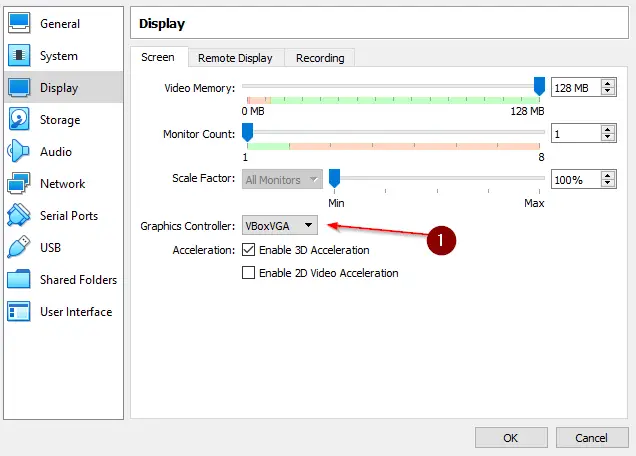
Next, right-click your VM, navigate to Display and make sure you choose VboxVGA for your Graphics Controller.
Perfect, you just created your first VM! Easy, wasn’t it? Next, we are going to install Linux Mint 19.
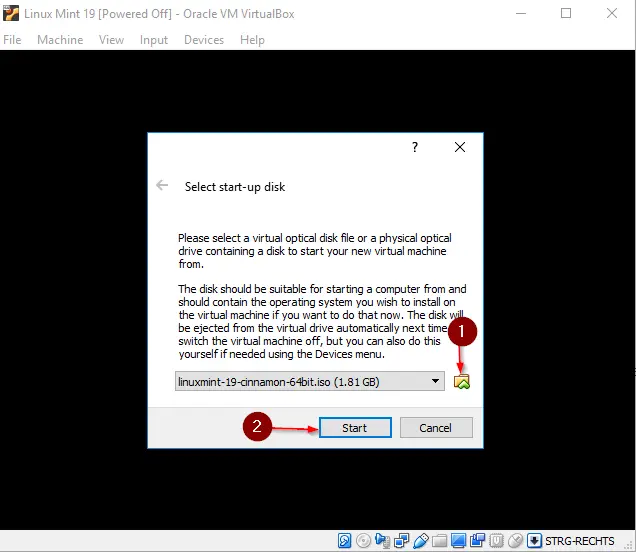
Alright, time for the fun part! Let’s start up your VM. Once you start it, it will ask you to provide an image file. That’s the Linux Mint 19 ISO file we downloaded earlier. Select your Linux Mint 19 VM and either click on Start from the navigation bar on the top or simply right-click the VM and hit Start -> Normal Start.
Now select the Linux Mint 19 ISO file from your Downloads folder.
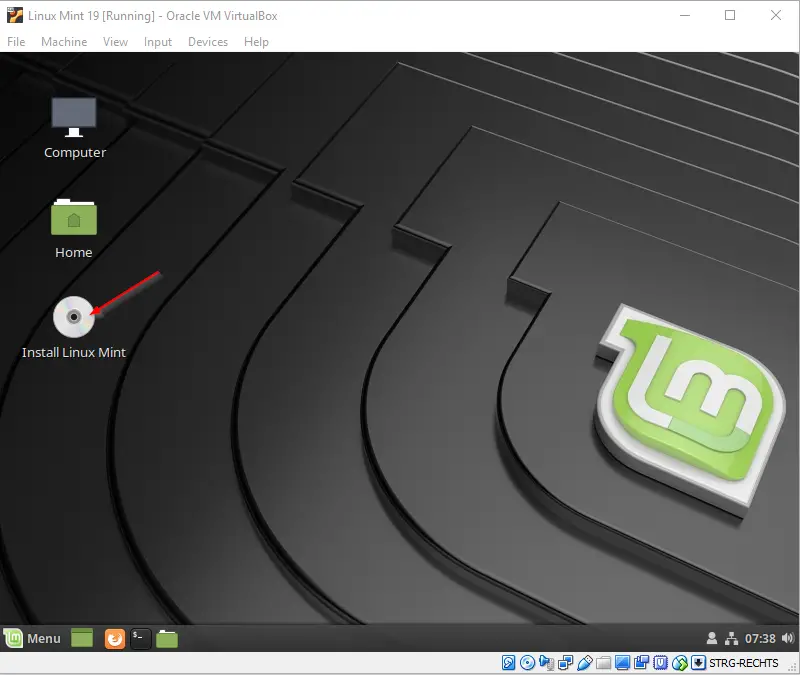
After you did this, Linux Mint 19 will boot into its live environment. Simply double-click Install Linux Mint on the Desktop.
This will bring up the installation menu. Now I won’t attach a screenshot for every step but I will guide you through in text form:
- Welcome Screen: Select your language and click Continue.
- Keyboard Layout: Select your preferred Keyboard layout and click Continue.
- Preparing to install Linux Mint: Leave the install third-party software box unticked. Click Continue.
- Installation type: Check Erase disk and install Linux Mint. Choose if you want to Encrypt your Hard Disk. Click Install Now.
- Write the changes to disks: Click Continue.
- Where are you: Select your Region to set the correct time zone.
- Who are you: Select a Username, a Computer Name, and a strong password. Click Continue.
Finally, the installer is running and installing Mint on your Virtual Hard Disk. Lean back and enjoy some cat pics, or check out some other Open Source Tutorials. When the installer is finished, click on Restart Now to reboot into your brand new Linux Mint 19 installation.
Press Enter in the remove the installation medium screen. VirtualBox automatically removes that for you.
Step 4 – Logging in
Now you can log in with your Username and Password that you set up earlier. You can play around with Mint now, even use the Internet, without having to install it on your physical computer. Great, isn’t it? You can go ahead and maximize the VirtualBox Window or even run Mint in Fullscreen mode to have a real Linux experience. Simply click on View -> Full-Screen Mode.
Wrapping up
I really like Linux Mint from a SysAdmin point of view. It’s the closest thing to Windows 10 that I know of, and really good for beginners who are interested in giving Linux a try.
If you are a Windows user and are trying Mint for the first time, let me know about your experience in the comments below!
Stefan
Stefan is the founder & creative head behind Ceos3c.
Stefan is a self-taught Software Engineer & Cyber Security professional and he helps other people to learn complicated topics.