
Table of Contents
Requirements
- USB pen drive (8GB or more).
- Root password (or sudo privileges).
- The disk image for Windows 10, Windows 11.
Ventoy is a great free and open source tool wherewith you can simply copy iso images to a USB pen drive and then mount and run them easily, directly from your computer without the need of another operating system.
Download the Windows 10/11 disk image
Download the Windows 10/11 disk image from the official Microsoft website:
- https://www.microsoft.com/en-gb/software-download/windows10
- https://www.microsoft.com/en-gb/software-download/windows11
Note
Note: Do not use any third party iso files for obvious security reasons.
Prepare your USB drive
Ventoy formats the USB disk while creating the bootable disk. However, we noticed it failed to do so for an already bootable Linux disk. For this reason, we advise you to format the USB disk before you proceed further.
1. Insert and then format the USB disk. You can do that from the Disks utility.
It doesn’t matter which filesystem you choose during formatting. It will be formatted again by Ventoy in the later steps. Once it is formatted, keep it plugged in and go on to the next step of installing Ventoy.
Download and run Ventoy
2. It is recommended to download the latest version. The file that should be downloaded ends with tar.gz. Once downloaded, extract the tar.gz file. Simply right-click on it and extract it.
3. Go inside the extracted folder, and you’ll find a few scripts in it. You need to execute the file named VentoyWeb.sh. To do that, you’ll have to use the command line.
You can use the Open in Terminal feature of the File Manager to open Terminal in the current location.
4. Once you are in the correct directory in the Terminal, use the following command to run Ventoy:
5. Ventoy runs inside a browser. It will give you the URL when you run it. Copy this URL and paste it in a browser.
Flash Ventoy on the USB pen drive
2. It will open a web page with Ventoy running in it and if the USB is already plugged in, it should recognize it. If not, press the refresh button.
3. Nows day, almost computers are support UEFI boot mode. So, you need change the Partition Style from the Option menu. Considering you are going for a UEFI installation, it will be wise use GPT for partitioning style.
4. Once the things are set, hit the button. It will show you a couple of obligatory warnings. Confirm your action by clicking on twice. The USB pen drive will be formatted. Wait for at least a minute after the operation has been completed.
5. If the installation completes successfully, you should see a success message.
When you hit the install button, it creates two partitions on the USB disk.
- VTOYEFI: A small partition for the UEFI files for booting.
- Ventoy: A big and empty partition in ExFAT format where you’ll copy the ISO image into it.
6. Now, copy the ISO image of the Windows 10/11 into the bigger ExFAT partition on the USB disk.
Note
Note: Once the copying finishes, DO NOT RUSH to plug out the USB just yet. Click on the unmount option from the file manager. Chances are that some files are still being written and it may show an error message.
Wait for a few more minutes and you should see a message that it is safe to remove the disk. Now you can unplug it and use it on whichever system you want.
Using the bootable Windows 10/11 disk
1. You are almost there. Insert your bootable Windows USB key you created in the previous section. Start the computer and at boot time, press F2 or F10 or F12 repeatedly to go to the boot settings. In here, select to boot from your USB.
2. It takes a couple of minutes to start the Windows disk. You should see a screen like this, and it will give you the option to install Windows.
3. Select the option Boot in normal mode.
4. You’ll see that Windows 10/11 is being booted and it gives you the option to install or repair your system. You know what to do now from here.
That’s it! You can now simply use your USB pen drive to boot to Windows 10/11. You can even copy other images of operating systems to your Ventoy USB pen drive to create a personal library of operating systems.
Additionally, if you just want to create the Windows bootable USB disk only once. You can close the Terminal window then delete Ventoy from your system.
If you have a computer running Windows 11 (or 10), you can set up a dual-boot configuration with Linux Mint, and in this guide, I’ll explain the steps to complete this process.
Although you can run Linux Mint (and other distributions) alongside Windows 11 using the Windows Subsystem for Linux (WSL) or a virtual machine, it’s also possible to install this distro in a dual-boot system to have full access to the hardware capabilities.
Or, if you’re still using Windows 10, you can configure a dual-boot system to test Linux Mint as the replacement operating system, as Windows 10 will retire on October 14, 2025.
In this guide, I will explain how to set up a dual-boot system using Windows and Mint. (You can follow these instructions to dual-boot Windows 11 and Ubuntu.)
Warning: It’s important to note that even though it’s safe to use this process to install Linux alongside Windows, creating a full backup of your computer before proceeding in case you need to roll back is still recommended.
Setting up a dual-boot system involves three main steps. First, create a Linux Mint bootable USB drive. Next, shrink the current Windows installation to allocate space for Linux. Finally, install Linux Mint alongside Windows 11 (or 10) on the same computer.
If your computer uses drive encryption, it’s recommended that you temporarily disable BitLocker before proceeding. Once Linux is installed, you can re-enable BitLocker.
- Create Linux Mint USB bootable media
- Shrink Windows 11 partition
- Dual-boot Windows 11 and Linux Mint
Create Linux Mint USB bootable media
The easiest way to create a bootable USB drive that works with both BIOS and UEFI systems is by using the Rufus tool. Rufus is user-friendly and widely recommended for this purpose.
To create a bootable Linux USB drive, follow these steps:
-
Open the Linux Mint download page.
-
Click the Download button for the Cinnamon Edition.

-
Click the download link closer to your location under the “Download mirrors” section.
-
Save the ISO file on your computer.
-
Open the Rufus website.
-
Click the link to download the latest version under the “Download” section.
-
Choose the USB flash drive from the “Device” setting.
-
Double-click the executable to launch the tool.
-
Click the Select button.

-
Select the Linux Mint ISO file.
-
Click the Open button.
-
Continue with the default settings after the download.
-
(Optional) Specify a name for the drive under the “Volume label” setting.
-
Click the Start button.
-
Click the OK button with the default option.

-
Click the Yes button.

-
Click the OK button.


After completing the steps, you can proceed with the steps below to create a dual-boot system with Linux Mint and Windows 11.
Alternatively, you can use the Ventoy utility to make any installation media bootable by dragging and dropping the ISO file into a USB flash drive.
Shrink Windows 11 partition
Although the Linux Mint setup has the option to install alongside Windows 11 (or 10), this feature may not always work. For that reason, you may want to manually shrink the Windows partition to create space to install the Linux distro.
Alternatively, you can use a secondary internal drive for the Linux Mint setup. This approach keeps each operating system on a separate physical drive, avoiding the need to modify the existing drive partition and reducing the risk of accidental data loss.
If your device does not currently have an operating system installed, perform a clean installation of Windows 11 (or use these steps for Windows 10). Once the installation is complete, proceed with the instructions below to set up a dual-boot configuration.
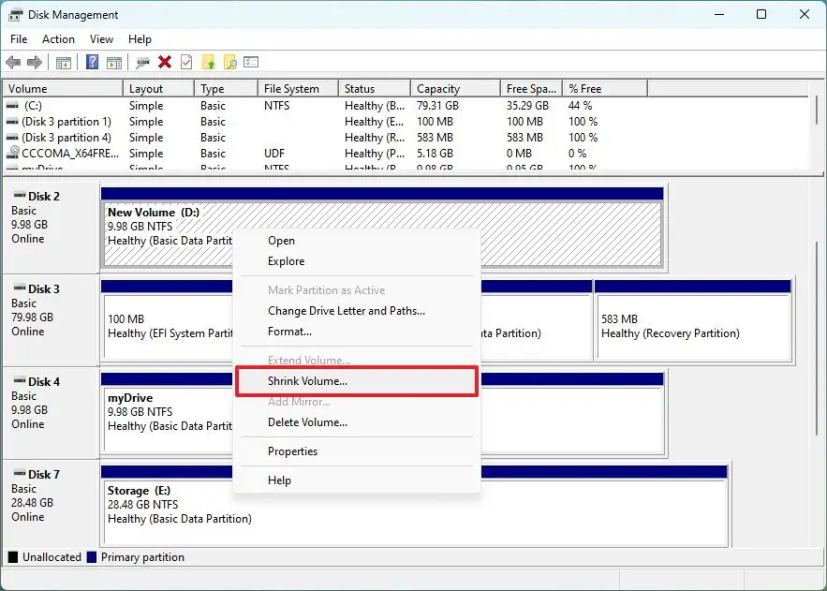
To shrink a partition on Windows 11 or 10 using Disk Management, follow these steps:
-
Open Start.
-
Search for Create and format hard disk partitions and click the top result to open the Disk Management console.
-
Right-click the drive you want to change its partition size and select the Shrink Volume option.

-
Confirm the amount of space to shrink the partition (in megabytes).
Quick note: Linux Mint requires at least 20GB of available space, but the rule of thumb is to reserve at least 100GB.
-
Click the Shrink button.

Once you complete the steps, you’ll have a smaller partition and some unallocated space to install Linux Mint.
Dual-boot Windows 11 and Linux Mint
After shrinking the system partition and creating a bootable Linux Mint installer, you can proceed with the dual-boot installation
To dual-boot Windows 11 and Linux Mint, follow these steps:
-
Start the PC with the Linux Mint USB flash drive.
Quick Tip: If your computer is not starting into the setup, you may need to access the system BIOS to change the boot settings to start from USB. Typically, you can change these settings by pressing one of the functions (for example, F2, F8, F12), Delete, or ESC key. However, check your computer manufacturer’s support website for more details.
-
Select the “Start Linux Mint” option and press Enter.

-
Double-click the “Install Linux Mint” icon on the desktop.

-
Select the installation language.
-
Click the Continue button.
-
Select the keyboard layout.
-
Click the Continue button.
-
(Optional) Check the “Install multimedia codecs” option.
-
Click the Continue button.
-
Select the “Something else” option on the “Installation type” page.
-
Click the Continue button.
-
Select the free space option, which is the unallocated space created with the Disk Management tool on Windows 11.
-
Click the “+” (plus) button to open the partition wizard.
-
Select the “/” option in the “Mount point” setting. Otherwise, you will receive the “no root file system is defined” error during a Linux Mint installation.
-
Click the OK button to create a Linux Mint-compatible partition with the total remaining space using the default settings.
-
Click the Install now button.
-
Click the Continue button.
-
Select your region.
-
Click the Continue button.
-
Create a local account for the Linux Mint installation.
-
Click the Continue button.
-
Click the Restart now button.
-
Disconnect the USB flash drive from the computer and press Enter.


Once you complete the steps, Linux Mint will install on your device alongside Windows 11 (or 10).
It’s important to note that since you are installing Linux as the second operating system, the Linux Mint installation will make the GRUB (Grand Unified Bootloader) the default experience.

Also, this setup will make the Linux Mint the default operating system. If you want to start the computer on Windows 11 (or Windows 10), you will have to select the “Windows Boot Manager” option.
WoeUSB is an application for GNU/Linux that enables you to create bootable USB media for Windows from Windows ISO images or DVDs.
So, there’s many different tools out there for all operating systems, for making USB’s of other systems. However, when it comes to making USB’s of Windows, from within a Linux system, I find that WoeUSB tends to be my go-to, it’s quick, painless, and worked without issues in the past.
The github site describes WoeUSB as, “…a simple tool that enable you to create your own usb stick windows installer from an iso image or a real DVD. It is a fork of Congelli501’s WinUSB.â€
WoeUSB
It goes on to continue:
This package contains two programs:
- woeusb: A command-line utility that enables you to create your own bootable Windows installation USB storage device from an existing Windows Installation disc or disk image
- woeusbgui: A GUI wrapper of woeusb based on WxWidgets
- Supported images: Windows Vista, Windows 7, Window 8.x, Windows 10. All languages and any version (home, pro…) and Windows PE are supported.
- Supported bootmodes: Legacy/MBR-style/IBM PC compatible bootmode. Native UEFI booting is supported for Windows 7 and later images (limited to the FAT filesystem as the target)
This project is a fork of Congelli501’s WinUSB software, which has not been maintained since 2012, according to the official website.â€
Installation of WoeUSB in Linux Mint or any Ubuntu based system is incredibly simple:
- sudo add-apt-repository ppa:nilarimogard/webupd8
- sudo apt update
- sudo apt install woeusb
WoeUSB is also available for Arch, Fedora, and Source, and more instructions can be found on the Github page. Essentially, most of the major systems can install without much of a hassle.
Using WoeUSB
Again, WoeUSB can’t really get much more simple. Select the ISO or CD/DVD image being used, select the target device from the list shown (your USB stick should automatically show up here), and let WoeUSB do its thing.
I found transferring to my no name 8GB USB stick took around 3-4 minutes to fire Windows 10 onto. You can then boot Windows from the USB Flash drive to install the operating system on a machine or upgrade an existing installation.
Last thoughts
Ultimately its a no-frills piece of software that doesn’t do anything fancy, but you don’t really need it to either. It simply works, I’ve never had an issue of any kind, and its the first thing I think of to recommend people in need of making a USB of Windows from within their GNU/Linux system.
Now Read:
- A comparison of GPT and MBR partition structures
- AutoBootDisk: copy Linux distributions to bootable USB drives
- Create bootable USB drives with Rufus
- How to fix broken USB install damaging your Linux dual boot
- The simplest way to make a LiveUSB from within GNU/Linux
Summary
Article Name
Easily make a Windows bootable USB from within Linux Mint with WoeUSB
Description
WoeUSB is an application for GNU/Linux that enables you to create bootable USB media for Windows from Windows ISO images or DVDs.
Author
Mike Turcotte-McCusker
Publisher
Ghacks Technology News
Logo
Advertisement
Whether you want to make a USB stick which can boot multiple ISOs or simply boot from a Windows ISO image, we recommend using Ventoy.
Ventoy
Ventoy is an open source tool which creates a special USB stick.
That stick contains an exFAT partition in which you can copy multiple ISO files and an EFI partition where Ventoy puts its bootable menu.
When you boot on the Ventoy USB stick, the menu lists all the ISOs you placed in the exFat partition and you can boot any of them.
Installation
Go to the Ventoy release page to find the latest version of Ventoy.
Download the tar.gz archive and decompress it.
Right-click the decompressed ventoy folder and choose Open in terminal.
Run the following command to start Ventoy:
Using Ventoy
Choose the device which corresponds to your USB stick.
Press the Install button.
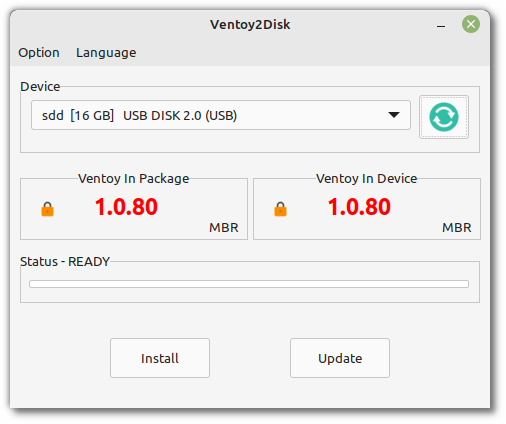
Once Ventoy is installed, your USB stick should now be called ventoy.
Mount it if’s not already mounted.
Copy ISO files to the stick.
Boot on the Ventoy USB stick.
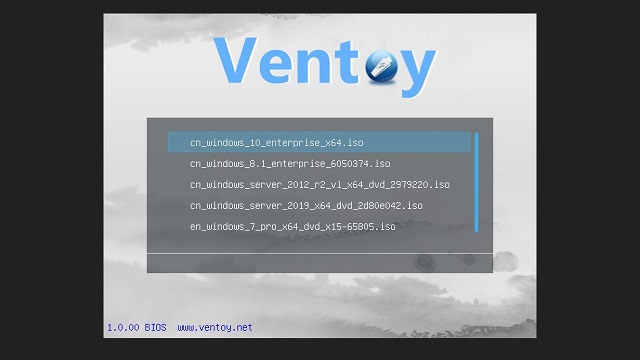
The ISOs you copied should appear as bootable options.
Перейти к содержимому
В жизни всякое случается. И даже пользователю Линукс вдруг приспичивает поставить Windows на какую-нибудь машину.
И тот, кто пробовал, знает — далеко не всегда создание загрузочной USB именно с Виндой завершается успехом — вроде бы делаешь все правильно, но компьютер, особенно из новых, эту флэшку в упор не видит. Проблема в софте — стандартные приложения тут, к сожалению, бессильны. Но —
— по счастью,
рабочее решение проблемы есть. Это WoeUSB.
Устанавливаем так:
sudo add-apt-repository ppa:nilarimogard/webupd8
sudo apt-get update
sudo apt-get install woeusb
Откуда берутся образы дисков с теми или иными операционными системами, я, конечно, рассказывать не буду. )))) Не забудьте перед установкой отформатировать ваш USB-носитель в FAT.