
This is about how to share files between Linux and Windows. Previously I have written an article for sharing files between Ubuntu Linux and Windows 10. Another article about creates a network with Linux and Windows. But now you can read this about share files via Linux Mint to Windows 10 and Windows to 10 Linux Mint. This could be the final article about sharing files between Linux and Windows. Because this article going to cover file sharing on all Linux distro and Windows clients.
- How to Share Files Between Ubuntu and Windows 10?
- How to Network Linux and Windows?
These two articles will help to solve most of your network and files sharing problems between Linux and Windows. So if specifically, you want to know sharing files via Linux Mint to Windows 10, follow this step by step article to share files between Linux and Windows.
No matter what Linux distro you are using, the Samba file server works perfectly for all Linux operating systems. Just try to learn how to use this simple files server on your favourite Linux distribution.
To share files between Linux Mint and Windows 10, firstly you must install the Samba files server on Linux Mint it’s not installed yet. By default, the Samba files server is installed on Linux Mint. So just try to share files.
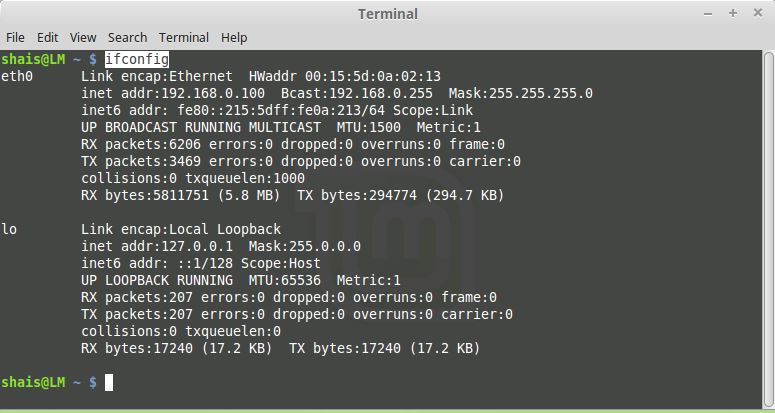
1. Set the IP address to Linux Mint or get it from the DHCP server. I have connected my computer through a Wireless Router, so all machines get their IP address automatically.
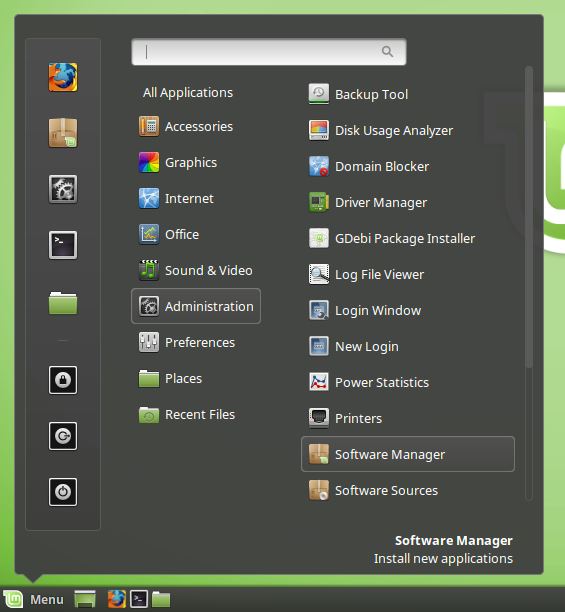
2. If the Samba is not installed, try to install it from the software manager or Terminal command line with the below command.
sudo apt-get update
sudo apt-get install samba
The Software Manager on Linux Mint is another option that helps you to install Samba.
3. Create and share a folder on Linux Mint. This shared folder will be reachable from Windows 10 machine. To share a folder, right-click the folder and select Properties. On the Properties window select the Share tab and tick the check box of Share this folder.
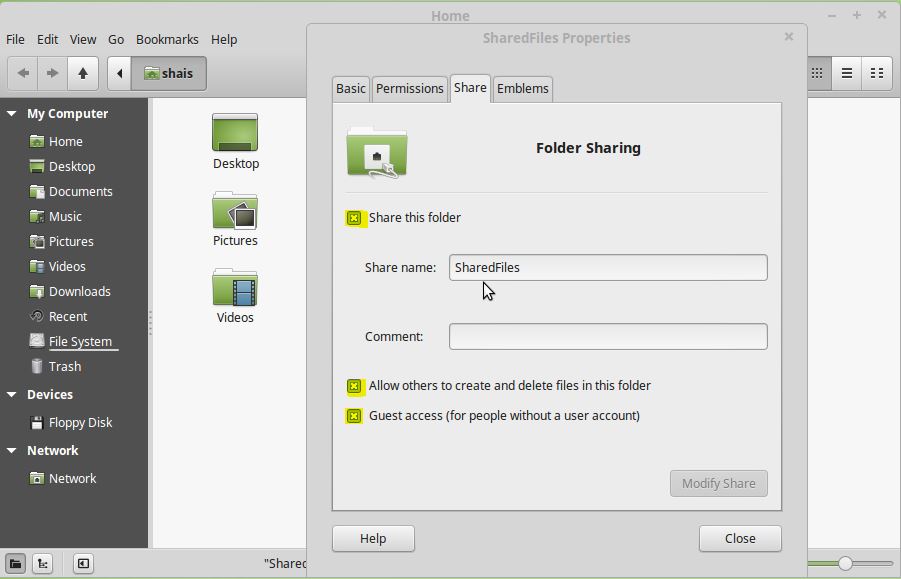
Change the permission to allow others to create and delete files in this folder also. Or the guest user has access to this Linux Mint shared folder. Finally, click Close to close all opened windows and go to Windows 10.
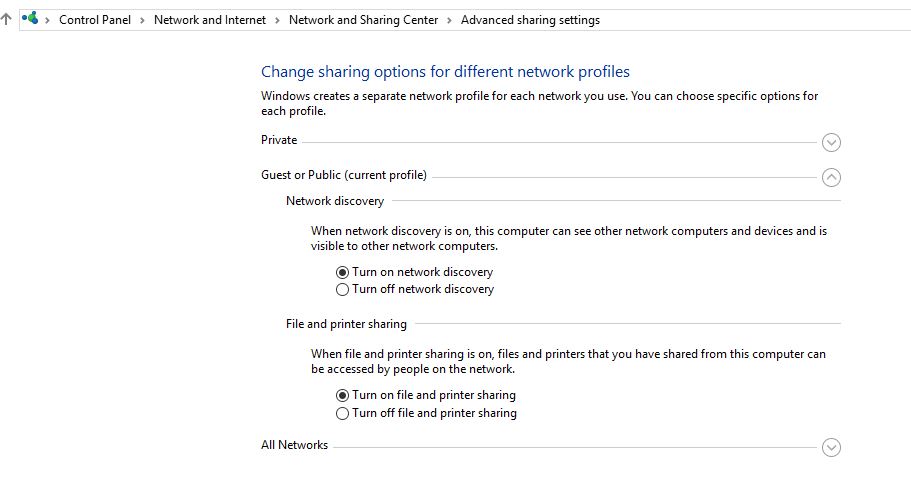
4. On Windows 10 make sure the IP address is configured correctly. Then try to enable network discovery from Network Settings. From Windows 10 Control Panel, Network and Internet, Network and Sharing Center select Advanced sharing settings. Finally, expand the Guest or Public profile and select Turn on network discovery.
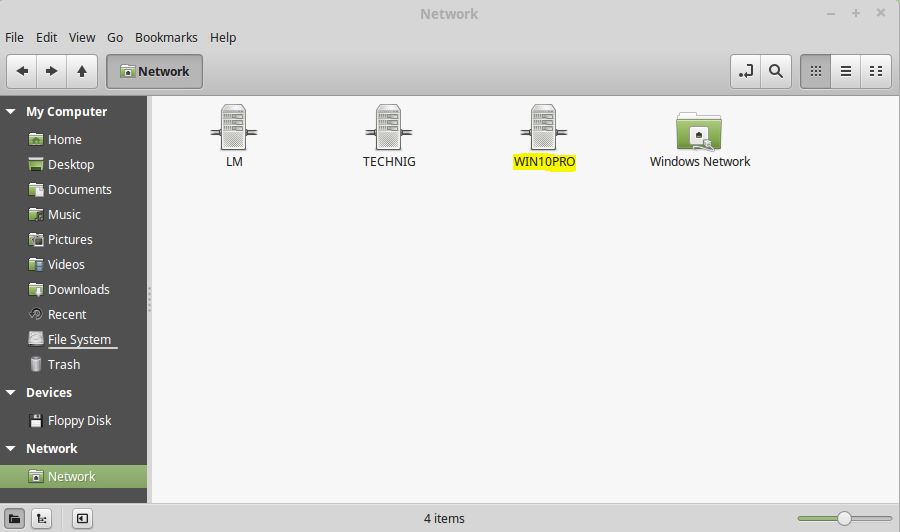
5. Now open the Network place from Windows 10 desktop or Windows File explorer and all machines must be listed like the below screenshot.
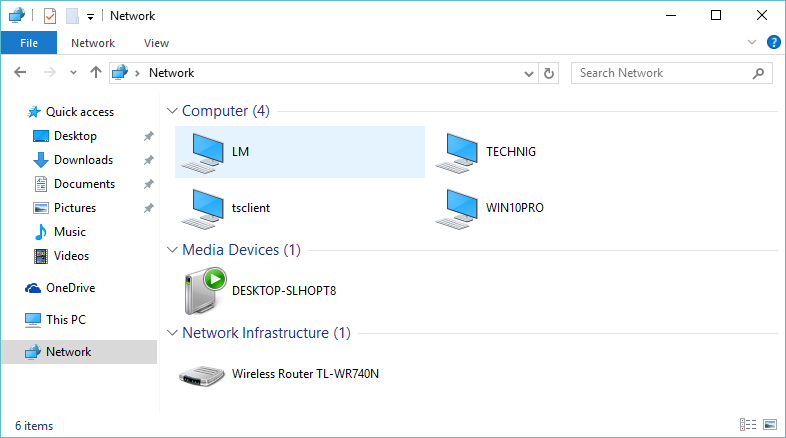
The LM is the Linux Mint machine. Open your Linux machine and see the shared folder. Yes, the file or folder has been shared successfully from Linux Mint to Windows. Let do sharing files via Windows to Linux.
Sharing Files via Windows 10 to Linux
It’s for Linux users that are not familiar with the Windows environment. Sharing files are the same but the interfaces are different.
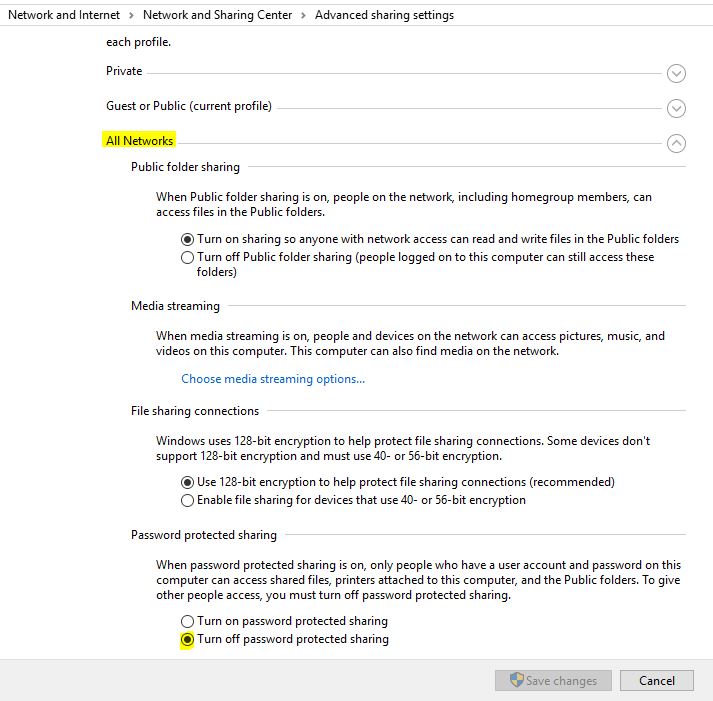
1. Make sure your Windows is ready for sharing files. The network discovery and Public File Sharing must be enabled on Windows 10. These are works the same on others Windows like Windows 8 and 7.
- How to Network Linux and Windows?
2. To enable these setting, navigate to Windows Control Panel, Network and Sharing Center, Advanced Sharing Settings and expand the All Networks.
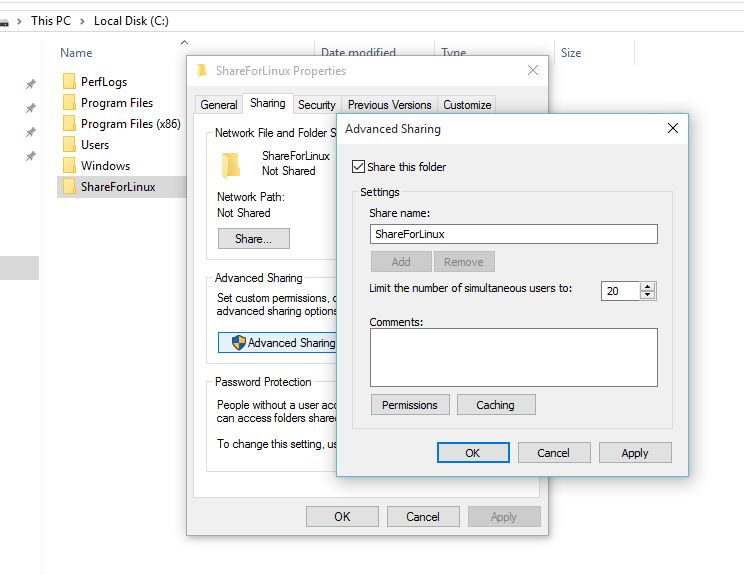
3. Let’s create a folder and share it for Linux. This folder must be reachable from the Linux Mint network section. To share a folder in Windows, right-click the folder and select Properties. On the Properties windows select Sharing tab. Then select Advanced Sharing to open the Advanced Sharing window. Now tick the check box of Share this folder. Finally, assign full permission form Permissions section and click OK to apply changes and closing the windows.
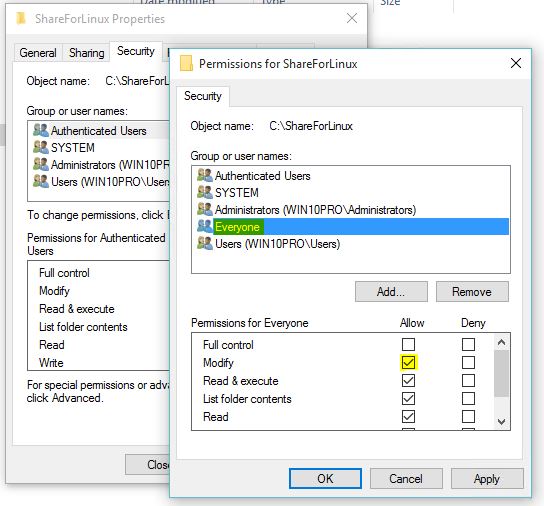
4. Try to assign the NTFS permission from the Security tab of folder properties also. If it’s not assigned, the folder will not be open over the network. To do this, add the Everyone group and assign the Modify permission.
5. Now go to Linux Mint and open the Network to see the Windows Network. Find the Windows machine and open it. You must see the shared folders.
That’s all. Hope it can solve the problems to share files via Linux to Windows 10 and Sharing files from Windows to Linux machines.
Final Word
The new chapter for Linux lovers happened. Nowadays social media users are sharing something that “Microsoft Love Linux“. It’s good to hear that a big company wants to support Linux. But mostly it reminds me of a proverb in Persian that says “The respect of Wolf could not be free“. I think Microsoft comes to swallow the Linux philosophy before loving. Hope it will not happen.
So, try to ask your questions related to sharing files via Linux Mint to Windows 10 and not discussing MS & Linux.
Sharing files between two operating systems can be pretty tricky at times. While Linux Mint and Windows use different file systems, several methods are still available to share files between them. In this article, we will provide step-by-step instructions on transferring files using Samba, a widely-used file-sharing protocol that allows Windows and Linux systems to communicate with each other.
We will also explore how to set up shared folders on Windows computers and connect to them from Linux Mint. By the end of this article, you will clearly understand how to seamlessly share files between these two systems, making your work easier and more productive. Linux Mint has always been known for its simple interface and ease of use. One of its many benefits is its ability to share files and folders across a network, which can be helpful for businesses or individuals who need to collaborate on projects or transfer data between computers. Learn how to share files and folders on a Linux Mint network easily.
Sharing files between Linux Mint and Windows
Setting up Samba on Linux Mint
Samba is an open-source software suite that allows Linux and Windows computers to share files, printers, and other resources. Samba uses the SMB/CIFS (Server Message Block/Common Internet File System) protocol to communicate with Windows systems. Let us look at the step-by-step procedure for setting up Samba on Linux Mint.
Open the terminal on your Linux Mint system. Run the following command to install Samba:
sudo apt-get install samba
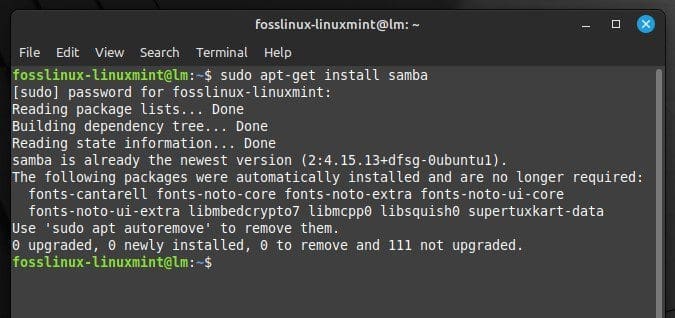
Installing Samba on Linux Mint
After the installation is complete, run the following command to create a backup of the Samba configuration file:
sudo cp /etc/samba/smb.conf /etc/samba/smb.conf.bak

Creating a backup of the Samba configuration file
Now, open the Samba configuration file in a text editor with the following command:
sudo nano /etc/samba/smb.conf
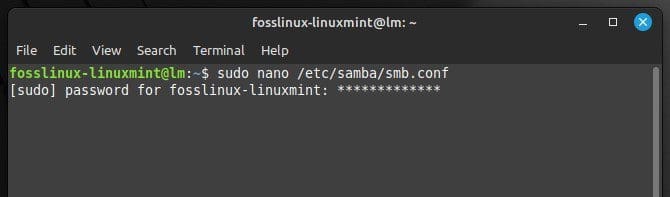
Opening the Samba configuration file
Scroll down to the bottom of the file and add these lines:
folder1

    path = /home/desktop/folder1

    available = yes

    valid users = fosslinux

    read only = no

    browseable = yes
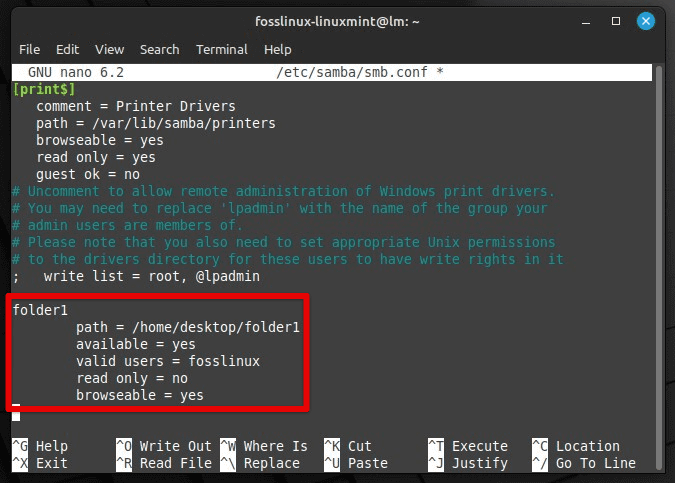
Replace “folder1” with the name you want to give the shared folder, “/home/desktop/folder1” with the actual path, and “fosslinux” with the username of the account that needs to have access to the shared folder. Save and close the file by pressing “Ctrl + O” and “Ctrl + X.”
Restart the Samba service by running the following command in the terminal:
sudo service smbd restart

Restarting the Samba service
Now, Samba is set up on your Linux Mint system, and you can proceed to configure it to share files with Windows computers. Did you know that sharing your Mint’s internet connection with other devices on the same network is also possible? Learn how to configure Linux Mint for internet connection sharing in this detailed guide.
Configuring Samba to share files
Now that you have installed Samba, it’s time to configure it to share files with Windows. Open the Samba configuration file in a text editor by running the following command:
sudo nano /etc/samba/smb.conf

Opening the configuration file
Scroll down to the bottom of the file and add these lines:
foldername

    path = /home/desktop/foldername

    available = yes

    valid users = fosslinux

    read only = no

    browseable = yes
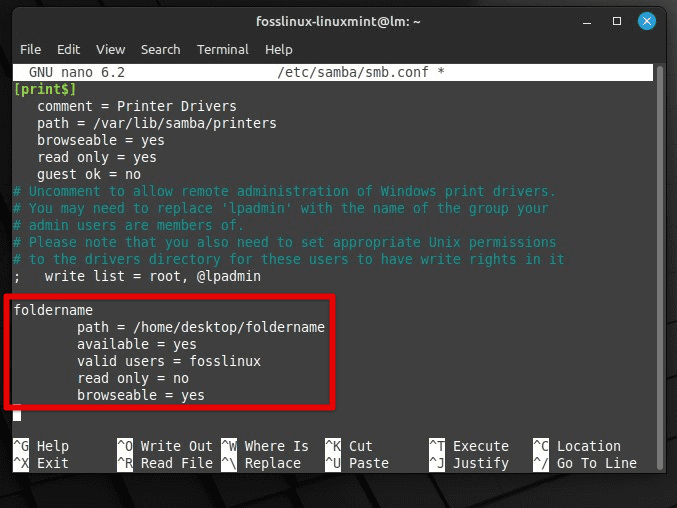
Editing the configuration file
Replace “foldername” with the name you want to give the shared folder, “/home/desktop/foldername” with the actual path, and “fosslinux” with the username of the account that needs to have access to the shared folder. Save and close the file by pressing “Ctrl + O” and “Ctrl + X”.
Set a Samba password for that user by running the following command:
sudo smbpasswd -a fosslinux
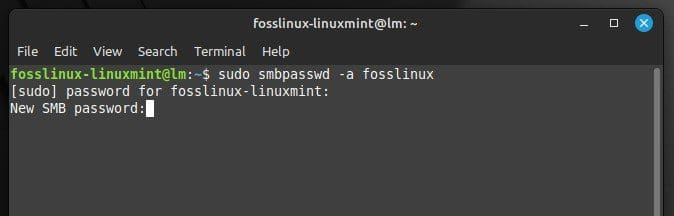
Setting a new password for Samba
Again, do not forget to replace “fosslinux” with the username on your end. You will be prompted to enter a password as soon as you run the above command.
Once the password is set, restart the Samba service with the following command:
sudo service smbd restart
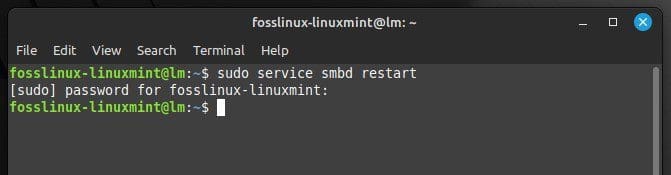
Restarting Samba
Open the Linux Mint firewall to allow Samba traffic.
sudo ufw allow samba

Enabling firewall to allow Samba traffic
Now, the Linux Mint system is fully configured to share files. You can proceed to connect with the shared folder from Windows.
Connecting with Samba from Windows
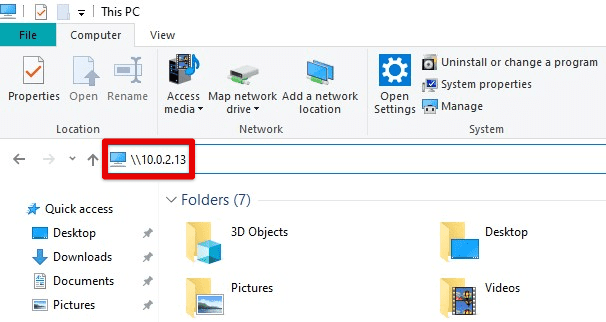
After you have set up Samba on Linux Mint and configured it to share files, you can connect to the shared folder from a Windows computer. This section will provide step-by-step instructions on how to do so. Launch Windows on your device and go to the file explorer. In the address bar, type the following:
\\10.0.2.13
Replace “10.0.2.13” with the actual IP address of your Linux device. Next, you will be prompted to enter the username and password you created in the Samba configuration file. Enter the username and password and click on “OK” to proceed.
Connecting to Linux Mint from Windows file explorer
You should now see the shared folder inside the file explorer on your Linux Mint computer. To access the shared folder in the future, create a shortcut by right-clicking on it and selecting “Pin to Quick Access” or “Add to Favorites”. Now, you can easily share any files copied into that folder from Linux Mint.
Configuring sharing setup on Windows
In addition to configuring Samba on Linux Mint, you may need to set up a shared folder from the Windows side. Doing so would complete a two-way transfer connection between these systems. Right-click on the folder you want to share and select “Properties.”
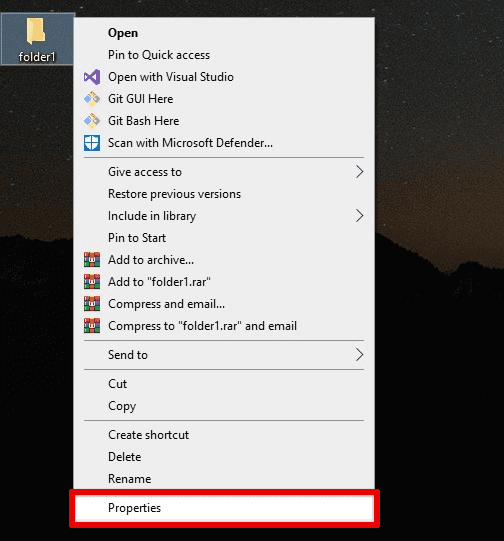
Opening folder properties
Go to the “Sharing” tab and click the “Advanced Sharing” button. Check the box next to “Share this folder” and enter a name to be used for that shared folder.
Advanced sharing options in sharing tab
Click on the “Permissions” button and set the appropriate permissions for the users with access to its contents. Finally, click on “OK” to save these changes.
Setting appropriate permissions
Go to “Security” and set the appropriate permissions. Click on “OK” to save these changes as well.
Setting security permissions
If the Windows device is behind a firewall, you will have to allow inbound traffic for file sharing explicitly. Go to the Control Panel, click “System and Security,” and then click “Windows Firewall.” Next, go to “Advanced settings” and then select “Inbound Rules.” Next, click “New Rule” and select “File and Printer Sharing” from the list. From there onwards, follow the on-screen prompts to complete the process.
Connecting to Windows from Linux Mint
After configuring the sharing setup on Windows, the last step would be to connect to the Windows shared folder from Linux Mint. In this section, there are step-by-step instructions to do so using Samba. Open the file manager on Linux Mint. Click on the address bar at the top and type the following:
smb:// desktop-SN4H230/folder1
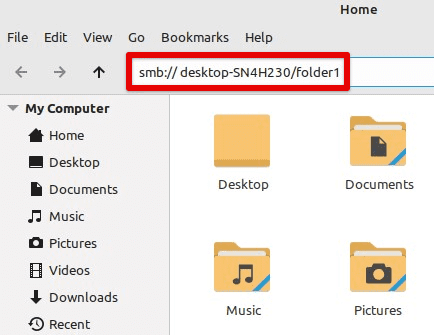
Connecting to Windows from Linux Mint
Replace “desktop-SN4H230” and “folder1” with the name of your Windows computer and the shared folder, respectively. You will be prompted to enter the username and password you created when setting up the shared folder on Windows. Enter the credentials and then click on “OK” to proceed.
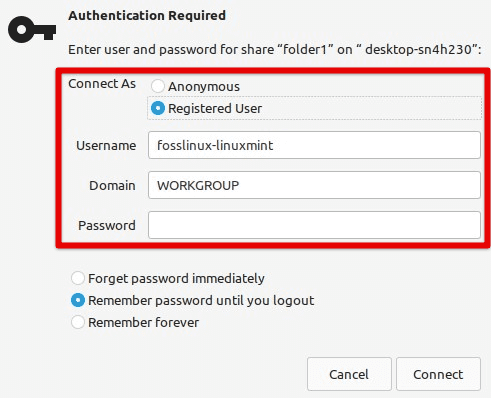
Entering credentials
You should now be able to see the shared folder on both devices simultaneously. Anything you copy into one directory will also appear on the other side. To access the shared folder easily, create a bookmark by right-clicking on it and selecting “Add Bookmark”.
Troubleshooting common issues
While sharing files between Linux Mint and Windows is generally straightforward, there may be some common issues that you might encounter. This section will discuss some of these problems and provide troubleshooting steps to resolve them.
Unable to connect with Samba from Windows
Check that Samba is running on Linux Mint by running the following command in the terminal:
sudo service smbd status
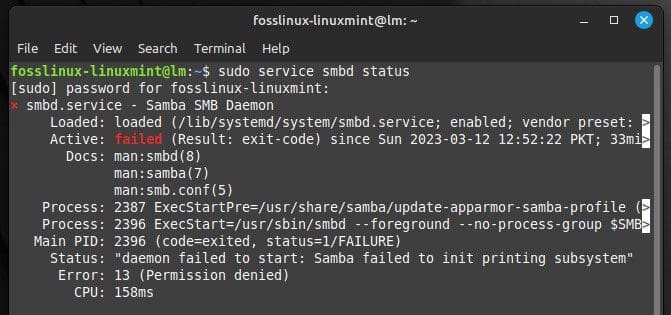
Checking Samba service status
Make sure that your firewall is not blocking Samba traffic. Try disabling the firewall temporarily to see if the connection can be established.
sudo ufw disable
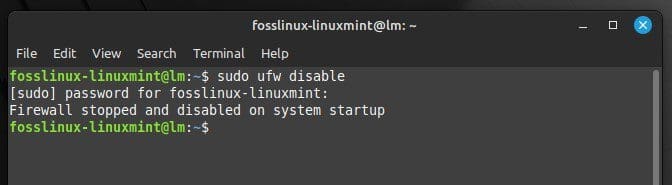
Disabling the firewall on Linux Mint
Verify that the shared folder on your Linux Mint device has the correct permissions. If not, change the permissions to give everyone with the credentials direct access to its contents. Also, validate that the username and password entered when connecting to Samba from Windows are correct.
Unable to connect with shared folder from Linux Mint
Ensure the Windows computer is powered on and connected to the network. Also, check to see if the folder has the correct permissions enabled from the control panel. Try changing them to allow general access.
Share permissions on Windows
It is also important to ensure that both Linux Mint and Windows devices are connected to the same wired or wireless network. Very commonly, users end up using the wrong IP address when configuring the connection. Therefore, ensure that the hostname or IP address used to connect to the other device is correct and validated. For verification, try pinging the Windows computer from Linux Mint.
Unable to see shared folder in Linux Mint file manager
In most cases, this problem arises when the folder to be synced is not shared correctly from the Windows side. Try re-sharing it and double-checking the configuration settings. Once again, ensure the computer is powered on and connected to the same network.
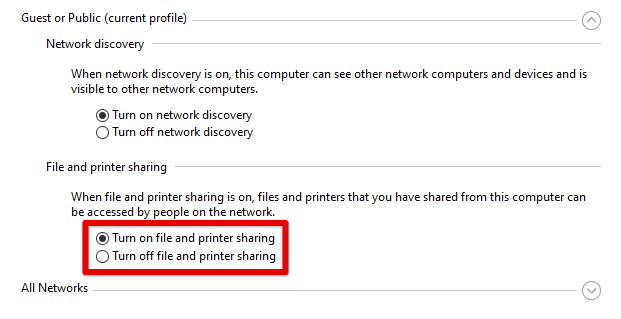
Enabling file and printer sharing
Another critical thing is to confirm that your Windows computer is configured to allow file sharing in general. Go to Control Panel > Network and Sharing Center > Change advanced sharing settings. Here, you can verify whether file and printer sharing is enabled.
Slow transfer speeds
If you can form a connection, but the file sharing is taking longer than expected, try connecting the systems through a wired connection. Doing so will reduce latency. Although, this can only be done if both devices are nearby.
Also, ensure that the network you transfer the files through is not congested. You may try sharing files at a different time when the traffic is lower than usual. Another crucial factor to consider here is that both Linux Mint and Windows must have enough resources to handle the file transfer. Close any unnecessary programs or processes to free up system memory on both ends.
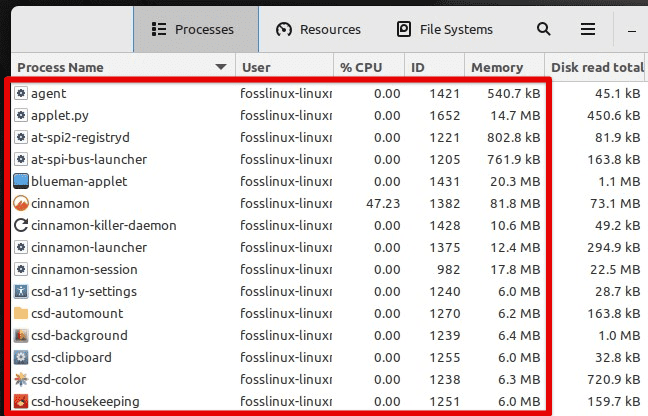
Linux Mint processes
By following these troubleshooting steps, you should be able to resolve the most common issues you may encounter when sharing files between Linux Mint and Windows.
Conclusion
Samba is a powerful tool that can make sharing files between different operating systems seamless and hassle-free. With some configuration and troubleshooting, you can make the most out of your file-sharing experience. In this article, we discussed how to share files between Linux Mint and Windows using Samba.
Detailed instructions on how to set up Samba on Linux Mint, configure it to share files, and connect to it from Windows were included. Finally, we provided troubleshooting steps for common issues when sharing files in such a setup. Are you looking for a way to wirelessly transfer files between your Android phone/tablet and your Linux PC? Here is a detailed guide on how to share files between Android and Linux wirelessly.
Sharing files between Linux Mint and Windows 10 can be done in a few simple steps. First, you will need to make sure that both machines are connected to the same network. Then, on the computer running Linux Mint, open your File Manager and select the folder or file you want to share. Right-click on it and select “Local Network Share” from the menu. On the next page, add a user name and password for remote access if desired. Finally, use Windows Explorer on your Windows machine to search for devices on your local network; you should see an entry for your Linux machine with shared folders available for access using this username/password combination (if provided).
How do I share files between Windows 10 and Linux?
Sharing files between Windows 10 and Linux can be accomplished with a few simple steps. First, make sure that both machines are connected to the same network and have access to one another. On the Windows machine, you’ll want to enable file sharing by going into Control Panel > Network and Internet > Network Sharing Center > Advanced Sharing Settings. From here, select “Turn on network discovery” and “Turn on file and printer sharing”.
On the Linux machine, you may need to install an additional software package such as Samba which will allow it to connect to other computers in your network. Once installed, open up System Tools > Shared Folders from within your operating system’s main menu (this may look different depending on what version of Linux you’re using). Here you should be able to see all devices available for connection – including your Windows 10 computer – enabling you to copy/paste files directly between them.
How to share files between Linux and Windows on same computer?
Sharing files between Linux and Windows operating systems on the same computer can be done in a few simple steps. First, you will need to create a shared folder that both OS’s can access. This is possible by creating the shared folder in either OS and setting sharing permissions for both read/write access. On Windows, this is done through File Explorer > right-click on folder > Properties > Sharing tab; on Linux, it’s done through terminal commands (e.g., chmod 777). Once the shared folder has been created and permissions set, you will then need to install a Samba server daemon so that each OS can communicate with one another over the local network connection. Finally, once installed, configure your Samba server settings within each operating system for file transfer protocols like FTP or SMB (or others) depending upon your needs/preferences. With these steps completed, users should now have full read/write access between their Linux and Windows computers when accessing their respective shared folders from each other’s filesystems
How do I enable file sharing in Linux Mint?
Enabling file sharing in Linux Mint is relatively straightforward and can be done by following a few steps. First, open up the system Settings window by clicking on the little gear icon in the panel at the bottom of your screen. Next, select “Sharing” from the list of options presented to you. Finally, toggle “Enable File Sharing” to turn it on or off as desired. That’s all there is to it!
How to connect Linux Mint to Windows 10?
Connecting Linux Mint to Windows 10 can be done in a few simple steps. First, ensure that both systems are on the same local network and have internet access. Then, open up the Network Connections window by searching for “Network & Sharing Center” in your Start menu. In this window, click on the Change adapter settings option located at the left side of the window. Here you will see all available networks; select one and right-click or double-click to bring up its Properties. Now enable file and printer sharing by checking off both boxes under File and Printer Sharing for Microsoft Networks as well as Client for Microsoft Networks if it is not already enabled (you may need to install it). Once these changes have been saved, you should be able to view resources from either system on either operating system’s computer browser — simply type [Computer Name] into your address bar where [Computer Name] is replaced with whatever name you gave each machine during setup. Finally, depending on what kind of data transfer you wish to do between machines — files such as documents or larger media content — there are additional steps outlined here which will allow for seamless transfers over FTP or Samba protocols: https://www.linuxmintusersguide.org/connecting_to_windows_networks/.
What software can I use to share files between Windows and Linux?
There are several software packages available for sharing files between Windows and Linux operating systems. Some of the most popular options include Samba, SSHFS, NFS, WebDAV, and Dropbox.
For basic file sharing between Windows and Linux machines, Samba is a good choice as it provides support for older versions of both platforms. To set up Samba you will need to install the appropriate server or client package on each machine depending on which one will be hosting the shared resource. Once installed you can configure it using a graphical user interface (GUI) or by editing its configuration files manually.
SSHFS is another option that allows you to mount remote directories from either platform over an SSH connection without having to install any additional software on either end. It supports secure file transfers over encrypted connections and requires minimal setup time compared to other solutions such as NFS or WebDAV which may require more technical knowledge in order to get them working properly.
NFS is primarily used for networked storage systems but can also be used as a way to share files between different computers running different operating systems such as Windows and Linux if they are all connected through a local area network (LAN). In this case setting up an NFS server would be required on at least one of the machines involved in order for this method to work properly.
WebDAV allows users to access resources stored remotely via HTTP/HTTPS protocols making it ideal for applications where direct access needs to be granted across multiple networks with no special installation requirements needed on either side. Additionally since WebDAV supports encryption methods like SSL/TLS your data remains safe during transit even when crossing untrusted networks like public Wi-Fi hotspots etcetera .
Finally there’s Dropbox which requires no special setup beyond creating an account before uploading your desired data into “the cloud” where it becomes accessible from any device running compatible platforms including both Windows & Linux based devices alike provided they have internet access enabled .
What is the fastest way to transfer files between Linux and Windows?
The fastest way to transfer files between Linux and Windows is to use a secure file transfer protocol (SFTP) tool. SFTP tools allow you to securely copy files from one computer or server to another over any network connection, including the Internet. Popular SFTP tools for Linux include OpenSSH and FileZilla, while popular options for Windows include WinSCP and Cyberduck.
To begin, you will need an SFTP client installed on both computers or servers that are involved in the file transfer process. Once the software is installed, open it up and enter the hostname of your destination computer into the “Host” field of your SFTP client. You may also need to enter a username and password if prompted by your destination computer’s security settings.
Once you have entered all necessary information into your SFTP client window, click “Connect” to establish an encrypted link with your destination computer over which files can be uploaded or downloaded quickly and securely. From there, simply drag-and-drop whichever files you wish to share between computers using either side of the window as needed before clicking “Disconnect” when finished transferring data from one system to another.
What tool transfers files between Windows and Linux?
The most commonly used tool for transferring files between Windows and Linux is an FTP client. An FTP (File Transfer Protocol) client allows you to securely transfer files between computers, regardless of the operating system they are running.
To use an FTP client, start by downloading a free program such as FileZilla or WinSCP. Once installed, configure your connection settings with the hostname (IP address or domain name) of the remote computer you want to access, along with any authentication information that may be required. You’ll then be able to log in and access the remote file directory structure in order to upload or download files from one machine to another.
{“@context”:”https://schema.org”,”@type”:”FAQPage”,”mainEntity”:[{“@type”:”Question”,”name”:”How do I share files between Windows 10 and Linux?”,”acceptedAnswer”:{“@type”:”Answer”,”text”:”nnSharing files between Windows 10 and Linux can be accomplished with a few simple steps. First, make sure that both machines are connected to the same network and have access to one another. On the Windows machine, you’ll want to enable file sharing by going into Control Panel > Network and Internet > Network Sharing Center > Advanced Sharing Settings. From here, select “Turn on network discovery” and “Turn on file and printer sharing”. nnOn the Linux machine, you may need to install an additional software package such as Samba which will allow it to connect to other computers in your network. Once installed, open up System Tools > Shared Folders from within your operating system’s main menu (this may look different depending on what version of Linux you’re using). Here you should be able to see all devices available for connection u2013 including your Windows 10 computer u2013 enabling you to copy/paste files directly between them.”}},{“@type”:”Question”,”name”:”How to share files between Linux and Windows on same computer?”,”acceptedAnswer”:{“@type”:”Answer”,”text”:”nnSharing files between Linux and Windows operating systems on the same computer can be done in a few simple steps. First, you will need to create a shared folder that both OS’s can access. This is possible by creating the shared folder in either OS and setting sharing permissions for both read/write access. On Windows, this is done through File Explorer > right-click on folder > Properties > Sharing tab; on Linux, itu2019s done through terminal commands (e.g., chmod 777). Once the shared folder has been created and permissions set, you will then need to install a Samba server daemon so that each OS can communicate with one another over the local network connection. Finally, once installed, configure your Samba server settings within each operating system for file transfer protocols like FTP or SMB (or others) depending upon your needs/preferences. With these steps completed, users should now have full read/write access between their Linux and Windows computers when accessing their respective shared folders from each otheru2019s filesystems”}},{“@type”:”Question”,”name”:”How do I enable file sharing in Linux Mint?”,”acceptedAnswer”:{“@type”:”Answer”,”text”:” nnEnabling file sharing in Linux Mint is relatively straightforward and can be done by following a few steps. First, open up the system Settings window by clicking on the little gear icon in the panel at the bottom of your screen. Next, select u201cSharingu201d from the list of options presented to you. Finally, toggle “Enable File Sharing” to turn it on or off as desired. That’s all there is to it!”}},{“@type”:”Question”,”name”:”How to connect Linux Mint to Windows 10?”,”acceptedAnswer”:{“@type”:”Answer”,”text”:”nnConnecting Linux Mint to Windows 10 can be done in a few simple steps. First, ensure that both systems are on the same local network and have internet access. Then, open up the Network Connections window by searching for u201cNetwork & Sharing Centeru201d in your Start menu. In this window, click on the Change adapter settings option located at the left side of the window. Here you will see all available networks; select one and right-click or double-click to bring up its Properties. Now enable file and printer sharing by checking off both boxes under File and Printer Sharing for Microsoft Networks as well as Client for Microsoft Networks if it is not already enabled (you may need to install it). Once these changes have been saved, you should be able to view resources from either system on either operating system’s computer browser u2014 simply type \[Computer Name] into your address bar where [Computer Name] is replaced with whatever name you gave each machine during setup. Finally, depending on what kind of data transfer you wish to do between machines u2014 files such as documents or larger media content u2014 there are additional steps outlined here which will allow for seamless transfers over FTP or Samba protocols: https://www.linuxmintusersguide.org/connecting_to_windows_networks/.”}},{“@type”:”Question”,”name”:”What software can I use to share files between Windows and Linux?”,”acceptedAnswer”:{“@type”:”Answer”,”text”:”nnThere are several software packages available for sharing files between Windows and Linux operating systems. Some of the most popular options include Samba, SSHFS, NFS, WebDAV, and Dropbox. nnFor basic file sharing between Windows and Linux machines, Samba is a good choice as it provides support for older versions of both platforms. To set up Samba you will need to install the appropriate server or client package on each machine depending on which one will be hosting the shared resource. Once installed you can configure it using a graphical user interface (GUI) or by editing its configuration files manually. nnSSHFS is another option that allows you to mount remote directories from either platform over an SSH connection without having to install any additional software on either end. It supports secure file transfers over encrypted connections and requires minimal setup time compared to other solutions such as NFS or WebDAV which may require more technical knowledge in order to get them working properly. nnNFS is primarily used for networked storage systems but can also be used as a way to share files between different computers running different operating systems such as Windows and Linux if they are all connected through a local area network (LAN). In this case setting up an NFS server would be required on at least one of the machines involved in order for this method to work properly. nnWebDAV allows users to access resources stored remotely via HTTP/HTTPS protocols making it ideal for applications where direct access needs to be granted across multiple networks with no special installation requirements needed on either side. Additionally since WebDAV supports encryption methods like SSL/TLS your data remains safe during transit even when crossing untrusted networks like public Wi-Fi hotspots etcetera . nnFinally thereu2019s Dropbox which requires no special setup beyond creating an account before uploading your desired data into u201cthe cloudu201d where it becomes accessible from any device running compatible platforms including both Windows & Linux based devices alike provided they have internet access enabled .”}},{“@type”:”Question”,”name”:”What is the fastest way to transfer files between Linux and Windows?”,”acceptedAnswer”:{“@type”:”Answer”,”text”:”nnThe fastest way to transfer files between Linux and Windows is to use a secure file transfer protocol (SFTP) tool. SFTP tools allow you to securely copy files from one computer or server to another over any network connection, including the Internet. Popular SFTP tools for Linux include OpenSSH and FileZilla, while popular options for Windows include WinSCP and Cyberduck. nnTo begin, you will need an SFTP client installed on both computers or servers that are involved in the file transfer process. Once the software is installed, open it up and enter the hostname of your destination computer into the u201cHostu201d field of your SFTP client. You may also need to enter a username and password if prompted by your destination computer’s security settings. nnOnce you have entered all necessary information into your SFTP client window, click u201cConnectu201d to establish an encrypted link with your destination computer over which files can be uploaded or downloaded quickly and securely. From there, simply drag-and-drop whichever files you wish to share between computers using either side of the window as needed before clicking u201cDisconnectu201d when finished transferring data from one system to another.”}},{“@type”:”Question”,”name”:”What tool transfers files between Windows and Linux?”,”acceptedAnswer”:{“@type”:”Answer”,”text”:”nnThe most commonly used tool for transferring files between Windows and Linux is an FTP client. An FTP (File Transfer Protocol) client allows you to securely transfer files between computers, regardless of the operating system they are running. nnTo use an FTP client, start by downloading a free program such as FileZilla or WinSCP. Once installed, configure your connection settings with the hostname (IP address or domain name) of the remote computer you want to access, along with any authentication information that may be required. Youu2019ll then be able to log in and access the remote file directory structure in order to upload or download files from one machine to another.”}}]}
If you’re having trouble sharing files between your Linux Mint system and Windows 10 system, here are some tips that should help you. Open the File Explorer on Linux Mint and search for “Shared Folders”. You can select the file or folder and share it to anyone with the correct credentials. Depending on your network speed, the process may take some time, so make sure you’ve set a realistic time frame.
To share files between Windows 10 and Linux Mint, you must install Samba. Samba is already installed on Mint 17 but you can manually install it to get started. When installing Samba, remember to set a password for your user name. To find out the user name, you can use the terminal command ‘id’. Note that caps count in Linux! Next, navigate to your Windows computer’s workgroup icon, right-click it and select “Support Samba sharing”. Then, enter the IP address in the address field.
Another method of file sharing is by downloading Warpinator. This app was developed by the team behind Linux Mint, and allows you to share files between Linux and Android devices wirelessly. Warpinator is already included in Linux Mint 20, but it is still possible to download it for iOS. This app also works seamlessly across all Linux and Android systems. This is a handy way to share files. The application’s GUI also makes it easy to share files.
Whether you use virtual box or a dual-boot system, sharing files between Ubuntu and Windows is a pain. While USB drives are convenient, they’re also a hassle when you need to work on different systems. Thankfully, there are many ways to share files between Linux and Windows 10, including shared network folders. Keep reading to find out more. Here are some tips to get you started. Listed below are some of the best methods for sharing files between Linux and Windows 10.
Open the folder that you’d like to share, and then right-click. Select Advanced Sharing and then click the Share This Folder option. From here, you can set the level of permissions that you want to grant access to. If you want to give everyone access to a folder, choose “Everyone” under “All Users.” Once you’ve set this permission, you can share the folder with other users by adjusting the “Permissions” settings.
How Copy File From Windows Share to Linux?
To copy a file from a Windows share to a Linux machine, you need to know how to navigate to the Windows directory. Once you have the Windows share directory, you can open it in your Linux file browser. To do this, make sure to set the folder to Network or Windows. You can then click the files you wish to transfer. In most cases, you can copy a file to one or more Linux machines.
The best method to transfer a file to Linux is to use a different partition. Windows cannot read the Linux file system without third-party software. By using another partition, you can avoid having to copy files from Linux to Windows and vice versa. This method is a more reliable solution than transferring data from Windows to Linux. This method also eliminates the need for duplicate files. When using another partition, you can be confident that both operating systems will be able to read the same file.
How Do I Connect to Linux Mint From Windows?
If you use a PC that runs a Linux Mint operating system, you can use this software to access the desktop of another computer. Once installed, it is easy to access the Linux Mint system by using the remote desktop protocol. The Linux Mint edition of the XRDP client must be installed on the Windows computer, and it must be run on a different IP address. You can then use the RDP connection to connect to Linux Mint from Windows.
First, you need to enter the OEM-specific boot options to access the Linux Mint environment. You can also access this setting by using a search engine. Once you’ve accessed the boot menu, you need to choose your language and select your operating system. If you’re using Windows, you’ll need to disable secure boot before connecting to Linux Mint. This setting should not be changed once you’ve booted Linux Mint.
How Do I Enable File Sharing in Linux Mint?
Linux Mint comes with a built-in file sharing feature called Samba. You can use this to share any folder in your system on a network. The default file browser, Nemo, will let you share any directory below the home folder. Simply click on the share icon to give everyone on your network access to your files and folders. It’s really that simple! Here’s how to get started.
Once the file sharing service has been installed, it’s time to add users to share files. First, make sure that all users have access to the folder. Be sure to make sure that your user name is the same as your login user name. If not, the most restrictive settings will take effect. To add new users, click the “Edit” button and enter the details for the new user. Now you’re ready to share files with friends and family.
Once you’ve installed Linux Mint, you can use Warpinator. It’s similar to the GTK file-transfer app Teleport, but provides more control. Mint also says that it was inspired by Giver, an app that came with Linux Mint when it was first released. Warpinator enables you to share files with others on your local network and even to your Android device. The Warpinator GUI will walk you through the process.
How Do I Enable Samba on Linux Mint?
If you’ve recently switched from Windows to Linux, you’re probably wondering “How do I enable Samba on my Linux Mint computer?” The answer is surprisingly simple. Samba is an open-source networking software that allows Windows users to share network resources. While Windows users are the most common target for Samba, it can be installed on Unix and Linux-based servers as well. Like Windows, Samba is based on the Common Internet File System or SMB.
To enable Samba on Linux Mint, open Network Settings and make sure your IP address is correct. Next, expand Guest or Public profiles. Then, choose Turn on network discovery. You should see a shared folder in your Linux Mint computer. You can now share files between Windows and Linux systems. Once you have configured the shared folder, you can share it with others.
Now that you’ve configured Samba on Linux Mint, you’ll need to enable it in Windows as well. You can find this in the Advanced Sharing window. It’s possible to share a folder between Windows and Linux by right-clicking it. You’ll also need to create a group of users for Linux Mint and tell it to use a Samba folder. Once this is done, you’re good to go! You’ll be able to share files between Windows 10 and Linux Mint and both will recognize them as shared folders.
How Do I Access Linux Files on Windows 10?
If you are using Windows 10 for the first time and would like to access Linux files on your PC, there are a few ways to do so. First, you must copy the Linux files to another location. You can do this by installing the Linux partition recovery tool on your Windows 10 PC. Next, you can browse the data on the Ext4 partition. Once you have found what you want, you can right-click and select ‘Save as…’. Then, you can check if the files you want to access are saved on your Windows 10 PC.
After you’ve installed Linux Reader, you can use it to view files on your Linux partition. This application will also mount Linux ext4 partitions connected to any Linux operating system. Once you’re able to view the files, you’ll be able to save them, but you will not be able to edit or delete them. You can also use it to mount folders, but you can’t edit them.
Is There a WinSCP For Linux?
While there is no native Windows file transfer client, WinSCP works very well on Linux if you’re running Wine. However, WinSCP is not a GUI counterpart to the command line SCP. Instead, it’s a free, open-source SFTP, FTP, and Amazon S3 client that also offers basic file manager functions. If you’re on Linux, it might be worth trying out WinSCP to see how it performs.
To download WinSCP, you must install PuTTY. PuTTY is an open-source tool for connecting to Linux shells. Kitty is an alternative, and provides similar features. PuTTY can be integrated into WinSCP. Once you’ve installed PuTTY, connect to the Linux server using SSH. Next, check the “Remember session password” option, and click OK.
Alternatively, you can download the commercial WinSCP alternative Transmit. It is compatible with Windows and Mac, and it also connects to a variety of cloud services. It also maintains standard FTP and SFTP protocols. It also supports Dropbox and Google Drive. WinSCP is one of the most popular file transfer programs on Windows, but it’s not suitable for Linux. Alternatively, you can use other open-source file transfer tools, such as Transmit, MuCommander, and Forklift.
Learn More Here:
1.) Windows Help Center
2.) Windows – Wikipedia
3.) Windows Blog
4.) Windows Central
Samba is a free implementation of the Microsoft Windows file sharing protocol (formerly called SMB, later renamed to CIFS) for UNIX-like systems. Why is it important? By installing Samba on Linux Mint, you can share resources and folders with Windows computers. Best of all, it is integrated from the file browser.
Samba is an open-source project that implements the Windows file sharing protocol for UNIX-like operating systems, such as Linux. The main feature of this application is that Linux computers can interact in a stable and efficient way with Windows networks.
What do I mean by interacting? Well, with Samba you can:
- Share various file systems.
- Share printers, with installation on the server as well as on the clients.
- Provide or assist with a WINS name resolution server.
Linux Mint and Ubuntu, which are two of the most widely used distributions in all of Linux, provide packages and configurations, so you can install without too much hassle.
Installing and enabling a Samba server in Linux Mint
Before you begin, it’s a good idea to update the entire operating system.
Open a terminal by pressing the CTRL + ALT + T keys or from the main menu. Then, run
sudo apt update
sudo apt upgrade
After this, you can install the samba package, which is the main package of the protocol.
sudo apt install samba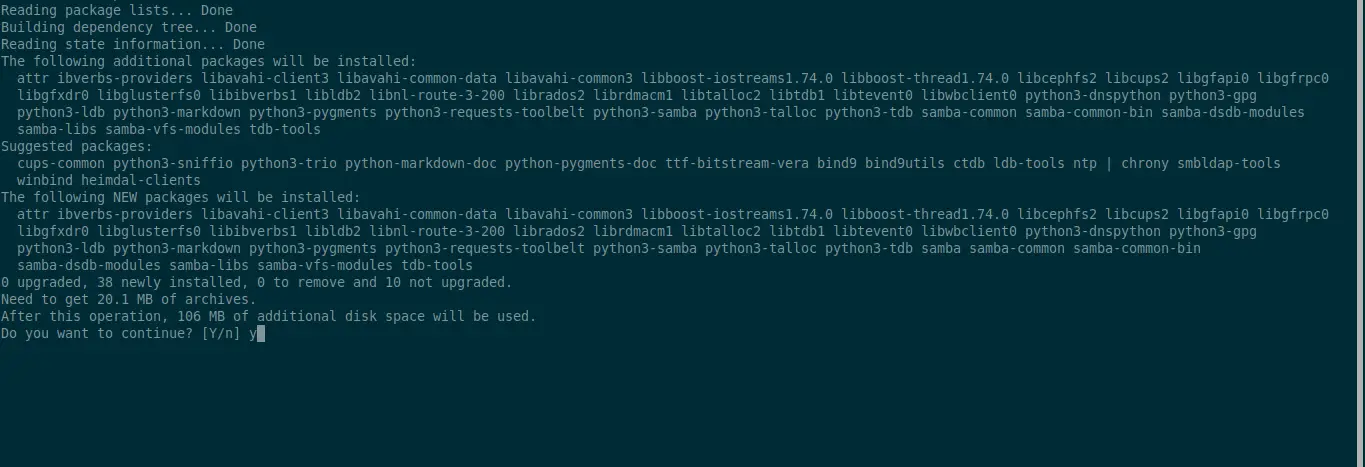
Samba runs as a system service, so you will need to enable it and run it to start up
sudo systemctl enable --now smbd
Synchronizing state of smbd.service with SysV service script with /lib/systemd/systemd-sysv-install.
Executing: /lib/systemd/systemd-sysv-install enable smbd
If you want to check that everything is OK, you can run
sudo systemctl status smbdThis command will check the status of the Samba service.
Sample Output
● smbd.service - Samba SMB Daemon
     Loaded: loaded (/lib/systemd/system/smbd.service; enabled; vendor preset: enabled)
     Active: active (running) since Fri 2022-12-16 22:36:11 UTC; 9s ago
       Docs: man:smbd(8)
             man:samba(7)
             man:smb.conf(5)
   Main PID: 2204 (smbd)
     Status: "smbd: ready to serve connections..."
      Tasks: 4 (limit: 2258)
     Memory: 10.4M
        CPU: 121ms
     CGroup: /system.slice/smbd.service
             ├─2204 /usr/sbin/smbd --foreground --no-process-group
             ├─2206 /usr/sbin/smbd --foreground --no-process-group
             ├─2207 /usr/sbin/smbd --foreground --no-process-group
             └─2208 /usr/lib/x86_64-linux-gnu/samba/samba-bgqd --ready-signal-fd=45 --parent-watch-fd=11 --debuglevel=0 -F

Dec 16 22:36:11 imaginelinux systemd[1]: Starting Samba SMB Daemon...
Dec 16 22:36:11 imaginelinux update-apparmor-samba-profile[2198]: grep: /etc/apparmor.d/samba/smbd-shares: No such file or directory
Dec 16 22:36:11 imaginelinux update-apparmor-samba-profile[2201]: diff: /etc/apparmor.d/samba/smbd-shares: No such file or directory
Dec 16 22:36:11 imaginelinux systemd[1]: Started Samba SMB Daemon.
Configuring Samba to share a folder
The main goal of installing and configuring Samba is to make the machine able to interact with Windows machines by sharing files.
So first, it is necessary to back up the Samba configuration file. Because it is useful to have it in case there are problems with the new configuration.
sudo cp /etc/samba/smb.conf{,.bak}This way it will be backed up.
Now you can create a public folder which, while not recommended, can be useful for quick sharing.
So, first create it and assign it the appropriate permissions
sudo mkdir -p /var/public/
sudo chmod -R 0777 /var/public
As you can imagine, you can set the path and folder name to whatever values you prefer.
It is recommended that, as it is a public folder, it does not belong to any user on the system. To do this.
sudo chown -R nobody:nogroup /var/publicAnd configure it to be used by Samba.
sudo chgrp sambashare /var/publicFor testing purposes, you can create an empty file or something so that the process is noticeable
sudo touch /var/public/imaginelinux.txtThen, edit the Samba configuration file to add the new configuration related to this new folder.
sudo nano /etc/samba/smb.confAt the bottom of the file, you can add the following settings
[public]
   path = /var/public
   browseable = yes
   guest ok = yes
   guest only = yes
   read only = no
   force user = nobody
   force create mode = 0777
   force directory mode = 0777
What these lines of code do is the following
- Sets the directory path
- Makes it navigable and will be used only by guest users
- It is editable
The rest are security settings that make the folder unusable with permissions besides those set and by different users.
Save the changes and close the editor.
To apply the changes, simply restart the server
sudo systemctl restart smbdRemember that you can check the status of the service
sudo systemctl status smbdFinally, using the Linux Mint file browser, you can make the connection
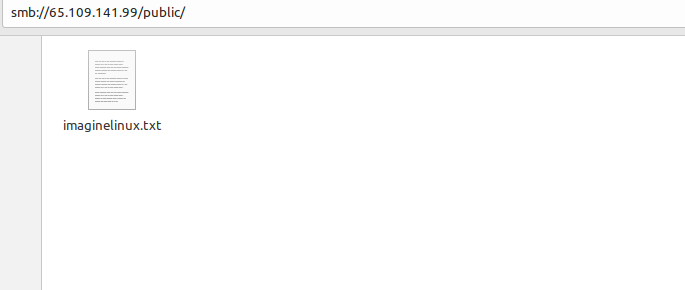
It is best to do this from the address bar.
Recommended: Creating a private folder in Samba
If you want to create a private folder to improve security and control access to it then there are a few more steps to take
First create a group for Samba
sudo addgroup sambaThen add the user to the group. You can also create it if it doesn’t exist.
sudo usermod -aG samba userOf course, you can choose a name besides user.
Now use samba to set a password for this user. Don’t confuse this password with the system password, you may want it to be a different one.
sudo smbpasswd -a userSample Output:
New SMB password:
Retype new SMB password:
Added user user.
Now create the private folder with the required permissions
sudo mkdir -p /smb/private
sudo chmod -R 0770 /smb/private
Again, you can assign the path of your choice.
Change the owner of the folder
sudo chown -R root:samba /smb/privateAgain edit the Samba configuration file
sudo nano /etc/samba/smb.confAnd at the end, add:
[Private]
path = /smb/private
valid users = @samba
guest ok = no
writable = yes
browsable = yes
Save the changes and close the editor.
To apply the changes, restart the Samba service
sudo systemctl restart smbdOpen your file browser, and you should see the changes made. For example, try to access the private folder.
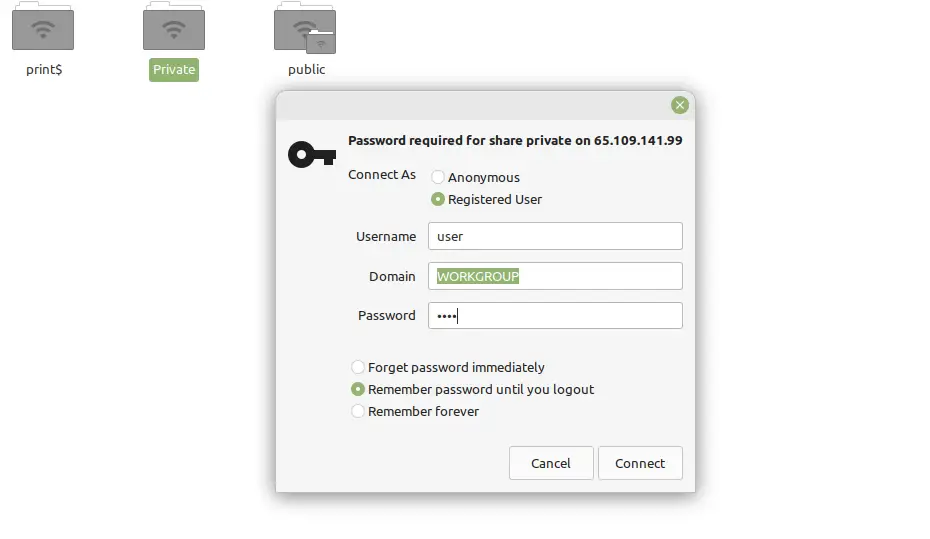
You will be prompted for a username and password. Enter them, and you should be able to quickly access them.
Conclusion
Samba is an important tool with which you can share files between Windows and Linux systems, but also between Linux clients only. Because it is so flexible, it has many options to increase security.
I hope you liked this post and can share it with friends.