
1. Overview
With a bootable Ubuntu USB stick, you can:
- Install or upgrade Ubuntu
- Test out the Ubuntu desktop experience without touching your PC configuration
- Boot into Ubuntu on a borrowed machine or from an internet cafe
- Use tools installed by default on the USB stick to repair or fix a broken configuration
This tutorial will show you how to create a bootable USB stick on Microsoft Windows using Rufus.
For most users we recommend balenaEtcher instead of Rufus which is simpler to use and also available on MacOS and Ubuntu. Instructions are now included in the primary Install Ubuntu Desktop tutorial.
Creating a bootable Ubuntu USB stick from Microsoft Windows is very simple and we’re going to cover the process in the next few steps.
Alternatively, we also have tutorials to help you create a bootable USB stick from both Ubuntu and Apple macOS.

2. Requirements
You will need:
- A 4GB or larger USB stick/flash drive
- Microsoft Windows XP or later
- Rufus, a free and open source USB stick writing tool
- An Ubuntu ISO file. See Get Ubuntu for download links

Take note of where your browser saves downloads: this is normally a directory called ‘Downloads’ on your Windows PC. Don’t download the ISO image directly to the USB stick! If using Windows XP or Vista, download version 2.18 of Rufus.
3. USB selection
Perform the following to configure your USB device in Rufus:
- Launch Rufus
- Insert your USB stick
- Rufus will update to set the device within the Device field
- If the Device selected is incorrect (perhaps you have multiple USB storage devices), select the correct one from the device field’s drop-down menu

You can avoid the hassle of selecting from a list of USB devices by ensuring no other devices are connected.
4. Select the Ubuntu ISO file
To select the Ubuntu ISO file you downloaded previously, click the SELECT to the right of “Boot selection”. If this is the only ISO file present in the Downloads folder you will only see one file listed.
Select the appropriate ISO file and click on Open.

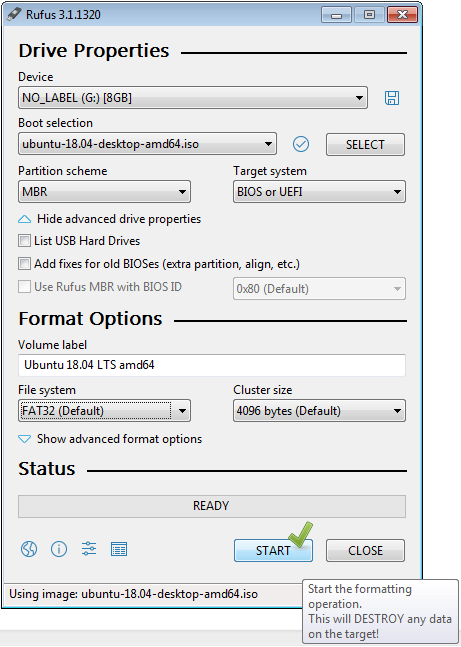
5. Write the ISO
The Volume label will be updated to reflect the ISO selected.
Leave all other parameters with their default values and click START to initiate the write process.

6. Additional downloads
You may be alerted that Rufus requires additional files to complete writing the ISO. If this dialog box appears, select Yes to continue.

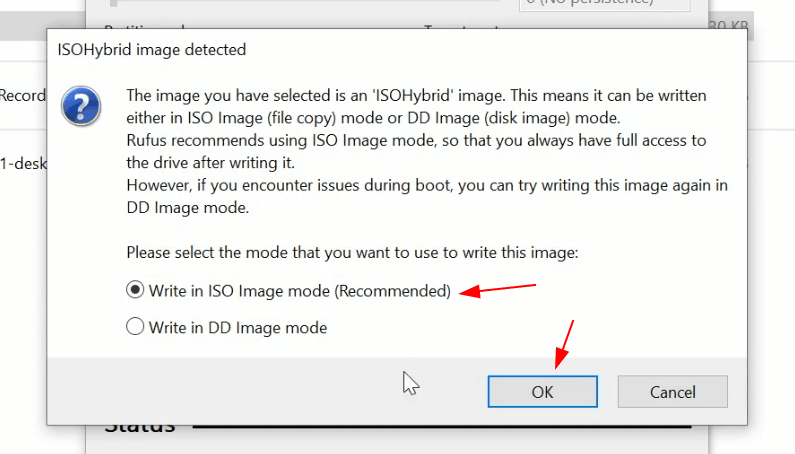
7. Write warnings
You will then be alerted that Rufus has detected that the Ubuntu ISO is an ISOHybrid image. This means the same image file can be used as the source for both a DVD and a USB stick without requiring conversion.
Keep Write in ISO Image mode selected and click on OK to continue.

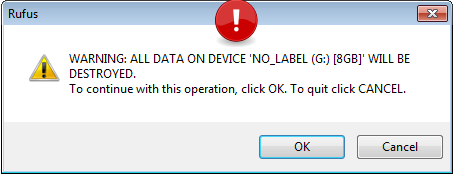
Rufus will also warn you that all data on your selected USB device is about to be destroyed. This is a good moment to double check you’ve selected the correct device before clicking OK when you’re confident you have.

If your USB stick contains multiple partitions Rufus will warn you in a separate pane that these will also be destroyed.
8. Writing the ISO
The ISO will now be written to your USB stick, and the progress bar in Rufus will give you some indication of where you are in the process. With a reasonably modern machine, this should take around 10 minutes. Total elapsed time is shown in the lower right corner of the Rufus window.

9. Installation complete
When Rufus has finished writing the USB device, the Status bar will be filled green and the word READY will appear in the center. Select CLOSE to complete the write process.

Congratulations! You now have Ubuntu on a USB stick, bootable and ready to go.
To use it you need to insert the stick into your target PC or laptop and reboot the device. It should recognise the installation media automatically during startup but you may need to hold down a specific key (usually F12) to bring up the boot menu and choose to boot from USB.
For a full walkthrough of installing Ubuntu, take a look at our install Ubuntu desktop tutorial.
Finding help
If you get stuck, help is always at hand:
- Ubuntu Discourse
- Ask Ubuntu
- IRC-based support
Was this tutorial useful?
Thank you for your feedback.
Download Article
All the software & instructions you need to make Linux portable
Download Article
- Creating a Bootable Linux Flash Drive
- Booting into Linux
- Video
- Tips
|
|
|
Whether you want to install Linux on your PC from a flash drive or just boot into a portable version of Linux, you can easily create a bootable Linux USB flash drive in Windows 10. We’ll show you how to download the software you’ll need to create your Linux USB drive, how to make the drive bootable, and how to make your PC boot from the flash drive instead of your hard drive.
Making a Bootable Linux USB
- Download an ISO image of Ubuntu or another Linux flavor.
- Install the free Rufus software on your PC.
- Insert your flash drive, open Rufus, and select your flash drive.
- Choose FreeDOS from the «Boot Selection» menu.
- Click “Select” and then choose your ISO, then click “Start.”
- Choose «Write in ISO image mode (Recommended)» and click “OK.”
- Click “OK” once more to create your bootable Linux drive.
-

To boot into Linux from a USB drive, you’ll need to download a file that contains an «image» of the Linux installation media. You can download the ISO for any flavor of Linux you want to install, including Debian and Linux Mint, and the process to create a bootable USB drive will be similar.[1]
- To download an ISO of Ubuntu, head over to https://ubuntu.com/download/desktop and click the Download link next to the latest stable version. Ubuntu is a good option if you want to try out Linux without installing it—once you boot from the flash drive, you’ll be able to choose an option to try before you install.[2]
- To download a Debian ISO, go to https://www.debian.org/download. The download will start automatically.
- You can get the Linux Mint ISO from https://linuxmint.com/download.php. Just click the Download button next to the version you want to install.
- If you just want to try out Linux without installing it on your hard drive, try Puppy Linux, which allows you to boot right into a functional Linux desktop. You can download a Puppy Linux ISO from https://puppylinux.com/index.html#download.
- To download an ISO of Ubuntu, head over to https://ubuntu.com/download/desktop and click the Download link next to the latest stable version. Ubuntu is a good option if you want to try out Linux without installing it—once you boot from the flash drive, you’ll be able to choose an option to try before you install.[2]
-
Rufus is free software that allows you to create bootable USB drives from ISO images.[3]
Go to https://rufus.ie and click the Rufus link under «Download» toward the bottom of the page to download the installer.- When the download is complete, double-click the file that begins with «rufus» and ends with «exe» and follow the on-screen instructions to install.
- Once Rufus is installed, you’ll find it in your Windows menu. Launch Rufus if it doesn’t start automatically after the installation.
Advertisement
-

You’ll want to use a blank USB drive, as everything on the drive will be deleted. Back the drive up before you continue if necessary.
-
If multiple external drives are connected to your PC, Rufus may select the wrong drive. Click the proper drive in the «Device» menu if it’s not accurate.
-
It’s just under the Device selector. This tells Rufus to make the drive bootable.[4]
- The default options for «Partition scheme» and «Target system» are filled in automatically and you won’t need to change them.
-
This button is to the right of the «Boot selection» menu. You should find the ISO in your default download folder, which is usually called Downloads.[5]
-
This begins the process of writing the ISO image to the flash drive.
- If Rufus prompts you to download an additional file to write the ISO, click Yes to continue.[6]
- If Rufus prompts you to download an additional file to write the ISO, click Yes to continue.[6]
-
This option will appear when the «ISOHybrid image detected» window appears. This just means you can use the same ISO on a bootable DVD or USB drive as needed.
-
This involves erasing the data on the drive and copying the necessary files for making the drive bootable. You’ll see a Status bar at the bottom of the window once the process begins.
- When the drive is ready, the status bar will say «READY.» At this point, you’ll have a bootable Linux USB drive.


Advertisement
-
If you’ve already set your PC to boot from USB, your computer will immediately boot into Linux once it comes back up.[7]
- If your PC boots back into Windows 10 instead, continue with this method.
- skip to step 5. Otherwise, the steps to get to the BIOS are going to be different depending on your motherboard—you’ll usually press a key immediately after the PC restarts, which is usually F2, F10, or Del.[8]
Search for your PC model and «BIOS setup key» to find your key. Alternatively, try the following steps to boot into the BIOS from Windows 10: - Press Windows key + i to open Settings.
- Click Update & Security.
- Click Recovery in the left panel.
- Click Restart now under «Advanced startup.»
- On the «Choose an option» screen, click Troubleshoot.
- Click UEFI Firmware Settings and then click Restart. The PC will boot into the BIOS or UEFI.
-
Once the computer boots into the BIOS, look for a menu called Boot, Boot Order, or Boot Options. You might have to enter a menu called Advanced, System, Storage, or Configuration to find it. What you’re looking for a list of boot devices, such as «Hard Drive» and «Removable Device» in order.
-
You may have to select an item called «1st boot device» or similar to bring up a list of options. The goal is to make your USB drive or removable media the first item in the list so your PC tries to boot from devices that are connected to it.
-
You’ll usually do this by pressing the F10 key or by selecting an option called Save & Exit. Once saved, your PC will reboot.
-
When your PC boots from the flash drive, you’ll be prompted to choose some regional and keyboard settings. If you made an Ubuntu drive, you can choose Try Ubuntu without installing to use the live version of Ubuntu, or install it on your hard drive. Regardless of the version of Linux you want to install, the remaining steps will be simple—follow the on-screen instructions to get started![9]
- If you’re installing Puppy Linux, you’ll boot right into a functional Linux desktop without having to install.


Advertisement
Ask a Question
200 characters left
Include your email address to get a message when this question is answered.
Submit
Advertisement
Video
-
Any time the flash drive is connected to your PC upon reboot, your PC will try to boot from it before it boots from your hard drive. If you don’t want to boot from the USB drive the next time you reboot, remove the drive before rebooting.
Thanks for submitting a tip for review!
Advertisement
References
About This Article
Article SummaryX
1. Download the ISO image.
2. Install Rufus.
3. Insert a blank USB drive.
4. Use Rufus to flash the ISO to the drive.
5. Go into the BIOS and set the USB drive as first in the boot order.
6. Reboot into Linux.
Did this summary help you?
Thanks to all authors for creating a page that has been read 157,735 times.
Is this article up to date?
A short tutorial for beginners on creating a bootable USB stick in Windows with Ubuntu/Linux ISO images.
A bootable Ubuntu USB is handy for multiple reasons. Suppose you are a Windows user and thinking of migrating to Linux. In that case, you can experience Ubuntu desktop/Linux desktops without hampering your PC configuration or installation using a Live USB stick. Also, using this, you can boot from the USB stick directly from an Internet Cafe or any borrowed computer. Not only that, if you have a broken system, you can always use the USB stick to boot from and repair the broken system/recover data. Here are the steps to follow to create a bootable Ubuntu USB from Microsoft Windows.
What you need
- USB stick or a flash drive with 2 GB or larger space.
- A working system with Microsoft Windows 10 or later.
- Rufus a free and open-source USB stick writing tool. You can download the latest Rufus exe file from the below link and install it on Windows.
- And Ubuntu ISO file/Any Linux flavour which you can download it. It is recommended to try Ubuntu if you are new to Linux. You can download it from here.
- Launch Rufus and Insert your USB stick into the Windows system
- In the Rufus main window, from the Drive drop-down, select your USB stick drive.
- In the Boot Selection drop-down, select Disk Or ISO Image and then click the Select button.
- Choose the ISO file of Ubuntu/Linux which you have downloaded.

- Choose the partition scheme as MBR, and select BIOS or UEFI from the target system drop-down.
- Leave all other options, like format options, file system, cluster size etc, as default values – don’t change anything.
- If you’re all set, click Start.
- A popup may come up with options for choosing which mode to operate.
- Ubuntu ISO images are ISO Hybrid images which means they can be written as ISO image mode as well as the disk image mode.
- Choose the Recommended Write in ISO Image Mode and click OK.

- The next popup will give you a warning that all the data on the USB will be erased. So double-check whether you have selected the correct drive or USB stick.
- Press OK to start and wait till Rufus finishes writing the disk.

After completion, you can open My Computer and check the ISO image data written on the USB Stick.

Now you can boot from this USB stick and enjoy Ubuntu without installing it.
Summary
If you are new to the Linux world, you can use a USB stick using the above method and give Ubuntu/Linux a try without installing it on your PC.
Drop a comment if you have any questions.
This tutorial is filed under boot tips.
Содержание статьи:
- Подготовка установочной флешки (с Linux)
- Ventoy
- Rufus
- Etcher
- Вопросы и ответы: 1
Всем доброго времени!
Сегодня хочу рассмотреть довольно типичную ситуацию: на вашем ПК установлена ОС Windows (работает), но появилось желание (необходимость) попробовать также и Linux (так сказать, сравнить их собственноручно 😉).
Разумеется, одним из первых действий будет подготовка загрузочного носителя (как правило флешки). Однако, здесь могут быть «нюансы», т.к. не все утилиты для создания загрузочных флешек с Windows подойдут и для текущей задачи.
Собственно, именно поэтому в этой заметке я выделил несколько утилит (и показать скрины настроек записи), которые позволяют решить этот вопрос (также отмечу, что приложения я отобрал бесплатные, макс. простые в работе, и совместимые с большинством дистрибутивов Linux).
И так…
👉 В тему!
Установка Linux Mint «рядом» с Windows 10 (без потери данных!). Пошаговая инструкция для начинающих
*
Подготовка установочной флешки (с Linux)
Ventoy
Офиц. сайт: https://www.ventoy.net/
Эта утилита хороша тем, что она позволяет легко и макс. быстро создавать универсальные мультизагрузочные флешки сразу с несколькими ISO-образами (на моей флешке, например, есть и Windows 10, и LiveCD, и Linux Mint, и пр.).
Как с ней работать:
1) после ее загрузки и запуска, выберите тип разметки (для современных ПК*, обычно, GPT) и установите флажок на пункт «Secure Boot Support» (защищенная загрузка, актуально также для новых устройств). Вот здесь подробнее о GPT, MBR…
2) После нажмите по кнопке «Install» — через несколько минут флешка будет специальным образом подготовлена (все данные с нее будут удалены!).
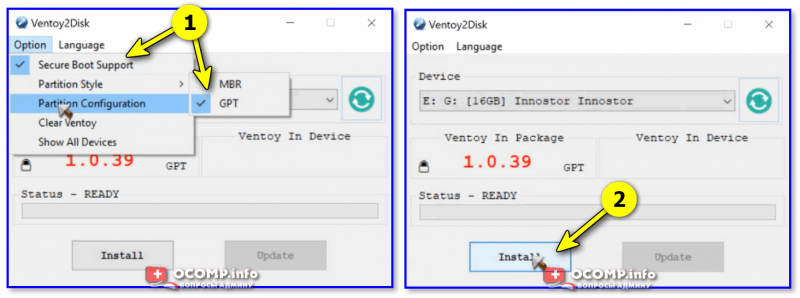
Ventoy — подготовка флешки (настройки)
3) Ну и последний штрих: на эту флешку нужно просто скопировать все нужные ISO-образы (никак не меняя их и не извлекая!). В своем примере ниже — я через проводник «отправил» нужный ISO на флешку.
Примечание: разумеется, скопировать можно столько ISO, сколько поместиться на вашу флешку!
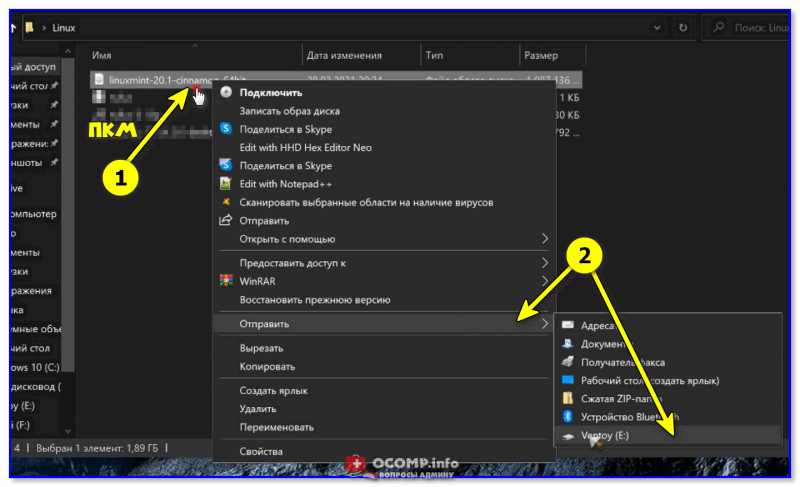
Отправить файл ISO на флешку (Ventoy)
Удобно?! 😉
Важно: флешки, подготовленные в Ventoy, могут не работать с некоторыми ноутбуками и моноблоками. Например, я с таким сталкивался на ноутбуках HP и Dell (само собой, не со всеми моделями…).
*
Rufus
Офиц. сайт: https://rufus.ie/ru/
Эта утилита отличается от предыдущей своей функциональностью: здесь гораздо больше настроек и всяких флажков (что может запутать). Однако с ее помощью можно подготовить загрузочный носитель для любого «капризного» ноутбука/ПК/моноблока!
Как пользоваться:
1) подключите флешку к USB-порту (предварительно скопировав всё нужное с неё) и запустите Rufus.
2) Далее в окне Rufus выберите флешку и образ ISO, который хотите записать (стрелки 1, 2 на скрине ниже 👇).
3) Задайте схему раздела и прошивку (GPT / UEFI для новых ПК*) и нажмите «Start».
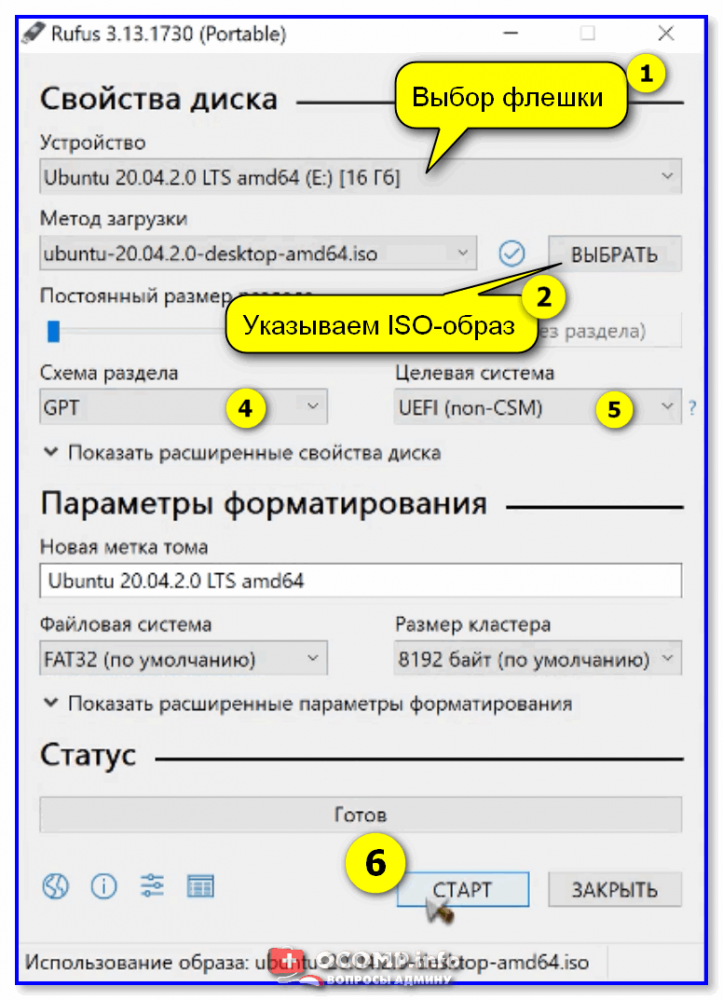
Rufus — настройки записи Ubuntu
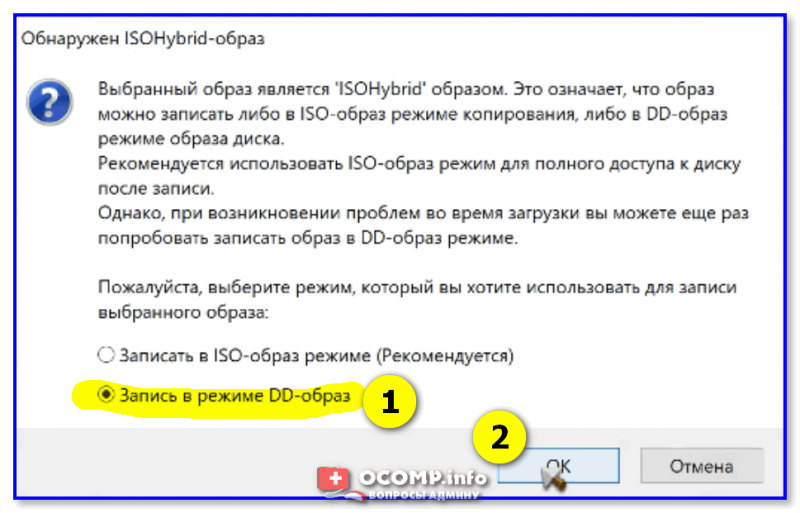
Если появится сообщение о «гибридном» ISO — рекомендую выбрать вариант «Записать в режим DD-образа». 👇
DD-образ
Когда статус записи дойдет до 100% и появится сообщение «Готов» — утилиту можно закрыть и приступить к использованию флешки…
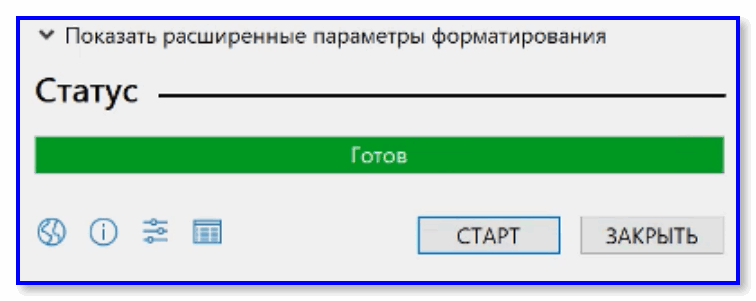
Флешка готова!
*
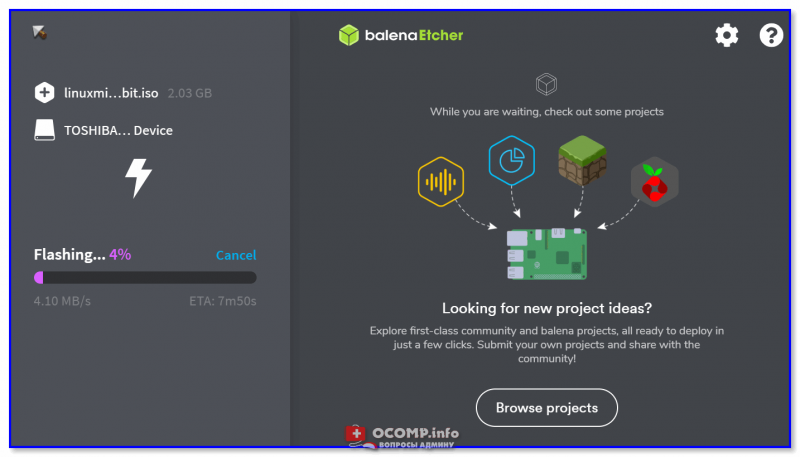
Etcher
Офиц. сайт: https://www.balena.io/etcher/
Etcher — приложение хорошо тем, что все «параметры» записи оно определяет автоматически (вам же останется только выбрать ISO, флешку и нажать «Старт»). С одной стороны — такой подход хорош, с другой — не дает гибкости…
Кстати, Etcher можно использовать в Windows, Linux, macOS.
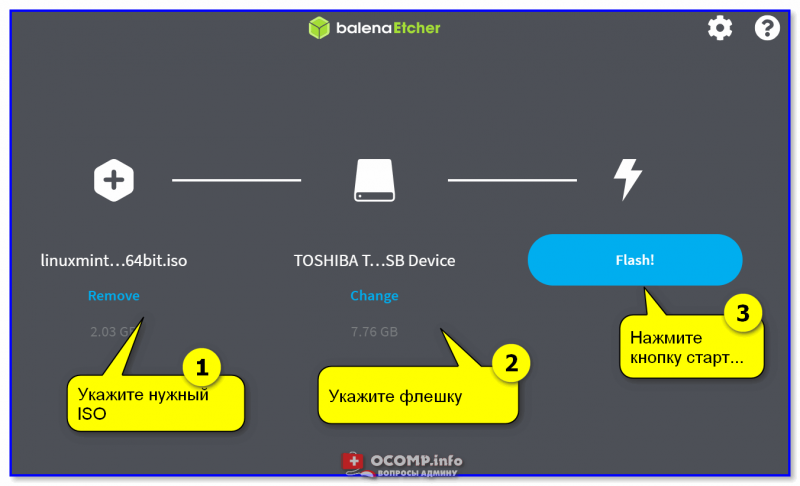
Etcher — всего три действия!
Процесс записи отображается в меню слева: при достижении 100% флешка будет готова!
Процесс подготовки флешки в Etcher
*
Дополнения по теме — приветствуются!
Всем успехов!
👋

One of the first few steps for installing Ubuntu is to create a bootable USB of Ubuntu.
There are several free live USB creation tools available in Windows. You may use any of these free applications.
In this tutorial, I’ll show two methods using two different applications for creating live Ubuntu USB in Windows:
- Rufus (recommended)
- Universal USB Installer
You can try Ubuntu without installing it with a live USB on your computer. You can, of course, use the same live USB to install Ubuntu on a computer as well.
Let me highlight some of the easiest methods. Before you start creating the bootable USB, get the essentials first.
Getting Things Ready
Make sure that you have the following:
- A USB key (pen drive) with at least 8 GB of size with no important data on it (the USB key will be formatted)
- Internet connection to download Ubuntu ISO (this could be done on any computer)
- It would be a good idea to know if your system uses MBR or GPT (Rufus will create live USB accordingly)
- You should also check if your system uses UEFI or legacy BIOS
Download Ubuntu ISO
ISO is an image file. You download this single file of around 4.9 GB, consisting of an “image” of Ubuntu Linux. You then use a tool to extract the content of the ISO file in such a manner that you can boot the Ubuntu operating system from the USB itself.
Go to the official website and choose the Ubuntu version of your choice. You may choose Ubuntu LTS if you do not want to upgrade your system every six to nine months.
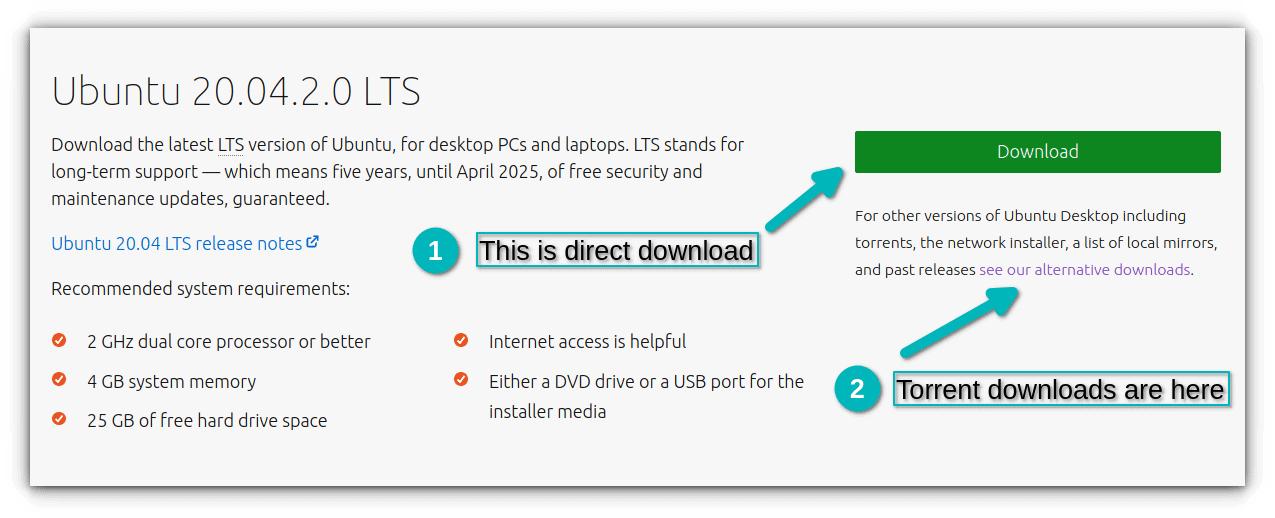
You can also download Ubuntu via torrents from the alternative downloads link on the same page.
Suggested Read 📖
Explained: Which Ubuntu Version Should I Use?
Confused about Ubuntu vs Xubuntu vs Lubuntu vs Kubuntu?? Want to know which Ubuntu flavor you should use? This beginner’s guide helps you decide which Ubuntu should you choose.
It’s FOSSAbhishek Prakash
Method 1: Make a live Ubuntu USB with Rufus (recommended)
Rufus is an excellent free, open-source tool for making bootable Linux USB disks. On Windows, I prefer and recommend using Rufus.
If you prefer videos to text, I have made this video to show the steps in action.
Step 1: Download Rufus
Go to the website of Rufus and download the .exe file:
This is an exe file, so you do not need to install Rufus. Just double-click on it to run it.
Step 2: Creating the live Ubuntu USB
Plug in your USB key (pen drive) to the computer. Now double-click on the download Rufus exe file, which should be in the Downloads folder.
When you run Rufus with the USB plugged in, it automatically recognizes it. If more than one USB key is plugged in, please select the correct USB under Device.
It may also automatically find the Ubuntu ISO. If not, you can always browse to the ISO by clicking on the SELECT button.
I hope you have checked the partitioning scheme and BIOS type, as I mentioned in the prerequisite section. Based on that, select the Partition Scheme and Target System in Rufus.
Everything looks good? Hit the START button.
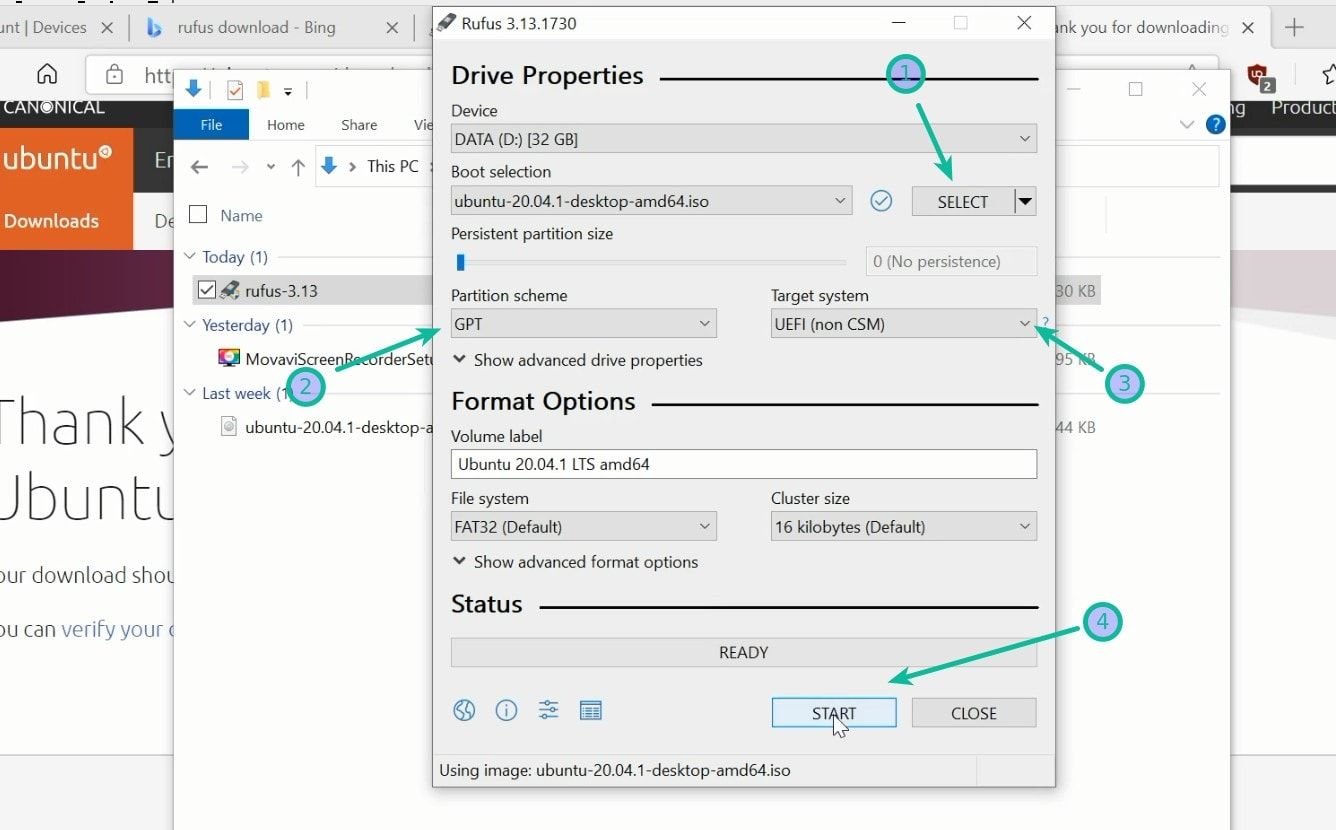
You may be asked to choose how to write the image. Choose ‘Write in ISO Image mode’:
It will take a few minutes to complete the process. You’ll see a green signal when the live USB is ready.
I’ll show you how to boot from the live USB in a moment.
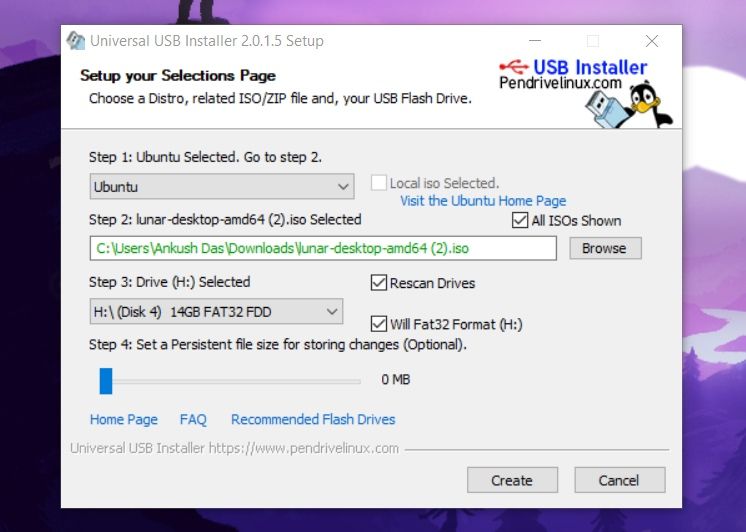
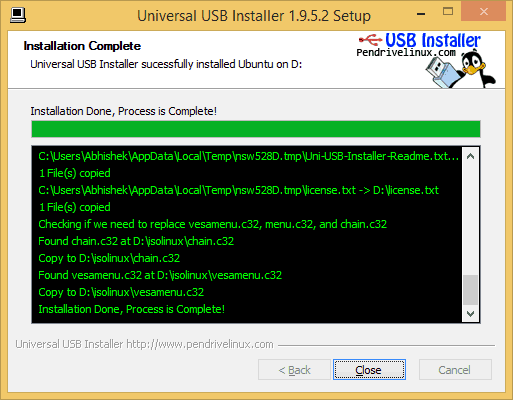
Method 2: Using Universal USB Installer to make bootable Linux USB
Go to the Universal USB installer project website and download the latest version of Universal USB Installer.
Plugin the USB drive in the computer and run Universal USB Installer. You need to do the following things now:
- Select Ubuntu under Step 1
- Browse to the location of the downloaded Ubuntu ISO in the Step 2 section
- In Step 3, select the USB drive and check the format option.
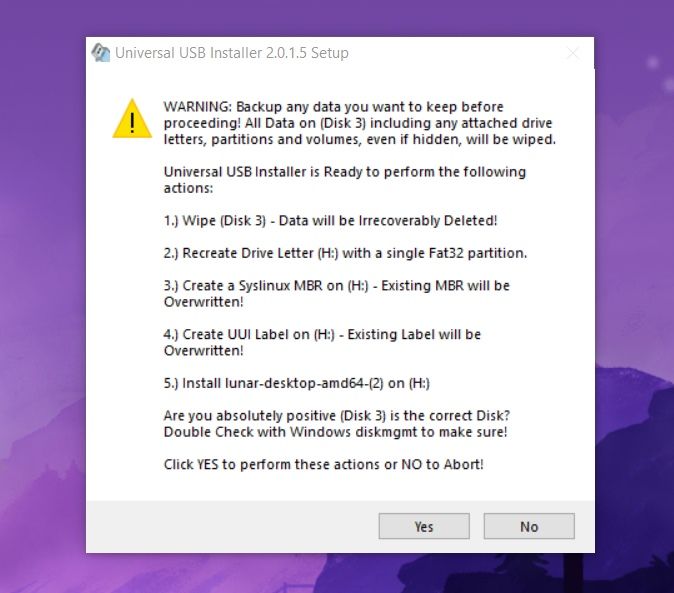
It will present you with obvious warnings; click Yes.
Wait for some time for the process to complete. You can push it to the background if you like.
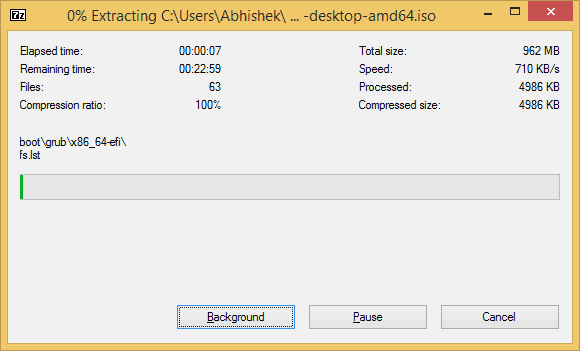
That said, your Ubuntu USB should be created in a few minutes.
That’s it.
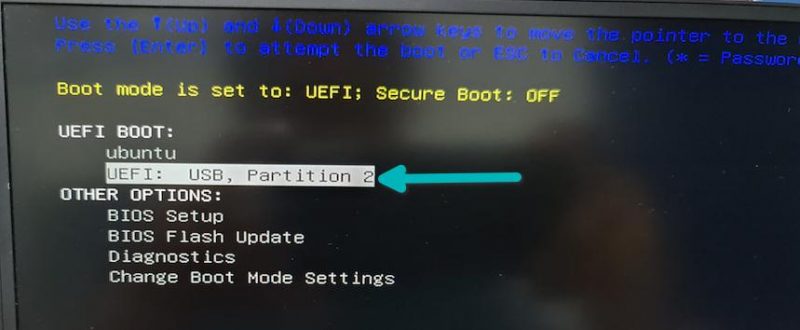
How to boot from live Ubuntu USB
Once the live USB is created, you can test Ubuntu in live mode. The bootable USB can be used on any system, not only on the one where you created it.
Plug in the live USB on the desired computer. What you need to do is restart or power on your computer.
At the screen that shows the logo of your system manufacturer, press the F2 or F10 or F12 key. You may try pressing all of them individually if you are unsure of the key. But be quick when you do that otherwise, it will boot into the operating system.
This key is different for different brands of computers. Some may even use Esc or Del keys for this purpose.
In rare cases, you may have to access the UEFI boot settings from within Windows.
In the BIOS settings, normally, you should see a screen like this. Here, you use the arrow keys to move down to the USB option and press enter to boot from the USB. Please note that the screen may look different in different systems.
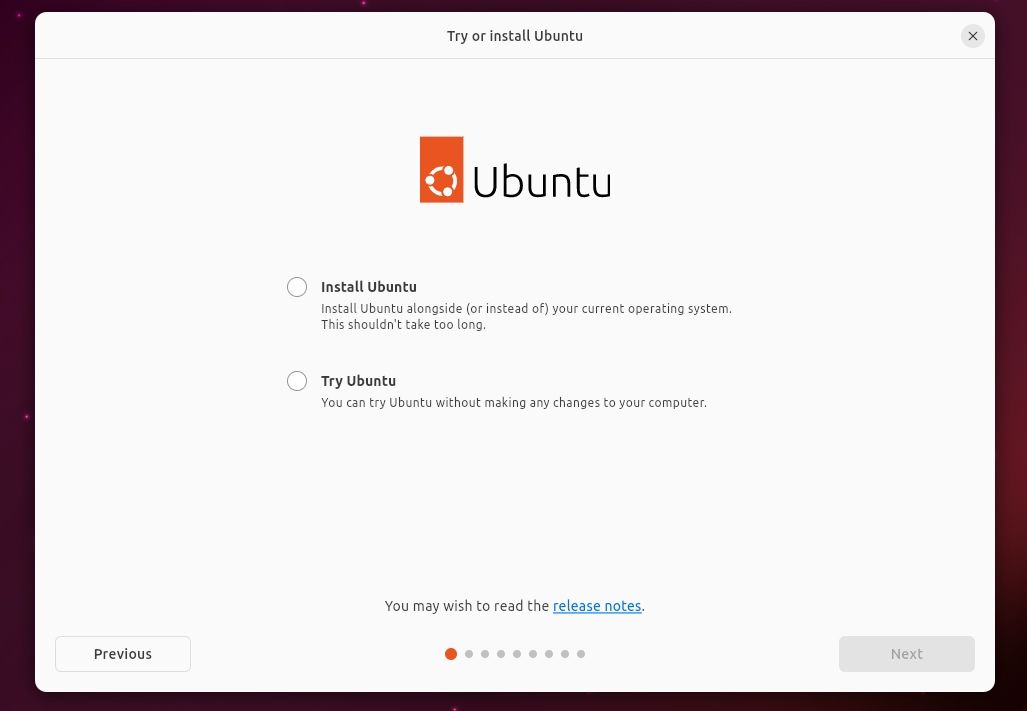
Once you boot into the USB, you will notice the grub screen with the following options:
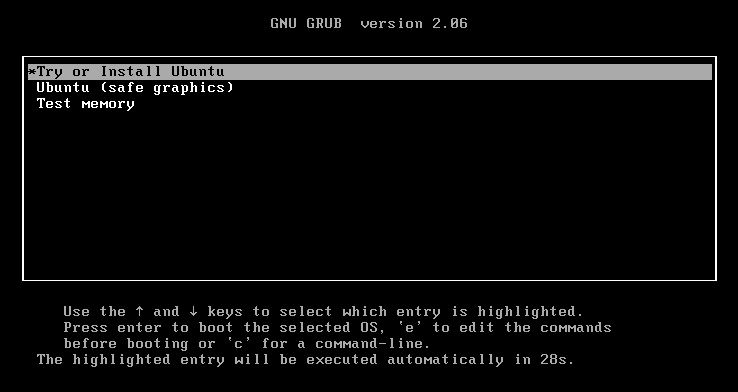
- Try or Install Ubuntu
- Ubuntu (safe graphics)
- Test memory
You need to click on «Try or Install Ubuntu». You do not need the safe graphics option unless your graphics card has an issue working with Ubuntu or if you are debugging some issue with graphics disabled.
In case you get different options, you need to select «Try Ubuntu» to use the Live USB session and do not want to install it immediately.
Once you go ahead with the first option, it will start the live USB session.
If you like it, you can install Ubuntu after selecting the preferred language.
Note that if you make any changes to the live Ubuntu system, like saving some files or installing applications, your changes will be lost if you boot from the live USB again.
Please remember that some systems may not allow you to boot from a bootable USB. If you see some error (like PCIe initialization on Dell systems) or cannot boot from the USB, disable secure boot and try booting from the USB again.
Ultimate Guide: Getting Started With Ubuntu
So you are thinking of using Ubuntu? Or perhaps you have already started using Ubuntu? But you do not know how to use Ubuntu or what to do after installing Ubuntu. Don’t worry, every beginner faces more or less the same issues. This is the reason why I have
It’s FOSSAbhishek Prakash
Considering that you are just starting, I advise you to follow this beginner’s guide to Ubuntu and learn how to use Ubuntu. Let me know if you need some help.