

You don’t have to have two different computers to use Linux and Windows 10. It’s possible to have a Linux distro installed on a computer with Windows 10 preinstalled.
In this article, I will show you how to dual boot Windows 10 and the popular Ubuntu Linux distro. But before that, you have to install Ubuntu on your Windows 10 PC.
Before you go through this process, you must backup your files. That’s because installing an OS is a risky process. Sometimes it can overwrite the existing OS and delete all your files.
N.B.: Most of the processes in this article take time to get done, so you need to be patient.
What We’ll Cover – A step-by-step Guide to Dual-Booting Windows 10 and Linux
- Prerequisites
- How to Partition your Hard Drive for Ubuntu
- How to Optimize your Hard Drive for More Partition Space (Optional)
- How to Download Ubuntu in ISO Image Format
- How to Make an Ubuntu (Linux) Bootable USB Drive
- How to Install Ubuntu Linux Distro along with Windows 10
- Now You Can Dual Boot Ubuntu and Windows 10
- Conclusion
Prerequisites
Most importantly, there are some things you must have in place if you want to use (and dual boot) Ubuntu and Windows 10 on the same PC:
- A computer preinstalled with Windows 10
- A partitioned hard drive
- A BIOS in UEFI mode (Unified Extensible Firmware Interface)
- An empty USB drive of at least 4Gig for creating a bootable disk
- An internet connection to download Ubuntu ISO image (the Linux distro) and Rufus (a bootable drive creation tool)
How to Check If Your PC BIOS is in UEFI Mode
To check if your PC BIOS comes in UEFI mode, search for “system information” and hit ENTER.
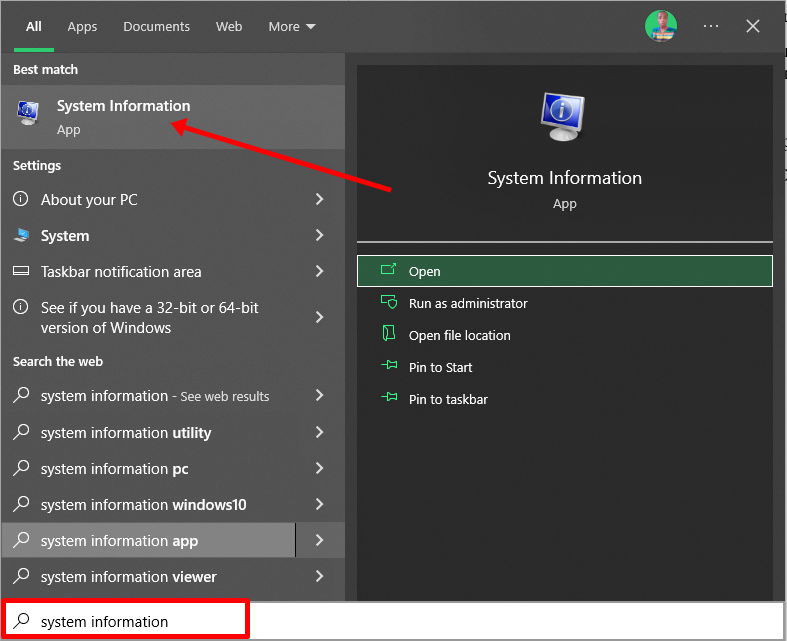
Look under BIOS mode to confirm that your PC BIOS mode comes as UEFI.
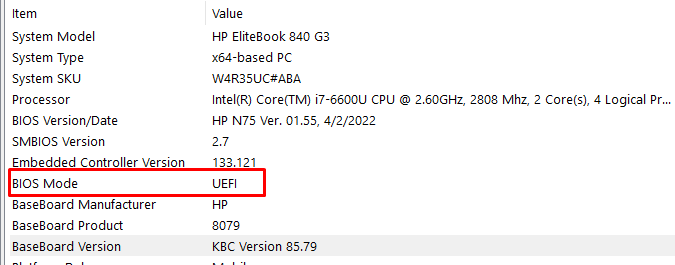
If your PC BIOS is not in UEFI mode, the two operating systems won’t see each other. You can learn more about the difference between these two modes here.
How to Partition your Hard Drive for Ubuntu
You have to partition your hard drive because you must set aside at least 20Gig for Ubuntu to live in and boot from.
To partition your hard drive, follow the steps below:
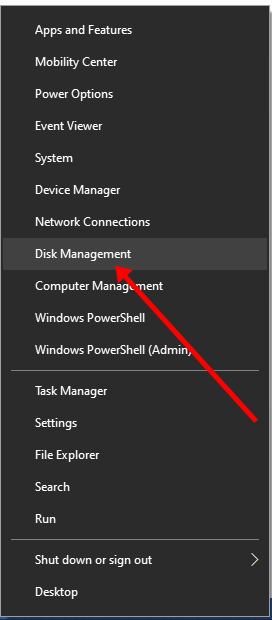
Step 1: Right-click on Start and select “Disk Management”.
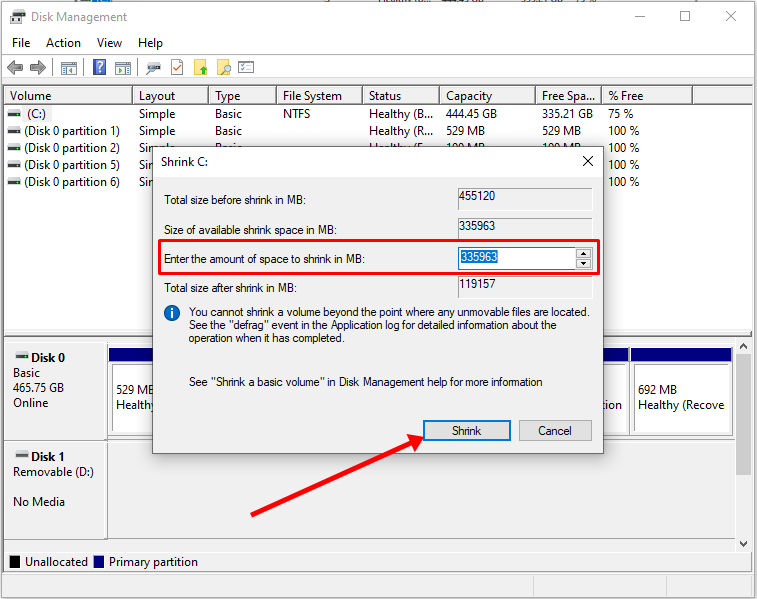
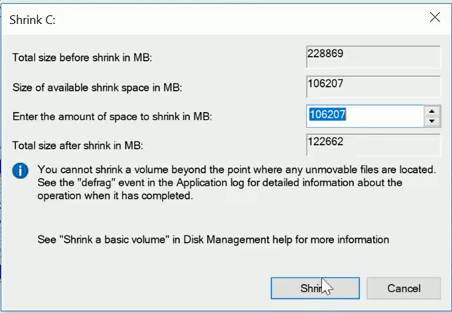
Step 2: Right-click on your C drive and select shrink volume.
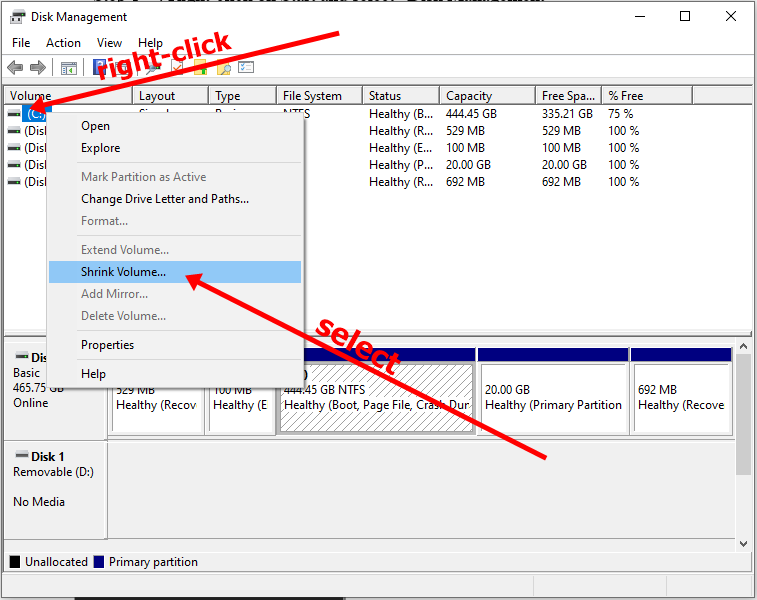
Step 3: Select at least (20000) 20Gig for Ubuntu and click “Shrink”. IT can take some time to complete, so be patient.
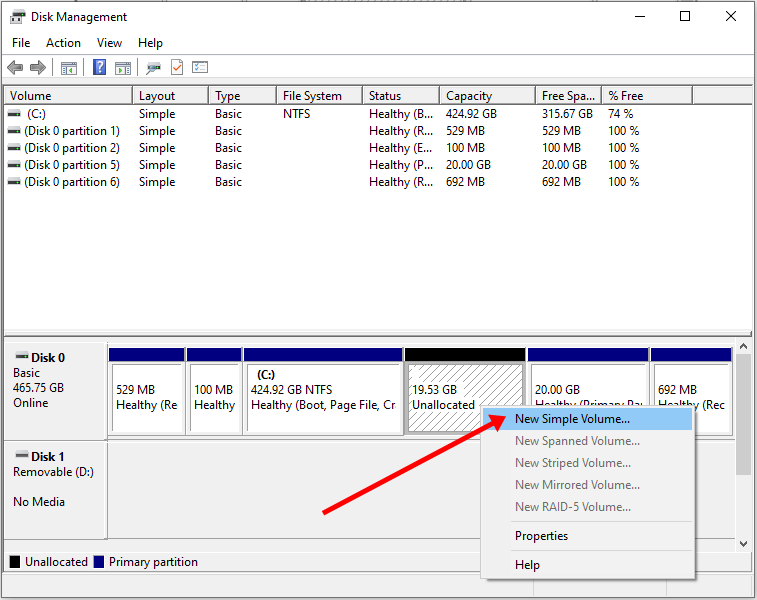
Step 4 (optional): You can go ahead and assign a letter to the new volume. Right-click on the unallocated space and select “New Simple Volume”.
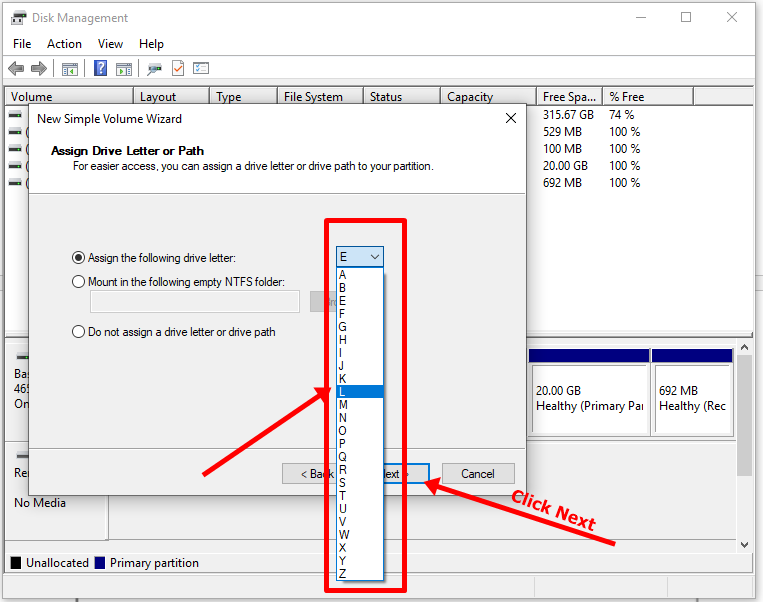
Step 5: Follow the wizard and assign a letter to the drive, then follow the rest of it.
After completing the wizard, the drive should be listed on your computer.
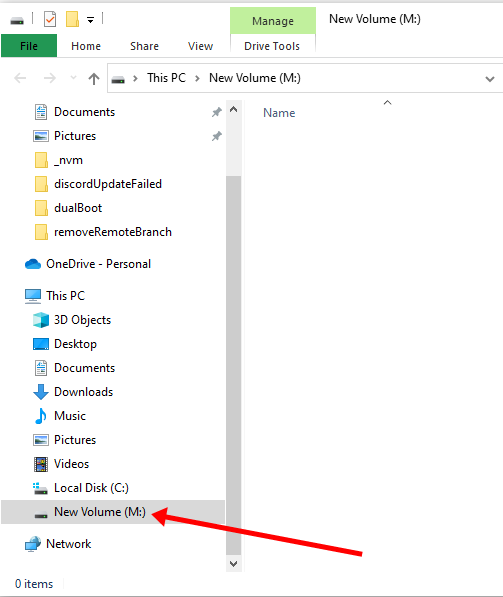
Congrats! You’ve successfully partitioned your hard drive.
N.B.: If you have a lot of free space in your hard drive but your PC still didn’t give you up to 20Gig partition space, then you need to optimize your PC’s hard drive. Proceed to the next section of this article to do that.
How to Optimize your Hard Drive for More Partition Space (Optional)
The common purpose of hard disk optimization is to speed up your computer during boot time and make it run smoother.
At the same time, the process will defragment the hard disk and make free space more available for partitioning.
To optimize your hard drive, click Start (Windows logo key), search for “defrag” and select “Defragment and Optimize Drives”.
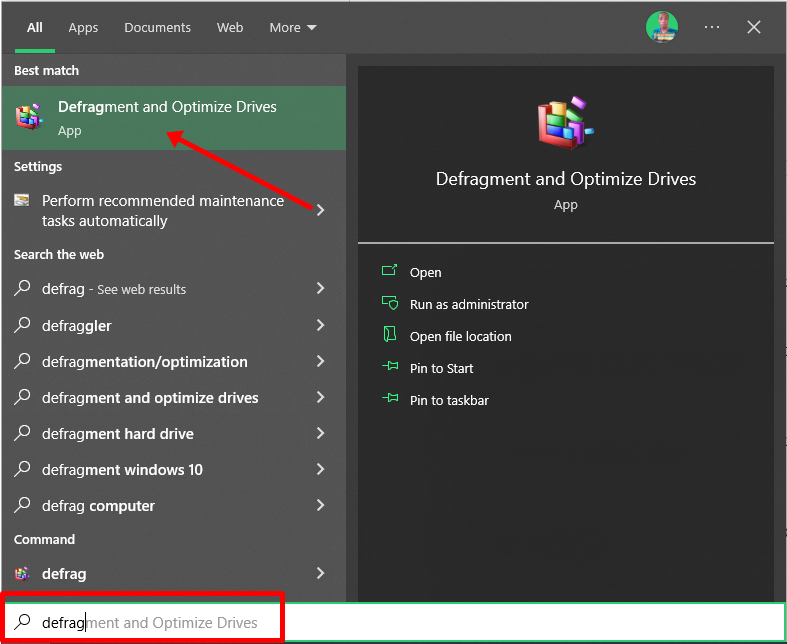
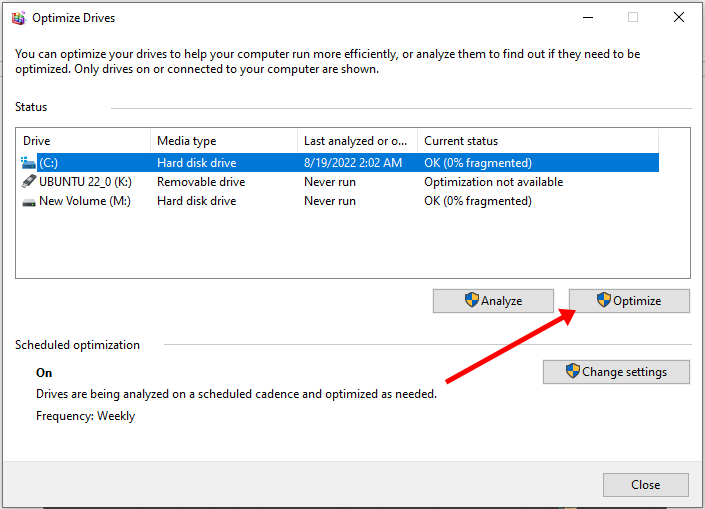
Make sure your C drive is highlighted, then click “Optimize”.
After you’ve been able to set aside at least 20Gig for Ubuntu by partitioning your hard drive, then it’s time to download Ubuntu and make a bootable USB.
How to Download Ubuntu in ISO Image Format
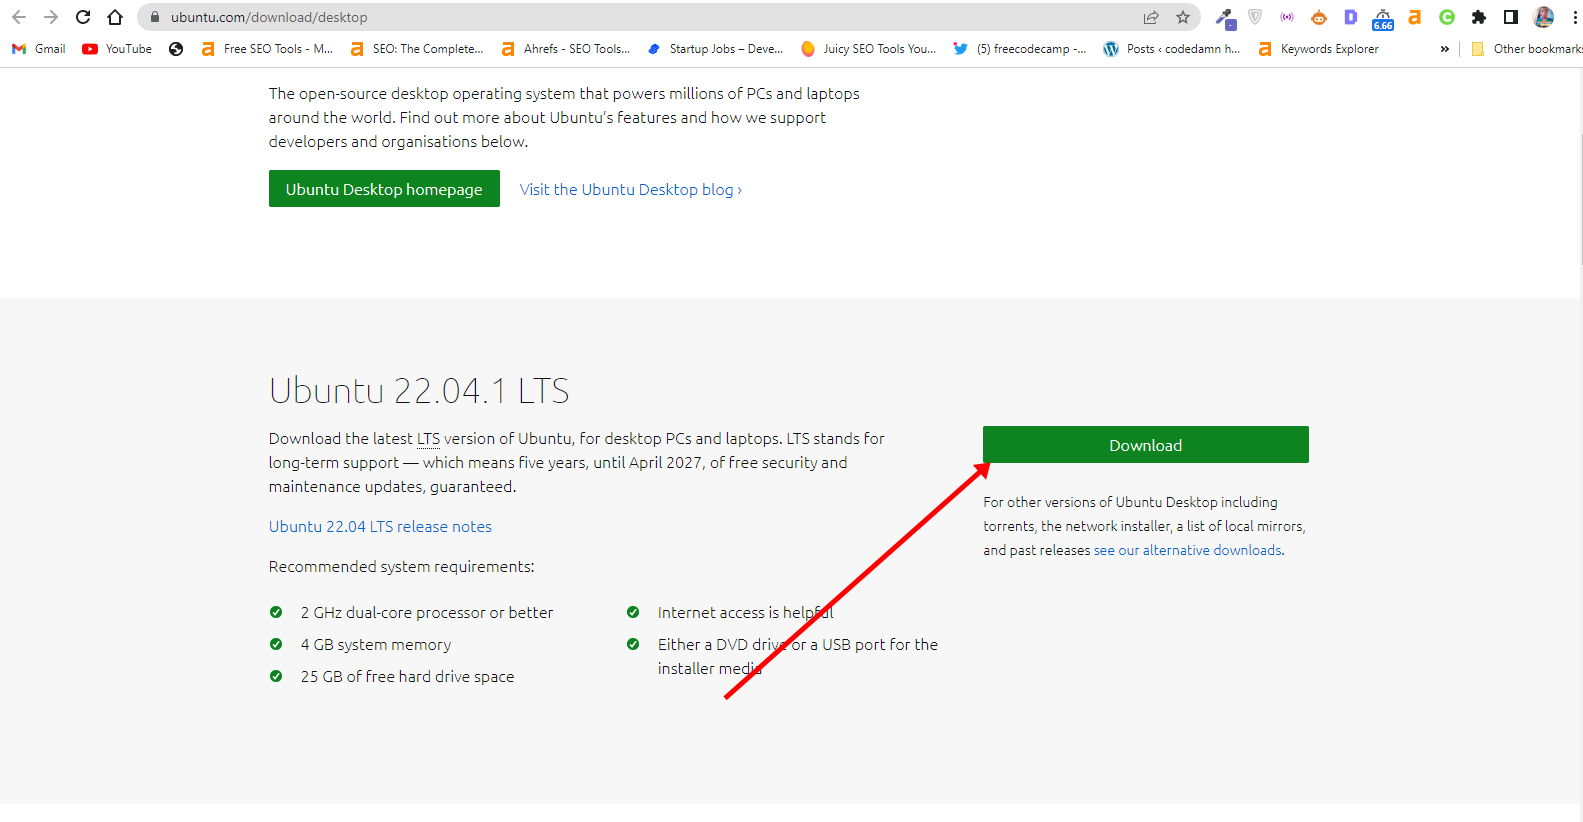
The next thing is to download Ubuntu in ISO image format so you can install Ubuntu. You can download it from the Ubuntu distro website.
After downloading Ubuntu, don’t do anything with it yet. You need to make a bootable USB and put it in there. That’s how you’ll be able to use it.
The reason you can’t install Ubuntu just like that is that it doesn’t come as an executable. It comes in form of ISO (optical disk image). That means you have to find a disk to put it in before it can work.
The next part of this guide shows how you can put the downloaded Ubuntu ISO on a USB stick.
How to Make an Ubuntu (Linux) Bootable USB Drive
You won’t be able to make a bootable USB drive for Ubuntu by just placing the downloaded ISO image in it. Follow these steps to get it done:
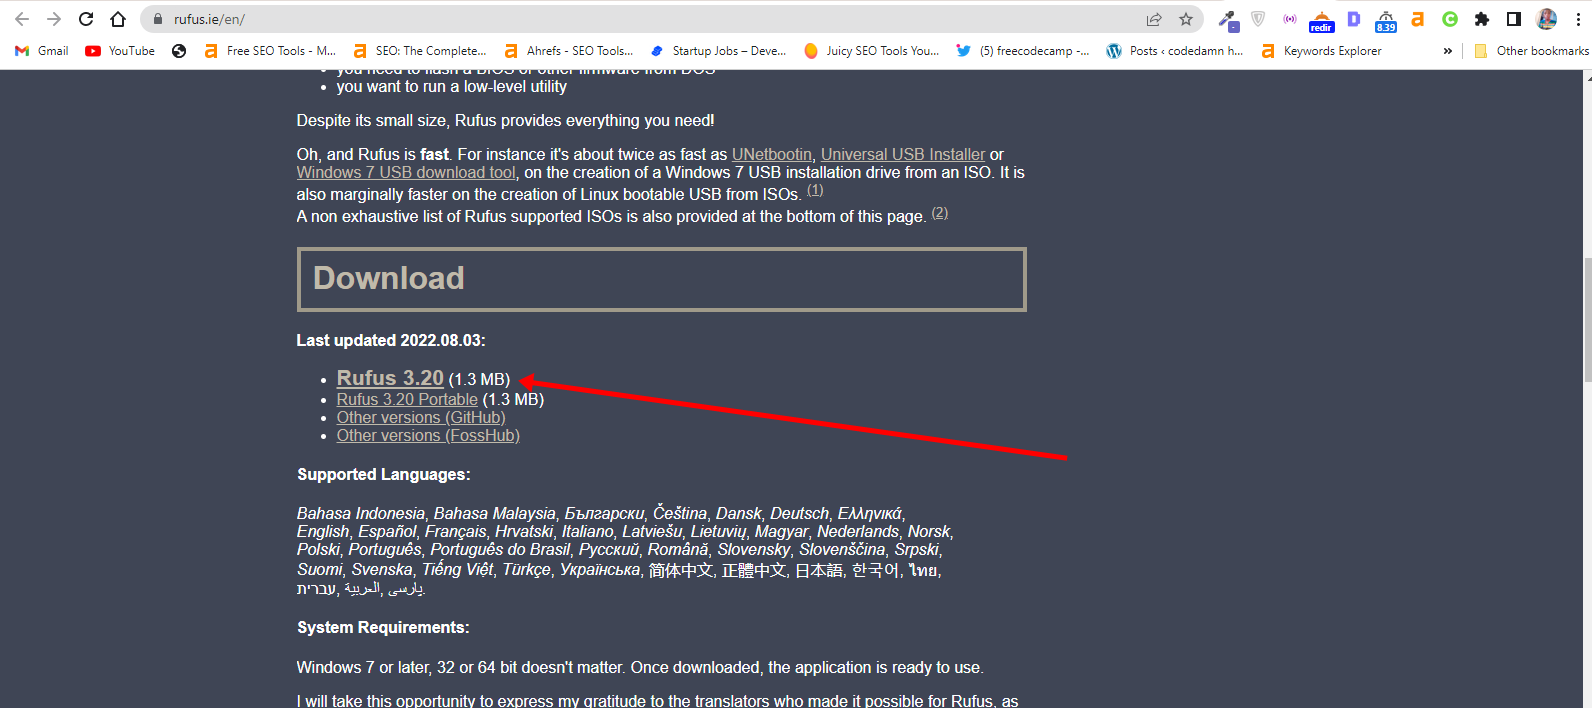
Step 1: You need to download a bootable USB drive creation tool like Rufus. You can download Rufus from their website.
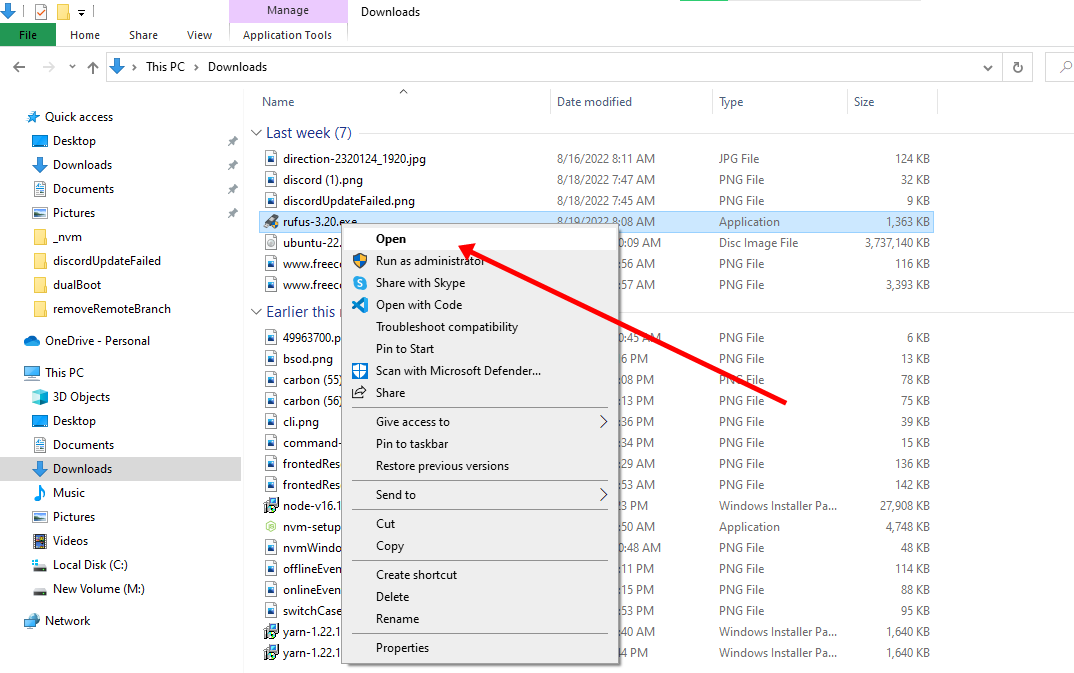
Step 2: Insert the empty USB drive into your Windows 10 PC. Right-click on Rufus and select “Open”.
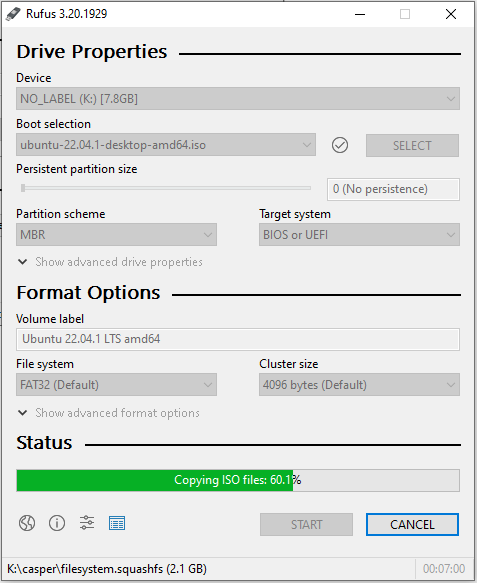
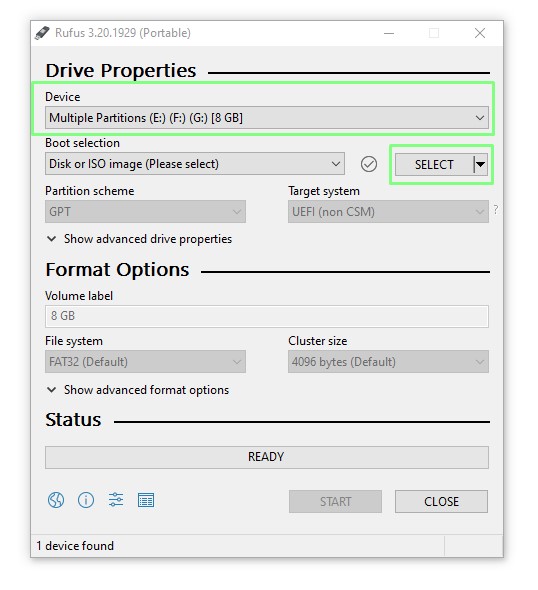
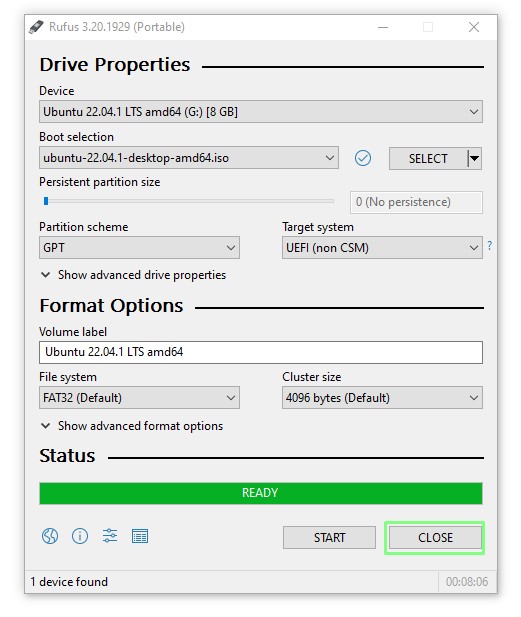
Step 3: Under “Device”, select your USB drive. And under “Boot selection”, click the “Select” button and select the Ubuntu ISO file you downloaded
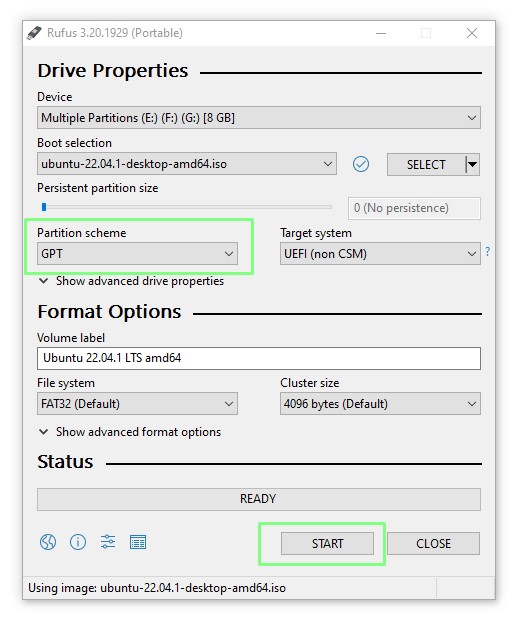
Step 4: Leave every other thing as default and click the “START” button to start burning the Ubuntu distro to the drive.

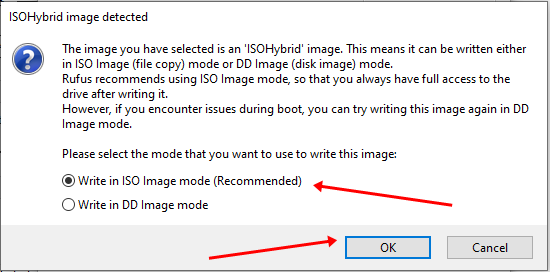
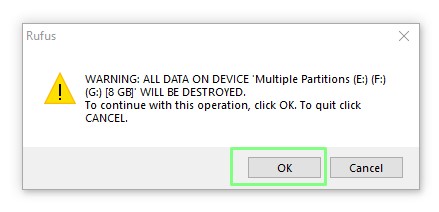
Step 5: Click OK to start the process.
Once the process is done, you should see “READY” on a green background. Click the Close button. Its time to install Ubuntu.
Congrats! Now you have a bootable drive with which you can install Linux.
The next step is to install the Ubuntu distro on your Windows 10 PC. To do this, you have to boot your PC from the bootable USB drive you created.
How to Install Ubuntu Linux Distro along with Windows 10
Step 1: Ensure the bootable drive is inserted into your Windows 10 PC
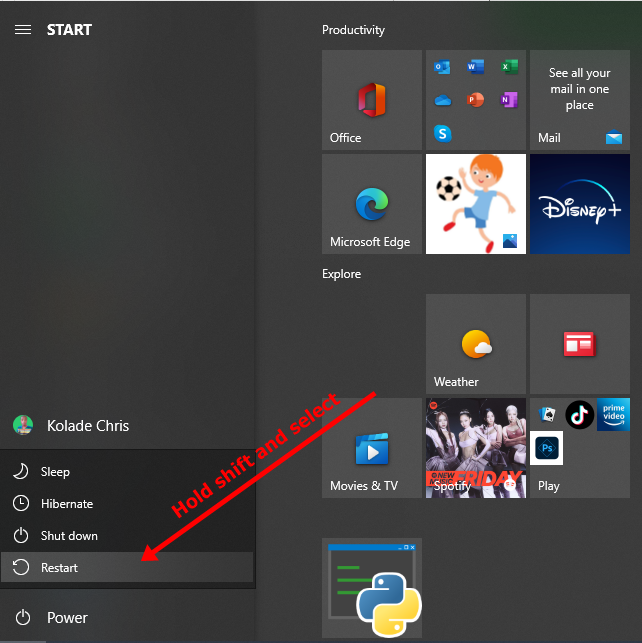
Step 2: Right-click on Start, hold SHIFT, and select Restart.
Step 2: Select “Use a Device”.
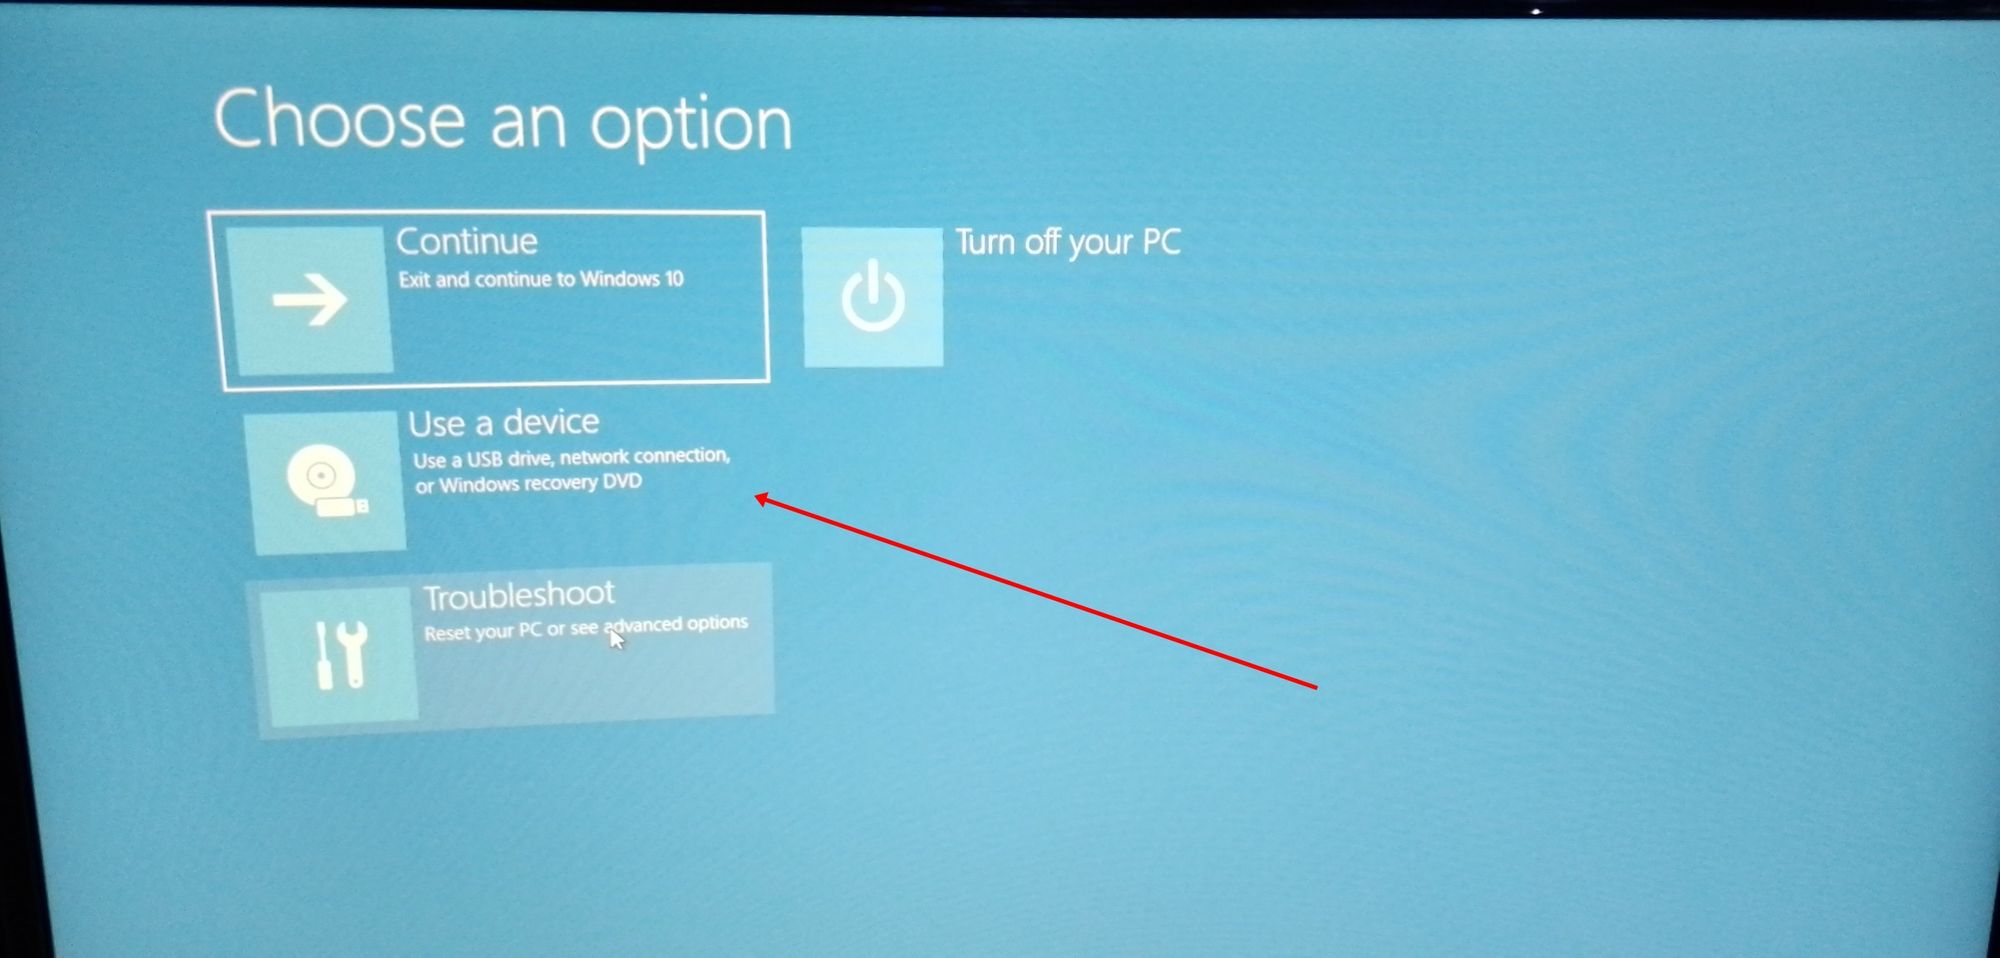
Step 3: On the next screen, you should see several devices you can boot from.
You may see the bootable drive as the name of the USB brand.
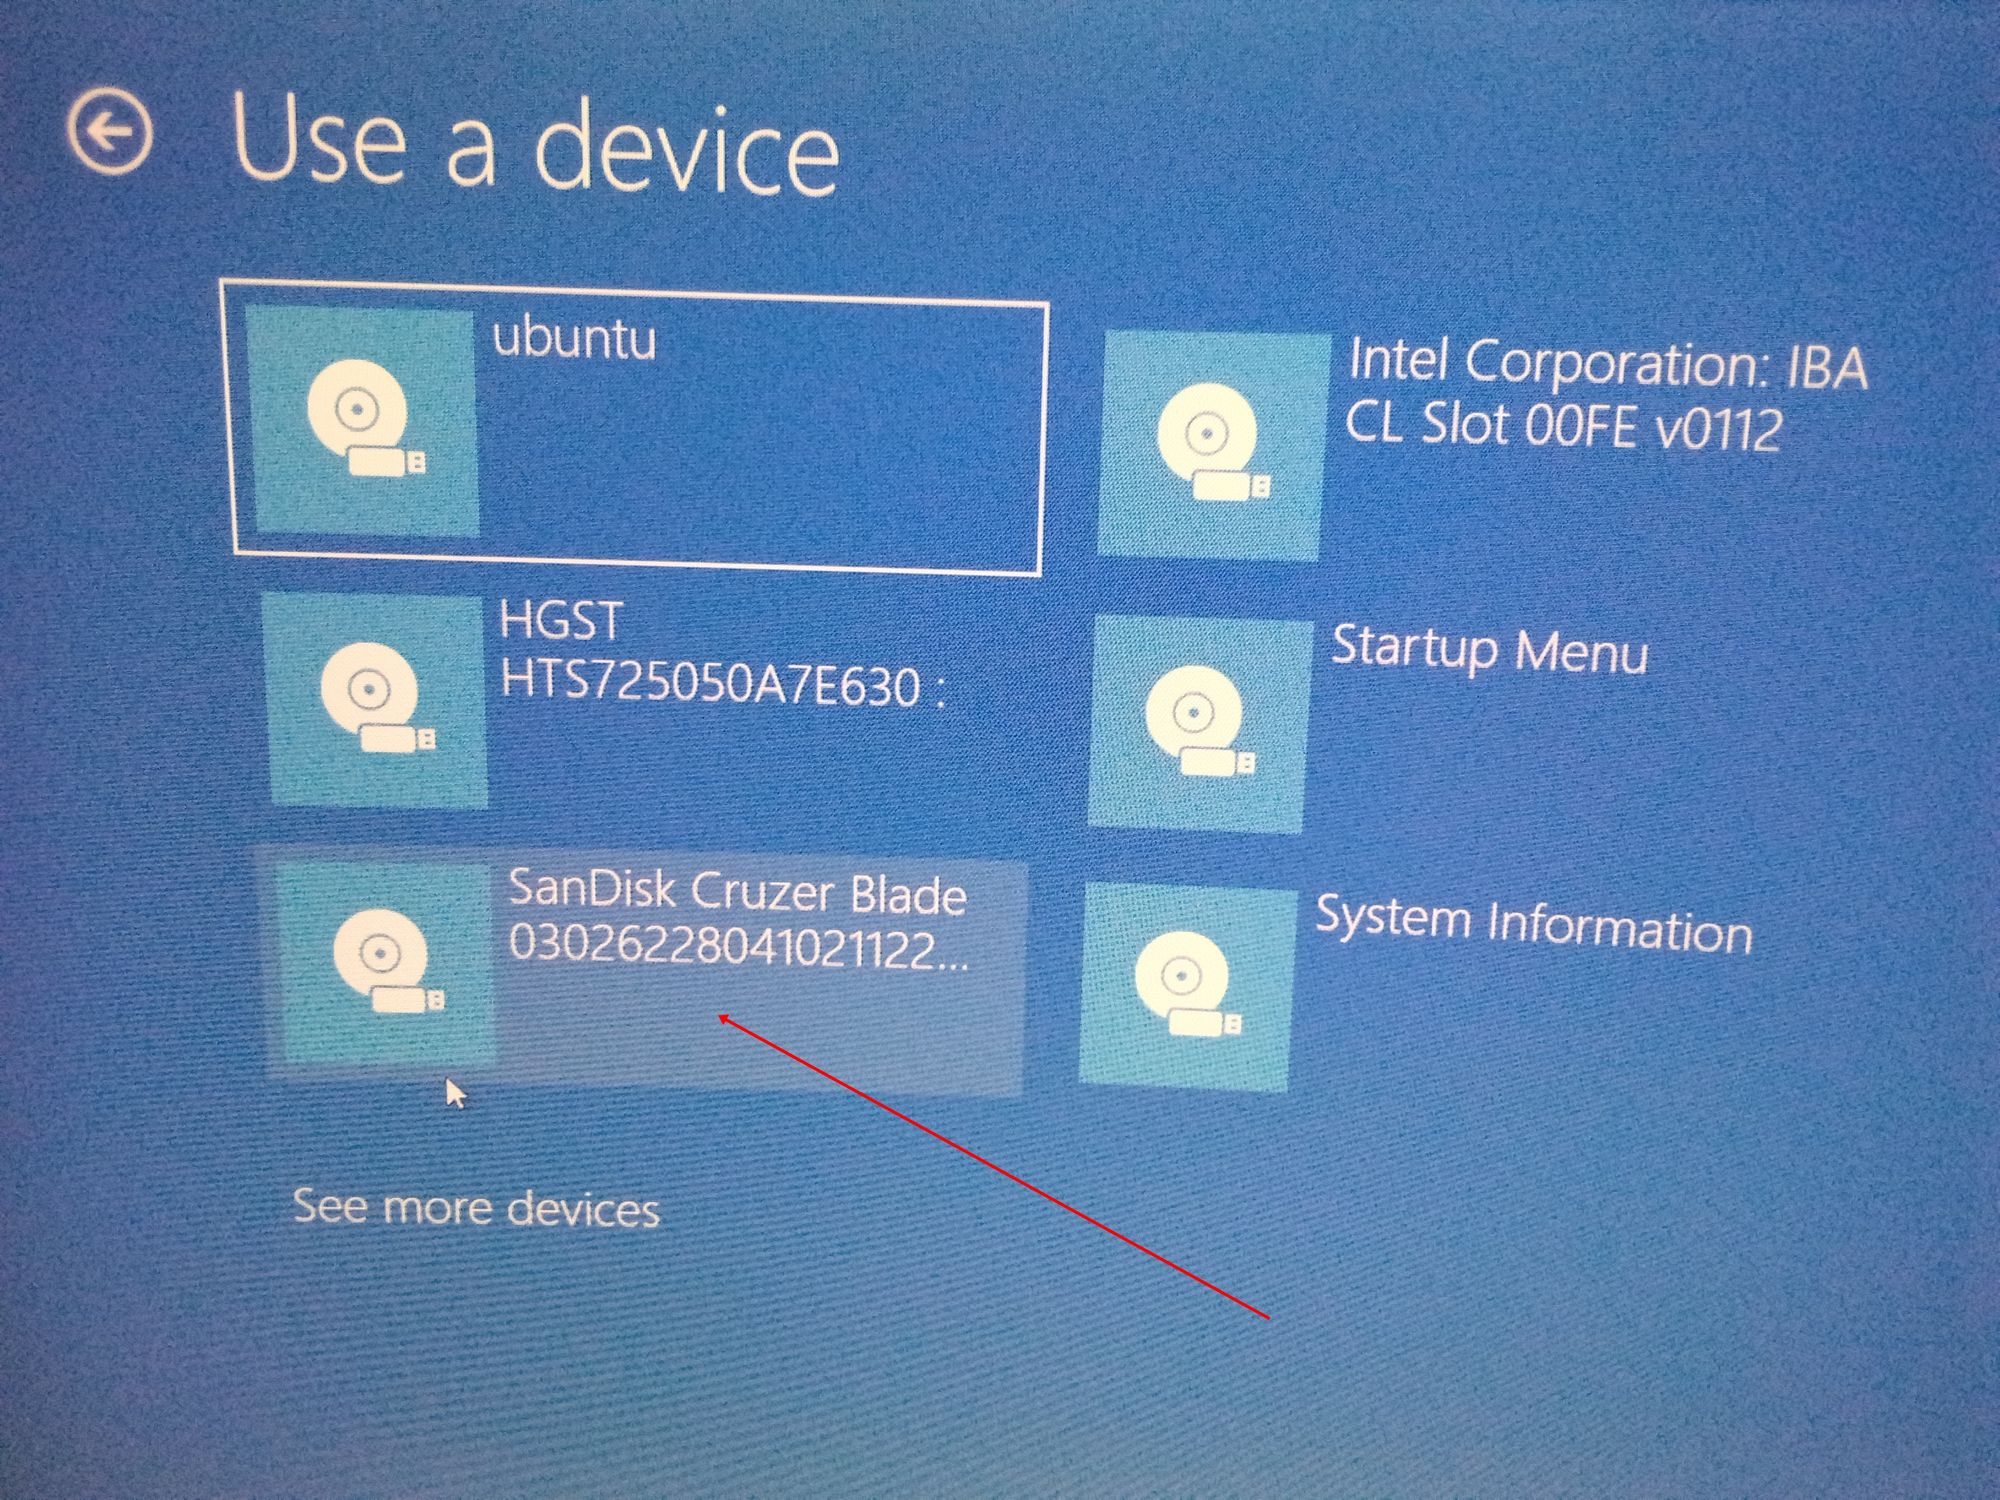
It’s possible to see it as “Ubuntu” too. Some other times, you might not see it, so you need to click on “See more devices».
If you still cannot see your bootable drive, head over to your boot menu by getting into BIOS. You will see it there.
N.B.: You should be very careful while making changes in BIOS. Whatever you do there has a lasting effect on your computer. If you are not sure of what you’re doing there, you should contact an IT professional.
Step 4: Choose «Install Ubuntu». You can also try it before installing it.
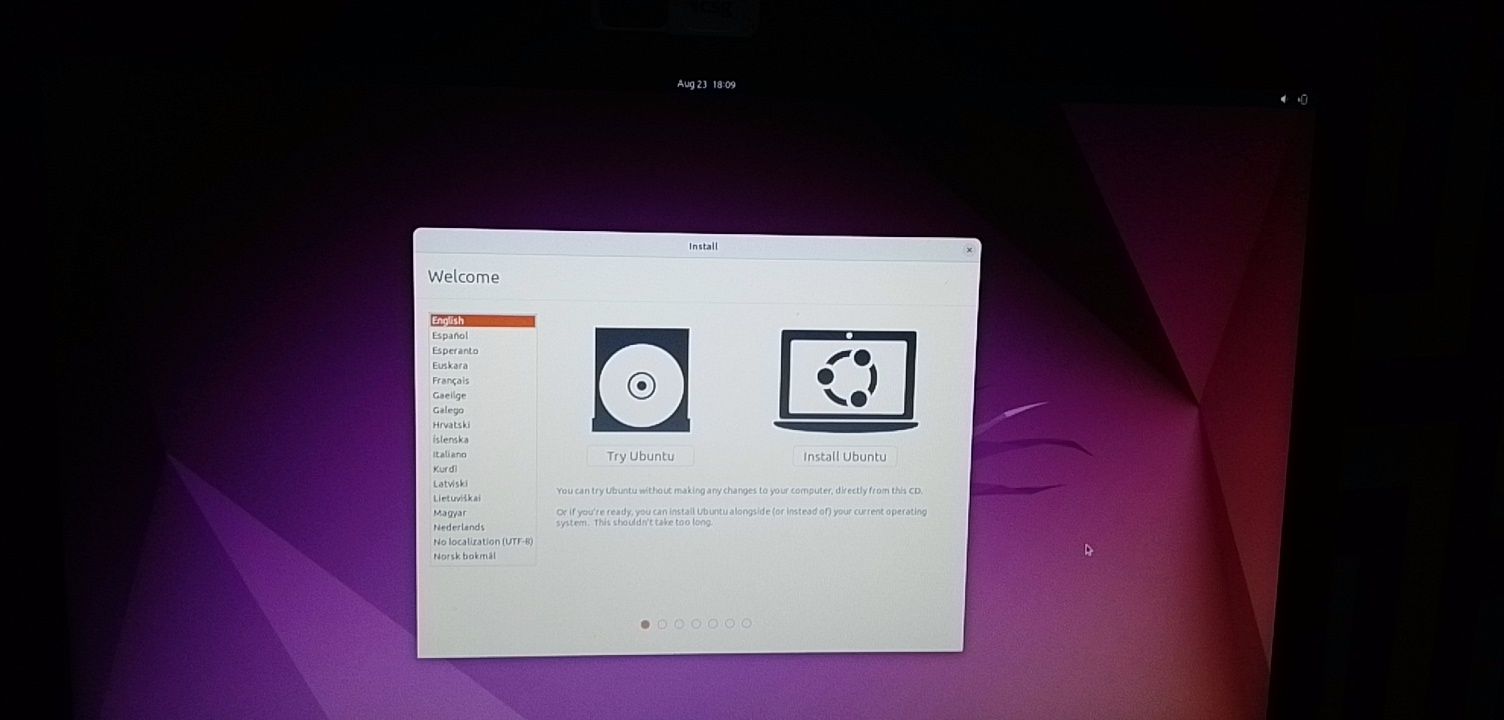
Follow other prompts of the installation wizard and make sure you don’t replace your Windows 10 OS installation with Ubuntu. This is why I suggested you back up all your files.
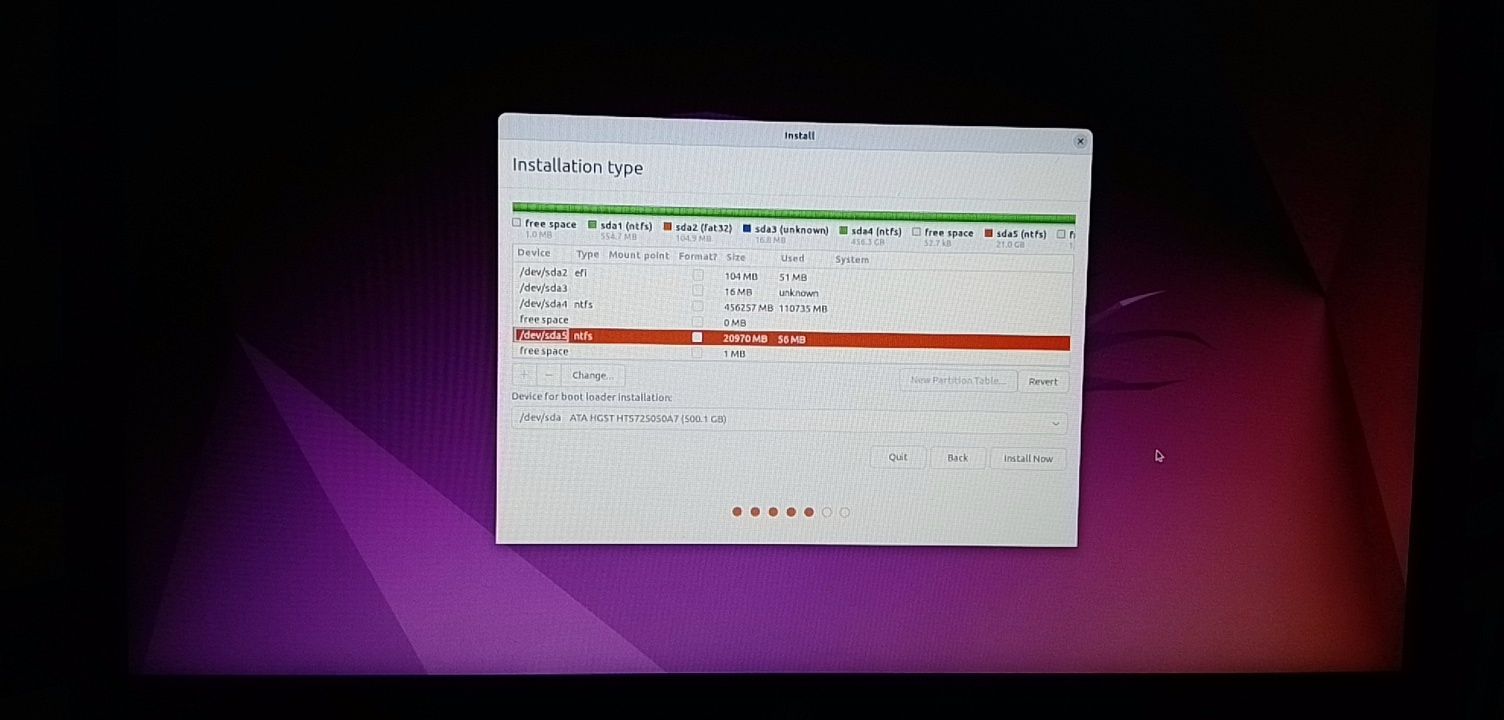
When you get to the point to select the partition you made, scroll to the partition you made earlier and press ENTER.
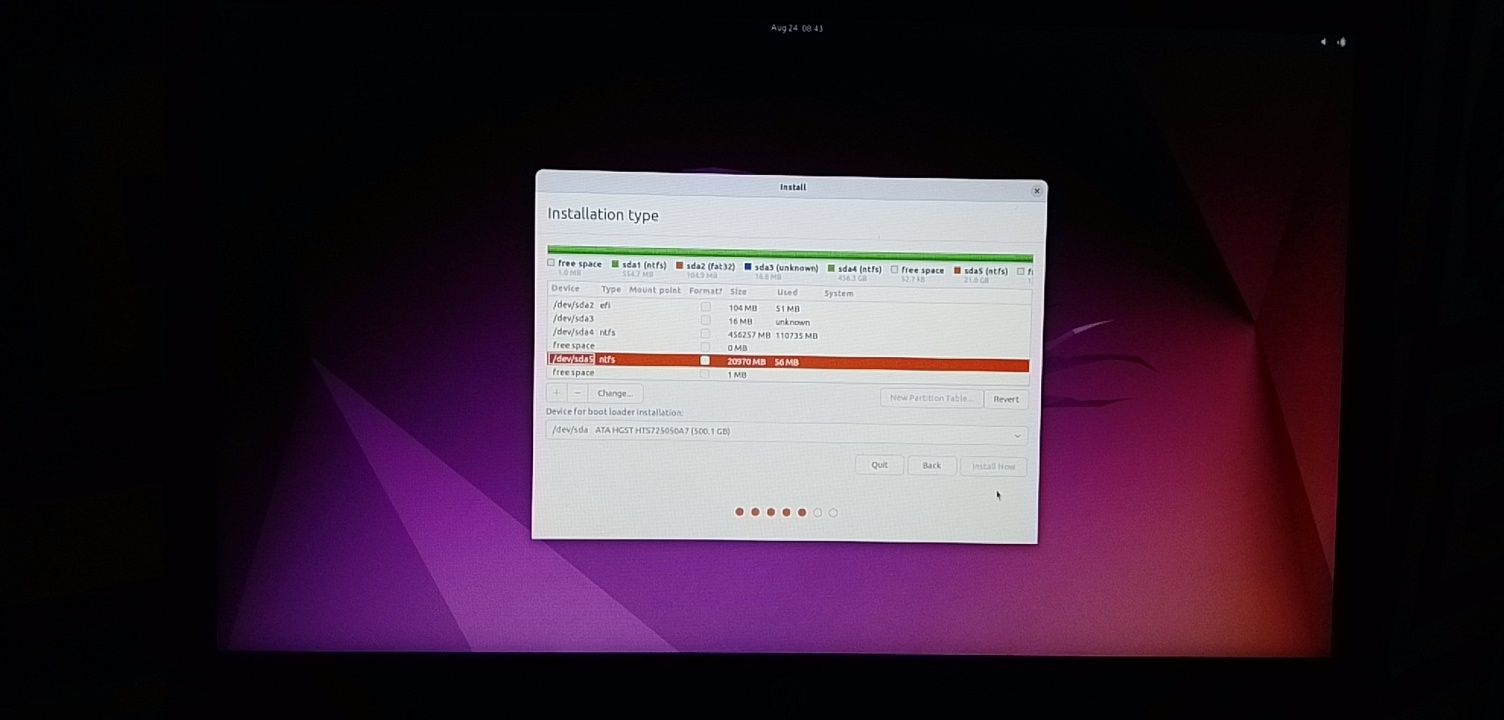
Click OK to select all the space in the partition.
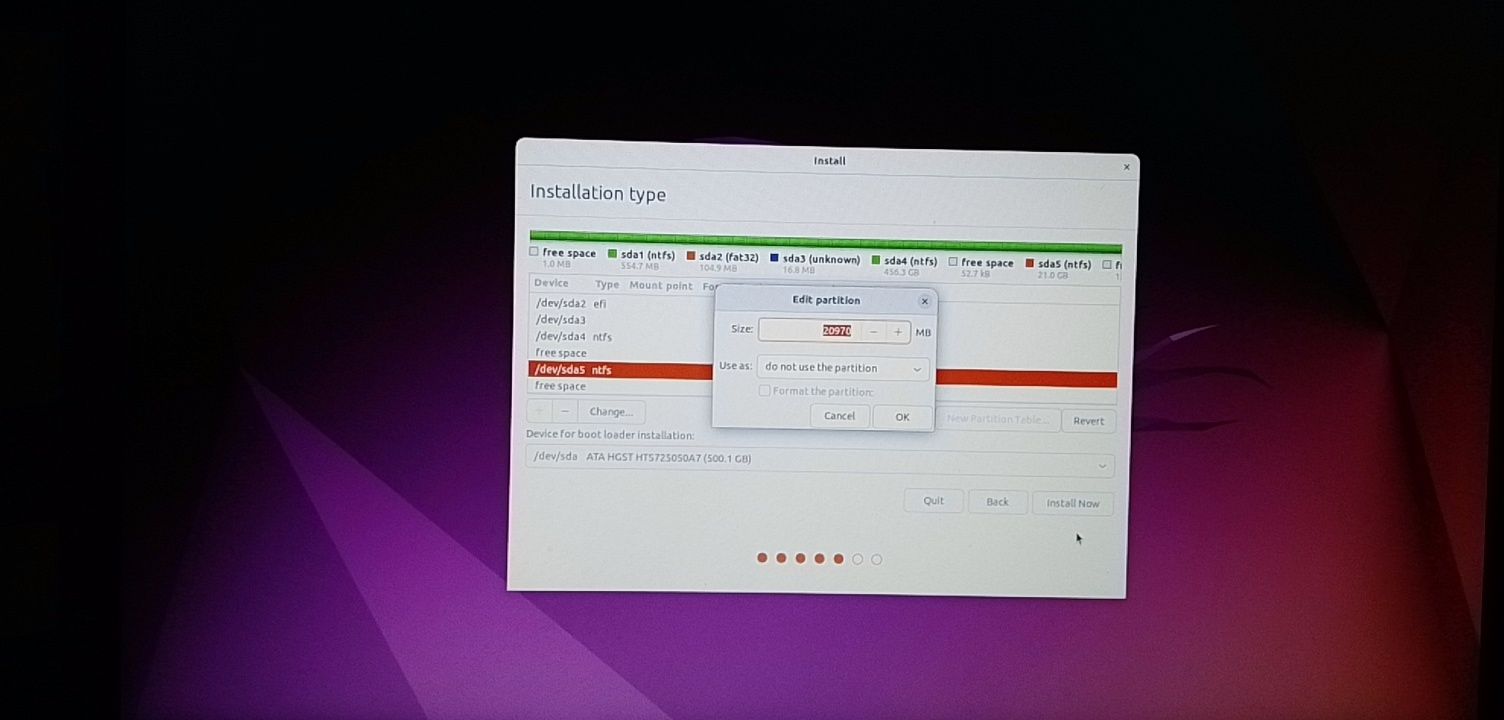
This time around, the “Install now” button will not be greyed out anymore.
Follow other prompts until Ubuntu starts installing.
After the installation is done, Ubuntu will prompt you to remove the bootable drive and press ENTER to reboot your Computer.
Now You Can Dual Boot Ubuntu and Windows 10
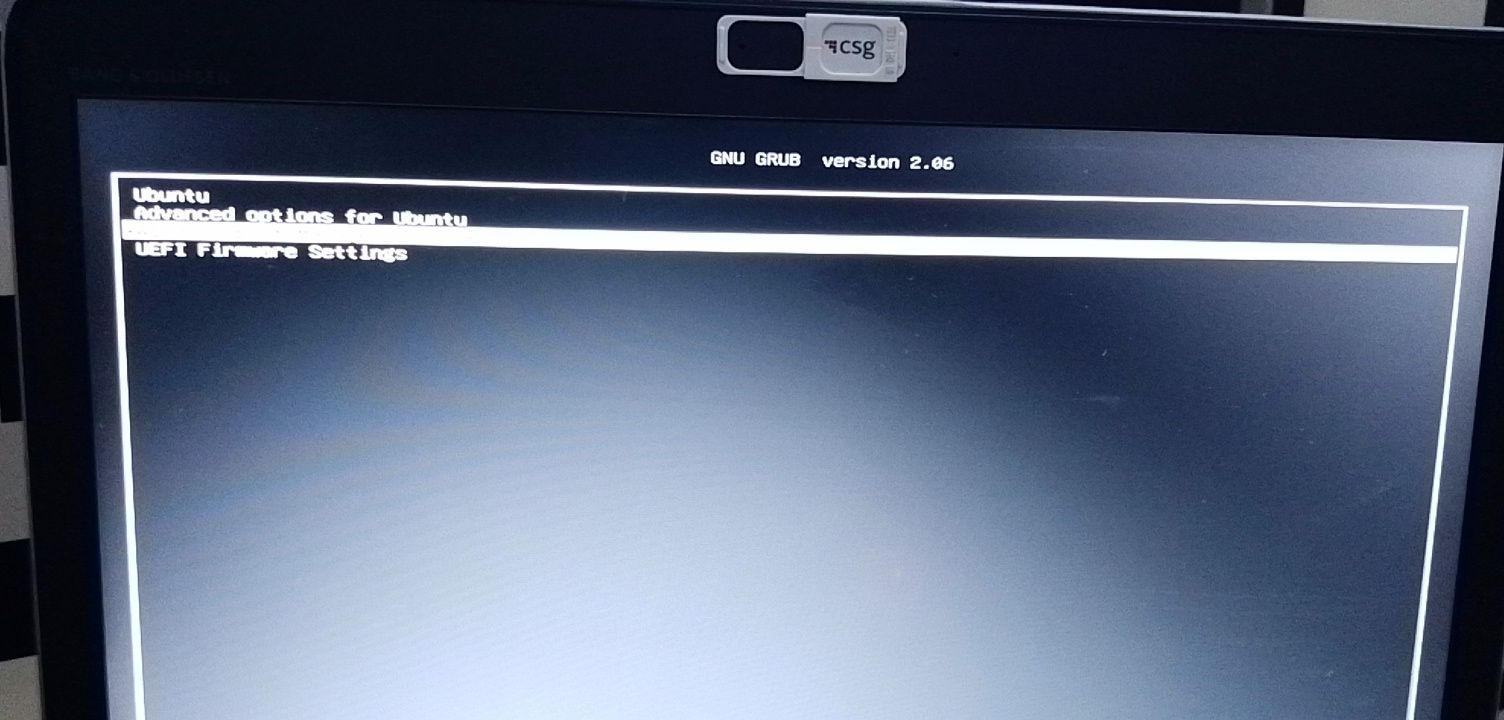
Immediately after you reboot the computer, you should see a screen that looks as shown below:
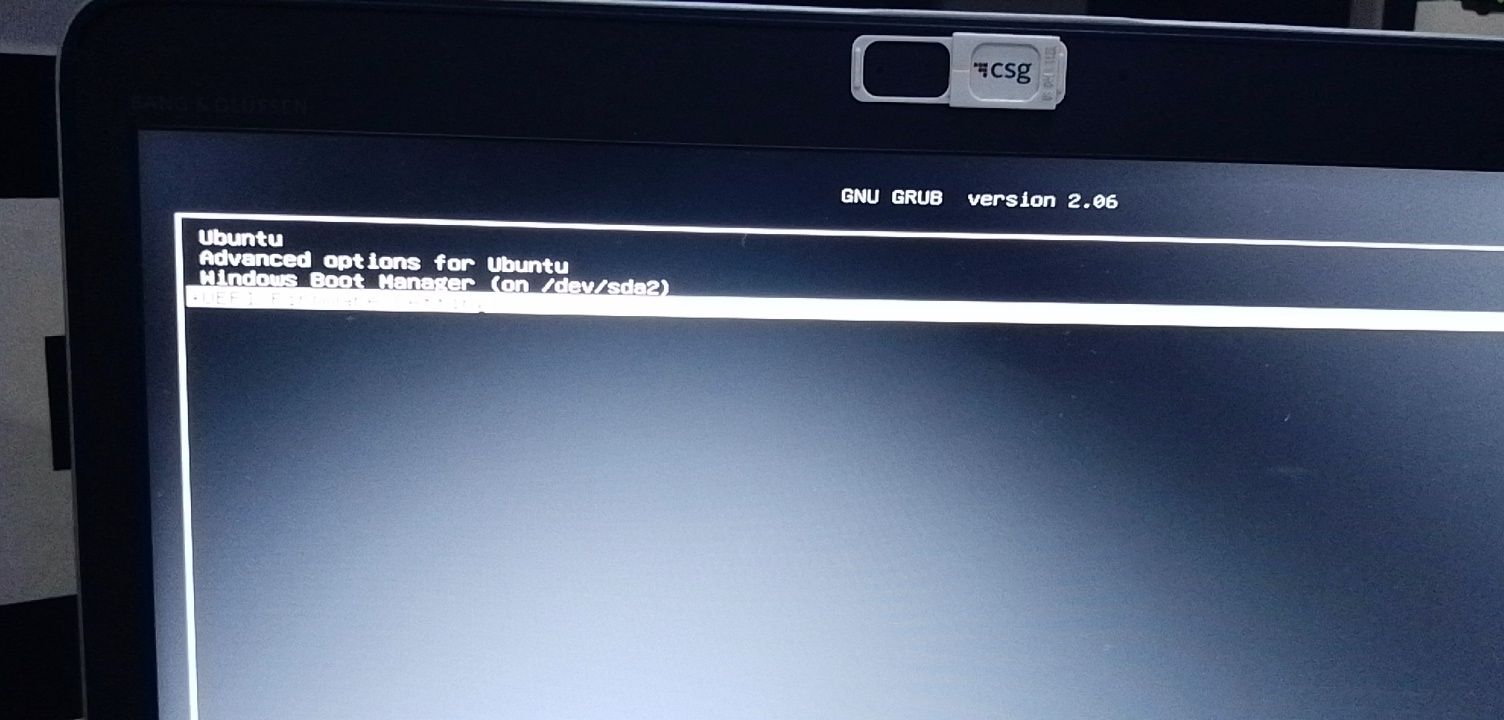
Now, you can select which one to boot into between Ubuntu and Windows 10.
To boot into Ubuntu, select Ubuntu. And to boot into Windows 10, select Windows boot manager.
You can also get into your BIOS from the same place by choosing UEFI Firmware Settings.
Conclusion
I hope this article helps you dual boot Ubuntu and Windows 10 on your computer.
The ultimate aim of this article was to show you how to dual boot Ubuntu and Windows 10.
But the article went beyond that to show you how to:
- check if your PC’s BIOS is in UEFI mode
- partition your hard drive
- optimize your hard drive
- make a bootable USB drive
- install Ubuntu Linux Distro along with Windows on your Windows 10 PC.
If you find this article helpful, kindly share it with your friends and family.
Learn to code for free. freeCodeCamp’s open source curriculum has helped more than 40,000 people get jobs as developers. Get started
We explain how you can install Windows and Linux on the same computer. It’s a fairly straightforward process and takes a few minutes to complete.
Choose a Linux distribution and create a bootable USB
Linux is an operating system that is divided into multiple distributions, i.e. multiple versions of the same operating system but with different characteristics. If you want to learn more about this topic, we invite you to read the following article which explains what all the versions of the Linux system are and their characteristics. There are some with less RAM and other more modern versions. Most are free and can be dual-booted with any version of Windows.
Once you have downloaded the version of Linux you have chosen to your computer, you need to create a boot disk to install Linux.
Since Linux weighs next to nothing, it fits on a basic 2GB pendrive so you don’t have any restrictions when installing. We recommend that you use Ubuntu GNOME as that’s what this tutorial is based on. You can download it here.
Boot your computer from the USB drive
When you turn on your computer, a black screen with white letters will appear. At the bottom of the screen a box will appear with different options, each one has an associated key, such as F2, F12 o Elimina.
Depending on your computer, the startup window varies. This screen is where you will enter the BIOS, i.e. where you will choose to have your PC run the operating system installed on the USB instead of booting Windows normally.
It is recommended to press the above-mentioned keys more than once until a window appears with the connected USB devices. When you find the USB whose name matches the pendrive where did you save Linux, press Enter.
Proceed with the Linux installation
The first thing that will appear are the language options. Select Spanish and, depending on the distribution, the next window that appears varies. One of these options may appear:
- Try Linux without installing — start a temporary session where you can install Linux from there.
- Install Linux
- Other options
You can choose to install it now or try it first. We advise you to try before installing it in so you can clearly see what the operating system is.
Dual boot Windows and Linux
When installing Linux, you need to select different options as they appear in each step. The installer walks you through the whole process.
After configuring the keyboard, you need to configure the Wi-Fi, although the option you prefer not to connect to a Wi-Fi network at this time will be selected by default.
In the next step you will choose how you want the installation to be, normal installation is recommended, but you can choose whichever one you prefer. Then you will have the option to install Ubuntu along with Windows and the system will automatically install it.
The next time you turn on your computer, two options will appear, if you want to enter with Windows or Linux.
What can you do if you have Linux and want to install Windows?

This is not that simple, but one way to do this would be to install a boot with Windows and Linux starting with Linux, it would be to create a partition and install Windows there, but requiring this format NTFS, you may have problems installing and you should also reinstall GRUB with a rescue disk
Ti we recommend installing windows and installing linux from there as it is simpler and less risky by following the steps already mentioned above. We hope it was helpful and if you want to know more about Linux, remember to read other articles like What are Linux log files and what are they for? , as well as we also recommend how to create directories and subdirectories in Linux with the «mkdir» command.
Dual booting Linux and Windows is a way to install and use both OS on the same PC, allowing you to switch between them as needed. This setup can be beneficial for those who require the use of specific software or tools that are only available on one platform, or for those who wish to explore the world of Linux while still having access to Windows.
However, it’s important to be aware of the potential risks and challenges involved in dual booting, such as partitioning your hard drive, managing boot loaders, and ensuring compatibility with your hardware. With proper planning and execution, though, dual booting can provide you with a versatile and powerful computing environment.
Dual Boot Linux and Windows

Here we have divided the entire installation into three steps:
- Prerequisites for dual boot
- Installation of Windows 10 on your PC
- Dual Boot Linux with your Windows
Step 1: Prerequisites to dual boot
Before you begin the process of dual booting Linux and Windows, there are a few prerequisites you should be aware of.
Firstly, make sure that your computer meets the hardware requirements for both operating systems. This includes having enough disk space, memory, and processing power to comfortably run both.
Next, you should have installation media for both operating systems, whether that be a CD/DVD or USB drive. Additionally, you’ll need to create a backup of any important data on your computer before proceeding, as the dual boot process involves partitioning your hard drive, which can result in data loss if done incorrectly.
Finally, it’s essential to have a basic understanding of partitioning, boot loaders, and file systems, as these concepts are critical to successfully setting up a dual boot configuration. You can find plenty of resources online to help you understand these concepts and guide you through the process.
Hardware Requirement
The hardware requirements for dual-booting Linux and Windows will vary depending on the specific versions of the operating systems you plan to install, as well as the software applications you intend to use.
For Windows, Microsoft provides minimum system requirements for each version of Windows, which typically include a 1GHz or faster processor, 1-2GB of RAM, and at least 16-20GB of available hard disk space. However, these are just the minimum requirements, and you may want to consider a more powerful system if you plan to use resource-intensive applications such as video editing software or high-end gaming.
For Linux, hardware requirements can vary widely depending on the specific distribution (or “distro”) you plan to install. In general, most Linux distros have lower system requirements than Windows, making them a great choice for older or lower-end hardware.
For example, Ubuntu, one of the most popular Linux distros, recommends a 2GHz dual-core processor, 4GB of RAM, and at least 25GB of available hard disk space. However, again, you should consider the specific requirements of the Linux distro you plan to use and any applications you’ll need to run.
Step 2: Create a bootable USB of Windows and do the installation
If you have already installed Windows on your system then you can skip this step. However; those who haven’t installed it yet are going to use these steps to create a bootable USB.
- Obtain a USB drive with at least 8GB of storage capacity. (USB will be formatted)
- Download the Windows 10 Media Creation Tool.
- Connect the USB drive to your computer and run the Media Creation Tool.
- Accept the license terms and select the option to create installation media for another PC.
- Choose the language, edition, and architecture (32-bit or 64-bit) of Windows 10 you want to install.
- Select the USB flash drive option and choose the USB drive you connected earlier.
- Click on Next and wait for the tool to create the bootable USB drive.
- Once the USB drive is ready, restart your computer and enter the BIOS or UEFI settings to change the boot order, and set the USB drive as the first boot device.
- Save the changes and exit the BIOS or UEFI settings. Your computer will now boot from the USB drive.
- Follow the on-screen instructions to install Windows 10 on your computer.
It’s important to note that during the installation process, you will be asked to choose the partition where you want to install Windows. If you’re planning to dual boot with Linux, you’ll need to create a separate partition for Linux beforehand. This will ensure that each operating system has its own dedicated partition and won’t interfere with each other.
You can do this partition while installing Windows too. You will create 2 local disks; one for Windows and another one for Linux.
Step 3: Create a bootable USB of Linux
Now you will need to create a bootable USB, you can follow these general steps:
- Choose a Linux distribution (or “distro”) that you want to install. Some popular options include Ubuntu, Fedora, and Mint.
- Download the ISO file for your chosen Linux distro.
- Obtain a USB drive with at least 8GB of storage capacity.

- Download and install a tool for creating bootable USB drives, such as Rufus (for Windows) or Etcher (for Mac or Linux).
- Connect the USB drive to your computer and run Rufus.
- Select the Linux ISO file you downloaded and the USB drive you want to use, and create the bootable USB drive.
- Restart your computer and enter the BIOS or UEFI settings to change the boot order and set the USB drive as the first boot device.
- Save the changes and exit the BIOS or UEFI settings. Your computer will now boot from the USB drive.
- Now you will install Linux on your system.
Step 4: Dual Boot Windows & Linux
During the installation process, choose the option to install Linux alongside Windows. This will ensure that the two operating systems can coexist on your computer without interfering with each other.
Also, when prompted, select the partition where you want to install Linux. Make sure to select the newly created disk that we created earlier.
If you have not created a separate disk for Linux then you can do the installation within the same disk as Windows.
Select the disk and complete the installation.
Restart your system. Upon restarting, you should see a boot menu that allows you to choose which operating system to boot into.
It’s important to note that the specific steps and options may vary slightly depending on the Linux distribution you choose and the tool you use to create the bootable USB drive. Additionally, be sure to back up any important data before attempting to dual boot your computer, as the process can potentially result in data loss if done incorrectly.
NOTE: if your system is directly boot to Windows or Linux without giving you any option then please check for boot options in BIOS. In the BIOS, you can change the booting sequence and boot the OS accordingly.
Related Topic:
Dual Boot Windows 11 and macOS
How to Dual Boot Two macOS on Mac?
Dual Boot Windows 11 and Windows 7
Dual Boot macOS Big Sur and Windows 10
Dual boot Windows and Linux on the same PC help you in many situations. Your PC is more powerful than you think it is. Your PC can hold more than one OS at a time. If you are using Windows OS on your PC, you can install Linux OS easily. It is like installing an extra app to your PC. Have more than one OS can be useful in situations like you can use the Linux platform for your coding related works and can use Windows 10 for watching movies.
There are three ways to Dual Boot Windows and Linux.
- Install Linux alongside Windows
- Using a Live Linux Version
- Using Virtual Machines
Contents
- Preliminary Things
- Method 1: How to Install Linux alongside Windows?
- Part 1: Create a live USB for Linux
- Part 2: Creating Partition for Linux
- Part 3: Ready to Boot Linux
- Part 4: Installing Linux on Windows PC
- Method 2: How to Dual Boot Windows and Linux using Live Linux Version?
- Method 3: How to Dual Boot Windows Linux using Virtual Machines?
Preliminary Things
Before dual booting Windows and Linux, you need to set some things on your PC.
Backup the data: The first and foremost thing in dual booting is to backup your data. On the dual booting process, if any error occurs you may end up losing all your data stored on your system. So, it is better to backup your data as a precautionary measure.
Software: Download Ubuntu 19.10 or any other Linux ISO version. Download and install Etcher or Universal USB Installer to create a live version of Linux.
Method 1: How to Install Linux alongside Windows?
This is time-consuming process but it won’t reduce your system’s speed and performance.
Part 1: Create a live USB for Linux
(1) Plugin a USB drive on your PC. Make sure that the USB drive is formatted. 32 GB drive is preferred.
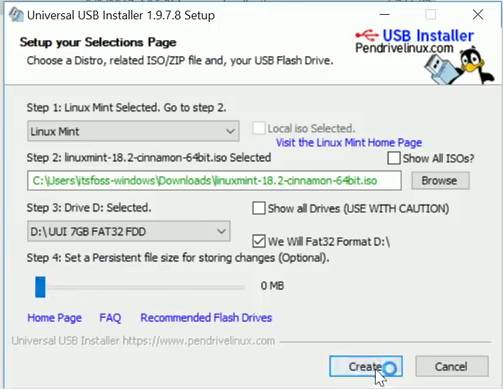
(2) Open the Universal USB Installer or Etcher. We are using the Universal USB Installer here.
(3) Choose the Linux Distribution that you have downloaded. In our case, it is Linux Mint.
(4) Click the Browse button to upload the Linux IOS image.
(5) In Step 3 box, choose your USB drive and choose the Fat32 Format option.
(6) After finishing the above steps, click the Create button.
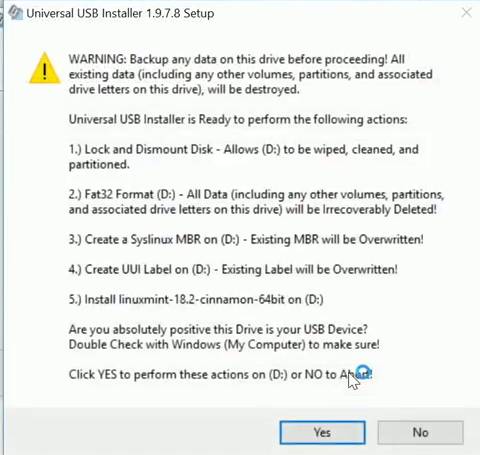
(7) When a pop-up appears, click Yes.
(8) Now, the installation will begin. It will take up to 10 minutes based on your PC.
Part 2: Creating Partition for Linux
At this point, you have created a live USB drive for Linux. To boot the Linux, you need to make space or memory.
(1) Open the Disk Management settings. (Right-click on
This PC –> Manage –> Disk Management).
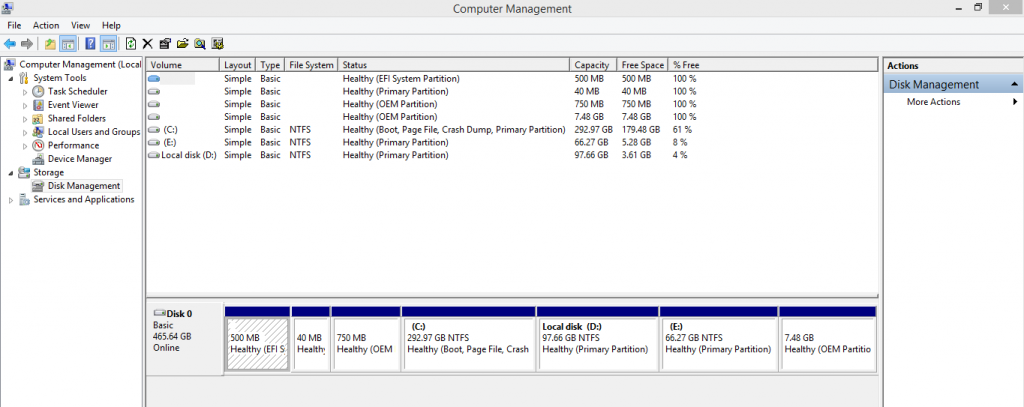
(2) Navigate to the OS (C) disk and right-click on it.
(3) Choose the Shrink Volume option to make some space for Linux. Make sure that the OS (C) is having at least 150 GB of free space.
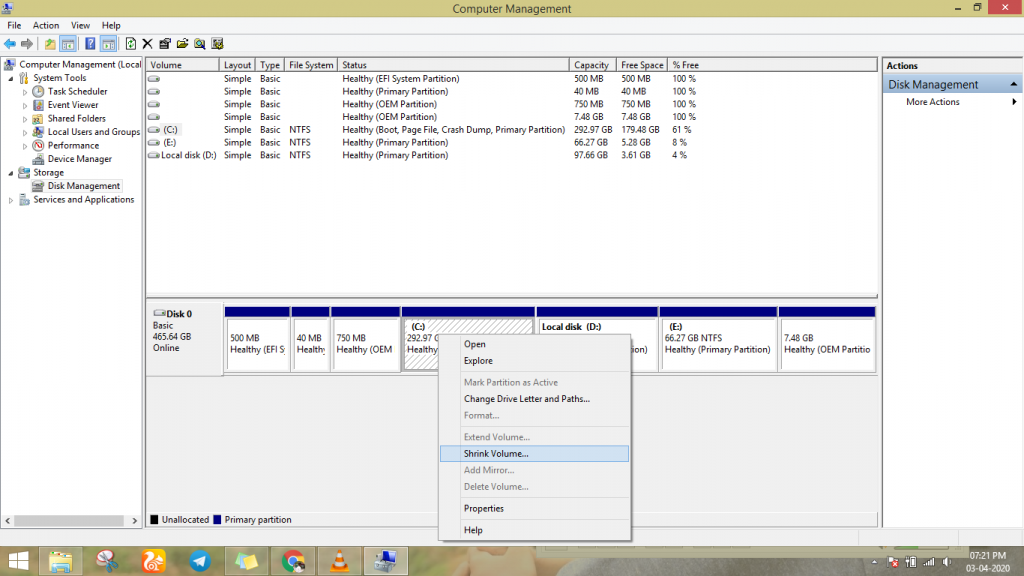
(4) Enter the amount of space you need for Linux. In most cases, 100 GB is more than enough. Enter 100 GB or more. You need to specify the MB count. So, 100 GB will be 100000 MB.
(5) After this, click on Shrink. Now, you will 100 GB of unallocated space. We are going to use this 100 GB unallocated space to run Linux on your system.
Part 3: Ready to Boot Linux
Now, you have created a Linux USB drive and space for Linux installation. It is time to boot Linux alongside Windows. It is important to know the function key that is required to open the Boot menu. For most PCs, it would be F10 or F12. But verify it from the official website. Don’t forget to insert the Linux USB drive.
(1) Close all your tab and restart your PC.
(2) When restarting, after the Windows logo, continuously press the Boot Key (F10 or F12) to enter the Boot menu.
(3) On the Boot Menu, choose the Linux USB drive. Your mouse won’t work here, use arrow keys and Enter key to select.
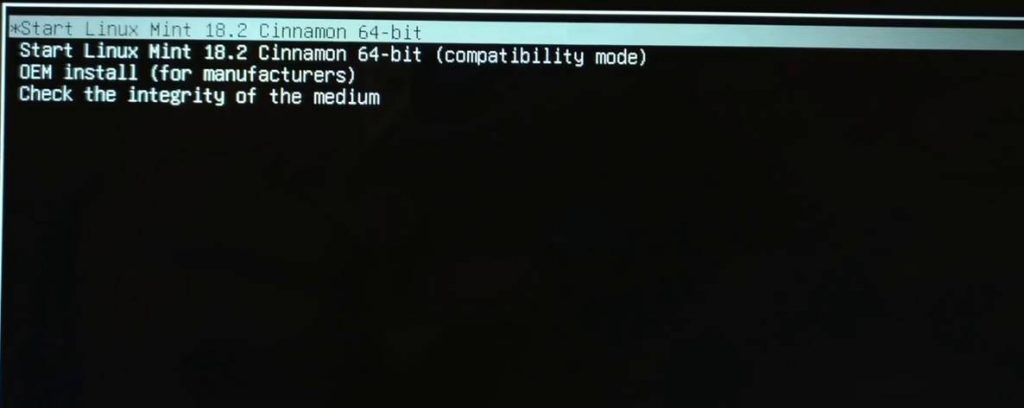
(4) Four options will appear. Choose the first option – Start Linux Mint 18.2 Cinamon 64-bit. The version number may differ according to the Linux version you have downloaded before. The second option – Start Linux Mint 18.2 Cinnamon 64-bit (compatibility mode) will be explained later. The rest two options are settings regarding the USB drive. You have nothing to do with these two options.
Part 4: Installing Linux on Windows PC
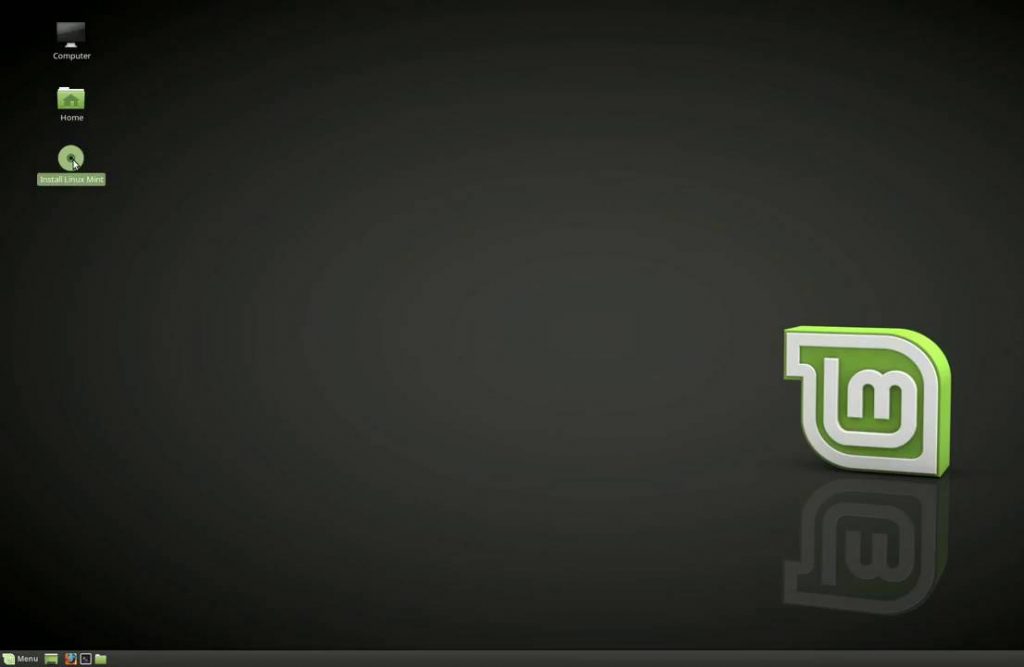
(1) After the booting, you will get three icon on the window. Run the Install Linux Mint icon.
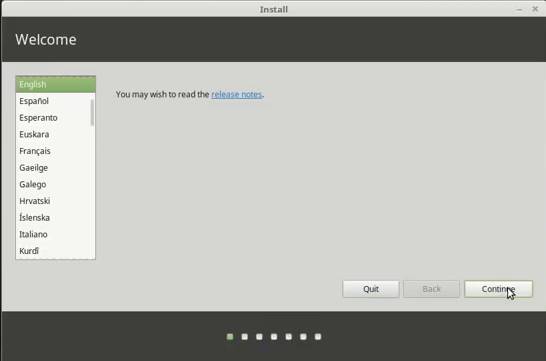
(2) Choose the language and click Continue.
(3) If you want to play audio & video files on Linux, opt for Install third-party options and Continue. If you don’t want, simply click Continue.

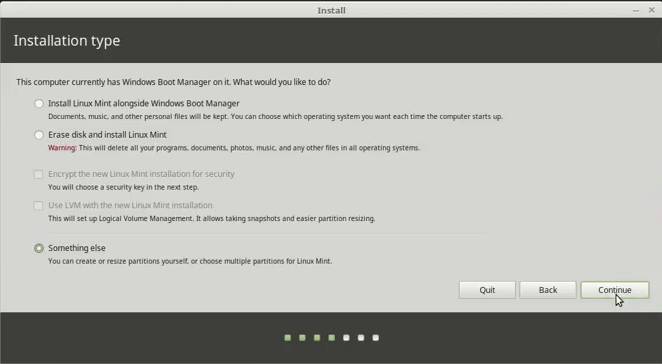
(4) Now, the Installation type window appears. Click Something else and tap on Continue.
(5) Here, choose the disk you have created for Linux installation. (100 GB of unallocated space) and click the + symbol at the bottom to create a partition.
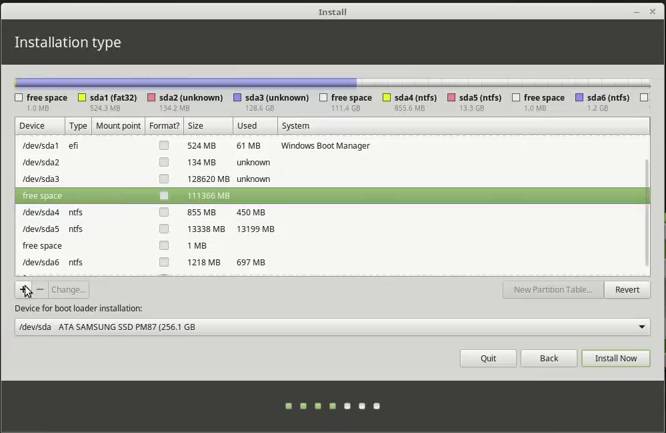
(6) You need to create two partitions. One for booting and another one for Swap. Booting requires 10-20 GB. Swap is not compulsory, if you are having low memory, skip it. Recommend size is 4-8 GB.
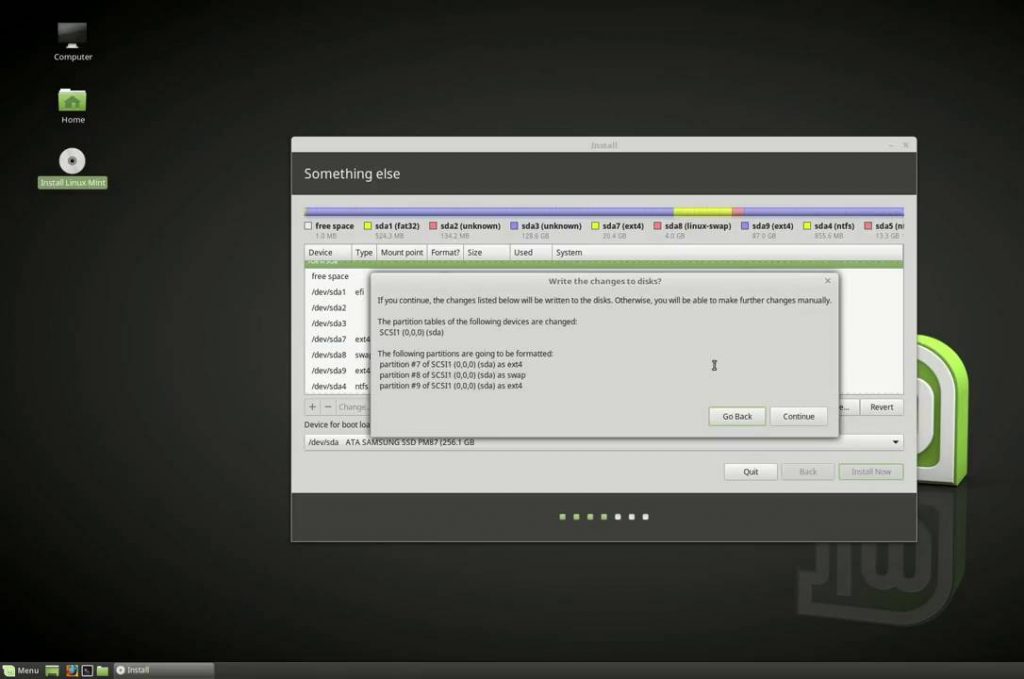
(7) Now, click Install Now. All the partition you have created will appear. Verify it and click Continue.
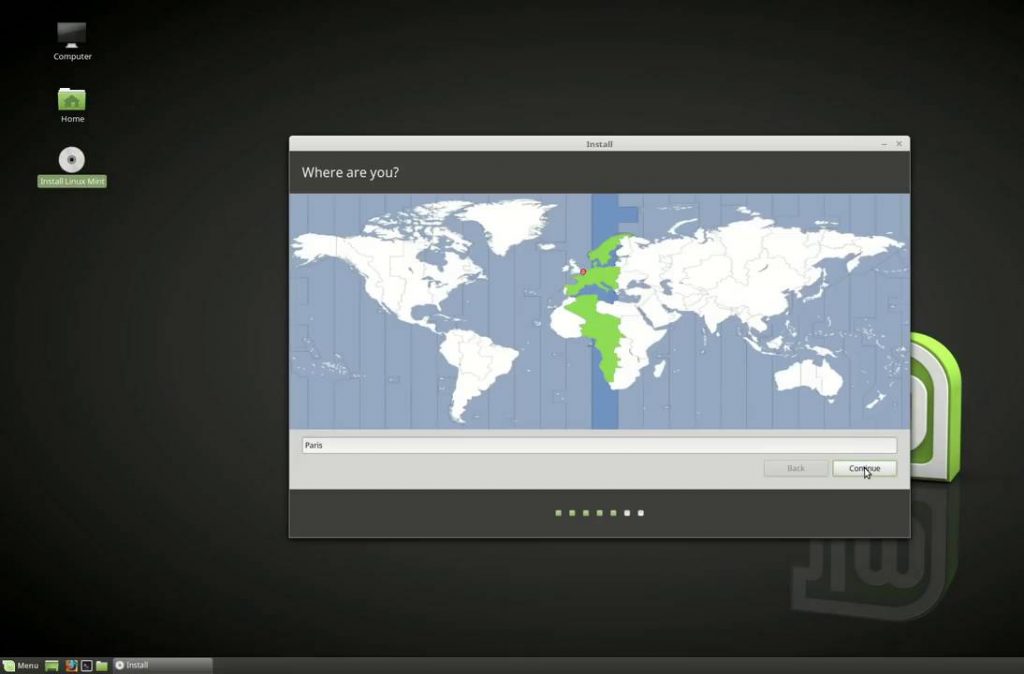
(8) In the Location window, specify your location and click Continue.
(9) In the Keyboard Layout, choose your preferred type and click Continue.
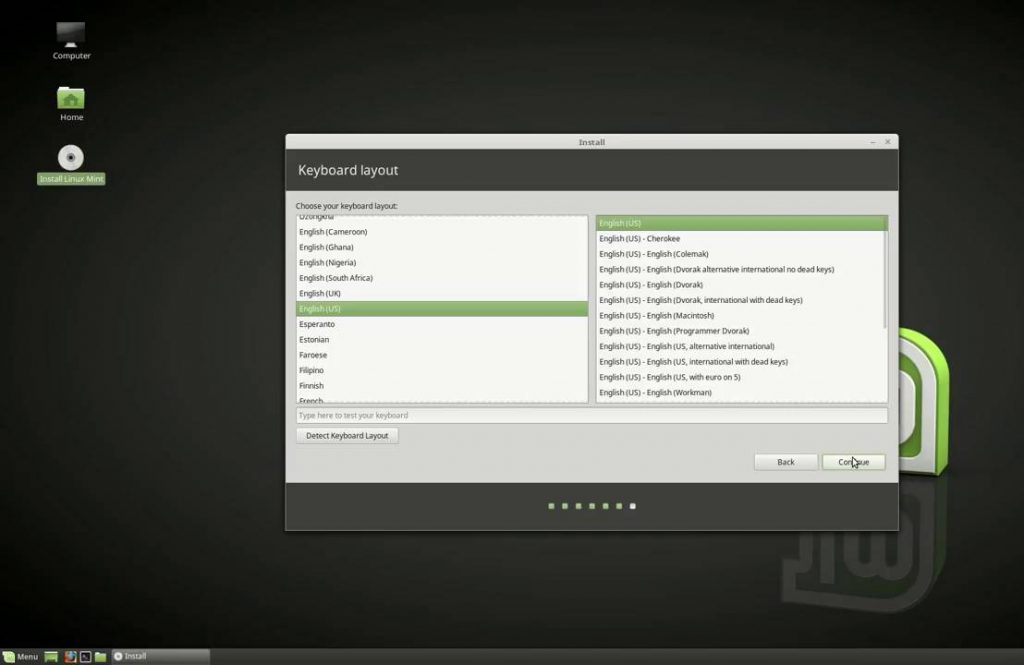
(10) Now, create your Username and Password for the Linux OS.
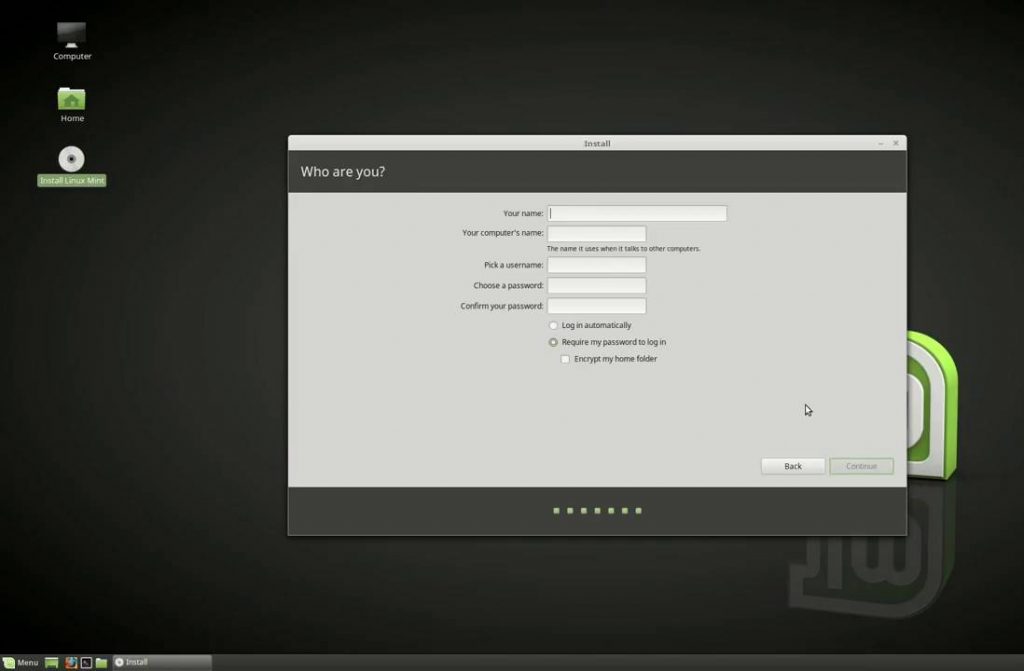
(11) Once you are done with, Welcome to Linux Mint window will appear and the installation will begin.
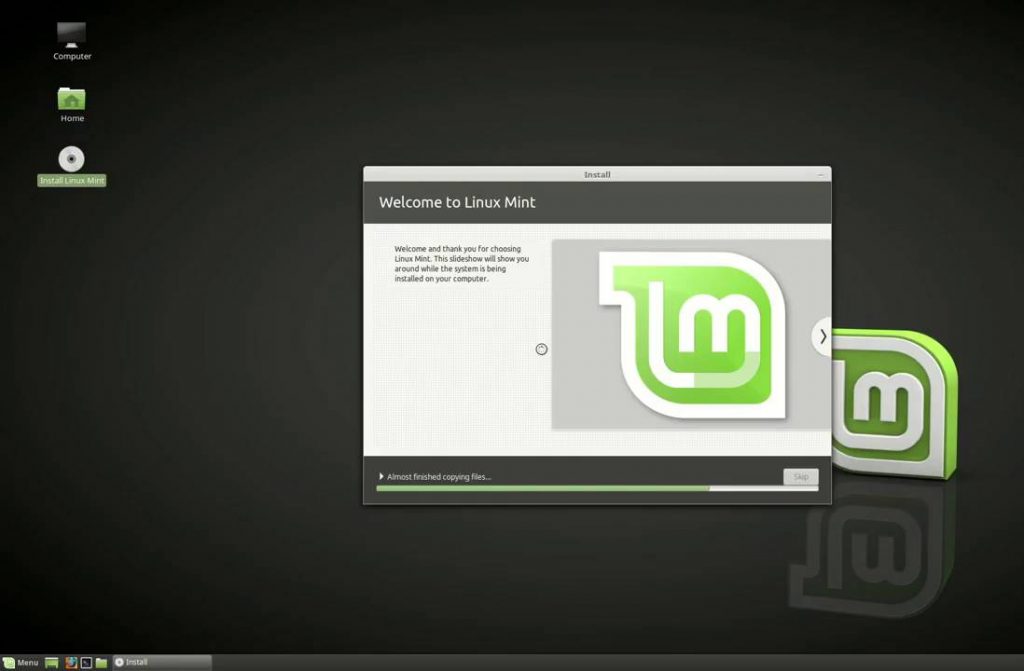
(12) When the installation is complete, click Restart Now or click Continue Testing if you are in a hurry.
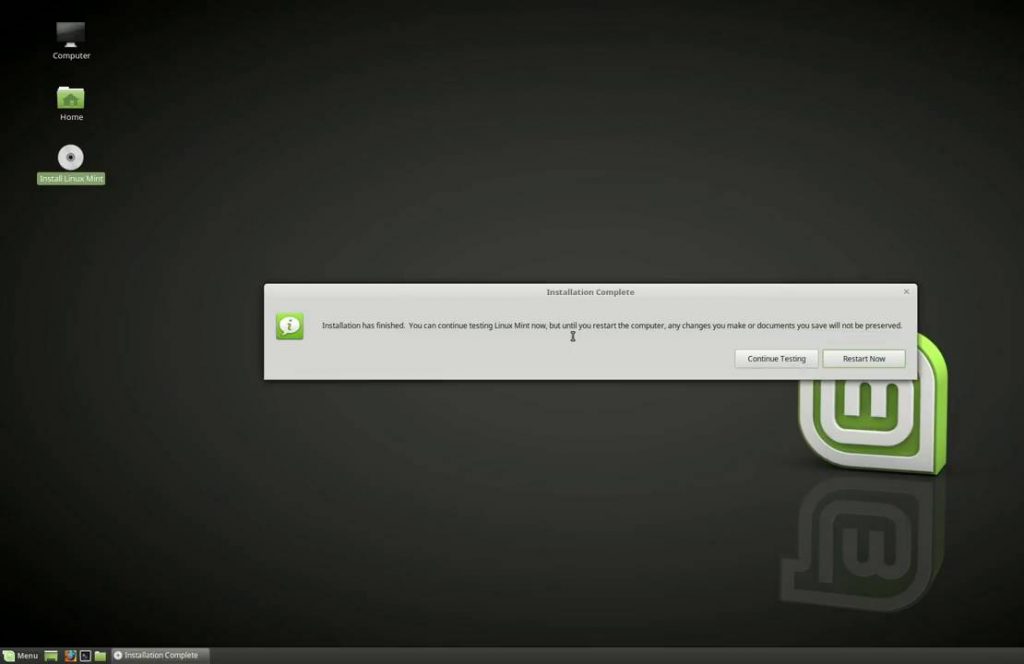
(13) If you click Restart Now, you will get a screen similar to the one below. Four options will appear. Choosing Linux Mint 18.2 Cinnamon 64-bit will boot Linux OS and choosing Window Boot Manager will boot Windows OS.

And voila, you have created a Linux OS alongside your Windows OS. From now on, when you want to use Linux on your PC, just restart your system and choose Linux OS in the boot menu.
Learn how to install Ubuntu alongside Windows here.
Method 2: How to Dual Boot Windows and Linux using Live Linux Version?
Remember Step 4 in Part 3? If you choose the Start Linux Mint 18.2 Cinnamon 64-bit (compatibility mode), you will get to use the Linux instantly. But none of your work can be saved permanently. When you reboot your system or unplug the Linux USB drive, you no longer access the Linux. It is for one-time use.
If you want to see how Linux is working and how it is designed, you can go for this method. It is like getting a trial version of Linux, if you like it, you can install the Linux OS permanently. If you don’t, you can go back to Windows OS.
Method 3: How to Dual Boot Windows Linux using Virtual Machines?
Virtual Machines are software applications that can be used to have more than one OS on your PC. There are virtual machines available separately for Windows OS, Mac OS to run Linux OS. You can install those Virtual Machines on your system and run Linux OS with ease. But this will consume a lot of memory processing and may slow down your PC.
These software applications are like Android Emulators, where you can install an app on your PC to run smartphone apps. Virtual Box, Virtual PC are some of the best examples for Virtual Machines.
Here are the best Virtual Machines for Windows PCs.
You can follow the same steps for any Linux OS like Ubuntu 18.04, Linux Mint 18, Xubuntu, Kali Linux or other lower versions of Linux. For Windows 7, 8, 8.1 users, the process is almost the same. The disk partition process may vary. If you want you can upgrade your Windows OS to Windows 10.
These are three ways that you can dual boot Windows and Linux on your PC. Dual-booting is a real saviour for people working or studying in an IT field. You can switch to Linux in a minute. If you are using Virtual Machines, you can do the same in seconds. If you any other method, mention that in the comments section. Follow us on Facebook and Twitter for more updates.
Was this article helpful?
YesNo
Taking your first steps into the world of Linux can be a scary proposition. After all, we have a whole new world of terminal commands, desktop environments and applications to learn. Thankfully Linux installation has improved leaps and bounds from the earliest text based installers used in the late 1990s (Where I started my journey with Mandrake, Corel Linux) via graphical installers in the early 2000s (Ubuntu, Open Suse). From the 2010s we have seen better graphical installers providing clearer and easier means to install the latest Linux distro.
The first steps into Linux now fall under two paths.: a single board computer such as the Raspberry Pi or more traditionally a dual boot setup, where Windows and Linux are installed to the same machine, often on the same boot drive. Using a custom boot menu, GRUB, we can choose between the two operating systems when we power on our PC.
In this how to, we shall learn how to dual boot Linux with Windows, using Ubuntu and Windows 11.
Before we kick-off, a word of caution. Ensure that you have backed up your drive before moving forwards. There is always a chance that you will accidentally overwrite your drive.
Creating a Linux Install USB
Our Linux distro is typically downloaded as an ISO image (ISO originally being used to reference CD / DVD sized images) of a live Linux OS that we can test on our machine. To use the ISO with a UEFI / Secure Boot system we need to use Rufus, a popular free utility that writes ISO files to USB Flash drives.
Our goal is to create a bootable USB stick containing our chosen Linux OS. A minimum capacity of 8GB is recommended for your USB drive.
For this project you will need
- Computer running Windows 10 or 11 (see how to get Windows 11 for free)
- USB Flash drive, 8GB or larger
- Linux distro (we chose Ubuntu)
1. Download and install Rufus for your operating system.
Get Tom’s Hardware’s best news and in-depth reviews, straight to your inbox.
2. Insert a USB drive into your machine and open Rufus.
3. Select your USB drive using Device, and then click SELECT and select the Linux OS that you wish to install. In our case it was Ubuntu.
4. Select the GPT partition scheme and click START to write the OS to the USB drive. GPT is the latest partition scheme and necessary for installing Ubuntu on a UEFI system. It is gradually replacing MBR.
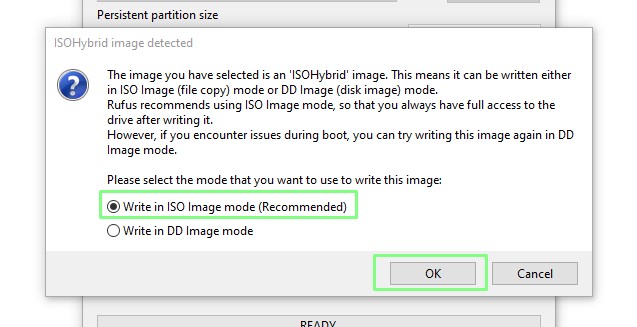
5. When prompted select “Write in ISO image mode” and click OK.
6. Read and understand the prompts to ensure that Linux OS will be written to the correct drive. There is no going back should you make a mistake.
7. Click CLOSE to exit Rufus and remove the USB drive from the machine.
How to Install Linux for Dual Boot
The Linux installer has come a long way. Gone are the old days of scary user interfaces and in their place are inviting and easy to use installers that guide you through the process. We’re going to use the Ubuntu 22.04.1 installer to split our 256GB NVMe drive in half. Giving Windows and Ubuntu enough space for a basic dual boot install. Then we will follow a typical Ubuntu installation.
1. Insert the USB drive into your computer and boot from it. Each computer is a little different, Some will offer a function key to select a boot device, some need to be selected from the BIOS.
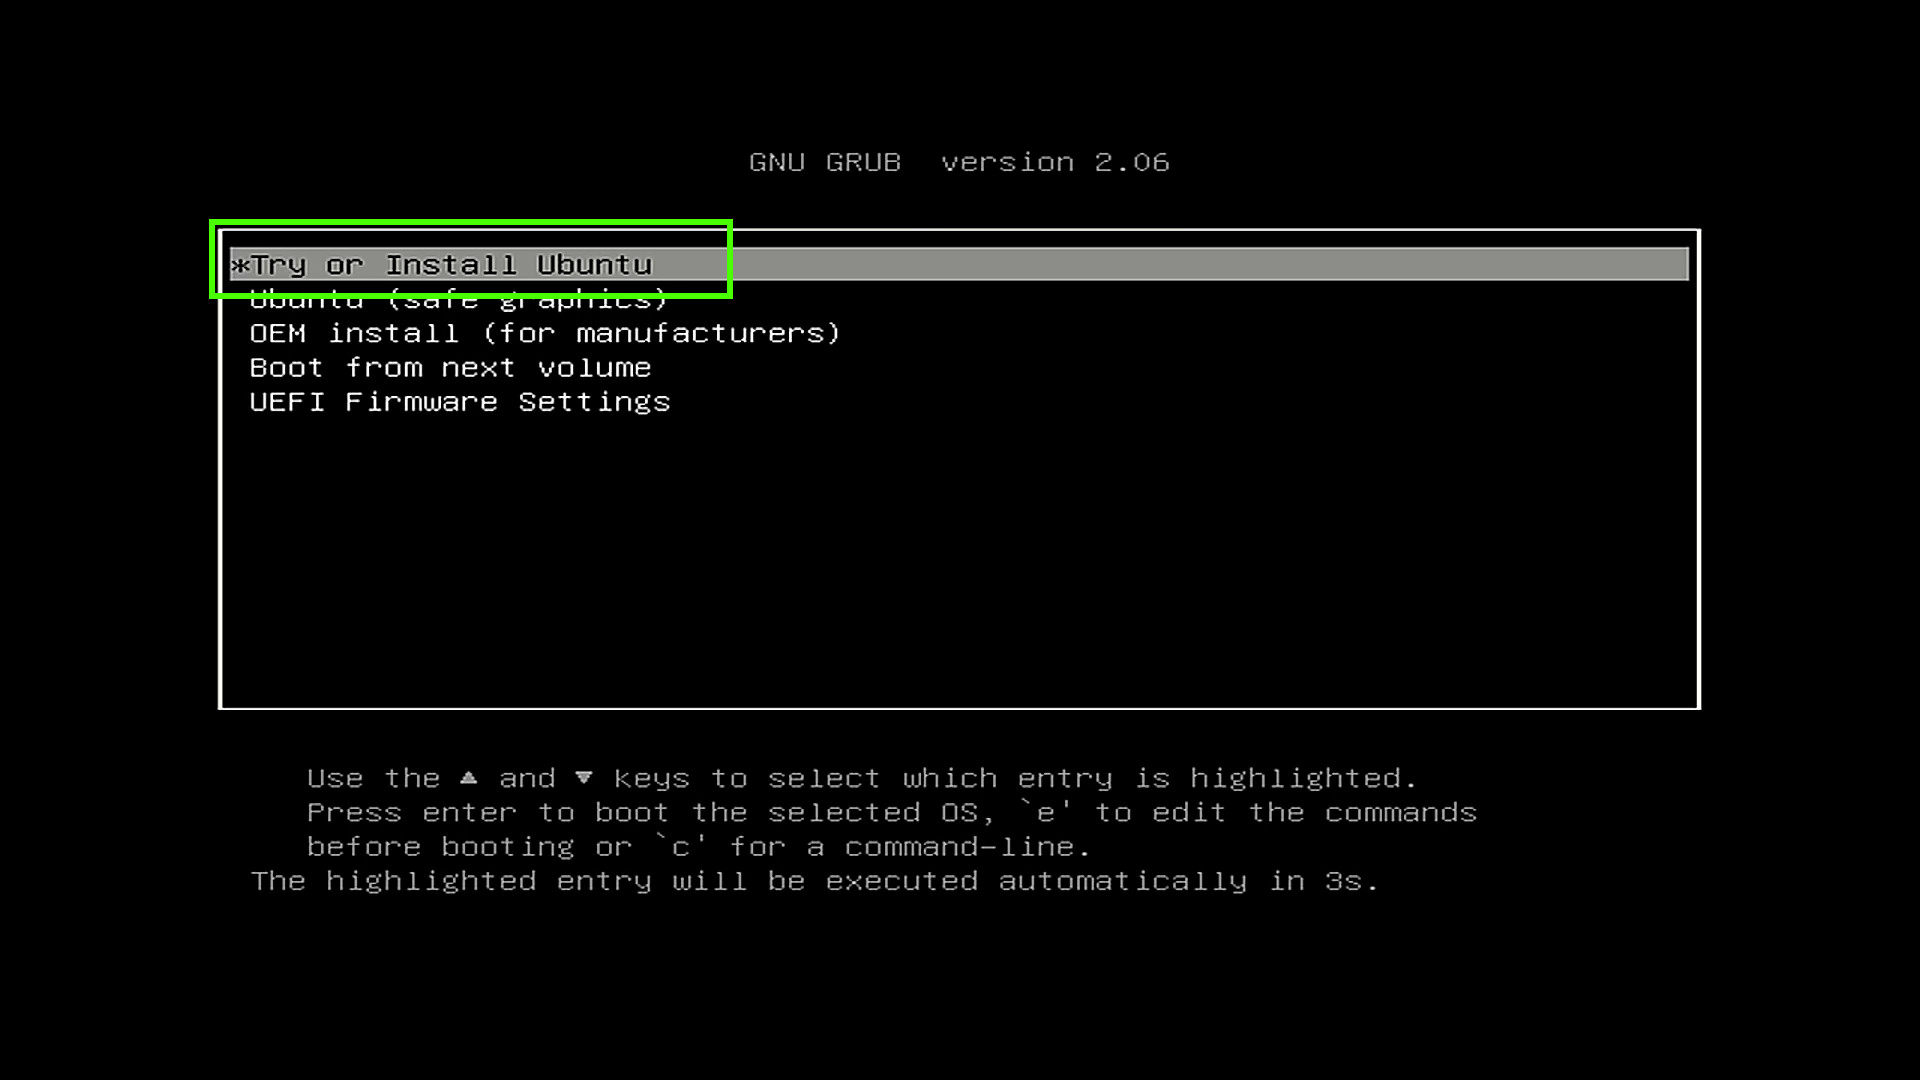
2. From the GRUB menu select “Try or Install Ubuntu” (or your Linux OS of choice) and press Enter . The GRUB menu is a custom boot menu used on Linux devices. It can also be customized to show a background image.
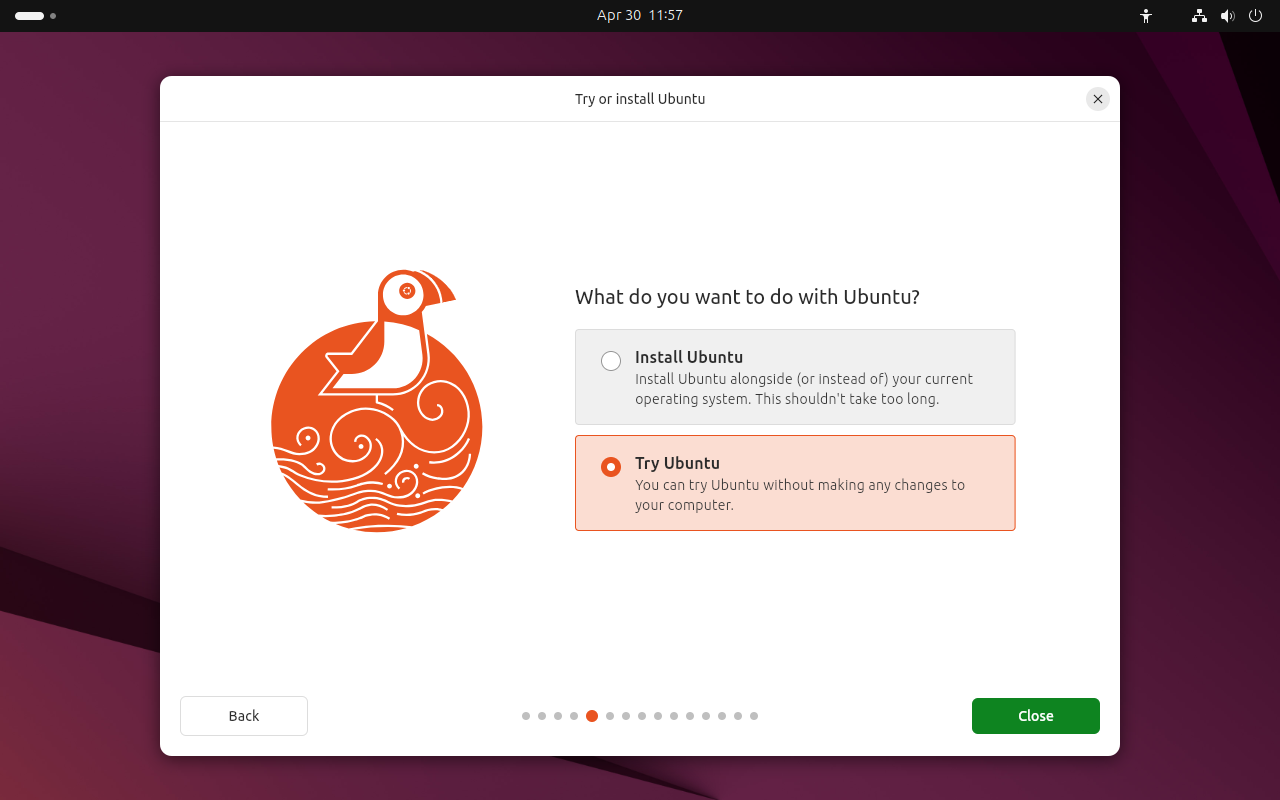
3. When prompted, click Try Ubuntu to load the OS into RAM as a “Live Distro”. Live Distros give us enough of the operating system to test on our machine without making any changes to the system. They are also useful as recovery devices to boot broken computers.
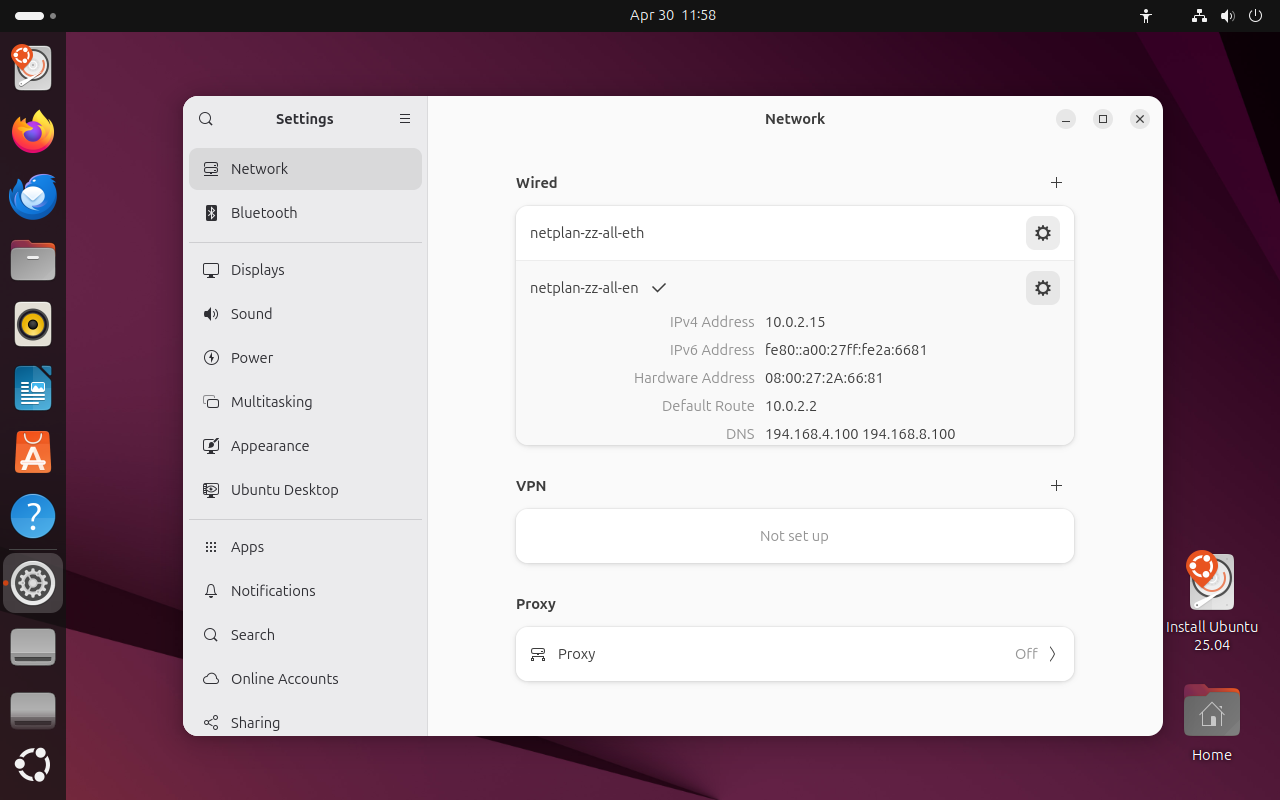
4. Test your hardware to make sure that everything you need is working. Check audio, Wi-Fi, Bluetooth etc before moving onwards.
5. Double click on the Install icon to launch the installer application.
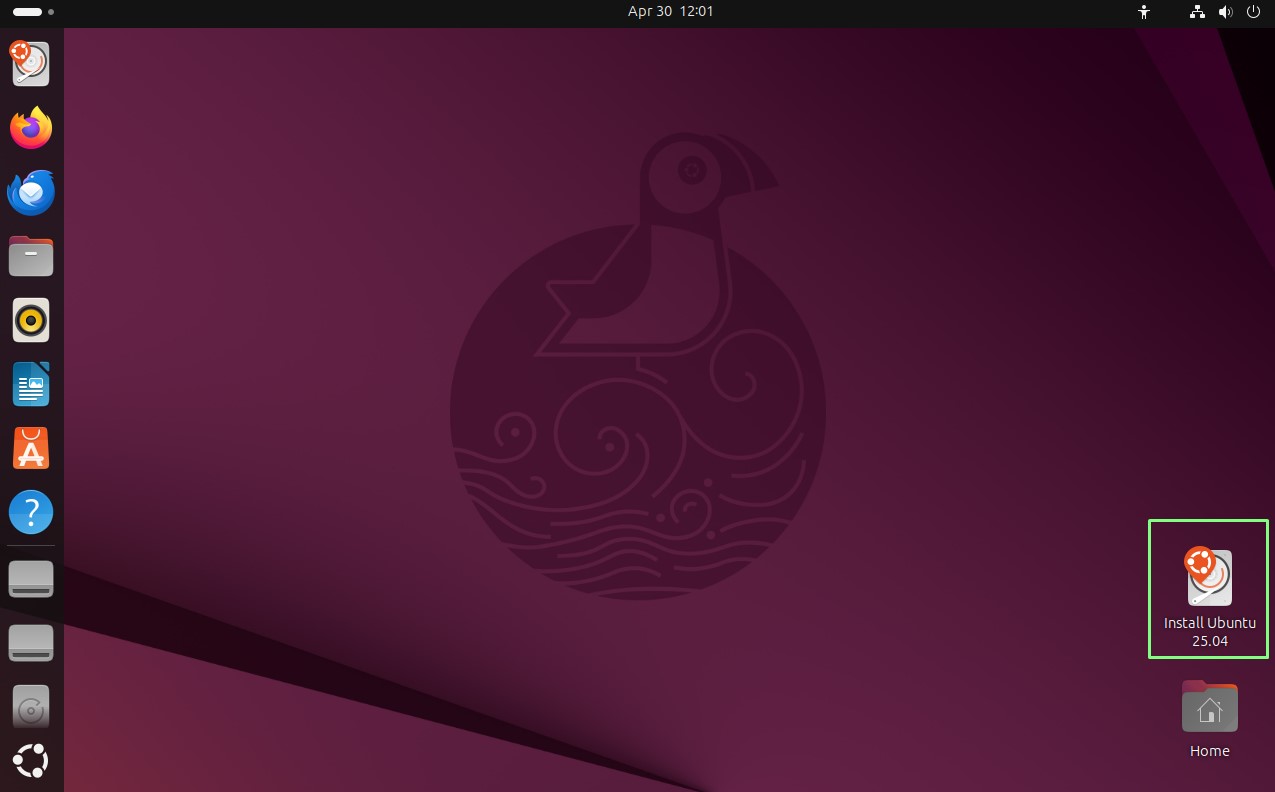
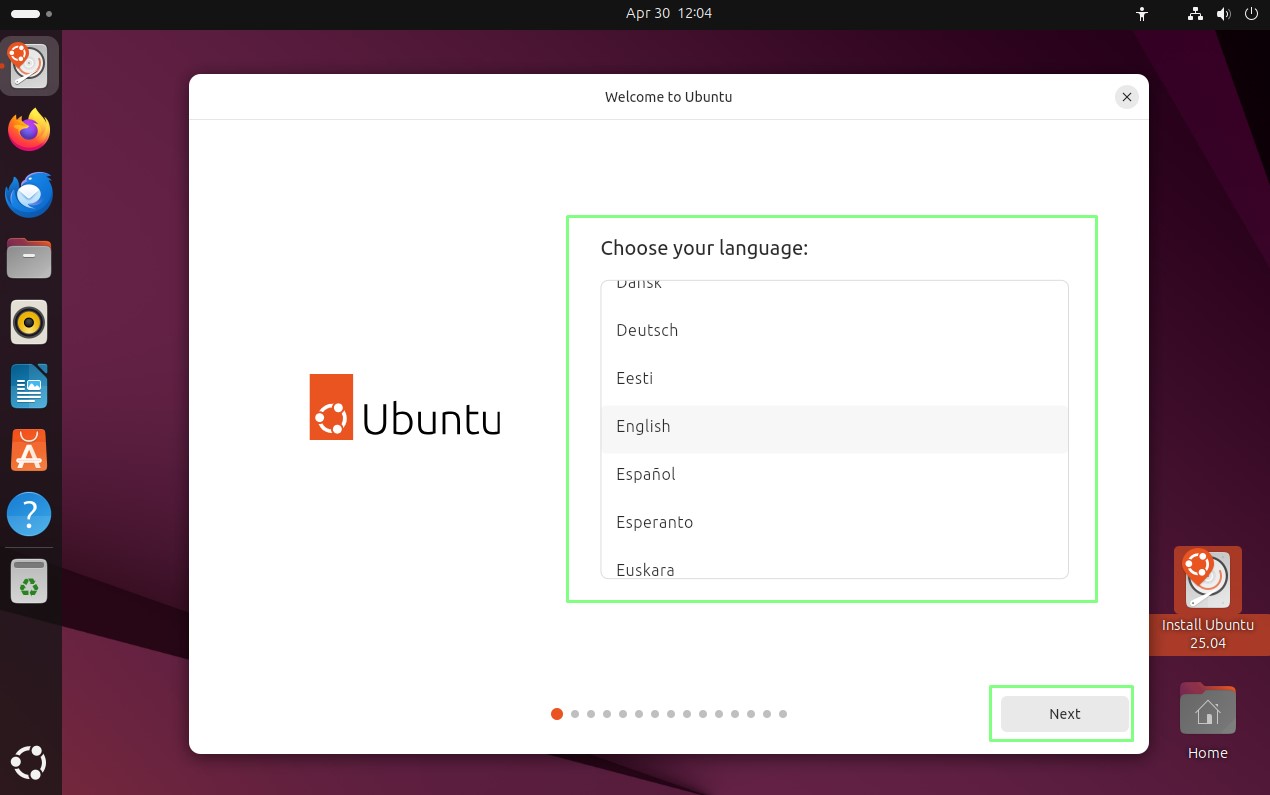
6. Select your language and click Continue.
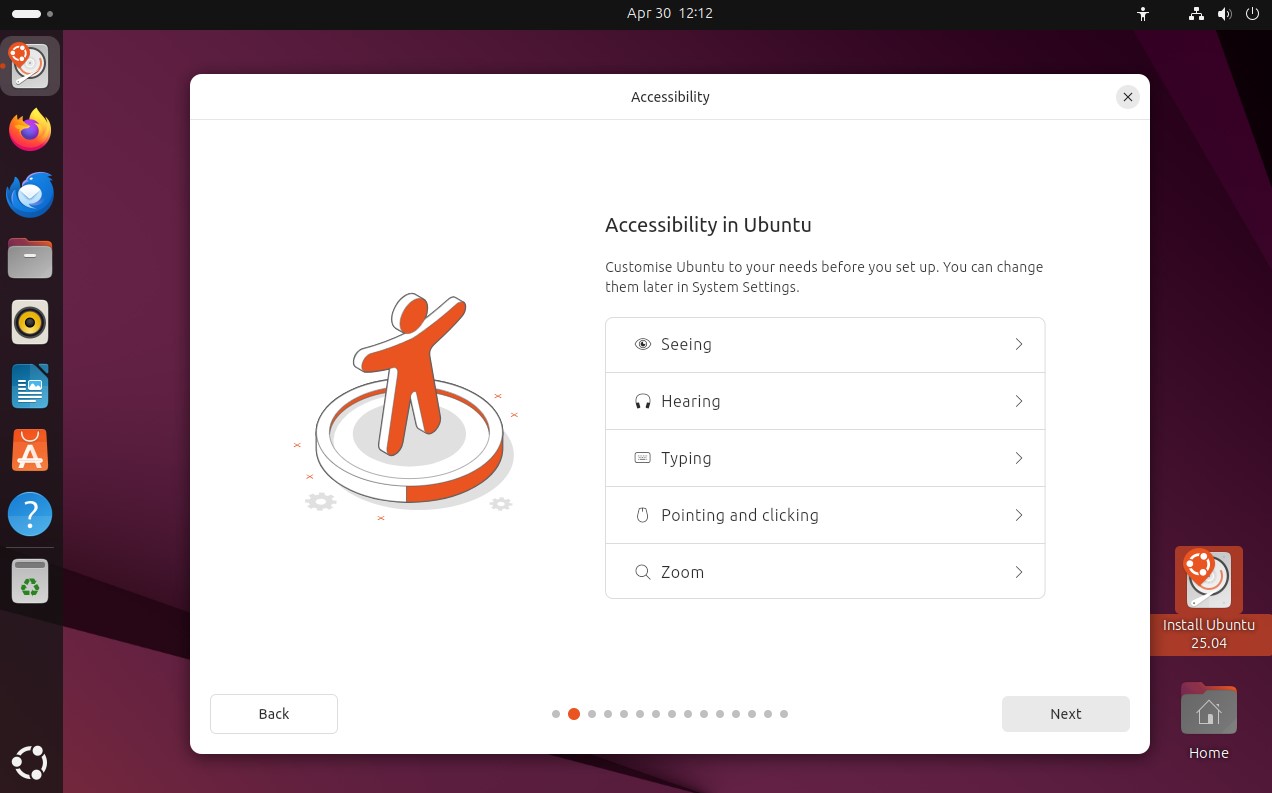
7. Configure your accessibility requirements and click Next.
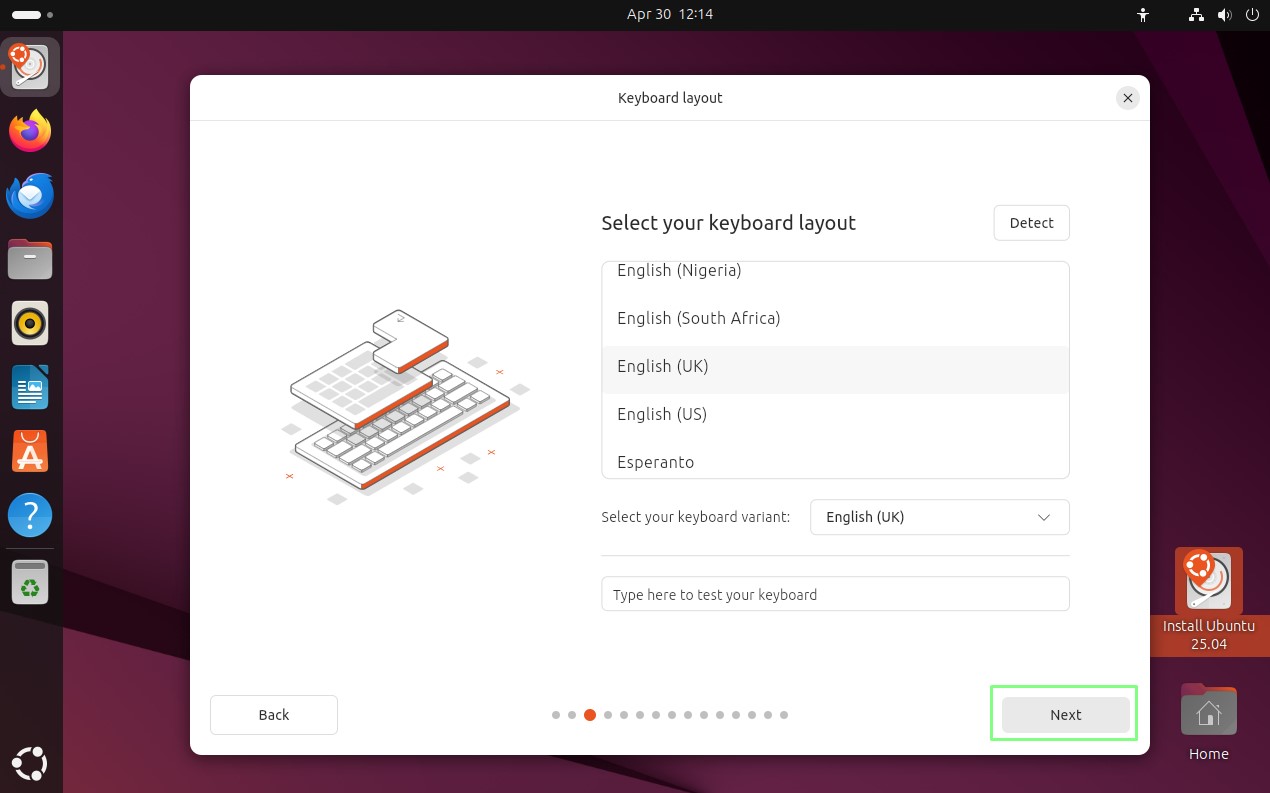
8. Select your preferred keyboard layout and click Continue.
9. Choose how you connect to the Internet and click Next to move on. If you have wired or Wi-Fi Internet access, choose the most appropriate method. Later, part of the install process will require Internet access to download software updates.
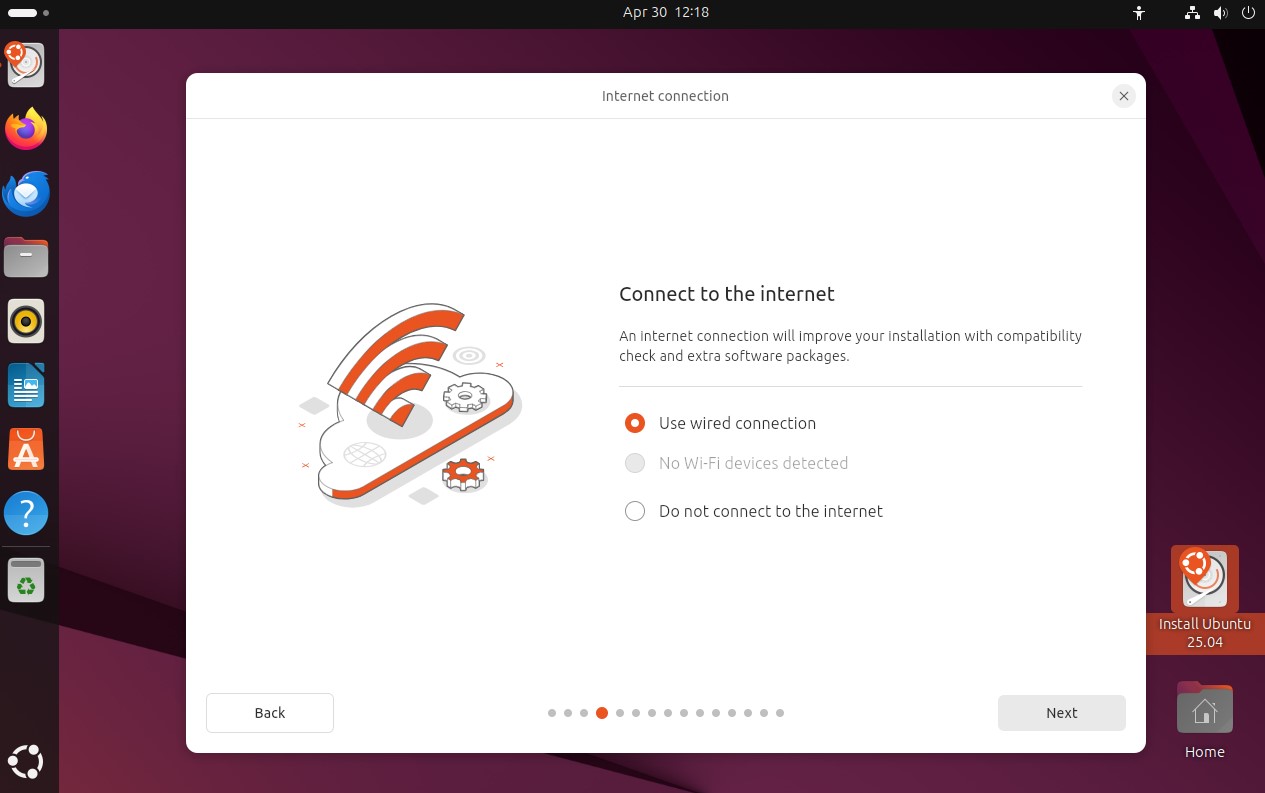
10. Select an Interactive Installation and click Next. Interactive installations will prompt the user for input as the install progresses. The automated install option is used for users who have a configuration script that automates the process.

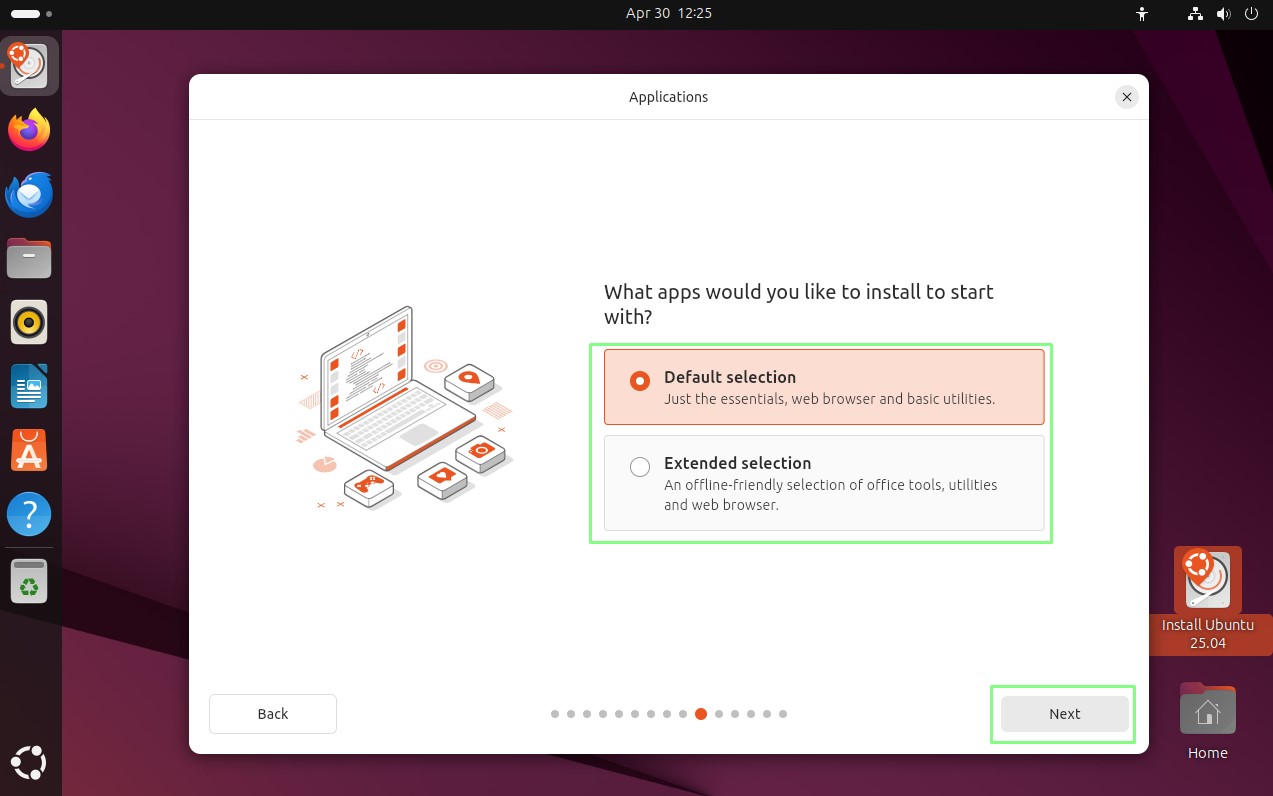
11. Select either Default or Extended and click Next. The Default option will install just the basic applications (file manager, web browser, and some basic utilities.) This is useful for creating a base install for use in specific projects. If you require more apps, such as office tools, image editors etc, opt for the Extended selection. This option is also useful for those new to Linux.
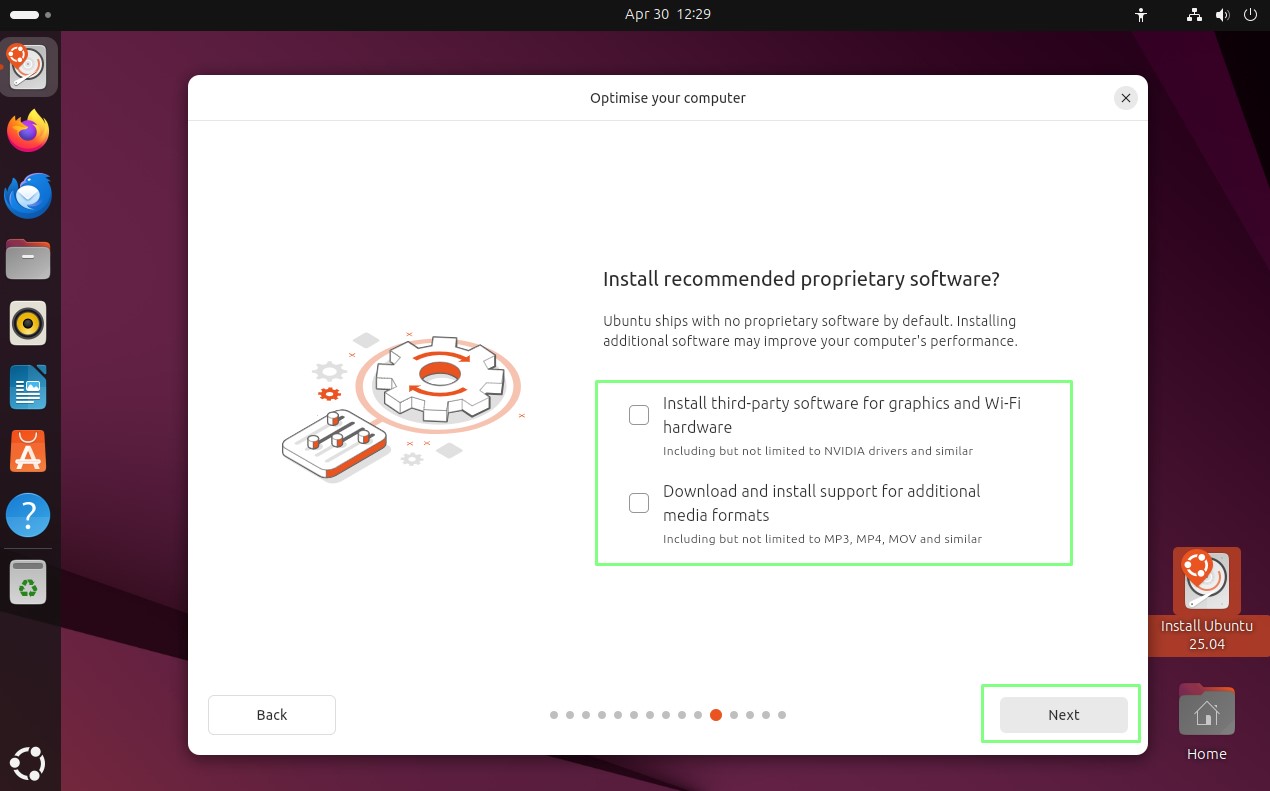
12. Tick the boxes to choose whether you require proprietary software and click Next. Ubuntu comes with no proprietary software as part of the ISO image, but here we can install software and drivers that make Ubuntu easier to use.
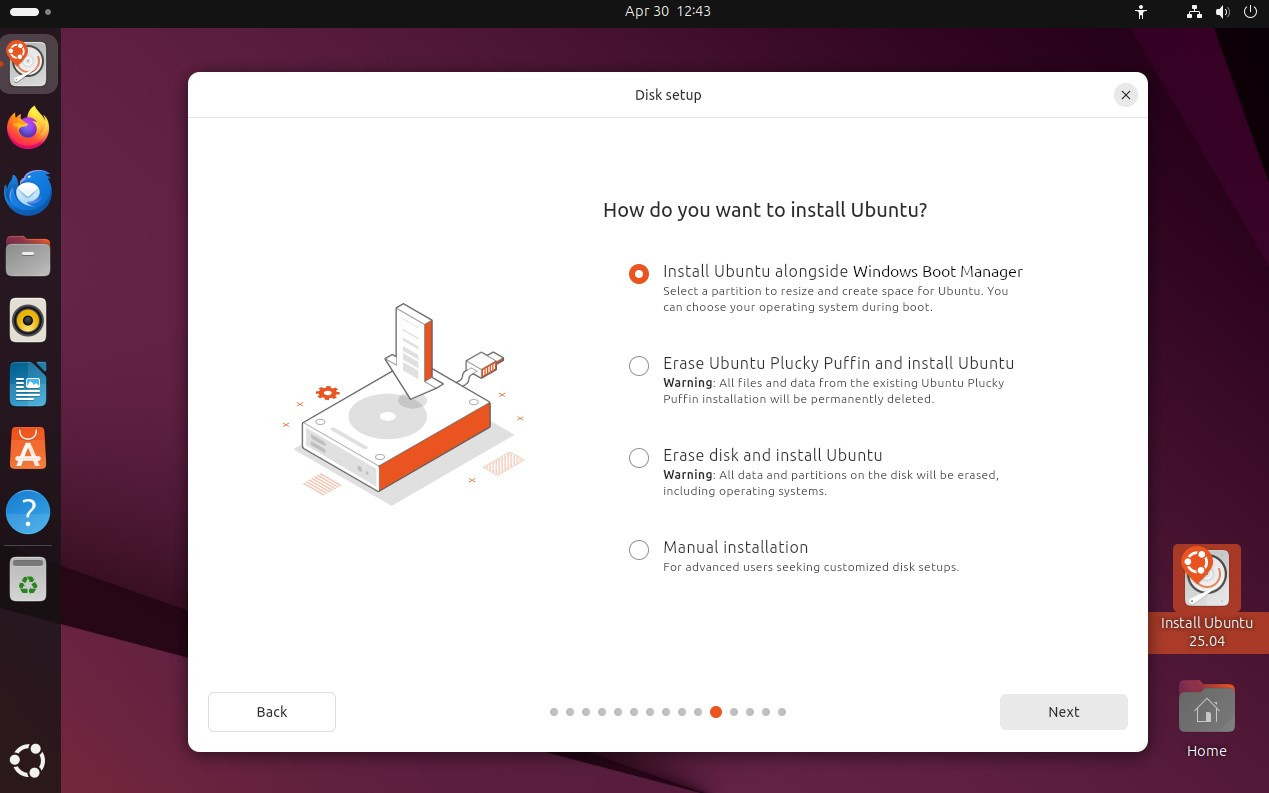
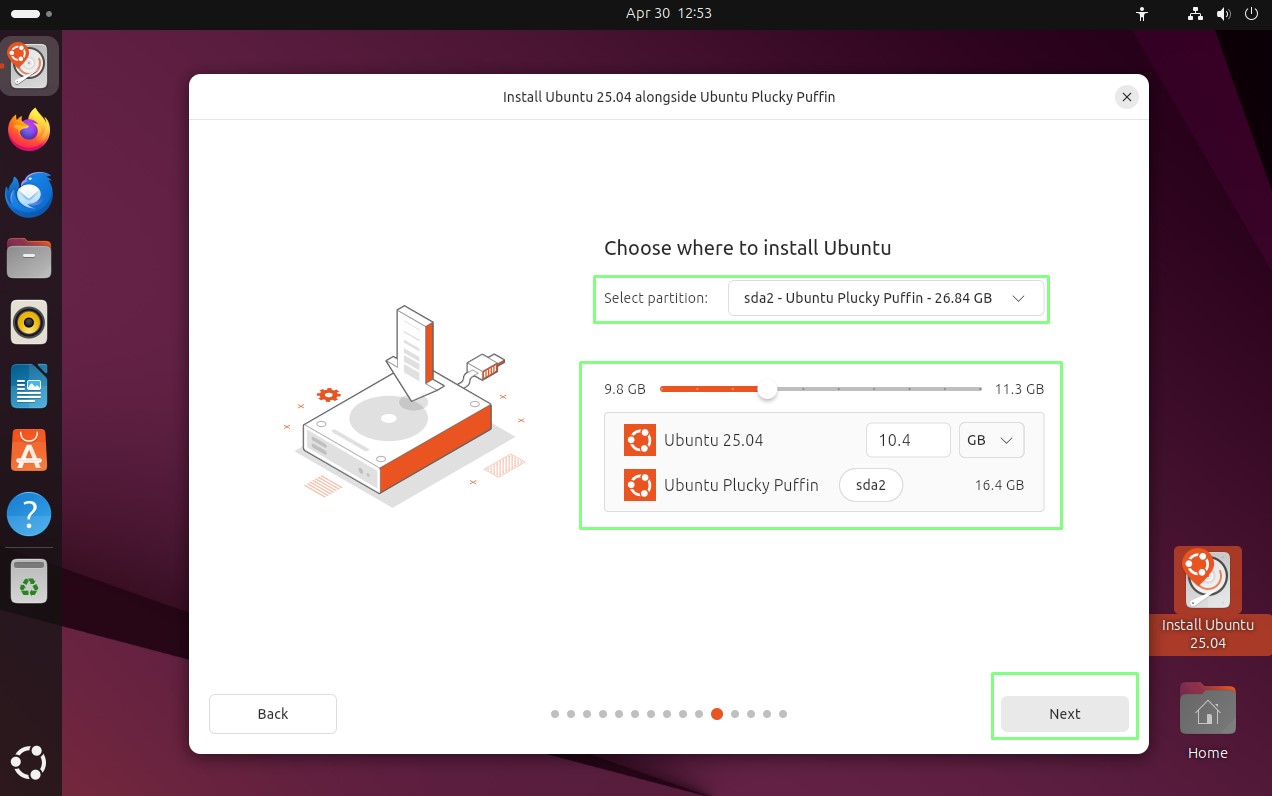
13. Select “Install Ubuntu alongside Windows Boot Manager” and click Next. Any other option will either delete the entire contents of the drive, or require manual configuration, so take great care.
14. Ensure that the correct drive has been selected, and slide the slider to adjust how much space each OS will have.
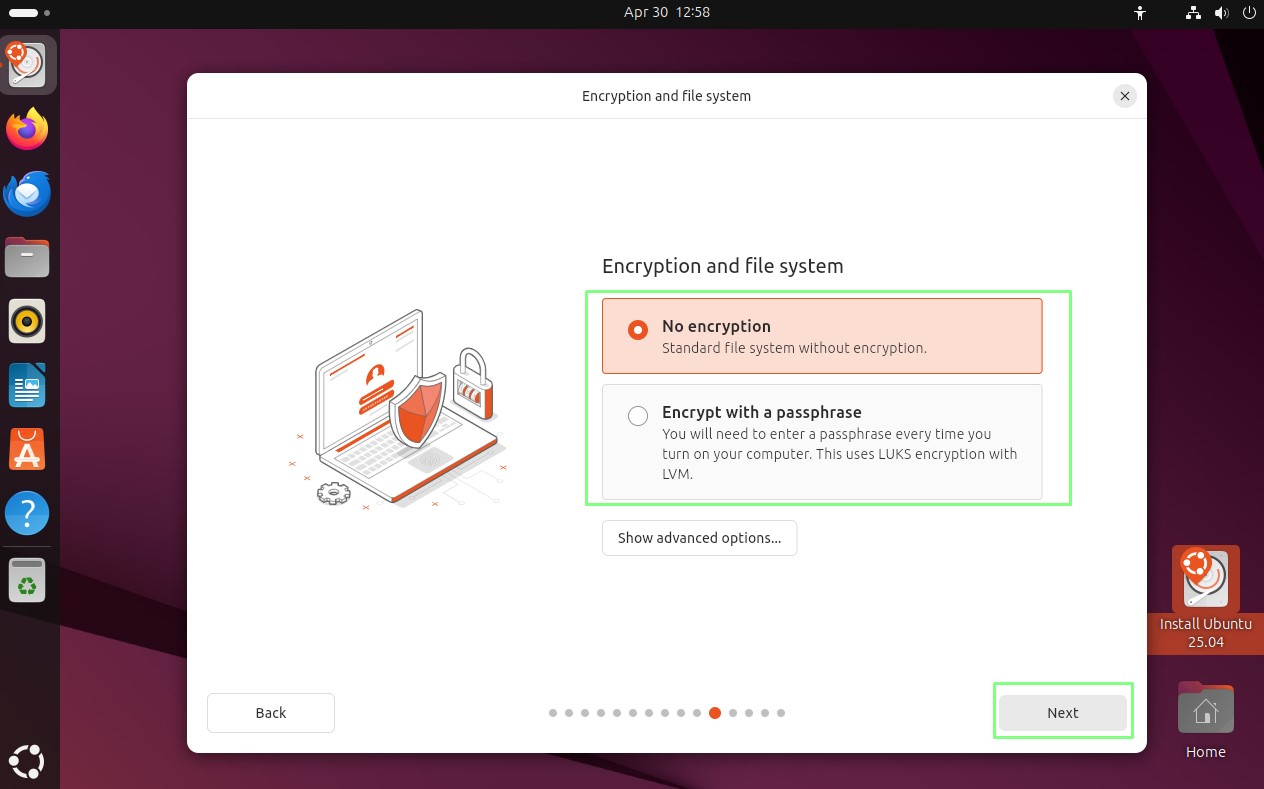
15. Select No Encryption to install Ubuntu without any form of drive encryption. Otherwise select Encrypt with a passphrase to encrypt your disk. Click Next to move on.
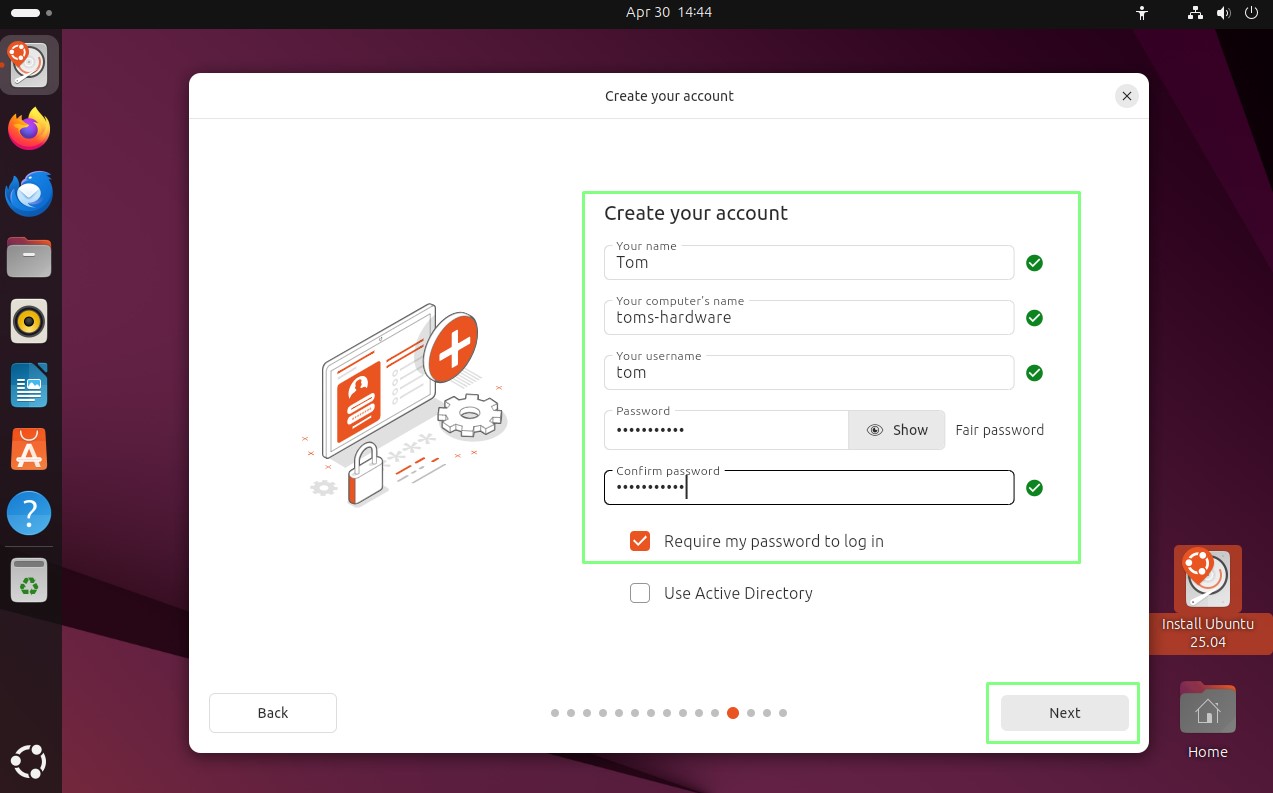
16. Create a new user and give your machine a relevant hostname. Click Next to continue. This will be the default user for the operating system, so make sure that it is relevant. The hostname identifies the machine, and if you have many machines on the network, it will make it easier to identify your machine.
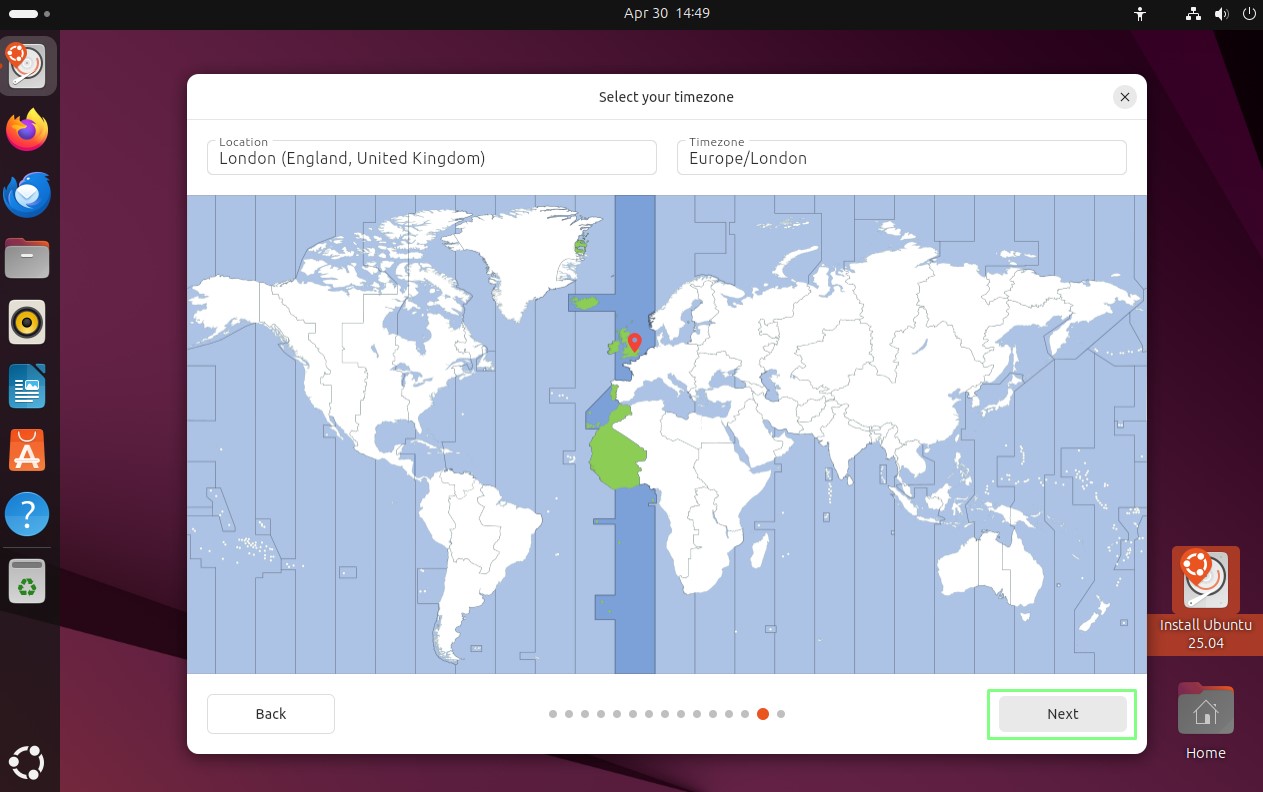
17. Set your location and click Continue.
18. Review your choices and click Install to begin.
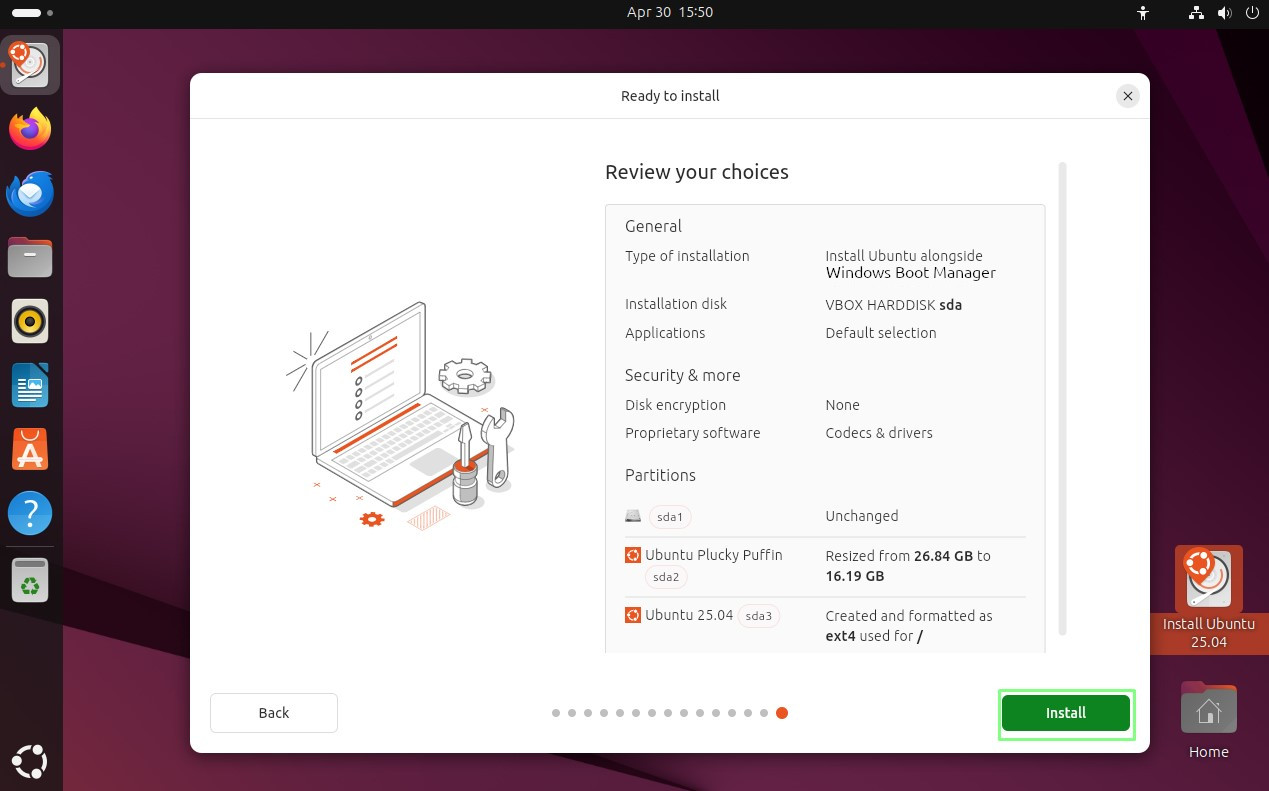
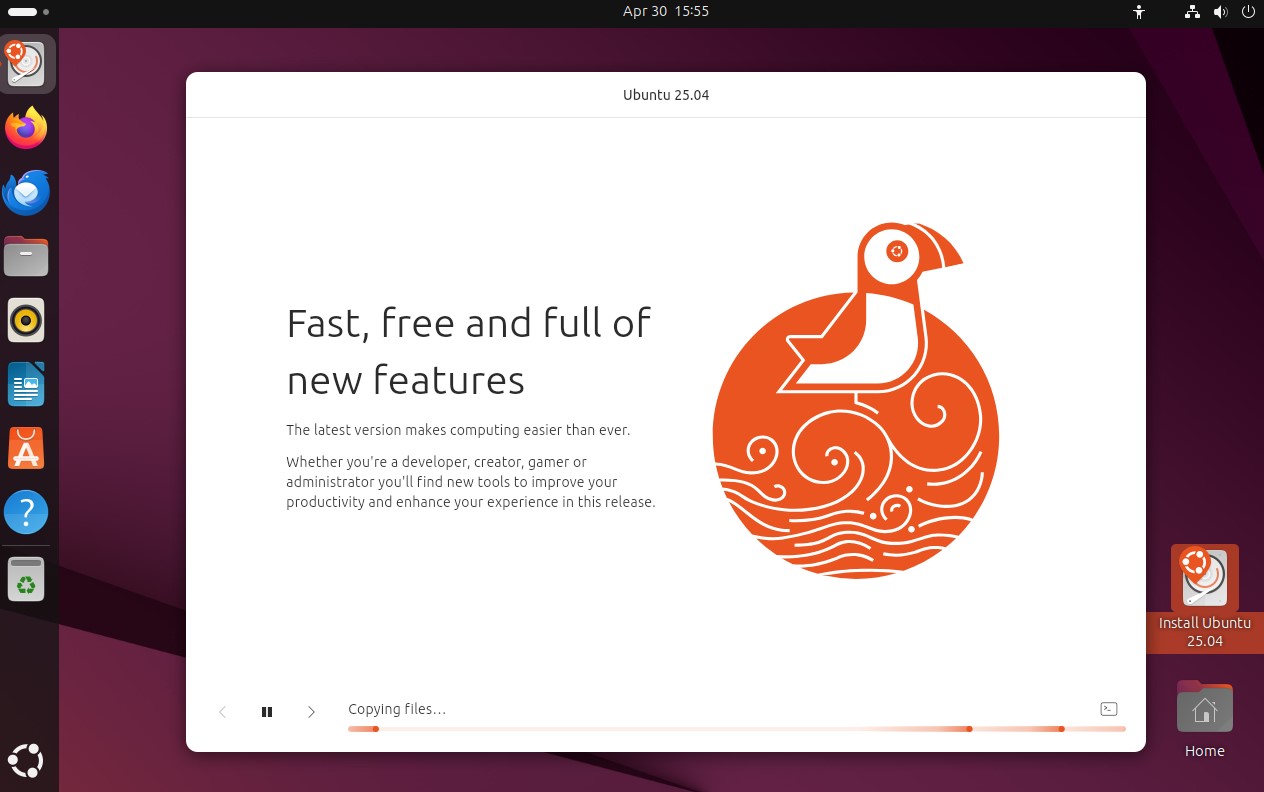
The installation will take a few minutes to complete.
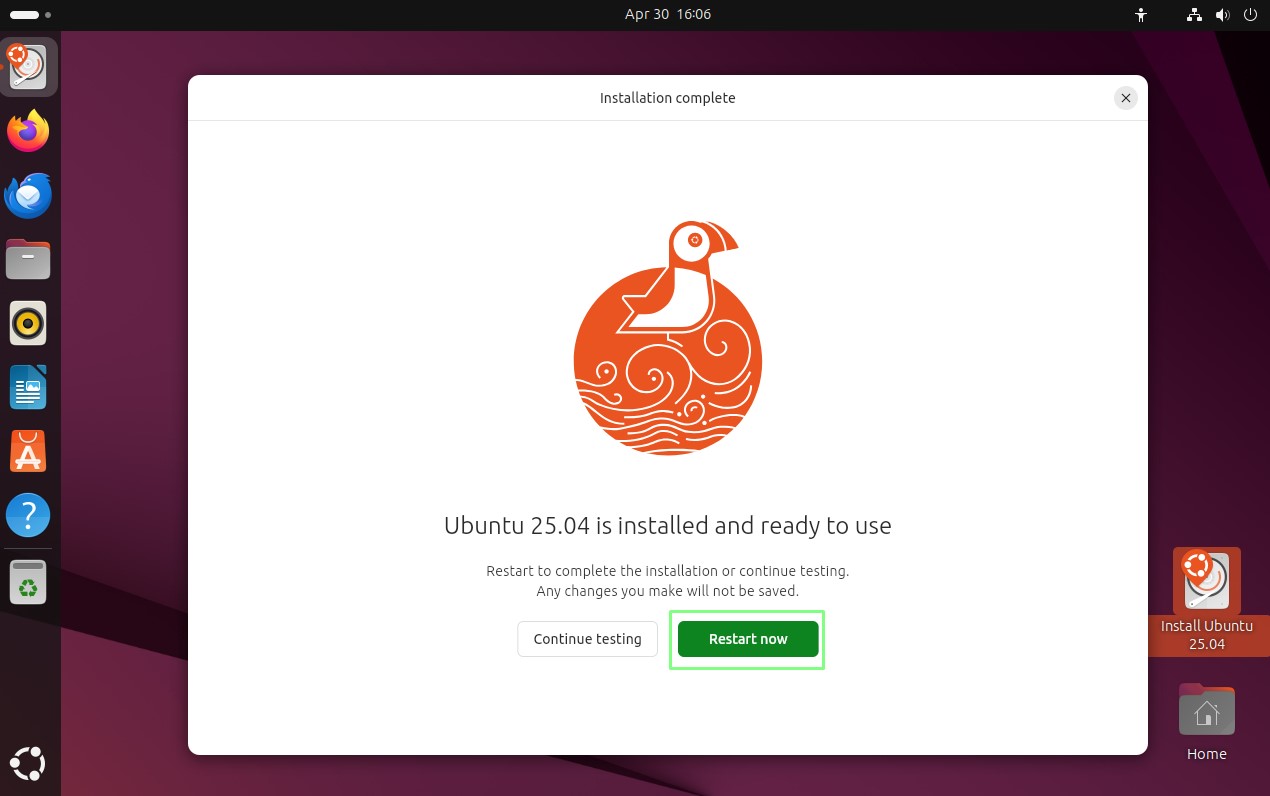
19. Click on Restart Now to reboot your computer.
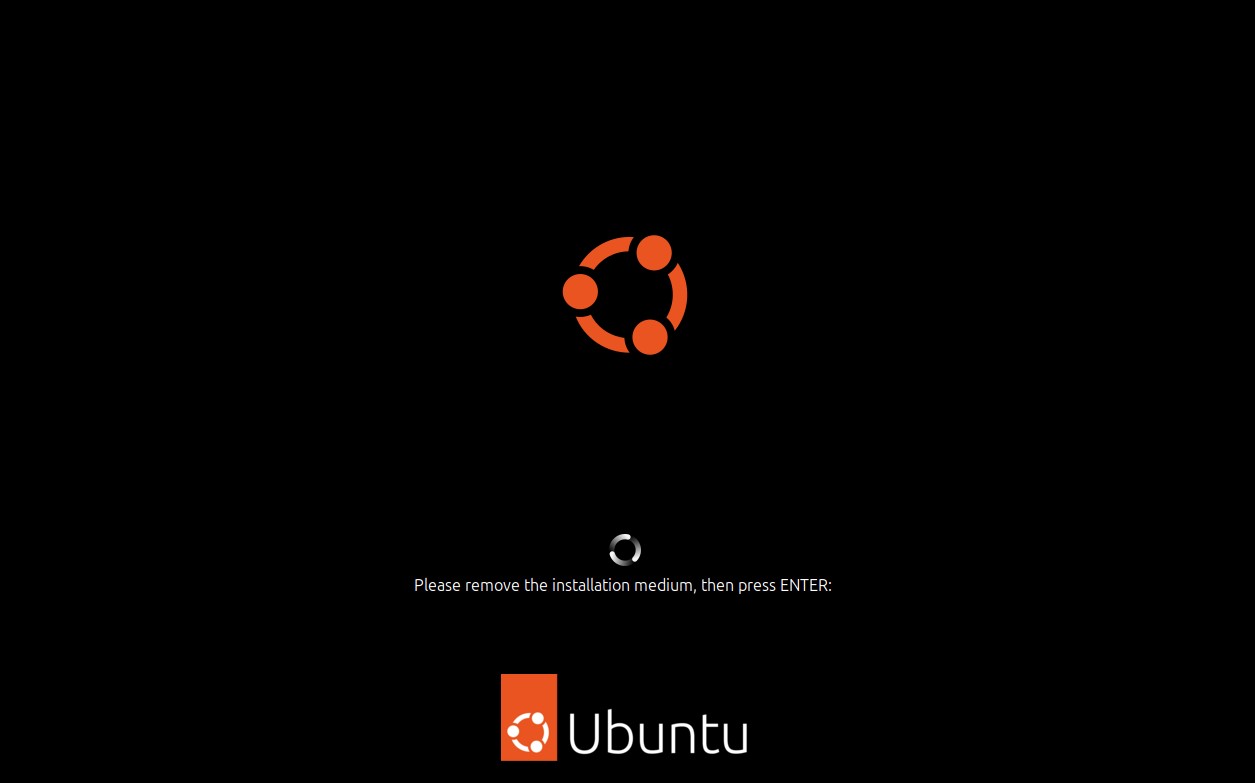
20. Remove the USB drive and press Enter when prompted.
First Linux Dual Boot
The first boot of a Linux dual boot system requires a little fine tuning in our BIOS. We need to tell the system to boot from our Linux install, which will trigger the GRUB menu to load. From there we can select an OS to boot from. Each BIOS is a little different, so use these steps as a general guide and refer to the manual for your motherboard for more specific information.
1. Open your BIOS menu. See our story on how to enter your BIOS if you don’t know how to do this already.

2. Select the Boot menu.
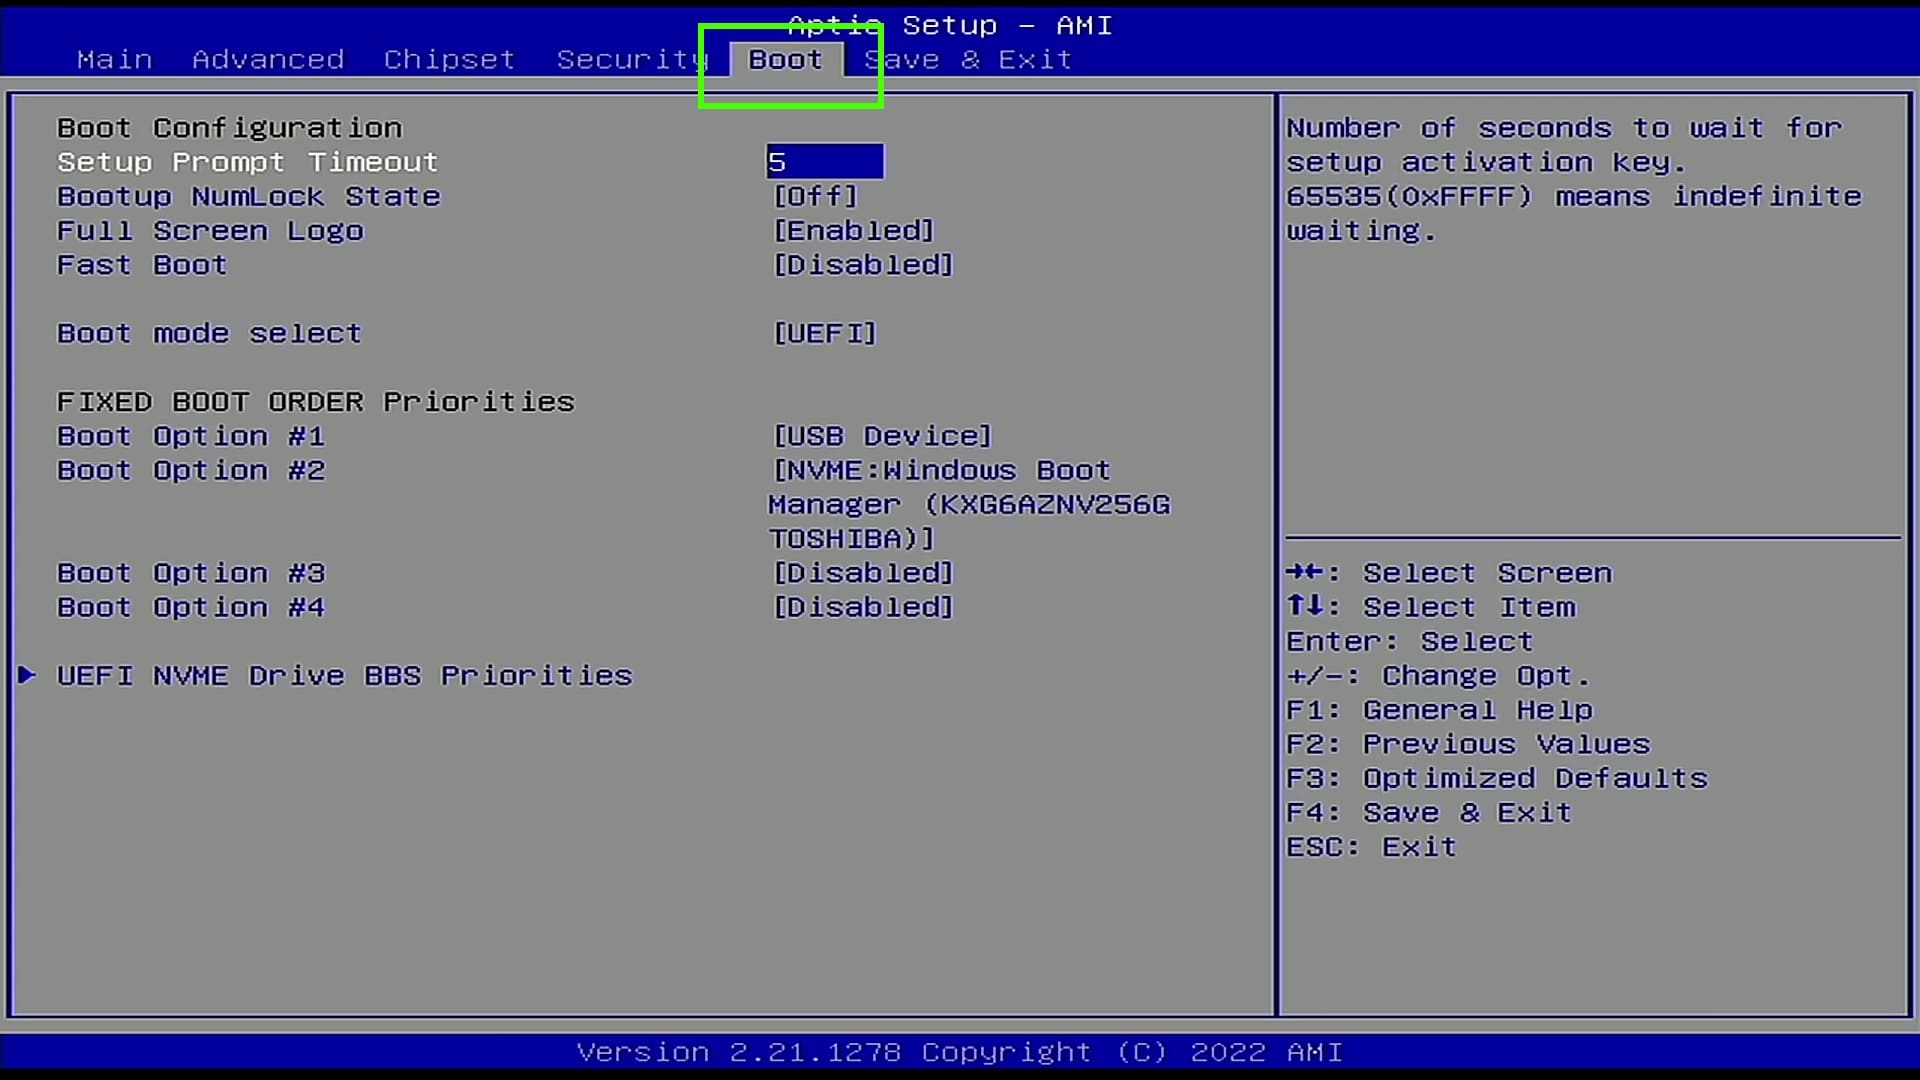
3. Select UEFI NVMe Drive BBS Priorities.
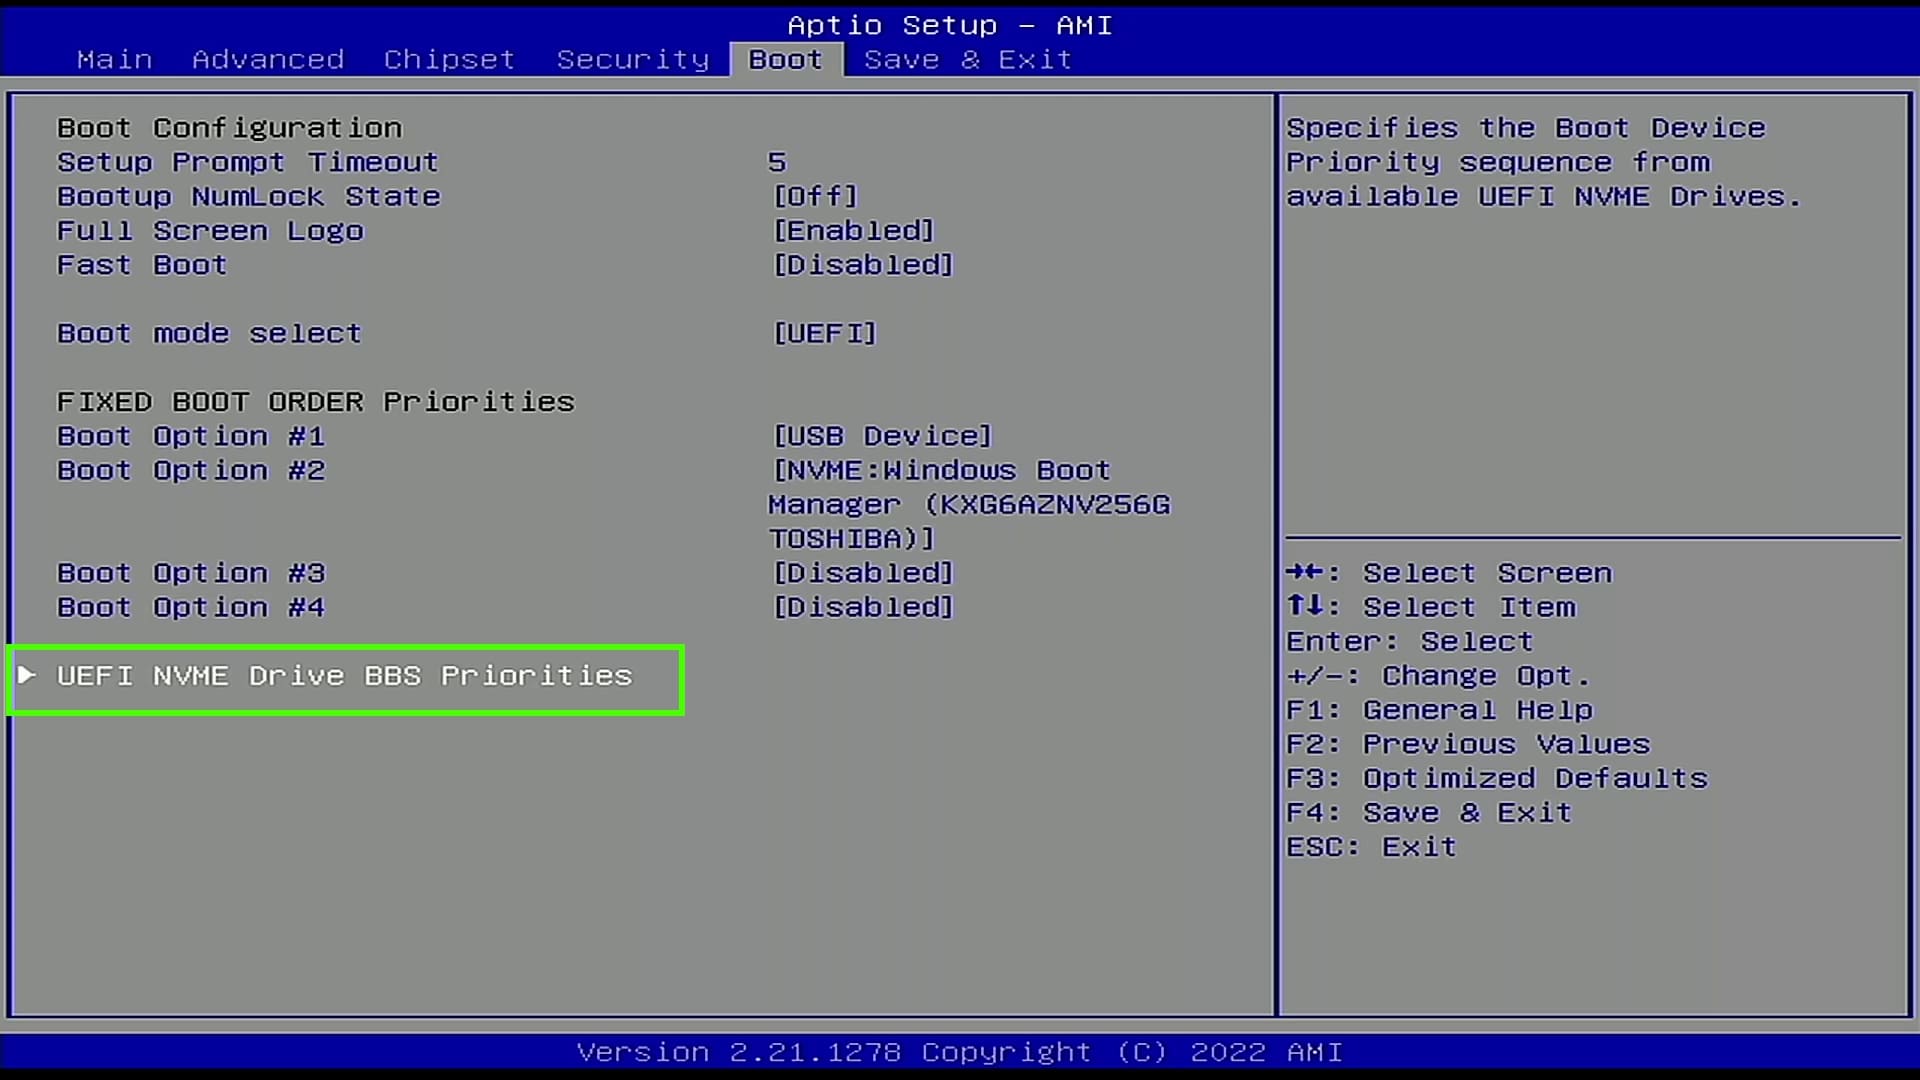
4. Set Boot Option 1 to be the Linux install.
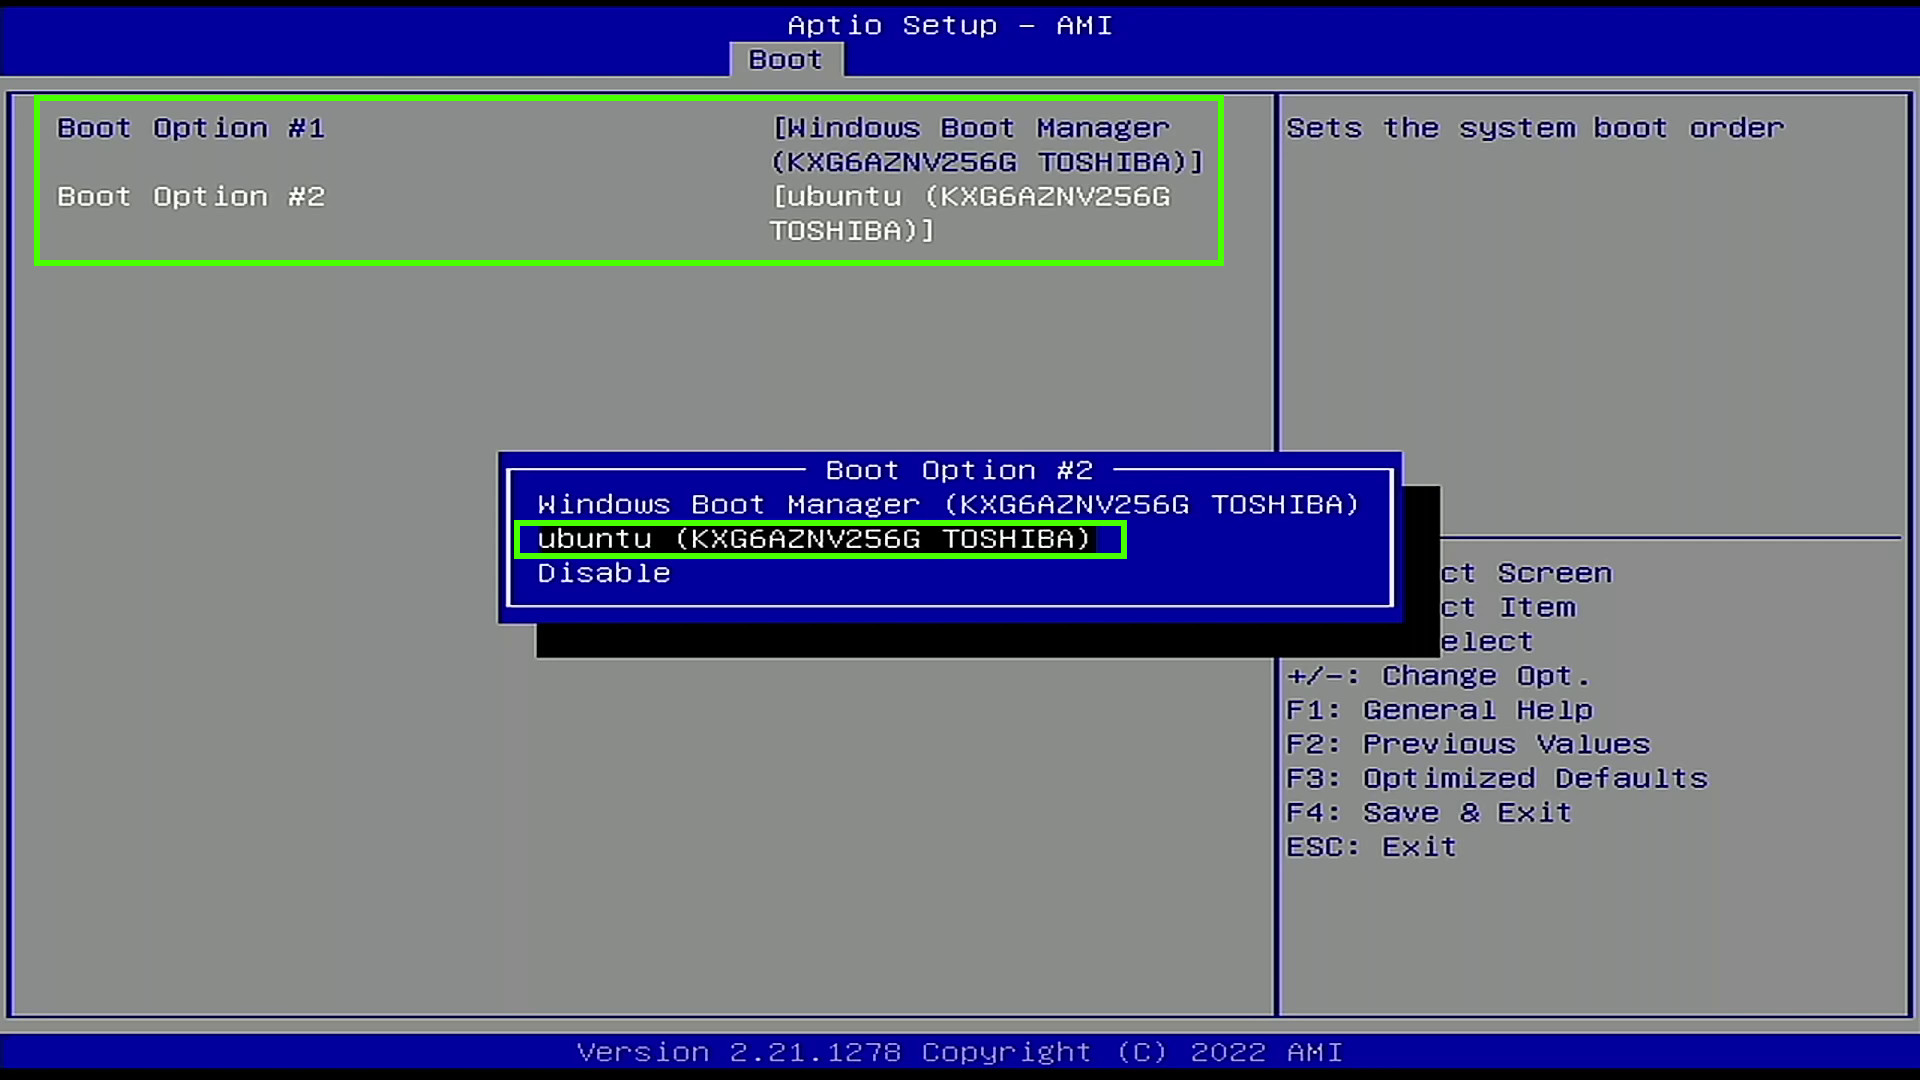
5. Check that the change has been made, then save and exit the BIOS.
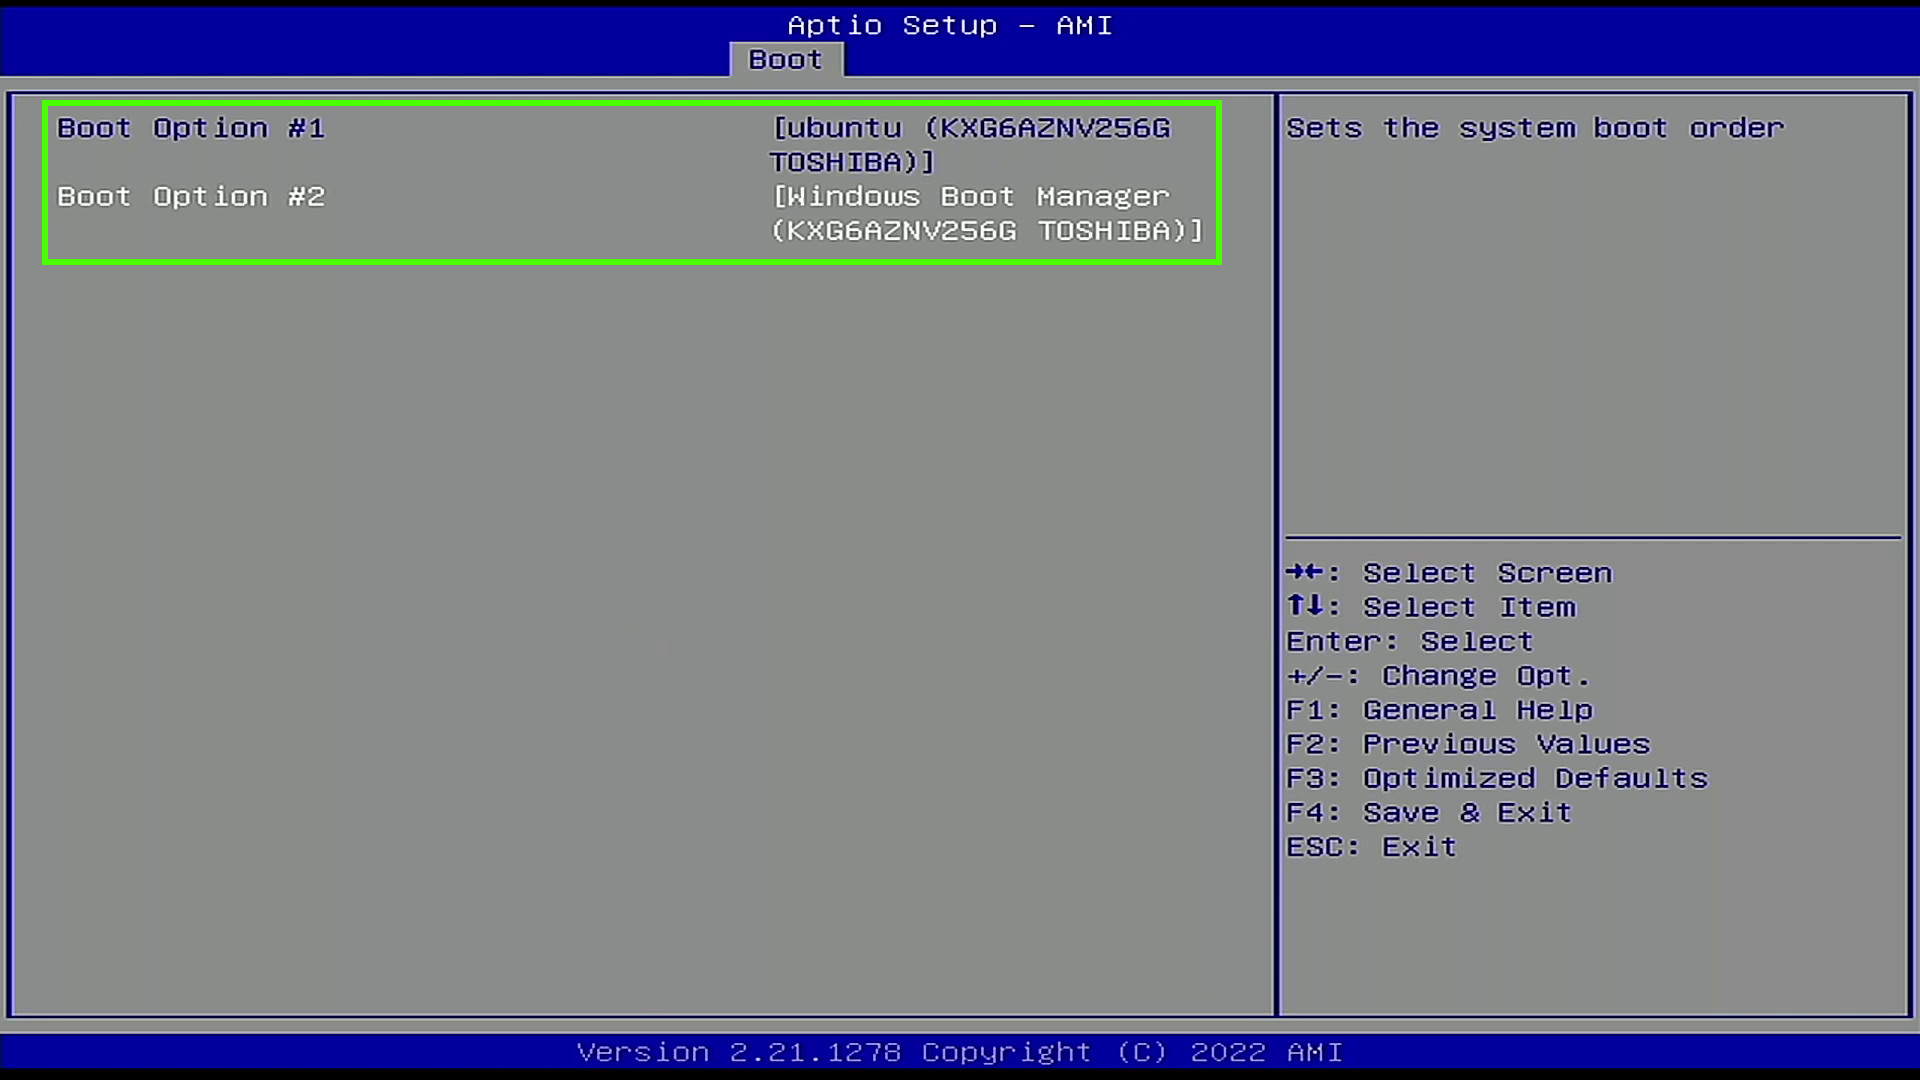
6. The system will now boot to GRUB, choose your Linux OS and press Enter. If we leave GRUB for 10 seconds, it will choose the default option, typically Linux.
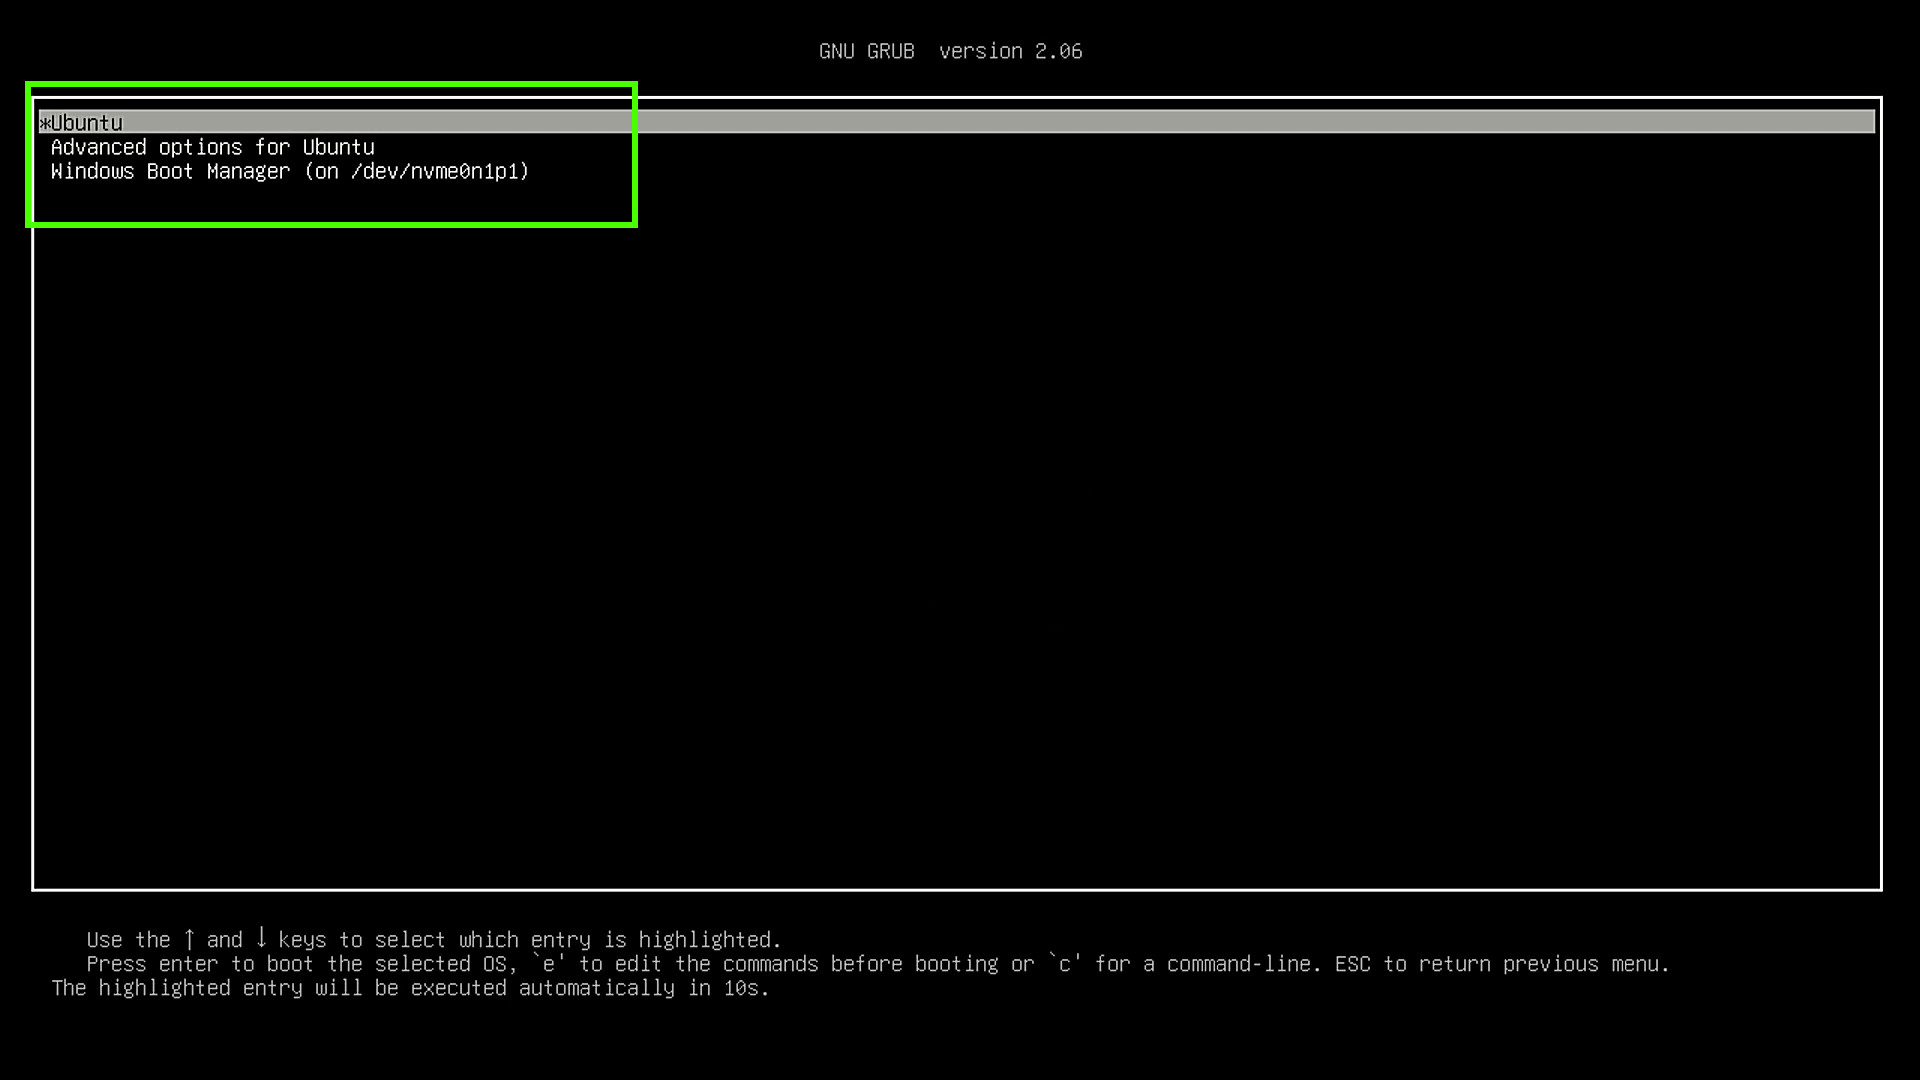
7. Boot to the Linux desktop and check that everything is correct.
8. Reboot to GRUB and select Windows to check that everything is working.