
Технология NIC Teaming (или Load Balancing/Failover – LBFO, или NIC bonding) позволяет объединить несколько физических сетевых адаптеров (NIC) в одну логическую сетевую карту. В этой статье мы рассмотрим, как настроить NIC Teaming в Windows Server 2019/2016/2012R2 и в десктопых версиях Windows 10 и 11.
Содержание:
- Настройка NIC Teaming в Windows Server 2019
- Используем PowerShell для настройки NIC Teaming в Windows Server
- Создаем группу сетевых адаптеров NIC Teaming в Windows 10 и 11
Для чего может понадобится объединять сетевые адаптеры в группу NIC Teaming?
- Увеличение пропускной способности. Например, объединив две сетевые 1 Гб сетевые карты в одну группу NIC Teaming, вы получите общую полосу пропускания на логическом адаптере 2 Гбит/с;
- Управление балансировкой нагрузки на сетевые карты – можно управлять распределением трафика между NIC сервера;
- Отказоустойчивость – при выходе из строя любой из сетевых карт, добавленных в группу NIC teaming, остальные подхватывают ее функции, и связь с сервером не прерывается. Для критически важных серверов этот механизм может защитить от простоя сервиса во время выхода из строя сетевого коммутатора или Ethernet порта на нем, сетевого кабеля (которым ваш хост подключен к коммутатору). Для реализации такой возможности, достаточно подключить сетевые карты в разные физические коммутаторы.
В Windows Server 2012R2/2016/2019/2022 технология NIC Teaming не совместима с Single-root I/O virtualization (SR-IOV), TCP Chimney и Remote Direct Memory Access (RDMA).
Настройка NIC Teaming в Windows Server 2019
Вы можете настроить NIC Teaming в Windows Server начиная с версии 2012. Рассмотрим, как объединить несколько сетевых адаптеров в Windows Server 2019 в одну группу NIC Teaming. Режим NIC Teaming по умолчанию отключен в Windows Server.
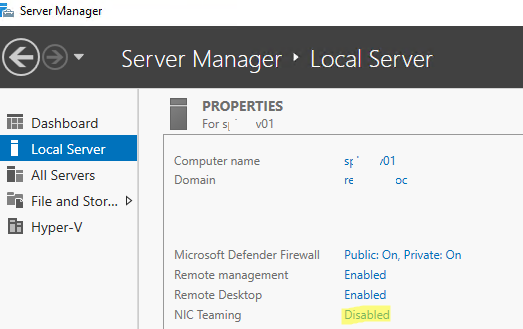
Чтобы включить его, откройте консоль Server Manager, выберите локальный сервер (Local Server) и в его свойствах выберите пункт “NIC Teaming: Disabled“.
В появившемся окне в левой нижней панели выберите пункт Tasks -> New Team (Создать группу).
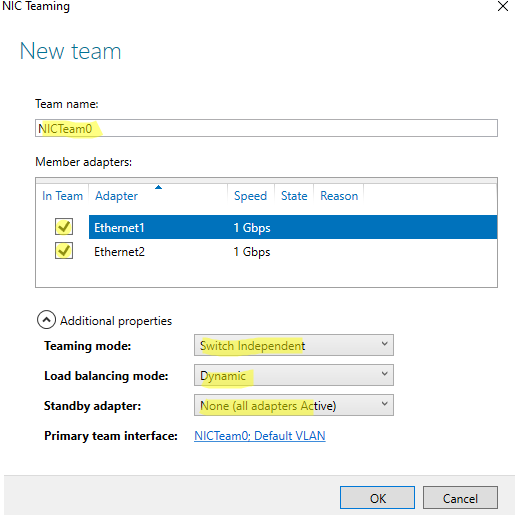
Далее нужно указать имя группы (Team Name) и выбрать сетевые адаптеры, которые будут входить в эту группу.
В Windows Server 2019 в одну NIC Teaming групп можно объединить до 32 физических сетевых адаптеров, главное, чтобы они работали на одной скорости.
Ниже можно настроить специальные параметры группы. От данных параметров зависит правила и эффективность NIC Teaming. Рассмотрим эти настройки подробнее.
Режим поддержки групп (Teaming Mode). Данный параметр определяет способ взаимодействия группы с сетевым оборудованием (коммутатором)
- Static Teaming (IEEE 802.3ad)— статический режим работы с зависимостью от сетевого оборудования. Все адаптеры группы должны быть подключены к одному коммутатору, Ethernet порты которого настроены на использование статической агрегации каналов (требуется настройка на коммутаторе);
- Switch Independent (режим по-умолчанию) – группа работает независимо от коммутатора, для реализации не нужно дополнительно настраивать сетевое оборудование. В этом режиме разные сетевые адаптеры группы можно подключить к разным коммутаторам для повышения отказоустойчивости (защита от сбоев в коммутаторах);
- LACP (Link Aggregation Control Protocol, LACP, IEEE 802.1ax) – режим также зависит от сетевого оборудования. Нужно включить и настроить на коммутаторе динамическую агрегацию каналов по протоколу LACP.
Режим балансировки нагрузки (Load Balancing mode) – задает как распределяется сетевой трафик по NIC в группе.
- Address Hash — для каждого из адаптеров вычисляется специальный хэш (на основании MAC или IP-адресов отправителя и получателя) и привязывается определенному физическому адаптеру. Весь трафик от данного отправителя будет идти через этот NIC;
- Hyper-V Port — режим можно использовать для сервера с ролью Hyper-V. Позволяет привязать конкретный адаптер группу NIC teaming к конкретному порту на виртуальном коммутаторе Hyper-V;
- Dynamic – опция по умолчанию, совмещает оба типа балансировки нагрузки.
Один из адаптеров в группе можно назначить резервным (Standby adapter). В обычном режиме работы данная NIC не используется для передачи трафика. При неполадке на любом другом адаптере в группе NIC Teaming, он тут-же занимает его место. В общем случае и без данной функции при выходе из строя любой сетевой карты, не будет простоя сервиса, т.к. ее нагрузка автоматически распределится между оставшимися картами в группе.
Выберите нужные параметры, нажмите ОК и новая группа Nic Teaming будет создана.
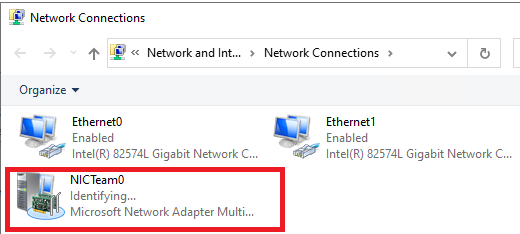
Откройте список сетевых подключения в панели управления Windows. Убедитесь, что в Windows Server появился новый сетевой адаптер Microsoft Network Adapter Multiplexor Driver (его иконка немного отличается). Это и есть виртуальный адаптер группы NIC Teaming.
Дальнейшая настройка параметров сетевой карты (протоколы, IPv4/v6 адрес) осуществляется теперь в свойствах этого адаптера.
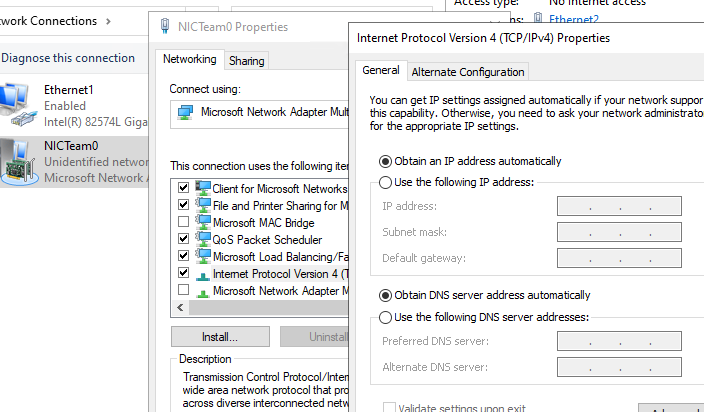
У всех остальных сетевых адаптеров, которые вы добавили в группу NIC Teaming уже не будет собственных IP адресов.
При удалении группы NIC Teaming предыдущие настройки сетевых адаптеров восстанавливаются.
В дальнейшем вы можете добавить или удалить сетевые адаптеры в группу NIC Teaming.
Вы можете использовать группу NIC Teaming для настройки нескольких VLAN интерфейсов в Windows Server. Для этого можно даже создать группу NIC Teaming из одного сетевого адаптера.
Используем PowerShell для настройки NIC Teaming в Windows Server
Вы можете создавать и управлять группами NIC Teaming не только из графического интерфейса Windows, но и с помощью PowerShell. Вы можете использовать PowerShell для настройки NIC Teaming в Windows Server Core
В Windows Server для управления MIC Teaming есть встроенный модуль NetLbfo. Выведите список сетевых адаптеров на сервере:
Get-NetAdapter

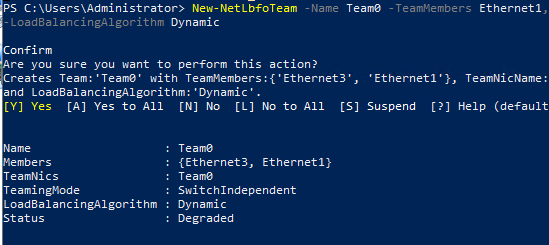
Создайте новую группу с Team0 из адаптеров с именами Ethernet1 и Ethernet3. Выберите режим работы NIC Teaming: Switch Independent с динамической балансировкой.
New-NetLbfoTeam -Name Team0 -TeamMembers Ethernet1,Ethernet3 -TeamingMode SwitchIndependent -LoadBalancingAlgorithm Dynamic
Доступные параметры:
- TeamingMode:
Static
,
SwitchIndependent
,
Lacp - LoadBalansingAlgorithm:
TransportPorts
,
IPAddresses
,
MacAddresses
,
HyperVPort
,
Dynamic
Информацию о группах NIC Teaming на сервере можно вывести с помощью команды:
Get-NetLbfoTeam
Name : Team0
Members : {Ethernet3, Ethernet1}
TeamNics : Team0
TeamingMode : SwitchIndependent
LoadBalancingAlgorithm : Dynamic
Status : Up
Можно настроить IP адрес интерфейса NIC Teaming с помощью PowerShell:
New-NetIPAddress -InterfaceAlias team0 -IPAddress 192.168.13.100 -PrefixLength 24 -DefaultGateway 192.168.13.1
Set-DnsClientServerAddress -InterfaceAlias team0 -ServerAddresses 192.168.13.10
Выполните команду
Get-NetAdapter
. Обратите внимание, что LinkSpeed сетевого адаптера группу NIC Teaming — 2 Гбит/с.

Чтобы изменить настройки группы NIC Teaming используется командлет Set-NetLbfoTeam:
Set-NetLbfoTeam -Name team0 -TeamingMode LACP
Если выполнить эту команду в ВМ, появится ошибка
Set-NetLbfoTeam : 'SwitchIndependent' is the only TeamingMode value supported in a Virtual Machine
Чтобы через NIC Teaming добавить отдельный VLAN интерфейс, используйте команду:
Add-NetLbfoTeamNIC -Team Team0 -VlanID 10
Удалить группу NIC Team можно командой:
Remove-NetLbfoTeam -Name Team0
Создаем группу сетевых адаптеров NIC Teaming в Windows 10 и 11
Вы можете использовать NIC Teaming для объединения сетевых карт не только в Windows Server, но и в клиентских версиях Windows 10 и 11. Главное, чтобы производитель вашей сетевой карты поддерживал для нее режим Link aggregation / NIC teaming/ LBFO.
Например, NIC Teaming работает из коробки с драйверами картами Realtek PCIe GbE Family Controller ( 10.35.510.2019) или Intel(R) 82574L Gigabit Network Connection.
Чтобы собрать группу NIC Teaming в Windows 10 (в этом примере это Windows 10 20H2), откройте консоль PowerShell и выведите список сетевых адаптеров:
Get-NetAdapter
Соберем группу NIC Team из адаптеров Ethernet0 и Ethernet1.
New-NetSwitchTeam -Name "MyNICTeam" -TeamMembers "Ethernet0","Ethernet1"

Проверьте, что в системе появился новый интерфейс NIC Teaming.
Get-NetSwitchTeam
Не забудьте задать для него сетевые настройки. Теперь у вас появился новый интерфейс с пропускной способностью 2 Гбит/с.

Для удаления созданной группы NIC Team, также нужно использовать PowerShell:
Remove-NetSwitchTeam -Name "MyNICTeam"
Windows 7, 8.1, and 10 for consumers don’t have link aggregation features baked into them. Microsoft requires that you use Windows Server instead, or you’ll have to use vendor-supplied drivers that have link aggregation features (such as Intel PROSet tools). Linux and OS X have built-in link aggregation features.
- Should I enable link aggregation?
- Does link aggregation increase bandwidth?
- Does Windows 10 support network teaming?
- Does Windows 10 support LACP?
- What is a benefit of link aggregation?
- When should I use an Ethernet port aggregation?
- Does LAG increase bandwidth?
- What is the difference between LAG and LACP?
- What is the difference between LACP and PAGP?
- Does link aggregation double speed?
- Does all router support link aggregation?
- Should I use WAN aggregation?
- What is the difference between NIC teaming and bridging?
- How do I know if my NIC is teamed?
Should I enable link aggregation?
Another important reason for using link aggregation is to provide fast and transparent recovery in case one of the individual links fails. Individual packets are kept intact and sent from one device to the other over one of the links. In fact, the protocol usually tries to keep whole sessions on a single link.
Does link aggregation increase bandwidth?
Link aggregation has the following benefits: Increased bandwidth – The capacity of multiple links is combined into one logical link.
Does Windows 10 support network teaming?
Client OSes such as Windows 10 do not have native NIC Teaming support (grouping between one and thirty-two physical network adapters into one or more software-based virtual network adapters).
Does Windows 10 support LACP?
LACP/LAG is not supported on Windows 10 operating systems
Specifically, it allows you to group anywhere from one to 32 physical Ethernet adapters (NIC) into any number of virtual network adapters (VLAN). Note: Dell does not support NIC teaming on Non-Server Operating Systems, such as Windows 10.
What is a benefit of link aggregation?
Link Aggregation Benefits
Link aggregation increases bandwidth, provides graceful degradation as failure occurs, and increases availability. It provides network redundancy by load-balancing traffic across all available links.
When should I use an Ethernet port aggregation?
Ethernet port aggregation between two devices allows your devices to treat multiple Ethernet links as if they were a single link. Combining two network connections for LAN aggregation allows you to increase network bandwidth and provide network redundancy between your router and a client device if one link fails.
Does LAG increase bandwidth?
A physical upgrade could produce a tenfold increase in bandwidth; LAG produces a two- or fivefold increase, useful if only a small increase is needed.
What is the difference between LAG and LACP?
Conclusion. LAG vs LACP issue is put forward for the confusing conception between them. LAG is an actual instance for link aggregation. LACP is a control protocol to enable LAG automatically configure network switch ports, detach link failure and activate failover.
What is the difference between LACP and PAGP?
LACP is an Open standard, i.e., supported by most vendors. While PAGP is Cisco proprietary; i.e., PAGP can only be used between Cisco devices. LACP has two modes, i.e., Active mode (Ports initiate negotiation with other ports by exchanging LACP packets.)
Does link aggregation double speed?
Details. Link Aggregation increases bandwidth and throughput by aggregating multiple network interfaces and provides traffic failover to maintain the network connection in case the connection is down. The total network bandwidth will only increase if there are multiple clients.
Does all router support link aggregation?
Well, yes and no. You may indeed be able to use two cables to get a faster link between the NAS box and the router, using a technology called 802.3ad Link Aggregation. But there are several potential hitches to be aware of. The first is that not all routers support 802.3ad.
Should I use WAN aggregation?
WAN aggregation might be useful if you have a multi-gig Internet connection but your modem does not have a Multi-Gig Ethernet or 2.5G Multi-Gig Ethernet port.
What is the difference between NIC teaming and bridging?
What is the difference between NIC teaming and bridging? NIC Teaming allows you to create a NIC interface that spans one or more NIC adapters that are all on the same subnet. NIC Bridging allows you to pair NIC adapters from different subnets to enable communication between the two subnets.
How do I know if my NIC is teamed?
To do so, open the Server Manager and click on Local Server. Next, locate the NIC Teaming option in the Properties section and then check to see if NIC Teaming is enabled or disabled, as shown in Figure A.
Benefit from Windows 10 Channel Bonding with Speedify
Looking for a way to combine and use multiple Internet connections on your Windows 10 computer at the same time? You’ve probably heard of terms such as Network (NIC) Teaming or link aggregation with mixed network adapters. What they all have in common is a complex setup with a lot of incompatibility issues users complain about.
Read below to see how you can set up a Windows 10 channel bonding solution in minutes using just a software app.
Expert Tip: Fix slow Internet by joining more connections together

Combine multiple connections to fix slow Internet
Speedify is the only app that seamlessly combines all of your connections, including WiFi, 4G, 5G, Ethernet, and Starlink, into one stronger connection to keep you online and secure.
In most cases, Speedify will automatically detect and start using any available Internet connections on your device while intelligently distributing your online traffic between them for optimal performance. If you need help we have quick start guides available for most common set ups.

Join multiple mobile hotspots at the same time
Speedify’s Pair & Share is a feature that enables you to connect to multiple hotspots at the same time and wirelessly share LTE, 4G, and 5G cellular connections back and forth between multiple Speedify users on the same local network to create a faster, more reliable connection for everyone.
For the first time, it’s possible to share cellular data between multiple devices, including PCs, Macs, iPhones and Androids. Use multiple phones as hotspots for internet access and get increased bandwidth and mobile failover.
I want to combine…
Windows 10 Channel Bonding: How It Works
Here’s your typical Internet connection: imagine yourself driving for a weekend getaway on a one-lane street. And many others like you on the road. Too many cars means that the traffic is slow. Plus, if there were an incident on the road, everybody would have to stop, so nobody would reach the destination in due time.
When you combine 2 or more Internet connections, it’s like having multiple roads that lead to the same destination. You would be able to switch from one road to another if one gets congested and you’ll be sure you’ll get there in time, if not even faster!
This is exactly what channel bonding does – it splits your traffic across multiple Internet connections so that communication happens faster and chances of your overall connection dropping are almost zero.
How Speedify Helps with Windows 10 Channel Bonding – Get Started in Minutes
Speedify’s unique channel bonding technology enables you to securely use multiple Internet connections at the same time for increased bandwidth, lower latency and better connection stability. Once connected to our fast secure VPN servers in the cloud, Speedify protects your privacy and optimizes your online experience by intelligently distributing online traffic between all available Internet connections on your Windows 10 computer.
Speedify’s patent pending channel bonding solution adds some perks to the standard specs of channel bonding, for your convenience:
- Security and online privacy: Speedify has mobile VPN capabilities and securely combines multiple Internet streams so that you can be sure no one can eavesdrop on your online traffic. You can be sure your private browsing data is safe even on public WiFi networks.
- Efficiency: Most link aggregation solutions aren’t intelligent and just blindly split traffic over each network connection in a “round robin” manner, like dealing cards in a card game. Speedify’s smart channel bonding technology is able to detect the capabilities of each network connection and intelligently distributes the traffic so that you will get up to 95% efficiency of their combined throughput.
- Performance: Unlike more expensive, hardware-based channel bonding solutions, Speedify’s Windows 10 channel bonding technology is software-based and isn’t limited by any bonding hardware. It will always be usable whether you change something in your Internet setup and it’s budget friendly!
Speedify Windows 10 Channel Bonding – Much More Load Balancing
Speedify is a fully featured channel bonding solution for Windows, macOS, Android and iOS devices. Some may think it’s a load balancing service – but it’s not. It’s much more than that!
Whereas load balancing works by optimizing Internet traffic per network sockets, channel bonding on the other hand goes one step further and optimizes traffic into smaller chunks of data – network packets. Learn more about Windows 10 channel bonding vs. load balancing.

Get started today!
With Speedify you can combine multiple internet sources into one bonded super-connection to improve livestreaming, video calling, gaming, web browsing, and everything else you do online.
Speed
Combine Wi-Fi, cellular, ethernet, satellite, and more to maximize performance
Stability
Avoid buffering and disconnects while streaming, gaming, and browsing.
Security
Keep your personal data safe from hackers, snoops and cyber criminals
Speedify’s network engineers are always exploring the latest in networking and security technology—like 5G, 6G, WiFi 7, laser and satellite internet—and sharing it in new discussion content across YouTube every week.
Got a tech question? Let’s go deeper! Pop into Speedify Office Hours live every Wednesday at 10 a.m. Eastern. Speedify CEO Alex Gizis and our network engineers are standing by to break down your questions about networks, tech updates, and Speedify features.
In recent months (as of this post), Microsoft decided to apparently cripple the UI panels for Teaming, VLANS, and a few other options in the Network Interface properties tab section. On update 1903 of Windows 10 Pro, this was very much so the case – no UI, but only PowerShell commands.
Assumptions:
- You have already created a LACP/LAGG on the Switch/Router/Whatever the NIC on the machine is connecting to.
- The NIC Team Ethernet ports are active to the switch.
- Your switch and ethernet NIC supports IEEE 802.3ad Dynamic Link Aggregation, AKA LACP.
The Tutorial…
Here’s a step by step to getting Teams (Teaming) functional on Windows 10 Pro using an Intel based NIC… with PowerShell.
- Remove any and all teams that exist on your machine – consider this a clean install of a team.
- You will need to go to the Device Manager on the machine and remove the team, then remove the adapter drivers.
- Ensure you’ve UNINSTALLED the drivers, not just a simple remove from the Device Manager.
- Download the Intel v24 (or whatever version it’s on now) from the Intel website: https://downloadcenter.intel.com/download/25016
- Install the proper-bit variant version for your machine… chances are, it’s x64.
- Once installed, let Windows 10 re-detect the Intel NIC’s.
- Once re-detected, we’re going to PowerShell.
- Right click your start menu and click “PowerShell (Admin)” or WinKey + R, Type in “powershell” without the quotes, OK.
- PowerShell HAS TO BE RUN as Administrator – otherwise, this goes south, quick.
- Let’s get an idea of what Interfaces you’ve got running. Type:
Get-IntelNetAdapterand press enter.- Note the interface NAMES that you wish to create a team of.
- Once we know the adapters to create a team of, we’ll be inputting the following command:
New-IntelNetTeam -TeamMemberNames "Intel(R) Ethernet Server Adapter I350-T2 #2","Intel(R) Ethernet Server Adapter I350-T2" -TeamMode IEEE802_3adDynamicLinkAggregation -TeamName "Team01"- For me, I have a dual-port i350-T2 ethernet adapter – it gets the job done, and makes this process easy.
- Team01 can be named whatever you wish it to be, but for simplicity sake, keep the name basic.
- When creating a team, it took about two minutes for this process to complete on my machine. It may appear frozen, but it’s working its magic.
- Once completed, the console will report back that the Primary and Secondary adapter was “NotSet”, let’s fix that…
- Type in:
Set-IntelNetTeam -TeamName "Team01" -PrimaryAdapterName "Intel(R) Ethernet Server Adapter I350-T2 #2" -SecondaryAdapterName "Intel(R) Ethernet Server Adapter I350-T2"– You’ll need to replace the adapter name to whatever your adapters names are. - This should take about 30 seconds tops.
- Once completed, the NIC should attempt to auto-negotiate a DHCP address using the primary NIC cards MAC address.
- Confirm the changes applied, type in
Get-IntelNetAdapteronce more to see ifTEAM:was applied as a prefix to the desired NIC’s to be Teamed.
Here’s a screenshot of the three commands used as listed above…


There are times when having a bit more performance is better. Actually, who are we kidding? Having more performance is always better. In the case of networking, this is especially true. You can never have enough bandwidth. There will be some, though, who argue that x number of megabits or gigabits per second is «more than enough.» We refer to this as the «640KB mentality.»
All of today’s motherboards ship with at least one gigabit Ethernet port. Some premium boards come with two. Of course, you can always add more by installing add-in NICs, and there are motherboards with more than two, but for the sake of this article we’re referring to consumer motherboards.
So, what exactly is link aggregation? In a nutshell, link aggregation (or trunking), is the fine, delicate art of combining two or more physical Ethernet links into a single logical link. So if two 1Gb/s ports were aggregated, you would get a total aggregated bandwidth of 2Gb/s. Note that we use the phrase «aggregated bandwidth.»
Think of link aggregation in terms of network link resiliency rather than total available throughput. In that sense, if one physical part of the logical link fails, traffic will failover to the remaining active links. Where you will see increased bandwidth is when you have multiple origin-destination IOs. For example, if you’re transferring a file from one PC to another over a 2Gb aggregated link, you’ll find that the total maximum transfer rate will top out at 1Gb/s. Start two file transfers, however, and you’ll see the benefits of aggregated bandwidth. In simple terms, link aggregation increases the number of lanes on a highway but it doesn’t increase the speed limit.
What this equates to is if you want true higher throughput, moving to a fatter pipe—like 10GbE—is the only way to go.
For the majority of home networks, setting up link aggregation serves little to no advantages. However, if you’re employing a NAS that has multiple Ethernet ports, it may support link aggregation and you’ll have some benefits there. So, how do you do it in a network?
First, you’re going to need a switch/router that supports link aggregation (LACP, 802.1ax/ad, etc.). Unfortunately, most consumer-level switches and routers do not support link aggregation, so you’ll have to link into business-level products, which will carry a premium.
Keep up to date with the most important stories and the best deals, as picked by the PC Gamer team.
Second, your PC needs to have two Ethernet ports, and whatever device you want to connect to needs to have at least the same. Assuming you have the hardware requirements covered, you’ll need an operating system that supports it. Windows 7, 8.1, and 10 for consumers don’t have link aggregation features baked into them. Microsoft requires that you use Windows Server instead, or you’ll have to use vendor-supplied drivers that have link aggregation features (such as Intel PROSet tools). Linux and OS X have built-in link aggregation features.
After you’ve satisfied all the prerequisites, here’s how to do it.
We used the following setup:
Swipe to scroll horizontally
Configuring the network
First, our NIC is a 10GbE Ethernet adapter from Small Tree that’s fully compatible with Windows, OS X, and Linux. You can get a 10GbE adapter with SFP+ connections, but for the sake of network compatibility, Small Tree sent a 10GBASE-T (RJ45) version.
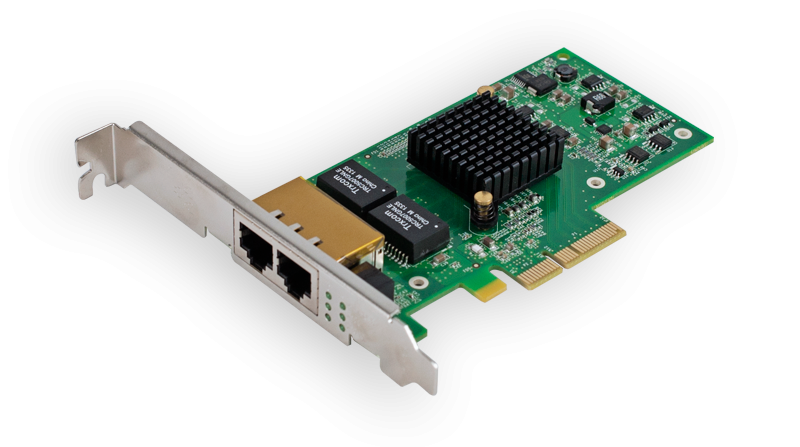
If you’re going for the ultimate in performance though, we recommend going with SFP+ connections, as 10GbE pushes the limits of CAT6 and RJ45 connectors. Small Tree also has SFP+ adapters available if you want that kind of setup. Keep in mind that SFP+ switches are even more expensive than RJ45 switches.
Next up: setting up the switch. You’ll need a switch that supports link aggregation, whereby there’s management capabilities that will allow you to bond individual ports. The Netgear ProSAFE XS708E comes with a utility that allows you to bond specific ports.
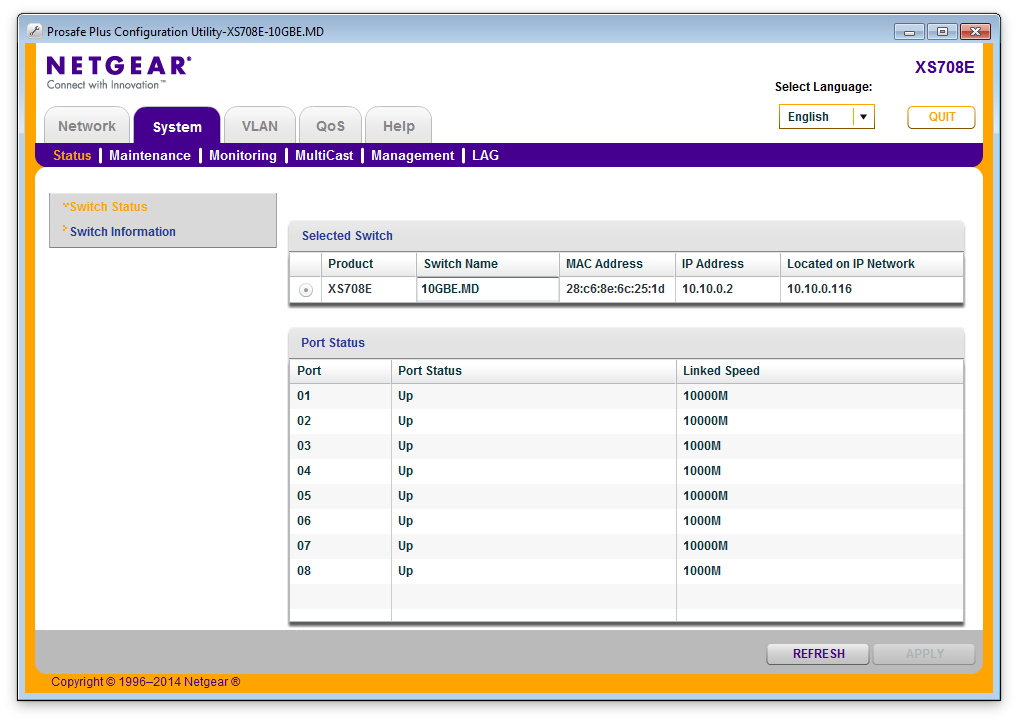
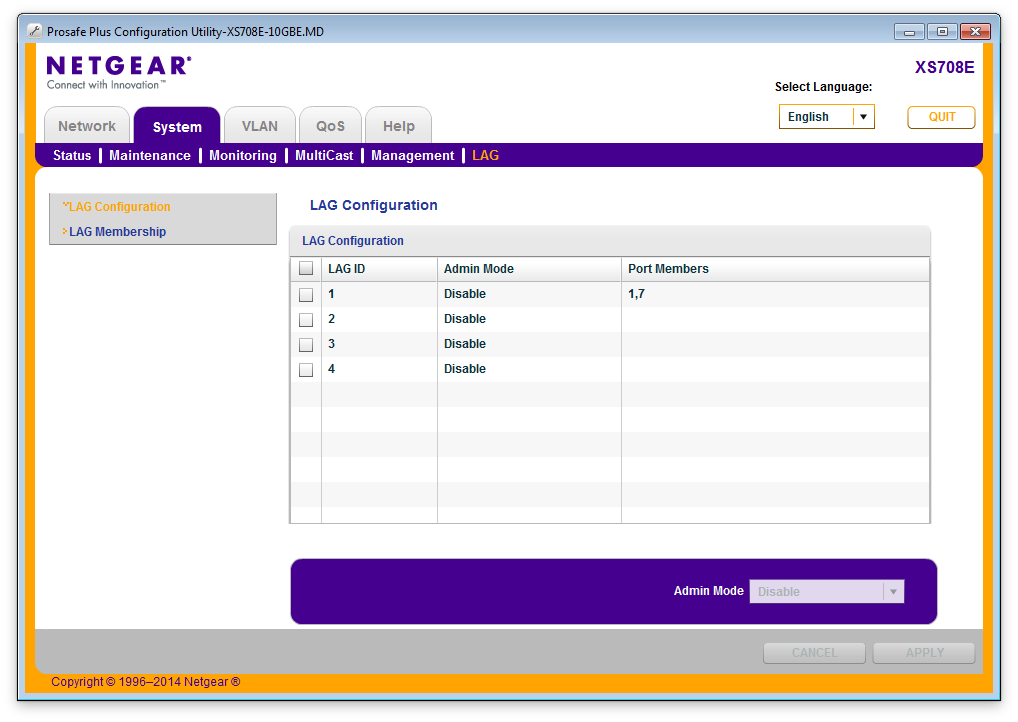
Depending on your switch, you’ll have something similar for teaming up ports like what you see in the image above. The above switch isn’t a managed switch, so the tool to set this up comes separately as a standalone application. Your switch may have a web interface.
Windows Server 2012 R2
Unfortunately, NIC teaming isn’t natively available in consumer versions of Windows, so we’ll have to use Windows Server and in this case, it’s Server 2012 R2. To do this in Windows Server, open the Server Manager. From there, click «Local Server» and you’ll see an option called «NIC Teaming.»
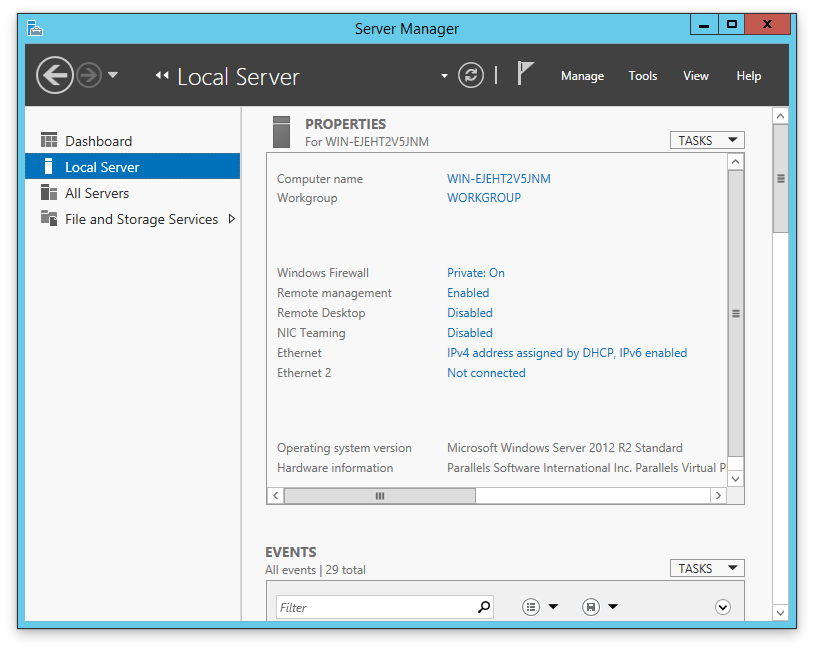
Click the option that says «Disabled» and you’ll be presented with the teaming configurator:
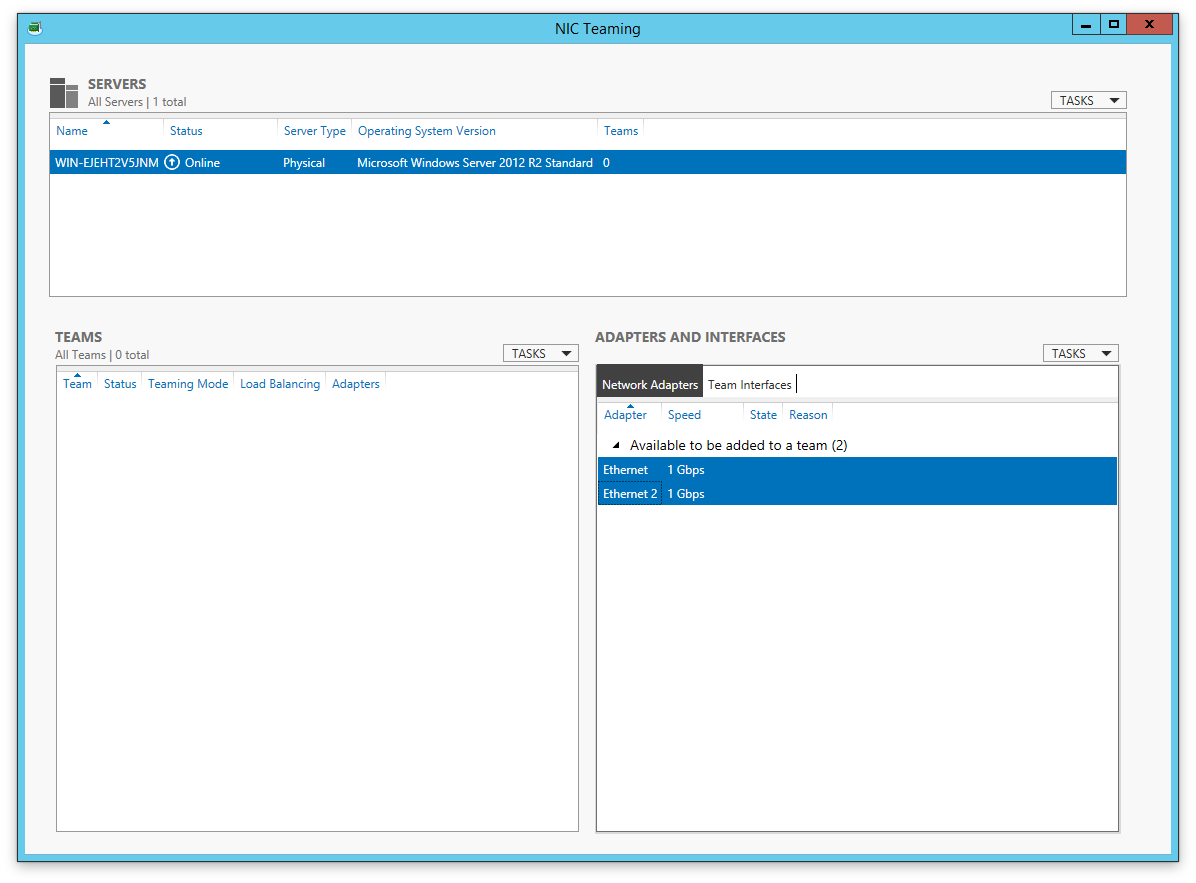
You’ll see both of your NIC interfaces listed under Adapters and Interfaces. Now, select both interfaces, right click, and select «New Team.» In the window that pops up, you’ll be given a field to name the new logical interface, as well as to select additional properties related to protocol. The protocol you choose depends on the type of switch you have. Give it a name and click OK.
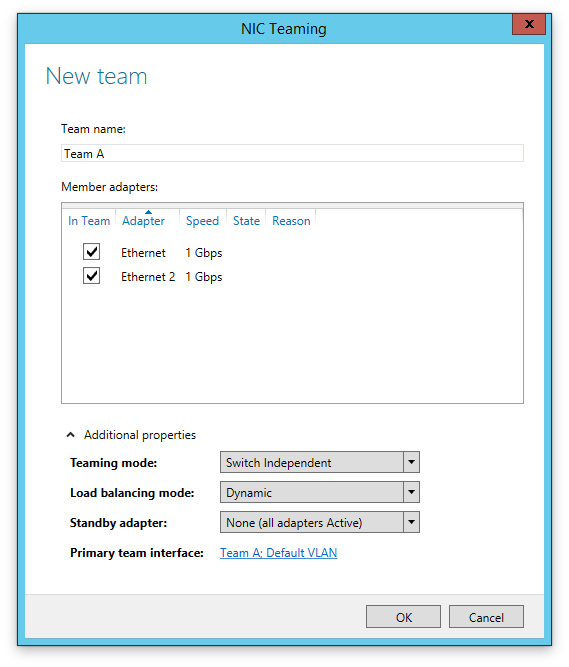
For maximum compatibility, select «Switch Independent» under Teaming Mode. Once that’s done, you’ll end up back in the main NIC Teaming window where you’ll see your newly named logical interface comprising your two physical interfaces. Easy!

If all goes correctly, both your physical connections will indicate an active state, and you can see the transmission details below, although there’s no stat for packets lost.
OS X
In OS X, setting up an aggregated link is a bit more straightforward, and doesn’t require special tools or third-party drivers—the feature is baked into the default Network preferences. To set it up, open System Preferences and go into the Network options.
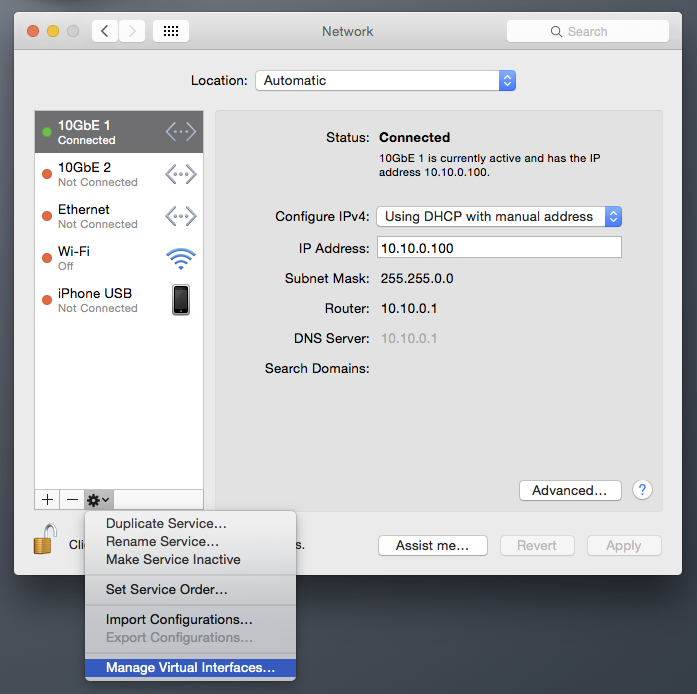
You may have to click the padlock icon to make the options available. Click the small gear icon and select «Manage Virtual Interfaces…»

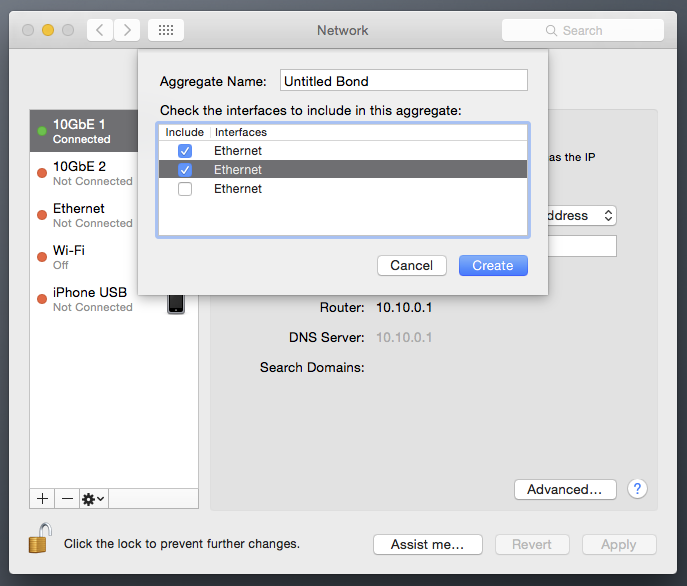
A drop-down menu will appear. Click the + button and select New Link Aggregate. You’ll be presented with a list of your physical interfaces, where you can select the ones you want to bond. Tick the boxes for the interfaces you want to combine, and select Create. Don’t forget to give it a name.
If all goes well, the two or more physical interfaces you bonded will disappear from the Network interfaces list, and instead be replaced with the logical bond you just created. It’s especially good if the light turns green.
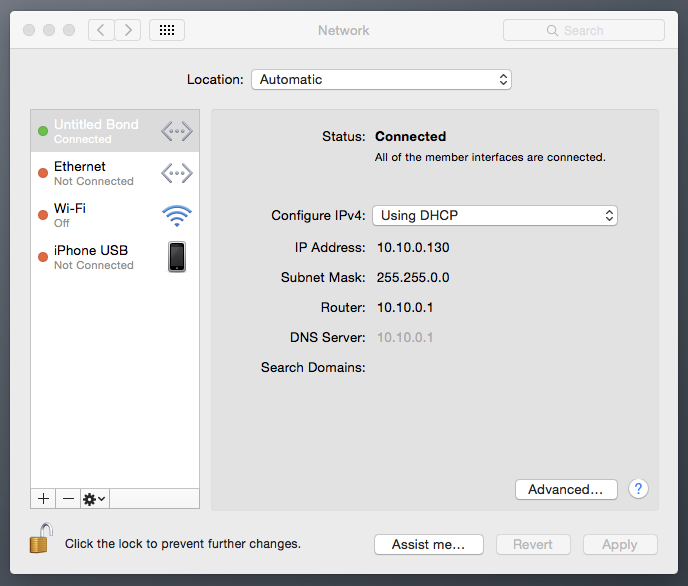
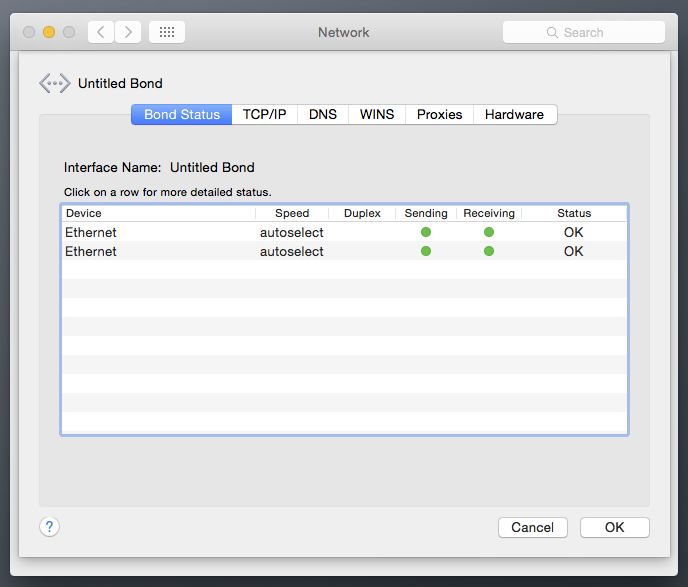
To see how your connection is doing, select the logical interface and click Advanced. You’ll be able to see its status as well as configure other options such as IP address, DNS, etc.
To remove the aggregated bond, simply select it in the main Network interfaces window and click the minus (-) button. You’ll then need to re-add the individual physical interfaces.
Linux
One could say that the Linux environment is the most straightforward of all OSes in which to create a logical bond. Open a terminal window (and of course, the same commands apply if you’re not using a GUI), and type in the following:
Here’s a breakdown of what that command means:
modprobe bonding: this loads the bonding driver.
bond0: the name we gave the logical interface.
The third line tells the system to turn on (up) the logical interface.
ifenslave: this tells the bonding interface to aggregate interfaces eth1 and eth2.
If you want to configure how the bonding actually operates, you’ll want to modify the /etc/modprobe.conf file to include the bond you want to create and define its properties. Open the .conf file and add the following lines:
max_bonds: defines the number of bond interfaces to create.
mode: defines bonding policies such as round-robin, etc.
miimon: defines the frequency in milliseconds that link monitoring will occur for high availability failover.
To see how your bond is operating, issue the following command:
And you should get the following output:
Tuan is the Editor-in-Chief of Maximum PC, and loves all things tech. He’s been building PCs and ruffling feathers in the industry for 20 years, and isn’t afraid to call out bad products and services. In fact, it’s very common to hear the words «this is shit» escape his lips. If you want to know if something is «Kick-Ass» or not, email or tweet him.