
Readers help support Windows Report. We may get a commission if you buy through our links.
Read our disclosure page to find out how can you help Windows Report sustain the editorial team. Read more
Speed Up Your Internet with Cool Tools for Windows 10
Are you tired of your internet going slow because other stuff on your computer is using it all up? Well, there’s a way to fix that with special tools for Windows 10!
What’s a Bandwidth Limiter?
Think of the internet like a pie. If one app overeats pie, there’s not much left for the others. A bandwidth limiter is like telling that app, “Hey, you can only have this much pie,” so there’s enough for everyone. This means your games and videos can run smoothly without getting stuck.
Why It’s Awesome
- See Who’s Consuming the Bandwidth: Find out which apps are being greedy with your internet and put them on a diet.
- Better Gaming and Videos: No more annoying pauses in your games or buffering in your videos.
- Share the Pie Fairly: If you’re not the only one using the internet at home, you can make sure everyone gets a fair share, even your roommate!
What’s New with Windows 10?
Windows 10 keeps improving at helping you manage your internet so that you can do more without slowing down. They’ve added new stuff to make sure your internet is used well so your games and videos can run better than ever.
So, using these special tools we installed on our testing laptop, which runs on Windows 10, can make a big difference in how fast your internet feels, ensuring there’s enough internet pie for everything you want to do!
ManageEngine NetFlow Analyzer – Great bandwidth limiter

For bandwidth analysis and in-depth control of your network elements, NetFlow Analyzer is idea because it also keeps an eye on routers and firewalls.
This software helps you monitor bandwidth usage by interfaces and applications, and check the traffic by volume, speed, and utilization.
Your IT manager will be able to view traffic graphs by volume, speed, and level of usage. And it will be easy to locate any problem because NetFlow Analyzer filters such key metrics by IP address, ports, and protocols.
You may even identify which application is causing a traffic spike and halt it or prioritize any other process instead.
For instance, the built-in Cisco NBAR technology detects specific applications that use dynamic ports and drain your network’s bandwidth so that you may stop them.
Every time when an interface, IP group, or access point is using more bandwidth than the allocated quantity, you will be alerted.
The bottom line is that with NetFlow Analyzer you get deep visibility into all the traffic data on your network so that you can act quickly and block any unusual behavior.
Here are some of its key features to take into consideration:
- Get alerts on exceeded bandwidth utilization
- Track bandwidth-hogging applications
- Get insights into the bandwidth usage of individual elements
- Detailed graphical representation of network activities
- Easy to use and implement on any network
ManageEngine NetFlow Analyzer
Set limits on any process or workstation on your network and track any unusual network activity.
PRTG Network Monitor – Best in the market

PRTG Network Monitor is the best band limiter out there. We are talking about a very complex solution that also includes customizable band-limiting in every aspect.
For instance, you can set channel limits to set threshold values and trigger notifications when they are exceeded.
You can also use a NetFlow sensor to monitor connections and applications with the most bandwidth.
Although this is a professional tool, the user interface is easy to control and master, with a very high learning curve.
After you open the PRTG Network Monitor, you can let the auto-discovery create a set of sensors for your complete network.
Then, you can easily read the live data about your network because it’s rendered in a friendly representation as a graph.
Once you have a complete picture of bandwidth usage, you can enforce limitations, diagnose the consumption, and create reports for your management teams.
You can either get the PRTG Network Monitor free version or the paid version with many more features.
You can start testing it for free for 30 days and then decide if you want to buy the full version or continue with just the basic features for free.
PRTG Network Monitor
Take control over bandwidth unusual use for all your Windows 10 with this network limiter and bandwidth diagnosis tool.
GlassWire – Wide range of features

GlassWire’s network monitor allows you to limit your bandwidth and consult your network activity by geo-location, application, and traffic, using easy-to-read graphs.
You will be able to see your computer’s traffic for up to 30 days. You can see the cause of a casual spike in your network activity and try to avoid it in the future by customizing your bandwidth traffic options as you see it suitable.
GlassWire alerts you about spikes, hosts that are known threats, unexpected network system file changes, ARP spoofs, and DNS changes so you can take immediate action.
If you are not in front of your computer, GlassWire allows you to remotely monitor and block suspect activity on the computers or servers you need to take care of.
Its firewall is a great tool to anticipate network threats and stop them before they can damage your system.
GlassWire’s firewall helps you detect what current and past servers your PC is communicating with so you can get rid of potential threats.
Here are some of its best features:
- Alerts on any unexpected network system file changes or DNS changes
- Remotely monitor and block the suspect activity
- Advanced bandwidth limitation options
- Comprehensive graphical reports
GlassWire
Set up your bandwidth traffic and get nonstop information about your computer and server’s activity, even when you’re not in front of your device.
NetLimiter – Quick app

NetLimiter is a bandwidth limiter tool that will limit bandwidth usage on your PC in just two clicks.
When you start the application, you’ll see the list of all active applications, similar to Task Manager. You can see how much bandwidth-specific application uses in the DL Rate and UL Rate columns.
Using this information, you can easily locate problematic applications and limit their bandwidth usage.
To do that, check the desired option in DL Limit or in the UL Limit column. In addition, you can also see how many downloads and uploads your applications are using in total.
This is especially useful if you’re using a connection with a data limit. As an advanced user, you can set custom filters on your PC and fine-tune all your applications.
NetLimiter is a great application for both basic and advanced users alike. Limiting bandwidth speed is simple; you can do that with just a single click.
You can use a free version or purchase the Pro or Lite version.
Check out a few of its key features:
- Set bandwidth limitations with just 2 clicks
- Set custom filters on your PC and fine-tune all your applications
- Check downloads and uploads for your PC
- Locate problematic applications that hog bandwidth
⇒ Get NetLimiter
NetBalancer – Detailed summary

The first time when you open NetBalancer, you’ll see the list of all available applications along with network usage statistics. In addition to the list, there’s also a live graph that shows you both download and upload.
Using the live graph, you can see which application uses the most bandwidth, so you can easily limit it. If you want, you can pause the graph and examine the information closely.
Regarding the list, it shows you both download and upload rates and total downloads and uploads. To limit certain applications, double-click it from the list, and you can change its download and upload priority.
In addition to priority, you can set drop rate and download delay as well. You can also quickly set download or upload priority or limit from the menu on the top.
In addition, there’s a button available that lets you block all network traffic with a single click.
If you’re an advanced user, you can also create all sorts of custom filters with ease. All actions are available from the menu on the top, so you can quickly change all important settings.
This application also has sync support, so you can easily sync your statistics and settings with other devices.
NetBalancer is a great app for limiting bandwidth, but it comes with a 15-day trial.
After the trial period expires, you can use this app only to monitor your network traffic. If you want to limit your traffic, you’ll need to purchase a license.
⇒ Get NetBalancer
cFosSpeed – User-friendly interface

cFosSpeed is another bandwidth limiter tool, but unlike other tools on our list, it does not set an established limit to your traffic but it would rather shape it continuously.
After you install cFosSpeed, you’ll get a status window in the bottom right corner where you can see your traffic status.
We have to admit that the status window looks rather plain and a bit confusing to new users.
Fortunately, you can click the status window, and it will open a new page and explain to you in detail how the status window works.
cFosSpeed comes with a 30-day trial, and if you want to continue using it, you need to purchase a license.
We have to admit that this application seems a bit complicated with its odd user interface. We couldn’t find the option to limit upload or download to a specific value, which is also a major problem.
cFosSpeed is a complicated application, and if you want to limit your bandwidth, you might want to consider some more user-friendly applications.
⇒ Get cFosSpeed
SoftPerfect Bandwidth Manager – Meant for experts

SoftPerfect Bandwidth Manager is another tool that allows you to limit your bandwidth usage.
This software is a bit more complicated to use than others on our list because it requires you to enter the address and connect to it before using it.
Using this tool, you can create your own rules, but you can also show important information, such as groups or quota managers.
You can also see the defined schedule or check the usage report, event log, or live usage monitor.
SoftPerfect Bandwidth Manager is a great tool, although a bit complicated for basic users. Unless you’re familiar with network configuration and protocols, you might consider using a simpler tool.
It comes with a 30-day trial period; if you want to continue using it, you’ll have to purchase the license.
⇒ Get SoftPerfect Bandwidth Manager
Net Peeker – Built-in Firewall

The first thing you’ll notice when you start, Net-Peeker is the slightly outdated interface. Despite the interface, this application is filled with great features.
As soon as the application starts, you’ll see the list of running applications along with bandwidth consumption.
From the menu, you can choose to end the selected program or process, abort all sessions, or block the program completely from accessing the Internet.
Of course, there’s an option available that allows you to set the upload or download speed for desired applications.
You can also see detailed information, such as a list of all available connections for a specific program. If you want, you can also show a live graph or see live network packets.
The application also has a built-in firewall and System Guard that you can use to protect your system. We have to mention that there are two versions of Net-Peeker available.
The personal version is designed to work only on a single PC. If you need to configure multiple PCs in your network remotely, you might want to try the Group version.
Net-Peeker offers an amazing amount of information and features to the user, and its only flaw is its slightly outdated user interface.
We have to mention that this application is available as a 30-day trial, and if you want to continue using it, you’ll have to purchase a license.
⇒ Get Net Peeker
NetCrunch – To monitor precise data

One of the biggest problems in a network, besides malware, of course, is when a user or process is hogging all of the bandwidth, effectively hindering everyone else’s connection. NetCrunch has that covered, all thanks to technologies like SNMP, NetFlow, IPFix, sFlow, or jFlow.
First of all, NetCrunch lets you monitor the precise distribution of bandwidth so that problems can be identified before any actions are taken.
This data is displayed in real-time and includes parameters like upload or download. You can regulate bandwidth usage by limiting the access of certain devices to it or providing more to others.
Here are some of the core features of NetCrunch:
- Monitor bandwidth with traffic flow analytics
- Monitor network bandwidth on servers
- Monitor traffic with SNMP and RMON
- Layer 2 mapping and monitoring
- Live port traffic monitoring
- Predefined top chart views
⇒ Get NetCrunch
As you probably noticed, most bandwidth limiter tools for Windows 10 require a license to run and effectively do the job.
If we had to pick one, we’d choose PRTG and Glasswire. Both tools have a similar interface and are relatively simple to use, so they will be perfect for most users.
Also, do not forget to check the best tools to increase the bandwidth on your Windows PC. We also have a guide on how to use Net Speed Monitor on Windows 11, so you might want to visit it.
If you have any other suggestions or questions, don’t hesitate to leave them in the comments section below.
Milan Stanojevic
Windows Toubleshooting Expert
Milan has been enthusiastic about technology ever since his childhood days, and this led him to take interest in all PC-related technologies. He’s a PC enthusiast and he spends most of his time learning about computers and technology.
Before joining WindowsReport, he worked as a front-end web developer. Now, he’s one of the Troubleshooting experts in our worldwide team, specializing in Windows errors & software issues.
Limiting bandwidth on your computer will stop you from wasting data. It’s very helpful to manage this setting if you have a specific data limit as it can stop you from being overcharged.
We’re going to show you how to control your bandwidth usage with built-in Windows 10 facilities, then offer some additional third-party tools that offer more features to help you limit your bandwidth.
How to Limit Data Usage in Windows 10
First, let’s look at how to control your network usage and apply a bandwidth limit using the tools that come with Windows 10.
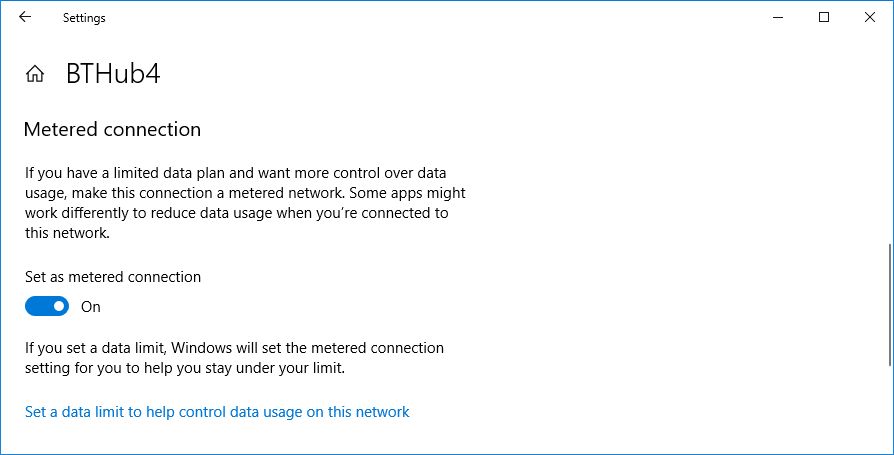
Enable a Metered Connection in Windows 10
One way to limit bandwidth in Windows 10 is to enable a metered connection.
Enabling this feature will mean that some updates for Windows won’t be installed automatically (except critical updates) and some Microsoft Store apps might lose some functionality or not work properly. It will also disable peer-to-peer updates that are designed to help with Microsoft’s server load.
To enable a metered connection:
- Press Windows key + I to open Settings.
- Click Network & Internet.
- Choose either Wi-Fi or Ethernet, depending on what method you use to connect to the internet.
If you selected Wi-Fi:
- Click Manage known networks.
- Select your network from the list.
- Click Properties.
- Slide Set as metered connection to On.
If you selected Ethernet:
- Click your connection from the list.
- Slide Set as metered connection to On.
Set a Data Usage Limit in Windows 10
Alternatively, you can set a custom data usage limit. This will automatically enable the metered connection feature. It won’t disconnect your internet when you hit the limit, but you will receive warning notifications as you near it. This is perfect to help prevent any charges from your ISP for going over a data cap.
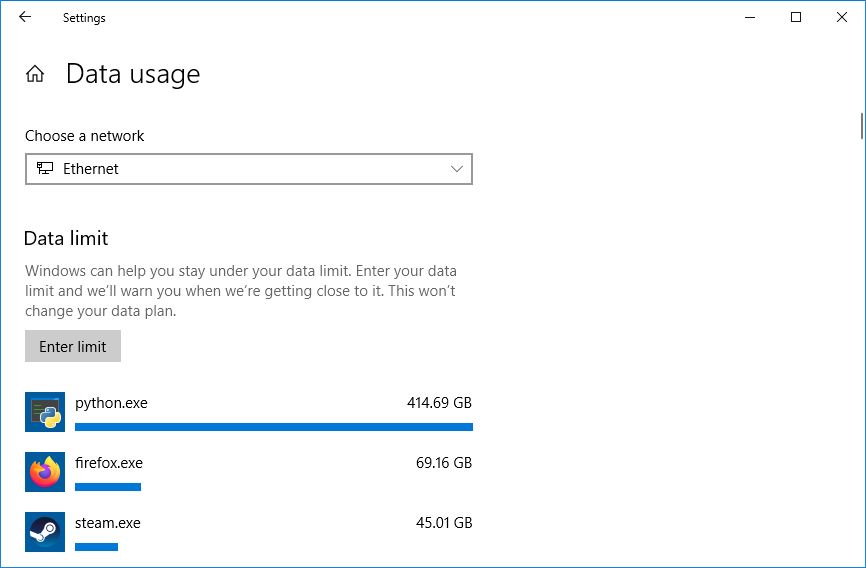
- Press Windows key + I to open Settings.
- Click Network & Internet.
- Beneath Network status, you’ll see your different internet connections and how much data each has used in the last 30 days. For the one you want to set a data usage limit for, click Data usage.
- Beneath Data limit, click Enter limit.
- Select a time period (Limit type), the Monthly reset date/Days until data expires, and the Data limit (set the Unit as either MB or GB.)
- Click Save.
You’ll see a graph that shows how much data has been used and how much is remaining. Click Edit limit to change the settings or Remove limit to scrap it.
Windows 10 has some helpful features to help you set a bandwidth limit and use less data, but you might need something more advanced. If so, these third-party tools are great choices.
1. NetBalancer
NetBalancer shows you a list of all the active processes on your system and any associated network usage. Beneath this is a live graph so you can see at a glance where any bandwidth spikes occur. Hover your mouse over the graph and you’ll be able to see which processes were sapping your bandwidth at that moment.
To limit a program’s bandwidth, find it on the list and double-click it. You can use the Download Priority and Upload Priority dropdowns to adjust its usage based on preset filters. This is handy if, for example, you still want a program to be unrestricted, but want other programs to use the bandwidth first if they need it. Alternatively, choose Custom from the dropdown to define your own limits.
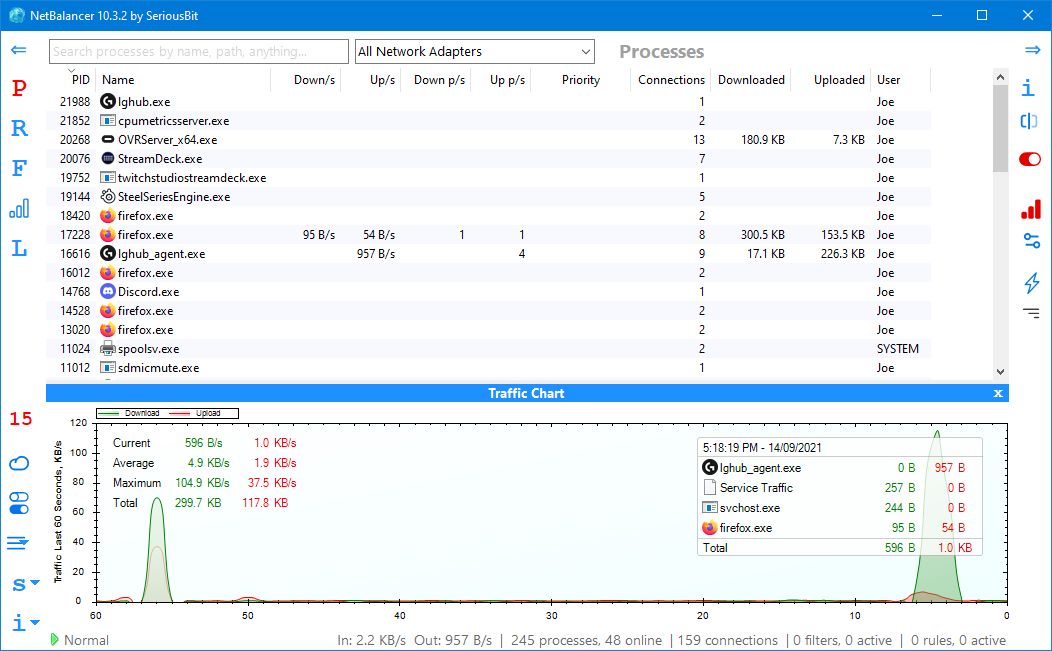
If you want to get into the nitty-gritty, you can set rules and filters; navigate to these sections from the icons on the left-hand menu. However, bear in mind that these are only available in the paid version of NetBalancer, which costs a one-time fee of $49.95. Alternatively, you can keep using it for free as a network monitor only.
2. NetLimiter
When you launch NetLimiter you’ll see a list of all your open applications, along with their current bandwidth usage. Of course, some applications will naturally use more bandwidth than others, but it’s handy to identify those which are consuming more than they need to.
The default limit is set to 5 KB/s for download and upload, which you can quickly enable by checking the box for a particular row. To edit those defaults, right-click a row and click Add rule. Here you can change the bandwidth boundaries.
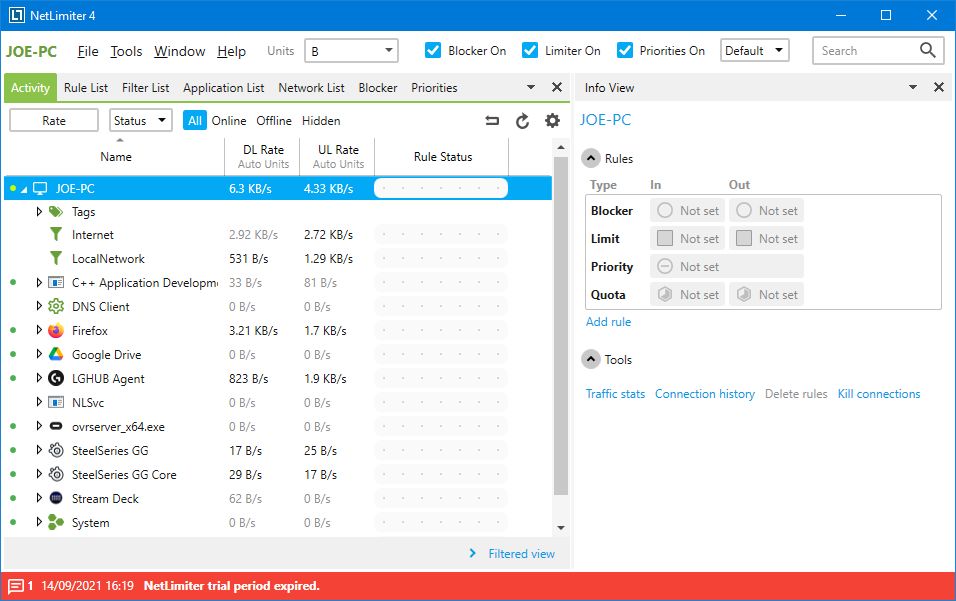
NetLimiter comes with a 28-day trial period. A single user home license for the Lite version costs $15.95, while the Pro version costs $24.95.
3. Net-Peeker
Net-Peeker has a simple user interface. At the top, you can see the active upload and download usage, along with access to a brief settings screen and some other features the program offers, like a system guard. We’ll just be focusing on its bandwidth limiting ability.
The main table lists all active processes on your system, along with its bandwidth consumption. You can double-click a process to get extremely detailed information on the Network Sessions and Loaded Modules tabs.
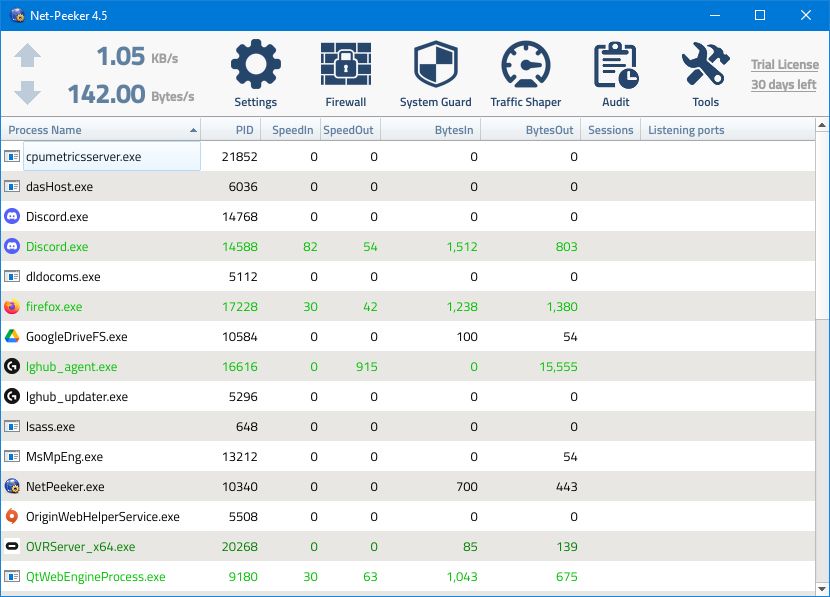
On either an entire process from the main window or on a specific network session, you can right-click to manage the connection. You can Limit speed to specify set bandwidth boundaries and Abort connection to disconnect it all together (until you open it again.)
Net-Peeker gives you a 30-day trial to experience all of its features. After that time, you can continue to use the program for $25. If you want the ability to control multiple systems, additional licenses cost $15 each.
4. SoftPerfect Bandwidth Manager
SoftPerfect Bandwidth Manager is a good program, but it is tricky to get to grips with. When you first launch, you’ll need to enter your network address and password before you can start monitoring the traffic.
If you’re comfortable with that, it’s a program worth checking out thanks to its decent rule customization. Press Ctrl + N to begin creating your rule. Move between each tab to see all the options, but be sure to name your rule and set your desired Rate limits. When done, click OK to activate your rule.
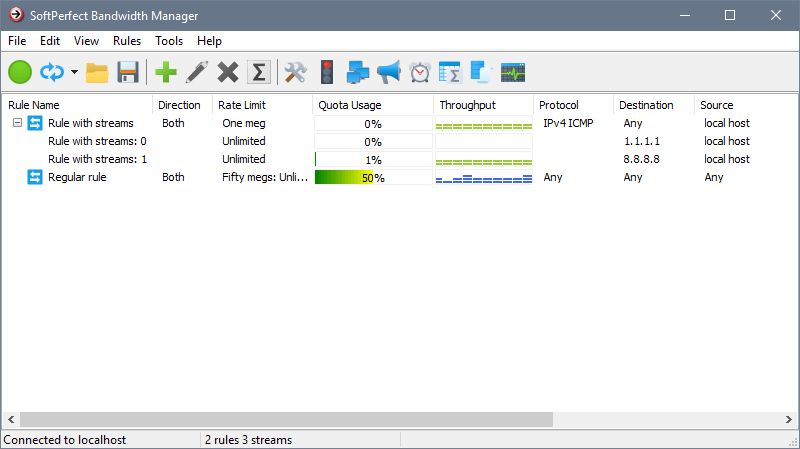
Use the Tools dropdown to set quotas and schedules for your bandwidth. It’s also worth checking out the Usage Report, which will give you an overview of all your traffic and help you identify any particular problems that need addressing.
SoftPerfect Bandwidth Manager has a 30-day trial period. After this, you can continue using the Lite version for free, with the limit of only being able to set five rules. Alternatively, you can pay $49 to upgrade to the Standard version. See the license comparison list for full details.
Monitor Your Network Usage With Ease
These are all great methods to control your bandwidth when using Windows 10; perfect if you’re not sure what’s eating up your bandwidth and you want to monitor your home network usage. Start with the default Windows 10 tools, then move to a third-party program if they don’t prove sufficient.
Wondering why network bandwidth on Windows is restricted? Want to increase bandwidth on Wi-Fi/ Ethernet? Yes, then you are in the right place. In this blog, you will learn how to change the bandwidth limit on a PC. Here we will explain ways to improve bandwidth on Windows 10.
Fact Check – To ensure system activities like Windows update, license checking, etc work properly Microsoft limits network bandwidth to 80%. Due to this when downloading a large file, you face issues. But remember, Microsoft does this to keep your data and system safe from zero-day exploits and malicious hackers.
However, if you want to overcome this problem and limit reservable bandwidth on Windows 10, you will need to read the post till the end.
Quick Solution –
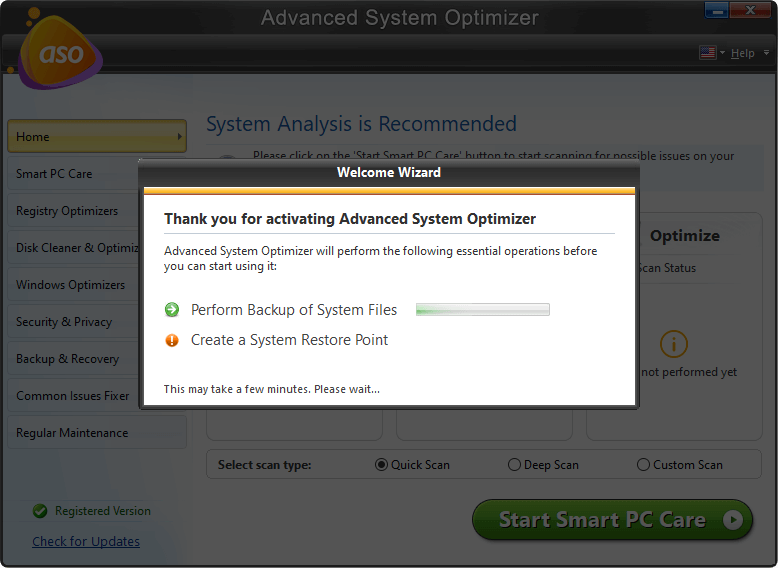
To change bandwidth limit on PC, first you need to change the Limit Reservable Bandwidth using Group Policy Editor. Second you need to disable the Metered connection. Additionally, you can close unwanted applications and tasks running on your computer. Plus, optimize your PC for maximum potential bandwidth using a tool such as Advanced System Optimizer.
Ways to Increase Ethernet and Wi-Fi Internet Speed – Windows 10
Slow internet speed for Windows 10 users is a common problem. To resolve this issue, they make changes to router settings, even change the connection but nothing helps. Do you know why this happens?
Microsoft’s latest operating system to deliver faster Windows updates uses a bit of data due to which the bandwidth is restricted. Therefore, to increase internet bandwidth, making changes to Windows settings is required. In this article, we will discuss what these changes are and how to make them increase internet bandwidth.
But, before getting into details, we suggest taking a complete backup of important files. For this, you can use Right Backup – the best multi-platform cloud backup tool.
Disclaimer: A corrupt or invalid registry key/entry can make the system unusable, therefore before making any changes to Windows Registry or Group Policy Editor make sure you have a backup of Windows Registry and a system restore point is in place. This will help avoid any unforeseen situation that may occur due to modifying registry settings.
Ways to Increase Bandwidth on Windows 10
A. Turning Off Windows Update Delivery
To deliver uninterrupted Windows updates, bandwidth is reserved due to which the problem of slow internet occurs. To resolve this, disabling Windows Update Delivery is recommended. To do so, follow the steps below:
1. Press Windows + I > Update & Security

2. Click Advanced options in the right pane.
3. In the next window, click Delivery Optimisation > Advanced options,> under Absolute bandwidth > limit how much bandwidth is used for downloading updates in the background


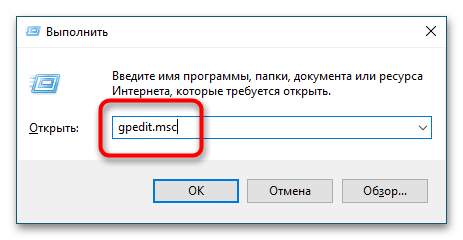
B. Using Group Policy Editor
For Windows 10 or Enterprise users, the most effective way to alter default settings for reservable bandwidth is through Group Policy Editor. To access it, you need to follow the steps below:
1. Press Windows + R
2. Type gpedit.msc > Ok
3. Click the Computer Configuration option present in the left pane
4. Next head to Administrative Templates > Network > QoS Packet Scheduler

5. Now in the right pane, select Limit Reservable Bandwidth > double-click

Select the Enable radio button and change the default value of 80 to zero.
Note: Selecting the Disabled radio button will not help as doing so will revert it to default.
6. Click Apply > Ok > exit editor
Now, if you try to download a large file, you should not face any problem and bandwidth should now be increased.
However, if you are a Windows 10 Home user, you will need to make some changes in the Windows Registry too. To learn how to do that, follow the steps below:
C. Modifying Reservable Bandwidth Settings Via Windows Registry
Alongside making changes to Group Policy Editor Windows 10 Home, users need to make some changes in Windows Registry too. To do so, follow the steps below:
1. Press Windows + R
2. Type regedit.msc > ok
3. Navigate to: Computer\HKEY_LOCAL_MACHINE\SOFTWARE\Policies\Microsoft\Windows\Psched

Note: If you cannot see the Psched Key, you will need to create one. For this, right-click anywhere in the left pane > from the context menu select New > Key > name it Psched. Now, select the Psched key > right-click > New > DWord (32-bit) Value > name it NonBestLimitEffort. Next, double click NonBestLimitEffort entry in the right pane and click the decimal radio button

Change the reservable bandwidth percentage to zero.
Click Ok > exit Registry Editor
Doing so will remove reservable bandwidth restrictions.
1. Flush DNS and clear temporary files
2. Open an elevated command prompt
3. Type IPCONFIG/flushdns and press Enter.
4. Exit Command Prompt
5. Press Windows + R > type %temp% > Ok
6. Ctrl + A to select all the files and press Shift + delete
This will remove all temporary files and we hope using the steps explained above, you can increase bandwidth on Windows 10.
A piece of advice
This way, you can increase the bandwidth of both Ethernet and Wi-Fi but remember doing so will make your system vulnerable. Therefore, make these changes only when your productivity is being compromised. However, if reservable bandwidth doesn’t affect you, do not make the changes to default settings.
D. Close Background Applications –
You might not notice but a lot of applications run in the background on your devices. Some of these use the network connection and also cause a slow speed for running applications. If you wish to increase bandwidth on Windows 10, one of the methods to increase the download/ upload speed. Turning off the background applications will save the distribution of internet speed. To see which applications are running in the background, open Task Manager and close the running application by ending the task.
E. Disable Metered Connection –
If you are using a shared computer this can be one of the reasons for not getting a good speed. The metered connection is turned on to keep a cap on the data usage on Windows PC. By removing it you can get faster download and upload speeds. Follow the instructions to disable Metered connection on your computer –
- Open Settings and go to the Network & Internet option.
- Here click on the Change connection properties option shown on the right tab.
- Now scroll down to look for Metered connection, if it is turned on, toggle the switch to turn it off.
Now the restrictions on your Windows 10 PC due to the Metered connection will be removed and this will help you in increasing the upload and download speed.
Pro – Tip –
In addition to this to keep your system optimized and clean, we recommend using Advanced System Optimizer, the best PC cleanup tool. This professional tool helps clean junk files, fix invalid registry entries, update drivers, recover deleted files, defrag hard disks, and do a lot more.
Frequently Asked Questions –
Q1. What is the limit of reservable bandwidth?
As the name implies, Limit reservable bandwidth determines the percentage of connection bandwidth that is reserved by the system for Windows updates.
Q2. How do I turn off bandwidth limits in Windows 10?
To disable the bandwidth limit in Windows 10, follow the steps below:
1. In Windows search bar type Group policy editor
2. Navigate to Local Computer Policy choose Computer Configuration > Administrative Templates > Network > QOS Packet Scheduler > Limit Reservable Bandwidth
3. Change the percentage to 0
To learn how to do that in detail, you can read the detailed steps explained above.
Q3. Does Windows 10 limit download speed?
Windows 10 limits the download bandwidth only for background downloads. The Delivery Optimization for the updates takes it automatically on Windows 10. But for the manual updates on Windows or Microsoft Store the bandwidth set by the user does not apply.
Q4. What’s a good download speed?
A range of 25 to 100 Mbps is considered to be a good download speed for any Windows PC. An average download speed of 200 Mbps is required if you rely heavily on downloading on your computer.
Q5. Should download and upload speed be the same?
Ideally, it should be the same for better usage but this is not the case with computers. As the service providers focus on downloading speed as that is what the internet is used for mostly. Therefore, you will see the variation in the download speed and upload speed a lot sometimes.
Conclusion –
There are many reasons why you would like to increase bandwidth on Windows 10. But the methods are limited and you can try them out to make sure which works best for you.
We hope this article will help you learn how to change the bandwidth limit on a PC. We would like to know your views on this post to make it more useful. Your suggestions and comments are welcome in the comment section below. Share the information with your friends and others by sharing the article on social media.
We love to hear from you!
For any queries or suggestions, please let us know in the comments section below. We would love to get back to you with a solution. We regularly post tips and tricks, along with answers to common issues related to technology.
Setting a bandwidth limit allows you to manage your data usage more efficiently. This reduces the consequences of additional charges from ISP but can lower internet speed.
You can limit bandwidth usage for applications, Windows updates, and other activities in Windows.
Before Windows 10, users were only allowed to set a bandwidth limit for third-party applications and programs. There was no way to change the bandwidth reserved for Windows system activities.
But with the latest version of Windows 10 and the release of Windows 11, Microsoft has added the feature to change the reserved bandwidth for Windows activities as well. This allows you to allocate that bandwidth to improve the network emphasis on other programs and activities. You can even completely disable it if you want.
Should You Limit Bandwidth?
Not everyone has unlimited bandwidth or connection at their expense.
Most Internet Service Provides apply data caps on their Network to counteract excessive use. If your usage crosses that limit, you might have to pay extra, or your service provider may reduce your internet speed.
That’s a pretty good reason to monitor your bandwidth and limit it if necessary, right?
The vital reasons why you might want to limit Bandwidth, be it for the applications on your PC or the Delivery Optimization feature, could be:
- To increase connection speed
- To limit apps from overusing data
- To stop other users from over-consuming bandwidth
How to Change Bandwidth Limit?
Changing the bandwidth limit allows you to manage your network usage and optimize your experience.
In windows, there are various methods to change the bandwidth limit. You can set bandwidth limits for applications, Windows updates, and windows services alike.
All of the methods are explained in detail as follows:
Via Windows Settings
If you didn’t know, Windows already has a built-in bandwidth limiter. The limiter allows users to limit data usage for applications.
If there’s a limit on your data cap, the limiter can help keep your usage under control.
Here’s how you can set data limits using Settings in Windows.
- Open Settings using Windows key + I
- Go to Network & internet > Advanced network settings > Data usage
- On the top-right corner, click and select the Network you want to set the limit to

- Click on Enter Limit button
- Set the limit type, reset date, and data limit
- Hit Save

In case there’s already a limitation in place, you can simply select Remove Limit in order to remove it.
Setting Metered Connection
Using metered connection feature in Windows allows you to track data usage by each app and limit excessive usage.
While the metered connection is turned on, the windows update will also pause the auto-update feature.
Here’s how you can set metered connection for Wi-Fi or Ethernet:
Wi-Fi
- Open Settings
- Head to Network & internet
- Click on Wi-Fi. Choose the Network you want to set the limit on
- Click on the slider corresponding to Metered connection


Ethernet
- Go to Settings > Network & internet > Ethernet
- Turn on the Metered connection slider


Through Delivery Optimization
A certain amount of bandwidth is always reserved by Windows to accommodate system activities like:
- Scan and download updates automatically
- Deliver updates to other users on the Network
- Check licenses
- Update apps and other Microsoft products
- Send continuous feedback
This feature is called Delivery Optimization, which is turned on by default.
Although the delivery optimization feature is essential for the smooth functioning of Windows, sometimes users might face difficulty while using network-heavy applications like games and software that require a strong connection.
Fortunately, you can change the reserved bandwidth limit or disable the feature altogether, to lower its impact.
To change or disable the delivery optimization feature, follow the steps below:
- Go to Settings
- Select Windows Update. Go to Advanced options.
- Under Additional options, choose Delivery optimization.
- Click on Advanced options.

- Now, set the download and upload bandwidth limit as per your convenience.

On Windows 10, go to Update & security instead of Windows Update, then follow the same steps as above.
Via Local Group Policy Editor
You can also change the bandwidth limit by editing the “Limit reservable bandwidth” entry via the Local Group Policy Editor.
Follow the steps mentioned below:
- Open Run (Windows key + R)
- Type
gpedit.mscand click Ok. - Navigate to the path: Computer configuration > Administrative Templates > Network > QoS Packet Scheduler.
- Locate the Limit reservable bandwidth entry and double-click on it.

- Click on Enabled.
- Under Options, set the bandwidth limit(%) to a lower value.

- Click Apply and Exit the editor.


Via Registry Editor
Before moving forward to change the bandwidth limit using the Registry Editor, make sure to back up the registry.
Now follow the steps below:
- Press Windows key + R to open Run
- Type
regeditand hit ok - Navigate through the following path:
Computer\HKEY_LOCAL_MACHINE\SOFTWARE\Policies\Microsoft\Windows\Psched
If the Psched key does not exist on your PC, you have to create it manually.
- Right-click the Windows key and select New > Key
- Name the key
Psched. - Right-click on the empty area and create a DWORD (32-bit) Value. Name it
NonBestEffortLimit - Double-click on it and set the value from 1 to 100.

Router
If you’re using a Wi-Fi network, you can use the router to change or set the bandwidth limit.
Most modern routers have a feature called Quality of Service. This feature allows you to set or change the bandwidth limit of your Network.
However, the steps to access the QOS feature can differ depending on your router. But the basic steps require you to access your router’s settings. To access it, you will need to know the Gateway IP address of your router.
To find out the gateway address of your router, follow the steps below:
- On the Start menu, search for cmd and open it
- Enter the following command:
ipconfig/all - From the displayed information, take note of the following:
- Default Gateway
- IPv4 Address
- Physical Address (MAC Address)


Now, to change or set the bandwidth limit, go through the steps below:
- Head to your browser. Type the Gateway Address on the search bar and hit Enter
- Fill in your credentials to log in to the router settings
- Then, go to Advanced settings and look for QoS (Quality Of Service)
- Enable it and set or change the bandwidth limit
How to check Bandwidth Usage?
In windows, You can view the bandwidth consumed by various applications and Windows activities through Settings. This allows you to make informed decisions about how to optimize your usage and whether you have to set a bandwidth limit or not.
To view the bandwidth usage of respective activities, follow the steps below.
Applications
To view the amount of bandwidth used by applications, follow the steps below:
- Open Settings (Windows key + I)
- Head to Network & internet
- Select Advanced network settings. Click on Data usage.
Here, you can see the data usage of various applications within 30 days.
Windows Activities
To view the bandwidth usage of Windows system activities, go through the steps mentioned below:
- Open Settings
- Select Windows Update
- Go to Advanced options. Select Delivery Optimization
- Click on Activity monitor


Here, you can view the download and upload statistics and other detailed information on Windows activities.
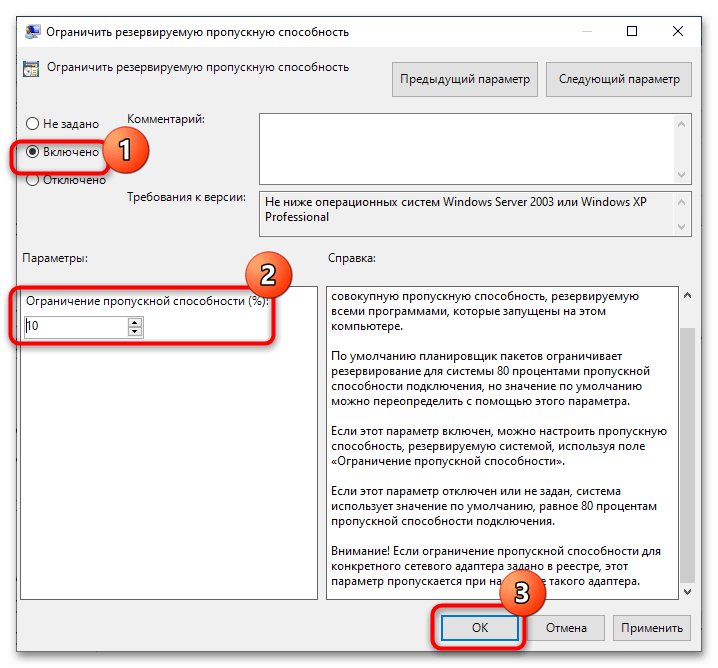
Способ 1: «Редактор локальных групповых политик»
В Windows 10 редакции Pro и выше для изменения настроек QoS удобнее всего использовать встроенный «Редактор локальных групповых политик».
- Запустите «Редактор локальных групповых политик» командой
gpedit.msc, выполненной в диалоговом окошке, которое вызывается клавишами Win + R. - Перейдите в раздел «Конфигурация компьютера» → «Административные шаблоны» → «Сеть» → «Планировщик пакетов QoS» и откройте двойным кликом настройки политики «Ограничить резервируемую пропускную способность».
- По умолчанию политика отключена и ограничивает резервирование 20 процентами пропускной способности подключения. Включите политику и задайте в поле «Ограничение пропускной способности (%)» цифру «0» для отключения приоритета.
- Сохраните настройки и перезагрузите компьютер.

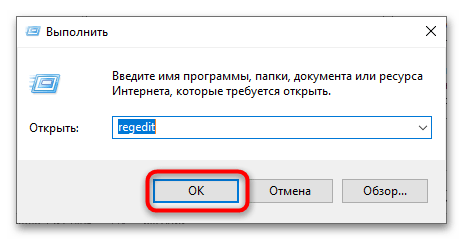
Способ 2: «Редактор реестра»
В Windows 10 домашней редакции, в которой «Редактор локальных групповых политик» недоступен, для настройки QoS используется «Редактор реестра».
- Откройте «Редактор реестра» командой
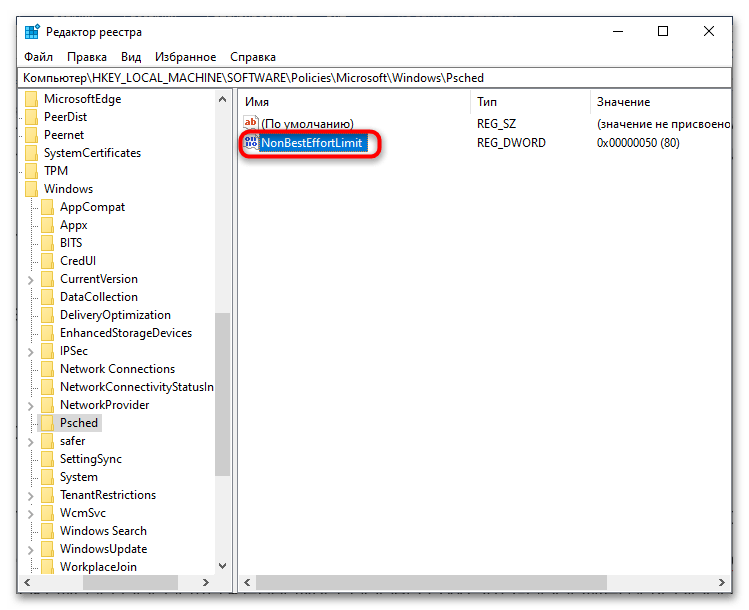
regedit, выполненной в одноименном диалоговом окошке (вызывается сочетанием клавиш Win + R). - Разверните в левой колонке ветку
HKEY_LOCAL_MACHINE\SOFTWARE\Policies\Microsoft\Windows\Pschedи откройте двойным кликом по расположенному справа DWORD-параметру «NonBestEffortLimit» окошко редактирования его значения. Если параметра «NonBestEffortLimit» или подраздела «Psched» не существует, что тоже может быть, их необходимо будет создать вручную из контекстного меню. - Переключитесь в окошке редактирования значения в десятичную систему счисления и установите в качестве значения число, равное проценту требуемой резервируемой полосы пропускания. Для отключения зарезервированной полосы пропускания выставьте «0».
- Закройте «Редактор реестра» и перезагрузите компьютер.
Вопреки распространенной точке зрения, ограничение QoS не приводит к увеличению скорости интернета. Уменьшать или отключать зарезервированную полосу пропускания без особой на то нужды не рекомендуется, так как это может привести к потенциальным проблемам в работе сетевых приложений с высокоприоритетными задачами.
Наша группа в TelegramПолезные советы и помощь