
Высокая частота процессора, Turbo Boost, гигагерцы и прочее — это отлично, но не во всех случаях. К примеру, при работе на ноутбуке преимущественно от батареи с не особенно ресурсоемкими приложениями, отключив повышение частоты и ограничив максимальную частоту процессора вы получите более тихую работу системы охлаждения и продолжительное время работы от аккумулятора, не особенно потеряв в производительности.
В этой инструкции подробно о способах ограничить максимальную частоту процессора в Windows 11 и Windows 10, используя встроенные средства управления схемами электропитания, не прибегая к сторонним утилитам.
Установка опции «Максимальное состояние процессора» в дополнительных параметрах схемы электропитания
Первый способ — настроить схему электропитания, используемую при работе от батареи, задав максимальное состояние процессора ниже 100% — это отключит ускорение Turbo Boost (когда частота может повышаться выше номинальной частоты процессора) и, даже если мы выставим 99% в значительной мере повлияет на расход заряда и нагрев. Шаги будут следующими:
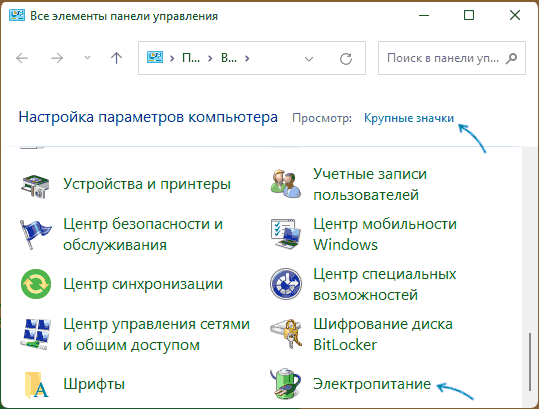
- Откройте Панель управления, для этого в Windows 11/10 можно использовать поиск в панели задач. В поле «Просмотр» установите «Значки» и откройте пункт «Электропитание».

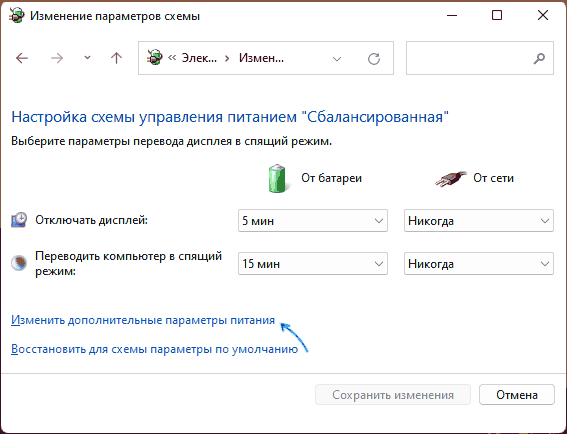
- Нажмите по пункту «Настройка схемы электропитания» у той схемы, которую вы используете при работе от батареи (при условии, что это ноутбук и вы переключаете схемы питания).

- В следующем окне нажмите «Изменить дополнительные параметры питания».

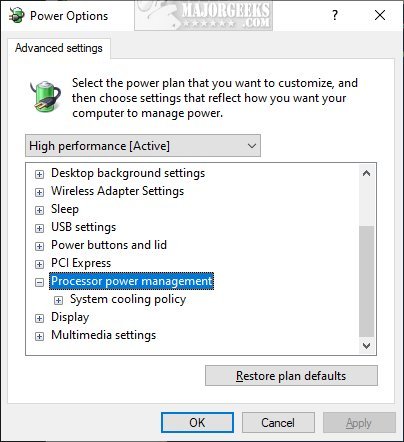
- В дополнительных параметрах раскройте раздел «Управление питанием процессора», а затем задайте собственное значение в пункте «Максимальной состояние процессора». Его можно задать отдельно для питания от батареи и электросети.

- Примените сделанные настройки.


На этом процесс будет завершен — изменения должны начать действовать сразу.
Полезным будет настроить две или более схем электропитания: одну экономичную с ограничением частоты, другую — для случаев, когда нужна высокая производительность. Также вы можете ускорить переключение между имеющимися схемами электропитания: Программы для удобно переключения схем электропитания на ноутбуке или ПК.
К примеру, я на своем основном ноутбуке с горячим Core i7-10870H пишу статьи в бесшумном режиме с ограниченной частотой, и температура процессора держится в пределах 35-40 градусов, при этом каких-либо неудобств нет. А когда необходимо монтировать видео — включаю схему электропитания с высокой производительностью.
Добавление опции «Максимальная частота процессора» в дополнительные параметры электропитания
Возможен вариант, когда ограничение «Максимального состояния процессора» не срабатывает. В этом случае можно установить максимальную частоту процессора. По умолчанию эта опция в дополнительных параметрах электропитания отсутствует.
Чтобы добавить возможность настройки максимальной частоты процессора, используйте один из следующих способов:
В Терминале Windows или PowerShell
- Запустите Windows PowerShell или Терминал Windows от имени администратора, нажав правой кнопкой мыши по кнопке «Пуск» и выбрав соответствующий пункт меню.
- Введите команду
powercfg -attributes SUB_PROCESSOR 75b0ae3f-bce0-45a7-8c89-c9611c25e100 -ATTRIB_HIDE
и нажмите Enter.


В редакторе реестра
- Нажмите клавиши Win+R на клавиатуре, введите regedit и нажмите Enter.
- Перейдите к разделу реестра
HKEY_LOCAL_MACHINE\SYSTEM\CurrentControlSet\Control\Power\PowerSettings\54533251-82be-4824-96c1-47b60b740d00\75b0ae3f-bce0-45a7-8c89-c9611c25e100
- Дважды нажмите по параметру с именем Attributes в правой панели и установите значение 2 для него. Примените сделанные настройки.


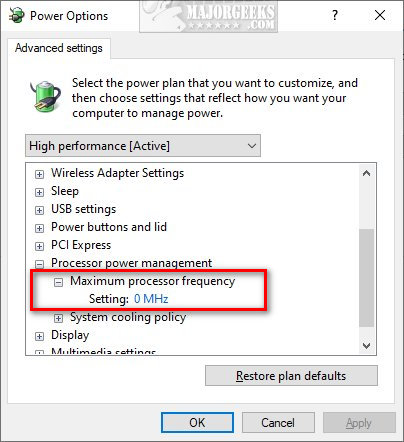
В результате, в дополнительных параметрах схемы электропитания в разделе «Управление питанием процессора» появится новый пункт «Максимальная частота процессора».

По умолчанию указано значение «0 МГц», при таком выборе частота не ограничивается. Вручную можно указать любую частоту в пределах номинальной частоты вашего процессора.
Надеюсь, для кого-то из читателей представленная информация окажется полезной. Если остаются вопросы — задавайте их в комментариях, я постараюсь ответить.
Большинство современных процессоров используют различные технологии энергосбережения, такие как Intel SpeedStep или AMD Cool’n’Quiet. Эти технологии основаны на динамическом изменении частоты работы процессора в зависимости от нагрузки с целью снижения энергопотребление и тепловыделения.
Для понимания рассмотрим общие принципы работы данных технологий.
У процессора есть состояния производительности (P-States), которые представляют из себя комбинацию множителя частоты (Frequency ID, FID) и напряжения питания (Voltage ID, VID). Тактовая частота работы процессора получается путем умножения частоты системной шины (FSB) на FID, соответственно чем больше множитель, тем выше частота, и наоборот. Количество поддерживаемых состояний зависит от характеристик процессора (макс. частота, множитель и т.п.).
В ходе первоначальной загрузки в BIOS создается описание возможных состояний производительности. Это описание в соответствии с интерфейсом ACPI считывается операционной системой при запуске. В процессе работы операционная система отслеживает загрузку процессора, при снижении нагрузки обращается к драйверу процессора и переводит процессор в пониженное состояние. Снизив частоту и напряжение, процессор будет потреблять меньше энергии и, соответственно, меньше нагреваться. Ну а при увеличении нагрузки операционная система опять запросит изменение состояния процессора, но уже в большую сторону.
Когда и в какое из состояний переводить процессор, операционная система решает автоматически, в соответствии с текущей политикой энергосбережения. Но, кроме этого, в Windows есть возможность вручную задать диапазон регулировки, ограничив минимальное и максимальное состояние.
В моем компьютере стоит Intel Core I7 4790К. Согласно спецификации, он имеет базовую частоту 4ГГц, а с использованием технологии Turbo Boost может разгоняться до максимальных 4.4ГГц. Для того, чтобы посмотреть текущую скорость работы процессора, запустим «Диспетчер задач» (Ctrl+Shift+Esc) и перейдем на вкладку «Производительность». Как видите, на данный момент нагрузка невелика и процессор работает вполсилы, частота его работы составляет 1.84ГГц.

Попробуем немного покрутить настройки частоты процессора и посмотрим, что из этого получится. Для запуска оснастки управления электропитанием жмем клавиши Win+R и выполняем команду powercfg.cpl.
В открывшемся окне выбираем текущую схему электропитания, переходим по ссылке «Настройка схемы электропитания»

и жмем на ссылку «Изменить дополнительные параметры питания».

За частоту работы процессора отвечают параметры «Минимальное состояние процессора» и «Максимальное состояние процессора», находящиеся в разделе «Управление питанием процессора».
Обратите внимание, что у ноутбуков для каждого параметр доступны два варианта настроек. Первый отвечает за частоту процессора при автономной работе (от батареи), второй — при работе от сети.
Проверим, как влияет изменение настроек на частоту работы процессора. Для начала уменьшим максимальное состояние до 20% и проверим результат. Как видите, частота работы снизилась до примерно 0.78ГГц, что как раз составляет примерно 20% от базовой частоты.

Что интересно, снизить частоту ниже 20% мне это не удалось. При выставлении значения ниже 20% частота продолжает оставаться на том же уровне, т.е. для моего процессора 800МГц является минимальной поддерживаемой частотой.

Чтобы разобраться, почему так, запустим диагностическую утилиту CPU-Z. Как видите, в нашем случае частота шины составляет 100МГц, а множитель изменяется в диапазоне от 8 до 44. Отсюда и получаем возможность изменения частоты от минимальных 800МГц до максимума 4.4ГГц с шагом в 100МГц.

Но переключение осуществляется не по каждому множителю, а более дискретно. Другими словами, количество состояний производительности не соответствует количеству значений множителя. Посмотреть все доступные состояния можно утилитой RightMark Power Management. Например для испытуемого процессора доступно всего 15 состояний, а переключения между ними происходят с переменным шагом 200-300МГц.

Ну а на что влияет минимальная частота процессора? Для проверки установим значение минимальной частоты в 100% и убедимся, что скорость работы процессора сразу поднялась почти до максимуму и достигла 4.3ГГц. И это при том, что загрузка процессора составила всего 14%.

Есть еще одна настройка, отвечающая за частоту работы процессора. По умолчанию она скрыта и для того, чтобы увидеть ее, необходимо произвести некоторые манипуляции в реестре. Поэтому открываем редактор реестра (Win+R ->regedit), переходим в раздел HKEY_LOCAL_MACHINE\SYSTEM\CurrentControlSet\Control\Power\PowerSettings\54533251-82be-4824-96c1-47b60b740d00\75b0ae3f-bce0-45a7-8c89-c9611c25e100, находим параметр Attributes и изменяем его значение на 2.

После этого в окне настроек появится параметр «Максимальная частота процессора». Как следует из названия, этот параметр отвечает за ограничение максимальной частоты работы процессора, его значение задается в мегагерцах. По умолчанию значение параметра равно 0, что означает отсутствие ограничений.
Установим ограничение в 1500МГц и проверим результат. И действительно, ограничение работает и частота не поднимается выше указанного значения.

Надо понимать, что регулировка частоты работает так-же дискретно, как и в случае с состояниями. Например при выставлении максимальной частоты 1200МГц реальное ограничение будет в районе 1000МГц. Это неудивительно, ведь переключения все равно производятся между P-состояниями, причем выбирается ближайшее минимальное значение.

Изменять дополнительные параметры питания процессора можно и из командной консоли, с помощью утилиты powercfg. Для начала выведем все имеющиеся настройки питания командой:
powercfg /query
В полученных результатах надо найти требуемые параметры. Каждый раздел и параметр можно идентифицировать по идентификатору GUID или по псевдониму (алиасу). Например у группы настроек «Управление питанием процессора» GUID 54533251-82be-4824-96c1-47b60b740d00, а псевдоним SUB_PROCESSOR, у параметра «Максимальное состояние процессора» GUID 75b0ae3f-bce0-45a7-8c89-c9611c25e100 и псевдоним PROCTHROTTLEMAX.

Зная нужные алиасы или GUID-ы можно оперировать настройками. Так посмотреть значение параметра «Максимальное состояние процессора» можно такой командой (SCHEME_CURRENT означает текущую схему электропитания):
powercfg /query SCHEME_CURRENT SUB_PROCESSOR PROCTHROTTLEMAX
В командной значения параметра показаны в шестнадцатеричном виде, т.е. значение 0x00000064 означает 100%.

Обратите внимание, что в командной строке доступны настройки как для питания от сети, так и от батареи. В зависимости от требуемого варианта команда будет отличаться. Так за настройку питания от сети отвечает ключ /SETACVALUEINDEX, а для питания от батареи используется ключ /SETDCVALUEINDEX. Различие всего в одной букве, поэтому нужно быть внимательным и постараться их не перепутать. Для примера снизим максимальное состояние процессора для питания от сети до 50%:
powercfg /setacvalueindex CHEME_CURRENT SUB_PROCESSOR PROCTHROTTLEMAX 50
Проверим результат. Как видите, текущее значение составляет 0x00000032 (50%).

Итак, мы убедились в том, что регулировки частоты работы процессора в Windows 10 есть и даже работают. Но для того, чтобы получить от них положительный эффект, необходим грамотный подход. Первым делом необходимо определиться с тем, что вы хотите получить в результате — поднять производительность, увеличить время автономной работы, снизить температуру или что-то еще. Затем надо выяснить основные параметры своего процессора, такие как частота шины, множитель, максимальная частота работы. И уже исходя из этого, опытным путем подобрать оптимальные для себя значения.
Вот как то так 🙂
How to Adjust CPU Frequency in Windows 10 Step 1: Get to the Power Menu. In the bottom left, where it says “Type here to search”, enter “Power” And Select the top Result. Step 2: Change Plan Settings. Step 3: Find “Processor Power Management” Step 4: Expand the First and Third Menu. Step 5: Congratulations!.
How do I limit my CPU speed Windows 10?
Open the Advanced settings for Power Options in Windows 10. You’ll need to look at these settings for each plan to maximize the impact. Look for Processor power management, then change the minimum processor state to: 70 percent for minimum and maximum processor state. Click “Apply” then “OK” to save the settings.
How do I limit the Ghz of my CPU?
How to Turn Down CPU Speed with FSB Clock Turn on the computer, and press the BIOS setup key to launch BIOS. Search through the BIOS menus for the “CPU Frequency” adjustment option. Select the “CPU Frequency” option, and change the value to the next lower numbered option. Save and exit BIOS.
What is CPU max frequency?
According to an answer here: Maximum Frequency in Resource Monitor is the same as the Processor Performance \ % of Maximum Frequency counter in Performance Monitor. For example if you have a 2.5 ghz processor which is running at 800 mhz then % of Maximum Frequency = 800/2500 = 31%.
How do I change the frequency of my CPU in Windows?
How to Adjust CPU Frequency in Windows 10 Step 1: Get to the Power Menu. In the bottom left, where it says “Type here to search”, enter “Power” And Select the top Result. Step 2: Change Plan Settings. Step 3: Find “Processor Power Management” Step 4: Expand the First and Third Menu. Step 5: Congratulations!.
How do I limit CPU usage in Windows?
Yes, you can definitely do that on pretty much on all versions of Windows, (namely 7, 8.1 and 10, don’t know about XP yet!). Just head to the Task Manager by pressing Ctrl+Shift+Esc keys on your keyboard, right click the application whose CPU time you want to control and click on “Go to details”.
How do I make my CPU frequency constant?
Change Advanced Power Settings Expand the Processor Power Management listing and then expand Minimum Processor State. Change this setting to 100%. This causes your CPU to kick in at 100 percent of its clock speed whenever it runs a process and to stay at 100 percent until the process is complete.
Is 1.1 GHz fast?
It should be noted that 1.1 GHz is a low speed today, but that does not mean that it is bad.
Is 1.2 GHz fast?
In the case of a lightly loaded machine the 1.2GHz machine is 20% faster than the 1GHz machine but since most of the time the computer is waiting for you and you are not waiting for the computer – an almost instant response is as good and undetectable from a 20% faster almost instant response.
How do I add or remove minimum CPU frequency from Power Options in Windows 10?
Add or remove Minimum and Maximum processor state options using Command Prompt Search for cmd in the Taskbar search box. Click on the Run as administrator and Yes options. Enter the powercfg command add or remove these options.
How do I control CPU usage?
Setting CPU Core Usage Press the “Ctrl,” “Shift” and “Esc” keys on your keyboard simultaneously to open the Task Manager. Click the “Processes” tab, then right-click the program you want to change the CPU core usage on and click “Set Affinity” from the popup menu.
How do I reduce CPU usage?
Press “Ctrl-Alt-Del” and click “Start Task Manager” to bring up your computer’s Task Manager. Scroll down the list and keep an eye out for any processes you don’t recognize. Next, click on any processes you wish to disable, then click the “End Process” button.
How do I lower my CPU usage?
Slow processing can stem from a variety of different causes, some of which will be more difficult to fix than others. But in the vast majority of cases, if you’re wondering how to lower CPU usage, the process is actually as simple as pressing Control + Shift + ESC.
How do I stop my CPU from Downclocking?
Make sure you’re using your computer at High performance at the power setting of you’r computer. And samsung laptops have like a little ventilator in the f11 key. If you press Fn+f11 your laptop will go in silent mode, which makes you cpu run al a lower speed, so try pressing it again to go back to normal mode.
How do I stop my CPU from overclocking?
To disable the automatic overclocking, adjust the settings either to “disabled” or “per core” and make sure that the individual multipliers match the original specifications. In doubt, please contact your motherboard vendor for detailed instructions on how to disable this feature.
Is 3.30 GHz good for gaming?
I hoped I helped you out in some way. Yes 3.2 GHz is fast enough if all the stats of the CPU are good, but a 3.2 GHz with no turbo and low caches, 4 cores, low threads, and high power usage would be slower than a 2.4 GHz that has good stats on everything else.
Is 2.40 GHz good for gaming?
A clock speed of 3.5 GHz to 4.0 GHz is generally considered a good clock speed for gaming but it’s more important to have good single-thread performance. This means that your CPU does a good job of understanding and completing single tasks.
Is 3.10 GHz fast?
If your CPU has at least 4 cores, 3.1 GHz (meaning the cpu cycles 3.1 billion times a second) will be fine for light or medium load gaming. If you’re on only a 2 code CPU, you may have some trouble playing games. That won’t be because if the clock speed, though, it’ll be because of the core count.
Is a 2.40 GHz processor good?
It is measured in gigahertz or by using a benchmark like PiFast or Whetstone. A good processor speed laptop is 3.50 to 4.2GHz.
Is 1.10 GHz good for gaming?
The short answer is, no, a 1GHz (presumably single core) processor is far from enough to game on.
Is 1.8 GHz enough for gaming?
Dignified. That CPU is a 2 core that can run 4 threads, its base clock is 1.8 but it boosts to 3.0, It should run the game Ok, but not great (assuming you have a dedicated GPU that isn’t trash).
Knowing how to change maximum processor frequency allows IT professionals to ensure the processor runs at its optimal speed while still maintaining efficiency. Adjusting the CPU frequency in Windows systems helps reduce power usage and control device temperatures.
In this guide, we’ll help you understand maximum processor frequency, break down all the different methods to adjust CPU frequency, and give you the best processor settings for performance on Windows systems.
Benefits of changing maximum processor frequency in Windows
1. Improving system performance
Adjusting CPU frequency in Windows allows the system to increase CPU speeds for more demanding tasks. Exceeding the recommended manufacturer settings or applying excessive limits can cause system instability or negatively impact system performance. Balancing performance versus efficiency will help you find the best processor settings for performance in Windows.
2. Power efficiency
Limiting CPU speed in Windows devices reduces power consumption and helps extend battery life.
3. Prevents overheating
Overheating can occur when the processor runs at higher clock speeds, particularly in systems with limited cooling. Setting a lower processor frequency can reduce heat generation in systems.
4. Longer lasting hardware
Consistently high CPU speeds put stress on device hardware, which can lead to wear and tear, reducing the device’s lifespan. This is because thermal stress and increased power draw typically degrade components faster.
How to limit CPU speed in Windows for battery life and device performance
Windows allows users to control the CPU speed in Windows to suit their needs. You can change maximum processor frequency through the Control Panel app, Command Prompt, Group Policy Editor, and Windows Registry. Each method suits different levels of expertise and system requirements.
Change maximum processor frequency using the Control Panel app
This is the simplest way to set processor frequency on Windows 10/11. However, this setting may not appear in the Control Panel app for some systems or Windows versions. If this is the case, you can use one of the other three methods instead.
- Open the Control Panel > System and Security > Power Options
- Choose the active power plan and click on “Change plan settings”.
- Click on “Change advanced power settings”.
- Locate “Processor power management” in the list and expand it.
- Next, click on “Maximum processor frequency,” then adjust the values for “Plugged in” and “On battery”* (for laptops) in MHz.
- Click Apply and then “OK” to save the changes.
Change maximum processor frequency using Command Prompt
Windows Command Prompt offers an alternative way to set processor frequency for Windows 10/11 devices that don’t have this in their Power Options. However, you will need administrator-level access to follow these steps.
- Open an elevated Command Prompt.
- Enter one of the two codes below to adjust CPU frequency in Windows
- Battery
[code block]powercfg -setdcvalueindex SCHEME_CURRENT 54533251-82be-4824-96c1-47b60b740d00 75b0ae3f-bce0-45a7-8c89-c9611c25e100 <MHz>[/code block]
- Plugged in
[code block]powercfg -setacvalueindex SCHEME_CURRENT 54533251-82be-4824-96c1-47b60b740d00 75b0ae3f-bce0-45a7-8c89-c9611c25e100 <MHz>[/code block]
Change maximum processor frequency using Group Policy Editor
The Local Group Policy Editor enables users managing multiple devices to deploy processor frequency settings at scale. However, the Group Policy Editor is only available on Windows Professional, Enterprise, and Education, but not in Home editions. That being said, this method can be a good choice for IT teams and managed service providers (MSPs) that need to change the maximum processor frequency across multiple systems.
- Press Win + R, then enter “gpedit.msc”.
- Navigate to Computer Configuration > Administrative Templates > System > Power Management > Processor Power Management
- Configure the Maximum Processor Frequency policy by enabling it and entering a value in percentage rather than MHz.
- Restart the device to apply the changes.
Change maximum processor frequency using Windows Registry
Using Windows Registry to make changes is only recommended for advanced users because incorrect modifications using Windows Registry can lead to system instability or crashes. Before using this method, use reliable backup software to prevent any data loss.
- Press Win + R, then enter “regedit”.
- Navigate to the following path: HKEY_LOCAL_MACHINE\SYSTEM\CurrentControlSet\Control\Power\User\PowerSettings
- Locate the subkeys that correspond to “Processor power management”.
- Inside “Processor power management”, find another subkey with a GUID that corresponds to the “Maximum processor state”.
- Change the “Value Data” within the “Maximum processor state” subkey. This data is usually represented as a percentage. Be careful with this step as the format and meaning of the “Value Data” can differ, depending on the system and processor.
- Exit the Registry Editor and restart the device.
Troubleshooting and common issues with maximum processor frequency
Processor frequency not changing after adjustments
Some changes may not take effect if overridden by BIOS/UEFI settings. Follow these steps to fix this error.
- Restart the system and enter the BIOS/UEFI interface. Typically, you can do this by pressing F2, but this button varies between manufacturers and models, so look up the specific process for your device.
- Check CPU-related settings, such as “CPU Configuration”, “Advanced CPU Control” or “CPU Clock Ratio”.
- Modify the values according to your CPU’s rated specifications or higher if you intend to overclock. Some model-specific features, like SpeedStep on Intel, dynamically adjust processor frequency so they do not limit maximum frequency.
- Save changes and reboot.
Missing processor power management options
Some versions of Windows will not show processor frequency controls in the Control Panel’s Power Options. The easiest way to enable the hidden option is to enter the following command into Command Prompt:
- [code box]powercfg -attributes SUB_PROCESSOR CPMAXFREQ -ATTRIB_HIDE.[/code box]
This should enable options to change maximum processor frequency in Power Options.
If the issue persists, try checking for any system updates via Windows Update to ensure compatibility with newer power settings features.
Compatibility issues with certain processors or Windows versions
Not all hardware or Windows editions support custom settings for processor frequency. Confirm processor support for frequency control by checking the CPU manufacturer’s documentation before making these changes
CPU frequency is limited
Check if your device is overheating. Windows systems can sometimes automatically throttle processor frequency to prevent damage to the hardware. To prevent this issue, monitor CPU temperatures with remote monitoring tools.
Why is my CPU frequency fluctuating in Windows?
Your processor frequency changes in Windows systems because of the power management feature, which adjusts CPU speed based on workload. When the system is idle or performing light tasks, the CPU slows down to save power and reduce heat. For heavy tasks, it speeds up for better performance.
Best processor settings for performance in Windows
- Use higher frequencies for workstations running high-demand applications, such as databases, heavy multitasking, video editing, 3D rendering, or gaming.
- Limit CPU speed on Windows devices running long-term tasks, such as file downloads or system monitoring, to save energy.
- Create specific power plans to guarantee power consistency and system temperatures across devices. You can also use an endpoint management tool to push out configurations
- Monitor background processes and identify any unnecessary programs running in the background. These can consume resources and make high-frequency settings less effective.
Gain granular control of Windows system settings with third-party software
Following the steps outlined in this guide to change maximum processor frequency. IT teams should balance performance, efficiency, and hardware health. Make use of IT monitoring tools to keep track of CPU usage, clock speeds, and hardware temperatures. A third-party Windows endpoint management software such as NinjaOne centralizes device monitoring while enabling you to push out custom CPU speed settings across multiple devices, streamlining your IT operations.
Named as G2’s no.1 choice for endpoint management, NinjaOne offers a full suite of tools that allow IT teams to monitor, manage, and secure their Windows devices. Boost IT efficiency, optimize device performance, and apply custom settings at scale with NinjaOne. On average, IT administrators spend 95% less time on manual tasks thanks to NinjaOne’s powerful automation capabilities. See how NinjaOne can help you manage Windows devices at scale. Watch a demo or get started with a 14-day free trial.
By Timothy Tibbetts |
Maximum processor frequency specifies the operating frequency of your CPU’s core. The maximum processor frequency option is hidden and set to 0 by default, which means your processor runs as fast as allowed. Advanced users can slow down the processor if your computer is running hot or consuming too much power.
Once added you will see the option Plugged in, and laptop users will also have On battery.
To edit the Maximum frequency, type in, and click on Edit power plan, and then click on Change advanced power settings.
Here’s a before and after:
1: Add or Remove ‘Maximum processor frequency’ With PowerShell
Using the Command Prompt (PowerShell) only takes seconds and is easy for anyone to try.
Open PowerShell and type in:
Add:
powercfg -attributes SUB_PROCESSOR 75b0ae3f-bce0-45a7-8c89-c9611c25e100 -ATTRIB_HIDE
Remove:
powercfg -attributes SUB_PROCESSOR 75b0ae3f-bce0-45a7-8c89-c9611c25e100 +ATTRIB_HIDE
2: Add or Remove ‘Maximum processor frequency’ In Registry
While more complicated, you can also enable or disable the Maximum processor frequency option in the registry manually or download the registry files.
Open the Registry editor and type HKEY_LOCAL_MACHINE\SYSTEM\CurrentControlSet\Control\Power\PowerSettings\54533251-82be-4824-96c1-47b60b740d00\75b0ae3f-bce0-45a7-8c89-c9611c25e100 in the search bar.
Double-click Attributes and change the Value data:
1 — Remove
2 — Add
That’s it.
Similar:
comments powered by Disqus