
Table of Contents
-
Overview
- About
- Binary Snapshots
- vcpkg port
- msys2 MinGW-w64 32bit/64bit package
- Build from Source
-
Supported Environments
- USB 3.x Support
- .NET support
-
How to use libusb on Windows
- Driver Installation
- Development Considerations
- Known Restrictions
- Development Links
Overview
About
This page details the specifics of the Windows backend part of libusb, which helps developers easily communicate with USB devices on Windows.
Currently it supports the WinUSB and HID drivers for generic USB device access as well as the libusb-win32 and libusbK drivers.
Please note that libusb-win32 and libusbK are separate projects. libusb-win32 is a Windows-only project which provides a libusb-0.1 API compatible library for Windows and the associated kernel driver libusb0.sys. libusbK is a Windows only project which provides a new set of API for Windows (supporting WinUSB, libusb0.sys and libusbk.sys) and kernel driver libusbK.sys.
Binary Snapshots
Pre-built binary snapshots are provided in the Sourceforge files directory along with the source code archive. Since 1.0.21 release, they are also at the GitHub release page.
The pre-built Windows binaries are provided AS IS for your convenience, generated for the following environments:
- Microsoft Visual Studio; MS32 (32 bit) and MS64 (64 bit) directories
- MinGW -> MinGW32 (32 bit) and MinGW64 (64 bit) directories.
Note that these archives are provided in the 7z format so you may have to install 7-zip.
vcpkg port
vcpkg now includes libusb ports.
Installing and building libusb via vcpkg:
You can download and install libusb using the vcpkg dependency manager:
    git clone https://github.com/Microsoft/vcpkg.git
    cd vcpkg
    .\bootstrap-vcpkg.bat
    .\vcpkg integrate install
    .\vcpkg install libusb
The libusb port in vcpkg is kept up to date by Microsoft team members and community contributors. If the version is out of date, please create an issue or pull request on the vcpkg repository.
msys2 MinGW-w64 32bit/64bit package
msys2 has a libusb package. Please contact the msys2 project if you encountered issues with the msys2 package. It is recommended to use pkg-config (libusb-1.0.pc) on MSYS2 or other MinGW-w64 distributions.
Reference: how to use libusb under MinGW-w64?
Build from Source
You may want to build from source if you encounter compatibility issues with the pre-built binaries. We recommend either Visual Studio or a MinGW-w64 based toolchain like MSYS2.
Note that the MinGW.org toolchain is not supported. clang support patches are welcome. Patches to add support for other toolchains (including MinGW.org) may be accepted after review even though these toolchains are not officially supported.
Supported Environments
Supported systems are all Windows platforms, starting with Windows Vista, and including 64 bit versions. Windows XP support was dropped in libusb 1.0.24.
USB 3.x Support
libusb supports USB 3.x controllers and devices on Windows. Proprietary vendor controller drivers for Windows 7 and earlier as well as the Microsoft controller xHCI driver for Windows 8/8.1/10 are supported. If you are are using Windows 7 or earlier version, you will be using vendor driver. Make sure you upgrade to the latest version of the driver if you encounter problems.
.NET support
A .NET version of libusb, called LibUsbDotNet, based on libusb 1.0. If you plan to use libusb in a .NET project, make sure you check out the latest release at github.
How to use libusb on Windows
Driver Installation
If your target device is not HID, and your device is not using WinUSB driver, you must install a driver before you can communicate with it using libusb. Currently, this means installing one of Microsoft’s WinUSB, libusb-win32 or libusbK drivers. Two options are available:
-
Recommended: Use the most recent version of Zadig, an Automated Driver Installer GUI application for
WinUSB (recommended),libusbK (only if you hit WinUSB limitations)andlibusb-win32 (only if you hit WinUSB/libusbK limitations). - For version 1.0.21 or later, you can also use the usbdk backend. usbdk provides another driver option for libusb Windows backend. For 1.0.21, usbdk is a compile-time option, but it becomes a runtime option from version 1.0.22 onwards, so you need to specify the usbdk backend using something like the following.
libusb_context * ctx = NULL;
libusb_init(&ctx);
libusb_set_option(ctx, LIBUSB_OPTION_USE_USBDK);
Note that if your device is using libusb-win32 driver (libusb0.sys), you will also need to install the libusbK DLL, as all libusb0.sys accesses are done through it. One way to install/update libusbK.dll is to install libusbk development kit (libusbK-x.x.x.x-setup.exe from Sourceforge site and choose to update the system files during the installation. However the support of libusb-win32/libusb0.sys filter driver mode is not good, please use the device driver mode when you have to use libusb0.sys.
Warning: use of the HID backend is highly discouraged. libusb project recommends the user to switch to hidapi.
Warning: use of usbdk is also discouraged as it seems to have some stability issue. Please use WinUSB driver instead.
Development Considerations
The handling of composite devices under Windows is done with multiple drivers, that are children of the usbccgp.sys driver (Composite Generic Parent), as this is the default for the OS. If needed, it is also possible to replace the composite parent driver to access the device. Zadig can be used for this purpose.
Because Windows does not provide a native poll() function, and cygwin is the only development environment that provides such a call, the use of libusb file descriptors with poll() on cygwin is NOT supported. In a future version of libusb, we should provide better handling of native Windows events, but this will require a redesign of the libusb API, so it probably won’t occur before libusb 2.0.
Known Restrictions
-
WinUSBcannot be used to send an actual reset command to an USB device. This is a limitation of WinUSB. -
WinUSBandlibusbKcannot be used to set a device configuration that is different from the first one. This is a limitation of KMDF USB I/O Target. -
WinUSBdoes not support multiple concurrent applications (as per the Microsoft Windows Hardware Drivers documentation).libusbkdriver allows this but it may have the limitation that you can claim the interface multiple times (https://github.com/libusb/libusb/issues/807).libusb-win32driver will also allow this but it is not recommended to be used due to multiple issues reported. -
WinUSBdoes not support isochronous transfers under Windows XP/Vista/7/8. WinUSB under Windows 8.1 or later supports isochronous transfer. libusb Windows supports isochronous transfer using the usbdk backend from version 1.0.21. libusb-1.0.22 adds isochronous support using libsubK driver. libusb-1.0.23 adds isochronous transfer support for WinUSB (Windows 8.1/10 or later) but the support may not be that mature. -
WinUSBallows setting up different pipe policy and RAW_IO can be useful in some use cases. Unfortunately it will make the WinUSB backend pretty complicated so this is not supported. why not WinUSB RAW_IO pipe policy? - With
WinUSB, whenLIBUSB_RECIPIENT_INTERFACEis used for the transfer, theWinUSBDLL forces the low byte ofwIndexto the interface number, regardless of what you set it to.- This is not a real limitation though, please refer to the OSR threads. From Tim Roberts answer in that thread:
- One can also argue that this is a security measure. The USB spec requires that the low byte of wIndex be set to the interface number when the recipient is set to «interface». Devices that use that field for other purposes are broken.
- HID keyboards and mice cannot be accessed using the native HID driver as Windows reserves exclusive access to them.
- Multiple HID top level collections are currently not supported (only the first top level collection will be used).
- The HID Report Descriptors provided by libusb are recomposed and may present minor differences from the actual ones, as the Windows HID API does not allow to read them directly from the device.
- Windows HID API does not support custom Control Transfer, everything needs to be done through report. Please check out the discussion here.
- Because there is no native
poll()on Windows, the ability to return externally pollable file descriptors on Windowslibusb_get_pollfd()returns an error. - If you use a composite device, and plan to install a libusb compatible driver for any of the interfaces, you should ensure that your driver package adds a Device Interface GUID in the registry, as proper enumeration of composite devices in libusb depends on it. This is typically achieved by adding something like the following in your inf:
HKR,,DeviceInterfaceGUIDs,0x00010000,{12345678-1234-1234-1234-123456789ABC}
This is in particular a problem with libusb-win32’s inf-wizard which will be deprecated by libusb-win32 project. Please use Zadig instead. -
libusb0.sys and libusbk.sysaccess is done through the libusbK DLL, therefore, if you plan to use the libusb-win32/libusb0.sys or libusbK/libusbk.sys driver in libusb, you must have that library installed. If using a recent version of Zadig, you should not have to do anything, at it will install the library for you. - libusb0.sys: the support of libusb0.sys filter driver has quite some issues, you should use the device driver mode if you really need to use libusb0.sys.
- libusb0.sys: cannot send libusb_control_transfer with zero wLength with libusb0.sys 1.2.6.0 version. Please use libusb0.sys 1.2.7.3 snapshot release or later. The recommendation is to use libusb-win32 1.4.0.0 release and later.
- uhubctl will not work under Windows. Please refer to Issue #391 due to limitation of the underlying drivers (libusb0.sys, libusbk.sys, usbdk and WinUSB) with regard to USB Hubs.
Development Links
-
How to Use WinUSB to Communicate with a USB Device & WinUSB (Winusb.sys) Installation.
Note that the inf file given in the howto has a typo. If you don’t changeSourceDisksFiles.NTamd64toSourceDisksFiles.amd64, the driver installation will fail to copy the required DLLs on 64 bit systems… - Using WinUSB for User-Mode to USB Device Communication
- WinUSB User-Mode Client Support Routines
- Microsoft’s USB Core Team Blog
- Microsoft HW Development Center — USB
- additional information about Windows Co-Installers
- Finding Memory Leaks Using the CRT Library
- libusbK documentation
- libwdi/Zadig Wiki
- Microsoft Devcon source code
- Microsoft USBView source code
You can read this article to learn the best methods to get the updated driver for LibUSB downloaded and installed effortlessly.
LibUSB is an open-source and free library that allows applications to control data transfers from and to USB devices. Moreover, it aids the creation of apps that interact with USB hardware. However, it may only perform well if an updated LibUSB driver is installed on your computer.
Since a lot of users remain confused about how to download, install, and update the driver, this article presents an easy and quick guide to help you do it.
Through this write-up, we walk you through the best possible methods to download the LibUSB driver, install it, and update it on your Windows 10 (32bit/64bit device). Let us begin it without wasting more of your precious time.
Howto Download, Install, and Update the LibUSB Driver
Here are the methods you can follow to get the updated LibUSB driver downloaded and installed on your computer.
Method 1: Download the LibUSB driver and install it from a zip file
You can use the LibUSB zip file to download and install the needed drivers. Though the process to do it may seem a bit technical and time-consuming, here is how to perform it.
- To begin with, get the LibUSB driver’s zip file downloaded on your computer.
- Secondly, you can right-click the downloaded zip file and choose to Extract it to a folder.
- Now, you may go to the libusb-win32-install-1.2.6.0 directory, right-click on the .exe file, and choose run as an administrator.

- Click Yes to confirm the access control if you are asked to do it.

- Now, you need to connect the USB device. This step requires you to initiate your device into bootloader mode via the RESET and PGM buttons.
- Click Next to proceed to the next step.
- This step requires you to choose the STM32 BOOTLOADER device from the on-screen list and click Next.

- You can now confirm the on-screen USB device information and select Next to proceed further.

- Now, you need to save the .inf file on your computer.
- After saving the .inf file, press Install Now to start the driver installation.

- Now, you need to wait patiently for the driver installation to complete.

- Lastly, click OK when the driver installation completes successfully and restart your computer to complete the process.


Also Read: USB Serial Controller D Driver Download and Update
Method 2: Use Device Manager to get the latest LibUSB driver for Windows 11/10
Device Manager is a tool found in all Windows computers to get all the drivers you may need for the device’s smooth performance. It allows you to download and install up-to-date drivers to solve various problems. Though the process of downloading the Win 64/Win 32 LibUSB driver may seem quite lengthy and non-beginner-friendly, here is the step-by-step process to try it.
Also Read: CP2104 USB to UART Bridge Controller Driver Windows 11, 10
Method 3: Download the LibUSB driver update automatically (Recommended)
All the manual methods discussed in this article to download and install the latest driver for LibUSB have certain shortcomings. For instance, a single incorrect step when installing the driver through a zip file may crash your system, and driver downloading from Device Manager is not beginner-friendly.
Hence, we recommend downloading and installing driver updates using a dedicated program. For example, you can use Win Riser, which is one of the top-rated driver updater and PC optimization software.
Win Riser is a celebrated name for its unique set of features, such as driver backup and restoration, ignore option for drivers you don’t wish to update, easy junk removal, detection of malware, scan scheduling, and a lot more. You can download and install this software from the following link to experience all its wonderful features yourself.
After completing the software installation (which takes only two to three seconds), simply scan your computer for outdated drivers, wait for a couple of seconds to let the scan complete, go through the results available on your screen, and click Fix Issues Now for an instant solution of all problems.

If you feel skeptical about updating all your drivers, you can update the LibUSB driver individually by clicking on the Update Now button. However, smart cookies update all their drivers to ensure the best computer performance.
Also Read: USB xHCI Compliant Host Controller Driver Download for Windows 10, 11
LibUSB Driver Downloaded and Updated
This article walked you through different ways to download, install, and update your LibUSB driver for Windows 10/Windows 11 computers. You can use any of the above ways depending on your technical knowledge and experience.
However, we suggest updating drivers safely with minimum effort using Win Riser to improve your computer performance. If you have any suggestions, concerns, or questions regarding this article, kindly let us know via the comments section below without any hesitation.
- How do I install libusb on Windows 10 64 bit?
- How do I install libusb-win32 on Windows 10?
- How do I install libusb on Windows?
- What is libusb win64?
- Where is libusb-win32?
- Does libusb work on Windows?
- How do I uninstall Zadig driver?
- What is the use of libusb?
- What is a Windows filter driver?
- What is Fltmc command?
- What is PNP filter?
How do I install libusb on Windows 10 64 bit?
Click Driver label and click ‘Update Driver’. Choose “Browse my computer for driver software”. Choose “Let me pick from a list of device drivers on my computer”. Click “Have Disk” and locate to your driver files directory.
How do I install libusb-win32 on Windows 10?
Download (https://sourceforge.net/projects/libusb-win32/files/) the latest filter driver installer (libusb-win32-devel-filter-x.x.x.x.zip and then unzip, or libusb-win32-devel-filter-x.x.x.x.exe ). Close all applications which use USB devices before installing. Run the installer, and follow its instructions.
How do I install libusb on Windows?
To install libusb on Windows 7 download the bin package for libusb-win32 (this link points to version 1.2. 6). Then go to the bin directory and run inf-wizard.exe . Here is where you can customize and generate an INF installation file for your device, as well as the installer executables.
What is libusb win64?
libusb-win32 is a port of the USB library libusb-0.1 (http://sf.net/projects/libusb/) to 32/64bit Windows. The library allows user space applications to access many USB device on Windows. Development of. Please use github if you need to report issues or submit patches.
Where is libusb-win32?
libusb-win32 is a port of the USB library libusb-0.1 (http://sf.net/projects/libusb/ ) to 32/64bit Windows.
Does libusb work on Windows?
libusb is a C library that provides generic access to USB devices. … It is portable: Using a single cross-platform API, it provides access to USB devices on Linux, macOS, Windows, etc. It is user-mode: No special privilege or elevation is required for the application to communicate with a device.
How do I uninstall Zadig driver?
Right click on your device and click Uninstall. Go to a hidden directory c:\windows\inf and delete those oem*. inf files which contains a reference to your device. Remove original libusb driver/zadig directory because Windows might look for all known places to find a device driver.
What is the use of libusb?
libusb is an open source library that allows you to communicate with USB devices from userspace. For more info, see the libusb homepage. This documentation is aimed at application developers wishing to communicate with USB peripherals from their own software.
What is a Windows filter driver?
A file system filter driver is an optional driver that adds value to or modifies the behavior of a file system. It is a kernel-mode component that runs as part of the Windows executive. A file system filter driver can filter I/O operations for one or more file systems or file system volumes.
What is Fltmc command?
Fltmc.exe Command
The Fltmc.exe program is a system-supplied command line utility for common minifilter driver management operations. Developers can use Fltmc.exe to load and unload minifilter drivers, attach or detach minifilter drivers from volumes, and enumerate minifilter drivers, instances, and volumes.
What is PNP filter?
Pnp filter system has simplified the connecting of one filter to another, reducing the complication of the standard fitting and tube connection. The greatest strength of this system is that anyone can change the filters without difficulty within a short amount of time.
09 Jun 2018, 12:00am TZ +00:00
Its common that one needs to use a programmer from the Arduino IDE, but on
Windows 10 things are not as simple. Many times the drivers installed are not
correct hence the avrdude tool in the Arduino IDE refuses to work.
Now, we have a way to do this programming in Linux as well.
Have a look at my latest article
Programming Arduino Bootloader using Avrdude with AVRISP mkII in Manjaro (Arch Linux)
.
Here we would look at a way to make that possible.
The idea would be first to get the Libusb-Win32 driver installed which is
essential for the avrdude to work.
Note: In case you have AtmelStudio installed this might have difficultly,
due to the presence of the Jungo WinUSB driver. We would look into moving
around that.
Let’s assume that on the PC we have the following situation:
- No drivers installed for AVRISP mkII
- We have Admin access
- We have internet available
Getting Libusb-win32
#
The libusb-win32 package available from Sourceforge.
https://sourceforge.net/projects/libusb-win32/
We just need to download the latest available release version of the package.
Currently it is libusb-win32-bin-1.2.6.0.zip as on June 2018.
Make sure to get something on the similar lines.
If you do not find, just go the Files section of the Sourceforge and go to the libusb-win32-releases folder. Select the latest version folder and
download the file similar to the above.
Setting Up Driver
#
Next, unarchive / unzip the Zip file libusb-win32-bin-1.2.6.0.zip as on June 2018.
Inside would be a directory structure similar to :
|
|
1. Open bin directory.
#
2. There in execute the inf-wizard.exe after connecting the AVRISP mkII.
#

3. Press the Next button.
#
4. Select the AVRISP mkII in the list
#

The Ids would be —
VendorID: 0x03EB
ProductID: 0x2104
Click Next to start the Ini creation process
5. Device Configuration
#
Do Not Touch this

Click Next to Proceed.
6. Save the INI file
#
Next it would ask to save an INI file with the name AVRISP_mkII.inf
Create A directory Named AVRISP_mkII-Driver.
Navigate to this directory and then Click on Save.
Next Click on Done to continue.
7. The Driver Directory
#
It should look something like
|
|
Disable the Driver Signing check
#
We would be disabling the Driver signing check temporarily.
-
Hold Shift and select Restart from the Start menu.
This would enter the advance setup mode. -
In Advanced Setup mode : Select Troubleshoot -> Advance Options
-
In Advanced Options click on See more recovery options
-
Next Startup Settings — This would reboot the PC and come to another
reboot screen displaying options with function keys to select them. -
Press F7 this would select to Disable Driver Signature Enforcement —
Again the system would reboot into normal windows. -
Now Open the Device Manager : Right click the AVRISP mkII under Other devices and select Update driver.
-
Select the Directory Location where we earlier stored the generated driver.
-
Windows 10 would show Warning about driver having no signature.
Don’t worry its not a problem just select Install Anyway… -
Now you should be able to see libusb-win32 devices under which the
AVRISP mkII is present in Device Manager -
We need to restore the Driver signing. Open an Administrator Command Prompt.
-
In Administrator Command Prompt Type Command :
BCDEDIT /set nointegritychecks OFF
This would re-Enable the Disable Driver Signature Enforcement -
Reboot the PC normally.
Note: The Easy way to the enable and disable Driver Signature Enforcement
Are 2 commands for an Administrator Command Prompt:
- To disable device driver signing, type
BCDEDIT /set nointegritychecks ONthen press Enter - To enable device driver signing, type
BCDEDIT /set nointegritychecks OFFthen press Enter
Finally
#
This completes the Installation of the Driver.
Now we can try and check in the Arduino IDE if the avrdude interface works with
AVRISP mkII
The generated Driver is included here.
1. Get installation zip
2. Start inf_wizard.exe
Now navigate to the libusb-win32-install-1.2.6.0 directory and run inf-wizard.exe as administrator.
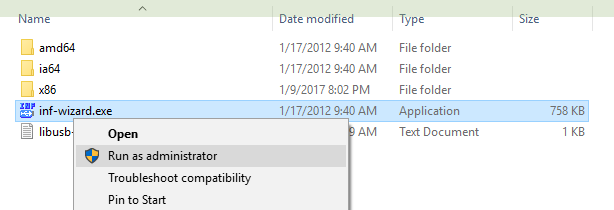
Figure 1. inf-wizard.exe
3. Access control
It is possible (depending on your security settings) you will need to confirm the access control.
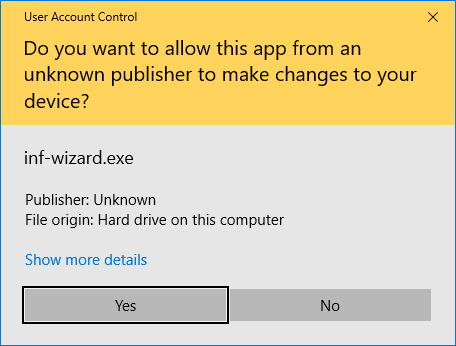
Figure 2. Access control
4. Connect USB device
First screen of inf-wizard instruct you to connect your USB device.
You have to initiate the device into bootloader mode using PGM and RESET buttons:
Press and hold PGM button, then press RESET and release PGM button
(see
Bootloader mode activation for more details).
Now you can connect it to the USB and press [ Next> ].
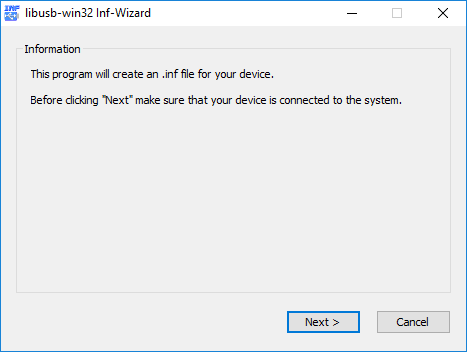
Figure 3. Connect usb device
5. Select USB device
Select STM32 BOOTLOADER device from the list and press [ Next> ].
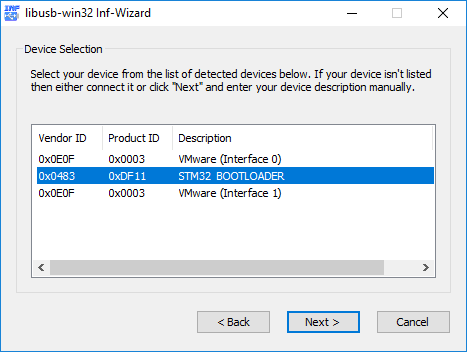
Figure 4. Select USB device
6. Confirm USB device info
Just check you have selected correct device and press [ Next> ].
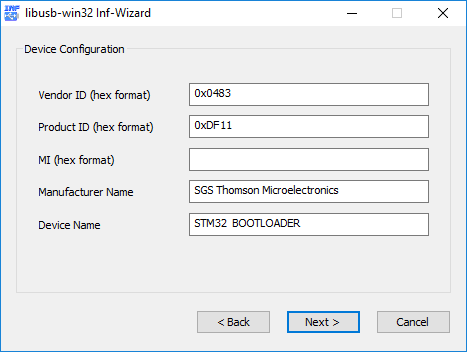
Figure 5. Confirm device info
7. Save .inf file
Save generated .inf file. You don’t have to do anything special with this
file if you proceed with automatic installation in the next step.
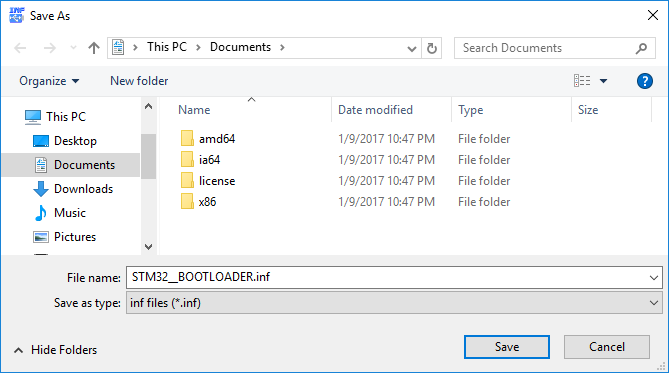
Figure 6. Save .inf file
8. Start Driver Installation
Start driver installation by pressing [ Install Now… ].
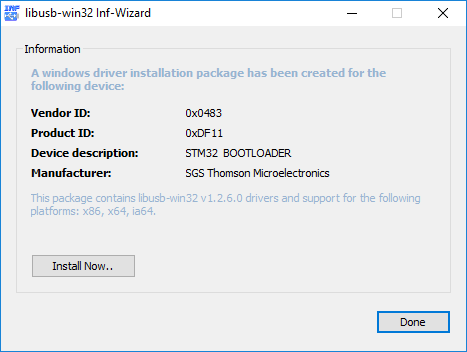
Figure 7. Start driver installation
9. Installation proceeds
Just look at the nice progressbar…
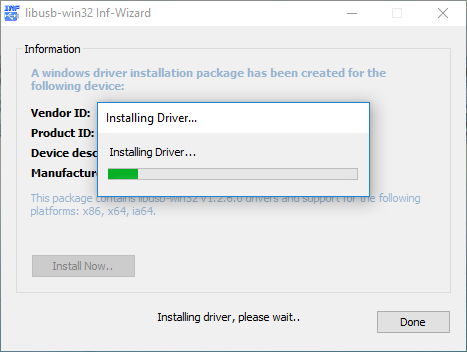
Figure 8. Installation
10. Installation finished
Hopefully the installation completes without error.

Figure 9. Installation finished
11. Check device manager
You can check successful installation of the USB driver by looking into
device manager at libusb-win32 devices. STM32 BOOTLOADER should be
listed there (as can be seen in next image).
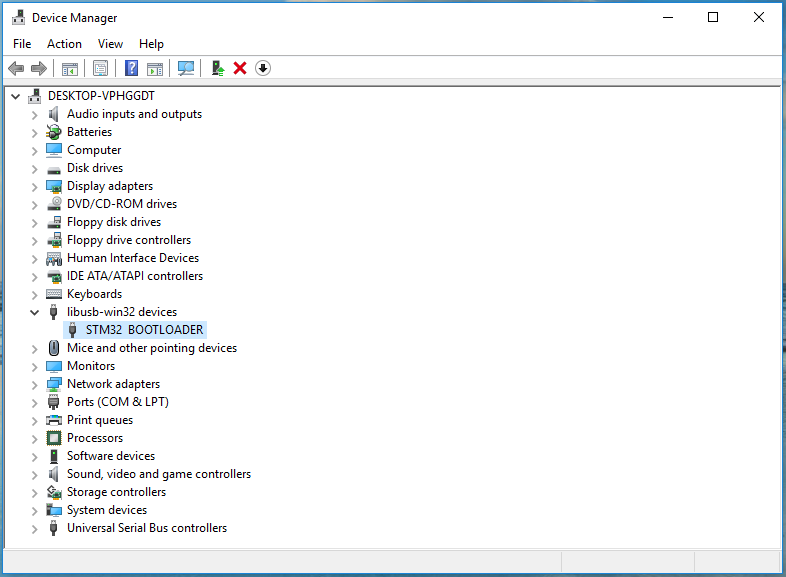
Figure 10. Device manager — STM32 BOOTLOADER