
Applies ToWindows 10
Помощник по клиентский компонент Центра обновления Windows скачивает и устанавливает обновления компонентов на вашем устройстве. Обновления компонентов предоставляют новые функциональные возможности и помогают обеспечить безопасность систем. Эти обновления автоматически устанавливаются после загрузки Центра обновлений.
Если вы не хотите ждать автоматического обновления или хотите проверка для обновления качества (которые являются более частыми и включают небольшие исправления и обновления для системы безопасности), вы можете обновить Windows 11 себя.
Если вы являетесь ИТ-специалистом, вы можете отложить обновления. Перейдите к Windows 11 параметры обслуживания.
Необходимо знать, какая версия Windows 11 работает на вашем устройстве? Вы можете проверить легко и быстро. В поле поиска на панели задач введите winver и выберите winver из результатов.
Хотите знать о требуемом дисковом пространстве, кодах ошибок, удалении установленных обновлений или других вопросах обновления? Узнайте больше в разделе Часто задаваемые вопросы по Центру обновления Windows.
Примечание: помощник по обновлению Windows 11 не работает на компьютерах под управлением ARM. Поддерживаются только ПК с процессорами x86/64.
Нужна дополнительная помощь?
Нужны дополнительные параметры?
Изучите преимущества подписки, просмотрите учебные курсы, узнайте, как защитить свое устройство и т. д.
Upgrading Windows 10 can feel like defusing a bomb—one misstep, and you’re staring at a crashed system or missing files. I’ve been there, sifting through countless Windows 10 upgrade tools, from Microsoft’s slick options to obscure offline solutions. The worry about choosing something too tricky or unreliable hits hard. Let’s dive into the best tools to get your PC updated smoothly, tailored to your comfort level and setup.
Part 1: Use Microsoft Update Assistant for Windows 10 Upgrade
The Windows 10 upgrade tool, Microsoft Update Assistant, is my first recommendation for anyone wanting a no-fuss update. It performs in-place upgrades, keeping your files, apps, and settings intact while moving you to the latest Windows 10 version. Think of it as a friendly guide, holding your hand through the process with Microsoft’s official backing. Compared to competitors like third-party updaters, it’s safer and more reliable, though it lacks the flexibility of other tools we’ll cover.
Steps:
Step 1: Visit Microsoft’s website and download the Update Assistant.
Step 2: Run the .exe file and follow the clear, step-by-step prompts.
Step 3: Let the tool check your PC’s compatibility, flagging issues upfront.
Step 4: Start the upgrade, which includes a few reboots to finalize.
Plug your PC into power and ensure a stable internet connection to avoid interruptions. Save open work, as reboots can catch you off guard.
I used the Update Assistant on my cousin’s old Dell laptop, which was limping along on an outdated Windows 10 build. During the compatibility check, the tool flagged a driver conflict, likely saving us from a crash. The process was mostly hands-off, though the reboots stretched to 30 minutes, testing my patience. Still compared to manual updates I’ve done before, this tool is a lifesaver- simple, reliable. And perfect for casual users who just want the upgrade done without dealing with technical headaches.
Part 2: Upgrade Windows 10 with Media Creation Tool
The Media Creation Tool, another Windows 10 upgrade tool, is like a Swiss Army knife for updates. It handles in-place upgrades or lets you create a bootable USB for clean installs, offering more control than the Update Assistant. It’s a step up in complexity but still manageable for users with basic tech skills. Unlike Google’s lightweight tools, which focus on cloud-based tasks, this is a robust, system-level solution from Microsoft.
Steps:
Step 1: Grab the Media Creation Tool from Microsoft’s official site.

Step 2: Choose “Upgrade this PC now” or “Create installation media” for a USB.

Step 3: For in-place upgrades, follow the prompts to download and install.
Step 4: For clean installs, boot from the USB and navigate the setup.
Back up all data before a clean install—it wipes everything. Have a 16GB USB ready for media creation.
I upgraded my work PC with this tool and later made a USB for a friend’s fresh install. The in-place upgrade was smooth—45 minutes, no data lost. Creating the USB was simple, but booting from it required BIOS tweaks, which felt daunting at first. Compared to third-party tools I’ve tested, this Windows 10 upgrade tool strikes a great balance of ease and versatility. It’s ideal if you want options without diving into overly technical territory.
Part 3: Upgrade Windows 10 with WSUS Offline Update
WSUS Offline Update is a niche Windows 10 upgrade tool for advanced users, especially those needing offline update solutions. It lets you download update packages on one PC and apply them offline on others, making it perfect for networks with no internet or batch updates. It’s more complex than Microsoft’s tools and lacks the user-friendly polish of, say, Microsoft Office’s interface, but its power is unmatched in specific scenarios.
Steps:
Step 1: Download WSUS Offline Update from its official website.

Step 2: Run UpdateGenerator.exe on an internet-connected PC to fetch updates.

Step 3: Transfer the update package to the target PC via USB or drive.
Step 4: Run UpdateInstaller.exe to apply updates offline.

Match the update package to your Windows 10 version to avoid compatibility issues. Test on one PC before rolling out to others.
I used WSUS for a client’s small office with shaky internet. Prepping the package took 25 minutes, but applying updates across five PCs was flawless. The interface feels like a relic, and the setup demands attention, but it’s a godsend for offline environments. Unlike simpler free Windows 10 upgrade tools, this one’s for those ready to roll up their sleeves.
Part 4: Comparison among Upgrade Tools

Selecting the right Windows 10 upgrade tool depends on your tech skills and setup. Here’s a breakdown of the three tools, using system update methods to highlight their strengths.
Comparison Table:
|
Tool Name |
Ease of Use |
Best For |
Requires Internet |
File/Data Retention |
|---|---|---|---|---|
|
Update Assistant |
Very Easy |
Beginners, casual users |
Yes |
Keeps files/apps |
|
Media Creation Tool |
Easy |
Users wanting clean installs |
Yes |
Optional |
|
WSUS Offline Update |
Moderate |
IT pros, offline updates |
No (after initial) |
Keeps files(not full upgrades) |
My Insight: The Update Assistant is my default for quick, worry-free updates—perfect for most users. The Media Creation Tool shines if you want flexibility, like a clean install for a sluggish PC. WSUS Offline Update is a beast for offline setups but requires effort. Pick based on your comfort level and internet access. Compared to alternatives like third-party updaters, these Microsoft-backed tools are safer and more reliable.
Part 5: Lightweight Office Suite During Windows 10 Upgrades — WPS Office

System upgrades can slow your PC to a crawl, but WPS Office, a free, 200MB office suite, keeps you productive. With 500 million users and a 4.8 Trustpilot score, it outshines heavier suites like Microsoft Office for resource efficiency, especially during upgrades.
Why It’s Recommended:
-
Minimal Strain: Runs smoothly even when upgrades hog resources.
-
File Compatibility: Handles Word, Excel, and PowerPoint files flawlessly.
-
Cloud Backup: Syncs files to the cloud, protecting them pre-upgrade.
-
Versatile Tools: Offers templates, PDF editing, and resume assistants for post-upgrade tasks.
I ran WPS Office during an Update Assistant upgrade, drafting a client email without a hitch. When reboots forced me to switch to my tablet, cloud sync let me pick up right where I left off. Compared to Microsoft Office, WPS is leaner and faster, making it the perfect companion for any Windows 10 upgrade tool.
FAQs
1. Which is the safest tool for upgrading Windows 10?
The Update Assistant is the safest Windows 10 upgrade tool. Microsoft’s support ensures reliability, and it’s designed to keep your files and apps intact.
2. Can I upgrade without internet access?
Yes, WSUS Offline Update lets you apply updates offline after downloading packages—ideal for remote setups.
3. Will I lose my files during an upgrade?
No, Update Assistant and Media Creation Tool (in-place mode) preserve files. For clean installs, back up first, as they wipe the drive.
Summary
Upgrading Windows 10 doesn’t have to be a headache with the right Windows 10 upgrade tool. The Update Assistant is a breeze for beginners, keeping files safe. The Media Creation Tool offers versatility for in-place or clean installs. WSUS Offline Update tackles offline updates for pros, despite its complexity. Each fits different needs—pick based on your skills and connectivity. Pair your upgrade with WPS Office for seamless work. Its 200MB size and cloud sync mesh perfectly with Windows 10 upgrade tools, ensuring efficient document management with minimal system strain during and after upgrades.
Microsoft выпускает новые обновления безопасности для своих продуктов как минимум один раз в месяц. В большинстве случаев служба Windows Update прекрасно справляется с автоматическим получением и установкой обновлений Windows. Также вы можете вручную найти, скачать и установить актуальное кумулятивное обновление безопасности для вашей редакции и версии Windows. Например, на компьютерах с отключенной службой wususerv, в изолированных от интернета сетях (если у вас не используется WSUS сервер, где можно вручную управлять тестированием и одобрением обновлений Windows), в локальной сети с лимитным подключением (metered connection) и т.д.
Содержание:
- Узнать дату установки последних обновлений Windows
- Как найти и скачать последние обновления безопасности для вашей версии Windows?
- Ручная установка кумулятивных обновлений в Windows
- Ручное обновление билда Windows 10 (Feature Update)
Каждый второй вторник месяца Microsoft выпускает новые обновления для всех поддерживаемых редакций Windows (исправления для особо критичных уязвимостей могут выпускаться быстрее, не дожидаясь этой даты. Также имейте в виду, что в Windows используется кумулятивная модель обновлений. Это означает, что для обновления Windows достаточно установить только один, последний, кумулятивный пакет безопасности.
Узнать дату установки последних обновлений Windows
Проверьте дату установки последних обновлений на вашем компьютере с помощью PowerShell команды:
gwmi win32_quickfixengineering |sort installedon -desc
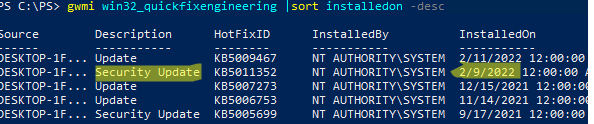
Source Description HotFixID InstalledBy InstalledOn
PCname1 Security Update KB5011352 NT AUTHORITY\SYSTEM 2/9/2022 12:00:00 AMН
В данном случае видно, что последний раз на этом компьютере обновление безопасности устанавливалось 9 февраля 2022 года.
Так же вы можете вывести историю установки обновлений с помощью командлета
Get-WUHistory
из модуля PSWindowsUpdate:
Get-WUHistory|Where-Object {$_.Title -match "KB*"} |Sort-Object date -desc
Затем вам нужно узнать версию и номер билда вашей Windows. Воспользуйтесь командой:
Get-ComputerInfo | select WindowsProductName, WindowsVersion, OsHardwareAbstractionLayer, OsArchitecture
WindowsProductName WindowsVersion OsHardwareAbstractionLayer, OsArchitecture
Windows 10 Pro 2009 10.0.19041.1566 64-bit

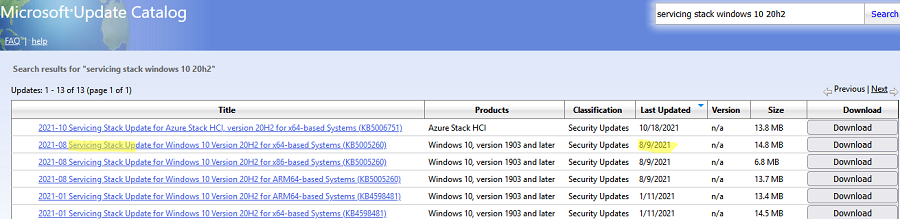
В моем случае мне нужно скачать последние обновления безопасности для Windows 10 20H2 x64.
Как найти и скачать последние обновления безопасности для вашей версии Windows?
Вы можете вручную скачать последние обновления для продуктов Microsoft из каталога обновлений Microsoft Update Catalog — https://www.catalog.update.microsoft.com/Home.aspx. В каталоге вы можете найти обновления для всех поддерживаемых версий Windows (также поддерживается прямой импорт обновлений через консоль WSUS). Главная проблема, что в каталоге отсутствует удобная система поиска. Если вы не знаете номер KB, который вам нужно установить, найти и скачать пакет с обновлением довольно трудно.
Рассмотрим, как сформировать правильный запрос для поиска обновлений для вашей редакции Windows в каталоге обновлений Microsoft. Статья пишется 9 марта 2022 года, соответственно последние обновления безопасности были выпушены вчера, 8 марта (второй вторник месяца). Для поиска обновлений безопасности для Windows 10 20H2 x64 за март 2022 года, воспользуйтесь таким поисковым запросом, который нужно вставить в поисковую строку в верхнем правом углу:
windows 10 20h2 x64 3/%/2022

Каталог Microsoft Update вернул список из 3 обновлений.
Как решить какие из этих обновлений нужно скачать и установить? Конечно, можно скачать и установить вручную все эти обновления, но можно сэкономить время. Т.к. Microsoft перешла на кумулятивные обновления, вам достаточно скачать и установить последнее Cumulative Update для вашей системы.
В моем случае доступно одно большое кумулятивное обновление для Windows 10:
- 2022-03 Cumulative Update for Windows 10 Version 20H2 for x64-based Systems (KB5011487), Windows 10 version 1903 and later, Security Updates, 3/7/2022 — 655.6 MB
Щелкните по названию обновления безопасности KB5011487. В открывшемся окне с информацией об обновлении перейдите на вкладку Package Details. На этой вкладке видно какие обновления заменяет данное обновление (This update replaces the following updates:), и каким обновлением заменяется в свою очередь оно (This update has been replaced by the following updates).
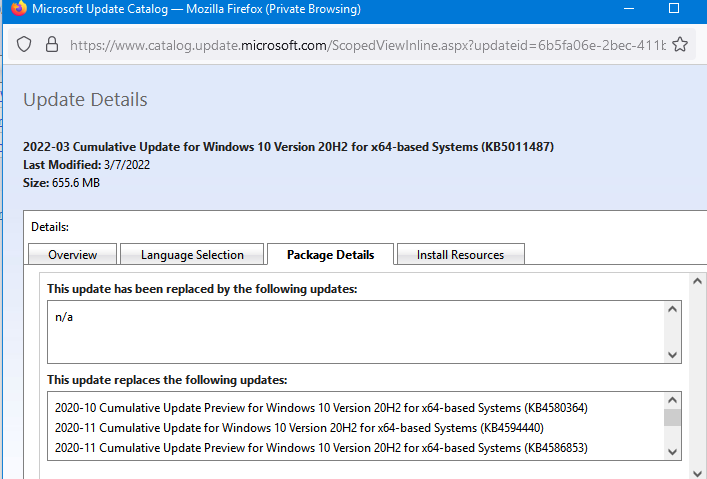
Как вы это обновление ничем не заменяется: This update has been replaced by the following updates: n/a. Значит это самое последнее и актуальное кумулятивное обновление безопасности для вашей версии Windows 10.
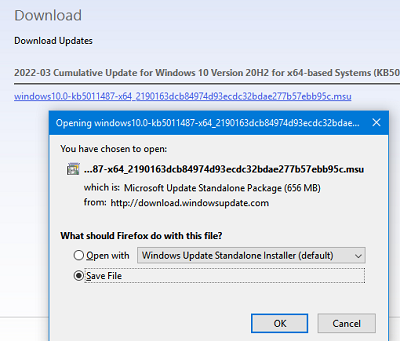
Нажмите на кнопку Download, в открывшемся окне появится прямая ссылка на загрузку MSU файла обновлений. Скачайте файл и сохраните его на диск.
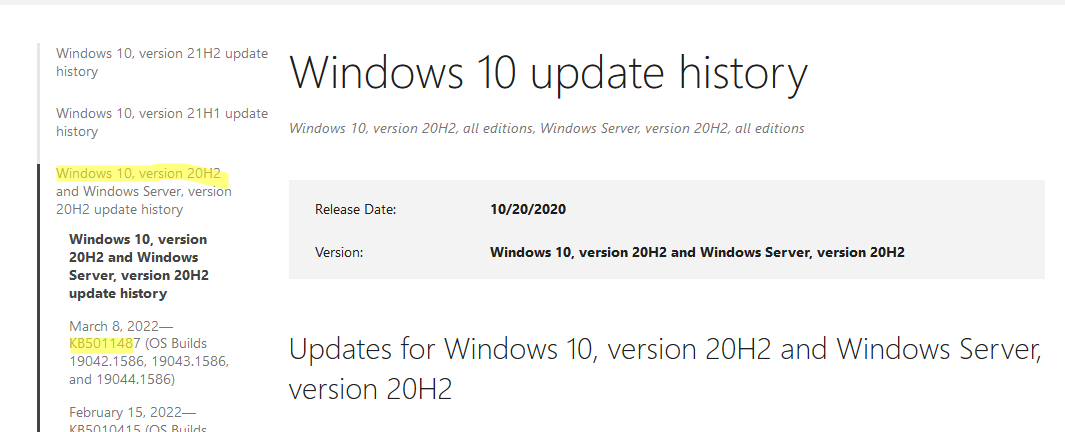
Также вы можете найти номер KB актуального кумулятивного обновления для вашей версии Windows 10 с помощью страницы https://support.microsoft.com/en-us/topic/windows-10-update-history-7dd3071a-3906-fa2c-c342-f7f86728a6e3.
В списке слева выберите вашу версию Windows 10 (в моем примере это Windows 10 20H2), затем обратите внимание на список In this release. Самая первая запись ссылается на статью базы знаний для последнего кумулятивного обновления Windows этой редакции. В нашем примере это March 8, 2022—KB5011487 (OS Builds 19042.1586, 19043.1586, and 19044.1586). Именно это обновление мы и скачали согласно методике выше.
Затем скачайте последнее доступное обновление служебного стека Windows 10 (SSU — Servicing Stack Updates). Это обновление также можно найти в Windows Update Catalog по ключевой фразе:
servicing stack windows 10 20h2
Обязательно установите Servicing Stack Update до установки накопительного обнолвения безопасности Windows.
C марта 2021 года, Microsoft перестала выпускать отдельные обновления SSU для билдов Windows 10 2004 и старше. Теперь они интегрируются в последнее кумулятивное обновление LCU (Latest Cumulative Update).
Скачать файлы обновлений Windows с помощью PowerShell
Для скачивания файлов MSU обновлений из Microsoft Update Catalog можно использовать командлет Save-KBFile из модуля KBUpdate (KB Viewer, Saver, Installer and Uninstaller) — https://github.com/potatoqualitee/kbupdate
Установите модуль из PowerShell Gallery:
Install-Module kbupdate -Scope CurrentUser
Для загрузки определенных файлов обновлений выполните команду PowerShell:
Save-KBFile -Name KB5011487, 5005260 -Architecture x64 -Path C:\Updates
Ручная установка кумулятивных обновлений в Windows
После того, как вы скачали MSU файл с актуальным кумулятивным обновлением для вашей редакции Windows 10, вы можете его установить.
Щелкните дважды по скачанному msu файлу и следуйте шагам мастера автономного установщика обновлений Windwows.
После окончания установки пакета обновлений нужно перезагрузить компьютер (если после установки обновления вы наблюдаете проблемы с работой ОС или приложений, вы можете удалить его).
Также вы можете установить обновление Windows из командной строки в тихом режиме с помощью утилиты wusa.exe (Windows Update Standalone Installer). Следующая команда установит указанное обновление в тихом режиме и отложит автоматическую перезагрузку системы после завершения установки:
wusa C:\updates\windows10.0-kb5011487-x64_2190163dcb84974d93ecdc32bdae277b57ebb95c.msu /quiet /norestart
Ручное обновление сигнатур Windows Defender
Если на вашем устройстве Windows включен встроенный Windows Defender Antivirus, вы можете вручную обновить его сигнатуры. Обновление с новым набором сигнатур можно скачать с Microsoft Update Catalog, либо (проще) со страницы https://www.microsoft.com/en-us/wdsi/defenderupdates#manual.
Скачайте файл офлайн установки для вашей версии Window. Например, Microsoft Defender Antivirus for Windows 10 and Windows 8.1 64-bit.
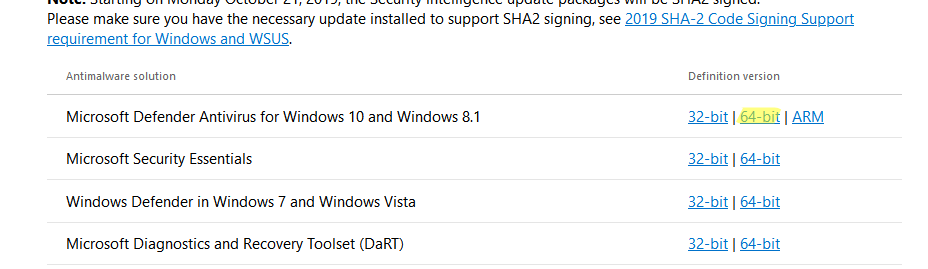
Запустите и установите файл
fpam-fe.exe
для обновления антивирусных баз.
Ручное обновление билда Windows 10 (Feature Update)
Также вы можете вручную обновить билд Windows 10 (Feature Update). Например, вы хотите вручную обновить билд Windows 10 на своем компьютере с 20H2 (окончание поддержки 10 мая 2022) на 21H2.
Для этого перейдите на страницу https://www.microsoft.com/en-us/software-download/windows10 и нажмите кнопку Update Now.
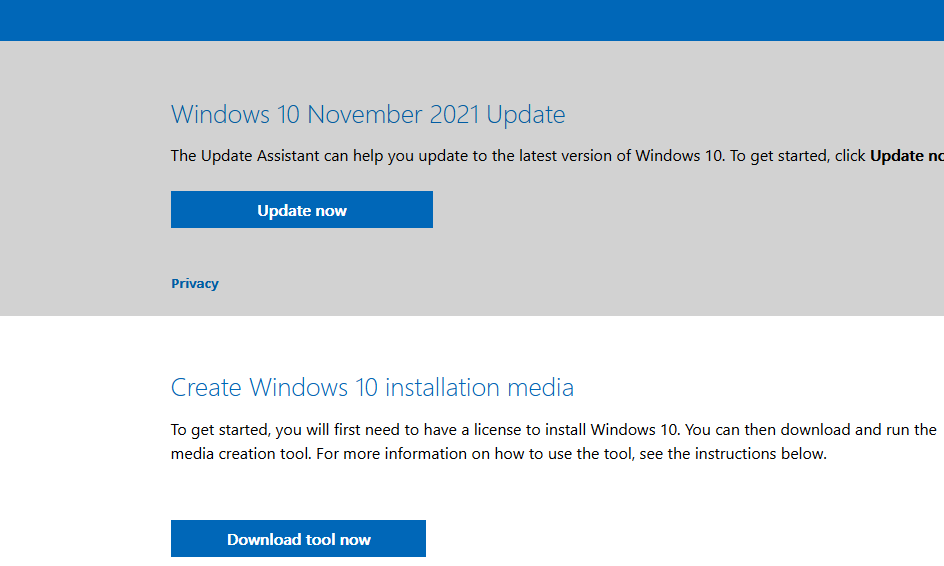
Скачайте и запустите файл Windows 10 Update Assistant (
Windows10Upgrade9252.exe)
.
Мастер предложит вам обновится до последней версии Windows 10 (Windows 10 November 2021 Update). Для такого обновления требуется подключение к интернету.
Чтобы выполнить оффлайн обновление билда Windows 10, сформируйте установочный ISO образ с новый билдом Windows 10 с помощью Media Citation Tool (позволяет создать iso образ или загрузочную флешку с Windows 10).
Затем смонтируйте ISO образ в виртуальный привод и запустите файл setup.exe. Следуйте шагам мастера обновления Windows. Подробнее это описано в статье про обновление билда Windows 10 из командной строки.
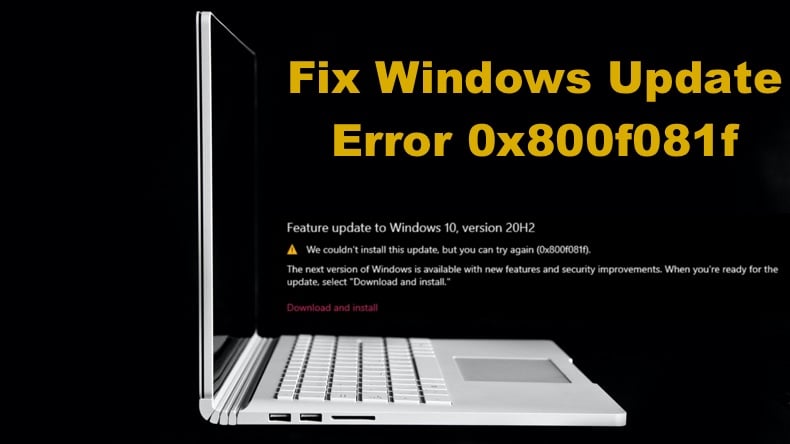
How to Fix Update Error 0x800f081f in Windows 10
If you’re getting error 0x800f081f when trying to update your operating system, you won’t get important system updates. This article will show you several methods to fix this error.
What Causes Error 0x800f081f
You may experience error 0x800f081f due to incompatibility issues caused by Microsoft .NET Framework 3.5. It has been determined that such incompatibilities occur when users enable NET Framework.
In Windows 10, NET Framework works as an on-demand feature, meaning that when the user turns it on, the Windows Update service tries to acquire the binaries of .NET and other files. If your computer has been incorrectly configured, you will get the 0x800f081f error because Windows Update cannot find the necessary files for NET.
If Microsoft NET Framework is the cause of error 0x800f081f, then you may be able to resolve the issue by using an offline NET Framework installer or enabling the currently installed NET Framework version manually. NET Framework can be enabled using a PowerShell Command, the Deployment Image Servicing, and Management tool, or the installation wizard.
Video Guide on How to Fix Windows Update Error 0x800f081f
Table of Contents:
- Introduction
- Solution 1. Run the Windows Update Troubleshooter
- Solution 2. Enable Microsoft .NET Framework using Command Prompt
- Solution 3. Run the System File Checker (SFC) Scan
- Solution 4. Run the Deployment Image & Servicing Management (DISM) Scan
- Solution 5. Configure the Group Policy Setting
- Solution 6. Upgrade Windows 10 Using the Media Creation Tool
- Video Guide on How to Fix Windows Update Error 0x800f081f
Download Computer Malware Repair Tool
It is recommended to run a free scan with Combo Cleaner — a tool to detect viruses and malware on your device. You will need to purchase the full version to remove infections. Free trial available. Combo Cleaner is owned and operated by Rcs Lt, the parent company of PCRisk.com read more.
Solution 1. Run the Windows Update Troubleshooter
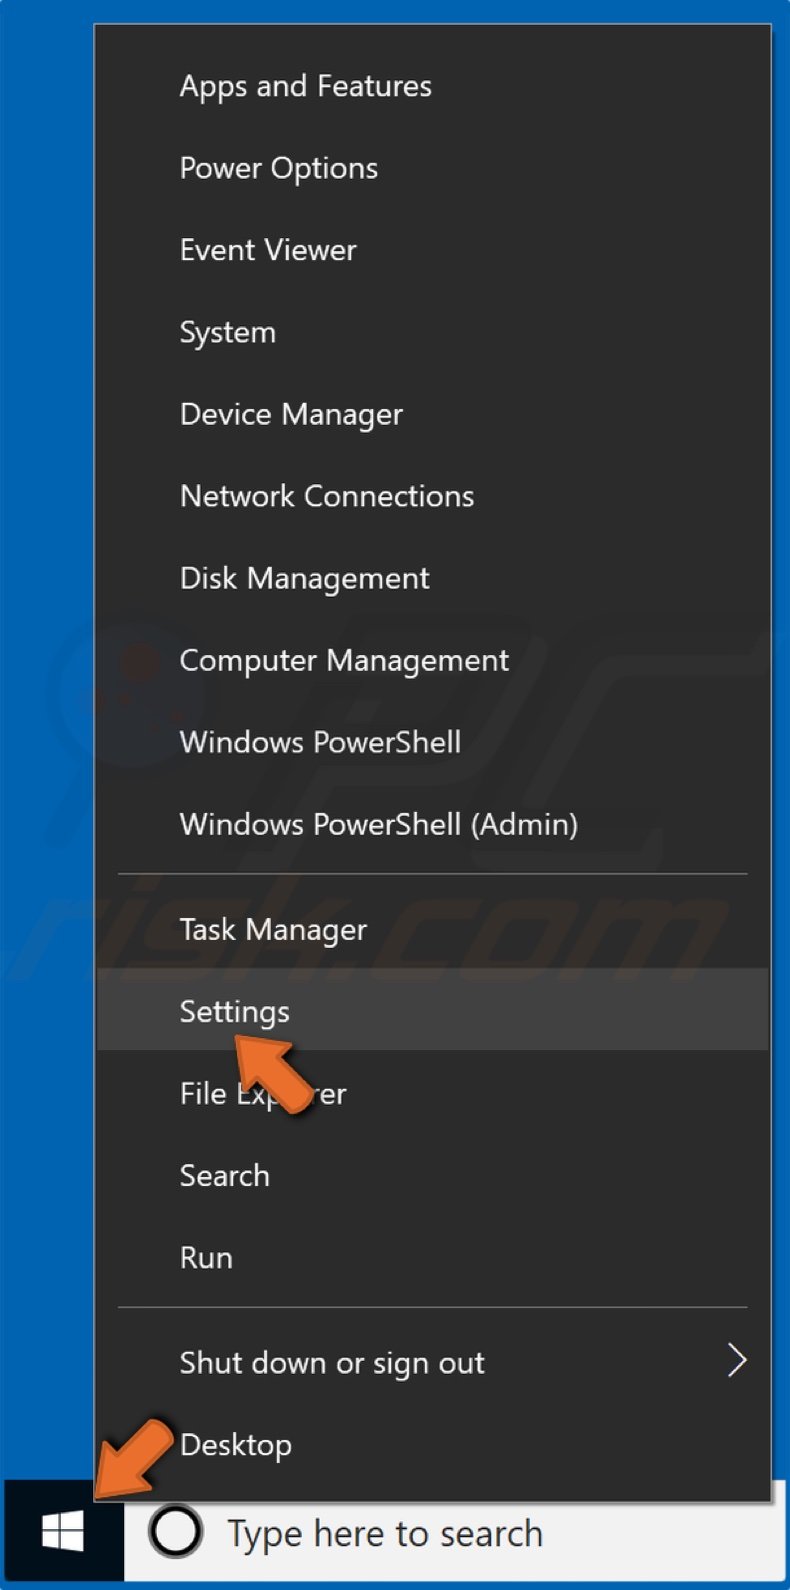
1. Right-click the Start Menu and click Settings.
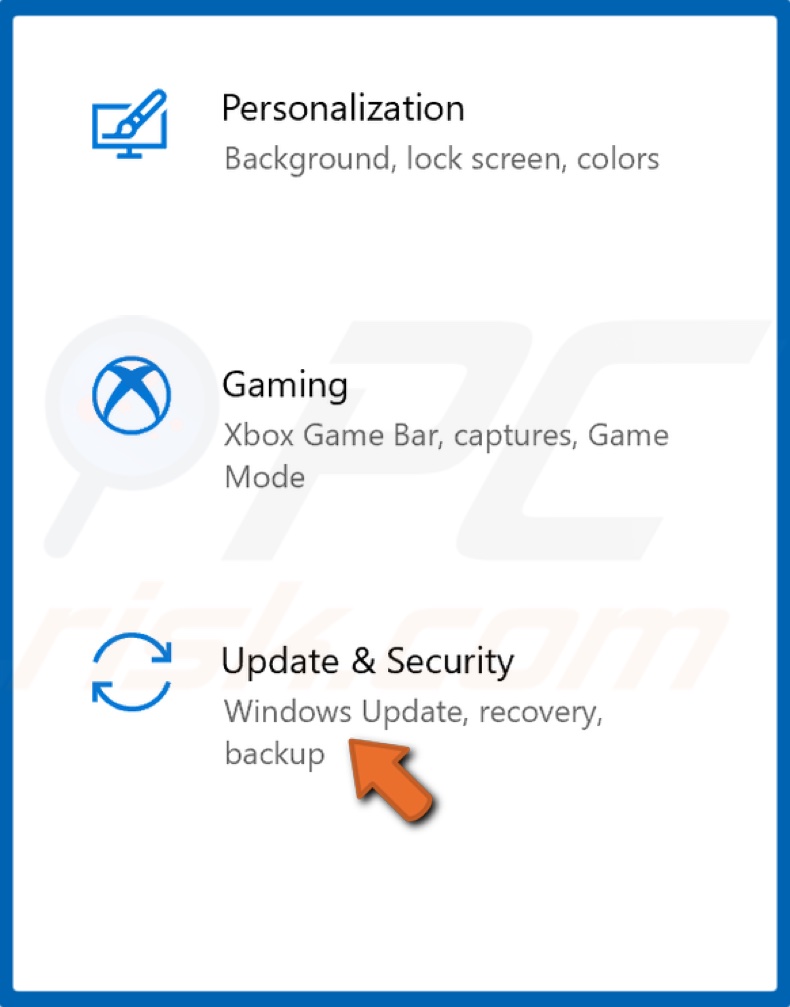
2. Select Update & Security.
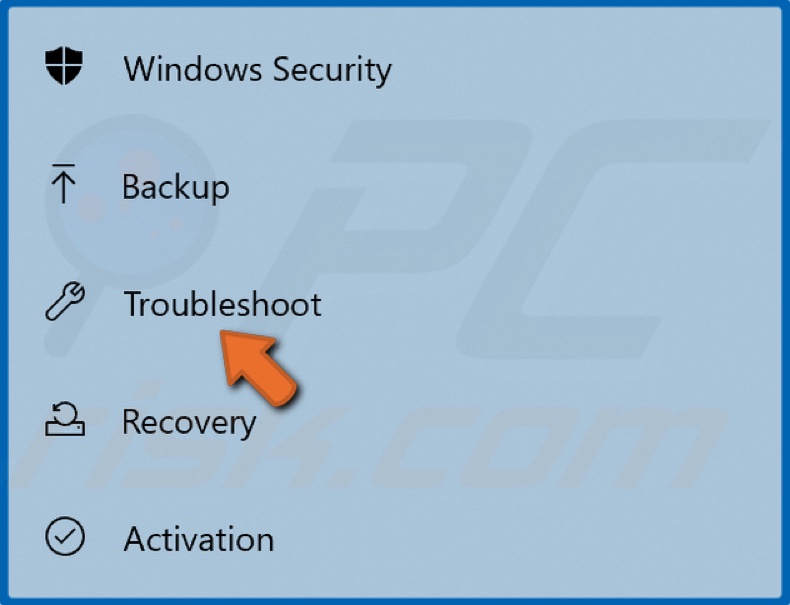
3. Click Troubleshoot.
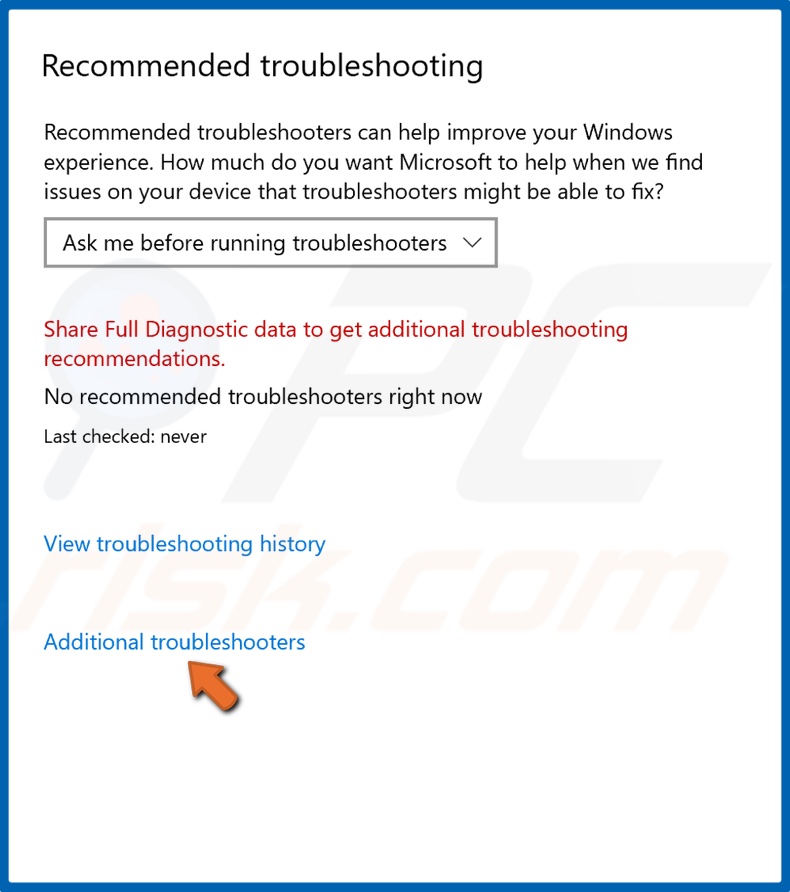
4. Click Additional troubleshooters.
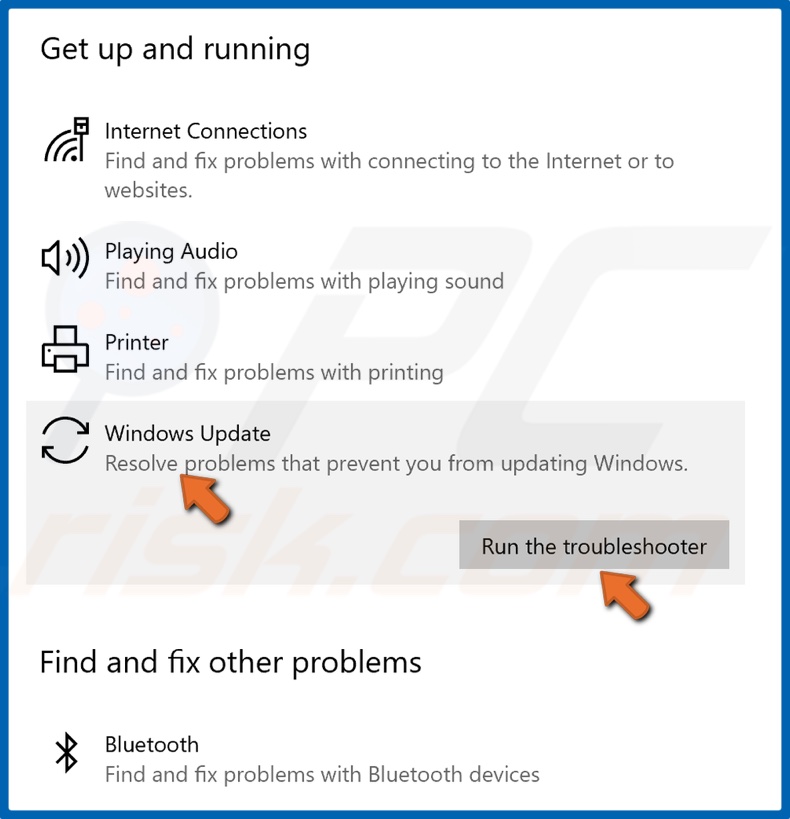
5. Select Windows Update and click Run the troubleshooter.
6. If the troubleshooter detects an issue, it will select and apply a fix automatically.
[Back to Table of Contents]
Solution 2. Enable Microsoft .NET Framework using Command Prompt
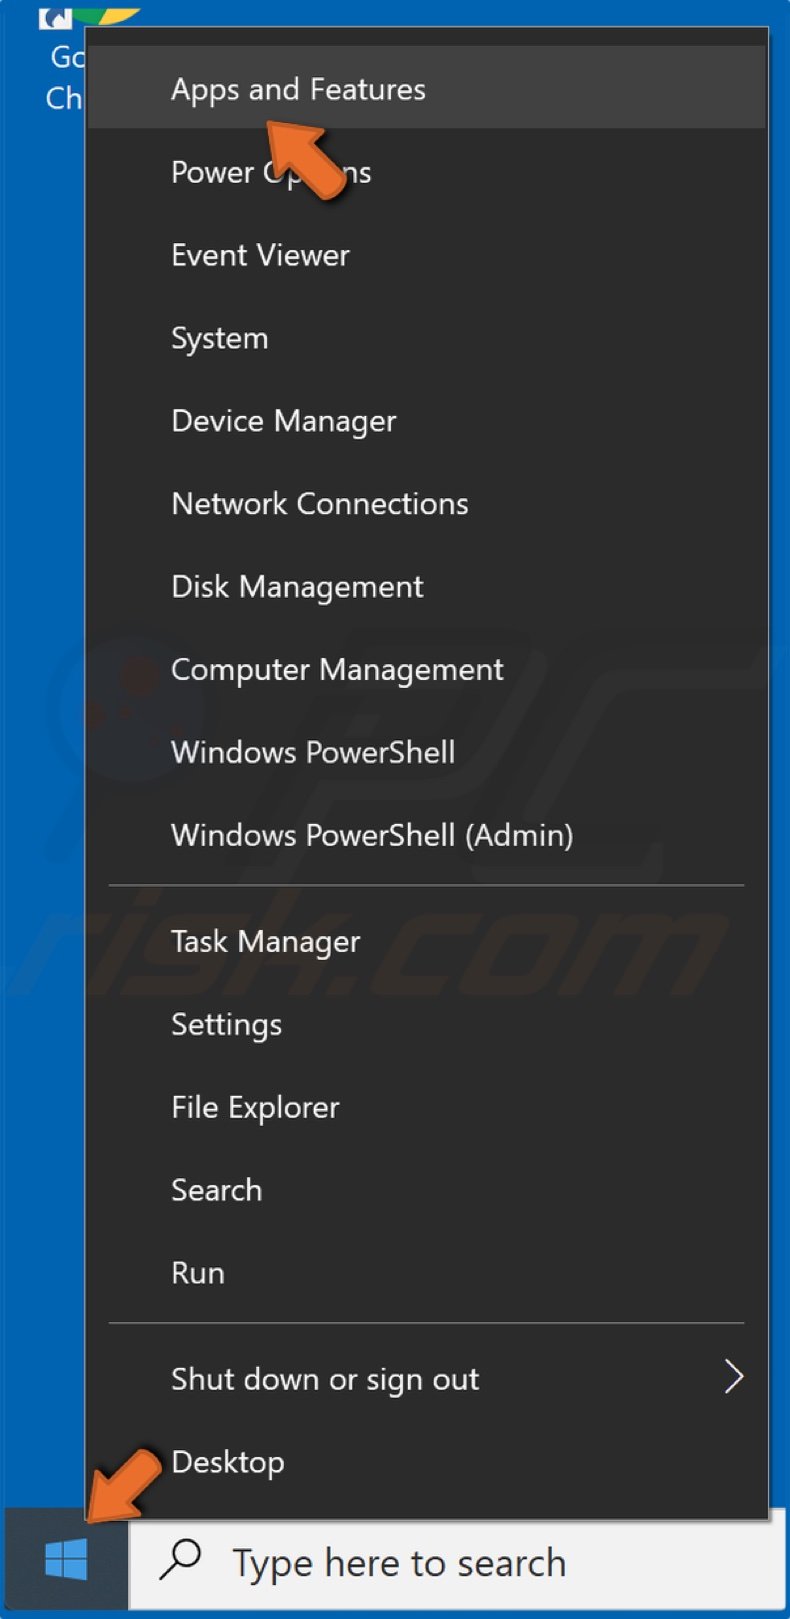
1. Right-click the Start Menu and select Apps and Features.
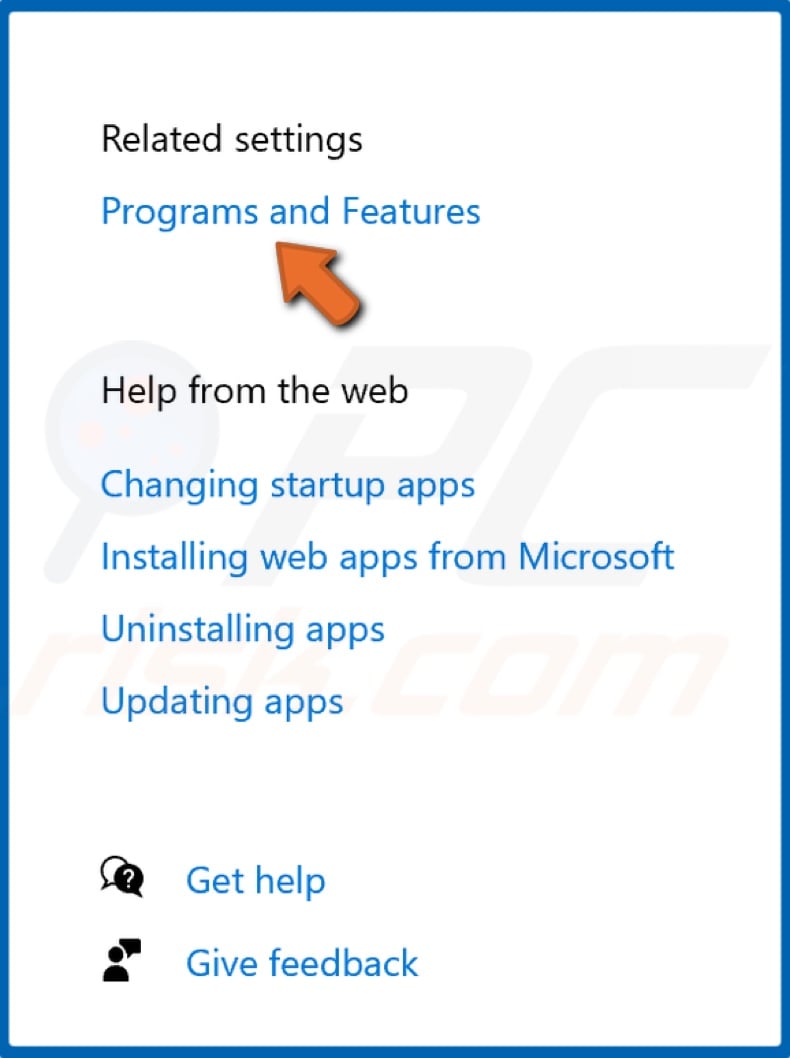
2. At the top-right of the window, select Programs and Features.
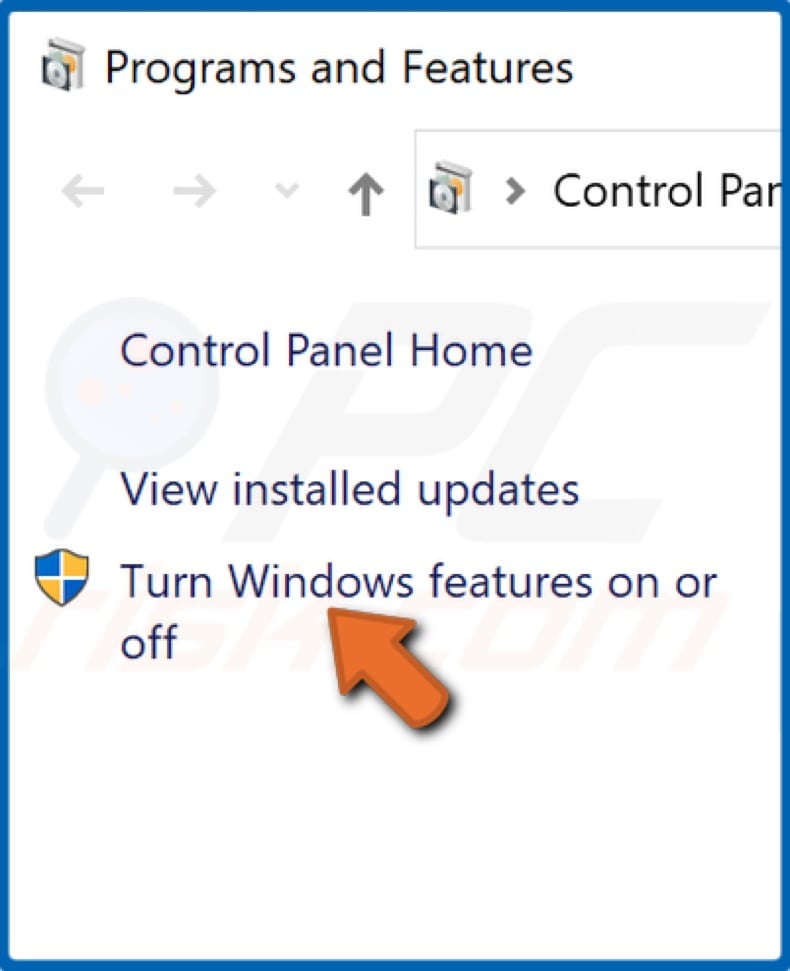
3. In the resulting Programs and Features window, click Turn Windows features on or off.
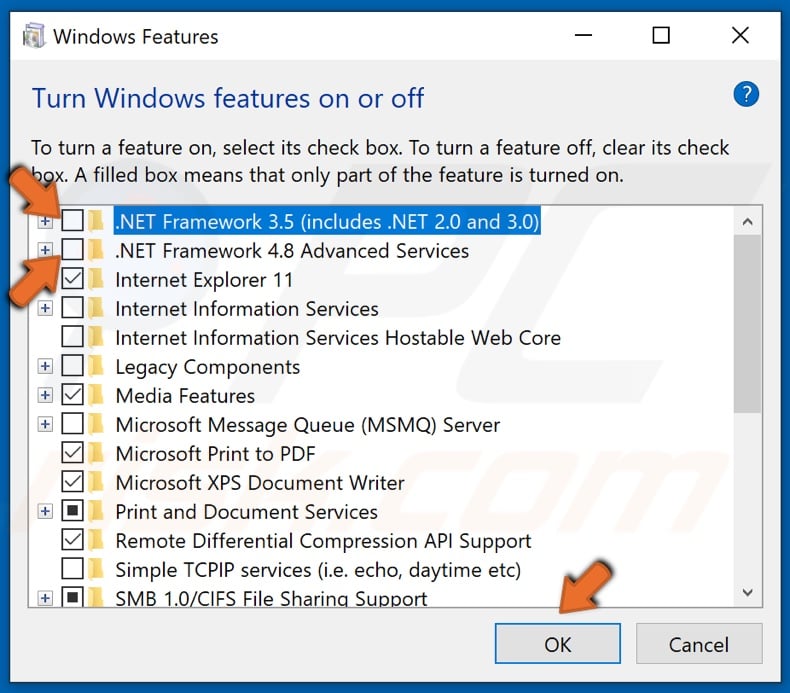
4. Find .NET Framework 3.5 and .NET Framework 4.8.
5. Uncheck the boxes next to .NET Framework 3.5 and .NET Framework 4.8 and click OK to disable them.
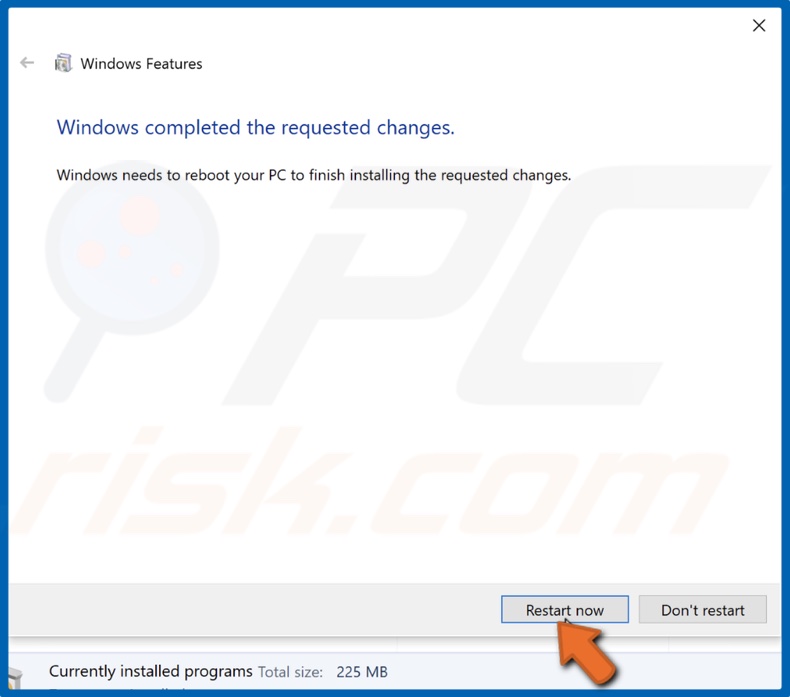
6. Click Restart Now.
7. Return to the Turn Windows features on or off window.
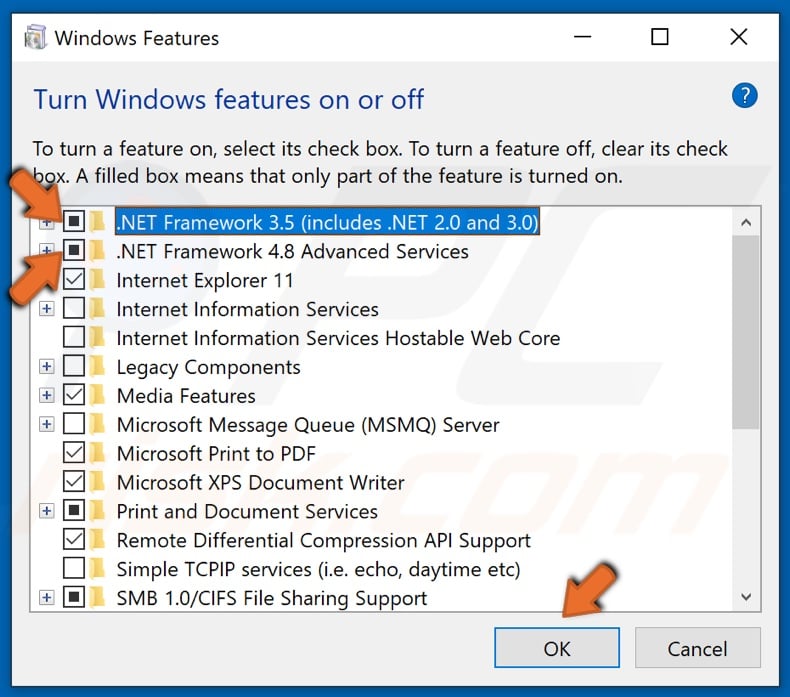
8. Check the boxes next to .NET Framework 3.5 and .NET Framework 4.8 and click OK.
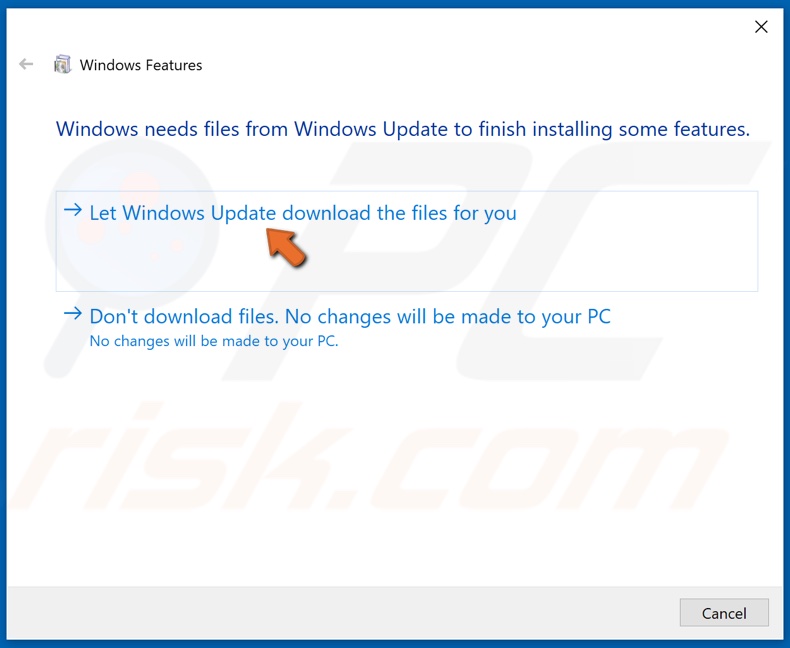
9. Then, click the Let Windows Update download the files for you option.
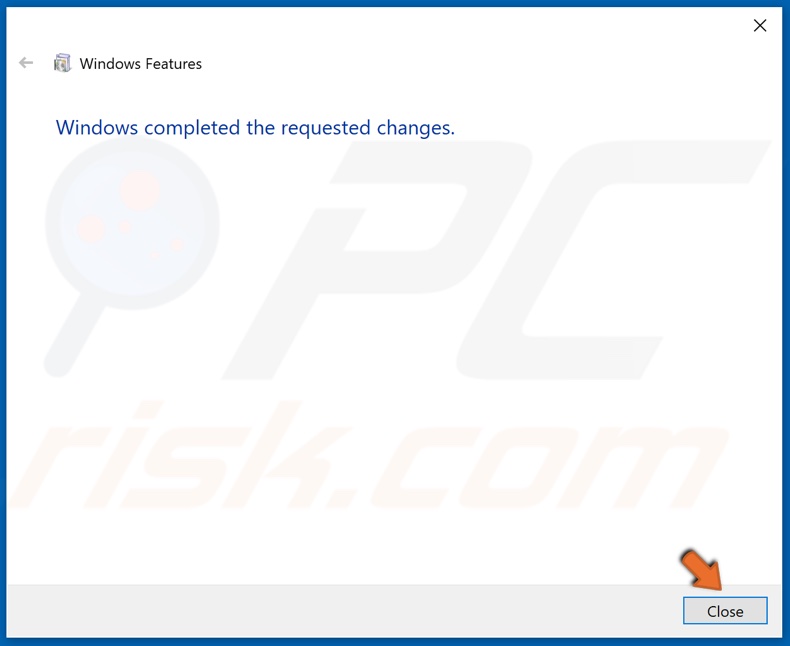
10. Click Close once the requested changes have been completed.

11. Then, Hold down Windows+R keys to open the Run dialog box.
12. Type in CMD in the dialog box, and hold down Ctrl+Shift+Enter to open elevated Command Prompt.
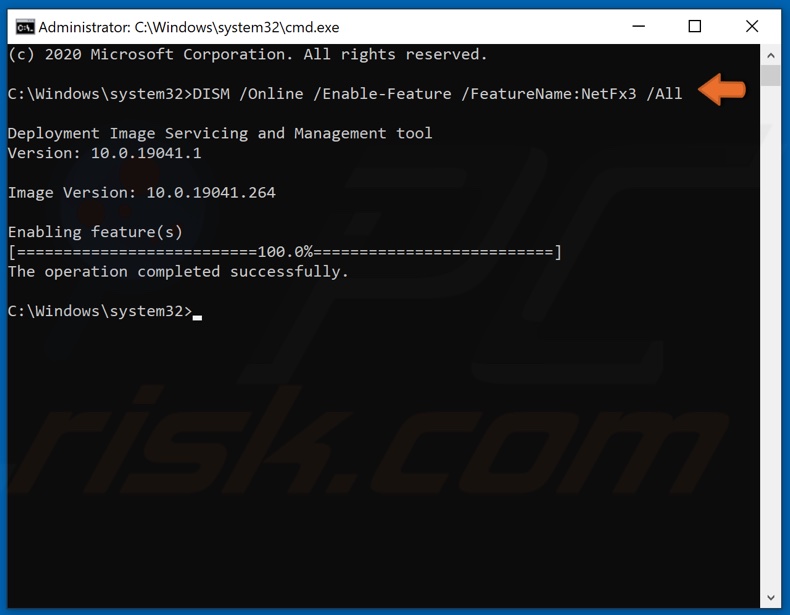
13. In the Command Prompt window, type in DISM /Online /Enable-Feature /FeatureName:NetFx3 /All and hit the Enter key.
14. Close the Command Prompt and try updating Windows.
[Back to Table of Contents]
Solution 3. Run the System File Checker (SFC) Scan
1. Hold down Windows+R keys to open the Run dialog box.
2. Type in CMD in the Run text box and hold down Ctrl+Shift+Enter keys to open the elevated Command Prompt.
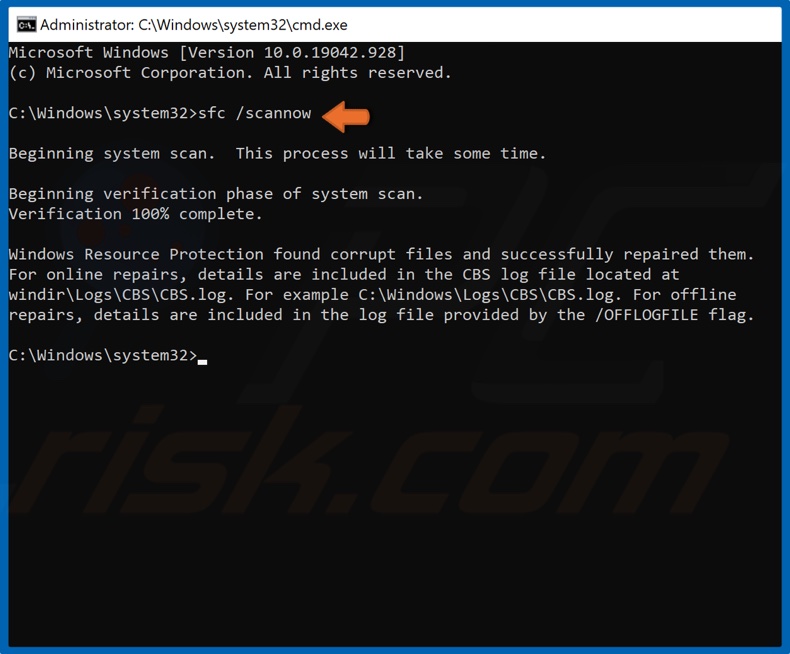
3. In the Command Prompt window, type in SFC /Scannow and hit the Enter key to start the scan.
4. Once the scan has been completed, restart your PC.
[Back to Table of Contents]
Solution 4. Run the Deployment Image & Servicing Management (DISM) Scan
1. Hold down Windows+R keys to open the Run dialog box.
2. Type in CMD in the Run text box and hold down Ctrl+Shift+Enter keys to open the elevated Command Prompt.
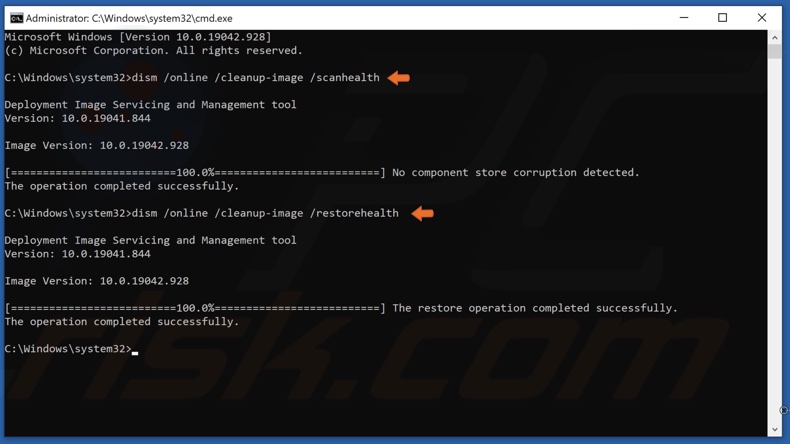
3. In the Command Prompt window, type in DISM /Online /Cleanup-Image /ScanHealth and hit the Enter key. This parameter will scan the component store for corruption.
4. Type in DISM /Online /Cleanup-Image /RestoreHealth and hit the Enter key.
5. Once the process has been completed, try updating Windows 10.
[Back to Table of Contents]
Solution 5. Configure the Group Policy Setting
This solution is not possible on Windows 10 Home Edition since the Home Edition does not have the Group Policy Editor.
1. Hold down Windows+R keys to open the Run dialog box.
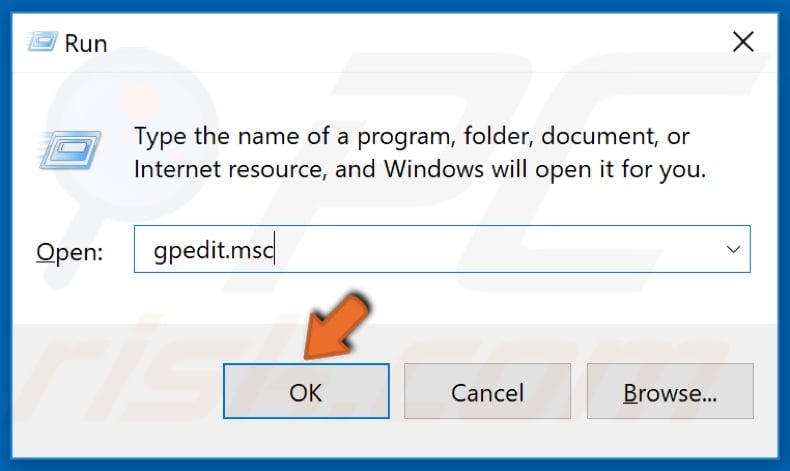
2. In the Run dialog box, type in gpedit.msc and click OK.
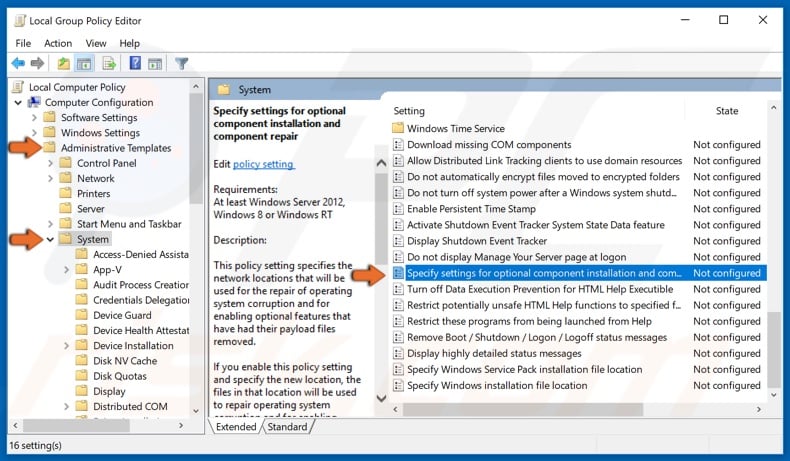
3. In the left pane, expand Administrative Templates.
4. Then, select System.
5. In the right pane, open the Specify Settings for Optional Content Installation.
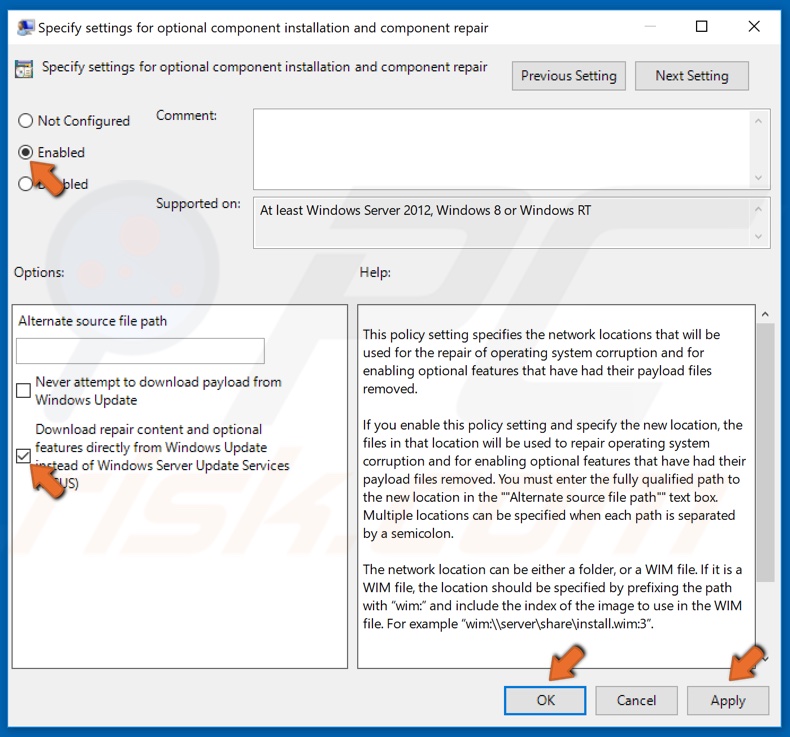
6. At the top-right of the window, select the Enabled option.
7. Then, mark the Download Repair Content and options features directly from Windows Update instead of Windows Server Update Services (WSUS) checkbox.
8. Click Apply and click OK to save the changes.
[Back to Table of Contents]
Solution 6. Upgrade Windows 10 Using the Media Creation Tool
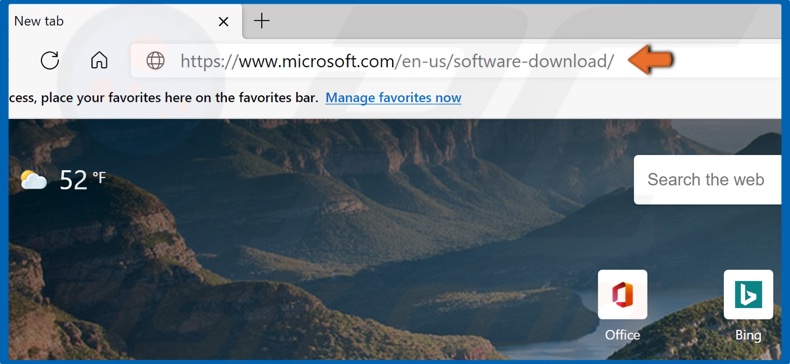
1. Open your web browser, and go to Microsoft’s Download Windows 10 web page.
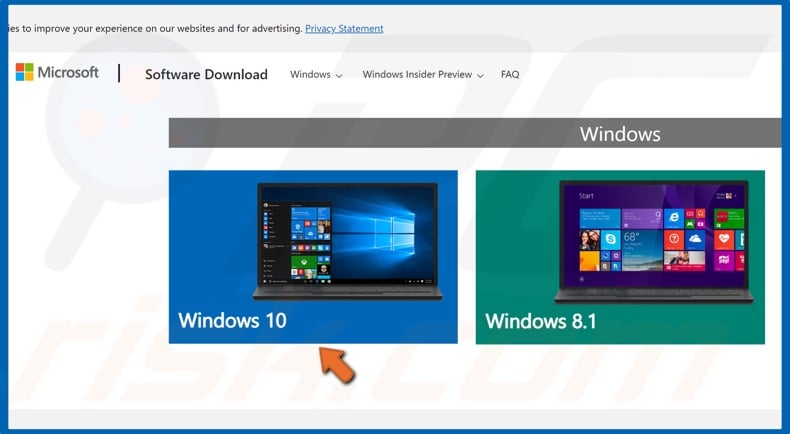
2. Once on the website, select Windows 10.

3. Click Download tool now to get the Media Creation Tool.
4. Run the Media Creation Tool once it’s been downloaded.
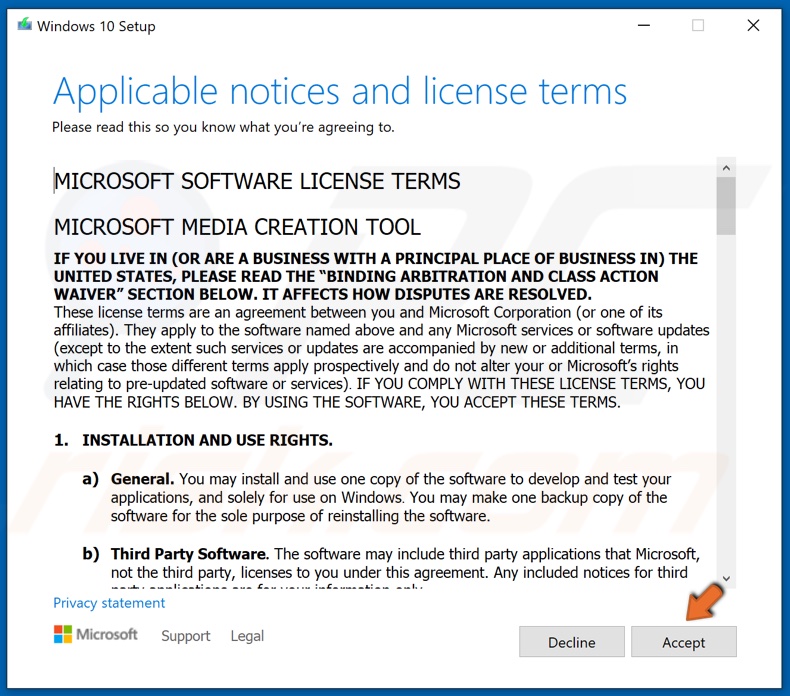
5. Then, Accept the license agreement.
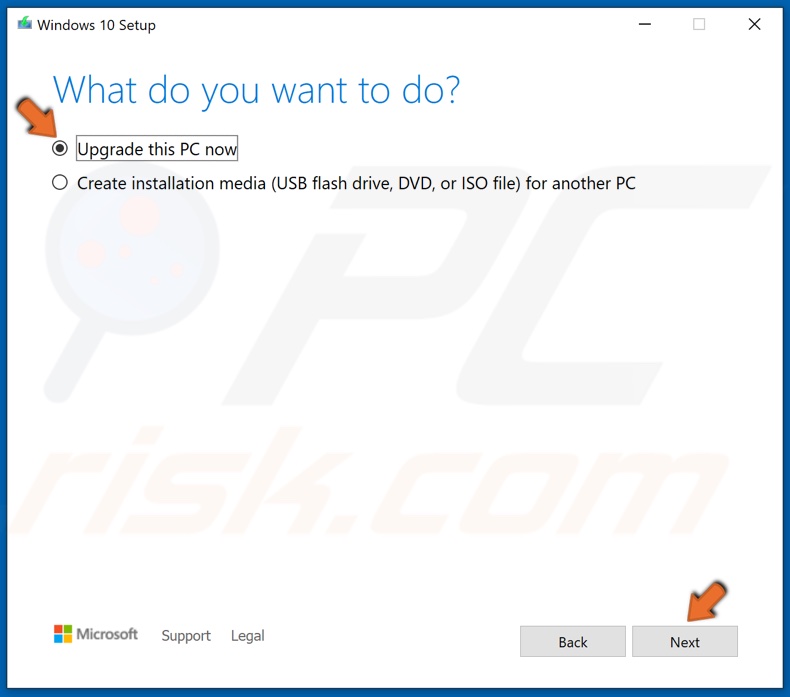
6. Make sure that the Upgrade this PC now is ticked, and click Next.
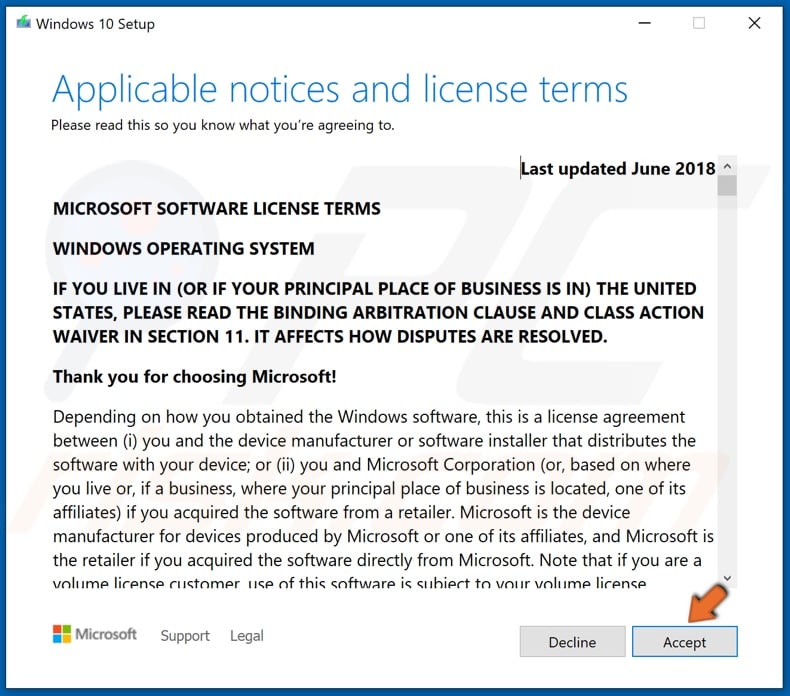
7. Then, Accept the Windows 10 license agreement.
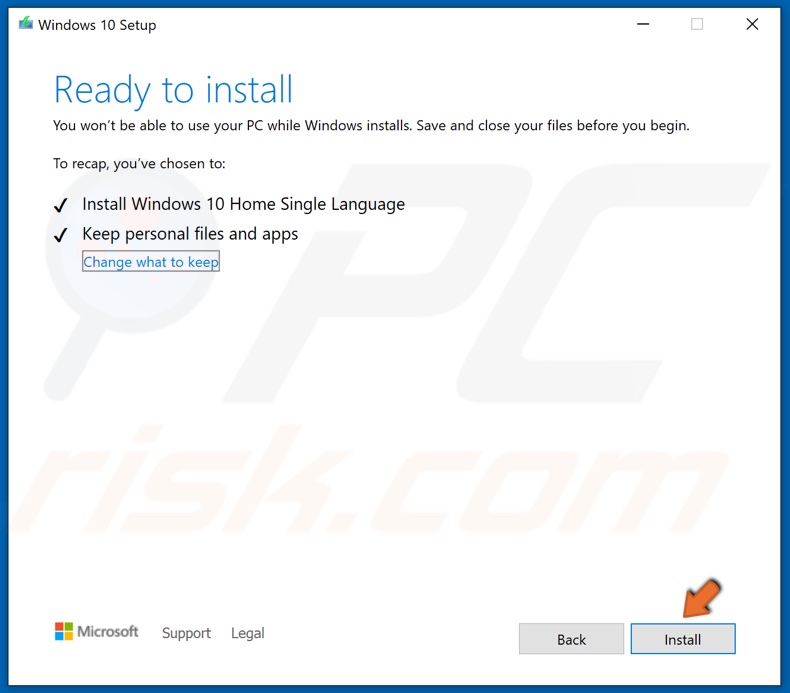
8. You can opt to keep your personal files and apps, but if you want a clean installation of Windows 10, click the Change what to keep button to customize the installation settings.
9. Then, click Install, and the setup will begin installing Windows 10.
Take note that the installation will take some time, and your computer will restart several times throughout the installation.
[Back to Top]
Microsoft Windows displays an error 0x800f0922 when a system update fails to install. If you haven’t been able to resolve this issue by retrying the update, you’ll want to follow other fixes to resolve the problem. Here are a few ways to get around the issue and install your update successfully.
If you’re curious why the above error occurs, some of the reasons are that your PC doesn’t have enough free disk space, the required .NET Framework versions aren’t enabled, a virus has infected your PC, Windows’ update cache has a problem, and more.

Restart Your Windows 10/11 PC
When you experience issues updating Windows, reboot your PC to fix the minor issues with your computer. This allows you to get rid of many small issues that may be causing Windows not to update.
Ensure you’ve saved your unsaved work before turning off your PC.
- Press the Windows key or select the Start menu icon to open the Start menu.
- Select the Power icon and choose Restart.

- Try to install your update when your PC turns back on.
Use Windows Update Troubleshooter
Microsoft understands that the Windows update process sometimes causes issues. To that effect, the company has included a Windows Update troubleshooter that you can use to find and fix issues with your Windows updates.
This tool runs on its own for the most part, which means it automatically detects and fixes many issues related to Windows updates.
- Open your Settings app by pressing Windows + I.
- Select System in the left sidebar and Troubleshoot on the right.
- Choose Other troubleshooters on the following screen.
- Select Run next to Windows Update to launch your troubleshooter.

- Wait for the troubleshooter to find and fix your update problems.
Free Up Your Disk Space
One reason Windows displays an error 0x800f0922 is that your disk doesn’t have enough free storage to install the update. This leaves Windows with no space to install the update.
You can get around that by removing unwanted files and making space on your disk. You can use Windows’ built-in Disk Cleanup utility to quickly find and remove various unwanted items from your system.
- Open the Start menu, find Disk Cleanup, and launch the utility.
- Select your Windows installation drive and choose OK.
- Wait for the utility to analyze your disk contents. This shouldn’t take too long.
- Choose the files you’re willing to let go of and select Clean up system files.

- Select Delete Files in the prompt.
- Reboot your PC when you’ve removed your files.
- Try to install your Windows update.
Scan Your Windows 11/10 PC for Viruses and Malware
A virus or malware can cause your Windows update installation to fail, and this may have happened with your PC. Since it’s not possible to manually find and remove viruses, run a full virus scan on your PC to find and get rid of all the threats from your storage.
You can use Windows’ built-in Microsoft Defender Antivirus to free your PC from viruses and malware.
- Open Start, find Windows Security, and launch the app.
- Select Virus & threat protection in the app.
- Choose Scan options on the following page.
- Select Full scan and choose Scan now at the bottom.

- Wait for the antivirus to scan and remove viruses from your system.
- Update your Windows PC.
Enable Various .NET Frameworks on Your PC
Your installed apps and various features use various .NET Framework versions. It’s possible a required framework version isn’t installed on your PC, causing your Windows updates to fail to install.
In this case, enable all the available .NET Framework versions on your PC, and your issue will be resolved.
- Open Start, find Control Panel, and launch the utility.
- Select Uninstall a program under Programs.
- Choose Turn Windows features on or off in the left sidebar.

- Enable the checkboxes for all available .NET Frameworks and choose OK.

- Select Let Windows Update download the files for you.
- Wait for Windows to download the required .NET Framework files.
- Restart your PC and resume your Windows update.
Fix Corrupt Windows System Files
When Windows’ system files go corrupt, your PC starts malfunctioning in many ways. Your error code 0x800f0922 may be the result of a bad system file. In this case, you’ll have to fix all your corrupt files before you can update your PC.
Luckily, you can use Windows’ built-in System File Checker (SFC) tool to find and fix all corrupt items on your PC. This tool runs from Command Prompt and automatically detects and replaces faulty system files.
- Open Start, find Command Prompt, and select Run as administrator.
- Choose Yes in the User Account Control prompt.
- Type the following on the CMD window and press Enter:
DISM.exe /Online /Cleanup-image /Restorehealth

- When the above command has finished running, use the following command:
sfc /scannow - Wait for the tool to fix your PC’s corrupt files.
- Reboot your PC and run your Windows update.
Clear Your Windows Update Cache
Windows saves all your downloaded system updates to a specific folder on your storage. These downloaded update files may have gone corrupt, causing Windows to fail to install your update.
You can fix this issue by clearing your downloaded update files. This will force Windows to redownload your updates, fixing any issues with those files.
- Open Run by pressing Windows + R.
- Type the following in Run and press Enter:
services.msc - Find the Windows Update service, right-click the service, and choose Stop. Keep the Services window open while following the below steps.

- Open Run again, enter the following, and press Enter:
C:WindowsSoftwareDistributionDownload - Select all files in the folder by using your mouse or pressing Ctrl + A.

- Drag all your files to the trash can icon at the top. This deletes all the files in the current folder.
- Get back to the Services window, right-click Windows Update, and select Start.
- Re-run your Windows update.
Manually Download and Install Your Windows Update
If you continue to see the 0x800f0922 error and Windows won’t install your update, your last resort is to manually download and install the update on your PC. This allows you to bring your operating system to the most recent version even when Windows Update doesn’t work.
- Note your update’s name, as you’ll need that to find your update on Microsoft’s website. The update names usually start with KB.
- Open a web browser on your PC and head to the Microsoft Update Catalog site.
- Enter your update name in the search box and select Search.

- Download the appropriate update from the list.
- Run the downloaded file to install your Windows update.
- Reboot your PC.
Many items can cause your updates to fail, making your PC display an error 0x800f0922. Luckily, you can get around this problem by tweaking a few options here and there on your system, as explained above.
Once you’ve resolved your problem, your Windows updates will install without any headache for you. Enjoy!
Related Posts
- How to Fix a “This file does not have an app associated with it” Error on Windows
- How to Fix an Update Error 0x800705b4 on Windows
- How to Resolve “A JavaScript error occured in the main process” Error on Windows
- How to Fix the Network Discovery Is Turned Off Error on Windows
- How to Change Folder Icons in Windows