
Applies ToPrivacy Windows 11 Windows 10
In Windows, apps can continue to perform actions even when you are not actively in the app’s window. These are commonly called background apps. You can decide which apps will run in the background, and which won’t.
Control whether an app can run in the background
-
Select Start , then select Settings > Apps > Installed apps.
-
Scroll to the desired app, select More options on the right edge of the window, then select Advanced options.
-
In the Background app permissions section, under Let this app run in background, select one of the following options:
-
Always—The app runs in the background, receiving info, sending notifications, and staying up-to-date even when you’re not actively using it. This option may use more power.
-
Power optimized (recommended) —Windows decides what will save the most power while still allowing the app to receive notifications and update periodically. This option may limit an app that uses a lot of power.
-
Stop an app from running in the background
If you don’t want to get notifications or updates for an app when you’re not using it, you can set it so it won’t run in the background.
-
Select Start , then select Settings > Apps > Installed apps.
-
Scroll to the desired app, select More options on the right edge of the window, then select Advanced options.
-
In the Background app permissions section, under Let this app run in background, select Never.
Exceptions to the privacy settings
Desktop apps won’t appear in Installed apps. To allow or block desktop apps, use the settings in those applications.
Note: How can you tell if an app is a desktop app? Desktop apps are usually downloaded from the Internet or with some type of media (such as a CD, DVD, or USB storage device). They’re launched using an .EXE or .DLL file, and they typically run on your device unlike web-based apps (which run in the cloud). You can also find desktop applications in Microsoft Store.
Need more help?
Want more options?
Explore subscription benefits, browse training courses, learn how to secure your device, and more.

This tutorial will show you how to enable or disable let apps run in the background for your account or all users in Windows 11.
In Windows 11, you can use apps that can continue to perform actions even when you are not actively in the app’s window. These are commonly called background apps.
Some apps let you manage background activity, which determines what they can do when they’re in the background and not actively in use. Apps that can run in the background can send and receive notifications, sync information, and stay up to date. If you find that an app is using a lot of battery when running in the background, you can change the setting for apps that allow it.
You can manage background apps permissions to Always, Power optimized, or Never let an app run in the background.
- Always. The app is always allowed to run in the background—receive info, send notifications, and stay up to date—even when you’re not actively using it. However, it might use more power as a result.
- Power optimized (recommended). Windows will decide what’s best to help save the most power while still allowing the app to receive notifications and update periodically. This option might limit an app that uses more power.
- Never. When you’re not actively using the app, it won’t run in the background. You won’t receive any notifications or updates for the app, but this will help save the most power.
References:
This only applies to apps from the Microsoft Store.
To enable or disable background apps for desktop apps, you will need to use the settings in those applications.
Contents
- Option One: Turn On or Off Background Apps for Current User using REG file
- Option Two: Turn On or Off Individual Background Apps for Current User in Apps Settings
- Option Three: Turn On or Off Individual Background Apps for Current User in Battery Settings
- Option Four: Enable or Disable Background Apps for All Users in Local Group Policy Editor
- Option Five: Enable or Disable Background Apps for All Users using REG file
Option One
Turn On or Off Background Apps for Current User using REG file
1 Do step 2 (on) or step 3 (off) below for what you would like to do.
2 To Turn On Background Apps for Current User
This is the default setting.
A) Click/tap on the Download button below to download the file below, and go to step 4 below.
Turn_On_Background_Apps_for_current_user.reg
(Contents of REG file for reference)
Code:
Windows Registry Editor Version 5.00

[HKEY_CURRENT_USER\Software\Microsoft\Windows\CurrentVersion\BackgroundAccessApplications]
"GlobalUserDisabled"=-

[HKEY_CURRENT_USER\Software\Microsoft\Windows\CurrentVersion\Search]
"BackgroundAppGlobalToggle"=-
3 To Turn Off Background Apps for Current User
This will disable and remove the Background apps permissions setting from Option Two and Option Three.
A) Click/tap on the Download button below to download the file below, and go to step 4 below.
Turn_Off_Background_Apps_for_current_user.reg
(Contents of REG file for reference)
Code:
Windows Registry Editor Version 5.00

[HKEY_CURRENT_USER\Software\Microsoft\Windows\CurrentVersion\BackgroundAccessApplications]
"GlobalUserDisabled"=dword:00000001

[HKEY_CURRENT_USER\Software\Microsoft\Windows\CurrentVersion\Search]
"BackgroundAppGlobalToggle"=dword:00000000
4 Save the .reg file to your desktop.
5 Double click/tap on the downloaded .reg file to merge it.
6 When prompted, click/tap on Run, Yes (UAC), Yes, and OK to approve the merge.
7 You can now delete the downloaded REG file if you like.
Option Two
Turn On or Off Individual Background Apps for Current User in Apps Settings
1 Open Settings (Win+I).
2 Click/tap on Apps on the left side, and click/tap on Apps & features or Installed apps on the right side. (see screenshot below)
System apps currently listed in Settings > Apps > Installed Apps page, have moved to their own page under Settings > System > System components.

3 Click/tap on the 3 dots button for the app you want, and click/tap on Advanced options. (see screenshot below)
If you do not have Advanced options available, then the app doesn’t support managing its background apps permissions.

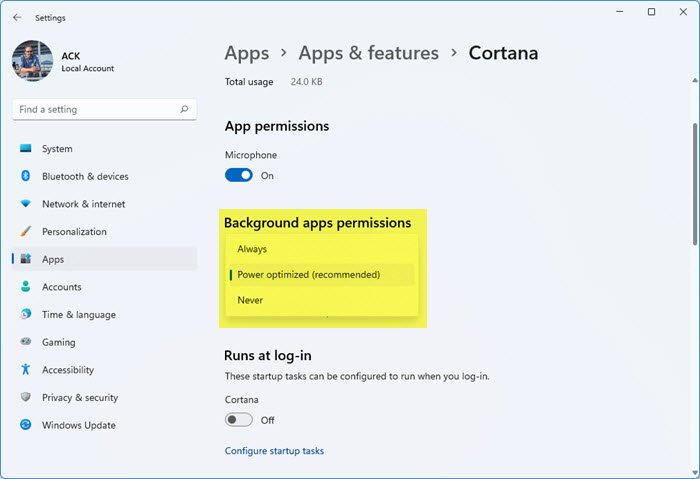
4 Under Background apps permissions, select Always, Power optimized (default), or Never for what you want in the Let this app run in background drop menu. (see screenshot below)

5 When finished managing background apps permissions, you can close Settings if you like.
Option Three
Turn On or Off Individual Background Apps for Current User in Battery Settings
This option is only available if your PC has a battery.
1 Open Settings (Win+I).
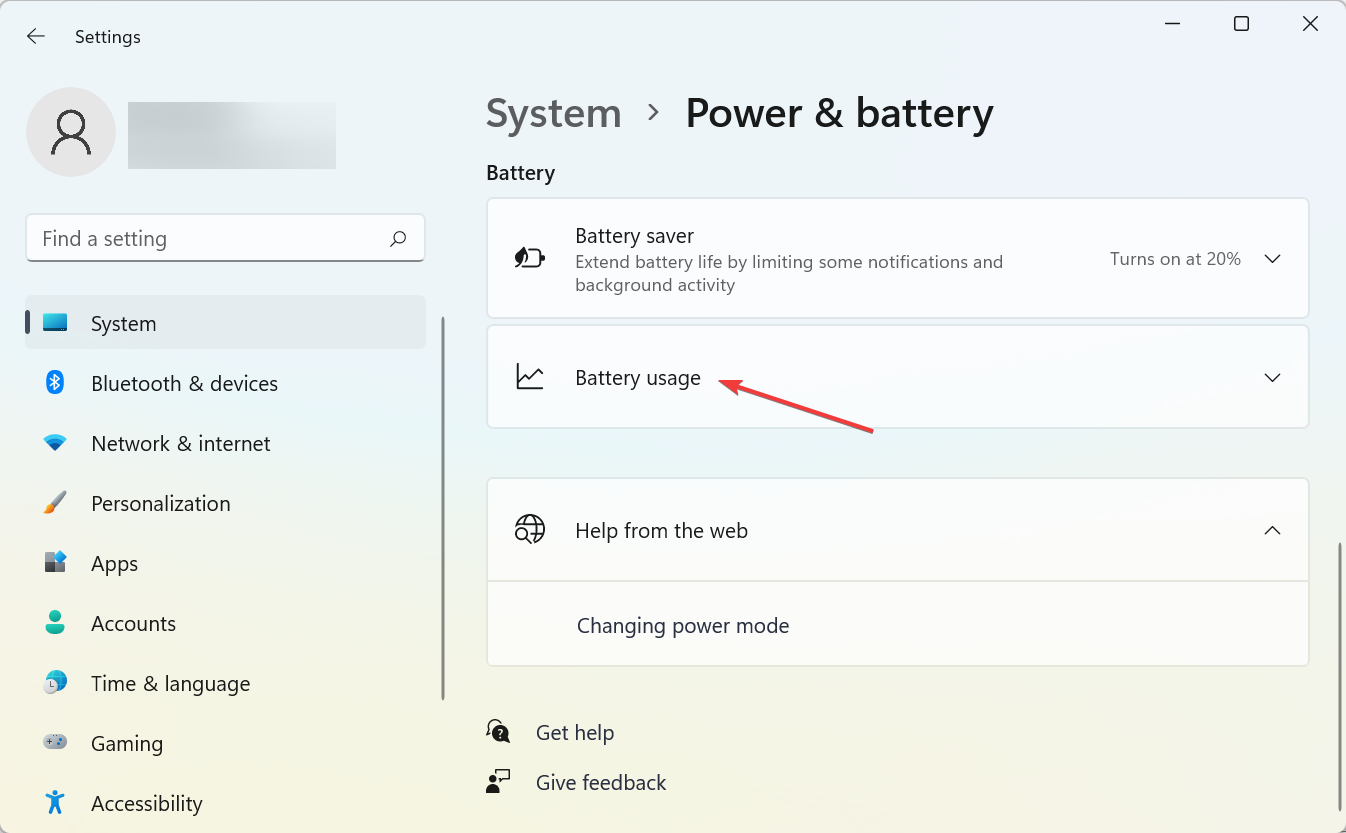
2 Click/tap on System on the left side, and click/tap on Power & battery on the right side. (see screenshot below)

3 Click/tap on Battery usage on the right side to expand it open. (see screenshot below)

4 Under Background usage per app, click/tap on the 3 dots button for the app you want, and click/tap on Manage background activity. (see screenshot below)
If you do not have Manage background activity available, then the app doesn’t support managing its background apps permissions.
5 Under Background apps permissions, select Always, Power optimized (default), or Never for what you want in the Let this app run in background drop menu. (see screenshot below)

6 When finished managing background apps permissions, you can close Settings if you like.
Option Four
Enable or Disable Background Apps for All Users in Local Group Policy Editor
You must be signed in as an administrator to use this option.
The Local Group Policy Editor is only available in the Windows 11 Pro, Enterprise, and Education editions.
All editions can use Option Five to configure this same policy using a REG file instead.
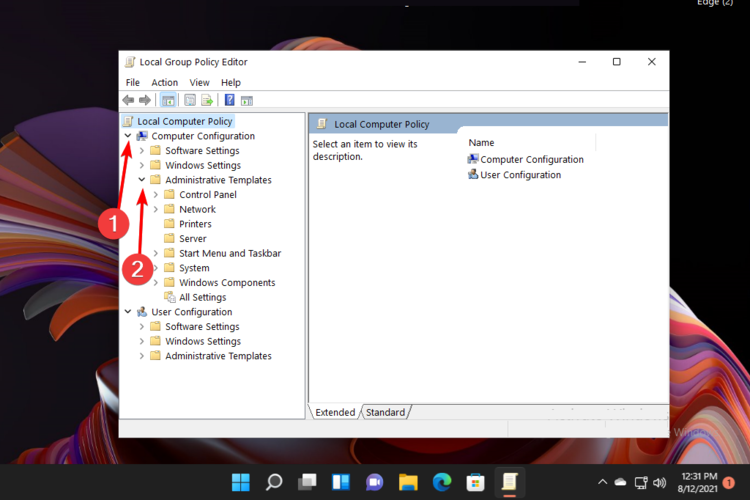
1 Open the Local Group Policy Editor (gpedit.msc).
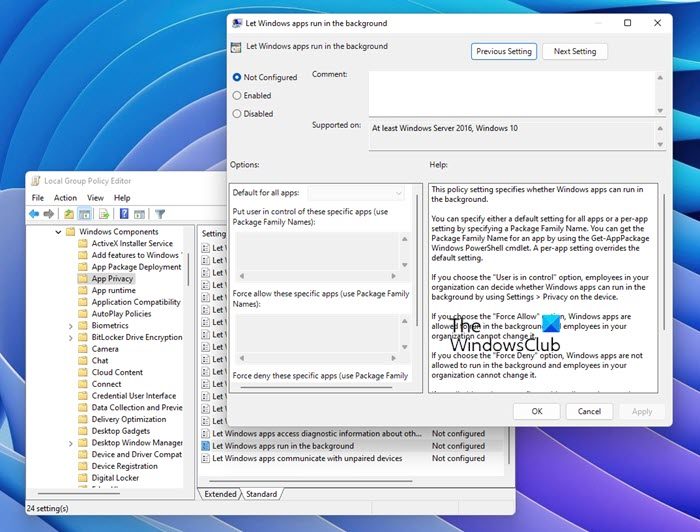
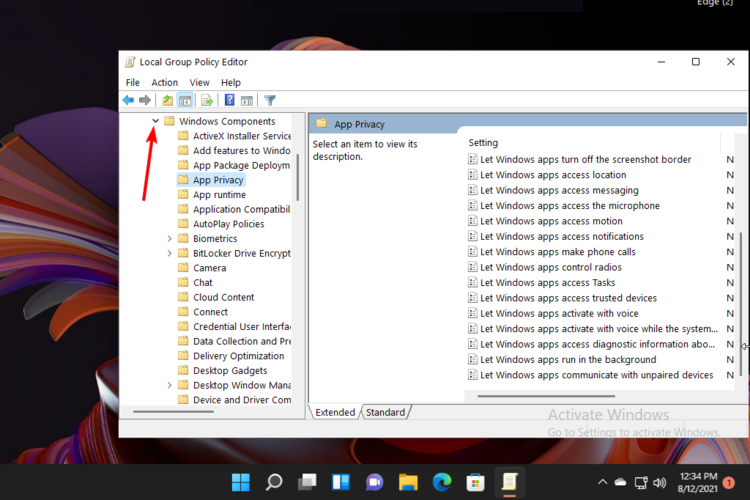
2 Navigate to the policy location below in the left pane of Local Group Policy Editor. (see screenshot below)
Computer Configuration\Administrative Templates\Windows Components\App Privacy

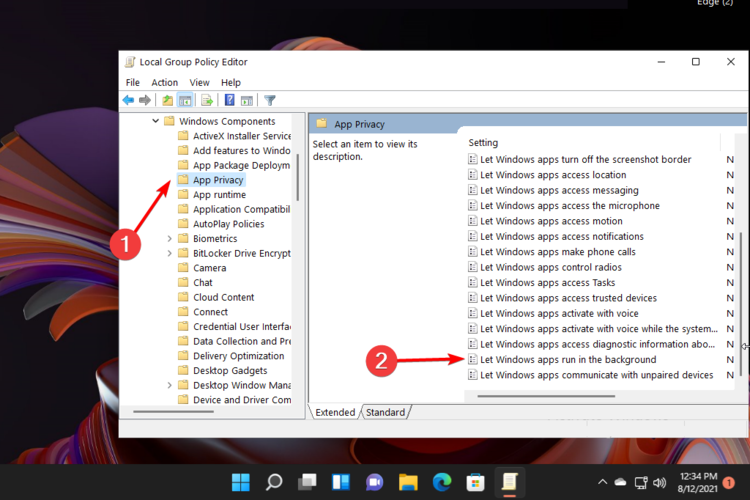
3 In the right pane of App Privacy in Local Group Policy Editor, double click/tap on the Let Windows apps run in the background policy to edit it. (see screenshot above)
4 Do step 5 (default), step 6 (always enable), or step 7 (always disable) below for what you want.
5 Default — Allow Users to Turn On or Off Background Apps for their Accounts
This is the default setting to allow users to manage Background apps permissions using Option One, Option Two, and Option Three.
A) Select (dot) Not Configured, click/tap on OK, and go to step 8 below. (see screenshot below)

6 Always Enable Background Apps for All Users
This will set the background apps permissions to Always for all apps, and disable and remove the Background apps permissions setting from Option One, Option Two, and Option Three.
A) Select (dot) Enabled, select Force Allow in the Default for all apps drop menu, click/tap on OK, and go to step 8 below. (see screenshot below)
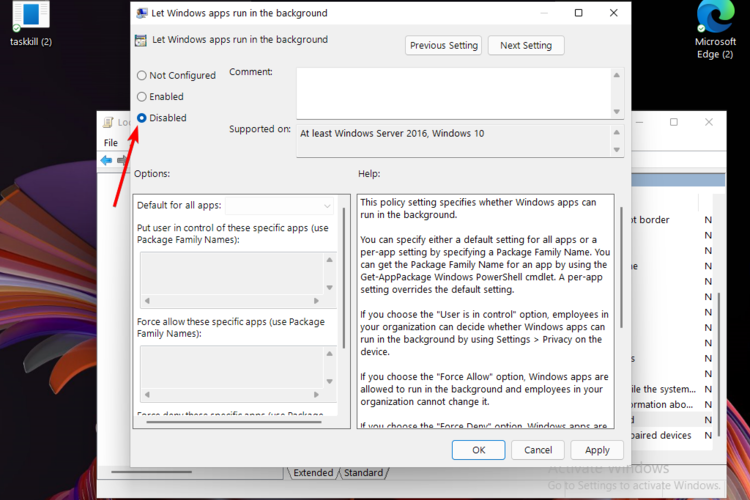
7 Always Disable Background Apps for All Users
This will set the background apps permissions to Never for all apps, and disable and remove the Background apps permissions setting from Option One, Option Two, and Option Three.
A) Select (dot) Enabled, select Force Deny in the Default for all apps drop menu, click/tap on OK, and go to step 8 below. (see screenshot below)
8 When finished, you can close the Local Group Policy Editor if you like.
Option Five
Enable or Disable Background Apps for All Users using REG file
You must be signed in as an administrator to use this option.
1 Do step 2 (default), step 3 (always enable), or step 4 (always disable) below for what you want.
2 Default — Allow Users to Turn On or Off Background Apps for their Accounts
This is the default setting to allow users to manage Background apps permissions using Option One, Option Two, and Option Three.
A) Click/tap on the Download button below to download the REG file below, and go to step 5 below.
Default_user_choice_for_Background_Apps.reg
(Contents of REG file for reference)
Code:
Windows Registry Editor Version 5.00

[HKEY_LOCAL_MACHINE\SOFTWARE\Policies\Microsoft\Windows\AppPrivacy]
"LetAppsRunInBackground"=-
"LetAppsRunInBackground_UserInControlOfTheseApps"=-
"LetAppsRunInBackground_ForceAllowTheseApps"=-
"LetAppsRunInBackground_ForceDenyTheseApps"=-
3 Always Enable Background Apps for All Users
This will set the background apps permissions to Always for all apps, and disable and remove the Background apps permissions setting from Option One, Option Two, and Option Three.
A) Click/tap on the Download button below to download the file below, and go to step 5 below.
Always_enable_Background_Apps_for_all_users.reg
(Contents of REG file for reference)
Code:
Windows Registry Editor Version 5.00

[HKEY_LOCAL_MACHINE\SOFTWARE\Policies\Microsoft\Windows\AppPrivacy]
"LetAppsRunInBackground"=dword:00000001
"LetAppsRunInBackground_UserInControlOfTheseApps"=-
"LetAppsRunInBackground_ForceAllowTheseApps"=-
"LetAppsRunInBackground_ForceDenyTheseApps"=-
4 Always Disable Background Apps for All Users
This will set the background apps permissions to Never for all apps, and disable and remove the Background apps permissions setting from Option One, Option Two, and Option Three.
A) Click/tap on the Download button below to download the file below, and go to step 5 below.
Always_disable_Background_Apps_for_all_users.reg
(Contents of REG file for reference)
Code:
Windows Registry Editor Version 5.00

[HKEY_LOCAL_MACHINE\SOFTWARE\Policies\Microsoft\Windows\AppPrivacy]
"LetAppsRunInBackground"=dword:00000002
"LetAppsRunInBackground_UserInControlOfTheseApps"=-
"LetAppsRunInBackground_ForceAllowTheseApps"=-
"LetAppsRunInBackground_ForceDenyTheseApps"=-
5 Save the .reg file to your desktop.
6 Double click/tap on the downloaded .reg file to merge it.
7 When prompted, click/tap on Run, Yes (UAC), Yes, and OK to approve the merge.
8 You can now delete the downloaded REG file if you like.
That’s it,
Shawn Brink
Related Tutorials
- Enable or Disable Startup Boost in Microsoft Edge
- Enable or Disable Background Extensions and Apps in Microsoft Edge
- Check Battery Usage per App in Windows 11
- Enable or Disable Startup Apps in Windows 11
- Enable or Disable Always Run WSA in Background in Windows 11
- Enable or Disable Photos app to Run in Background at Startup in Windows 11
- Enable or Disable Allow Windows Terminal Run in Background in Windows 11
UWP or Universal Windows Platform apps can be found in the Microsoft Store, and in many ways, they operate differently from the traditional Win32 apps, but by nature, they are the same. Like the regular Win32 apps, these apps can drain your battery if left to run in the background. The thing is, many of these apps need to run in the background in order for the user to take advantage of the full feature set. You see, for such things as live tiles and notifications to work, UWP apps must run in the background at all times.
Turn off or Disable Background Apps in Windows 11/10
Seeing as the information for live tiles and notifications are usually delivered from the cloud, UWP apps should drain less power from your battery when compared to Win32 apps, but this has yet to be tested by us, so it is still up in the air.
There are four ways to do this, but first, we are going to look at how to stop specific apps from running – you know, the ones that are not overly important.
1] Via Windows Settings Background Apps Permissions
Windows 10
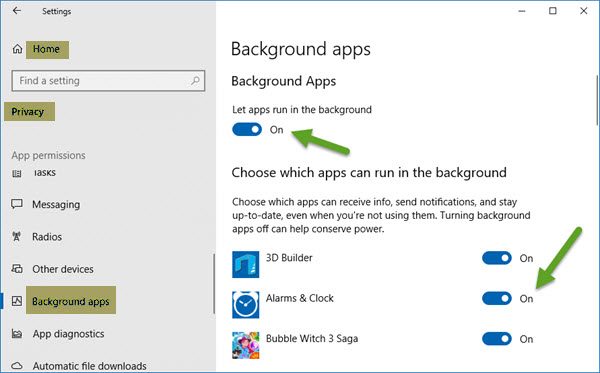
To accomplish this, click on the Start Menu then open the Settings apps. Click on Privacy, then scroll down to the option that says, Background Apps.
From here, you should see a list of apps that have permission to run in the background. Under Let apps run in the background section, simply use the toggle off/on switches to perform the relevant task.
Windows 11
In Windows 11, there is no global setting that allows you to turn off all background apps. You have to do it for every app individually.
To prevent or Windows 11 apps from running in the background:
- Open Windows 11 Settings
- Go to Apps > Apps & features
- Locate the app you want to prevent from running in the background
- Click on Advanced options
- Open the Background apps permission drop-down menu
- Here you can select Always, Recommended, or Never.
Keep in mind that apps such as the Alarm and Mail apps should always run in the background if they are used on a regular basis. Turning them off means you won’t get awakened by the Alarm bell, and you won’t get notifications or live tile updates when a new email has arrived.
When you reduce the apps that can run in the background, you will definitely conserve power as well as make your PC run better.
2] Via Battery Saver mode
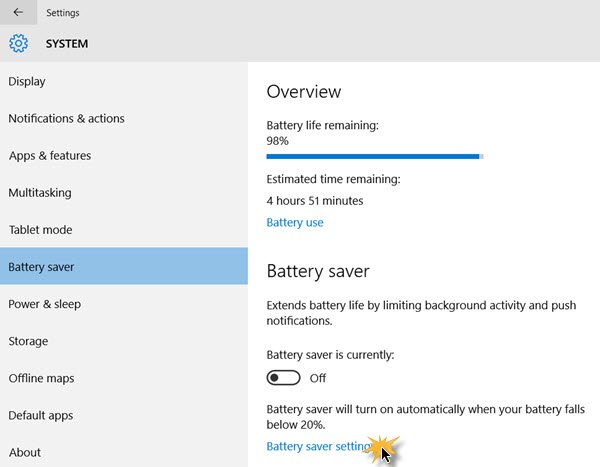
Another way of stopping UWP apps from running in the background, is simply, turning On the Battery Saver mode. Do this, and all apps will cease from running in the background right away. This is great for when you’re away from a power supply and want to get the most out of your battery’s energy.
To do this, click on the battery icon situated in the notification area, then click on the Battery Saver option to complete the task. See that? The whole process is as easy as saying your ABCs, so there should be no more complaints about battery problems in the future.
In Windows 11 similarly, you have to configure the Battery saver settings.
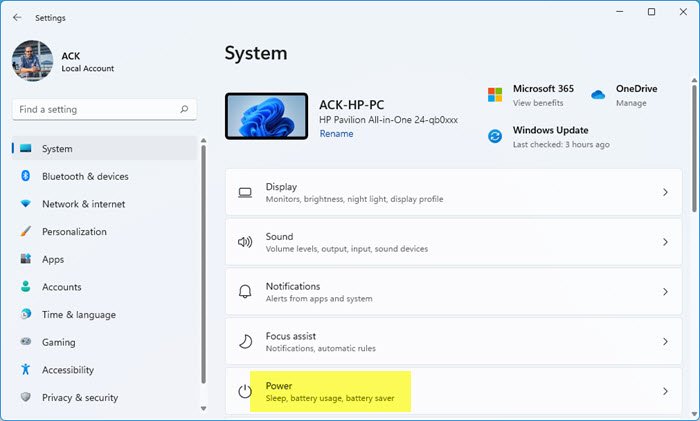
You will get them under Settings > System > Power.
3] Using Registry Editor
Open Registry Editor and navigate to the following key;
HKEY_CURRENT_USER\Software\Microsoft\Windows\CurrentVersion\BackgroundAccessApplication
Here:
- Create a new DWORD (32-bit) value with the name Default and set its value to 1
- Also, create another DWORD (32-bit) value with the name Migrated and set its value to 4
Restart your computer.
This will prevent all your Windows apps from running in the background.
4] Using Group Policy Editor
Open Group Policy Editor and navigate to the following setting:
Computer Configuration > Administrative Templates > Windows Components > App Privacy.
Locate the Let Windows apps run in the background setting and set it to Enabled.
From the drop-down menu for Default for all apps, select Force Deny.
Click Apply and exit.
This will prevent all your Windows apps from running in the background. In this way, you can also restore a Missing Background Apps Permission Option in Windows 11/10.
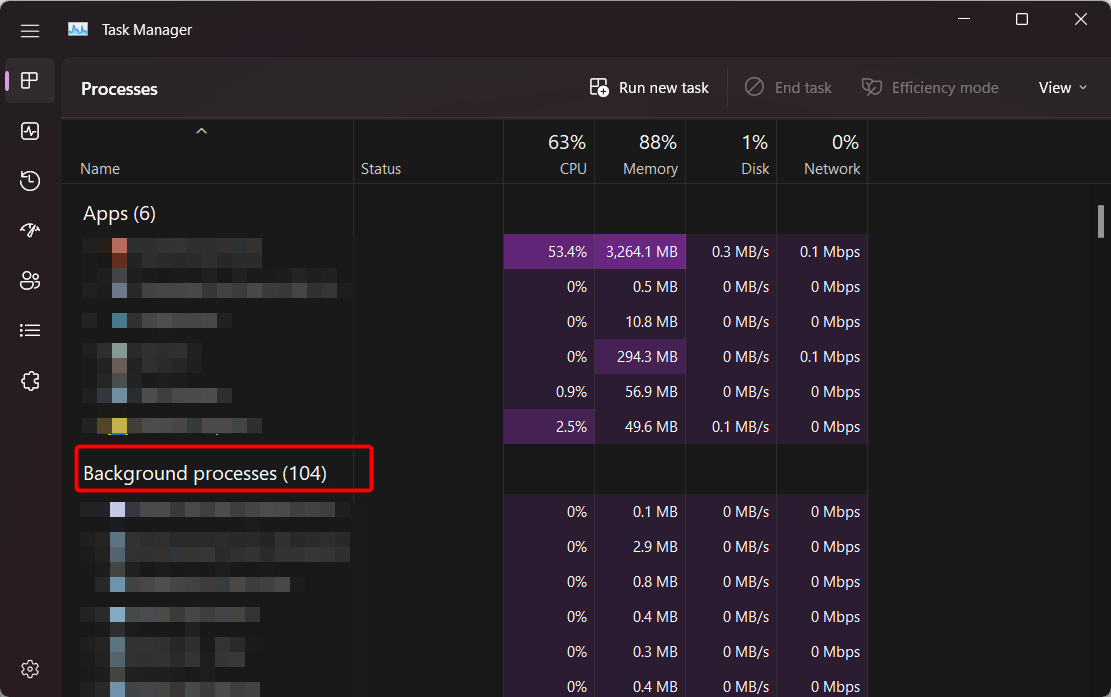
How do I reduce background processes in Windows 11?
There are many ways to manage or reduce background processes in Windows 11. You can use the Task Manager to kill unnecessary background processes. Be careful while terminating the processes via the Task Manager. Terminating useful Windows processes can make your system unstable. You can also use the MSConfig app to prevent third-party services from running automatically on system startup. Again, be careful while using the MSConfig app for disabling startup services. If you disable all the services, you will not be able to use your system.
How can I make Windows 11 faster?
You can enhance the performance of Windows 11 on your system by tweaking some settings. Background apps continuously use system memory. This will impact your system’s performance if it has less RAM. Hence, disable these startup apps. Turning on Fast Startup will make Windows 11 boot quickly.
Hope this helps!
Windows 10 comes with a feature that allows apps to run in the background even when they are not started. This enables apps to receive information, send notifications, and stay up to date even when they aren’t actively running.
Although useful, these apps can sometimes consume a considerable amount of system resources, including CPU, RAM, Internet bandwidth, and battery power.
Fortunately, you can choose which apps and programs can run in the background. In this article, we discuss ways to put programs to sleep selectively so they can’t wake without being actively used or how to disable the background apps feature altogether.
Put programs to sleep from Windows Settings
Disable programs from running from Task Manager/Configuration Manager
Unfortunately, the above mentioned settings only apply to Windows Universal apps (also known as Metro Apps). If you want to prevent traditional Windows programs and executables from running in the background, you will need to follow the steps below:
- Open the Task Manager (Ctrl + Shift + Esc)
- Open the Startup tab
- Select the programs you don’t want to run in the background and then click on the Disable button


To disable all startup items at once, follow the steps below:
- Open the Microsoft Configuration Manager by going to Run –> msconfig
- In General tab, select “Selective startup” and uncheck “Load startup items“


This will make your system faster. The apps and programs will not consume any system resources until you start them. This may slightly increase the startup time of each application but will also increase system performance.
The Verdict
I usually keep selective background apps running as they are very useful in providing timely information and updates. For example, my currently enabled background apps include Mail and Calendar, Microsoft Store, Microsoft To Do, OneNote for Windows 10, Skype and Windows Security.
What apps do you prefer running in the background?
Readers help support Windows Report. We may get a commission if you buy through our links.
Read our disclosure page to find out how can you help Windows Report sustain the editorial team. Read more
Having an interactive digital environment is cool but it can also make your PC slower. A background app continues performing actions even when you are not actively in its specific window.
It seems like users are interested in finding how to disable background apps in Windows 11. These are part of the latest UI design, which is just one of the new features that matter in Windows 11.
All users need to improve their PC performance. Apart from the hardware upgrade, you’ll always have to take care of the running apps on your computer.
How do I see what apps are running in the background Windows 11?
Background apps are the one that run in the background even when you have not manually opened them. These perform various background processes, for instance, updates or bugs checks.
Press Ctrl + Shift + Esc to open Task Manager and see what background apps are running.
Background apps play a critical role on your computer and ensure the effective functioning of the installed programs.
Which background apps should I turn off?
In Windows 11, most of those apps will run in the background at all times by default. And this is happening even though most users are not using them.
Running background apps implies using an important portion of your system resources (RAM, CPU cycles, etc.). This might make your device work a little slower than it would if they weren’t enabled in the background.
In addition, some background apps can also use lots of Internet data. This is a harmful aspect, especially if you’re using a limited data plan.
And considering that Windows 11 doesn’t support old devices as we thought, these problems are much worse for aged machines.
You can easily choose to remove OneDrive from Windows 11, uninstall Dropbox, or remove Google Drive if you are using this instead.
How do I stop apps from running in the background Windows 11?
1. Use the Apps settings
-
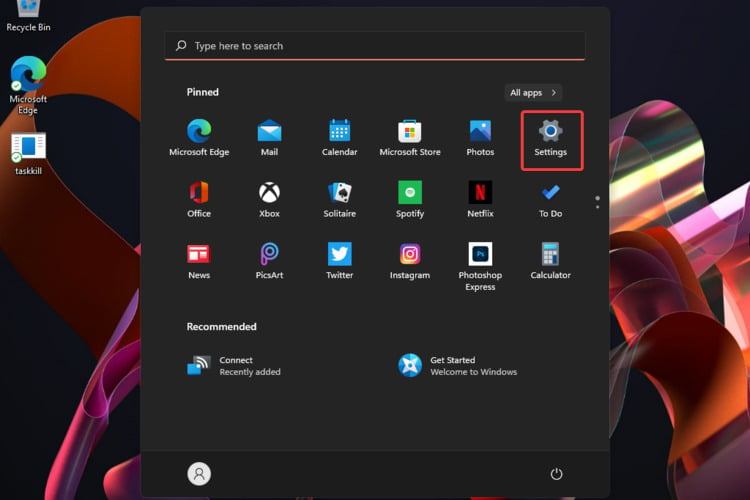
1. Hit the Windows key, then open the Settings menu.

-
2. Click on Apps, then on Apps & features.
-
3. Search for the app you want to disable.
-
4. Click on the three horizontal dots next to the app, and select Advanced options.
-
5. Navigate to the Backgrouns apps permissions section.
-
6. Under Let this app run in the background, choose the Never option.
-
7. Repeat the same steps for each background app you need to disable.
Unwanted apps can be easily prevented from running in the background on your device through the Apps Settings. In the apps list, you will be able to view and configure settings for all the apps that have permission to run in the background.


If you want to disable all background apps in Windows 11, it can be done on your device through the Apps Settings. In the apps list, you will be able to view and configure settings for all the apps that have permission to run in the background.
Note that some apps are important to keep, like the weather app, to get timely info or the Alarms & Clock app, which helps you to receive important event reminders, and others.
2. Try the help of Battery Settings
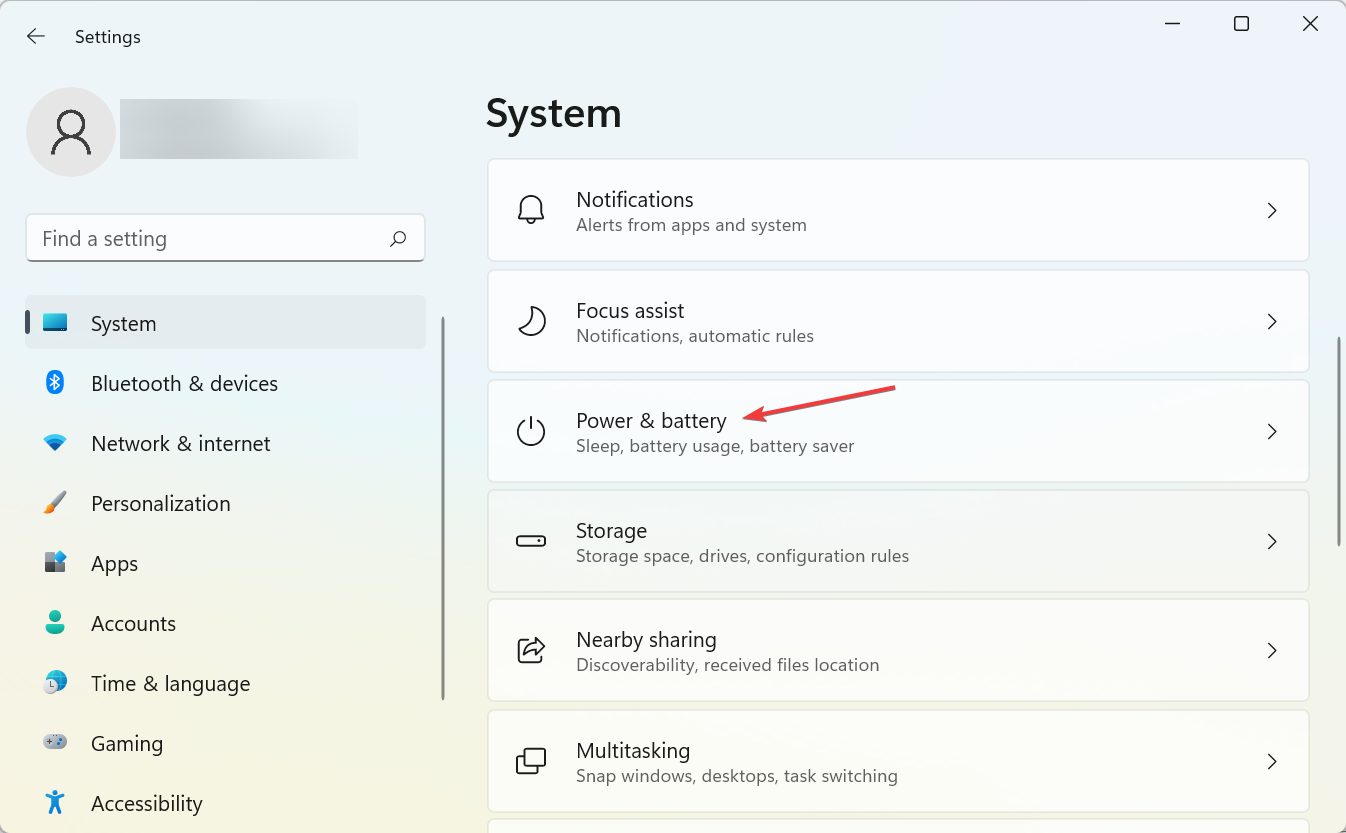
- Press simultaneously on Windows + I to open the Settings menu, go to System, then click on Power & battery.

- Click on the Battery usage section.
- Under the Battery usage per app section, search for the needed background app, click on the ellipsis next to it, and then select Manage background activity.
- You’ll be redirected to the Apps & features page. There, under the Background apps permissions section, choose again the Never option.

Keep in mind that this option will work only if your PC has a battery. For example, it wouldn’t be available if you’re running Windows 11 on a VM machine.
3. Navigate to Task Manager
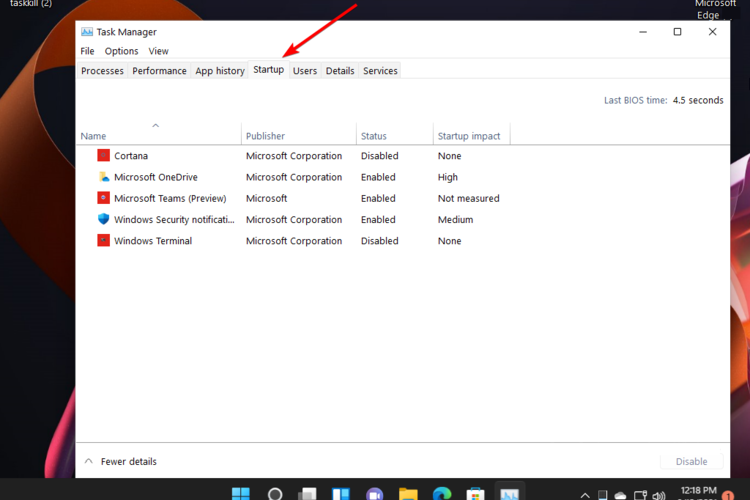
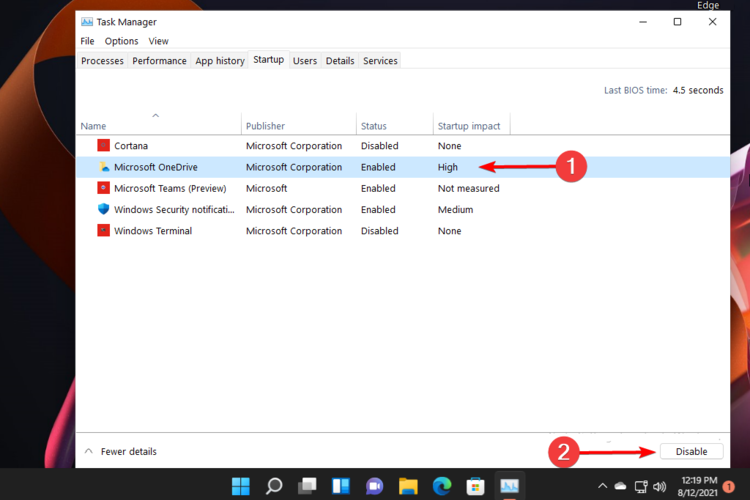
- Press Ctrl + Shift + Del to open the Task Manager, and then go to the Startup tab.
- Search for the app you want to turn off, click on it, then press the Disable button.
With Task Manager, you can disable only traditional desktop programs from running in the background.
4. Use Local Group Policy Editor
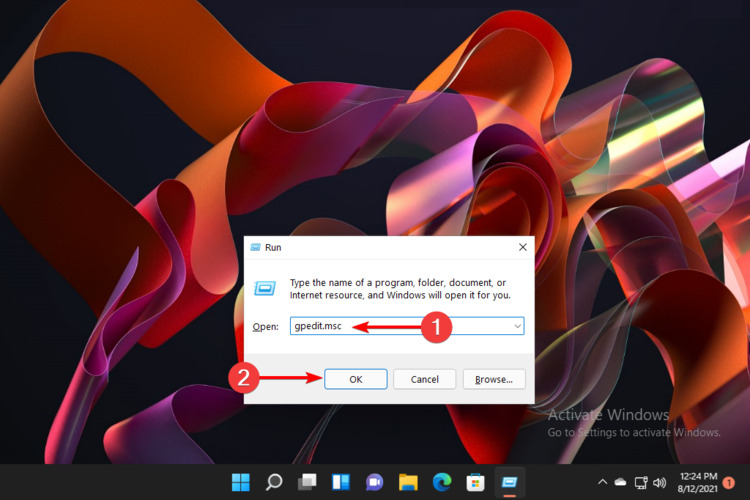
- Press Windows + R to open the Run command, type gpedit.msc, then click on OK.
- Expand the Computer Configuration section, then the Administrative Templates section.
- Open the Windows Components section.
- There, click on App Privacy, then look at the right window side and double-click on Let Windows apps run in the background.
- Checkmark the Disabled option.
- Click on Apply, then on OK.
This option will only be successful if you’re signed in as an administrator. You can easily disable background apps in Windows 11 using Registry and helps programs use the computer’s resources.
5. Disable background apps in Windows 11 via Registry
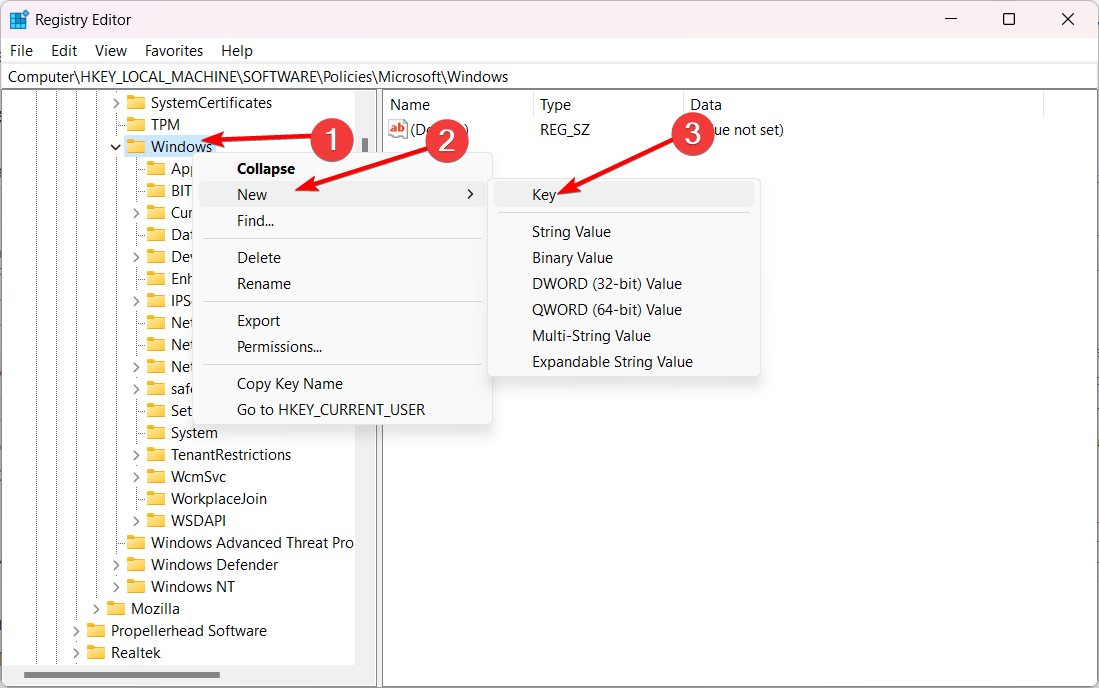
- Press Windows Key + R and enter regedit. Press Enter or click OK to open the Registry Editor.

- Navigate to the following key then check if you have AppPrivacy under Windows. If not, you’ll have to create one:
HKEY_LOCAL_MACHINE\SOFTWARE\Policies\Microsoft\Windows - Right-click on Windows then choose New followed by Key and name it AppPrivacy.

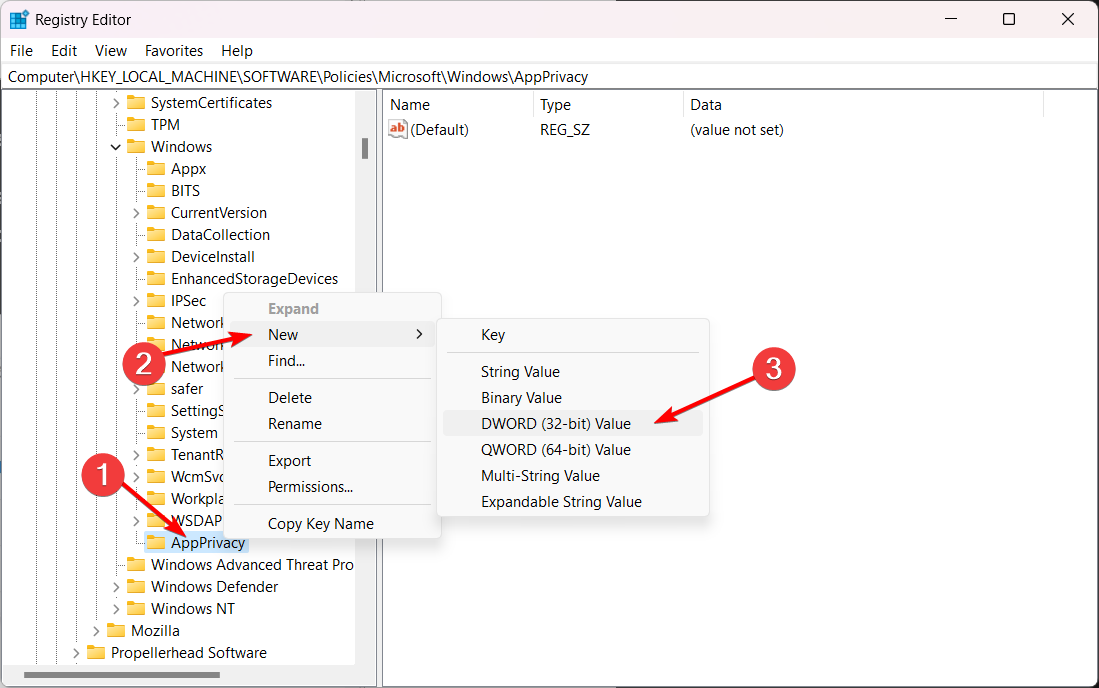
- Next, right-click the AppPrivacy key then choose New followed by DWORD and name it LetAppsRunInBackground.
- Right-click the LetAppsRunInBackground value and select Modify. Set the Value data to 2 then save the changes made and reboot your PC.

How do I enable background Apps?
If you suddenly change your mind and want to bring back your background apps in Windows 11, note that you can do it with ease. To perform this action, the Settings menu or Registry Editor would also be essential supports.
For those times when you want to turn them on, you should check out these accessible methods to make Windows 11 faster and more responsive.
Advantages of running apps on Windows 11 background
When it comes to running Windows 11 background apps, it is not only about disadvantages. There are also some great implications if you choose to enable them back.
Having them opened in this way will allow you to receive notifications and information and stay up-to-date with various data without directly using related programs.
Isn’t it great that Windows OS allows you to customize your digital environment whenever you like?
If you were wondering how to disable the apps in Windows 11, these were the most effective methods to do that.
However, consider that you can get plenty of harmful apps, so you should always be prepared. To prevent such a situation, we recommend checking how to block potentially unwanted apps on your Windows device.
It is important to have a secured digital environment without being affected by corrupted apps. So, you should also take a look at these antivirus options for Windows 11.
You can use all the tips from this guide to stop Microsoft Edge from running in the background at all times, so don’t hesitate to try it.
We’re always excited to find your thoughts and opinions, so leaving a comment in the section below will definitely help us.
Vladimir Popescu
Being an artist his entire life while also playing handball at a professional level, Vladimir has also developed a passion for all things computer-related.
With an innate fascination for research and analysis, and realizing many other people share his passion for this subject, he delved into writing Windows-related articles, so other people can also benefit from the acquired information.
When not writing kick-ass articles, Vladimir likes to spend his time doing Crossfit and creating art.