
На этой странице вы можете бесплатно скачать Драйвер для Lenovo G500 Diagnostics v.4.26.1
Категория:Notebooks
Производитель:Lenovo
Оборудование:Lenovo G500
Тип программы:Software
Название:Diagnostics
Версия:4.26.1
Размер файла:42.42Mb
Рейтинг:5/5
Тип архива:ZIP
Дата выхода:12 Nov 2018
Система:Windows 10 64-bit, Windows 8.1 64-bit, Windows 8 64-bit, Windows 7 64-bit, Windows Server 2008, Windows Server 2003
Status:Free
Загрузок:811
Описание:Diagnostics driver for Lenovo G500
Правовая информация:Все програмное обеспечение, размещённое на Driver.ru является бесплатным. Все названия и торговые марки принадлежат их владельцам.
Внимание:Некоторые программы получены из непроверенных источников. Мы не гарантируем их совместимость и работоспособность. Всегда проверяйте загруженные файлы с помощью антивирусных программ. Мы не несём никакой ответственности за возможные потери, возникшие в результате установки загруженных программ. Загрузка файла с Driver.ru обозначает вашу информированность об этом и согласие с данными условиями.
Похожие файлы:
Название:Diagnostics
Версия:4.26.1
Система:Windows 10, Windows 8.1, Windows 8, Windows 7, Windows XPWindows Server 2003
Тип программы:BIOS Update
Версия:78CN25WW(V2.03)
Система:Windows 8.1Windows 8.1 64-bit
Название:Keyboard Test
Версия:4.7.0.8081
Система:Windows 10, Windows 8.1, Windows 8, Windows 7, Windows XPWindows Server 2003
Название:Display Interface Test
Версия:4.7.0.8081
Система:Windows 10, Windows 8.1, Windows 8, Windows 7, Windows XPWindows Server 2003
Название:Display Interface Test for Window 64 bit
Версия:4.7.0.8081
Система:Windows 10 64-bit, Windows 8.1 64-bit, Windows 8 64-bit, Windows 7 64-bitWindows Server 2003
Описание:Display Interface Test for Window 64 bit driver for Lenovo G500
Display Interface Test for Window 10 (64-bit), Windows 8 (64-bit), 7 (64-bit), 2003 Advanced Server (64-bit) and 2008 Advanced Server (64-bit) — Desktops, Notebooks, Workstations
Скачать Lenovo G500 Display Interface Test for Window 64 bit v.4.7.0.8081 драйвер
Название:Keyboard Test
Версия:4.7.0.8081
Система:Windows 10 64-bit, Windows 8.1 64-bit, Windows 8 64-bit, Windows 7 64-bit, Windows Server 2008Windows Server 2003
Название:Bootable Generator
Версия:2.1.0
Система:Windows 8, Windows 8 64-bit, Windows 7, Windows 7 64-bit, Windows Vista, Windows Vista 64-bit, Windows XPWindows Server 2008
Описание:Bootable Generator driver for Lenovo G500
is a tool runs on Windows platform to create Lenovo UEFI Diagnostics — Bootable USB and Lenovo Linux Diagnostics — Bootable USB. Lenovo UEFI Diagnostics — Bootable USB is a diagnostic tool that can be booted itself and tests hardware devices in Lenovo ThinkPad, ThinkCentre, ThinkStation, ThinkServer and IdeaPad Lenovo Linux Diagnostics — Boota…
Скачать Lenovo G500 Bootable Generator v.2.1.0 драйвер
Название:OneKey Recovery
Версия:8.0.0.2105
Система:Windows 8.1 64-bit
Название:Intel WLAN Driver
Версия:15.8.0.5
Система:Windows 8 64-bit
Название:AMD Video Driver
Версия:13.151.0.0
Система:Windows 8.1Windows 8.1 64-bit
Are you using a Lenovo computer? Do you want to test your computer’s devices? Here Lenovo diagnostics tool may be what you need. Now, MiniTool will introduce you this Lenovo hardware diagnostics tool in details and some extra useful tips.
As its name implies, Lenovo diagnostics is a diagnostic tool that can only be used on Lenovo computers. The Lenovo hardware diagnostics tool is mainly composed of Modules (Tests) and Tools. Its modules allow you to test a variety of devices in Lenovo computers including audio, battery, fan, RAID, storage, memory, motherboard, mouse devices, etc.
Tip: Click here to download this Lenovo PC diagnostics tool based on your system information (32-bit or 64-bit). This tool also provides a bootable version that you can use to create a bootable USB and CD/DVD.
Besides, Lenovo diagnostics includes many tools that you can use them to create a diagnostic script, analyze system information, view log history, recover bad sectors, measure network speed, show the real-time temperature of your devices, etc.
There are 2 major test types that you can choose to run this Lenovo diagnostics tool including Quick tests and Full tests. This tool also provides a customized option to perform the test. In a nutshell, Lenovo diagnostics is a practical and comprehensive hardware diagnostics tool. Now, please keep reading to know more details.
What Modules and Tests Does Lenovo Diagnostic Includes
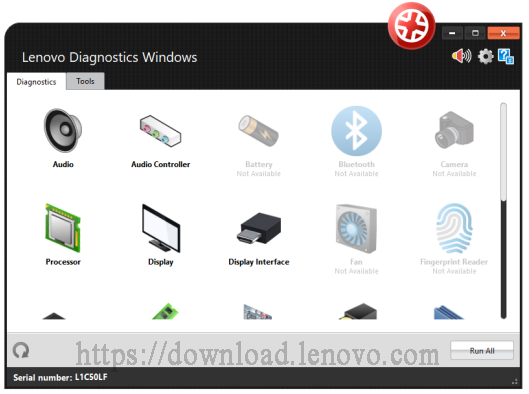
In this part, we mainly focus on the modules and tests that Lenovo diagnostics can perform on your computer. This program supports you to diagnose 24 types of devices in Lenovo computers. Here we mainly introduce the following 5 modules that are widely performed by users.
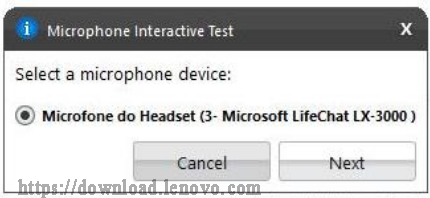
#1. Audio
The audio module is composed of the Audio Playback test and Microphone Interactive test. Both of the 2 tests belong to the Quick test. The Audio Playback test will advise the users some audio patterns and ask them if the device volume can be heard.
The Microphone Interactive test can help you test if the microphone is able to capture sound properly. You need to select a microphone to be tested and speak on it. Then this tool will listen to the audio you recorded and inform you if the sound can be captured.
#2. Battery
Battery health has a significant impact on the lifespan of your computer. A lot of people are troubled by various battery issues such as battery not charging, wrong battery percentage, and missing battery icon, etc. So, you can use the Lenovo diagnostics tool to test your battery’s health.
In addition, this tool also can help you make an extended discharge/charge test as well as a quick battery temperature test. For example, if the battery temporary is too high, this tool will remind you to change the battery or offer other solutions.
#3. Memory
Memory test should be one of the most commonly used operations on Lenovo diagnostics. This test includes many test items including quick random pattern test, advanced integrity test, bit low/high test, random number sequence test, block move test, and so forth.
It is not only used to test the health of your memory but also to improve the performance or cover some faults. For instance, when performing the advanced integrity test, it intends to cover some coupling faults and transition faults. The address test can help you cover any addressing faults in the accessible memory range.
#4. Motherboard
It is also important to diagnose your motherboard on a regular basis to avoid some potential risks. This Lenovo PC diagnostics tool can perform a motherboard test including chipset test, PCI/PCI-e test, RTC test, and USB test. You can refer to the following information:
- Chipset test: This test can check the status of the controllers that consist of the motherboard chipsets including the EHCI, OHCI, SATA, AHCI, etc.
- PCI/PCI-e test: It mainly checks for unexpected errors or power failure on the PCI onboard devices.
- RTC test: It checks the Real-Time Clock (RTC) properties that make sure the proper operation of the motherboard.
- USB test: It checks the errors for your USB devices.
#5. Storage
The Lenovo hardware diagnostics tool can also be used to check the status of your storage devices including HHD and SSD. The storage diagnostic test is reported by SMART so that you can identify if the device is faulty or not.
This test includes many types such as SMART status test, target read test, SAMRT drive self-Test, and so forth. For instance, the target read test can identify the bad sectors reported in the SMART logs. The SMART drive self-test can check the sequential and random disk read speeds.
Right now, you may already have an overall understanding of the Lenovo PC diagnostic test. Apart from the above-introduced modules, you can choose other devices modules based on your needs. Next, let’s further explore the Lenovo diagnostics tools.
#1. Diagnostic Script
The diagnostic script is one of the most important tools that allow you to create a customized list of tests for the devices. It’s composed of the following 3 options:
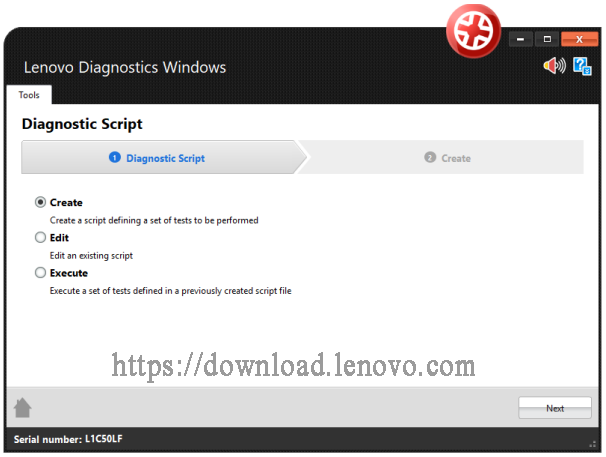
- Create: It allows you to create a new diagnostic script that you can select a set of modules.
- Edit: It allows you to edit the diagnostic script that you saved previously or select an existing diagnostic script. You can modify its configuration by changing the list of tests and modifying the execution numbers.
- Execute: It allows you to perform the test configuration that you have modified in a diagnostic script.
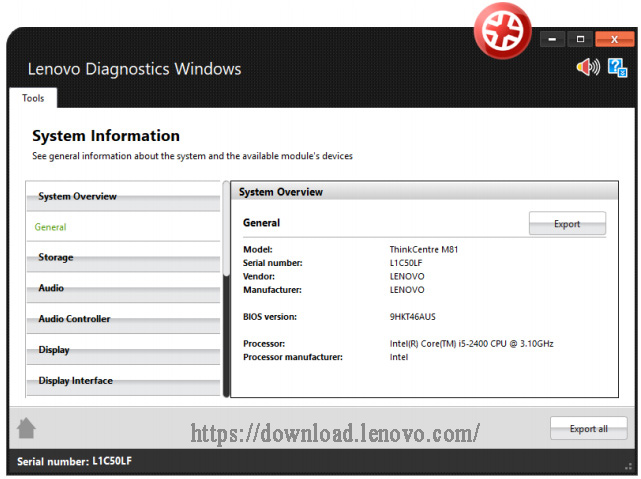
#2. System Information
The system information tool enables you to view the general information about the system including BIOS version, processor, manufacture, etc. Besides, it can explore the available devices that you can perform a diagnostic module on your Lenovo computer. You can also export the system information via modules.
#3. Recover Bad Sector
The recover bad sector tool is a practical tool that enables users to scan for bad sectors on HDD or SSD devices and repair them if possible. However, it has an obvious disadvantage. According to users’ reports, this recovery operation requires your confirmation and can lead to data loss. So, please make sure you have a backup of your disk before performing the operation.

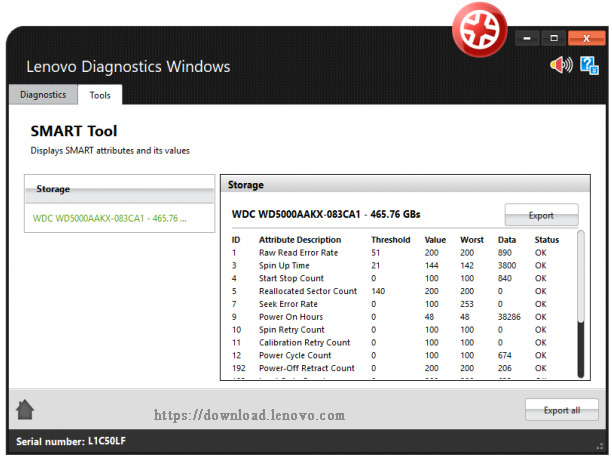
#4. SMART Tool
The SMART tool is used to export the information about the storage devices on your Lenovo computer. The information can be exported to an HTML or PDF file. According to this tool, you can know the attribute description, threshold, value, data, and worst of a storage device
After exploring its modules and tools, you may wonder how to run Lenovo diagnostics. Let’s go on.
How to run Lenovo diagnostics tool? To do so, follow the full guide below:
Step 1. Download and install a suitable version on your Lenovo computer from its official website.
Step 2. In the main interface, you can choose the Diagnostics or Tools based on your needs. Here we take the modules for example. Select the Diagnostics tab to go on.
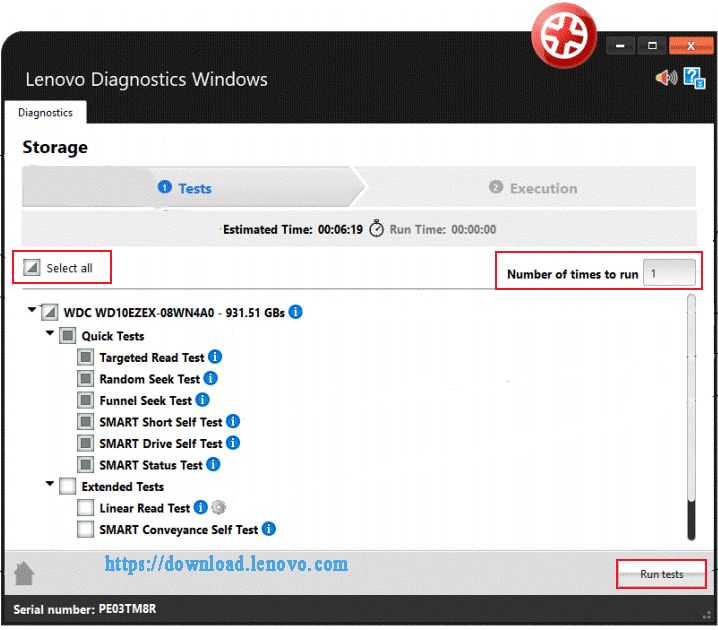
Step 3. Select a module in the Diagnostics tab. After that, you will be directed to select a device that you want to diagnose and all the test items will be displayed.
Step 4. Here click on the Select all option, or you can select the test items that you need. For example, you can select all test items or just select Target Read Test and Random Seek Test for storage test. After that, click on the Run tests button.
Tip: You can set the test in a range from 1 to 20 times.
Step 5. Click on See Device Information and you can view the detailed information of this storage device. The results depend on your selected module.
Step 6. Click on See test description, and then you can see a brief introduction of this test and the estimated time to perform the test.
Step 7. After you specify the test execution, click on the Run test, and OK to execute this operation. Here you can choose the recommended or custom test.
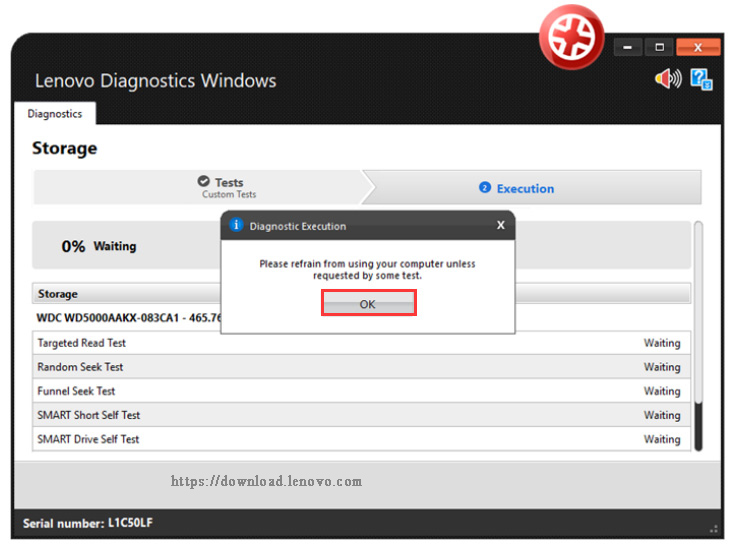
Now, the test execution starts and you need to wait for some time. According to the results, you will have a general understanding of your storage including its size, rotation rate, physical/logical sector size, model, etc.
However, the Lenovo diagnostics tool can’t measure the write speed and help you manage storage devices effectively. Besides, some users report that they encounter a BSOD crash on a ThinkPad computer when using the Recovery Media version of Lenovo diagnostics to reinstall OS.
So, you can consider using another storage management tool – MiniTool Partition Wizard to test your storage device.
Do you want to test your storage device effectively? MiniTool Partition Wizard is a powerful and trusted alternative to Lenovo diagnostics. It can not only be used to test the storage devices of Lenovo computer but other external devices such as SD card, HHD, and SSD that connect to your Lenovo PC.
It can help you perform a disk benchmark, rebuild MBR, resize partition, change cluster size, migrate OS, and so on. If you encounter a BSOD error and your computer is unbootable, MiniTool Partition Wizard Pro Ultimate Edition is recommended. This is because you can use this edition to create a bootable CD/DVD that you can use it to manage your storage under WinPE.
#1. Perform a Disk Benchmark
Step 1. Connect your storage device to your computer and run the MiniTool Partition Wizard to get its main interface.
Step 2. Click on Disk Benchmark on the top toolbar.
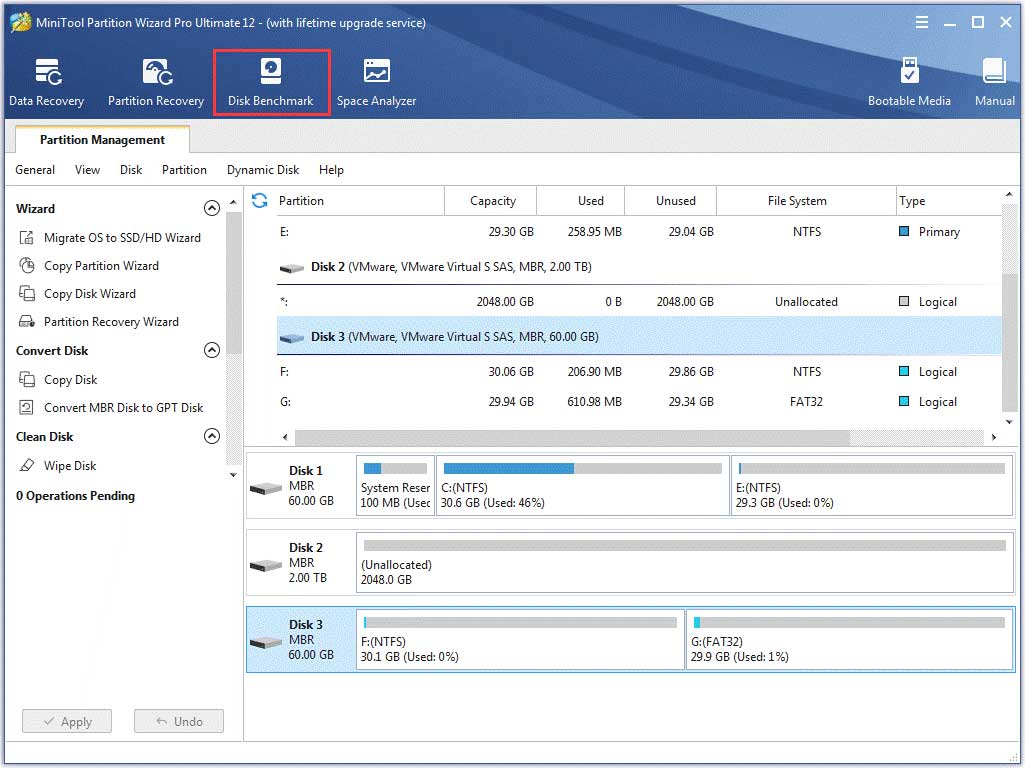
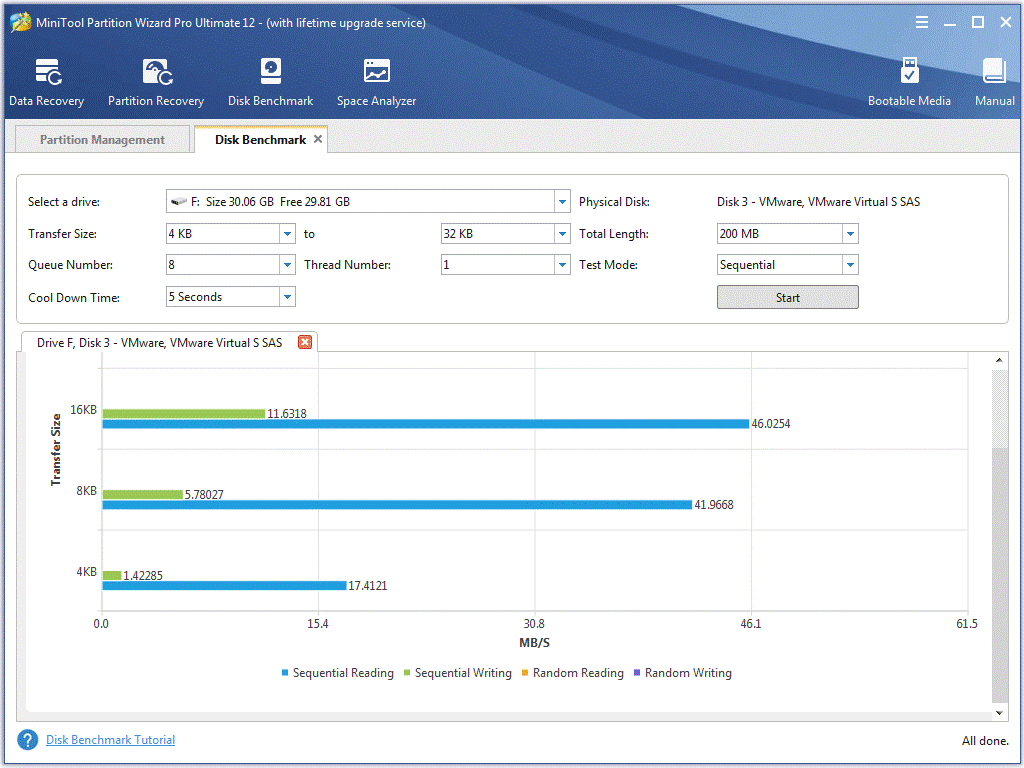
Step 3. Select the storage drive letter from the drop-down menu and click on the Start button to check your storage device.

Step 4. Wait for some time, and then you will obtain the test results including transfer size, random reading and writing speed, etc.
#2. Check File System
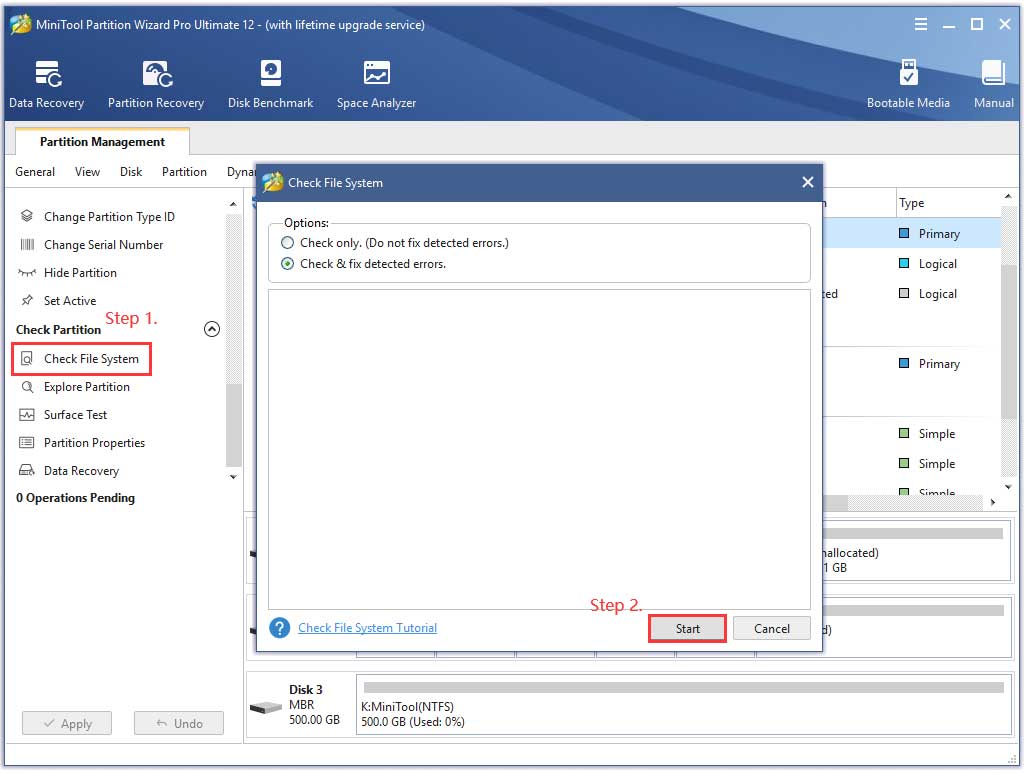
The Check File System feature of MiniTool Partition Wizard can help you identify if there are any damaged file system and repair the file system errors on the hard drive. For that:
Step 1. Select the partition that you want to check and click on the Check File System from the left pane.
Step 2. Select the Check & fix detected errors option and click the Start button. After that, this tool will check and fix file system errors at once.
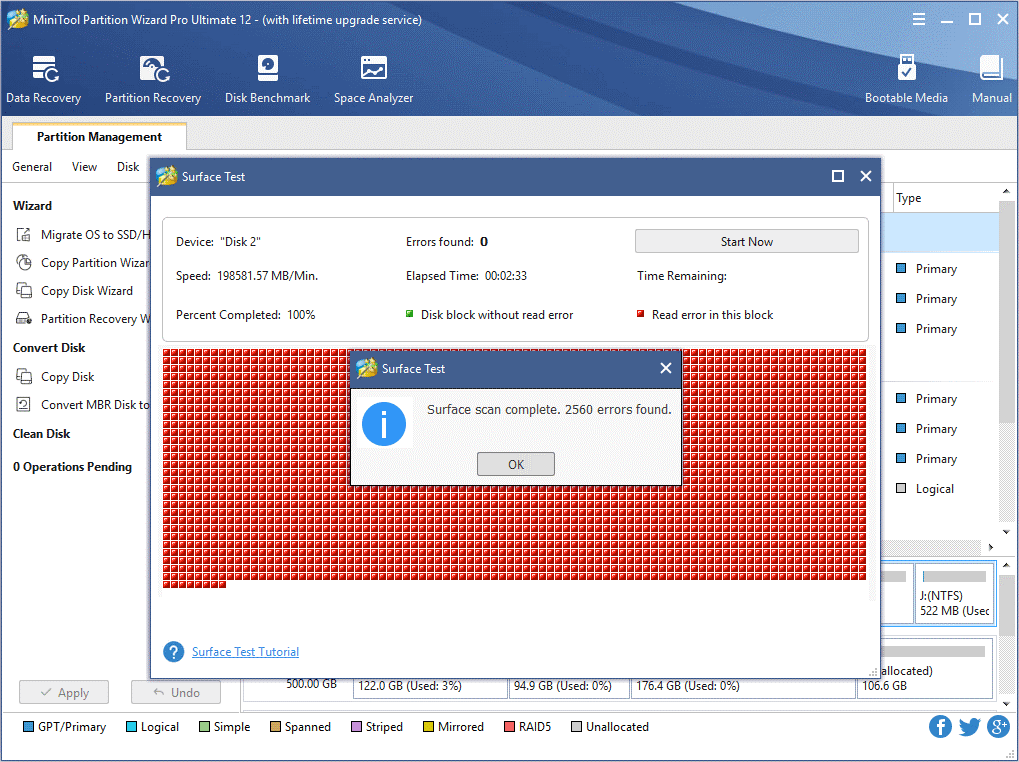
#3. Check Bad Sectors
This powerful program can also help you check the errors on your storage drive. It is very simple to operate with a few clicks.
Step 1. Select the target drive and click on the Surface Test on the left pane.
Step 2. Then click on the Start Now button in the pop-up window to check the hard drive for error.
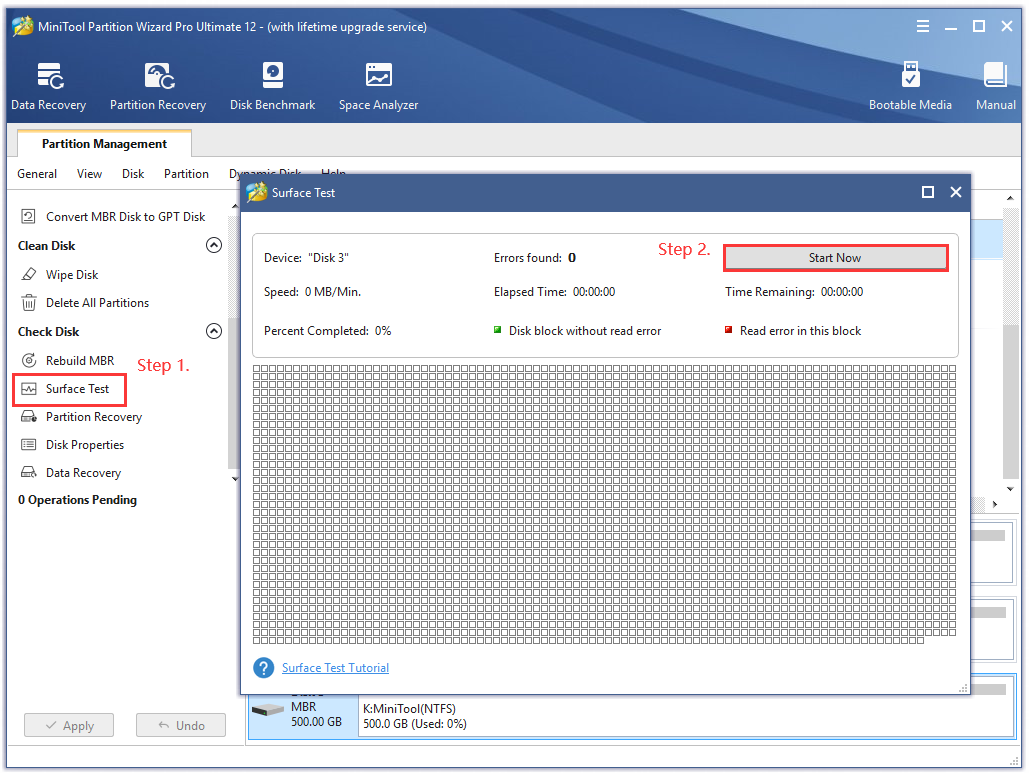
Step 3. After that, you can check if there are any bad sectors on the drive. If there are bad sectors that are marked with red colors, you can run chkdsk /f/r command to repair or consider replacing your drive.
What is Lenovo diagnostics? How to use this tool? Is there any better program to check my storage devices? Click here to get these answers.Click to Tweet
Bottom Line
What is Lenovo diagnostics and how to use it? I believe that you already have a deep understanding of these questions. Besides, you can use MiniTool Partition Wizard to test your storage devices. If you have any questions, please send us an e-mail via [email protected]. We also appreciate any endeavor that makes us go further.
Lenovo Diagnostics FAQ
?How do I stop Lenovo diagnostics?
- Launch Lenovo diagnostics tool and then go to the Dashboard view.
- Click on Edit, and then disable them by dragging updates or other unneeded items to the right Event not monitored
- Right click the Lenovo Solution center and click on Disable.
?How do I get to the boot menu on a Lenovo?
- Restart your Lenovo computer until you arrive at the Lenovo logo screen.
- Press the F12 (Fn + F12) keys for several seconds to enter Windows Boot Manager.
- Now, you can select the boot device from the BIOS list.
?Does Lenovo have built in diagnostics?
Yes, it is. You can use the Lenovo diagnostics that contains a set of quick and extended tests. You can use it to test memory, motherboard, HHD/SSD, audio, CPU, RAID, video, etc. You can run it on Windows or Linux operating systems.
?How do I run a memory diagnostic tool?
You can use the Windows built-in diagnostic tool to check your computer’s memory.
- press the Win + R keys to open the Run dialogue box, and then type exe in it and hit Enter.
- Select the Restart now and check for problems option in the pop-up window. Then your computer will restart and this tool will perform a memory test automatically.
Описание
Примечание: поддержка Lenovo Solution Center закончилась 2019-04. Используйте Lenovo Diagnostics или Lenovo Vantage.
Среди самых известных сервисных программ для устройств Lenovo выделяется Lenovo Solution Center. Её основное назначение – это проведение стабилизации внутренней системы на персональных компьютерах и ноутбуках. Софт официально поставляется к каждому новому продукту бренда, а также может быть свободно скачен с официального сайта компании.
Функционал Lenovo Solution Center достаточно широк. Приложение отвечает за обновление программного, системного софта. В то же время контролирует ситуацию с firewall и антивирусами. По заданному настройками графику активируется режим многочисленных, аппаратных тестов. При этом специальной команды пользователя на это не требуется. Работа Lenovo Solution Center осуществляется в автоматическом режиме.
Настройки Lenovo Solution Center просты в освоении и упрощают навигацию для пользователя. Есть всего два блока в главном окне. Первый представлен несколькими вкладками. Второй – выводит на экран результаты запросов и все запущенные, активные процессы. В любой момент вы сможете получить интересующую информацию.
Официальный сайт: support.lenovo.com
Here is the List of all lenovo Diagnostic Drivers, you can Free download all lenovo Diagnostic Drivers online, just free update Diagnostic drivers online for your lenovo device now!
Download all lenovo Diagnostic drivers free.
Total 227 Lenovo Diagnostic Drivers
previous 1 2 3 4 5 6 7 next
File Name Description
File Size
Release Date
File Name
Intel VGA Driver for Windows 10 (64-bit) — Lenovo B71-80 Laptop
Intel VGA Driver
85.5 MB
2015/11/23
2tlb06af.exe
Real Time Diagnostics (Linux) — IBM BladeCenter E (Type 1881, 7967, 8677)
IBM Real Time Diagnostics — Linux
6.05MB
2008/1/9 0
39m7088.tgz
Real Time Diagnostics v2.20 (Linux Standalone) — IBM BladeCenter E (1881, 7967, 8677)
Real Time Diagnostics — Linux Standalone
72.07MB
2008/1/8 0
39m7089.tgz
Real Time Diagnostics v2.20 ( Microsoft Windows) — IBM BladeCenter E (1881, 7967, 8677)
Real Time Diagnostics — Windows
6.38MB
2008/1/8 0
39m7090.exe
Real Time Diagnostics v2.20 (Microsoft Windows Standalone) — IBM BladeCenter E (1881, 7967, 8677)
Real Time Diagnostics — Windows Standalone
57.79MB
2008/1/8 0
39m7091.zip
Intel VGA Driver for Windows 10 (64-bit) — B41-30, B51-30
Intel VGA Driver
86.7 MB
2016/6/15
73b204af.exe
Intel VGA Driver for Windows 7 (64-bit) — B41-30, B51-30
Intel VGA Driver
106.8 MB
2016/11/1
73B302WF.exe
Intel VGA Driver for Windows 7 (32-bit) — Lenovo E31-80
Intel VGA Driver
55.1 MB
2015/11/20
8xet01wf.exe
Intel VGA Driver for Windows 7 (64-bit) — B41-80, B51-80, E41-50, E51-80
Intel VGA Driver
107 MB
2016/10/14
9eb003wf.exe
Intel VGA Driver for Windows 8.1 (64-bit) — B41-80, B51-80, E41-80, E51-80
Intel VGA Driver
90.6 MB
2015/10/16
9eb2019f.exe
AMD VGA Driver for Windows 8.1 (64-bit) — B41-80, B51-80, E41-80, E51-80
AMD VGA Driver
283.1 MB
2015/10/16
9eb3019f.exe
AMD VGA Driver for Windows 10 (32-bit, 64-bit) — B41-80, B51-80
AMD VGA Driver
283.1 MB
2015/10/8
9eb601af.exe
Intel VGA Driver for Windows 10 (32-bit, 64-bit) — B41-80, B51-80
Intel VGA Driver
90.6 MB
2015/10/8
9ebv01af.exe
Intel VGA Driver for Windows 7 (32-bit) — B41-80, B51-80, E41-80, E51-80
Intel VGA Driver
67.4 MB
2016/10/14
9ebv03wf.exe
Autonomic Computing Package for networking events — IBM eServer BladeCenter
Instructions for installing BladeCenter Networking events and readme
1.08MB
2004/7/14
bcautopack.pdf
Autonomic Computing Package for networking events — IBM eServer BladeCenter
Diagnostic java code
961.37KB
2004/7/14
bladecenterac.zip
Lenovo Diagnostics — Bootable USB (Create it on Windows OS) — Desktops, Notebooks, Workstations
Lenovo Windows Diagnostics — Bootable USB
1.8 MB
2016/10/11
bootable-generator-10.exe
Lenovo Bootable Generator for Windows 8 (32-bit, 64-bit), 7 (32-bit, 64-bit), Vista (32-bit, 64-bit), XP, Server 2008 — Desktops, Notebooks, Workstations
Lenovo Bootable Generator
7.2 MB
2016/3/3 0
bootable-generator-gui-210.zip
Lenovo CPU Test for Windows 10 (64- bit), 8.1 (64-bit), 8 (64-bit), 7 (64-bit), 2003 Advanced Server (64-bit) and 2008 Advanced Server (64-bit) — Desktops, Notebooks, Workstations
Lenovo CPU Test for Windows 64-bit
6.0 MB
2016/4/12
cpu_test_x64_4708081.exe
Lenovo CPU Test for Windows 10 (32-bit), 8.1 (32-bit), 8 (32-bit), 7 (32-bit), XP (32-bit) and 2003 Advanced Server (32-bit) — Desktops, Notebooks, Workstations
Lenovo CPU Test for Windows 32-bit
5.3 MB
2016/4/12
cpu_test_x86_4708081.exe
Preboot Dynamic System Analysis (DSA) Update for Windows Server 2003 (32-bit and 64-bit) and 2008 (32-bit and 64-bit) — ThinkServer RD210 and RD220
Firmware Update for Preboot Dynamic System Analysis (DSA) Update
60.17MB
2013/10/23
d6yt32a.exe
ThinkStation Diagnostics — ThinkStation P500, P700, P900
Lenovo Mobile Diagnostics (Google Play Store)
2014/12/8
details?id=com.lenovo.diagnostics
Lenovo Display Interface Test for Windows 10 (64-bit), Windows 8 (64-bit), 7 (64-bit), 2003 Advanced Server (64-bit) and 2008 Advanced Server (64-bit) — Desktops, Notebooks, Workstations
Lenovo Display Interface Test for Window 64 bit
5.8 MB
2016/4/12
display_interface_test_x64_4708081.exe
Lenovo Display Interface Test for Windows 10 (32bit), Windows 8.1 (32bit), Windows 8 (32bit), Windows 7 (32bit), windows XP (32bit), windows 2003 advanced server (32bit) — Desktops, Notebooks, Workstations
Lenovo Display Interface Test for Windows 32bit
5.1 MB
2016/4/12
display_interface_test_x86_4708081.exe
Preboot Dynamic System Analysis (DSA) Update for Windows Server 2003, 2008, RHEL 5, SLES 10 and SLES 11 — ThinkServer TS200, TD200x, TD200, RD210, RD220 and RS210
Preboot Dynamic System Analysis Update For Linux
94.44MB
2013/10/23
dsyt70xl.bin
Preboot Dynamic System Analysis (DSA) Update for Windows Server 2003, 2008, RHEL 5, SLES 10 and SLES 11 — ThinkServer TS200, TD200x, TD200, RD210, RD220 and RS210
Preboot Dynamic System Analysis Update For Windows
94.29MB
2013/10/23
dsyt70xw.exe
Lenovo Fan Test for Windows 10 (64-bit), 8.1 (64-bit), 8 (64-bit), 7 (64-bit), 2003 Advanced Server (64-bit) and 2008 Advanced Server (64-bit) — Desktops, Notebooks, Workstations
Lenovo Fan Test for Windows 64-bit
7.4 MB
2016/4/12
fan_test_x64_4708081.exe
Lenovo Fan Test for Windows 10 (32-bit), 8.1 (32-bit), 8 (32-bit), 7 (32-bit), XP (32-bit), 2003 Advanced Server (32-bit) — ThinkPad
Lenovo Fan Test for Windows 32-bit
6.5 MB
2016/4/12
fan_test_x86_4708081.exe
Intel Thunderbolt Controller Driver for Windows 10 (64-bit) — ThinkPad W540, W541
Intel Thunderbolt Controller Driver
1.9 MB
2015/9/7 0
gmtc03ww.exe
ThinkPad Tablet Drive Erase Utility for eMMC Drive for EFI Shell — ThinkPad 8, ThinkPad 10
ThinkPad Tablet Drive Erase Utility for eMMC Drive
36.2 KB
2014/8/19
gufd01ww.zip
Total 227 Diagnostic Drivers For Lenovo
previous 1 2 3 4 5 6 7 next
Primary Query: How do I run diagnostics on my Lenovo laptop?
To run diagnostics on your Lenovo laptop, follow these steps:
- Determine Bootability: First, check if your laptop can boot into the operating system (OS). This will determine which diagnostic tools you can use.
- Use Lenovo Vantage: For laptops that boot into Windows, Lenovo Vantage provides a comprehensive diagnostic tool.
- Explore Lenovo Diagnostic Solutions: If your laptop cannot boot into the OS, use bootable diagnostic packages available for Windows and Linux.
- Run UEFI Diagnostics: In cases where the OS is inaccessible, UEFI diagnostics can be accessed through the BIOS.
Follow-Up Questions
- What diagnostic tools are available for Lenovo laptops?
- How to Run Full Diagnostics on My Lenovo Laptop?
- How does Lenovo Vantage help in diagnostics?
- What are the Lenovo Diagnostic Solutions?
- How can I run UEFI diagnostics on my Lenovo laptop?
- How do I interpret diagnostic results?
- What additional resources are available for Lenovo diagnostics?
Lenovo offers a range of diagnostic tools tailored for different scenarios:
- Lenovo Vantage: A versatile tool for users who can boot into Windows OS. It provides system management and diagnostic features.
- Bootable Packages: Essential for systems that cannot boot into the OS. These packages can be run from a CD/DVD or USB drive.
- Lenovo Diagnostics for Windows: Installs and runs from within Windows for quick component checks.
- UEFI Diagnostics: Accessed through BIOS, offering critical tests when the OS is unreachable.
These tools collectively help in scanning and identifying hardware issues, ensuring precise troubleshooting.
How to Run Full Diagnostics on My Lenovo Laptop?
When you need a comprehensive analysis of your system, full diagnostics are the way to go. Here’s how to run them using both Lenovo Vantage and Lenovo Diagnostic Solutions:
Using Lenovo Vantage Custom Scan
- Open Lenovo Vantage and navigate to the Hardware Diagnostics section.
- Select “Custom Scan.”
- Choose the specific components you want to test. You can select individual components or opt for a full system scan.
- Lenovo Vantage will provide an estimated scan time based on your selections.
- Click “Scan Selected” to initiate the scan.
- During the scan, you’ll see status updates for each component.
- Once the scan is complete, review the results and the Final Result Code.
- Save a copy of the scan results for reference.
Using Lenovo Diagnostic Solutions
- Determine whether you need bootable diagnostics (if you can’t boot into your operating system) or downloadable diagnostics (if you can boot into Windows or Linux).
- Download the appropriate diagnostic tool from the Lenovo Support website. Use the links provided earlier to access the download pages.
- If using the bootable option, create bootable media (USB drive or DVD) using the instructions provided with the downloaded tool.
- If using the downloadable option, run the downloaded package within your operating system.
- Follow the on-screen instructions to initiate the diagnostic scan.
- Review the results and note any “fail” statuses or error codes.
- Save a copy of the diagnostic logs for your records.
Individual Diagnostic Tools: Targeted Troubleshooting
Lenovo also provides individual diagnostic tools for specific hardware components, such as the Lenovo Hard Drive Quick Test. These tools are particularly helpful when you suspect an issue with a particular component. You can find these tools on the Lenovo Diagnostic Solutions website under the “Individual Diagnostic Tools” section.
How Do I Run a Battery Diagnostic on My Lenovo Laptop?
- Lenovo Vantage: Check if Lenovo Vantage includes a battery health check feature.
- Lenovo Diagnostic Solutions: Explore the Lenovo Diagnostic Solutions suite or the individual tools download page for a dedicated battery diagnostic tool.

How Does Lenovo Vantage Help in Diagnostics?
Lenovo Vantage is a powerful application that simplifies diagnostics and system management:
- Hardware Diagnostics: Offers both Simple and Custom scan options to check the health of components like CPU, memory, storage (SSD, SATA, SAS), optical drives, wireless components, motherboard, video, and RAID.
- User-Friendly Interface: Makes diagnostics accessible even to non-tech-savvy users, providing clear instructions and results.
- Common Issue Detection: Identifies frequent issues such as battery performance problems and system lags.
- Step-by-Step Guide: Users can easily navigate through diagnostics with guided prompts and recommendations.
Benefits: By streamlining system checks, Lenovo Vantage empowers users to maintain optimal laptop performance without needing extensive technical knowledge.
What Are the Lenovo Diagnostic Solutions?
Lenovo Diagnostic Solutions provide comprehensive testing for various troubleshooting scenarios:
- Bootable and Downloadable Packages: Available for both Windows and Linux, these tools facilitate diagnostics when the OS is unbootable.
- Types of Tests: Include memory, storage, CPU, motherboard, and specific tests like the Lenovo Hard Drive Quick Test.
- Scenario-Based Troubleshooting: Ideal for addressing complex issues such as boot failures and hardware malfunctions.
- User Guide: Offers detailed instructions for downloading and utilizing these tools effectively.
These solutions enable users to perform deep diagnostics, helping identify and resolve system issues efficiently.
How Can I Run UEFI Diagnostics on My Lenovo Laptop?
UEFI diagnostics are essential when the OS is inaccessible, offering a way to diagnose hardware independently of the OS:
- Accessing BIOS: Restart your laptop and press the designated key (often F2, F10, or Del) to enter BIOS setup.
- Navigating to UEFI Diagnostics: Locate the diagnostics section within the BIOS menu.
- Running Tests: Select and run the necessary tests for hardware components such as memory, motherboard, and storage.
To enhance this process, you can download bootable media with an option for UEFI Diagnostics from the Lenovo support site.
Importance: UEFI diagnostics provide a low-level testing environment, crucial for diagnosing fundamental hardware issues without relying on the OS.
How Do I Interpret Diagnostic Results?
Interpreting diagnostic results is key to understanding your laptop’s health:
- Pass/Fail Statuses: Each test will return a ‘pass’ or ‘fail’ status, indicating the condition of the component.
- Result Codes: Use these codes to seek further support or technical assistance if needed.
- Warranty Check: Verify the warranty status for potential part replacements if a component fails.
- Saving Logs: Save diagnostic logs for future reference or to assist technical support in troubleshooting.
These steps help users make informed decisions regarding repairs and maintenance.
Common Troubleshooting Scenarios
- Freezing: If your Lenovo laptop keeps freezing, diagnostics can help identify potential causes. Run a memory test using Lenovo Vantage or Lenovo Diagnostic Solutions to check for RAM issues. A full system scan can also help uncover other hardware or software conflicts that might be contributing to the problem.
- Black Screen: A black screen can be caused by various hardware issues, such as problems with the display, graphics card, or even the motherboard. Try accessing UEFI diagnostics to test your hardware components. If you can access the Lenovo logo screen before the screen goes black, it might indicate an issue with the operating system loading. Consider booting into Safe Mode to try resolving software conflicts or using a bootable recovery drive to repair your operating system.
- Boot Problems: If your Lenovo laptop won’t boot, it might be due to issues with the hard drive, boot files, or BIOS settings. Try accessing UEFI diagnostics to test your hardware. If you can’t even access the BIOS menu, it could indicate a more serious hardware problem requiring professional repair.
What Additional Resources Are Available for Lenovo Diagnostics?
Lenovo provides a variety of resources to enhance diagnostic capabilities:
- Lenovo ID Benefits: Creating a Lenovo ID offers critical product support, upgrades, and alerts, including safety issues or product recalls. It also helps validate the warranty with purchase history.
- ThinkVantage Technologies: Offers additional applications for managing system performance and security.
- External Links: Access Lenovo Diagnostic Solutions, Lenovo Vantage download, and ThinkVantage Technologies downloads for tools and guides.
- Contacting Lenovo Support: If diagnostics do not resolve your issue, reach out to Lenovo support for further assistance. This provides a direct avenue for professional help.
Conclusion
Running diagnostics on your Lenovo laptop is crucial for maintaining its health and performance. By leveraging tools like Lenovo Vantage and Lenovo Diagnostic Solutions, you can effectively troubleshoot and resolve issues. Regular diagnostics empower you to keep your device in optimal condition, ensuring it meets your needs reliably. Remember to perform checks periodically and seek professional help if required.
How to perform hardware diagnostics with Lenovo Vantage video:
_____________________
J.S. is the owner, content creator, and editor at Upgrades-and-Options.com. I’ve worked in the IT and Computer Support field for over 20 years. The server hardware in my computer labs has mostly been IBM, but I’ve supported Dell, HP, and various other hardware. In addition, as part of my lab administrator responsibilities, I’ve learned, supported, and repaired/upgraded network hardware such as Cisco routers and switches. READ FULL BIO >>