
Linux is a family of open-source operating systems. They are based on the Linux kernel and are free to download. They can be installed on either a Mac or Windows computer. Here’s how to install Linux on a Windows 10 PC.
If you want to dual boot Linux and Windows, you will need to create a space for your Linux OS to live. In order to do this, you will have to partition your main hard drive. Here’s how to do that:
How to Partition a Hard Drive in Windows 10
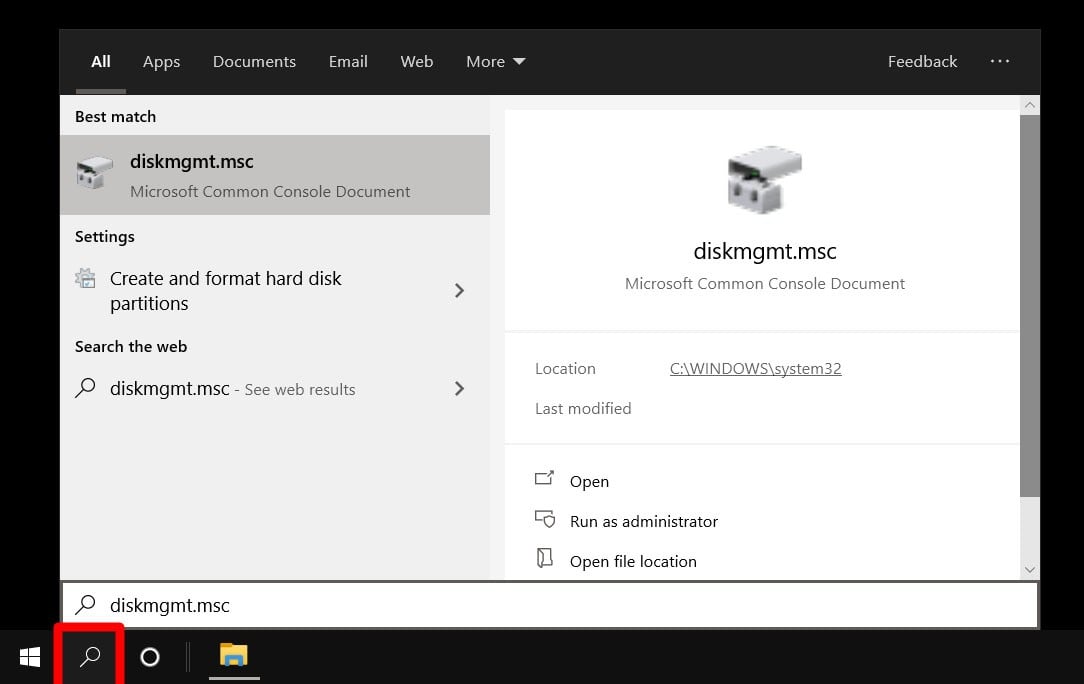
- Open the Windows Search Bar. This is the magnifying glass-shaped icon in the bottom-left corner of your screen.
- Then type “DISKMGMT.MSC” in the search bar and hit enter.

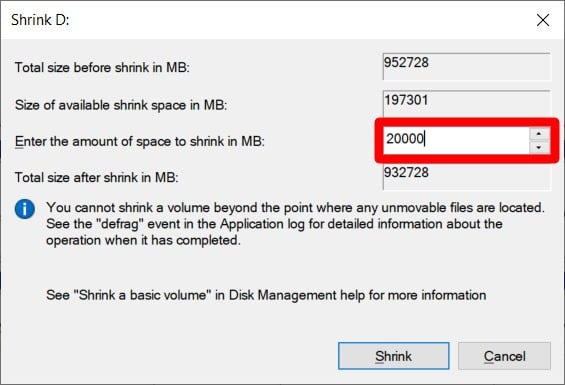
- Right-click on your main hard drive and select Shrink Volume. If you have more than one drive, make sure to choose the one that says Primary Partition. This will usually be labeled as the C: drive.
- Then choose how much you want to shrink your drive. It is recommended that you set aside at least 20GB (20,000MB) for Linux.
- Finally, click Shrink.

Once you have a designated space to install Linux, you’ll need to write a Linux Distro onto a USB thumb drive or external drive 4GB or larger. Here’s how to do that:
How to Make a Linux Bootable USB
- Download a Linux distro in ISO format. An ISO file is a disk image. Some of the top options are Ubuntu, Mint, or Fedora. They are free to download from each distribution’s main website. For this article, we are using Ubuntu.
- Insert the USB drive into your computer. You might be asked to format your drive. This will erase all the data stored on your drive, so make sure to back up your files before you begin.
- Download Rufus. You can find the latest version of the application here.
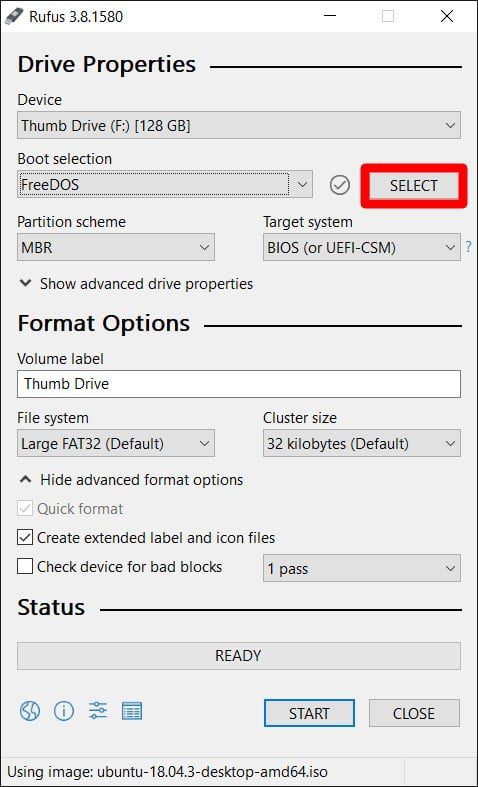
- Open Rufus and select your USB drive from the Device list. If you don’t know which drive to use, eject all other drives until you only have one to choose from.
- Under Boot Selection, click the Select button and choose the ISO file you downloaded earlier. Don’t change the other default settings.
- Finally, click Start. If you get a pop-up message asking you to select a mode that you want to use to write the image, choose ISO.
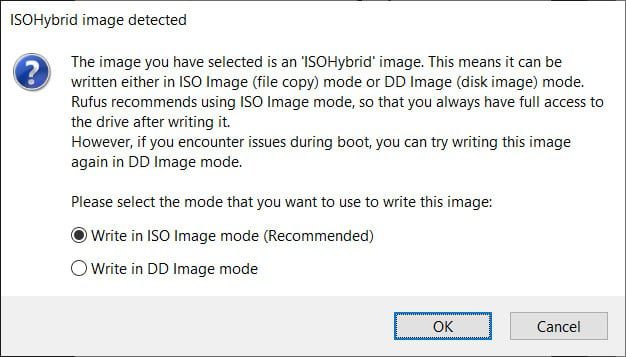
Then wait for Rufus to mount your ISO file onto your drive. This
might take some time, so be patient if the progress bar gets stuck.
Warning: This will erase all the data on your drive, so make sure to back up any important files.
How to Install Linux from USB
Now that you have your Linux distro on a USB, here’s how to
- Insert a bootable Linux USB drive.
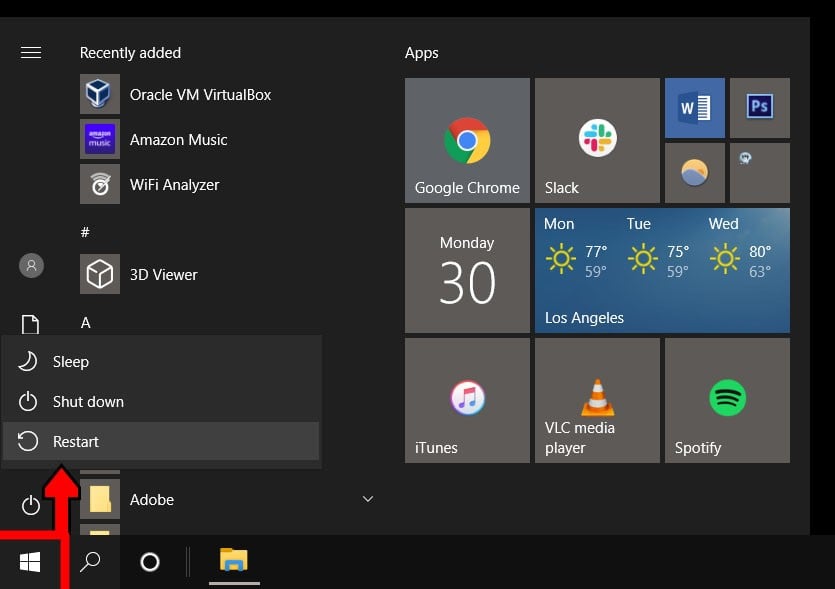
- Click the start menu. This is the button in the lower-left corner of your screen that looks like the Windows logo.
- Then hold down the SHIFT key while clicking Restart. This will take you into the Windows Recovery Environment.
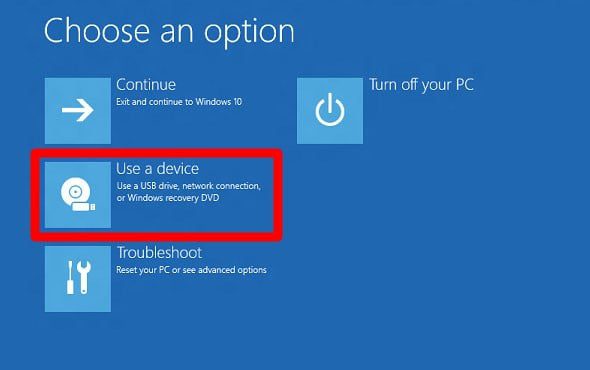
- Then select Use a Device.
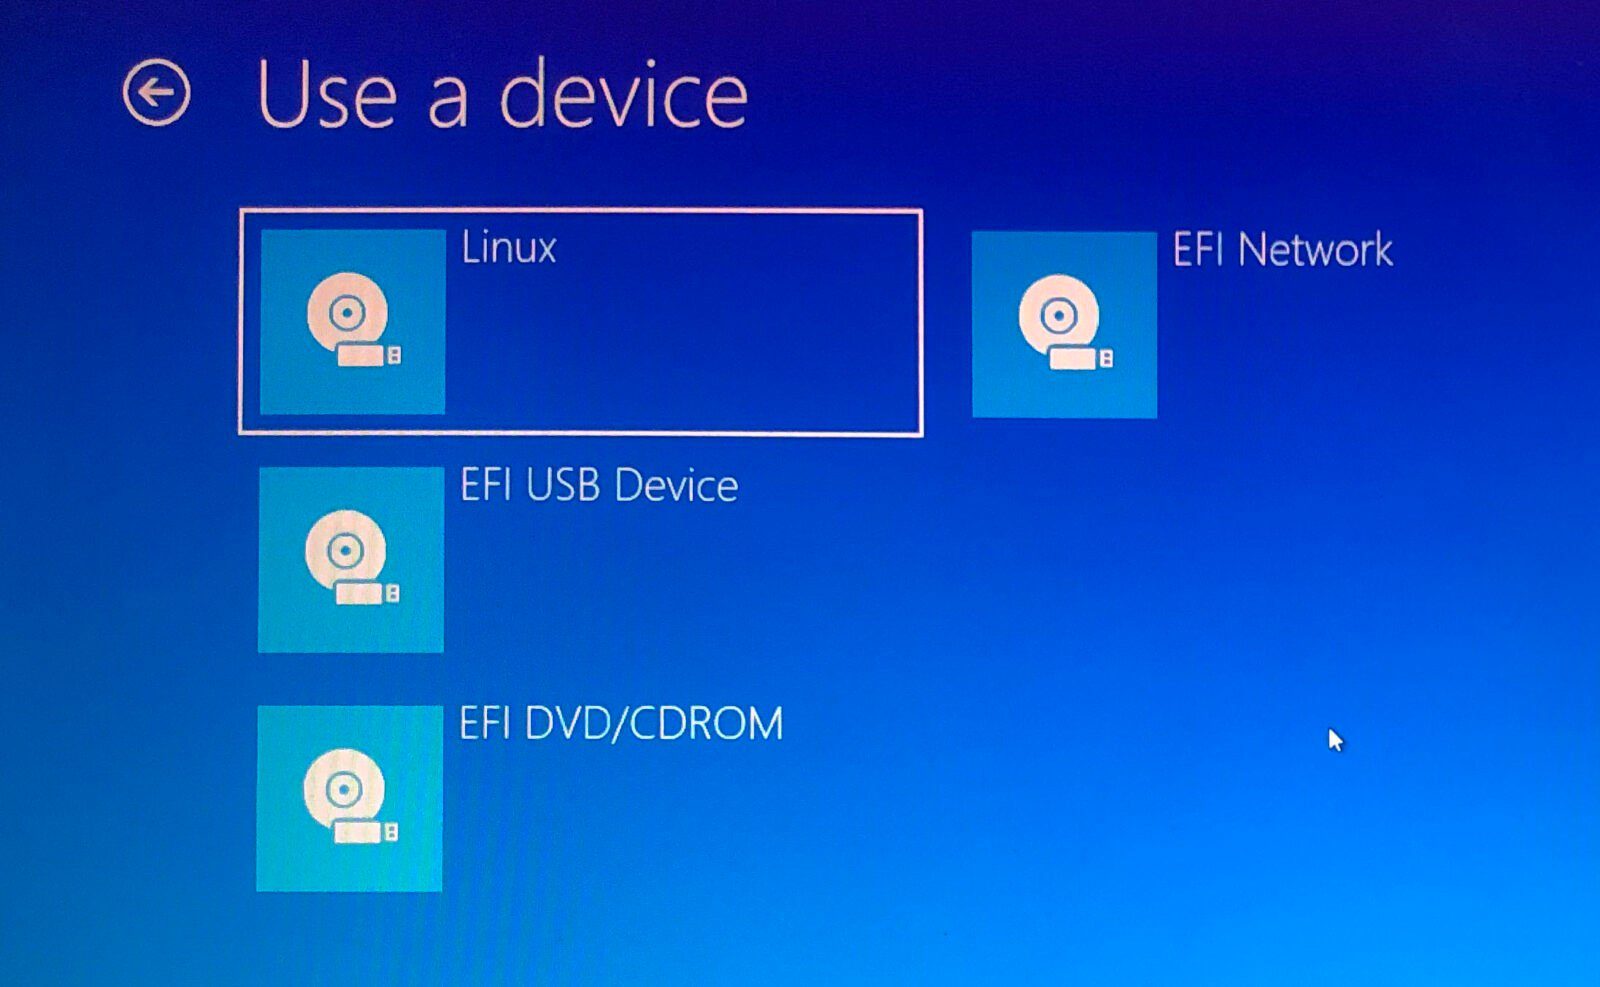
- Find your device in the list. If you don’t see your drive, choose EFI USB Device, then pick your drive from the next screen.
- Your computer will now boot Linux. If your computer reboots Windows, there was either an issue with your drive, or you might have to change settings in your BIOS.
Warning: Changing BIOS settings can damage your computer if you don’t know what you’re doing.
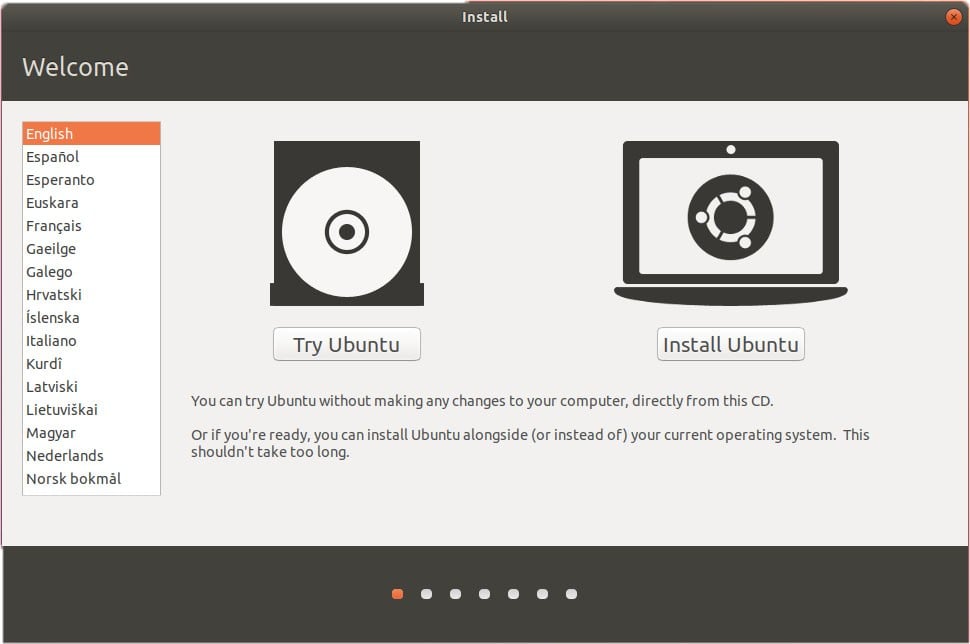
- Select Install Linux. Some distros also let you try out the OS before installing it here.
- Go through the installation process. This will differ depending on which distro you are trying to install. These details might include your WiFi network, language, time zone, keyboard layout, etc. You might also be required to create an account with a username and password. Make sure to write down any details, as you will likely need them in the future.
- Most distros will allow you to partition your drive or erase it and do a clean install during the installation.
Warning: Erasing your disk will mean you will lose your settings, files, and Windows operating system. Only select Erase if you have saved copies of all your files before starting the install process.
- Reboot your computer when prompted. If you have more than one OS in your system, you will be taken to a GNU GRUB screen after rebooting. This screen allows you to select which OS you want to boot.
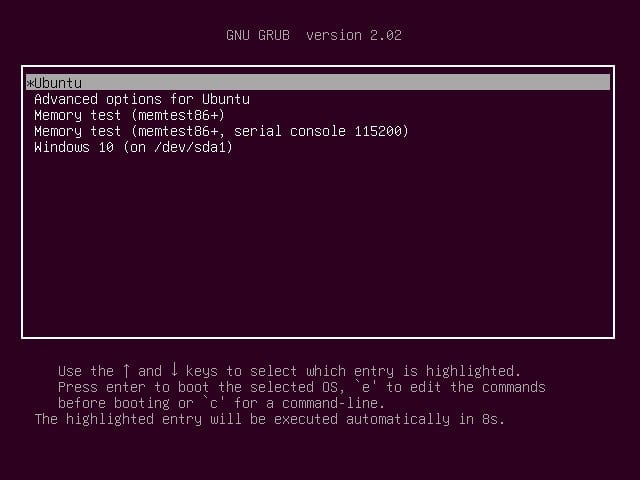
If you do not see a GRUB screen when you boot up your
computer, you can try moving your Linux distro higher on your boot list in
BIOS.
When you’re done, you can do a hardware check. In some cases, you may need to download additional drivers to make some hardware work. The option to download drivers can be found in the Systems Settings of your new Linux OS. After verifying that your hardware is working properly, you can start exploring and using your Linux distro.
If you’re a Mac user, check out our blog on how to install Linux on your Mac.
Either you love or hate it, but you won’t’ be able to ignore it. Yes, that’s the power of Open source and Linux. In this tutorial, I will show you “How to install Linux on Windows 10 using WSL1“. and explain “How to update WSL1 to WSL2 kernel in Windows 10“, in case you already have WSL1 installed.
- Checkout new Windows 11 features
- Install WSL on Windows 10 in single command
Have you ever imagined, Microsoft “The market dominator” will handshake with Open source and will support its development?
Whatever you never thought is now possible on Windows, In earlier days, if I need to run Rsync or any other Linux utility, Cygwin was the answer to most of the problems.
Nowadays there are options like VMware Workstation Player, Virtual box and many other Virtualization Software to install Linux as guest OS but Microsoft is thinking differently.
Microsoft has introduced WSL2 (Windows Subsystem for Linux) recently to make developer’s life easy. Now administrators and developers can run Linux commands or can do programming from windows 10 itself.
let’s understand a bit on WSL1 and WSL2
What are WSL1 and WSL2
WSL (Windows subsystem for Linux) was aimed to enable bash shell and core Linux commands/utilities for Developer and users. WSL2 (Windows subsystem for Linux version2) is an upgraded version of WSL1.
The main motto of introducing WSL2 was to increase the performance and to support full system call compatibility with a lighter VM. Installation of Docker, Editors, Core Linux utilities and Developer tools is now possible in WSL2.
A complete Linux kernel has been introduced by Microsoft and future upgrades will be in pipeline, the only major limitation of WSL is no GUI (although debatable), you have to deal with the command line.
Prerequisite to install WSL1 or WSL2
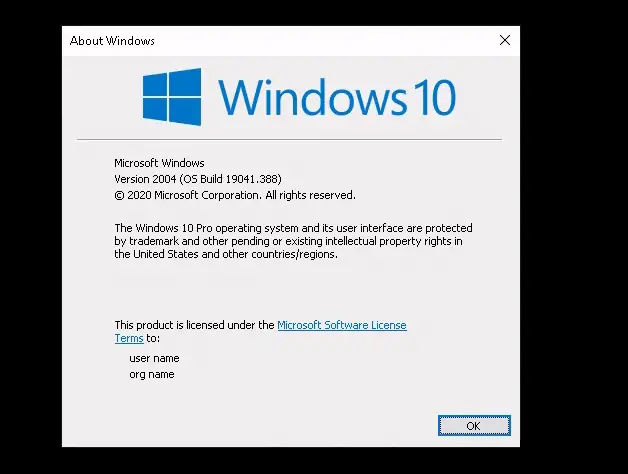
- WSL1/WSL2 both are supported on Windows 10 and Windows server 2019 64 bit version only. WSL1 requires Windows 10 Build 16215 or later and WSL2 is only available for Windows10 Builds 19041 or higher.
- Computer with Hyper-V or Virtualization support and enabled from Bios.
- 64-bit Processor with Second Level Address Translation (SLAT) for WSL2. For WSL1, SLAT is not mandatory and it works fine without it.
- Check your windows version
- Enable Linux subsystem for Windows 10 feature and restart.
- Download, Extract and install Linux distribution
- Provide username and password for user
- Launch your Distribution.
I will show you all steps on Windows 10 latest update 2004 with Ubuntu 20.04 on the Command line and Ubuntu 18.04 on GUI
Step1 – Check your windows version
Check your windows version using “Windows key + R” and type “Winver” in the run dialogue box.
then open “system information” by typing “msinfo” in the search bar for hardware information (32 or 64bit). Look for the information “System type”, it must be 64 bit.

Step2 – Enable Linux subsystem to deploy Linux on Windows 10
–> Enable windows subsystem for Linux (WSL) using PowerShell
Open Powershell window “Run as administrator” from the search bar and type this command to enable Linux subsystem for Windows 10 feature.
dism.exe /online /enable-feature /featurename:Microsoft-Windows-Subsystem-Linux /all /norestart
once the command is successful, restart your machine.
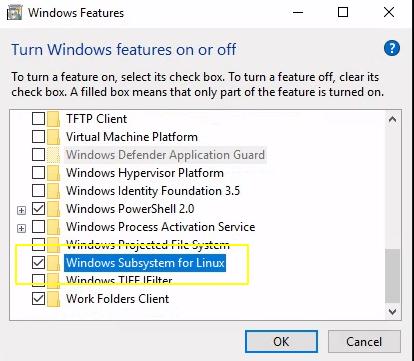
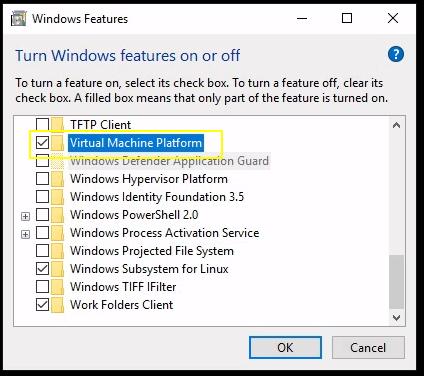
–> Enable windows subsystem for Linux using Graphical user interface (GUI)
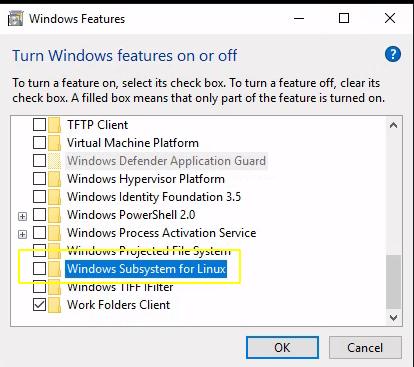
- Search for “Turn Windows Features on or off” in the windows search bar.
- Open and scroll down – Select the “Windows subsystem for Linux” box and click OK. Restart your system.
Step3 – Download your favourite Linux Distro
Download your favourite Linux distro from the command line or Microsoft store, I will download Ubuntu 20.04 from the Power Shell command line. Replace “wslubuntu2004” with your “distro name” in the command.
Check out the Microsoft site to download manually.
- Ubuntu 16.04 LTS
- Ubuntu 18.04 LTS
- openSUSE Leap 42
- Ubuntu 20.04 LTS
- SUSE Linux Enterprise Server 12 SP5
- SUSE Linux Enterprise Server 15 SP1
- Kali Linux
- Debian GNU/Linux
- Fedora Remix for WSL
- Pengwin
- Pengwin Enterprise
- Alpine WSL
Invoke-WebRequest -Uri https://aka.ms/wslubuntu2004 -OutFile Ubuntu.appx -UseBasicParsing
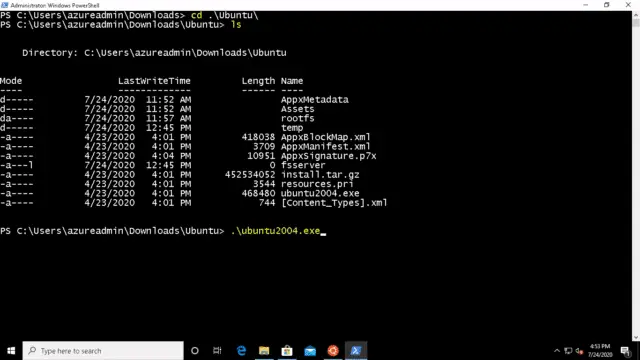
Go to your Downloads directory using the cd command, Rename your distro file in Powershell console.
For example
Ubuntu_2004.2020.424.0_x64.appx renamed to ubuntu.zip
Rename-Item .\Ubuntu_2004.2020.424.0_x64.appx .\Ubuntu.zip
Extract zip file from Powershell (PS) window.
Expand-Archive .\Ubuntu.zip .\UbuntuNow change to the Ubuntu or distro directory using “cd” command and launch your “distro-name.exe“, “Ubuntu2004.exe” in my case.
Step4 – Provide your credentials
Once the installation will finish successfully, it will ask for a username and password for your Linux distro, so provide as per your preference.

Step5 – Validate your favourite Linux on windows 10
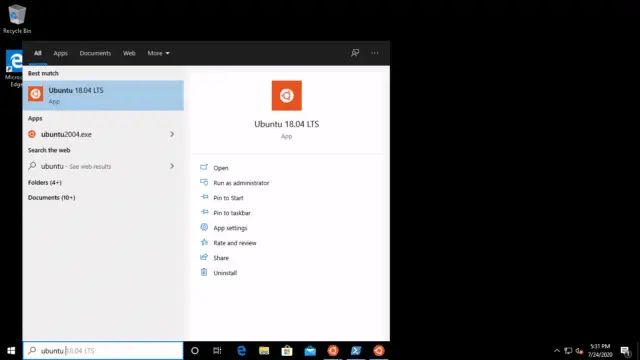
Search your “Distro name” in the Windows search bar and click “open“. and you will be in your favourite Linux prompt.

Steps to update WSL1 to WSL2 kernel in Windows 10
- Check your windows version
- Check for Second Level Address Translation (SLAT) using systeminfo command.
- Enable Linux subsystem for Windows 10 feature and restart your machine
- Enable the “VM (Virtual machine) platform” component and restart your machine
- Install wsl2 Kernel
- Set WSL2 as your default version
- Install your favourite distro from the Microsoft Store app and Launch
Step6 – Check your windows version and architecture
Follow the instructions of “Step1” to check the windows version and 64bit architecture.
Step7 -Check for Second Level Address Translation (SLAT) for WSL2
The 64-bit processor with SLAT is the key requirement for WSL2. Run the systeminfo command and verify. If you don’t have SLAT support, then WSL2 will not work in your system.
Step8 – Enable Linux subsystem to install Linux on Windows 10
Enable Linux subsystem for Windows 10 feature and restart your machine as per Step2.
Step9 – Enable virtualization
–> Enable virtual machine platform feature using PowerShell
Enable the “VM (Virtual machine) platform” component in the PowerShell console and restart your machine.
dism.exe /online /enable-feature /featurename:VirtualMachinePlatform /all /norestart
Output
Deployment Image Servicing and Management tool
Version: 10.0.19041.329Image Version: 10.0.19041.388
Enabling feature(s)
[==========================100.0%==========================]
The operation completed successfully.
–> Enable virtual machine platform (Virtualization) feature using GUI
- Search for “Turn Windows Features on or off” in the windows search bar.
- Open and scroll down – Select the “Virtual machine platform” box and click OK. Now restart your machine.
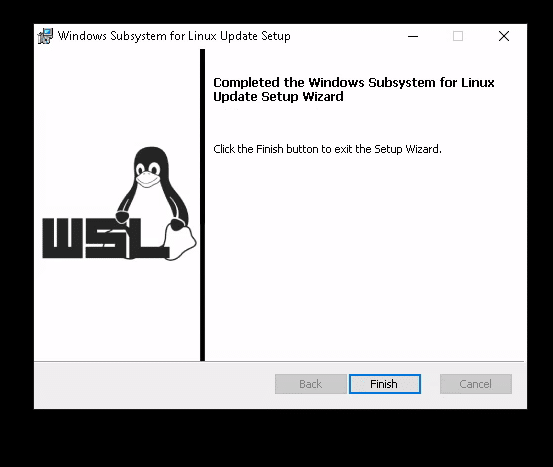
Step10 – Run Kernel installer
Install WSL2 Kernel as WSL2 requires an update to its kernel component. Download kernel by visiting “https://aka.ms/wsl2kernel” or click here.
Once the download completes, run the “.msi” installer and complete the wizard.
Step11 – Change WSL version
Set WSL2 as your default version and check your version. Update from WSL1 to WSL2 may take some time to complete.
wsl --set-default-version 2
Note
If wsl –set-default-version ends up as an invalid command, just enter wsl –help and provide command as listed in help. If the –set-default-version is not listed, means it’s not supported by your windows10 build and try updating it to version 2004, Build 19041 or higher.
Step12 – Install Linux on Windows 10 using GUI
If you are working on the GUI (Graphical user interface), look for your favourite Linux distro from Microsoft Store, open “Microsoft store” from the search console
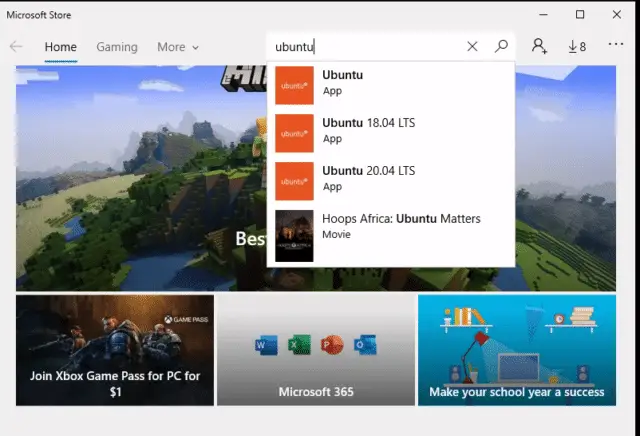
Click on Get to download and install your distro, mine is Ubuntu 18.04 in case of GUI
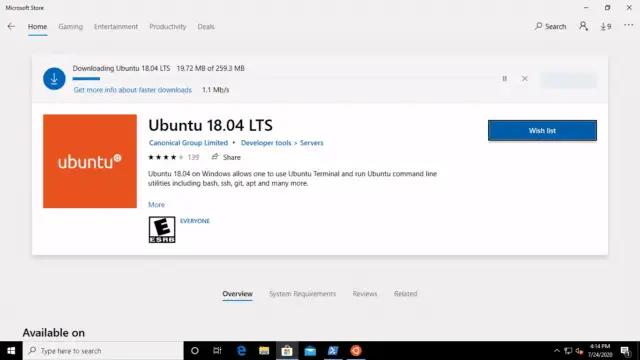
Click on Launch after download completes, it will ask for username and password for your Linux distro, so provide as per your preference.
Search your “Distro name” in the windows search bar and click “open“. I can see both Ubuntu 18.04 and Ubuntu 20.04 as installed using GUI and Command-line respectively.
Enjoy Linux on Windows 10.

let’s check the WSL version for Ubuntu 20.04 and Ubuntu 18.04. It must be WSL1 for ubuntu 20.04 and WSL2 for ubuntu 18.04 after the upgrade.
wsl --list --verbose

How to Uninstall Linux Distro (WSL) from windows 10
Step13 – Open PowerShell and remove Distro package
Open PowerShell “Run as administrator” and run the below-mentioned command with your distro to list package name.
Get-AppxPackage *distro-name*
For Example Ubuntu in my case
Get-AppxPackage *ubuntu*
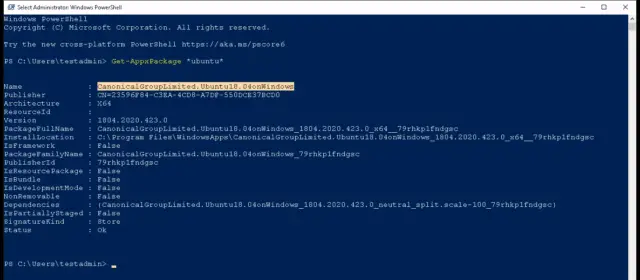
Make a note of “your distro package name” as highlighted in screenshot and Remove package with “Remove-AppxPackage” command.
Example
Get-AppxPackage "CanonicalGroupLimited.Ubuntu18.04onWindows" | Remove-AppxPackage
How to Disable WSL (Windows Subsystem for Linux) feature
Step14 – Disable Windows subsystem from PowerShell
Open Powershell, “Run as administrator” and execute the below-mentioned command, once you have completed distro package removal in step12.
Disable-WindowsOptionalFeature -Online -FeatureName Microsoft-Windows-Subsystem-Linux
Press “Y” to disable it.

It will restart your computer and you are done.
Step15 – Disable Windows subsystem for Linux from GUI.
- Search for “Turn Windows Features on or off” in the windows search bar.
- Open and scroll down – Remove the checkmark from the “Windows subsystem for Linux” box and click OK. Restart your system.
Note*
All the above-mentioned steps are applicable to “Install Linux on Windows 2019 using WSL” also.
Common errors and solution regarding WSL
1# Fix for Error: 0x80040306
This error may occur during installation because Microsoft doesn’t support legacy console. So, to resolve this issue, you have to disable the legacy console.
Open Command prompt by typing “cmd.exe” -> Open properties by right-clicking title bar -> Uncheck use legacy console in cmd properties – then click ok.
2# Fix for Error: 0x80040154
This error may occur after a windows update, which sometimes results in disabling the windows subsystem for the Linux feature. So, to fix this issue, you just need to follow step 2 of this tutorial.
3# Fix for “The referenced assembly could not be found”
You may face this error while enabling WSL optional features. This may occur due to the bad installation. So to resolve this, you may try updating Windows to fix it or you may need to reinstall windows 10.
4# Fix for “Error: 0x1bc while setting WSL default version 2”
This error may occur while executing step 10 of this tutorial. Follow step 9 of this tutorial (install kernel) to get this fix. If your CPU doesn’t support SLAT (second-level address translation). Then also, you won’t be able to upgrade to WSL2.
Video
Install Linux on Windows 10 using (wsl1 or wsl2) update 2020
Summary Note
I have shown you, “How to install Linux on Windows 10 with WSL1″, and How to upgrade your WSL1 to WSL2 with the kernel upgrade and set up WSL2 as your default version.
If you liked this article, please share it on your social media and comment, if you are facing any issue during installation.
Enjoy your favourite Linux on Windows, who knows in future, Windows will be provided as a subsystem to Linux.
Signing off with this thought 💡
1. Overview
What you’ll learn
In this tutorial, we will guide you through the steps required to install Ubuntu Desktop on your laptop or PC.
What you’ll need
-
A laptop or PC with at least 25GB of storage space.
-
A flash drive (12GB or above recommended).
Whilst Ubuntu works on a wide range of devices, it is recommended that you use a device listed on the Ubuntu certified hardware page. These devices have been tested and confirmed to work well with Ubuntu.
If you are installing Ubuntu on a PC or laptop you have used previously, it is always recommended to back up your data prior to installation.
2. Download an Ubuntu image
Get the Ubuntu image from the Download Ubuntu Desktop page. Save it to a memorable location on your PC! This tutorial uses the latest Ubuntu 24.04 LTS release (available on April 25th 2024), which features the new Ubuntu Desktop installer.
If you are installing an older version of Ubuntu, such as Ubuntu 22.04 LTS, you will find that the visual presentation of the installer is different, but the overall flow should remain similar.

3. Create a bootable USB stick
To install Ubuntu Desktop, write your downloaded ISO to a USB stick to create the installation media. This is not the same as copying the ISO and requires some special software.
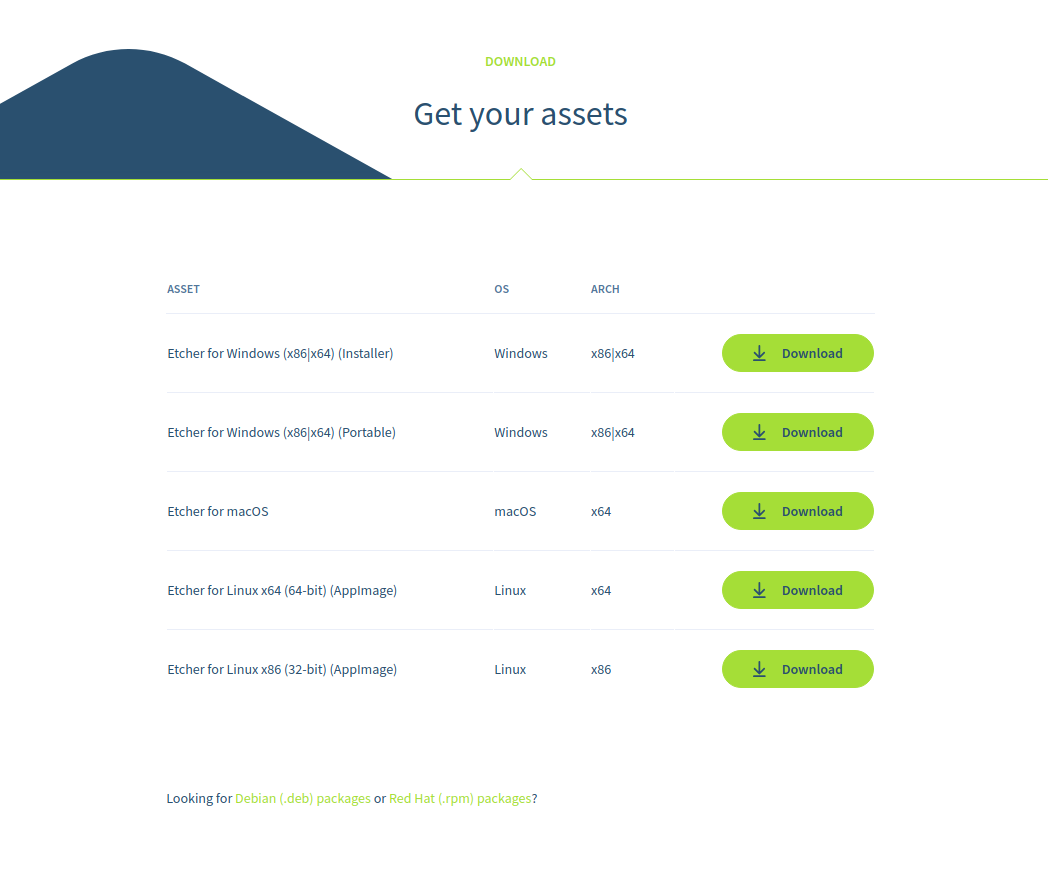
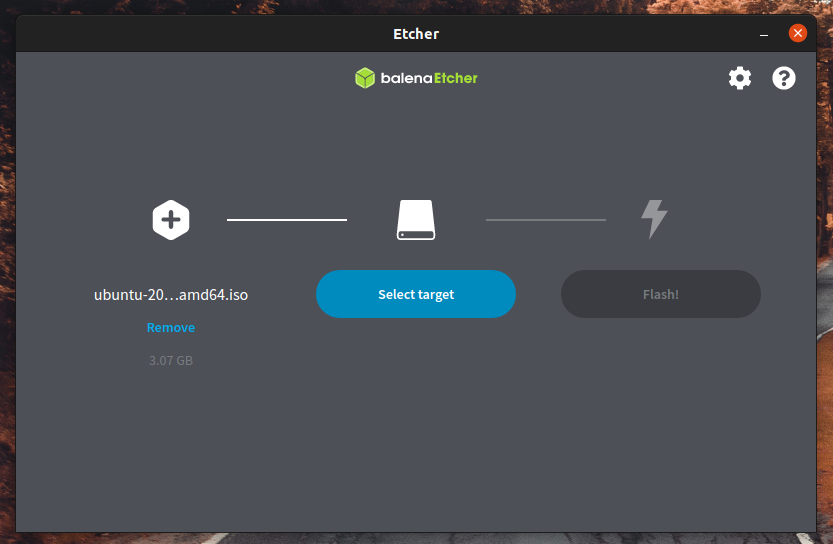
This tutorial uses balenaEtcher because it runs on Linux, Windows and macOS. Choose the version that corresponds to your current operating system, download and install the tool.
Select your downloaded ISO, choose your USB flash drive, and then click Flash! to write your image.
4. Boot from USB flash drive
Insert the USB flash drive into the laptop or PC you want to use to install Ubuntu and boot or restart the device. It should recognise the installation media automatically. If not, try holding F12 during startup and selecting the USB device from the system-specific boot menu.
F12 is the most common key for bringing up the system boot menu but Escape, F2 and F10 are common alternatives. If unsure, look for a brief message when your system starts – this often informs you which key to press to access the boot menu.
Once the installer has initialised, you are invited to choose your language.

And then presented with the option to select any accessibility settings your require.

Your keyboard layout.

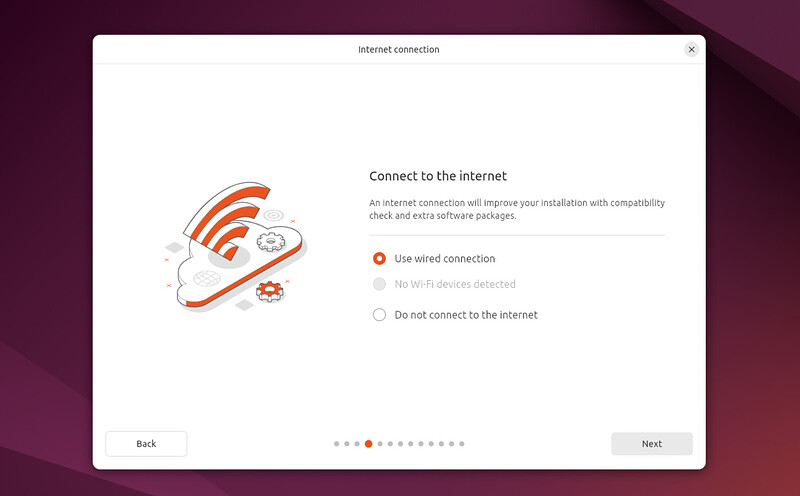
And connect to your network. This allows Ubuntu to download updates and third party drivers (such as NVIDIA graphics drivers) during installation.
You are then offered the choice to try or install Ubuntu.

If you click Try Ubuntu, you can preview Ubuntu without making any changes to your PC. You can return to the installer menu at any time by clicking the Install Ubuntu shortcut on the desktop.
To proceed, click Install Ubuntu.
Some PCs use Intel RST (Rapid Storage Technology), which is not supported by Ubuntu. If this is the case, you will not be able to proceed beyond this point without disabling RST in the BIOS menu of your machine. If you encounter this alert, visit help.ubuntu.com/rst for more information.
5. Installation setup
You will be prompted to choose between Interactive installation and Automated Installation. The interactive option is the standard route, but more advanced users can use the automated installation option to import a configuration file from a web server to standardise multiple installs and add further customisations. An example tutorial for Automated installation is available here.

In this tutorial we will remain on the primary route.
You will be prompted to choose between the Default selection and Extended selection options. The default installation comes with the basic essentials to get started which you can then expand on after install using the App Center. The extended selection contains additional office tools and utilities, useful for offline situations.

In the following screen you will be prompted to install third-party software that may improve device support and performance (for example, Nvidia graphics drivers) and support for additional media formats. It is recommended to check both of these boxes.

6. Type of installation
This screen allows you to configure your installation. If you would like Ubuntu to be the only operating system on your hard drive, select Erase disk and install Ubuntu.
If your device currently has another operating system installed, you will receive additional options to install Ubuntu alongside that OS rather than replacing it.

Let’s take a moment to review all of the above options in detail.
Installing Ubuntu alongside another operating system
If you select this option you will be given a simple interface that allows you to select the drive you want to install Ubuntu on and a slider to determine the amount of disk space you would like Ubuntu to use. The available space is limited by the existing contents of the disk and is designed to avoid overwriting existing files.
This view automatically selects the largest partition on the drive. For more fine-grained control you can switch to the Manual partitioning option that is detailed further down.

Erase disk and install Ubuntu
If you select this option Ubuntu will take up the entire disk space on the selected drive.

If your PC has multiple hard drives then this option allows you to install Ubuntu alongside an existing OS as long as they each have their own drive. Take care to ensure that you are selecting the right drive in this instance!
This option also allows you to encrypt your entire drive using LVM, ZFS or using the Trusted Platform Module on the device. To do this open the Advanced features option before proceeding to the above screen and select ‘Encrypt the new Ubuntu installation for security’

LVM stands for Logical Volume Management. By using LVM during the setup, it makes it easier to create and manage partitions post installation.
ZFS allows users to create pooled storage volumes that span multiple drives as well as snapshorts and data repair features. It is a powerful option for advanced users.
TPM-backed full disk encryption is a new, highly experimental feature of Ubuntu Desktop that currently supports only the generic kernel. This means that machines that require additional drivers to support webcams or NVIDIA graphics cards will not support this setup until additional features land after release. In addition, certain hardware vendors may have BIOS options enabled that alter the chain of trust. Please do not select this option unless you are comfortable debugging or re-installing in the event of an issue.
If you select either LVM or ZFS based encryption you will be prompted to create a Security key that you will need to enter on boot before logging in with your user credentials.

If you are using TPM-based Full Disc Encryption you will be prompted to run the command snap recovery --show-keys after installing to generate a recovery key.
If you select encryption, it is important that you do not lose your security key! Write it down and store it in a safe place outside of your local system. You will not be able to recover your data without it!
Manual partitioning
Manual partitioning is designed for advanced users who want to create specific configurations for their use-cases. As such we assume that these users will be comfortable with this interface and will not go into detail during this tutorial on specific setups.
Here users can see all existing drives and partitions and create and manage new partition tables and configurations.

(Alert) Windows BitLocker is enabled
If your device has Windows BitLocker Drive Encryption enabled then Ubuntu will not be able to gather the drive information it needs to install Ubuntu safely alongside Windows.
If this is the case you will get a prompt to disable BitLocker in Windows before restarting the Ubuntu installer.

Disabling Windows BitLocker is not required when fully erasing Windows or when there is a separate, unencrypted drive available for Ubuntu. For more information see the final section at the end of this tutorial.
7. Create Your Login Details
On this screen, you will be prompted to enter your name and the name of your computer as it will appear on the network. Finally, you will create a username and a strong password.
You can choose to log in automatically or require a password. If you are using your device whilst travelling, it’s recommended to keep “Require my password to log in” enabled.

8. Choose your Location
Select your location and timezone from the map screen and click Continue. This information will be detected automatically if you are connected to the internet.

9. Ready to install
Clicking Next will take you to a summary of your installation configuration to give you a chance to confirm your setup before clicking Install.

If you had chosen to import an autoinstall configuration at the start of the installation process you would be taken immediately to this screen to confirm that your configuration has been installed correctly.
Once you proceed, Ubuntu will begin the installation process.
10. Complete the Installation
Sit back and enjoy the slideshow as Ubuntu installs in the background!

Alternatively you can see a detailed output of the installation process by clicking the icon in the bottom right corner of the window.
Once the installation has completed, you will be prompted to restart your machine.
Click Restart Now.

When you restart, you will be prompted to remove your USB flash drive from the device. Once you’ve done this, press ENTER.

Enter your encryption password if you created one.

This is then followed by the login screen, where you can enter your username and password.

And that’s it, welcome to your new Ubuntu Desktop!

The welcome widget will help you with some additional setup options, including:
-
Attaching an Ubuntu Pro free personal or paid subscription to apply additional security patches to your device (this option is only available when using a long term support [LTS] version of Ubuntu).
-
Opting into sending device information to Canonical to help improve Ubuntu (by default, Canonical doesn’t collect device information).
-
Downloading additional apps from Ubuntu Software.

11. Don’t forget to Update!
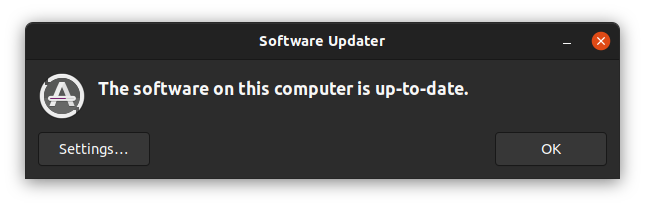
It’s always good practice to ensure your system is up to date, especially after a fresh install.
The easiest way to do this is via the Software Updater app. Search for Software Updater via the app menu (the icon with 9 squares in the bottom corner of your window) and it will check for updates and apply them.
You can also update Ubuntu using the terminal.
Press CTRL+ALT+T to bring up a Terminal window (or click the terminal icon in the sidebar).
Type in:
sudo apt update
You will be prompted to enter your login password.
This will check for updates and tell you if there are any that need applying. To apply any updates, type:
sudo apt upgrade
Type Y, then press ENTER to confirm to finish the update process.
12. You’ve installed Ubuntu!
Thank you for completing this tutorial. We hope you enjoy your new desktop.
Check out our picks for Top 10 apps for a fresh Linux install in 2021.
If you have any issues, please contact us via the Ubuntu Discourse, or visit Ask Ubuntu.
You can also read the latest news about Ubuntu Desktop on the Ubuntu Blog.
As a next step, why not try:
-
Installing Ubuntu Desktop on a Raspberry Pi 4
-
Using VirtualBox to try out different Ubuntu flavours
For users who need to run both Ubuntu and Windows you can also install Ubuntu via Windows Subsystem for Linux (WSL).
- Install Ubuntu on Windows Subsystem for Linux (WSL)
To help us improve our tutorials, please let us know how you got on!
Survey:
I found this tutorial helpful
Yes
No
I found Ubuntu easy to install
Very Easy
Easy
Neutral
Difficult
Very Difficult
13. (Additional) Installing Ubuntu alongside Windows with BitLocker
During the installation type step, you may find that you are unable to proceed with the installation without first deactivating Windows Bitlocker.
BitLocker Drive Encryption is a data protection feature that integrates with the Windows operating system. When activated, it will encrypt the contents of the hard drives in Windows, making the data inaccessible without the correct decryption key. It is designed to minimize the risk of data theft or exposure from lost or stolen computers.
When a user starts their computer and properly authenticates with the correct credentials, BitLocker will decrypt the data and allow seamless usage of the hard drive and the data it contains. Without the correct credentials, the encrypted hard drive data will look like random noise.
BitLocker & Ubuntu installation
If you plan to install Ubuntu side by side with Windows, you need to take into consideration the operational setup on your computer.
-
If you are not using BitLocker, Ubuntu will be able to see the correct hard drive structure, including any partitions and data stored on it. This allows the guided wizard to correctly map the data, and safely make adjustments to accommodate the additional installation of Ubuntu alongside Windows.
-
If you are using BitLocker, the hard drive contents will not be accessible, and they will appear as random noise. This means that the Ubuntu installer cannot correctly map data, and the additional installation cannot be safely performed without data loss… Additionally, some manufacturers ship systems with BitLocker enabled but the hard drive contents not yet encrypted. In this case the Ubuntu installer will also not be able to correctly map data.
You can:
-
Cancel the installation of Ubuntu and continue using Windows only.
-
Decide that the data stored in Windows is not important, and that you are willing to overwrite the data contents. The Ubuntu installer can then erase the entire contents of the hard drive and create its own structure (partitions and data). This is a destructive operation, with no option to recover any Windows data.
-
Decide to turn BitLocker off. This will turn off the encryption feature, and the hard drive and its data will be visible and accessible from the Ubuntu installer, allowing it to correctly and safely set up a side-by-side configuration. For systems with BitLocker enabled but not yet encrypted you will need to first turn BitLocker on and then turn it off.
-
Note: Not all versions of Windows will allow you to re-enable BitLocker after disabling it. If you wish to re-encrypt your Windows partition after installing Ubuntu alongside it, please check that your version of Windows supports this.
Turn BitLocker off
If you decide to proceed with the third option, you will need to do the following:
-
Back your data up — any encryption procedure, hard drive structure change or installation of new operating systems on a hard drive that already contains data can potentially lead to a data loss. You need to make sure your personal data is safe. Even simply copying the important files to an external drive can minimize the risk of data loss.
-
Quit the Ubuntu installer and reboot the computer into Windows.
-
In Windows, open Settings > type Manage BitLocker in the search box. Alternatively, open Control Panel > System and Security > BitLocker Drive Encryption.

Windows will now inform you that it is going to decrypt the data.

This process can take a little bit of time:


-
Once this step is complete, reboot the computer, log into Windows, to make sure everything works correctly, and that all your data is intact.
-
Reboot your computer again, and launch the Ubuntu installer. At this point, you will be able to proceed with the hard disk configuration step.
Was this tutorial useful?
Thank you for your feedback.
Теперь каждый справится с установкой Mint, Ubuntu и других дистрибутивов на компьютеры с Windows и macOS или без ОС.
Linux может пригодиться вам по многим причинам. Например, ваш старый компьютер нельзя обновить до новых версий Windows или macOS, или вам нужны специфические приложения для Linux, или же вам просто любопытно попробовать новое. А может быть, вы просто приобрели новый компьютер без операционной системы и хотите сэкономить, выбрав бесплатную Linux.
Установить Linux несложно. Конечно, есть такие дистрибутивы, как Arch, установка которого довольно трудна для новичка. Но большинство современных дистрибутивов устанавливается очень просто. Пожалуй, даже проще и быстрее, чем Windows.
Прежде чем устанавливать Linux на свой основной компьютер, сделайте копию важных данных. Работая с разделами жёсткого диска, вы можете по небрежности стереть что-нибудь важное. Конечно, если вы будете следовать инструкциям и внимательно читать, что делаете, то ничего непредвиденного не произойдёт. Но бэкап — нелишняя штука в любом случае.
Установить Linux можно на компьютеры под управлением Windows и macOS или на пустой жёсткий диск. Вы можете выбрать Linux своей основной системой либо пользоваться ей параллельно с вашей старой системой.
1. Загрузите дистрибутив Linux

Прежде всего нужно выбрать дистрибутив. Определиться вам поможет наш топ лучших дистибутивов Linux.
Затем нужно загрузить выбранный дистрибутив. Сделать это проще простого: откройте сайт нужного дистрибутива, отыщите раздел загрузок и выберите то, что подходит по разрядности вашему процессору.
Как правило, дистрибутивы Linux на официальных сайтах предлагается скачать двумя способами. Первый способ — обычная загрузка. Второй — через P2P посредством торрент-клиента. Второй способ, естественно, быстрее. Так что выбирайте его, если хотите сэкономить время.
2. Запишите дистрибутив на носитель

Когда дистрибутив в формате ISO скачан, нужно записать его на CD или обычную USB-флешку.
Запись на CD можно осуществлять стандартными средствами системы: «Запись образа диска» Windows или «Дисковая утилита» macOS. Достаточно щёлкнуть по загруженному образу правой кнопкой мыши и выбрать соответствующий пункт в меню.
Для записи ISO на флешку вам понадобятся специальные утилиты. Для Windows лучше выбрать Rufus, а для macOS — Etcher. У этих программ очень простой интерфейс, в них довольно сложно запутаться.

Ещё один вариант — просто распаковать содержимое ISO-архива на флешку. Это, правда, сработает только с более-менее современными компьютерами, у которых вместо традиционного BIOS новая UEFI.
3. Подготовьте раздел диска
Этот пункт следует выполнять в том случае, если вы хотите сохранить установленную у вас систему и использовать Linux одновременно с ней. Если вы решили перевести свой компьютер на Linux полностью или устанавливаете ОС на пустой жёсткий диск, пропустите параграф.
Windows

Откройте «Средство управления дисками» Windows. Выберите диск или раздел, от которого вы планируете отрезать немного места для установки Linux. Большинству дистрибутивов с лихвой хватит 15 ГБ. Но если вы планируете устанавливать много приложений, возьмите больше. Щёлкните по разделу правой кнопкой мыши и выберите «Сжать том». Введите размер и нажмите ОК.
Процесс может занять довольно много времени, так что запаситесь терпением.
Когда «Средство управления дисками» закончит изменять размеры разделов, на диске появится пустое неразмеченное пространство, отмеченное чёрным цветом. Туда мы и установим Linux.
Позже, если Linux вам не понадобится, можно будет удалить разделы с ним и отдать освободившееся место обратно Windows при помощи всё того же «Средства управления дисками».
macOS

Выделить место для установки Linux можно через «Дисковую утилиту» macOS. Выберите ваш диск и щёлкните по значку «+», чтобы создать раздел для Linux. Создание нового раздела может занять некоторое время.
4. Подготовьте загрузчик
Windows
Этот пункт касается только новых компьютеров под управлением предустановленной Windows 10, 8.1 или 8. На таких компьютерах используется загрузчик UEFI, который не позволит вам загрузить какую бы то ни было систему, кроме Windows.
Чтобы это исправить, зайдите в настройки BIOS вашего компьютера и отключите опцию Secure Boot. Затем перезагрузитесь. Готово, теперь вы можете загружать и устанавливать другие системы рядом со своей Windows.
macOS
В отличие от большинства компьютеров, Mac требует пары дополнительных действий для того, чтобы установить Linux в дуалбуте с macOS.
Прежде всего отключите SIP. Перезагрузите Mac и нажмите Cmd + R. Появится меню Recovery. Выберите в нём «Терминал» и введите csrutil disable.
Перезагрузите Mac ещё раз. SIP отключён.
Загрузите и установите rEFInd. Встроенная утилита Boot Camp может помочь вам установить только Windows. rEFInd умеет загружать и macOS, и Windows, и Linux. Так что вы сможете выбирать, какая система будет загружаться при старте.
Распакуйте rEFInd. Затем откройте «Терминал» и введите diskutil list. Найдите в появившемся списке, как называется ваш загрузчик EFI. Чаще всего это /dev/disk0s1.
Введите mount /dev/disk0s1 и запустите установку rEFInd, перетащив install.sh из распакованной папки в окно «Терминала».
5. Загрузите Linux с носителя
Перезагрузитесь и выберите флешку или CD с Linux в качестве загрузочного носителя. На разных компьютерах это делается по-разному. На устройствах с Windows порядок загрузки можно определить с помощью Esc, F9 или меню BIOS. На Mac это делается долгим нажатием клавиши Option.
6. Начните установку Linux
Нас приветствует установщик Linux. Для примера возьмём дистрибутив Linux Mint за его популярность. Но процессы установки Ubuntu, openSUSE, Fedora, Debian, Manjaro и большинства других дистрибутивов практически идентичны.
Исключение — дистрибутивы, использующие псевдографический установщик. Единственное серьёзное отличие такого установщика в том, что выбирать опции в нём придётся при помощи клавиш. В остальном всё одинаково.
Выберите язык, который хотите использовать в системе, и нажмите «Продолжить».

Укажите, какую раскладку клавиатуры хотите использовать в дополнение к английскому.

Отметьте пункт «Установить стороннее программное обеспечение» или «Установка мультимедиа кодеков», чтобы Linux смогла использовать проприетарные драйверы и кодеки.

Опцию «Загрузить обновления во время установки», если она есть, можно включить, чтобы система скачала все самые свежие патчи, пока устанавливается. Или оставить её выключенной, если у вас не очень быстрое интернет-соединение, и обновиться потом.
7. Разметьте диск
Это ответственный этап, на котором вы должны быть очень внимательны.
Далее действия различаются в зависимости от того, хотите ли вы установить Linux рядом со своей системой или заменить систему. Не сотрите случайно диск, если хотите оставить систему.
Как установить Linux вместо текущей системы
Итак, вы решили установить Linux вместо вашей текущей системы (либо на пустой жёсткий диск). Есть два варианта.
Автоматически

Установщик сотрёт все данные с вашего диска, создаст новые разделы и установит систему, не утруждая вас лишними вопросами. Для этого выберите «Стереть диск и установить Linux». Прежде чем выполнять чистую установку, сохраните свои файлы на другой жёсткий диск или в облачное хранилище.
Вручную
Способ подойдёт, если вы хотите сами задать размеры для ваших разделов или, например, создать отдельный раздел для ваших файлов. Для этого выберите «Другой вариант» и нажмите «Продолжить».

Linux отобразит, какие разделы есть у вас на компьютере. Вы можете удалять их, форматировать или, наоборот, не трогать разделы с той информацией, которую хотите сохранить.
Чтобы установить Linux вместо вашей системы, выберите раздел с установленной ОС и удалите его кнопкой «–». Затем на освободившемся месте создайте новые разделы.

- Корневой раздел для системных файлов Linux. Выберите файловую систему Ext4 и точку монтирования /.
- Swap-раздел, или раздел подкачки. Пригодится, если у вас не хватает оперативной памяти, но зато быстрый SSD-диск. В списке файловых систем выберите «Раздел подкачки».
- Home-раздел, где будут храниться ваши файлы. Выберите файловую систему Ext4 и точку монтирования / home.
Нажмите «Продолжить» и подтвердите изменения. Установщик сотрёт выбранные вами разделы и создаст новые на освободившемся месте.
Как установить Linux рядом с текущей системой
Установить Linux рядом с вашей системой можно двумя способами.
Автоматически

Большинство установщиков Linux сразу обнаруживают установленные у вас системы. Если вы не создавали отдельное пространство на диске для Linux, то можете попробовать выбрать пункт «Установить рядом с Windows». Установщик самостоятельно создаст нужные разделы, и вам не придётся ничего делать вручную. В дальнейшем вы сможете выбирать нужную систему при загрузке компьютера.
Вручную

Если же вы хотите сами определить, сколько места выделять системе, и выполнили указания в пункте 3, щёлкните «Другой вариант» и нажмите «Продолжить». Вы увидите разделы своего диска и пустое место, которое мы приготовили для Linux. Создайте там корневой раздел (точка монтирования /), как описано выше. Домашний раздел в таком случае не обязателен: вы сможете копировать и изменять файлы в своей основной системе.
Нажмите «Продолжить». Установщик оставит ваши файлы на своих местах. Он просто создаст новые разделы на свободном месте. Вы сможете выбирать, какую систему хотите загрузить при запуске.
8. Завершите установку Linux

Дальше всё просто. Установщик может спросить вас, где вы находитесь, чтобы определить часовой пояс, и предложит выбрать предпочитаемый язык ввода.

Затем вам будет предложено представиться. Введите своё имя и придумайте пароль. Не забудьте его, поскольку он будет постоянно нужен вам для выполнения задач от имени всех. При желании можете зашифровать свою домашнюю папку.

Начнётся установка системы. Подождите, пока Linux скопирует свои файлы.

Когда процесс завершится, вам будет предложено вытащить установочный диск и перезагрузиться. Не забудьте отключить в BIOS загрузку с внешних дисков, если вы включали её.
Когда вы перезагрузитесь и перед вами появится рабочий стол вашей Linux, вы сможете делать всё то же, что и в Windows и macOS: сёрфить в интернете, редактировать документы и слушать музыку. Но перед этим в первую очередь следует обновиться — соответствующий пункт обычно можно найти в главном меню системы.
Затем вы можете заглянуть в «Магазин приложений» (или его аналог в зависимости от дистрибутива), чтобы доустановить нужные вам приложения. И напоследок выбрать обои посимпатичнее.
Попробуйте Linux, и вы увидите, что в повседневной жизни она ничуть не сложнее Windows или macOS.
Текст статьи был обновлён 11 марта 2021 года.
Все способы:
- Вариант 1: Установка в полуавтоматическом режиме
- Шаг 1: Выбор доступных дистрибутивов Linux
- Шаг 2: Запуск инсталляции
- Вариант 2: Установка в ручном режиме
- Шаг 1: Предварительная настройка системы
- Шаг 2: Загрузка и настройка ядра WSL2
- Шаг 3: Выбор и инсталляция дистрибутива Linux
- Вопросы и ответы: 1
Вариант 1: Установка в полуавтоматическом режиме
Установка WSL в операционной системе Windows осуществляется посредством выполнения специальных команд в консоли. Для этого потребуется предварительно определиться с дистрибутивом Linux, а затем запустить процесс его инсталляции.
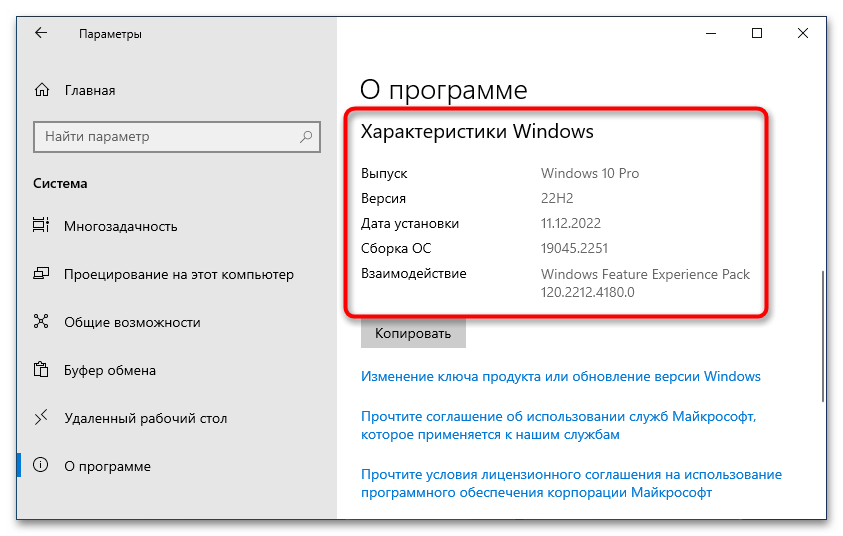
Важно! Приведенная ниже инструкция может быть выполнена только при условии использования Windows 10 версии 2004 (19041) и более новых. Узнать эту информацию можно в свойствах системы.
Шаг 1: Выбор доступных дистрибутивов Linux
Каждому пользователю актуальной версии Windows 10 предоставляется возможность вручную выбрать дистрибутив Linux, который будет использоваться в WSL2. Для просмотра списка доступных систем необходимо ввести специальную команду в консоль, поэтому предварительно запустите «Командную строку» с правами администратора. Сделать это можно множеством способов, например посредством поискового запроса, как показано на изображении ниже.
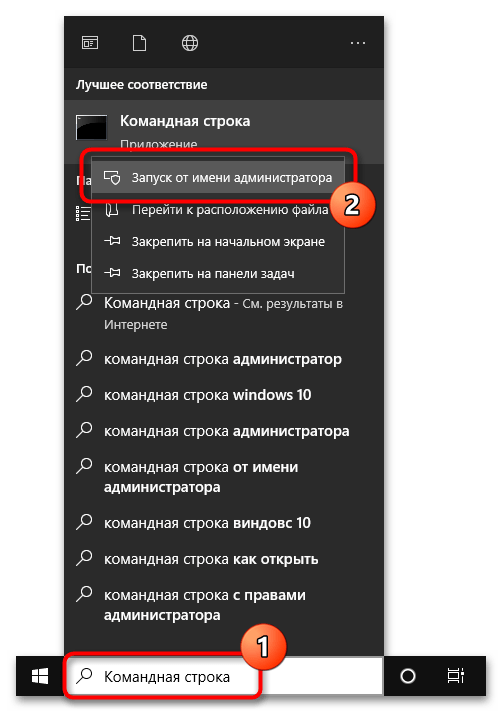
Читайте также: Как открыть «Командную строку» от имени администратора в Windows 10
Примечание! По умолчанию всегда выбрана последняя версия дистрибутива Ubuntu. Если именно его вы и хотите установить, то пропустите этот шаг и переходите сразу ко второму.
После того как окно консоли будет открыто, впишите или вставьте в него одну из нижеприведенных команд, после чего нажмите клавишу Enter:
wsl --list --online или wsl -l -o
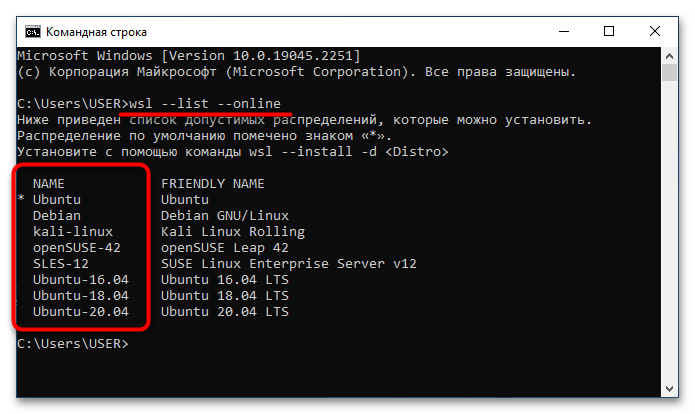
В результатах выдачи будет приведен список всех доступных дистрибутивов Linux. На этом этапе вам необходимо запомнить или скопировать в буфер обмена название, которое находится в столбце «NAME».
Обратите внимание! Если в списке доступных дистрибутивов нет желаемого, его можно импортировать в WSL2 посредством файла TAR или APPX. При необходимости есть возможность создать собственный дистрибутив на базе ядра Linux. Эти процессы описываются в официальной документации Microsoft, при необходимости ознакомиться с ними можно, воспользовавшись ссылками ниже.
Импорт любого дистрибутива Linux для использования с WSL
Создание пользовательского дистрибутива Linux для WSL
Шаг 2: Запуск инсталляции
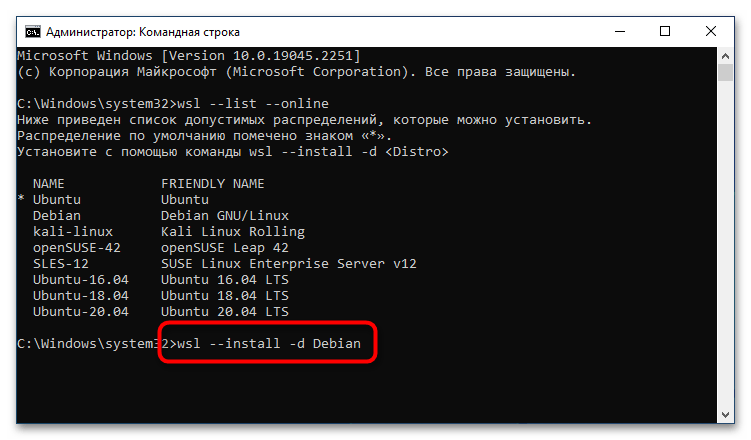
После того как версия дистрибутива Linux для WSL2 была выбрана, можно переходить непосредственно к ее инсталляции. Делается это тоже в «Командной строке», для чего нужно воспользоваться приведенной ниже командой. Не забудьте после ее ввода нажать клавишу Enter.
wsl --install -d <НазваниеДистрибутива>
Примечание! Если вы хотите установить версию по умолчанию, тогда нет необходимости прописывать название дистрибутива вручную, можно воспользоваться следующей командой:
wsl —install
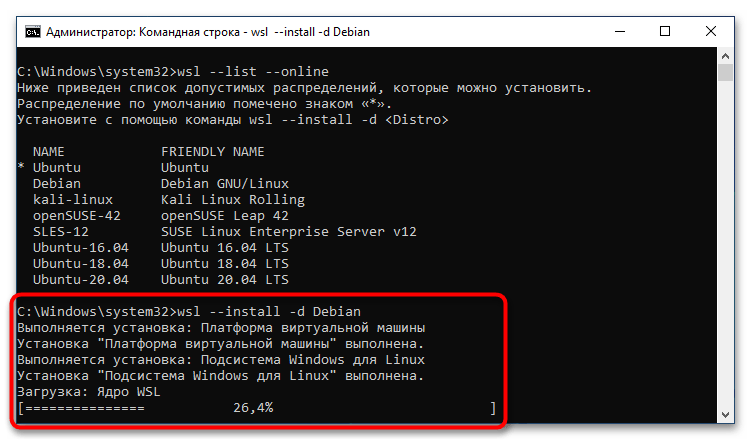
Сразу после этого начнется процесс установки платформы виртуальной машины, затем инсталлируется «Подсистема Windows для Linux», а в завершение будет выполнена загрузка ядра WSL2.
После всех этих процедур можно будет воспользоваться WSL2 для вызова подсистемы Linux. Для этого достаточно будет запустить установленный дистрибутив через меню «Пуск».
Вариант 2: Установка в ручном режиме
Если версия вашей операционной системы Windows 10 ниже 2004 (19041), тогда воспользоваться вышеприведенной инструкцией не получится и большинство действий придется выполнять вручную.
Шаг 1: Предварительная настройка системы
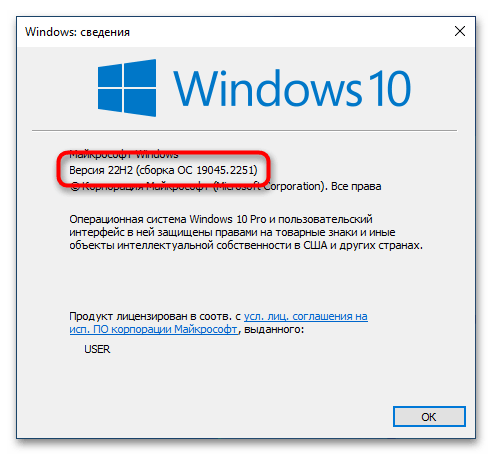
Первостепенно необходимо проверить, поддерживает ли установленная версия операционной системы обновление WSL до второй версии. Сделать это можно посредством вызова окна «Windows: сведения». Для этого нажмите сочетание горячих клавиш Win + R, впишите в поле запроса команду winver и нажмите клавишу Enter.

Появится соответствующее окно, в котором будет указана версия операционной системы и ее сборка. Убедитесь, что она выше 1903 (18362). Если это так, можете продолжить выполнение этой инструкции, в противном случае попробуйте прежде обновить Windows 10 до актуальной версии.
Читайте также: Как обновить Windows 10 до последней версии
Важно! Если ваш компьютер работает на процессоре с архитектурой ARM64, этот способ установки WSL2 не подойдет. Обновитесь до последней версии Windows 10 и воспользуйтесь ранее предоставляемой инструкцией.
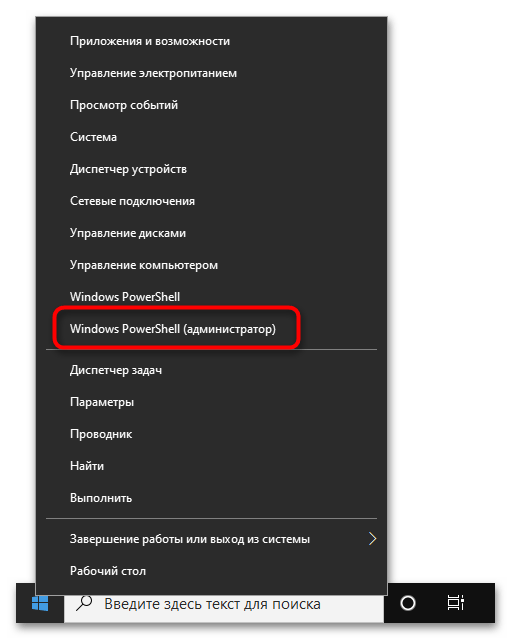
После того как вы удостоверились в актуальности версии операционной системы, необходимо произвести ее предварительную настройку, а именно — включить «Подсистему Windows для Linux» и компонент виртуальных машин. Делается это в оболочке PowerShell, поэтому предварительно запустите ее с правами администратора. Проще всего сделать это через контекстное меню кнопки «Пуск», как показано на изображении ниже. Но это не единственный способ.
Подробнее: Как открыть PowerShell в Windows 10
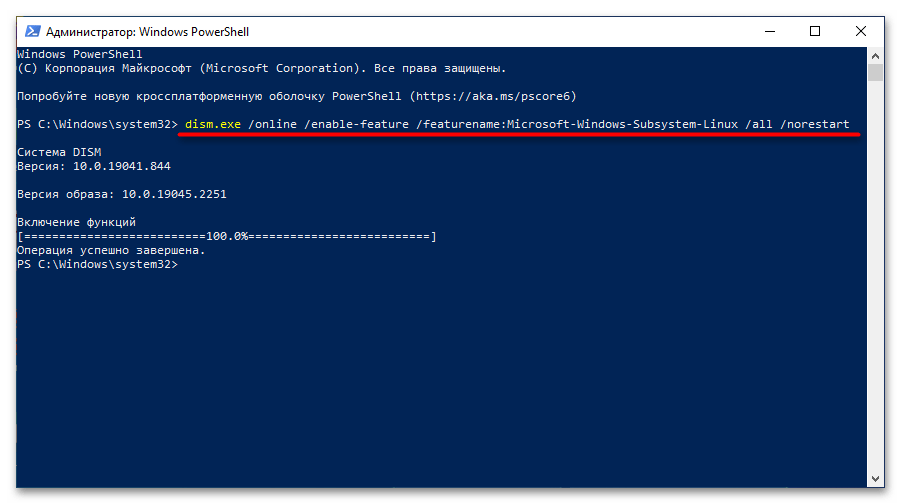
Теперь необходимо включить компонент «Подсистема Windows для Linux». Для этого скопируйте и вставьте в окно консоли PowerShell следующую команду, после чего нажмите Enter:
dism.exe /online /enable-feature /featurename:Microsoft-Windows-Subsystem-Linux /all /norestart
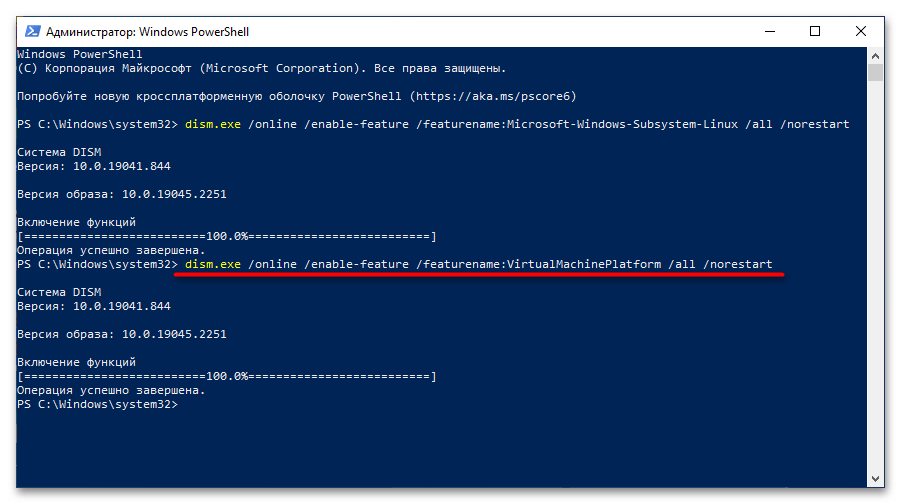
Ожидайте завершения процедуры, когда на экране появится приглашение к вводу новой команды. После этого включите компонент виртуальных машин. Это делается посредством нижепредставленной команды:
dism.exe /online /enable-feature /featurename:VirtualMachinePlatform /all /norestart
Важно! Если результатом ее выполнения является ошибка, потребуется предварительно включить виртуализацию. Делается это через BIOS, но сначала следует проверить статус этой функции в операционной системе. На нашем сайте есть отдельные статьи, посвященные этой теме.
Подробнее:
Как проверить, включена ли виртуализация в Windows 10
Как включить виртуализацию в BIOS

После того как компонент виртуальных машин будет установлен, потребуется перезагрузить компьютер.
Шаг 2: Загрузка и настройка ядра WSL2
Следующим шагом будет загрузка и установка ядра второй версии WSL, но изначально нужно определить архитектуру процессора, на которой работает операционная система. Для этого вызовите окно «Командной строки», в котором выполните следующую команду:
systeminfo | find "Тип системы"
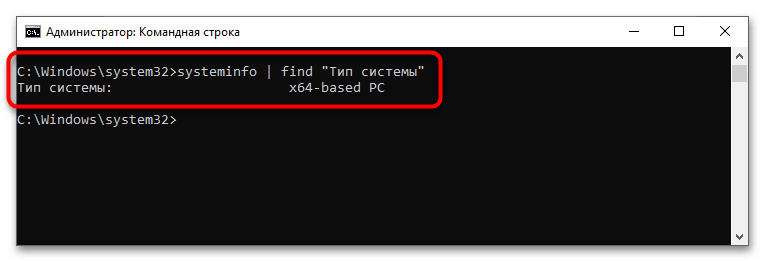
В результатах выдачи будет указана архитектура процессора. Если упоминается x64, скачайте пакет обновления ядра Linux в WSL2 для 64-разрядных компьютеров на базе процессора x86. Если в результатах выдачи есть упоминание ARM64, загрузите пакет обновлений по этой ссылке. Сохраните файл в любое удобное место, после чего запустите его, дважды кликнув по названию. Далее следуйте инструкции инсталлятора, пока не будет произведена установка.

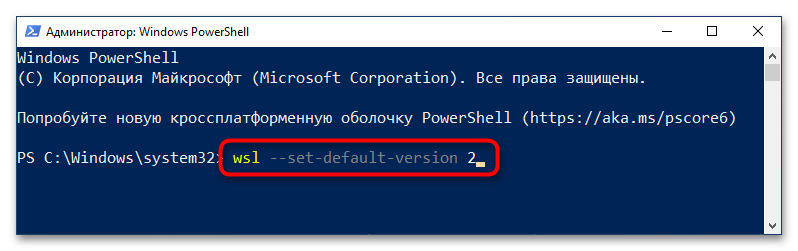
Теперь необходимо выбрать WSL2 версией по умолчанию, чтобы при установке дистрибутивов Linux они инсталлировались в этом окружении. Для этого достаточно в окне PowerShell выполнить представленную ниже команду:
wsl --set-default-version 2
Шаг 3: Выбор и инсталляция дистрибутива Linux
Как только все необходимые компоненты будут установлены, можно переходить к выбору дистрибутива Linux для инсталляции в окружении WSL2. В отличие от первого способа, представленного в этой статье, все действия будут выполняться не в «Командной строке», а в Microsoft Store. Для удобства ниже приведен список доступных систем со ссылками на них:
- Ubuntu 18.04 LTS
- Ubuntu 20.04 LTS
- Ubuntu 22.04 LTS
- openSUSE Leap 15.1
- SUSE Linux Enterprise Server 12 SP5
- SUSE Linux Enterprise Server 15 SP1
- Kali Linux
- Debian GNU/Linux
- Fedora Remix for WSL
- Pengwin
- Pengwin Enterprise
- Alpine WSL
- Raft (пробная версия)
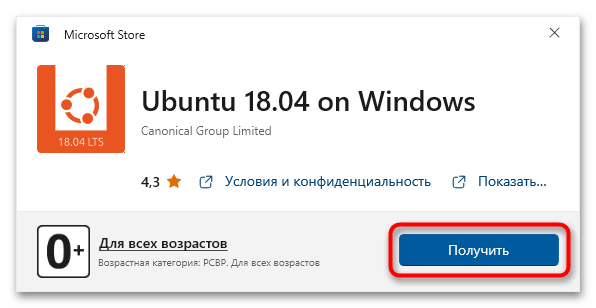
Воспользуйтесь нужной ссылкой, чтобы перейти в магазин приложений от Microsoft. Находясь на странице нужного дистрибутива, щелкните по кнопке «Получить», расположенной рядом с его названием.
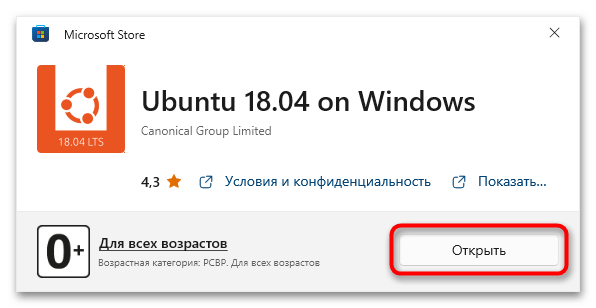
Дождитесь завершения загрузки, после чего кликните по появившейся кнопке «Открыть». Запустится окно консоли, в котором будет предложено подождать несколько минут, пока идет распаковка дистрибутива. В дальнейшем процедура инициализации ядра Linux будет занимать считанные секунды.
Примечание! Представленный выше список дистрибутивов взят с официального сайта Microsoft и может со временем измениться. В случае необходимости рекомендуем обратиться за справкой непосредственно к статье-первоисточнику.
Наша группа в TelegramПолезные советы и помощь