
- Можно ли восстановить BAD-блоки жесткого диска?
- Victoria HDD
- HDD Regenerator
- Disk Revival
- DiskGenius
- MHDD
BAD-блоки — логически или физически неисправные сектора жестких дисков, чтение или запись информации на которые невозможна или затруднена. Возникают бэд блоки по различным причинам — из-за неосторожной транспортировки винчестера, сбоев подачи электроэнергии на устройство, внутренних ошибок управляющей платы/программы, естественного износа поверхности диска и т.д.
Более подробная эта проблема описана на сайте NoDevice.com.
Можно ли восстановить BAD-блоки жесткого диска?
В некоторых случаях BAD-блоки могут быть восстановлены специализированными утилитами. Если же сектора повреждены физически, то восстановить их программно невозможно. В этом случае применяется метод переназначения адреса сектора. На каждом винчестере имеется специально выделенная область для подобных мероприятий. Пока эта область остается свободной, ее можно использовать вместо поврежденных секторов.
Таким образом, для восстановления BAD-блоков должно быть соблюдено одно из двух условий — либо неисправность носит логический характер, либо на диске имеется служебное пространство для переназначения бэд-блока. Но следует иметь в виду, что не всегда удается «вылечить» бэд-блоки, т.к. многое зависит от конструктивных особенностей винчестера, функциональности его встроенного программного обеспечения и множества других факторов.
Рассмотрим наиболее распространенные утилиты, позволяющие с некоторой вероятностью восстановить битые сектора жестких дисков.
Victoria HDD
Эту утилиту от белорусского программиста Сергея Казанского знают по всему миру. Программа Victoria HDD является очень мощным средством диагностики и восстановления жестких дисков. Одной из ключевых функций утилиты является посекторальное сканирование всей поверхности диска с целью обнаружения поврежденных секторов.
В качестве опций такого сканирования в Victoria HDD предусмотрена возможность восстановления (Refresh), полного стирания (Erase) или перераспределения (Remap) битого сектора. Первая опция помогает устранить логические ошибки, вторая и третья — физические и не устраняемые (без уничтожения информации) программные неисправности.
Пользоваться программой достаточно просто:
- Перейти во вкладку «Tests».
- В блоке опций действий при обнаружении ошибок (нижняя правая часть окна) перевести переключатель на «Refresh», «Erase» или «Remap» (рекомендуется задействовать сначала первую, потом вторую опцию).
- Нажать на кнопку «Scan».
- Ожидать окончание процедуры сканирования, которая может занять несколько часов в зависимости от объема диска.
Среди плюсов и особенностей программы Victoria HDD выделим:
- Программа бесплатная.
- Высокая эффективность работы с любыми моделями винчестеров от любых производителей.
- Наличие большого количества дополнительных опций и настроек сканирования.
- Встроенный HEX-редактор позволяет редактировать 16-ричные данные любой пустой или заполненной области жесткого диска.
- Возможность чтения паспортных сведений и SMART-атрибутов винчестера.
- Поддержка USB-накопителей и многое другое.
Минусы:
- Программа Victoria HDD рассчитана на опытных пользователей, потому управление ею может вызвать трудности.
- Отсутствует поддержка русского языка в официальной версии.
Скачать Victoria HDD
HDD Regenerator
HDD Regenerator достаточно узкоспециализированная утилита, решающая одну единственную задачу — обнаружение и исправление BAD-блоков.
Пользоваться программой относительно просто:
- Сразу после запуска из выпадающего меню «Regeneration» выбрать пункт «Start Process under Windows».
- В блоке «Choose Drive to Process» выбрать сканируемый диск, после чего кликнуть «Start Process»
- Откроется консоль с вариантами запуска функции восстановления.
- Ввести с клавиатуры «2», нажать клавишу ввода.
- Ввести «1», нажать клавишу ввода.
- Снова ввести «1» и затем «Enter».
- Дождаться окончания процедуры.
Приведенная выше инструкция запускает сканирование поверхности жесткого диска с опцией восстановления бэд-блоков, начиная с самого первого сектора. Доступны и другие режимы работы.
Плюсы программы:
- Относительно простое использование.
- Возможность создания прямо из программы загрузочной флешки/диска с загрузочной версией HDD Regenerator на борту.
- Просмотр SMART-атрибутов винчестеров.
Минусы программы HDD Regenerator:
- Программа платная. Free-версия позволяет восстановить всего 1 поврежденный блок. Таких ограничений нет для загрузочной версии HDD Regenerator.
- Для запуска сканирования жесткий диск должен быть полностью свободен от каких-либо задач. К примеру, если открыть какой-либо файл на винчестере, программа работать не будет. Т.е. сканирование винчестера, где хранится система Windows, в принципе невозможно.
- Отсутствует поддержка русского языка.
Скачать HDD Regenerator
Disk Revival
Программа Disk Revival позиционируется автором как инструмент для блокировки «почти» битых и/или медленных секторов жесткого диска. Т.е., по сути, утилита не восстанавливает бед-блоки, а «консервирует» их. Сразу отметим, что утилита не справляется с физическими неисправностями секторов, потому выше и было использовано выражение «почти битые» блоки. Тем не менее, подобные секторы зачастую помечаются (той же Victoria, например) как битые. И именно с такими — «не совсем» битыми — блоками и работает Disk Revival.
В целом процесс исправления программой медленных секторов можно считать восстановлением жесткого диска, т.к. имеющиеся на нем неисправные участки более не будут использоваться, а, значит, и исчезнут все связанные с наличием таких блоков проблемы.
Пользоваться программой Disk Revival достаточно просто:
- В меню «Диски» выбираем сканируемый раздел диска.
- Нажимаем на кнопку «Старт».
- Ожидаем окончания процедуры.
Утилита Disk Revival обнаружит все медленные сектора на диске и заполнит их произвольными данными. Другими словами, бэд-блоки блокируются на уровне файловой системы.
Плюсы программы Disk Revival:
- Простота эксплуатации, русскоязычный интерфейс со встроенной инструкцией и пояснениями по использованию программы.
- Возможность ускорения работы винчестера за счет блокировки медленных секторов.
- По заявлению разработчика, Disk Revival может справляться с ситуациями, с которыми часто не может справиться даже Victoria.
Минусы Disk Revival:
- Программа платная. Бесплатная версия позволяет обработать только 10 Гб дискового пространства.
- Нет функции перераспределения секторов.
- При форматировании или дефрагментации раздела диска результат работ сбрасывается, т.е. медленные сектора вновь становятся доступными для обработки. Для обхода этой ситуации программу следует запускать повторно после форматирования/дефрагментации.
Скачать Disk Revival
DiskGenius
DiskGenius — многофункциональная программа для работы с накопителями информации и хранящихся на них данных. В приложении также реализована функция проверки поверхности диска на предмет наличия плохо читаемых и бэд-блоков.
Использование DiskGenius:
- После запуска программы в левой части окна отобразится список с подключенными к ПК носителями информации.
- Для запуска модуля сканирования нужно кликнуть правой кнопкой мыши по выбранному диску, а затем выбрать пункт «Verify Of Repair Bad Sectors».
- Во вновь открывшемся окне кликнуть по кнопке «Repair».
- Дождаться окончания процесса.
Исправление проблем с бэд-блоками производится программой DiskGenius примерно также, как это делает утилита Disk Revival.
Положительные качества DiskGenius:
- Достаточно простая эксплуатация даже неопытными пользователями — никаких настроек производить не придется.
- Наличие множества функций по восстановлению данных с дисков и утраченных разделов.
- Поддержка множества файловых систем.
- Возможность создания загрузочной флешки/диска с DiskGenius.
К минусам DiskGenius можно отнести:
- Программа платная. Однако функция исправления бэд-секторов работает и в бесплатной версии DiskGenius без ограничений.
- Не поддерживает технологию перераспределения секторов.
- Отсутствует русский язык.
Скачать DiskGenius
MHDD
Все рассмотренные выше программы предназначены для работы в среде Windows (если не брать в расчет загрузочные версии Victoria и DiskGenius). Утилита MHDD не работает из операционной системы (Windows-версия хоть и существует, но с ее запуском обычно возникают всевозможные проблемы). Программа первоначально создавалась и в данный момент развивается в качестве загрузочного ПО для тестирования, диагностики и восстановления жестких дисков.
Наибольшую сложность у новичков вызывает процесс запуска MHDD, всегда начинающийся с создания загрузочной флешки или диска. Здесь этот процесс мы не будем рассматривать, а приведем ссылки для скачивания необходимых файлов:
- Здесь (https://www.softsalad.ru/software/sistema/utility/mhdd) можно скачать архив с ISO-образом MHDD.
- А здесь (https://www.softsalad.ru/software/sistema/utility/wintoflash) можно скачать бесплатную программу для создания загрузочных флешек WinToFlash.
Далее останется загрузить компьютер с вновь созданной флешки и выполнить несколько простых шагов по восстановлению BAD-блоков винчестера:
- Нажать F2 для построения программой списка жестких дисков.
- Ввести цифру, соответствующую номеру винчестера в списке, нажать Enter.
- В небольшом окне переместиться стрелками на клавиатуре к пункту «Remap», установить «ON», затем к пункту «Erase Delays», также установить «ON». Первая опция включает режим переназначения неисправимых бэд-блоков, вторая опция помогает восстановить программно битые секторы путем их полной перезаписи.
- Нажать Enter и ожидать завершения процедуры.
О плюсах и минусах MHDD судить сложно, т.к. программа в одном случае идеально справляется со своей задачей, в других — даже не определяет жесткий диск. Здесь многое зависит от модели винчестера и конфигурации материнской платы.
То, что в процессе работы с винчестерами не используются всевозможные системные драйверы и прочее посредническое программное обеспечение (т.е. работа с накопителем происходит практически напрямую), делает MHDD очень быстрым и безошибочным средством, чего нельзя сказать о любых утилитах, запускающихся из-под Windows.
Скачать MHDD
Рекомендуем прочитать статьи:
- Проверка жестких дисков
- Тестирование производительности жестких дисков
- Восстановление жестких дисков
- Дефрагментация жестких дисков
What to do when a hard disk has bad sectors? This guide includes the best solutions to repair bad sectors on hard drive and protect your important data effectively.
Occasionally, when one or more bad sectors come upon a hard disk, the disk will go bad. When this happens, the data in those bad sectors may be lost, but the data on the rest of the disk will be unaffected and the disk is still completely usable. This article from EaseUS will tell you how to scan and repair bad sectors on a hard disk and remove bad sectors from hard disk permanently on your computer. Let’s get started.
Before you dive into the detailed information on this topic, let’s see what you need to prepare.
| 🧰Tools You Will Use | EaseUS Disk Copy |
|
📃Preparations |
|
Download this awesome disk cloning software here
HDD Bad Sector Overview
Before you start, learn the basic information about bad sectors to pick a better solution and remove bad sectors from your drive.
What Is Bad Sector
According to Wikipedia and professional IT sites, the bad sector is defied a permanently managed storage unit on a hard disk. Once the sector gets damaged, all saved information in that section is lost. Usually, an operating system like Windows 10/8/7 will skip the bad sector once it’s found and marked.
Two Types of Bad Sectors
Basically, there are two types of bad sectors — The hard bad sector (also called the physical bad sector) and the soft bad sector (also known as the Logical bad sector).
The hard bad sector is mainly caused by physical damage (in 1,2 causes), such as manufacturing error, physically broken, etc. While the soft bad sector is usually related to software issues (in the 3rd cause) such as improper operations on hard drives, file system errors, etc.
Due to the different causes of bad sectors, the ways to repair bad sectors are also varied. Continue reading, you will find the best solutions to repair bad sectors on your hard drive in Windows 10/8/7.
How to Fix Bad Sectors on HDD in Windows 10
As you know when the operating system detects bad sectors, it would mark them as unusable no matter if it’s logical or physical bad sectors. As a result, data loss and the loss of disk capacity are unavoidable. Then, how to fix and remove bad sectors from the hard disk? Read on for in-depth tutorials and get to know a complete repair process.
First Thing to Do: Back Up and Clone HDD to a Good Hard Drive (Skip Bad Sectors)
If the disk contains many bad sectors and is always stuck or slow to load data on the computer, or the drive is failing due to physical bad sectors, it is impossible to repair bad sectors. The wise choice is to back up and save all the data at first to an USB flash drive or an external hard drive. But how to copy a hard drive with bad sectors?
EaseUS Disk Copy, a powerful disk cloning tool for Windows 11/10/8/7, can skip the bad sectors and clone disks to make a full copy of your hard drive. Therefore, it can help you clone a hard drive with bad sectors. In addition, it can help you clone a hard disk for backup and recovery needs and replace a laptop’s hard disk without losing data without hassle.
Some key features of EaseUS disk cloning software:
- It can serve as bad sector repair software
- Resize partitions in the cloning process
- Clone hard drive to USB flash drive easily
- Clone a larger HDD to a smaller SSD
- Transfer OS to new hard drive without reinstalling Windows and applications
Download and apply this disk copy software to upgrade and clone HDD with bad sectors to a healthy hard drive without effort.
If your computer can’t boot into your operating system, create a bootable USB in advance, and then follow the steps below to copy your data. Remember to connect the new hard drive to the computer as a storage device.
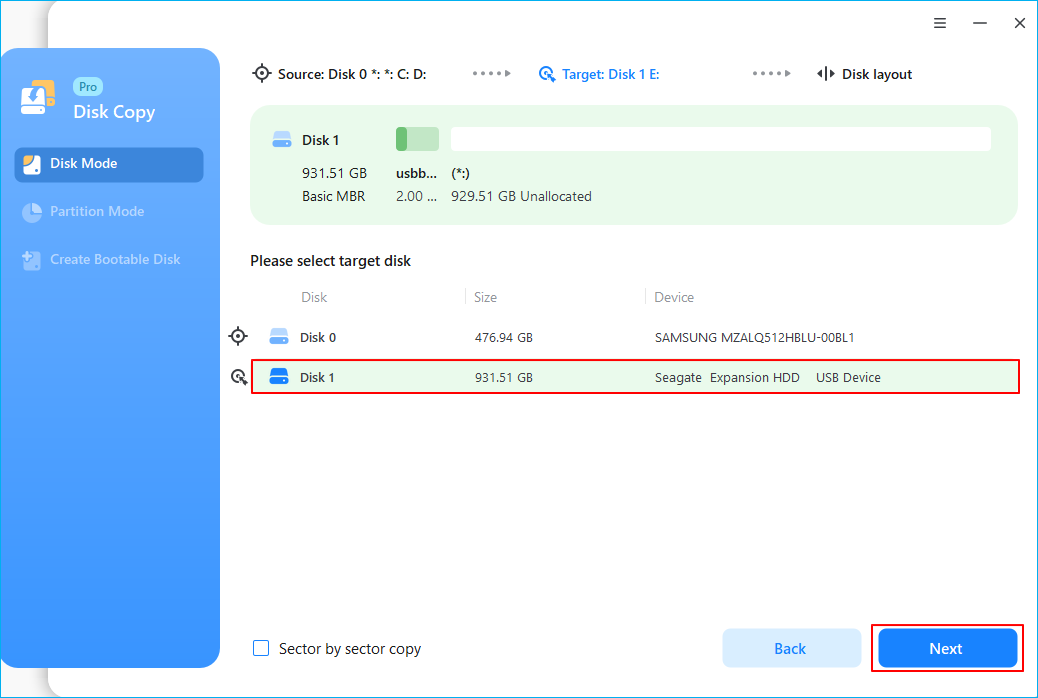
Step 1: Choose «Disk mode» and select the smaller hard drive as the source disk.

Step 2: Choose the bigger hard drive to save the data and then click «Next».
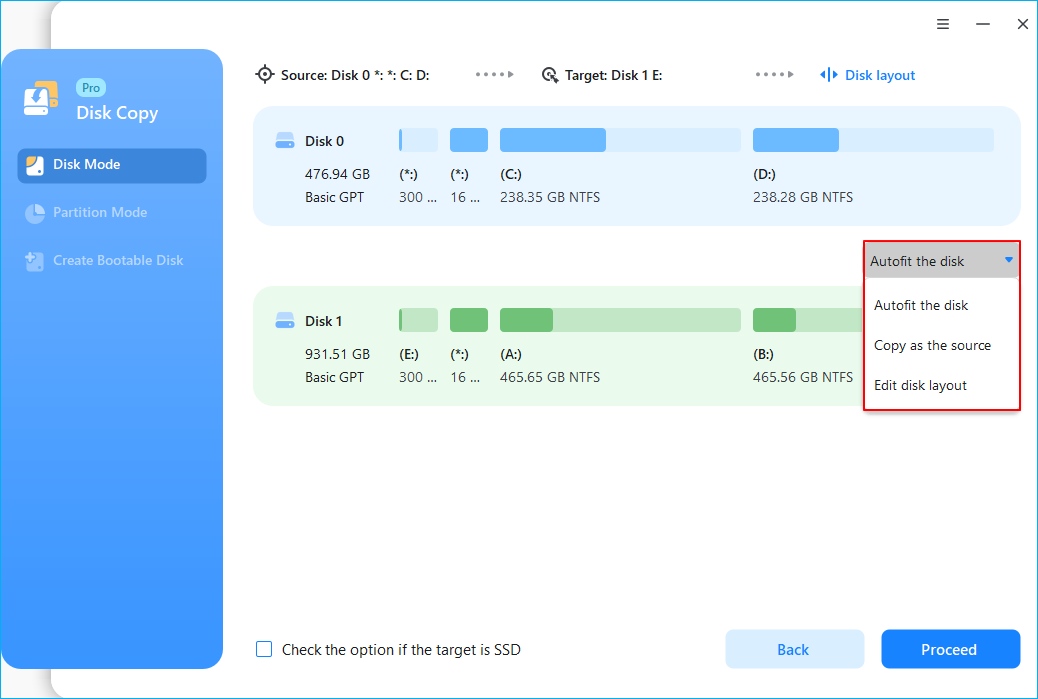
Step 3: Edit the disk layout and then click «Proceed» to continue.
- «Autofit the disk» resize the layout on destination disk according to the size of it to make the disk as the best status.
- «Copy as the source» doesn’t change anything on destination disk and the layout is same as source disk.
- «Edit disk layout» allows you to manually resize/move partition layout on this destination disk.
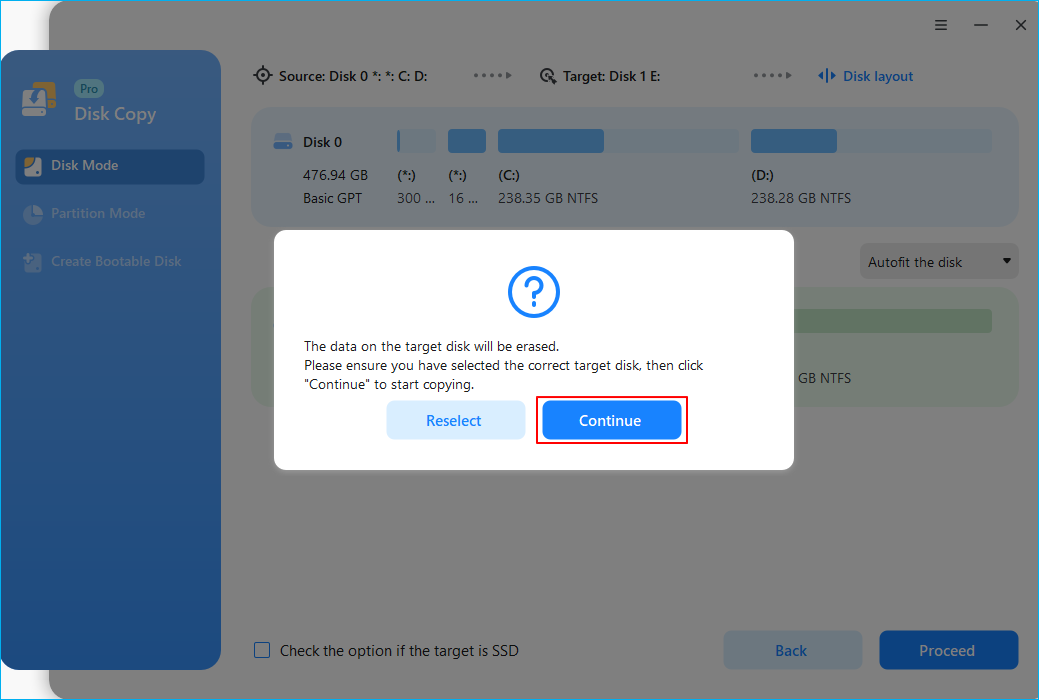
Step 4: A warning message tells you that the data on the destination disk will be overwritten. Click «OK» to continue if you do not have important data on the destination disk.
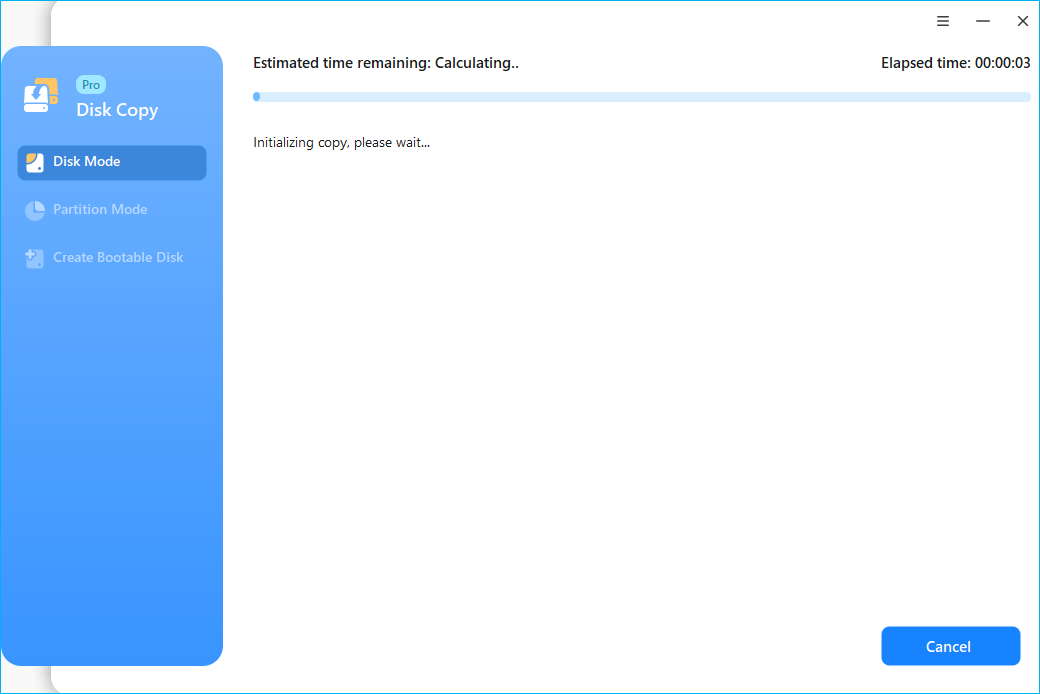
Step 5: Wait for the process to complete.
When the cloning process finishes, shut down your computer, insert the newly upgrade hard drive into your computer and replace the old drive. If it’s a system drive, set the computer to boot from a new hard drive instead of the old one in BIOS.
Repairing Soft/Logical Bad Sectors in Windows
If your hard drive is experiencing one or more bad sectors, still accessible, follow our instructions to fix your problem and remove bad sectors permanently from the hard disk with bad sectors repair tools.
1. Run CHKDSK Command and Format Hard Drive
If there are only a few bad sectors on your drive, you can run the CHKDSK command and format the drive to repair those bad sectors:
Step 1. Run the CHKDSK command to repair disk errors.
1. Press the Windows key and type cmd.
2. Right-click «Command Prompt» and choose «Run as administrator».
3. Type chkdsk E: /f /r /x and hit Enter. (Replace E with the drive letter of your hard drive.)
Step 2. Format hard drive to usable again
1. Open Windows File Explorer, locate, and right-click on your hard drive.
2. Select «Format», reset the file system as NTFS, tick «Quick Format» and click «Start».
After this, you can save your data back to your hard drive and use it again.
2. Use a free disk check and repair tool to fix bad sectors
EaseUS Partition Management software offers the simplest method to check and fix hard drive errors. You can apply its Check File System option to check and repair hard disk partition errors in Windows 10. Just download and start EaseUS partition management software, locate the hard disk, then run the check file system.
3. Use data recovery software to retrieve your hard drive to its previous state
EaseUS Data Recovery, a professional data recovery tool, will restore data lost caused by deleting, formatting, partition loss, unbootable or crashed system, virus attack, etc., from your hard drive. With this robust yet easy program, you can recover data and your disk to a normal state with simple clicks.
If you like this post, you can share it on your social platforms to help more people.
Hard/Physical Bad Sectors Repair
Mostly, when your hard drive contains hard bad sectors, you cannot repair bad sectors by using normal solutions. The only possible way is to low-level format the drive, resetting the hard drive blocks, clusters, and sectors.
A low-level format is also called a physical format. Modern hard drives are low-level formatted at the factory for the life of the drive. A PC cannot perform an LLF on a modern IDE/ATA or SCSI hard disk, and doing so would destroy the hard disk. That is to say, you can’t repair a bad sector.
To resolve this issue, you have two choices:
1. Send your hard drive to the manufacturer or a local repair center, and customize it for a low-level format.
2. Choose to clone the disk with bad sectors to a good hard drive to avoid the hard disk getting worse with more bad sectors.
Summary of Bad Sector Repair
This page provides a complete guide to help you repair bad sectors on hard drive in Windows 11/10/8/7. To remove bad sectors from the hard disk permanently, you can use the Windows CHKDSK command or EaseUS free partitioning software. With the two bad sector repair tools, you can efficiently fix and repair bad sectors on the hard drive, and external storage devices.
In contrast to logical bad sectors, if there are physical bad sectors on your hard drive, it’s almost impossible to repair your hard disk. You need to replace it with a new hard HDD. So, to avoid data loss, when you find bad sectors on your disk, be sure to use EaseUS Disk Copy to copy and make a backup of your data.
FAQs on Repairing Bad Sectors
Some people may also have questions about diagnosing if bad sectors are on your drive. You may judge from the following two factors:
1. What are the symptoms of bad sectors?
When you meet one of the following symptoms, your hard drive or external storage devices may contain bad sectors:
- Strange friction sound when booting or running a hard drive.
- The system’s pop-up window shows message like «Sector not found» or «General error in reading drive C,» etc.
- The disk won’t format, getting an disk error.
- Scandisk (a diagnostic utility) automatically runs when the system is booted.
- Some operations are stuck or become random to a certain process.
2. What are the causes of hard bad sectors?
1. Hard drive was shipped from the factory with bad sectors. (e.g. SSD disk)
2. Physical damage, like:
- Manufacturing disk errors
- Accidental drop, break, etc.
- The touch of the hard drive header to the platter
- Dust
3. What are the causes of soft bad sectors
- Software issues, like:
- Sudden shutdown of the computer
- Sectors that contain data don’t match the error-correction code
- Viruses and malware mess up computers and cause bad sectors.
4. How to avoid bad sectors?
Some of you may also want to know how to protect the drive from bad sector errors. Here are some tips:
- Run Disk Check or CHKDSK command on your drive regularly to remove soft bad sectors.
- Run virus cleaner software to remove viruses and malware.
- Execute proper operations on your drive, for example: close all running programs before shutting down the computer.
Bad sector can crop up on any storage devices like external HDD, hard drives, SSDs, flash drives etc. When there are just a few bad sectors it would not indicate that your system’s hard drive would surely fail as some of these commonly prevalent bad sectors can be detected and repaired successfully. Next time when you encounter a bad sector in any of your storage devices, you need not panic. This article mainly focuses on explaining how to solve the problem of Windows repair tool C corrupted or not readable.
- Part 1: What Is Bad Sector Hard Drive?
- Part 2: Best 20 Bad Sector Repair Software on Windows 10/8/7
Part 1: What Is Bad Sector Hard Drive?
A bad sector is that sector of your computer, laptop or external hard drive, which is either un-writeable or inaccessible. When a large number of bad sectors get accumulated, the issue of low disk space arises. The files in these bad sectors would be inaccessible, unreadable or can even be corrupted. If you want to avoid such issues which arise due to bad sector hard drive, you would have to turn to the reliable bad sector repair software which can solve this problem easily.
Part 2: Best 20 Bad Sector Repair Software on Windows 10/8/7
You can make use of these best 20 bad sector repair software Windows 10/8/7 to solve the problem.
- Top 1: Tenorshare UltData -Windows/Mac Data Recovery(Recommended)
- Top 2: EaseUS Partition Master
- Top 3: Clonezilla
- Top 4: WinDirStat
- Top 5: TestDisk
- Top 6: OSFMount
- Top 7: Defraggler
- Top 8: SSDLife
- Top 9: Darik’s Boot And Nuke (DBAN)
- Top 10: HD Tune
- Top 11: VeraCrypt
- Top 12: CrystalDiskInfo
- Top 13: Recuva
- Top 14: TreeSize
- Top 15: HDDScan
- Top 16: Disk2vhd
- Top 17: NTFSWalker
- Top 18: GParted
- Top 19: SpeedFan
- Top 20: MyDefrag
Top 1: Tenorshare 4DDiG for Windows Data Recovery(Recommended)
Tenorshare 4DDiG for Windows Data Recovery is an excellent data recovery software and known to be one of the best bad sector repair software Windows 10. This can be used for both the Windows as well as Mac systems. It performs efficiently in helping you get back any formatted, lost or deleted data from your hard drive. You can use this software in the following way.
For Windows Data Recovery
Step 1: From the main interface, click on the location from where your file was lost, if you are unsure about this click on “The Whole Computer”.
Step 2: Click “Scan” and once the scan process is over, all the deleted files from your system or the selected location on your system, will be displayed.
Step 3: Click on the file which you wish to recover and click on “Recover” option.
For Mac Data Recovery
For Mac users, you can use 4DDiG for Mac Data Recovery to retrive lost data. Here are the specific steps.
Step 1: After launching the software, select a location on your hard drive and click on “Scan”.
Step 2: All deleted files will be displayed on the screen, you can preview any file prior to recovering it.
Step 3: Click on the file you wish to recover and select the location where you would want to recover it.
These lost or formatted data can be easily recovered with the help of Tenorshare 4DDiG for Windows Data Recovery.
Top 2: EaseUS Partition Master
EaseUS Partition Master is a very easy to use software and should be one of your first choices when you are looking for repairing bad sector hard drive. Although this is a great software, the basic version of this software does not have all the advanced features and to access these advanced features you would have to purchase the full version.
Pros:
- User friendly for novice users.
- You can preview the changes prior to applying them.
Cons:
- Only good for personal use.
- When you want to extend the system volume, you would be required to reboot the system.
- Dynamic volumes cannot be managed by this software.
Top 3: Clonezilla
This bad sector repair tool need not be installed on your system. You can easily boot it from a USB flash drive and use it to suit your requirements. Clonezilla is a very powerful tool which can create an image of the hard drive and restore is exactly in the same form. Cloning process is made easier with the help of this software.
Pros:
- Lightweight software.
- Supports multiple platforms.
Cons:
- Difficult to be used by inexperienced technicians.
- Fewer features in comparison to its competitors.
- The processes are very slow.
Top 4: WinDirStat
WinDirStat can be used for any version of the Windows systems and laptops. Through this software you can view the disk usage statistics and also clean up a hard drive easily. It effectively scans your system hard drive and displays all the necessary information through which you can understand what exactly is causing the bad sector problem.
Pros:
- Installation is pretty quick and easy.
- You can scan a single folder instead of scanning the entire hard drive.
Cons:
- The scanning process is pretty slow.
- You have to install this software as there is no portable option of this software available.
- The scan results cannot be saved, so you cannot open them anytime in the future.
Top 5: TestDisk
TestDisk is a free open source software which performs the data recovery effectively. It is designed specifically to recover all the lost or formatted partition and also to unerase any other kind of data on your Windows system. This software is perfect for the advanced system users and it is jam packed with a lot of essential features.
Pros:
- Time required for the recovery process to complete is pretty less.
- It need not be installed on your system.
Cons:
- It is mainly targeted for advanced users.
- The recovery process is very confusing to start as no step by step guide is available.
- Graphical user interface is absent.
Top 6: OSFMount
OSFMount allows users to mount the disk image files on Windows system in the form of a logical drive letter or physical disk. By default, all the disk image files are mounted in the form of read only files just so that the original files remain unaltered. In “write cache” mode, this software can be used to mount the disk images as read or write format.
Pros:
- The process speed is very high.
- The data is stored in RAM.
Cons:
- Does not have advanced features.
- Windows integration is not possible.
- It is not effective for some system games which require installation media.
Top 7: Defraggler
Defraggler is a very safe and secure way to speed up the operations on your Windows PC or laptop. This software assembles the fragmented files which are present on your Windows system and organizes them in a much more efficient fashion. With the help of this software, fragmentation can be prevented prior to its occurrence.
Pros:
- Very easy to use.
- Installation is very quick.
Cons:
- Registry scan function is absent.
- Google Chrome gets installed by default.
- Optimization feature is not there.
Top 8: SSDLife
With the help of SSDLife, you can control and check how worn out your SSDs are. It offers an easy and convenient way to analyze the SSD data and store the data in it in a safe and secure manner. It is compatible with almost all the leading SSDs including Intel, Corsair, Western Digital, Apple, etc.
Pros:
- A reasonable estimate of the lifespan of your SSD can be acquired.
- Makes use of very little resources.
Cons:
- Very expensive
- It is a fairly new technology and lacks efficiency in performing certain operations.
- Processes carried out through this software are pretty slow.
Top 9: Darik’s Boot And Nuke (DBAN)
Darik’s Boot And Nuke (DBAN) is one of the most powerful and the best free data destruction program available for your Windows system. If you are a novice system user, this program may be a bit difficult for you to use, however it is not entirely impossible. It does not matter how many files are there on the drive or what type of files they are, this software can be used to wipe all data.
Pros:
- Download file is small.
- Supports almost all the operating systems.
Cons:
- The instructions this program might be a bit intimidating.
- SSDs cannot be wiped with this software.
- Entire drive can be erased and not one particular partition.
Top 10: HD Tune
HD Tune is a software developed for all the Windows systems for testing the hard drive. This way the general health of your system’s hard drive can be easily checked. With the help of this software, you can run a scan to find out if there are any errors in the hard disk, can perform a benchmark reading test and do so much more.
Pros:
- Some of the features can be customized.
- Supports almost all the types of hard drives.
Cons:
- It is only available for free when used for personal use
- The information cannot be saved directly to a file.
- Only supports information copy to the clipboard.
Top 11: VeraCrypt
VeraCrypt software can be used to create encrypted files which can then be mounted in the form of virtual drives with an assigned drive letter. With the help of this software your can add files, create files, delete files and other data from your system hard drive. The contents are always going to be encrypted.
Pros:
- The software is developed keeping the users data privacy in focus.
- Multi-factor security is available.
Cons:
- It interferes with the file history.
- Not suitable for novice users.
- Apart from Windows 10 systems, when installed in other systems there are several shortcomings.
Top 12: CrystalDiskInfo
CrystalDiskInfo is a great software through which you can easily monitor the health of your system’s drive. Whenever the drive’s health on your system is deteriorating, this software warns you so that the subsequent measures can be taken. Even the health of the external USB drive can be monitored with the help of this software.
Pros:
- Shows the health of each drive present in the system tray.
- Great settings to adjust the AAM/APM.
Cons:
- Certain settings have to be made for constant monitoring.
- This software has to be set up to be as resident.
- Surface and SMART tests absent.
Top 13: Recuva
Recuva is one of the most affordable software for hard drive management. It comes in both a free as well as paid version which is reasonable priced. This is one of the most convenient to use file recovery software for all the novice Windows system users. The professional version of this software has the ability to create an image file with the files in the disk and then recover files from the image.
Pros:
- Inexpensive software.
- Easy to use.
Cons:
- The free version does not have any useful features.
- Fails to dig in deeply like the other higher priced software.
- Lacks certain useful advanced features.
Top 14: TreeSize
TreeSize proves to be very useful whenever your hard disk drive nears its capacity. It can tell you where all the space in your system’s hard disk drive is gone. Using “Treemap” in the software you can keep a close watch on your system’s disk space. This software supports several languages including Chinese, Dutch, Czech, Italian, French etc.
Pros:
- Several options for file sorting is available
- Large files can be scanned in both the internal as well as external hard drives.
Cons:
- The filter feature is not very effective.
- The disk storage analysis is a bit difficult.
- Scan menu is sometimes unresponsive.
Top 15: HDDScanc
HDDScanc works efficiently as a hard drive diagnostics. This freeware software can be used to test the storage devices like hard drives for any errors like bad sectors or bad blocks. This program also shows the SMART attributes and can also be used to change the HDD parameters like APM, AAM etc.
Pros:
- Many different types of storage devices can be scanned with the help of this software.
- Very easy to install and use.
Cons:
- There is no option through which the software can get installed into your Windows system.
- There are no instructions to make the process easier.
- Help or tips documents to run the software are absent.
Top 16: Disk2vhd
Disk2vhd is a utility software which helps the users in creating virtual hard disk versions of the physical disks in your Windows computer. You can run this program on any system which is online. You can use this software to create virtual hard disks on local volumes including the ones which are being converted.
Pros:
- Very good for file migration.
- Efficiently creates hard disk images.
Cons:
- Does not make a pure conversion of the files.
- Can be demanding when used on older versions of Windows systems.
- Heavy applications cannot be dealt effectively with this software.
Top 17: NTFSWalker
NTFSWalker is one of the most effective MBR repair tool which adopts the straightforward approach to analyze the partitions on any storage devices like hard disks, USB flash drives, memory cards, floppy disks etc. This software allows you to view all the deleted and regular files. Not just this, but it also allows the user to view the attributes deleted from a file.
Pros:
- You need not install this software, you can use it as soon as you download it.
- Scanning process is pretty fast.
Cons:
- Unless the target drives use NTFS file system, scanning or recovery of files cannot be done.
- You can select just one partition for one particular operation.
- There is no built-in filter or search function.
Top 18: GParted
GParted is a form of free partition editor which can be used graphically to manage the disk partitions. With the help of this software you can copy, resize and move any partition without the fear of data loss. This way you can shrink or grow your C: drive, make space for the newer operating systems and also attempt to rescue and recover from the lost partitions.
Pros:
- Graphical user interface which is very simple to use and navigate.
- No need to reboot the system when committing the changes.
Cons:
- Download limit is upto 300 MB.
- Can use this software only once it has been downloaded on a USB flash drive or a disc.
- Cannot redo any changes made.
Top 19: SpeedFan
SpeedFan is an excellent software which can be used to monitor the fan speeds, voltages and temperatures in any computer system with the hardware monitor chips. This program can also access SMART information data and can show the hard disk temperature as well. SCSI disks are also supported by this software.
Pros:
- Has an excellent auto-scanning feature.
- Packed with extensive options to manage the computer system and hard disk.
Cons:
- Users who are not tech-experts may struggle while using this software
- Pre-set settings which could be easily activated is absent.
- The program has to be kept running in order for it to perform efficiently.
Top 20: MyDefrag
All the Windows computer systems, starting from Windows 2000 can use MyDefrag for defragmentation of files on their hard disk. This program features a graphical user interface which makes it pretty simple and comfortable to use. This program features several optimization strategies which makes most of the processes fast and efficient.
Pros:
- External and internal drives can be defragmented
- The scripts make custom defrag options available.
Cons:
- Built-in scheduling options are absent.
- Context menu integration is not there.
- Software has not been updated since a long time.
Conclusion
Bad sectors can deteriorate the performance of any system. This problem should be tackled immediately. Also, sooner or later every hard disk drive would near its capacity, that is when the above listed bad sector repair software can come to use. Out of all these tools, Tenorshare UltData – Windows Data Recovery is the best as it is highly efficient in its performance and do not fail to deliver satisfactory results as required by the user. Highly recommended!
A Fabulous Video Repair Tool
- A wide range of repair video file formats up to 17+, MP4, MOV, AVI, MKV, F4V, and a lot more;
- Corrupted video repair for phones, cameras, GoPro, drones, etc.;
- Perfectly featured with 4K, 8K, 360° & VR video repair;
- Compatible with Windows 10 & macOS Catalina for freshman or expert;
Free Trial
Free Trial
Speak Your Mind
Leave a Comment
Create your review for Tenorshare articles
Все способы:
- Способы лечения нестабильных секторов
- Способ 1: Victoria
- Способ 2: Встроенные средств Windows
- Другие рекомендации
- Вопросы и ответы: 25
Нестабильные сектора или бэд блоки — это участки жесткого диска, чтение которых вызывает у контроллера затруднения. Проблемы могут быть вызваны физическим износом HDD или программными ошибками. Наличие слишком большого количества нестабильных секторов может привести к зависаниям, сбоям в работе операционной системы. Исправить проблему можно с помощью специального софта.
Способы лечения нестабильных секторов
Наличие определенного процента бэд блоков — нормальная ситуация. Особенно когда жесткий диск используется не первый год. Но если этот показатель превышает норму, часть нестабильных секторов можно попытаться заблокировать или восстановить.
Читайте также: Как проверить жесткий диск на битые сектора
Способ 1: Victoria
Если сектор был обозначен нестабильным из-за несоответствия записанной в нем информации и контрольной суммы (например, из-за сбоя при записи), то такой участок можно восстановить путем затирания данных. Сделать это можно с помощью программы Victoria.
Скачать программу Victoria
Для этого:
- Запустите встроенную SMART-проверку для выявления общего процента неисправных секторов.
- Выберите один из доступных режимов восстановления (Remap, Restore, Erase) и дождитесь окончания процедуры.
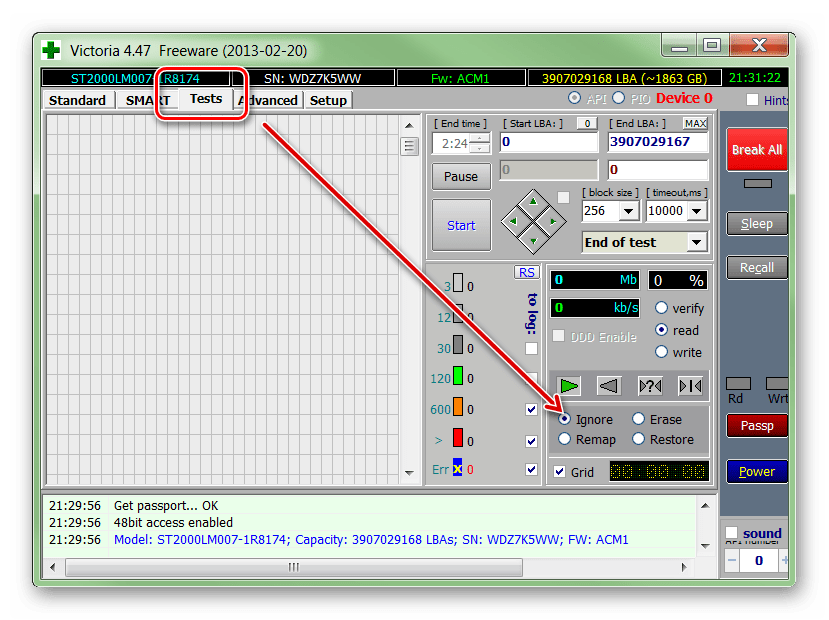
Программное обеспечение подходит для программного анализа физических и логических дисков. Может использоваться для восстановления битых или нестабильных секторов.
Подробнее: Восстанавливаем жесткий диск программой Victoria
Способ 2: Встроенные средств Windows
Проверить и восстановить часть неисправных секторов можно с помощью встроенной в Виндовс утилиты «Проверка диска». Порядок действий:
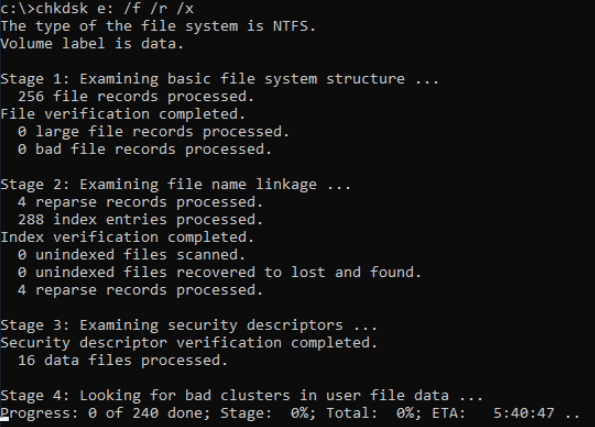
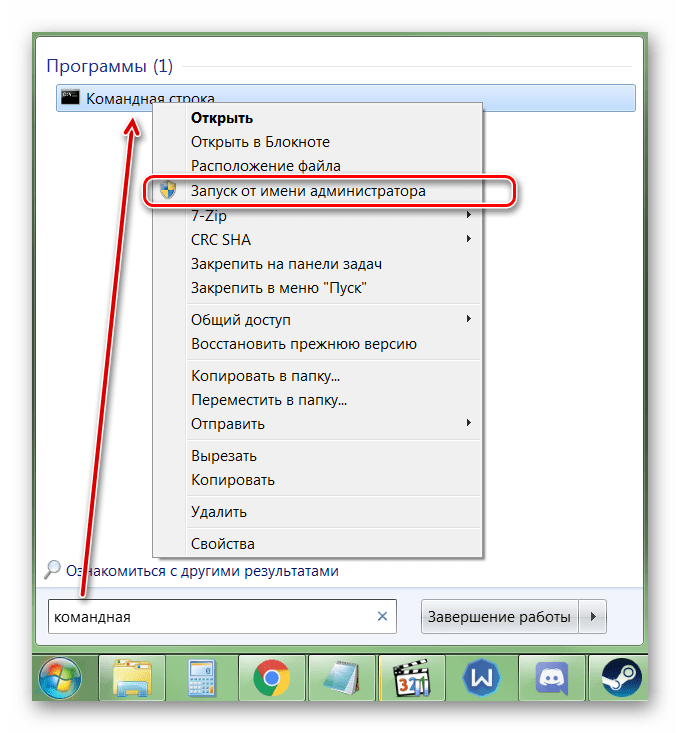
- Запустите командную строку от имени администратора. Для этого откройте меню «Пуск» и воспользуйтесь поиском. Кликните по ярлыку правой кнопкой мыши и в выпадающем списке выберите «Запустить от имени администратора».
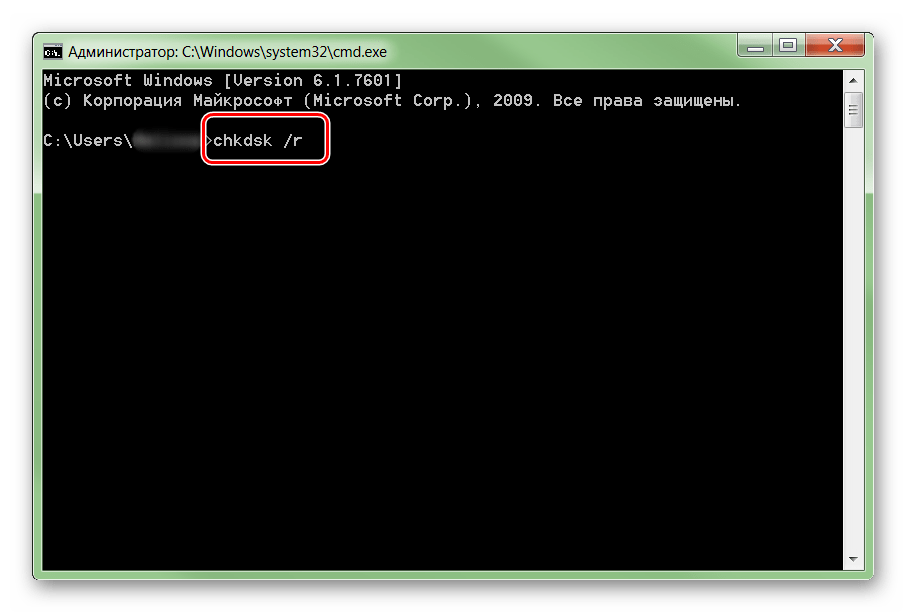
- В открывшемся окне введите команду
chkdsk /rи нажмите кнопку Enter на клавиатуре, чтобы начать проверку. - Если на диске установлена операционная система, то проверка будет проведена после перезагрузки. Для этого нажмите Y на клавиатуре, чтобы подтвердить действие и перезапустите компьютер.
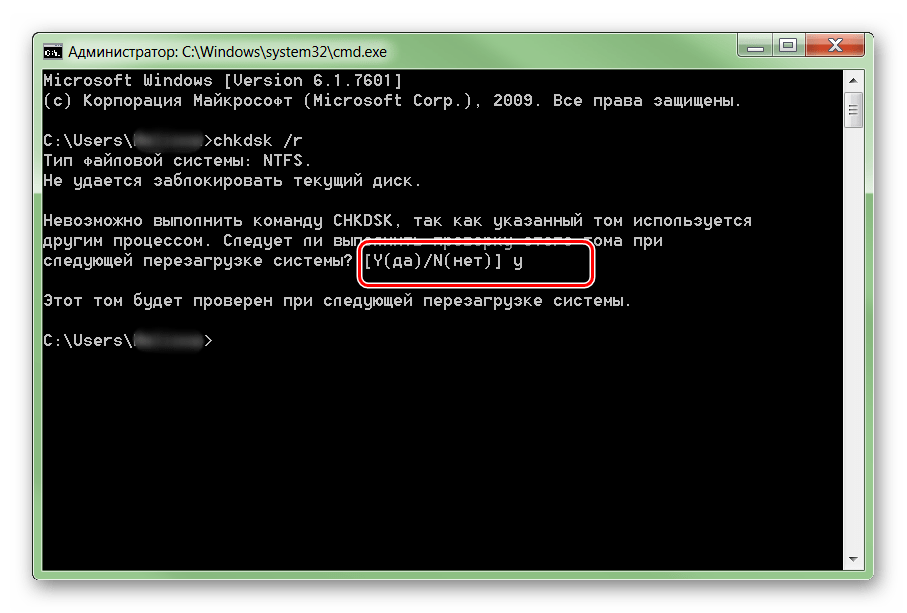
После этого начнется анализ диска, по возможности восстановив какие-то сектора путем их переписывания. В процессе может появиться ошибка — значит, вероятно, процент нестабильных участков слишком большой и резервных блоков-заплаток больше нет. В таком случае лучшим выходом станет приобретение нового винчестера.
Другие рекомендации
Если после анализа жесткого диска с помощью специального софта, программа выявила слишком большой процент битых или нестабильных секторов, то проще всего заменить неисправный HDD. Другие рекомендации:
- Когда жесткий диск используется уже долгое время, то, скорее всего, в негодность пришла магнитная головка. Поэтому восстановление даже части секторов не исправят ситуацию. HDD рекомендуется заменить.
- После повреждения жесткого диска и увеличения показателя bad sectors нередко пропадают пользовательские данные — восстановить их можно с помощью специального софта.
- Не рекомендуется использовать неисправные HDD для хранения важной информации или устанавливать на них операционную систему. Они отличаются нестабильностью и могут быть установлены в компьютер только в качестве запасных устройств после предварительно проведенного ремапа специальным софтом (переназначения адресов бэд блоков на запасные).
Подробнее:
Лучшие программы для восстановления удаленных файлов
Чтобы жесткий диск не вышел из строя раньше времени, старайтесь периодически проверять его на наличие ошибок и своевременно проводить дефрагментацию.
Вылечить часть нестабильных секторов на жестком диске можно с помощью стандартных средств Windows или специального софта. Если процент битых участков слишком большой, то произведите замену HDD. При необходимости восстановить часть информации с неисправного диска можно с помощью специального софта.
Наша группа в TelegramПолезные советы и помощь
Readers help support Windows Report. We may get a commission if you buy through our links.
Read our disclosure page to find out how can you help Windows Report sustain the editorial team. Read more
The role of a hard disk in a computer system is extremely important because it holds all your valuable information and keeps the operating system working properly. And when the data on it is lost, a bad sector repair tool comes into the picture.
The data on the bad sectors may be temporarily or permanently lost depending on the cause of the problem.
Hardware errors are impossible to fix with software and can only be rectified by creating a backup and replacing the hardware itself. If the damage is caused by software errors then you can fix them by using bad sector repair software.
A hard drive contains millions of sectors that, over time, can get damaged or become inaccessible for a variety of reasons – logical corruption, physical damage to the disk, etc.
When a section of the hard drive is inaccessible, in the worst-case scenario, it can cause the operating system to crash. This is one of the most frequent root causes for Blue Screen of Death errors, aka BSoD errors.
So, let’s find out all about the issue and the best bad sector repair tools with a free download to fix things.
How to fix bad sectors permanently?
Bad sectors are the part of the hard drive which have been rendered unreadable. And over time, several of these may come up due to various reasons, for instance, improper shutdown, overheating, malware, or physical damage.
Frankly speaking, the possibility of fixing bad sectors is usually bleak, and this is where advanced third-party bad sector repair tools may come to your aid.

Though Windows offers a built-in utility, Check Disk, to automatically identify and eliminate issues with the hard drive. Also, you may defragment the hard drive, but that wouldn’t work for an SSD.
Stellar Data Recovery: Simply the best

Stellar Data Recovery software allows you to recover lost or deleted files, folders, photos, documents, videos, and other files, even if your hard drive was severely corrupted or due to accidental deletion or formatting.
It has been perfecting its software for more than 25 years. During this time, this company has received more than 100 awards for its top-of-the-line products.
This is one of the leading names on the market in regards to the recovery of files a hard drive failure or formatting and offers you 3 great options that cover users’ needs from basic users to the most advanced.
Stellar Data Recovery
Recover any file format on any storage device with the most powerful tool available on the market!
1. Stellar Data Recovery – Standard
The Standard version of this software is designed for the average PC user that needs help in recuperating lost or corrupted files like Office documents, emails, spreadsheets, presentations, photos, videos, audio files, and others.
Stellar Data Recovery-Windows Standard is limited to recovering data up to 1GB which is more than enough for the average PC user.
It can also recover data from external storage devices such as external hard drives, SD cards, USB flash drives, Cameras, Camcorders, etc.
Stellar Data Recovery Standard offers an easy-to-use and very user-friendly interface in order to make it as easy as possible for you to quickly undo any data loss issues encountered. And it does so while preserving the original structure of the data.
All you need to do is connect the affected storage media (internal or external), launch the software and run a scan.
Stellar Data Recovery V8’s very performant search feature will help you to easily locate specific files by searching by custom filters like file name, size, file type, and even by last modified date and created date.
In order for you to dig even deeper inside the affected hard drive, Stellar Data Recovery Standard has a Deep Scan feature specifically designed to tackle damaged and formatted devices.
Sometimes we find that an entire partition of our hard drive is missing. This powerful software has a built-in option called Cannot Find Drive that can recover an entire partition at once and even allows you to preview the data before you recover it.
⇒ Get Stellar Data Recovery Standard edition
2. Stellar Data Recovery – Professional
The professional version of this amazing software holds all the capabilities mentioned above in the Standard version with a few key added options:
- It recovers data that was deleted/lost from unbootable systems
- NTFS, exFAT, and FAT (FAT16/FAT32) support for formatted drives
- Selective file recovery with over 300 pre-listed files types or recover files with a particular file extension
- You can save and load scan information in order to save time
You can find a step-by-step guide to using this tool on the Stellar knowledge base page.
⇒ Get Data Recovery – Professional edition
3. Stellar Data Recovery – Technician
This version of the software is the ultimate bad sector repair tool, and includes all the options covered in the first two versions with a plethora of additional features:
- Safe and risk-free data recovery from logically corrupt or inaccessible RAID 0, RAID 5, and RAID 6 servers
- Data recovery for formatted or deleted volumes
- Remote recovery – recovers data remotely over a network
- It can create Virtual RAID when probable RAID construction fails
- The tool can recover data from lost/deleted FAT, exFAT, and NTFS partitions
- RAW recovery – of the entire RAID array
- It can create images of your hard drive containing bad sectors
- It facilitates recovery from hard disks with 2 TB or more storage capacity
- Track hard-disk performance with SMART attributes (display data in real-time)
- Set out threshold and Critical limits to monitor and analyze temperature, performance statistics, and health of hard disks
⇒ Get Stellar Data Recovery Technician
All the versions of the software have multiple languages support: English, German, French, Italian, Spanish, Japanese, and Chinese. You can easily change it either in pre-installation or post-installation from the Advanced Settings.
- 3 best HDD health check software for PC users
- Hard Drive Shows 0 Bytes is Available [Solved]
- 4 Simple Ways to Initialize a Drive in Windows 11
- Why are games taking up huge amounts of space on our hard drives?
- After WDC, Seagate increases SSD and HDD prices effective immediately
AOMEI Partition Assistant: Offers several repair options
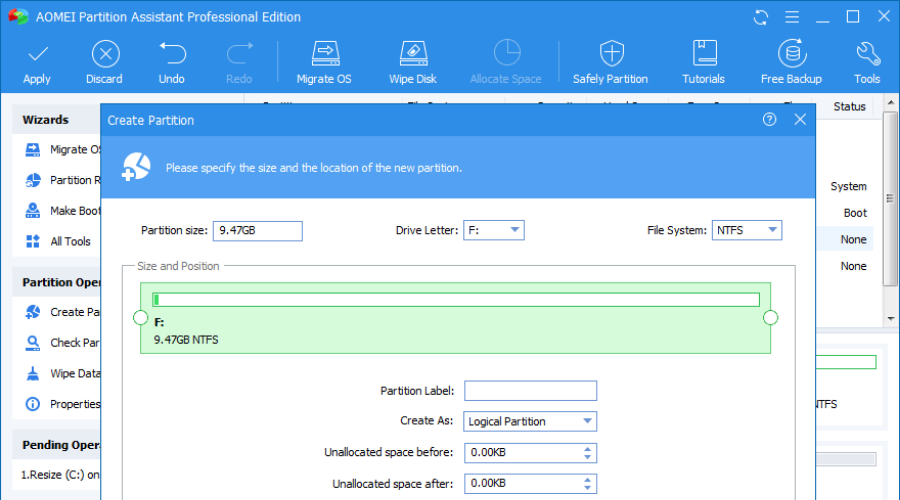
AOMEI Partition Assistant has a variety of very efficient tools, all tied up by a very user-friendly interface that simplifies your PC disk partition management and offers a safe environment for you to work.
It allows you to create, resize, move, merge, and split partitions without losing any data and even repairs MBR (Master Boot Record) with ease.
AOMEI Partition Assistant supported devices include:
- Traditional hard disk drives (HDD), solid-state drives (SSD) and SSHD
- External hard drive (USB 1.0/2.0/3.0), PC card, all-flash drives, Thumb Drives, and other removable media
- All storage devices recognized by Windows – IDE, SATA, iSCSI, SCSI disk, IEEE1394 (FireWire), etc
- Hardware RAID, including RAID 0, RAID 1, RAID 5, RAID 10, etc.
- Up to 128 disks in one system
- Hard disk with 4096, 2048, 1024, 512 bytes sector size
- Supports TFS, FAT32/FAT16/FAT12, exFAT/ReFS, Ext2/Ext3/Ext4
If your computer doesn’t boot and you see an error information message like operating system not found, missing operating system, or invalid partition table that shows you that there is something wrong with the MBR.
MBR problems can be caused by partitions being infected by a trojan horse virus that your antivirus didn’t remove completely or loading a corrupted backup image for your OS. This problem also occurs on some external hard disks.
You can go to the AOMEI website to see a step-by-step guide on how to repair corrupted MBR on Windows PCs.
AOMEI Partition Assistant
The best tool to manage your disk partitions with great ease and high efficiency!
Disk Genius: One of the most trusted repair tool
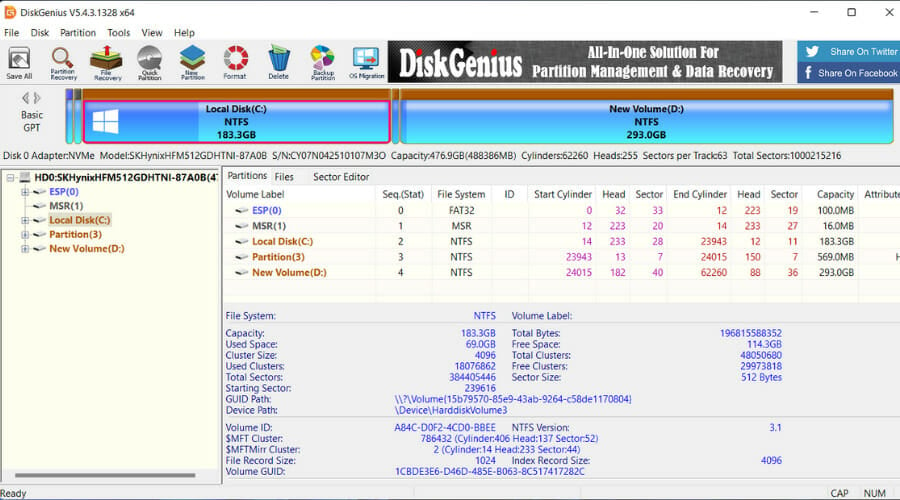
Disk Genius is one of the oldest software on the market with a great reputation for repairing computers.
Disk Genius is not only a great utility to take care of your PC and system but also to run tests and apply fixes to your hardware. The Disk Utilities feature from Disk Genius is a great dedicated tool for repairing bad sectors on your HDD.
Another important feature of this tool is the backup & restore option, which allows you to save your system configurations before taking any disk repair actions.
Here is a quick overview of the most important processes that it can perform:
- Check and repair bad sectors in Windows 10 on HDD, SSD, external HDD, and other storage devices
- Disk and partition management: format, resize, split, clone, hide, extend
- Create a WinPE bootable disk so you can access your disk when the system crashes or the PC has no OS
- Backup and restore partition
- Recover lost data from your disk and storage devices
These are only some of its key features, but they’re the most important if you want to keep your disk healthy.
From repairing the bad sectors to recovering lost files – Disk Genius is your disk guardian. You can get a free version from the official website.
Disk Genius
Reliable data disk utilities and data backup and recovery for Windows that you cannot get enough of!
Will formatting HDD fix bad sectors?
No, formatting the HDD, or even an SSD, for that matter, won’t fix the bad sectors on it. Though it is beneficial as the bad sectors will be marked, and data will not be stored on it any further. This will minimize the loss of data stored in the bad sectors in the long run.
When you find a bad sector on the drive, the ideal approach is to repair it using a third-party tool or create a backup of the data and transfer it to a new hard drive.
And if faced with the problem, you now know the best bad sector repair tools to employ and get your hard drive to work seamlessly again. Some of the tools also support USB bad sector repair.
If you have any questions or suggestions, feel free to comment below.
Milan Stanojevic
Windows Toubleshooting Expert
Milan has been enthusiastic about technology ever since his childhood days, and this led him to take interest in all PC-related technologies. He’s a PC enthusiast and he spends most of his time learning about computers and technology.
Before joining WindowsReport, he worked as a front-end web developer. Now, he’s one of the Troubleshooting experts in our worldwide team, specializing in Windows errors & software issues.