
Watch Now This tutorial has a related video course created by the Real Python team. Watch it together with the written tutorial to deepen your understanding: Running Python Scripts
Running a Python script is a fundamental task for any Python developer. You can execute a Python .py file through various methods depending on your environment and platform. On Windows, Linux, and macOS, use the command line by typing python script_name.py to run your script. You can also use the python command with the -m option to execute modules. This tutorial covers these methods and more, ensuring you can run Python scripts efficiently.
By the end of this tutorial, you’ll understand that:
- Running a Python
.pyscript involves using thepythoncommand followed by the script’s filename in the terminal or command prompt. - Running Python from the command prompt requires you to open the command prompt, navigate to the script’s directory, and execute it using
python script_name.py. - Running a
.pyfile in Windows can be done directly from the command prompt or by double-clicking the file if Python is associated with.pyfiles. - Running a Python script without Python installed is possible by using online interpreters or converting scripts to executables, but it’s more flexible to install Python and run scripts natively.
To get the most out of this tutorial, you should know the basics of working with your operating system’s terminal and file manager. It’d also be beneficial for you to be familiar with a Python-friendly IDE or code editor and with the standard Python REPL (Read-Eval-Print Loop).
Take the Quiz: Test your knowledge with our interactive “How to Run Your Python Scripts” quiz. You’ll receive a score upon completion to help you track your learning progress:

Interactive Quiz
How to Run Your Python Scripts
One of the most important skills you need to build as a Python developer is to be able to run Python scripts and code. Test your understanding on how good you are with running your code.
What Scripts and Modules Are
In computing, the term script refers to a text file containing a logical sequence of orders that you can run to accomplish a specific task. These orders are typically expressed in a scripting language, which is a programming language that allows you to manipulate, customize, and automate tasks.
Scripting languages are usually interpreted at runtime rather than compiled. So, scripts are typically run by some kind of interpreter, which is responsible for executing each order in a sequence.
Python is an interpreted language. Because of that, Python programs are commonly called scripts. However, this terminology isn’t completely accurate because Python programs can be way more complex than a simple, sequential script.
In general, a file containing executable Python code is called a script—or an entry-point script in more complex applications—which is a common term for a top-level program. On the other hand, a file containing Python code that’s designed to be imported and used from another Python file is called a module.
So, the main difference between a module and a script is that modules store importable code while scripts hold executable code.
In the following sections, you’ll learn how to run Python scripts, programs, and code in general. To kick things off, you’ll start by learning how to run them from your operating system’s command line or terminal.
How to Run Python Scripts From the Command Line
In Python programming, you’ll write programs in plain text files. By convention, files containing Python code use the .py extension, and there’s no distinction between scripts or executable programs and modules. All of them will use the same extension.
To create a Python script, you can use any Python-friendly code editor or IDE (integrated development environment). To keep moving forward in this tutorial, you’ll need to create a basic script, so fire up your favorite text editor and create a new hello.py file containing the following code:
This is the classic "Hello, World!" program in Python. The executable code consists of a call to the built-in print() function that displays the "Hello, World!" message on your screen.
With this small program ready, you’re ready to learn different ways to run it. You’ll start by running the program from your command line, which is arguably the most commonly used approach to running scripts.
Using the python Command
To run Python scripts with the python command, you need to open a command-line window and type in the word python followed by the path to your target script:
- Windows
- Linux + macOS
After you press Enter, you’ll see the phrase Hello, World! on your screen. If the previous command doesn’t work right, then you may need to check if Python is in your system’s PATH. You can also check where you saved hello.py.
That’s it! You’ve run your first script! Note that on Windows, you also have the option of using the py command, which triggers the py.exe launcher for console applications. This is the most basic and practical way to run Python scripts.
A cool feature of a terminal or shell application is that you can redirect the output of your commands using a straightforward syntax. This feature may be useful in those situations where you have a Python program that can generate a long output, and you’d like to save it to a file for later analysis.
In these situations, you can do something like the following:
In this command, the > symbol tells the shell to redirect the output of your command to the output.txt file, rather than to the standard system output, your screen. This process is commonly known as redirection, and it works on both Windows and Unix-like systems, such as Linux and macOS.
If the output file doesn’t exist, then the shell automatically creates it. On the other hand, if the file already exists, then the shell overwrites its old content with the new output.
Finally, if you want to add the output of consecutive executions to the end of output.txt, then you can use two angle brackets (>>) instead of one:
Now, the shell app will append the current output to the end of output.txt. You’ll end up with a file containing the phrase "Hello, World!" twice.
Using the Script’s Filename Directly
On Windows, you can also run Python scripts by simply entering the name of the file containing the executable code at the command line:
Once you’ve written the path to your script and pressed Enter, you’ll note that a new terminal window appears on your screen for a few seconds, showing the script output. This is possible because Windows associates .py and .pyw files to python.exe and pythonw.exe, respectively.
This way of running Python scripts on Windows may be annoying because the code runs in a new terminal window that automatically closes after the execution ends. In most cases, you won’t be able to check the program’s output.
On Linux and macOS, you can also run your scripts directly. However, things are a bit different here, and you need some setup steps. Go ahead and run the following command:
- Linux
- macOS
Unix systems prioritize security, which means that you can’t go around executing any file as a program. So, you get a permission denied error when you try to run hello.py directly. To fix this issue, you need to explicitly tell the system that the file is executable. To do this, you can use the chmod command:
After running this command, your hello.py file will be executable. However, that’s not enough for the script to run properly:
Why are you getting another error now? The problem is that your operating system (OS) doesn’t know which program to use for running your script and is trying to run it with the shell itself. You can fix that by making a small addition to your hello.py file:
You’ve added a new line at the beginning of hello.py. It now starts with a Unix-style shebang, which is a special kind of comment that you can include in your scripts to tell the operating system which program to use for running the content of this file. In this case, you tell the OS to use Python.
Now you can run the script directly from your command line:
Wow! That was a long road! However, the effort was worth it. Now when you create a Python script to automate tasks in a Unix operating system, you know how to make it executable and run it from your command line.
Running Modules With the -m Option
The python command has a series of command-line options that can be useful in specific situations. For example, if you want to run a Python module, then you can use the command python -m <module-name>. The -m option searches Python’s module search path, sys.path, for the module name and runs its content:
In this example, you run the hello.py file as a module. This is possible because Python automatically adds the current directory to its sys.path list. Note that the module-name argument needs to be the name of a module object, not a file name. In other words, you don’t include the .py suffix.
If the target module isn’t in sys.path, then you get an error:
In this example, the missing name isn’t in the sys.path list, so Python isn’t able to execute it, and therefore it returns an error.
How to Run Python Code Interactively
Running scripts isn’t the only way to run Python code. Because Python is an interpreted language, you can use the interpreter to run code interactively. When you run the python command without arguments, you start a new interactive session, or REPL (Read-Eval-Print Loop). In there, you can run any Python code and get immediate feedback about how the code works.
In the following sections, you’ll learn the basics of the Python interpreter and how to run code in it. This knowledge will be pretty valuable for you, especially in those situations where you need to quickly test a small piece of Python code.
Getting to Know the Python Interpreter
Python is a high-level programming language with a clean and readable syntax. Python and its wide ecosystem of packages and libraries can boost your productivity in a variety of fields. The name Python also refers to a piece of software called the interpreter, which is the program that allows you to run Python code.
The interpreter is a layer of software that works between your program and your computer hardware to get your code running. Depending on the Python implementation that you use, the interpreter can be a program written in:
- C, like CPython, which is the core implementation of the language
- Python itself, like PyPy, which is a fast implementation with a just-in-time (JIT) compiler
- Java, like Jython, which can take advantage of the Java ecosystem
- .NET, like IronPython, which uses the .NET ecosystem
Whatever interpreter you use, the code that you write will run in this program. Therefore, the first condition to be able to run scripts and code is to have the interpreter correctly installed on your operating system.
The Python interpreter can run code in two different modes:
- Script, or program
- Interactive, or REPL
In script mode, you use the interpreter to run a source file as an executable program, just like you learned in the previous section. In this case, Python loads the file content and runs the code line by line, following the program’s execution flow.
Alternatively, interactive mode is when you launch the interpreter and use it as a platform to run code that you type in directly. This mode is pretty useful for learning Python as well as for developing, testing, and debugging your applications.
Running Python Code Interactively
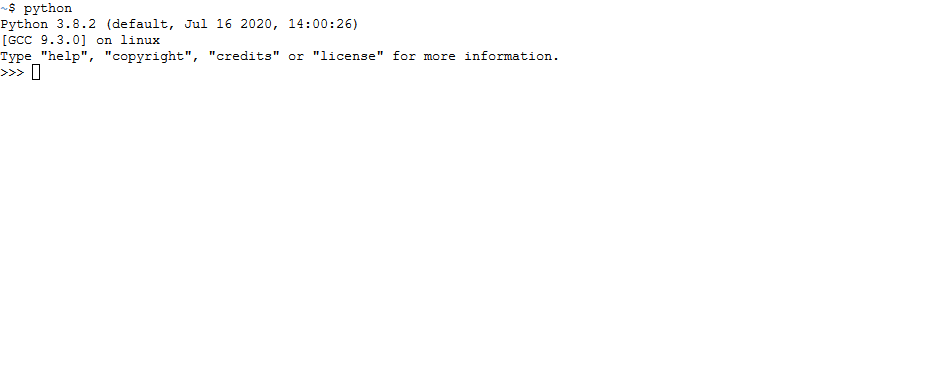
Interactive sessions are a widely used tool for running Python code. To start a Python interactive session, or REPL, open a command-line window, type in the python command, and then press Enter.
These steps will take you into the Python interpreter, which looks something like the following:
- Windows
- Linux
- macOS
The standard primary prompt for the interactive mode consists of three right angle brackets, >>>. So, as soon as you see these characters, you’ll know that you’re in.
The Python interpreter is an interactive way to talk to your computer using the language. It’s like live chat. It’s also known as the REPL because it goes through four steps that run under the hood:
- Reading your input, which consists of Python code as expressions and statements
- Evaluating your Python code, which generates a result or causes side effects
- Printing any output so that you can check your code’s results and get immediate feedback
- Looping back to step one to continue the interaction
This feature of Python is a powerful tool that you’ll wind up needing in your Python coding adventure, especially when you’re learning the language or when you’re in the early stages of a development process.
Once you’ve started a REPL session, you can write and run Python code as you wish. The only drawback is that when you close the session, your code will be gone. This is another difference between the script and interactive modes. Scripts are persistent.
When you work interactively, Python evaluates and executes every expression and statement immediately:
An interactive session will allow you to test every piece of code that you execute. That’s why this tool is an awesome development helper and an excellent space to experiment with the language and test ideas on the fly.
To leave interactive mode and jump back to the system shell, you can use one of the following options:
- Executing the built-in
quit()orexit()functions - Pressing the Ctrl+Z and Enter key combination on Windows, or the Ctrl+D combination on Unix systems, such as Linux and macOS
Go ahead and give the Python REPL a try. You’ll see that it’s a great development tool that you must keep in your tool kit.
How to Run Scripts From Python Code
You can also run Python scripts and modules from an interactive session or from a .py file. This option opens a variety of possibilities. In the following sections, you’ll explore a few tools and techniques that will allow you to run scripts and code from Python code.
Taking Advantage of import Statements
When you import a module from another module, script, or interactive session, what really happens is that Python loads its contents for later access and use. The interesting point is that the import statement runs any executable code in the imported module.
When the module contains only class, function, variable, and constant definitions, you probably won’t be aware that the code was run. However, when the module includes calls to functions, methods, or other statements that generate visible results, then you’ll witness its execution.
This provides you with another option to run scripts:
You’ll note that import runs the code only once per session. After you first import a module, successive imports do nothing, even if you modify the content of the module. This is because import operations are expensive, and Python takes some extra steps to optimize overall performance:
These two imports do nothing because Python knows that the hello module was already imported. Therefore, Python skips the import. This behavior may seem annoying, especially when you’re working on a module and trying to test your changes in an interactive session. However, it’s an intentional optimization.
Using the importlib Standard-Library Module
In the Python standard library, you can find the importlib module. This module provides the import_module() function, which allows you to programmatically import modules.
With import_module(), you can emulate an import operation and, therefore, execute any module or script. Take a look at this example:
The import_module() function imports a module, bringing its name to your current namespace. It also runs any executable code that the target module contains. That’s why you get Hello, World! on your screen.
You already know that once you’ve imported a module for the first time, you won’t be able to import it again using another import statement. If you want to reload the module and run it once again, then you can use the reload() function, which forces the interpreter to import the module again:
An important point to note here is that the argument of reload() has to be the name of a module object, not a string. So, to use reload() successfully, you need to provide a module that’s already imported.
Leveraging the Power of the Built-in exec() Function
So far, you’ve learned about some handy ways to run Python scripts. In this section, you’ll learn how to do that by using the built-in exec() function, which supports the dynamic execution of Python code.
The exec() function provides an alternative way to run your scripts from inside your code:
In this example, you use the with statement to open the hello.py file for reading. Then, you read the file’s content with the .read() method. This method returns a string that you pass to exec() for execution.
You must be careful when using the exec() function because it implies some important security risks, especially if you’re using it for running external code. To learn more about this function, check out Python’s exec(): Execute Dynamically Generated Code.
How to Run Python Scripts on IDEs and Code Editors
For developing a large and complex application, you should use an integrated development environment (IDE) or an advanced text editor that incorporates programmer-friendly features.
Most of these programs have options that allow you to run your programs from inside the environment itself. It’s common for them to include a Run or Build action, which is usually available from the toolbar or from the main menu.
Python’s standard distribution comes with IDLE as the default IDE. You can use this program to write, debug, modify, and run your modules and scripts. Other IDEs, such as PyCharm and Thonny, also allow you to run scripts from inside the environment. For example, in PyCharm, you can press Ctrl+R on your keyboard to quickly run your app’s entry-point script.
Advanced code editors like Visual Studio Code and Sublime Text also allow you to run your scripts. In Visual Studio Code, you can press Ctrl+F5 to run the file that’s currently active, for example.
To learn how to run Python scripts from your preferred IDE or code editor, check its specific documentation or take a quick look at the program’s GUI. You’ll quickly figure out the answer.
How to Run Python Scripts From a File Manager
Running a script by double-clicking on its icon in a file manager is another way to run your Python scripts. You probably won’t use this option much in the development stage, but you may use it when you release your code for production.
In order to run your scripts with a double click, you must satisfy some conditions that will depend on your operating system.
Windows, for example, associates the extensions .py and .pyw with the programs python.exe and pythonw.exe, respectively. This allows you to run your scripts by double-clicking on their icons.
On Unix systems, you’ll probably be able to run your scripts by double-clicking on them in your file manager. To achieve this, your script must have execution permissions, and you’ll need to use the shebang trick that you’ve already learned. Like on Windows, you may not see any output on-screen when it comes to command-line interface scripts.
The execution of scripts through a double click has several limitations and depends on many factors, such as the operating system, the file manager, execution permissions, and file associations. Still, you can consider this alternative a viable option for production-ready scripts and programs.
Conclusion
You’ve acquired the knowledge and skills that you need for running Python scripts and code in several ways and in a variety of situations and development environments. The command line will be your best friend when you need to run production-ready scripts. During development, your IDE or code editor will provide the right option to run your code.
In this tutorial, you’ve learned how to:
- Run Python scripts from the command line or terminal in your current OS
- Execute code in interactive mode using Python’s standard REPL
- Use your favorite IDE or code editor to run Python scripts during development
- Launch scripts and programs from your operating system’s file manager
These skills are essential for you as a Python developer. They’ll make your development process much faster, as well as more productive and flexible.
Take the Quiz: Test your knowledge with our interactive “How to Run Your Python Scripts” quiz. You’ll receive a score upon completion to help you track your learning progress:
Interactive Quiz
How to Run Your Python Scripts
One of the most important skills you need to build as a Python developer is to be able to run Python scripts and code. Test your understanding on how good you are with running your code.
Frequently Asked Questions
Now that you have some experience with running Python scripts and code, you can use the questions and answers below to check your understanding and recap what you’ve learned.
These FAQs are related to the most important concepts you’ve covered in this tutorial. Click the Show/Hide toggle beside each question to reveal the answer.
To run a Python script from the command line, open a terminal or command prompt and type python followed by the path to your script file. For example, python hello.py. On Windows, you might also use py instead of python. If you see any errors, check that Python is added to your system’s PATH variable.
In script mode, you execute a file containing Python code using the Python interpreter, and the code runs sequentially. In interactive mode, you use the Python interpreter to run code directly, one statement at a time, often in a REPL (Read-Eval-Print Loop). This allows for immediate feedback and experimentation.
Yes. On Windows, you can double-click .py files to run them since they’re associated with python.exe. On Unix systems, you need to ensure that the script has execution permissions and includes a shebang (#!/usr/bin/env python) as the first line. However, this method may not display output for console applications.
You can execute a Python module using the command line with the -m option. For example, python -m module_name. This runs the module as a script, provided it’s available in the Python module search path.
Besides the command line, you can run Python scripts using an IDE (Integrated Development Environment) like PyCharm or Thonny, a code editor like Visual Studio Code, or from an interactive session using the Python REPL. Each environment provides additional features to aid development and debugging.
Watch Now This tutorial has a related video course created by the Real Python team. Watch it together with the written tutorial to deepen your understanding: Running Python Scripts
- Из командной строки
-
Windows (cmd)
-
Linux (bash)
-
MacOS (bash)
- Из IDE
-
PyCharm
-
VSCode (Visual Studio Code)
-
Sublime Text
-
IDLE
- В виртуальном окружении
-
Venv
-
Pipenv
-
Poetry
- С помощью Docker
- Через онлайн-сервисы
- По двойному клику на значок файла
- FAQ
-
Как запустить python-скрипт без установки Python?
-
Как запустить python-скрипт с параметрами?
-
Как запустить python-скрипт на сервере?
-
Как перенаправить вывод?
-
Как запустить несколько скриптов python одновременно?
-
Как запустить python-скрипт в фоновом режиме?
-
Как сделать запуск скрипта по расписанию?
Python-скрипт — это набор команд для интерпретатора Python.
Именно интерпретатор выполняет скрипты — переводит их в байт-код, запускает на виртуальной машине и т.д. Для удобства скрипты сохраняют в файл с расширением .py.
Важнейший навык Python-программиста — умение запускать такие скрипты.
Технически запускается не сам скрипт, а Python-интерпретатор — он считывает код из файла и выполняет его
В этой статье мы разберем 6 возможных вариантов запуска python-файлов со скриптами, от самых популярных до менее популярных.
Из командной строки
Самый популярный способ запуска Python-скрипта — из командной строки.
Командная строка (еще её называют консоль или терминал) — это программа, которая позволяет управлять компьютером через текстовые команды.
Например, через консоль можно быстро создать файл с расширением .py:
echo print('hello') > my.py
И запустить его:
python3 my.py
В каждой операционной системе по умолчанию установлены разные консоли, и текстовые команды могут отличаться. Ниже рассмотрим варианты запуска python-скриптов из консоли для Windows, Linux и MacOS.
Windows (cmd)
Cmd (command line interpreter) — интерпретатор командной строки в Windows. Это приложение будет расшифровывать и выполнять ваши текстовые команды (в том числе и команды на запуск python-скриптов).
👉 Чтобы запустить python-скрипт из командной строки в Windows:
1 Предварительно установите Python (инструкция для Windows);
2 Откройте консоль cmd: комбинация клавиш Windows+R, далее введите «cmd» и нажмите «Enter» (или через поиск по фразе «Командная строка»);
Откроется окно «Командная строка».
3 Команда для запуска Python-скрипта выглядит так:
python + <путь_до_файла>\<название_файла>.py
Пример:
python C:\projects\example.py
Чтобы запустить программу, нажмите «Enter». Ваша программа запущена 🎉.
💭 Чтобы каждый раз не набирать длинный путь до файла, перейдите в директорию со скриптом (команда cd) и используйте при запуске только название файла:
Аналоги терминала cmd — Cmder, Hyper, Tabby.
Linux (bash)
В разных дистрибутивах Linux используются разные командные интерпретаторы. Самые популярные — shell (Unix shell) и bash (Bourne again shell). В них мы будем писать команды для запуска python-файлов.
👉 Чтобы запустить python-скрипт из командной строки в Linux:
1 Предварительно установите Python (инструкция для Linux);
2 Откройте терминал: комбинация клавиш Ctrl+Alt+T (или через «Приложения» → «Терминал») [шаг для версии Linux с графическим интерфейсом];
3 Команда для запуска выглядит так:
python3 + <путь_до_файла>/<название_файла>.py
Пример:
python3 /var/projects/example.py
После ввода команды нажмите «Enter». Программа запущена 🎉.
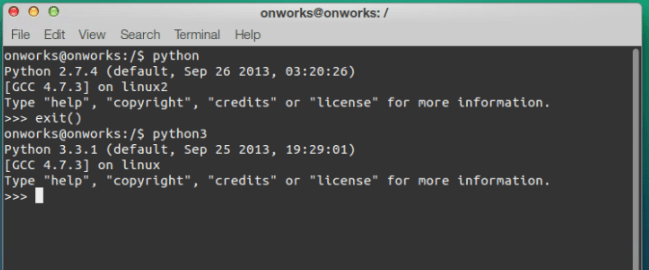
☝️ В большинстве дистрибутивов Linux по умолчанию команда python запустит Python 2.x.x. После того как вы установите Python 3-й версии, он будет доступен через команду python3.
💭 Для удобства запуска можно сразу перейти в каталог со скриптом (команда cd) и использовать при запуске только название файла:
python3 example.py
MacOS (bash)
В OS X по умолчанию используется командный интерпретатор bash. Процесс запуска python-скриптов такой же, как и в Linux.
👉 Чтобы запустить python-скрипт из командной строки в MacOS:
1 Предварительно установите Python (инструкция для MacOS);
2 Откройте терминал: «Программы» («Launchpad») → «Утилиты» → «Терминал» или «Finder» → каталог «Программы/Утилиты» → «Терминал».
3 Команда для запуска:
python3 + <путь_до_файла>/<название_файла>.py
Пример:
python3 /var/projects/example.py
Для запуска команды нажмите «Enter». Python-скрипт запущен 🎉.
☝️ Команда python запустит Python 2.x.x. (в MacOS он установлен по умолчанию). После установки Python 3-й версии используйте команду python3.
💭 Для удобства запуска перейти в каталог со скриптом (команда cd) и используйте для запуска только название файла:
python3 example.py
Из IDE
IDE (Integrated development environment) — интегрированная среда разработки. Простыми словами это программа, которая помогает программистам разрабатывать программный код.
Чтобы запускать Python скрипты в IDE, нужно:
- Предварительно установить интерпретатор;
- Подключить интерпретатор в IDE.
Ниже рассмотрим, как подключить интерпретатор Python к PyCharm, VSCode, Sublime Text и IDLE.
PyCharm
👉 Для запуска python-скриптов через PyCharm:
1 Предварительно установите Python (инструкция по установке);
2 Установите PyCharm (на официальном сайте есть бесплатная версия Community Edition);
3 Укажите в PyCharm путь до python-интерпретатора:
Способ #1 (для нового проекта): при создании нового проекта File → New Project PyCharm предложит:
- Использовать виртуальное окружение (например pipenv) и указать интерпретатор;
- Использовать интерпретатор без виртуального окружения.
Способ #2 (для существующего проекта): откройте проект в PyCharm и добавьте интерпретатор в настройках File → Settings → Project:<name> → Project Interpreter.
💭 Иногда PyСharm не видит интерпретатор, тогда его нужно добавить вручную. Для этого рядом со строкой выбора интерпретатора нажмите на «Add Interpreter» (или «шестеренку»). Откроется окно «Add Python Interpreter», в котором нужно указать путь до вашего интерпретатора Python.
💡 Чтобы узнать путь до python-интерпретатора, запустите в консоли python в интерактивном режиме (команда python3 или python) и выполните 2 команды:
>>> import sys

>>> sys.executable
Отобразится полный путь до интерпретатора python — скопируйте его и используйте для настройки PyCharm.
4 Создайте новый файл с расширением .py и запустите его через Run → Run... (или комбинацией клавиш Alt + Shift + F10);
Запуск через Run... означает, что будет создана новая конфигурация для PyCharm-запускатора.
Python-файл запущен 🎉. В панели слева снизу отобразится консоль с результатом выполнения программы.
💭 Для следующих запусков файла можете использовать кнопку «Play» в правом верхнем меню (или комбинацию клавиш Shift + F10).
VSCode (Visual Studio Code)
👉 Чтобы запускать python-скрипты через VSCode:
1 Предварительно установите Python (инструкция по установке);
2 Установите VSCode;
3 Установите расширение «Python» для VSCode. Для этого нужно перейти на вкладку «Extensions» (на панели слева) и найти расширение «Python».
4 Укажите в VSCode путь до python-интерпретатора. Для этого откройте командную строку VSCode комбинацией Ctrl + Shift + P (или «Шестеренка слева снизу» → «Палитра команд…»).
Далее найдите пункт «Python: Выбор интерпретатора» и в открывшемся окне выберите нужный интерпретатор.
5 Создайте новый файл с расширением .py и запустите его, нажав на значок «Play» в правом верхнем углу;
💡 Чтобы запускать Python-скрипты через сочетание клавиш, зайдите в меню «Сочетания клавиш» («Шестеренка слева снизу» → «Сочетания клавиш»), найдите «Запустить файл Python в терминале» и установите нужное сочетание.
Sublime Text
👉 Чтобы запускать python-скрипты через Sublime Text:
1 Предварительно установите Python (инструкция по установке);
2 Установите Sublime Text;
3 В меню «Tools» → «Build System» выберите «Python» в качестве системы сборки.
4 Создайте новый файл с расширением .py и запустите его через меню «Tools» → «Build» (или комбинацией клавиш Crtl + B);
Если в терминале не отображается вывод скрипта, запустите его через «Tools» → «Build With…» → Python.
💡 В Sublime Text можно создать свою систему сборки через меню «Tools» → «Build System» → «New Build System…».
После создания конфигурации его необходимо сохранить по предложенному пути. Для корректной работы, конфигурация должна называться <ваше_название>.sublime-build. (например: Python1.sublime-build.), иначе она не отобразится в меню «Build Systems».
Подробнее о системах сборки в Sublime Text читайте в официальной документации в разделе «Build Systems».
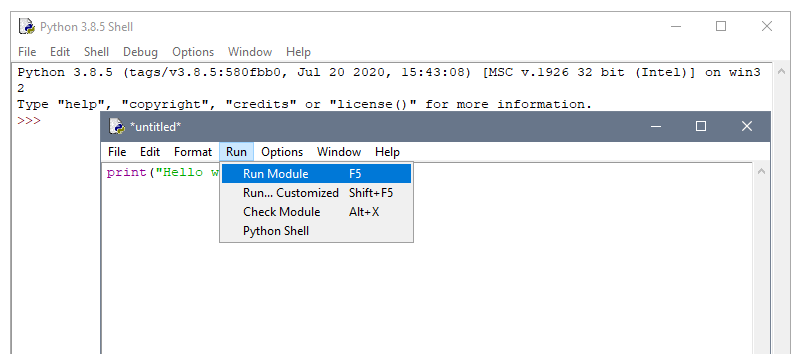
IDLE
👉 Для запуска python-скриптов в IDLE:
1 Предварительно установите Python (инструкция по установке);
2 Откройте IDLE, создайте новый файл и сохраните его.
3 Для запуска скрипта выберите в меню «Run» → «Run Module» (или нажмите «F5»).
В виртуальном окружении
Более продвинутый способ запуска python-скриптов — через инструменты для работы с виртуальными средами (например Venv, Pipenv или Poetry).
Основная цель виртуального окружения — создание изолированной среды. В такой среде ваш скрипт будет использовать свои собственные зависимости, а не глобальные по умолчанию.
Venv
Venv — это модуль для создания облегченных «виртуальных сред». Каждая такая среда будет иметь собственный независимый набор python-пакетов.
Модуль Venv входит в стандартную библиотеку Python, отдельно устанавливать его не нужно.
👉 Чтобы запустить python-скрипт с использованием Venv:
1 Установите Python (инструкция по установке);
2 Откройте консоль (терминал) и перейдите в каталог с python-скриптом;
3 Создайте новое виртуальное окружение. Для этого выполните команду:
python -m venv venv
venv — название виртуального окружения. Если создание прошло успешно, появится новая директория venv.
4 Активируйте виртуальное окружение:
venv\Scripts\activate.bat— для Windows;source venv/bin/activate— для Linux и MacOS.
4 Теперь, когда виртуальное окружение активировано, можно использовать стандартную консольную команду для запуска:
python + <путь_до_файла>\<название_файла>.py
Пример:
python example.py
Для деактивации выполните команду deactivate.
Pipenv
Pipenv — это инструмент управления виртуальными окружениями и зависимостями.
По сути это аналог npm у NodeJS, или composer у PHP.
👉 Для запуска скрипта на Python через Pipenv:
1 Установите Python (инструкция по установке);
2 Откройте консоль (терминал) и установите глобально Pipenv командой:
pip install pipenv
3 Запускать python-скрипты можно несколькими способами:
Способ #1. Активируйте виртуальное окружение:
pipenv shell
После этого все команды будут выполняться в виртуальной среде. Для запуска используйте команду:
python example.py
Для деактивации виртуальной среды Pipenv выполните команду exit.
Способ #2. Cразу запускайте скрипты внутри virtualenv через pipenv run python:
pipenv run python example.py
В этом способе Pipenv автоматически создаст виртуальную среду.
💡 Если вы хотите, чтобы Pipenv создавал файлы виртуальной среды в текущем каталоге проекта, установите переменную среды export PIPENV_VENV_IN_PROJECT=1.
Для полного удаления файлов виртуального окружения Pipenv используйте команду:
pipenv --rm
Poetry
Poetry — это продвинутый менеджер зависимостей для Python-проектов.
Poetry используют как альтернативу для Pipenv.
👉 Для запуска скрипта на Python через Poetry:
1 Установите Python (инструкция по установке);
2 Откройте консоль (терминал) и установите глобально Poetry (инструкция по установке Poetry);
3 Создайте новый проект:
poetry new project-poetry
Или инициализируйте Poetry-проект в уже существующем каталоге:
poetry init
4 Запускать python-скрипты можно несколькими способами:
Способ #1. Активируйте виртуальное окружение командой:
poetry shell
После этого все скрипты будут запускать в этом окружении. Для запуска файла выполните:
python example.py
Для деактивации виртуальной среды Poetry выполните команду exit.
Способ #2. Запускайте скрипты через команду poetry run python:
poetry run python example.py
С помощью Docker
Рассмотрим на примере запуск в Docker простого скрипта «Hello World!» на Python:
1 Проверим работу Docker:
docker version
Если Docker не установлен, установите его (инструкция по установке Docker).
2 Создайте директорию проекта:
mkdir /opt/project
и перейдите в неё:
cd /opt/project
3 Создайте python-скрипт с расширением .py:
# /opt/project/example.py
print("Hello, world!")
4 Создайте конфигурационный файл Dockerfile:
# /opt/project/Dockerfile
# Получаем базовый образ Python
FROM python:latest
# Запускаем shell-команду для создания нового каталога /app
RUN mkdir /app
# Копируем исходные файлы в каталог /app
ADD . /app
# Устаналиваем /app в качестве рабочего каталога
# Команды RUN, CMD, ADD и т.д. будут выполненяться в рамках этой директории
WORKDIR /app
# Запуск python-скрипта
CMD ["python3", "example.py"]
5 Соберите docker-образ командой docker build -t <имя образа>:<версия> <директория_исходников_проекта>:
docker build -t python-hello-world .
-t — тег для Docker-образа. Если не указывать версию, по умолчанию она будет latest.
Найти созданный образ можно в списке всех образов:
docker images
6 Запустите контейнер приложения:
docker run python-hello-world
Выше мы рассмотрели простейший пример запуска python-скрипта в Docker-контейнере. Вот ссылки на более сложные варианты:
- Запустить Python через Pipenv в Docker-контейнере;
- Веб-приложение на Python (Flask, Redis) с использованием Docker Compose;
- FastAPI в Docker-контейнере;
- Django-приложение в Docker-контейнере.
Через онлайн-сервисы
Простой способ запустить скрипт без установки Python — использовать онлайн-сервисы (также их называют онлайн-компиляторы).
⭐ ТОП–5 онлайн-сервисов для запуска python-скриптов:
- Online-python;
- OnlineGDB;
- Trinket;
- Replit;
- Programiz.
👉 Чтобы запустить python-скрипт через онлайн-сервис:
1 Зайдите на сайт сервиса (например Online-python);
2 Загрузите свой файл. Для этого нажмите на значок «Open File from Disk» в левом верхнем углу.
3 Для запуска скрипта нажмите «Run» (или клавишу «F8»).
По двойному клику на значок файла
Данный способ работает в операционных системах с графическим интерфейсом. Подойдет тем, кто не хочет писать команды в консоли. Чтобы способ сработал, необходимо предварительно установить Python.
После создания файла с расширением .py, операционная система по умолчанию ассоциирует его с приложением Python. Чтобы запустить скрипт, кликните дважды по значку файла — запустится интерпретатор Python и выполнит ваш скрипт.
Если вместо выполнения кода открывается редактор (для Windows):
- Нажмите на значок файла правой кнопкой мыши;
- Выберите «Открыть с помощью» → «Python».
Чтобы изменить приложение по умолчанию для файлов с расширением .py (для Windows):
- Нажмите на значок файла правой кнопкой мыши;
- Выберите «Свойства» → «Приложение (Изменить…)» → «Python».
💡 При запуске скрипта данным способом, окно с результатами выполнения автоматически закроется. Чтобы избежать этого, напишите в конце своего кода input().
FAQ
Как запустить python-скрипт без установки Python?
Самый простой вариант — использовать онлайн-сервисы. Многие сервисы поддерживают загрузку python-файлов.
Еще можно заранее скомпилировать python-скрипт в исполняемый .exe файл. Минус данного способа — для сборки понадобится Python и библиотека PyInstaller. Зато итоговый exe-файл можно запускать без установки интерпретатора Python.
Как запустить python-скрипт с параметрами?
Самый популярный вариант параметризации python-скриптов — использовать аргументы командной строки (Command-Line Arguments) при запуске скрипта через консоль. Аргументы прописываются через пробел после названия файла:
python example.py 2024 hello
В коде аргументы принимаются через sys.argv:
import sys

print(sys.argv)
> ['example.py', '2024', 'hello']
Первым аргументом всегда будет название файла. Все аргументы приходят в виде строк. Для продвинутой работы с аргументами командной строки используйте модуль argparse.
При запуске скриптов через IDE, аргументы передаются через настройку конфигурации:
- PyCharm — «Run» → «Edit Configurations…» → «Add new configuration» (или «+»). В поле «Parameters» перечисляются нужные параметры в формате
"arg1" "arg2"; - VSCode — Откройте каталог (проект) с python-скриптом. Далее «Запуск и отладка» (
Ctrl + Shift + D) → «создайте файл launch.json». Добавьте в конфигурацию параметр «args» в формате"args": ["arg1", "arg2"]; - Sublime Text — Аргументы указываются в конфигурации сборки, например:
"cmd": ["python", "$file", "arg1", "arg2"]. - IDLE — Откройте файл, далее «Run» → «Run… Customized» (или
Shift + F5). Во всплывающем окне введите параметры в форматеarg1 arg2.
Чтобы запустить python-скрипт с параметрами через двойной клик по значку файла:
- Кликните правой кнопкой мыши по файлу → «создать ярлык»;
- Кликните правой кнопкой мыши по созданному ярлыку → «свойства»;
- В поле «Объект» добавьте аргументы через пробел, например
C:\projects\new\example.py arg1 arg2. Теперь кликнув по ярлыку запустится скрипт с параметрами.
Как запустить python-скрипт на сервере?
Принцип запуска скриптов на сервере прост — скрипты предварительно заливаются на сервер и в локальной консоли создается SSH-соединение с сервером. В рамках созданного SSH-соединения все консольные команды будут выполняться на стороне сервере.
Для запуска скриптов нужно предварительно узнать IP адрес, имя пользователя (username) и пароль (password) вашего сервера.
👉 Чтобы запустить скрипт на сервере (с Windows машины):
1 Установите SSH-клиент (самый популярный для Windows — PuTTY).
2 Перенесите скрипты на сервер с помощью утилиты pscp (идет в комплекте с PuTTY). Для этого откройте командную строку (через поиск → «командная строка» или Win + R + «cmd») и выполните команду в формате pscp <источник> <назначение>. Пример:
pscp c:\projects\new\example.py root@180.110.1.10:/opt/project
В данном примере локальный файл example.py перенесется на сервер в каталог /opt/project. Каталог /opt/project должен быть заранее создан на сервере.
💭 Альтернативные вариант заливки скриптов — через программу WinSCP.
3 Создайте новое SSH-соединение через PuTTY. В окне «PuTTY Configuration» укажите IP-адрес сервера, выберите тип соединения «SSH» и нажмите кнопку «Open».
Далее нужно ввести имя пользователя и пароль от удаленного сервера.
4 Запустите скрипт, переданный на сервер:
python3 /opt/project/example.py
👉 Чтобы запустить скрипт на сервере (с Linux/MacOS машины):
1 Откройте терминал.
2 Перенесите скрипты на сервер с помощью утилиты scp.
Если нужно перенести один скрипт, используйте команду в формате scp <источник> <назначение>:
scp /opt/project/example.py root@180.110.1.10:/opt/project
В данном примере локальный файл example.py будет перенесен на сервер в каталог /opt/project. При это каталог /opt/project должен быть заранее создан на сервере.
Для переноса целого проекта используйте команду в формате scp -r <источник> <назначение>:
scp -r /opt/project root@180.110.1.10:/opt
В данном примере на удаленном сервере в каталоге /opt создастся каталог project, в который перенесутся все файлы из локального каталога /opt/project (флаг -r означает рекурсивное копирование содержимого каталога).
3 Создайте ssh-соединение с вашим сервером используя команду ssh <имя_пользователя>@<ip_сервера>:
ssh root@180.110.1.10
После нажатия «Enter» нужно ввести пароль.
4 Запустите скрипт, переданный на сервер:
python3 /opt/project/example.py
Как перенаправить вывод?
В случае запуска скриптов через командную строку, результаты выполнения отображаются в окне консоли (терминала). Вы можете перенаправлять вывод в файл или в другую программу (процесс).
Перенаправление в файл полезно, когда необходимо сохранить результаты работы программы (особенно когда данных очень много):
python example.py > output.txt
> — символ перенаправления потока вывода. Если файл не существует, оболочка сама создаст его. Если файл существует, он будет перезаписан.
Если вы хотите каждый раз дописывать в файл новые данные (вместо перезаписи), используйте оператор >>:
python example.py >> output.txt
💭 Чтобы «заглушить» вывод используют перенаправление в /dev/null (для Unix-систем):
python example.py > /dev/null
Перенаправить вывод в другую программу может быть полезно при поэтапной обработке, когда один скрипт обрабатывает результаты другого скрипта. Используя оператор | можно перенаправить вывод одного python-скрипта на вход другого:
python example.py | python input.py
В данном примере для приема данных в файле input.py используется sys.stdin:
import sys
for line in sys.stdin:
print(line)
> Hello from example.py
Как запустить несколько скриптов python одновременно?
Параллельно запустить python-скрипты можно несколькими способами. Для примера создадим 2 файла:
# example1.py
import time
for i in range(0, 3):
print(f"example1.py → {i + 1}")
time.sleep(1)# example2.py
import time
for i in range(0, 3):
print(f"example2.py → {i + 1}")
time.sleep(2)
Способ #1 — запуск в фоновом режиме через консоль.
Для Unix:
python3 example1.py &

python3 example2.py &
> example2.py 1
> example1.py 1
> example1.py 2
> example2.py 2
> example1.py 3
> example2.py 3
& — в конце строки означает запуск в фоновом режиме.
💡 Если в конце команды добавить wait, скрипт завершится после завершения всех процессов.
Для Windows:
start /b python example1.py & start /b python example2.py> example2.py → 1
> example1.py → 2
> example1.py → 3
> example2.py → 2
> example2.py → 3
start — запускает отдельное окно командной строки.
/b — флаг для запуск без открытия нового окна командной строки.
& — для запуска нескольких команд в одной строке.
💭 После окончания работы скриптов нажмите Enter или Ctrl + C.
Способ #2 — запуск нескольких потоков из отдельного python-файла:
# runner.py
import subprocess
# Создаем и запускаем процессы
proc1 = subprocess.Popen(['python', 'example1.py'])
proc2 = subprocess.Popen(['python', 'example2.py'])
# Ждем завершение процессов
proc1.wait()
proc2.wait()
> example1.py → 1
> example2.py → 1

> example1.py → 2

> example1.py → 3

> example2.py → 2

> example2.py → 3
В примере выше 2 независимых процесса выполняются параллельно и пишут вывод в одну консоль с разной задержкой.
💭 Если вы используете python3, измените аргументы subprocess.Popen на ['python3', 'example1.py'].
Как запустить python-скрипт в фоновом режиме?
В Unix используется & в конце команды. Скрипт запустится в фоновом режиме и будет работать даже если закрыть консоль.
python3 example.py &
Вывод можно перенаправить в файл:
python3 example.py > log.txt &
В Windows команда start с флагом /b создает новое окно командной строки, при этом не открывая его. Скрипт перестанет работать если закрыть консоль.
START /B python example.py
Команда с перенаправлением вывода в файл:
START /B python example.py > log.txt
Как сделать запуск скрипта по расписанию?
В Linux самый простой способ запускать скрипты по расписанию — через Cron.
Cron — это демон (программа), запускающий другие программы по расписанию.
👉 Чтобы настроить расписание в Cron (для Linux):
1 Зайдите в таблицу Cron через команду crontab:
crontab -e
В редакторе откроется конфигурационный файл Cron.
2 В конце файла напишите новое задание.
*/5 * * * * python3 /var/new/example.py
В данном примере скрипт example.py будет запускаться каждые 5 минут. Создать свой шаблон расписания можно через сервис crontab.guru.
3 Сохраните файл комбинацией клавиш Ctrl + X → Y → Enter.
Готово 🎉.
Запуски через Cron логируются в файл /var/log/syslog. Чтобы отменить запуск скрипта по расписанию, удалите строку с заданием через crontab -e.
В Windows скрипты по расписанию запускаются через планировщик задач.
👉 Чтобы настроить расписание через планировщик задач (для Windows):
1 Найдите «Планировщик заданий» через поиск в Windows.
2 Зайдите в «Действия» → «Создать простую задачу».
3 Следуйте инструкции мастера создания простой задачи:
- В поле «Имя» введите название задачи.
- Настройте периодичность запуска в разделе «Триггер».
- Во вкладке «Действие» выберите пункт «Запустить программу».
- Во вкладке «Запуск программы» в поле «Программа или сценарий» укажите путь до интерпретатора Python, а в поле «Аргументы» впишите полный путь до нужного скрипта.
Готово 🎉.
Созданная задача появится в общем списке планировщика задач. Изменить настройки задачи можно через клик правой кнопкой мыши по задаче → «Свойства».
Теперь вы умеете запускать скрипты на Python 😎
Запуск через консоль — универсальный способ. В процессе разработки используйте запуск через IDE — в нем можно не только запускать, но и отлаживать код через отладчик (debugger). Для изоляции вашего проекта, запускайте скрипты в виртуальном окружении (например через pipenv). Запуск через Docker чаще всего используют при развертывании приложений на продакшене. Через онлайн-сервисы можно быстро протестировать свой код, когда Python-а нет под рукой. А владельцы Windows могут использовать «ленивый» метод — двойной клик по значку файла.
Код, написанный на языке Python, может храниться в редакторе кода, IDE или файле. И он не будет работать, если не знать, как его правильно запускать.
В этом материале рассмотрим 7 способов запуска кода, написанного на Python. Они будут работать вне зависимости от операционной системы, среды Python или местоположения кода.
Python-код можно запустить одним из следующих способов:
- С помощью командной строки операционной системы (shell или терминал);
- С помощью конкретной версии Python или Anaconda;
- Использовать Crontab;
- Запустить код с помощью другого Python-скрипта;
- С помощью файлового менеджера;
- Использовать интерактивный режим Python;
- Использовать IDE или редактор кода.
Запуск Python-кода интерактивно
Для запуска интерактивной сессии нужно просто открыть терминал или командную строку и ввести python (или python3 в зависимости от версии). После нажатия Enter запустится интерактивный режим.
Вот как запустить интерактивный режим в разных ОС.
Интерактивный режим в Linux
Откройте терминал. Он должен выглядеть приблизительно вот так :
После нажатия Enter будет запущен интерактивный режим Python.
Интерактивный режим в macOS
На устройствах с macOS все работает похожим образом. Изображение ниже демонстрирует интерактивный режим в этой ОС.
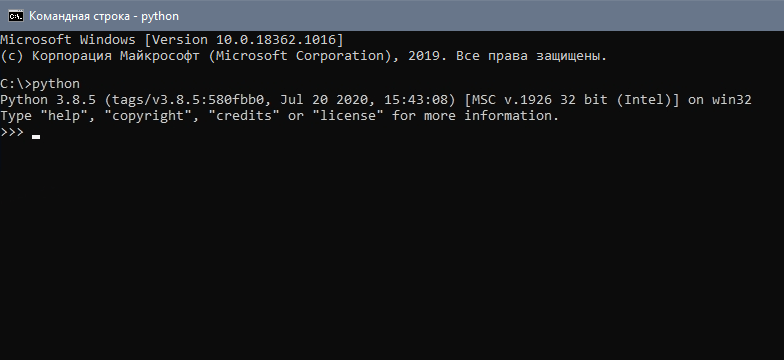
Интерактивный режим в Windows
В Windows нужно открыть командную строку и ввести python. После нажатия Enter появится приблизительно следующее:
Запуск Python-скриптов в интерактивном режиме
В таком режиме можно писать код и исполнять его, чтобы получить желаемый результат или отчет об ошибке. Возьмем в качестве примера следующий цикл.
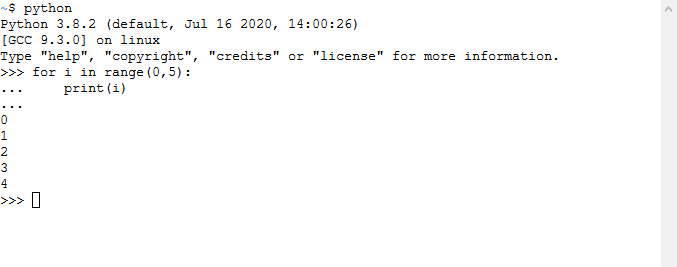
Этот код должен выводить целые числа от 0 до 5. В данном случае вывод — все, что появилось после print(i).
Для выхода из интерактивного режима нужно написать следующее:
И нажать Enter. Вы вернетесь в терминал, из которого и начинали.
Есть и другие способы остановки работы с интерактивным режимом Python. В Linux нужно нажать Ctrl + D, а в Windows — Ctrl + Z + Enter.
Стоит отметить, что при использовании этого режима Python-скрипты не сохраняются в локальный файл.
Как выполняются Python-скрипты?
Отличный способ представить, что происходит при выполнении Python-скрипта, — использовать диаграмму ниже. Этот блок представляет собой скрипт (или функцию) Python, а каждый внутренний блок — строка кода.
Первая строка (кода):
    Вторая = строка кода
    Третья строка > кода:
        Четвертая (строка == кода)
    Пятая строка кода
При запуске скрипта интерпретатор Python проходит сверху вниз, выполняя каждую из них. Именно таким образом происходит выполнение кода.
Но и это еще не все.
Блок-схема выполнения кода интерпретатором
- Шаг 1: скрипт или .py-файл компилируется, и из него генерируются бинарные данные. Готовый файл имеет расширение .pyc или .pyo.
- Шаг 2: генерируется бинарный файл. Он читается интерпретатором для выполнения инструкций.
Это набор инструкций, которые приводят к финальному результату.
Иногда полезно изучать байткод. Если вы планируете стать опытным Python-программистом, то важно уметь понимать его для написания качественного кода.
Это также пригодится для принятия решений в процессе. Можно обратить внимание на отдельные факторы и понять, почему определенные функции/структуры данных работают быстрее остальных.
Как запускать Python-скрипты?
Для запуска Python-скрипта с помощью командной строки сначала нужно сохранить код в локальный файл.
Возьмем в качестве примера файл, который был сохранен как python_script.py. Сохранить его можно вот так:
- Создать Python-скрипт из командной строки и сохранить его,
- Создать Python-скрипт с помощью текстового редактора или IDE и сохранить его. Просто создайте файл, добавьте код и сохраните как «python_script.py»
Сохранить скрипт в текстовом редакторе достаточно легко. Процесс ничем не отличается от сохранения простого текстового файла.
Но если использовать командную строку, то здесь нужны дополнительные шаги. Во-первых, в самом терминале нужно перейти в директорию, где должен быть сохранен файл. Оказавшись в нужной папке, следует выполнить следующую команду (на linux):
sudo nano python_script.pyПосле нажатия Enter откроется интерфейс командной строки, который выглядит приблизительно следующим образом:
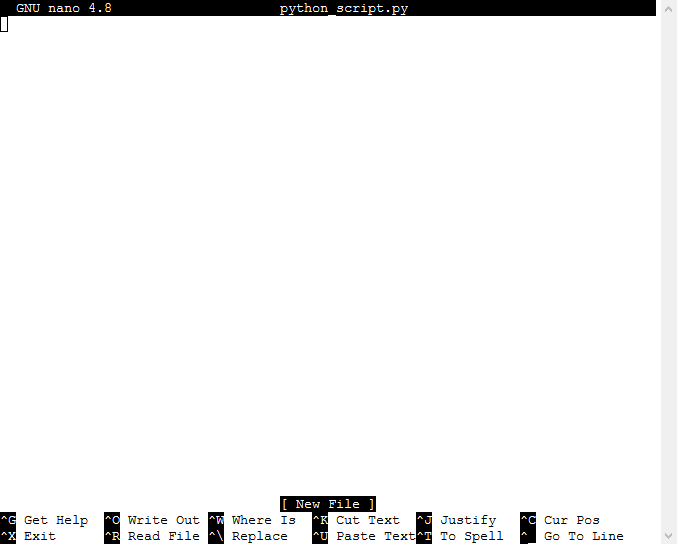
Теперь можно писать код и с легкостью сохранять его прямо в командной строке.
Как запускать скрипт в командной строке?
Скрипты можно запустить и с помощью команды Python прямо в интерфейсе терминала. Для этого нужно убедиться, что вы указали путь до него или находитесь в той же папке. Для выполнения скрипта (python_script.py) откройте командную строку и напишите python3 python_script.py.
Замените python3 на python, если хотите использовать версию Python2.x.
Вот что будет храниться в самом файле python_script.py:
for i in range(0,5):

    print(i)
Вывод в командной строке будет следующим:
~$ python python_script.py
0
1
2
3
4
Предположим, что нужно сохранить вывод этого года (0, 1, 2, 3, 4). Для этого можно использовать оператор pipe.
Это делается вот так:
python python_script.py > newfile.txtПосле этого будет создан файл «newfile.txt» с сохраненным выводом.
Как выполнять код интерактивно
Есть больше 4 способов запустить Python-скрипт интерактивно. Рассмотрим их все подробно.
Использование import для запуска скриптов
Импорт модулей для загрузки скриптов и библиотек используется постоянно. Можно даже написать собственный скрипт (например code1.py) и импортировать его в другой файл без необходимости повторять то же самое.
Вот как нужно импортировать code1.py в новом скрипте.
Но таким образом импортируется все содержимое файла code1.py. Это не проблема до тех пор, пока не появляется необходимость, в том, чтобы код был оптимизирован и быстро работал.
Предположим, что внутри файла есть маленькая функция, например chart_code1(), которая рисует красивый график. И нужна только она. Вместо того чтобы взывать весь скрипт целиком, можно вызвать ее.
Вот как это обычно делается.
>>> from code1 import chart_code1
Теперь появляется возможность использовать chart_code1 в новом файле так, будто бы эта функция была написана здесь.
Использование importlib для запуска кода
import_module() из importlib позволяет импортировать и исполнять другие Python-скрипты.
Это работает очень просто. Для скрипта code1.py нужно сделать следующее:
import importlib

import.import_module('code1')
И нет необходимости добавлять .py в import_module().
Разберем случай, когда есть сложная структура папок, и нужно использовать importlib. Предположим, что структура следующая:
level1
|
+– __init__.py
 – level2
 |
 +– __init__.py
  – level3.py
В таком случае, написав, например, importlib.import_module("level3"), вы получите ошибку. Это называется относительным импортом и работает за счет явного использования относительного пути.
Так, для запуска скрипта level3.py можно написать так:
importlib.import_module('.level3', 'level1.level')

# или так

importlib.import_module('level1.level2.level3')
Запуск кода с помощью runpy
Модуль runpy ищет и исполняет Python-скрипт без импорта. Он также легко используется, ведь достаточно просто вызывать имя модуля в run_module().
Вот как, например, выполнить code1.py с помощью runpy.
>>> import runpy

>>> runpy.run_module(mod_name="code1")
Запуск кода динамически
Рассмотрим функцию exec(), которая также используется для динамического выполнения скриптов. В Python2 эта функция была инструкцией.
Вот как она помогает выполнять код динамически на примере строки.
>>> print_the_string  = 'print("Выполнен динамический код")'

>>> exec(print_the_string)
Однако этот способ уже устарел. Он медленный и непредсказуемый, а Python предлагает массу других вариантов.
Запуск скриптов Python из текстового редактора
Для запуска кода с помощью текстового редактора можно использовать команду по умолчанию (run) или горячие клавиши (Function + F5 или просто F5 в зависимости от ОС).
Вот пример того, как код выполняется в IDLE.
Но стоит обратить внимание на то, что в данном случае нет контроля над виртуальной средой, как это бывает при исполнении с помощью интерфейса командной строки.
Поэтому IDE и продвинутые редакторы текста куда лучше базовых редакторов.
Запуск кода из IDE
IDE можно использовать не только для запуска Python-кода, но также для выбора среды и отладки.
Интерфейс этих программ может отличаться, но список возможностей должен совпадать: сохранение, запуск и редактирование кода.
Запуск кода из файлового менеджера
Что если бы был способ запустить Python-скрипт двойным кликом по файлу с ним. Это можно сделать, создав исполняемый файл. Например, в случае с Windows для этого достаточно создать файл с расширением .exe и запустить его двойным кликом.
Как запустить Python-скрипт из другого кода
Хотя об этом явно не говорилось, можно прийти к выводу, что в случае с Python есть возможность:
- Запустить скрипт в командной строке, и этот скрипт будет вызывать другой код;
- Использовать модуль для загрузки другого скрипта.
Основные моменты
- Python-код можно писать в интерактивном и не-интерактивном режимах. При выходе из интерактивного режима вы теряете данные. Поэтому лучше использовать
sudo nano your_python_filename.py. - Код можно запускать с помощью IDE, редактора кода или командной строки.
- Есть разные способы импорта кода и использования его из другого скрипта. Выбирайте вдумчиво, рассматривая все преимущества и недостатки.
- Python читает написанный код, транслирует его в байткод, который затем используется как инструкция — все это происходит при запуске скрипта. Поэтому важно учиться использовать байткод для оптимизации Python-кода.
Download Article
A quick guide to operating Python scripts in command prompt
Download Article
Whether you’re writing Python code on your Windows PC or just want to use existing Python scripts, it’ll be helpful to learn how to run code from the Command Prompt. Running Python code is easy—you’ll just need to have Python installed. This wikiHow article will walk you through opening a Python file from Command Prompt, and teach you how to fix the common «python is not recognized as an internal or external command» error.
Easy Way to Run a Python Script
To run a Python file, type “Python File.py” where “File” is your file’s name. For example, if your Python file is named “Script,” type “Python script.py” instead. Press enter to run the command and open the file.
-

Find the Python file that you want to open in Command Prompt.
- If you already know the folder path to the Python file you want to open, skip ahead to opening the file in Command Prompt.
-

Click once the Python file for which you want to see the folder path.
Advertisement
-
Doing so prompts a drop-down menu to appear.
-
It’s in the drop-down menu. The properties window will open.
-
The folder address (or «path») to the right of the «Location» heading is what you’ll need to enter into Command Prompt when switching to the directory in which your Python file is stored.
- You can copy the location by highlighting it (click and drag your mouse across the «Location» value) and then pressing Ctrl+C.


Advertisement
-

Click the Windows logo in the bottom-left corner of the screen. The Start menu will pop up.
-
Type in cmd to do so.
-

It’s at the top of the Start menu. Doing so will open Command Prompt.
-

Type cd and a space, then type in the «Location» address for your Python file and press ↵ Enter.
- For example, to open a Python file in a folder named «Files» on your Desktop, you would enter cd desktop/Files here.
- If you copied the path to the file, you can type in cd and a space and then press Ctrl+V to paste in the path.
-
Type in python file.py where file is your Python file’s name.
- For example, if your Python file is named «script», you would type in python script.py here.
- If your Python file has one or more spaces in its name, you’ll place quotation marks around the file name and extension (e.g., python "my script.py").
-
Doing so runs your command and opens your Python file via your computer’s installed Python program.
- If you encounter an error that says
'python' is not recognized as an internal or external commandafter pressing Enter, you’ll need to add Python to the PATH list before retrying this part.
- If you encounter an error that says


Advertisement
-

Enable viewing for hidden folders. Since one of the folders that contains your Python installation folder is most likely hidden, you’ll have to unhide it before proceeding:
- Open File Explorer

.
- Click the View tab.
- Check the «Hidden items» box.
- Open File Explorer
-
In some cases, the Python path is «C:\Python27»; however, if you’ve installed the most recent version of Python using the default settings, it’s tucked away in a hidden folder. You can copy the proper file path by doing the following:
- Click This PC on the left side of the File Explorer.
- Double-click your hard drive in the «Devices and drives» section.
- Scroll down and double-click the «Users» folder.
- Double-click the folder with your username on it.
- Scroll down and double-click «AppData».
- Double-click «Local».
- Scroll down and double-click «Programs».
- Double-click the «Python» folder.
- Double-click the Python folder with your preferred version number (e.g., «Python36»).
-

Click once the address bar at the top of the File Explorer to highlight its contents, then press Ctrl+C to copy the highlighted address.
-
Right-click the Start

icon to do so. You should see a pop-up menu appear.
- You can also press ⊞ Win+X to open the Power User pop-up menu.
-
It’s in the pop-up menu. A new window will open.
-

This is a link in the upper-right corner of the window. Doing so opens the System Information window.
-
You’ll see this in the upper-left side of the System Information window. Yet another window will pop up.
-
It’s in the bottom-right corner of the pop-up window.
-
This window is at the top of the Environment Variables window.
- You may have to scroll up or down with your mouse cursor hovering over the «User variables» pane to find the «Path» variable.
-

Doing so opens a pop-up window.
-
It’s on the right side of the window. A text field will open in the middle of the window.
-
Press Ctrl+V to do so. Your copied path will appear in the text field in the middle of the window.
-
This will save your changes and close the «Path» window, the «Environmental Variables» window, and the «System Properties» window.


Advertisement
Add New Question
-
Question
I want to create a shortcut that executes the utility «ptpython,» running in the cmd prompt. The shortcut I have points to the directory containing «ptpython.exe» file but it does not execute it.
It sounds like ptpython.exe is a command-line utility, meaning it will only start if you execute it from a DOS window — you can’t create a shortcut for it directly. You can probably create a shortcut to cmd.exe, though (the DOS window) and pass it the ptpython.exe file as a parameter. Something like «cmd.exe /c ptpython.exe» should work, or if this disappears in the end, try with /k (instead of /c).
-
Question
Does this work on Windows 7?
Yes. The directions to access the environment variables would be slightly different, as there is no «Power User» menu in Windows 7. Instead: 1. Press the Windows key and R to open the Run dialog. 2. Enter «sysdm.cpl». 3. Click the «Advanced» tab of the System Properties Window. 4. Click the «Environmental variables». Most everything else would work as described even on Windows 95 (if there’s a version of Python for Windows 95).
-
Question
After opening the Command Prompt and navigation to the directory in which the py file exists and opening Python, not able to run the file using python file_name.py. It says that the syntax is wrong.
That sounds like a problem with the file you’re trying to run. Make sure you are using the right version of Python for it (version 2 or 3, usually).
See more answers
Ask a Question
200 characters left
Include your email address to get a message when this question is answered.
Submit
Advertisement
Thanks for reading our article! If you’d like to learn more about programming languages, check out our in-depth interview with Kevin Burnett.
Video
Thanks for submitting a tip for review!
About This Article
Thanks to all authors for creating a page that has been read 996,754 times.
Is this article up to date?
Last Updated :
21 Dec, 2023
Python scripts are Python code files saved with a .py extension. You can run these files on any device if it has Python installed on it. They are very versatile programs and can perform a variety of tasks like data analysis, web development, etc.
You might get these Python scripts if you are a beginner in Python so in this discussion, we will explore various techniques for executing a Python script.
What is Python Script?
Python is a well-known high-level programming language. The Python script is a file containing Python-written code. The file containing Python script has the extension ‘.py’ or can also have the extension ‘.pyw’ if it is being run on a Windows 10 machine.
To run a Python script, we need a Python interpreter installed on the device. In this article, we will learn how to run a Python script.
Methods to Run a Script in Python
There are various methods to Run a Python script, we will go through some generally used methods for running a Python script:
- Interactive Mode
- Command Line
- Text Editor (VS Code)
- IDE (PyCharm)
How to Run a Python Script?
Let’s go through the basic steps and understand how a script works.
Here is a simple code to print ‘Hello World!’.
Python3
To Execute this program, first we have to save it with the ‘.py’ extension. Then we can execute this file with the help of the terminal.
Here, the print() function is to print out any text written within the parenthesis. We can write the text that we want to be printed using either a single quote as shown in the above script or a double quote.
If you are coming from any other language then you will also notice that there is no semicolon at the end of the statement as, with Python, you do not need to specify a semicolon at the end of the line. And also we don’t need to include or import any files to run a simple Python script.
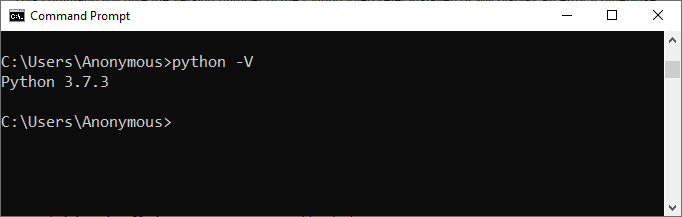
There are various ways to run a script in Python but before going toward the different ways to run a Python script, we first have to check whether a Python interpreter is installed on the system or not. So in Windows, open ‘cmd’ (Command Prompt) and type the following command.
python -V
This command will give the version number of the Python interpreter installed or will display an error if otherwise.
1. Run Python Script Interactively
In Python Interactive Mode, you can run your script line by line in a sequence. To enter an interactive mode, you will have to open Command Prompt on your Windows machine, type ‘python’ and press Enter.
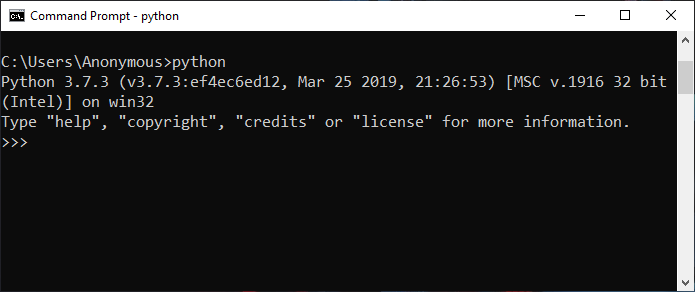
Example1: Using Print Function
Run the following line in the interactive mode:
print('Hello World !')
Output:
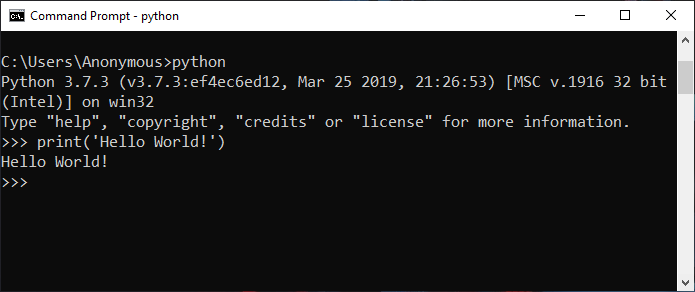
Example 2: Using Interactive Execution
Run the following lines one by one in the interactive mode.
name = "Aakash"
print("My name is " + name)
Output:
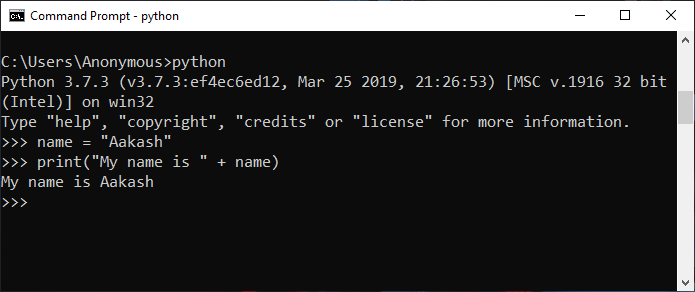
Example 3: Interactive Mode Comparison
Run the following lines one by one in the interactive mode.
a = 1
b = 3
if a > b:
    print("a is Greater")
else:
    print("b is Greater")
Output:
Note: To exit from this mode, press ‘Ctrl+Z’ and then press ‘Enter’ or type ‘exit()’ and then press Enter.
2. Run Python Script by the Command Line
Running Python scripts on Windows via the command line provides a direct and efficient way to execute code. It allows for easy navigation to the script’s directory and initiation, facilitating quick testing and automation.
Example 1: Using Script Filename
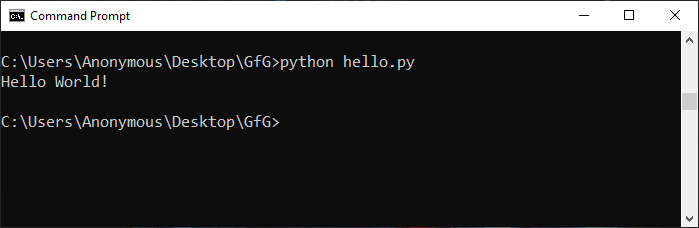
To run Python in the terminal, store it in a ‘.py’ file in the command line, we have to write the ‘python’ keyword before the file name in the command prompt. In this way we can run Python programs in cmd.
python hello.py
You can write your own file name in place of ‘hello.py’.
Output:
Example 2: Redirecting output
To run a Python script in Terminal from the command line, navigate to the script’s directory and use the python script_name.py command. Redirecting output involves using the > symbol followed by a file name to capture the script’s output in a file. For example, python script_name.py > output.txt redirects the standard output to a file named “output.txt.”
Output :

Output
3. Run a Script in Python using a Text Editor
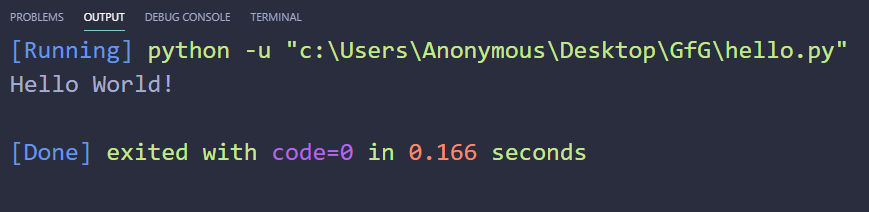
To run Python script on a text editor like VS Code (Visual Studio Code) then you will have to do the following:
- Go to the extension section or press ‘Ctrl+Shift+X’ on Windows, then search and install the extension named ‘Python’ and ‘Code Runner’. Restart your vs code after that.
- Now, create a new file with the name ‘hello.py’ and write the below code in it:
print('Hello World!')
- Then, right-click anywhere in the text area and select the option that says ‘Run Code’ or press ‘Ctrl+Alt+N’ to run the code.
Output:
4. Run Python Scripts using an IDE
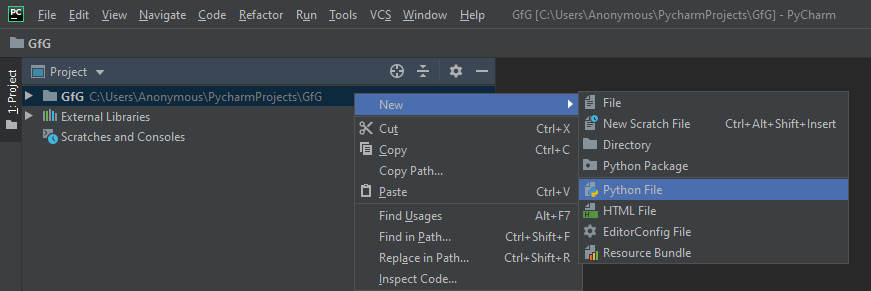
To run Python script on an IDE (Integrated Development Environment) like PyCharm, you will have to do the following:
- Create a new project.
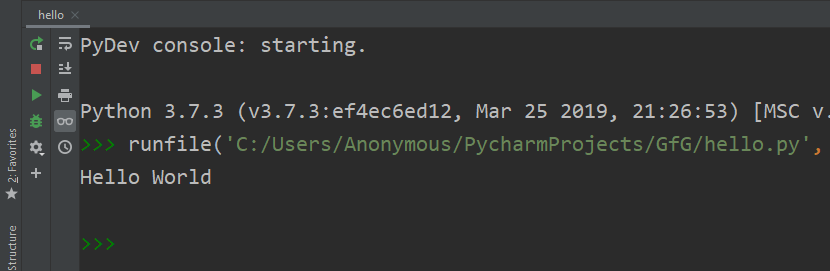
- Give a name to that project as ‘GfG’ and click on Create.
- Select the root directory with the project name we specified in the last step. Right-click on it, go to New, anto, and click on the ‘Python file’ option. Then give the name of the file as ‘hello’ (you can specify any name as per your project requirement). This will create a ‘hello.py’ file in the project root directory.
Note: You don’t have to specify the extension as it will take it automatically.
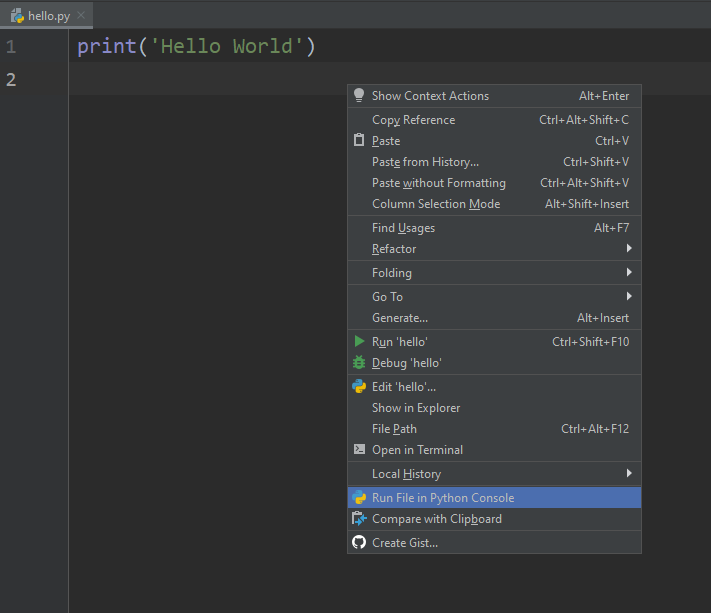
- Now write the below Python script to print the message:
print('Hello World !')
- To run this Python script, Right click and select the ‘Run File in Python Console’ option. This will open a console box at the bottom and show the output there. We can also run using the Green Play Button at the top right corner of the IDE.
Output:
We have covered 4 different methods to run Python scripts on your device. You can use any of the above methods depending on your device. Running Python scripts is a very basic and easy task. It helps you in sharing your work and accessing other source work for learning.
Similar Reads:
- Run Python script from anywhere in linux
- Run function from the command line In Python
- How to Run a Python Script using Docker?
- Schedule a Python Script to Run Daily