
LAPS (Local Administrator Password Solution) позволяет централизованно управлять паролями локальных администраторов на компьютерах домена. Текущий пароль локального администратора хранятся в защищённых атрибутах объектов Computer в Active Directory, регулярно меняется автоматически, и может быть получен авторизованными пользователями.
В этой статье мы покажем, как настроить Windows LAPS для управления паролями локальных администраторов на компьютерах в домене Active Directory.
Содержание:
- Особенности новой версии Windows LAPS
- Разворачиваем Local Administrator Password Solution в домене Active Directory
- Настройка групповой политики смены локальных паролей через LAPS
- Как узнать пароль локального администратора через LAPS?
До апреля 2023 года установочный MSI файл LAPS нужно было вручную скачивать с сайта Microsoft, разворачивать на компьютерах компоненты администратора или клиентскую часть, устанавливать ADMX шаблоны GPO для LAPS и расширять схему AD.
В апреле 2023 года вышли обновления, которые добавляют встроенную поддержку новой версии LAPS в Windows. Теперь для использования LAPS не нужно скачивать и устанавливать MSI пакет.
Особенности новой версии Windows LAPS
Встроенная поддержка Windows LAPS была добавлена в следующих кумулятивных обновлениях, выпущенных в апреле 2023 года:
- Windows 11 22H2 – KB5025239
- Windows 11 21H2 – KB5025224
- Windows 10 22H2 — KB5025221
- Windows Server 2022 – KB5025230
- Windows Server 2019 – KB5025229
Что нового в Windows LAPS?
- Все компоненты нового LAPS встроены в Windows;
- Позволяет сохранять пароли администраторов в локальную AD и Azure AD;
- Поддерживается управление паролем DSRM (Directory Services Restore Mode) на контроллерах домена AD;
- Поддержка шифрования паролей;
- История паролей;
- Автоматическое изменение пароля локального администратора после его использования для локального входа на компьютер
Новая версия Windows LAPS требует версии Windows Server 2016 для функционального уровня домена.
Как мы уже указали выше, теперь не нужно скачивать и устанавливать клиент LAPS вручную, все необходимые компоненты LAPS доступны в Windows после установки апрельских обновлений.
Инструменты управления Windows LAPS:
- Новый ADMX файл групповых политик;
- Отдельная вкладка в свойствах компьютера в консоли Active Directory Users and Computers (ADUC);
- PowerShell модуль Windows LAPS;
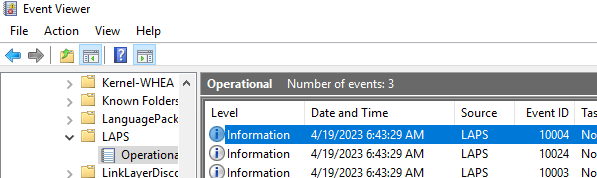
- Отдельный журнал Event Viewer: Application and Service Logs -> Microsoft -> Windows -> LAPS -> Operational.

Microsoft указывает, что нужно отключить политики и удалить настройки предыдущую версию legacy LAPS (msi) перед развертыванием групповых политик новой LAPS. Для этого нужно остановить новые установки MSI LAPS и удалить все параметры в ветке реестра HKLM\Software\Microsoft\Windows\CurrentVersion\LAPS\State.
Если старая версия не удалена в Event Viewer будут появляться события со следующими Event ID:
- Event ID 10033, LAPS — The machine is configured with legacy LAPS policy settings, but legacy LAPS product appears to be installed. The configured account’s password will not be managed by Windows until the legacy product is uninstalled. Alternatively, you may consider configuring the newer LAPS policy settings.
- Event 10031, LAPS — LAPS blocked an external request that tried to modify the password of the current manager account.
Разворачиваем Local Administrator Password Solution в домене Active Directory
Вы можете начать внедрение новой версии LAPS после установки новых обновлений на все контроллера домена.
Для управления Local Administrator Password Solution используются PowerShell командлеты из модуля LAPS. Доступны следующие команды:
Get-Command -Module LAPS
- Get-LapsAADPassword
- Get-LapsDiagnostics
- Find-LapsADExtendedRights
- Get-LapsADPassword
- Invoke-LapsPolicyProcessing
- Reset-LapsPassword
- Set-LapsADAuditing
- Set-LapsADComputerSelfPermission
- Set-LapsADPasswordExpirationTime
- Set-LapsADReadPasswordPermission
- Set-LapsADResetPasswordPermission
- Update-LapsADSchema

После установки обновлений на DC и клиенты, нужно выполнить обновление схемы AD, которое добавит новые атрибуты. Выполните команду:
Update-LapsADSchema
Если не все DC были обновлены, команда вернет ошибку:
Update-LapsADSchema : A local error occurred.
В схемы будут добавлены следующие атрибуты:
- msLAPS-PasswordExpirationTime
- msLAPS-Password
- msLAPS-EncryptedPassword
- msLAPS-EncryptedPasswordHistory
- msLAPS-EncryptedDSRMPassword
- msLAPS-EncryptedDSRMPasswordHistory
Windows LAPS не использует для хранения пароля атрибуты, которые использовались в предыдущей версии (ms-Mcs-AdmPwd и ms-Mcs-AdmPwdExpirationTime).
Откройте консоль ADUC, выберите любой компьютер в AD и перейдите на вкладку редактора атрибутов объекта AD. Проверьте, что у объекта теперь доступны новые атрибуты.
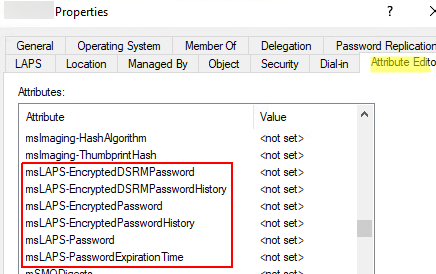
Атрибуты
msLAPS-*
пока не заполнены.
Теперь нужно разрешить компьютерам в указанном Organizational Unit (OU) обновлять атрибуты msLAPS-* в свойствах своих учетных записей в AD.
Например, я хочу разрешить компьютерам из OU MSK обновлять пароль, который хранится в атрибутах AD. Выполните команду:
Set-LapsADComputerSelfPermission -Identity "OU=Computers,OU=MSK,DC=winitpro,DC=ru"
Теперь с помощью PowerShell создадим группу пользователей, которым можно просматривать пароли локальных администраторов на компьютерах в этом OU:
New-ADGroup MSK-LAPS-Admins -path 'OU=Groups,OU=MSK,DC=winitpro,DC=ru' -GroupScope local -PassThru –Verbose
Add-AdGroupMember -Identity MSK-LAPS-Admins -Members user1, user2
Разрешим для этой группы просматривать пароли и сбрасывать их:
$ComputerOU = "OU=Computers,OU=MSK,DC=winitpro,DC=ru"
Set-LapsADReadPasswordPermission –Identity $ComputerOU –AllowedPrincipals MSK-LAPS-Admins
Set-LapsADResetPasswordPermission -Identity $ComputerOU -AllowedPrincipals MSK-LAPS-Admins
Члены группы Domain Admins по умолчанию могут просматривать пароли локальных администраторов на компьютерах.
Чтобы проверить текущие права на атрибуты LAPS в OU используется команда Find-LapsADExtendedRights.
Find-LapsADExtendedRights -Identity "OU=computers,DC=yourdomain,DC=com"
Настройка групповой политики смены локальных паролей через LAPS
При установке последних обновлений в Windows появится новый набор административных шаблонов для управления конфигурацией LAPS через GPO (%systemroot%\PolicyDefinitions\laps.admx).
Если у вас используется централизованное хранилище для хранения ADMX шаблонов, скопируйте LAPS.admx в
\\winitpro.ru\SysVol\winitpro.ru\Policies\PolicyDefinitions
.
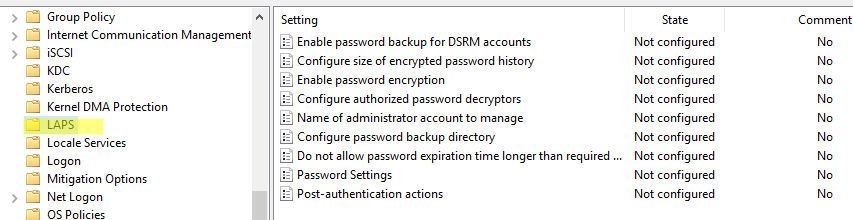
Настройки LAPS находятся в следующем разделе групповых Computer Configuration -> Policies -> Administrative Templates -> System -> LAPS. Здесь доступны следующие политики LAPS:
- Enable password backup for DSRM accounts
- Configure size of encrypted password histor
- Enable password encryption
- Configure authorized password decryptors
- Name of administrator account to manage
- Configure password backup directory
- Do not allow password expiration time longer than required by policy
- Password Settings
- Post-authentication actions
Попробуем настроить минимальную групповую политику LAPS для домена Active Directory.
- Откройте консоль Group Policy Management (
gpmc.msc
), создайте новую GPO и назначьте на OU с компьютерами; - Откройте новую GPO и перейдите в раздел с настройками LAPS;
- Включите политику Configure password backup directory и выберите Active Directory. Эта политика разрешает сохранять пароль администратора в учетной записи компьютера;
Windows LAPS может сохранять пароли в Azure Active Directory (AAD) вместо локальной ADDS.
- Затем включите политику Password Settings. Здесь нужно указать параметры сложности пароля, длину, частоту смены ;
- В параметре Name of administrator account to manage нужно указать имя учетной записи администратора, пароль которого нужно менять. Если вы используете встроенного администратора Windows, укажите Administrator здесь.
LGPO не создает локальные учетные записи администратора. Если вы хотите использовать другую учетную запись администратора, нужно предварительно создать ее на компьютерах с помощью GPO или PowerShell.
- Перезагрузите компьютер чтобы применить новые настройки GPO.
Как узнать пароль локального администратора через LAPS?
После внедрения политик LAPS, Windows при загрузке изменит пароль локального администратора и запишет его в защищенный атрибут msLAPS-Password в объект компьютера в AD. Вы можете получить текущий пароль компьютера в консоли ADUС или с помощью PowerShell.
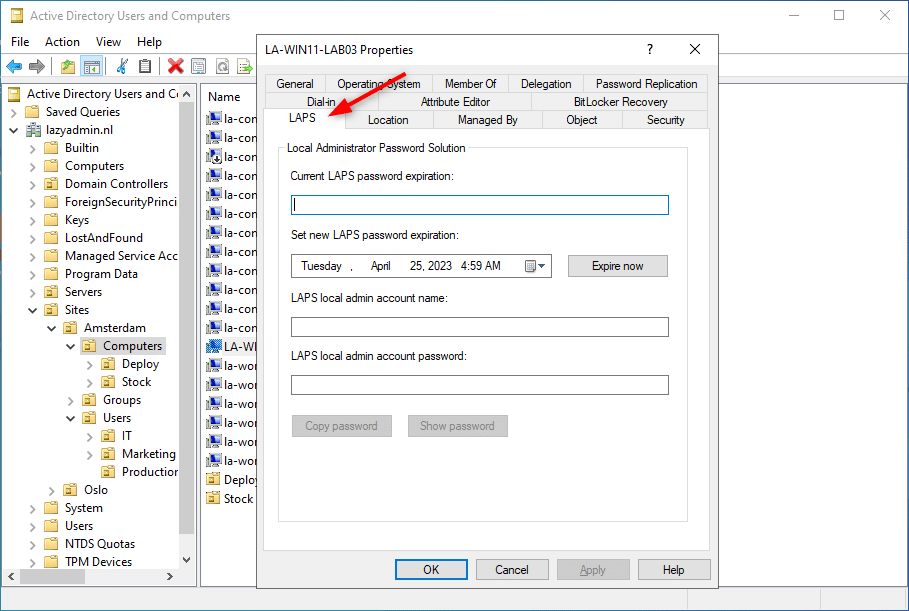
Откройте консоль ADUC и найдите компьютер, пароль которого вы хотите получить. В свойствах компьютера появилась новая вкладка LAPS.
На вкладке отображаются следующие данные:
- Current LAPS password expiration
- LASP local admin account name
- LASP local admin account password
Также вы можете получить текущий пароль администратора компьютер через PowerShell:
Get-LapsADPassword "msk-pc221" -AsPlainText
ComputerName : msk-pc221
DistinguishedName : CN= msk-pc221,OU=…
Account : administrator
Password : .[lB2DWxy1!k23
PasswordUpdateTime : 4/20/2023 10:13:16 AM
ExpirationTimestamp : 5/20/2023 10:13:16 AM
Source : EncryptedPassword
DecryptionStatus : Success
AuthorizedDecryptor : WINITRPRO\Domain Admins

Вы можете использовать этот пароль для локального входа на этот компьютер с под учетной запись администратора.
Если вы хотите сбросить текущий пароль, выполните на компьютере команду:
Reset-LapsPassword
Это вызовет немедленную смену пароля текущего пользователя и запишет новый пароль в AD.
Windows Local Administrator Password Solution – это простое встроенное решение, которое позволит вам повысить безопасность использования учетных записей локальных администраторов на компьютерах домена. LAPS хранит текущий пароль администратора в защищённом атрибуте AD и регулярно меняет их на всех компьютерах.
This step-by-step guide demonstrates the integration of LAPS in an Active Directory environment. Active Directory user passwords are stored centrally on all Domain Controllers. What about the local account of the administrator? Many of us use the same password on all computers. A nightmare in terms of security. LAPS can store and change local administrator passwords centrally.
Downloading the LAPS Installer
LAPS should be installed on a management server (in my case, a Windows Server 2016 domain controller). First, we have to download the LAPS Installer: https://www.microsoft.com/en-us/download/details.aspx?id=46899
Installing LAPS on the Management-Server
During setup it’s important to select all features, otherwise only the client-side extensions (which are also required for the clients) will be installed.

Modifying the Active Directory Schema
Two attributes must be added to the computer objects:
- msMcsAdmPwd
- msMcsAdmPwdExpirationTime
Both attributes can be created by using LAPS commands in PowerShell. The user must be a member of the Active Directory Schema Admins group. Open Windows PowerShell and run
Import-Module AdmPwd.PS
Update-AdmPwdADSchema

Configuring Permissions
Domain computers must have write permissions to renew the password of the local administrator. In my case, I grant access for all computers of the organizational unit “Workstations”.
Set-AdmPwdComputerSelfPermission -Identity Workstations

Now we have to configure group permissions. All group members of this group will be able to read the local password of each computer centrally. I grant “read password permission” for the domain admins group.
Set-AdmPwdReadPasswordPermission -OrgUnit Workstations -AllowedPrincipals "Domain-Admins"
Next we configure the right to reset the password of the local administrator account. As before, I allow it for all Domain Admins.
Set-AdmPwdResetPasswordPermission -OrgUnit Workstations -AllowedPrincipals "Domain-Admins"
Installing LAPS on the Client Computers manually
In order to use LAPS, the AdmPwd GPO Extensions must be installed on all client computers. This can be done either manually or via GPO. In my case, I manually install the previously used tool on a Windows 10 system. All you need to do is to install only the client-side extensions.

Installing LAPS on the Client Computers by using Group Policy Software Installation (Bulk)
Well, it’s boring to install LAPS on hundred or thousand computers manually. In a production environment you can install the software by using group policy. This now takes some time. Are you ready? 😉
Create a shared folder
First, we have to create a shared folder and put the installation files in it. All we need is PowerShell and the installation package. For creating a shared folder on the management server open Windows PowerShell and run
New-Item -Itemtype Directory -Name LAPS -Path C:\

Once the folder is created, activate sharing.
New-SmbShare -Name LAPS -Path C:\LAPS\

Now copy the installation package into the folder.

Configure a GPO for Software Installation
On a domain controller, open the group management console (gpmc.msc). Create a new GPO by following my screenshots.

Provide a name for the GPO.
Click on Edit.

Navigate to Computer Configuration – Policies – Software Settings. Right click Software Installation and select New – Package.

Pay attention to the path. You have to provide the UNC Path of the previously configured shared folder. Do not start browsing your computer to find the package! Enter the path to the folder manually by using the format \\ServerName\SharedFolderName\LAPS.x64.msi and click Open.

Next, select Assigned.
Review your work.

Finally, link the GPO to an organizational unit. Make sure, that you link it to the OU of your client computers.

For testing, run gpupdate /force on one of your client computers. Then restart the computer. After restarting check Programs and Features.

Let’s move on configuring the final steps.
Enabling LAPS on all Client Computers
The last step is to create a GPO for LAPS. On a domain controller, open the group policy management console (gpmc.msc) and create a new GPO named LAPS. Open the GPO and navigate to Computer Configuration – Policies – Administrative Templates – LAPS. Enable “Enable local admin password mangement“.
Important note: You might want to change setting “Name of administrator account to manage” if the name of your local administrator account on your client-computer is not “administrator”, but f.e. “admin“.

Then link the GPO to the Organizational Unit.

Run gpupdate /force on all Client Computers. You can do this remotely: PowerShell: Force gpupdate on all Domain Computers
Showing Local Administrator Passwords
On the management server open LAPS.

Enter the computer name of one of your clients.

As an alternative, open Windows PowerShell and run
Import-Module AdmPwd.PS
Get-AdmPwdPassword -ComputerName ComputerName | Format-List

Advanced Settings
Changing Password Policies
With LAPS you can enforce local administrator password policies. Open the previously created GPO and configure the appropriate settings.

Have fun with LAPS!
More Informations about LAPS here: Technet: “Local Administrator Password Solution”.
I would like to help you setting up LAPS in your environment – just follow this simple guide how to do it and say “bye bye” to not-secure fixed local administrators passwords.
First you need to download x64 (and if you need x86) LAPS from Microsoft website:
https://www.microsoft.com/en-us/download/details.aspx?id=46899
Download LAPS.x64.msi on your Active Directory domain controller and install it – add also Management Tools that are not selected by default:

After installing it open Powershell on your DC, import Powershell module for LAPS, update AD Schema for LAPS (you need to be schema admin!), define OU where computers / servers that will be under LAPS management are, define user or group that will have privilege to read and reset password for client or server:
Import-Module AdmPwd.PS
Update-AdmPwdADSchema
Set-AdmPwdComputerSelfPermission -OrgUnit Clients
Set-AdmPwdResetPasswordPermission -Identity Clients -AllowedPrincipals “demo\domain admins”
Set-AdmPwdReadPasswordPermission -Identity Clients -AllowedPrincipals “demo\domain admins”


Create group policy object on clients / servers OU (in my case with name LAPS) in which you will configure settings and deploy client on machines (yes, the MSI package that was installed on DC needs to be installed on workstations and servers too – the simplest way to do it is by using software deployment in group policy.


Reboot your clients or use gpupdate /force to apply group policy settings and installation of the package.
If everything was installed and applied correctly you should see the installed package in programs on client workstation or server:

On your AD server you can now check password by using Powershell or by using LAPS GUI:
Get-AdmPwdPassword -ComputerName w10 -Verbose


LAPS is great, simple and adds some more security in your environment.
This guide to setting up LAPS in Active Directory is the first part of a two-part series about configuring Windows LAPS. This post covers setting up LAPS with on-premises Active Directory. The next guide will cover setting up LAPS with Entra ID (Azure Active Directory).
It’s important to note that the features of Windows LAPS vary if you are using the Active Directory version or the Entra ID (Azure Active Directory) version. More information about features and architecture can be found here.
Table of Contents
- Prerequisites and Notes
- Setting Up Windows LAPS
- Configuring Group Policy
- Group Policy Descriptions
- Verifying success
Prerequisites and Notes
Before configuring Windows LAPS in Active Directory, there are a couple of important prerequisites and notes about what is required for functionality.
- The first involves Domain Functional Level (DFL).
- Full Windows LAPS features, encryption of passwords, and Directory Services Restore Mode (DSRM) password encryption, only works with a DFL of 2016. If you are below a DFL of 2016, you cannot encrypt LAPS passwords in AD, or use LAPS to encrypt your DSRM.
- If you are on a Domain Functional Level of 2016, and have Windows Server 2016 Domain Controllers, you can encrypt the passwords, but you cannot use LAPS to manage your DSRM.
- If you are on a Domain Functional Level of 2016 and have Windows Server 2019 or 2022 Domain Controllers, you can use all the features of Windows LAPS.
- The versions of Windows and Windows Server required to use Windows LAPS:
- Windows 11 Professional, Education, or Enterprise
- Windows 10 Professional, Education, or Enterprise
- Windows Server 2022 and Windows Server Core 2022
- Windows Server 2019
Setting Up Windows LAPS: Step by Step
1. Check for the PowerShell Module
The PowerShell module should be available on Windows 2019 and 2022 that have been updated to at least the April 2023 Cumulative Update. However, you can confirm that the PowerShell module for LAPS has been added by using the command Get-Command –Module LAPS. You should see the below response if the PowerShell module has been added.
2. Extend the Active Directory Schema
In order for Windows LAPS to work you will need to extend the Schema with the new attributes that are required. Make sure you are a schema admin and enter the following command:
Update-LapsADSchema –verbose The command will ask you if you want to extend the AD Schema, type “A” to add all the schema extensions that are needed. The –verbose parameter in the command will show additional information about what the command is doing and can be omitted if desired.
3. Verify the Schema was Extended
You can verify the schema was extended by looking at the computer object in Active Directory Users and Computers. You should see a new LAPS tab. It will not be populated with data until you set up the policies in Group Policy.
4. Set the AD LAPS Computer Permission
Next we need to set the OU (or multiple OU’s) in which the computers will have permission to change their password. The command is
set-lapsadcomputerselfpermission –identity “<Name of OU>”
You may need to use the full distinguishedname for the command to work as in the command below.
5. Configuring Group Policy
There are two group policy settings that must be set for LAPS to function, others are optional and can be applied as needed.
- Open group policy editor
- Create new Computer Policy
- Edit the policy and navigate to “Computer Configuration -> Policies -> Administrative Templates -> System -> LAPS”
Group Policy Descriptions
6. Configure Password Backup Directory (required)
With this group policy setting you determine if the password is going to be stored in Active Directory, or Azure Active Directory (Entra ID).
7. Password Settings (required)
This policy setting determines the password complexity, password length, and password age in days.
8. Enable Password Backup for DSRM Accounts (optional)
This setting allows the DSRM Administrator account to be backed up to Active Directory. Password encryption must be enabled for this setting to apply.
9. Configure Size of Encrypted Password History (optional)
This setting configures how many pervious encrypted passwords will be saved in Active Directory. The minimum that are stored is 0, the maximum is 12.
10. Enable Password Encryption (optional)
This setting determines if passwords will be encrypted when they are stored in Active Directory.
11. Configure Authorized Password Descriptors (optional)
This setting determines the specific user or group who is authorized to decrypt encrypted passwords.
12. Name of Administrator Account to Manage (optional)
This setting specifies a custom Administrator account for which to manage the password if you are using an account that is not the built in Administrator account.
13. Do not Allow Password Expiration Time Longer than Required by Policy (optional)
With this setting, passwords are not allowed to have expiration times that are beyond the age dictated by the “password settings” policy.
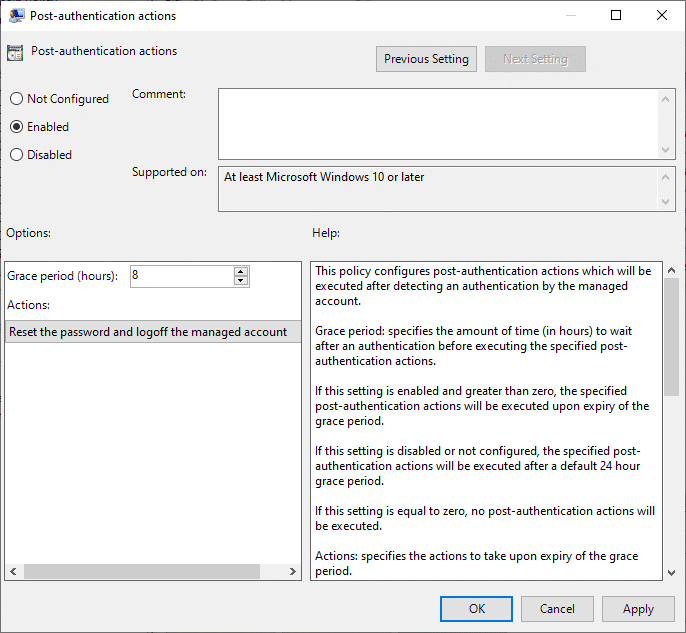
14. Post-authentication Actions (optional)
This setting determines the actions to take after the administrator password has been used, and the grace period before the action is taken in hours.
15. Verifying Success and Retrieving Passwords
After you have configured the group policies, you should run gpupdate /force and allow group policy to update. If everything is working correctly you will see password information in your Active Directory Users and Computer Object. Select “Copy Password” to copy the administrator password to your clipboard.
I hope this guide helped you with your Windows LAPS configuration. Watch for our next guide covering how to set up LAPS with Entra ID (formerly Azure AD).
Additional Windows LAPS Posts
- How to Set Up Windows LAPS with Microsoft Intune
- Windows LAPS Overview
By IT, for IT.
We are a dedicated group of Systems Administrators and tech-savvy product experts that love what we do and the IT community we do it with.
Windows LAPS is a Windows feature that allows you to automatically set and backup local administrator passwords of your domain-joined devices. LAPS (Local Administrator Password Solution), creates a unique and random password for each device in your network and stores it in the Active Directory or Azure Active Directory.
Windows LAPS is the successor of the legacy Microsoft LAPS, which has been available for the past years. The new Windows LAPS comes with more features and is now built into Windows 10 and 11. So we don’t need to install a client on the computers anymore.
In this article
In this article, we are going to take a look at the difference between Microsoft LAPS and Windows LAPS, how to install and configure the new LAPS, and how to migrate from legacy LAPS to Windows LAPS.
What is Windows LAPS?
You can easily change the password of your domain administrator account, but what about the local administrator account? The password of the local admin account is often set during installation, but you can’t easily change it on all computers. This is where Windows LAPS comes in. LAPS stands for Local Administrator Password Solution.
With LAPS we can automatically set unique local administrator passwords on each computer, which are stored in the Azure Active Directory or in your local Active Directory. The password is automatically changed every 30 days by default. Windows LAPS can also be used to manage and back up the DSRM (Directory Services Restore Mode) password of your Active Directory.
Microsoft LAPS vs Windows LAPS
Windows LAPS is the successor of Microsoft LAPS, which has been available for many years. So what are the differences between the two versions? The most important change is that the new version is built into Windows. This means that we don’t have to install an MSI anymore on the clients. But there are more advantages:
- Store password in Azure AD – Easier to retrieve password
- Password History – View previous passwords, useful for recovery scenarios
- Encrypt passwords – Improves security in local Active Directory
- Automatically rotate password – Reset password after the account is used
- View with Microsoft Graph – You can retrieve the passwords with Microsoft Graph
- DSRM Password Backups – Secure and rotate the domain controller recovery password
- New PowerShell Module – Gives you more control through PowerShell
- Dedicated event log – Makes it easier to troubleshoot issues
Requirements
To use Windows LAPS you will need to make sure that your computers and servers have the latest security update, from April 11, 2023, installed. The following operating systems are supported:
- Windows 11 Pro, EDU, and Enterprise
- Windows 10 Pro, EDU, and Enterprise
- Windows Server 2022
- Windows Server 2019
Make sure that all your domain controllers are fully updated before you start with the installation.
How to Install Windows LAPS
If your devices are managed with Intune, then it’s recommended to roll out LAPS using the Windows LAPS configuration service providers. When you don’t use Intune, then you can still deploy LAPS, using your local Active Directory.
I will explain both methods, starting with the local Active Directory.
Deploy LAPS on local Active Directory
This method can be used when you have a complete on-premise environment and for hybrid environments where your local Active Directory is synced with Azure Active Directory.
Step 1 – Extend AD Schema
The first step is to extend the Active Directory schema. We do this on one domain controller, which then will automatically sync the new schema to the other domain controllers in your forest.
To update the AD Schema, open PowerShell (Admin) on the domain controller and run the following command:
Update-LapsADSchema
Press A (Yes to all) on the question if you want to proceed. If you get an error running the Update-LapsADSchema command, then check the FAQ at the end of the article for possible solutions.
We can verify the Active Directory schema extension by opening a computer object in the Active Directory. You will now see the new LAPS tab.
Step 2 – Set Permissions
The computers need to have permission to update their password in the Active Directory. We do this by setting inheritable permissions on the OU of the computers with the help of the Set-LapsADComputerSelfPermission cmdlet in PowerShell.
We will need to specify the OU name, if the name isn’t unique in your Active Directory, then you will need to specify the DistinguishedName.
Set-LapsADComputerSelfPermission -Identity "Computers"

# Or with the full distinguishedName:
Set-LapsADComputerSelfPermission -Identity "OU=Computers,OU=Amsterdam,OU=Sites,DC=lazyadmin,DC=nl"
Step 3 – Configure LAPS Group Policies
To configure LAPS we will need to create a new Group Policy.
- Open the Group Policy Management on the domain controller
- Create a new Computer Policy (CPO_LAPS) in your computer OU
- Edit the new policy and navigate to Computer Configuration > Policies > Administrative Templates > System > LAPS

Note
If you don’t see LAPS under Administrative Templates > System then copy the ADMX files from C:\Windows\PolicyDefinitions to your central store :\\contoso.com\SYSVOL\contoso.com\policies\PolicyDefinitions
- Open Configure password backup directory and set it to either Active Directory or Azure Active Directory. Make sure that your device is managed in the AD that you select.

- Open Password Settings and enable the setting. Optionally change the configuration.
- (Optional) Open Name of administrator account to manage, enable it, and set the account name to LAPSAdmin. If you don’t configure this setting, then the built-in Administrator account will be used.
There are a couple of other settings that you might want to enable. I recommend enabling at least the setting Post-Authentication actions. This setting is triggered when the LAPS password is used. It will reset the password and optionally logoff the managed account after for example 8 hours:
If you create snapshots from your computers then it might be interesting to enable the password history setting. This will store the last 12 passwords in the AD, allowing you to log in with the local admin account when restoring an old snapshot. To use this setting you will need to enable password encryption as well.
Step 5 – Create a local admin account
The new Windows LAPS feature doesn’t create a local admin account automatically just like the legacy LAPS did. The easiest option is to use the built-in Administrator account and don’t configure a unique admin account for laps.
But if you still want to use a dedicated account, then you will need to create a new local admin account with PowerShell for example. We can add the following PowerShell script to the start-up scripts in the Group Policy (Computer Configuration > Windows Settings > Scripts > Startup)
If ($null -eq (Get-LocalUser -Name "lapsadmin")){
  New-LocalUser -AccountNeverExpires:$true -Password ( ConvertTo-SecureString -AsPlainText -Force 'TempPassword123!') -Name 'lapsadmin' | Add-LocalGroupMember -Group administrators
}
Step 6 – Verify Settings
To verify the settings we will need a Windows 10 or 11 device with the latest updates installed. We first need to pull the latest policy settings to the device, so that the LAPS password is created and written back to the Active Directory. You can either run the GPUpdate command or the special LAPS Policy cmdlet Invoke-LapsPolicyProcessing:
Invoke-LapsPolicyProcessing
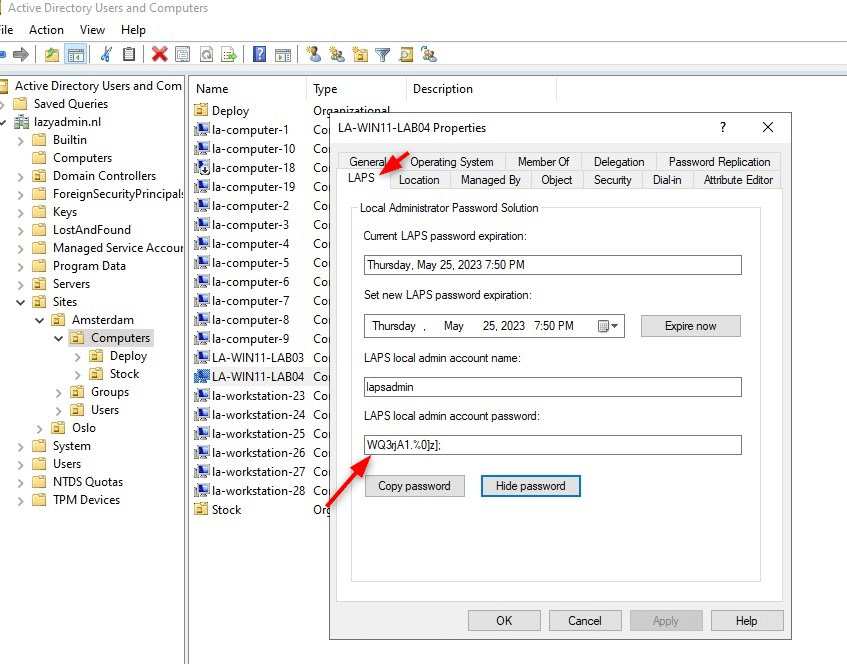
After the policy is retrieved, we can verify the LAPS password in the Active Directory. Look up the device and open the properties. If you open the LAPS tab you will see the LAPS password:
Manage LAPS with PowerShell
The Windows LAPS PowerShell module is now included into Windows. This means that we don’t have to import a new module to manage LAPS with PowerShell. I won’t go through all cmdlets (you can find the complete list here), but we will discuss the most important ones.
We can use the cmdlet Get-LapsADPassword to view the LAPS password. Make sure that you add the parameter -AsPlainText to actually view the password.
Get-LapsADPassword -Identity la-win11-lab04 -AsPlainText


ComputerName        : LA-WIN11-LAB04
DistinguishedName   : CN=LA-WIN11-LAB04,OU=Computers,OU=Amsterdam,OU=Sites,DC=lazyadmin,DC=nl
Account             : lapsadmin
Password            : WQ3rjA1.%0]z];
PasswordUpdateTime  : 4/25/2023 7:50:36 PM
ExpirationTimestamp : 5/25/2023 7:50:36 PM
Source              : EncryptedPassword
DecryptionStatus    : Success
AuthorizedDecryptor : LAZYADMIN\Domain Admins
Now I recommend to configure the policy to automatically reset the password after it’s used. But we can also reset (rotate) the password with PowerShell. This cmdlet needs to be run on the endpoint, or you will need to run the command remotely with Invoke-Command
Reset-LapsPassword

# Run it on a remote computer
Invoke-Command -ComputerName LA-Win11-Lab04 -ScriptBlock {Reset-LapsPassword}
View LAPS Password Permissions
To view the password with PowerShell, you will need to have LAPS password read permissions on the OU of the computers. Domain Admin has this permission by default, but you might want to give your helpdesk admins read permissions as well.
We can add the permissions with the Set-LapsADReadPasswordPermission cmdlet in PowerShell. You will need to specify the OU and User or Group that you want to give access:
Set-LapsADReadPasswordPermission -Identity "OU=Computers,OU=Amsterdam,OU=Sites,DC=lazyadmin,DC=nl" -AllowedPrincipals "Helpdesk Admins"

# Or add multiple users at once:
Set-LapsADReadPasswordPermission -Identity "OU=Computers,OU=Amsterdam,OU=Sites,DC=lazyadmin,DC=nl" -AllowedPrincipals @("alexw@lazyadmin.nl", "helpdesk@lazyadmin.nl"
To verify the permissions you can use the cmdlet Find-LapsADExetendedRights:
Find-LapsADExetendedRights -Identity "OU=Computers,OU=Amsterdam,OU=Sites,DC=lazyadmin,DC=nl"
Deploy LAPS with Intune
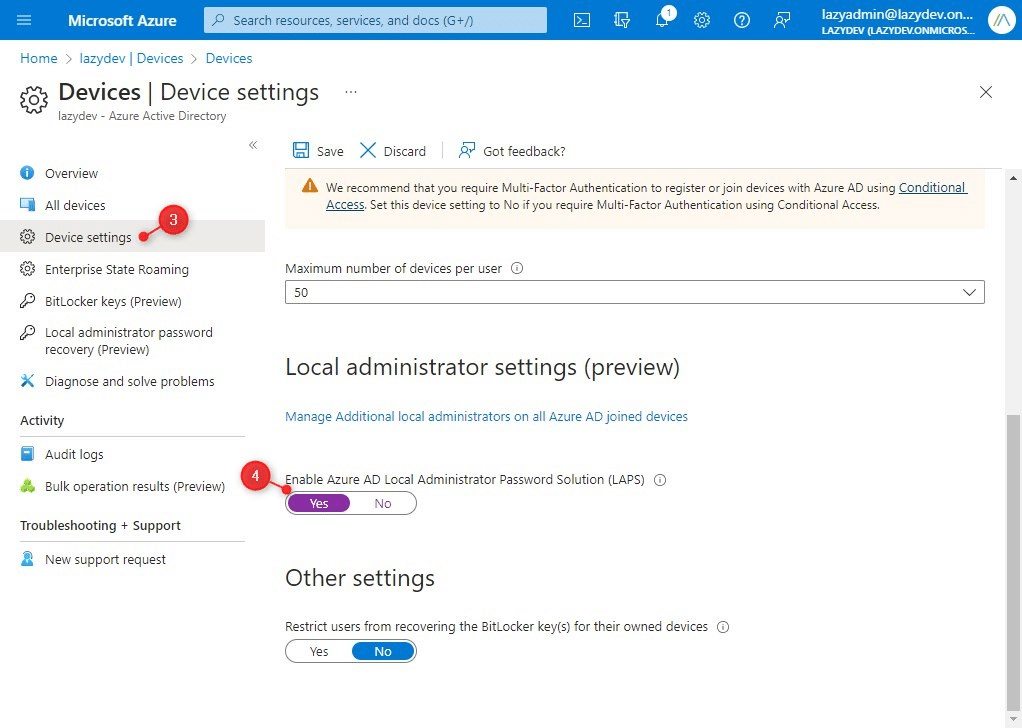
If your devices are managed through Intune then you can also deploy Windows LAPS with Intune. We don’t need to install anything, we only need to create a new policy for our endpoints in Intune. Before we start we will need to make sure that LAPS is enabled in Azure AD:
- Open portal.azure.com
- Click on the Azure Active Directory
- Open Devices > Device Settings
- Enable Azure AD Local Administrator Password Solution (LAPS)
- Click on Save
With LAPS enabled in Azure AD, we can now create the new policy:
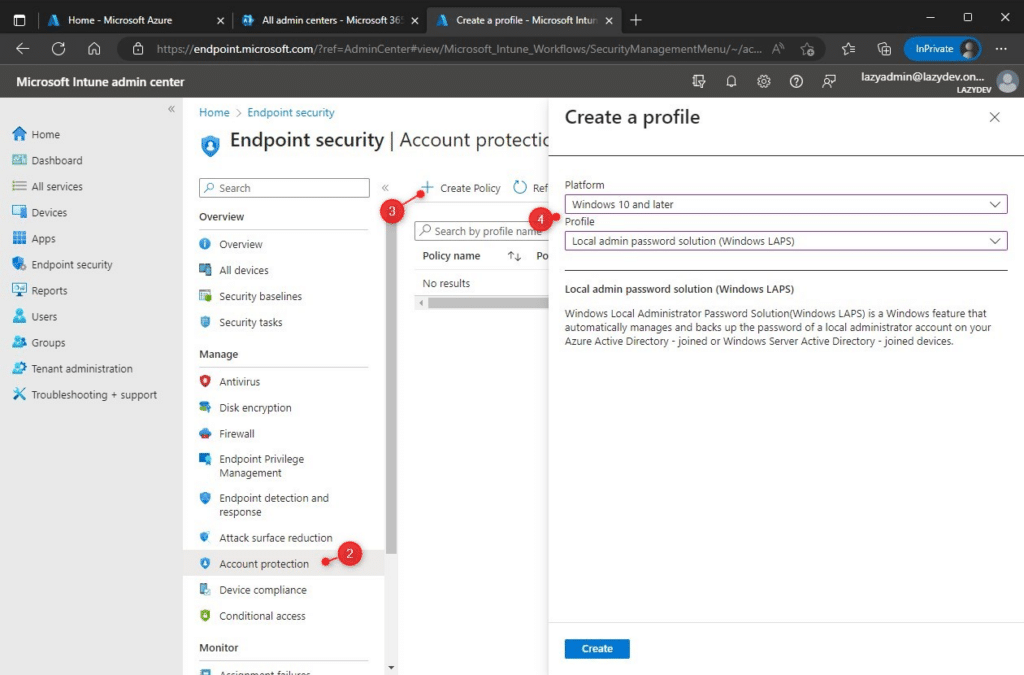
- Open Endpoint Manager (Intune)
- Go to Endpoint Security > Account Protection
- Create a new policy
- Select the platform Windows 10 and later and the profile Local admin password solution
- Give the profile a name, for example, Windows LAPS
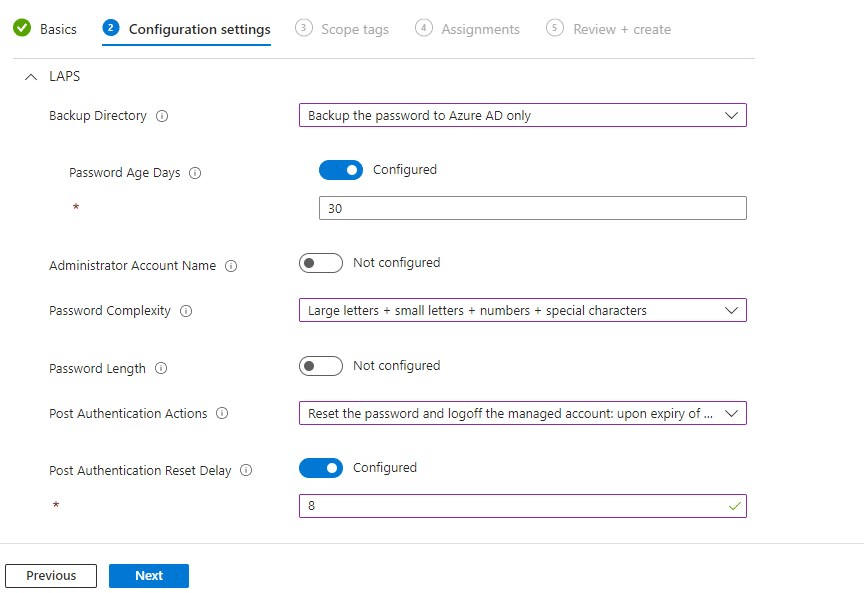
- In step 2 we will need to configure the following settings at least:
- Backup Directory > Backup the password to Azure AD only
- Password Age Days > 30
- Password Complexity > Choose one of the options
- Password Length > Default is 14, you can change it. Minimum is 8
- Post Authentication Actions > Set to Reset password and log off the managed account.
- Reset Delay > 8 hours
- You can skip the Scope tags
- Assignments > Add a group with devices on which you want to deploy Windows LAPS
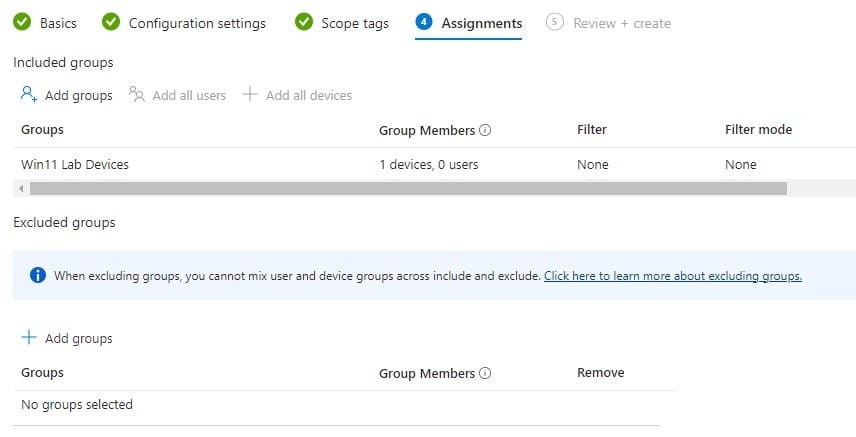
- Review the settings and create the new policy
After you have created and assigned the policy it can take some time before it’s deployed to all the endpoints. You can force the synchronization of the policy in the Intune Admin center by opening a device and clicking on sync.
To view the progress of the rollout, you will need to go back to Endpoint Security > Account Protection, open the newly created policy, and click on View Report.
Viewing the LAPS Password
We have a couple of options to view the LAPS password of devices. The most convenient way is to open either Azure AD or Intune (Endpoint Manager). Another option is to use PowerShell with Microsoft Graph to retrieve the passwords, but that requires some configuration before you can use it.
To view the passwords in the Azure AD, open Devices and click on Local Administrator password recovery. This will give you a list of all devices where LAPS is active and allows you to show the password.
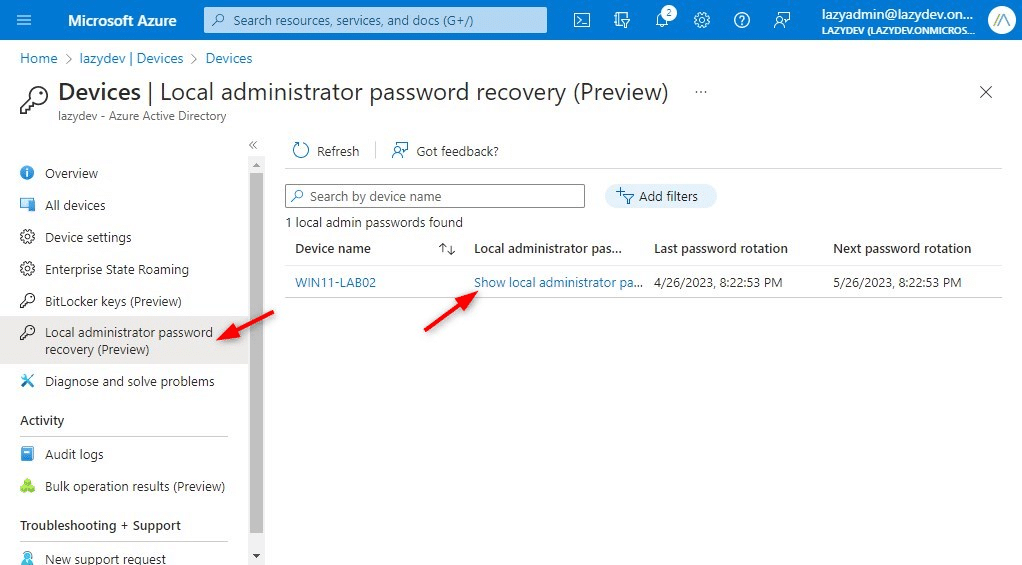
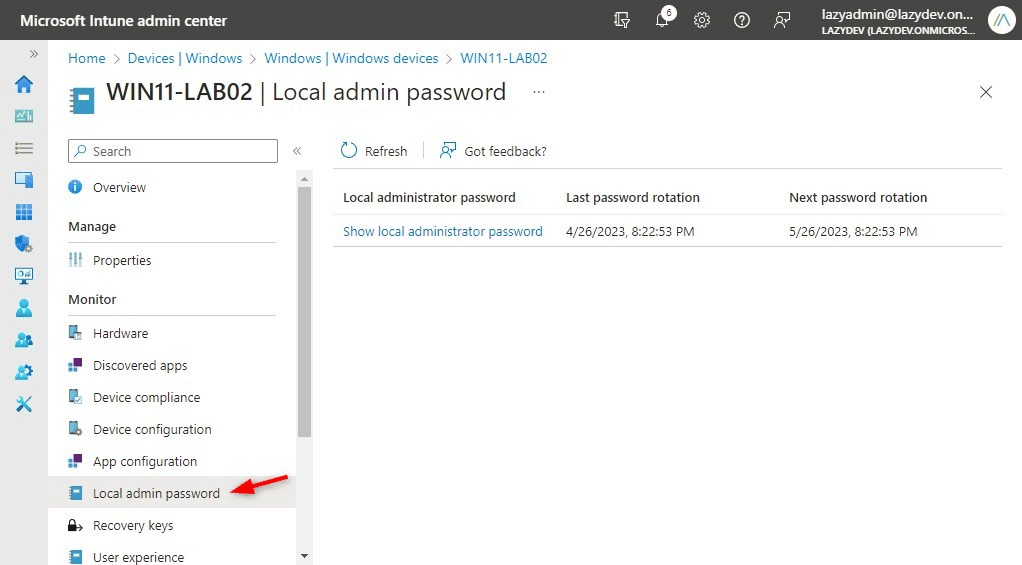
You can also view the password by first opening the device in Azure AD. The other option is to use Intune (Endpoint Manager). If you navigate to the device and open it, you will see Local Admin Password in the sidebar. Click on it to show the local administrator password:
Migrate Microsoft LAPS to Windows LAPS
When you have the old Microsoft LAPS (legacy LAPS) already running in your environment, then you can easily migrate to the new Windows LAPS. Important to note is that we can re-use the LAPS admin account name, we are basically going to set up Microsoft and Windows LAPS side-by-side. If everything runs great in the new version, then we can remove the legacy LAPS.
Step 1 – Deploy Windows LAPS
Install Windows LAPS with the steps described above, extending the AD schema, setting permissions, and configuring the policy. In the policy, make sure that you use a unique local admin account name, for example, lapsadmin2.
Step 2 – Add the local Admin Account to your Devices
We will need to manually create the new local admin account on the devices. You can use the same PowerShell script as described earlier:
If ($null -eq (Get-LocalUser -Name "lapsadmin2")){
  New-LocalUser -AccountNeverExpires:$true -Password ( ConvertTo-SecureString -AsPlainText -Force 'TempPassword123!') -Name 'lapsadmin2' | Add-LocalGroupMember -Group administrators
}
Step 3 – Test the new Windows LAPS
You can run the new Windows LAPS side-by-side with the legacy LAPS to test the new solution.
Step 4 – Remove the Legacy LAPS
If the new solution is running as expected, then we can start with removing the legacy LAPS from the clients. Uninstall the Microsoft LAPS client from the devices, remove the old LAPS Admin account and remove the old policies.
Troubleshooting LAPS issues
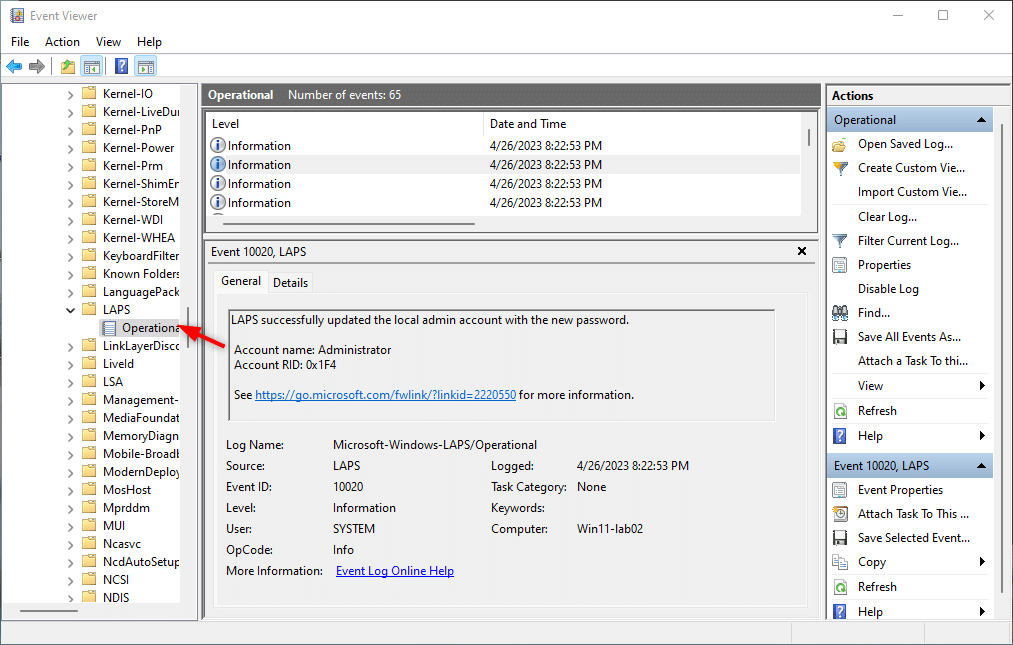
Policies are always a bit hard to troubleshoot. For LAPS we got a couple of options to debug any problem that comes up. The first step would be to check the event viewer. You can find all events related to LAPS in the event viewer under Applications and Services > Microsoft > Windows > LAPS:
If you are using Intune for the deployment of Windows LAPS, then you can also view the report in the Intune Admin Center (Endpoint Manager). Open the policy in Endpoint Security > Account Protection and click on View Report.
Another option is to generate a diagnostics report with PowerShell. Run the cmdlet Get-LapsDiagnostics on the endpoint to generate a report. In the export, you will find an event log and CSV file will all the events related to LAPS.
FAQ
Update-LapsADSchema – The user has insufficient access rights.
To extend the AD Schema, you will need to be a member of the Security Group Schema Admins which you can find in the Active Directory. Make sure that you log off / on after you added the account to Schema Admins.
Update-LapsADSchema is not recognized
Make sure that you have installed the latest updates on your Windows servers and restarted the server after updating.
Error – Local admin password solution is not enabled for this tenant
You will need to enable LAPS in your Azure Active Directory. In the Azure Active Directory open Devices > Device Settings and enable Local Administrator Settings. This error is also listed in the event log under event id 10059
Wrapping Up
The new Windows LAPS is a great improvement over the older Microsoft LAPS solution. Everything you need is now built-in to the latest Windows build, making it a robust solution. The implementation of the new version is pretty easy, especially if you are using Microsoft Intune (Endpoint manager).
I hope this article helped you with implementing the new LAPS. If you have any questions or tips, just drop a comment below.