

Да-да, это очередной гайд по настройке Windows. Здесь не будет настроек, которые относятся к внешнему виду и прочей мишуры. Это так же не является каким-то ультимативным гайдом, но здесь я попытался собрать именно те твики и настройки, которые работают. Здесь нет бессмысленного переписывания не нужных и старых твиков – в основном это попытка собрать оптимизации, которые служат для уменьшения задержек, инпут-лага и троттлинга путём отключение таймера HPET в Windows, настройки и приоритизации прерываний устройств и их драйверов, а так же отключение энергосберегающих функций. Благодаря этим настройкам система становится более отзывчивой, пропадают фризы и микролаги в Windows и ресурсоёмких приложениях, а так же увеличивается плавность в играх. Кроме этого данный гайд так же может решить проблемы с задержками при движении мыши, заиканием звука при использовании других устройств и прочие неприятности связанные с задержками между устройствами.

Содержание
🎓 Перед тем как начать
- Вступление
- На какой версии Windows это работает?
- Я готов, что дальше?
- Как всё не сломать или вернуть как было
- А можно всё это настроить одной кнопкой?
🔌 Драйверы и системные библиотеки
- Драйверы
- Системные библиотеки
🚥 Оптимизация задержек
- Отключение таймера HPET
- Включение MSI mode
- Приоритизация прерываний
- Приоритизация драйверов
- Распараллеливание драйверов по ядрам
🔨 Оптимизация Windows
- Настройка схемы электропитания
- Настройки системных устройств
- Настройка Windows
🔩 Настройки устройств
- Настройка мыши и клавиатуры
- Настройка видеокарты
- Отключение GameBar, GameDVR
- Настройки игр
- Настройки лаунчеров
- Настройка Oculus VR
🎯 Дополнительные настройки
- Оптимизация загрузки
- Настройка аудио
📝 Прочее
- Экспериментальные твики
- Плохие твики
🔗 Ссылки
- Утилиты используемые в гайде
- Полезные ссылки и референсы
🔮 Тесты и выводы
✨ Если у вас есть конкретные рекомендации как улучшить или изменить данный гайд или какие-то предложения и пожелания, то можете написать обо всём в Issues.
Windows 10 is great and there’s no doubt that Microsoft is pushing a lot of updates to make it even better. But, a lot of users regularly complain about the slow and laggy Windows 10. There is no denying that a lot of Windows 10 users, or even users who are using other Windows OS, will face the slow computer issue. You will notice that your machine was really fast when you installed a fresh copy of Windows or when it came out of the box. But, now your machine is really slow. This lag in the machine won’t cause any major issues but it will make your overall Windows experience quite annoying. The slow and laggy Windows will definitely waste a lot of your time and might cost you some money especially if you are using it for business purposes.
The lag and slowness aren’t always caused by the Operating system, there can be a lot of various different reasons for the slowness of your Windows. The lag issue might be because of the low RAM or because of a virus/malware using up your resources or it might simply be because of a heavy program running in the background. Since there are many reasons for this, there are a lot of solutions as well.
Method 1: Turn off Unwanted Programs
The first that should be done in a scenario where your system is really slow is to get rid of unwanted programs. There are a lot of programs that run in the background and uses a portion of your resources. These programs can cause a lot of lag in your Windows especially if there are quite a few of them.
Keep in mind that we aren’t talking about the viruses or other malicious programs that run in the background. We are talking about regular programs that a lot of users use on a daily basis like Adobe Creative Cloud or your antivirus program or OneDrive. These programs usually come with a default setting to start on your computer startup. So, these will start running in the background as soon as you log in to your computer. A lot of these can easily be disabled if you aren’t using them.
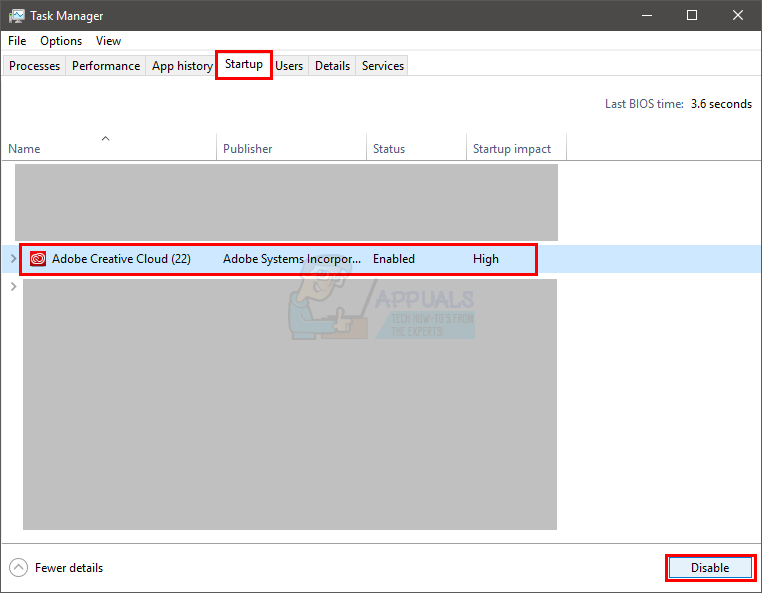
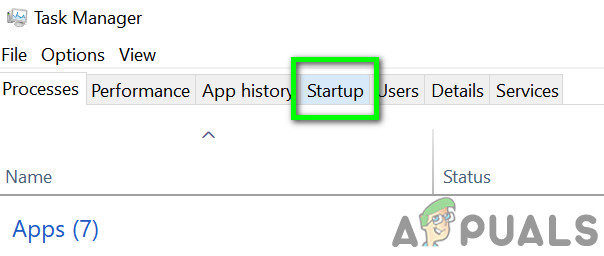
- Press and Hold CTRL, SHIFT and Esc key simultaneously (CTRL + SHIFT + ESC) to open the task manager
- Click on the Startup tab
- Now, look at the programs mentioned there. There should be a few of them. Select the one that you don’t use regularly and click on Disable. Repeat this step for every program that you see in the list.
Note: If you want, you can open the program that you see in the startup and turn off the automatically start on startup option. The option’s location will vary from program to program but these options are usually in the settings and can easily be found. Just uncheck that option and save your settings so you don’t have to disable the program on every startup. Do this only for programs that you don’t want to start when your computer starts.
Check Antiviruses: You should also try to disable your antivirus for a few minutes and see if it changes the speed of your system. Most of these antiviruses take up a lot of resources. The anti-virus programs scan files and websites before opening them so a lot of resources are being taken by them, continuously. Almost every anti-virus has an option to disable it for a short amount of time e.g. 10-15 minutes. Just right click on your anti-virus icon from the system tray (bottom right corner of your desktop screen) and select Disable. You will probably see an option of disabling the anti-virus for 10 minutes or until the computer restarts.
Note: The Disable option will vary from anti-virus to anti-virus. But, there should be an option in your anti-virus settings somewhere.
Method 2: Check Drivers
This method is for people who experienced the lag after a Windows 10 update. You can follow the steps given below even if the problem didn’t occur after a Windows 10 update but the chances of this working will be high for those who recently installed the Windows 10 update.
Basically, Windows 10 favors its own generic drivers over third party drivers a lot. So, there is a chance that Windows 10 might replace your old drivers with its own generic set whenever you install a new update. There’s also a chance that your drivers might be outdated and that’s what might be causing the lag.
The drivers that you should check are the display drivers. These drivers, if problematic, can cause slowness and lag on your PC.
- Hold Windows key and press R
- Type devmgmt.msc and press Enter
- Now, check your important drivers especially the Display Drivers. Double click the Display Adaptors and then double click your display device as well

- Click on the Driver tab

Look at the information provided there. If the driver provider is changed then that means the slow and lag is because of the changed driver. Just simply click on the Uninstall button and follow the on-screen instructions. Once the driver is uninstalled, you can download and install your third-party drivers or roll back to the previous ones if they were installed before the update
If the problem isn’t solved by replacing the driver or the driver wasn’t changed then you might try to update the driver as well. Go to your manufacturers’ website and look for the latest driver versions. If you find an updated driver then download the driver file and follow the steps given below
- Hold Windows key and press R
- Type devmgmt.msc and press Enter
- Double click the category of the device you found the latest drivers for. For example, if you found the latest drivers for your display device then double click the Display Adaptors.
- Right-click your device and click Update Driver Software…

- Select Browse my computer for driver software

- Click Browse and navigate to the location where you downloaded the driver, select the driver and click Open
- Click Next and follow any additional on-screen instructions

The problem should be gone once you’re done updating the drivers.
Method 3: Scan for Viruses
A lot of the times, the slow and lag on your Windows is caused by the viruses. Viruses and malware usually install programs on your computer and those programs runs on the background. These programs use the resources of your computer as well as your internet resources especially if they are sending important information back to the attacker. If your internet is unusually slow as well then that is a good indicator that you need a proper machine scan.
Open your Antivirus program and perform a deep scan of your system. Do not perform a quick scan as that isn’t as efficient as a deep scan.
If you don’t have an antivirus program installed on your machine then we will recommend Malwarebytes. It is a very popular and very good anti-malware software that is trusted by many. You can download it by clicking here and download a free version.
Method 4: Fragmentation
Note: If you have an SSD then skip this method. There is no point in defragmenting your SSD.
This is another very important thing that is overlooked in most cases. Fragmentation happens over time which causes your computer to slow down. Now, what is fragmentation? Basically, the files on your drive get fragmented on your hard drive. This means that parts of your files are spread far apart on your hard drive. Another way to look at it is that the parts of your file aren’t at a single place on your Hard Drive. This slows down the PC because the computer has to gather the parts of the file from the entire Hard Disk.
Fragmentation happens over time because the more a file is read, modified and overwritten the more fragmented it will get. That is why your computer might be really fast in the beginning but slowed down after some time. This may be because of the fragmentation especially if you don’t defragment your Hard Drive on a regular basis.
Windows comes with its own de-fragmentation utility that fixes this problem. So, you can run that tool and solve this issue. Follow the steps given below to perform de-fragmentation on your system.
Note: Defragmentation takes a lot of time so make sure that you don’t have to do anything else on the computer.
- Hold Windows key and press R
- Type “dfrgui” and press Enter
- Select the drive that you want to defragment and click on Analyze. This will show you the status of your drive and how much the drive is fragmented. A rule of thumb is that you should defragment if the drive is more 10% fragmented. However, there is no hard in defragmenting even if the drive isn’t fragmented to 10%


- Once the Analyzing period is finished, you should be able to see the fragmentation status of your drives. If the drive you selected is heavily fragmented then select your drive and click on Optimize. This will start the defragmentation process


You can take a break while the Windows defragments your drive. Once it is done, you will be able to see the results and the status of your drive.
Method 5: RAM
Sometimes the problem might simply be with your computer’s capacity. Your system will obviously be slow if your computer doesn’t have enough RAM to work with. Even if your computer isn’t slow, it is recommended to have the maximum amount of RAM that your PC can support (or at least have a decent amount of RAM). This is mainly because having sufficient RAM does wonder for your PC. Also, RAMs are very cheap these days so a few dollars are worth the speed that you will get for it.
Upgrading your RAM will solve the problem if it was caused by not having enough resources. Programs like anti-viruses take up a lot of resources. Having enough RAM will make sure that your system is running fairly quickly even with the anti-virus enabled.
So, go to your computer manufacturer’s website and look at your model. Check to see how much RAM do you have and how much is supported. If you have space and the money then upgrade your RAM. Because there isn’t anything else that you can do if the problem is because of the hardware limitations.
Method 6: Clear Temporary Files
Your Windows operating system has a dedicated folder for storing temporary files from all applications that you run on your computer regularly. These files served as cached data of certain launch configurations that the application generates at startup but in case the computer stores them on the hard drive, the launching process gets sped up.
However, if these files have been corrupted over time or if they have taken a huge chunk of the storage, they can actually end up preventing the computer from running smoothly. Therefore, in this step, we will be clearing out any temporary files that the computer might be stored to speed it up.
- Press “Windows” + “R” to open the run prompt.
- Type in “%temp%” and press “Enter” to launch the temporary files folder.
Typing in “%temp%” and pressing “Enter”. - Press “Ctrl” + “A” to select all files and then press “Shift” + “Delete” to clear them from your computer.
Method 7: Perform Disk Cleanup
In some situations, the main partition might be filled up with unnecessary files and that might actually be preventing the computer from running at the normal speed. These files might include update leftovers, older backups, cached data from system files or some older updates that were left back in case you wanted to downgrade your version of Windows.
However, in this step, we will be performing a Disk Cleanup to ensure that there is enough space on our main partition and that all this junk is cleaned up to provide for a more optimal storage environment in the main partition.
- Press “Windows” + “E” to open the File Explorer and click on the “This PC” option from the left pane.
- Right-click on your main partition and select “Properties”.
- Click on the “Disk Cleanup” option and a new window should pop up.
- Click on the “Clean up System Files” button to provide for a more advanced clean up.
- Navigate through the available options and check the ones that you think might be more suitable for you.
Selecting the suitable options - Click on “OK” to start the Disk Cleaning process.
- Select the “Delete Files” option in the prompt that pops up.
Clicking on “Delete Files” - Check to see if there is any improvement after running the Disk Cleanup utility on your computer.
Method 8: Install Windows Updates
While updates are often delivered to the Windows 10 users, they are mostly not installed by a lot of users due to the bad reputation that they carry with them. In spite of this, some updates are very necessary to keep your system running with optimal performance. Therefore, in this step, we will be applying some Windows Update on your computer to make sure that it is running the latest version of Windows 10.
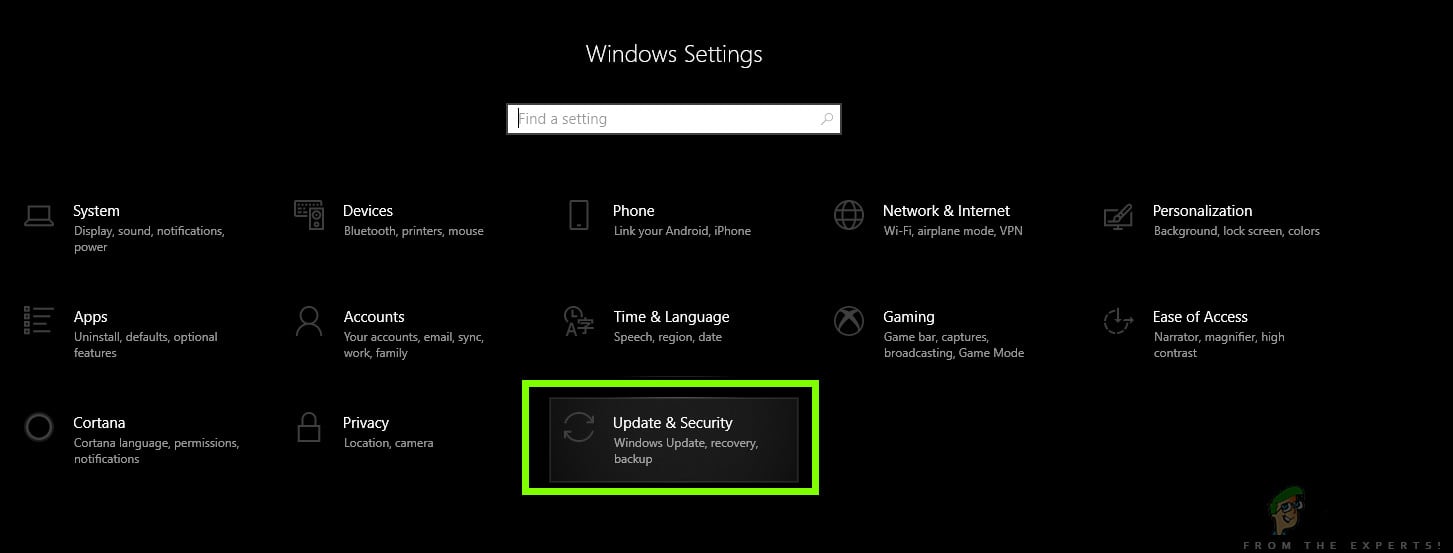
- Press “Windows’ + “I” on your keyboard to launch the settings.
- In the settings, click on the “Update and Security” option and then select the “Windows Update” button from the left tab.

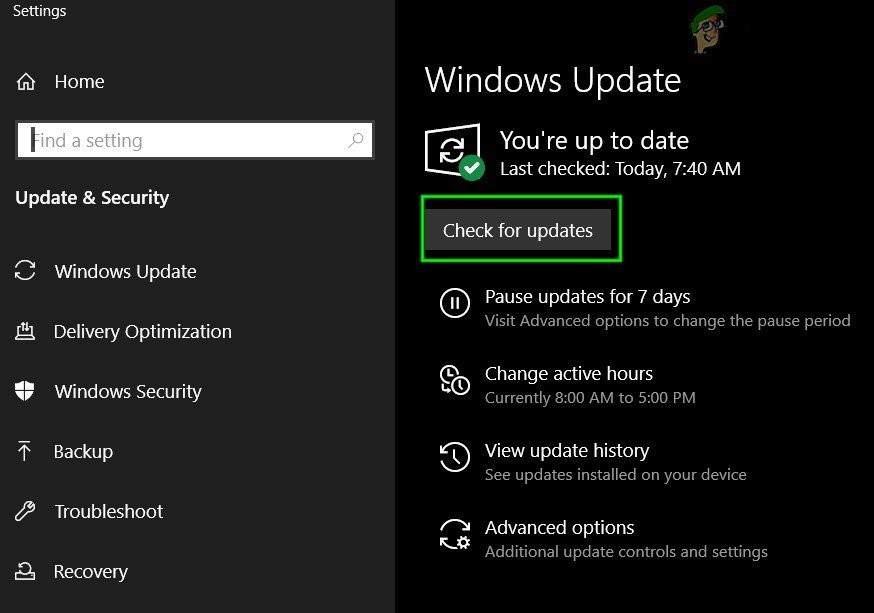
Settings/Updates and Security - Click on the “Check for Updates” option and let Windows run an automatic check for any available updates.

Check For Updates in Windows Update - Updates will now automatically downloaded on your computer and you will probably be asked to restart your computer to install these updates.
- After installing the updates, check to see if your system has sped up a little.
Method 9: Use ReadyBoost
This is a step that can be performed on very old computers that are likely running slow with Windows 10 due to their hardware deficiencies. Due to this incapability of the hardware, you can make use of an extra USB that you might have on your hand to increase your performance a little bit by employing the ReadyBoost feature that Windows offers.
Basically, the feature makes use of that USB by assigning it only to the computer which renders its storage capability weakened, and then it uses the USB as a Temporary RAM to store some files that would otherwise be loaded up from scratch. In order to make use of this feature:
-
- Connect the USB to the computer and make sure to back up any extra data from it beforehand.
- Press “Windows’ + “E” on the Windows Explorer and click on the “This PC” option from the left-hand side.
- The USB should show up in the list of connected devices to the computer.
- Right-click on it and select the “Format Device” option.
Formatting the SD card - Click on “Start” to begin the formatting process of the USB.
- Now, right-click on the USB again and click on the “ReadyBoost” tab at the top.
- Check the “Dedicate this device to ReadyBoost” option and then push the slider all the up to the max.
Selecting the “Dedicate this device to ReadyBoost” option - Click on “Apply” to save your changes and click on “OK” to exit out of the window.
- Check to see if applying the ReadyBoost has increased the speed of your computer.
Method 10: Increase Page File Size
While running applications or using any system services on the computer, the operating system actually creates some small cache files on the disk temporarily to make sure that it doesn’t need to reload these files again and again which increases the speed of the system and allows for more optimal performance.
However, in some situations, your PC might be running out of this Page File Size that has been allocated to it. Either you might’ve changed this setting to conserve system storage on your computer or it might’ve been automatically changed. Therefore, in this step, we will be changing it by increasing the Page File Size.
- Press “Windows” + “R” to launch the run prompt.
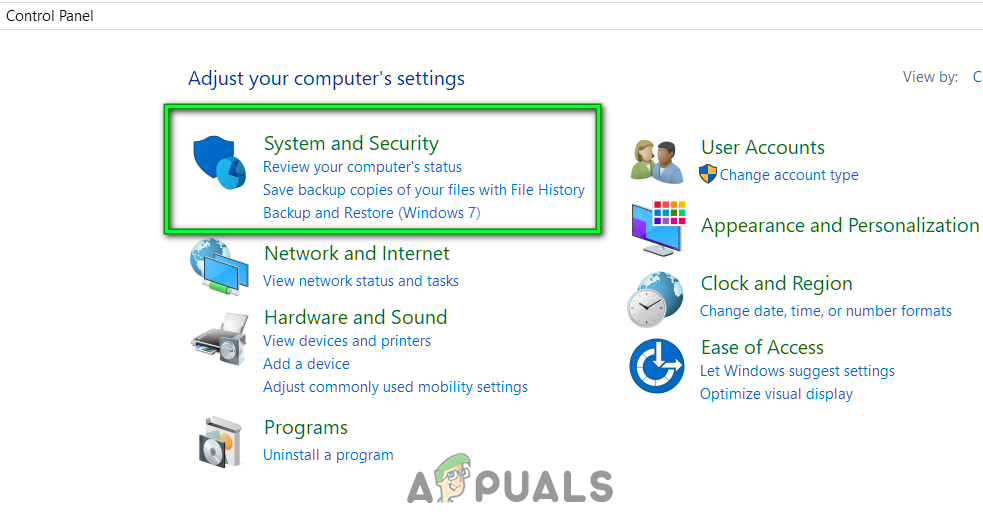
- Type in “Control Panel” and press “Enter to launch the classical control panel interface.
- Click on the “System and Security” option and then select “System” on the next screen.

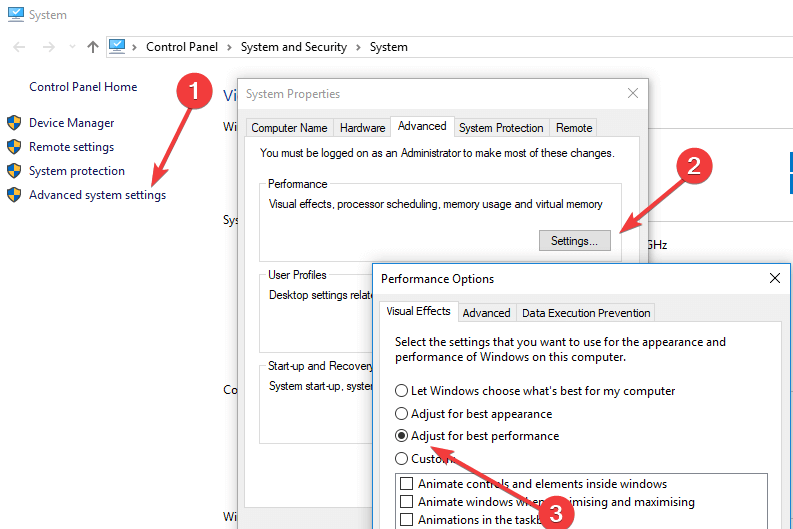
Tap System and Security - In the system settings, click on the “Advanced System Settings” option from the left side.
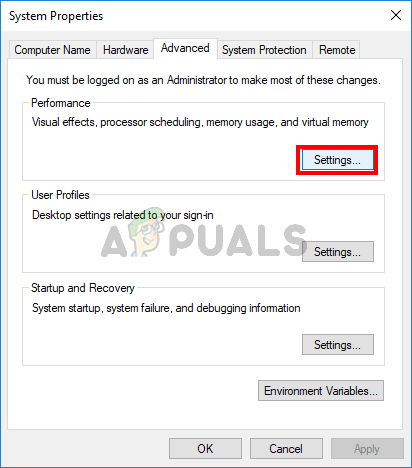
- Click on the “Advanced” option and then click on the “Settings” option below the “Performance” heading.

Advanced Performance Settings - Again, click on the “Advanced” tab in the new window and click on the “Change” button below the Virtual memory heading.
- Uncheck the automatically manage paging file size for all drives option and check the “Custom Size” option.
- From here, make sure to enter “4096 MB” and “8192 MB” in the initial and the Maximum Size options available for the drive.
Checking The Custom Size Option - Click on “OK’ to save your changes and exit out of the window.
- After increasing the page file size, check to see if the system performance is improved on your computer.
Method 11: Adjust and Cater for Visual Effects on Windows 10
In some cases, the Visual Effects that are used by Windows 10 on your computer might not be good for your hardware usage and resource usage on your computer. Windows 10 isn’t a lightweight operating system and by default, it comes equipped with all sorts of extra features that aren’t really useful in day to day usage.
Therefore, in this step, we will be disabling these features and then check if the system performance is increased by doing so. You can adjust these options to your own liking to and have more options enabled to you depending upon your personal preference but it is highly recommended that you disable them all if you are on a very low-end pc.
- Press “Windows” + “R” to launch the run prompt.
- Type in “Control Panel” and press “Enter to launch the classical control panel interface.
- Click on the “System and Security” option and then select “System” on the next screen.
Tap System and Security - In the system settings, click on the “Advanced System Settings” option from the left side.
- Click on the “Advanced” option and then click on the “Settings” option below the “Performance” heading.
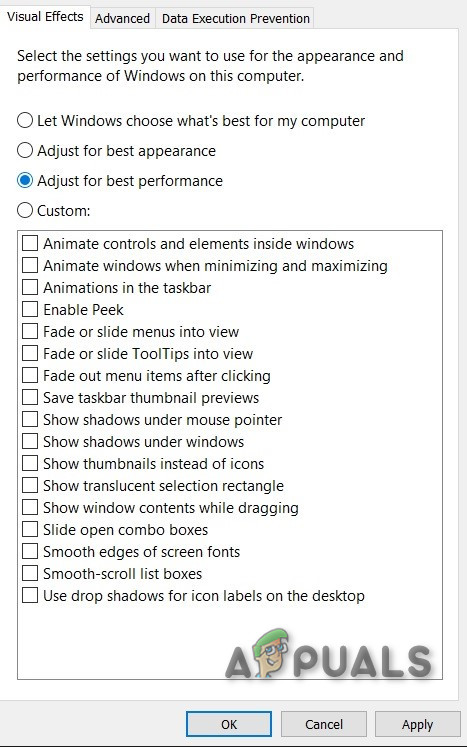
Advanced Performance Settings - Click on the “Visual Effects” tab and then click on the “Adjust for the best performance” option.

Adjust for best performance - Select “Apply” and then click on the “OK’ button to close out of the window.
- Check to see if the Windows performance has improved by disabling these visual effects. You can also choose to customize this setting by disabling individual options in the Visual Effects tab by unchecking the boxes but it is recommended to just adjust for best performance since you are on a low-end computer.
Method 12: Stop OneDrive
Another nuisance on the Windows 10 operating system in the OneDrive application that comes enabled by default if you chose the Microsoft Sign in option and it automatically backs up certain files on your computer. Although it is useful, it can sometimes end up seriously hindering your computers performance due to continued resource usage.
Therefore, in this step, we will be disabling it from starting up when the computer starts and also close if it is currently running in the background. This should get you some performance improvements if it was actively syncing in the background of your computer.
- Press “Windows’ + “R” to launch the Run prompt.
- Type in “Taskmgr” and press “Enter” to launch the Windows Task Manager.
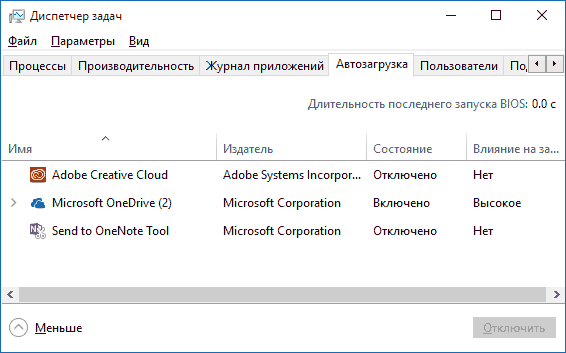
Running the Task Manager - Click on the “Startup” tab and select “OneDrive” if it listed there.

Navigate to Startup Tab of the Task Manager - Click on the “Disable” button to prevent OneDrive from launching when the computer is launched.
- After this, click on the “More Icons” option from the lower right side of your taskbar and right-click on the OneDrive icon.
- Select “Quit OneDrive” to close out of Microsoft OneDrive on your computer.
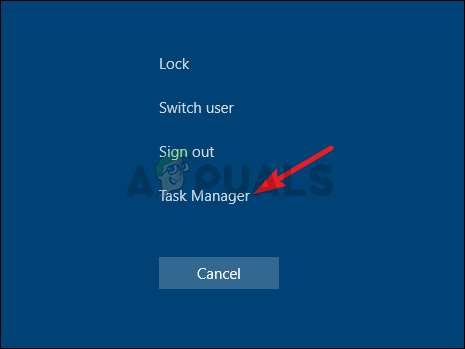
- Press “Ctrl” + “Alt” + “Del” and then click on the “Task Manager” to navigate back to the Task Manager Window.

Opening Task Manager - In the processes tab, click on the “OneDrive” process and click on the “End Task” button.
- This should end the OneDrive application from syncing in the background of your computer.
- Check to see if computer performance has improved by doing so.
Method 13: Restore Computer
If you haven’t been able to observe any substantial gains in the performance of your computer so far after trying all of the options above, one of the things that we can try is to revert our system to an earlier date in which it may have been working better. This is for you to decide if you have noticed any recent performance loss on your computer.
- Press “Windows” + “R” buttons on your keyboard to launch the run prompt.
- Type in “rstrui” in the run prompt and press “Enter” to launch the Windows Restore window.
- In the Windows Restore Window, it should give you a “Recommended Restore Point” if you have recently gone through a major change on your computer.

Choosing the Restore Points - Otherwise, there should be a “Choose a Different Restore Point” option present as well.
- Choose the option that you think would be better for your computer and click on “Next”.
- Proceed with the on-screen instructions to successfully revert your computer to an earlier restore point and check to see if doing so has fixed the issue with your computer running slow.

Method 14: Change Power Plan
If you are using a laptop this solutions should be the most effective for you but even on a computer, changing the power plan that your operating system is using can be a major factor in determining the speed of your computer. Basically, the more power your hardware consumes, the more room it has for performance improvement. If the hardware is given less power than is actually required, it can cause some serious performance hurdles. Therefore, in this step, we will be changing the computer’s power plan.
- Press “Windows” + “R” to launch the Run prompt.
- Type in “Control” and then press “Enter” to launch the control panel interface.
- In the Control Panel, click on the “View By:” option and then select the “Large Icons:” option.

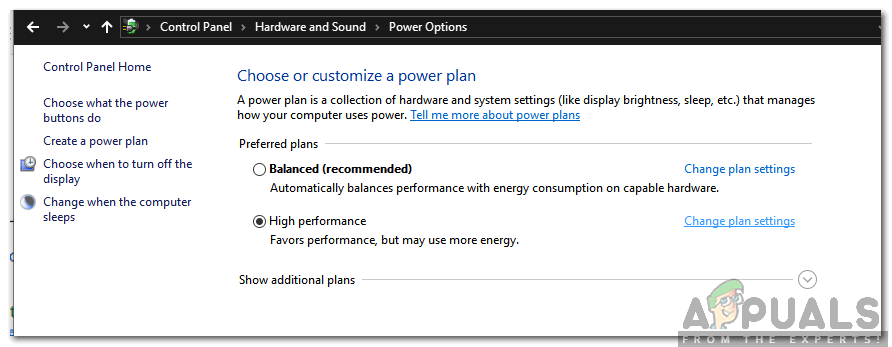
Change Category to Large Icons - Select the “Power Options” button in the Control Panel and then click on the “High Performance” button to allow for the operating system to use the High-Performance profile.

Checking “High Performance” and selecting “Change Plan Settings” - Closeout of this window for the changes to take effect.
- Check to see if this improves the performance of the computer running Windows 10.
If you’re grappling with lag on your Windows 10 PC, you’re not alone. Lag can be a real buzzkill, especially when you’re in the middle of something important. Thankfully, you can address this issue with a few straightforward steps. Start by closing unnecessary programs that hog resources, then ensure your PC is up to date with the latest Windows updates. Adjust your power settings for maximum performance and scan for pesky viruses. Finally, consider optimizing your hard drive for better efficiency. With these strategies, your PC will be cruising at top speed in no time.
Let’s dive into the nitty-gritty of getting your Windows 10 PC back in action without that annoying lag. These steps will help you identify and tackle the root causes of lag, ensuring smoother performance.
Step 1: Close Unnecessary Programs
Identify and close all programs running in the background that you don’t need.
Closing unnecessary programs frees up your computer’s resources, like RAM and CPU power, that could be better used elsewhere. Open your Task Manager (Ctrl + Shift + Esc) to see what’s hogging the juice. Right-click on the programs you don’t need and hit ‘End Task’ to shut them down.
Step 2: Update Windows
Make sure your Windows 10 operating system is up to date with the latest updates.
Windows regularly releases updates that fix bugs and enhance performance. Go to ‘Settings,’ click on ‘Update & Security,’ and then ‘Windows Update.’ Hit ‘Check for Updates’ to install any pending updates. Keeping your OS updated ensures you’re not stuck with old glitches.
Step 3: Adjust Power Settings
Switch your power settings to High Performance to give your PC a speed boost.
Your PC might be set to a ‘Balanced’ or ‘Power Saver’ mode, which limits its speed to save energy. Go to ‘Control Panel,’ find ‘Power Options,’ and select ‘High Performance.’ This setting prioritizes performance over energy savings, allowing your computer to use more power and operate faster.
Step 4: Scan for Viruses
Run a full virus scan to detect and remove any viruses or malware.
Viruses can slow down your PC significantly. Use Windows Defender or any reliable antivirus software to conduct a thorough scan. Once detected, follow the software’s instructions to remove any threats. Regular scans keep your PC safe and running smoothly.
Step 5: Optimize Your Hard Drive
Use disk optimization tools to defragment and clean up your hard drive.
Over time, files get scattered across your hard drive, making it harder for your PC to find what it needs quickly. Go to ‘This PC,’ right-click on your hard drive, choose ‘Properties,’ and under the ‘Tools’ tab, you’ll find ‘Optimize.’ Run this tool to tidy up your files and improve access speed.
After completing these actions, your Windows 10 PC should run more efficiently, with reduced lag and better overall performance.
Tips for Fixing Lag on PC Windows 10
- Regularly check for software updates to keep your system running smoothly.
- Disable startup programs that slow down your boot time.
- Consider upgrading your RAM if your PC consistently lags.
- Clean your PC physically to prevent overheating and dust buildup.
- Monitor your internet connection if lag occurs during online activities.
Frequently Asked Questions
Why is my Windows 10 PC lagging?
Lag can be caused by running too many programs at once, outdated software, viruses, or insufficient hardware resources.
How can I speed up my Windows 10 startup?
Disable unnecessary startup programs in the Task Manager to speed up the boot process.
Is it safe to run my PC on High Performance mode?
Yes, but it uses more power, which might not be ideal for laptops on battery power.
How often should I scan for viruses?
It’s good practice to run a full virus scan weekly to ensure your system stays secure.
Can lag be caused by a failing hard drive?
Yes, a failing hard drive can cause lag. Regularly back up your data and check your drive’s health.
Summary
- Close unnecessary programs.
- Update Windows.
- Adjust power settings to High Performance.
- Scan for viruses.
- Optimize your hard drive.
Conclusion
Dealing with a lagging PC can feel like dragging a ball and chain, especially when you rely on your computer for work, gaming, or streaming. Fixing lag on Windows 10 involves a bit of detective work and a proactive approach. By closing unnecessary programs, keeping your system updated, adjusting power settings, scanning for viruses, and optimizing your hard drive, you’re not just putting a Band-Aid on the problem—you’re getting to the root of the issue.
Remember, technology is like a plant. It needs regular attention and care to thrive. Keep an eye on your PC’s performance, run regular maintenance checks, and don’t hesitate to upgrade hardware components if needed. Each step you take not only helps with the current lag but also sets the stage for a healthier, faster PC in the long run.
For those who are still experiencing issues after following these steps, consider diving deeper into each solution. Explore forums, read up on the latest tech tips, and don’t shy away from seeking professional help if needed. Your PC is an investment and ensuring it runs smoothly will save you time and frustration in the future.
Matt Jacobs has been working as an IT consultant for small businesses since receiving his Master’s degree in 2003. While he still does some consulting work, his primary focus now is on creating technology support content for SupportYourTech.com.
His work can be found on many websites and focuses on topics such as Microsoft Office, Apple devices, Android devices, Photoshop, and more.
Readers help support Windows Report. We may get a commission if you buy through our links.
Read our disclosure page to find out how can you help Windows Report sustain the editorial team. Read more
- Adjust your PC for better performance
- Disable unwanted programs
- Scan for viruses
- Update your RAM
Since the release of Windows 10 and Windows 8.1 along with Windows RT, users were constantly arguing if this Microsoft’s operating system is good or bad, or if it’s better or worse than the previous one. But whether you like it or not, you have to agree that some of the major system problems of Windows 10 and Windows 8.1 are the fact that it becomes slow and begins to lag after some time of using. But don’t worry, there’s a solution to that problem, as well, and you’ll find it in this article.
The best solution to a lagging problem is definitely a fresh installation of the system, but I guess that most of you would rather skip that step. But, there’s one more thing you could do, besides installing the new system. Just follow these easy steps and your performance should significantly improve and use of your computer will be much smoother than it is now.
How can I stop Windows 10 from lagging?
Solution 1 – Adjust your PC for better performance
- While you’re on Desktop, right-click on Computer and then click on Properties.
- In the System window, click on Advanced system settings located on the left side of the screen.
- A new System Properties window will open. Under Performance click on Settings.
- In System Properties window click on Adjust for best performance, and before you click on OK, check the Smooth edges of screen fonts option.

If you’re running Windows 10 you need to go to This PC in order to adjust to settings.
Solution 2 – Disable unwanted programs
In most cases of lagging computers, there are a lot of useless programs that run in the background and use a big part of your memory. All these programs running at the same time may cause your computer to run slowly. Here’s how you can disable them easily.
- Press Ctrl+Shift+Esc keys together to bring up the Task Manager dialog box.
- Click on the Startup tab.
- Select the program that you don’t use often and then click Disable.
Solution 3 – Scan for viruses
Your windows may be running slow also because of undetected viruses. Perform a deep scan on your system with an Antivirus program, rather than a quick one for a better result.
Solution 4 – Update your RAM
If you need to use a lot of applications at the same time, you should probably update your RAM. This will most likely make your computer work faster.
And that’s pretty much it, from now on your Windows PC should perform a lot better than before.
Your performance might suffer a bit because of this tweak, but it will certainly improve the performance of using your computer. These are some very useful tips if you have a slower computer from the start, or you want to make your system operate faster without any hardware upgrades. If you have some questions, or somehow these steps doesn’t work for you, please leave your comments and thoughts in the comment section below.
RELATED STORIES TO CHECK OUT:
- Yoga 13 Users Experiencing Lag and Slow Performance After Updating to Windows 8.1, 10
- How to fix Bluetooth keyboard lag in Windows 10
- How to fix mouse lags in Windows 10 (and make it fast again)
Ivan Jenic
Windows Hardware Expert
Passionate about all elements related to Windows and combined with his innate curiosity, Ivan has delved deep into understanding this operating system, with a specialization in drivers and driver troubleshooting.
When he’s not tackling diverse driver-related problems, Ivan enjoys watching good movies and spending time hiking with his family and friends.
О какой бы версии ОС от Microsoft не шла речь, один из самых частых вопросов — как сделать ее быстрее. В этой инструкции поговорим о том, почему тормозит Windows 10 и как ускорить её, что может влиять на ее быстродействие и какие действия могут улучшить его в тех или иных ситуациях.
Речь не будет идти о повышении производительности компьютера путем изменения каких-либо аппаратных характеристик (об этом есть в статье Как ускорить компьютер), а лишь о том, что наиболее часто вызывает тормоза Windows 10 и каким образом это можно исправить, ускорив тем самым работу ОС.
В других моих статьях на схожую тему часто встречаются комментарии наподобие «я использую такую-то программу для ускорения компьютера и у меня он быстрый». Мое мнение по этому поводу: автоматические «ускорители» не особенно полезны (особенно висящие в автозагрузке), а при их использовании в ручном режиме следует все-таки понимать, что именно они делают и как.
Программы в автозагрузке — самая частая причина медленной работы
Одна из самых часто встречающихся причин медленной работы Windows 10, как, впрочем, и предыдущих версий ОС у пользователей — те программы, которые запускаются автоматически при входе в систему: они не только увеличивают время загрузки компьютера, но и могут негативно влиять на производительность уже во время работы.
Многие пользователи могут даже не подозревать, что у них что-то есть в автозагрузке, либо быть уверенными, что все там находящееся необходимо для работы, однако в большинстве случаев это не так.
Ниже — примеры некоторых программ, которые могут запускаться автоматически, потреблять ресурсы компьютера, но не приносить особенной пользы при постоянной работе.
- Программы принтеров и сканеров — почти у всех, у кого есть принтер, сканер или МФУ, автоматически загружаются и различные (штуки по 2-4) программы от их производителя. При этом, в большинстве своем, ими (программами) никто не пользуется, а печатать и сканировать эти устройства будут и без запуска этих программ — в ваших привычных офисных и графических приложениях.
- Программы для скачивания чего-либо, торрент-клиенты — если вы не заняты постоянно загрузкой каких-либо файлов из Интернета, то нет необходимости держать uTorrent, MediaGet или еще что-то подобное в автозагрузке. Когда понадобится (при скачивании файла, который должен открываться через соответствующую программу), они запустятся сами. В то же самое время, постоянно запущенный и раздающий что-то торрент-клиент, особенно на ноутбуке с обычным HDD, может приводить к действительно заметным тормозам системы.
- Облачные хранилища, которыми вы не пользуетесь. Например, в Windows 10 по умолчанию запускается OneDrive. Если вы его не используете, в автозагрузке он не нужен.
- Неизвестные программы — может оказаться, что в списке автозагрузке у вас находится значительное количество программ, о которых вы ничего не знаете и никогда ими не пользовались. Это могут быть программы производителя ноутбука или компьютера, а может быть и какой-либо скрытно устанавливаемый софт. Поищите в Интернете, что это за программы по их имени — с большой вероятностью их нахождение в автозагрузке не является необходимым.
Подробно о том, как посмотреть и удалить программы в автозагрузке я недавно написал в инструкции Автозагрузка в Windows 10. Если вы хотите сделать, чтобы система работала быстрее, держите там только то, что действительно необходимо.
Кстати, помимо программ в автозагрузке, изучите список установленных программ в разделе «Программы и компоненты» панели управления. Удалите то, что вам не нужно и держите на компьютере лишь то ПО, которое вы используете.
Тормозит интерфейс Windows 10
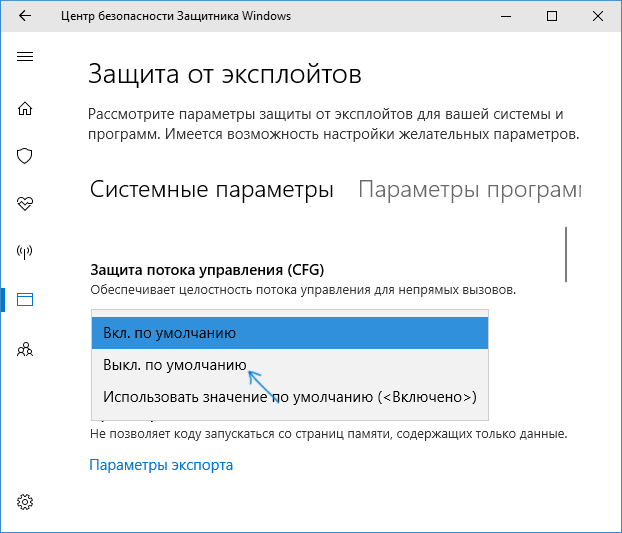
В последнее время на некоторых компьютерах и ноутбуках частой проблемой стали лаги интерфейса Windows 10 с последними обновлениями. В некоторых случаях причина проблемы — включенная по умолчанию функция CFG (Control Flow Guard), функция которой — защита от эксплойтов, эксплуатирующих уязвимости доступа к памяти.
Угроза не слишком частая и, если избавиться от тормозов Windows 10 — более ценно, чем обеспечить дополнительные функции безопасности, вы можете отключить CFG
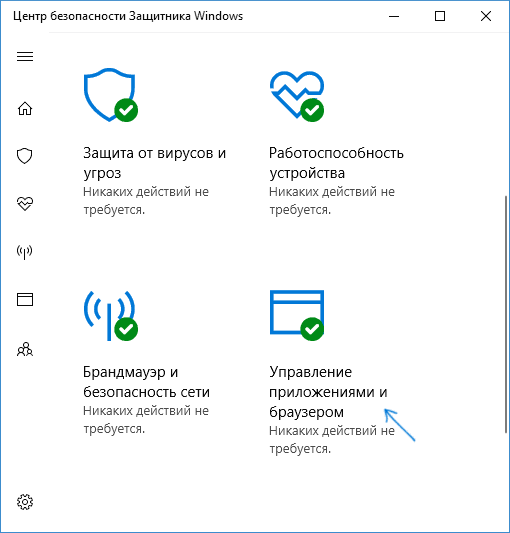
- Зайдите в Центр безопасности Защитника Windows 10 (используйте значок в области уведомлений или через Параметры — Обновления и безопасность — Защитник Windows) и откройте раздел «Управление приложениями и браузером».

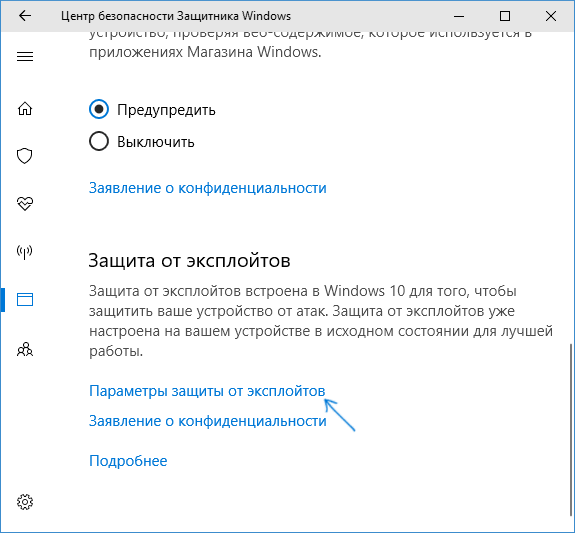
- Внизу параметров найдите раздел «Защита от эксплойтов» и нажмите «Параметры защиты от эксплойтов».

- В поле «Защита потока управления» (CFG) установите «Выкл. По умолчанию».

- Подтвердите изменение параметров.
Отключение CFG должно сработать сразу, но я бы рекомендовал перезагрузить компьютер (при этом учитывайте, что в Windows 10 завершение работы и включение — не то же самое, что перезагрузка).
Процессы Windows 10 грузящие процессор или память
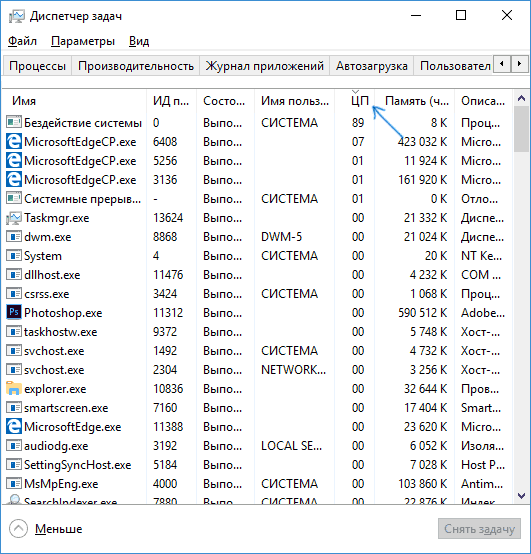
Иногда бывает, что неправильная работа какого-то фонового процесса вызывает тормоза системы. Вы можете выявить такие процессы, используя диспетчер задач.
- Нажмите правой кнопкой мыши по кнопке Пуск и выберите пункт меню «Диспетчер задач». Если он отображается в компактном виде, внизу слева нажмите по «Подробнее».
- Откройте вкладку «Подробности» и отсортируйте по столбцу ЦП (нажав по нему мышкой).

- Обратите внимание на процессы, которые используют максимум процессорного времени (кроме «Бездействие системы»).
Если среди этих процессов есть те, которые все время активно используют процессор (или значительный объем оперативной памяти), поищите в Интернете, что это за процесс и в зависимости от того, что обнаружится, предпримите действия.
Функции слежения Windows 10
Многие начитаны о том, что Windows 10 шпионит за своими пользователями. И если каких-либо опасений по этому поводу лично у меня нет, то в части влияния на скорость работы системы, подобные функции могут оказывать негативное воздействие.
По этой причине, их отключение может быть вполне целесообразным. Подробно об этих функциях и их отключении в руководстве Как отключить функции слежения Windows 10.
Приложения в меню Пуск
Сразу после установки или обновления до Windows 10, в меню пуск вы обнаружите набор живых плиток приложений. Они также используют ресурсы системы (хоть обычно и незначительно) для обновления и отображения информации. Пользуетесь ли вы ими?
Если нет — разумным шагом будет как минимум убрать их из меню пуск или отключить живые плитки (правый клик — открепить от начального экрана) или даже удалить (см. Как удалить встроенные приложения Windows 10).
Драйверы
Еще одна причина медленной работы Windows 10, причем у большего количества пользователей, чем можно предположить — отсутствие оригинальных драйверов оборудования. Особенно часто это касается драйверов видеокарты, но может также применимо к драйверам SATA, чипсета в целом и других устройств.
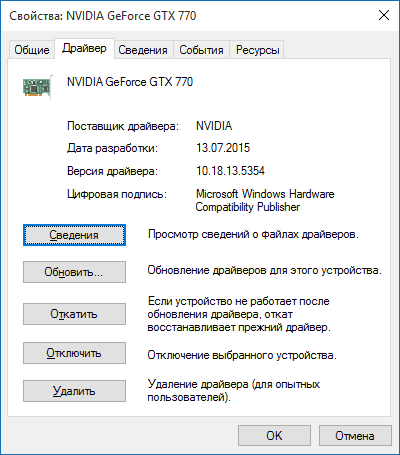
Несмотря на то, что новая ОС, кажется «научилась» автоматически устанавливать большое количество оригинальных драйверов оборудования, не лишним будет зайти в диспетчер устройств (через правый клик по кнопке «Пуск»), и заглянуть в свойства ключевых устройств (видеокарты в первую очередь) на вкладку «Драйвер». Если в качестве поставщика указан Microsoft, скачайте и установите драйверы с официального сайта производителя вашего ноутбука или компьютера, а если речь идет о видеокарте — то с сайтов NVidia, AMD или Intel, в зависимости от модели.
Графические эффекты и звуки
Не могу сказать, что этот пункт (отключение графических эффектов и звуков) сможет серьезно увеличить скорость работы Windows 10 на современных компьютерах, но на старом ПК или ноутбуке может дать некоторых прирост производительности.
Для отключения графических эффектов, кликните правой кнопкой мыши по кнопке «Пуск» и выберите пункт «Система», а затем, слева — «Дополнительные параметры системы». На вкладке «Дополнительно» в разделе «Быстродействие» нажмите «Параметры».

Здесь вы можете, отметив пункт «Обеспечить наилучшее быстродействие» отключить сразу все анимации и эффекты Windows 10. Можно также оставить отдельные из них, без которых работа становится не совсем удобной — например, эффекты разворачивания и сворачивания окон.
Дополнительно, нажмите клавиши Windows (клавиша с эмблемой) + I, зайдите в раздел Специальные возможности — Другие параметры и отключите пункт «Воспроизводить анимацию в Windows».
Так же, в «Параметрах» Windows 10, разделе «Персонализация» — «Цвета» отключите прозрачность для меню пуск, панели задач и центра уведомлений, это также может положительно сказаться на общей производительности медленной системы.
Для отключения звуков событий, кликните правой кнопкой мыши по пуску и выберите «Панель управления», а затем — «Звук». На вкладке «Звуки» вы можете включить звуковую схему «Без звука» и Windows 10 больше не придется обращаться к жесткому диску в поиске файла и запускать воспроизведение звука при тех или иных событиях.

Нежелательные и вредоносные программы
Если ваша система непонятным образом тормозит, а никакие способы не помогают, то есть вероятность наличия вредоносных и нежелательных программ на компьютере, при этом очень многие из этих программ «не видны» антивирусам, какой бы хороший он ни был.
Рекомендую, сейчас, да и в дальнейшем изредка проверять компьютер утилитами наподобие AdwCleaner или Malwarebytes Anti-Malware в дополнение к вашему антивирусу. Подробнее: лучшие средства для удаления вредоносных программ.
Если наблюдается медленная работа браузеров, помимо прочего, следует заглянуть в список расширений и отключить все те, что вам не нужны или, что хуже, не известны. Часто проблема бывает именно в них.
Не рекомендую для ускорения Windows 10
А теперь список некоторых вещей, которые я не рекомендовал бы делать, чтобы гипотетически ускорить работу системы, но которые часто рекомендуются тут и там в Интернете.
- Отключать файл подкачки Windows 10 — часто рекомендуется, если у вас значительный объем оперативной памяти, для продления срока жизни SSD и подобных вещей. Я бы этого делать не стал: прежде всего, с большой вероятностью прироста производительности не будет, а некоторые программы и вовсе могут не запускаться без файла подкачки, даже если у вас 32 Гб RAM. При этом, если вы начинающий пользователь, вы можете даже не разобраться, а почему, собственно, они не запускаются.
- Постоянно «чистить компьютер от мусора». Некоторые на ежедневной основе или автоматическими средствами вычищают с компьютера кэш браузеров, чистят реестр, очищают временные файлы с помощью CCleaner и похожих программ. Несмотря на то, что использование таких утилит может быть полезным и удобным (см. Использование CCleaner с умом), ваши действия не всегда могут приводить к желаемому результату, нужно понимать, что именно делается. Например, очистка кэша браузера нужна лишь при проблемах, которые в теории можно решить с помощью нее. Сам по себе кэш в браузерах предназначен именно для ускорения загрузки страниц и действительно её ускоряет.
- Отключать ненужные службы Windows 10. То же, что и с файлом подкачки, особенно если вы в этом не очень разбираетесь — когда возникнет проблема с работой Интернета, программы или чего-то еще, вы можете не понять и не вспомнить, что вызвано это как раз отключенной «ненужной» службой.
- Держать в автозагрузке программы (да и вообще, использовать их) «Для ускорения компьютера». Они могут не только не ускорять, но и замедлять его работу.
- Отключать индексацию файлов в Windows 10. За исключением, возможно, тех случаев, когда на вашем компьютере установлен SSD.
- Отключать службы. Но на этот счет у меня есть инструкция Какие службы можно отключить в Windows 10.
Дополнительная информация
Помимо всего вышеперечисленного, могу рекомендовать:
- Держать Windows 10 обновленной (впрочем, это не сложно, поскольку обновления устанавливаются принудительно), следить за состоянием компьютера, программ в автозагрузке, наличием вредоносного ПО.
- Если вы чувствуете себя уверенным пользователем, используете лицензионный или бесплатный софт с официальных сайтов, давно не сталкивались с вирусами, то возможно рассмотреть вариант использования только встроенных средств защиты Windows 10 вместо сторонних антивирусов и фаерволов, что также позволит ускорить работу системы.
- Следить за свободным местом на системном разделе жесткого диска. Если его там мало (меньше 3-5 Гб), это почти гарантированно приведет к проблемам с быстродействием. Более того, если ваш жесткий диск разделен на два и более разделов, рекомендую использовать второй из этих разделов только для хранения данных, но не для установки программ — их лучше ставить на системный раздел (если у вас два физических диска, этой рекомендацией можно пренебречь).
- Важно: не держать на компьютере два и более сторонних антивирусов — большинство об этом знают, но сталкиваться с тем, что у кого-то работа с Windows стала невозможна после установки двух антивирусов приходится регулярно.
Также стоит учитывать, что причины медленной работы Windows 10 могут быть вызваны не только чем-то из вышеперечисленного, но и множеством иных проблем, иногда более серьезных: например, выходящий из строя жесткий диск, перегрев и другие.