
В этом кратком руководстве мы опишем процесс установки и настройке VPN-сервера на базе Windows Server. Все действия, описанные в этой статье, были выполнены на Windows Server 2016, но эта инструкция подходит для любой современной серверной операционной системы Windows, начиная с Windows Server 2008 R2 и заканчивая Windows Server 2016.
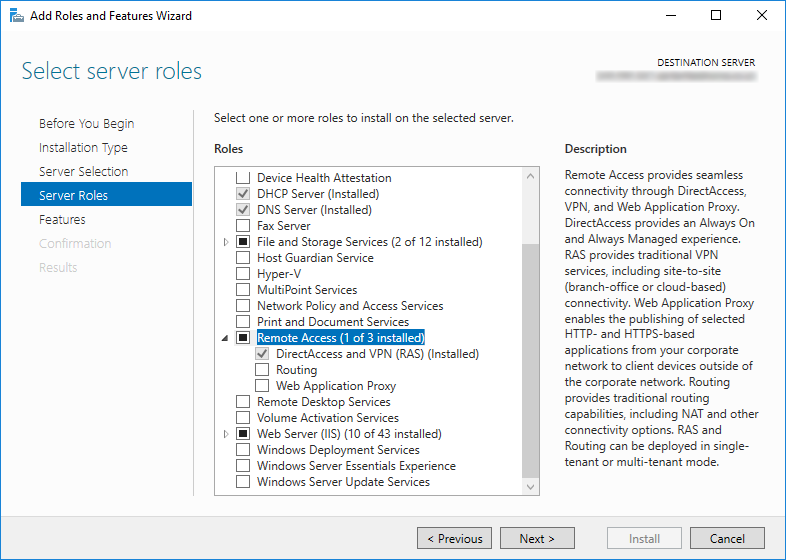
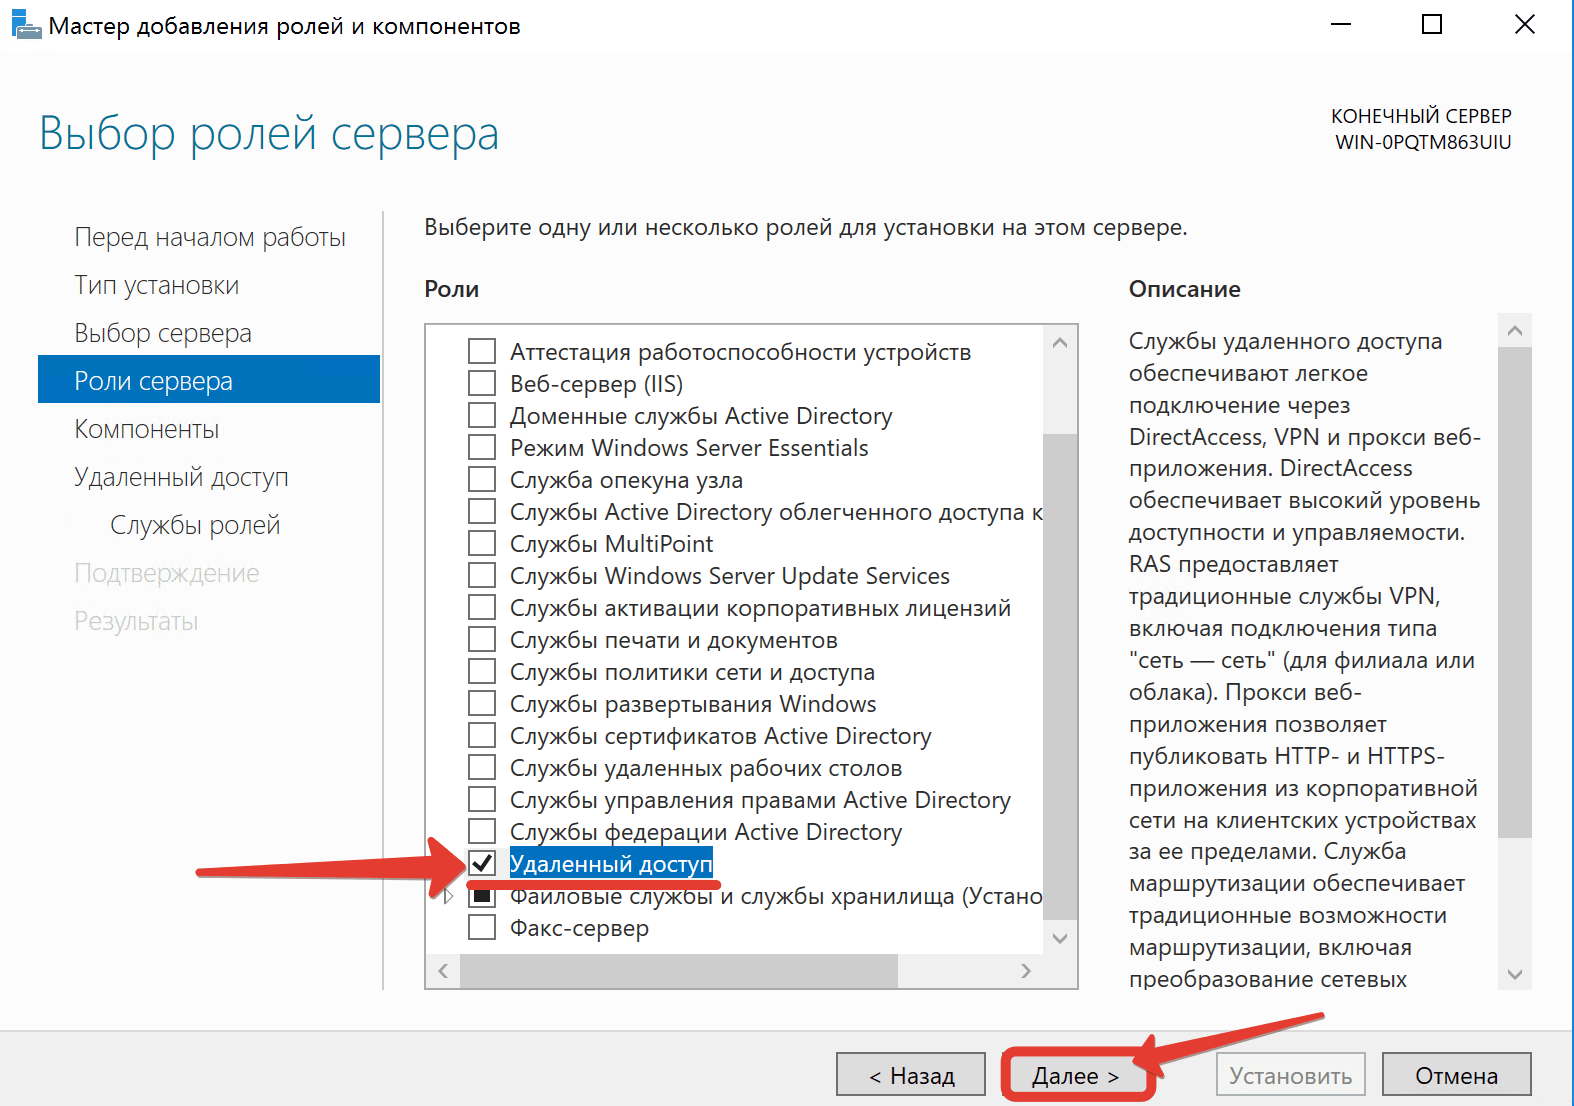
Итак, давайте начнем. Прежде всего нам нужно настроить роль удаленного доступа (Remote Access). Для этого в оснастке Server Manager запустите мастер добавления ролей и выберите роль Remote Access.
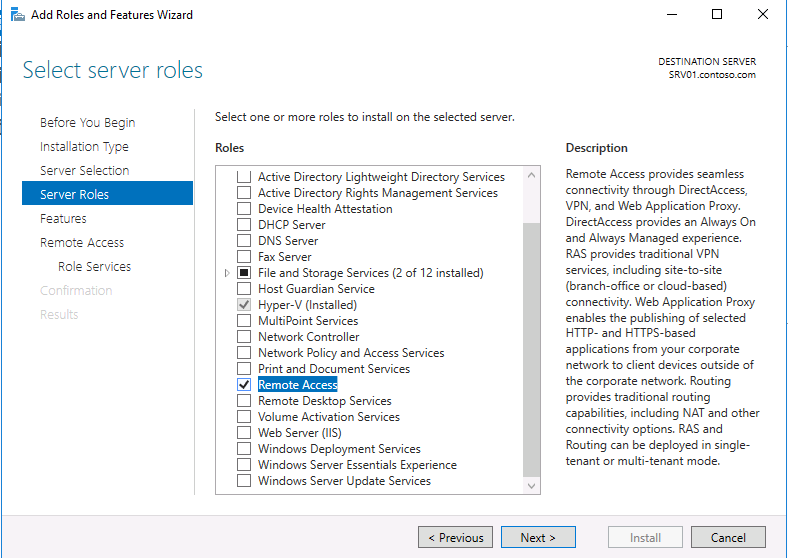
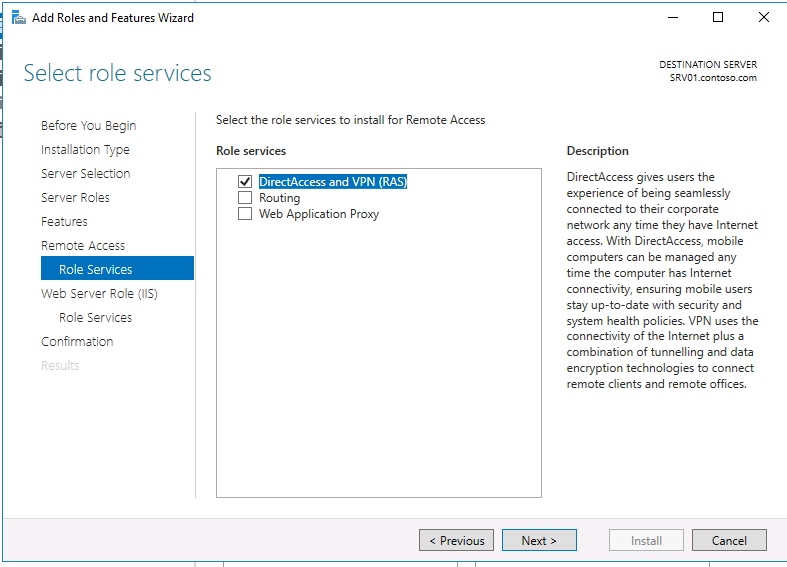
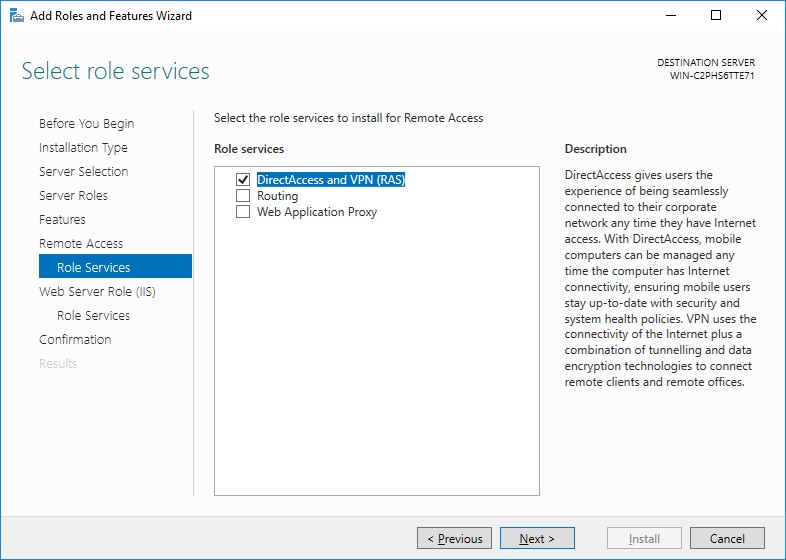
Затем, в списке служб роли выберите опцию «DirectAccess and VPN (RAS)«.
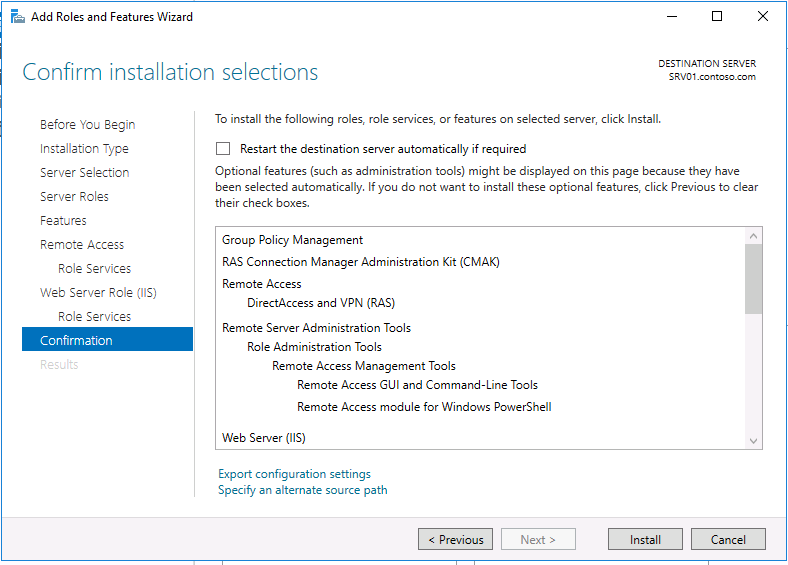
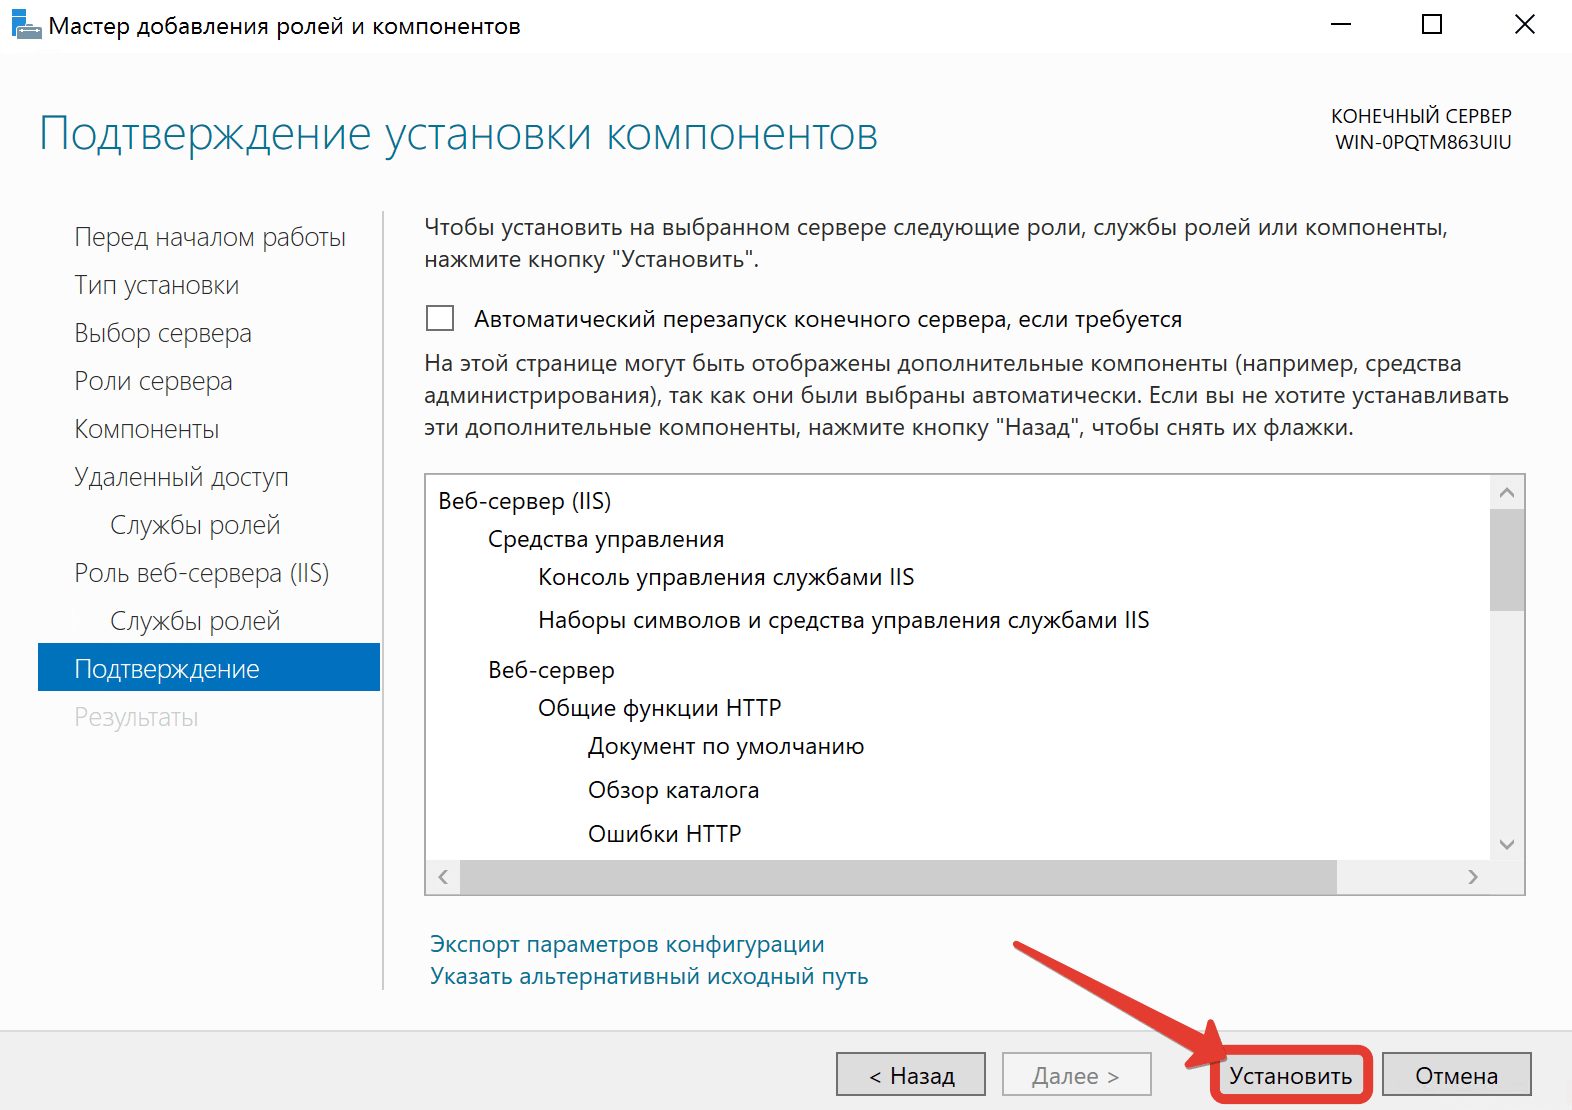
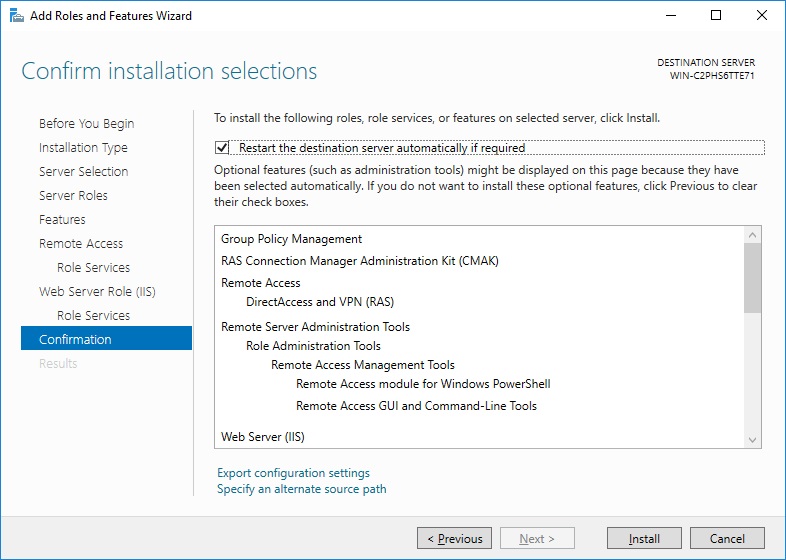
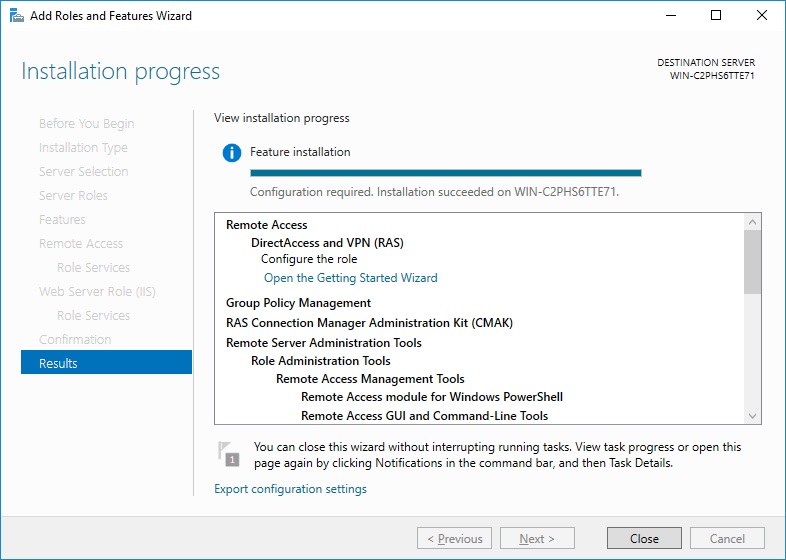
В дополнение к роли удаленного доступа и средствам управления, также автоматически будут установлены веб-сервер IIS и внутренняя база данных Windows (WID). Полный список установленных функций можно просмотреть в окончательном окне мастера, появляющимся перед тем, как вы подтвердите установку.
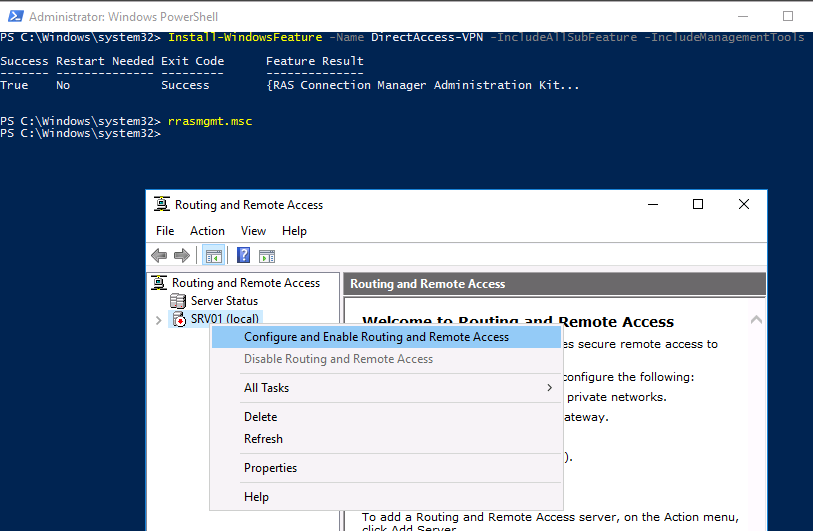
Установить роль Remote Access вместе со всеми необходимыми опциями можно всего одной командой PowerShell:
Install-WindowsFeature -Name DirectAccess-VPN -IncludeAllSubFeature -IncludeManagementTools
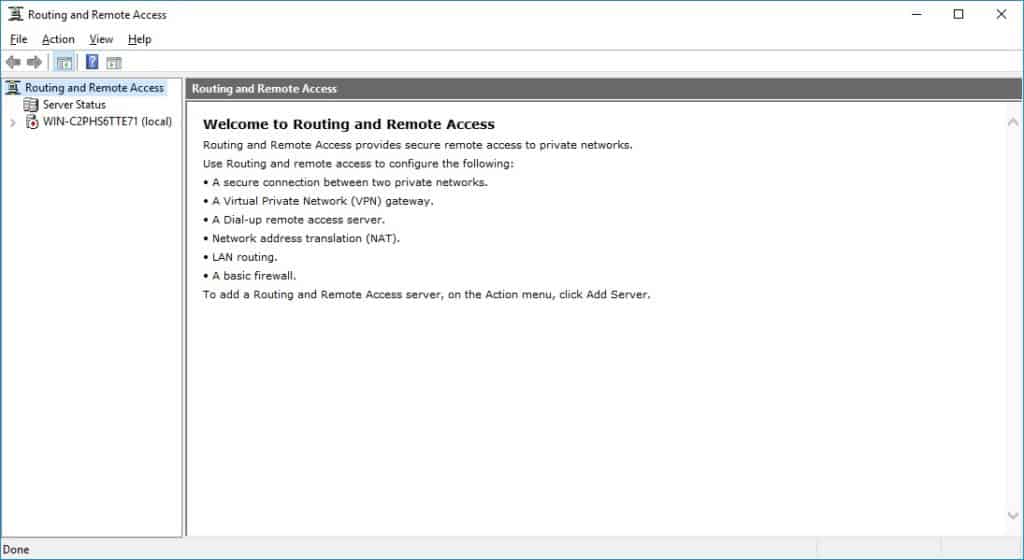
После установки роли вам необходимо включить и настроить службу с помощью оснастки «Маршрутизация и удаленный доступ» (Routing and Remote Access) — rrasmgmt.msc.
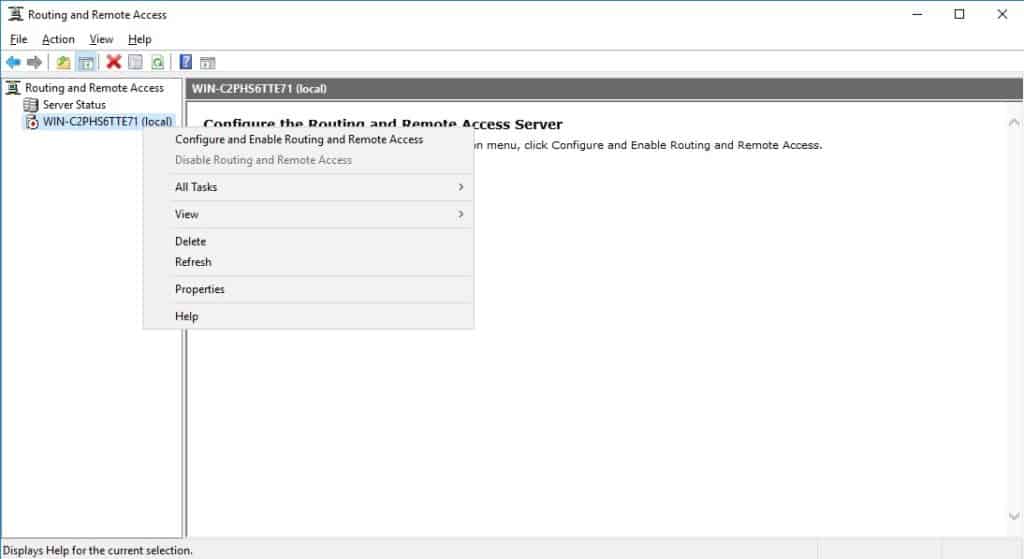
В оснастке RRAS выберите имя сервера, щелкните правой кнопкой мыши и выберите «Настроить и включить маршрутизацию и удаленный доступ» (Configure and Enable Routing and Remote Access) в открывшемся меню.
В мастере настройки выберите пункт Custom configuration.
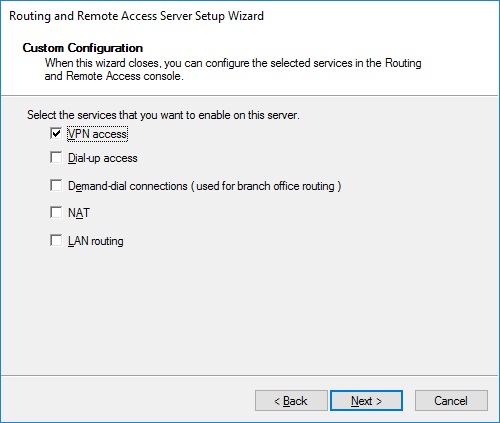
В списке служб выберите опцию VPN access.
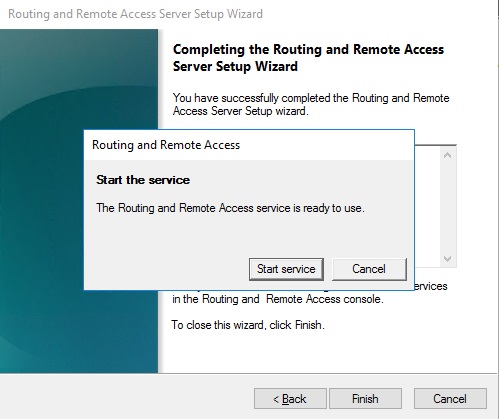
После этого система предложит вам запустить службу Маршрутизации и удаленного доступа.
Служба VPN установлена и включена, теперь ее необходимо настроить. Снова откройте меню сервера и выберите пункт «Свойства».
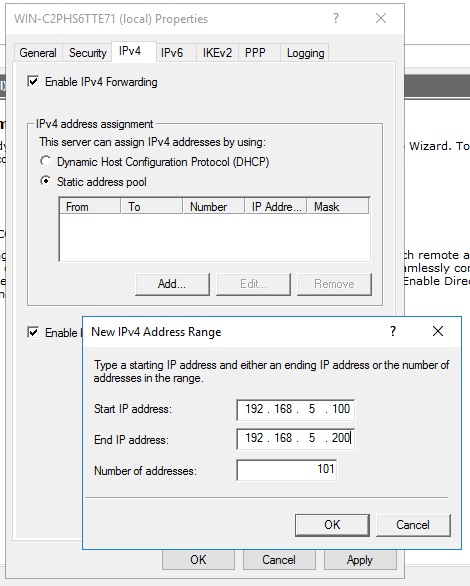
Перейдите на вкладку IPv4. Если у вас нет DHCP-серверов в сети, вам необходимо указать диапазон IP-адресов, которые будут получать клиенты при подключении к VPN-серверу.
Кроме того, на вкладке Security вы можете настроить параметры безопасности — выбрать тип проверки подлинности, установить предварительный общий ключ для L2TP или выбрать сертификат для SSTP.
И еще пара нужных моментов, которые следует иметь в виду при настройке VPN-сервера.
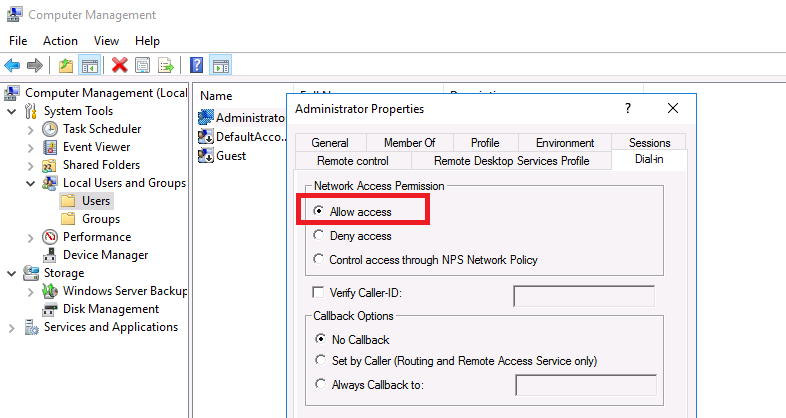
Во-первых, вам нужно указать пользователей, которых будет разрешено подключаться к этому VPN-серверу. Для автономного сервера настройка выполняется локально, в оснастке «Управление компьютером». Чтобы запустить оснастку, вам нужно выполнить команду compmgmt.msc, затем перейдите в раздел «Локальные пользователи и группы». Затем вам нужно выбрать пользователя, открыть его свойства, а на вкладке «Dial-In» отметьте пункт «Разрешить доступ» (Allow access). Если компьютер является членом домена Active Directory, те же настройки можно сделать из оснастки ADUC.
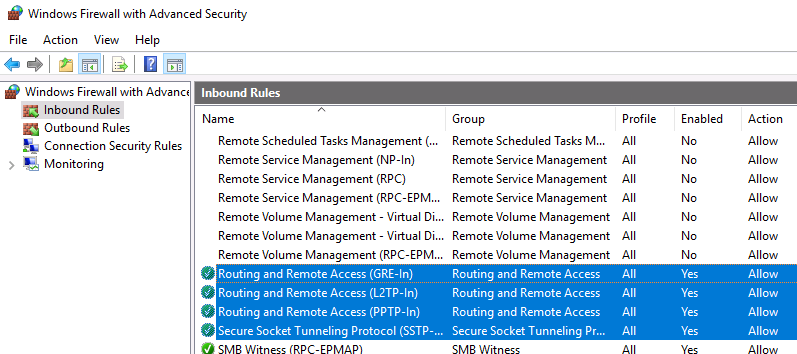
Во-вторых, проверьте, открыты ли все необходимые порты на брандмауэре Windows и межсетевом экране, осуществляющим NAT-трансляцию. Теоретически, когда вы устанавливаете роль RRAS, соответствующие правила автоматически включаются, но на всякий случай проверьте их самостоятельно. Список разрешенных правил для входящего трафика:
- Routing and Remote Access (GRE-In) — протокол 47 (GRE)
- Routing and Remote Access (L2TP-In) – TCP/1701, UDP/500, UDP/4500 и протокол 50 (ESP)
- Routing and Remote Access (PPTP-In) — TCP/1723
- Secure Socket Tunneling protocol (SSTP-in) – TCP/443
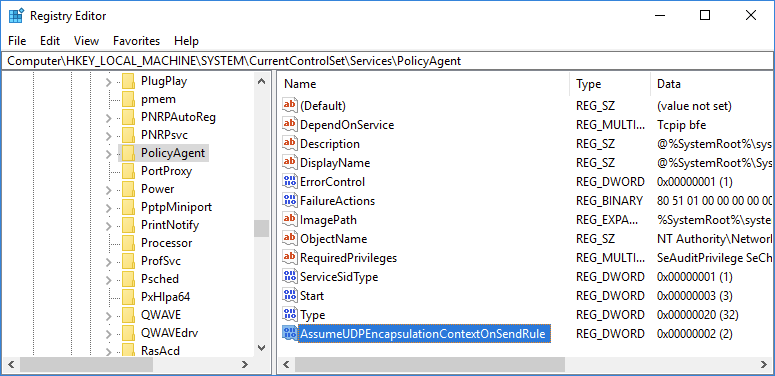
Если ваш VPN-сервер находится за NAT, для корректной установки VPN-соединения по протоколу L2TP/ipsec, на стороне клиента необходимо в ветке HKEY_LOCAL_MACHINE\SYSTEM\CurrentControlSet\Services\PolicyAgent создать ключ с именем AssumeUDPEncapsulationContextOnSendRule и значением 2.
На этом все. Теперь, когда у вас имеется настроенный VPN-сервер, вы можете подключиться к нему с помощью VPN-клиента.
Following tutorial shows how to setup Windows Server 2016 (single NIC, behind NAT/Firewall) as a L2TP / IPSec VPN Server.
Install Remote Access Role
- Open Server Manager > Manage > Add Roles and Features and add Remote Access role.
- On Role Services screen choose only DirectAccess and VPN (RAS).

Enable and Configure Routing and Remote Access
- Open Server Manager > Tools > Routing and Remote Access
- Right click on server name and choose Configure Routing and Remote Access.
- Follow the wizard and choose options Custom Configuration and VPN Access.
- Right click on server name and choose Properties.
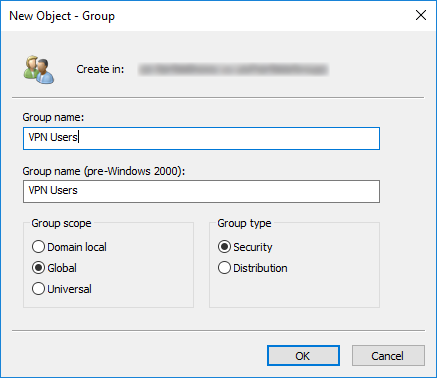
Create Active Directory VPN Group
- Open Active Directory Users and Computers.
- Create a new security group and add all users that will have permission to connect via VPN.

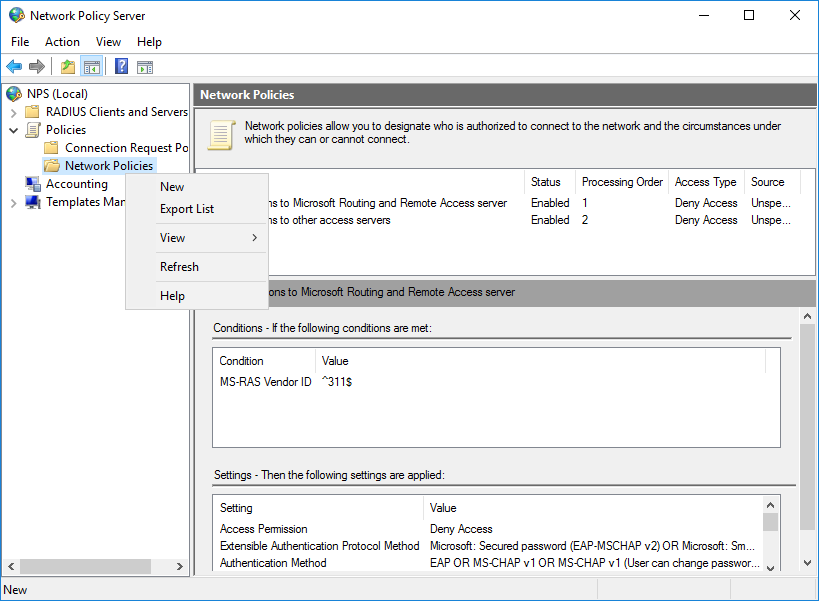
Create and Configure Remote Access Policy
- Open Server Manager > Tools > Network Policy Server
- Open Policies, right click on Network Policies and click on New

- Configure as follows:
Make registry changes to allow L2TP behind NAT
This registry change needs to be done on the VPN server and all Windows VPN clients:
- Open regedit.exe
- Navigate to HKEY_LOCAL_MACHINE\SYSTEM\CurrentControlSet\Services\PolicyAgent
- Create a new DWORD 32 type value:
- Name: AssumeUDPEncapsulationContextOnSendRule
- Data: 2
0 – No connection to servers behind NAT (Default).
1 – Connection where VPN server is behind NAT.
2 – Connection where VPN server and client are behind NAT.
- Reboot computer for changes to take effect.

April 2018
Windows Server Standard 2016
Настройка VPN L2TP сервер на Windows Server 2016
Для работы нам понадобится Windows Server 2016 (применимо и к другим версиям), который имеет белый IP и выход за NAT. В качестве клиента будет использоваться стандартная рабочая станция с Windows 10.
1. Первым делом заходим на сервер в корпоративной сети и в оснастке «Диспетчер серверов» кликаем по пункту «Добавить роли и компоненты».

2. Далее.

3. Оставляем параметр «Установка ролей и компонентов».

4. В данном окне выбираем сервер, на котором собираемся поднимать службу VPN. У нас выбор не велик. Жмём «Далее».

5. Отмечаем пункт «Удалённый доступ». Next.
6. В компонентах ничего не меняем.

7. Знакомимся с информацией о том, что такое в принципе VPN и зачем нужен удаленный доступ.

8. Отмечаем галочкой параметр «DirectAccess и VPN» и добавляем необходимые компоненты.

9. Далее.

10. Далее.

11. Всё. Можно приступить к установке. Кликаем по соответствующей кнопке и идём заваривать чай.
12. По завершению установки закрываем данную оснастку.

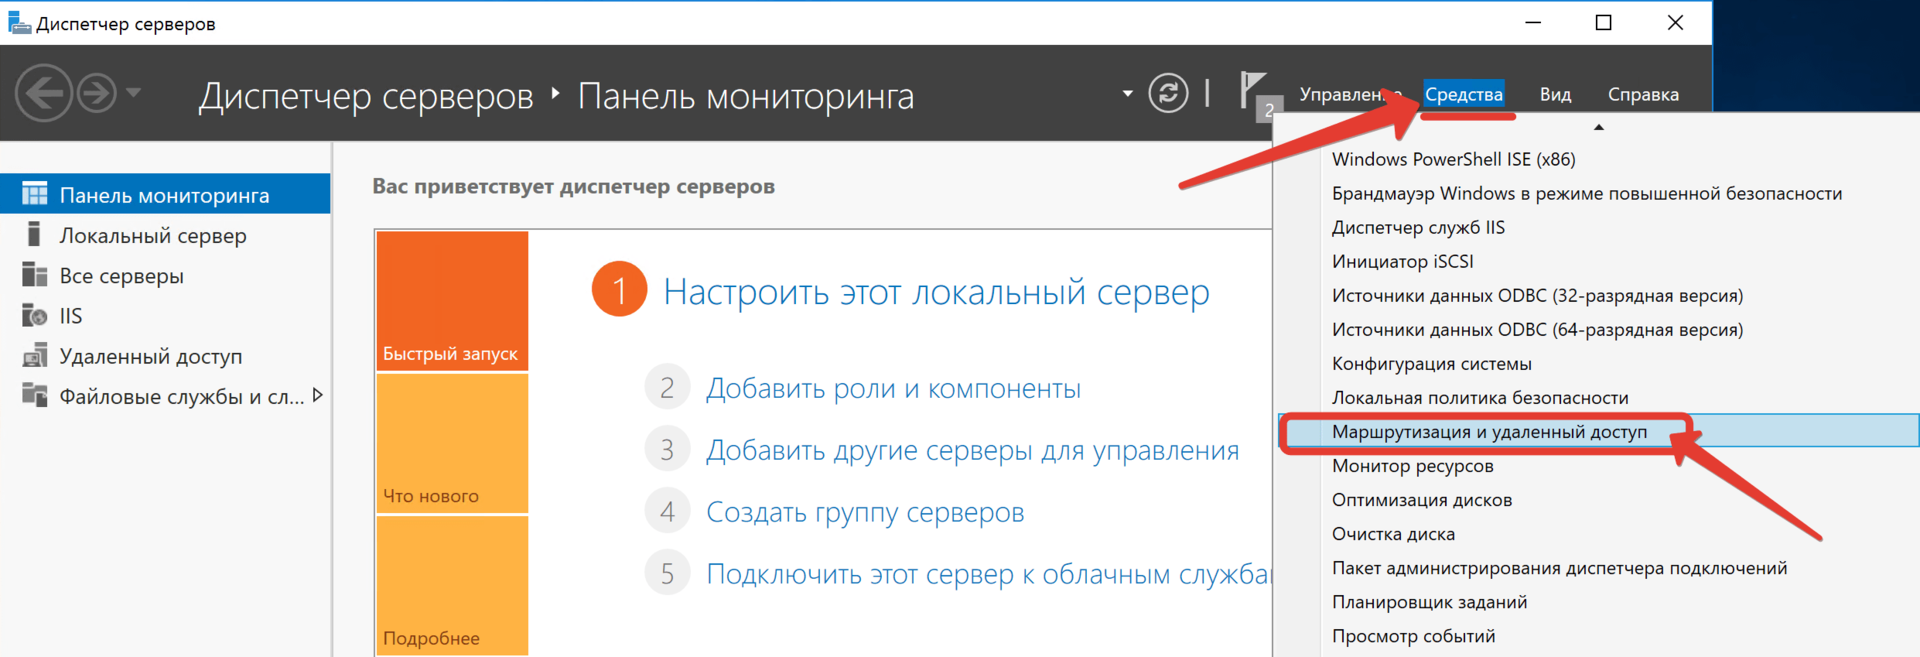
13. В диспетчере серверов раскрываем «Средства» и ищем пункт «Маршрутизация и удаленный доступ».
14. Видим слева наш сервер, отмеченный красной меткой. Данный цвет кружка свидетельствует о том, что сервер VPN не настроен и соответственно не функционирует. Исправим это недоразумение. Кликаем правой кнопкой. «Настроить и включить маршрутизацию и удаленный доступ».

15. Выбираем пункт «Особая конфигурация».

16. Отмечаем «Доступ к виртуальной частной сети (VPN)».

17. И после нажатия на «Готово» в последнем окне кликаем по кнопке «Запустить службу».

18. Сервер взлетел. Остались нюансы. Вызываем контекстное меню. «Свойства».

19. У меня на учебном сервере не настроен DHCP, поэтому на вкладке IPv4 укажем статический пул адресов. Из этого диапазона будут получать настройки наши рабочие станции, которые мы далее будем подключать извне.

20. Отлично. Диапазон задали. Теперь затронем вопрос безопасности. Переходим на соответствующую вкладку и отмечаем параметр «Разрешить пользовательские политики IPsec для L2TP». Вводим секретный ключ, который будет использоваться для подключения к нашей корпоративной сети из интернета. Жмём «Применить» и в появившемся окне соглашаемся с предупреждением о важности перезапуска службы маршрутизации.

21. Перезапускать мы её будем прямо сейчас. В диспетчере привычным движением раскрываем «Средства» — «Службы».

22. Ищем в длинном списке «Маршрутизация и удаленный доступ» и вызвав контекстное меню, перезапускаем эту историю.

23. Осталось подумать, каким пользователям будет предоставлен доступ к нашей частной сети. У меня данная тачка не в домене. Т.к. подразумевается, что она выполняет исключительно роль общей шары. Поэтому будем мудрить с локальными пользюками. Открываем в пуске «Управление компьютером» и на соответствующей вкладке отмечаем нужного пользователя. Я заранее создал одного Юзверя.

24. Заходим в свойства данной учётки и на вкладке «Входящие звонки» разрешаем «Права доступа к сети». Применяем наши изменения.

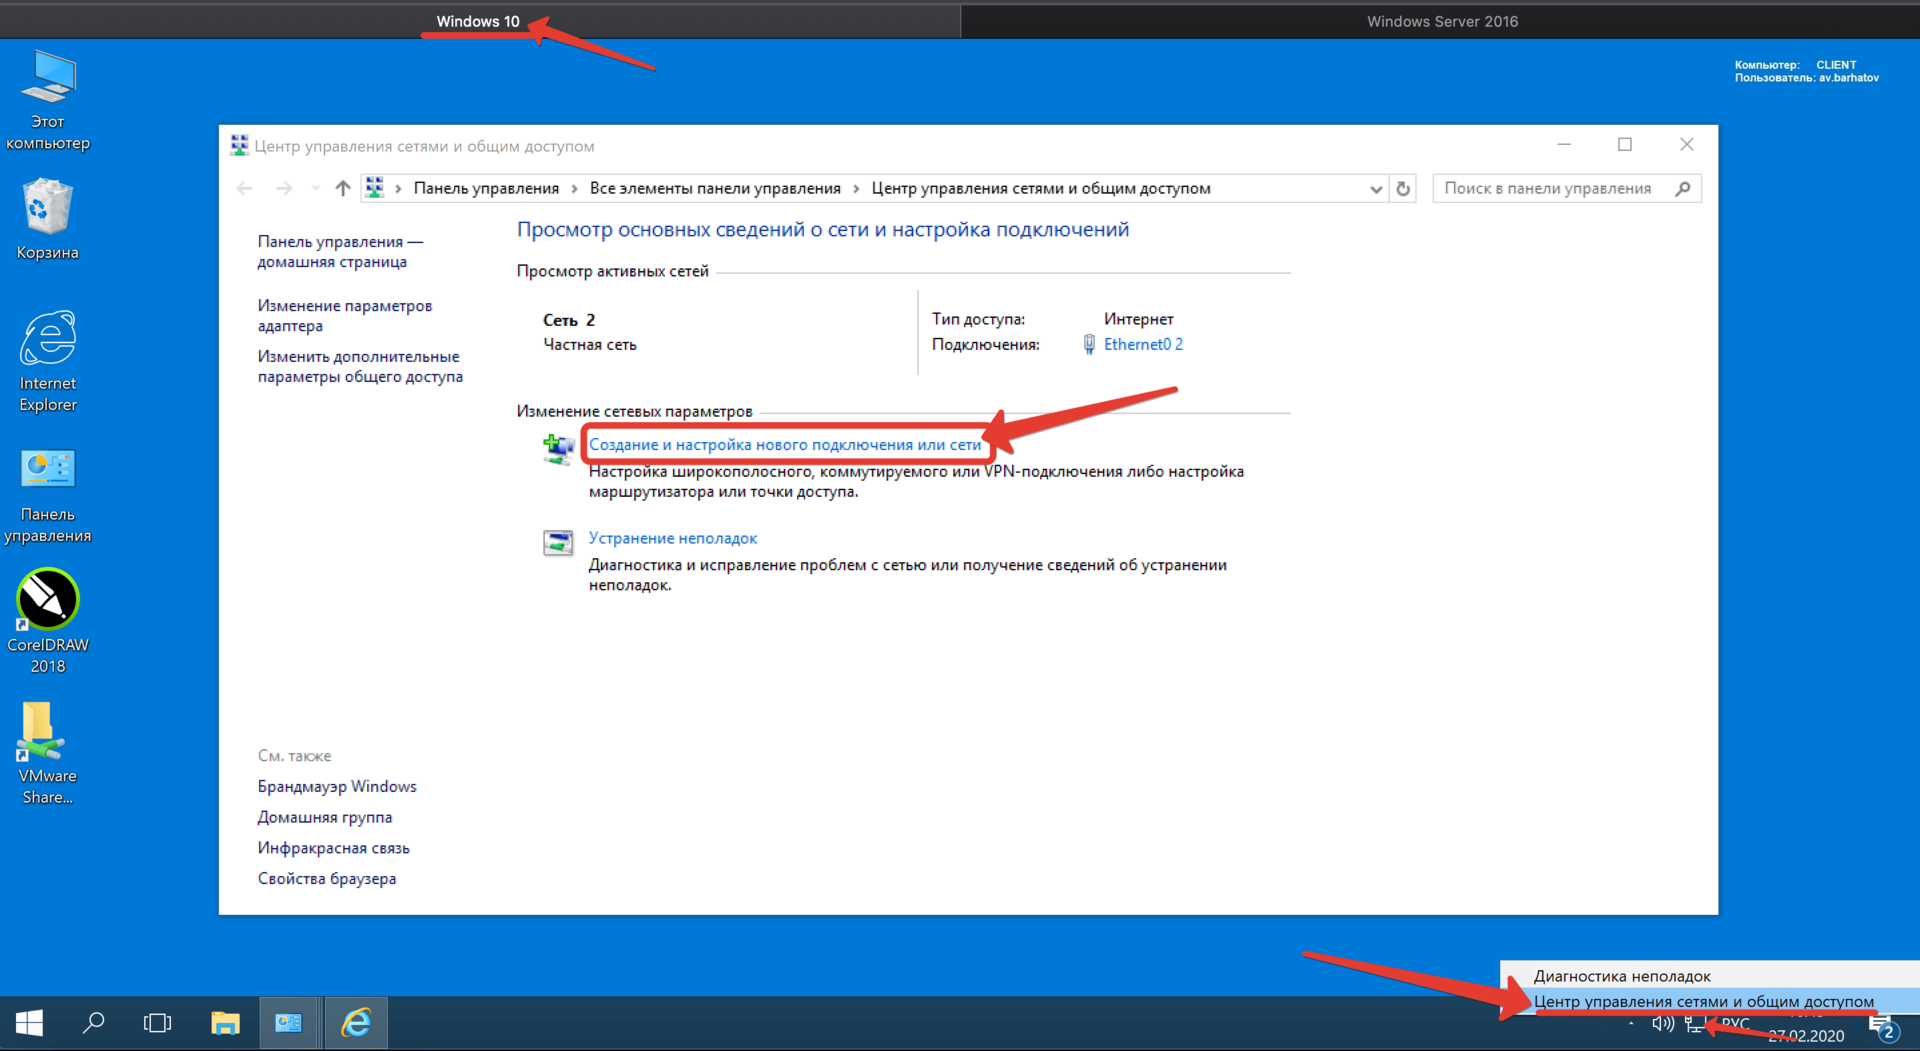
25. И переходим к настройке клиентского компьютера. У меня это комп на Windows 10. Отмечу, что он не находится в одной сети с сервером, но при этом имеет выход в Интернет. Открываем «Центр управления сетями и общим доступом» и далее «Создание и настройка нового подключения или сети».
26. В открывшемся окне помощника выбираем пункт «Подключение к рабочему месту».

27. «Использовать моё подключение к интернету».

28. Вводим белый ip-адрес нашего сервера, который выведен за NAT. И при желании изменяем название подключения. Я оставлю по умолчанию. Ждём «Создать».

29. Хорошо. Далее заходим в «Свойства» созданного подключения.

30. И на вкладочке «Сеть» раскрываем «Свойства» компонента IPv4. Жмём «Дополнительно» и снимаем галочку с пункта «Использовать основной шлюз в удаленной сети». Это очень важный момент. Если этого не сделать, то сразу после подключения к корпоративной сети, ваше локальное подключение к Интернету на компьютере пропадёт, ибо по умолчанию VPN использует шлюз удалёнки. Так что будьте предельно внимательны и не пропускайте данный шаг при настройке внешних рабочих станций.

31. Сохраняем изменения и переходим на вкладочку «Безопасность». Тут нам необходимо изменить тип протокола на «L2TP» и в дополнительных параметрах задать «Ключ для проверки подлинности», который мы ранее указывали на сервере.

32. Всё, братцы. Теперь смело можно подключаться. Кликаем по значку сети на панели задач и выбираем наше подключение.

33. Вводим данные от учетной записи пользователя. Помним, что в данном примере мы разрешали доступ к нашей сети извне только одному Юзверю.

34. И дожидаемся статуса «Подключено». С этого момента мы находимся в корпоративной сети, а следовательно можем пользоваться её ресурсами.

35. Давайте попробуем проверить функционал общих папок. Открываем проводник и в адресной строке вводим ip сервера.

36. Через некоторое время видим расшареную папку «Общий обмен». Это свидетельствует о том, что наше VPN-подключение к серверу сконфигурировано корректно.

Удачи в настройке VPN L2TP на базе Windows server 2016.
This post shows you how you can install a VPN Server on Windows Server 2016 Step-by-Step. It shows you how you can easily setup a VPN server for a small environment or for a hosted server scenario. This blog post covers how you can use Windows Server VPN.
This is definitely not a guide for an enterprise deployment, if you are thinking about a enterprise deployment you should definitely have a look at Direct Access.
I already did similar blog posts for Windows Server 2008 R2, Windows Server 2012 and Windows Server 2012 R2.
- How to Install VPN on Windows Server 2012 R2
- How to Install VPN on Windows Server 2012
- How to Install VPN on Windows Server 2008 R2
- How to Install VPN on Windows Server 2019
You can simply follow this step by step guide:
Install the Windows Server VPN Role
First install the “Remote Access” via Server Manager or Windows PowerShell.

Select the “DirectAccess and VPN (RAS)” role services and click next.
On the next steps just use the default settings. After that you can have a look at the overview screen and install the role.
After the features are installed, which can take a while to finish you see the link for the Getting Started Wizard. Click on “Open the Getting Started Wizard“.
Configure Windows Server VPN
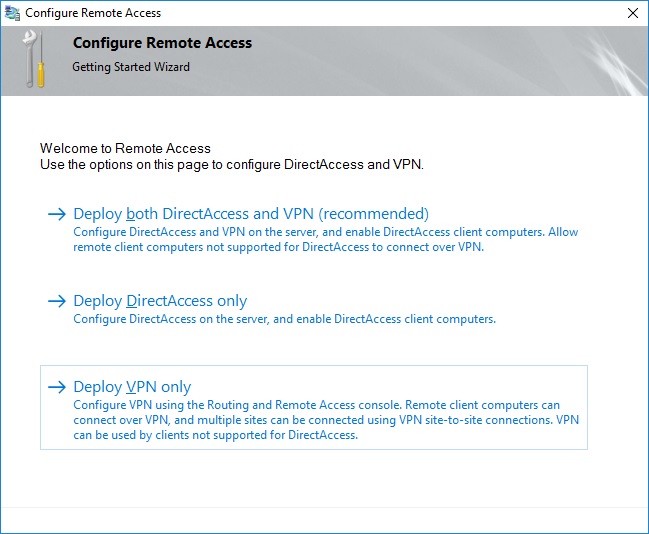
This opens a new wizard which will help you to configure the server. On the first screen select “Deploy VPN only“.
This opens the Routing and Remote Access Management Console
Right click on the Server name and click on “Configure and Enable Routing and Remote Access“.
On the new wizard select “Custom configuration“.
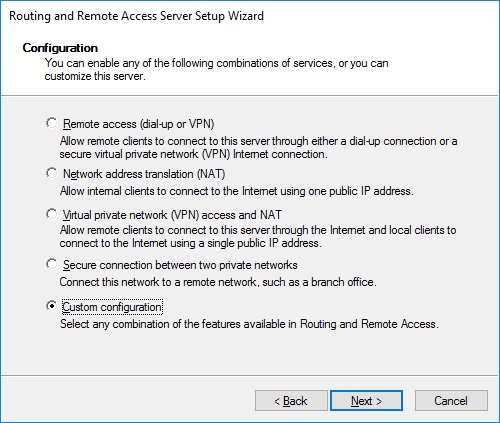
Select “VPN Access“.
After you have click finish you can now start the Routing and Remote Access service.
If you have an other firewall between the internet and your Windows Server you have to open the following Firewall port sand forward them to your Windows Server:
For PPTP: 1723 TCP and Protocol 47 GRE (also known as PPTP Pass-through)
For L2TP over IPSEC: 1701 TCP and 500 UDP
For SSTP: 443 TCP
After the installation Users have to be enabled for Remote Access to connect to your VPN Server. On a standalone server this can be done in the Computer Management MMC, in a domain environment this can be done in the user properties of an Active Directory user.

If you don’t have a DHCP Server in your environment you have to add a static IP address pool. This is often needed if you have a single server hosted at a service provider. In the properties of your VPN server you can click on the IPv4 tab and enable and configure the “Static address pool”.
You now have to add a IP address from the same subnet as your static address pool to the network interface of your server, so users can access the server.
I hope this helps you to setup a VPN server in a small environment, lab or hosted server.
Tags: Direct Access, GRE, installation, L2TP, Microsoft, PPTP, RAS, Remote Access, routing, setup, SSTP, VPN, VPN Server, Windows, Windows Server, Windows Server 2016, Windows Server VPN Last modified: April 25, 2019
About the Author / Thomas Maurer
Thomas works as a Principal Program Manager & Chief Evangelist Azure Hybrid at Microsoft (Cloud + AI). He engages with the community and customers around the world to share his knowledge and collect feedback to improve the Azure hybrid cloud and edge platform. Prior to joining the Azure engineering team (Cloud + AI), Thomas was a Lead Architect and Microsoft MVP, to help architect, implement and promote Microsoft cloud technology.
If you want to know more about Thomas, check out his blog: www.thomasmaurer.ch and Twitter: www.twitter.com/thomasmaurer
Introduction
A virtual private network (VPN) extends a private network across a public network so that you will be able to access your data remotely through the public network securely. You can also use a VPN to secure your internet activity by using the VPN server as a proxy server.
This article will show you how you can set up an L2TP/IPsec VPN on a Windows Server 2016 Standard with step by step screenshots. This VPN can be used to get access to your business network.
We will configure the VPN with the built-in feature (Routing and Remote Access RRAS) which Microsoft is providing in Windows Server 2016. This can feature can be enabled in the Add Roles and Features wizard.
Prerequisites
- Server with Windows Server 2016 Standard installed. If you do not have a server you can order a server on Snel.com
- Access to your Windows Server with administrator or a user with administrator permissions
Step 1 – Log in using RDP
You must be logged in via RDP as an administrator or a user with administrator permission. Please see this article for instructions if you don’t know how to connect.
Step 2 – Update Windows
All Windows updates needs to be installed before you start with installing and configuring L2TP/IPsec. This is needed to keep the server up to date with all security patches.
Open Windows Start menu and click Settings
Navigate to Update & Security
Click on Check for updates to check if there are any updates for your server.
Download and install all updates if there is any available.
Step 3 – Install Dependencies
Open Windows Start menu and click on Server Manager
Click on Manage -> Add Roles and Features
A new screen will be opened and click on Next
Select Role-based or feature-based installation and click on Next
Select Select a server from the server pool and click on Next
Select Remote Access and click on Next
Click on Next
Click on Next
Select DirectAccess and VPN (RAS) and Routing. Once it’s selected a pop up will be shown and click on Add Features
Click on Next
Click on Next
Click on Next
Select Restart the destination server automatically if required
Once it’s selected a pop up will be shown and click on Yes to allow the system to reboot if required.
The last step is to click on Install.
Pending installation.
Installation is finished.
Step 4 – Routing and Remote Access
Open Routing and Remote Access in Server Manager -> Tools -> Routing and Remote Access.
A new screen will be opened. Right click on the server name and click on Configure Routing and Remote Access.
A new screen will be opened to setup Routing Access Server and click on Next
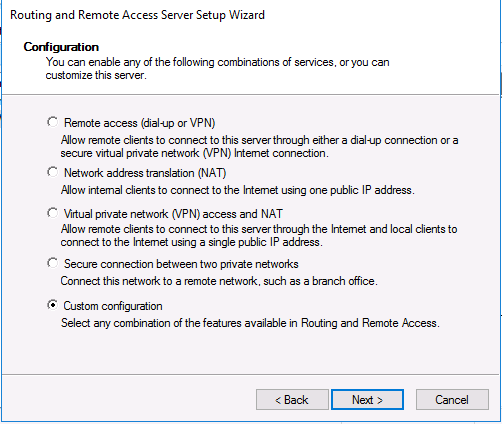
We are using Custom configuration because Virtual private network (VPN) access and NAT requires two or more network interfaces.
Select Custom configuration and click on Next
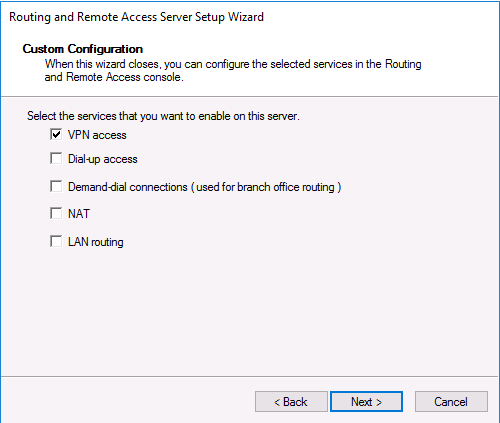
Select VPN access and NAT and click on Next
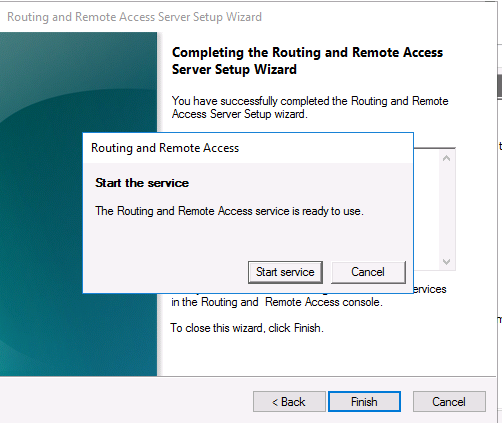
Complete the wizard by clicking on Finish
After the wizard is completed a pop up will be shown with the question if you want to Start the Routing and Remote Acess Service. Click on Start Service
Step 5 – Configure Routing and Remote Access
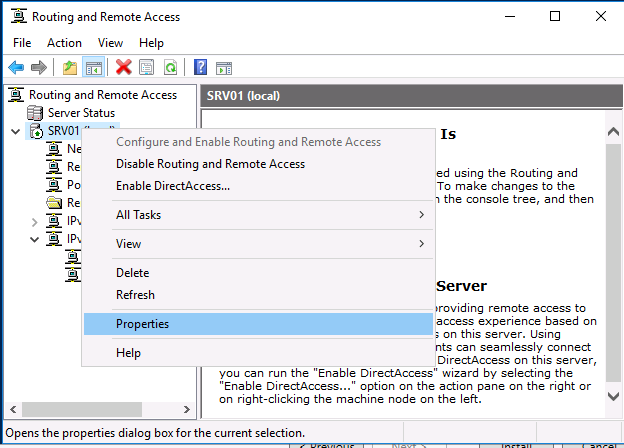
Right click on the server name (VPN) and click on Properties
Navigate to Securitytab and select Allow custom IPsec policy for L2TP/IKev2 connection. In our screenshot section Preshared Key but you have to fill this with a strong password.
You can use a password. passphrase generator for creating a preshared key. Generate a strong pre-shared key with at least 32+ characters.
Navigate to IPv4. In our setup we do not have a DHCP server, therefore, we have to select the option Static address pool and click on Addto enter your IP address range.
We used the following range:
Start IP address: 10.10.10.1
End IP address: 10.10.10.254
Number of addresses: 254
Click on OK to save the IPv4 range.
Click on OK to apply the changes which we made in the properties of the Routing and Remote Access service. You should get a warning pop up with the information to restart the service click OK.
Step 6 – Configure NAT
Right click on NAT by navigating to Routing and Remote Access -> VPN (server name) -> IPv4 -> NAT and click on New Interface...
A new screen will be opened and select Ethernet and click on OK.
Select Public interface connected to the Internet and select Enable NAT on this Interface
Open Services and Ports tab select VPN Gateway (L2TP/IPsec - running on this server) from the list.
A new screen will be opened. Edit Private address variable from 0.0.0.0 to 127.0.0.1 and click on OK
Click on OK
Step 7 – Restart Routing and Remote Access
Right click on server name (VPN) and navigate to All Tasks and click on Restart
Step 8 – Windows Firewall
Open Windows Start menu and click on Control Panel
Open System and Security
Open Windows Firewall
Click on Advanced settingsin the left menu
A new screen will be opened and open Inbound Rules
Create a new rule by clicking on New Rule... in the right menu.
A new screen will be opened. Select Predefined: Routing and Remote Access and click on Next
Select Routing and Remote Access (L2TP-In) and click on Next
Click on Finish
Verify that the rule is created
Step 9 – Configure User(s)
Before user(s) can start using VPN we have to give them permission to connect.
Right click on the Windows icon and click on Computer Management
Open Local Users and Groups from the left menu and click on Users
You should see a list of users of your server. Right click on the user you want to enable VPN and click on Properties
In our article we are enabling VPN for our Administrator user. We advise creating/using separate users for VPN purposes with limited permissions.
A new screen will be opened with User Properties. In our example it’s Administrator. Open Dial-Intab and select Allow access
Click on OK and close Computer Management. User Administrator has now the permission to connect to the server via L2TP/IPsec VPN connection.
Step 10 – Remote Access Management
Open Windows start menu and click on Server Manager.
Navigate to Tools -> Remote Access Management. A new screen will be opened with the Remote Access Dashboard. You can see in our overview that services are running without warnings.
More information regarding Remote Access Management can be found here.
Step 11 – Reboot the server
Open Windows Start menu
Right click on the power icon and click on Restart
Step 12 – Client Connection
- How to connect L2TP/IPsec VPN on Mac OS X
- How to connect L2TP/IPsec VPN on Windows 10
Conclusion
Congratulations, you have now configured an L2TP/IPsec VPN on your Windows Server 2016 Standard. If you need further assistance or help with configuring your Windows Server 2016 Standard get in touch with our support.