
L2TP over IPsec is a VPN protocol that combines the Layer 2 Tunneling Protocol (L2TP) with the Internet Protocol Security (IPsec), providing secure data transmission and remote access capabilities.
Please follow the steps below to set up the L2TP/IPSec VPN connection on Windows PC and MacBook.
Windows PC
1. Go to Settings > Network & Internet, then select VPN.

2. Click on Add a VPN connection, choose the VPN provider as Windows (built-in), enter the name of your VPN in the Connection name field, fill in the Server name or address with the server domain name or public IP address, select L2TP/IPsec with pre-shared key as the VPN type.

3. Choose Username and password for the sign-in info, and enter your username and password, then click Save

4. Find the configured VPN in the list, click «Connect,»

5. If your L2TP/IPsec connection shows Connected, and data being sent and received during your VPN connection, it typically indicates that the VPN connection has been successfully established.

MacBook
1. On Mac, select the Apple menu > «System Settings.»
2. Click on «VPN» in the sidebar, then click «Add VPN Configuration» and select «L2TP over IPsec.»

3. Please modify the display name,fill in the Server name or address with the server domain name or public IP address, enter the account name and Password, fill in the pre-shared key in the Shared secret.

4. Please enable the VPN. If you L2TP/IPsec connection shows Connected, it typically indicates that the VPN connection has been successfully established.

Is this faq useful?
Your feedback helps improve this site.
What’s your concern with this article?
- Dissatisfied with product
- Too Complicated
- Confusing Title
- Does not apply to me
- Too Vague
- Other
We’d love to get your feedback, please let us know how we can improve this content.
Thank you
We appreciate your feedback.
Click here to contact TP-Link technical support.
Introduction
Configuring a VPN connection on Windows using the built-in client is a reliable method for establishing a secure connection to a private network over the internet. One of the most common VPN protocols is L2TP (Layer 2 Tunneling Protocol) combined with IPsec for encryption. This setup ensures secure communication by encrypting the data transmitted between your device and the VPN server.
This guide will walk through configuring the Windows built-in VPN client for an L2TP/IPsec connection. It is designed for users who want to securely access remote networks, such as corporate environments or personal VPN servers, and need to configure the connection manually.
The steps outlined here apply to any version of Windows with the built-in VPN feature, such as Windows 10 or Windows 11. This guide is suitable for users who have the necessary credentials (IP address, pre-shared key, and login information) for the VPN server.
Prerequisites
Before configuring the VPN connection, ensure that you have the following:
- The IP address of the VPN server.
- The pre-shared key provided by your VPN provider.
- A valid username and password for authentication.
Step-by-step Guide
Step 1: Open the Settings App
In the Windows search bar, type “Settings” and click on the Settings app to open it.

Step 2: Navigate to Network & Internet
In the Settings app, click on Network & Internet to access network-related configurations.
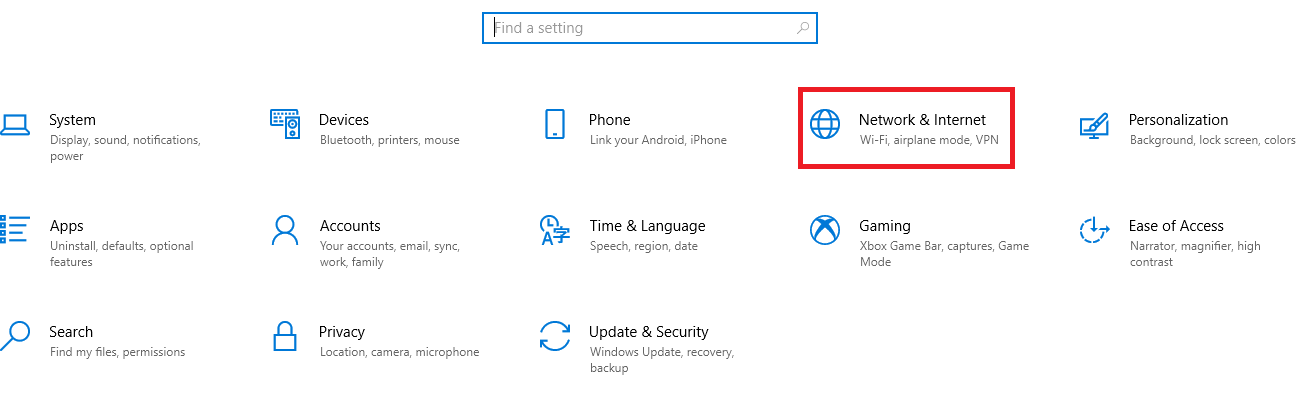
Step 3: Access the VPN Settings
Under the Network & Internet section, select VPN from the options listed on the left-hand side of the screen.
Step 4: Add a VPN Connection
Click on the Add a VPN connection button to begin configuring your VPN connection.
Step 5: Configure VPN Provider and Connection Name
- For the VPN provider, select Windows (built-in).
- Enter a Connection name of your choice. This name will help you identify the VPN connection later.
- In the Server name or address field, input the IP address provided when launching the VPN instance.
Step 6: Set VPN Type and Input Pre-shared Key
- For the VPN type, select L2TP/IPsec with pre-shared key.
- In the next field, input the Pre-shared key provided by your VPN provider.
Step 7: Input Sign-in Information
- Under Type of sign-in info, select User name and password.
- Enter the User name and Password required for authentication to the VPN server.
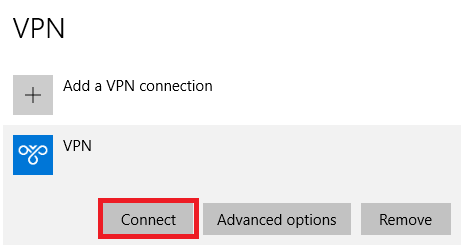
Step 8: Save the Connection Settings and Connect
Click on Save to store the VPN connection settings. After saving, click on Connect to establish the VPN connection.
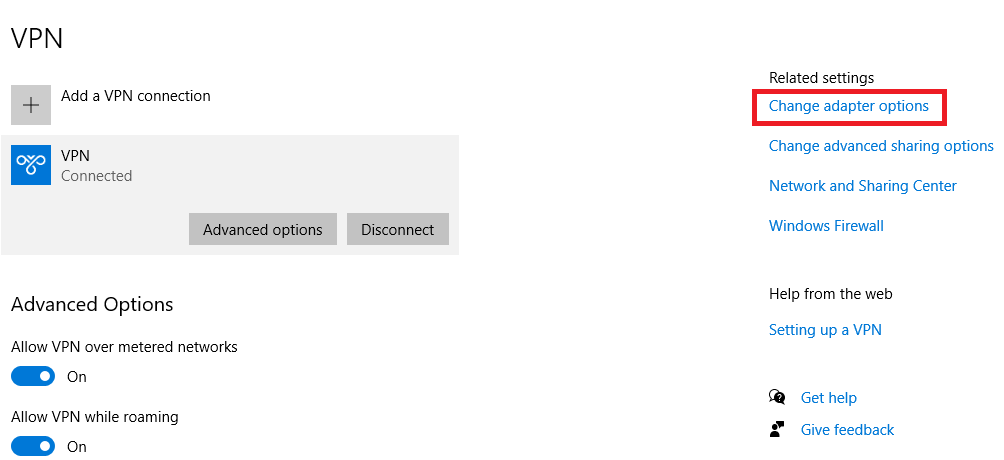
Step 9: Verify VPN Traffic Routing
To ensure that all your network traffic is routed through the VPN, you must verify that the VPN gateway is being used. Start by navigating to the Change adapter options.
Step 10: Access VPN Adapter Settings
In the Network Connections window, locate the VPN adapter you created. The adapter name will correspond to the Connection name you defined earlier. Double-click the adapter to open its properties.
Step 10: Look for your VPN adapter and double click. The Adapter name will follow the name of your VPN connection that you have created previously.
Step 11: Open Adapter Properties
Click on Properties to access the configuration options for your VPN adapter.
Step 12: Modify IPv4 Settings
In the Properties window, navigate to the Networking tab. Select Internet Protocol Version 4 (TCP/IPv4) and click on Properties.
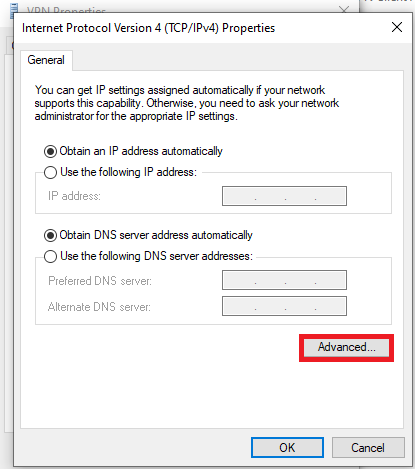
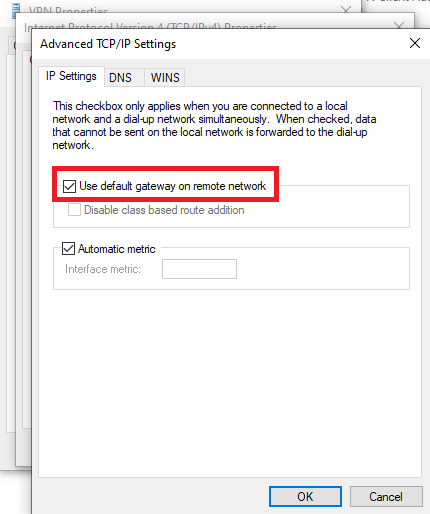
Step 13: Access Advanced Settings
In the IPv4 Properties window, click on Advanced to modify advanced network settings.
Step 14: Enable Default Gateway on Remote Network
Ensure that the Use default gateway on remote network option is checked. This setting routes all internet traffic through the VPN, ensuring a secure connection.
Conclusion
By following this guide, you have successfully configured the Windows built-in client for an L2TP/IPsec VPN connection. This setup ensures that your network traffic is encrypted and securely routed through the VPN. Make sure to verify the connection and traffic routing for a secure experience.
Should you have any inquiries about the guidelines, please feel free to open a ticket through your portal account or contact us at support@ipserverone.com. We’ll be happy to assist you further.
Article posted on 9 December 2020 by jzyap
I will guide you in this article through the process of setup of the L2TP/IPSec client in Windows 7 and later OS. This tutorial also covers the Windows server platform. The client side setup does not depend on the type of VPN server.
Thanks to the Mikrotik RouterOS and similar platforms, setup for this kind of tunnel is very simple today. Moreover, this tutorial is the client-side part of our IPSec series. We will explain the server side after this mini-series related to client-side configuration.
Today, L2TP/IPSec client is supported out-of-the-box in Windows 7 and later OS’s, including all server platforms. Although we rarely need VPN on the server platform, we can do it with easy in the same way.
You can find the following tutorials related to the L2TP/IPSec VPN clients on my blog:
- Windows 7 and later (this article)
- Windows XP
- Android
- Apple iOS
- Mikrotik (added 26.01.2017.)
Our recipe
1) We need to open Network and Sharing Center and to search for the option Set up a new connection or network. The number of options in this step can vary between Windows versions, but there is always this option, as the first in the list.

2) The new window will be opened. We will see a few options in this window. We should choose the option Connect to a workplace.

3) We will create a new connection. We usually do not need to establish a previous connection. We need to establish a different connection before the VPN connection only if we are using dial-up or similar on demand connection.

4) In the next step, we should choose the option to connect to distant network using the VPN connection – Use my Internet connection (VPN)

5) The new window will open. We need to fill the destination and descriptive name of our connection. You should name this connection in a user friendly way, like Contoso VPN.
The destination can be either an IP address or DNS name (as demonstrated in the screenshot). In case you want to use the DNS (a.k.a. FQDN) name, you must register it in your DNS zone. This option allows you to register multiple IP addresses under the same DNS name and to use so-called round-robin access.

This means that we can have two or more independent Internet links and to allow users to establish the VPN over a random link. In the event that one of the links is unavailable due any problem with the ISP, your VPN concentrator is still up and running.
If you want to make this connection available to all users of this computer, you should enable the option Allow other people to use this connection. On domain joined computers, this option will establish the VPN with your company before you log in to the system. This is very handy if you want to increase the security.
You should also enable the option Don’t connect now; just set it up so I can connect later.
6) On the next window, we can enter the username and password. However, for security reasons it’s strongly advised that your password for the VPN connection is not saved. Yes, you will need to type it every time. But hey, this is a small price for greater security.

7) Now the Wizard can finish the steps to complete the connection. Please, be patient until the Wizard finishes its work. This will take maybe a minute to complete.

 After a short while, we will see the ending screen that will inform us that the new connection is ready to be used. However, we must click on the button [ Close ] to finish the Wizard.

9) The next step is to open the option Change Adapter Settings and to locate our new connection in the list. The same can be achieved by using icon for network connections in the notification area.
Right click on our connection and from the menu context we should choose the option Properties.
10) We should select the third tab named Security. Here we can refine here the VPN setting. By default, it is on Automatic. We will select Layer 2Tunneling Protocol with IPSec (L2TP/IPSec). All other parameters should be setup either according this screenshot or in compliance with instructions from your system administrator.
11) Before we close this window, we should make one more significant tweak. There is a button [ Advanced settings ] under the type of VPN connection.
12) Click on it. The new dialog window will open. We have two options here. Both are related to the IPSec part of the tunnel. We can use either the pre-shared key or certificate. In our case, and in most situations, we will choose the pre-shared key. In which case, the system administrator must provide us with the key.

13) We should click on the button [ OK ] to close this dialog. Then [ OK ] again to close the whole dialog window for the VPN connection properties. We now have our VPN connection with the appropriate settings. Now we can try to connect.
14) We will open the connection, entering the username and password. The VPN connection will initiate the connection process.
15) After a short while (depending on the quality of your link) we should be connected to the remote network.
16) We will now open the Network and Sharing Center and see that there are 2 active connections. We can click on the VPN connection. We will see the parameters in the new window. We should click the tab Details.
Here we can see all parameters of the VPN connection. Some interesting parameters are authentication and encryption algorithms, internal IP address of the client and so on.
Security considerations
Now when you see how easy it is to setup this connection, you should consider replacing those old PPTP VPNs with a modern and stronger L2TP/IPSec VPN tunnel. The most vulnerable part here can be the IPSec pre-shared key, as all users on your system must share the same key.
The key should be very complex. However, if you need to share it with other people and give it to them in clear text, then sooner or later the secret key will be leaked. If you’re administering the VPN system, you should configure all of this for your users or customer.
You can consider the idea of additional protection through the certificates, but this is another story to tell. Stay tuned.
Provide feedback
Saved searches
Use saved searches to filter your results more quickly
Sign up
Appearance settings
Материал из MikroTik Wiki
В статье разбирается настройка L2TP/IPSec-подключения с ОС Windows 7, Android, macOS и iOS к маршрутизатору MikroTik с целью подключения рабочего места сотрудника (client-to-site VPN). После создания VPN-канала между сетями будет работать маршрутизация.
Windows 7
- В верху справа в меню «Просмотр» должно стоять «Крупные значки». Если стоит «Категория» или что-то другое, то надо кликнуть и выбрать «Крупные значки».

- Выбрать «Центр управления сетями и общим доступом».
Полезные материалы по MikroTik
На Telegram-канале Mikrotik-сэнсей можно получить доступ к закрытой информации от официального тренера MikroTik. Подписывайтесь

ИП Скоромнов Дмитрий Анатольевич, ИНН 331403723315

- Выбрать «Настройка нового подключения или сети».

- Выбрать «Подключение к рабочему месту»

- Выбрать «Использовать мое подключение к Интернету (VPN).

- В строке «Интернет-адрес» ввести адрес VPN-сервера. В строке «Имя местоназначения» ввести понятное имя для подключения может быть любым. Поставить галочку «Не подключаться сейчас, только выполнить установку для подключения в будущем».

- На следующем экране нажать «Создать».

- На следующем экране нажать «Закрыть».

- В «Центр управления сетями и общим доступом» выбрать «Изменение параметров адаптера».

- Выбрать созданное ранее подключение, кликнуть по нему правой клавишей мыши и выбрать свойства.

L2TP с IPSec
Если IPSec не будет использоваться, то переходите сразу к следующему блоку «L2TP без IPSec».
- Выбрать «Тип VPN» тип используемого VPN. Можно узнать у системного администратора. На приведенном скриншоте это L2TP, но также это может быть PPTP и другие типы. В опциях внизу оставить галку только на «Протокол Microsoft CHAP версии 2». Нажать «OK».
- Нажать кнопку «Дополнительные параметры» и ввести пароль IPSec.

- Ввести имя пользователя, пароль и нажать «Подключение».
- Начать пользоваться ресурсами удаленной сети.
L2TP без IPSec
- Выбрать «Тип VPN» тип используемого VPN. Можно узнать у системного администратора. На приведенном скриншоте это L2TP, но также это может быть PPTP и другие типы. «Шифрование данных» выбрать «необязательное (подключиться даже без шифрования)». В опциях внизу оставить галку только на «Протокол Microsoft CHAP версии 2». Нажать «OK».
- Ввести имя пользователя, пароль и нажать «Подключение».
- Если на маршрутизаторе используется сеть L2TP без IPSec, то на ПК надо перейти в ветку реестра HKEY_LOCAL_MACHINE\System\CurrentControlSet\Services\Rasman\Parameters и создать ключ REG_DWORD с именем ProhibitIpSec и значением 1.
- Перезагрузить компьютер.
Полезные материалы по MikroTik
На Telegram-канале Mikrotik-сэнсей можно получить доступ к закрытой информации от официального тренера MikroTik. Подписывайтесь

ИП Скоромнов Дмитрий Анатольевич, ИНН 331403723315
Android
Пример для Android версии 4.2.2
- Откройте настройки и выберите «Еще»(в разных переводах он может называться по-разному – расположение одинаковое (в конце раздела основных настроек сети).
- Выберите пункт «VPN».
- Если у вас не заданы параметры блокировки экрана, то будет такое сообщение – необходимо задать один из вариантов.

- Нажмите «Добавить профиль VPN».
- Настроить, как показано ниже, подставляя предоставленные настройки. Имя подключения может быть любым. Для отображения настроек показанных на 2-ом скриншоте, нужно прокрутить вверх экран.
- Далее нажмите на созданное подключение «Test»(или ваше имя), отметьте пункт «Сохранить учетные данные», и введите ваш логин и пароль. После этого нажмите «Подключиться».

- При единичном нажатии пальцем на имени подключения должно отобразиться такое окно (при успешном подключении).

MacOS
Работа L2TP/IPSec на устройствах Apple может не заработать в виду разной трактовки протоколов.
- Первое, что Вам необходимо сделать, это открыть меню «Apple», затем перейти в меню «System Preferences» («Системные настройки»), где выбрать пункт «Network» («Сеть»). Если вдруг окажется, что у Вас нет прав настраивать сеть, то в этом случае нужно кликнуть по иконке замка и ввести имя и пароль администратора компьютера. Затем в меню «Network» («Сеть») слева внизу следует нажать знак плюса, после чего на экране откроется диалоговое окно для создания подключения, где Вы должны выбрать пункт «VPN».

- В следующем окне выбираете следующие параметры:
- в строке «Interface» выбираете «VPN»;
- в строке «VPN Type» («Тип VPN») выбираете «L2TP over IPSec» («L2TP через IPSec»);
- строке «Service Name» («Имя службы») присваиваете имя создаваемому подключению.
После того, как параметры выбраны, нажимаете кнопку «Create» («Создать»).

- Теперь, когда подключение VPN Вы создали, Вам необходимо его правильно настроить, для чего слева выбираете только что созданное VPN- подключение и в меню справа кликаете по параметру «Configuration» («Конфигурация»). В появившемся списке Вы должны выбрать «Add Configuration» («Добавить конфигурацию»).

- После того, как Вы выбрали строку «Add Configuration» («Добавить конфигурацию»), Вам нужно ввести имя конфигурации, которое можно выбрать произвольное. В строке «Server Address» («Адрес сервера») вводите адрес сервера, к которому будет осуществляться подключение, в строке «Account Name» («Имя учетной записи») вводите свой логин на сервере L2TP. Все эти данные вы можете получить у своего VPN провайдера.

- Затем нужно нажать кнопку «Authentication Settings» («Настройки аутентификации») и в новом окне задать пароль, а также при необходимости группу и шифрование трафика. Password – пароль L2TP. Shared Secret – пароль ipsec.

- После того, как ввод параметров завершен, проверьте закладку «Advanced» («Параметры»).

На этом настройка VPN-соединения завершена, Вам осталось нажать применить изменения, нажав «Apply («Применить»)», после чего можно нажимать кнопку «Connection» («Подключиться»).
Внимание! При включении галочки в поле Send all traffic over VPN connection весь сетевой трафик, включая трафик в Интернет, будет направляться (маршрутизироваться) в VPN-подключение. Включайте только в случае необходимости.
iOS
Работа L2TP/IPSec на устройствах Apple может не заработать в виду разной трактовки протоколов.
- В самом начале настройки вам необходимо в главном меню выбрать подпункт «Settings», где перейти в меню «General», а затем выбрать меню «Network».
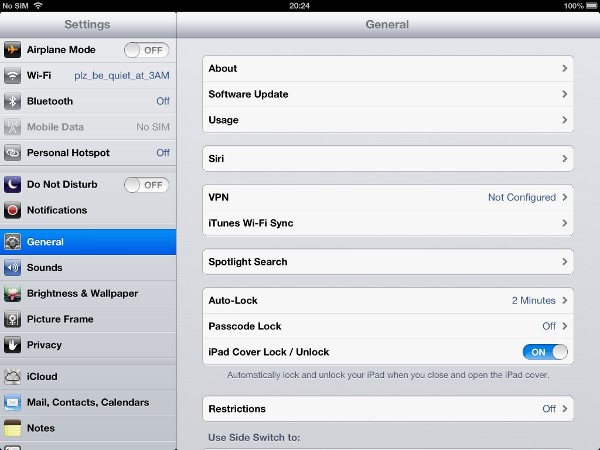
- В меню «Network» необходимо перейти на закладку «VPN», где выбрать меню «Add VPN Configuration».

- Во вновь открывшейся вкладке необходимо выбрать нужный протокол, в нашем случае это » L2TP», где затем прописать следующие параметры:
- в поле «Description» вводите название своего соединения, имя можно выбрать любое;
- в поле «Server» вводите название своего VPN-сервера;
- в поле «Account» прописываете свой логин L2TP;
- в поле «RSA SecurID» оставляете «Off»;
- в поле «Password» вводите свой пароль L2TP;
- в поле «Secret» вводите свой пароль ipsec;
- в поле «Send All traffic» выставляете «On».
После выставления всех параметров нажимаете справа вверху кнопку «Save»

- Если Вы сделали все согласно инструкции, то у Вас на экране должна быть такая же картинка, как на приведенном скриншоте.

На этом настройку VPN-соединение по протоколу L2TP для iPad можно считать завершенной. Теперь Вы сможете самостоятельно без посторонней помощи подключиться со своего устройства к удаленному VPN-серверу.
Подключение производится с помощью встроенного клиента операционной системы.
- Нажать «Пуск» и выбрать «Панель управления».
Полезные материалы по MikroTik
На Telegram-канале Mikrotik-сэнсей можно получить доступ к закрытой информации от официального тренера MikroTik. Подписывайтесь

ИП Скоромнов Дмитрий Анатольевич, ИНН 331403723315