
Платформа виртуализации Hyper-V доступна не только в Windows Server, но и в десктопных редакциях Windows 10 и 11. С помощью встроенного гипервизора Hyper-V пользователи могут создавать и запускать виртуальные машины. В этой статье мы рассмотрим, как включить компоненты Hyper-V в Windows 10 и 11.
Компоненты роли виртуализации Hyper-V можно установить в Pro и Enterprise редакциях Windows 10 и 11. Сначала, нужно проверить, поддерживает ли ваш компьютер виртуализацию Hyper-V. Откройте командную строку с правами администратор и выполните:
systeminfo
Промотайте в конец вывода и проверьте, что включены следующие компоненты в разделе Hyper-V Requirements:
VM Monitor Mode Extensions: Yes
Virtualization Enabled In Firmware: Yes
Second Level Address Translation: Yes
Data Execution Prevention Available: Yes

Если здесь указано Virtualization Enabled in Firmware: No, попробуйте включить аппаратную поддержку виртуализации в настройках BIOS/UEFI компьютера (может называться Intel VT-X или AMD-V).
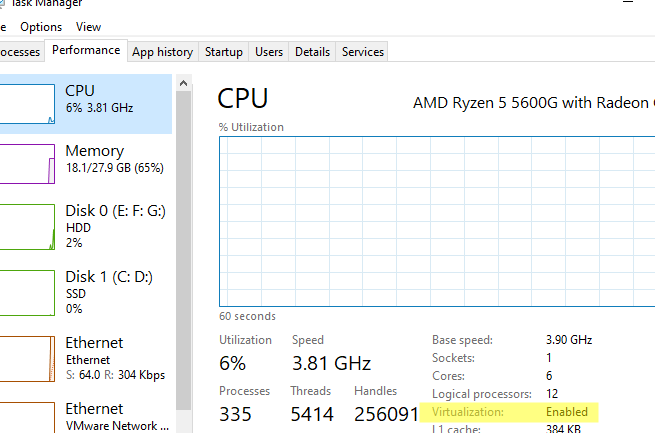
Также проверить совместимость вашего процессора можно на вкладке CPU в диспетчере задач Windows. Здесь должно быть указано
Virtualization: Enabled
.
Если тут указано
A hypervisor has been detected. Features required for Hyper-V will not be displayed
, значит компоненты Hyper-V уже установлены.
Включить роль Hyper-V в Windows 10 и 11 можно через панель управления компонентами Windows Features. Выполните команду
optionalfeatures
и выберите для установки компоненты Hyper-V Platform и Management Tools.
Также вы можете включить компоненты Hyper-V в Windows из командной строки. С помощью PowerShell команды:
Enable-WindowsOptionalFeature -Online -FeatureName Microsoft-Hyper-V -All
Или с помощью DISM:
dism.exe /Online /Enable-Feature:Microsoft-Hyper-V-All

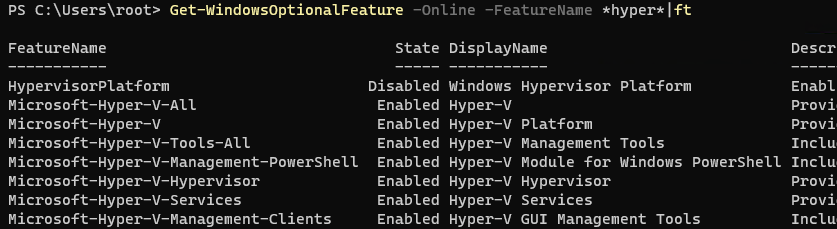
После завершения установки компонентов перезагрузите компьютер. Проверьте, что компоненты гипервизора установлены:
Get-WindowsOptionalFeature -Online -FeatureName *hyper*|ft
Включите автоматический запуск Hyper-V при загрузке:
bcdedit /set HypervisorLaunchType auto
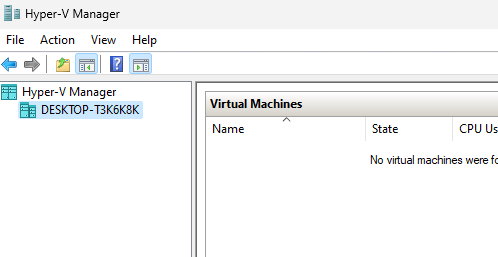
Для управления Hyper-V и виртуальными машинами используется графическая консоль Hyper-V Manager (
virtmgmt.msc
). Запустите ее и можете начать создавать виртуальные машины.
Также для управления гипервизором и ВМ можно использовать командлеты PowerShell из встроенного модуля Hyper-V.
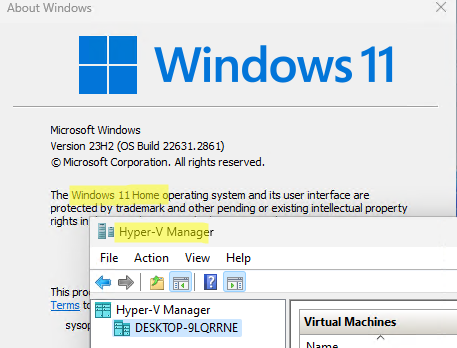
Компонент виртуализации Hyper-V отсутствует в домашних (Home) редакциях Windows 10 и 11. Однако есть небольшой трюк, который позволяет установить роль Hyper-V из зранилища компонентов WinSxS даже в Home редакции Windows.
Создайте на рабочем столе файл enable-hyperv.bat с кодом
pushd "%~dp0"
dir /b %SystemRoot%\servicing\Packages\*Hyper-V*.mum >hyper-v.txt
for /f %%i in ('findstr /i . hyper-v.txt 2^>nul') do dism /online /norestart /add-package:"%SystemRoot%\servicing\Packages\%%i"
del hyper-v.txt
 Dism /online /enable-feature /featurename:Microsoft-Hyper-V -All /LimitAccess /ALL
pause
Запустите BAT файл с правами администратора.
После завершения установки компонентов, перезагрузите компьютер. Проверьте, что виртуализация Hyper-V теперь доступна в вашей Home редакции Windows.
В данной статье мы подробно рассмотрим как правильно настроить систему виртуализации KVM/libvirt в Fedora и установим в качестве гостевой ОС Microsoft Windows 10.
Введение
Многие пользователи для запуска виртуальных машин до сих пор предпочитают использовать VirtualBox, поэтому в данной статье мы решили рассмотреть альтернативу, имеющую ряд серьёзных преимуществ:
- нет необходимости в установке out-of-tree модулей ядра, т.к. они уже входят в его состав;
- корректная работа на конфигурациях с активной технологией UEFI Secure Boot;
- более быстрая работа гипервизора за счёт отсутствия необходимости переключения между режимами ядра и пользователя.
Первым делом установим ряд необходимых пакетов:
sudo dnf install libvirt qemu-kvm virt-manager
По окончании активируем автоматическую загрузку сервиса libvirtd при помощи systemd:
sudo systemctl enable --now libvirtd.service
Внимание! Сразу после этого действия может отключиться текущее сетевое соединение из-за изменения в конфигурации адаптеров и появления новых виртуальных. Это нормальное явление. Именно по этой причине не следует пытаться установить KVM через SSH подключение.
Перезагрузим систему:
sudo systemctl reboot
Выбор режима работы KVM
KVM поддерживает работу в двух режимах:
- системный сеанс — qemu:///system — виртуальные машины будут запускаться с повышенными правами от имени пользователя libvirt с полноценной поддержкой сети и общими для всех пулами данных;
- пользовательский сеанс — qemu:///session — виртуальные машины будут запускаться с правами текущего пользователя с индивидуальным пулом и поддержкой сети при помощи qemu-bridge.
Более полное сравнение можно найти здесь (на английском языке).
Системный сеанс считается enterprise-ready решением, а пользовательский наиболее безопасным.
Настройка системного сеанса KVM
Настройка прав доступа
Для работы с виртуальными машинами внутри системного сеанса необходимо состоять в особой группе libvirt, поэтому добавим нашу основную учётную запись в неё:
sudo usermod -a -G libvirt $(whoami)
Создание подключения к пулу
Запустим Менеджер виртуальных машин (virt-manager) из меню используемой графической среды.
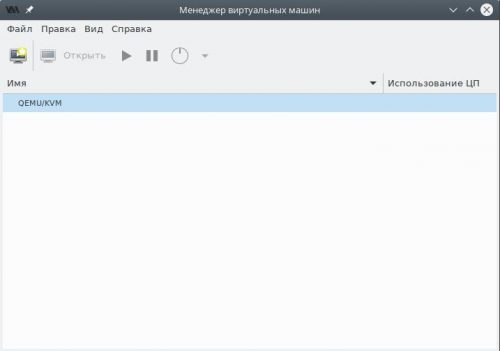
Если в списке отсутствует пункт QEMU/KVM, добавим его, вызвав диалог создания нового подключения через меню Файл — Добавить соединение.
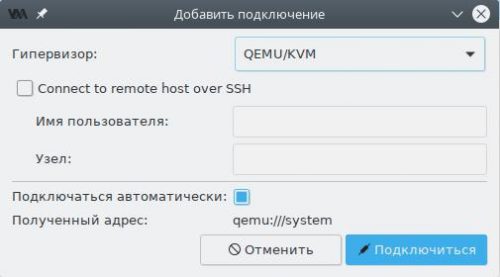
В поле Гипервизор выберем пункт QEMU/KVM, затем установим флажок в чекбокс Подключаться автоматически и нажмём Подключиться. Новый пункт появится в списке как показано на скриншоте выше.
Создание каталогов для образов
По умолчанию предлагается использовать каталог /var/lib/libvirt/images для хранения дисковых образов виртуальных машин, однако место внутри корневого раздела у большинства ограничено, поэтому мы создадим новое на отдельном разделе диска.
Внимание! Для системного сеанса не следует указывать в качестве хранилища каталоги, расположенные внутри /home, т.к. SELinux настроен на полную блокировку доступа к домашним каталогам пользователей для любых системных сервисов и по этой причине гипервизор не сможет работать с ними.
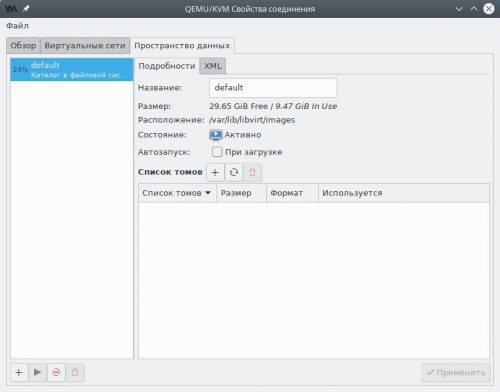
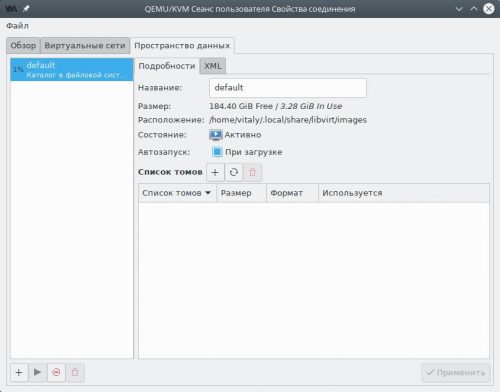
В главном окне менеджера выделим пункт QEMU/KVM, затем в меню Правка выберем пункт Свойства подключения и переключимся на вкладку Пространство данных.
Создадим новый раздел диска, отформатируем его в любую поддерживающую Unix-права доступа файловую систему (рекомендуется ext4 или xfs), пропишем в /etc/fstab и смонтируем например в качестве /media/virt.
Перейдём в созданный раздел и создадим два каталога: images для дисковых образов виртуальных машин и iso для ISO образов, из которых будет производиться установка операционных систем:
sudo mkdir /media/virt/{images,iso}
sudo chown $(whoami):libvirt /media/virt/{images,iso}
В левой панели окна менеджера пространств данных нажмём кнопку Добавить пул (с символом плюс).
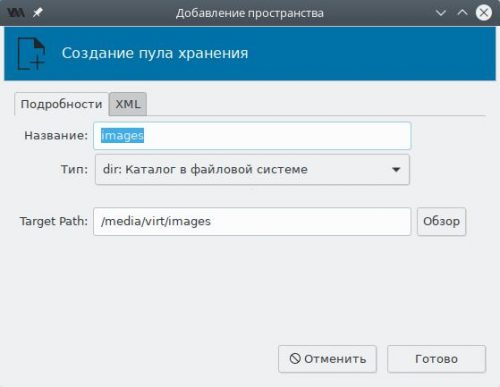
В поле Название для пула с дисковыми образами укажем images, Тип — каталог в файловой системе, а Target Path — каталог на диске (в нашем случае — созданный ранее /media/virt/images). Нажмём Готово и пул появится в списке. Подтвердим сохранение изменений.
Повторим то же самое, но для ISO образов:
- название — iso;
- target path — /media/virt/iso.

Если всё сделано верно, в левой панели появятся два новых пула — images и iso. Выберем каждый и убедимся, что в чекбоксе Автозапуск при загрузке установлен флажок. Если это не так, исправим и нажмём Применить.
Пул с именем default теперь допускается удалить, хотя это и не обязательно. Для этого выберем его, нажмём кнопку Остановить пул, а затем Удалить пул и подтвердим намерение.
На этом базовая настройка завершена и можно приступать к установке гостевых операционных систем.
Настройка пользовательского сеанса KVM
Создание подключения к сеансу
Запустим Менеджер виртуальных машин (virt-manager) из меню используемой графической среды.
В главном окне менеджера виртуальных машин, нажмём правой кнопкой мыши по QEMU/KVM, затем в контекстном меню выберем вариант Отключиться и Удалить. Подтвердим удаление.
В меню Файл выберем Добавить соединение.
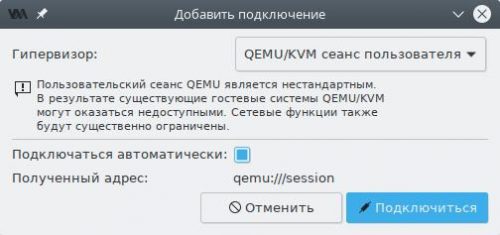
В поле Гипервизор выберем пункт QEMU/KVM сеанс пользователя, затем установим флажок в чекбокс Подключаться автоматически и нажмём Подключиться. Новый пункт появится в списке.
Создание каталогов для образов
По умолчанию предлагается использовать каталог ~/.local/share/libvirt/images для хранения дисковых образов виртуальных машин, однако для удобства мы создадим новые.
Это опциональное действие. Можно использовать пул default для любых целей.
В главном окне менеджера выделим пункт QEMU/KVM сеанс пользователя, затем в меню Правка выберем пункт Свойства подключения и переключимся на вкладку Пространство данных.
Создадим два каталога: images для дисковых образов виртуальных машин и iso для ISO образов, из которых будет производиться установка операционных систем:
mkdir -p ~/virt/{images,iso}
В левой панели окна менеджера пространств данных нажмём кнопку Добавить пул (с символом плюс).

В поле Название для пула с дисковыми образами укажем images, Тип — каталог в файловой системе, а Target Path — каталог на диске (в нашем случае — созданный ранее ~/virt/images). Нажмём Готово и пул появится в списке. Подтвердим сохранение изменений.
Повторим то же самое, но для ISO образов:
- название — iso;
- target path — ~/virt/iso.
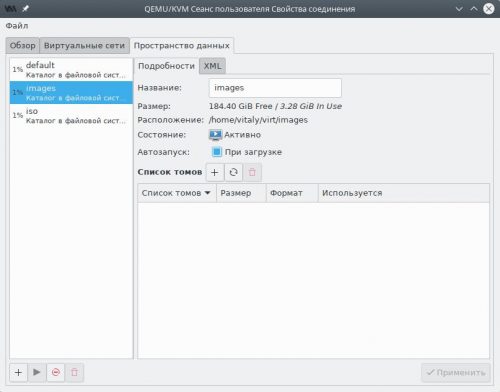
Если всё сделано верно, в левой панели появятся два новых пула — images и iso. Выберем каждый и убедимся, что в чекбоксе Автозапуск при загрузке установлен флажок. Если это не так, исправим и нажмём Применить.
Пул с именем default теперь допускается удалить, хотя это и не обязательно. Для этого выберем его, нажмём кнопку Остановить пул, а затем Удалить пул и подтвердим намерение.
Настройка сети в пользовательском сеансе
Создадим сетевой мост для виртуальных машин:
sudo nmcli con add type bridge autoconnect yes ifname virbr0 ipv4.method shared ipv4.address 192.168.122.1/24
Добавим основное проводное соединение в качестве ведущего для моста:
sudo nmcli con add type bridge-slave autoconnect yes ifname enp3s0 master virbr0
Здесь вместо enp3s0 укажем физический интерфейс проводного соединения (может быть получен из вывода nmcli device status).
Разрешим использование моста в qemu-bridge-helper:
echo allow virbr0 | sudo tee -a /etc/qemu/bridge.conf
Добавим правила для файрвола:
sudo firewall-cmd --zone libvirt --add-interface virbr0 --permanent
sudo firewall-cmd --zone libvirt --add-service dhcp --permanent
sudo firewall-cmd --zone libvirt --add-service dhcpv6 --permanent
sudo firewall-cmd --zone libvirt --add-service dns --permanent
sudo firewall-cmd --reload
На этом настройка пользовательского сеанса завершена и можно приступать к установке гостевых операционных систем.
Подготовка к установке
Для установки нам потребуются:
- официальный ISO образ операционной системы Windows 10, который можно скачать с официального сайта Microsoft (30-дневная пробная версия);
- ISO образ с набором драйверов Virtio для гостевых операционных систем;
- образ дискеты с драйверами Virtio для ранней стадии установки.
Скачаем указанные образы, скопируем их в каталог /media/virt/iso (системный сеанс), либо ~/virt/iso (пользовательский сеанс).
Создание гостевой ОС Windows 10
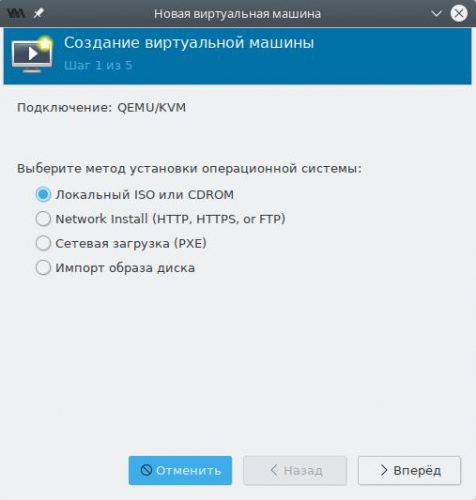
На главной панели инструментов нажмём кнопку Создать виртуальную машину или выберем одноимённый пункт из меню Файл.
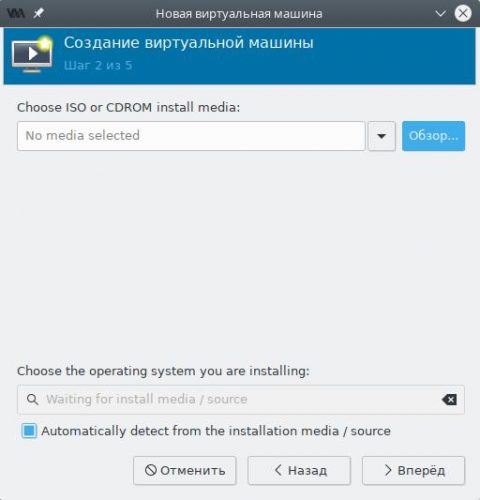
В появившемся окне мастера на первом шаге выберем пункт Локальный ISO или cdrom.
На втором шаге мастера нажмём кнопку Обзор, выберем из списка загруженный ранее ISO образ и нажмём Выбор тома.
Оставляем флажок в чекбоксе Automatically detect from installation media/source, чтобы Virt Manager самостоятельно подобрал оптимальные параметры для виртуальной машины и жмём Вперёд.
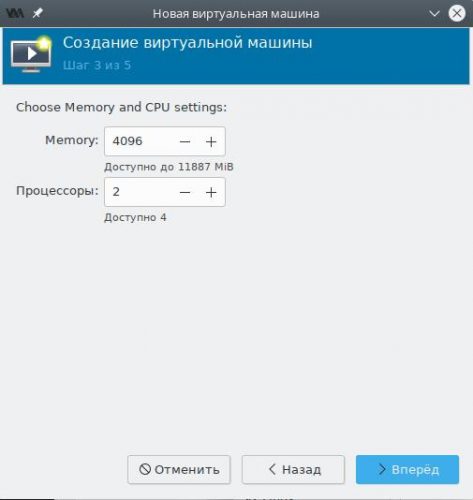
Указываем выделяемый виртуальной машине объём оперативной памяти и количество ядер процессора.
Теперь создадим локальный дисковый образ для гостевой ОС.
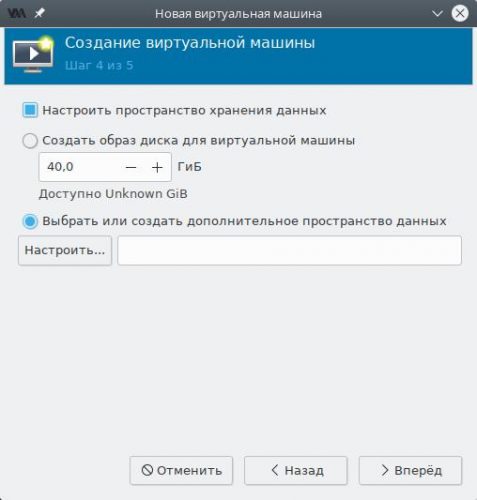
Установим флажок в чекбокс Настроить пространство хранения данных, а также точку около пункта Выбрать или создать дополнительное пространство данных и нажмём кнопку Настроить.
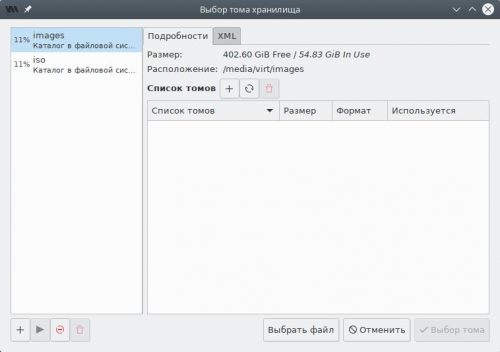
В левой панели переключимся на пул images, затем нажмём кнопку Создать том.
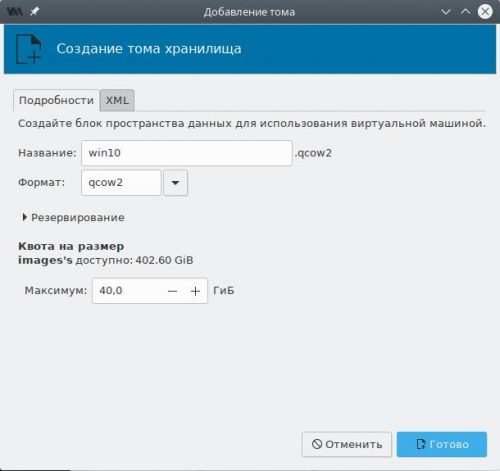
Создадим новый том для гостевой ОС:
- название — любое, но без пробелов и русских букв;
- формат — qcow2;
- максимальный размер — не менее 40 ГБ.
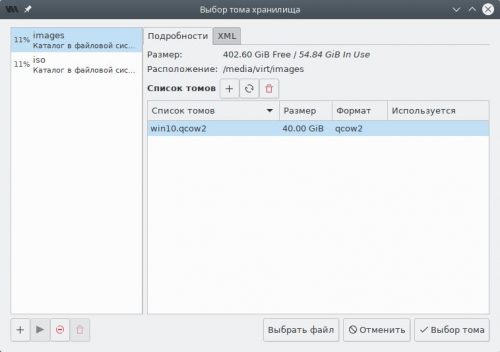
Выберем созданный том в списке и нажмём кнопку Выбор тома.
На заключительном шаге мастера будет предложено указать название для виртуальной машины (пробелы и русские буквы также не допускаются).
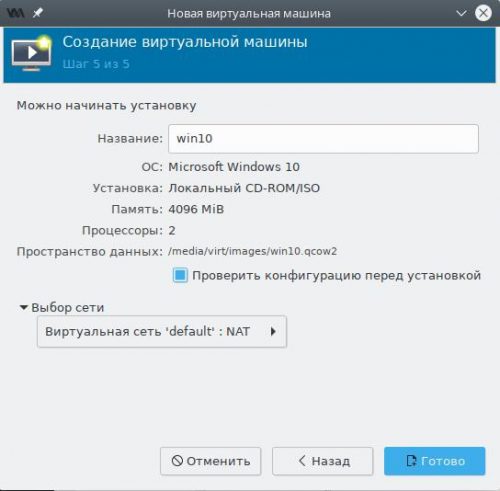
Обязательно установим флажок в Проверить конфигурацию перед установкой и нажмём Готово.
Настройка гостевой ОС Windows 10
Мы не будем подробно описывать все параметры конфигурации гостевой ОС, а лишь остановимся лишь на самых важных, от правильной установки которых зависит успех всей нашей задачи.
Переключимся на страницу SATA диск 1, выберем пункт Дополнительные параметры и изменим шину диска с SATA на VirtIO.
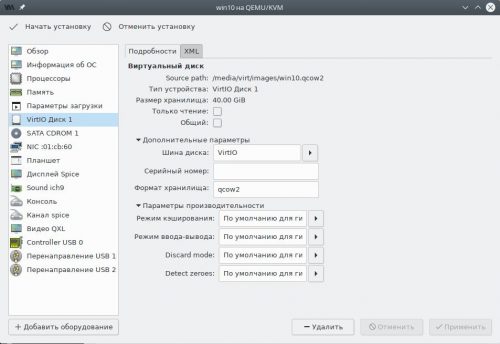
Здесь же допускается явно задать серийный номер накопителя, который будет передан гостевой ОС (если не указано, то генерируется автоматически), а также включить поддержку процедуры TRIM в случае если хранилище было создано на SSD накопителе.
Нажмём кнопку Добавить оборудование, выберем тип Хранилище.
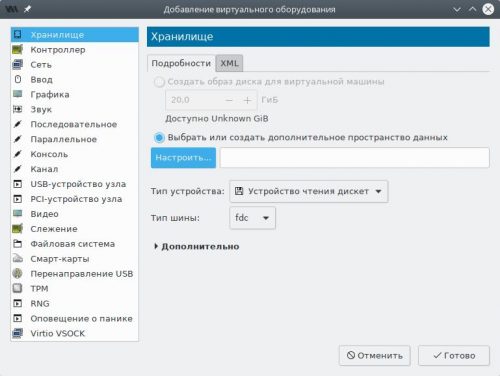
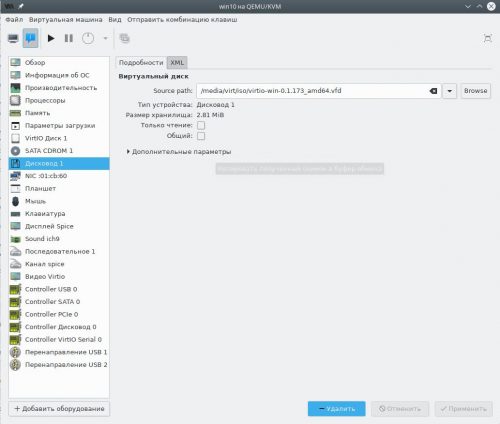
Изменим Тип устройства на Устройство чтения дискет, затем установим точку в Выбрать или создать дополнительное пространство данных и нажмём кнопку Настроить.
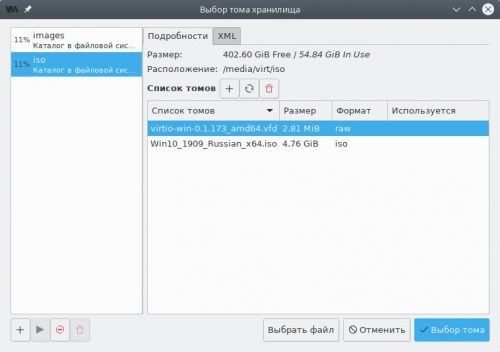
В появившемся окне переключимся на пул iso, выберем образ дискеты, нажмём Выбор тома, а затем Готово.
Переключимся на страницу Видео и в поле Модель убедимся, что установлено значение QXL. Если это не так, внесём правки.
Все остальные параметры оставим по умолчанию и нажмём кнопку Начать установку.
Установка гостевой Windows 10
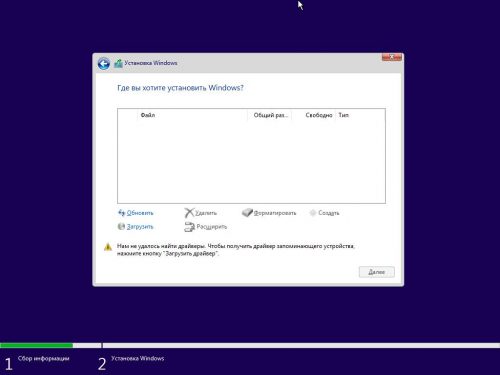
Запускаем стандартную установку данной ОС, выбираем редакцию, вводим или пропускаем (для получения 30 дневной пробной версии) серийный номер, принимаем лицензионное соглашение с конечным пользователем, затем Выборочная установка ибо нам требуется создать разделы на диске и установить драйвер VirtIO для ранней стадии загрузки системы.
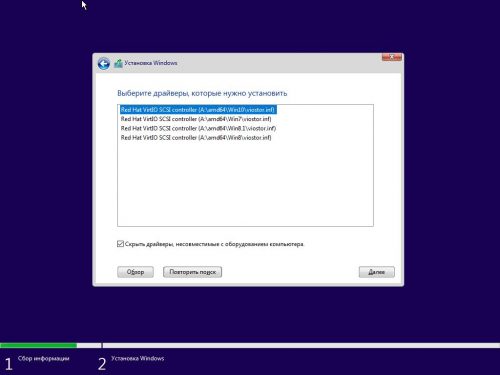
Когда появится сообщение об ошибке о том, что не удалось загрузить драйверы, нажмём кнопку Загрузить, а затем в появишемся окне разрешим автоматический поиск при помощи нажатия OK.
Укажем версию драйвера Red Hat VirtIO SCSI controller для Windows 10 и нажмём Далее.
С этого момента программа установки наконец обнаружит наш виртуальный накопитель и предложит создать разделы, а затем установить на него операционную систему.
Далее весь процесс установки вполне стандартный и описывать его мы не будем.
Установка драйверов Virtio гостевой ОС
По окончании установки сразу завершаем работу виртуальной машины (Пуск — Выключение), нажимаем кнопку Показать виртуальное оборудование на панели инструментов, переходим на страницу SATA CDROM 1, жмём Browse и внутри пула iso выбираем ISO-образ с гостевыми драйверами Virtio.
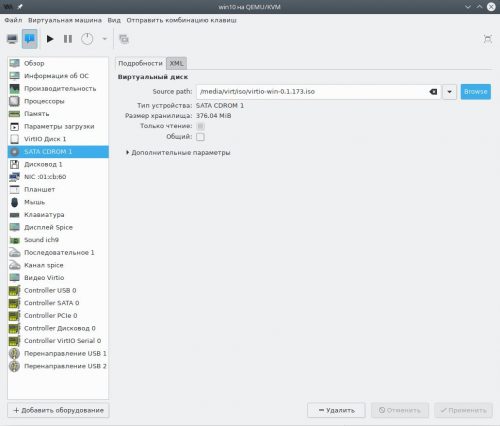
Применим изменения, а затем перейдём на страницу Дисковод 1, нажмём кнопку Удалить и Применить, т.к. он более нам не требуется.
На панели инструментов нажмём кнопку Показать графическую консоль, а затем Включить виртуальную машину.
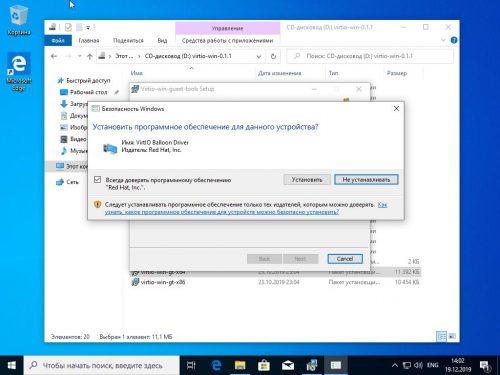
Откроем Проводник Windows, перейдём на виртуальный CD диск D: и запустим программу установки virtio-win-gt-x64.exe.
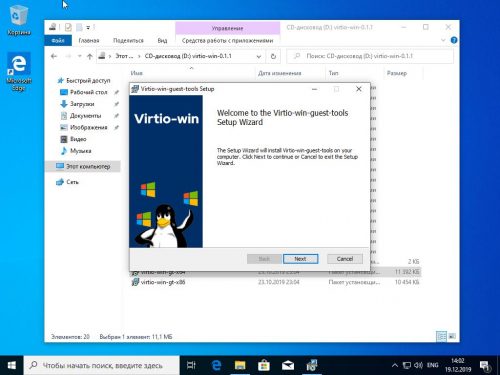
Выберем рекомендуемые Red Hat компоненты.
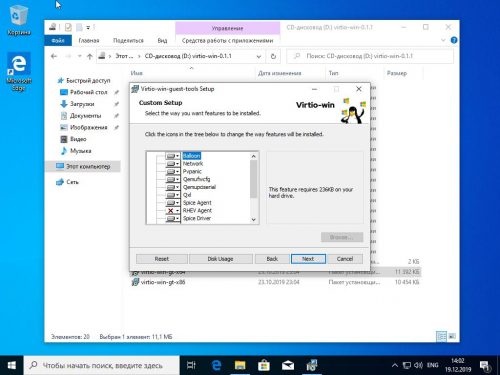
Разрешим установку драйверов с цифровой подписью Red Hat, нажав Установить.
Установка гостевых дополнений SPICE
Для того, чтобы в гостевой ОС появилась полная поддержка обмена данными с буфером обмена хостовой ОС, динамическое изменение разрешения виртуального дисплея и т.д., установим внутри гостя пакет SPICE Guest Tools по прямой ссылке.
Запустим скачанный файл и выполним установку всех предложенных по умолчанию компонентов, включая дополнительные драйверы виртуального дисплея QXL. Перезагрузим виртуальную машину для вступления изменений в силу.
Установка окончена.
,
This guide contains instructions to resolve the following error in Hyper-V Manager when trying to import a virtual machine: «Hyper-V did not find virtual machines to import from location…Virtual machine could not be found. You might not have permissions to access it».

The error «Hyper_V did not find virtual machines to import from…», usually appears for one of the following reasons:
1. Missing or corrupted files: The virtual machine configuration files are missing or could not be read (e.g. when they are corrupted).
2. Lack of permissions: You do not have enough rights to import the virtual machine or you don’t have permission on the folder where the virtual machine files are stored.
3. Unsupported Hyper-V configuration version: The virtual machine you are trying to import has been exported from a Hyper-V host running a newer version or Hyper-V. This typically means that you cannot import a virtual machine from a Windows 11 Hyper-V host to a Windows 10 host, or from a Server 2019 host to a Server 2016 host.
To troubleshoot the error «Hyper-V No virtual Machine files found», follow the steps below.
How to FIX: Hyper-V No virtual Machine files found from location.
Step 1. Export Virtual Machine again.
To import a virtual machine to another Hyper-V host, you must have exported the following virtual machine’s files from the old host:
- Virtual Hard Disk:
(C:\ProgramData\Microsoft\Windows\Virtual Hard Disks) - Configuration files:
(C:\ProgramData\Microsoft\Windows\Hyper-V\Virtual Machines) - Checkpoints: (C:\ProgramData\Microsoft\Windows\Hyper-V\Snapshots)
So make sure you have moved in the new Hyper-V host the following folders:
- Virtual Hard Disks
- Virtual Machines
- Snapshots
If you have done this, try re-exporting the virtual machine from the old Hyper-V host and then doing the import again to make sure the files are intact.
Step 2. Verify Permissions.
Make sure you have administrative rights on the new Hyper-V host to import the virtual machine and you have enough permissions on the exported folder.
Step 3. Create a New VM and attach the Virtual Disk file (.VHD)
As mentioned above, you can import a virtual machine to a Hyper-V host running a newer version of Hyper-V, but you cannot import a virtual machine created on a newer version of Hyper-V to an older version of Hyper-V.
For example, if you have exported the virtual machine from a Windows 11 Hyper-V host and try to import it into Windows 10, you will get the error «Hyper_V could not find any virtual machines to import». You will also get the same error when trying to import into Server 2016 a virtual machine exported from Server 2016 or Server 2022.
To work around this problem, create a new virtual machine and attach to it the disk file of the virtual machine you want to import. To do that:
1. Copy all the contents of the «Virtual Hard Disks» folder of the virtual machine you want to import, to the following location/folder on the new host:
- C:\ProgramData\Microsoft\Windows\Virtual Hard Disks\
2. Then, open Hyper-V Manager and click New > Virtual Machine to create a new VM.

3. Click Next on the first screen, then type a name for the new virtual machine and click Next again.

4. On the next screen choose the machine’s generation e.g. «Generation 1» in this example and click Next again.

5. Then specify the amount of memory to allocate to this virtual machine and click Next.

6. Now select Default Switch for networking and click Next.

7a. In ‘Connect Virtual Hard Disk’ screen, select Use an existing virtual disk and then click Browse.

7b. Now choose the VM’s virtual disk file (.VHD or .VHDX) and click Open.

7c. Then click Next to continue.

8. Finally click Finish.

9. Finally, start the virtual machine and you’re done!
That’s it! Let me know if this guide has helped you by leaving your comment about your experience. Please like and share this guide to help others.
If this article was useful for you, please consider supporting us by making a donation. Even $1 can a make a huge difference for us in our effort to continue to help others while keeping this site free:
- Author
- Recent Posts
Konstantinos is the founder and administrator of Wintips.org. Since 1995 he works and provides IT support as a computer and network expert to individuals and large companies. He is specialized in solving problems related to Windows or other Microsoft products (Windows Server, Office, Microsoft 365, etc.).
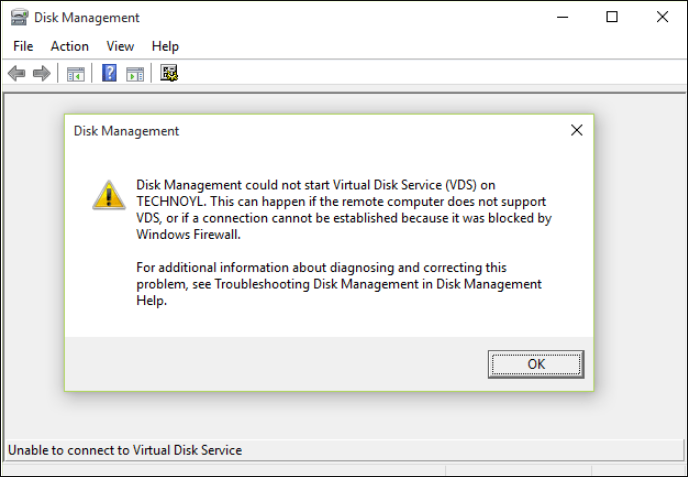
Do you frequently receive prompts showing «unable to connect to virtual disk service» on Windows 10 or 11? Also, When attempting to access Disk Management in Windows 7, it may become stuck in «connecting to the virtual disk service» or «loading disk configuration information.»
Here, we outline the steps you can take to solve this issue, as it is a Windows service that controls and makes information available on the virtual disk.
Why Unable to Connect to Virtual Disk Service
You are wondering why your Disk Management cannot connect to the virtual disk service. Here are some of the reasons why.
- The remote computer does not support VDS.
A computer won’t connect to a virtual disk service if it doesn’t support it. So always check to know if the laptop supports it before connecting.
- The connection is blocked by Windows Firewall.
The Windows Firewall monitors network traffic into and out of the computer and determines which network traffic to block or allow based on the security rules. So, the Windows Firewall may be responsible for the coming errors.
- Other reasons, such as faulty devices.
You could check on external storage devices like an external hard drive, a card reader, or a USB drive, as they could be faulty and responsible for the errors. These devices could also be incompatible with Disk Management.
To get this virtual disk service error fixed, look at the next part of this article. The fixes would help with the error on either a Windows PC or a Windows Server.
How Do I Fix the «Unable to Connect to Virtual Disk Service» Error
Outlined here are the possible ways you can get the «unable to connect to virtual disk service» prompt fixed. We present to you six ways to fix the error. They are as follows:
Fix 1. Use Alternative Software for Disk Management
Fix 2. Disable Windows Defender
Fix 3. Enable Virtual Disk Service
Fix 4. Use SFC or DISM to Fix the Error
Fix 5. Unblock Windows Firewall
Fix 6. Check All External Storage Devices
Now, let’s learn the fixes in detail and start with the first one.
Fix 1. Use Alternative Software for Disk Management
What if I told you that you could use an alternative software for Disk Management that would serve the same purpose without any issues? Interesting right? EaseUS Partition Master Free serves this purpose well, and yes, it can completely replace disk management in all aspects.
It is more efficient and safer than disk management and has other exciting features. Here are some reasons why it is an ideal alternative.
- Create/Delete partition: You can delete/create partitions on USB drive, SD cards, and other drives.
- Resize/Move partition: This tool can resize encrypted partition or move unallocated space to C drive
- Extend system partition: You can make the most of available or unallocated space. To speed up the PC, use the «Extend» feature.
- Merge partitions: With its help, it is easy to merge partitions on SSD or a USB.
- Format/Wipe Partition: You can format a disk or delete a partition using the free EaseUS Partition Manager.
You can’t wait to try it out with the features listed. You can click the button below to download.
Fix 2. Disable Windows Defender
Sometimes disabling the built-in Windows Defender antivirus can prevent the error from occurring.
To disable them, follow these steps.
Step 1: Press the «Windows + R» keys and type in «gpedit.msc» in order to open Local Group Policy Editor.
Step 2: Navigate to Computer Configuration > Administrative Templates > Windows Components > Windows Defender Antivirus.
Step 3: Highlight Windows Defender Antivirus and double click Turn off Windows Defender Antivirus.
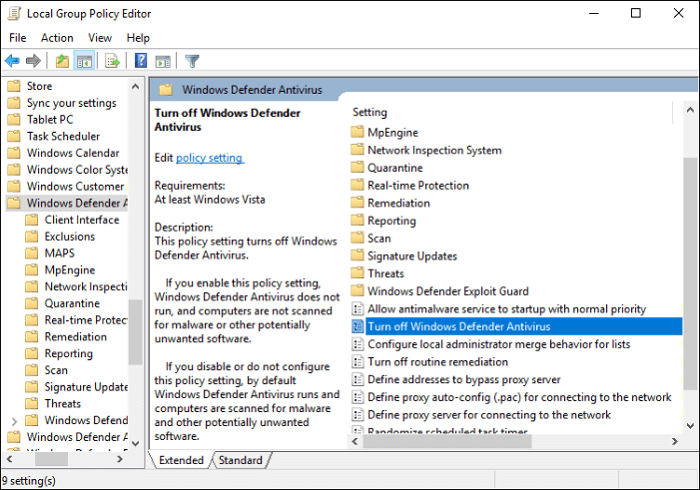
Step 4: Mark «Enabled,» then «Apply,» and «OK» to save the changes.
Step 5: Reboot the computer to effect the changes.
Fix 3. Enable Virtual Disk Service
The virtual disk services might not be enabled; to enable them, follow this guide.
Step 1: Press the «Windows + R» keys simultaneously to call out the Run box.
Step 2: Type «services.msc» in the Run box, and after, press Enter to open Windows Services Manager.
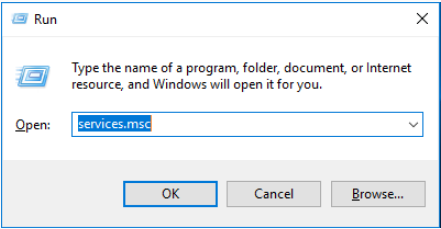
Step 3: Scroll down to find the Virtual Disk Service. Double-click this service to open it.
Step 4: Choose Automatic/Manual for the startup type. Then, click «OK» to save the changes.
Fix 4. Use SFC or DISM to Fix the Error
Step 1: Open the Command Prompt window. Enter «command prompt» in Search. Right-click the Command Prompt icon and Run as administrator.
Step 2: Type «sfc /scannow» and press the Enter key. Then, wait until the procedure ends.
You can start Disk Management to see if it can be loaded as usual. If the SFC command fails to fix this problem, you can try the DISM command.
The steps for running the DISM command are given below.
- Similarly, launch Command Prompt as an administrator.
- Type this:
exe /Online /Cleanup-image /Scanhealth
exe /Online /Cleanup-image /Restorehealth
- Close the Command Prompt window after the procedure ends and test whether the error is solved.
Fix 5. Unblock Windows Firewall
Based on its security rules, the Windows Firewall often acts as an obstacle. Follow the steps below to unblock the Windows Firewall.
Step 1: Select the Start button > Settings > Update & Security > Windows Security and then Firewall & network protection
Step 2: Select «Windows Defender» and click «Open Windows Defender Security Center.»
Step 3: Click «Firewall & network protection» and «Allow an app through firewall.»
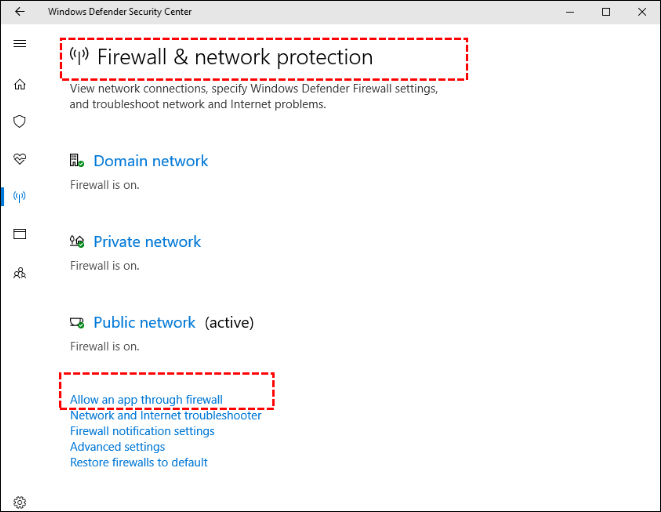
Step 4: In the new window, click «Change settings.»
Step 5: Find «Remote Volume Management» and tick both squares, then click the «OK» button to save changes.
Fix 6. Check All External Storage Devices
Troubleshooting external storage devices can sometimes fix this. removing all external devices one by one to determine if any are defective. The external storage devices can be a card reader, a USB drive, or a hard drive. Also, the universal serial bus drivers should be updated.
Conclusion
With the virtual disk service, it is possible to execute management functions for disks, file systems, volumes, and storage arrays, and mistakes would be prevalent.
The causes of this have been covered in this article; now, we need to determine whether the remote computer is capable of using it, whether any external storage devices are broken, or whether the Windows firewall has blocked the connection. There are six ways to resolve the issues, regardless of whether a Windows PC or Windows Server is involved.
There are some other disk partition issues you may run into when you use Disk Management. Click the links to help:
FAQs Related to Unable to Connect to Virtual Disk Service
Some of the frequently asked questions with answers related to being unable to connect to virtual disk service are provided here.
1. What is the Virtual Disk Service?
This Microsoft Windows service performs queries, configuration tasks, and volume and disk management functions as end users, scripts, and programs are requested.
2. How do I enable virtual disk services?
Information on how to enable virtual disk services has been given in this article.
3. Can I restart the virtual disk service?
Yes, you can. Below are a few steps to do this.
Step 1. Press the Windows key + R on the Keyboard.
Step 2. Type services.MSC and hit Enter.
Step 3. In the Services Window, look for Virtual Disk service and stop it.
Step 4. Restart the computer, Start the Virtual Disk Service, and set it to Automatic.
0
2
Есть гость windows 10 64b на хосте Debian 8 64b. Все с последними обновлениями.
Виртуалка нормально стартует и работает. Но если из самой win 10 выполнить перезагрузку машина больше не загружается.
В ее окне отображается такая информация:
SeaBIOS (version 1.7.5-20140531_083030-gandalf)
Machine UUID ….
Press F12 for boot menu/
Booting from Hard Disk…
Причем машина пытается загрузится с диска, но не может.
При нажатии F12 и ручном выборе загрузка тоже не происходит.
Если выполнить: virsh destroy skwin10, а потом virsh start skwin10 то машина нормально запустится.
Из под liveCD gparted нормально видит диск как загрузочный.
Права на доступ к файлу диска разрешен для всех.
Виртуалка ставилась командой:
virt-install —connect qemu:///system —name skwin10 —ram 6144 —vcpus=2 —disk path=/vm/vf/skwin10hdd.qcow2,size=130,bus=virtio,format=qcow2 —disk /vm/iso/SW_DVD5_Win_Pro_10_1607_64BIT_Russian_MLF_X21-07302.ISO,device=cdrom —bridge=br0,model=e1000 —os-type=windows —os-variant=win7 —graphics vnc,port=5901,listen=10.10.1.221 —noautoconsole —video=vga —cpu=host-passthrough —disk /vm/iso/virtio-win-0.1-100.iso,device=cdrom,bus=ide
Если при установке гостя у диска сделать bus=ide – картина та же самая.
Диск определяется нормально:
qemu-img info /vm/vf/skwin10hdd.img
image: /vm/vf/skwin10hdd.img
file format: qcow2
virtual size: 130G (139586437120 bytes)
disk size: 17G
cluster_size: 65536
Format specific information:
compat: 1.1
lazy refcounts: true
qemu-img check /vm/vf/skwin10hdd.img
No errors were found on the image.
2129920/2129920 = 100.00% allocated, 0.00% fragmented, 0.00% compressed clusters
Image end offset: 139607998464
XML виртуальной машины:
<domain type='kvm'>
  <name>skwin10</name>
  <uuid>63b94132-33cd-497e-bce0-3399db9cf8e3</uuid>
  <memory unit='KiB'>6291456</memory>
  <currentMemory unit='KiB'>6291456</currentMemory>
  <vcpu placement='static'>2</vcpu>
  <os>
    <type arch='x86_64' machine='pc-i440fx-2.1'>hvm</type>
    <boot dev='hd'/>
    <bootmenu enable='yes'/>
  </os>
  <features>
    <acpi/>
    <apic/>
    <pae/>
  </features>
  <cpu mode='host-passthrough'>
  </cpu>
  <clock offset='localtime'>
    <timer name='rtc' tickpolicy='catchup'/>
    <timer name='pit' tickpolicy='delay'/>
    <timer name='hpet' present='no'/>
  </clock>
  <on_poweroff>destroy</on_poweroff>
  <on_reboot>restart</on_reboot>
  <on_crash>restart</on_crash>
  <devices>
    <emulator>/usr/bin/kvm</emulator>
    <disk type='file' device='disk'>
      <driver name='qemu' type='qcow2' cache='writethrough'/>
      <source file='/vm/vf/skwin10hdd.img'/>
      <target dev='vda' bus='virtio'/>
      <address type='pci' domain='0x0000' bus='0x00' slot='0x05' function='0x0'/>
    </disk>
    <controller type='usb' index='0' model='ich9-ehci1'>
      <address type='pci' domain='0x0000' bus='0x00' slot='0x04' function='0x7'/>
    </controller>
    <controller type='usb' index='0' model='ich9-uhci1'>
      <master startport='0'/>
      <address type='pci' domain='0x0000' bus='0x00' slot='0x04' function='0x0' multifunction='on'/>
    </controller>
    <controller type='usb' index='0' model='ich9-uhci2'>
      <master startport='2'/>
      <address type='pci' domain='0x0000' bus='0x00' slot='0x04' function='0x1'/>
    </controller>
    <controller type='usb' index='0' model='ich9-uhci3'>
      <master startport='4'/>
      <address type='pci' domain='0x0000' bus='0x00' slot='0x04' function='0x2'/>
    </controller>
    <controller type='pci' index='0' model='pci-root'/>
    <controller type='ide' index='0'>
      <address type='pci' domain='0x0000' bus='0x00' slot='0x01' function='0x1'/>
    </controller>
    <interface type='bridge'>
      <mac address='52:54:00:6b:67:74'/>
      <source bridge='br0'/>
      <model type='e1000'/>
      <rom bar='off'/>
      <address type='pci' domain='0x0000' bus='0x00' slot='0x03' function='0x0'/>
    </interface>
    <serial type='pty'>
      <target port='0'/>
    </serial>
    <console type='pty'>
      <target type='serial' port='0'/>
    </console>
    <input type='tablet' bus='usb'/>
    <input type='mouse' bus='ps2'/>
    <input type='keyboard' bus='ps2'/>
    <graphics type='vnc' port='5901' autoport='no' listen='10.10.1.221'>
      <listen type='address' address='10.10.1.221'/>
    </graphics>
    <video>
      <model type='vga' vram='9216' heads='1'/>
      <address type='pci' domain='0x0000' bus='0x00' slot='0x02' function='0x0'/>
    </video>
    <memballoon model='virtio'>
      <address type='pci' domain='0x0000' bus='0x00' slot='0x06' function='0x0'/>
    </memballoon>
  </devices>
</domain>