
Время на прочтение7 мин
Количество просмотров136K
Задача: запустить некоторое количество виртуальных машин с Windows на типовом Линукс-сервере.
Решение: любой современный Linux-дистрибутив, «родная» технология виртуализации KVM, Windows 2003 и настройки, описанные ниже.
Смотри также: вводную часть статьи по настройке KVM-контейнеров для FreeBSD.
Выбор гостевой ОС
Windows XP работает под Linux KVM неустойчиво. Основные ошибки — потребление 100% процессора процессом csrss.exe (вплоть до обрыва RDP-сессий) и BSOD с кодом IRQL_NOT_LESS_OR_EQUAL в HAL.DLL. Если удалось достичь стабильной работы, обязательно отключите автоматическую установку обновлений! По нашему опыту, для работы WinXP под KVM они стали главным источником проблем.
Windows 7 работает нормально, но согласно счётчикам Proxmox, требует для работы более 3 гигабайт ОЗУ.
Оптимальным вариантом оказалась 32-разрядная редакция Windows 2003 R2:
- работает надёжно, в т.ч. с virtio,
- проблем совместимости с XP не имеет (даже внешний вид может быть сделан таким же),
- занимает в ОЗУ менее 800 мегабайт.
Верхнего лимита в 4 гигабайта памяти (без PAE) оказалось достаточно для всех возникавших задач.
Для ознакомительных целей годится любой опубликованный на RuTracker дистрибутив.
Первый запуск и virtio
#!/bin/sh
VM_ID="10"

MACBASE="00:16:3e:ff:ff"

HDA="vm_${VM_ID}.img"
HDB="temp.img"
HDC="w2k3_r2_ent_rus_x86/ru_win_srv_2003_r2_enterprise_with_sp2_vl_cd1_X13-46484.iso"
HDD="virtio-win-0.1-52.iso"

sudo kvm \
-enable-kvm \
-boot "menu=on,order=d" \
-m 1024M \
-balloon virtio \
-name "kvm_${VM_ID}" \
-drive "file=$HDA,index=0,media=disk,cache=writeback" \
-drive "file=$HDB,index=1,media=disk,cache=writeback,if=virtio" \
-drive "file=$HDC,index=2,media=cdrom,cache=writeback,readonly" \
-drive "file=$HDD,index=3,media=cdrom,cache=writeback,readonly" \
-net "nic,model=virtio,macaddr=${MACBASE}:${VM_ID}" \
-net "tap,ifname=tap${VM_ID},script=no,downscript=no" \
-vnc "0.0.0.0:${VM_ID}"
Параметр «-vnc …» имеет смысл только на сервере без GUI. По умолчанию KVM откроет окно через SDL. В обоих случаях Ctrl+Alt+Shift+1 и Ctrl+Alt+Shift+2 служат для переключения внутри окна между гостевой и управляющей консолью.
Параметр «-net nic,model=virtio,...» создаст внутри ВМ сетевую карту неизвестного Windows типа, для которого мастер настройки оборудования предложит выбрать драйвер. Парный ему параметр «-net tap,...» создаст в хост-ОС сетевой интерфейс для связи с ВМ. Назначение IP-адресов, настройка DHCP и выхода во внешний мир через ProxyARP, NAT или Bridge не имеют прямого отношения к Windows, поэтому здесь не рассматриваются.
Теперь про самое важное на данном этапе, т.е. про диски.
HDC — это ISO-образ с дистрибутивом Windows. Имя файла взято из торрента в предыдущем разделе. С него внутри ВМ произойдет первая загрузка системы («-boot order=d«).
HDD — это ISO-образ с драйверами virtio. Скачивается с alt.fedoraproject.org/pub/alt/virtio-win/latest/images/bin
HDA — это пустой образ диска, на который будет устанавливаться система. Создан командой «kvm-img create -f qcow2 vm_10.img 50G«.
HDB — это пустой образ диска, созданный через «kvm-img create -f qcow2 temp.img 1G» с единственной целью — показать Windows устройство незнакомого типа, чтобы она затребовала драйвер для него. Установка в систему драйвера virtio для временного диска позволит переключить затем с IDE на virtio системный диск.
После того, как установка системы и драйверов будет полностью завершена, в команде запуска следует убрать «-boot» и все строки «-drive», кроме первой, т.к. временный диск и ISO-образы станут не нужны (обратите внимание на добавленный «if=virtio«!):
kvm ... -drive "file=$HDA,index=0,media=disk,cache=writeback,if=virtio" ...
Про пользу virtio, варианты настройки сети и параметры командной строки kvm читайте в habrahabr.ru/post/167099
Рекомендуемые настройки Windows
Во-первых, по умолчанию Windows создаёт при BSOD’ах полный дамп памяти. В лучшем случае, это существенно замедлит перезагрузку. В худшем, приведёт к полному зависанию.
Во-вторых, автоматические обновления по умолчанию включены, и есть риск, что одно из них сделает работу под KVM нестабильной.
Поэтому после завершения инсталляции в самую первую очередь (до установки драйверов!) рекомендуется зайти в Панель управления => Система:
- Автоматическое обновление: Отключить
- Дополнительно => Отчет об ошибках => Отключить
- Дополнительно => Загрузка и восстановление => Параметры => Отказ системы => Запись отладочной информации => Малый дамп памяти (64КБ)
Настройки TCP/IP не являются обязательными, но немного повысят производительность, т.к. в виртуальной среде отсутствуют некоторые проблемы, которые нужно учитывать при передаче по физической сети.
Описание: www.linux-kvm.org/page/WindowsGuestDrivers/kvmnet/registry
Готовый REG-файл: svn1.sytes.net/linuxkvm/tune-guest-tcpip.reg
После этого можете приступать к установке драйверов для диска (virt-stor) и сетевой карты (virt-net). После их установки в Диспетчере оборудования появятся «Red Hat VirtIO SCSI Controller», «Red Hat VirtIO SCSI Disk Device» и «Red Hat VirtIO Ethernet Adapter».
Ballooning
Традиционный подход — сразу при запуске виртуальной машины (ВМ) выделять ей блок ОЗУ заданного размера, например, 512 мегабайт. Его недостаток — в те моменты, когда в памяти ВМ есть неиспользуемое пространство, в других ВМ и хост-системе её может не хватать.
Memory ballooning — это механизм динамического (а) выделения хост-ОЗУ для ВМ по мере необходимости и (б) возвращения неиспользуемых блоков по мере освобождения. Благодаря ему становится возможным одновременно запускать множество ВМ, суммарный объём виртуального ОЗУ в которых больше объёма физического ОЗУ в хост-системе, при условии, что они не станут использовать максимально разрешённый объём все сразу. Благодаря этому память хост-системы распределяется между ВМ так же гибко, как между обычными процессами.
Создание виртуальных ресурсов, превышающих физические по объёму, обозначается любимыми для многих хостеров терминами «overcommit» и «overselling».
Для работы баллонинга требуется согласованная работа двух программных компонентов:
- MOM (memory overcommitment manager) в хост-системе, меняющего объём ОЗУ для ВМ на основании запросов из неё,
- VMM (менеджера виртуальной памяти) в гостевой ОС, взаимодействующего с MOM через виртуальный PCI-контроллер.
MOM в последних версиях KVM включается автоматически, старые требовали включать его с помощью «kvm… -balloon virtio» в командной строке.
Гостевое устройство для связи с MOM диспетчер оборудования (devmgmt.msc) Windows увидит как «PCI standard RAM controller» неизвестного типа. В отличие от virt-stor и virt-net, драйвер к нему не будет предложено установить автоматически. Вместо этого, следует зайти в свойства устройства, на вкладке «Драйвер» выбрать обновление и вручную указать путь к balloon.inf на VirtIO CD (пруф). После этого устройство переименуется в «VirtIO Balloon Driver».
ACPI
По умолчанию Windows 2003 разрешает выключать себя единственным способом — ввести логин-пароль, выбрать Пуск => «Завершение работы», ввести примечание, нажать «OK». Разумеется, на VDS-ферме такой подход неприемлем. KVM (и QEMU) умеет эмулировать ACPI. Команда «system_powerdown» аналогична нажатию кнопки питания на физическом компьютере, но Windows её проигнорирует. Лечится следующим REG-файлом:
Windows Registry Editor Version 5.00

[HKEY_LOCAL_MACHINE\SOFTWARE\Microsoft\Windows\CurrentVersion\policies\system]
"ShutdownWithoutLogon"=dword:00000001
"DisableCAD"=dword:00000001

[HKEY_LOCAL_MACHINE\SOFTWARE\Microsoft\Windows NT\CurrentVersion\Windows]
"ShutdownWarningDialogTimeout"=dword:00000003
Он же в готовом для запуска виде: svn1.sytes.net/linuxkvm/win-acpi-kvm.reg
Первоисточник с подробными объяснениями: umgum.com/acpi-windows2003-shutdown
Кэширование
Если образ гостевого диска хранится на VDS-ферме в виде файла, кэширование гостевых файлов может оказаться двойным — сначала их кэширует гостевая ОС при обращениях к виртуальному диску, затем ОС фермы при обращениях к физическому.
Всего возможны 3 основных режима:
- none — хост-система не кэширует файл-образ ни на чтение, ни на запись
- writeback — запись выполняется немедленно, чтение кэшируется
- writethrough — чтение и запись кэшируются
В разных версиях qemu/kvm и в разных ОС по умолчанию могут использоваться разные режимы. Например, Qemu до версии 1.2 использует writethrough, 1.2 перешёл на writeback, в Proxmox выбран cache=none.
Все без исключения источники в Сети советуют не использовать writethrough как наиболее медленный. По субъективной оценке, для ВМ с Windows оптимален writeback, для ВМ с Linux и FreeBSD — none.
Зависания сети
Единственной серьёзной проблемой, которую однозначно вызывает ошибка в KVM, являются подвисания гостевой сети при интенсивном трафике: bugs.centos.org/view.php?id=5526 (кроме собственно описания ошибки, там же есть важные ссылки на другие багтрекеры).
Рекомендации, предлагаемые участниками обсуждений (обновление qemu-kvm и ядра, изменение параметров командной строки, использование vhost-net), к сожалению, пока не сумели её решить.
При каждом подвисании приходится заходить на консоль ВМ по VNC и выполнять сброс сетевого интерфейса, после чего трафик снова начинает ходить нормально.
Автоматизировать данное действие в Windows можно с помощью AutoIt, если создать файл PingFailed_ResetNic.au3 и вызывать его Диспетчером заданий каждые несколько минут:
#include «EventLog.au3»

Local $PingHost = "192.168.0.1"
Local $Interface = "LAN"

Ping($PingHost, 250)
If @error = 0 Then Exit

Local $hEventLog = _EventLog__Open("", "RestartNicOnPingFailure")
Local $aEmpty[1] = [0]
_EventLog__Report($hEventLog, 2, 0, 1, "", "Restart NIC " & Interface & " on failed ping to " & PingHost, $aEmpty)
_EventLog__Close($hEventLog)

RunWait("netsh interface set interface " & $Interface & " DISABLED", "", @SW_HIDE)
RunWait("netsh interface set interface " & $Interface &  " ENABLED", "", @SW_HIDE)
Вариант для CMD.EXE: rickosborne.org/blog/2007/02/stupid-windows-tricks-restart-network-adapter-when-it-hangs
Подобное «решение» не везде может рассматриваться как удовлетворительное, но в ряде случаев его достаточно, чтобы свести негативный эффект к приемлемому минимуму, позволяющему дождаться выхода исправления вместо более кардинальных мер.
Note: I no longer use libvirt, nor do I have a Windows 10 KVM anymore. I strictly use my M1 Mac now and only Hyper-V with Discrete Device Passthrough (PCIe Passthrough) on separate hardware. For future readers who may find this on Google and use this for reference, I’ll give some important things to know about and advice:
- Recommended distribution for QEMU/KVM is Arch Linux. Not Arch-based distros. Arch Linux uses a properly updated kernel that doesn’t freeze on an old LTS version like 4.18 or 4.19 or 5.4. There are KVM fixes and improvements that have not been backported to these distribution-maintained kernels. Not only that, your kernel security patches will be delayed. Distributions to avoid that do this (non-exhaustive) are Debian, Ubuntu, CentOS, Red Hat Enterprise Linux, Manjaro, and Proxmox. These distributions also heavily freeze the qemu package, some being as old as qemu 4.x. Arch Linux uses the latest qemu stable package.
- If your hardware requires the usage of ACS patches, as unfortunate as it sounds you should refrain from using the ACS patches entirely and consider different hardware. ACS patches do not guarantee that the hardware you passthrough despite the IOMMU groups will function properly. These affect the stability of both the guest and the host from issues such as interrupt (IRQ) conflicts. Not only that, completely bypassing IOMMU groups pose a security risk because of false sense of guest-host and device isolation. This can be used to get guest DMA access on the host through other devices that aren’t supposed to be in the same group. Memory corruption can also be exploited to perform guest-host escape. This is exactly why these patches will never ever be upstreamed as IOMMU is heavily used for security isolation and gamble stability. See Android.
- Another awful piece of advice like ACS patches is allowing unsafe interrupts. Allowing unsafe interrupts is for CPUs that has poor/legacy IOMMU and doesn’t support interrupt remapping, something any CPU from 2013 and later can do. This is commonly required if you need the ACS patch. Allowing unsafe interrupts and using Message Signaled Interrupts, a better way of sending interrupts to the interrupt handler necessary to drastically improve interrupt performance and latency, can allow devices to spoof interrupts from other devices and allow the guest to get host DMA write access from a host interrupt block. This is because MSI interrupts are triggered by a DMA write to a special address range. Interrupt remapping in newer IOMMU protects this address range.
- If you’re looking to get Secure Boot working on the VM for improved boot-time and driver security (and maybe nested virtualization for virtualization-based security), you’ll want to compile EDK2 OVMF with secure boot support and add the Microsoft Windows 8.1 keys to OVMF’s trust store. A Docker image exists to do those. You’ll also find that Fedora’s rebuilds of the Virtio drivers are not compatible with Secure Boot on Windows 10 v1607 and above. This is because 1607 was the last version to allow Authenticode signed drivers to be loaded with Secure Boot. Your drivers must be signed by WHQL (Microsoft Hardware Compatibility Labs). Due to licensing issues, Fedora cannot ship these WHQL-signed drivers to their RPM repos. You have to obtain the Virtio drivers ISO from CentOS or Red Hat Enterprise Linux (RHEL) repos. A Docker image also exists for this.
- Best thing to pair Secure Boot with is a TPM chip. A TPM chip is also necessary for more secure Bitlocker through better RNG and key management. It’s recommended to use a vTPM rather than passing through your TPM to avoid possible TPM vulnerabilities leaking to the host. They’re also easier to maintain and handle because BIOS/UEFI issues affecting the host TPM will not affect the vTPM on the guest. Use
swtpmfor this. A simple 3-5 line bash script to create a swtpm vTPM 2.0 socket and telling qemu to create a vTPM 2.0 device and pointing it to the socket will create a simple vTPM with persistence. - The Arch Wiki incorrectly documents some key things about Virtio SCSI. First, use virtio-scsi. Its TRIM support and codebase is newer. Mature codebase != better. Second, do NOT blindly set your scsi controller queues to 8. Yes, it does increase performance because it’s multiqueue, but it can severely decrease performance and cause stuttering if you allocate more than your hardware can handle during high disk operations. This issue is from overallocating, causing lockups and thrashing the entire CPU. This setting should not be set any more than the amount of vCPUs your guest has.
- The same concept of multiqueue processing also applies to the paravirtualized virtio networking. Network intensive tasks will again thrash and lockup threads causing massive stuttering. If you pass through a PCIe NIC, this isn’t a concern for you. But for virtio NICs, you should do the same a you did with the SCSI controller: setting it to no more than the amount of vCPUs you have. Preferably drop one queue from the vCPUs you have. x — 1
- If you intend on using evdev to pass through your USB keyboard and mice, you will absolutely want to add the virtio-keyboard-pci and virtio-mouse-pci devices. The USB tablet device causes awful interrupt latency and is only meant for compatibility with legacy operating systems.
- One more incorrect thing about Virtio SCSI the Arch Wiki gets wrong is the threading model for the SCSI controller. User space is NOT as fast as kernel space. Linux uses a high speed kernel asynchronous I/O (AIO). The
nativethreading model for the disk, the kernel space AIO, is not «single threaded» at all like Arch wiki claims.threadedis more slower and less efficient because it continuously spawns userspace threads based on I/O activity. It’s meant for compatibility only.nativeuses kernel AIO and threads. You will also want to combinecache=nonewith this for maximum performance to completely eliminate all userspace I/O.
- Specs
- Hardware
- Software
- Preinstallation/Setup
- Guest Audio and keyboard+mouse
- Important files modified or added
- Static Hugepages
- Installation
- Post-installation (and performance tweaks!)
- Networking
- Hyper-V enlightenments, APIC, SMM, IOAPIC driver, and vmport
- Passthrough host CPU cache and enable CPU features
- virtio-scsi (and Virtio drivers)
- NVIDIA Drivers
- System and VM internal clock
- Message signal-based interrupts
- Bitlocker
- Reducing VM presence
- Minor performance tweaks
- CPU Pinning, Interrupts, Affinity, Governors, Topology, Isolating, and Priorities
- Topology
- Isolating the CPUs
- Interrupts, Governors, and Affinity coming soon. I need sleep.
Specs
Hardware
- Motherboard: MSI Z370-A PRO
- CPU: Intel i7-8700k OC @ 4.2GHz
- GPU 1: MSI NVIDIA GTX 1070 (Guest GPU)
- GPU 2: EVGA NVIDIA GTX 550 Ti 2048MB (unused)
- Integrated GPU: Intel UHD 630 (Host GPU)
- Memory: 32GB DDR4 2400MHz
- Host SSD: SATA Western Digital Green 250GB
- Guest SSD: SATA Samsung 860 EVO 250GB
Software
- Motherboard firmware version: 7B48v2D2 (Beta) 2021-04-20
- Linux distribution (Host OS): Arch Linux
- Linux kernel and version: linux-hardened
- QEMU version: 6.0.0
- Guest OS: Microsoft Windows 10 Enterprise 20H2 (19042.985)
- Distro is using Pipewire JACK with Pipewire JACK dropin.
- Guest audio is using Pipewire JACK and NVIDIA HDMI Audio. I alter between both if I need a microphone or not. Usually I just use HDMI audio.
Preinstallation/Setup
UPDATE YOUR UEFI/BIOS TO THE LATEST. PLEASE. Many, many, many, many, many, many, many, many, many IOMMU and Intel VT-x/AMD-v bugs are solved with updating your motherboard firmware. Hackintosh users know how painfully true motherboard firmware updates solve so many issues.
Guest Audio and keyboard+mouse
We’re simply using Pulseaudio/Pipewire here. We’re also using evdev to pass through our keyboard and mouse with LCTRL+RCTRL as switch keys.
QEMU Commandline for it:
  <qemu:commandline>
    <qemu:arg value="-audiodev"/>
    <qemu:arg value="driver=pa,id=pa1,server=unix:/run/user/1000/pulse/native,out.buffer-length=4000,timer-period=1000"/>
    <qemu:arg value="-object"/>
    <qemu:arg value="input-linux,id=mouse1,evdev=/dev/input/by-id/usb-Razer_Razer_DeathAdder_Essential_White_Edition-event-mouse"/>
    <qemu:arg value="-object"/>
    <qemu:arg value="input-linux,id=kbd1,evdev=/dev/input/by-id/usb-413c_Dell_KB216_Wired_Keyboard-event-kbd,grab_all=on,repeat=on"/>
    <qemu:env name="PIPEWIRE_RUNTIME_DIR" value="/run/user/1000"/>
  </qemu:commandline>
Important files modified or added
/usr/local/bin/vfio-pci-override.sh
#!/bin/sh

# We know what GPU we want to pass through so we'll define it. Use lspci to find the VGA compat. controller and Audio device of your GPU.
DEVS="0000:01:00.0 0000:01:00.1"

if [ ! -z "$(ls -A /sys/class/iommu)" ]; then
    for DEV in $DEVS; do
        echo "vfio-pci" > /sys/bus/pci/devices/$DEV/driver_override
    done
fi

modprobe -i vfio-pci
Make sure you give it execute permissions or it will not work! sudo chmod +x vfio-pci-override.sh
/etc/mkinitcpio.conf
MODULES=(vfio_pci vfio vfio_iommu_type1 vfio_virqfd i915)
# ...
FILES=(/usr/local/bin/vfio-pci-override.sh)
# ...
# Add modconf if it doesn't exist, usually after autodetect. Order matters.
HOOKS="base udev autodetect modconf ..."
/etc/modprobe.d/kvm.conf
# Ignoring MSRS solves bugcheck issue with 1809+ guests. Second option prevents clogging up dmesg.
options kvm ignore_msrs=1
options kvm report_ignored_msrs=0

# Usually on by default, but just to be safe since we will use Hyper-V virtualization for security such as Windows Sandbox and Windows Defender Application Guard.
options kvm_intel nested=1
/etc/modprobe.d/vfio.conf
install vfio-pci /usr/local/bin/vfio-pci-override.sh
options vfio-pci ids=10de:1b81,10de:10f0
Warning: Do not enable unsafe interrupts. Enabling unsafe interrupts is for CPUs that has poor/legacy IOMMU and doesn’t support interrupt remapping. You might need this if you’re using the ACS patch. You’re killing IOMMU anyways by using ACS patch, killing all virtualization-based security protections and risk of malicious devices attacking your host easier.
Enabling unsafe interrupts and using Message Signaled Interrupts can allow devices to spoof interrupts from other devices, thus VM escaping by getting host DMA write access to the interrupt block from the guest. This is because MSI interrupts are triggered by a DMA write to a special address range. Interrupt remapping in newer IOMMU protects this address range. If your CPU doesn’t support interrupt remapping, throw it out and get something from at least 2013.
If you absolutely need it, check dmesg and see if it tells you to use it.
/etc/default/grub (Kernel commandline)
GRUB_CMDLINE_LINUX_DEFAULT="quiet nohz_full=1,2,3,4,7,8,9,10 rcu_nocbs=1,2,3,4,7,8,9,10 isolcpus=1,2,3,4,7,8,9,10 kvm.nx_huge_pages=force pti=on page_poison=1 mce=0 random.trust_cpu=off efi=disable_early_pci_dma slab_nomerge slub_debug=FZP page_alloc.shuffle=1 transparent_hugepage=never default_hugepagesz=1G hugepagesz=1G hugepages=14 vsyscall=none i915.enable_fbc=1 vfio-pci.ids=10de:1b81,10de:10f0 intel_iommu=on iommu=pt rd.driver.pre=vfio-pci ..."
Static Hugepages
Take note of the following above:
transparent_hugepage=neverdefault_hugepagesz=1Ghugepagesz=1Ghugepages=14
This is allocating huge pages at boot time.
We are using static huge pages for improved performance. We set the page files to 1GB each and allocate 14 of them. The VM has 12GB of memory allocated. It usually requires some extra pages rather than the exact else it fails to launch.
We’re disabling transparent hugepages as it can hinder performance from the kernel dynamically allocating hugepages, increasing CPU usage. Allocating huge pages at boot time reduces memory fragmentation the most.
See https://pingcap.com/blog/why-we-disable-linux-thp-feature-for-databases
While modern CPUs should be able to do 1GB pages, always double check:
cat /proc/cpuinfo | grep -i 'pdpe1gb'
If there is output, you can safely set page sizes to 1GB. Otherwise, you’ll need to use 2MB pages and calculate how many pages you need to allocate.
Set this line in your fstab to be sure hugepages are allocated, and use noatime of course.
hugetlbfs /dev/hugepages hugetlbfs noatime,pagesize=1G 0 0
Add yourself to the libvirt and kvm group: sudo gpasswd -a $USER kvm,libvirt
Then add the following to your XML file:
  <memoryBacking>
    <hugepages/>
    <nosharepages/>
    <locked/>
  </memoryBacking>
continued…
/etc/libvirt/qemu.conf
nographics_allow_host_audio = 1
# ...

# ...
user = "zanthed" # your user
group = "kvm"
# ...

cgroup_device_acl = [
     "/dev/input/by-id/usb-Lite-On_Technology_Corp._USB_Multimedia_Keyboard-event-kbd",
     "/dev/input/by-id/usb-Razer_Razer_DeathAdder_Essential_White_Edition-event-mouse",
     "/dev/null", "/dev/full", "/dev/zero",
     "/dev/random", "/dev/urandom",
     "/dev/ptmx", "/dev/kvm", "/dev/kqemu",
     "/dev/rtc","/dev/hpet", "/dev/sev"
]
cgroup_device_acl is for allow access to pass through keyboard and mouse data to guest via evdev. See: https://wiki.archlinux.org/index.php/PCI_passthrough_via_OVMF#Passing_keyboard/mouse_via_Evdev
Note you will absolutely want to install the virtio-input driver if you take this route instead of a USB passthrough. The default driver causes very, very, very high DPC latency.
Installation
Attach your installation media.
Emulate a SATA disk instead of SCSI for now to avoid driver issues.
Install as normal, setup, everything. Detach installation media after reboot. Boot normally. Now proceed to setting up drivers and networking.
Post-installation (and performance tweaks!)
Networking
Create a bridged connection with nm-connection-editor. Because the «Network Interfaces» tab was removed from virt-managersource you will need to do it via virsh.
First create a temporary file with the bridge defined /tmp/bridge.xml
<network>
  <name>br0</name>
  <forward mode="bridge"/>
  <bridge name="br0"/>
</network>
Replace br0 with your bridge interface if necessary.
Define it: # virsh net-define /tmp/bridge.xml
Start and enable autostarting: # virsh net-start br0 && virsh net-autostart br0
Utilize the bridge in the VM:
<interface type="bridge">
  <mac address="52:54:00:71:69:a7"/>
  <source bridge="br0"/>
  <model type="virtio-net-pci"/>
</interface>
virtio-net-pci is used over virtio for some performance and to solve possible connection issues using some Hyper-V enlightenments that don’t occur on virtio-net-pci.
If you pass through a physical network card, check if it can do SR-IOV. It’s blazing fast. Intel cards can normally do this:
lspci -s "Ethernet controller ID here" -vvv | grep -i "Root"
If there is output, replace the model type with sr-iov.
Model of network card is virtio. Emulating a real card is very CPU intensive and has a lot of overhead compared to virtio which uses paravirtualization. Though, passing through real hardware is always better. I suggest purchasing an Intel card that can do hardware timestamps.
Windows requires NetKVM driver from virtio drivers to utilize virtio model for paravirtualization.
If you use virtio instead of virtio-net-pci, set your driver queues for multiqueue properly to allow faster packet processing!
See https://pve.proxmox.com/pve-docs/chapter-qm.html#qm_network_device
Hyper-V enlightenments, APIC, SMM, IOAPIC driver, and vmport
Special things to speed up VM performance:
  <features>
    <acpi/>
    <apic>
    <hyperv>
      <relaxed state="on"/>
      <vapic state="on"/>
      <spinlocks state="on" retries="8191"/>
      <vpindex state="on"/>
      <runtime state="on"/>
      <synic state="on"/>
      <stimer state="on"/>
      <reset state="on"/>
      <vendor_id state="on" value="eridanampora"/>
      <frequencies state="on"/>
      <reenlightenment state='on'/>
      <tlbflush state='on'/>
    </hyperv>
    <vmport state="off"/>
    <smm state="on"/>
    <ioapic driver="kvm"/>
  </features>
AMD users might need to use
`
Passthrough host CPU cache and enable CPU features
  <cpu mode="host-passthrough" check="full" migratable="on">
    <topology sockets='1' dies='1' cores='4' threads='2'/>
  </cpu>
Intel users do not need to set the require policy on the following features:
    <feature policy="require" name="invtsc"/>
    <feature policy="require" name="vmx"/>
    <feature policy="require" name="topoext"/>
This is only necessary if you are on AMD Ryzen.
virtio-scsi (and Virtio drivers)
Grab the ISO for Fedora’s Virtio drivers: https://fedorapeople.org/groups/virt/virtio-win/direct-downloads/
Note, UEFI Secure Boot guests: As these drivers are rebuilds of Red Hat’s virtio drivers due to their licensing, they are not signed the same way that Windows 10 requires now. Windows 10 now requires, as of 1803 to have drivers signed by Microsoft’s WHQL, otherwise they will fail to load. If you use Secure Boot on the guest like me you will need to obtain Red Hat’s virtio drivers instead of Fedora’s rebuilds. If you use Scream audio, the developer does sign their driver to get around Windows 10 forbidding unsigned drivers, but it is impossible to get it WHQL approved and signed due to the way it works.
Otherwise, continue and ignore.
Mount it, run virtio-win-guest-tools.exe. Install all the drivers and shut down.
Create a virtio-scsi controller:
<controller type="scsi" index="0" model="virtio-scsi">
  <driver queues="5" iothread="1"/>
</controller>
Important! The Arch Wiki poorly documents that to increase performance, you should use multiqueue by setting queues to 8. While this is true, setting too many queues than your hardware can handle can cause lockups and thrash the host CPU, decreasing performance severely on heavy I/O operations. You should use no more than the amount of vCPUs you have on your guest. If you have 6 vCPUs, including hyperthreading, use 6. I personally drop 1 queue just to be safe.
Create a SCSI raw block disk using your real drive:
<disk type="block" device="disk">
  <driver name="qemu" type="raw" cache="none" io="native" discard="unmap"/>
  <source dev="/dev/disk/by-id/ata-Samsung_SSD_860_EVO_250GB_S3YHNX1KB15676F"/>
  <target dev="sda" bus="scsi"/>
  <address type="drive" controller="0" bus="0" target="0" unit="0"/>
</disk>
Important! The AIO (asynchronous I/O) is a major performance factor based on your hardware. The Arch wiki, again, poorly documents and even gets this section completely wrong.
Arch Wiki! Let me correct your incorrect advice: Native does not use a single threaded synchronous model. That’s not how proper asynchronous processing works. It also does not «lower» peak performance. Userspace is slower than kernel space. threads uses userspace threads. native uses kernel space threads. Spawning dozens of threads to do something in userspace is never more efficient just because you have «enough host cores». If you need to spawn dozens of threads, you need to consider using kernel space for better efficiency and avoiding host lockups.
Now, back to the main topic.
QEMU can use two AIO methods: the userspace method by spawning dozens of userspace threads (this is not the same as I/O threads) and the kernel method. Both asynchronous, but are very difference in performance.
Using the userspace method (io='threads') will spawn and scale userspace threads based on the amount of guest I/O operations. This is very compatible and works in all environments, but it is not as efficient as kernel AIO.
Using the kernel AIO (cache=none io=native) is the fastest. This is the best choice for performance for block devices. RAW and QCOW2 (with pre-allocation) also benefit the best from this. Warning though if you do not pre-allocate, you will find using kernel AIO can decrease performance due to writing to not yet allocated sectors and lock up the threads.
If you happen to have more than one VM and all use native, you might find yourself failing to start VMs because you reached the max AIO requests. To see the current value, run # sysctl fs.aio-nr fs.aio-max-nr.
Increase fs.aio-max-nr to a higher number. E.g. sysctl -w fs.aio-max-nr=4194304
TLDR: Use cache=none io=native.
NVIDIA Drivers
I’ll assume you have already got the process of passing through your GPU done and now you just need drivers.
NVIDIA drivers before v465 will require you to simply spoof the Hyper-V vendor ID to avoid error 43:
  <features>
    <hyperv>
      <vendor_id state="on" value="eridanampora"/>
    </hyperv>
  </features>
NVIDIA actually admits that this error 43 issue is a bug and was not intended, but they made fixing this a low priority until 465. In the past, you had to hide the KVM leaf and spoof the Hyper-V vendor ID. However, they did fix in 393 (?) that hiding the KVM leaf was no longer necessary.
System and VM internal clock
Very important so you don’t suffer the pain of awful latency from things like HPET or a clock that fails to catchup properly which would induce DPC latency.
Note: Windows machines use localtime unlike Linux machines which use rtc! Very important to set clock offset to localtime. This is related to Linux and Windows dual booting showing incorrect times because Windows is trying to use localtime where Linux is using rtc and are causing conflicts.
  <clock offset="localtime">
    <timer name="rtc" tickpolicy="catchup" track="guest"/>
    <timer name="pit" tickpolicy="delay"/>
    <timer name="tsc" present="yes" mode="native"/>
    <timer name="hpet" present="no"/>
    <timer name="kvmclock" present="no"/>
    <timer name="hypervclock" present="yes"/>
  </clock>
In your BIOS, disable HPET and make sure Linux is using TSC:
cat /sys/devices/system/clocksource/clocksource0/current_clocksource
See Red Hat’s guide on optimizing the host TSC for low latency/real time: https://access.redhat.com/documentation/en-us/red_hat_enterprise_linux_for_real_time/8/html-single/tuning_guide/index
Message signal-based interrupts
Line-based interrupts are shit. And a lot more hardware supports MSI than just your GPU. The effects of using MSI compared to Line-based are tremendous with a QEMU KVM.
Use MSI_util_v3 (original thread) and enable MSI for all devices that can support it and reboot the guest. If you pass through audio via Pulseaudio like me, the latency and quality will be a LOT better. Hardware acceleration will be smoother.
DO. NOT. ENABLE. MSI. FOR. DEVICES. THAT. DO. NOT. SUPPORT. IT. 9/10 times your system will be rendered unbootable until you restore the registry hive where the key is located, usually by a System Restore or booting with last known good configuration.
Bitlocker
Create a vTPM 2.0.
Requires swtpm.
sudo pacman -S swtpm
<tpm model="tpm-crb">
  <backend type="emulator" version="2.0"/>
  <alias name="tpm0"/>
</tpm>
Reducing VM presence
(Not meant to be exhaustive. Hypervisor detection is very easy no matter how hard you try, but you can do some things to get around basic detections such as Faceit Anti Cheat, ESEA, and EasyAC. Do not use a VM for secure exam testing or tournament matches. Even if your intentions are not illicit, they are always forbidden if found to be using one after the fact.)
Pass through as much physical hardware as you can through IOMMU and remove unused hardware like SPICE displays and graphics and serial controllers.
Hide certain timers (hiding hypervclock may impact performance slightly):
  <clock offset="localtime">
    <timer name="kvmclock" present="no"/>
    <timer name="hypervclock" present="no"/>
  </clock>
Use host’s SMBIOS:
  <os>
    <smbios mode="host"/>
  </os>
Hide KVM leaf and spoof Hyper-V vendor ID
  <kvm>
    <hidden state="on">
  </kvm>
Disable hypervisor feature and pass through your CPU features and model:
  <cpu mode="host-passthrough" check="full" migratable="on">
    <feature policy="disable" name="hypervisor"/>
  </cpu>
Remove as many SPICE, virtio, QEMU, etc drivers and hardware. Pass through as much physical hardware as you can.
Minor performance tweaks
Blacklist the iTCO_wdt (kernel watchdog) module:
sudo echo "blacklist iTCO_wdt" > /etc/modprobe.d/nowatchdog.conf
Then run sudo mkinitcpio -P
Prevent ARP Flux from networks in same segment1:
sudo echo "net.ipv4.conf.all.arp_filter = 1" > /etc/sysctl.d/30-arpflux.conf
Try using performance and latency-optimized kernels like linux-xanmod (https://xanmod.org/) or linux-zen. I personally use xanmod. Both also include the ACS patches. Experiment with real-time kernels too. Everyone’s hardware is different.
Installed tuned and tuned-adm and set the profile to virtual-host to optimize the host for virtualizing guests.
CPU Pinning, Interrupts, Affinity, Governors, Topology, Isolating, and Priorities
This warrants an entirely separate section because of how much of an impact this can make while also requiring a decent amount of time. And I mean a major impact. Even after doing all those tweaks above, I still had awful DPC latency and stutters. After just a bit of messing with interrupts and pinning, I am almost consistently under 800 µs.
My system only has a single CPU and six cores twelve threads so messing with NUMA nodes is not documented here unfortunately.
Topology
Find out how many cores and threads you want to give your VM. Leave at least 2 cores for the host, otherwise both the guest and host performance will suffer. More is not better. For me, I’m giving it 4 cores 8 threads. Set your CPU topology to that, and of course pass through your CPU features by setting CPU mode to host-passthrough (unless you have special AMD CPUs that require EPYC emulation for old QEMU versions)
<topology sockets="1" dies="1" cores="4" threads="2"/>
This says we will have one socket, 4 cores, and 8 threads through hyperthreading. Our CPU pinning will match this too. If you only want physical CPUs and no hyperthreading, set core count to the amount of cores you want and threads to 1. e.g.
<topology sockets="1" dies="1" cores="8" threads="1"/>
Isolating the CPUs
We need to isolate the pinned CPUs from being used by the host. This is pretty easy through the kernel arguments nohz_full, rcu_nocbs, isolcpus.
Append the following arguments based on your pinned CPUs:
nohz_full=0-3,6-9 rcu_nocbs=0-3,6-9 isolcpus=0-3,6-9
Update your bootloader config and reboot.
Interrupts, Governors, and Affinity coming soon. I need sleep.
TODO: Document interrupt pinning, CPU governors, systemd tweaks, memballoon disabling.
В данной статье мы подробно рассмотрим как правильно настроить систему виртуализации KVM/libvirt в Fedora и установим в качестве гостевой ОС Microsoft Windows 10.
Введение
Многие пользователи для запуска виртуальных машин до сих пор предпочитают использовать VirtualBox, поэтому в данной статье мы решили рассмотреть альтернативу, имеющую ряд серьёзных преимуществ:
- нет необходимости в установке out-of-tree модулей ядра, т.к. они уже входят в его состав;
- корректная работа на конфигурациях с активной технологией UEFI Secure Boot;
- более быстрая работа гипервизора за счёт отсутствия необходимости переключения между режимами ядра и пользователя.
Первым делом установим ряд необходимых пакетов:
sudo dnf install libvirt qemu-kvm virt-manager
По окончании активируем автоматическую загрузку сервиса libvirtd при помощи systemd:
sudo systemctl enable --now libvirtd.service
Внимание! Сразу после этого действия может отключиться текущее сетевое соединение из-за изменения в конфигурации адаптеров и появления новых виртуальных. Это нормальное явление. Именно по этой причине не следует пытаться установить KVM через SSH подключение.
Перезагрузим систему:
sudo systemctl reboot
Выбор режима работы KVM
KVM поддерживает работу в двух режимах:
- системный сеанс — qemu:///system — виртуальные машины будут запускаться с повышенными правами от имени пользователя libvirt с полноценной поддержкой сети и общими для всех пулами данных;
- пользовательский сеанс — qemu:///session — виртуальные машины будут запускаться с правами текущего пользователя с индивидуальным пулом и поддержкой сети при помощи qemu-bridge.
Более полное сравнение можно найти здесь (на английском языке).
Системный сеанс считается enterprise-ready решением, а пользовательский наиболее безопасным.
Настройка системного сеанса KVM
Настройка прав доступа
Для работы с виртуальными машинами внутри системного сеанса необходимо состоять в особой группе libvirt, поэтому добавим нашу основную учётную запись в неё:
sudo usermod -a -G libvirt $(whoami)
Создание подключения к пулу
Запустим Менеджер виртуальных машин (virt-manager) из меню используемой графической среды.
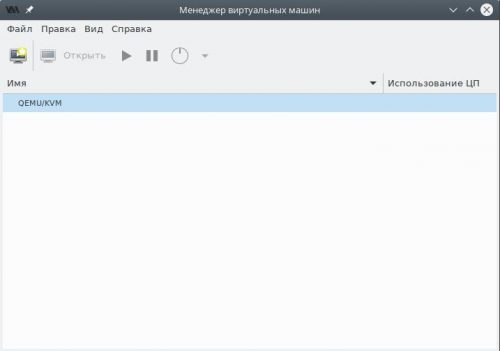
Если в списке отсутствует пункт QEMU/KVM, добавим его, вызвав диалог создания нового подключения через меню Файл — Добавить соединение.
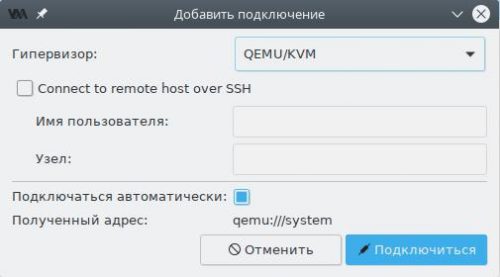
В поле Гипервизор выберем пункт QEMU/KVM, затем установим флажок в чекбокс Подключаться автоматически и нажмём Подключиться. Новый пункт появится в списке как показано на скриншоте выше.
Создание каталогов для образов
По умолчанию предлагается использовать каталог /var/lib/libvirt/images для хранения дисковых образов виртуальных машин, однако место внутри корневого раздела у большинства ограничено, поэтому мы создадим новое на отдельном разделе диска.
Внимание! Для системного сеанса не следует указывать в качестве хранилища каталоги, расположенные внутри /home, т.к. SELinux настроен на полную блокировку доступа к домашним каталогам пользователей для любых системных сервисов и по этой причине гипервизор не сможет работать с ними.
В главном окне менеджера выделим пункт QEMU/KVM, затем в меню Правка выберем пункт Свойства подключения и переключимся на вкладку Пространство данных.
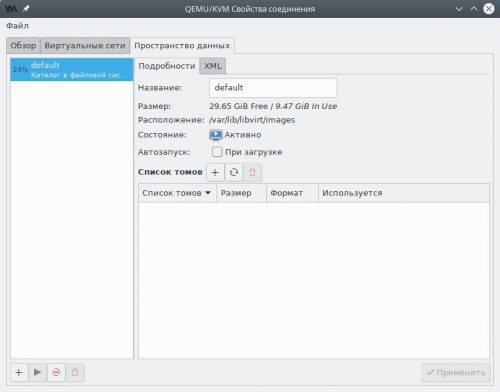
Создадим новый раздел диска, отформатируем его в любую поддерживающую Unix-права доступа файловую систему (рекомендуется ext4 или xfs), пропишем в /etc/fstab и смонтируем например в качестве /media/virt.
Перейдём в созданный раздел и создадим два каталога: images для дисковых образов виртуальных машин и iso для ISO образов, из которых будет производиться установка операционных систем:
sudo mkdir /media/virt/{images,iso}
sudo chown $(whoami):libvirt /media/virt/{images,iso}
В левой панели окна менеджера пространств данных нажмём кнопку Добавить пул (с символом плюс).
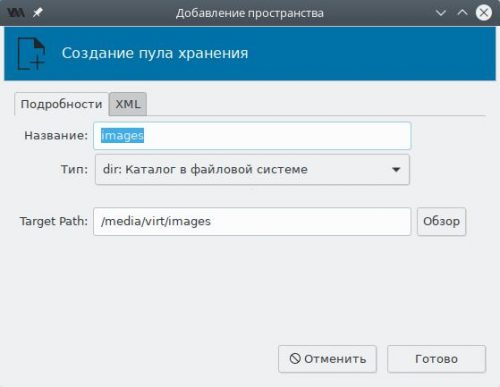
В поле Название для пула с дисковыми образами укажем images, Тип — каталог в файловой системе, а Target Path — каталог на диске (в нашем случае — созданный ранее /media/virt/images). Нажмём Готово и пул появится в списке. Подтвердим сохранение изменений.
Повторим то же самое, но для ISO образов:
- название — iso;
- target path — /media/virt/iso.

Если всё сделано верно, в левой панели появятся два новых пула — images и iso. Выберем каждый и убедимся, что в чекбоксе Автозапуск при загрузке установлен флажок. Если это не так, исправим и нажмём Применить.
Пул с именем default теперь допускается удалить, хотя это и не обязательно. Для этого выберем его, нажмём кнопку Остановить пул, а затем Удалить пул и подтвердим намерение.
На этом базовая настройка завершена и можно приступать к установке гостевых операционных систем.
Настройка пользовательского сеанса KVM
Создание подключения к сеансу
Запустим Менеджер виртуальных машин (virt-manager) из меню используемой графической среды.
В главном окне менеджера виртуальных машин, нажмём правой кнопкой мыши по QEMU/KVM, затем в контекстном меню выберем вариант Отключиться и Удалить. Подтвердим удаление.
В меню Файл выберем Добавить соединение.
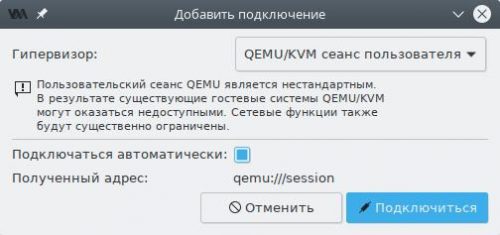
В поле Гипервизор выберем пункт QEMU/KVM сеанс пользователя, затем установим флажок в чекбокс Подключаться автоматически и нажмём Подключиться. Новый пункт появится в списке.
Создание каталогов для образов
По умолчанию предлагается использовать каталог ~/.local/share/libvirt/images для хранения дисковых образов виртуальных машин, однако для удобства мы создадим новые.
Это опциональное действие. Можно использовать пул default для любых целей.
В главном окне менеджера выделим пункт QEMU/KVM сеанс пользователя, затем в меню Правка выберем пункт Свойства подключения и переключимся на вкладку Пространство данных.
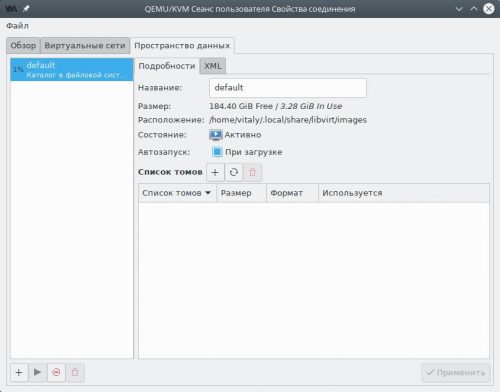
Создадим два каталога: images для дисковых образов виртуальных машин и iso для ISO образов, из которых будет производиться установка операционных систем:
mkdir -p ~/virt/{images,iso}
В левой панели окна менеджера пространств данных нажмём кнопку Добавить пул (с символом плюс).

В поле Название для пула с дисковыми образами укажем images, Тип — каталог в файловой системе, а Target Path — каталог на диске (в нашем случае — созданный ранее ~/virt/images). Нажмём Готово и пул появится в списке. Подтвердим сохранение изменений.
Повторим то же самое, но для ISO образов:
- название — iso;
- target path — ~/virt/iso.
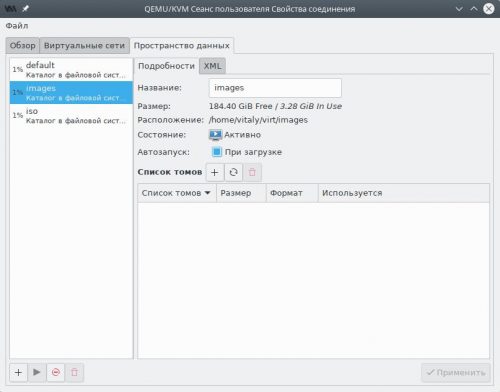
Если всё сделано верно, в левой панели появятся два новых пула — images и iso. Выберем каждый и убедимся, что в чекбоксе Автозапуск при загрузке установлен флажок. Если это не так, исправим и нажмём Применить.
Пул с именем default теперь допускается удалить, хотя это и не обязательно. Для этого выберем его, нажмём кнопку Остановить пул, а затем Удалить пул и подтвердим намерение.
Настройка сети в пользовательском сеансе
Создадим сетевой мост для виртуальных машин:
sudo nmcli con add type bridge autoconnect yes ifname virbr0 ipv4.method shared ipv4.address 192.168.122.1/24
Добавим основное проводное соединение в качестве ведущего для моста:
sudo nmcli con add type bridge-slave autoconnect yes ifname enp3s0 master virbr0
Здесь вместо enp3s0 укажем физический интерфейс проводного соединения (может быть получен из вывода nmcli device status).
Разрешим использование моста в qemu-bridge-helper:
echo allow virbr0 | sudo tee -a /etc/qemu/bridge.conf
Добавим правила для файрвола:
sudo firewall-cmd --zone libvirt --add-interface virbr0 --permanent
sudo firewall-cmd --zone libvirt --add-service dhcp --permanent
sudo firewall-cmd --zone libvirt --add-service dhcpv6 --permanent
sudo firewall-cmd --zone libvirt --add-service dns --permanent
sudo firewall-cmd --reload
На этом настройка пользовательского сеанса завершена и можно приступать к установке гостевых операционных систем.
Подготовка к установке
Для установки нам потребуются:
- официальный ISO образ операционной системы Windows 10, который можно скачать с официального сайта Microsoft (30-дневная пробная версия);
- ISO образ с набором драйверов Virtio для гостевых операционных систем;
- образ дискеты с драйверами Virtio для ранней стадии установки.
Скачаем указанные образы, скопируем их в каталог /media/virt/iso (системный сеанс), либо ~/virt/iso (пользовательский сеанс).
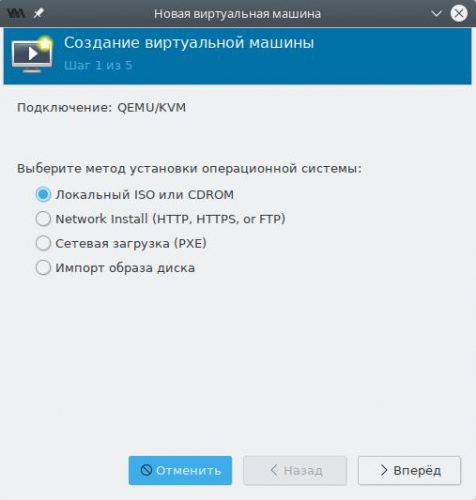
Создание гостевой ОС Windows 10
На главной панели инструментов нажмём кнопку Создать виртуальную машину или выберем одноимённый пункт из меню Файл.
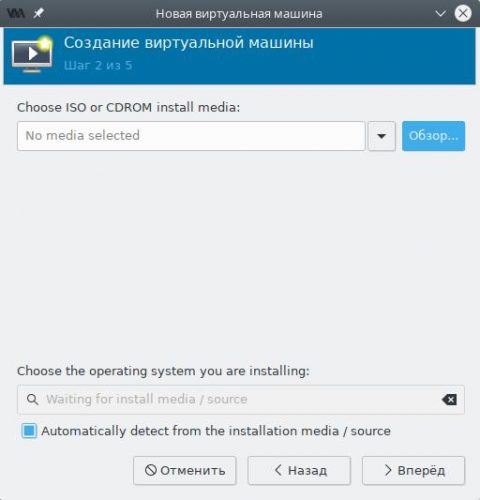
В появившемся окне мастера на первом шаге выберем пункт Локальный ISO или cdrom.
На втором шаге мастера нажмём кнопку Обзор, выберем из списка загруженный ранее ISO образ и нажмём Выбор тома.
Оставляем флажок в чекбоксе Automatically detect from installation media/source, чтобы Virt Manager самостоятельно подобрал оптимальные параметры для виртуальной машины и жмём Вперёд.
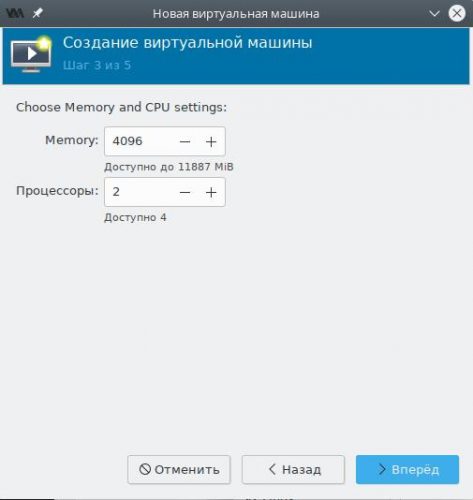
Указываем выделяемый виртуальной машине объём оперативной памяти и количество ядер процессора.
Теперь создадим локальный дисковый образ для гостевой ОС.
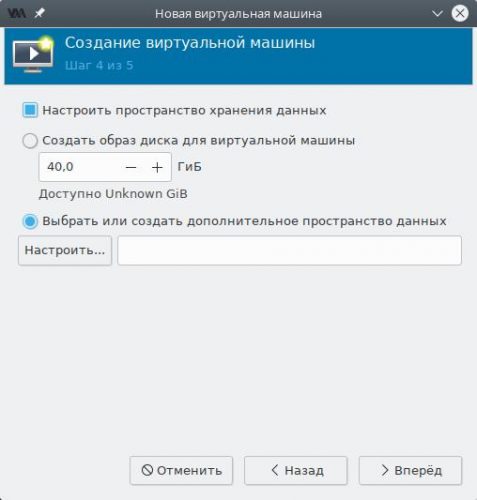
Установим флажок в чекбокс Настроить пространство хранения данных, а также точку около пункта Выбрать или создать дополнительное пространство данных и нажмём кнопку Настроить.
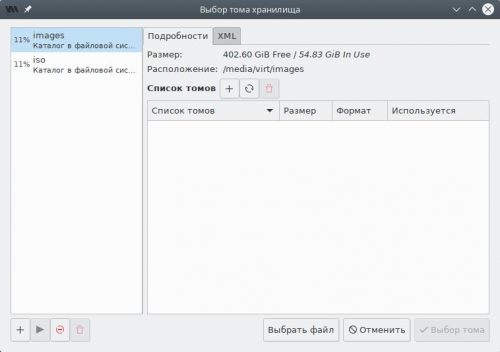
В левой панели переключимся на пул images, затем нажмём кнопку Создать том.
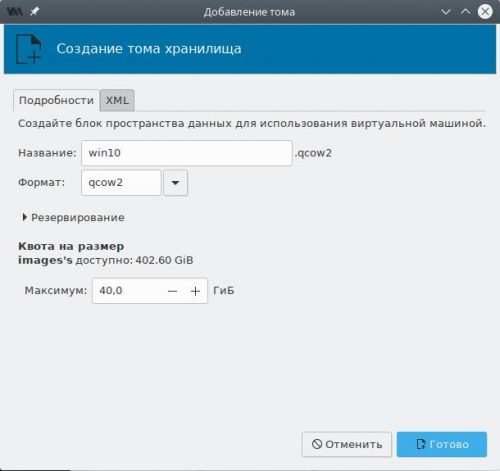
Создадим новый том для гостевой ОС:
- название — любое, но без пробелов и русских букв;
- формат — qcow2;
- максимальный размер — не менее 40 ГБ.
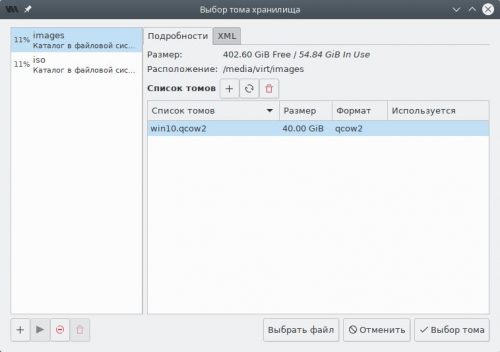
Выберем созданный том в списке и нажмём кнопку Выбор тома.
На заключительном шаге мастера будет предложено указать название для виртуальной машины (пробелы и русские буквы также не допускаются).
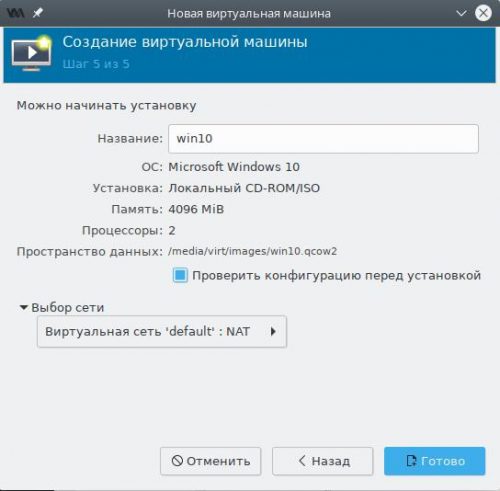
Обязательно установим флажок в Проверить конфигурацию перед установкой и нажмём Готово.
Настройка гостевой ОС Windows 10
Мы не будем подробно описывать все параметры конфигурации гостевой ОС, а лишь остановимся лишь на самых важных, от правильной установки которых зависит успех всей нашей задачи.
Переключимся на страницу SATA диск 1, выберем пункт Дополнительные параметры и изменим шину диска с SATA на VirtIO.
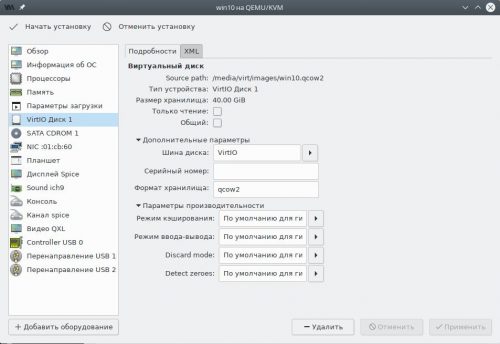
Здесь же допускается явно задать серийный номер накопителя, который будет передан гостевой ОС (если не указано, то генерируется автоматически), а также включить поддержку процедуры TRIM в случае если хранилище было создано на SSD накопителе.
Нажмём кнопку Добавить оборудование, выберем тип Хранилище.
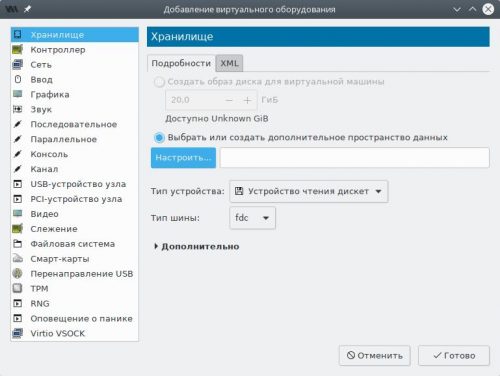
Изменим Тип устройства на Устройство чтения дискет, затем установим точку в Выбрать или создать дополнительное пространство данных и нажмём кнопку Настроить.
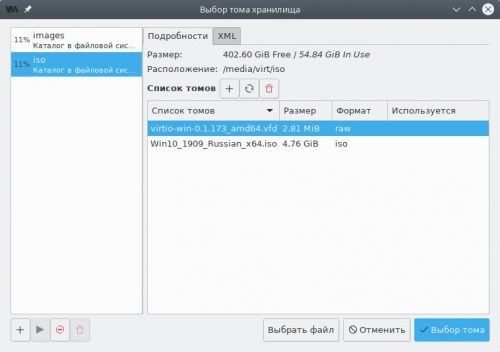
В появившемся окне переключимся на пул iso, выберем образ дискеты, нажмём Выбор тома, а затем Готово.
Переключимся на страницу Видео и в поле Модель убедимся, что установлено значение QXL. Если это не так, внесём правки.
Все остальные параметры оставим по умолчанию и нажмём кнопку Начать установку.
Установка гостевой Windows 10
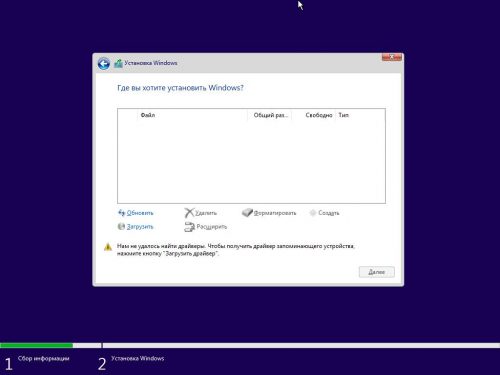
Запускаем стандартную установку данной ОС, выбираем редакцию, вводим или пропускаем (для получения 30 дневной пробной версии) серийный номер, принимаем лицензионное соглашение с конечным пользователем, затем Выборочная установка ибо нам требуется создать разделы на диске и установить драйвер VirtIO для ранней стадии загрузки системы.
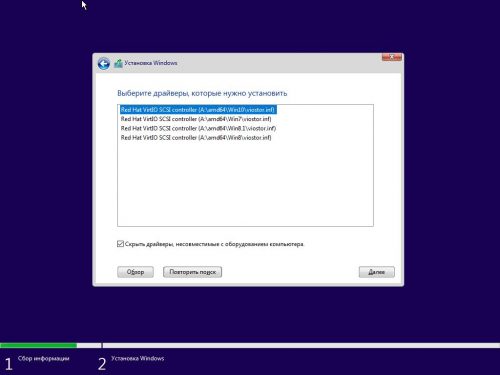
Когда появится сообщение об ошибке о том, что не удалось загрузить драйверы, нажмём кнопку Загрузить, а затем в появишемся окне разрешим автоматический поиск при помощи нажатия OK.
Укажем версию драйвера Red Hat VirtIO SCSI controller для Windows 10 и нажмём Далее.
С этого момента программа установки наконец обнаружит наш виртуальный накопитель и предложит создать разделы, а затем установить на него операционную систему.
Далее весь процесс установки вполне стандартный и описывать его мы не будем.
Установка драйверов Virtio гостевой ОС
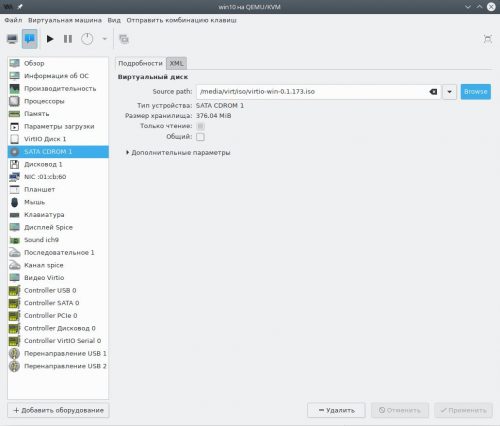
По окончании установки сразу завершаем работу виртуальной машины (Пуск — Выключение), нажимаем кнопку Показать виртуальное оборудование на панели инструментов, переходим на страницу SATA CDROM 1, жмём Browse и внутри пула iso выбираем ISO-образ с гостевыми драйверами Virtio.
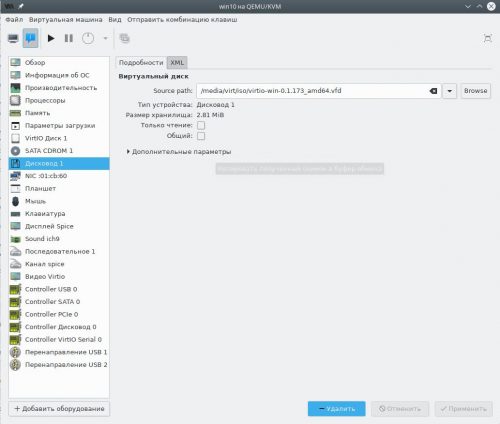
Применим изменения, а затем перейдём на страницу Дисковод 1, нажмём кнопку Удалить и Применить, т.к. он более нам не требуется.
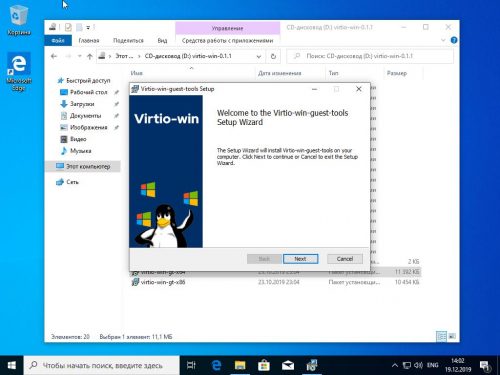
На панели инструментов нажмём кнопку Показать графическую консоль, а затем Включить виртуальную машину.
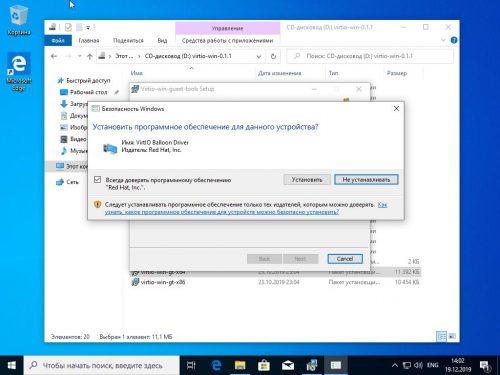
Откроем Проводник Windows, перейдём на виртуальный CD диск D: и запустим программу установки virtio-win-gt-x64.exe.
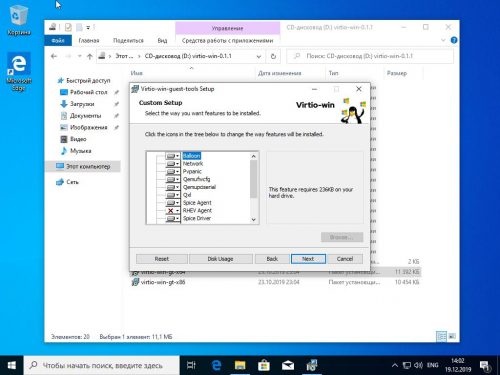
Выберем рекомендуемые Red Hat компоненты.
Разрешим установку драйверов с цифровой подписью Red Hat, нажав Установить.
Установка гостевых дополнений SPICE
Для того, чтобы в гостевой ОС появилась полная поддержка обмена данными с буфером обмена хостовой ОС, динамическое изменение разрешения виртуального дисплея и т.д., установим внутри гостя пакет SPICE Guest Tools по прямой ссылке.
Запустим скачанный файл и выполним установку всех предложенных по умолчанию компонентов, включая дополнительные драйверы виртуального дисплея QXL. Перезагрузим виртуальную машину для вступления изменений в силу.
Установка окончена.
Table of Contents
Ubuntu — KVM — Installing Virtio Drivers In Windows On KVM
Virtio drivers are paravirtualized device drivers for KVM virtual machines.
Paravirtualized drivers enhance the performance of machines, decreasing I/O latency and increasing throughput to near bare-metal levels.
It is recommended to use the paravirtualized drivers for fully virtualized machines.
Download ISO
We recommend the stable release, the same as what is shipped with Red Hat Enterprise Linux.
This is the link to download:
https://fedorapeople.org/groups/virt/virtio-win/direct-downloads/stable-virtio/virtio-win.iso
Download and add the ISO to your virtualization platform.
Machine Configuration
Edit the machine configuration and set these:
-
Disk bus: Virtio SCSI pass-through controller
-
NIC model: Virtio Ethernet
-
Video model: QXL
-
Video RAM: 32MB
Attach ISO
This bit depends on whether you are installing a new Windows VM or you already have an existing Windows VM.
If you are installing a new Windows VM, set the ISO to be the 2nd CD-ROM drive leaving the Windows install ISO as the 1st CD-ROM drive.
Begin Install
If you are not installing a new Windows VM, you can skip this section.
Storage Driver
At the disk detection stage, the Windows installer cannot detect any disks for installation.
This is expected behaviour, since the virtio drivers have not been loaded yet and are not included by Microsoft in the installation media.
Click “Load driver” and select “CD Drive (E:) virtio-win-0.1.1”
The driver required is the “VirtIO SCSI pass-through controller” located at:
E:\vioscsi\2k16\amd64\vioscsi.inf
For other editions of Windows, the driver will be located in the relevant directory on the ISO.
Select the driver and click “Next”.
The driver is loaded and the and the disk is now detected.
Select the disk for installation and click “Next”.
Post Install
Once the installation is complete and the VM has booted, the next steps are to install the guest agent and resolve any missing drivers.
Guest Agent
It is essential the guest agent is installed.
The guest agent is used by the hypervisor to communicate directly with the VM.
The guest agent is required for clean VM shutdown and to enable live snapshots of the VM images.
On the task bar click “File Explorer”.
Select “This PC” then double click “CD Drive (E:) virtio-win-0.1.1”.
Open the “guest-agent” folder.
Right click the “qemu-ga-x64” file and select “Install”.
The QEMU guest agent will now install.
Once installed the VM must be completely shutdown before the agent can run.
When the VM is started again, the guest agent service will automatically start.
Device Manager
This table lists the devices and the drivers required.
| Device | Driver |
|---|---|
| Storage controller | Virtio SCSI pass-through controller (already installed) |
| Ethernet controller | Virtio Ethernet adapter |
| PCI device | Virtio balloon driver |
| PCI input device | Virtio input driver |
| PCI simple communications controller | Virtio serial driver |
| Display adapter | QXL video driver |
| HID button over interrupt driver | Generic bus |
The procedure is simple but repetitive.
Generic Bus
This is a Microsoft bug which is easily resolved.
Right click on “HID Button over Interrupt Driver” and select “Update Driver Software…”
In Device Manager we can see the following unconfigured devices.
Select “Browse my computer for driver software”.
Select “Let me pick from a list of device drivers on my computer”.
Select the model “Generic Bus”.
This resolves the bug, and removes the driver warning.
Virtio Ethernet Adapter
This is a high speed driver capable of 10GbE and better.
Right click on “Ethernet Controller” and select “Update Driver Software…”.
Select “Browse my computer for driver software”.
Select “CD Drive (E:) virtio-win-0.1.1” and click OK.
Device Manager will automatically find the correct driver. The path to the driver does not need to be specified.
At the prompt click “Install”.
The driver is installed.
The device description has now changed in Device Manager.
Virtio Balloon Driver
The balloon driver allows the memory in the VM to be changed dynamically.
Right click on “PCI Device” and select “Update Driver Software…”.
Follow the same steps for the Ethernet adapter above to complete the driver installation.
Virtio Input Driver
This provides accurate mouse tracking within the console.
Right click on “PCI Input Device” and select “Update Driver Software…”.
Follow the same steps for the Ethernet adapter above to complete the driver installation.
Virtio Serial Driver
This is a virtual serial port for communication between the hypervisor and the VM.
Right click on “PCI Simple Communications Controller” and select “Update Driver Software…”.
Follow the same steps for the Ethernet adapter above to complete the driver installation.
QXL Video Driver
This is a video driver that improves performance and allows for higher resolutions.
It also provides a seamless cursor when using the console to manage the VM.
Right click on “Microsoft Basic Display Adapter” and select “Update Driver Software…”.
Follow the same steps for the Ethernet adapter above to complete the driver installation.
Cursor Tweak
When using the QXL driver, the mouse cursor needs to be tweaked.
This will provide a seamless cursor in web based VM consoles.
On the start menu click “Settings”.
Click “Devices”.
Click “Mouse & touchpad”.
Click “Additional mouse options”.
In the Pointers tab, enable “Enable pointer shadow” and click OK to update.
This allows the use of black and extra large cursors.
References
☰ Table of Content
Working KVM drives and guest tools.
This walkthrough also apply to Windows 10.
Download Drivers
Get virtio drivers before installing Windows 11 in KVM. As we need the driver iso during the installation process.
Go to following URL:
https://fedorapeople.org/groups/virt/virtio-win/direct-downloads/latest-virtio/
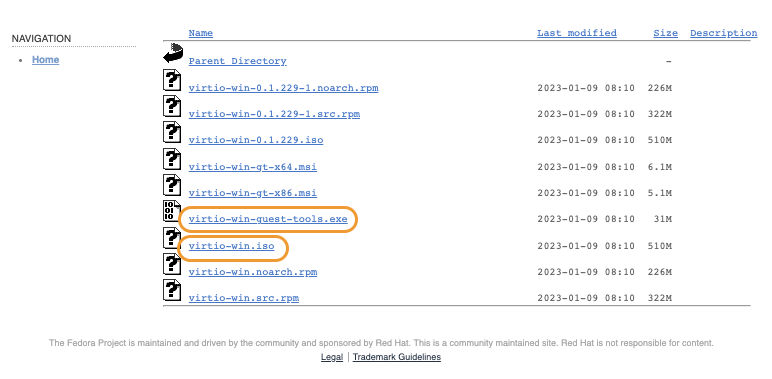
Download virtio-win.iso and virtio-win-guest-tools.exe.
| File | Direct Link | Usage |
|---|---|---|
virtio-win.iso |
link | Required during installation. Provide network and storage drivers. |
virtio-win-guest-tools.exe |
link | Required after installation. Provide dynamic screen resizing for remote connection. |
Setup KVM
Prepare ISO
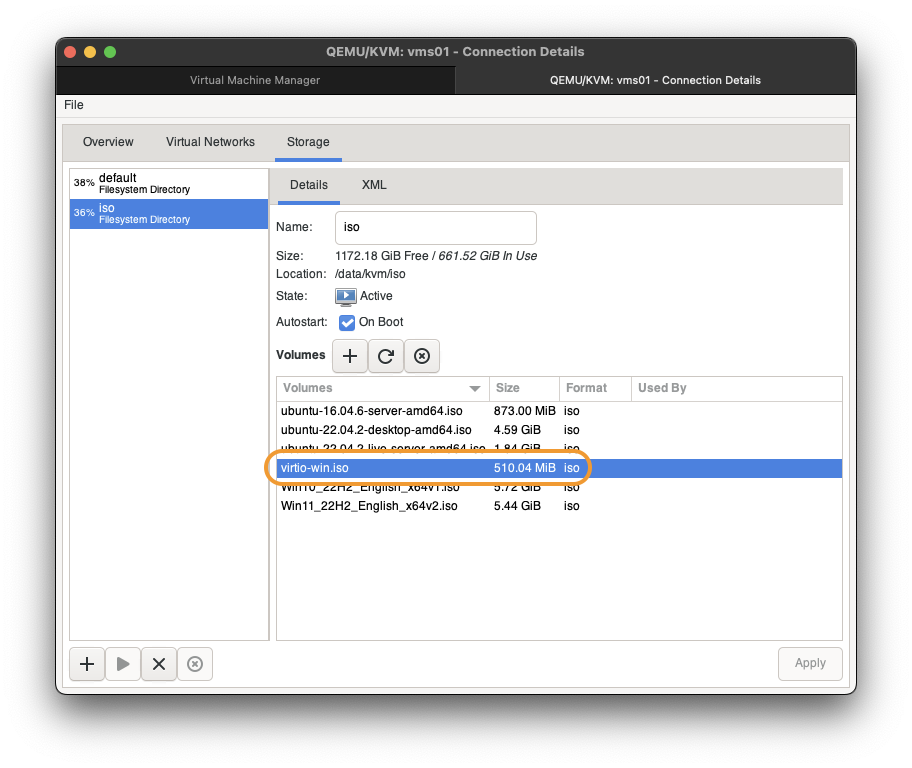
On KVM host, put both Windows iso and virtio-win.iso into KVM storage pool. The default location is /var/lib/libvirt/images/.
If done correctly, they should show up in KVM storage pool like following.
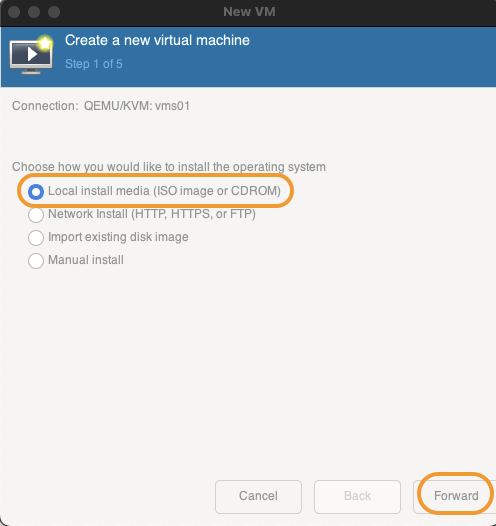
Create VM
Start KVM creation.
-
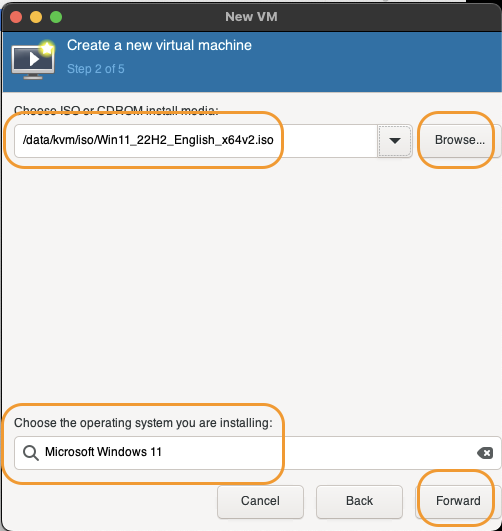
Choose local media. Then
Forward.
-
Select Windows ISO either by drop down or
Browse....
If operating system was not detect automatically, typeMicrosoftin the box and you should be presented with a pop up menu. ChooseMicrosoft Windows 11.
ThenForward.
-
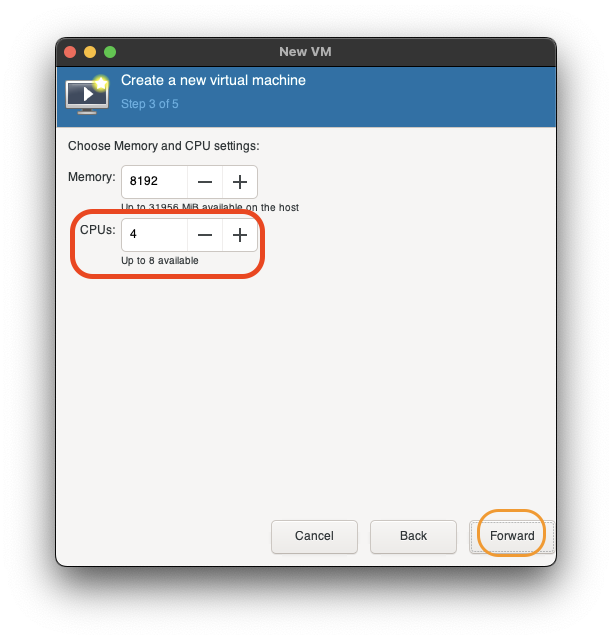
Set memory size. Then
Forward.CPUwill be override in customization steps.
-
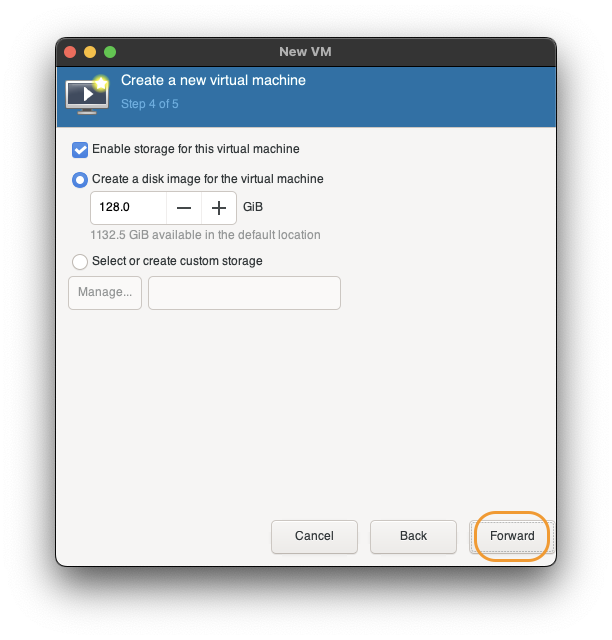
Set disk size. Then
Forward.
-
Set name of new VM.
CheckmarkCustomize configuration before install.
ThenFinish.
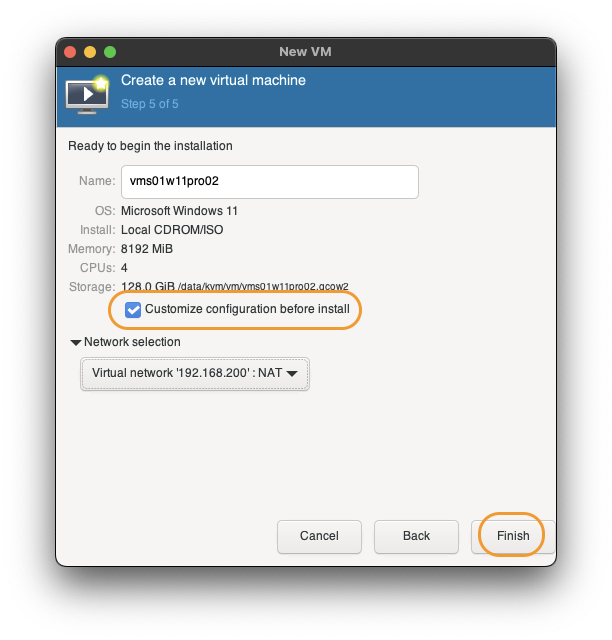
Customization screen will pop up. Continue to next section.
Customize VM
We will set VM to use VirtIO, TPM.
-
In
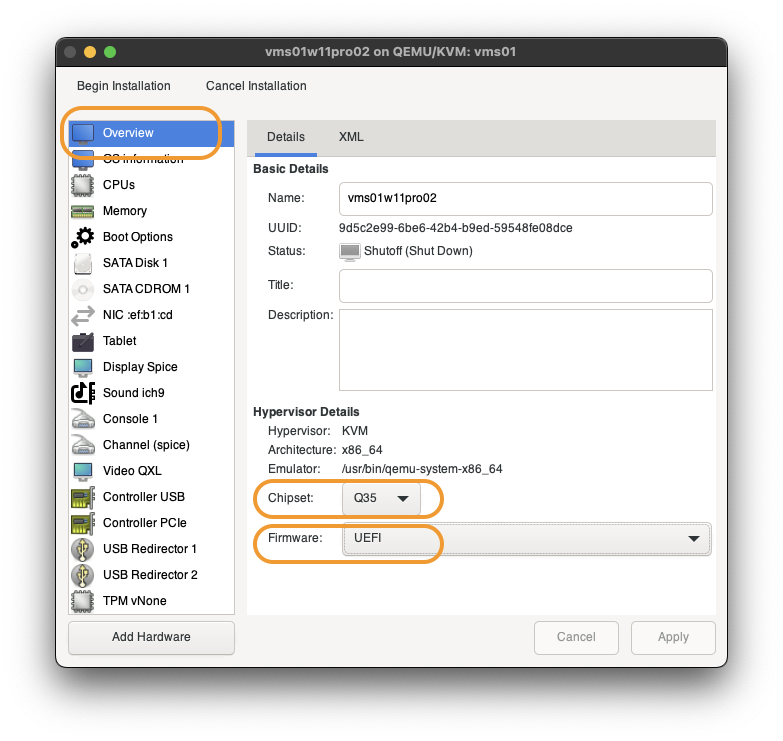
OverviewChipsetshould beQ35Firmwareshould beUEFI
-
In
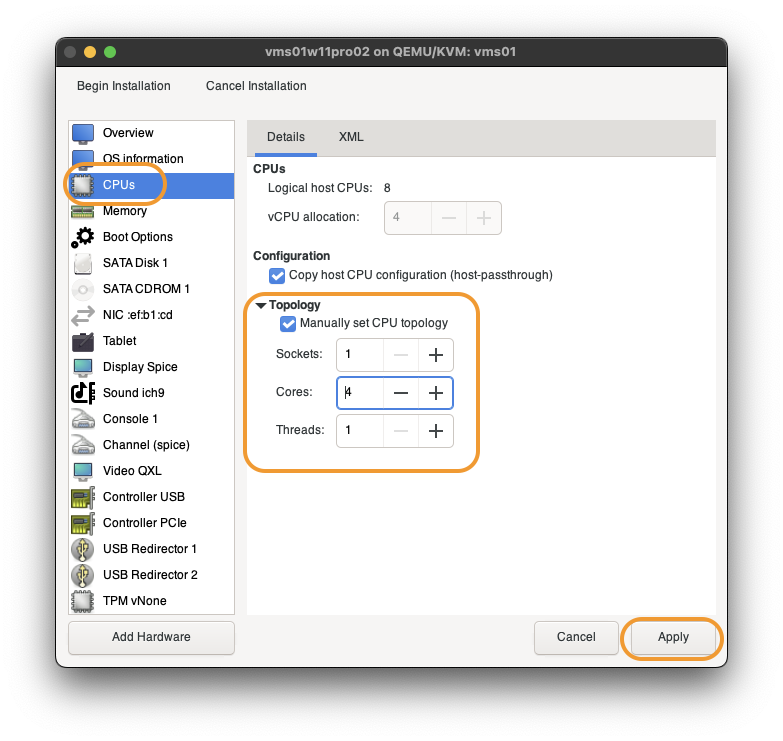
CPUs(IMPORTANT)
Windows Home only use 1 CPU socket, Windows Pro only use 2 CPU sockets. IfvCPUis used to assign more cpu, Windows VM will only use 1(home) or 2(pro) CPUs and become extremely slow. We have to useTopologyinstead.
CheckmarkManually set CPU topology.
SetSocketsto 1.
SetCoresto your desire value.
ThenApply.
-
In
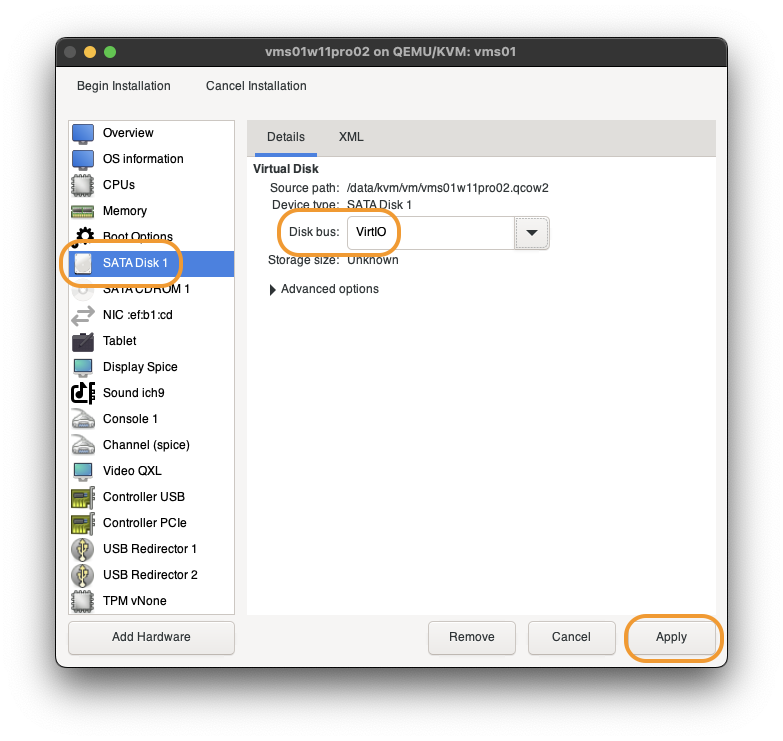
SATA Disk 1, changeDisk BustoVirtIO. ThenApply.
-
In
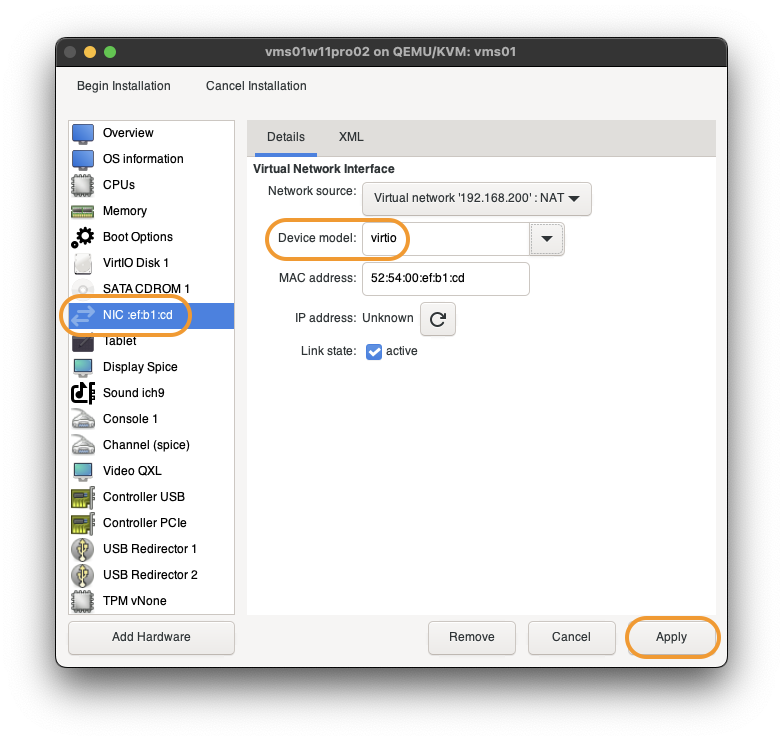
NIC ..., changeDevice modeltovirtio. ThenApply.
-
In
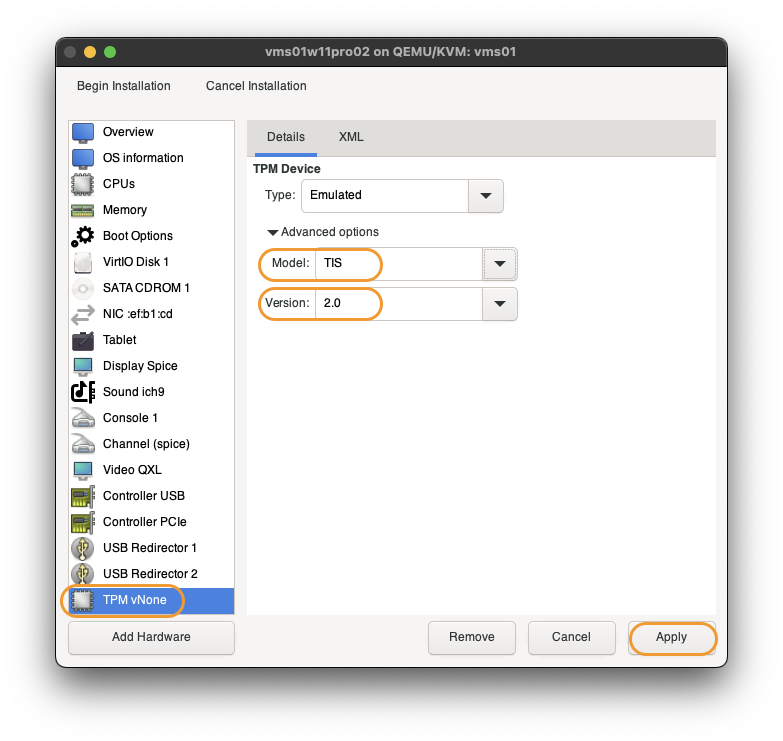
TPM vNone,
SetModeltoTIS.
SetVersionto2.0.
ThenApply.
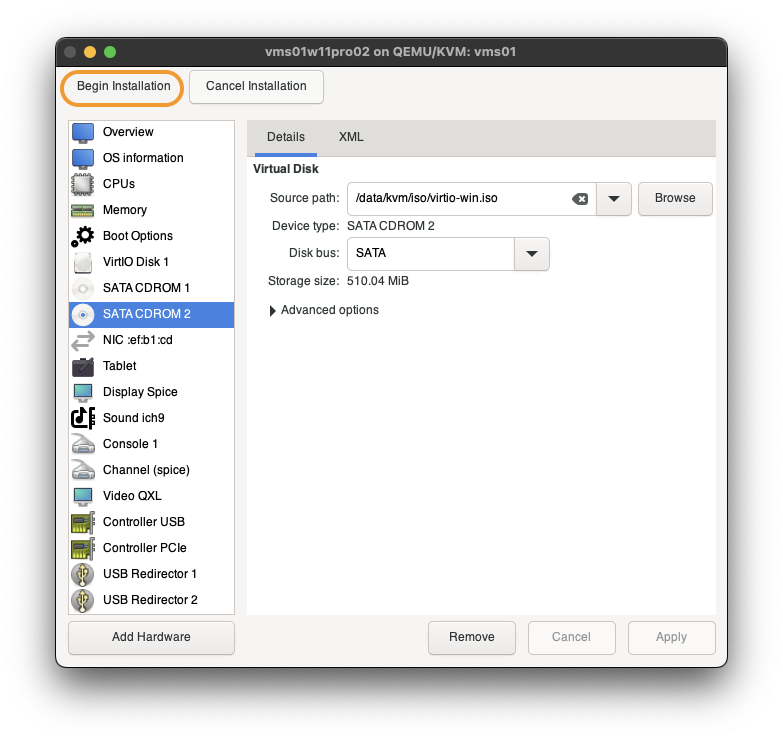
-
Click
Add Hardwareto open add hardware pop up.
InStorage:
ClickSelect or create custom storage
ClickManageand assignvirtio-win.iso.
SetDevice typetoCDROM device.
ThenFinish.
This allow us to add storage and network drivers during Windows installation.
-
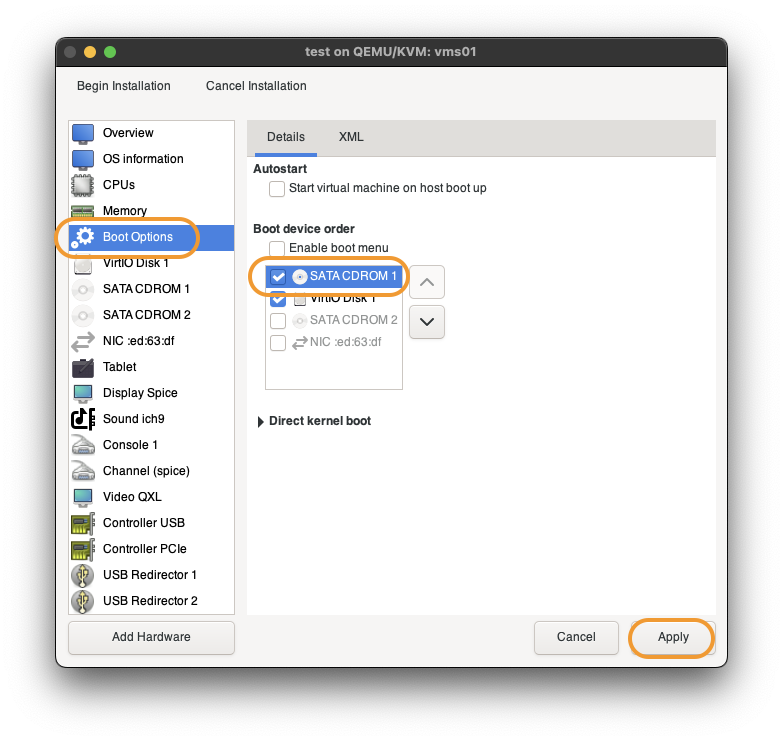
Click
Boot Options.
CheckmarkSATA CSROM 1and move it to the top.
ThenApply.
-
Click
Begin Installationto start Windows installation.

Windows Installation
We will not go through every single screen for Windows 11 setup, but only a few points:
Press A Key
When VM start, you have to press a key to boot CD(ISO). Else it will enter EFI prompt and you have to restart the VM again. You only have a few seconds to do it.
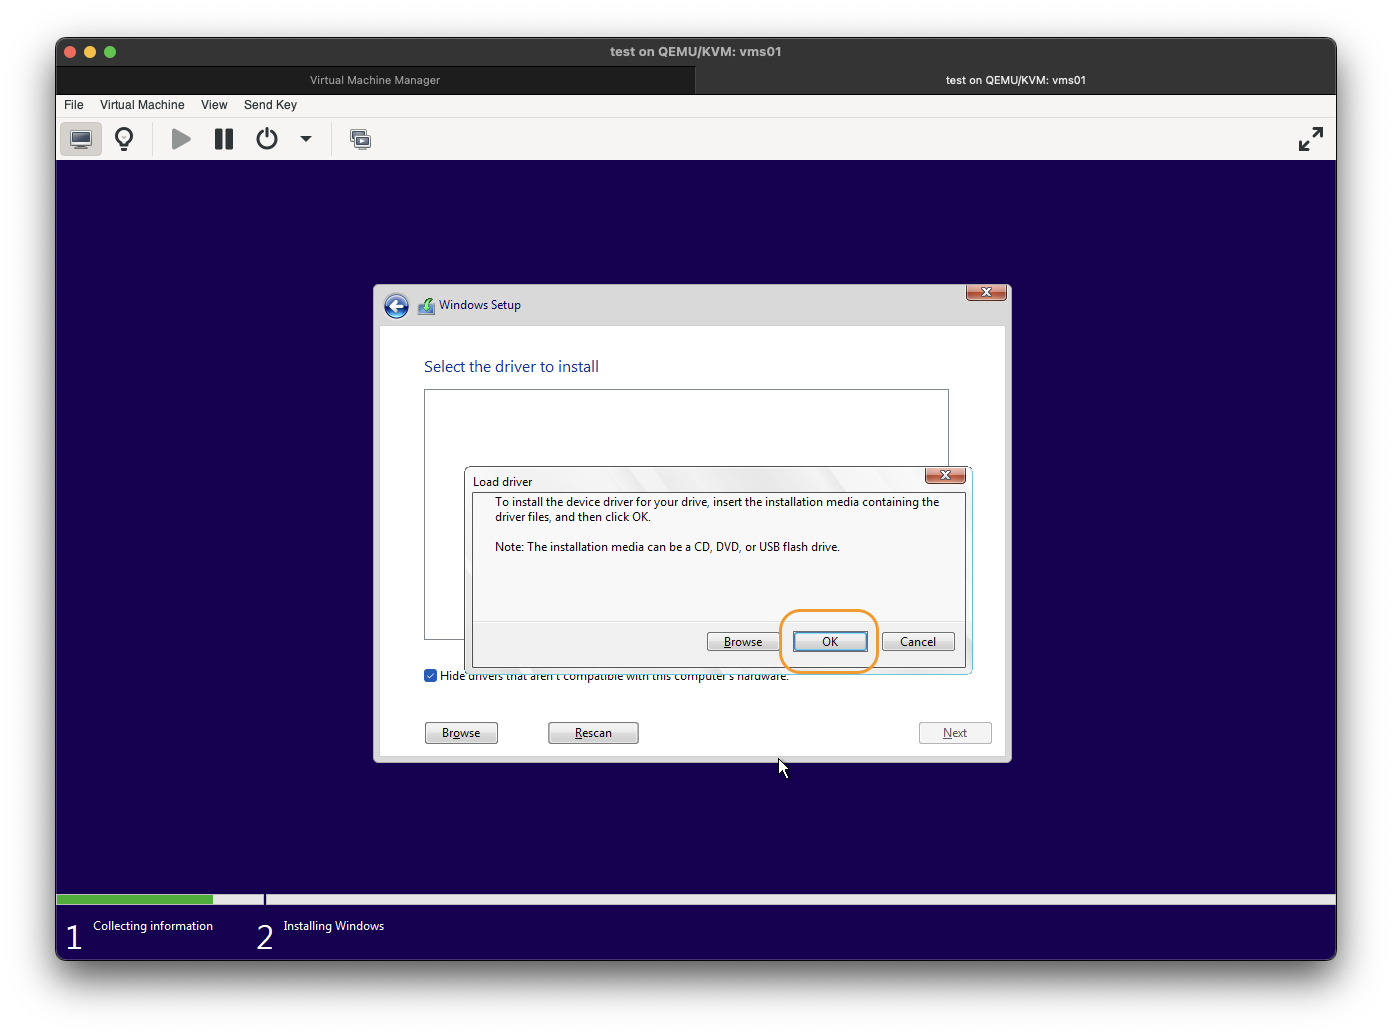
Loading Drivers
When we reach the disk screen, it will be empty. We will be loading both the storage driver and network driver.
-
Click
Load driver
-
Click
OK.
-
Select
Red Hat VirtIO SCSI controllerwithw11in the path.
ThenNext.
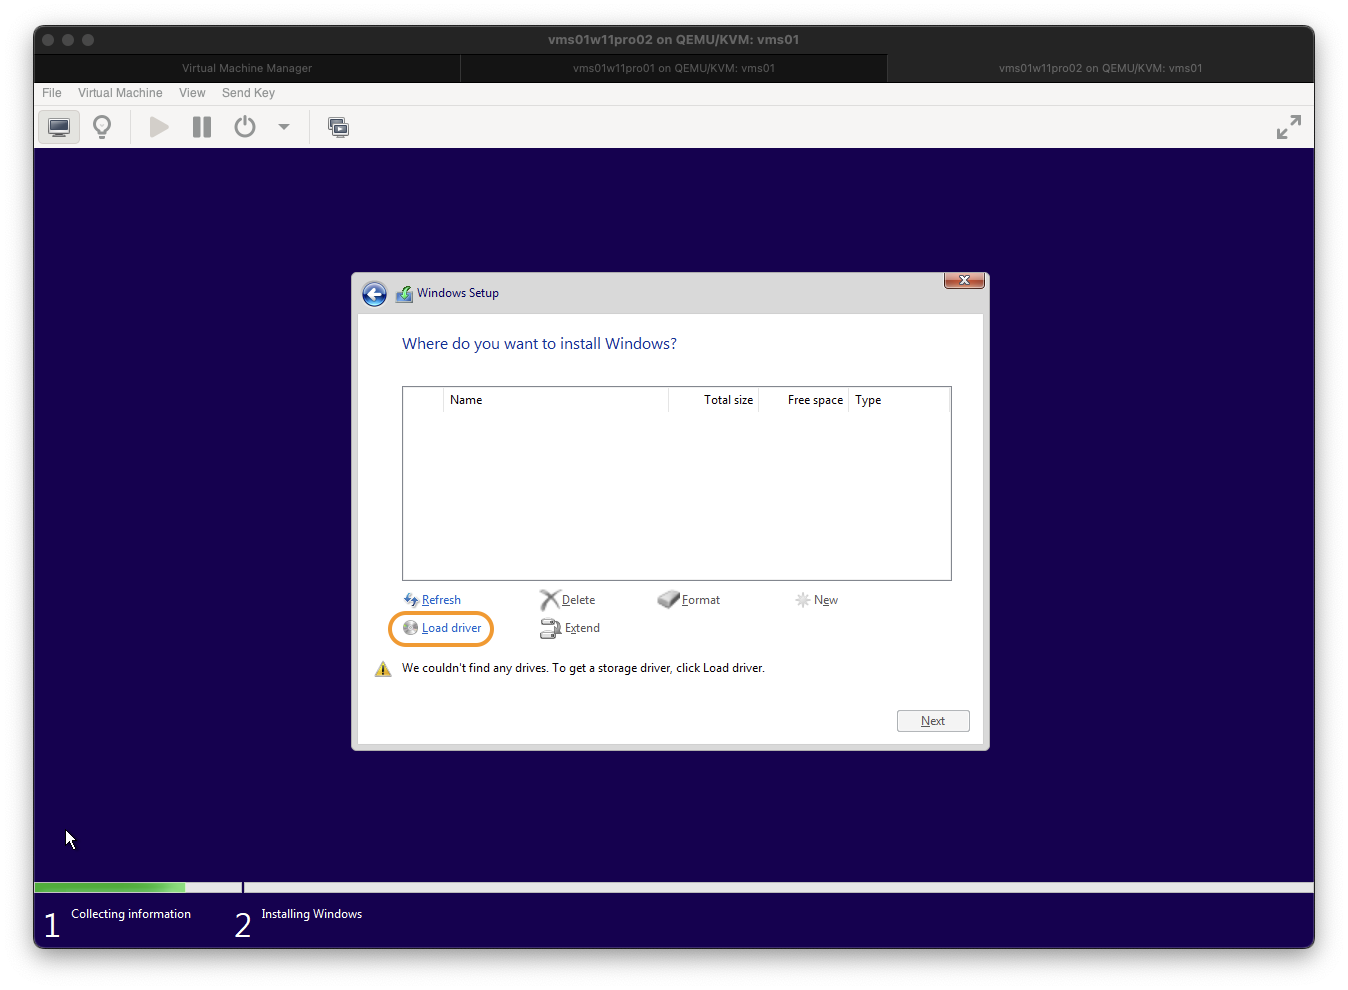
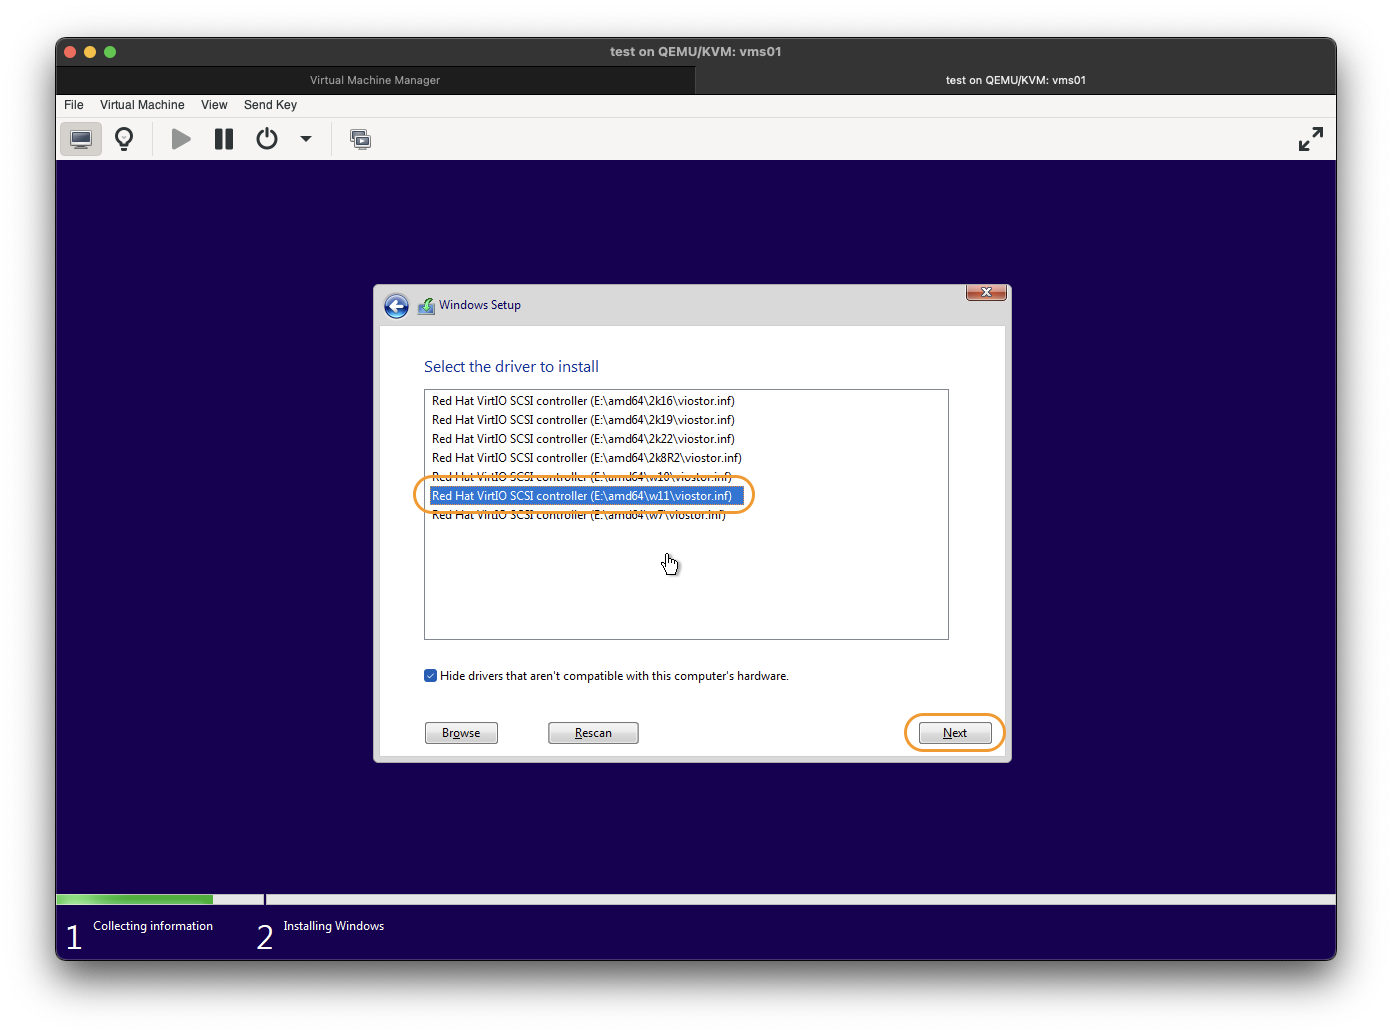
The above not only load the VirtIO SCSI driver, but also the network driver.
Finish the installation process and boot into Windows. Do not remote the virtio-win ISO yet. We still need it in next phase.
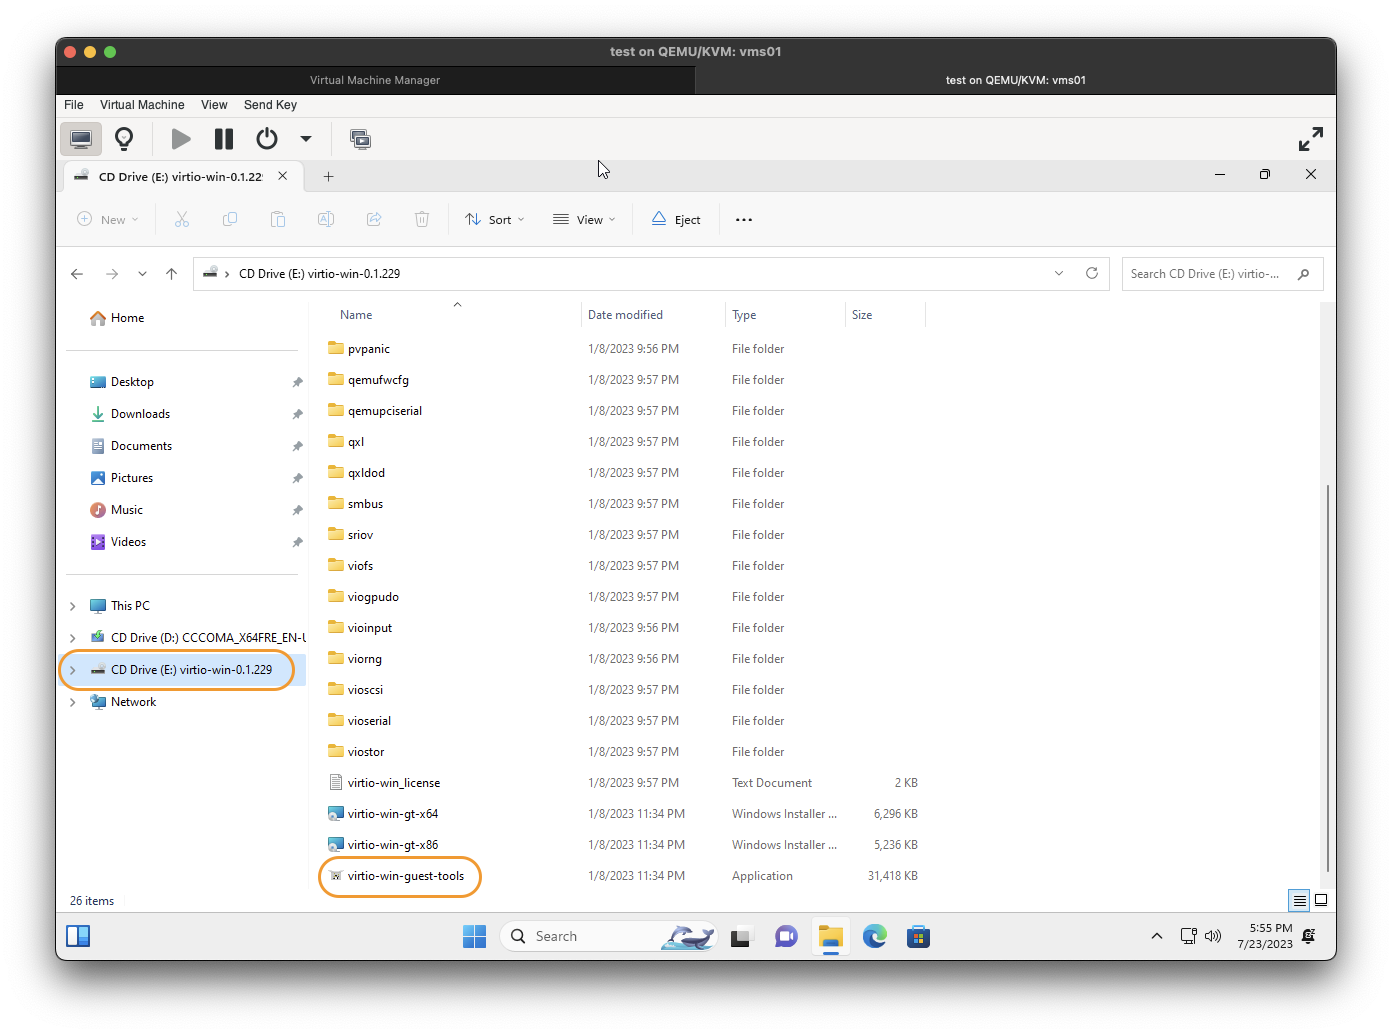
VirtIO Guest Tool
After Windows installation and initial setup, go CDROM drive with wirtio-win, run virtio-win-guest-tools.exe. That will install all remaining drivers and most importantly, the display driver allow for remote resizing.
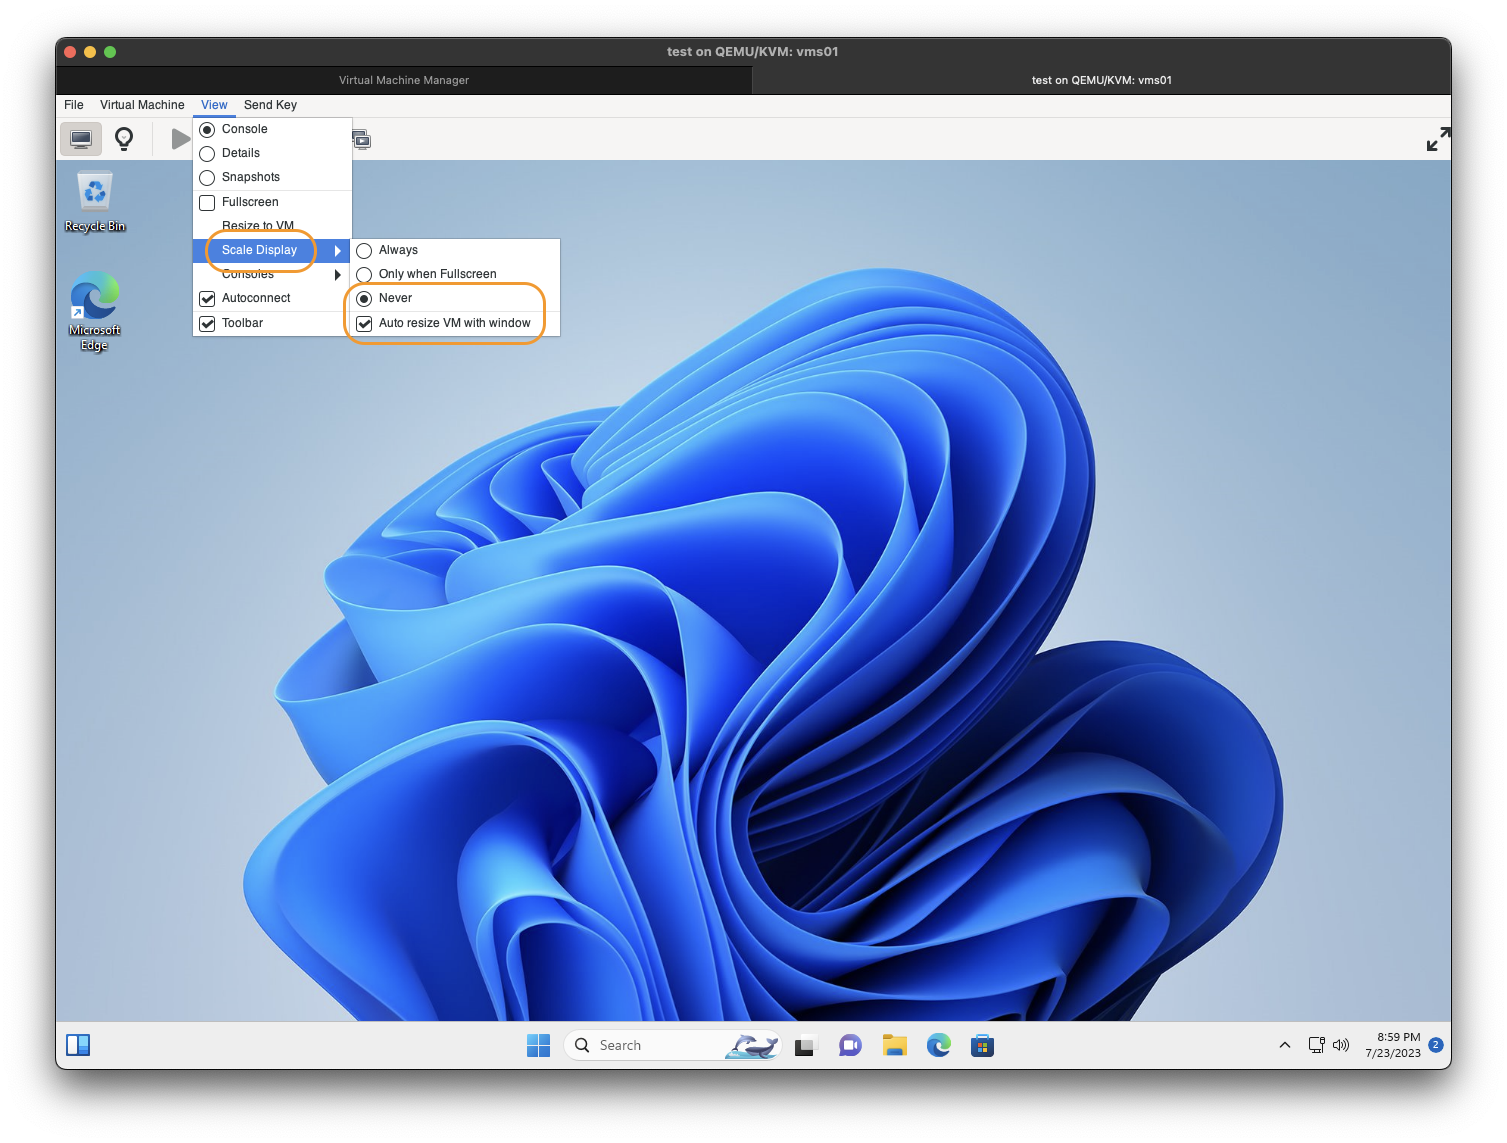
Turn on auto resize in virt-manager.
John Siu
Update: 2023-07-23
comments powered by