
I love Ubuntu, especially when I wanted to work with python programming, But I also love windows 10 because of its GUI and the vast variety of software support.
In the last blog, I covered how you can install windows 10 on Centos/Redhat KVM. But in this tutorial I going to cover the Debian derivative Ubuntu.
And the steps mentioned here are exactly the same for the other Debian derivative Linux mint.
Since I get a lot of questions with regards to Ubuntu specifically I decided to write separate blogs for Ubuntu and Redhat, so if you are using Centos/Redhat/Fedora you may click here.
Prerequisite.
Ubuntu machine with good configuration.
Download the Windows ISO image by following the guide here.
Windows virtio drivers iso download latest.
Download Spice guest tools.
1. How to install KVM on Ubuntu?
The first step is to prepare the environment by installing the KVM utilities on the Ubuntu host.
On my PC I am using Ubuntu version 20.04 so enter the below commands to install KVM on an ubuntu machine. The Same command can be used with as well.
sudo apt update
sudo apt install qemu-kvm bridge-utils virt-manager libosinfo-bin -y
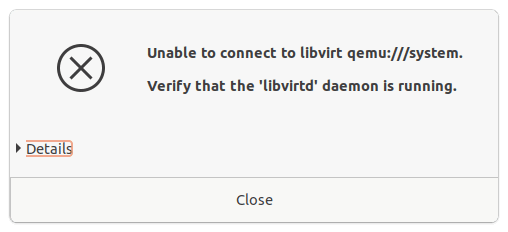
You may now go ahead and reboot the host, if you dont reboot the machine then you will end getting a below error.
2. Open the virtualization manager and create the VM.
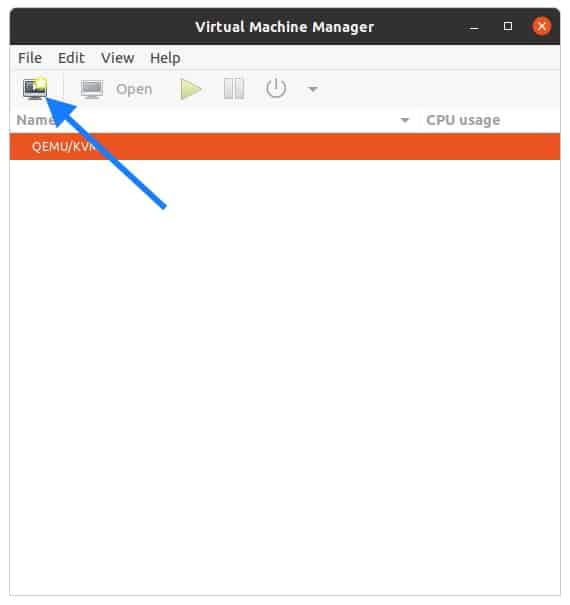
Open terminal and type virt-manager
In the virtual machine manager window click on create a new virtual machine.
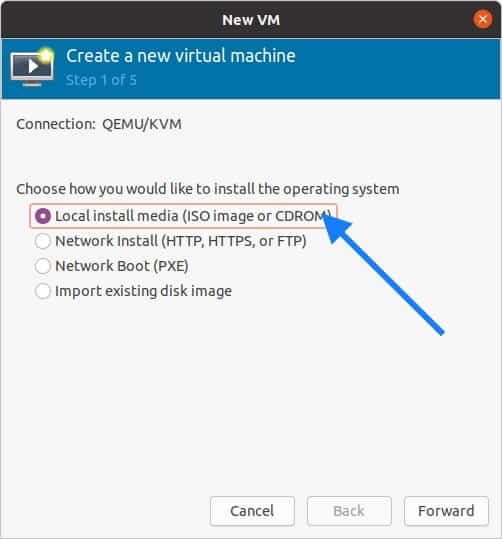
A new window now will pop up. In the New VM wizard select Local install media and click on forward.
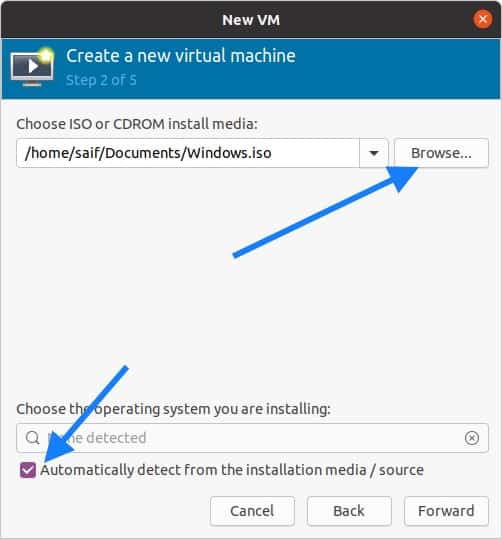
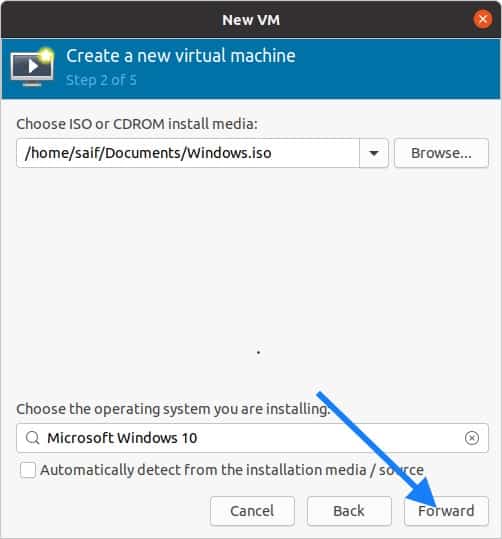
You will now have to browse for the windows 10 iso that you have downloaded and Uncheck the option which says automatically detect from the installation media.
Start searching for the window10 under choose operating system, and check the box which says include end of life operating system. Once you check the box you will be able to see the Microsoft Windows 10 operating system in the list.
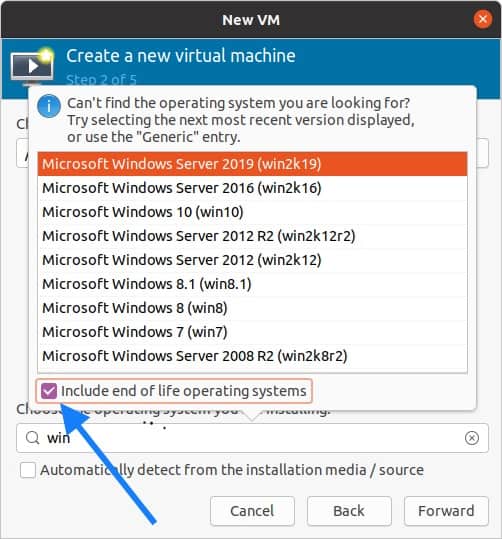
Once you select the Microsoft Windows 10 click on forward.
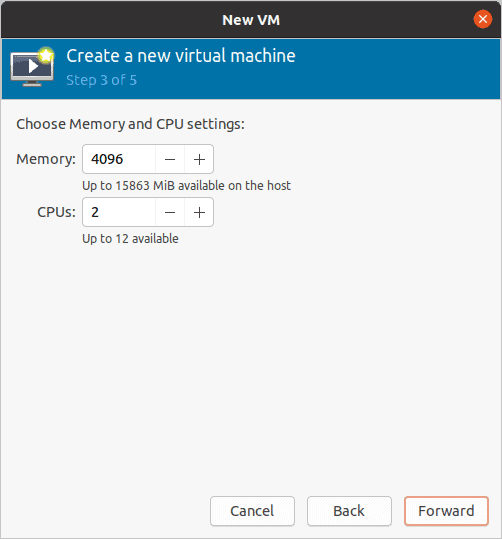
3. Configure the virtual machine resources.
Next, you will be asked to define the memory and the CPU, I am giving 4GB of memory and 2 CPU’s and click on forward.
Depends on your configuration you may choose yours.
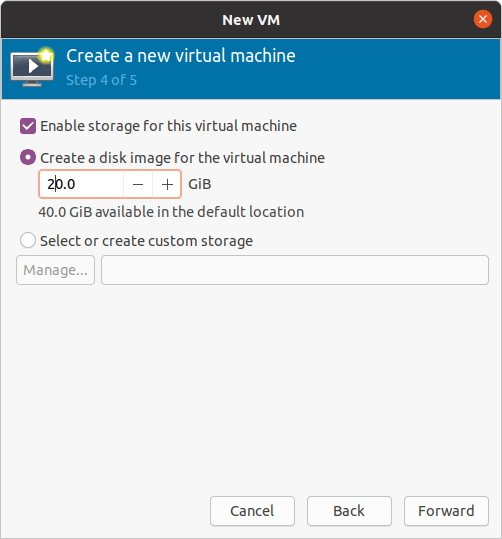
When you configure the virtual hard disk, by default Ubuntu KVM would pick up 40GB, since I don’t require that much space I just added only 20GB and clicked forward.
You may choose 40GB or more.
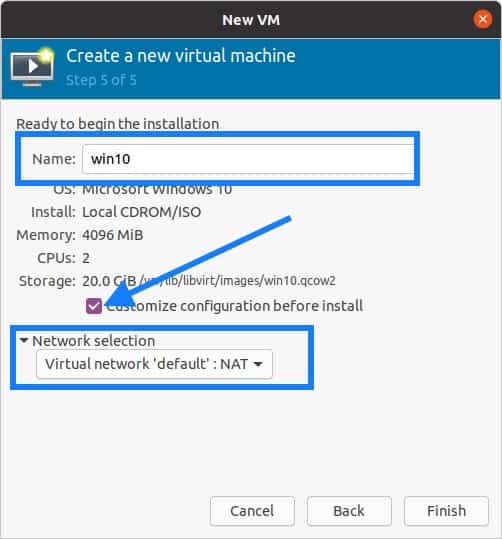
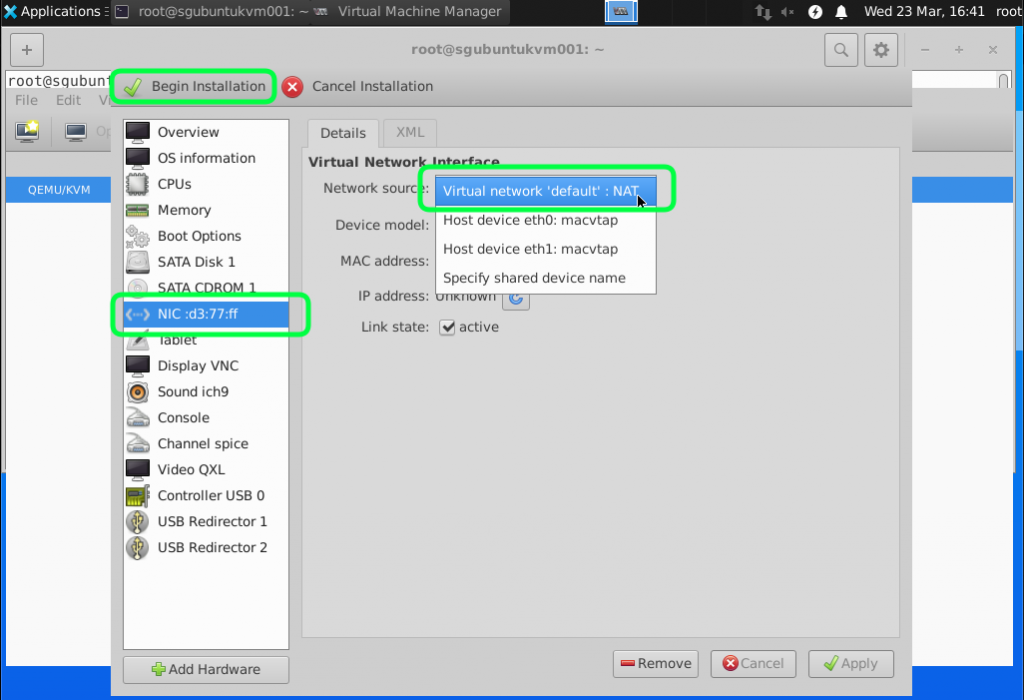
Finally, you will have to Name the windows KVM VM and check the option Customize configuration before install.
I also selected the network as Virtual network ‘default’ NAT. By selecting this network you guest VM will start using the Ubuntu host internet connection.
Click on Finish at this moment now.
4. Configure the virtual Hardware’s.
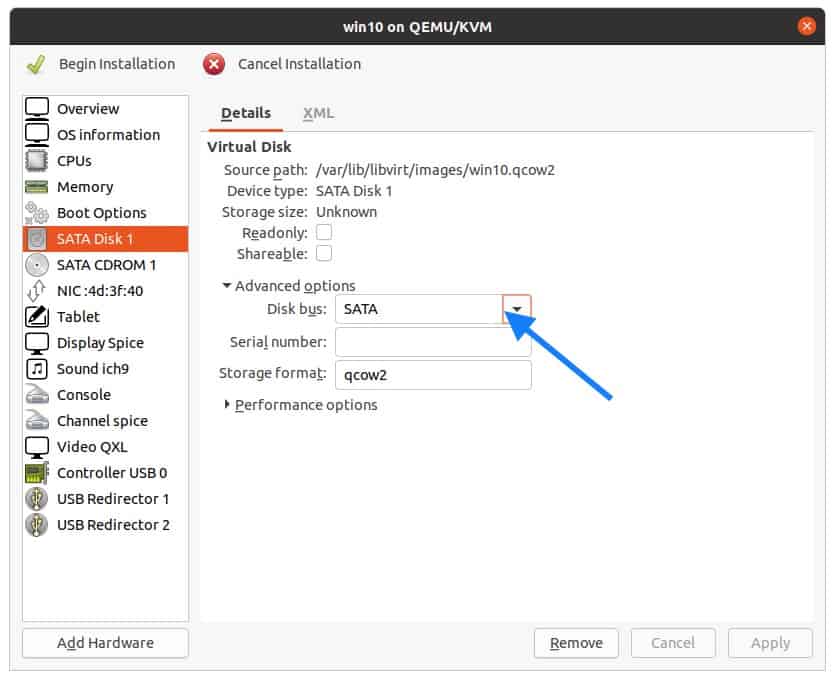
Since you selected customize option you will now be presented with the KVM customization screen.
Do not click on Begin installation yet, before that we have to modify some hardware changes.
Click on the SATA Disk1 , and on the right side expand the advanced options and click on the Disk bus drop-down list.
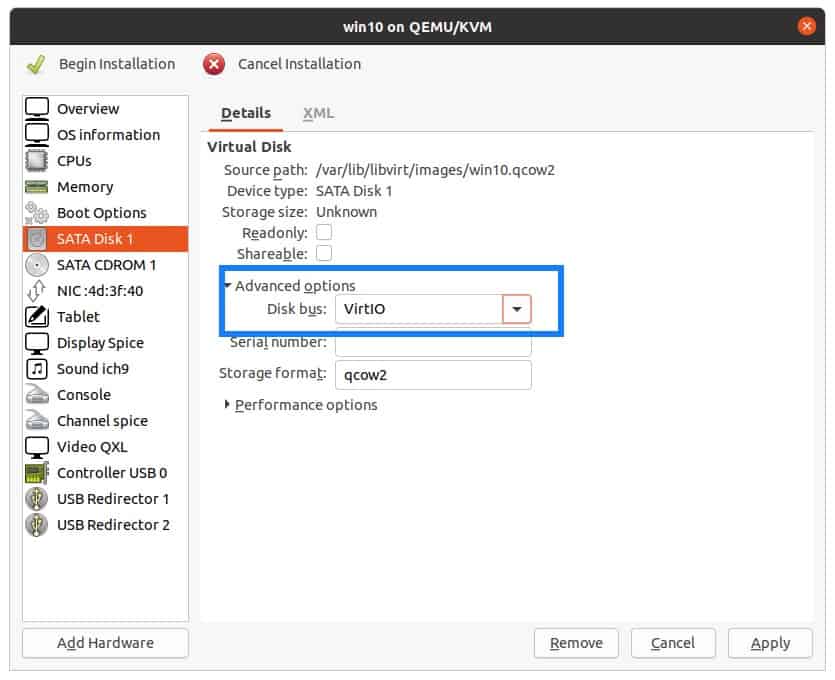
Select VirtIO as the disk bus, and then click on Apply.
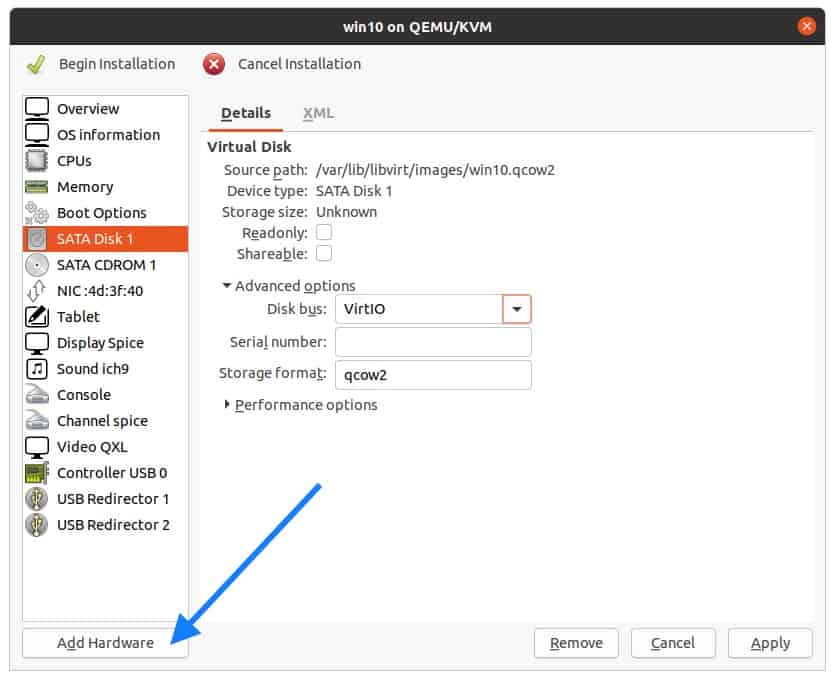
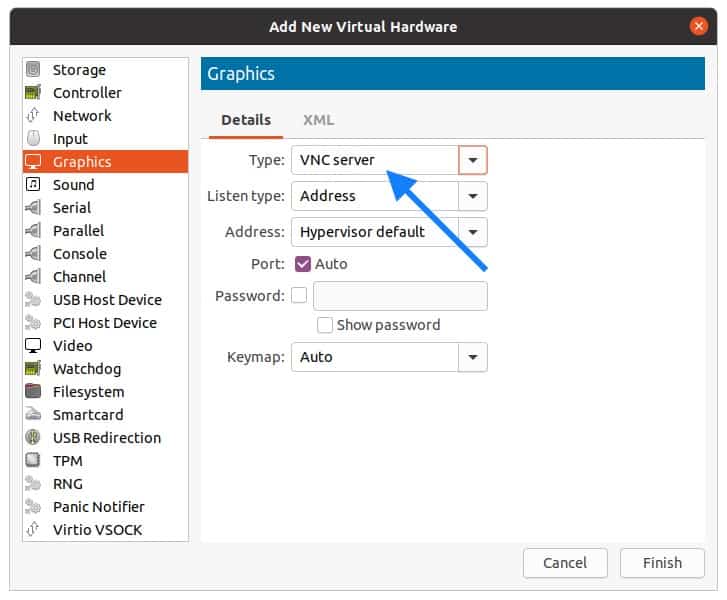
You now have to add VNC Viewer as the graphics, so click on Add hardware from the bottom left.
In the add New virtual hardware windows, select Graphics and in the Type select VNC Server and click on Finish.
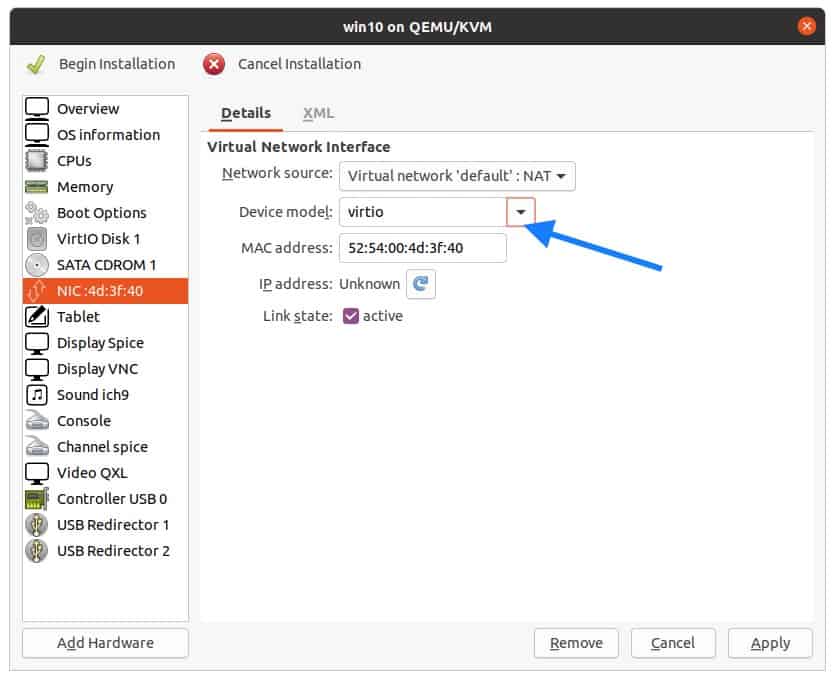
Click on Network interface card (NIC), change the device model to VirtIO, and click on Apply.
5. Add the Windows 10 virt drivers and configure the boot loader.
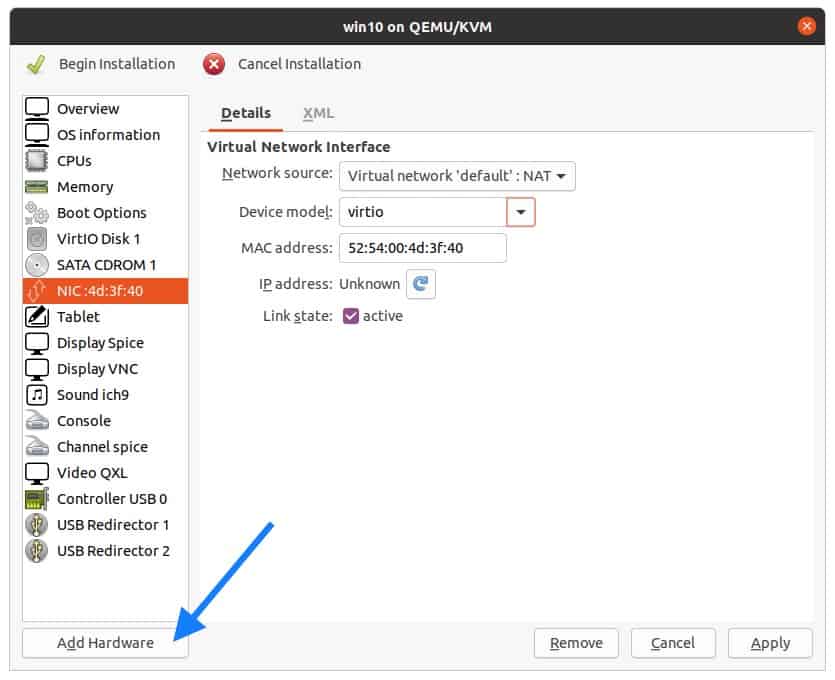
Remember that we have downloaded VirtIO Windows drivers for Ubuntu KVM, let’s attach that now. So click on Add hardware.
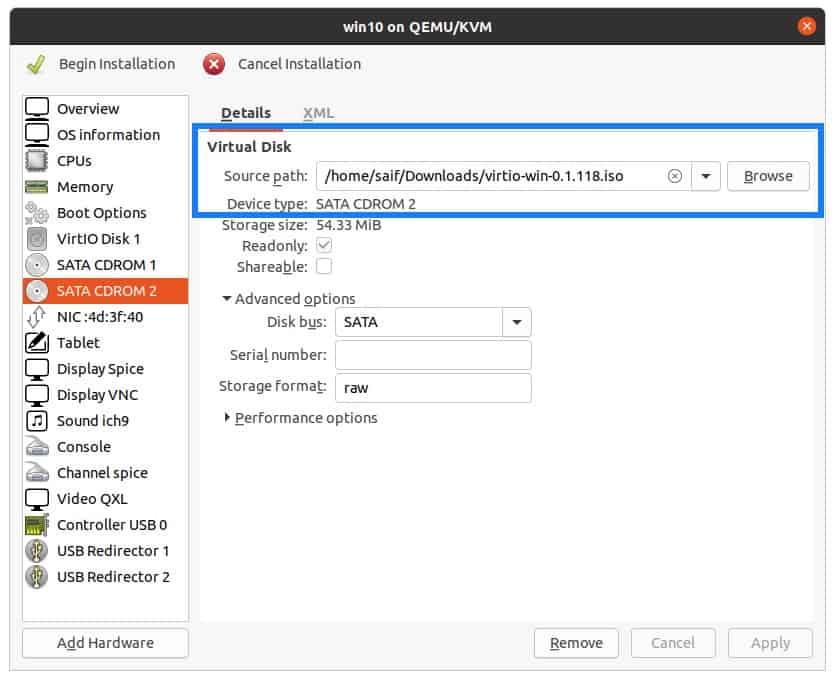
Select the storage and click on manage and attach the VirtIO iso file that we have downloaded, and also change the Disk type to CDROM device and click on Finish.

The second CDROM now has VirtIO drivers and the first one has the windows 10 ISO image.
Change the boot order for windows
Let’s go ahead and change the Boot order of the device, first being the CDROM1 and the VirtIO disk and the CDROM2.
Note : The important part is for the KVM to load the windows 10 image from the list.
Check the option Enable boot menu.
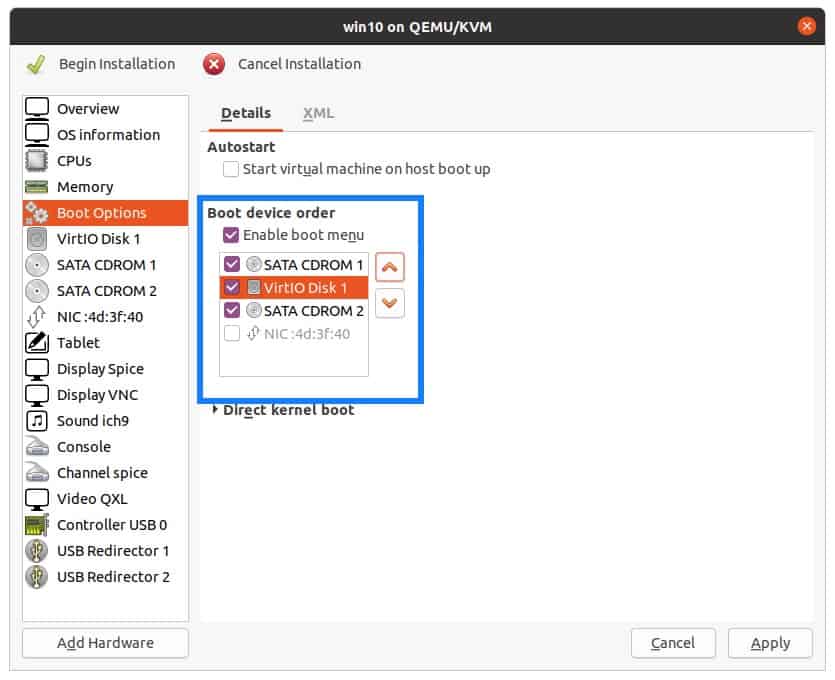
Once you rearranged the boot loader click on Apply.
6. Configure the qemu CPU the right way.
Click on CPU and change the current allocations to 4
Check the options which say manually set CPU topology.
In the topology assign 1 socket, 2cores and 2threads.
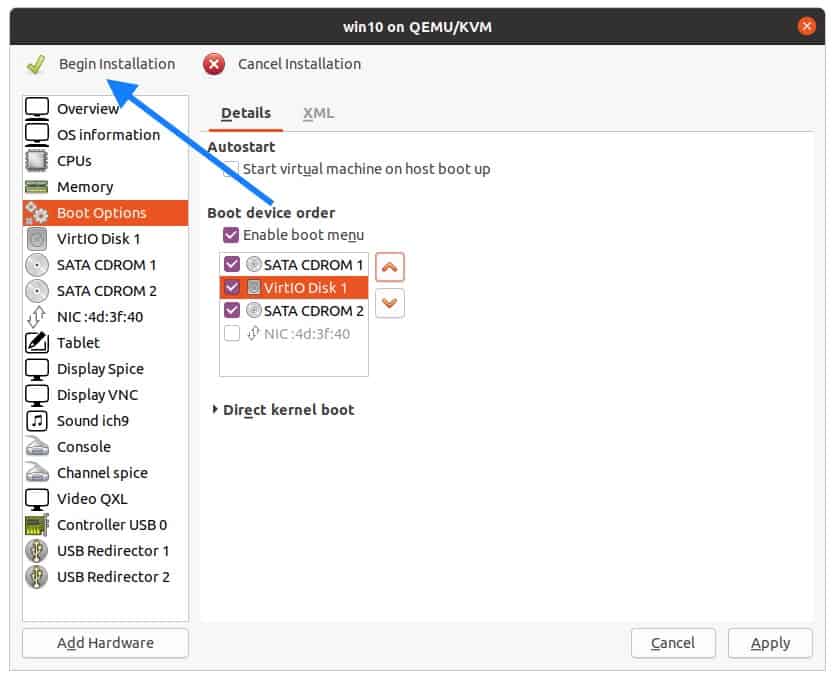
7. Begin the windows 10 VM installation.
We just finished adding the required virtual hardware, you may now click on Begin installation.
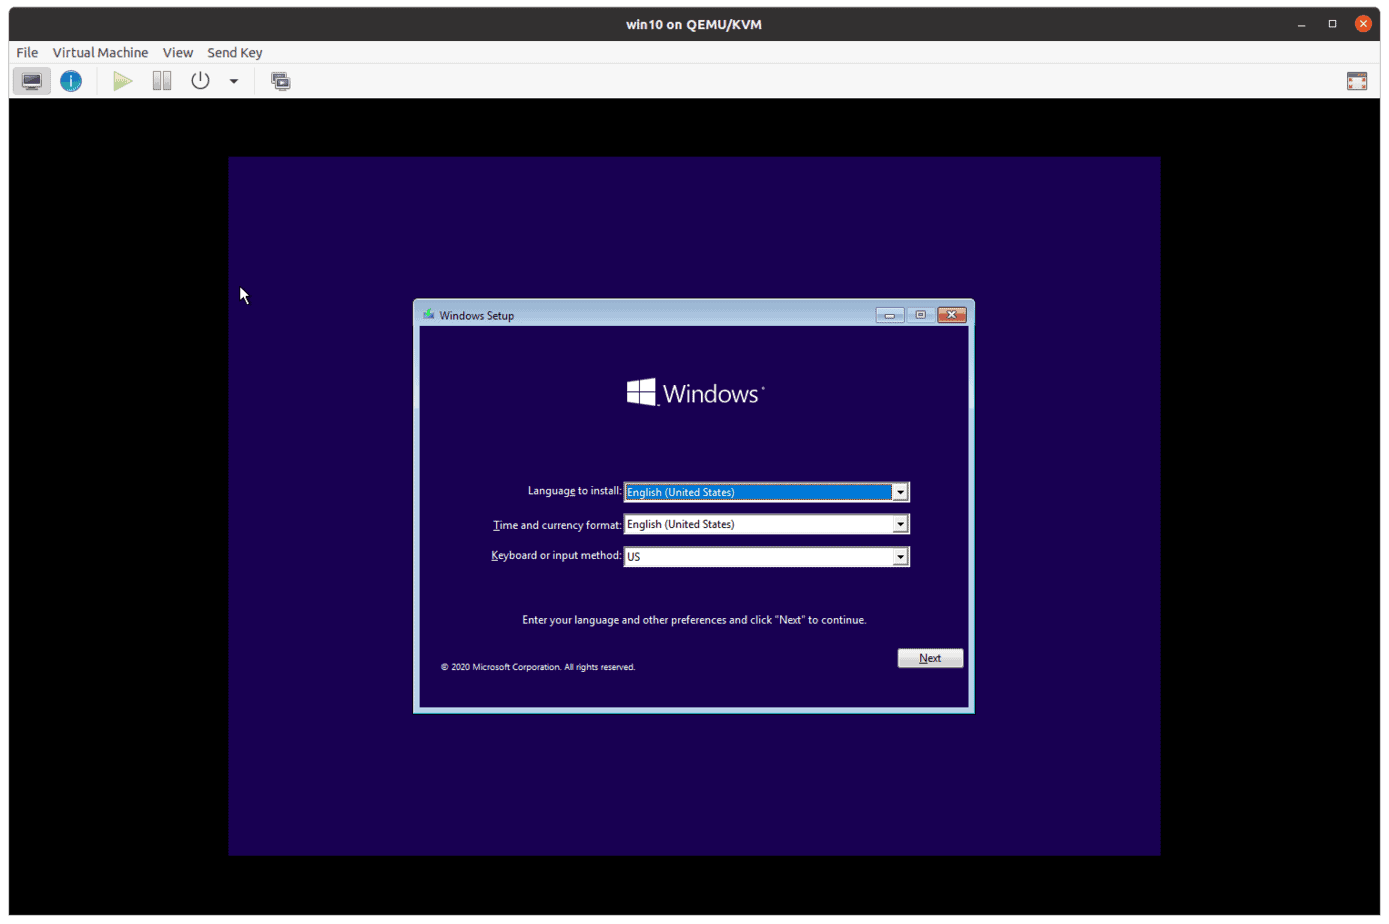
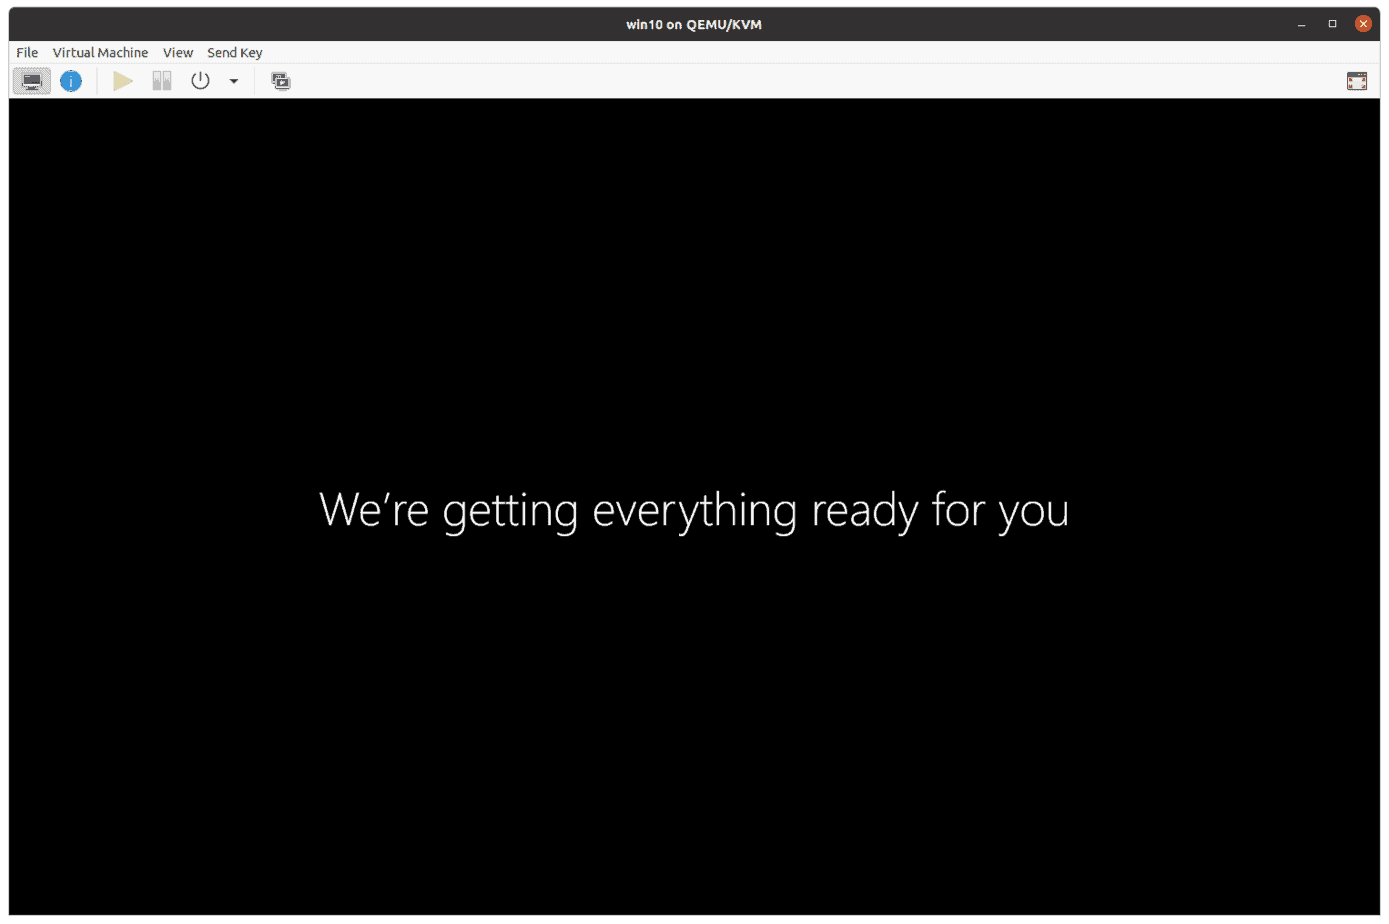
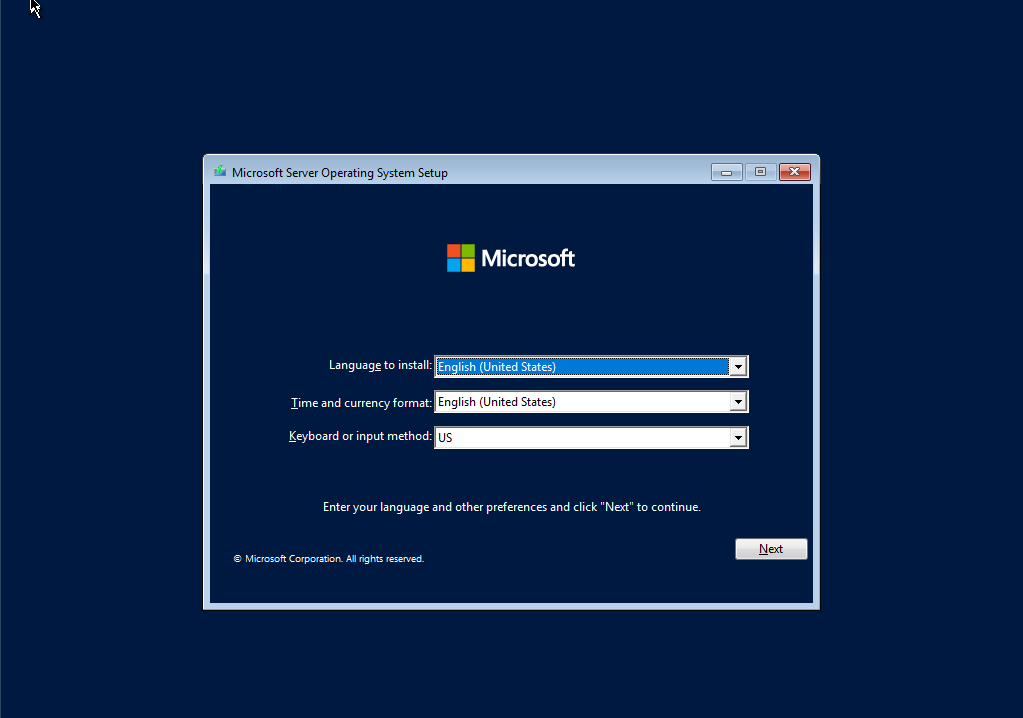
If everything went well, you should be able to see the windows logo, and after few seconds Windows prompt where you have to choose the language and the time and date and the keyboard click on Next.
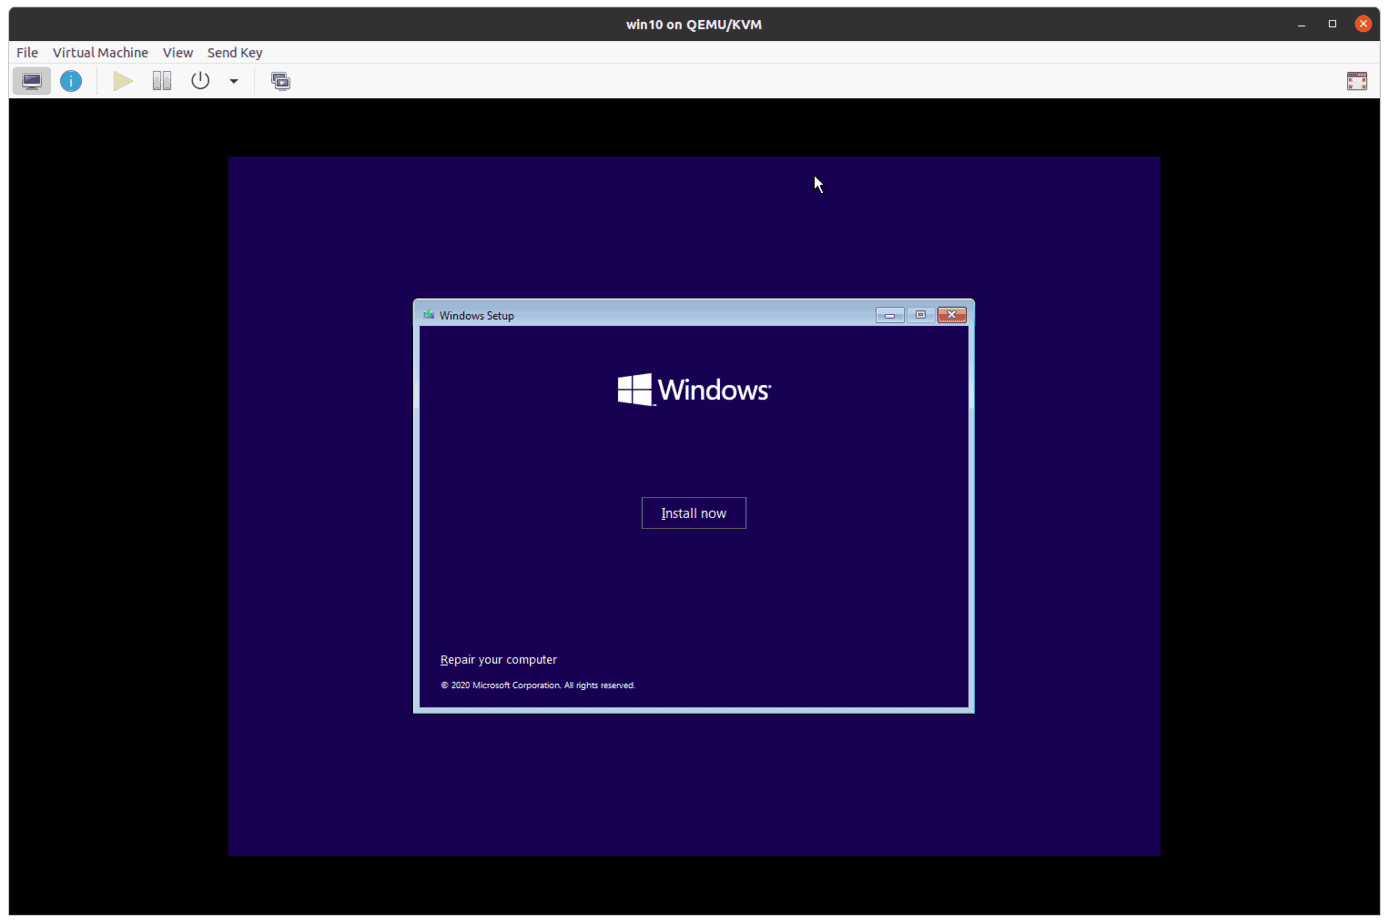
You will have to click on install now on the next prompt.
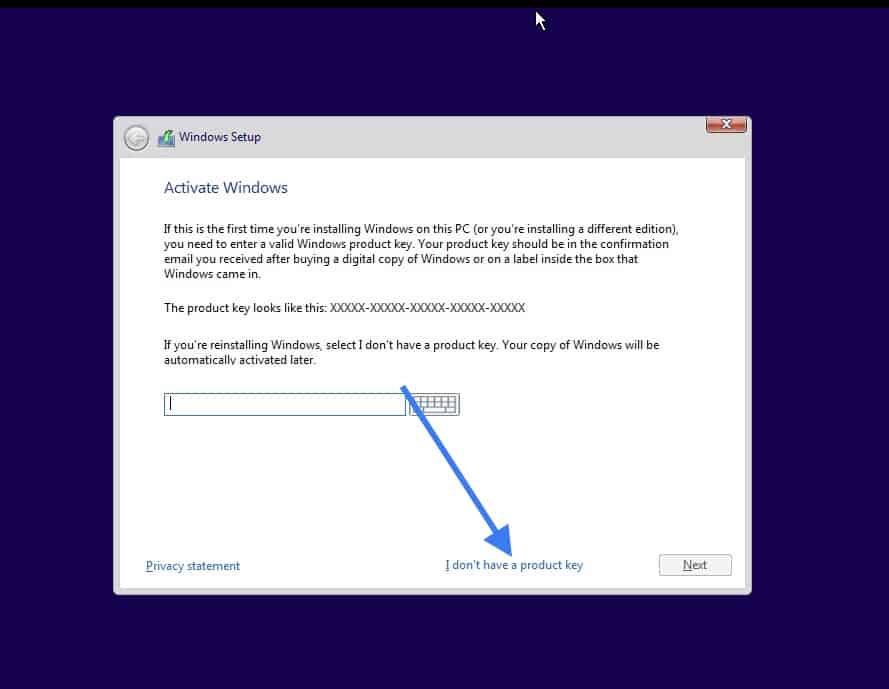
If you have the product license key, you may enter it now. Else click on I don’t have a product key, I choose the same as I didn’t have the product key during the installation.
Select the version that you would like to install, I am choosing the version Windows 10 Pro.

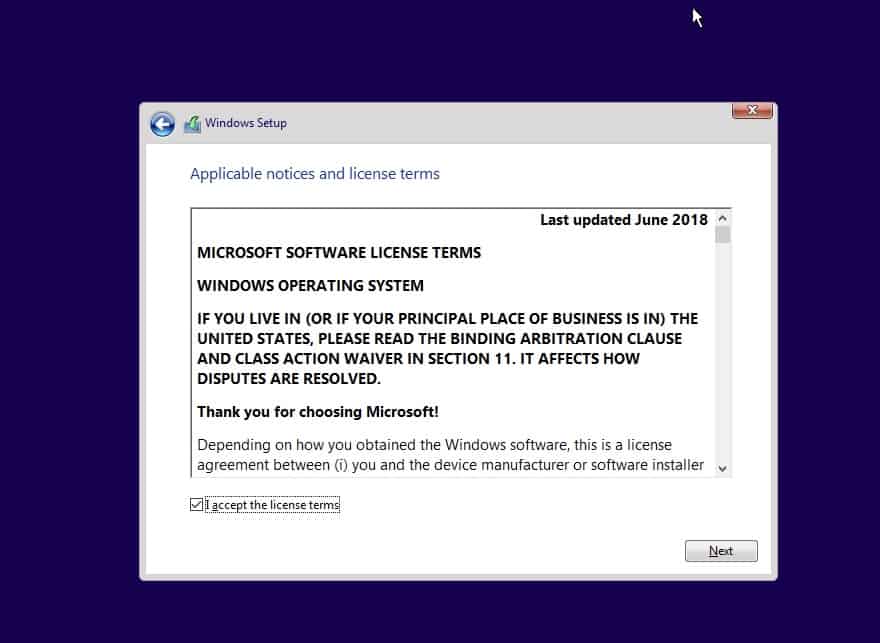
Accept the license agreement and click on Next.
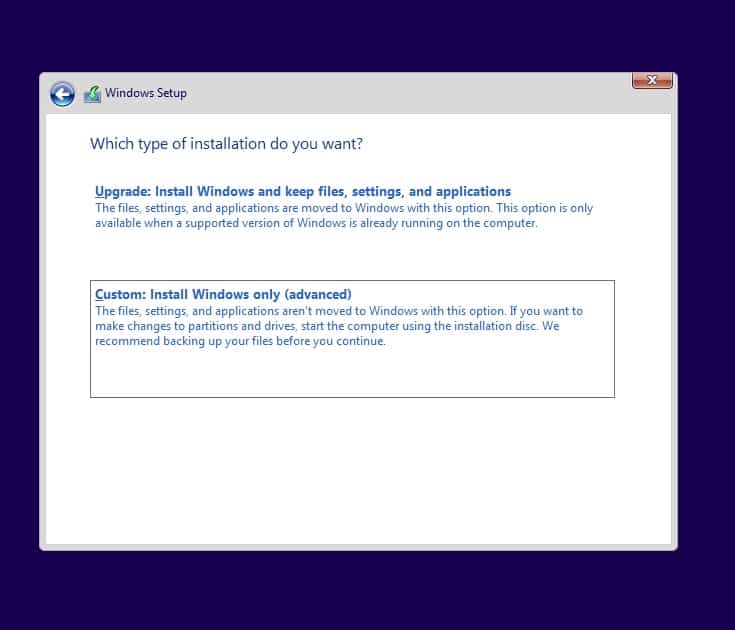
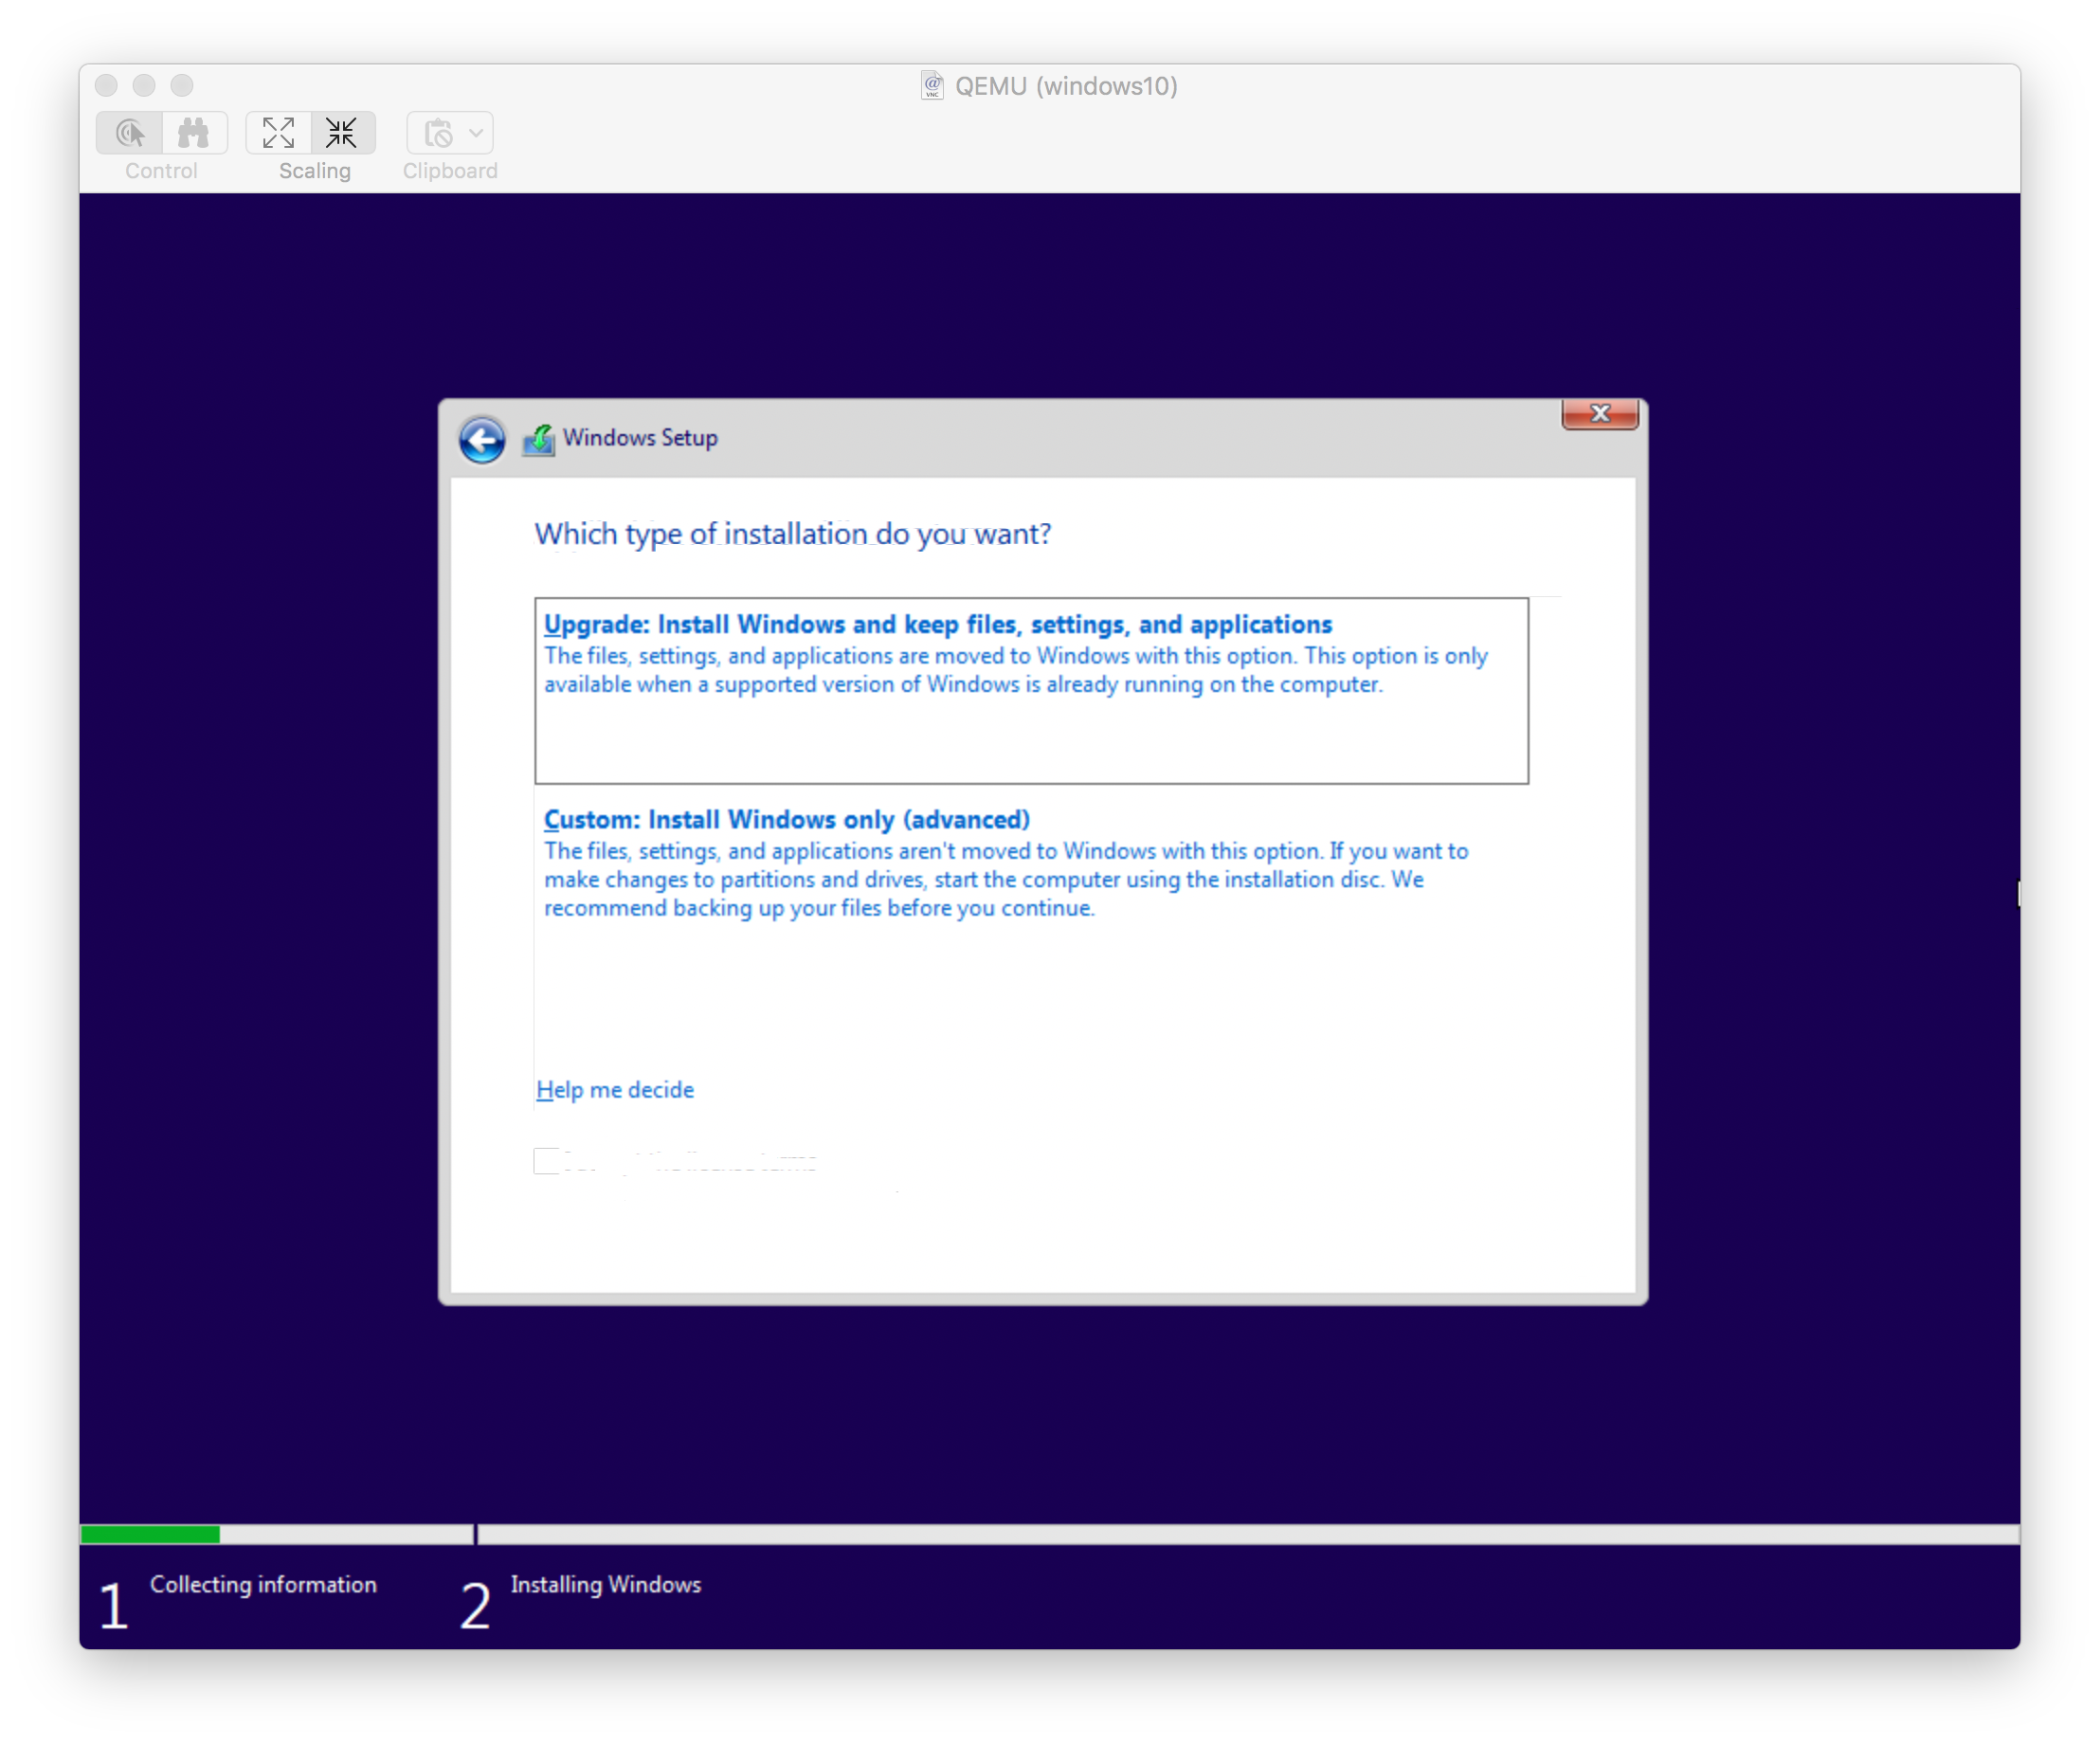
You now have two options to install the windows, Either upgrade or Custom, Choose custom here.
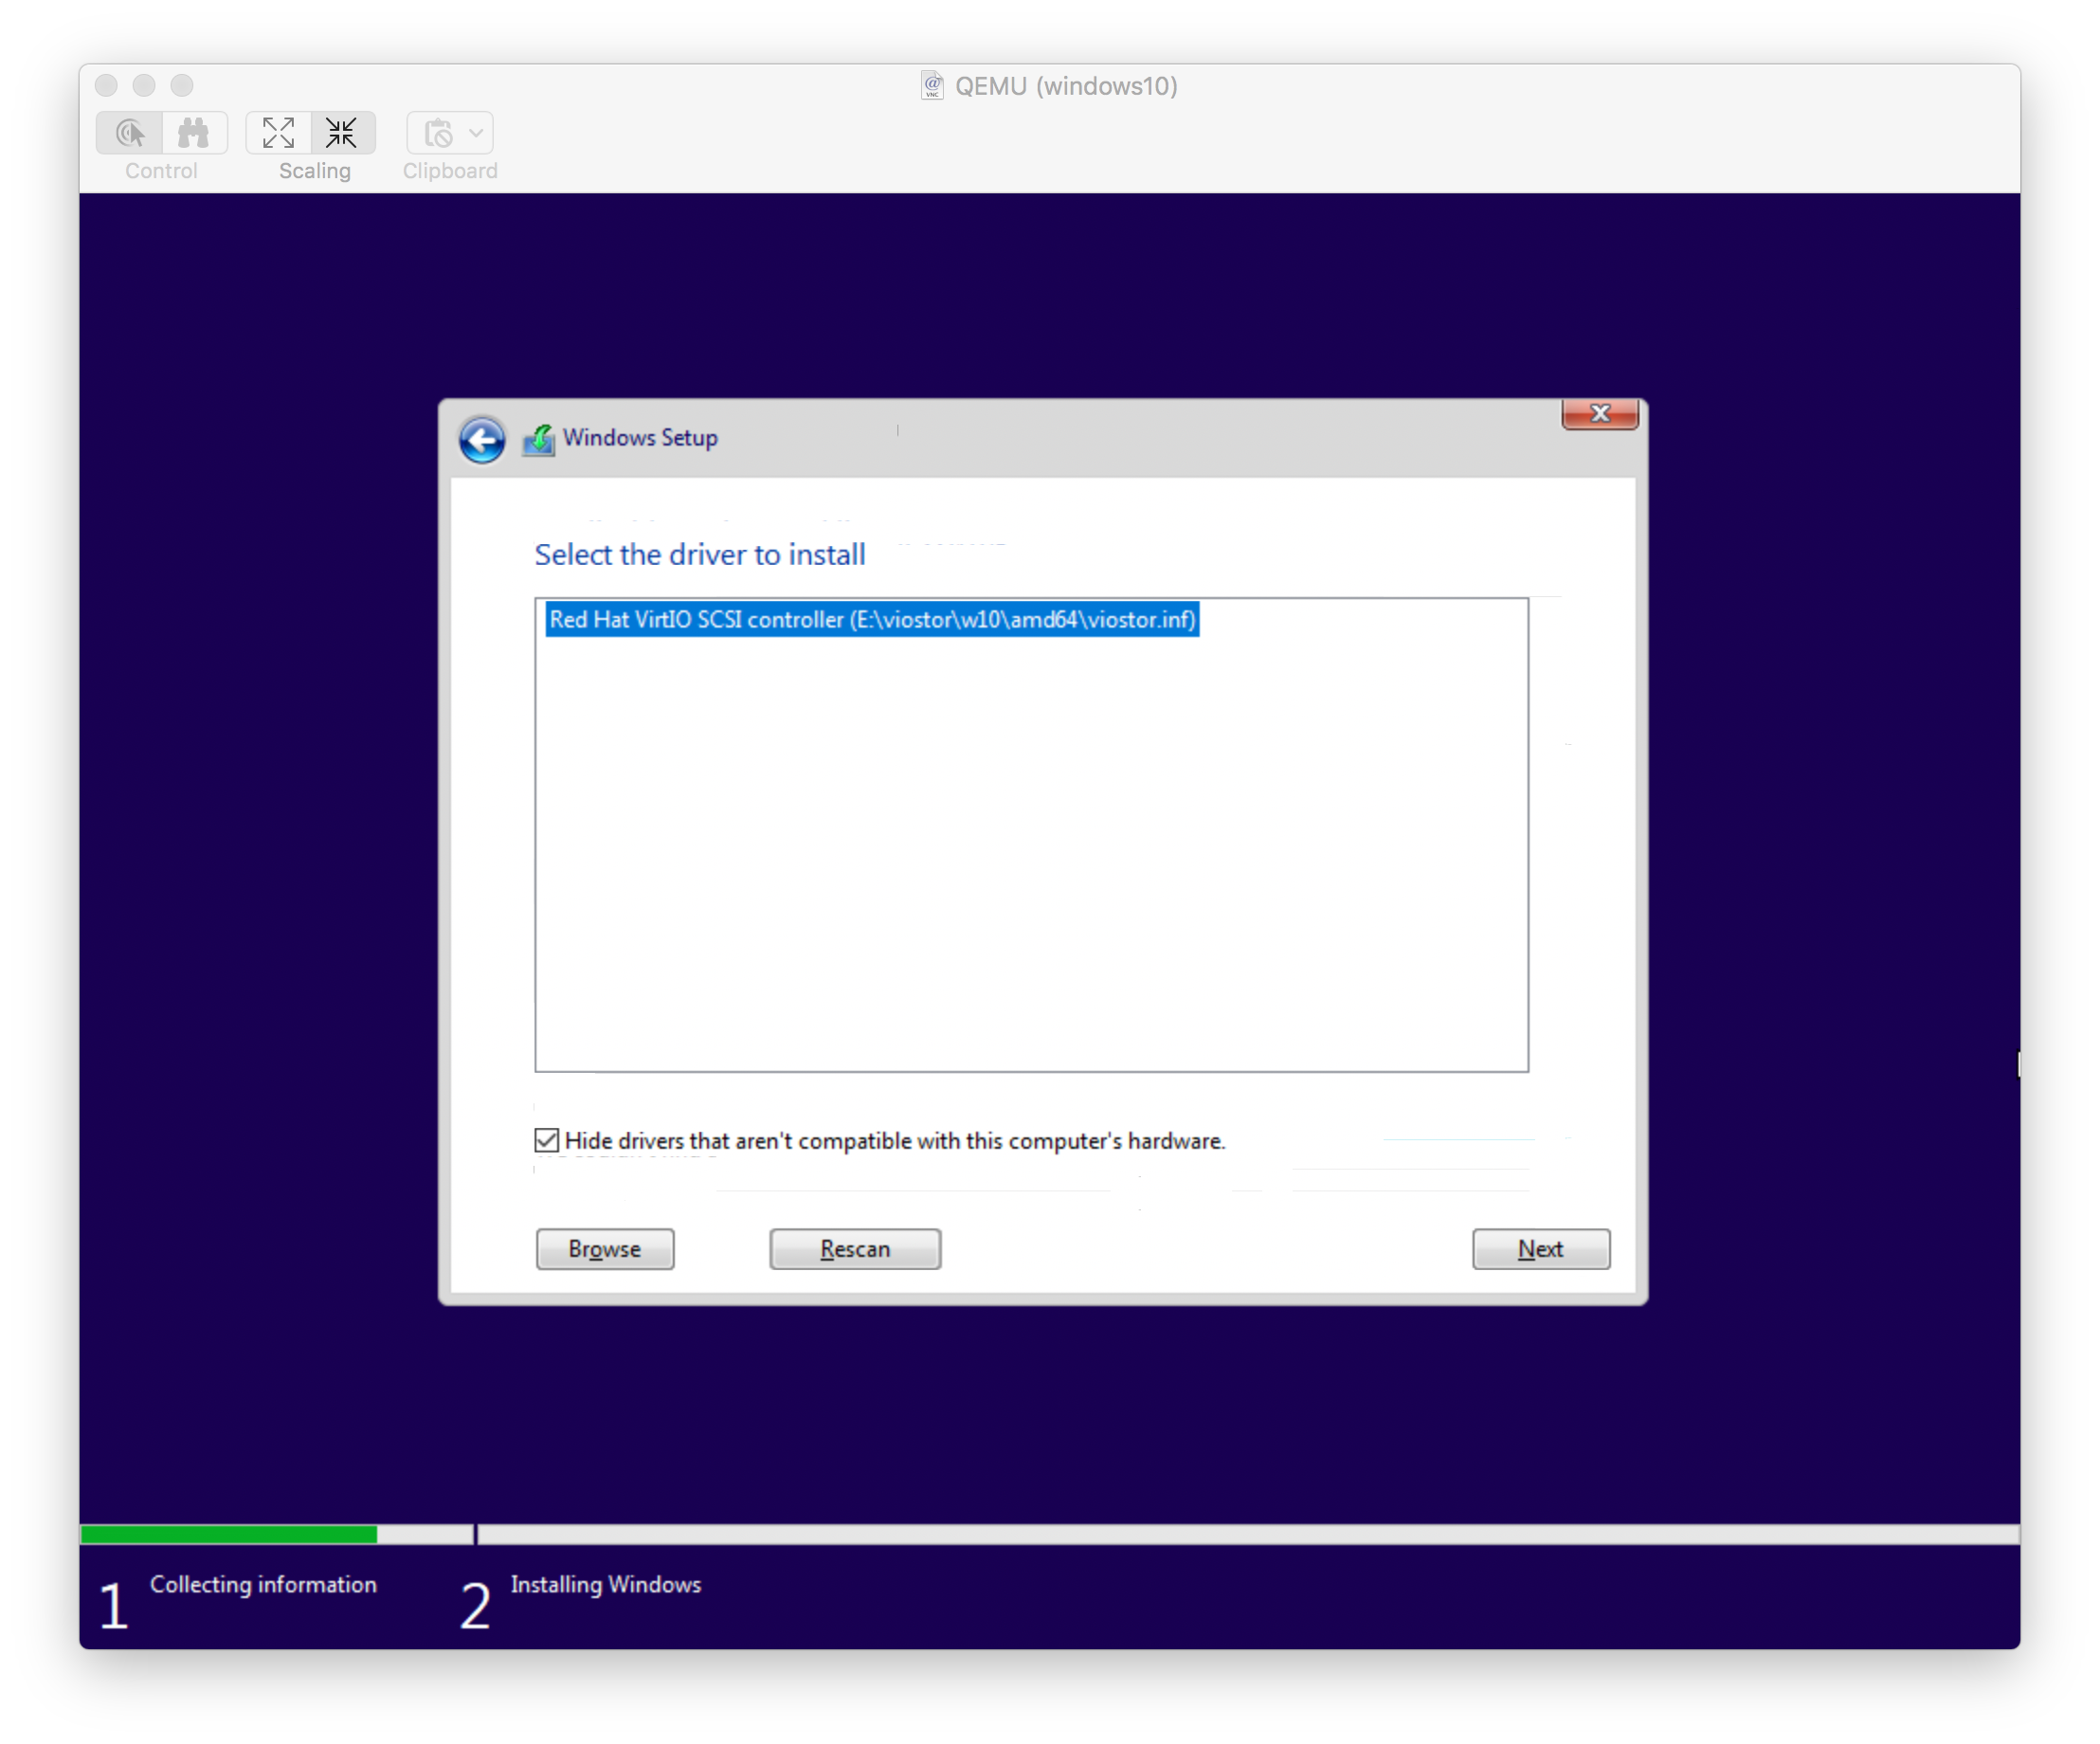
8. Install the Redhat SCSI controller driver.
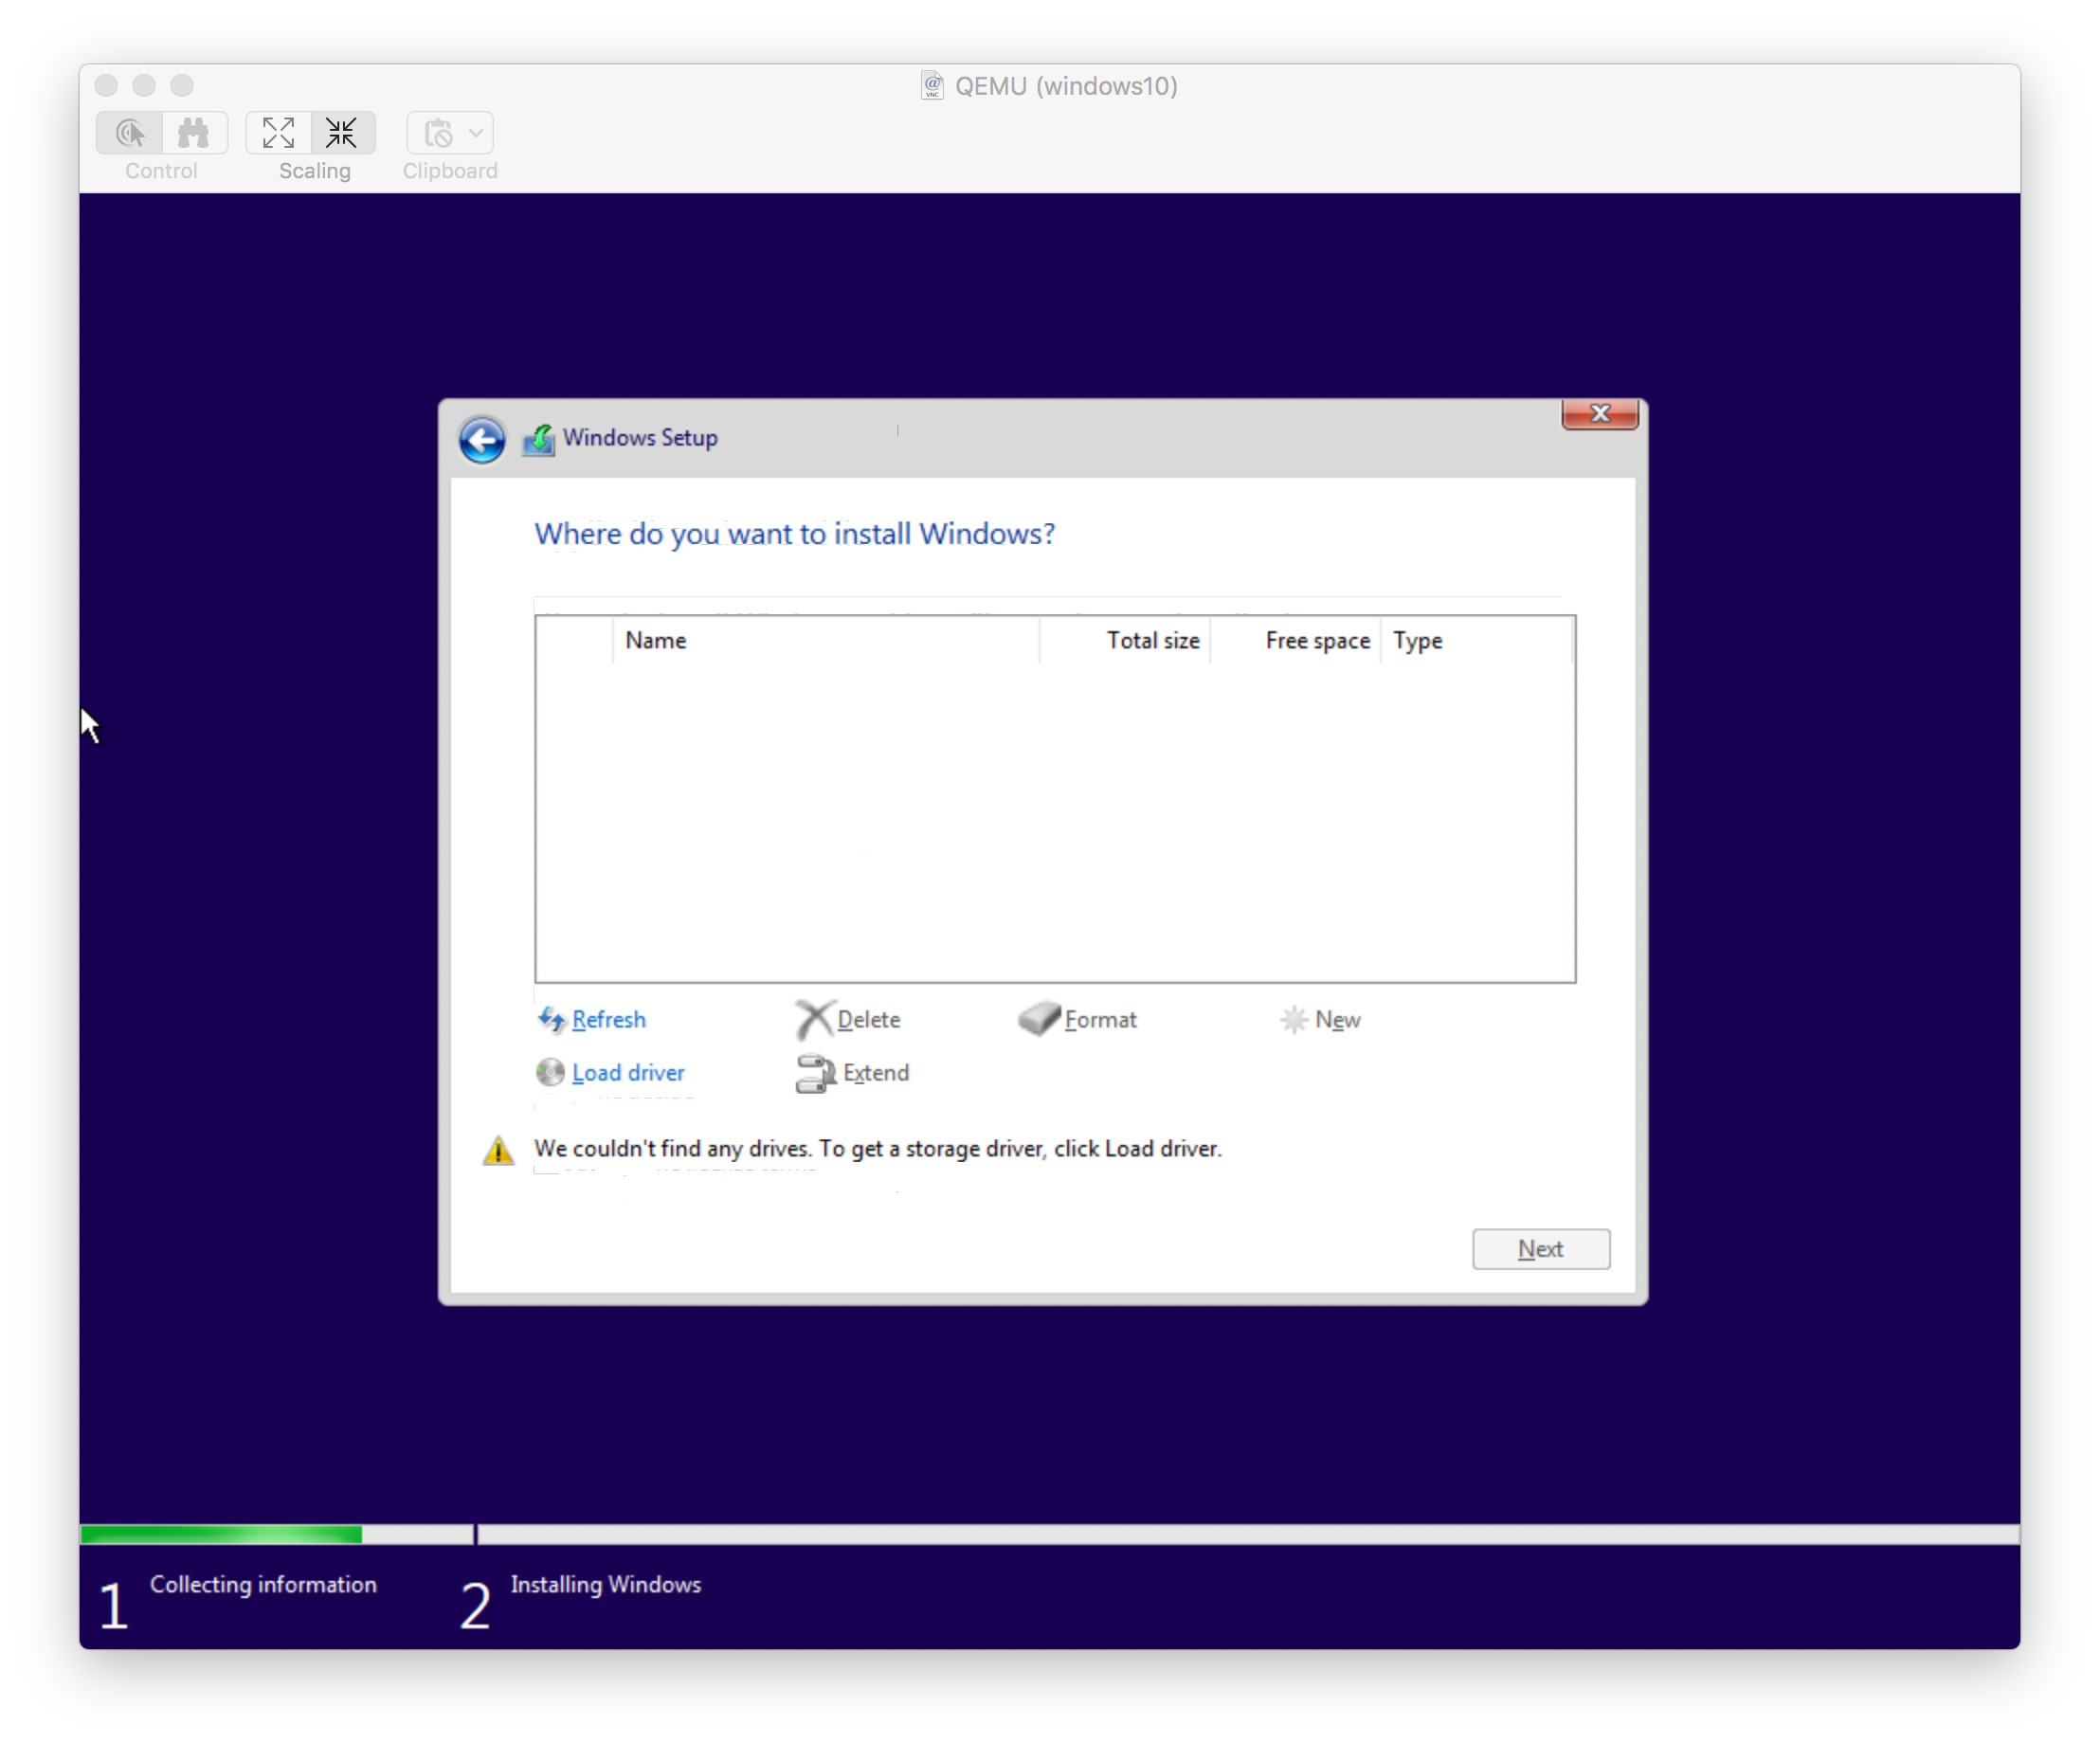
Remember we have added the storage of 20GB in the beginning, but we are not able to see them so click on Load driver here.
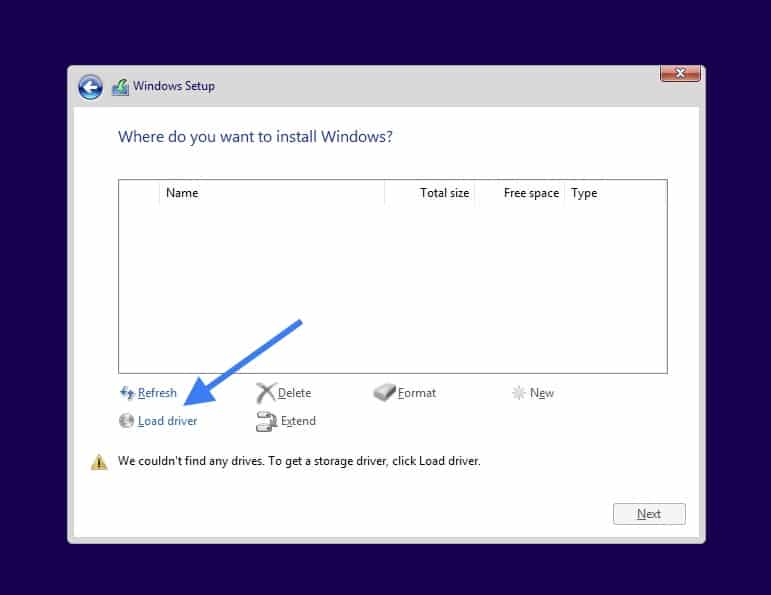
You will get a load driver prompt click on OK.
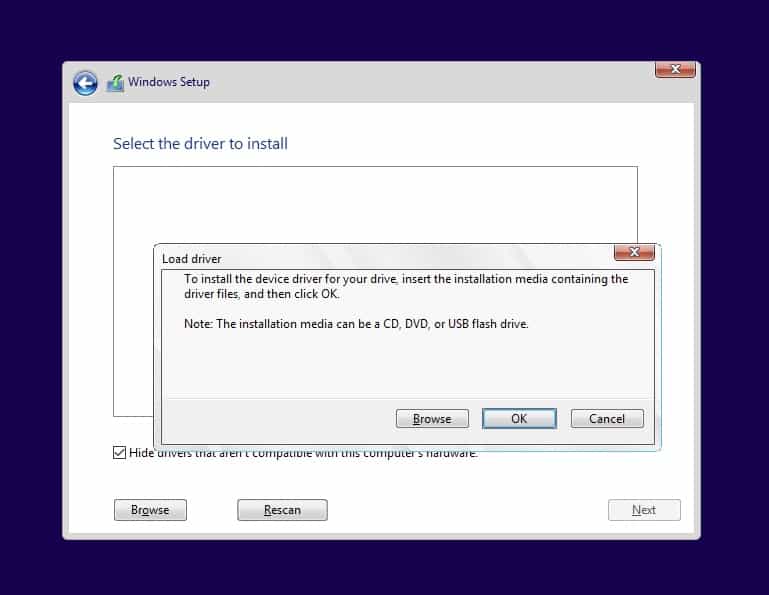
Once you click on OK you will be able to see all the drivers like below.
Select the windows 10 SCSI driver and click on Next.
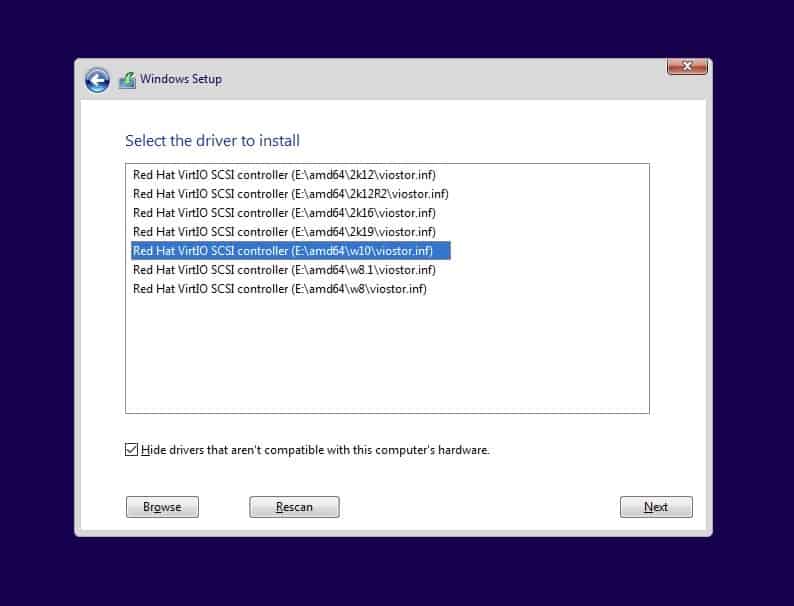
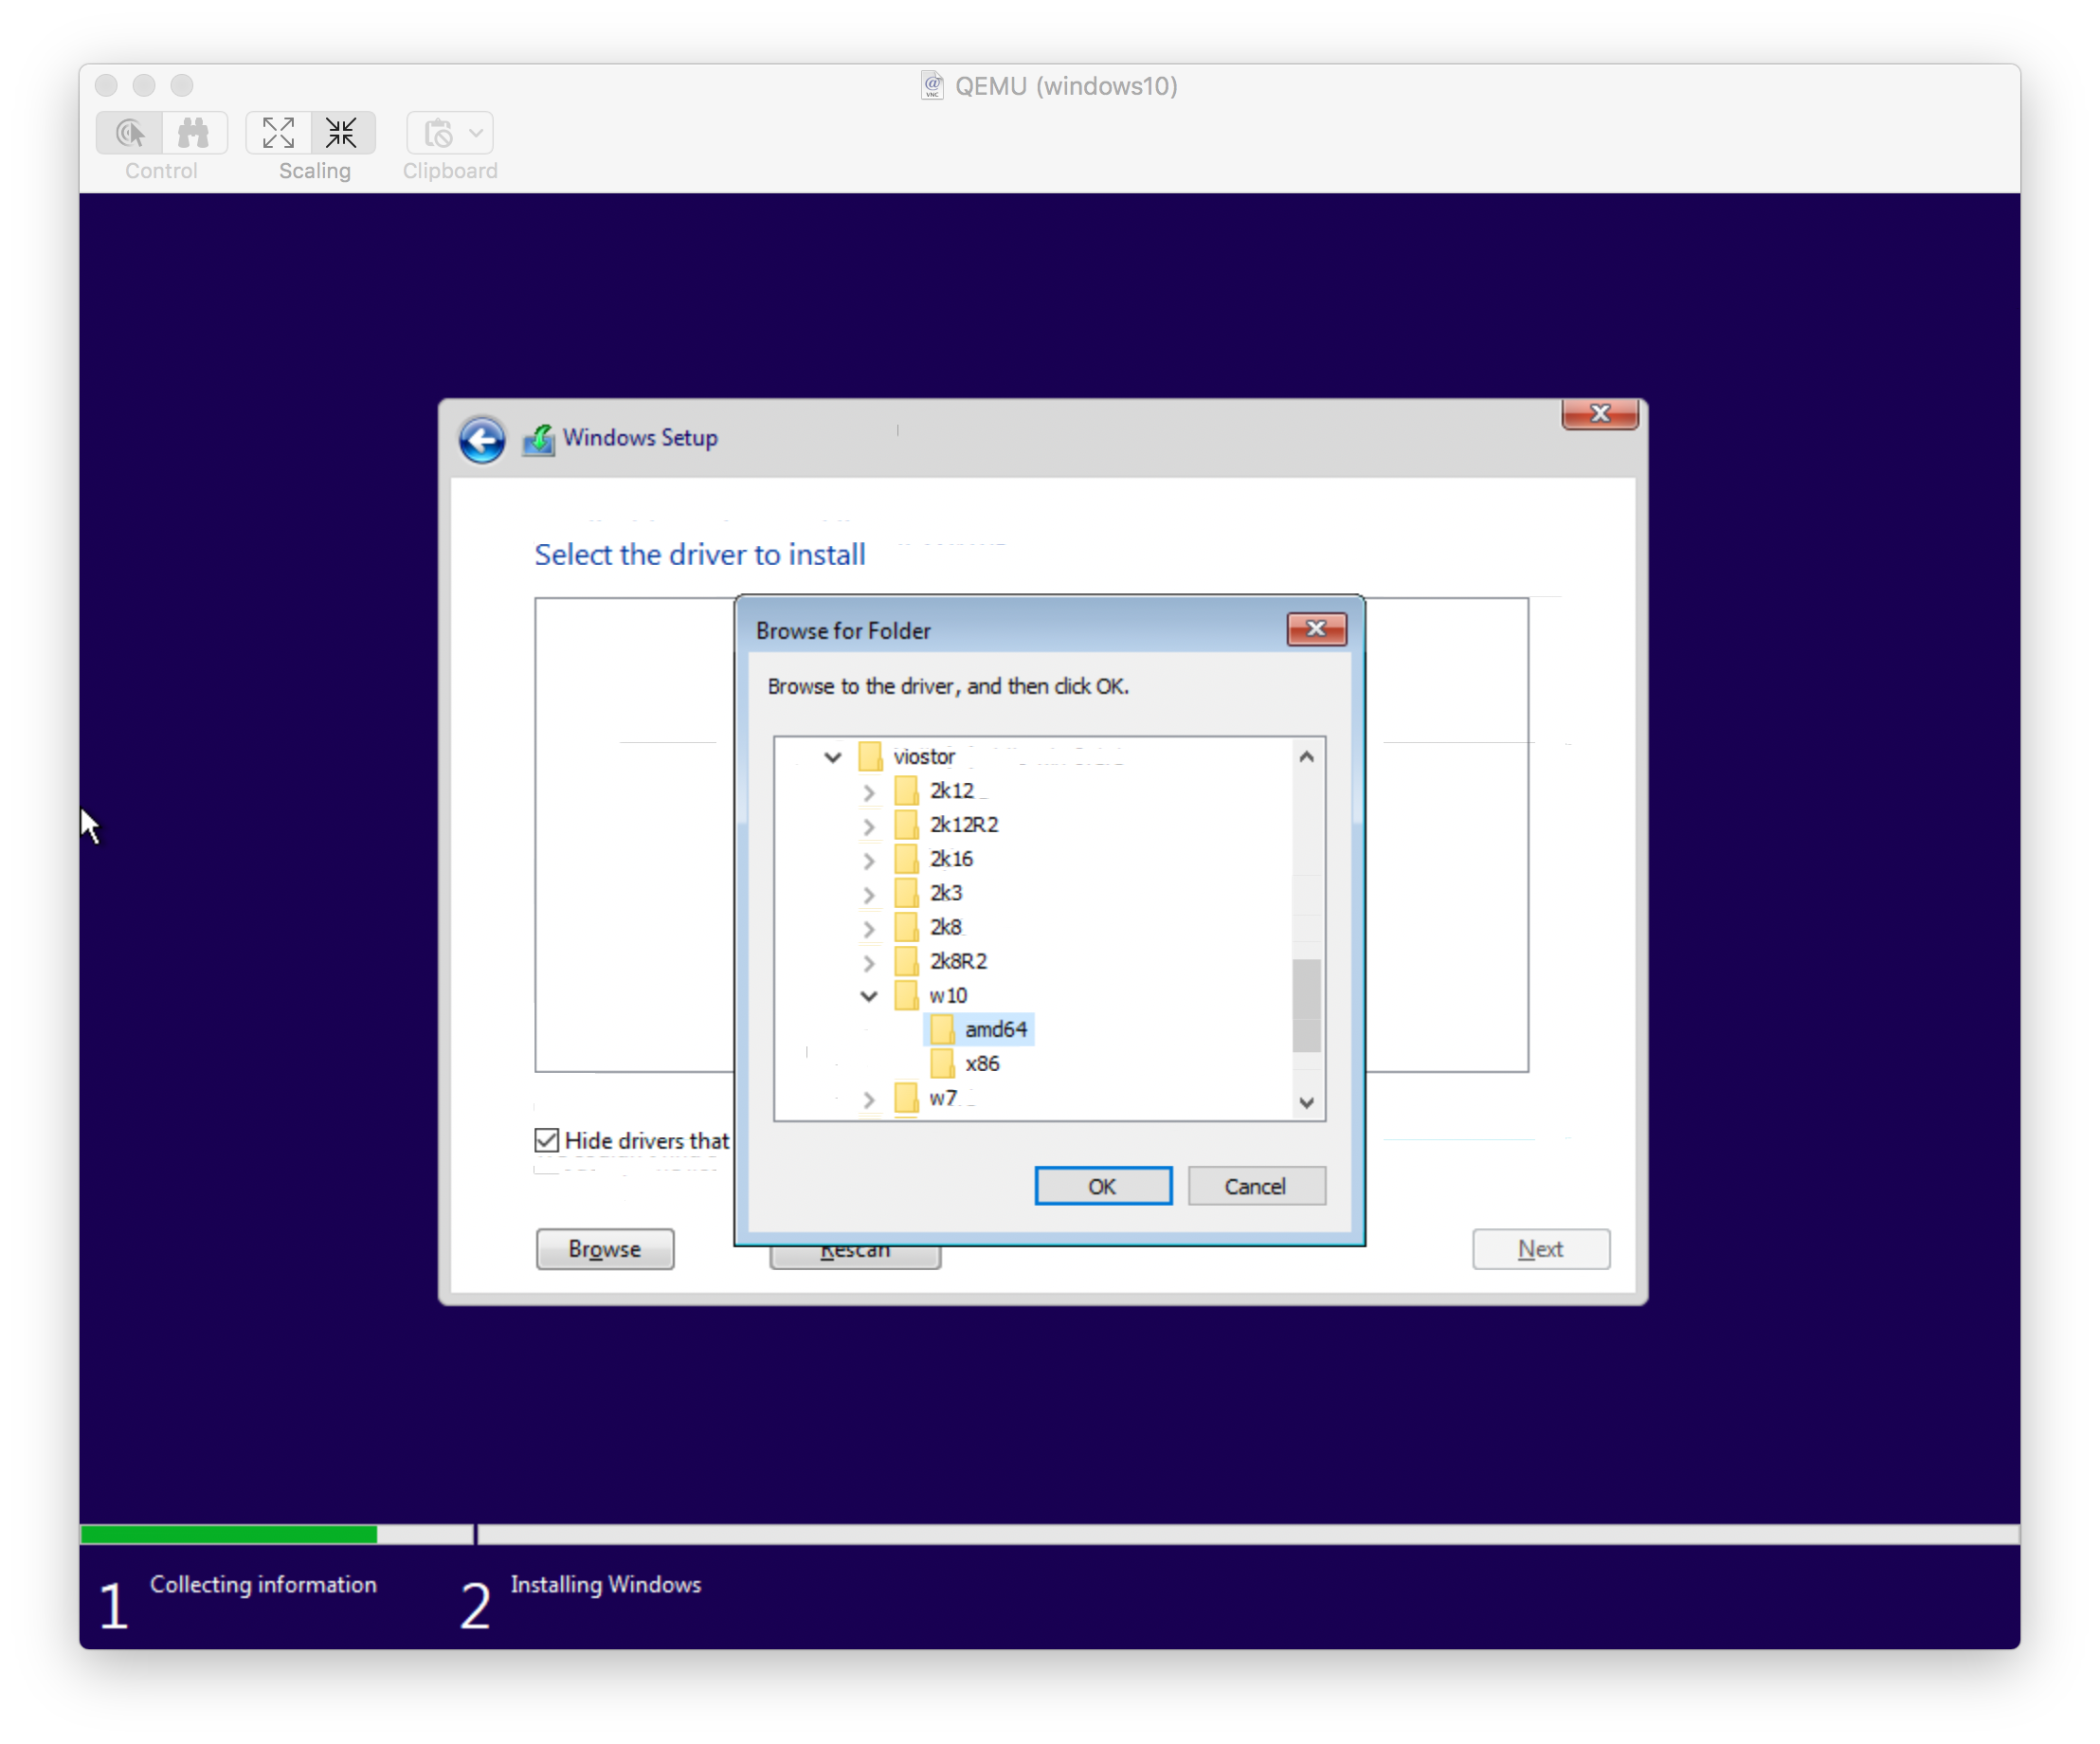
Note: If the driver doesn’t show up then you may follow the below steps.
- Click on Browse and expand the VirtIO driver iso file CDROM.
- Go down and expand the folder viostor.
- Expand Win10
- And select amd64 and click on OK.
- You should now be able to see the drive listed now.
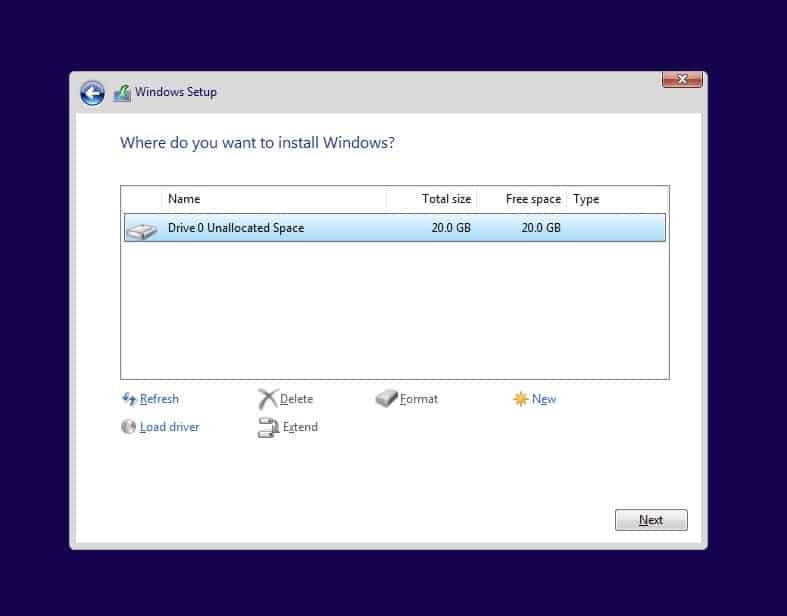
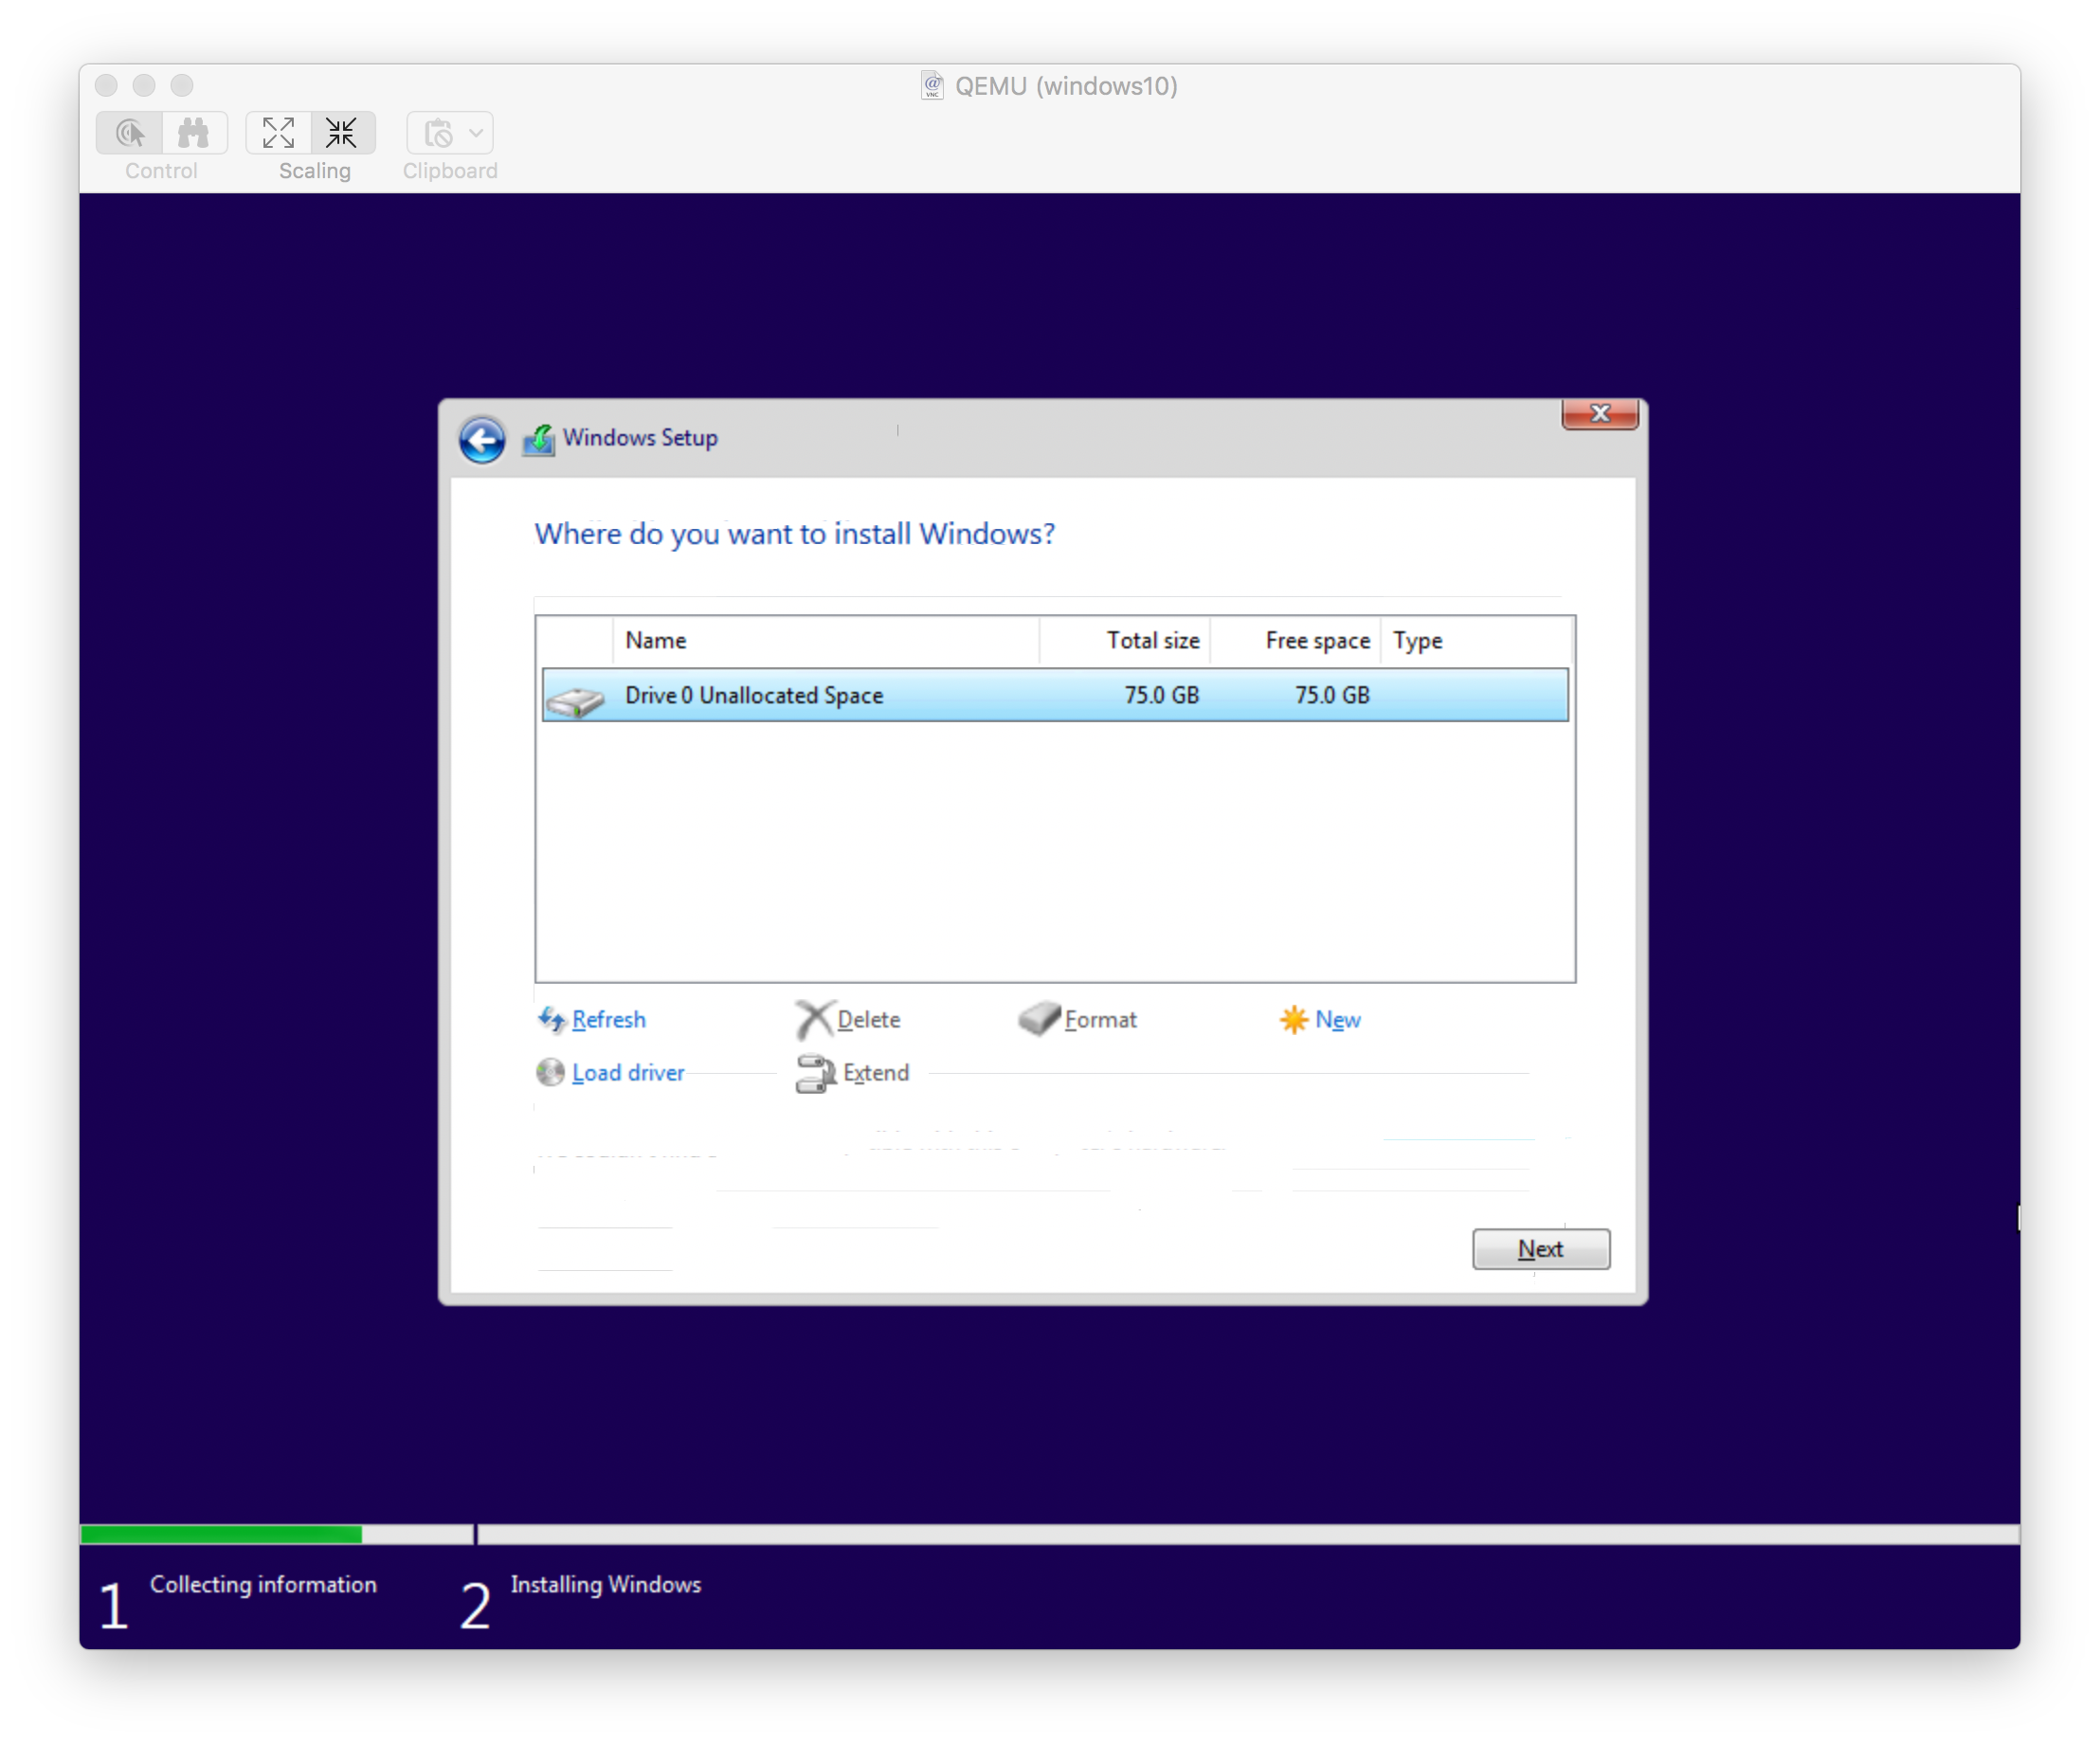
After you selected the drive and once you click on Next after a few seconds you should be able to see the virtual hard disk that you have attached earlier, select that and click on Next.
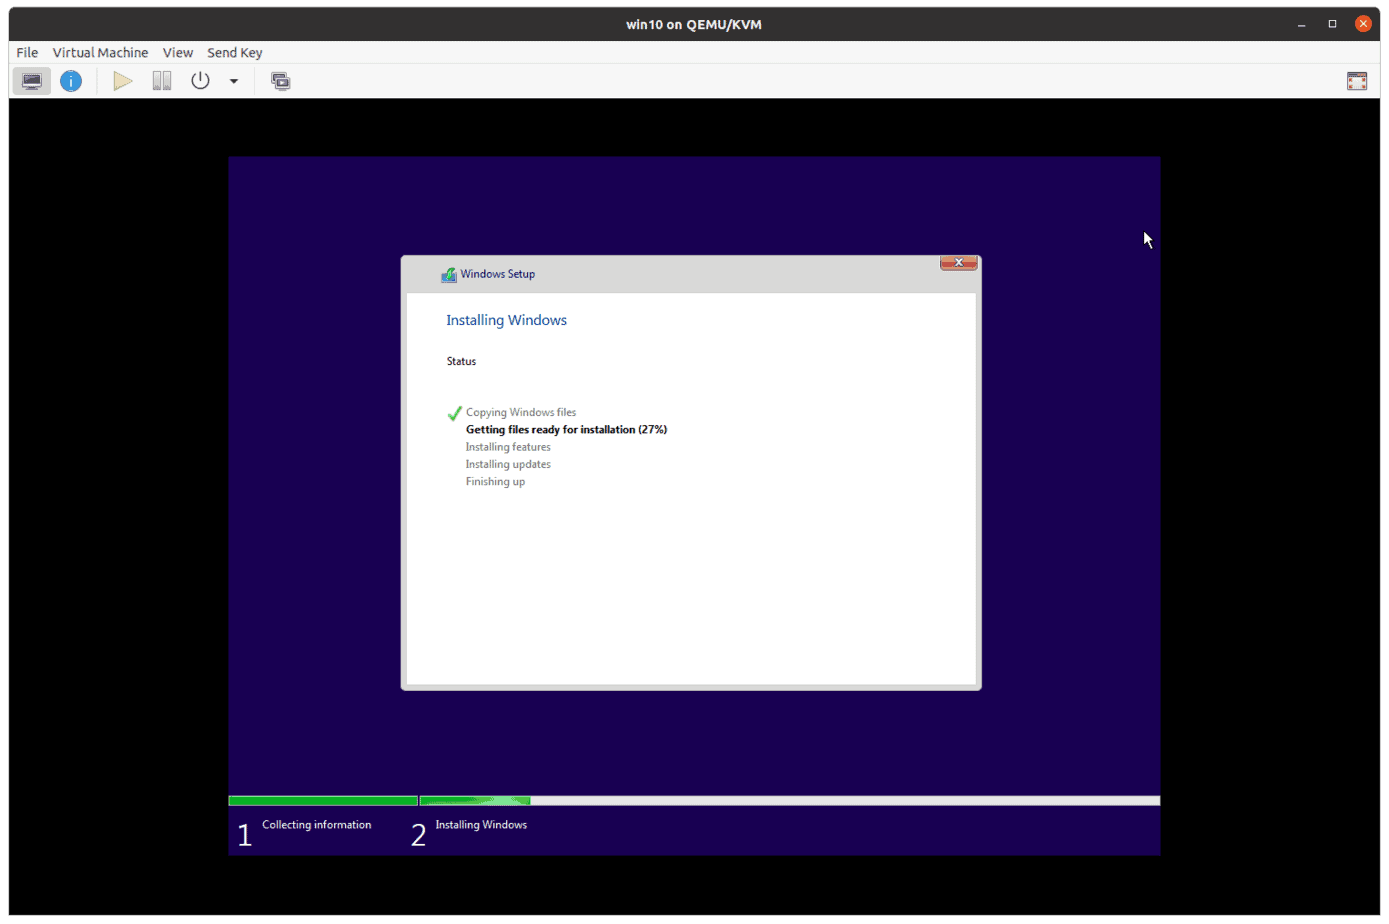
The windows installation now begins and starts to copy the files now.
After a couple of restarts, you should get the windows setup screen where you need to have the basic configuration to be done.
During the process, you could either connect the Microsoft account or create a local account.
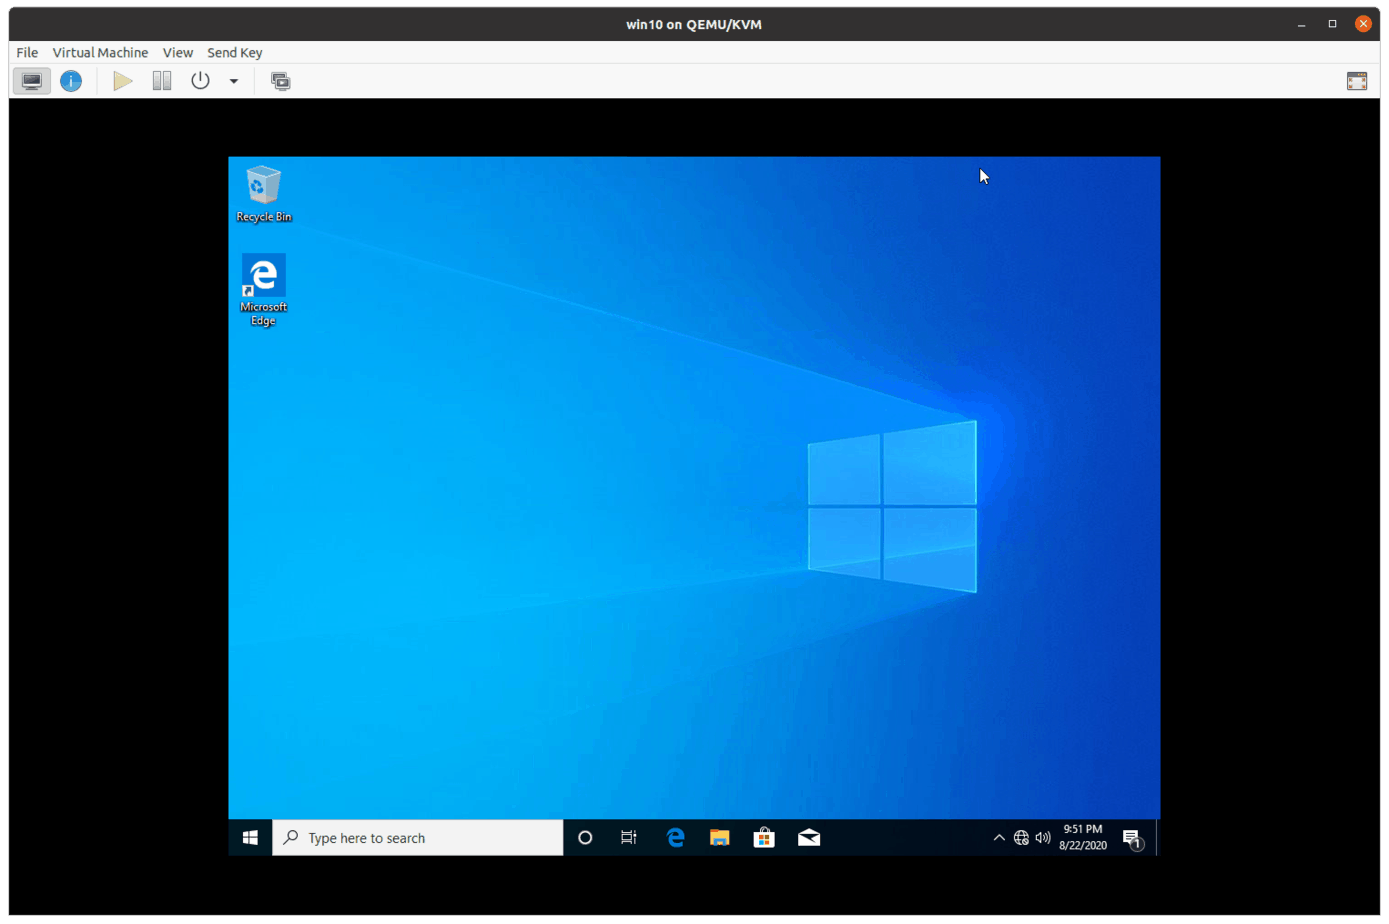
And you should be presented with the windows home screen like below.
9. How to install virtio drivers windows 10.
After the windows 10 installation is completed, you now have to install the VirtIO drivers to windows 10. Post which the networking, display graphics, copy-paste functionality, and others should work.
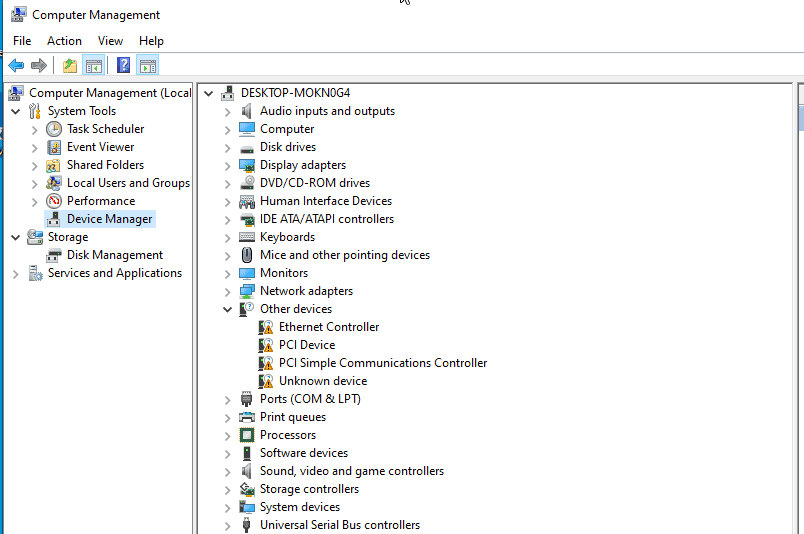
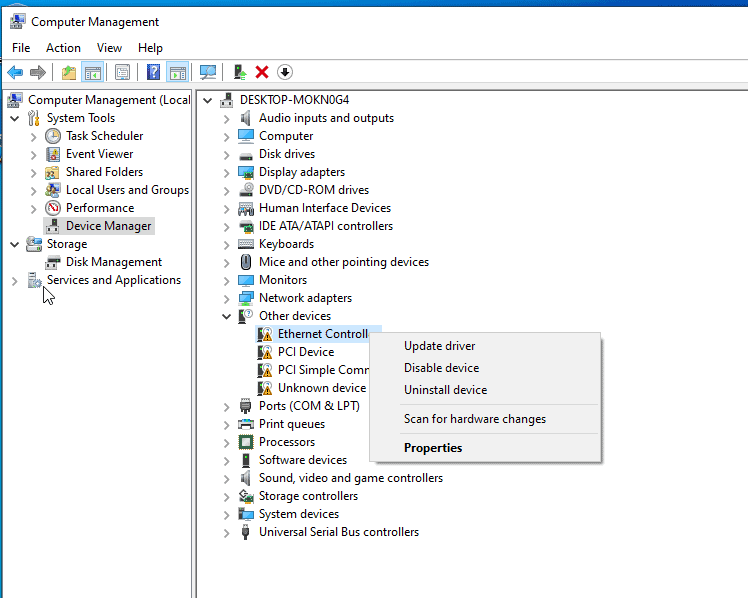
Type This PC and right click and click on Manage.
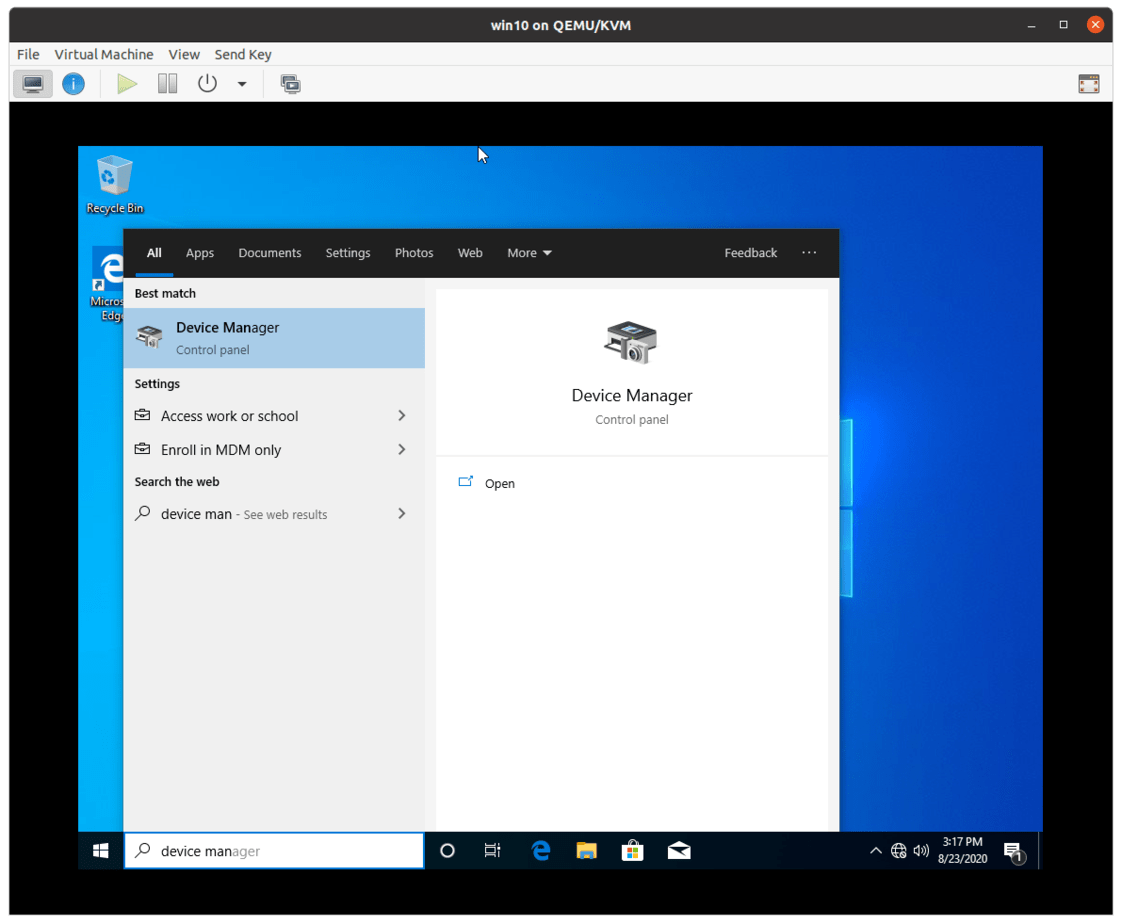
In the device manager, you should be able to see there are some drivers that are not installed under Other devices.
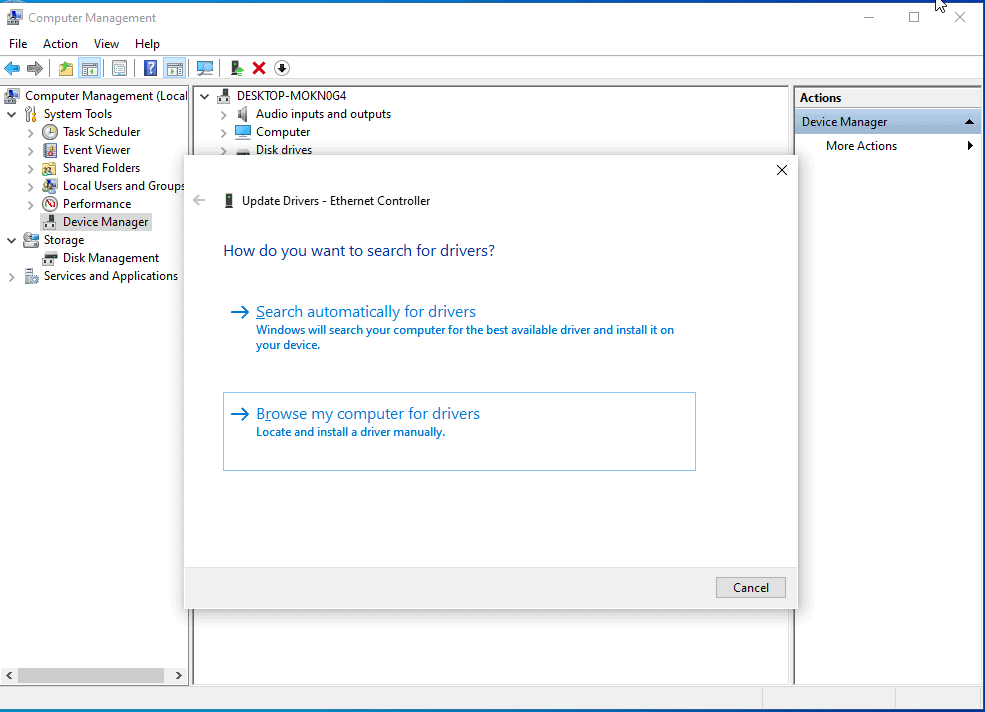
Just right click on each driver and click on update driver. Let’s see how we can do it for the Ethernet controller.
Click on Browse my computer for drivers
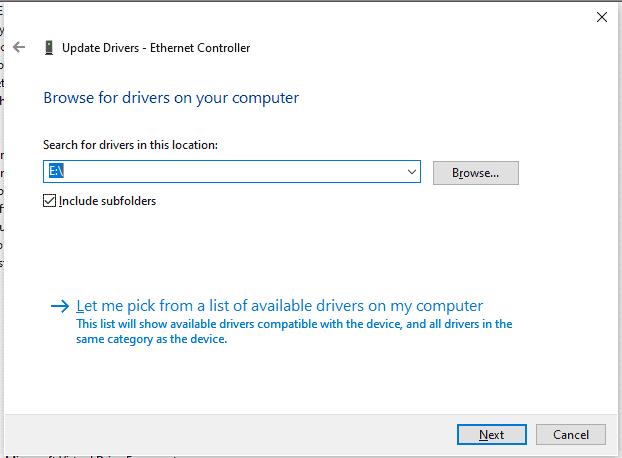
In the browse section select the VirtIO iso CDROM that we have attached.

You should be able to see the drive letter as E, check the box which says include subfolders, and click on Next.
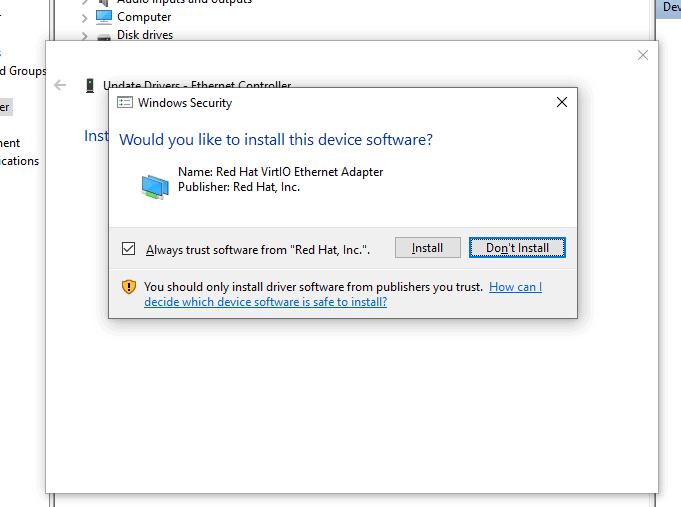
You should be able to see the pop up to install the Redhat ehternet Adapter driver to the machine click on Install.
Similarly do it for other dirvers as well.
Note: I couldn’t quite get the ‘Unknown device’ to get it working under other drivers, so it should be fine.
There is one more driver that you need to install, which is Display adapters, By default it has picked up Microsoft Basic Display Adapter.
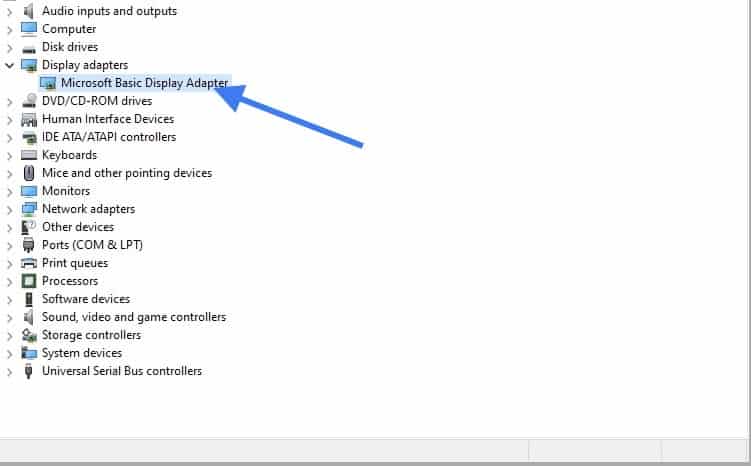
Just like you did the driver update for other devices, do the same thing for the display adapter as well.
10. Install SPICE Guest tools.
There is a SPICE Guest agent that you need to install now. For that you need to transfer the file from Ubuntu host machine to the windows.
Steps to transfer files from Ubuntu host to Windows 10 guest vm.
In windows create folder called Driver.
Now right click and click on properties.
Click on the Sharing tab, and click on Advanced sharing.
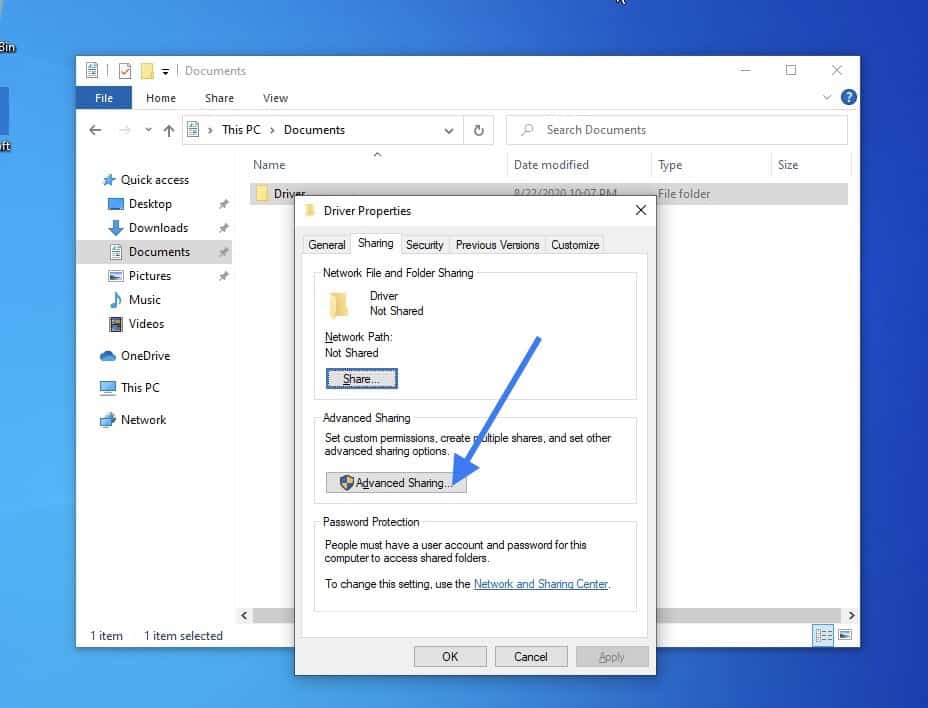
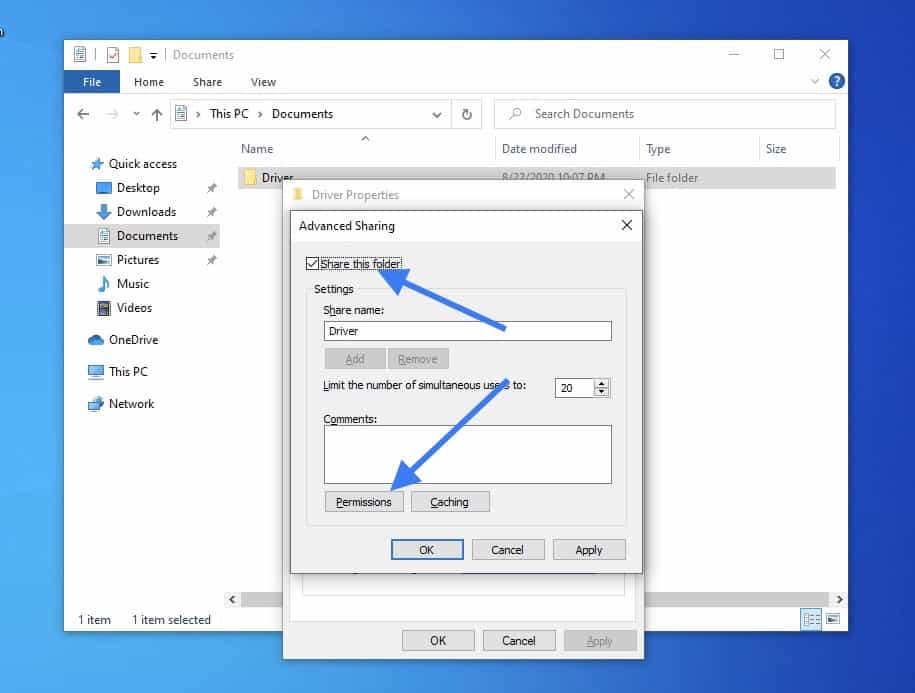
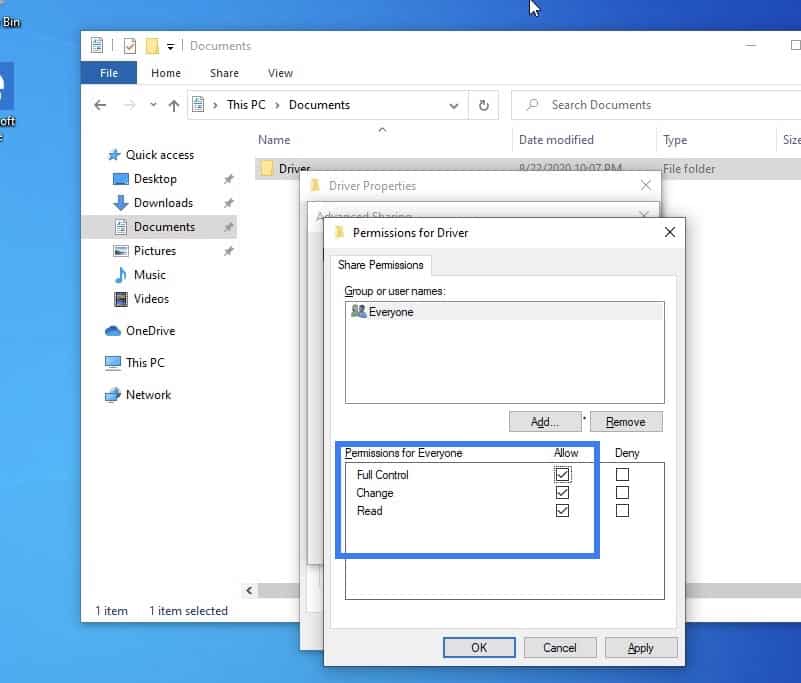
Check the option Share this folder and click on Permissions.
Check all the permissions now, you may cancel this later once you transfer the files.
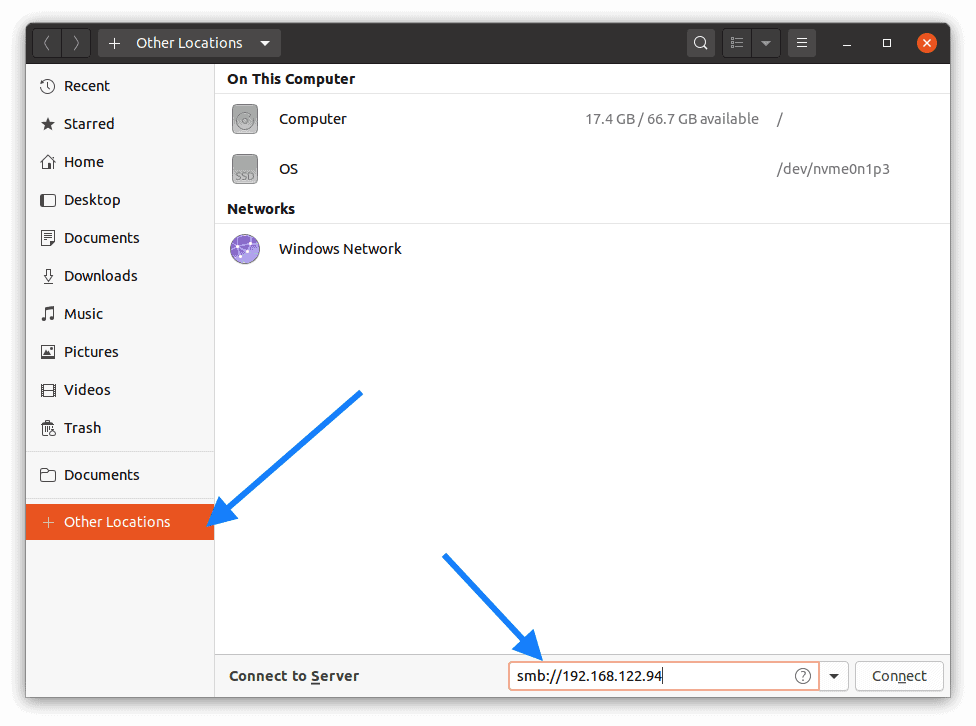
Now the folder is shared, go to Files in Ubuntu and click on Other locations.
In the connect to server address bar, type smb://windows host IP and hit enther.
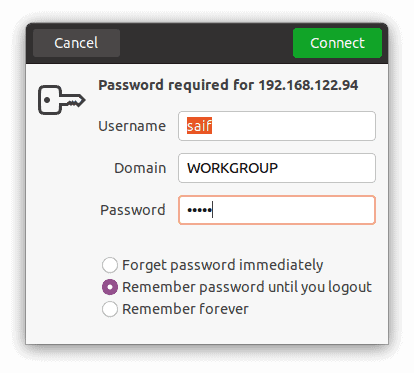
You will be asked to provide the windows 10 credentials, enter it now.
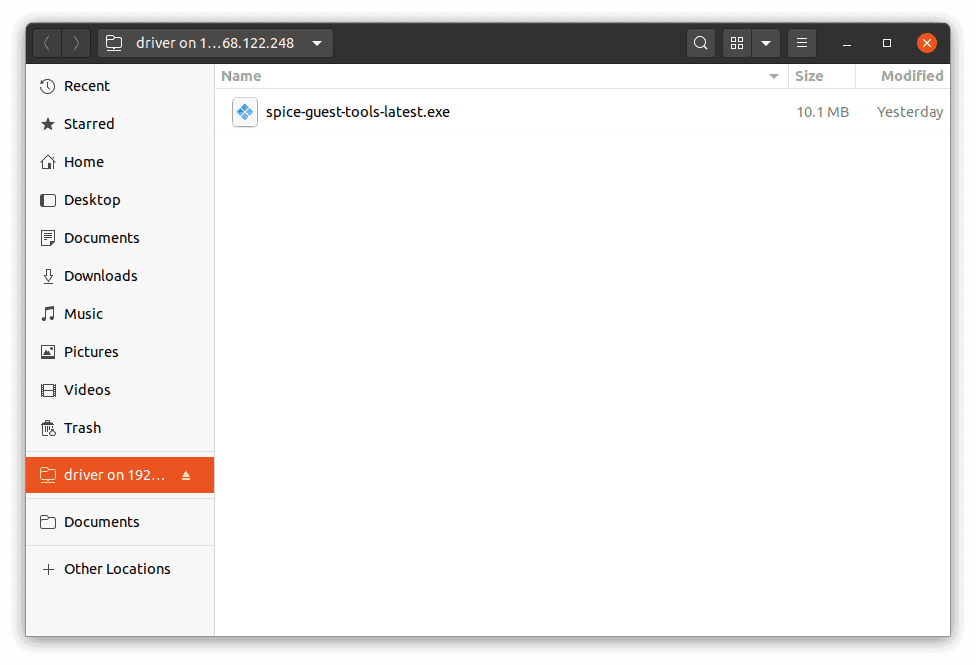
Paste the Spice guest tools here
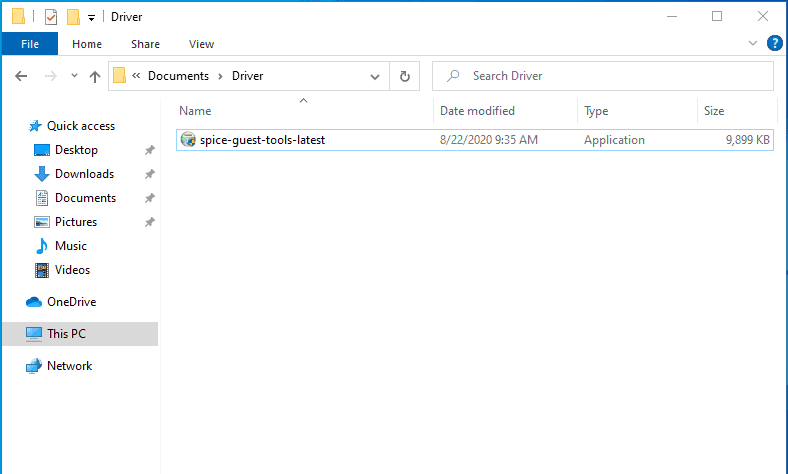
Now go back to the windows 10 and you should be able to see the Spcie guest tools software there, double click on it install the software, and you should be good to go.
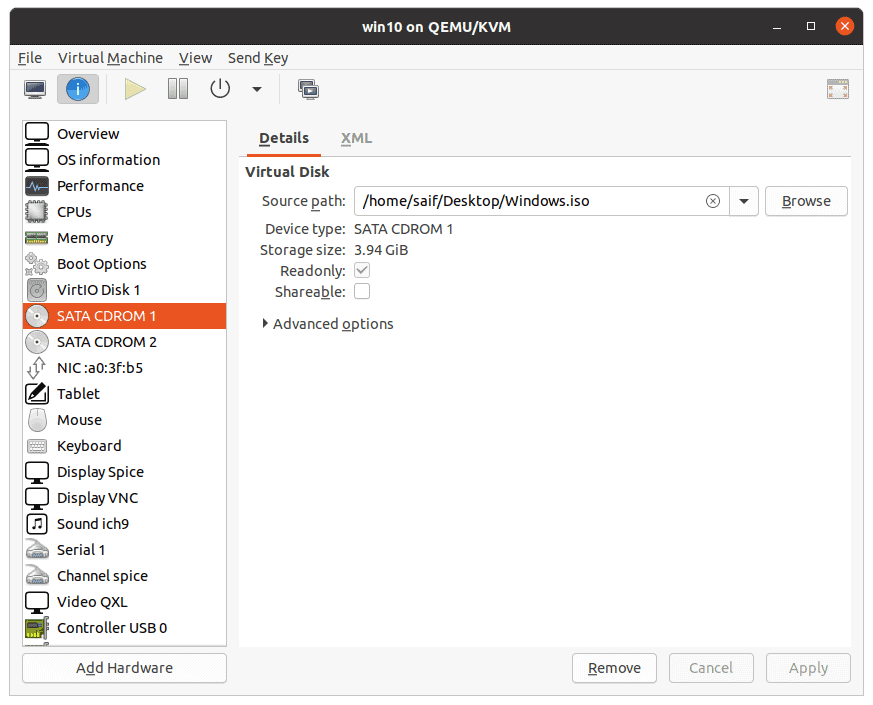
11. Detach the CDROM1 and 2.
Awesome! you just installed windows 10 on your Ubuntu KVM. If you wanted to know how you can manage this VM when you wanted to access it, you can check out the article here.
At this point you should be good to go however, next time when you shutdown the Guest VM, you need to make sure that you remove the CDROM drive 1 and two that you had attached during the installation.
In source path, you may click on the x icon to detach.
Below is the video, if you prefer to watch over video.
These are the steps I arrived at in order to install a Windows 10 Guest on an Ubuntu 18.04 host using virt-manager to install a Qemu VM with KVM acceleration and VirtIO drivers.
Prerequisites
Create a directory to work in and install the tools we will need. The virtio-win ISO image contains the drivers we will need in order to make Windows bootable.
1 |
mkdir windows |
You will also need to copy your Windows 10 installer ISO into your windows/ directory.
Disk Setup
This creates a blank image that will be attached as a virtual hard drive to the Windows instance. We use qcow2 because it supports some nice extensions above those on the raw format, like thin provisioning of storage.
1 |
qemu-img create -f qcow2 windows_10_x64.qcow2 75G |
Creating the VM
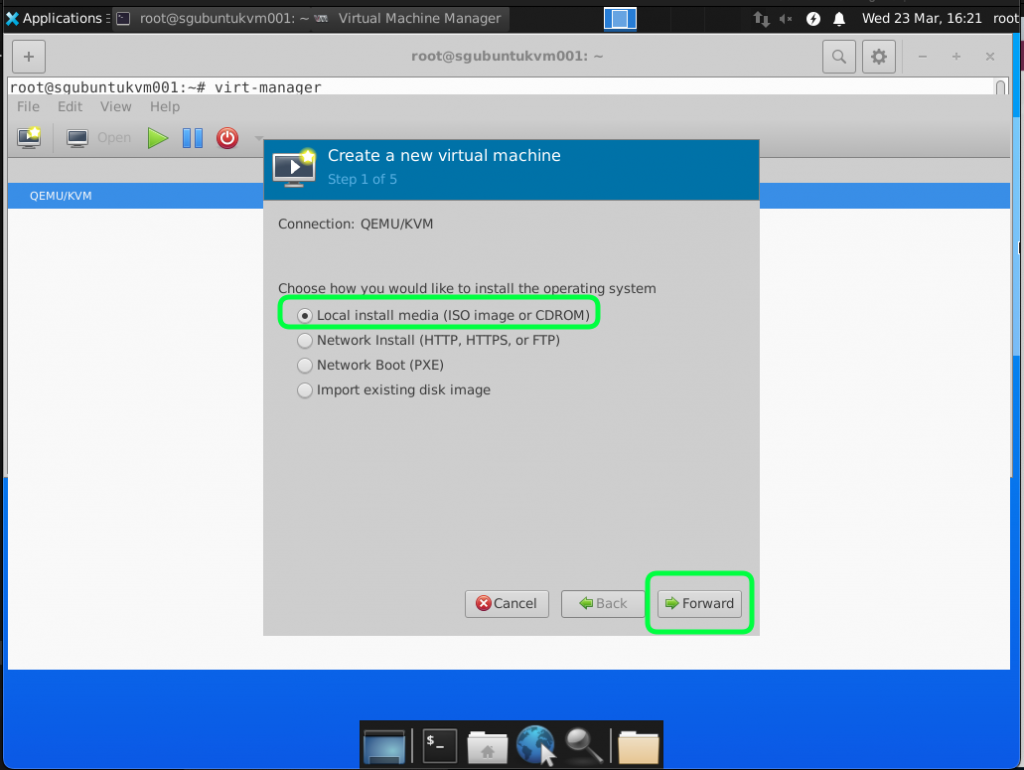
Call virt-install to create the VM.
1 |
virt-install \ |
Verify the running VMs with the virsh command:
1 |
~/windows $ virsh list |
Connecting to the VM
Now that the VM is running, you need to connect to it and install Windows. VNC to the host machine on port 5900 using the password you specified in the virt-install command. You did change that password, didn’t you?
On Mac OS you can use open to call the built in VNC client.
1 |
open vnc://<host>:5900 |
Windows Install
There will be a few extra steps to install Windows above and beyond a normal install. Because the accelerated VirtIO drivers required to interface with the virtual disk controller are not bundled with Windows, we need to load them into the installer before it will be able to talk to the virtual hard drive.
When asked to do an Upgrade or a Custom install, select Custom Install.
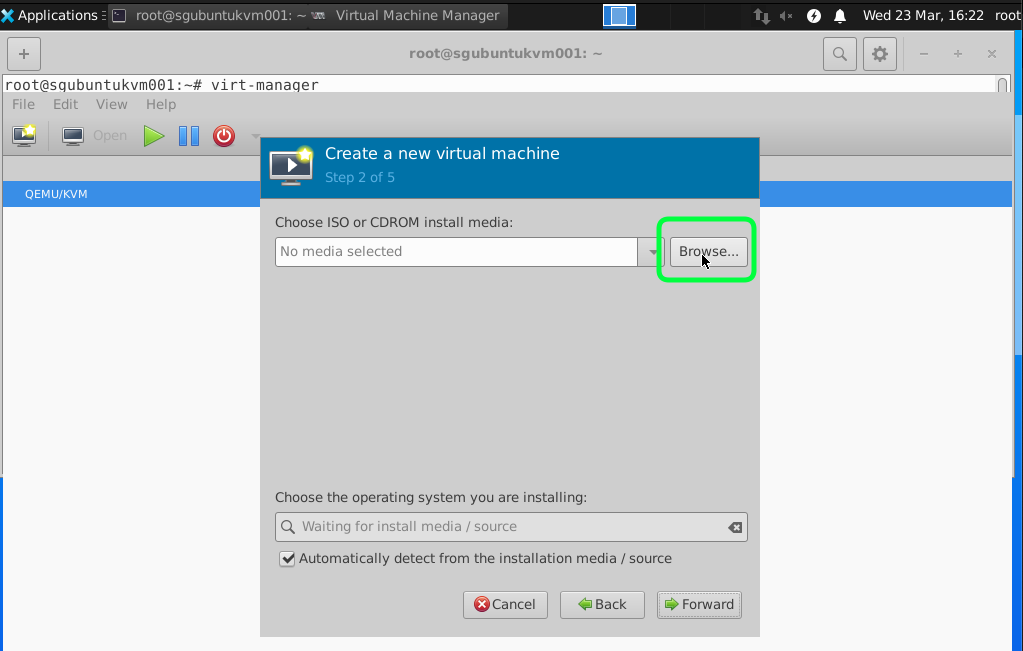
Select Load Driver to point the installer to your driver file.
Navigate to E:\viostor\w10\amd64
There should only be one option, the VirtIO SCSI Controller.
The installer should now see your virtual disk. Hit next to let Windows automatically partition it.
Next steps
Once the installer finishes and you get into Windows you may want to do a few more things
- Install the other drivers on the virtio-win ISO (network, etc…)
- Apply Updates
- Enable RDP
In this tutorial I am going to show you how to install Windows Server 2022 on Ubuntu Nested KVM.
You can download the Windows Server 2022 from the official Microsoft Evaluation Download site. You need to enter you information do download the eval.
https://www.microsoft.com/en-us/evalcenter/evaluate-windows-server-2022
You can download the virtual IO drivers from here.
https://fedorapeople.org/groups/virt/virtio-win/direct-downloads/stable-virtio/virtio-win.iso
To install the necessary packages to run KVM virtualized software packages, install the following.
sudo apt -y install bridge-utils cpu-checker libvirt-clients libvirt-daemon qemu qemu-kvm virt-manager
Check if you Ubuntu machine allows running of KVM or nested KVM.
sudo kvm-ok

Add your sudoer user to the following group.
sudo adduser <username> kvm
sudo adduser <username> libvirt
Make sure that your Virtualized Daemon is running
sudo systemctl status libvirtd
If you have not create a directory where there is enough space you might want to do so.
sudo ln -s /mnt/ /mnt/
sudo mkdir -p /
Make sure you have install remote access tool such as VNC. You can follow the following tutorial if you need the steps to do it.
https://old.dracocybersecurity.com/install-tightvncserver-on-ubuntu-20-04/
First copy or download the windows iso and virtio windows driver file necessary for the installation to the Ubuntu Server
We are going to use virtual manager (virt-manager) to install the Windows Server 2022.
Next you can follow the step by step guide to install Windows Server 2022 using Virtual Manager (virt-manager)
Run virt-manager from the terminal in the GDE

Right Click on QEMU/KVM and select New.

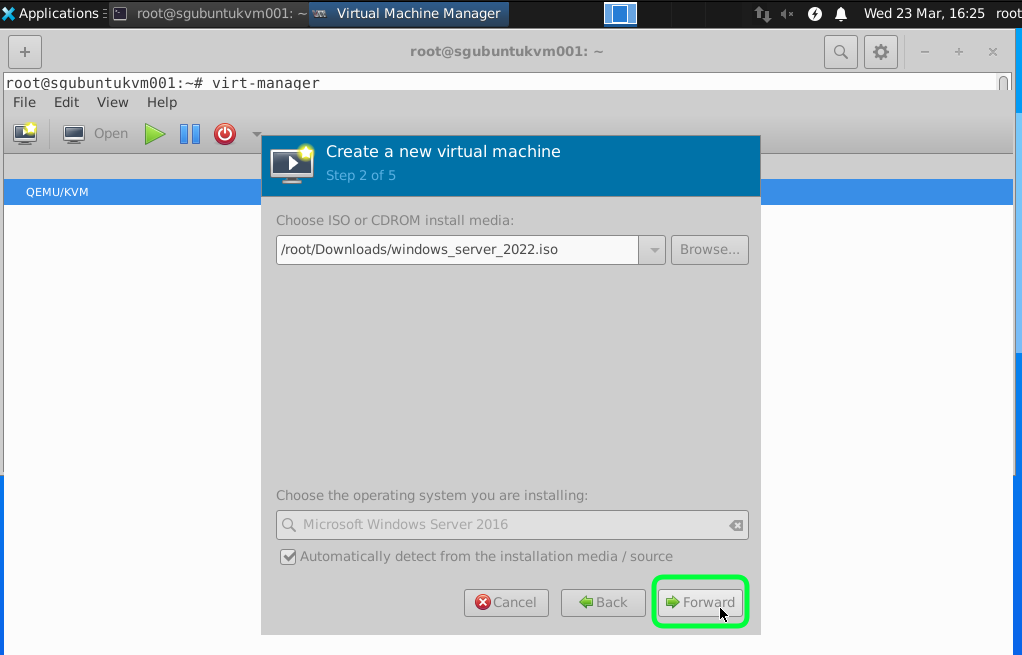
We are using local images that we have copied into the Ubuntu so select Local install media and click Forward.
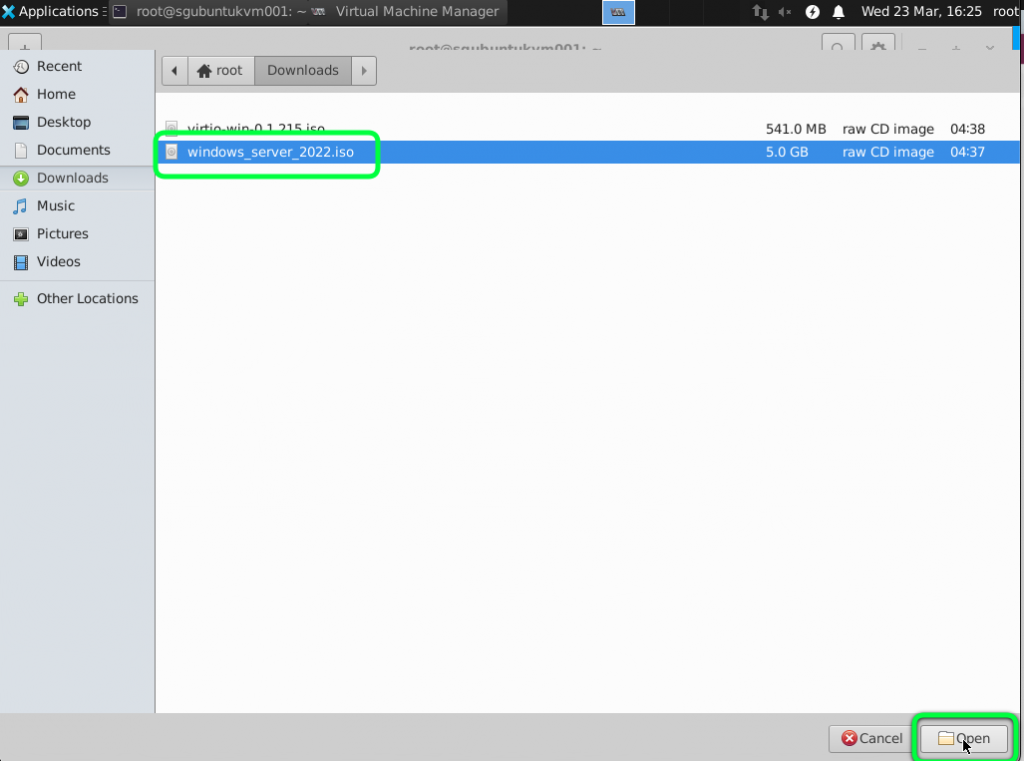
Click on Browse and Select the Windows Image.
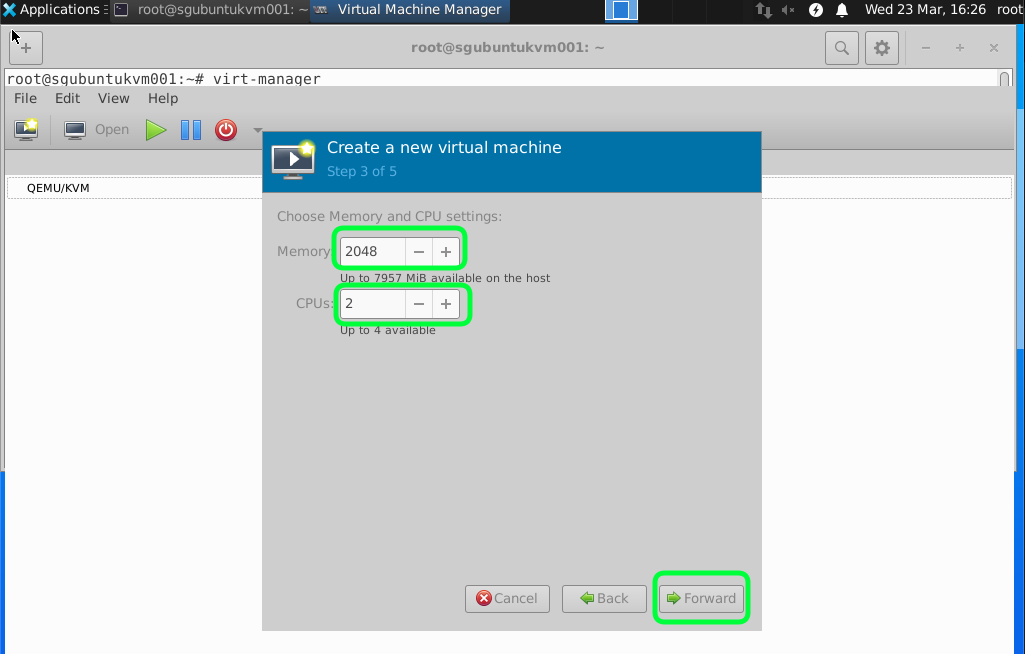
I would recommend having minimum 2GB RAM and 2 vCPUs for a start. As anything lower than this make the VM very slow and can become unstable.
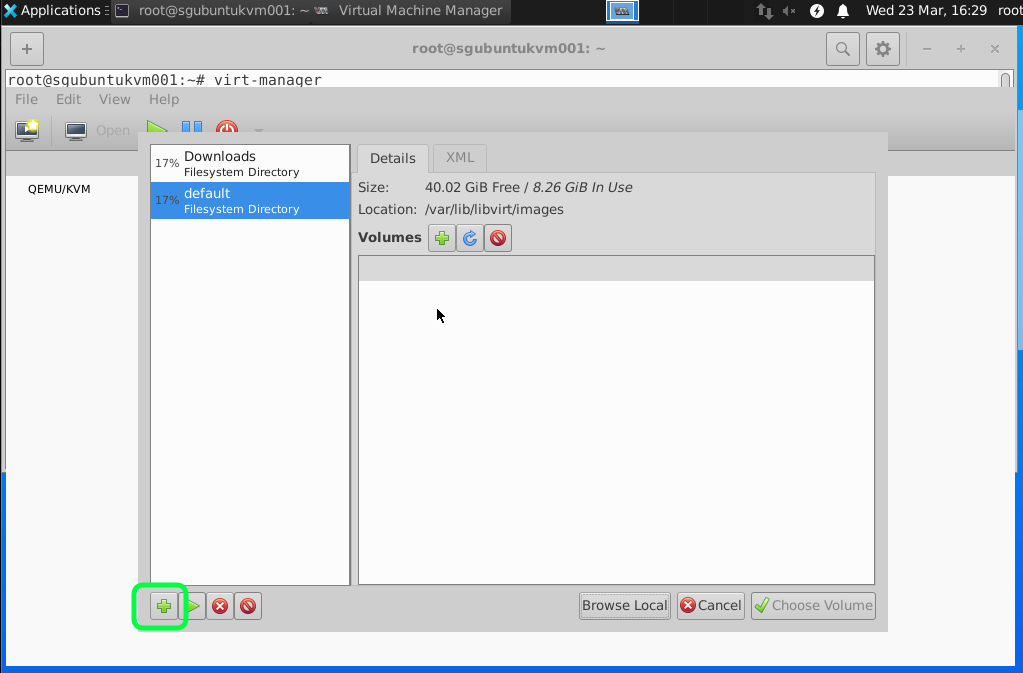
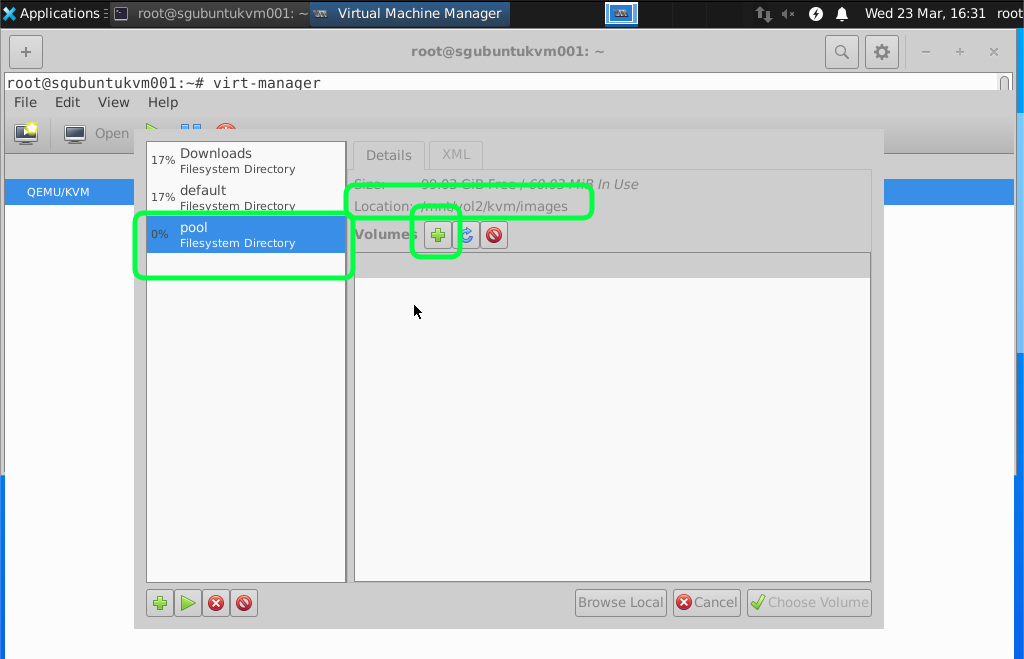
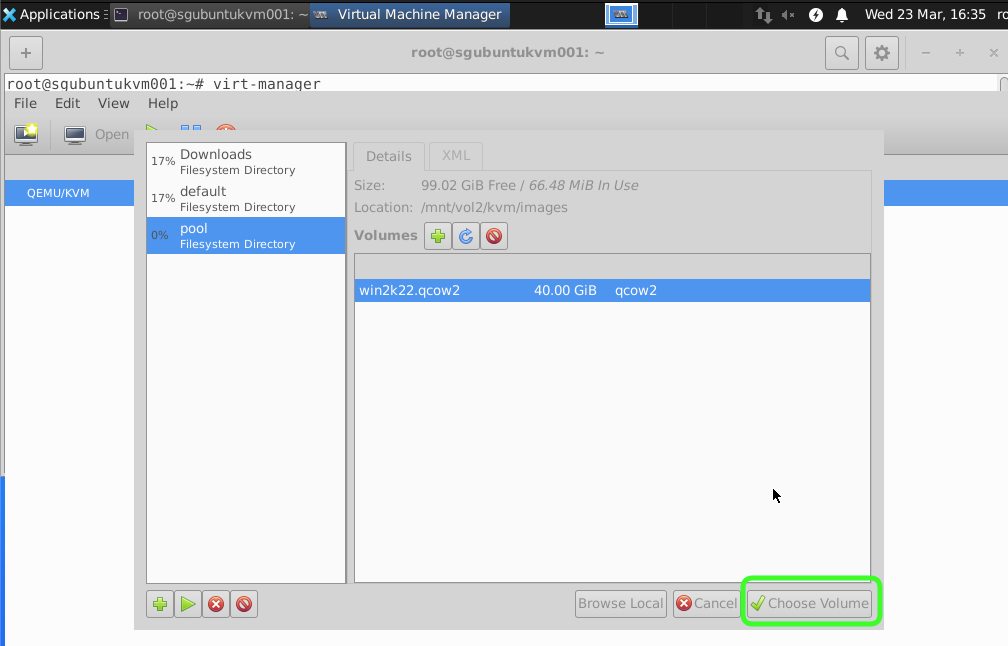
For this tutorial we are going to add and select a attached storage.
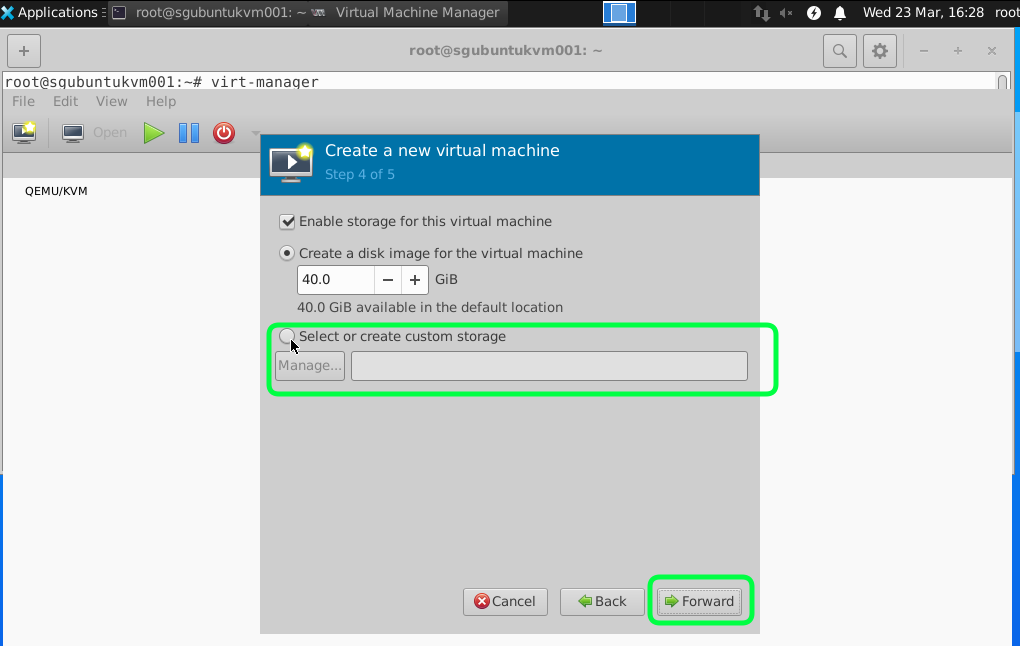
Click on the add icon to select a new Directory.
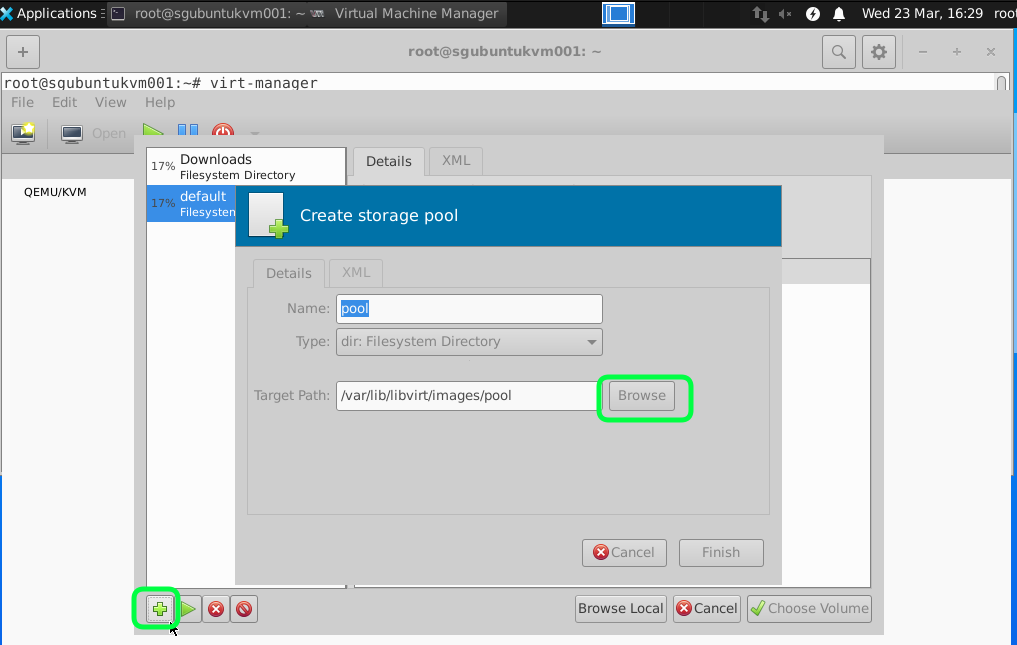
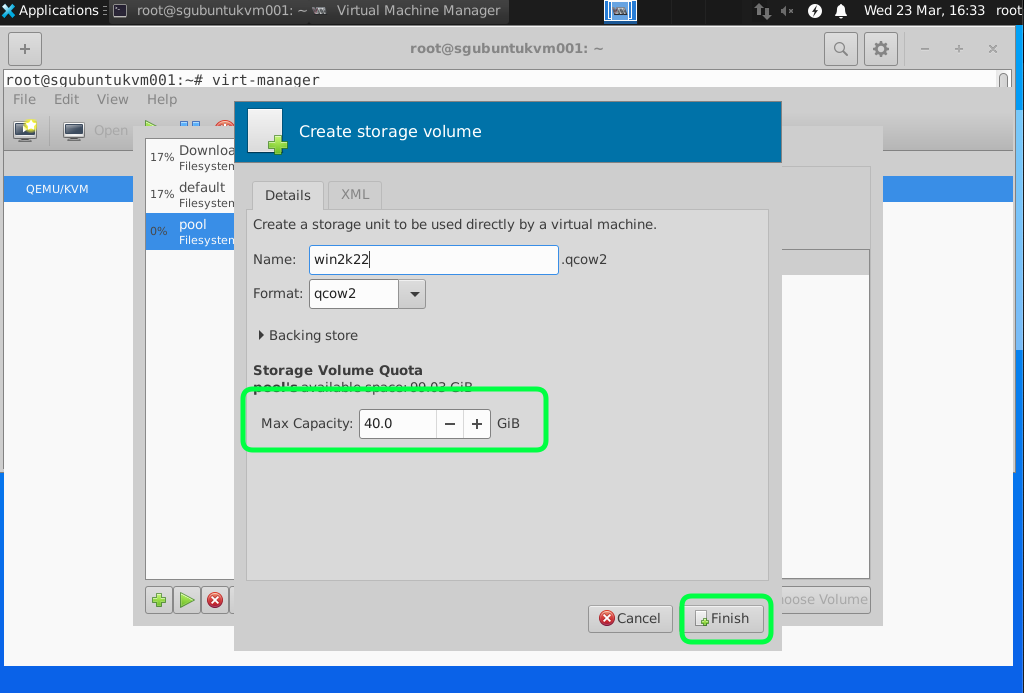
Recommend to have 40GB of Hard disk space you can start with a smaller size and fix disk with more capacity later but setting the minimum of 40GB it should last you for a while. If you are using the Windows Server just as a Active Directory for my lab.
Click on Customize Configuration before install to adjust a few settings.
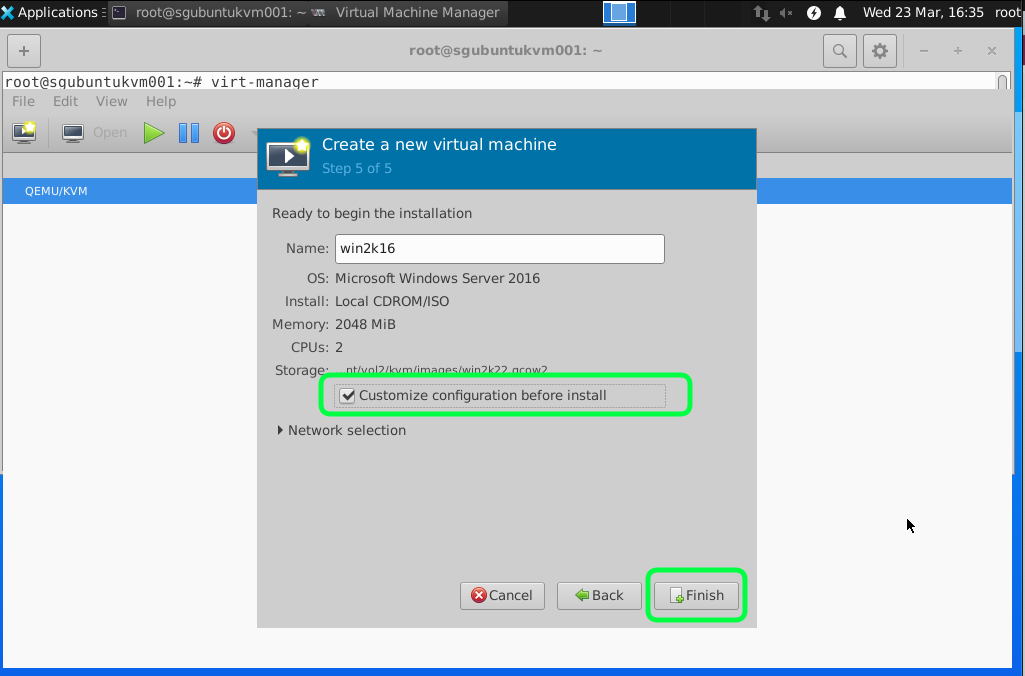
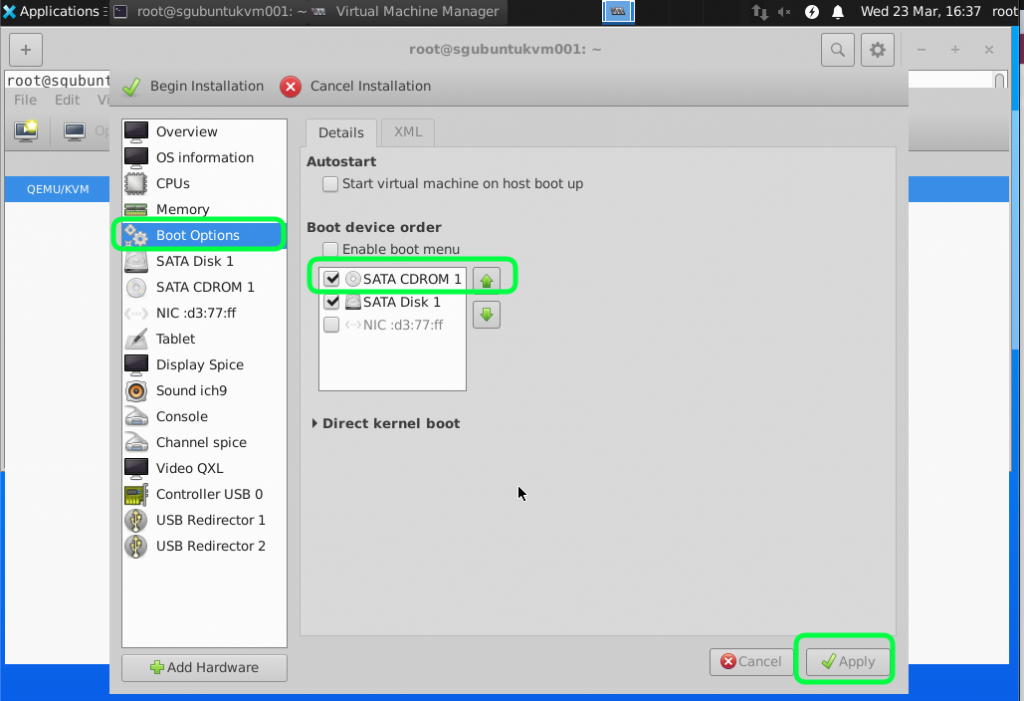
Set the boot option to boot from the CD ROM where the Windows Server ISO is stored.
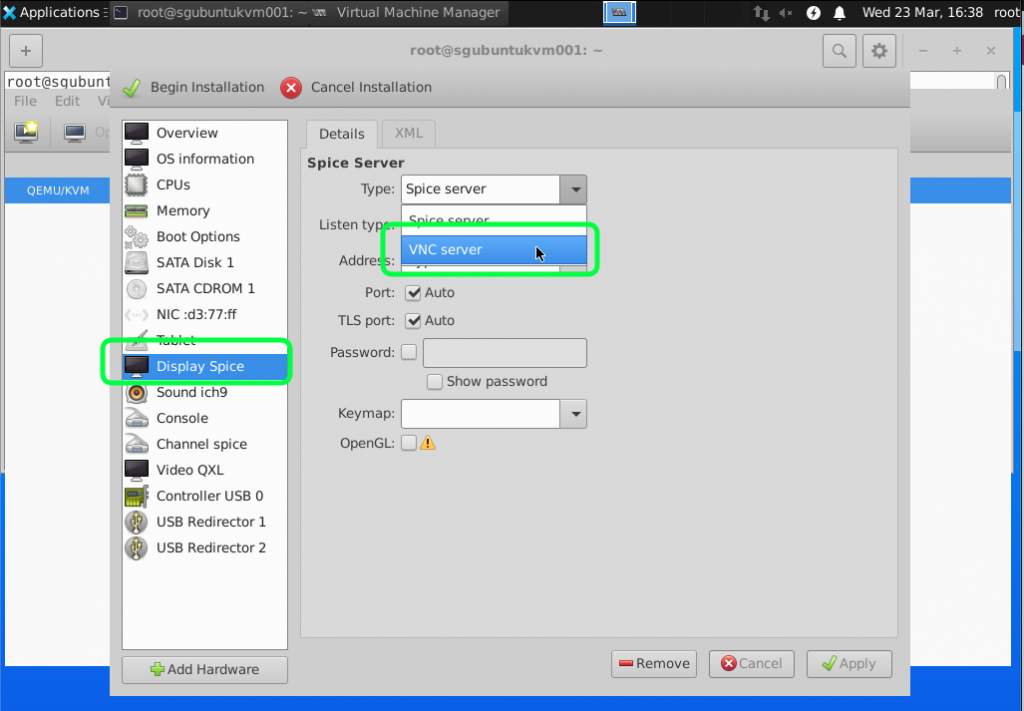
I find VNC Server Display better for installing Windows Server. For Spice I sometime lose the keyboard control.
We are going to use the default NAT just to test the connectivity and ensure that the virtual nic/network is working. We will go through the bridge mode in the next tutorial. You can start the installation by clicking on Begin Installation.
Once that is done you can go through the normal windows installation process. Depend on the resources and the connection to the internet it might take some time to complete the installation.
To allow non root (sudo) users that you have added to the libvirt group to be able to configure the VM you need to edit the /etc/libvirt/libvirtd.conf file.
nano /etc/libvirt/libvirtd.conf
Add or uncomment the following and change the permission accordingly.
unix_sock_group = “libvirt”
unix_sock_rw_perms = “0770”

Restart the libvirtd service.
sudo systemctl restart libvirtd.service
На чтение4 мин
Опубликовано
Обновлено
Windows — это самая популярная операционная система, используемая миллионами людей по всему миру. Но что делать, если у вас на компьютере установлена операционная система Ubuntu и вы хотите запустить какую-то программу, доступную только для Windows?
Один из вариантов — установка Windows внутри Ubuntu с использованием виртуализации. Одной из самых популярных программ для виртуализации является KVM (Kernel-based Virtual Machine). Она позволяет запускать виртуальные машины с различными операционными системами на вашем компьютере.
В этой статье мы рассмотрим, как установить Windows на Ubuntu с помощью KVM. Мы предполагаем, что у вас уже установлена Ubuntu и вы знакомы с основами работы с терминалом.
Первым шагом будет установка KVM. Для этого откройте терминал и выполните следующую команду:
sudo apt install qemu-kvm libvirt-daemon-system libvirt-clients bridge-utils virt-manager
После установки KVM, вам нужно будет создать виртуальную машину. Для этого откройте программу VirtManager, которая является графическим интерфейсом для управления виртуальными машинами KVM.
Подготовка к установке
Перед установкой Windows на Ubuntu с использованием KVM необходимо выполнить некоторые предварительные шаги:
- Установите программу виртуализации KVM на своем компьютере. Она позволит создавать и управлять виртуальными машинами, в том числе для установки операционной системы Windows.
- Проверьте, есть ли достаточно свободного места на жестком диске, чтобы разместить виртуальную машину с Windows. Рекомендуется иметь не менее 20-30 ГБ свободного места.
- Загрузите образ операционной системы Windows, который планируете использовать. Обычно это файл с расширением .iso или .img. Убедитесь, что загруженный образ совместим с KVM.
- Создайте новую виртуальную машину в KVM, указав необходимые параметры: количество выделенной оперативной памяти, размер жесткого диска и другие. Учтите требования операционной системы Windows к системным ресурсам и установите значения соответствующим образом.
- Присвойте виртуальной машине имя и выберите путь для сохранения файла виртуального диска. Обычно рекомендуется выбирать формат qcow2 для виртуального диска, так как он обеспечивает лучшую производительность и гибкость.
После выполнения этих шагов вы будете готовы к установке операционной системы Windows на виртуальную машину в Ubuntu с использованием KVM.
Установка необходимых пакетов
Перед установкой Windows на Ubuntu с использованием KVM, необходимо установить несколько пакетов, которые позволят вам создать виртуальную машину и управлять ею:
- Установите пакеты KVM с помощью следующей команды:
sudo apt install qemu-kvm libvirt-daemon-system libvirt-clients bridge-utils virt-manager - После установки пакетов, добавьте себя в группу libvirt:
sudo adduser `id -un` libvirt - Перезагрузите систему, чтобы изменения вступили в силу:
sudo reboot
После установки этих пакетов вы сможете создать виртуальную машину и установить на нее операционную систему Windows с помощью KVM и Ubuntu.
Настройка KVM
Как уже упоминалось ранее, для установки Windows на Ubuntu с использованием KVM необходимо настроить KVM. В этом разделе мы рассмотрим этот процесс.
1. Проверьте, поддерживает ли ваш компьютер виртуализацию. Для этого выполните команду:
egrep -c ‘(vmx|svm)’ /proc/cpuinfo
Если результат равен «0», то ваш процессор не поддерживает виртуализацию, и вы не сможете использовать KVM.
2. Установите пакеты KVM:
sudo apt-get install qemu-kvm libvirt-daemon-system libvirt-clients bridge-utils virt-manager
3. Добавьте вашего пользователя в группу libvirt:
sudo adduser <ваше_имя_пользователя> libvirt
4. Перезагрузите компьютер:
sudo reboot
5. Установите дополнительные пакеты:
sudo apt-get install virt-viewer virtinst
Теперь у вас должны быть настроены KVM и вы готовы установить Windows на Ubuntu с помощью KVM.
Создание виртуальной машины Windows
Шаг 1: Установка KVM
- Откройте терминал и введите команду
sudo apt-get update, чтобы обновить список пакетов. - Затем введите команду
sudo apt-get install qemu-kvm libvirt-daemon-system libvirt-clients bridge-utils virt-managerдля установки KVM и необходимых компонентов. - Дождитесь завершения установки.
Шаг 2: Создание диска для виртуальной машины
- Откройте программу «Виртуальная машина KVM» из меню приложений.
- Нажмите кнопку «Создать виртуальную машину», чтобы начать процесс создания новой виртуальной машины.
- Выберите тип установки «Использовать образ диска (ISO)» и укажите путь к ISO-образу установочного диска Windows.
- Введите имя и выберите местоположение для диска виртуальной машины.
- Выберите необходимый размер диска и настройки виртуальной машины.
- Нажмите кнопку «Создать» для создания диска.
Шаг 3: Установка Windows на виртуальную машину
- Вернитесь в программу «Виртуальная машина KVM» и выберите созданную виртуальную машину.
- Нажмите кнопку «Запустить» для запуска виртуальной машины.
- Следуйте инструкциям установщика Windows для установки операционной системы на созданный диск виртуальной машины.
- После завершения установки Windows перезапустите виртуальную машину.
Поздравляем, вы только что создали виртуальную машину Windows на Ubuntu с использованием KVM!
Установка Windows в виртуальную машину
Установка Windows в виртуальную машину позволяет запускать операционную систему Windows на вашем компьютере, работающем под управлением Ubuntu, без необходимости полноценной установки на жесткий диск. Виртуальные машины позволяют создавать изолированную среду, в которой можно запускать различные операционные системы, включая Windows.
Для установки Windows в виртуальную машину на Ubuntu можно использовать гипервизор KVM. KVM (Kernel-based Virtual Machine) является модулем ядра Linux, который исполняет гостевые операционные системы в виртуальной машине. Установка Windows через KVM включает несколько шагов:
- Установка пакетов KVM на Ubuntu.
- Создание виртуальной машины.
- Загрузка образа установочного диска Windows.
- Установка Windows в виртуальную машину.
- Настройка и запуск Windows в виртуальной машине.
После завершения установки Windows в виртуальную машину, вы сможете взаимодействовать с этой операционной системой, как с обычным компьютером, в окне виртуальной машины на рабочем столе Ubuntu.
Настройка сети
После установки и настройки KVM в Ubuntu, вам необходимо настроить сетевое подключение для виртуальной машины Windows.
1. Откройте программу управления сетевыми подключениями, путем щелчка правой кнопкой мыши на значок сети в верхнем правом углу панели инструментов и выберите «Настройки сети».
2. В окне «Настройки сети» выберите вкладку «Подключения» и нажмите кнопку «Добавить».
3. В появившемся окне выберите «Создать новое подключение» и нажмите кнопку «Продолжить».
4. Выберите тип подключения «Ethernet» и нажмите кнопку «Продолжить».
5. Введите имя подключения (например, «Windows VM») и нажмите кнопку «Продолжить».
6. В окне «Настройки Ethernet» выберите «Привязка к MAC-адресу» и выберите виртуальный сетевой адаптер, который был создан для вашей виртуальной машины Windows, в раскрывающемся списке.
7. Нажмите кнопку «Продолжить» и закройте окно «Настройки сети».
Теперь ваша виртуальная машина Windows должна иметь доступ к сети и интернету.
Intro
Windows in KVM is one of the best hypervisors that built right into Linux.
Virtualization is one of the most amazing tools used by many to test drive any operating system they wish to install.
Virtualbox, VMware, and even Microsoft’s Hyper-V (Windows) are a great selection of software for anyone to start using a virtual machine.
One of the most popular hypervisors in Linux that is natively supported out of the box is KVM (Kernel-based Virtual Machine).
I previously used this virtual machine from my video on demonstrating how to install Arch Linux with LVM.
KVM can manage an enormous network of virtual labs running Linux without a sweat, but what about Windows?
Getting the perfect setup
After spending a fair amount of time searching for a well-written guide in order to proceed on this task, I decided to only focus on running a new single Windows instance.

My previous goal used to be attempting to run macOS in order to see how well it would perform, but I realized it takes more work than I preferred to put in, which was something I wouldn’t enjoy.
I had to copy and paste various commands to add each driver code, which led me to abandon the effort.
After seeing how simple the steps to install Windows would be, I rolled with it instead.
Picking Windows 7 was an automatic choice since 8 and 10 are bloated by default, and it would be a waste of time trying to optimize the OS.
Applications that are installed automatically such as Candy Crush are difficult to remove on Windows.
Windows 8 is less of a burden, but I found more support online for 7 so picked it instead.
Nonetheless, it detected Windows 7 and ran flawlessly after applying the recommended patches.
What’s great about running KVM
After getting the Windows OS driver optimized under QEMU for it to render properly, it felt like brand new.
Driver settings such as networking, file system storage, and sound worked out of the box in the Windows guest.
The Windows guest was plug and play because of the virtIO drivers offered by Red Hat.
Usually, I would have to fiddle with it in order for the Windows guest to work, but the virtIO drivers made the performance all fine and dandy.
For the driver performance, the Windows guest felt more responsive than before on VirtualBox, and it seemed like a setup I might prefer over time.
If you have a Linux PC that’s a bit slow in virtualization, then KVM is your best bet when trying out Windows.
Since it’s a type-1 hypervisor, it has direct access to the hardware, which gives it more horsepower for it to use up.
Without further ado, I’ll demonstrate how easy it is to begin installing Windows on it.
I’ll be using Ubuntu 18.04.
Resources
Commands
Install the KVM and QEMU network drivers
sudo apt install qemu qemu-kvm libvirt-bin bridge-utils virt-manager build-essential
find your user
whoami
Disable password requirement with the user when launching virt-manager
sudo gpasswd -a (your_username) kvm
Enable the network and reboot the computer
sudo systemctl enable libvirtd virtlogd
reboot
Conclusion
Hopefully, this should get you up to speed and start exploring what KVM and QEMU on Linux have to offer.
Once all of the performance optimizations are applied, you should have a performant virtual machine with each driver for the guest well-established!
It does take more time for it to add each driver code as compared to VirtualBox, but KVM’s features might convince you otherwise.
If you would like to continue where I gave up, try installing macOS under Linux and let me know how it goes.