
In this guide, you will learn how to share a folder between Windows guest, running under a Linux host – such as Fedora, Ubuntu or Linux Mint using KVM.
The virt-manager application (with libvirt) and packages provide a flexible set of tools to manage virtual machines in Linux. It is free and open-source and used for KVM virtual machines and other hypervisors.
In the prior article, I explained how to share folders between a Linux guest and a Linux host. However, when you are trying to create a shared folder using Windows Guest and Linux host, it’s a little difficult and complex process. Because both the operating system works differently and a lot of configuration is needed.
Follow the below instructions as mentioned to share the folder between Windows guest and Linux host.
A note about virtiofs
The sharing files and folders are powered by the libvirt shared file system called virtiofs. It provides all the features and parameters to access the directory tree on the host machine. Since most of the virt-manager virtual machine configurations are translated to XML, the share files/folders can also be specified by the XML file.
Note: If you are looking for file sharing using KVM between two Linux machines (guest and host), read this article.
The following instructions assume that you have installed Windows in virt-manager in any Linux host. If not, you can read this complete guide on how to install Windows in Linux.
Set up a mount tag in virt-manager
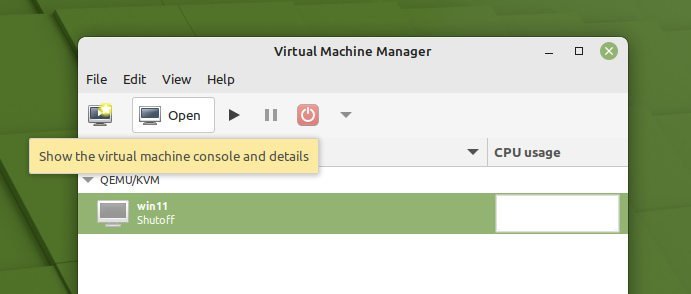
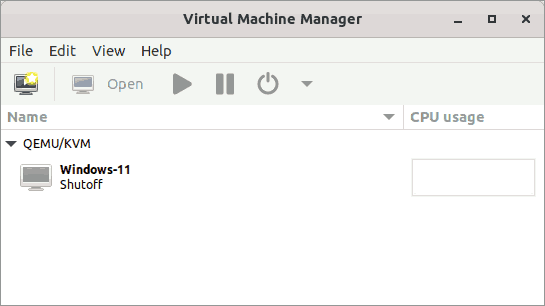
- First, make sure your guest virtual machine is powered off. From the virt-manager GUI, select the virtual machine and click on Open to pull up the console settings.
- Click on the icon which says show virtual hardware details in the toolbar. And then click on Memory on the left panel.
- Select the option “Enable shared memory“. Click Apply.
- Make sure the XML shows “access mode=shared” as below in the XML tab.
  <memoryBacking>
    <source type="memfd"/>
    <access mode="shared"/>
  </memoryBacking>

- Click “Add hardware” at the bottom.
- Select File system from the left panel in the add new hardware window.
- Then select Driver=virtiofs in the details tab. Click on
browse > browse localand select the host path from your Linux system. - In the target path, mention any name you want. It’s just a file tag which will be used during mount. This name in the target path will be mounted as Drive in Windows – My PC in Explorer.
- I have added “linux_pictures” as the target mount tag.
- So, if I want to access the Pictures folder (
/home/debugpoint/Pictures), sample settings could be the following: - Click Finish.

The XML settings are below for the above configuration. You can find it in the XML tab.
<filesystem type="mount" accessmode="passthrough">
  <driver type="virtiofs"/>
  <source dir="/home/debugpoint/Pictures"/>
  <target dir="linux_pictures"/>
  <address type="pci" domain="0x0000" bus="0x05" slot="0x00" function="0x0"/>
</filesystem>
In the main virt-manager window, right-click on the Windows virtual machine and click Run to start the virtual machine. Make sure to click on the “show the graphical console” (monitor icon in the toolbar) – if the VM is not showing.
Set up WinFSP – FUSE for Windows
Make sure Windows virtual machine (guest) is running.
- First, we need to set up the WinFSP or Windows File System Proxy – FUSE for Windows. This enables you to mount any UNIX-like filesystem without any difficulties.
- Open the below page in the WinFSP GitHub from the guest Windows machine.
- Download the WinFSP .msi installer.
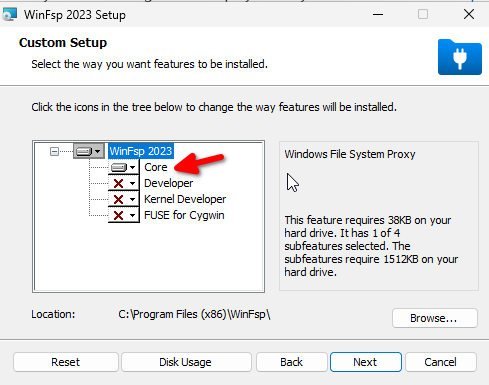
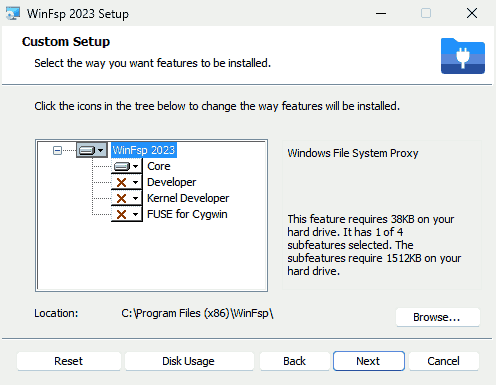
- Install the package on Windows virtual machine. Make sure to select “Core” while installing the package. Finish the installation.
Create VirtIO-FS as a service
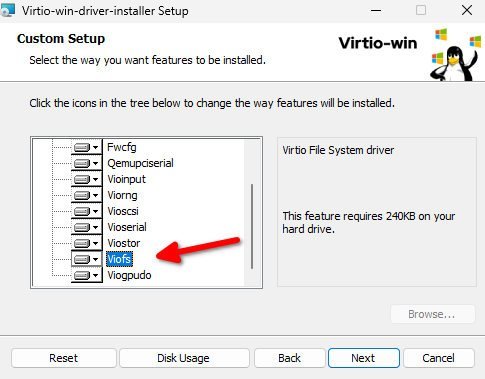
- Download the virtio-win-guest-tools.exe from the below path by going inside stable-virtio folder.

- Install the package on Windows virtual machine.
- After installation is complete, reboot Windows virtual machine.
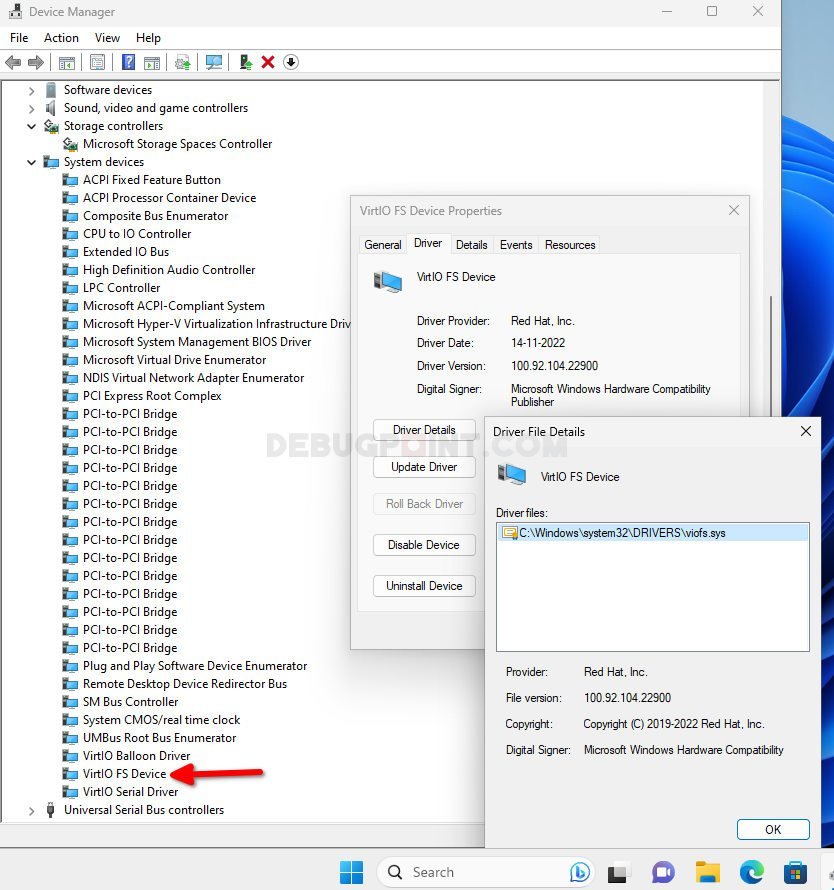
- After reboot, open the “Device Manager” by searching in the start menu.
- Navigate to System devices and look for “VirtIO FS Device”. It should be recognized and driver should be signed by Red Hat.
- Note: (optional) If you see an exclamation mark i.e. driver is not detected, then follow the instructions here on how to download ISO file, mount it and manually detect the driver.
- Open the start menu and search for “Services”.
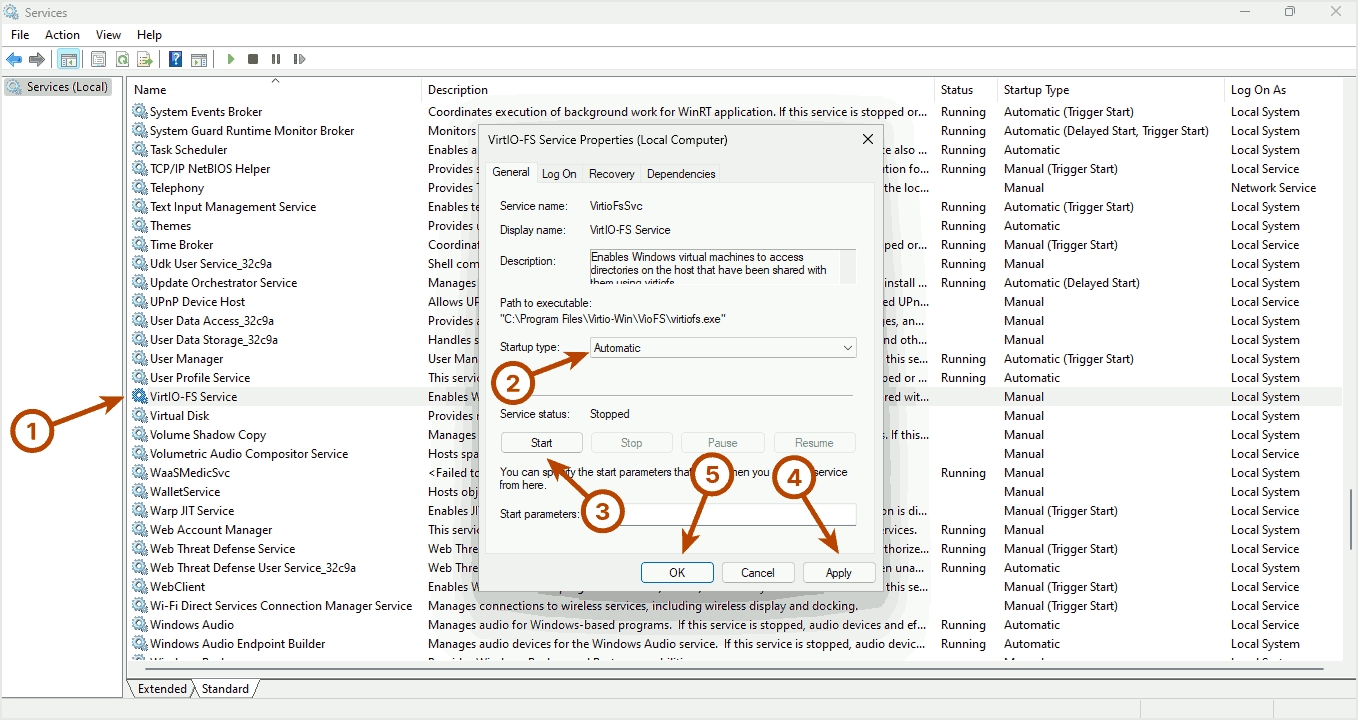
- Scroll down to find out the “VirtIO-FS Service”. Right-click and hit Start to start the service.
- (Optional) If you want to start the service each time you boot Windows guest, then set VirtIO-Sevice-FS > Properties > Startup type > Manual to Automatic
- Alternatively, you can run the below command from PowerShell/command prompt as admin to start the service.
sc create VirtioFsSvc binpath="C:\Program Files\Virtio-Win\VioFS\virtiofs.exe" start=auto depend="WinFsp.Launcher/VirtioFsDrv" DisplayName="Virtio FS Service"
sc start VirtioFsSvc

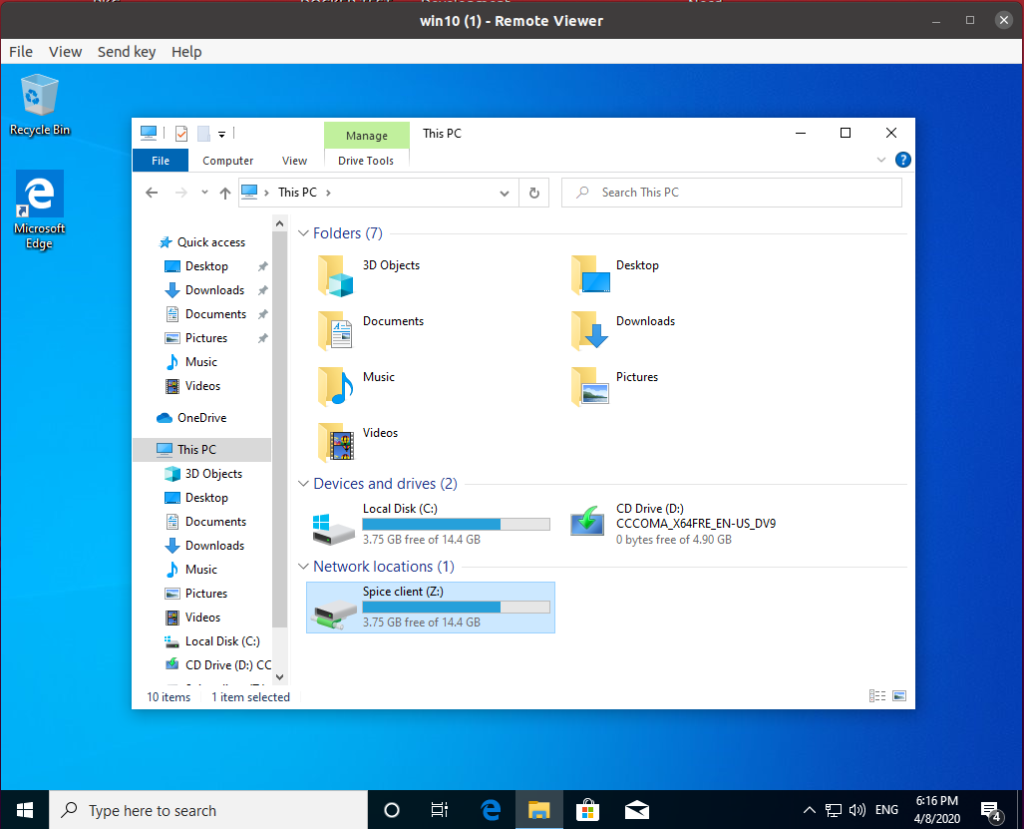
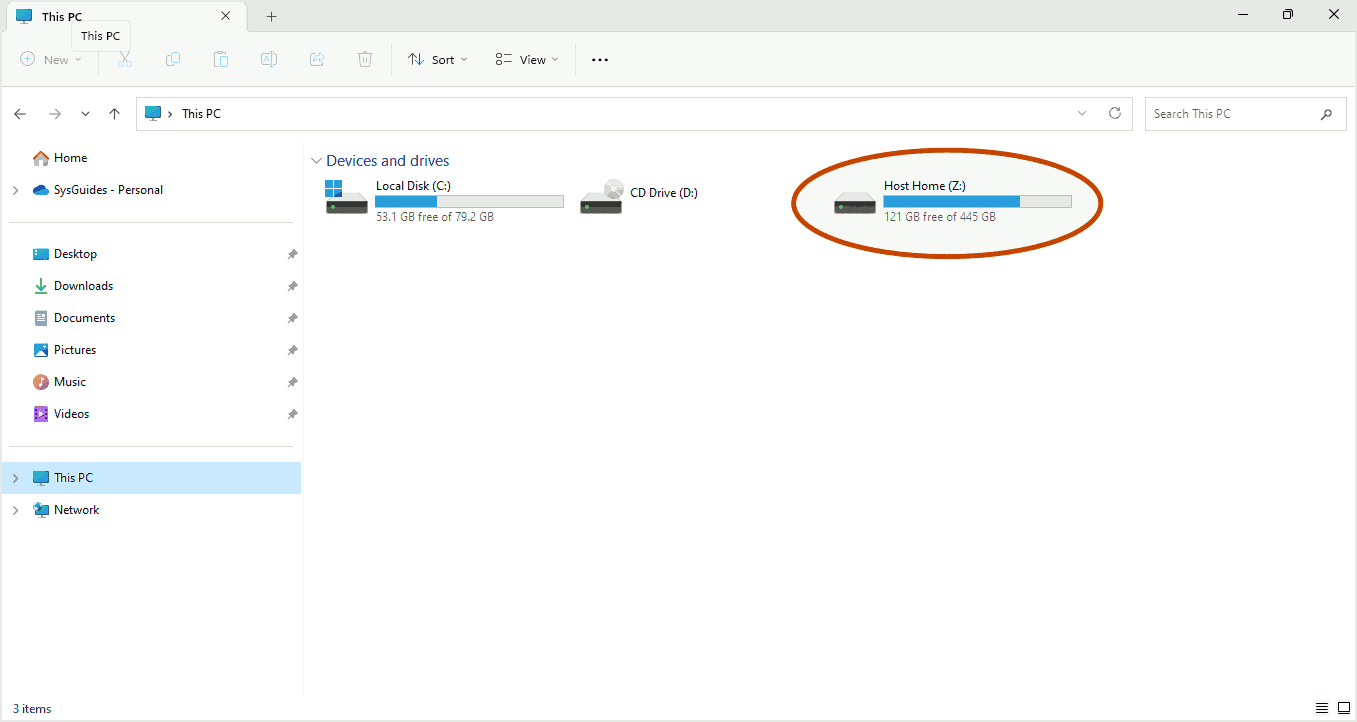
- After the service start, open Explorer, and you should see the mount tag which you have created in the first step above, which should be mapped as Z drive. See below.
- You can now access the entire Linux folder with modified permission as per your need.

Here is a side-by-side comparison of the same folder accessed in Linux Mint and Windows guest.

Conclusion
I hope you can now able to share a folder between Windows guest and Linux host system. The above method is tested in Linux Mint for this article. It should work for Ubuntu, Fedora as well.
If the above method works, drop a comment below for the benefit of others.
References
- https://virtio-fs.gitlab.io/howto-windows.html
- https://docs.fedoraproject.org/en-US/quick-docs/creating-windows-virtual-machines-using-virtio-drivers/
- https://github.com/virtio-win/virtio-win-pkg-scripts/blob/master/README.md
- https://github.com/virtio-win/kvm-guest-drivers-windows/issues/473
Introduction
This note is about how to set up file share between host and guest virtual machines.
There are various methods
- fileshare through network protocol, e.g. smb.
- fileshare through SPICE-webdav.
- files system passthrough.
- use a usb drive and USB redirection between host and guest systems.
SPICE folder sharing
This is not recommend for transferring large files.
Information about this setting could be find on the internet from like
https://www.spice-space.org/spice-user-manual.html#_folder_sharing
https://github.com/lofyer/spice-webdav
https://www.guyrutenberg.com/2018/10/25/sharing-a-folder-a-windows-guest-under-virt-manager/-
On the host machine, set up Spice webdav port using either one of these methods:
-
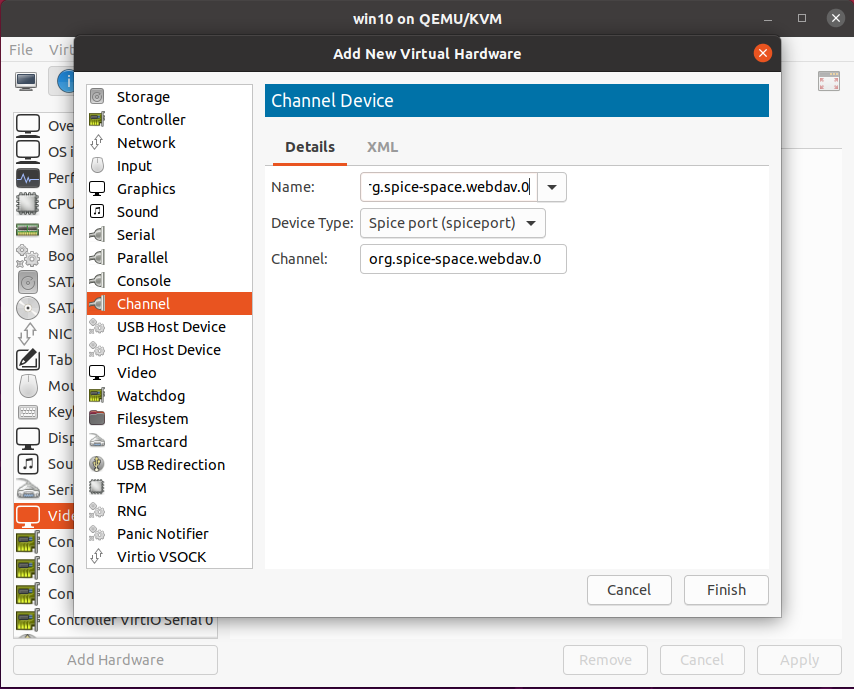
Using virt-manager
In the hardware details, click on “Add Hardware”, then select “Channel”. Add aSpice portdevice type with theorg.spice-space.webdav.0name. -
Using libvirt
In order to set up folder sharing, qemu needs to expose a org.spice-space.webdav.0 virtio port, associated with a corresponding Spice port:<devices> <channel type='spiceport'> <source channel='org.spice-space.webdav.0'/> <target type='virtio' name='org.spice-space.webdav.0'/> </channel> </devices> -
Using QEMU
In order to set up folder sharing, qemu needs to expose a org.spice-space.webdav.0 virtio port, associated with a corresponding Spice port:-device virtserialport,bus=virtio-serial0.0,nr=1,chardev=charchannel1,id=channel1,name=org.spice-space.webdav.0 -chardev spiceport,name=org.spice-space.webdav.0,id=charchannel1
-
-
Windows guest configuration:
- Disable windows firewall.
- Downlaod the spice-webdav-windows-service
and install it asAdministrator. - Make sure the
spice-webdavservice is running fromtask manager’sservicetab. - Make sure the
spice-webdavservice is running fromservices.msc.
-
When the guest system is running, connect to it using
virt-viewer(NOTvirt-manager) asAdmnistrator(
you may need tosuorsudo). Then at the openedremote-viewerchooseFile -> Preferencesmenu to enable spice folder share.
The default shared directory is the XDG Public Share directory (ie ~/Public if you use a regular system). -
If the shared folder is not showed up in windows guest system’s
This PC, you can manually runC:\Program File\SPICE webdavd\map-drive.batas
Admnistrator.
Filesystem passthrough
You can find instructions at
http://www.linux-kvm.org/page/9p_virtioIt relys on the 9p-virtio driver and it’s not friendly with Windows.
USB redirection
this can be found in [another guide about device passthroug](/post/device-passthrough-in-kvm/).
Considering donating if you found my post helpful 😊

Clipboard and folder sharing are usually an important feature to have when we run virtual machines. So here am I sharing the complete guide for you guys.
I found people talking about Qemu/KVM on Reddit, so I decided to try. Main reason why I wanted to try because I want to move away from VirtualBox that I can never enable folder sharing, and VMWare which is paid.
I am currently running Ubuntu 20.04 as the Host and Windows 10 as the Guests.
Problems
It is quite confusing when you first started. I started with virt-manager and had no clipboard sharing enabled. By default, virt-manager is using SPICE. The key to this tutorial is, install spice-guest-tools and Spice WebDAV daemon.
Notes
I am writing this tutorial based on virt-manager. It should be working for any SPICE remote viewer too such as Cockpit (tested).
Solution – Clipboard sharing
(Updated as 26th Oct)
Step 1 – Download spice-guest-tools to Windows Guest
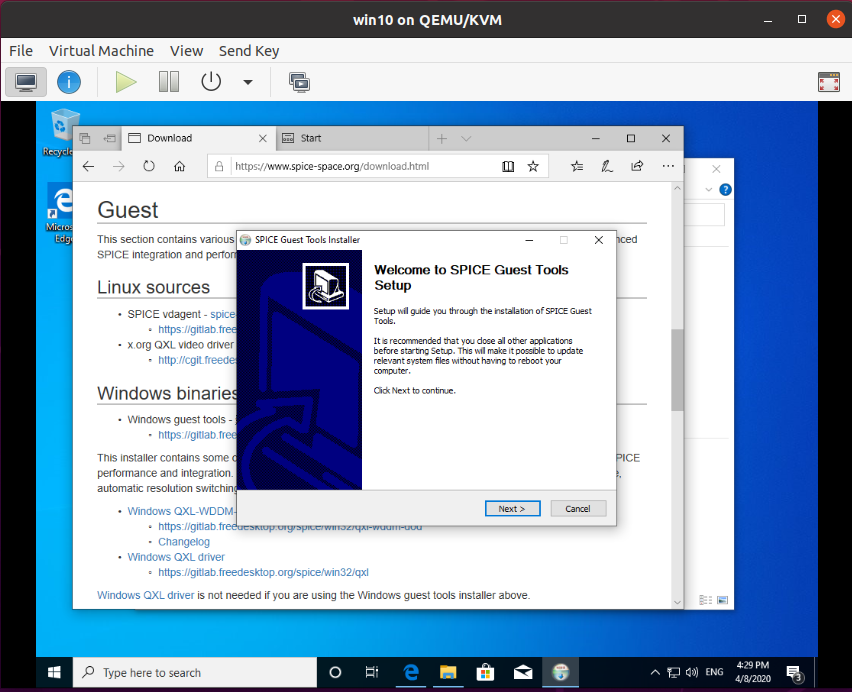
Open the download page (https://cutt.ly/2ROq8dK) on your Windows Guest, scroll down a bit until you found Windows binaries under Guest, click the Windows guest tools link to start the download. Or you can use this link
https://www.spice-space.org/download/windows/spice-guest-tools/spice-guest-tools-latest.exe

Or easier, shortened URL: https://cutt.ly/SROqBqZ

Step 2 – Run and install spice-guest-tools
After the file is available on your Windows Guest, run and install the program.
The display might blinking a few times, so don’t worry about that.
Step 3 – Test your copy/paste
You are pretty much finished. Try copying something in your Windows Guest and paste it in your Host, it should work. But if it doesn’t, try rebooting the VM. If it still won’t work, remove the program and reinstall. It should be working.
Solution – Folder sharing
(Updated as 26th Oct)
So, you have clipboard sharing enabled and now want to share folder?
We will be using virt-manager and Cockpit
Unfortunately, virt-manager has not implemented SPICE WebDAV in its client. So, we are going to use Cockpit, the alternative.
Step 1 – Install Cockpit and Cockpit Virtual Machines
First, install Cockpit and Cockpit Virtual Machines. For Ubuntu, run
Ubuntu: $ sudo apt install cockpit cockpit-machines
Arch: $ sudo pacman -Sy cockpit cockpit-machines
If you are using another Linux distribution, refer this page. You will still need to install cockpit-machines using your package manager to enable Virtual Machine manager.
Then enable and start cockpit
$ sudo systemctl enable cockpit.socket
$ sudo systemctl start cockpit.socket
Step 2 – Open the Web-UI in your browser
Cockpit provides Web-UI which you can access to use the program. Simply open this URL in your browser
http://localhost:9090
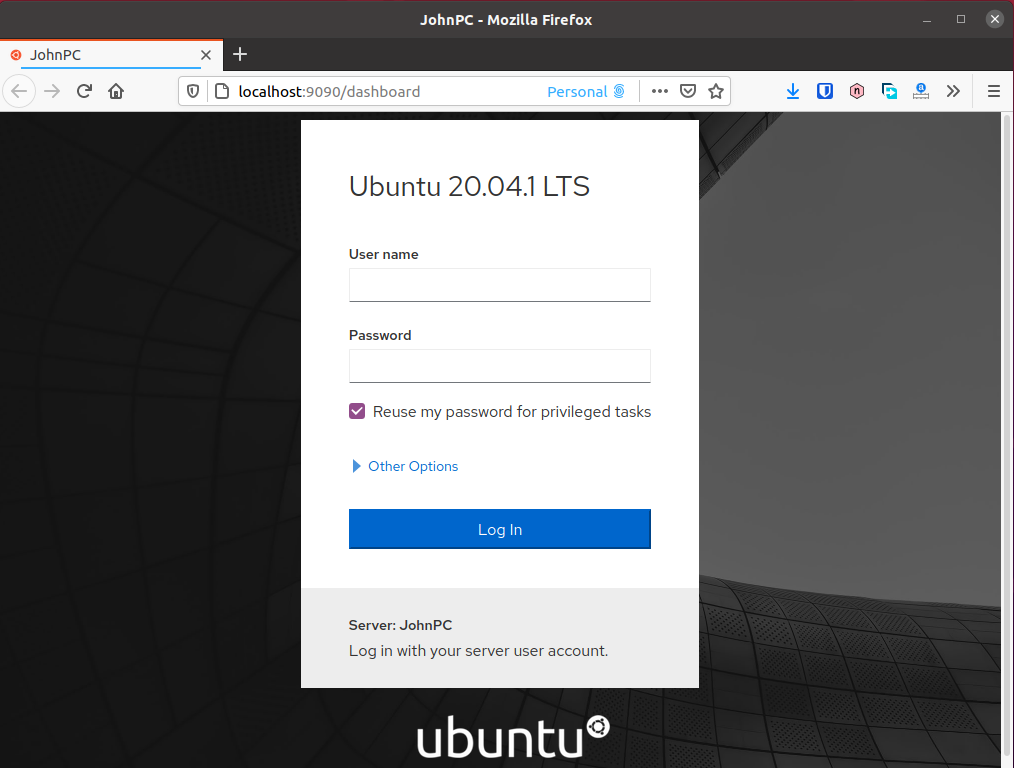
Login using your PC user and username
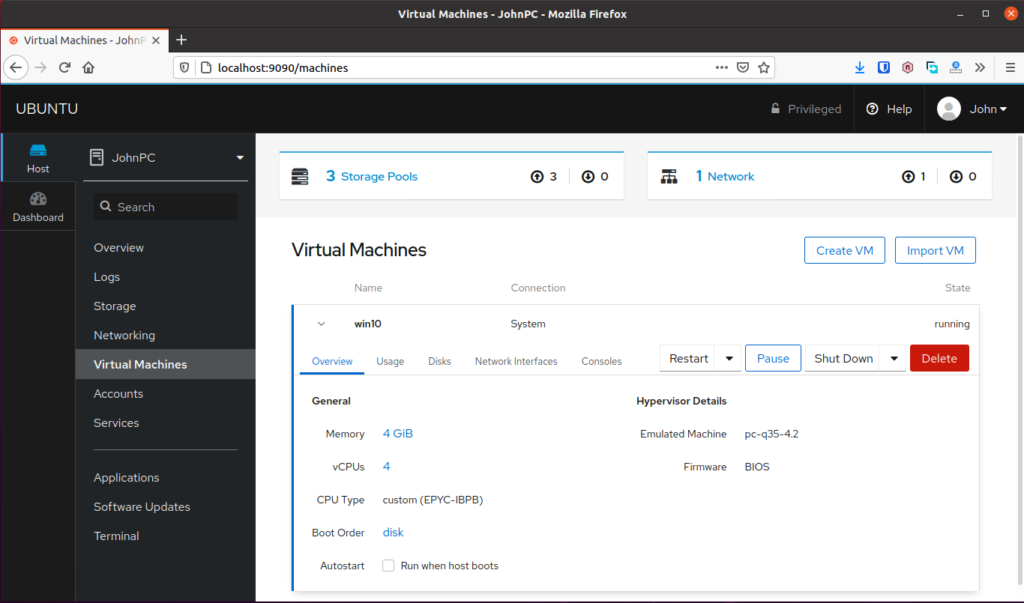
Step 2 – Go to Virtual Machine and shutdown your VM
You need to shutdown your VM or your settings in the next few steps probably won’t work. Simply go to Virtual Machines and hit the Shut Down button to turn off the VM.
Notes: If your Virtual Machine is empty, go to Overview and check if there is a notification at the top asking for a permission. Allow the access and your VMs should be showing up.
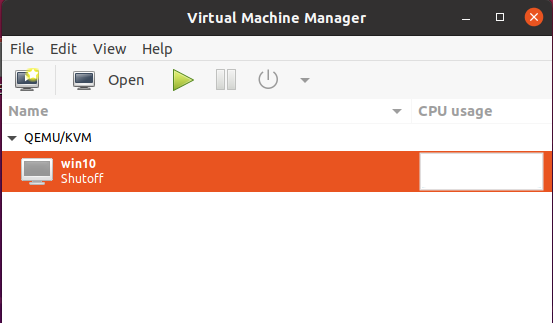
Step 3 – Open virt-manager, add new hardware
Open your virt-manager, right click on your VM and select open. You can also click on your VM, then hit the big “Open” button at the top.
Click Add Hardware and select Channel. Delete whatever in “Name” column, and insert this
org.spice-space.webdav.0
Step 4 – Return to Cockpit Web-UI, run your VM
You don’t need virt-manager for now, so you can close it. Then return to Cockpit Web-UI and hit Run button to start your VM.
Then go to Consoles tab and click “Launch remote viewer”
Notes: You probably need to install Remote Viewer if you are not on Ubuntu. On Arch, Install virt-viewer.
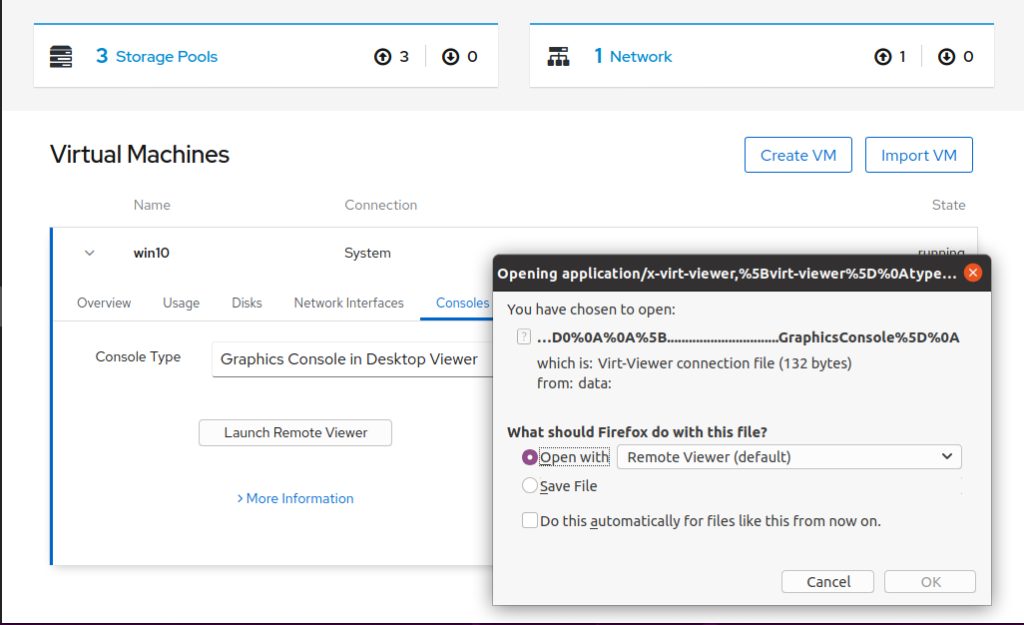
Click “OK” and you will see your Windows Desktop.
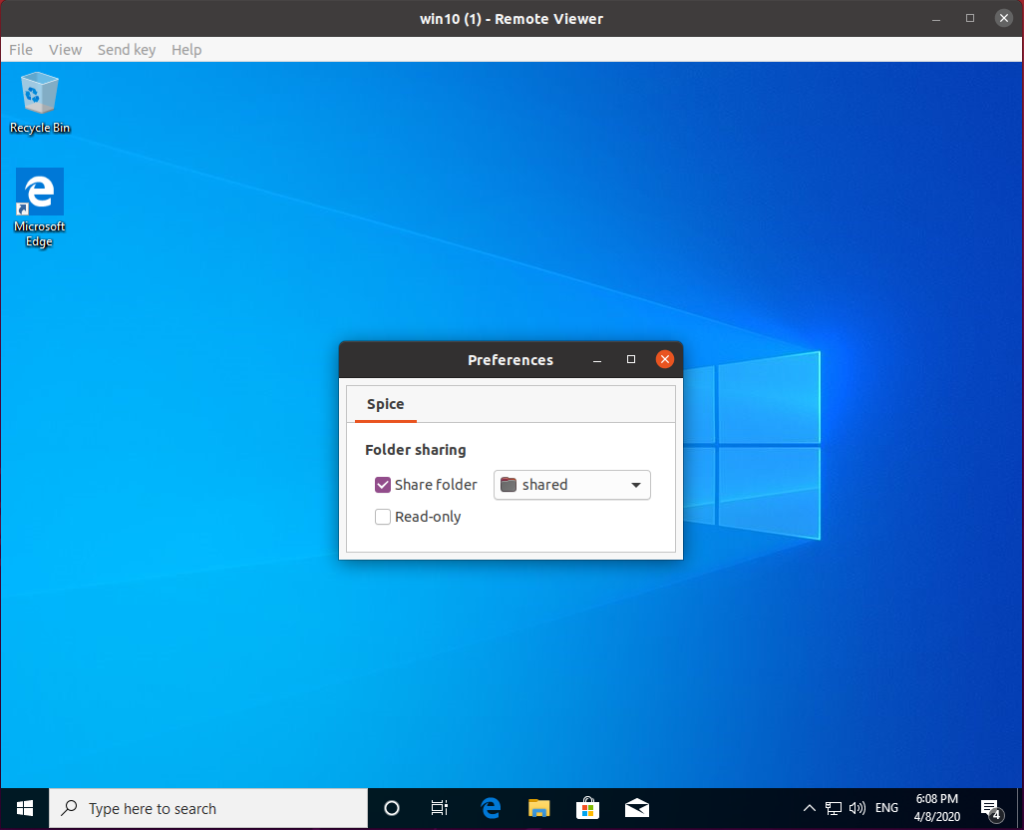
Step 5 – Enable Folder Sharing
Click menu File, then select Preferences. tick “Share Folder” and choose which folder you want to share with the Guest.
Notes: On Arch, Preferences is in hamburger menu on the right.
Download and install spice-webdavd in Windows Guest. Pay attention on the file extension. You will want to donwload .msi file which usually larger than the other. Or you can just use this link for the latest installer
https://www.spice-space.org/download/windows/spice-webdavd/spice-webdavd-x86-latest.msi

Be aware, some browsers will open the link instead of downloading it. At least Edge displaying the file content to me instead of downloading it.

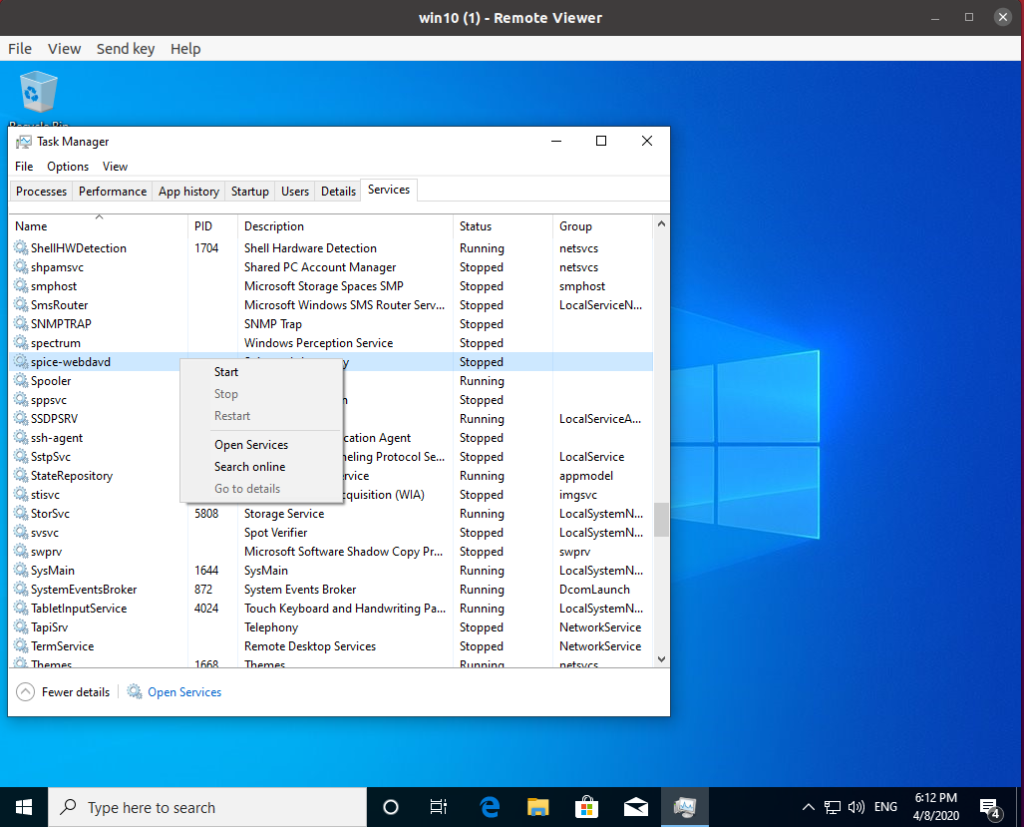
Then in the Windows, open Task Manager and go to Services tab. Find “spice-webdavd” and start the process if it doesn’t.
Step 7 – Verify the Folder Sharing is working
After running the “Spice webdav proxy” service, you should see a new storage in “This PC” or “My Computer”.
Try creating a file or folder and check shared folder on your Host to see if the changes reflected.
You are now done 🙂
Considering donating if you found my post helpful 😊
After many months, i finally moved everything from Windows to Linux but i am still playing my games on Windows with KVM VFIO.
Recently, i created a very cheap Linux — Debian gaming-streaming* VFIO PC where i can play some lovely games from my tablet in home or from any internet PC with Moonlight & Sunshine streams (future guides but i will add their links as references at the bottom of this guide so you know what i am talking about) and to support my home network with a Streaming PC to handle my family’s streams with total cost less than 400 euro (future post too) and i wanted to have a shared folder from the Linux Hosts to Windows 10 gaming guests*.
I am chosing the Linux Host — Windows Guest implementation over the Windows Host — Windows Guest because i think the OS diversity increases the security of implementation and it minimizes the risk of infection of host from its guests and vice versa. Also since i decided to move from Windows to Linux i wanted to learn the Linux Raid with mdadm to use it to my future projects i have in mind.
During this guide the Linux Distro and Version is Debian 11, the Host’s Qemu is running without any modifications like running as root or any changes inside the config files of /etc/libvirt/ folder as many other guides suggest, you don’t need to have same username on Guest machine that access the shared folder because Libvirt-qemu is the owner of KVM and shared folder and it automatically changes the owners and groups on folder to every user on Host or Guest that have create/write/read permissions of the shared folder and its files!
Enough with words let’s start the KVM guide and let me tell you now that if you copy paste any command inside the quoted text below works because i used this guide too for the last KVM Guest i created when it was draft!

PREPARE THE DEBIAN 11 HOST MACHINE:
1. Add the user you are running Virt Manager to libvirt-qemu group by typing as root from # or sudo from $ on a user’s terminal.
sudo adduser $USER libvirt-qemu
check if the user is now on libvirt-qemu group with this commnand:
2. Create the folder you want to share and change the ownership to libvirt-qemu as root from # or sudo from $. Personal preference is the /mnt directory since for this reason created on Linux.
sudo mkdir /mnt/Win10SharedFiles
sudo chown -R libvirt-qemu:$USER /mnt/Win10SharedFiles
If you don’t want to have problems with write permissions because our linux user has not any rights on /mnt in general, use this command to give him write rights on the folder you just created.
sudo chmod -R +775 /mnt/Win10SharedFiles
If you copied files and folders on this folder re-type this command to apply the new permissions to these files and folders too.You can re-type this command anytime you want even after the end of this guide but with the Guest Machine in shutdown state!
sudo chmod -R +775 /mnt/Win10SharedFiles/*
You can check that everything is good with this command: ls -la
3. Now we are creating the filesystem share from inside Virt Manager (the window of the above image) with the Windows 10 Guest in shutdown state this way.
+ Add Hardware > Filesystem and we choose
Windows Option
Type: mount
Mode: passthrough
Source path: /mnt/Win10SharedFiles
Target path: Win10SharedFiles
INFO: The Virt Manager displays passthrough as hypervisor default and when you press aplly it displays passthrough.
If you choose all the 4 above options press apply to create your new filesystem share and if you want the Guest Machine to has Read only access inside the Folder you should tick the Export filesystem as readonly mount (i haven’t try it yet).
Now edit the previous entry in XML of Virt Manager and add the virtiofs driver by adding <driver type=’virtiofs’ queue=’1024’/> after the 1st line. The xml should be like this after the last addition:
<filesystem type=’mount’ accessmode=’passthrough’>
<driver type=’virtiofs’ queue=’1024’/>
<source dir=’/mnt/Win10SharedFiles’/>
<target dir=’Win10SharedFiles’/>
<address type=’pci’ domain=’0x0000′ bus=’0x05′ slot=’0x00′ function=’0x0’/>
</filesystem>
Don’t worry if the numeric values are different at your VM, the important of this step is to add the <driver type=’virtiofs’ queue=’1024’/> line and only!
Also you should add manually under the <domain line of our Windows Guest xml these 4 lines. Press Overview of your windows Guest machine and press XML and add after the </metadata> exactly where is the memory options and after the </currentMemory> insert these 4 lines on the same coloumn with it.
<memoryBacking>
<source type=’memfd’/>
<access mode=’shared’/>
</memoryBacking>
INFO: To allow virt-manager edits the XML you should have enable it by ticking the option enable xml editing in Virt Manager preferences (the main window of Virt Manager, not the window of windows guest)
4. After that step add an option to apparmor to the local file that is unaffected from the updates to make this folder writable from libvirt-qemu.
sudo nano /etc/apparmor.d/local/abstractions/libvirt-qemu
and add this line. Probable this is a blank file but if there are things inside it from other programs add this line below of them.
/mnt/Win10SharedFiles/(,**) rw,
This step is also very important because this command allows the local user inside guest machine to take inheritance permission from the libvirt-qemu user to write the files & and folders inside the shared folder. Also there are already installed apparmor settings with a apparrmor profile and you can check them with aa-status as root.
ON WINDOWS 10 GUEST MACHINE NOW,
and better after a restart of the Host to be sure that the changes on the Host appplied correct…
5. Start the Windows Guest and be prepared to install 2 drivers and 1 service inside the Guest that will auto-mount your Linux’s Host shared folder as Z: Network Drive by following the WinSFP guide from its github page (and this is the WinSFP gitlab page). During the next paragraphs i will notice only the important steps since its a bit techie article and i know that streamers will have problems to succefully install the 2 drivers and the risk for failure is big if they follow the easy way… the right click GUI way!
a) Download and install the SFP driver from github (when i installed it was the version v1.12.22339 you see below as WinFsp 2022.2 that is digital signed and this version this guide follows). Only the Core you need (as the image below shows) and nothing else. You can find the description and the newer versions if you press the link on version above but if you read the newer versions releases text you will see that many changes happened on this driver and maybe this guide is not the correct for the newer versions!
b) Now, if you already have enabled the VFIO kernel module for your Win 10 guest gaming machine it’s time to re-attach the virtio-win iso from Red Hat as cdrom image… We will copy everything from the folder viofs/w10/amd64 that you can find inside the files of the virtio-win iso to C:Utils\VirtioFS folder of the guest (i am using the name Utils as directory on C: to add inside it any app or service that i want to run without installer because it is easier for me their backup) and if you don’t have the VFIO windows drivers available on your PC you can find them here: https://github.com/virtio-win/virtio-win-pkg-scripts
(i am using the virtio-win-0.1.225.iso version for this guide and on my home but the latest version the time i published the guide changed and now is virtio-win-0.1.229.iso and maybe in the future has changed if you press the link on the previous paragraph. it’s up to you what you will use because i don’t think there is reason to not use the latest. if it fails and you have used the last try the version 0.1.225 i am using )
c) If you did the previous steps, copy everything from viofs/w10/amd64 folder of the virtio ISO image that is mounted as Cdrom files to your new C:Utils\VirtioFS directory like there are on the image below.
CAUTION: If you try to install the driver and service with right click on inf file, by using the PowerShell as administrator (like the image below) or cmd without Administrator they will all fail even the inf reported that installed in simple and not a administrator cmd.
THE RIGHT WAY IS THE OLD SCHOOL CMD AS ADMINISTRATOR WAY FOLKS** …
d) Right click on a cmd.exe shortcut and run as Administrator! change your working directory to the folder with our files with this command:
and type these 3 commands on the Administrator terminal that have path the C:Utils\VirtioFS directory :
sc create VirtioFsSvc binpath= «C:\Utils\VirtioFS\virtiofs.exe» start= auto depend= «VirtioFsDrv» displayname= «Virtio FS Service»
%SystemRoot%\System32\pnputil.exe -i -a *.inf
Update 26/1/2024: if the sc start fails to start means that the binpath is wrong and if you want to delete the wrong service use the next command to re-create the service with the sc command as Administrator on cmd.
The space after = on each parameter on the 1st command is important otherwise the command will fail. Better copy paste everything as it is here!
After the 3rd command as you see from the above image Win 10 OS reports that the service started, and if not check your antivirus/antimalware program for reports or any group policy (3 times so far never failed) or do a restart of the Win Guest machine and the Shared Folder from Host will be there on explorer as … Z:\ like the network mounts and if you check the permissions from both guest and host you will see that are correct like the image below. Also the copy speed is really impressive since it is not a really network path but emulates it!
That’s it, happy KVM Folder and File sharing … on Linux Hosts with its Windows 10 Guests!
p.s. if you confused with names and where you should create them i will write their explanations and their locations now to have them as guide:
/mnt/Win10SharedFiles = the shared folder on Host.
Win10SharedFiles = the shareName name you will use as shared name on Virt Manager’s Target Path and you will see it as z:sharename inside the Guest machine.
better use everything as it is here to avoid make mistake at least to the 1st KVM.
References for Windows Guests on Linux Hosts.
7. Sunshine is a self-hosted game stream host for Moonlight (i was using nvidia’s stream service on the first implemamtation but nvidia closed the shield project and i replaced it with sunshine and it works… better since it is self hosted and a great program too. support if you can)
* if you don’t have official windows images to use for your Windows 10 guest machine download an OFFICIAL one from microsoft by following this very easy method. It is still working!
** if you prefer poweshell than cmd now you realized why you should stop and i have no words to describe what i am feeling about this powerkek implementation… CMD FOR THE WIN & FOREVER. Run my gamelink console app that you can find inside the zip file and you’ll see what i mean ;).
In this post, I’ll show you how to share files between the KVM host and Windows guest using Virtiofs.
To share files between the KVM host and Windows guest, you can use Samba, the standard Windows interoperability suite of programs for Linux and Unix. However, because Samba is not designed for virtualization, there will be some communication overhead.
As a result, a new file system called Virtiofs was created. Virtiofs is a shared file system that allows virtual machines to access the host’s directory tree. Its purpose is to emulate the semantics and performance of the local filesystem.
To demonstrate this, I’ll share the home directory of my host system with the Windows 11 guest virtual machine.
Before you begin, ensure that you have VirtIO Windows guest tools installed in your Windows 11 guest virtual machine. If not, see my other guide, ‘How to Properly Install a Windows 11 Virtual Machine on KVM’. At the end of Section 2, I explain how to install the VirtIO Windows guest tools.
Launch the Virtual Machine Manager application.
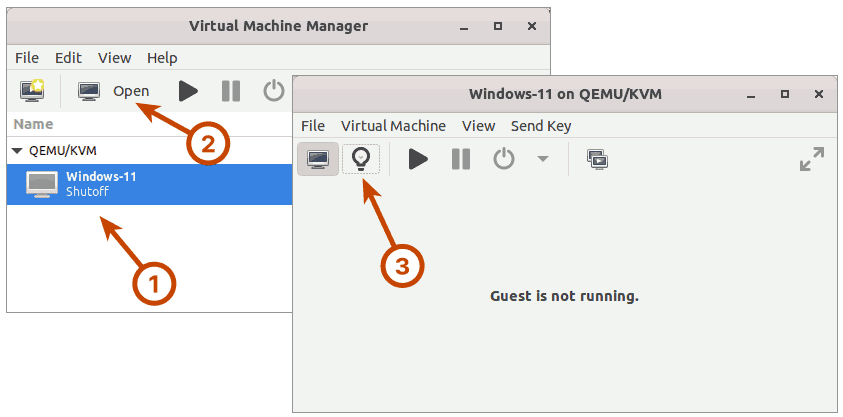
Select the Windows guest on which you want to mount the shared directory of the host. Then, click the Open button. In the new window that appears, click the lightbulb icon in the toolbar to show virtual hardware details.
You must enable shared memory backing. Memory backing enables virtual memory pages to be backed by host pages.
On the left panel, select Memory, and on the right panel, check the Enable shared memory checkbox. Then press the Apply button.

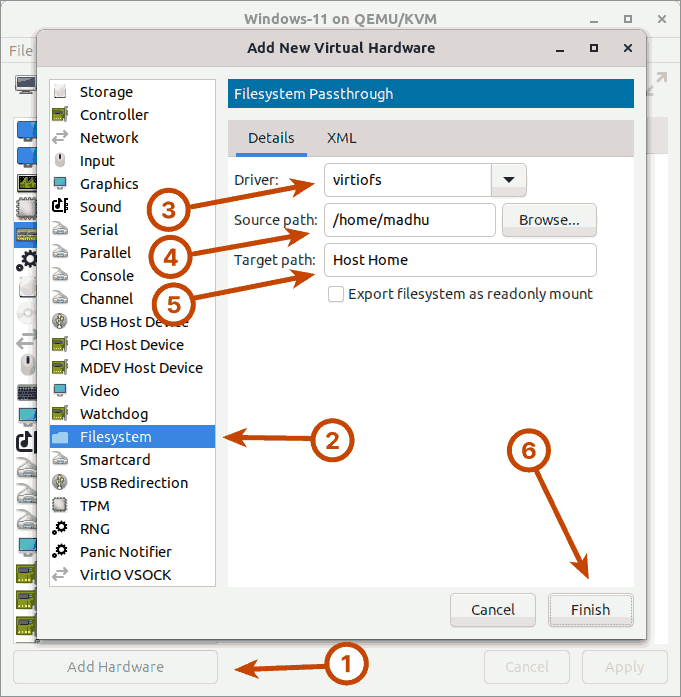
Next, on the left bottom, click the Add Hardware button. In the new window that appears, select the Filesystem option from the left panel.
In the right panel, set the driver to virtiofs. Set the source path to the directory on the host that you want to share with the Windows 11 guest virtual machine. I’ll be sharing my home directory, so I’ll set the path to /home/madhu. Then, in the target path, enter any arbitrary string. This string will be used to identify the shared directory that will be mounted within the Windows 11 guest. I’ll set it to ‘Host Home‘, but you can change it to whatever you want. Complete the process by hitting the Finish button.
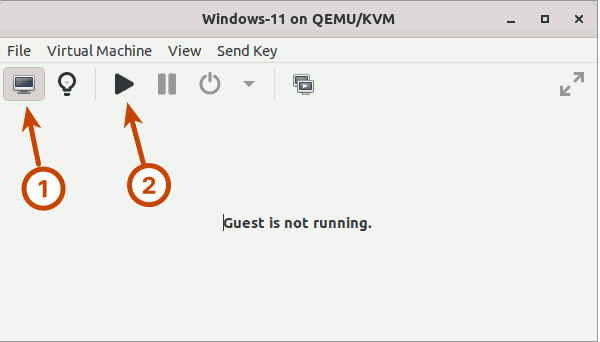
Finally, run the Windows-11 guest virtual machine by clicking the computer monitor icon and then the play icon in the toolbar.
Install Windows File System Proxy
WinFsp (Windows File System Proxy) is system software that provides runtime and development support for custom file systems on Windows computers. In this sense, it is similar to FUSE (Filesystem in Userspace), which provides the same functionality on UNIX-like computers.
But, before you install WinFsp, make sure your Windows 11 is up to date.
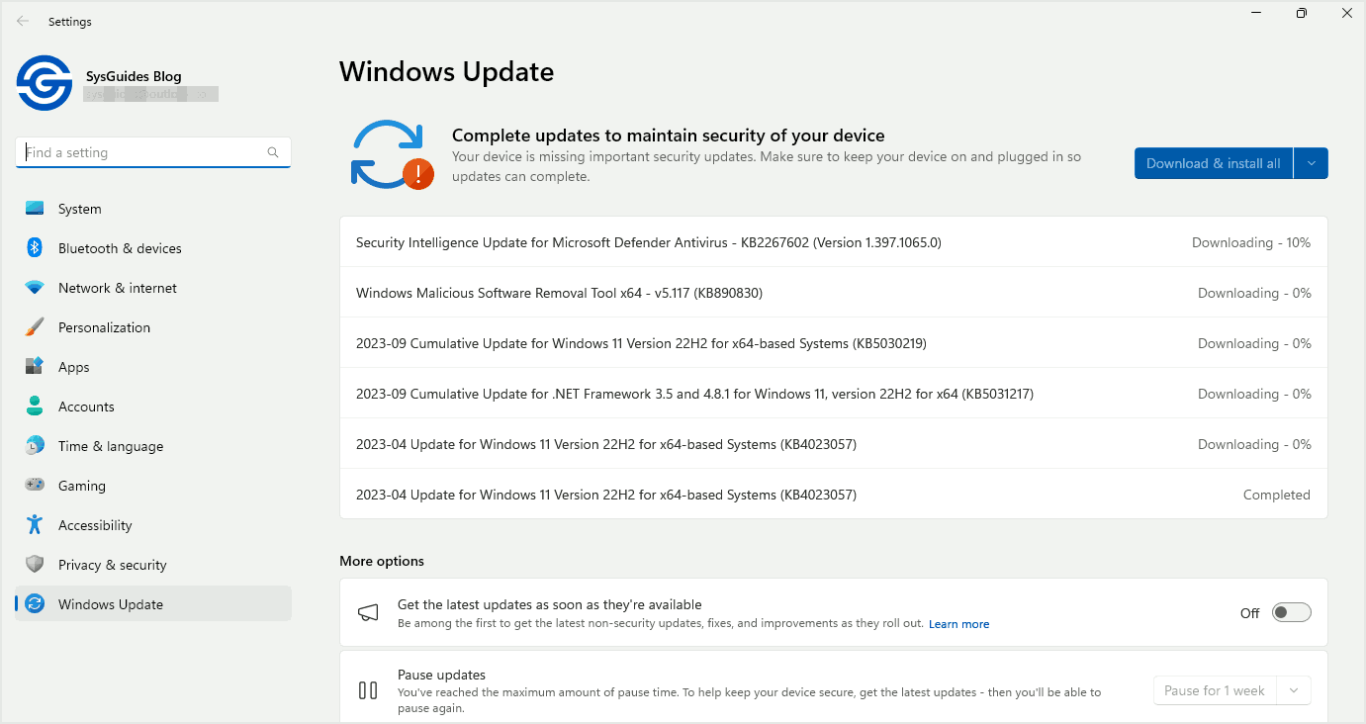
After you have updated your Windows 11, download and install the most recent stable version of the WinFsp MSI package.
Once the WinFsp package is installed, reboot your Windows 11 guest virtual machine.
Now that you have installed the WinFsp package, you have to enable the VirtIO-FS Service in the Windows 11 guest virtual machine in order to mount the shared directory.
To enable VirtIO-FS Service, type services into the search box and press [Enter] to open the Services window.
In the Services window, look for VirtIO-FS Service. Right-click it and select Properties. Then, enable the VirtIO-FS Service.
Then launch Windows Explorer, and you should see your shared directory mounted.
If you double-click on the mounted shared directory, you should now be able to access your host’s home directory.
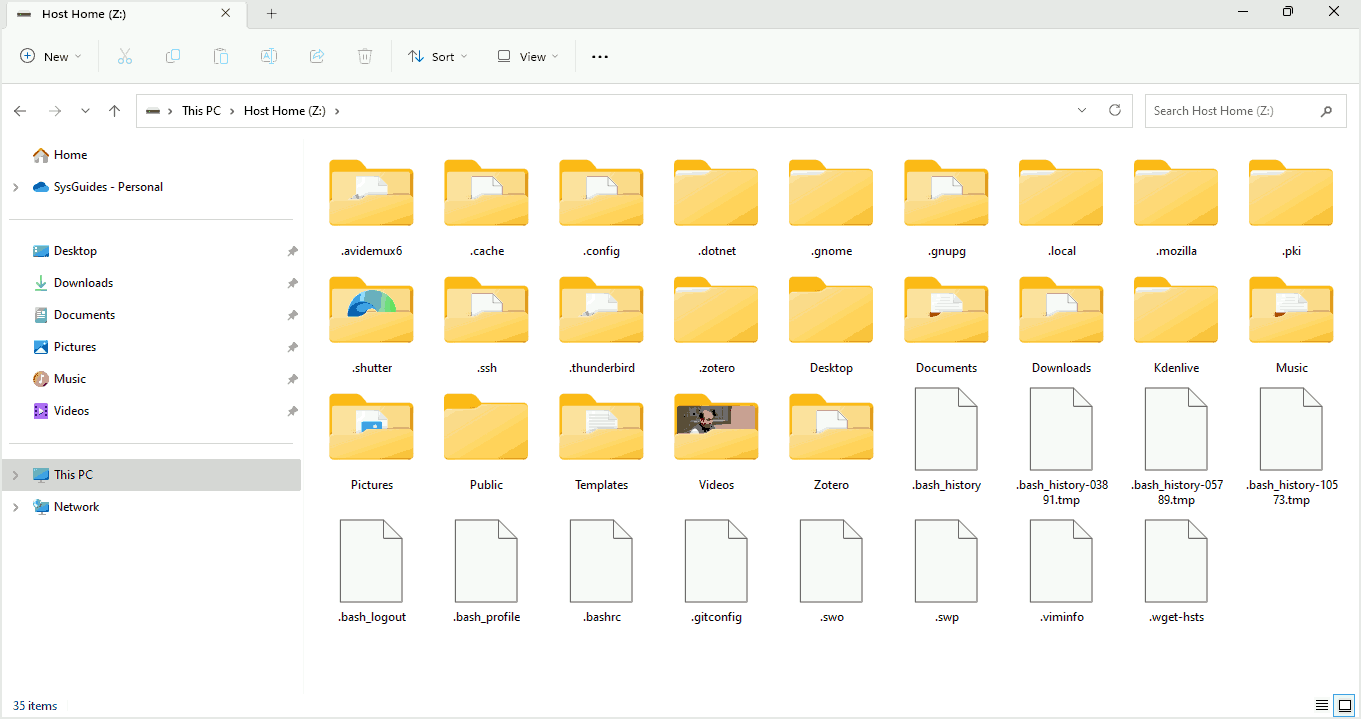
The file sharing between the KVM host and Windows guest using Virtiofs is now complete.