
System Requirements | Help | Upgrade | Contact | Free Resources

We’ve now added Stop Motion Studio animation software for Windows and macOS to provide you with an enhanced software offering for your HUE Animation Studio kit.
HUE Animation, our award-winning stop motion software for Windows, is still included with every HUE Animation Studio kit but now you have the choice of two amazing apps.
System Requirements
- 512MB RAM (1GB recommended)
- HUE Animation requires: Windows 11, 10, 8, 7 or XP and graphics drivers with OpenGL 2.0 support
- Stop Motion Studio requires: Windows 10 or later, or macOS 11+
Help
The following Tutorials and FAQs are for the new Stop Motion Studio software. If you have a problem with your camera or the HUE Animation software for Windows, please also check our other HUE Animation Studio Tutorials and FAQs, or contact us below.
Tutorials: Stop Motion Studio
In this short tutorial video, we will show you how to connect your HUE camera and create a simple animation to share with your friends, family, teachers or students.
Browse the full Stop Motion Studio for HUE playlist on YouTube for more tips, tricks, troubleshooting guidance and tutorials.
If there is something we have not covered in our Stop Motion Studio Tutorials that you need help with, please contact us for further assistance.
IMPORTANT: Before you can add audio to a Stop Motion Studio project, you must first have some frames on the project timeline. Audio clips can then be added to one of the captured frames in the following ways:
- Recording audio with your microphone.
- Adding a sound clip from the audio library.
- Importing sounds from your computer.
Recording audio with your microphone
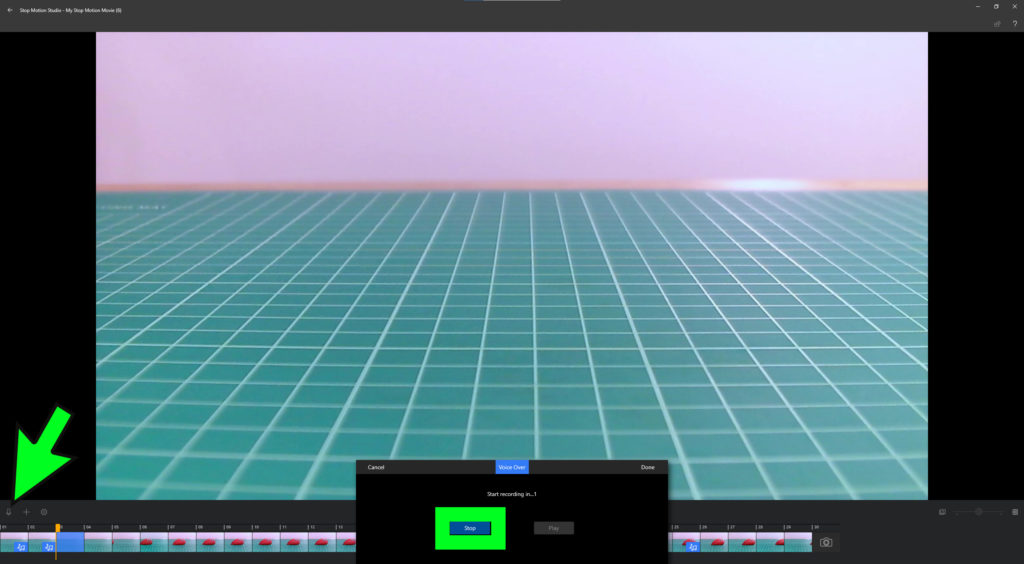
To record voice-overs or sound effects directly into your animation project, select a frame in your timeline where you want the audio to begin.
Click on the Microphone icon, to the far left of the screen, just above the timeline.
From the pop up window, click on the Record Button to start capturing audio.
Once you have recorded your audio clip, click the Play Button to review your recording.
If you are happy with your recording, click Done to close the pop up window.
Adding a sound clip from the audio library
If you don’t want to record your own audio, Stop Motion Studio also has a fantastic library of sound effects and theme music that you can use in your movies.
To access the library, select a frame in your timeline that does not have an audio track (adding a sound to a frame that already has a track will replace the existing track).
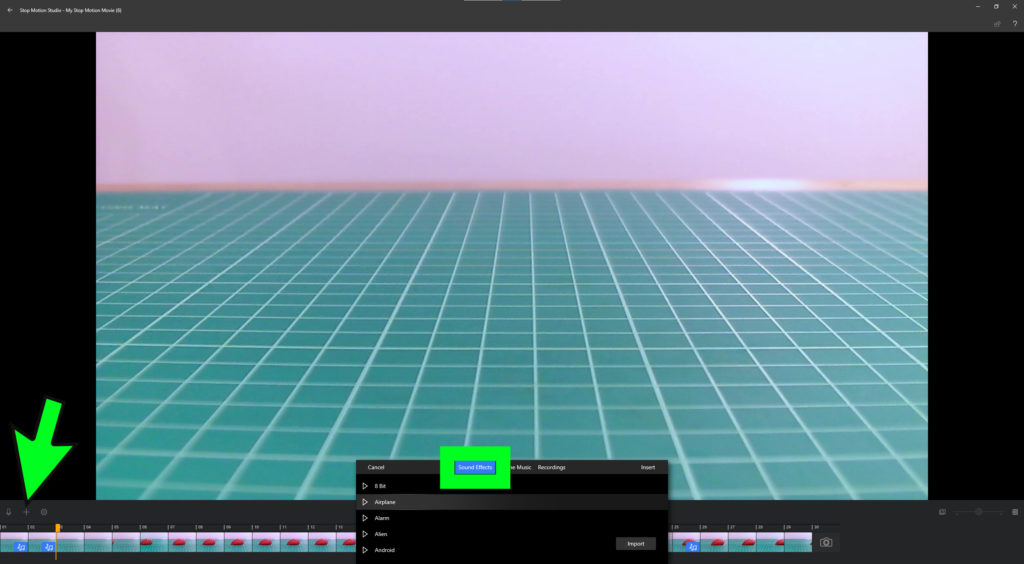
Click on the Add Media (+ symbol) and select the Audio option.
From the pop up box select Sound Effects or Theme Music to view the list of pre-loaded clips.
Scroll through the list to find the perfect sound effect or music clip for your project.
You can preview each audio clip by clicking on the small play buttons next to each clip.
Select an audio clip you would like to use and click Insert to add it to your project.
If the audio clip is too long, or too loud, you can make adjustments to the volume and clip length.
To do this, right click on the audio frame in your timeline and click the Audio option in the Edit Menu.
Use the volume and trim sliders to edit your sound clip.
When you are happy with your edits, click Insert to close the pop up box.
Importing sounds from your computer
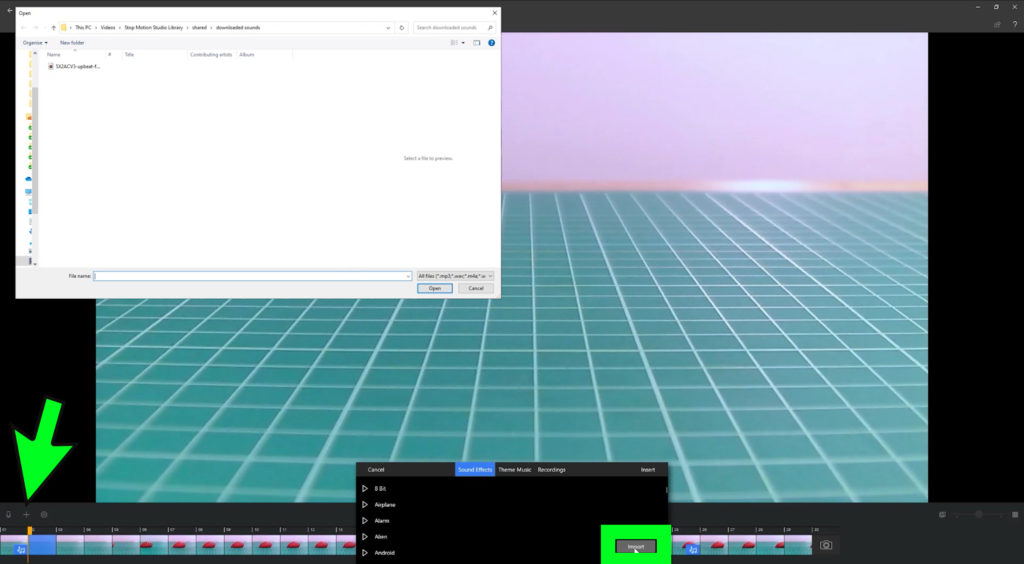
Select a frame in your timeline, click on the plus + symbol and select the Audio option.
Click the Import button.
This will open a browser window where you can search for audio files you already have on your computer.
Select the file and click open to add the audio clip into your project.
Click on the play button to hear the unedited version of your imported sound.
To edit the sound clip, right click on the audio frame in your timeline and click the Audio option in the Edit Menu.
Use the sliders to edit the volume and duration of your sound clip.
Click on the play button to preview the edited clip and adjust the sliders until you are happy with the results.
When you are satisfied with your edits, click Done to close the pop up box.
Before you can add a title or credit page to a Stop Motion Studio project, you must first capture some frames of an animation. Title pages can then be added to one of the captured frames.
Add an opening title and closing credit page to your film using different themes. You can customize elements such as the studio and movie name, the text size, color and font.
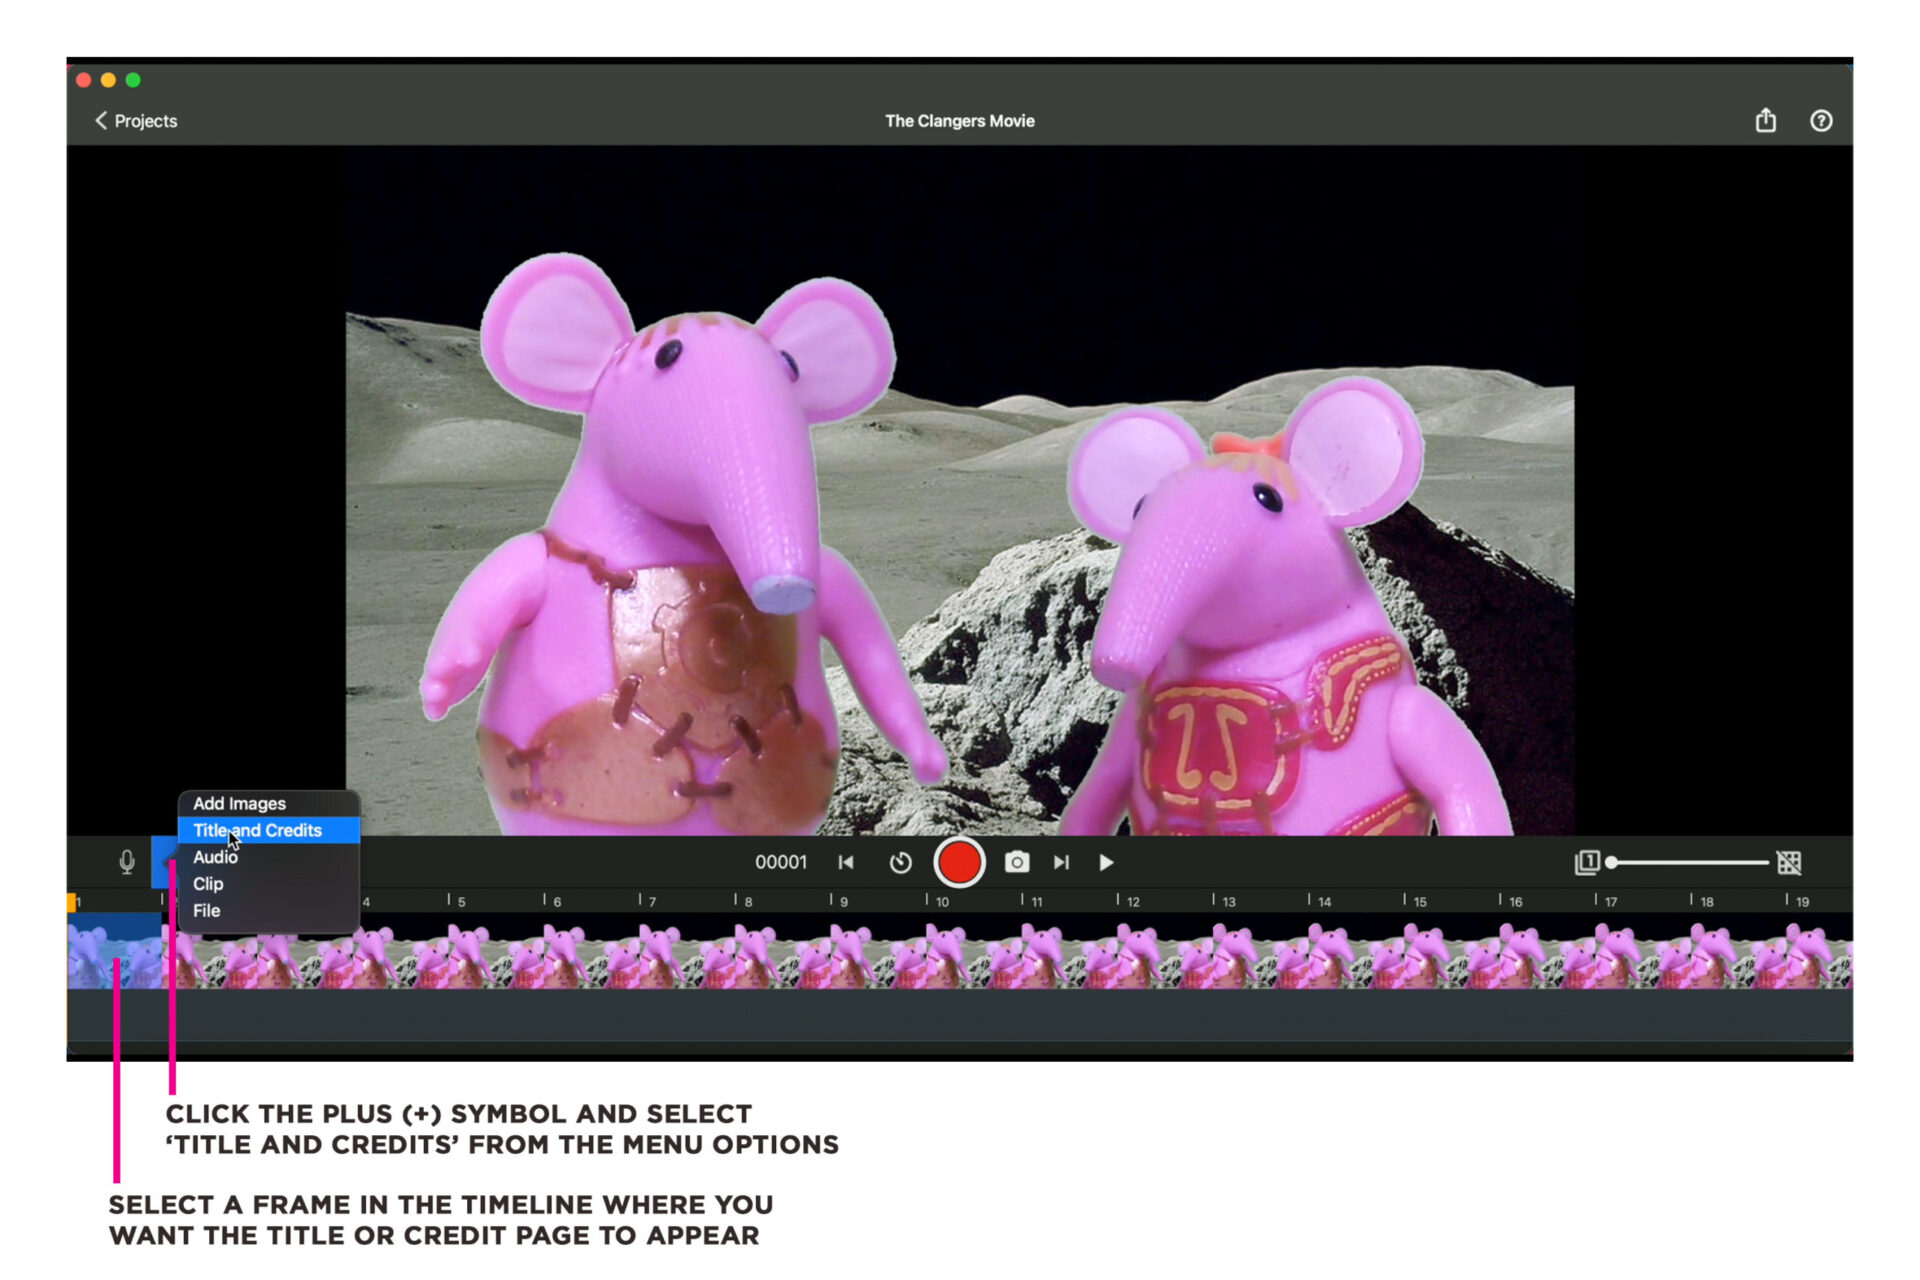
- With your project open, scroll the timeline so that the playhead appears over the place where you want to add the title or credits.
- Click the Add Media button (+ symbol), select Title and Credits.
- Click the title or credit you want to add.
- The chosen design will be opened in the image editor where you can customize the text, size, font and color of the titles.
To remove a title template from your movie, right-click the frame in your video timeline, which will open a contextual menu. Select Pause and move the slider to adjust the length of time your title appears on screen. Select Delete from the right-click menu options to completely remove your title clip.
IMPORTANT: The Green Screen effect cannot be applied to existing frames. The feature needs to be turned on BEFORE you capture any frames.
The Chroma Key function lets you select a color from your scene (green or blue) and replace it with an image.
Set up your animation scene with a bright green or blue background and make sure your characters are a different color from the background you have chosen.
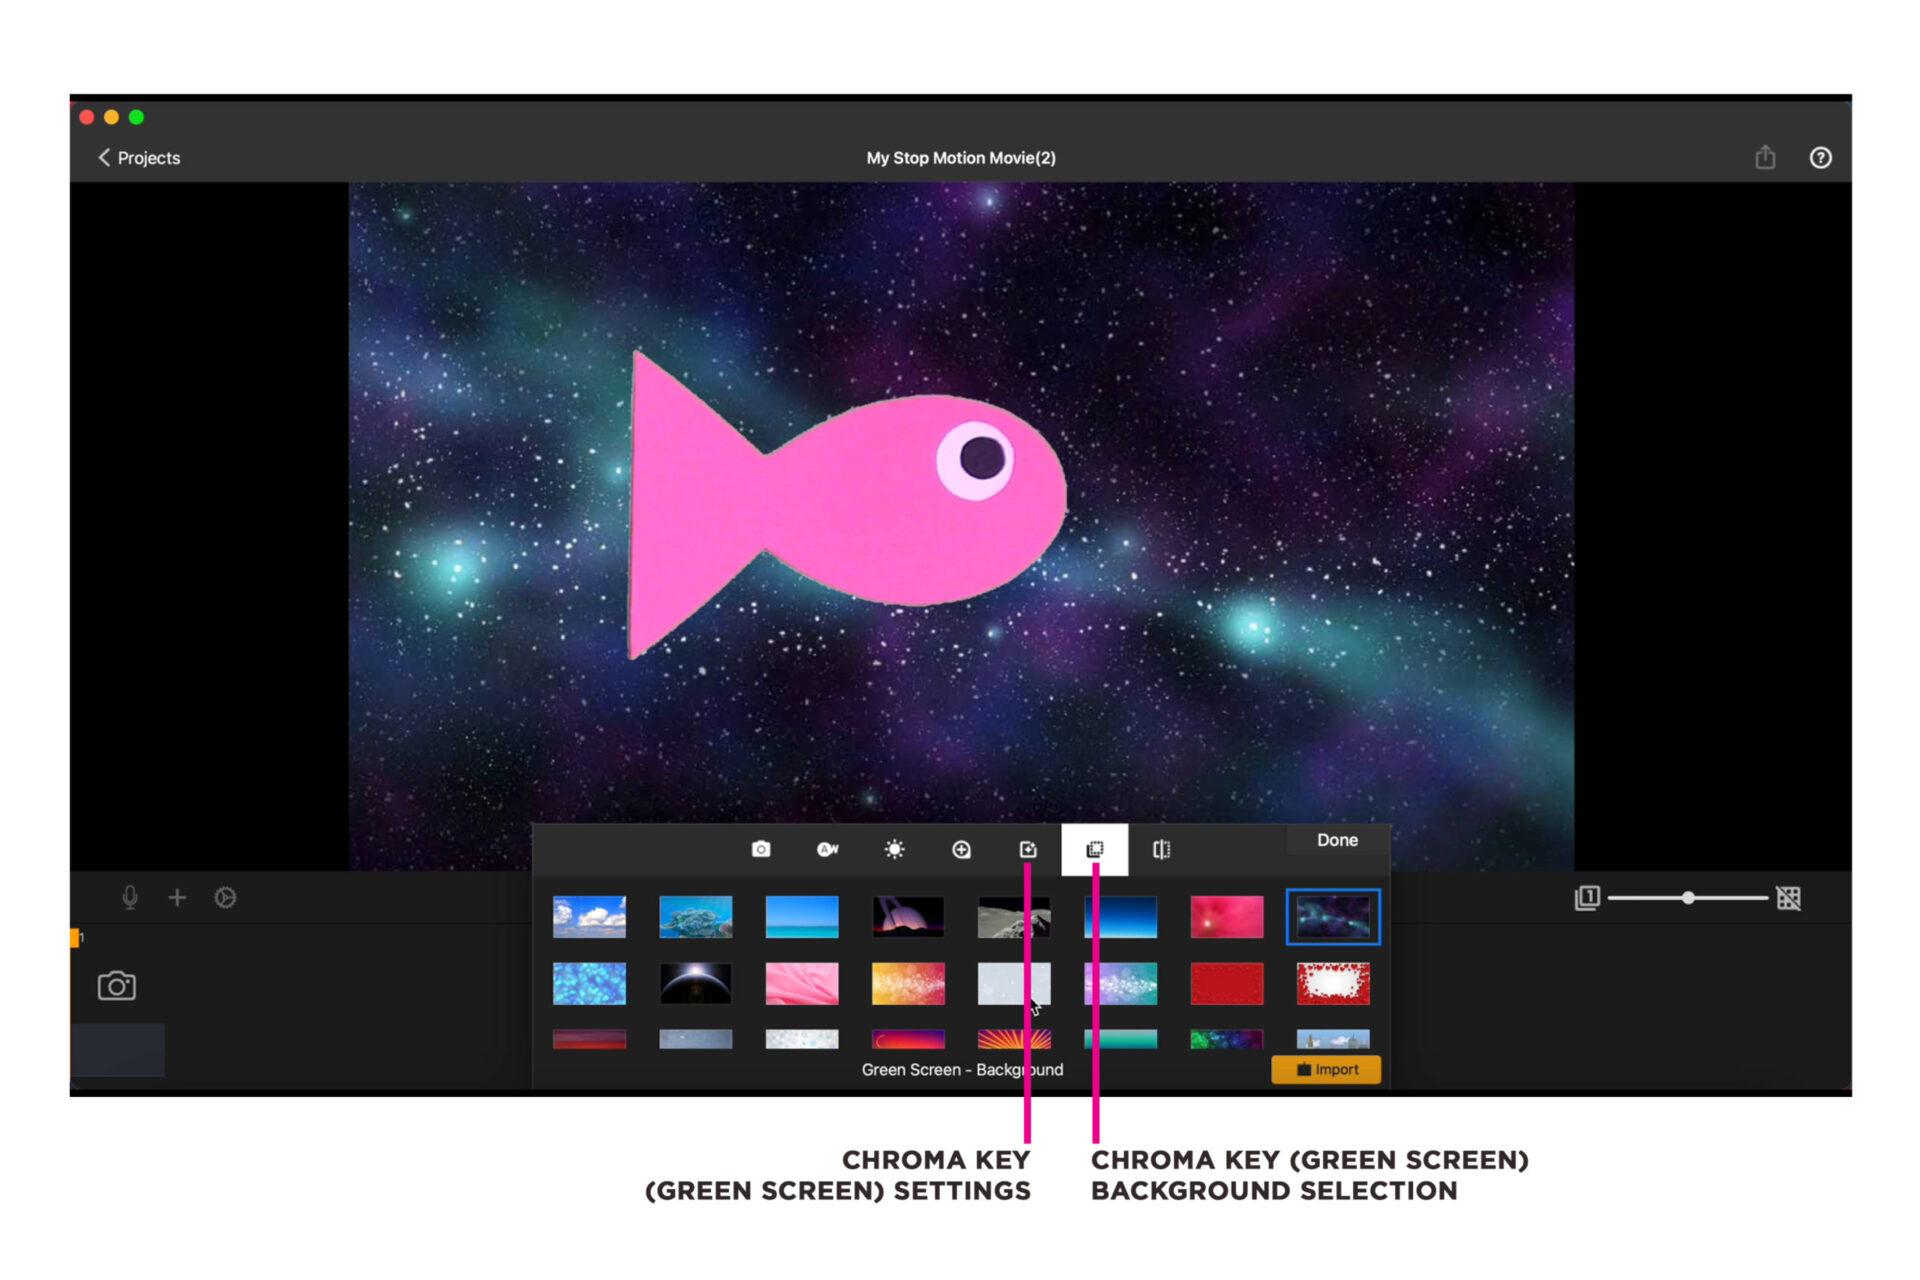
It is important to illuminate your background with bright, even light. The better lighting you have, the better chroma result you will get.
Click DONE when you are happy with your settings and start animating.
Time-lapse is a technique used in film-making to record processes that take place over long periods of time.
By capturing images at set intervals, we can see a high-speed version of reality when the footage is played back as a movie.

To create a time-lapse sequence in Stop Motion Studio for HUE:
- Click on the TIMER icon to the left-hand side of the red CAPTURE BUTTON.
- Use the slider to choose the number of seconds you want to set between captured frames.
For things that move slowly, such as plants growing, set a longer interval between frame captures. For faster moving activities, such as drawing or LEGO® building, set a shorter interval.
- Once you have set the interval, click DONE to close the time-lapse setting window.
- When you are ready to begin your time-lapse, click the red CAPTURE BUTTON to start auto-capturing images.
- When you have finished your time-lapse, click the red CAPTURE BUTTON once more to stop capturing images.
If you want to capture frames manually, don’t forget to return the auto-capture interval slider to the OFF position.
You can slow your animation down in two ways, either by capturing more pictures, or by lowering the frame rate of your animation project.
To lower the frame rate, click on the Project Settings icon to the left-hand side of your screen.
From the project settings window, click on the frames per second (fps) icon and drag the slider to select a lower frame rate. The lower the number the slower your animation will move.
Once you have selected a lower frame rate, click Done to close the window.
As we all know from Shrek, onions have layers.
Back in the olden days of animation, cartoons were drawn on semi-translucent paper called onionskin. This enabled animators to layer keyframe drawings on top of each other so they could draw inbetween frames to create smooth animated sequences.
This age-old technique still helps animators nowadays and the feature is available in Stop Motion Studio for HUE.
Whether you are animating on paper, with clay, LEGO®, or with found objects, the onion skin feature will show you ghost-like images of the previous frames of your animation and help you to line up your next shot.
You can use the onion skin slider in Stop Motion Studio to toggle the opacity between previously captured frames and the live camera view.
To apply the onion skin effect to more layers, click on the small numbered square to the left of the opacity slider.
When you are animating it can sometimes be helpful to copy and paste, and reverse, frames of your animation to create a loop of your footage.
To do this, you first need to select all the frames you want to copy In the project timeline.

When you have selected your frames, right click on any of the selected frames to open the editing box.
Select COPY from the menu options, right click where you want to paste your frames and select PASTE from the editing box.
Animating LEGO® characters is lots of fun, but it can be tricky to change their facial expressions by replacing their tiny heads.
Thankfully, Stop Motion Studio has a fantastic feature that enables you to add digital faces to your LEGO® characters after you have animated them.
You will need to turn your LEGO® Minifugure’s head all the way round so that you can animate your character with a blank face.


To add faces to your character:
- Right-click on the first frame in the timeline and select Edit.
- Click on the plus (+) symbol at the top right hand side of the screen and select Face.
- Use your mouse to resize and position the LEGO face so it fits perfectly onto your character.
- Copy the face by hitting Command – or Control for PC users – plus the C key on your keyboard. Alternatively, right-click the face layer on the sidebar and select Copy.
- Click on the small arrow at the top of the screen to display the next frame (you can also use the arrow keys on your keyboard).
- Hit command – or control for PC users – plus the V key on your keyboard, to paste the face from the previous frame.
Repeat this process for all of the frames that will be using the selected face.
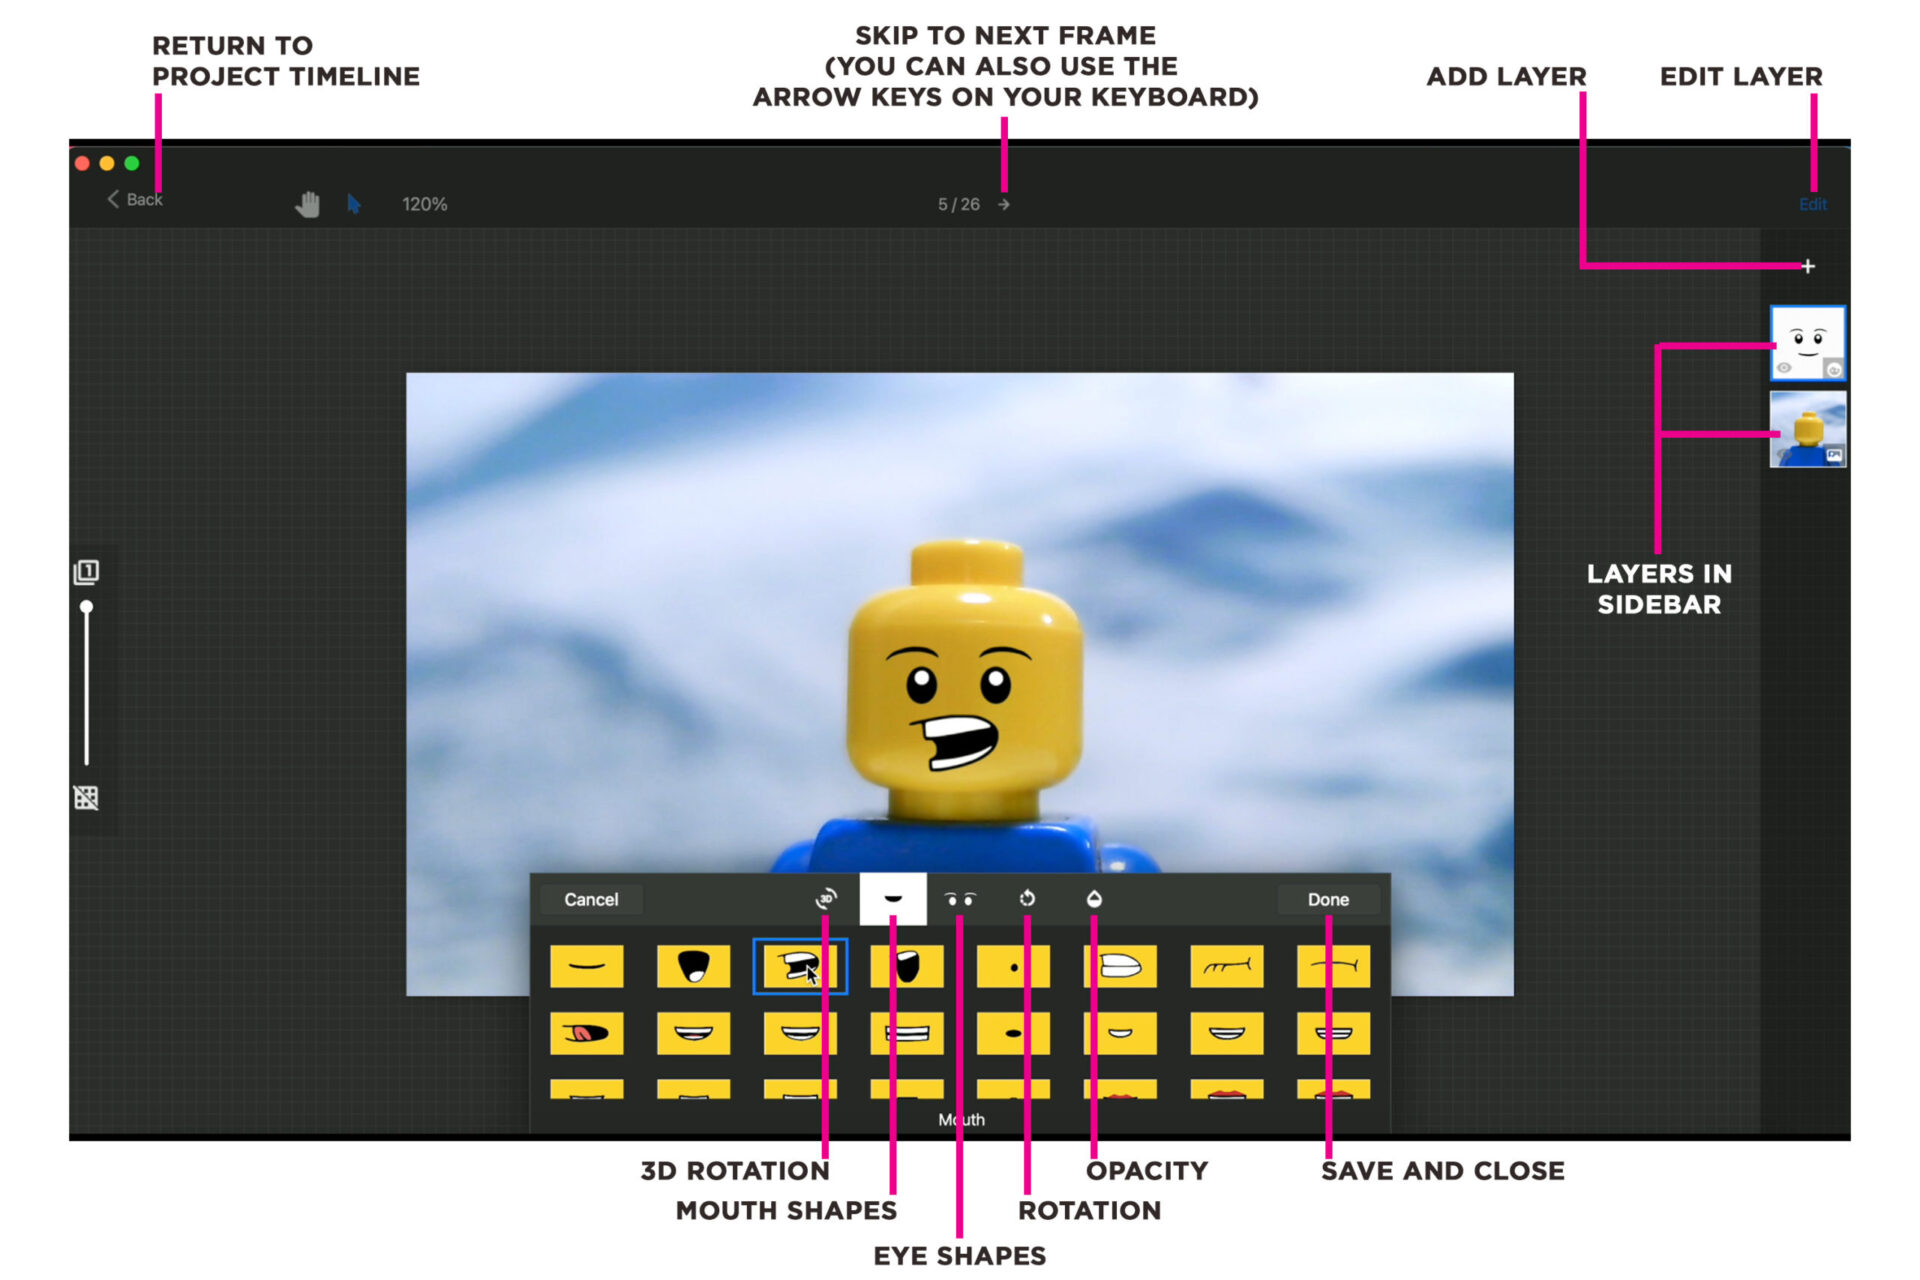
To edit the face:
- Select the face layer in the sidebar.
- Click on Edit at the top right hand side of the screen.
Here you will find lots of fun options such as changing your character’s eye and mouth shape, opacity and rotation.
Once you have finished editing the face, click Done.
To return to your project timeline, click the Back button.
FAQs: Stop Motion Studio
A perpetual single-user license of the Stop Motion Studio software is now included with every purchase of HUE Animation Studio.
To access your software, log into or create an account on the HUE website by entering your email address and choosing a password.

Once you have logged in, click on Register New Software.
Enter your activation code, which can be found on the back cover of The HUE Book of Animation, in the box provided to upgrade to the desktop version of Stop Motion Studio.
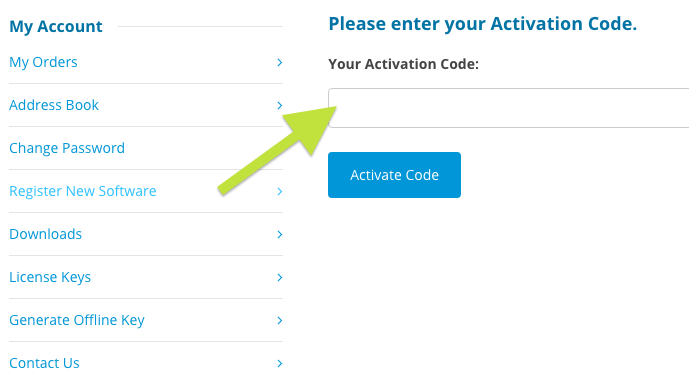
This will permanently add your software and license keys to your online account.
To access your copy of Stop Motion Studio software again in future, click the Downloads link in your account. The license key will be stored in License Keys.
When downloading, you will be prompted to either Open or Save the downloaded file then the download will begin.
HUE Animation Studio now comes with Stop Motion Studio for Windows/macOS, which requires a HUE camera. Please ensure that you have given the software permission to connect to cameras in your computer’s Privacy/Security settings.
The following information only applies to the older ‘HUE Animation’ software.
HUE Animation only works with cameras without flash memory, so it’s not compatible with digital SLR (DSLR) cameras, camcorders which store videos internally, or flip cameras.
HUE Animation is designed to work with webcams and some document cameras with a USB connection. These cameras are capable of real time video streaming. If you are testing a camera on your computer, make sure that your computer has the correct driver software to run the camera.
We recommend using ‘plug and play’ webcams as these will not require any additional driver installation.
The code on the back of the HUE Book of Animation is your unique activation code, which unlocks all of your HUE Animation Studio benefits such as the software, the translated digital editions of the book and the downloadable extras included with the kit.
The code can be registered instantly in My Account (free account registration is required). You will then receive download links for the software and your Stop Motion Studio for HUE software license key.
If you need more help with registration, please check this detailed activation guide.

From the project window, click the question mark symbol top right of the screen.
I still can’t see the tooltips! What do I do now?
From the project browser / home page, click the settings cog, bottom left of the screen. When the settings box opens, click on Tooltips and then click on Show tooltips.
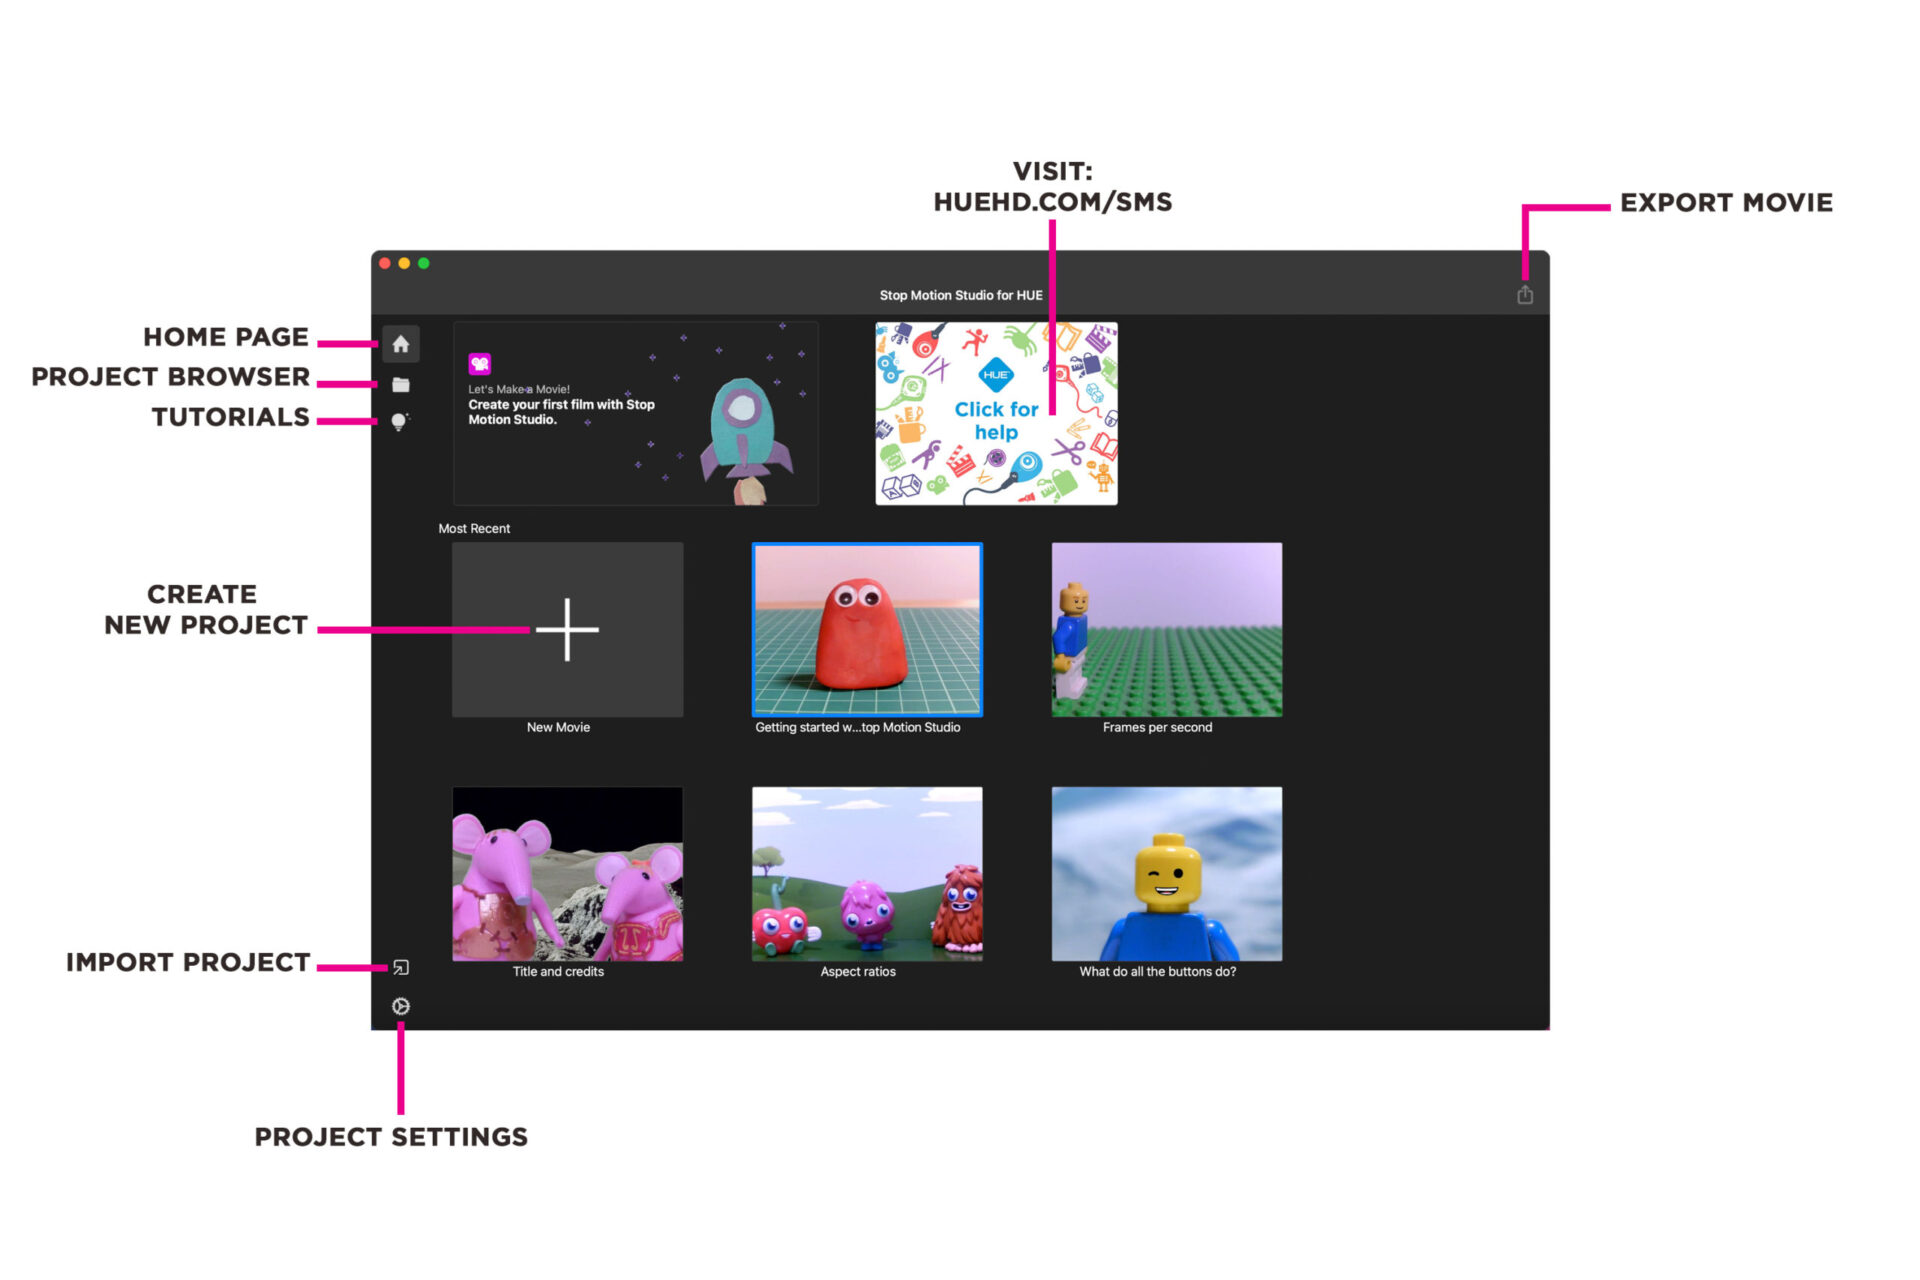
The Stop Motion Studio app HOME PAGE is where you can start a new project, access tutorials and import and export projects.
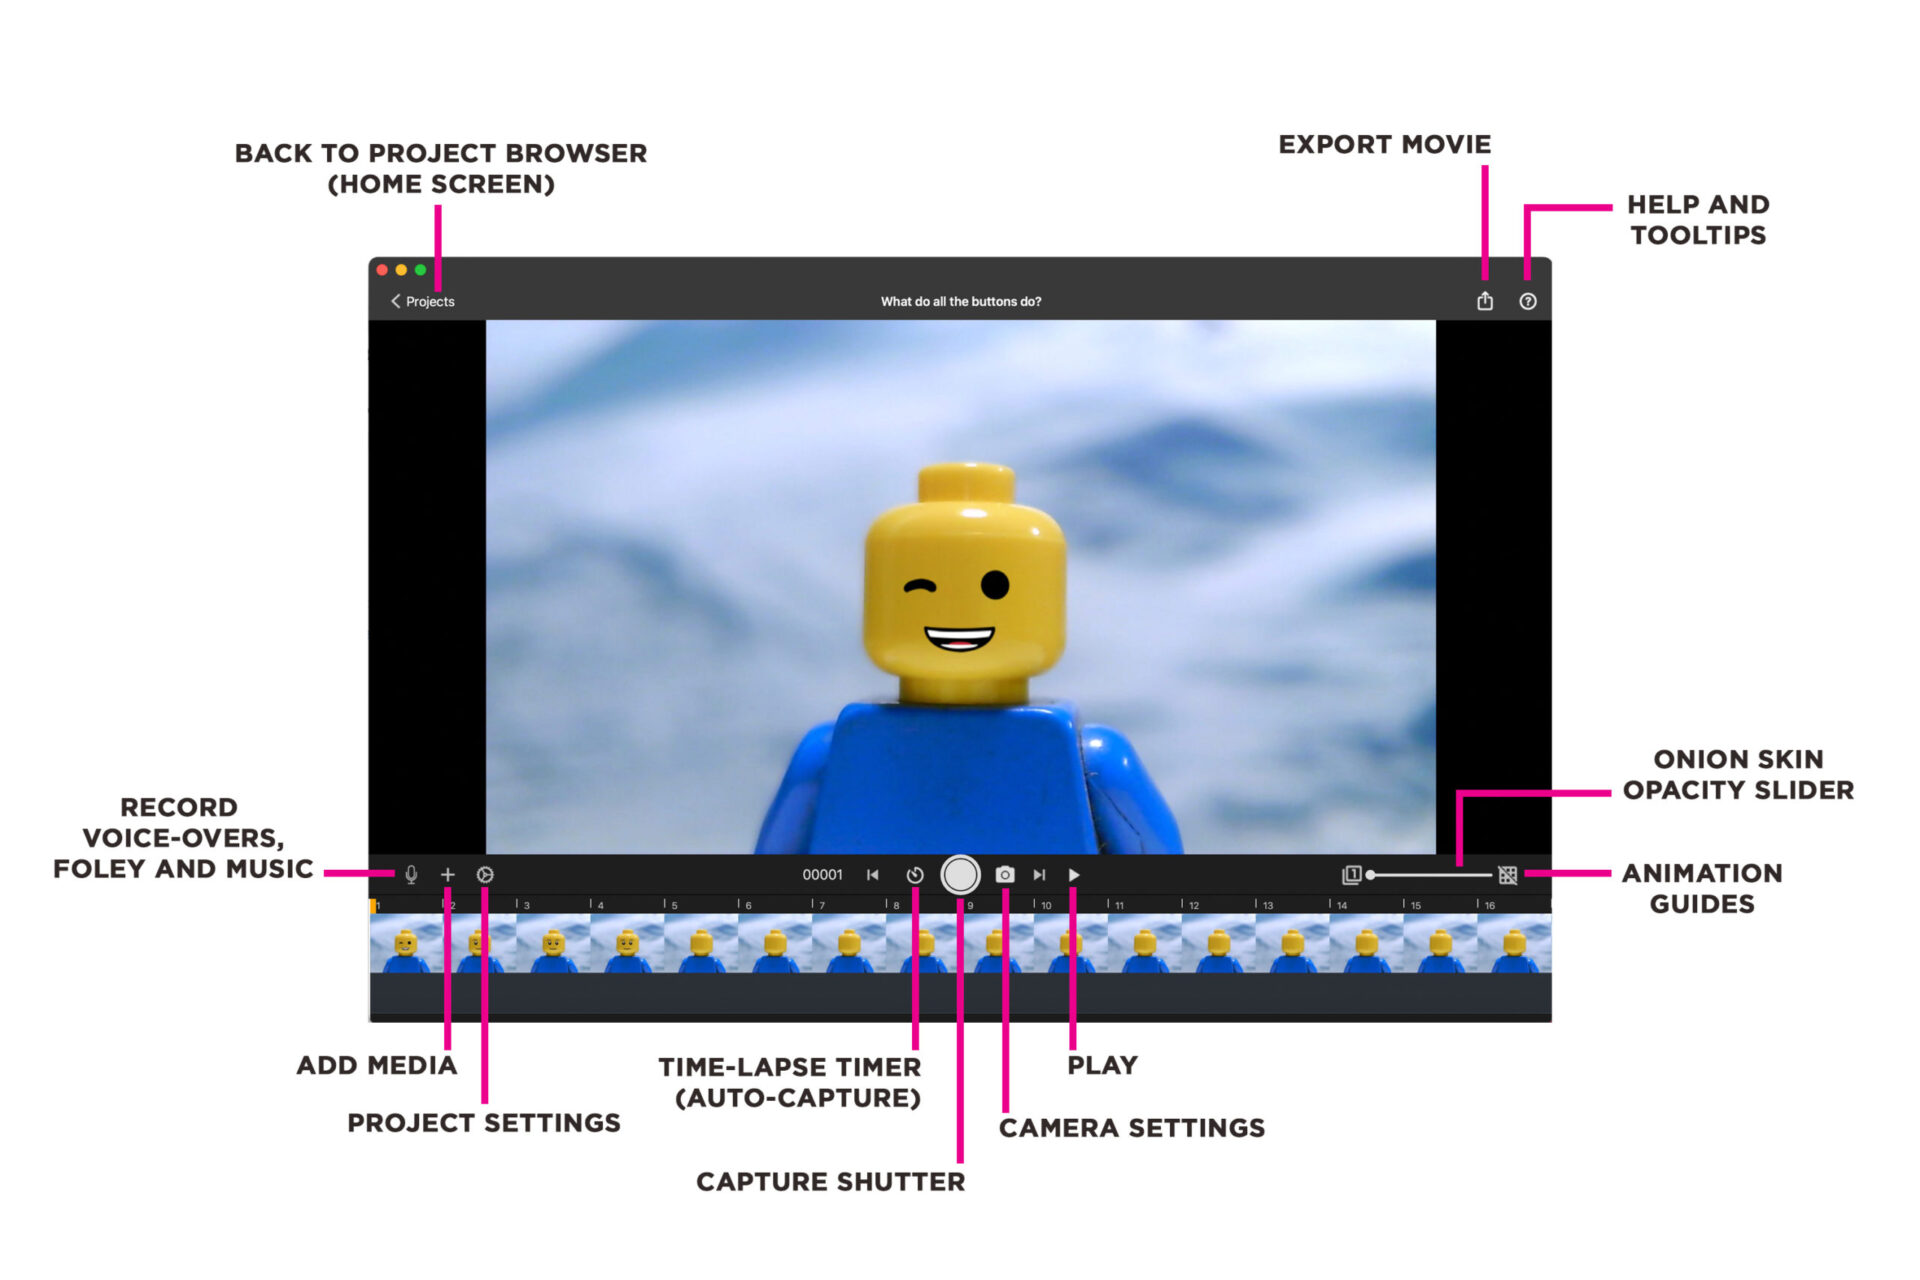
In the PROJECT TIMELINE window, you can access camera and project settings, add media and audio, capture frames, preview your animation and export your movie.
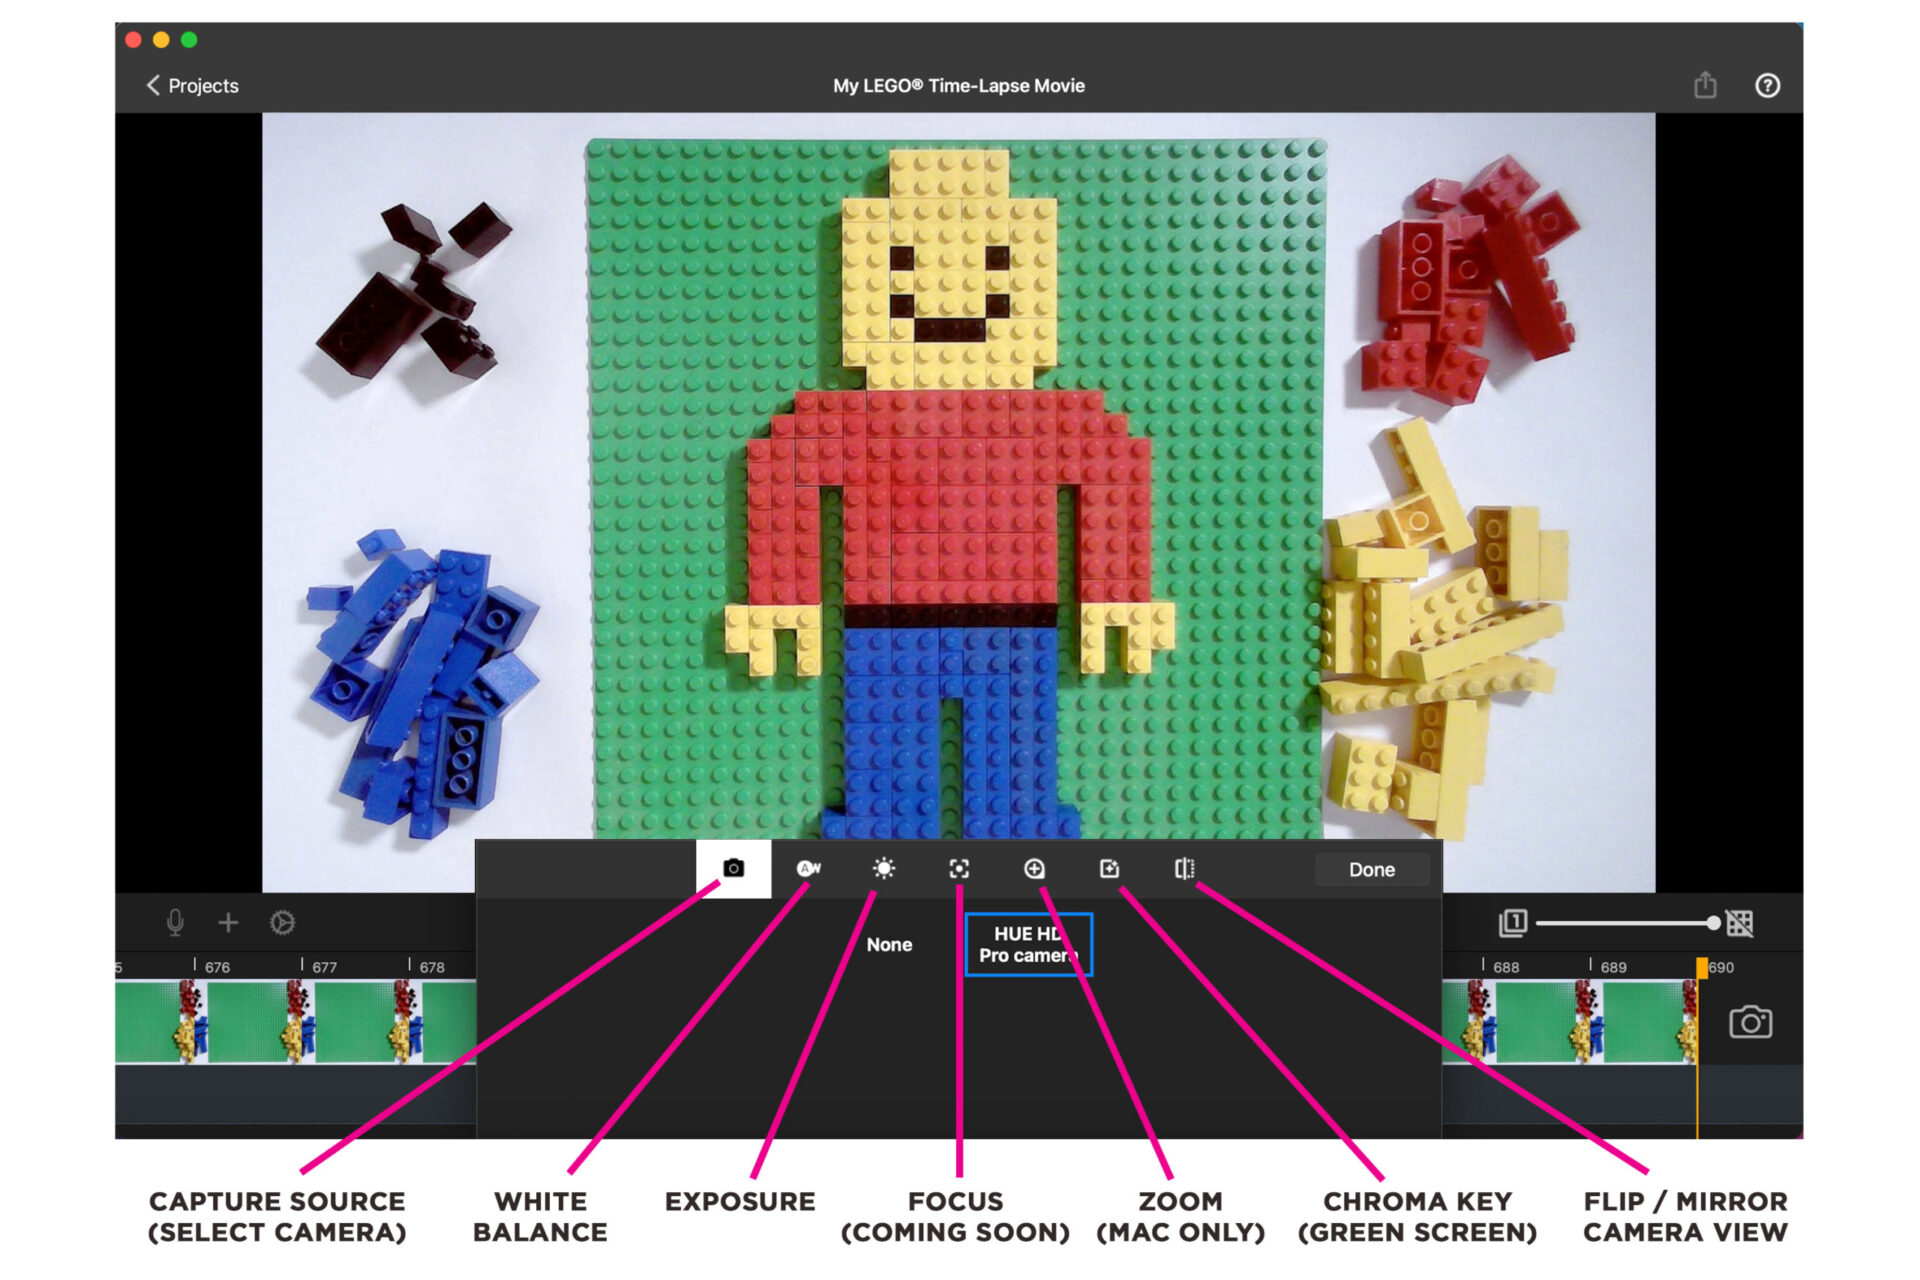
In the CAMERA SETTINGS menu you can select your camera (capture source), make adjustments to the white balance, exposure and orientation of your scene, and access the chroma key (green screen) feature.
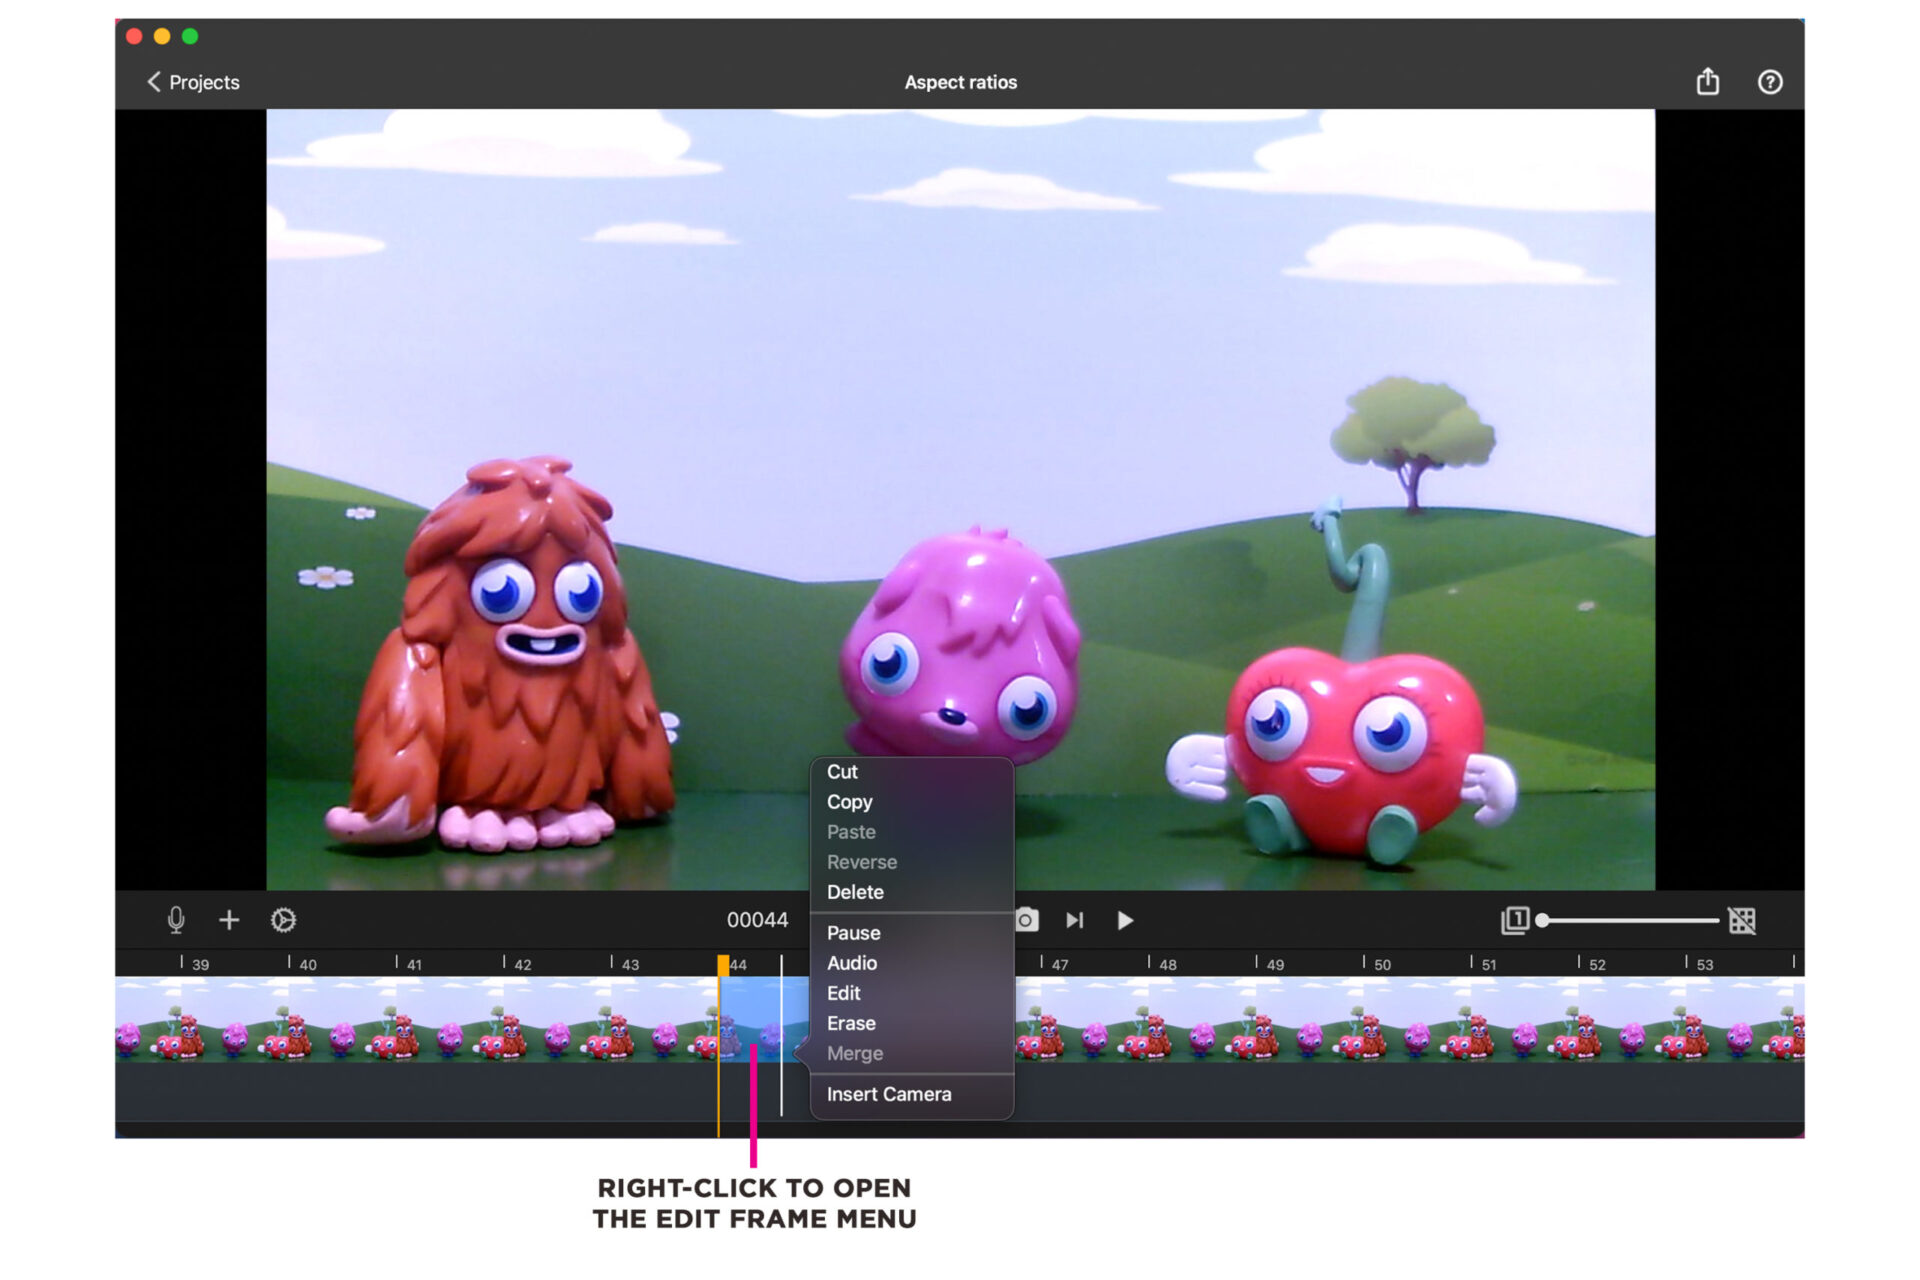
To view the EDIT FRAME menu, right-click on a frame (or multiple frames) in your animation timeline.
In the menu you have options to cut, copy, paste, reverse, delete and pause the duration of the selected frame/s.
Additionally there are options to add audio, edit the frame with drawings, text or shapes, erase drawings, and merge multiple frames.
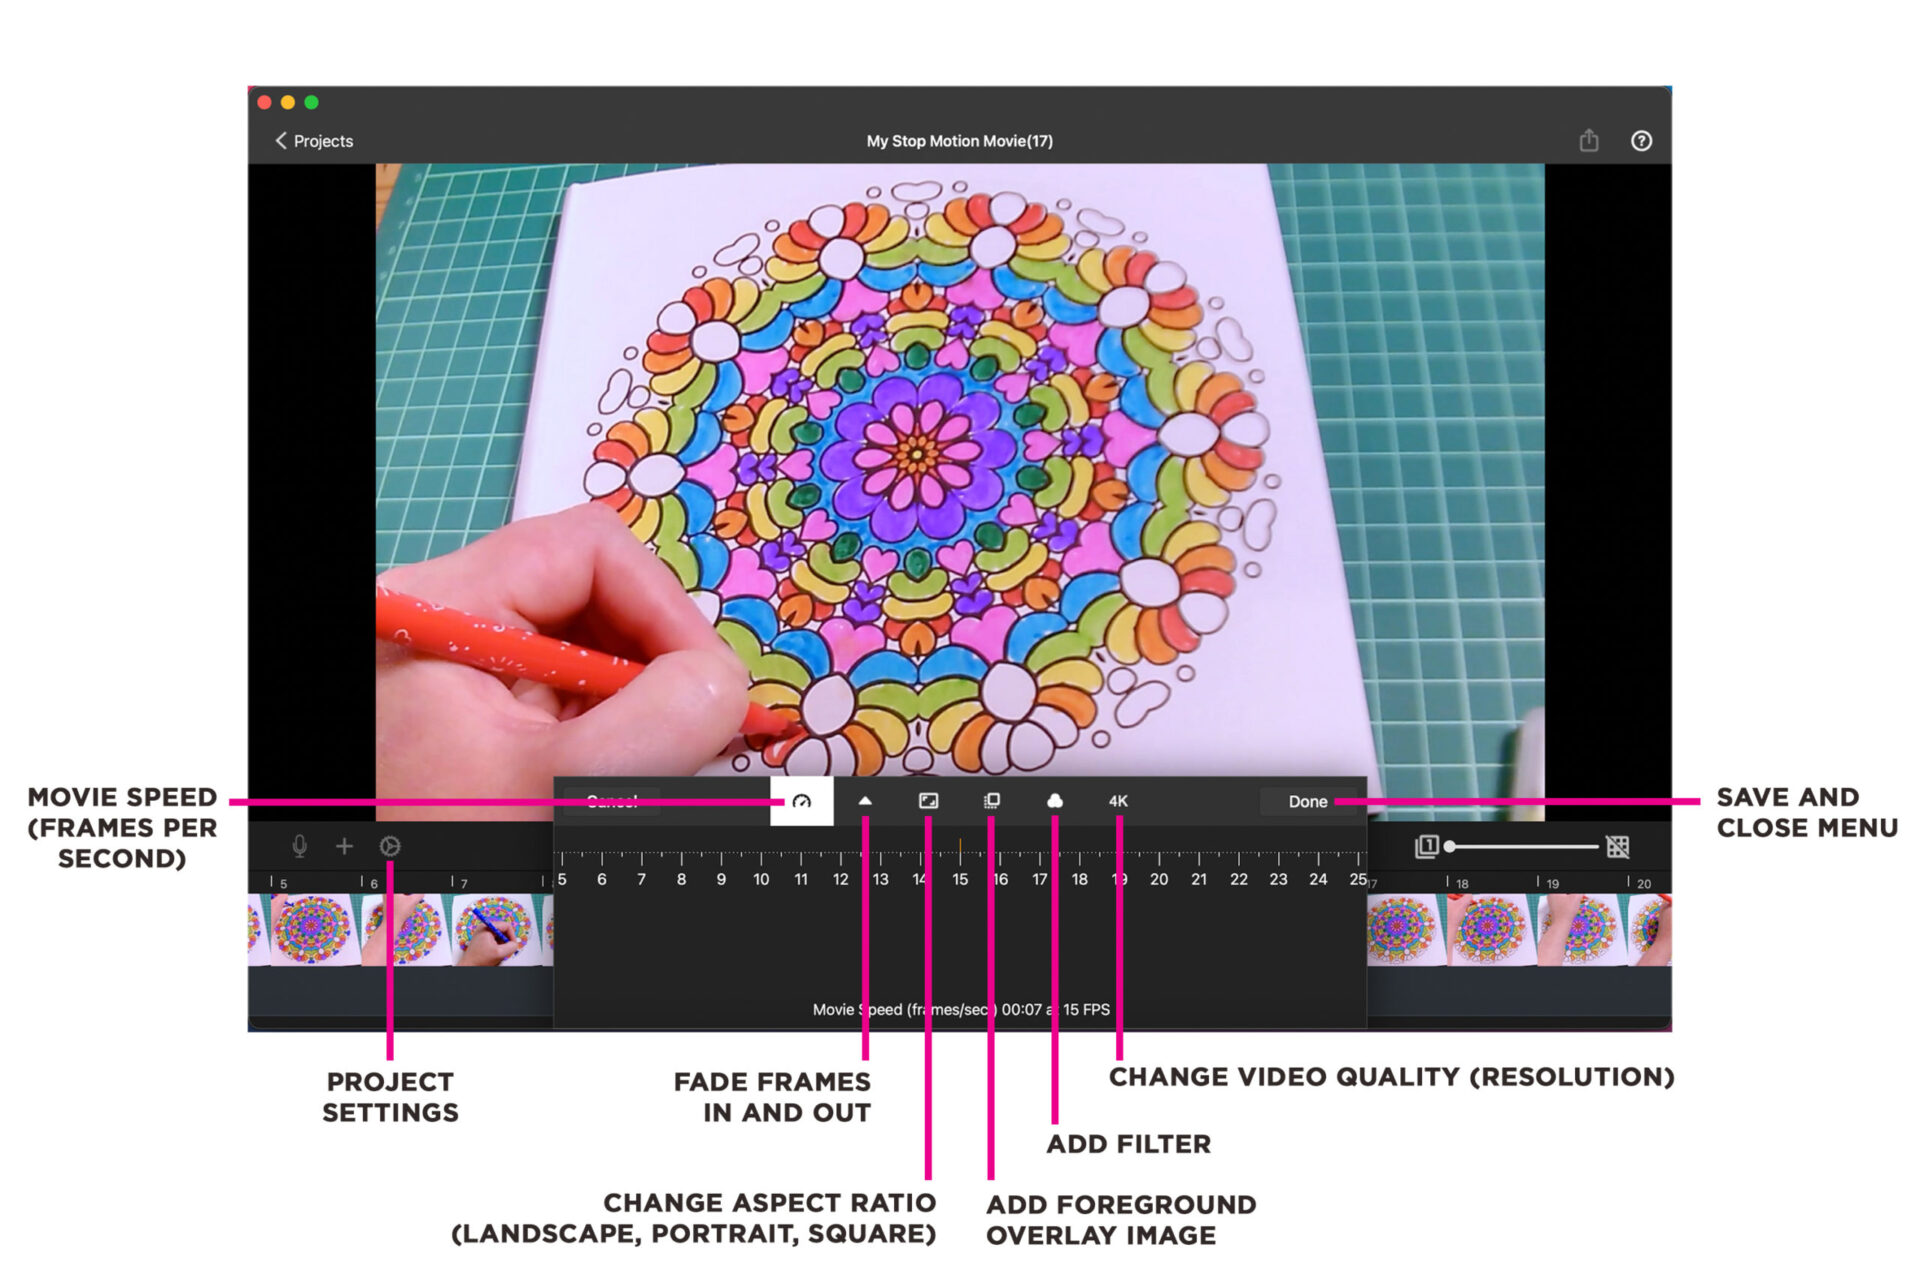
Click the small cog wheel icon to open the PROJECT SETTINGS menu.
Here you will find options to:
- Change the speed of your movie by adjusting the frames per second (fps).
- Fade your movie in or out with a black video overlay.
- Change the aspect ratio of your movie to landscape, portrait or square.
- Add a foreground image over your animation.
- Add a filter effect such as black & white, neon, mirrored and pixelated.
- Change the video quality/resolution of your animation (allowed by the camera you are using).
If your HUE camera isn’t listed as a capture source in Stop Motion Studio software, checking your computer’s Privacy settings could solve the issue quickly and easily.
In this FAQ you will find written instructions and images – for macOS and Windows – to show you how to allow the Stop Motion Studio app to access your HUE camera.
Instructions for macOS
The Privacy tab will have options to block or allow applications to access your Camera and Microphone. Please ensure that the HUE software you want to use has permission to access both the camera and the microphone; this should unlock the video and audio features in the software.
If the software is missing from the list, removing it and then reinstalling it to the Applications folder should cause macOS to detect it properly. Please contact us if you are having any additional trouble.
Some non-Apple antivirus and security applications also block camera connections by default. Checking your security software settings should help with most connectivity problems.
To allow the Stop Motion Studio app to access your camera:
- Go to the Apple menu.
- Choose System Preferences.
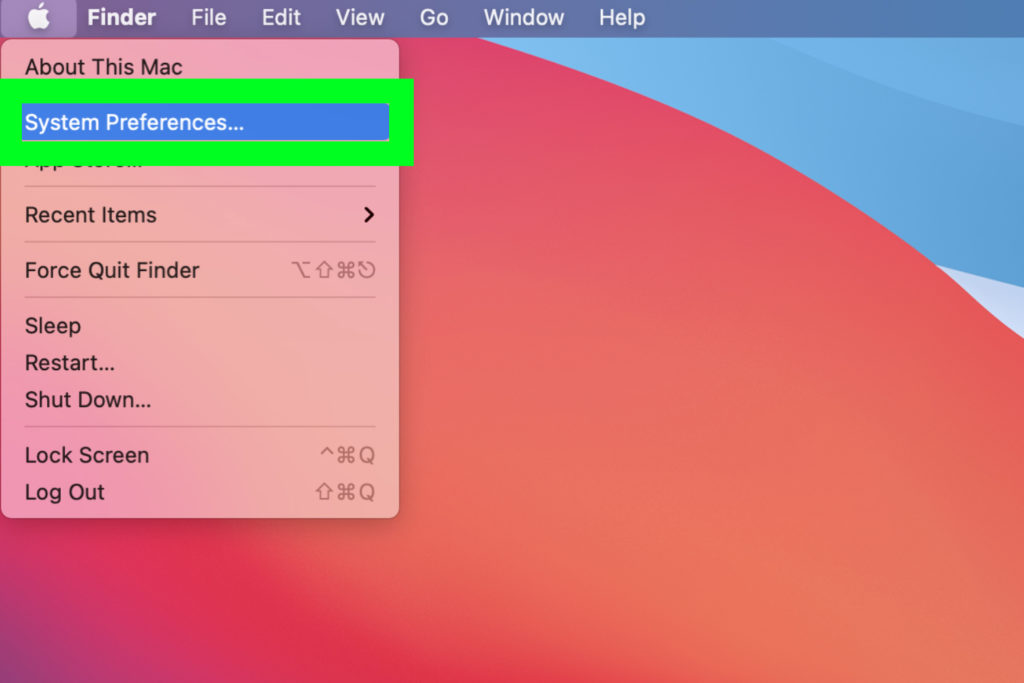
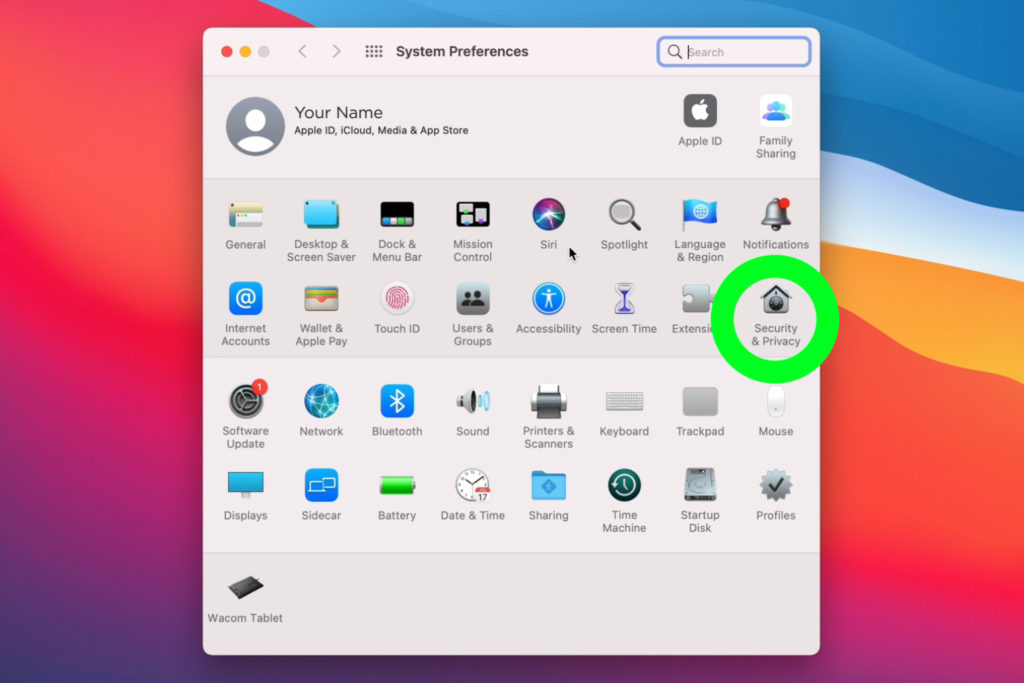
- Click Security & Privacy (also called Privacy & Security in some versions of macOS).
- Choose Camera from the menu.
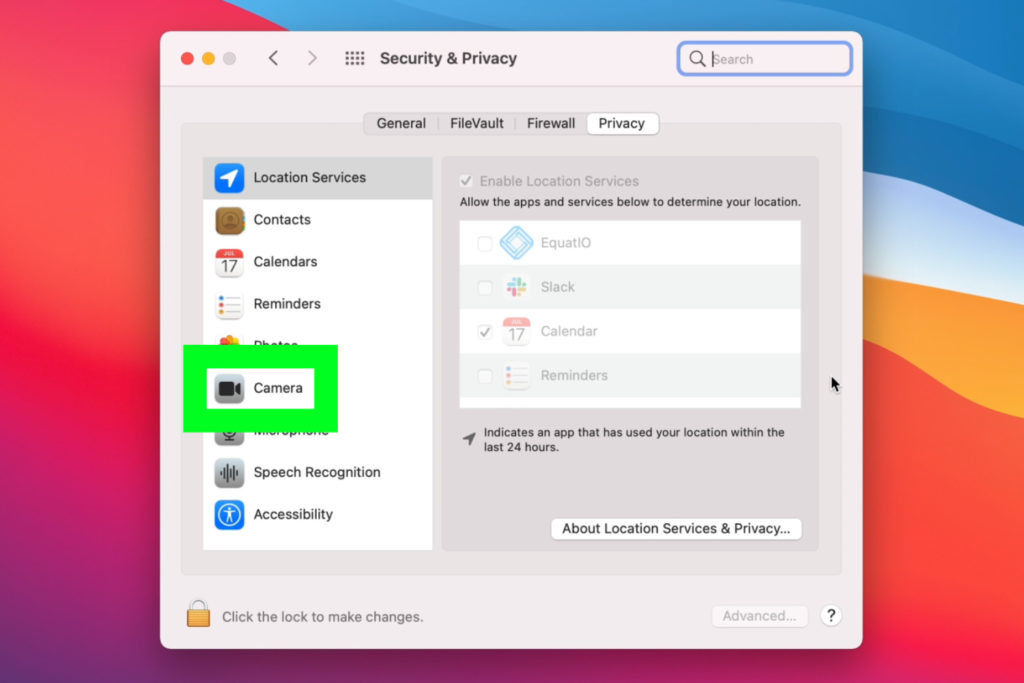
- Allow the Stop Motion Studio app to access your camera.
-

macOS Big Sur -
macOS Ventura


Instructions for Windows
To prepare your HUE camera for Stop Motion Studio on Windows PCs:
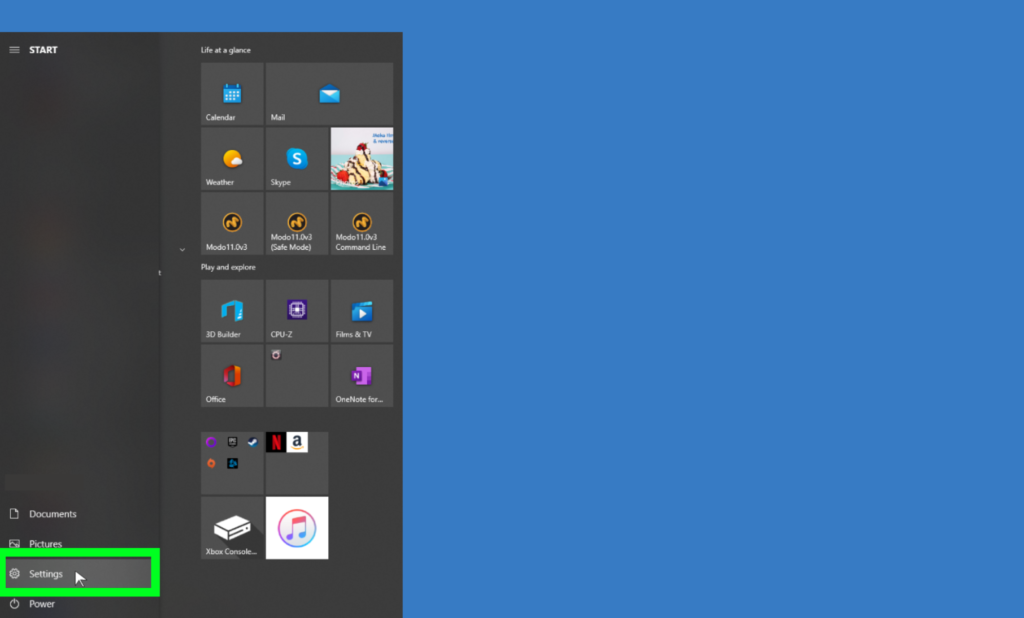
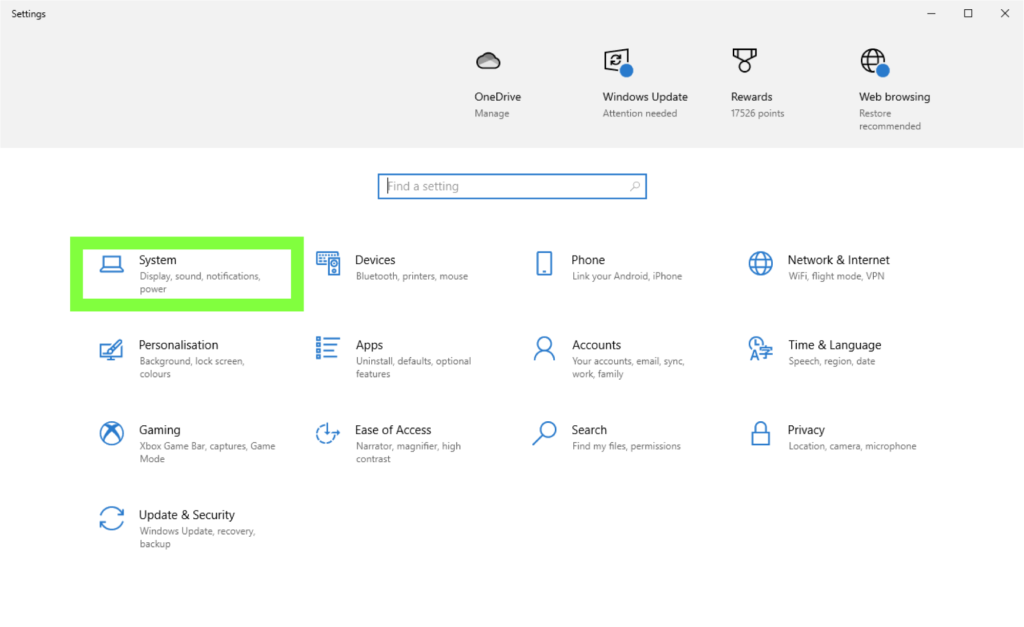
- Open the Settings page and click on the Privacy button. You can also locate the Privacy setting using Windows’ built-in search feature.
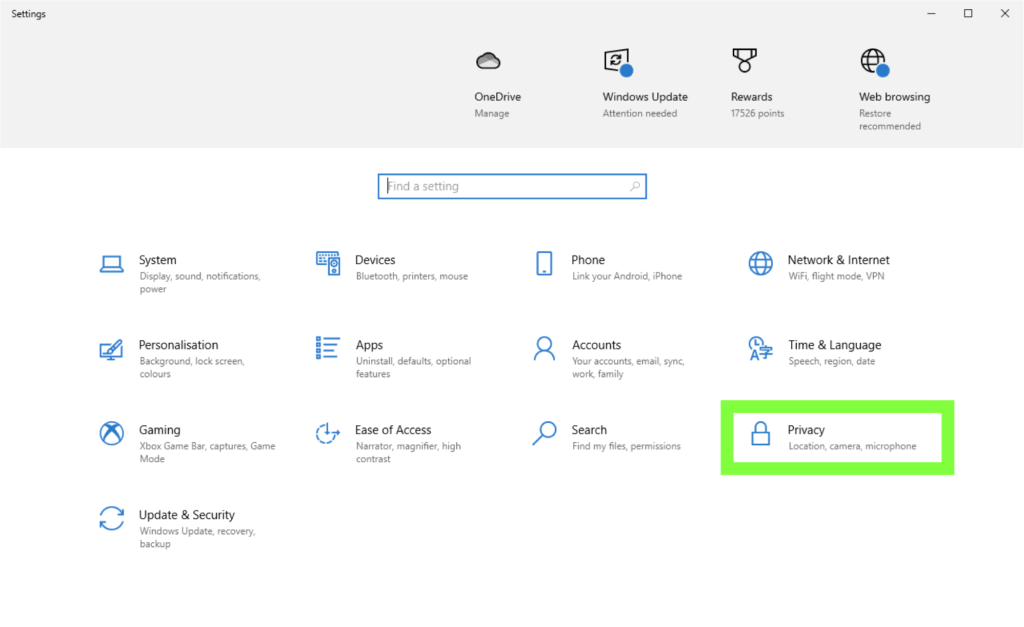
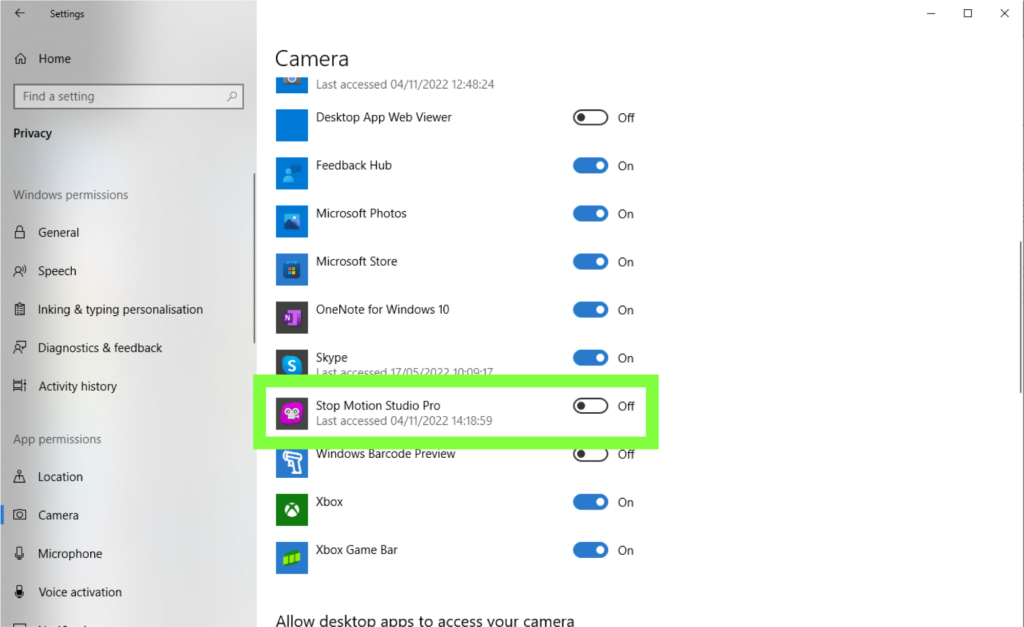
- Click on the Camera option on the left side then toggle the button under Allow apps to access your camera.
- Scroll down and toggle the button next to Stop Motion Studio.
- Click on the Microphone option on the left side to reveal the microphone privacy settings.
- Follow the same steps as you did with the Camera privacy settings by toggling the relevant options.
Stop Motion Studio system requirements:
- 512MB RAM (1GB recommended)
- Windows 10 or later, or macOS 11+
If your system is not compatible with Stop Motion Studio, you might be able to use HUE Animation software instead.
HUE Animation system requirements:
- PC: Windows 11, 10, 8, 7 or XP and graphics drivers with OpenGL 2.0 support
- Mac: OS X 10.5 (Leopard) to macOS 10.14 (Mojave) * Please note that the HUE Animation software is not compatible with macOS 10.15 (Catalina) or later.
- 512MB RAM (1GB recommended)
Stop Motion Studio uses the default microphone on your computer for recording audio. In this FAQ we cover the steps you need to follow to change the default microphone input on macOS and Windows computers.
Instructions for macOS
To enable Stop Motion Studio to use your HUE camera’s integrated microphone on macOS:
- Plug your HUE camera into a USB port on your computer.
- Go to the Apple menu.
- Choose System Preferences.
- Click on the Sound icon.
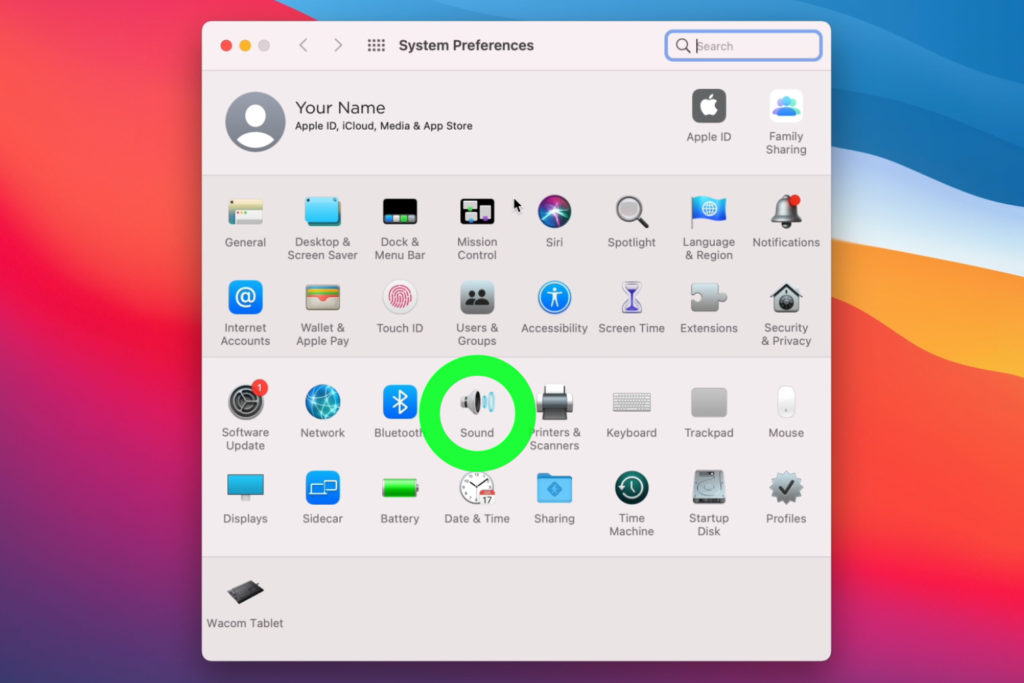
- Select Input from the menu options.
- Choose your HUE camera from the device list.


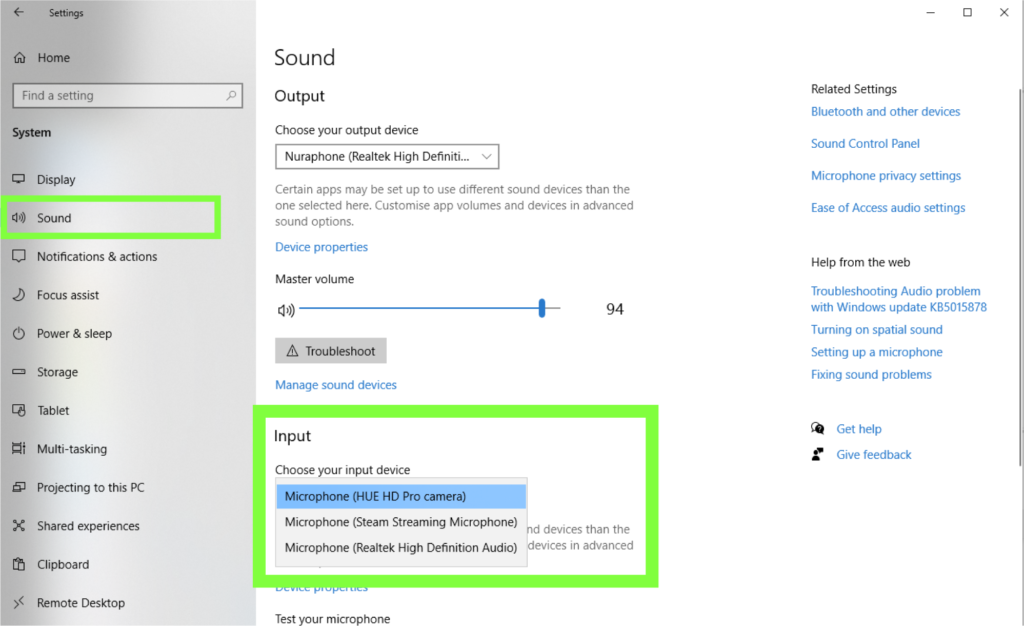
Instructions for Windows
To select your microphone in the PC’s System settings:
- Click on the System button to open the System settings page. You can also search for the Sound settings using the built-in search feature.
- Click on the Sound option on the left side to reveal the Sound settings.
- At the Input section menu, click on the box below Choose your input device and select your preferred microphone.
The Stop Motion Studio software included in HUE Animation Studio has been translated into US English, Czech, Danish, Dutch, French, German, Italian, Japanese, Korean, Polish, Portuguese (Portugal), Russian, Simplified Chinese, Spanish (Spain), Swedish, Turkish and Ukrainian. If your computer is set to use one of these supported languages, Stop Motion Studio will be fully localized.
Upgrade
Registering your HUE Animation Studio activation code online will instantly add a Stop Motion Studio license key to your account at no extra charge! If you can’t see the code on your account, please complete this form to request your upgrade.
Contact
If you can’t find an answer to your question in the FAQs or Tutorials, you can contact our support team here. We’ll usually respond within 24 hours, and often much sooner. Please include as much detail as possible with your message so that we can find the problem without delay.
Free Resources
Did someone say free stuff?
- Download the free storyboards, sound effects, activities and resources that come with HUE Animation Studio.
- Animate the curriculum with our growing library of educational activity guides.
- Follow HUE cameras on TeachersPayTeachers.com for even more freebies and worksheets.
Share your creations with the HUE Community
Want your movie masterpiece to appear on HUE’s YouTube and social media channels?
Get in touch to send us your films or share your creations on social media @HUEcameras with #SMSforHUE and #HUEAnimation! We can’t wait to see your marvelous movies!
Дата публикации: 01.08.2022
Время чтения: 9 мин.
Эльвина Амирханова
ЭКСПЕРТ
Редактор портала Otzyvmarketing.ru. Работаю в сфере интернет-маркетинга с 2010 года.
С начала 2010-х технология stop-motion вновь начала пользоваться спросом. В попытке привлечь внимание к своему продукту маркетологи начали использовать ее в рекламных роликах, а музыканты переосмысливать подход к клипам, возвращаясь к съемкам в стиле стоп-моушн.
Актуальна ли такая технология производства роликов сегодня, и почему мы любим, но очень редко видим stop-motion на современных экранах — попробуем разобраться в этой статье.
Что такое стоп-моушн
В детстве многие люди смотрели кукольные советские мультфильмы, созданные помощью склейки многочисленных кадров. Для каждого нового кадра аниматоры передвигали куклы и декорации в соответствии со сценарием. Щелчок — новая сцена запечатлена на пленку, постановщик передвигает куклу на миллиметр, снова щелк затвора и все по новой.
Эта технология и получила в современном мире название «Stop-motion».
Стоп-моушн — это способ создания видео с покадровой съемкой, когда фотографирует каждое перемещение объекта, а затем все полученные снимки «склеивают» в единый ролик.
Ролик, смонтированный в стиле стоп-моушн, по сути представляет собой видеопрезентацию. Он собран из соединенных между собой тысячи кадров.
По факту мультики начала прошлого века — это тот же stop-motion. Художники рисовали линии на бумаге, фотографировали рисунок, затем добавляли новые детали, снова делали фото и так минимум тысячу раз. После этого все кадры склеиваются в одну цепочку и получается полноценный мультфильм.
Как сделать анимацию
Процесс производства роликов stop-motion хоть и требует большого терпения, но занимает благодаря простому монтажу, примерно столько же времени, как и производство обычного видеоролика и имеет схожие этапы продакшна.
1. Сценарий
Как и любое видео, фильм, сделанный по технологии стоп-моушн, требует заранее прописанной сюжетной линии. Помимо развития сюжета, в сценарий также должны входить слова героев и их длительность в секундах, чтобы передвижение кукол и предметов было выверено вплоть до каждого кадра, и не было расхождения на этапе сведения видеоряда с аудиодорожкой.
2. Раскадровка
Покадрово распишите расположение предметов. Необязательно для этого отрисовывать сотни тысяч картинок. Зафиксируйте на бумаге лишь основные моменты: откуда персонаж пришел и куда направляется, как расположены декорации и герои на сцене.
Пример того, как может выглядеть раскадровка:

Такой план полезно иметь под рукой во время съемки, чтобы не тратить время съемочной группы на продумывание размещения кукол. Поверьте, вы и без этого потратите много часов на их перестановку и позы.
3. Установка камеры и предметов
Очень важно установить камеру на штатив и закрепить ее на одном месте так, чтобы не было даже случайной возможности изменить направление или высоту ракурса без ведома режиссера или оператора.

В противном случае вы будете вынуждены переснимать уже готовые кадры, так как вряд ли у вас получится выстроить идентичный ракурс испорченного кадра.
Для закрепления можете использовать любые подручные предметы: от скотча до селфи-палки, но рекомендуется все же приобрести устойчивый штатив. С помощью него вам будет легче настроить нужный ракурс и не снести объектив в порыве работы.
Куклы и декорации фильма размещаются относительно камеры, исходя из того, как вы видите ракурс съемки. Сами куклы необходимо делать тоже устойчивыми, чтобы они могли оставаться на месте и не падать в разных позах.
Увидеть подготовку к съемке и узнать несколько нюансов предпродакшна stop–motion можно в этом видео:
4. Камера, мотор!
И вот, наступил волшебный момент съемки. Но возникает вопрос: сколько кадров нужно сделать?
Число необходимых снимков зависит от того, насколько плавным должен быть ролик. Обычно снимается до 25 кадров в секунду, но для начала можно остановиться и на 10. Именно скорость 10 кадров в секунду делает ролик плавным и помогает не сойти с ума от огромного количества микропередвижений кукол.

Например, если ваш фильм должен длиться хотя бы 10 минут, то вам предстоит сделать как минимум 6000 кадров. Если в среднем на передвижение фигур и щелчок камеры будет уходить по 10 секунд, то такой ролик вы снимете примерно за 15 часов.
5. Монтаж
Самый приятный и простой этап работы со стоп-моушн. Тысячи кадров отсняты, теперь вам нужно лишь загрузить их на компьютер в видеоредактор и собрать снимки в единый видеоряд.
Здесь важно не забыть подогнать все кадры под один размер, если вы делали фото на разных устройствах. Затем задайте требуемую частоту смены кадров и настройте цветокоррекцию.

Далее по желанию добавьте подписи, титры или заставку. При использовании текста без подложки следите, чтобы буквы не сливались с фоном изображения.
6. Наложение аудиоэффектов
Эпоха немого кино осталась позади, поэтому не забудьте про звучание вашего видеоролика.
Помните, как на этапе предпродакшна мы писали сценарий? Самое время его достать, чтобы быстро сориентироваться при сведении аудио- и видеоряда. Заметьте, что слова персонажа не должны звучать, если у героя закрыт рот, а посторонние шумы мешать восприятию звука.
Если же вы хотите упростить себе жизнь, то воспользуйтесь музыкой и сделайте музыкальный клип на любимую песню.
Подробная инструкция, как сделать стоп-моушн, на примере кулинарного видео:
Плюсы и минусы stop-motion
Главным достоинством стоп-моушна является простота производства. Сделать такой анимированный ролик сможет даже ребенок: собрать героев и декорации фильма можно из игрушек, камеру просто поставить на стол, а смонтировать ролик в самом простом видеоредакторе.
Хороший stop-motion можно снять буквально за копейки. Вспомните школьные уроки труда и рукоделия — соберите куклы из подручных материалов. Вместо цифровой камеры отлично подойдет телефон: сейчас 90% гаджетов имеют камеру не хуже любительского фотоаппарата. А для монтажа вам даже необязательно использовать какие-то лицензионные программы, вроде After Effects. В интернете много бесплатных видеоредакторов. Их возможностей и функционала вполне хватит для простой склейки кадров.
Заказ видеоролика в технике стоп-моушн обойдется дешевле обычного: в среднем за несколько минут покадровой съемки студии предлагают около 1 500$.
К недостаткам стоп-моушн можно отнести достаточно кропотливый процесс создания фотоснимков для ролика. Иногда ради одного удачного кадра нужно потеть полчаса в попытке поставить куклу под нужным углом. А какой-нибудь неповоротливый коллега точно снесет декорацию, которую вы с щепетильностью выстраивали для антуража картины.
Сложно назвать это минусом анимации, но зачастую роликам со стоп-моушн сложно найти свою аудиторию. Современный зритель отвык от кукольных постановок и требует сложных дорогих спецэффектов. Но несмотря на это, некоторые авторы пробиваются в массы вместе с кукольной анимацией.
Например, «Остров собак» Уэса Андерсона о непростой судьбе изгоев завоевал призвание у массового зрителя.

Идеи по созданию креативных анимаций
Главным ограничением при работе с анимацией stop-motion является ваша фантазия. Иногда законы физики, но особо изворотливые постановщики могут справиться и с этим.
Для вдохновения смотрите как можно больше роликов, подходящих к типу и стилю вашего фильма.
В музыкальной индустрии использует стоп-моушн британская группа ОК Go. Вы только посмотрите, как они сочетают обычную съемку и фотоснимки цветных листов бумаги в клипе на песню «Obsession»:
Не будем далеко ходить и рассмотрим бумагу в качестве персонажей. Вы можете сделать героев видеоролика из простой бумаги. Техника оригами отлично подойдет, как для мультика с восточными нотками, так и для любого видео.

Для рекламного ролика хорошо подойдут зарисовки на бумаге. При это вам даже необязательно каждый раз заново зарисовывать с нуля каждую сцену. Можно постепенно добавлять линии на холст и каждый раз фотографировать прогресс в рисунке.
Также по интернету ходят миллионы роликов увядания цветов и фруктов, смены времен года или взросления людей. Такие ролики смонтированы по технологии stop-motion. Например, для съемки процесса увядания продукт кладется на стол, а над ним закрепляют камеру, которая делает от 10 кадров в минуту. Затем кадры склеиваются в единый видеоролик.
9 программ для стоп-моушн
Где же можно быстро превратить набор фотокарточек в целостный видеоролик?
VSDC (https://www.videosoftdev.com/ru) — видеоредактор, который позволяет в несколько кликов загрузить все кадры и собрать из них видеоролик.

iKITMovie (https://www.ikitmovie.com/) — продвинутая программа для монтажа с разрешением HD со встроенной возможностью использования зеленого экрана.

Tik-Tok (https://www.tiktok.com/ru-RU/) — не просто социальная сеть, а полноценное мобильное приложение для редактирования видео, где вы также можете собрать все кадры и настроить длительность каждого из них.

MonkeyJam (https://monkeyjam.org/) — бесплатный видеоредактор для новичков с ограниченным функционалом и понятным интерфейсом из 90-х.

iStopMotion (https://istopmotion.ru.uptodown.com/mac) — самое доступное по цене лицензированное ПО для видеомонтажа. Простой интерфейс и обширный функционал — все ,что нужно для счастья создателей видеороликов на Мас.

Stop Motion Pro (https://www.stopmotionpro.com/) — программа для Windows, которая напрямую подключается к цифровой камере. С ее помощью вы можете выгружать снимки сразу на компьютер после звука затвора фотоаппарата.

Frames (https://www.tech4learning.com/frames/) — популярный вариант среди аниматоров. Подходит только для создания роликов технологии стоп-моушн и мультфильмов. Если хотите монтировать видеоролики с движущимися кадрами, то лучше выбрать другой видеоредактор.

Filmora (https://filmora.wondershare.com.ru/) — лицензионная программа с большим набором инструментов для создания фильмов технологии стоп-моушн. Имеет как бесплатный вариант использования с водяным знаком, так и платные пакеты установки.

Dragonframe (https://www.dragonframe.com/) — видеоредактор с одним единственным применением, который создан именно для анимации типа stop-motion с огромным функционалом для аниматоров.

Также любители мобильной съемки могут воспользоваться приложениями InShot и YouCut для монтажа stop-motion на телефоне:
Полезные советы новичкам
Если вы только начинаете снимать ролики в стиле stop-motion, обратите внимание на несколько моментов:
Устойчивая камера. Не пожалейте денег на крепкий штатив. Кадры будут получаться только с нужного вам ракурса, что исключит случайные подвижки камеры и сэкономит вам кучу времени, сил и нервов.
Лица героев. Для того, чтобы не переделывать лицо одной куклы по 10 раз ради получения разных эмоций, используйте несколько вариантов головы одной и той же фигуры с разными выражениями лица. Казалось бы очевидно, но человечество додумалось до этого лишь спустя несколько десятков лет после зарождения кукольной анимации.
Тени и свет. Естественный свет может меняться на протяжении дня, что скажется на тенях от фигурок героев. Поэтому лучше снимать в темном помещении с искусственным светом, если перемещение солнца по небосводу не входило в ваши планы.
Заключение
Сейчас stop-motion получил новый виток популярности. Простота в производстве и неограниченность возможностей — идеальное сочетание для малоизвестных авторов кино без больших бюджетов. Эта технология уже успела завоевать сердца многих зрителей и не планирует останавливаться, подсказывая художникам все новые доступные способы самовыражения.
Вам понравилась статья?
6
1
С этими утилитами сделать собственный мультфильм не так сложно, как кажется.
1. Moho
- Платформы: Windows, macOS.
- Стоимость: 60 долларов за базовую версию, 400 долларов за Pro‑версию.
Один из лучших профильных инструментов для работы с векторной 2D‑анимацией и мультипликацией. Moho позволяет рисовать на графическом планшете, делать раскадровки и послойно обрабатывать изображения во встроенном графическом редакторе. Утилита имеет библиотеку визуальных объектов и персонажей, обеспечивает реалистичную физику, а также интегрирована с движком Unity.
Скачать с официального сайта →
2. Dragonframe
- Платформы: Windows, macOS, Linux.
- Стоимость: 295 долларов.
Мощная программа для создания кукольной анимации, или stop‑motion. Dragonframe позволяет манипулировать камерой и сценой и объединять отснятые изображения в последовательность анимированных кадров. Этот инструмент часто используют профессионалы во время работы над коротко- и полнометражными мультфильмами.
Скачать с официального сайта →
3. Synfig Studio
- Платформы: Windows, macOS, Linux.
- Стоимость: бесплатно.
Довольно простой в использовании редактор 2D‑анимации с открытым исходным кодом. Synfig позволяет создавать мультипликацию, применять фильтры, эффекты затенения и морфинга. Есть поддержка скелетной анимации. Очень удобно, что готовый материал можно отрендерить позже или вообще на другом компьютере.
Скачать с официального сайта →
4. Cinema 4D
- Платформы: Windows, macOS, Linux.
- Стоимость: 5 486 рублей в месяц.
Профессиональное решение для создания 3D‑объектов, анимированной графики и реалистичных рендеров. Cinema 4D отличается простым интерфейсом, в котором легко разобраться даже новичку.
Программа поддерживает процедурное и полигональное моделирование, а также имеет различные пакетные модули на все случаи жизни, включая визуализацию сцен, симуляцию динамики объектов, анимации персонажей и другое.
Скачать с официального сайта →
5. Pencil2D
- Платформы: Windows, macOS, Linux.
- Стоимость: бесплатно.
Минималистичное приложение с открытым исходным кодом для работы с простой 2D‑графикой. Позволяет на ходу рисовать персонажей и анимировать их, не усложняя творческий процесс. Легко обрабатывает как векторную, так и растровую графику, умеет добавлять эффекты и фильтры. Содержит полезные подсказки и примеры, которые помогут освоиться начинающим художникам.
Скачать с официального сайта →
6. OpenToonz
- Платформы: Windows, macOS, Linux.
- Стоимость: бесплатно.
Профессиональный программный комплекс для рисования двухмерной анимации, который использовался при создании «Футурамы», «Унесённых призраками» и «Губки Боба». OpenToonz позволяет переносить изображения с кальки, имеет большой набор инструментов и эффектов для рисования, а также может похвастаться удобной функцией скелетной анимации персонажей.
Скачать с официального сайта →
7. TupiTube
- Платформы: Windows, macOS, Linux, Android.
- Стоимость: бесплатно.
Простой инструмент для создания 2D‑анимации, ориентированный на любительскую аудиторию и детей в частности. Главная особенность TupiTube — лёгкий процесс рисования, благодаря которому можно сделать мультфильм всего за несколько простых шагов. Есть встроенная библиотека ресурсов и поддержка экспорта готовой анимации в различные форматы.
Скачать с официального сайта →
8. Easy GIF Animator
- Платформа: Windows.
- Стоимость: бесплатно.
Популярная программа, позволяющая делать несложные двухмерные анимации с последующим сохранением в GIF, AVI или SWF. Easy GIF Animator полностью оправдывает своё название. Приложение имеет интуитивный интерфейс и пошаговый мастер настройки, который упростит работу новичкам.
Скачать с официального сайта →
9. FlipaClip
- Платформы: iOS, Android.
- Стоимость: бесплатно.
Популярное приложение для создания анимации на мобильных устройствах. Позволяет делать эскизы и раскадровки с помощью простых и интуитивно понятных инструментов. Приложение поможет раскрыть творческий потенциал с помощью большого набора кистей, палитр и спецэффектов.
FlipaClip: студия анимации
Visual Blasters LLCЦена: Бесплатно
Загрузить
FlipaClip: 2D-анимацию
Visual Blasters LLCЦена: Бесплатно
Загрузить
10. Pivot Animator
- Платформа: Windows.
- Стоимость: бесплатно.
Очень доступный в освоении редактор, специализация которого — простые 2D‑клипы с человечками‑палочками. Программа позволяет самостоятельно конструировать персонажей, использовать спрайты, менять фон и добавлять различные эффекты. Словом, есть всё необходимое, чтобы за несколько минут создать забавный мультфильм в духе серии игр Stickman.
Скачать с официального сайта →
Этот материал впервые был опубликован в сентябре 2019 года. В мае 2023‑го мы обновили текст.
Stop motion is an animation technique that involves physically manipulating objects to give the illusion of movement. This is done with an interesting technique.
In other words, the respective objects are moved over very short distances and then photographed individually which gives the impression that they move.
The photos are then played in a fast sequence to create movement. So, if you’re into stop-motion animation, you’ll also need a dedicated stop-motion animation tool for your creations.
Moreover, so-called stop-frame animation is not a simple process, and animators who use this technique have to work carefully to create really fluid animation.
Hence, if you desire to learn this animation method or you’re using it regularly then third-party software comes in handy and can provide real help.
In this article, we’re going to list the best stop-motion animation software that you can use on your Windows PC. Read the product description and if a particular tool suits your needs, download it on your computer.
Note: All the prices and offers in this article are subject to change, so be sure to check the official product page to get the latest deal. If the product/offer you’re looking for is no longer available, you can try to find it on its official manufacturer page or get another one from our list.
Which software is best for stop-motion animation?
- Adobe Premiere Pro – powerful tool with pro features
- Filmora Video Editor – lots of visual & audio effects
- Movavi Video Editor – all-in-one editor
- Dragon Frame – easy-to-use
- Stop Motion Studio – very intuitive interface
- Stop Motion Pro Eclipse – direct connectivity with your camera
- Frames – classic tool with mainstream features
- IKITMovie – suited for beginners
- AnimatorHD – works great on Windows
- MonkeyJam – pencil test animation tool
Now let’s take a closer look at each tool.
Adobe Premiere Pro – Powerful tool with pro features
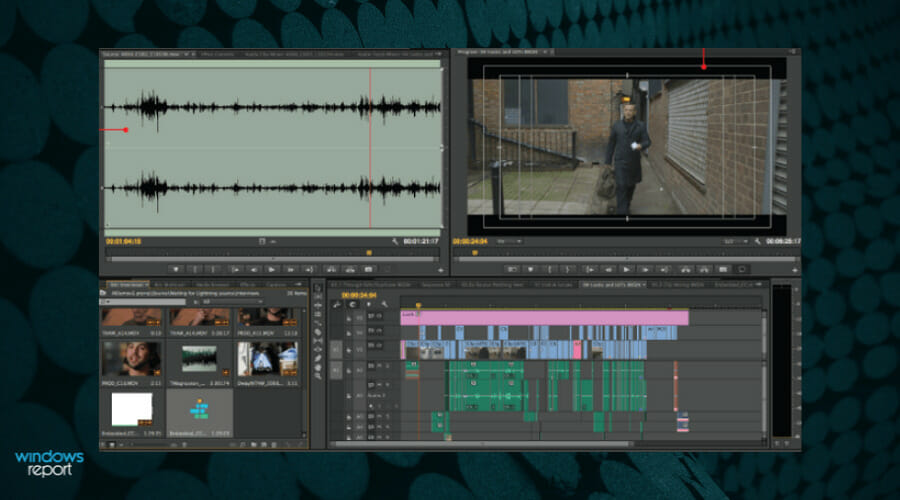
Adobe Premiere Pro is well known for its strong video and audio features. I think we don’t surprise you by mentioning that Adobe can help you in creating stop motion animation effects.
You will be able to make your cartoons more dynamic with the help of Motion effect features and keyframes that Adobe offers you.
The editing process becomes easier as you are free to use Adobe’s animated motion templates or you can create your own motion graphic using the instruments from the Essential Graphics panel.
Moreover, in recent years, several graphic enhancements considerably eased the process of creating a fast sequence of movements.
In the videography process, you are offered to benefit from color correction, color grading, precise trim footage, and more.
You don’t have to be worried about the complexity of Adobe’s instruments, as it provides a lot of tutorials so you can create the quality animation that you like.
Adobe Premiere Pro
Create and edit your video projects from any device, using the cutting-edge techniques employed by this expert tool
Filmora Video Editor – Lots of visual & audio effects
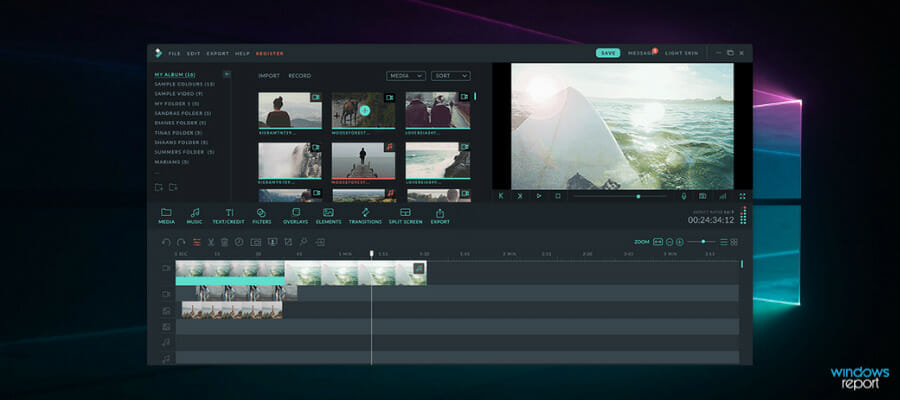
Although Filmora Video Editor is not a stop-motion software per se, you can easily use it to get the best out of your animation projects.
To this end, Filmora brings a plethora of visual and audio effects, including filters, transitions, overlays, custom titles, and elements that will help you create professional videos.
The software adds updates every month so you can make your creations more eye-catching.
The tools come with a user-friendly layout, with all editing options at hand so that you can stay more productive.
Moreover, with this software, it’s easier to create professional-looking videos using technology that will increase your video quality instantly.
For example, you can use audio ducking to improve your recording, color match, or hotkeys commands. Hence, don’t hesitate and create your animations with Filmora to stand out with your movies.
Filmora Video Editor
Give your video projects a new flavor with all the filters and effects this tool brings
Movavi Video Editor – Complete online editor
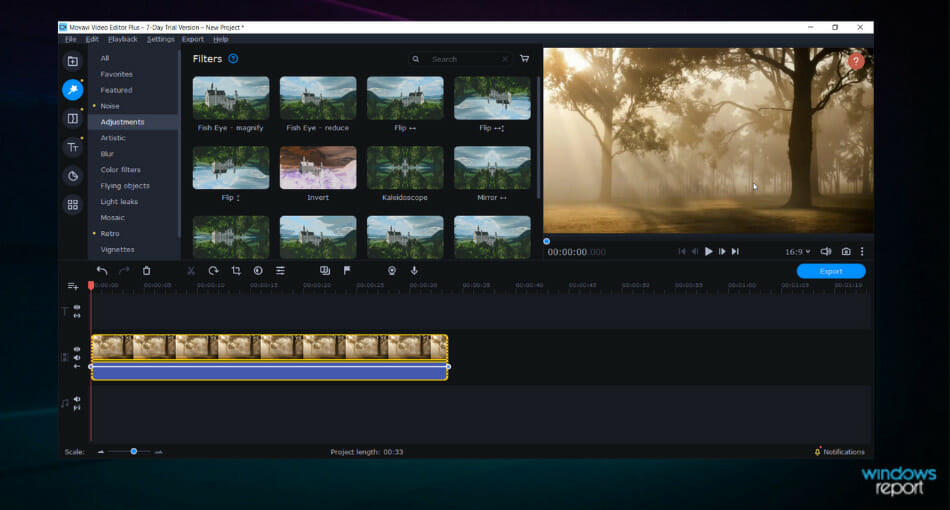
Movavi Editor is an all-in-one solution for editing your videos in a very creative manner and in a very simple way.
With this video editor software, you can explore your imagination by creating professional videos, using an intuitive editing program. So with powerful functionalities like keyframe animation and other video effects, your video will shine.
More exactly, the program allows you to edit videos with a basic timeline editor and lively effects or text animations, transitions, or chroma backgrounds that will boost your creation beyond expectations.
Moreover, with Movavi it is possible to create stop motion videos easily by importing your photos in the editing program, arranging your scenes, and finally adding some effects or transitions.
Hence, using this video editor solution will drastically simplify your workflow with stop motion animation thus creating a remarkable outcome or put a smile on every single face.
In addition, if you need to create a professional or business-purpose video using stop-motion animation, this software is perfectly suited to add extra quality and make your product popular.
Movavi Video Editor
Using this incredible tool, you can edit and create stop-motion videos professionally!
Dragon Frame – Easy-to-use
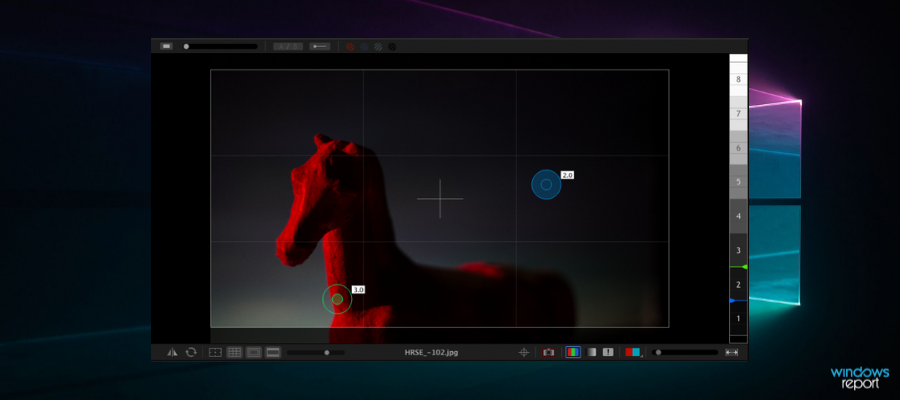
Dragon Frame is a powerful stop-motion animation tool that will help you create really stunning images.
The software allows you to bring animations to life with the help of a bevy of professional on-screen tools.
Dragon Frame lets you capture precise movements, compose and light the perfect shot with camera controls, and edit images with the help of advanced image review tools.
What’s more, you can animate your video using tools like toggling, looping, or onion skin and make amazing shots with cinematographic features to set the camera settings or adjust focus.
You can also insert audio and edit it according to your characters’ needs. Some of its key features include:
- Timeline: You can edit your frame with a simple drag-and-drop move to adjust timing, reshoot sequences, or restore deleted frames
- Drawing tools: Vector-based drawing tools allow you to better control your animation
- Live view magnification support
- Color detection lets you compare tone ranges between shots and adjust them
You can try out the tool-free for 30 days. The trial period allows you to test the software with your camera and become familiar with its features.
Keep in mind that all the images captured using the trial version of the tool will have a watermark. Dragon Frame is suitable for professionals and experienced animators.
⇒ Get Dragon Frame
Stop Motion Studio – Very intuitive interface
The next solution on our list is Stop Motion Studio, powerful and rounded software that will make your animation movie look as famous as Lego animation productions.
Firstly, using this intuitive software will help you in creating valuable stop-motion videos with its frame-by-frame editor, simplistic timeline, or sound editing tools.
You should know by now that stop-motion animation is a slow process, and you have to take several pictures to create your final creation. However, using simple tools offered by this program you can edit your videos quickly on desktop or mobile versions.
Additionally, using this program you can produce desktop-class videos and edit them by cutting, removing, copy or paste single photos frames and adding them to any position that fits perfectly for the sequence.
Besides that, you can capture the perfect moment with your digital camera because this program supports known camera brands like Canon, Nikon, or Sony.
Therefore, you can try out the software on different devices including Windows PC, Mac, or Android, and enjoy your movies anywhere.
⇒ Get Stop Motion Studio
Stop Motion Pro Eclipse – Direct connectivity with your camera
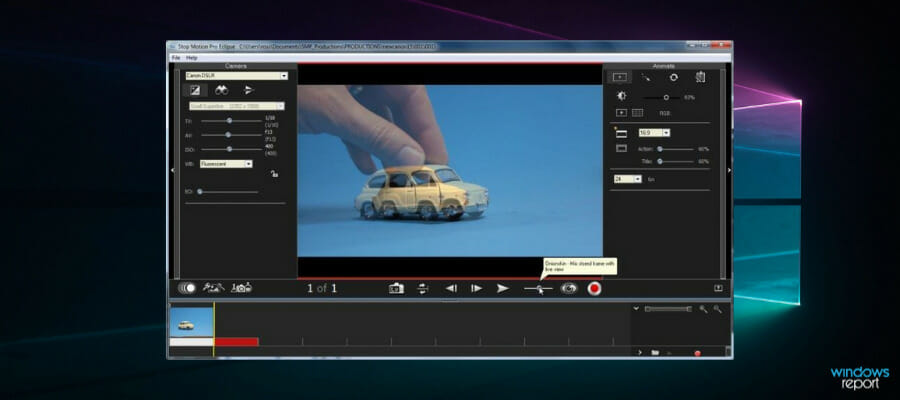
Stop Motion Pro is an interesting animation software that easily connects to your camera or webcam. You can use it to capture and paste images and convey interesting stories through your animated characters.
You can also use markers to track and plan your characters’ movements. The tool can play up to 30 frames per second and allows you to record audio while playing back animation. Lip-sync support is also available.
The software is compatible with dozens of cameras and features advanced project management tools which are very useful when managing long-term animation projects.
Furthermore, you can create your story using practical features offered by this tool, such as tracking movement with markers, smooth playback of 30 frames per second, audio recording, multiple frames with one click, and more.
Stop Motion Pro’s UI is available in five languages: English, French, German, Spanish, and Chinese.
Therefore, take advantage of its user-friendly interface and create your animation films and characters using this robust software.
⇒ Get Stop Motion Pro Eclipse
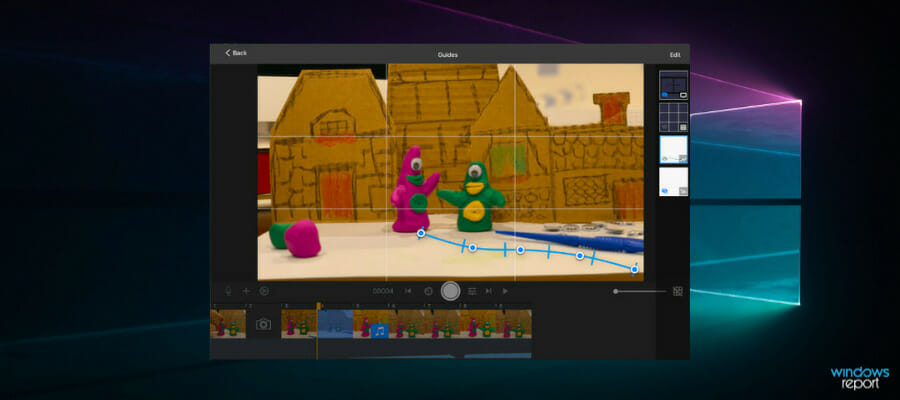
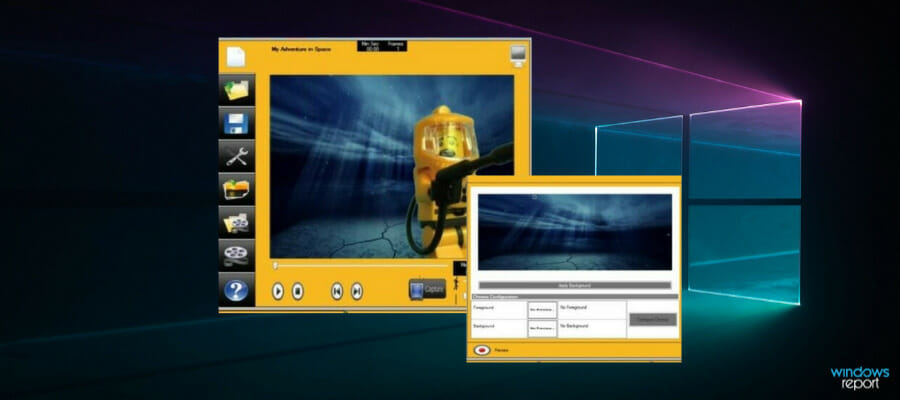
Frames – Classic tool with mainstream features
The next entry is Frames, a powerful stop-motion software designed to produce impressive clay animation or other great animated videos.
With this specialized program, you can dive deep into your animated story and create powerful stories to transmit any message you conceive.
To be more clear, this tool provides help with capturing webcam images or importing folders with images from your digital camera. You can enjoy features like onion skin, chroma key, or time-lapse to simplify the animation process.
Moreover, if you are eager about cartoon animation you can benefit from dedicated tools to make your story alive. For example, you have drawing tools, clip art, and art animation paths, plus more soundtracks to combine narration.
If you want to expose an inspirational digital story, using images text, and videos, this program will not only provide technical help but inspire you to grow out of your comfort zone.
All in all, using Frames you will perfect your video animation skills and get the opportunity to express the stories you always needed to share with the world.
⇒ Get Frames
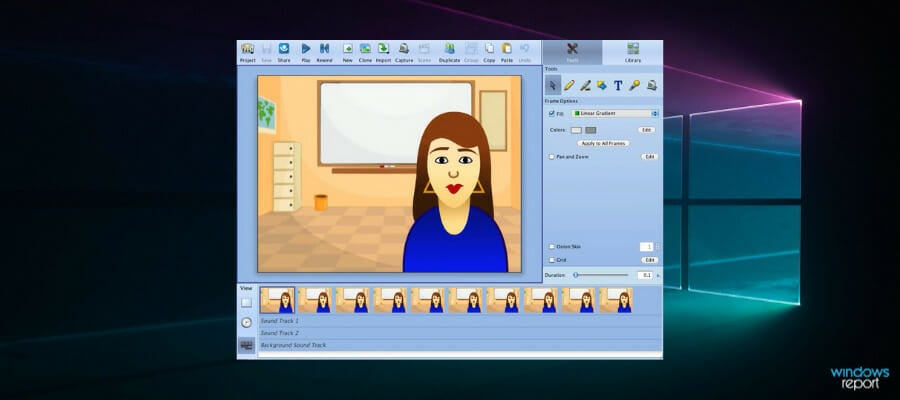
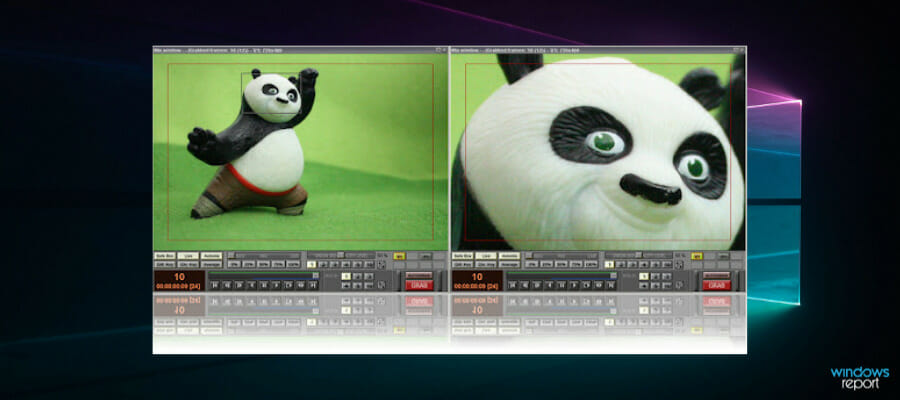
IKITMovie – Suited for beginners
iKITMovie is a stop motion animation tool compatible with Windows XP/Vista/Windows 7/8 or Windows 10 PCs.
If you’re into LEGO or claymation, this is the perfect tool for you. Most importantly, unlike most stop-motion tools, this program can be used by users of all ages, including older kids and teenagers.
IKITMovie features over 2,200 free sound effects and background music tracks to customize your creations.
The tool also features a green screen that allows users to replace backgrounds with still or moving images. This feature is very popular among animators using this type of animation technique.
If you’re new to stop-motion animation, you can watch step-by-step video tutorials to learn how you can better use the tool. IKITMovie is perfect for students and educators.
With that being said, you should use this solution if you need influential animation videos and qualitative editing features.
⇒ Get IKITMovie
AnimatorHD – Works great on Windows
AnimatorHD is a Windows-based software that you can use to create stop motion and time-lapse animation.
The tool also supports stereoscopic 3D movies and DSLR cameras, including Canon and Nikon Live View, as well as 3D stereo shooting.
You can use your laptop’s webcam and other video recording devices as input sources. The RAM Player with live frames allows you to control and edit each frame according to your needs.
Once you’re satisfied with the results, you can export your animations to After Effects and further enhance them.
In addition, using this software you can benefit from powerful traits such as advanced frames and AVI movie export, multi-exposure for video feed, variants of each sequence, 3D stereo live preview, camera preview, and many more.
That being said, this software solution will offer all the functional resources you need to create unbeatable stop-motion films.
⇒ Get AnimatorHD
MonkeyJam – Free and intuitive solution
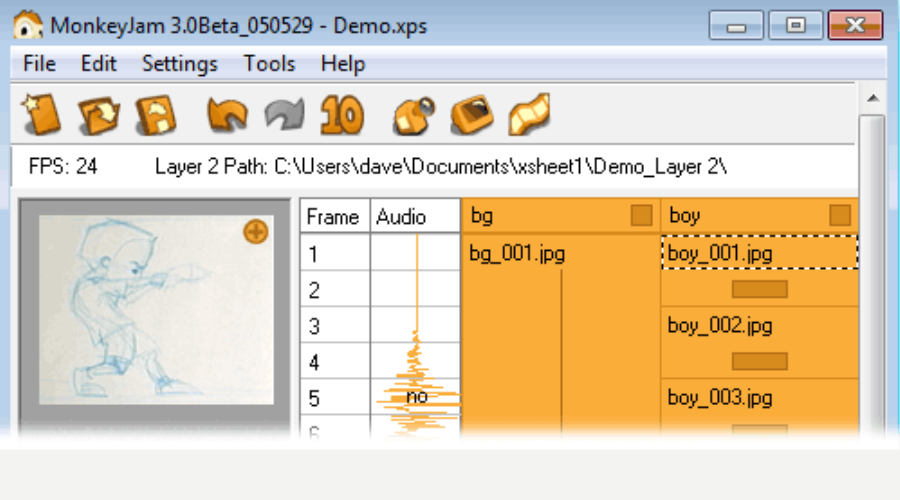
MonkeyJam is a user-friendly stop animation application that offers practical tools to craft fluid animation stories.
This tool can be used by artists or amateurs at the same time, regardless of animating background.
You can record using a webcam, camcorder, or scanner and create stop motion animations with distinct frames.
It’s worth knowing that such tool comes with drawing instruments for crafting animated characters or pictures by hand.
More exactly, you can use specific features to create professional animation movies even though the tool is designed for pencil drawing.
When the project is done, you have certain preview modes to help you see the entire film or a specific range on the shooting.
⇒ Get MonkeyJam
So, we’ll end our list of the best stop-motion animation software here. If you’ve used other similar tools that you think we should add to this list, let us know in the comments below.
Stop motion animation is a special technique that implies the physical manipulation of objects to bring them to life on the screen with the help of a stop motion editor. This type of animation is used for creating films, TV shows, educational tutorials, advertising campaigns when promoting products and brands, and more.
Why you can trust FixThePhoto ☑. Our team carefully tests every software, product and service to give you honest recommendations for your requirements and purpose. Learn more about how we test.
-
Filmora —
Feature-rich stop motion software
-
Stop Motion Studio —
With an easy-to-use clip editor
-
MonkeyJam —
Automated X-sheet logging
-
Movavi —
For beginners
-
DragonFrame —
Easy frame editing
-
Stop Motion Pro —
For novice animators
-
qStopMotion —
Management using scenes & takes
-
iKITMovie —
For kids
-
Frames —
All-in-one animation suite
-
Boinx iStopMotion —
Creating stop motions with iPhone
Each animation is an individually photographed frame. When the series of frames is played quickly, the objects turn out animated. Your knowledge and creativity aren’t enough, you need paid or free stop motion software to produce a decent animation clip.
I’ve tested a slew of free and paid stop motion animation software to pick the top options. I focused on such factors as frame editing capabilities, storyboarding, export options, audio integration, playback preview, and the range of effects available.
To my mind, Wondershare Filmora fits the bill perfectly. It is my go-to software for stop motion creation and editing. The best part is that it is available free. I love that it can be installed on both Mac and Windows, which is a must for me since I switch between these operating systems from time to time.
1. Filmora – Feature-rich stop motion software

Pros
- Streamlined interface
- Advanced features
- Top-level audio mixer
- Supports multiple export formats
Cons
- Free version has limited functionality
Compatibility: Windows, macOS
Filmora is a widely-used web-based service and my favorite for creating stop-motion animations and engaging videos. This software stands out for its intuitive tools suitable for creating all kinds of animations. While being user-friendly, the tools are powerful enough for producing top-notch stop motion projects.
I frequently resort to the keyframing feature to give my stop-motion animations a professional feel. When I just started to create stop motion animation, I used a free version despite the watermarked added to all exported files. To remove a watermark and get access to a wider choice of tools, I paid for an annual subscription.
Alternatively, you can make a one-time purchase to get a program. Moreover, if you want to receive the color grading software and animation tool in one pack, you should look elsewhere, because color correction features available here are rather basic.
2. Stop Motion Studio – With an easy-to-use clip editor
Pros
- User-oriented
- Comes with a tutorial
- An array of recording and editing tools
- Overlay mode
Cons
- Free version has only basic functionality
- Export limitations
Compatibility: Windows, macOS, iOS, Android
I think Stop Motion Studio is one of the simplest but still powerful stop motion software free options capable of making first-class animated clips for my clients. I like how functional this program is, meaning I can create unique projects of any complexity. Besides frame-by-frame previews, Stop Motion Studio has great tools for editing sound and graphics.
With overlay mode, built-in video editor, and frame-by-frame view shows, creating a catchy motion video is a no-brainer task. Moreover, it is possible to import images from the library, add sound effects, and record voice-overs. I can also embellish my animated clips with the help of awesome filters and captions.
3. MonkeyJam — Automated X-sheet logging
Pros
- Frame capture and playback
- Intuitive navigation
- Doesn’t require configuration
- Export clips in multiple formats
Cons
- Lacks panning options
- Doesn’t offer real layer compositing
Compatibility: Windows
MonkeyJam is a feature-rich stop motion Windows free software that allows me to recode images from a scanner, webcam or digital camera and assemble them as individual frames. I can also use the images and audio stored on my computer, which is rarely possible in similar programs. It is very cool that I can perform most operations in one place.
Even though MonkeyJam is developed for pencil and paper animations, I think it is also an excellent stop motion app. I didn’t use this software before, but the UI is very understandable, so I took little time to figure out the functionality of the program.
4. Movavi – For beginners
Pros
- Speedy video rendering
- Ability to upload files to YouTube
- Uncluttered interface
- Guides and tutorials
Cons
- Doesn’t support LUTs
- Blank design
Compatibility: Windows, macOS
Movavi Video Editor is easy-to-use free stop motion software for PC & Mac that allows me to produce jaw-dropping animated clips. I like that it’s easy to upload video files either from my computer or external storage.
It is also possible to import recordings right from my camera, which is a time-saving feature when I want to turn recently recorded materials into a stop-mo clip. Another benefit is that Movavi lets me save my clips in various video formats, including MP4, which is perfect for uploading videos to the web.
Even though this program is suitable for beginners, there are advanced features for those, who want to bring their work to a whole new level like me. During tests, I was amazed by how easy it was to jazz up my clips with presets for mobile devices. Moreover, I could easily post my videos on YouTube. This is crucial, if you want to share the finished content with your followers.
5. DragonFrame – Easy frame editing
Pros
- Camera motion control for single-frame animation
- First-class set of animation tools
- Ability to import animation to video editing programs
- Easy audio sync
Cons
- Difficult for beginners
- Too limited trial version
Compatibility: Windows, macOS
The DragonFrame stop motion animation software free for PC and Mac has achieved vast popularity for its powerful stop motion production capabilities. The program turned out a nice alternative to Filmora, which lacks some important features like onion skinning and advanced audio sync.
DragonFrame was developed by the top talents in the industry. To assist users, the DragonFrame team has organized first-class customer support and a forum where people can discuss their projects. Most of all, I like that it is possible to see the works of other professionals as well as find people interested in project-based cooperation.
The newest version of the program features an easy-to-use keypad controller that allows me to stay focused on animating. Besides, this compositing software can replace several other niche-focused programs, as it comes with an extensive toolset. Also, DragonFrame allows controlling digital still cameras.
6. Stop Motion Pro — for novice animators
Pros
- Works with the majority of webcams
- Frame thumbnails
- Ability to adjust angles and zoom
- Multi-track editing features
Cons
- Playback may skip some animation frames
- Lacks advanced options
Compatibility: Windows, macOS
Stop Motion Pro is free stop motion software for Windows and Mac that supports the creation of still images and animated clips. To use the software, you need a camcorder or webcam and such Windows OS editions as 7, 8, Vista, and XP. I typically turn to this program when I’m working on projects for my Insta blog, especially when I just need basic stop motion animation tools.
When I was a beginning animator, Stop Motion Pro seemed somewhat difficult to master, especially its audio synchronization tool. Nevertheless, when I managed to understand all the functions of this program, I got precise control over my animation, and the entire functionality turned out to be more straightforward.
I like making captivating stop-motion clips, so such features as auto time-lapse capture, frame-by-frame editor, and the ability to add multiple audio tracks to my works are very helpful.
7. qStopMotion — Management using scenes & takes
Pros
- Negative frame grabber
- Excellent camera control system
- Works with AVI and MPEG video formats
- User-oriented
Cons
- Few features
- Compatibility problems
Compatibility: Linux
Speaking of Linux, qStopMotion is the best free software for stop motion animation. It allows you to import images from either your camera or computer and create awesome animations. What I really like is that once my edits are ready, I can save my clip in multiple video formats – MP4, MOV, AVI, MKV, and even WebM.
The bragging feature of qStopMotion is its robust Qt capabilities. Thus, you don’t need to resort to external tools like Linux video editing software. With the intuitive interface that includes only basic features, using this program will be a breeze. However, for my professional needs, it doesn’t quite measure up, as I need more advanced tools, and I typically work on a Mac-based laptop.
8. iKITMovie – For kids
Pros
- User-friendly
- Range of backgrounds and overlays
- Compatible with the majority of webcams
- Full-screen user interface view
Cons
- Features are too simple
- Customer support could be better
Compatibility: Windows, macOS
iKITMovie is a widely recognized free stop motion software for PC and Mac. This software is sought after among kids and hobbyists across the world as a popular Claymation and lego stop motion maker. This is the only stop motion program that comes with 2,200 soundtracks to complement your animation clips. This is probably the biggest database I’ve come across.
iKITMovie is compatible with multiple Windows editions such as 10, 7, 8, XP, and Vista. With the Stop Motion Green Screen feature, you can animate your objects in front of a green screen and later change the background, which is my regular trick when creating content for my YouTube channel.
I believe iKITMovie is a perfect option for education purposes or for those, who just started out their artistic path in animation.
9. Frames — All-in-one animation suite
Pros
- Green screen stop motion
- Combine frames into a scene
- Supports Pan and Zoom features
- Ability to add folders of images to a program
Cons
- Few export options
- Poor camera control
Compatibility: iOS
Due to the combination of effective illustration and animation tools in one suite, Frames takes a decent place on my list. If you are on the lookout for a modern free stop motion animation software for iPhone or iPad, I highly recommend Frames. It lets you create amazing animations using illustrations or images on the go.
With Frames, I can create clay animations, capture images using a webcam, and even import pictures right from my camera. This software allows to import the entire folder of images, create my digital story, and complement it with the audio from iTunes.
Besides, it has a library of built-in effects and transitions, such as particle systems, lighting effects, and transformations. With them, you can enhance the visual appeal of animations and create smooth transitions between scenes or elements similar to those available in specialized animation software.
10. iStopMotion – Creating stop motions with iPhone
Pros
- Time-lapse functionality
- Voice activation
- Built-in effects and filters
- Good camera controls
Cons
- Lacks video editing capabilities
- Depends on Apple devices
Compatibility: macOS, iOS
iStopMotion free stop motion software for Mac from Boinx comes with the latest tools needed to bring to life stop motion animation ideas. It has a neat interface and broad functionality, being capable of working fast even while producing HD videos.
Though there are no clip editing options, it is good for simple tasks thanks to the integration with iMovie and Final Cut Pro. Also, you can download a mobile version of iStopMotion, which is available for iOS. With the mobile version, I use the camera of my device and work in iStopMotion in real-time. This is crucial when I need to make swift edits.
My Experiment: AI vs Stop Motion Software
These days, a lot of artists are diving into the world of artificial intelligence software to make stop-motion content. With AI algorithms at their disposal, they can analyze video footage, track object movements, and combine motion paths tailor-made for stop-motion animation. Such software solutions cut down on the tedious manual tinkering with frames one by one.
AI algorithms pack a punch when it comes to mimicking natural motion and physics, producing animations that are very realistic. They can mimic gravity, simulate object collisions, and create fluid motion effects. Therefore, the resulting animations are smoother and more lifelike than ever before.
However, artificial intelligence still has a long way to go for such tasks, and users frequently end up with subpar results. They are almost impossible to tweak due to the limited capabilities of AI-powered tools.
I decided to put both methods of creating stop-motion animations to the test. I chose one of the popular generators and threw a challenge its way. Simultaneously, I made an animation with the same request using Filmora’s capabilities. It’s worth mentioning that my aim was to create a simple stop-motion animation, using only basic functions that are commonly available in any free stop motion software.
My request was: “Create a simple stop motion animation which demonstrates the release of new sneakers designed for passionate runners”.

AI
SOFTWARE
I can say that the AI-based program generated a far less polished animation. What’s more, it doesn’t look very realistic. I like the transitions, but it’s practically impossible to edit parts of the animation.
However, I see the merit in using AI stop-motion generators as a source of inspiration, especially when I hit a creative block and don’t know where to begin.
As for Filmora, I am absolutely pleased with the outcomes. I used basic tools and video editing features to improve the look of my stop-motion animation. By working with this free stop motion software, I managed to bring my animation to life just as I envisioned it from the outset. Therefore, if you want to get professional-quality work, I highly recommend using the programs I mentioned above.