
When it comes to installing DLL files in Windows 10, there are several recommended locations depending on the purpose and usage of the DLL file. Here are the steps to determine the appropriate location for installing DLL files:
1. System32 folder: If the DLL file is intended to be used by the operating system or critical system components, it should be installed in the System32 folder. The path to this folder is typically «C:\Windows\System32\«. However, be cautious and ensure that the DLL file is from a trusted source to avoid any security risks.
2. Program folder: For DLL files used by specific programs or applications, it is generally recommended to place them in the program’s installation folder. This helps ensure that the program can easily locate and access the DLL when needed. The program installation folder’s path usually varies depending on the software and can be found in the «Program Files» or «Program Files (x86)» directory.
3. SysWOW64 folder: If you have a 64-bit version of Windows 10, you might encounter 32-bit DLL files. In such cases, these DLL files should be installed in the SysWOW64 folder, which can be found at «C:\Windows\SysWOW64\«. This enables compatibility with 32-bit applications running on a 64-bit system.
4. Shared DLLs folder: Windows offers a shared DLL folder known as the WinSxS (Windows Side-by-Side) folder. It is primarily used for system libraries and shared components, ensuring multiple applications can utilize the same DLL without conflicts. It is not recommended to manually place DLL files in this folder unless specifically instructed by software developers.
Remember to exercise caution while installing DLL files and ensure they originate from trustworthy sources. Improper installation or utilization of DLL files can cause system instability or security vulnerabilities.
Video Tutorial: Where is DLL folder in Windows 10?
How do I install a missing DLL in Windows 10?
To install a missing DLL file in Windows 10, you can follow these steps:
1. Identify the missing DLL: Firstly, determine the specific DLL file that is missing. It is important to have the correct information to perform the installation accurately. You can typically identify the missing DLL by the error message displayed when you try to run a particular program or application.
2. Check the Recycle Bin: Sometimes, DLL files may be accidentally deleted and end up in the Recycle Bin. If that is the case, simply restore the DLL file from the Recycle Bin to its original location on your computer.
3. Use the System File Checker (SFC) tool: Windows has a built-in utility called the System File Checker that scans the system for corrupted or missing system files, including DLL files.
a. Open the Command Prompt as an administrator: Press the Windows key, type «cmd,» right-click on «Command Prompt,» and select «Run as administrator.«
b. In the Command Prompt window, type the following command and press Enter: `sfc /scannow`
c. Wait for the scan to complete: The System File Checker will automatically scan your system for missing or corrupted DLL files and other system files. It may take some time to finish the scan and repair any issues it finds.
4. Update Windows: Keeping your Windows operating system up to date is vital as updates often fix known issues and provide necessary DLL files. Make sure your Windows 10 is updated with the latest patches and updates by following these steps:
a. Press the Windows key, type «Settings,» and open the «Settings» app.
b. Click on «Update & Security.«
c. In the Windows Update section, click on «Check for updates» and allow Windows to install any available updates.
5. Download the missing DLL file from trusted sources: If the above methods didn’t resolve the issue, you can download the specific DLL file from reliable sources. Be cautious and ensure you only download DLL files from trustworthy websites to avoid malware or other security risks.
a. Search for the specific DLL file: Use a search engine to find a trusted website that offers the DLL file you need.
b. Download the DLL file: Locate the appropriate DLL file, download it, and save it to a specific folder on your computer.
c. Place the DLL file in the correct system directory: Once downloaded, locate the folder where the missing DLL should be stored (often the System32 folder), and copy the downloaded DLL file into that directory.
6. Register the DLL file: Finally, you may need to register the DLL file with Windows using the regsvr32 command. To do this:
a. Open the Command Prompt as an administrator.
b. In the Command Prompt window, type the following command and press Enter: `regsvr32 `
c. Replace « with the actual file path of the DLL file you downloaded, including the file extension.
After performing these steps, restart your computer and check if the program or application that previously displayed the missing DLL error is now working correctly. Remember to exercise caution when dealing with DLL files and only download them from reputable sources.
How do I run a DLL file in Windows 10?
To run a DLL (Dynamic Link Library) file in Windows 10, follow these steps:
1. Identify the DLL file: Confirm that you have the specific DLL file you want to run. DLL files contain functions and resources that multiple programs can use. Check if the DLL file is compatible with your version of Windows. Ensure that you have obtained the DLL file from a reputable source.
2. Place the DLL file in the appropriate location: DLL files usually need to be placed in specific folders for applications or the operating system to access them. The most common locations for DLL files are the application folder (where the program is installed) and the Windows system folder (typically C:\Windows\System32 or C:\Windows\SysWOW64 for 64-bit systems).
3. Register the DLL file (if necessary): Some DLL files require registration to work properly. To register a DLL file, you can use the regsvr32 command in the Command Prompt. Open the Command Prompt as an administrator, navigate to the folder containing the DLL file using the «cd» command, and then use the following command: regsvr32 .dll
4. Run an application that uses the DLL file: Once the DLL file is in place and registered (if needed), you can run an application that relies on it. Launch the application as you normally would, and it should automatically access and utilize the DLL file.
Note: Be cautious when working with DLL files, as incorrect handling can potentially cause system errors or compromise your computer’s security. It’s advisable to back up your system and exercise caution when obtaining and using DLL files from external sources.
Remember, running DLL files should be done cautiously and preferably with guidance from an experienced professional or trusted sources.
How do I put DLL files on my computer?
To put DLL files on your computer, you can follow these steps:
1. Identify the DLL file: First, ensure you have the DLL file you want to install on your computer. DLL files are dynamic link library files that contain code and data that multiple programs can utilize.
2. Check compatibility: Make sure the DLL file is compatible with your operating system. DLL files are specific to the version of the operating system and the software they are designed for.
3. Determine the appropriate directory: Identify the appropriate directory on your computer where the DLL file needs to be placed. Typically, DLL files are stored in the System32 or SysWOW64 folders within the Windows directory.
4. Copy the DLL file: Copy the DLL file from its current location. You can either use Windows File Explorer or the command prompt to perform this action. Ensure you have the necessary permissions to copy files in the destination folder.
5. Paste the DLL file: Navigate to the appropriate directory where you want to put the DLL file. Right-click on an empty space within the folder and select «Paste» to place the DLL file.
6. Register the DLL file (optional): In some cases, you may need to register the DLL file to make it usable by programs. To register a DLL file, open the command prompt with administrative privileges, navigate to the directory where the DLL file is located, and use the «regsvr32» command followed by the DLL file name.
7. Restart your computer: After placing the DLL file, it is recommended to restart your computer. This ensures that any changes related to the DLL file can take effect properly.
Note: It is essential to be cautious when dealing with DLL files. Ensure you download DLL files from trusted sources and always keep an updated backup of your files in case any unexpected issues arise.
How do I manually install a DLL in Windows 10?
Manually installing a DLL file in Windows 10 involves a few steps. Here’s a guide to help you through the process:
1. Identify the DLL file: Ensure you have the correct DLL file that you want to install. It’s crucial to obtain it from a reliable source or from the software’s official distribution.
2. Place the DLL file in the appropriate directory: The DLL file needs to be placed in the correct location for it to work properly. The typical directory for system DLL files is the System32 folder, located in the Windows installation folder (usually C:\Windows\System32). If it’s a user-specific DLL, you may need to put it in the corresponding application folder or in the Program Files directory.
3. Open the File Explorer: Press the Windows key + E or navigate to it via the taskbar.
4. Locate the DLL file: Use the File Explorer to navigate to the folder where you placed the DLL file.
5. Copy the DLL file: Right-click on the DLL file and select «Copy» from the context menu.
6. Navigate to the target directory: Open another File Explorer window and go to the folder where you want to install the DLL file. For system DLLs, navigate to C:\Windows\System32.
7. Paste the DLL file: Right-click inside the target directory and choose «Paste» from the context menu.
8. Administrator privileges: If prompted, grant administrative privileges to confirm the file transfer.
9. Register the DLL (optional): Certain DLL files require registration to function properly. To register a DLL, open the Command Prompt with administrative rights (press Windows key, type «Command Prompt,» right-click on it, and choose «Run as administrator«) and enter the command «regsvr32 filename.dll» (replace «filename» with the actual name of the file).
10. Confirm registration (optional): A dialog box should appear confirming that the DLL was successfully registered.
Remember that manual installation of DLL files can carry risks. It’s essential to exercise caution and ensure the file is obtained from a trusted source. If you’re unsure or want to be on the safer side, it’s advisable to consult professional assistance or use software provided by trusted developers to handle DLL installations.
How do I know if a DLL is loaded in Windows?
To determine if a DLL (Dynamic Link Library) is loaded in Windows, you can follow these steps:
1. Open the Task Manager: You can do this by right-clicking on the taskbar and selecting «Task Manager» from the menu that appears.
2. Navigate to the «Processes» or «Details» tab: This section will display a list of all the processes currently running on your system.
3. Locate the process of the application you suspect is using the DLL: Scroll through the list or use the search function to find the specific process associated with the application.
4. Check the «Modules» or «DLLs» column: In the Task Manager, you will usually find a column labeled «Modules» or «DLLs» that shows the modules loaded by each process. It displays the filenames of the DLLs that are currently loaded by the process.
5. Look for the DLL you are interested in: Scan through the DLL names in the Modules or DLLs column to find the DLL you want to check. If the DLL is present in the list, it means it is loaded by the corresponding process.
Please note that if a DLL is being dynamically loaded and unloaded by an application during its execution, it may not appear in the list of loaded modules at all times. In such cases, you might need to resort to additional tools or techniques to investigate the dynamic loading behavior of the application.
Remember, the steps provided here are based on general knowledge of Windows systems and the Task Manager interface. Depending on your specific Windows version or configuration, there could be slight variations in the steps or the names of the options presented.
How do I run a DLL directly?
Running a DLL (Dynamic Link Library) directly involves a few steps. Here’s a guide on how to do it:
1. Identify the purpose of the DLL: DLLs contain reusable code and resources that can be utilized by multiple applications. Before running a DLL, you need to determine its purpose and ensure it matches your requirements.
2. Check if the DLL is compatible: DLLs are designed to work with specific operating systems and applications. Verify if the DLL is compatible with the operating system you are using and the program you intend to use it with. Ensure you have the necessary software dependencies installed.
3. Place the DLL in the appropriate directory: Most DLLs need to be placed in specific directories for them to be detected and used by applications. These directories include the application’s working directory, system directories, or the directory where the specific application expects the DLL to be located. Consult the DLL’s documentation or the application’s documentation to determine the correct directory.
4. Register the DLL: In some cases, DLLs need to be registered before they can be used. This process involves adding the DLL’s information to the system registry. To register a DLL, open a command prompt with administrative privileges, navigate to the DLL’s location, and use the regsvr32 command followed by the DLL’s name. For example: regsvr32 mydll.dll.
5. Load the DLL in an application: Once you have ensured compatibility and placed the DLL in the correct directory, you can load and use it in an application that supports DLL integration. This typically involves writing code to import and access the functions or resources provided by the DLL. The process for loading a DLL varies depending on the programming language and framework being used.
It’s important to note that running DLLs directly should be done with caution. Ensure you obtain DLLs from trusted sources to avoid potential security risks or conflicts with your system. Additionally, be aware of any licensing restrictions or terms of use associated with the DLL you are using.
Remember to consult official documentation, relevant forums, or seek professional advice specific to the DLL you are working with for a more detailed and accurate procedure.
Все способы:
- Варианты установки
- Способ 1: DLL-Files.com Client
- Способ 2: Средства системы
- Вопросы и ответы: 0
Часто можно столкнуться с ситуацией, когда программа или игра требует установки различных дополнительных DLL файлов. Эту проблему можно решить довольно легко, для этого не понадобятся особые знания или навыки.
Варианты установки
Установить библиотеку в систему можно различными способами. Есть специальные программы для выполнения данной операции, а также можно сделать это вручную. Проще говоря, в этой статье будет дан ответ на вопрос — «Куда кидать dll файлы?» после их скачивания. Рассмотрим каждый вариант по отдельности.
Способ 1: DLL-Files.com Client
Скачать DLL-Files.com Client
Для установки библиотеки здесь нужно произвести следующие действия:
- Ввести имя искомого файла.
- Нажать на кнопку «Выполните поиск DLL файла».
- Нажать на имя найденной библиотеки в результатах поиска.
- В открывшемся новом окне нажать на кнопку «Установить».
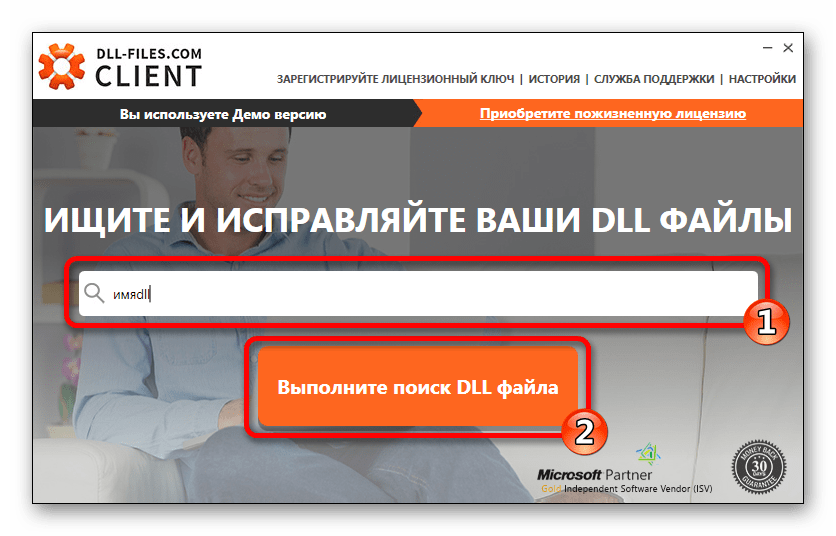
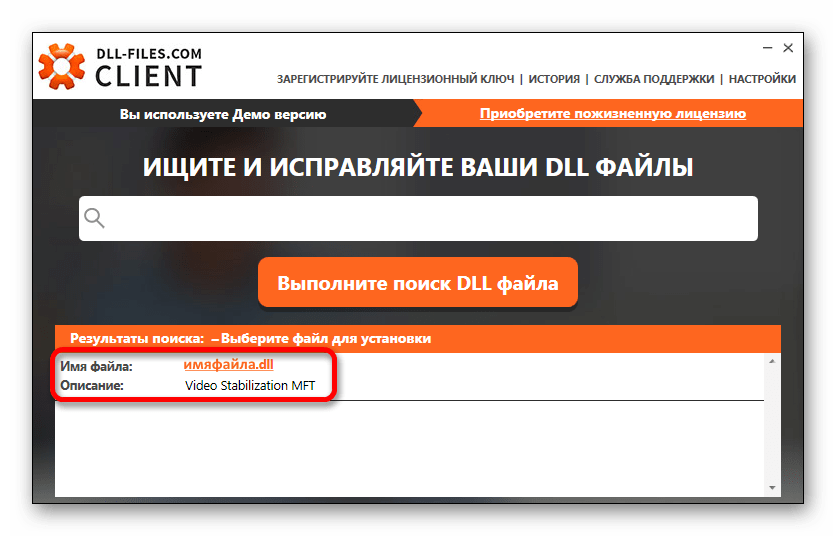

Все, ваша DLL библиотека скопирована в систему.
У программы имеется дополнительный продвинутый вид – это режим, в котором вы сможете выбрать различные версии DLL для установки. Если игра или программа требует конкретную версию файла, то можно найти её, включив этот вид в DLL-Files.com Client.
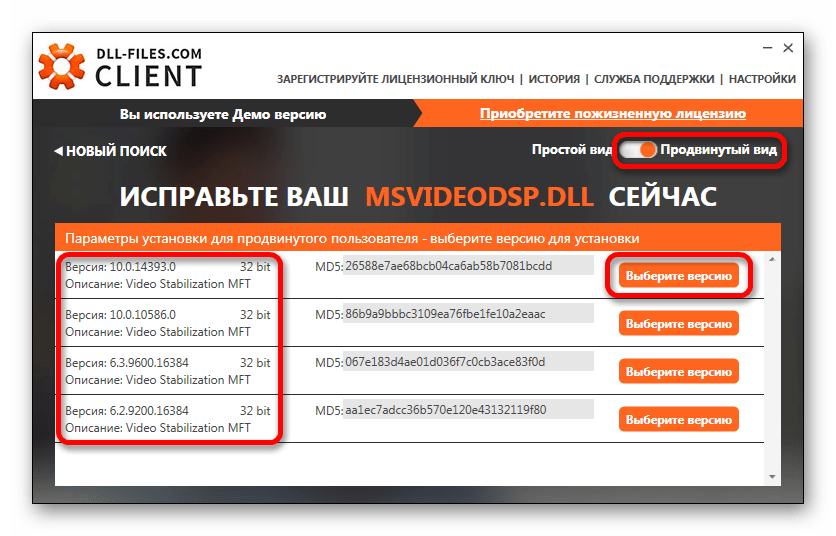
В случае, если нужно скопировать файл не в папку по умолчанию, вы нажимаете на кнопку «Выберите версию» и попадаете в окно параметров установки для продвинутого пользователя. Здесь вы производите следующие действия:
- Задаете путь, по которому будет выполнена установка.
- Нажимаете на кнопку «Установить сейчас».

Программа скопирует файл в указанную папку.
Способ 2: Средства системы
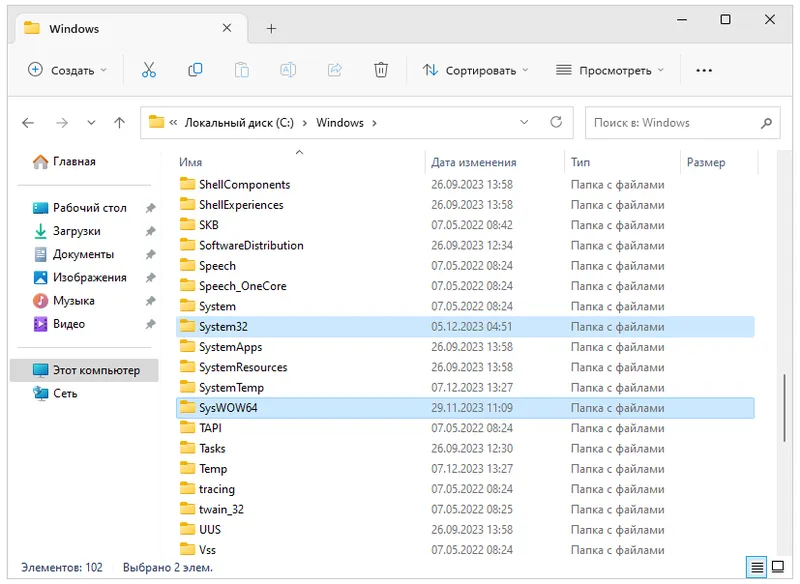
Можно установить библиотеку вручную. Для этого нужно будет скачать сам файл DLL и впоследствии просто скопировать или переместить его в папку по адресу:
C:\Windows\System32

В завершении надо сказать, что в большинстве случаев DLL файлы устанавливаются по пути:
C:\Windows\System32
64-разрядные системы могут потребовать свой путь для установки:
C:\Windows\SysWOW64
Но если вы имеете дело с операционными системами Windows 95/98/Me, то путь для установки будет таким:
C:\Windows\System
В случае Windows NT/2000:
C:\WINNT\System32
Читайте также: Регистрируем файл DLL в ОС Windows
Наша группа в TelegramПолезные советы и помощь

DLL (или динамически подключаемая библиотека) являются системными файлами Windows, содержащими набор функций и процедур, доступных для использования другими программами. Такой подход уменьшает дублирование кода, что повышает быстродействие ОС и ПО. Если по каким-то причинам DLL отсутствует, его можно установить в ручном режиме. Рассмотрим, как установить файл DLL для компьютера, работающего под управлением Windows 7, 8, 10, 11 x64 Bit более подробно.
Копирование файла
Дальше давайте переходить непосредственно к установке библиотеки. Последняя проводится следующим образом:
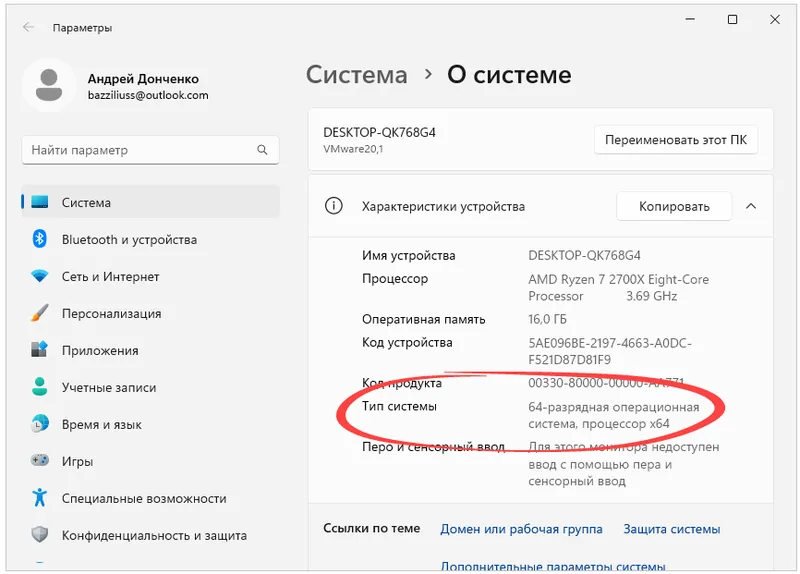
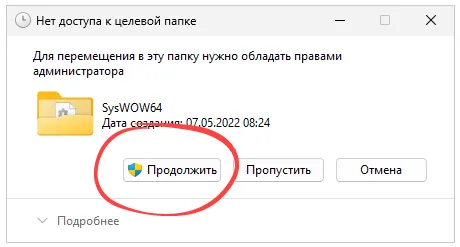
- Сначала нам потребуется скопировать DLL файл на свое законное место. Развитие событий зависит от архитектуры Windows. Для того чтобы проверить разрядность операционной системы, необходимо одновременно нажать кнопки «Win» + «Pause». В результате отобразится информация о разрядности ОС.
- Переходим к проводнику Windows. В зависимости от разрядности операционной системы выбираем тот или иной каталог.
Для Windows 32 Bit: C:\Windows\System32
Для Windows 64 Bit: C:\Windows\SysWOW64
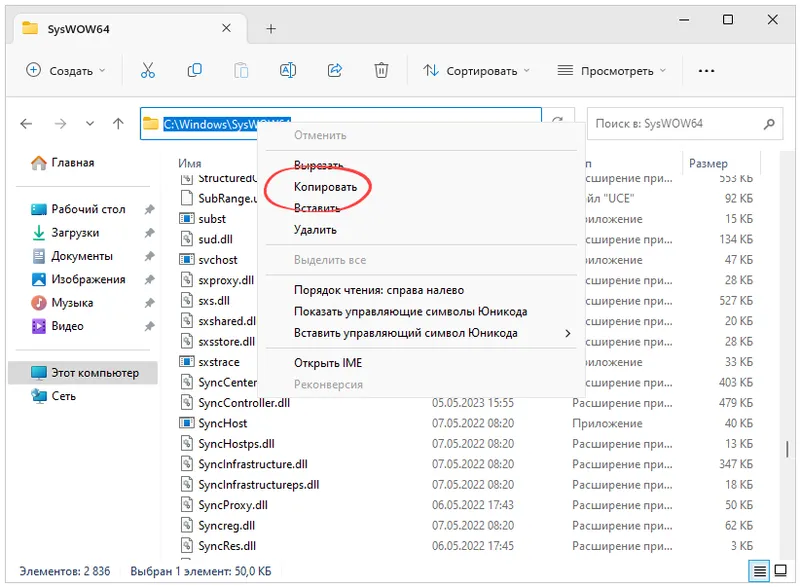
- Копируем наш файл DLL в открывшуюся папку и подтверждаем доступ к полномочиям администратора. Для этого, соответственно, нажимаем обозначенную кнопку в новом окошке.
- Также, сделав правый клик в верхней части окна, копируем путь к этому каталогу. Прямо сейчас он нам пригодится.
Регистрация
Простого копирования плагина DLL файлов в системный каталог недостаточно. Также нам потребуется регистрация, о которой ниже рассказано более подробно:
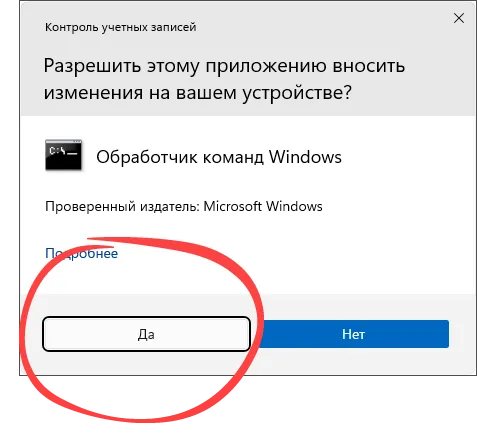
- Воспользовавшись поисковой строкой, прописываем символы «CMD» и делаем правый клик на иконке командной строки. В появившемся списке выбираем пункт запуска от имени Администратора.
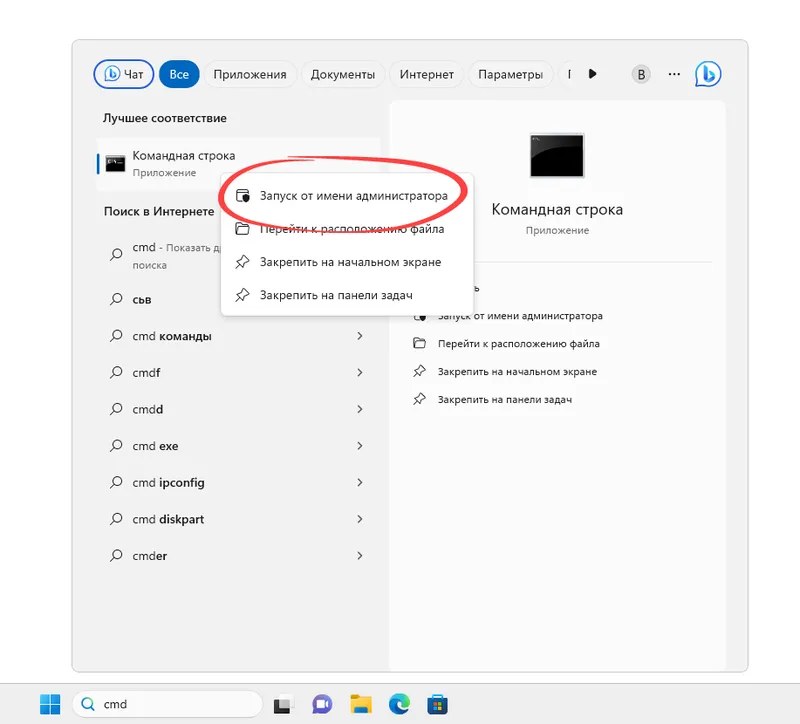
- Тотчас же появится еще одно окно, в котором мы должны подтвердить свое намерение, нажав «Да».
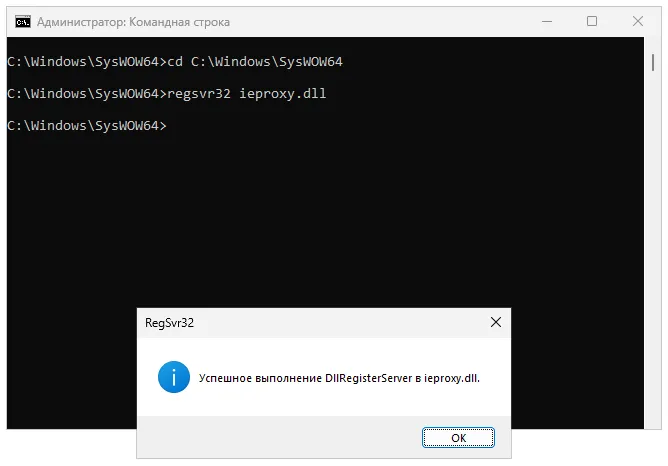
- Командная строка откроется. Снова сделав в правый клик мышью, вставляем только что скопированный в буфер обмена путь. Предварительно добавляем приставку:
cd. В результате мы перейдем в тот каталог, в который поместили драйвер DLL. Вводим еще один оператор:regsvr32 имя нашего DLLи жмем «Enter». В результате должно появиться маленькое окошко с уведомлением об успешном исходе операции. Если последует Сообщение об ошибке, возможно, данный файл не требует регистрации и работает сразу после копирования.
Далеко не все DLL требуют регистрации в реестре. Чтобы установить программу вручную, порой достаточно просто скопировать файл, перезагрузить операционную систему и наслаждаться исправленной проблемой.
( 5 оценок, среднее 5 из 5 )
How to Register/Re-register DLL Files in Windows 10 and Windows 11
Sometimes users experience problems such as running certain applications and need to register a DLL file or multiple DLL files manually. This article will show you how to register DLL files in Windows 10 (64 and 32-bit versions) and Windows 11.
DLL stands for Dynamic Link Library. A DLL file includes a combination of multiple files. DLLs help applications find the right libraries to perform the operations they were designed to perform.
In most cases, the libraries are already on your system, and the DLL files direct the application to the libraries. DLL files are created to prevent duplicate files with the same functions.
However, most DLL files don’t support registration or are already registered. You can’t register DLL files that came pre-installed on Windows because Windows updates fix all outdated and corrupted DLLs.
Third-party libraries and DLL files are registered during installation. Unfortunately, when you install an application, its DLL files may not register and prevent the application from accessing the libraries via DLLs. Registering DLL files can fix startup problems of applications or games that require specific DLL files to work.
Registering DLL files means storing the DLL file information into the Windows registry. DLL files can be registered using the Regsvr32 tool.
The Regsvr32 tool is a command-line utility used for registering and un-registering DLL and OCX files. The tutorial found below will help you register DLL files in Windows 11, Windows 10, in 32-bit and 64-bit versions.
Video Tutorial on How to Register DLL Files in Windows
Table of Contents:
- Introduction
- Register a DLL File in Windows 32-bit
- Register a DLL File in Windows 64-bit
- Re-register All DLL Files on Your System
- Video Tutorial on How to Register DLL Files in Windows
Download Computer Malware Repair Tool
It is recommended to run a free scan with Combo Cleaner — a tool to detect viruses and malware on your device. You will need to purchase the full version to remove infections. Free trial available. Combo Cleaner is owned and operated by Rcs Lt, the parent company of PCRisk.com read more.
Register a DLL File in Windows 32-bit
1. Hold down Windows+R keys to open Run.
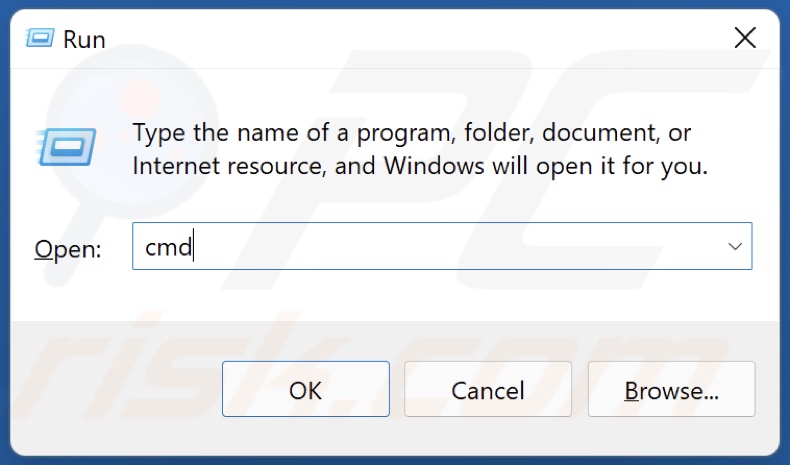
2. In the Run dialog box, type in CMD and hold down Ctrl+Shift+Enter keys to open the Command Prompt as an administrator.
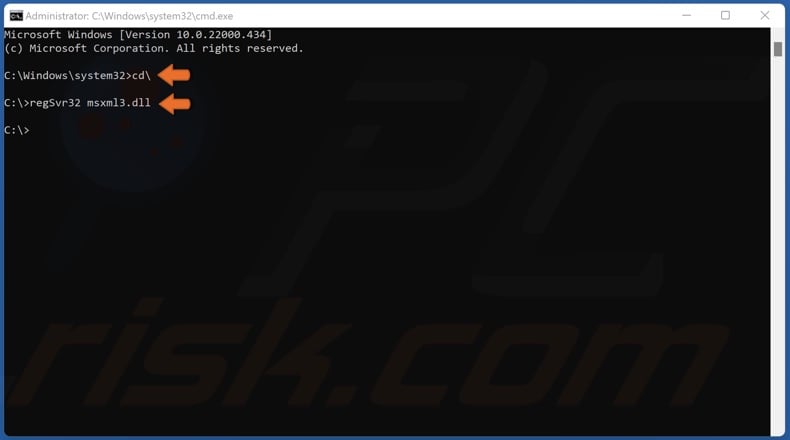
3. In the Command Prompt window, type in cd\ and press the Enter key.
4. Then, type in regSvr32 FileName.dll and press Enter. Substitute “FileName” with the name of the DLL file you want to register. For example, to register the “msxml3.dll” file, type in regSvr32 msxml3.dll and press Enter.
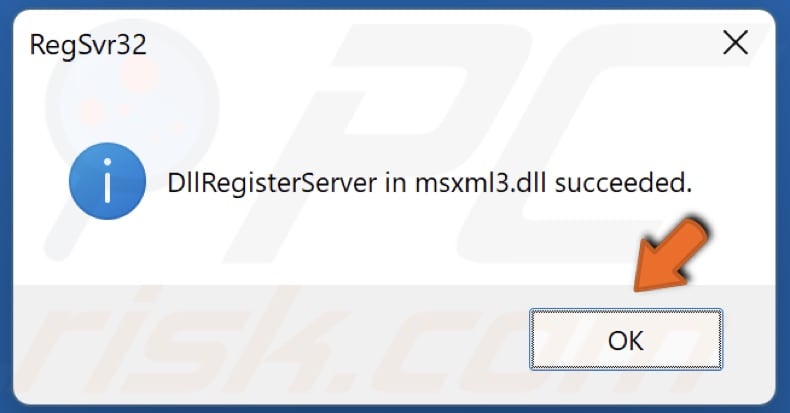
5. Click OK.

6. To unregister a file type in regSvr32 /u FileName.dll and press Enter.
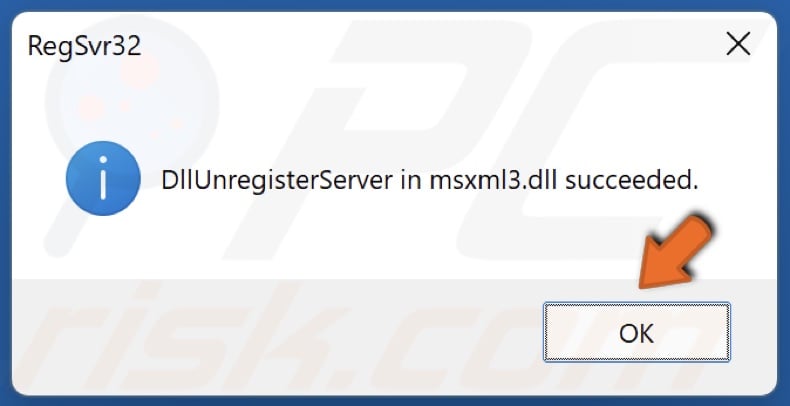
7. Click OK.
Note, if you get “The module “FileName.dll” was loaded but the entry point dllRegisterServer was not found error, it means that the file doesn’t need to be registered.
[Back to Table of Contents]
Register a DLL File in Windows 64-bit
1. Hold down Windows+R keys to open Run.
2. In the Run dialog box, type in CMD and hold down Ctrl+Shift+Enter keys to open the Command Prompt as an administrator.
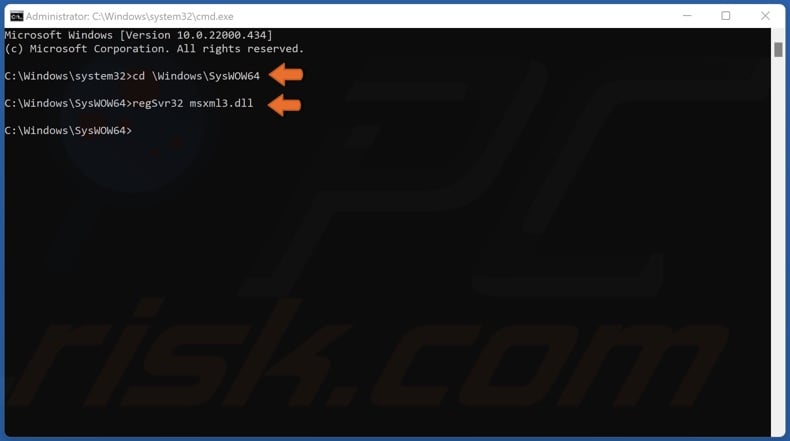
3. in the Command Prompt window, type in cd \Windows\SysWOW64 and press the Enter key.
4. Then, type in regSvr32 FileName.dll and press Enter. Substitute “FileName” with the name of the DLL file you want to register.
5. Click OK.
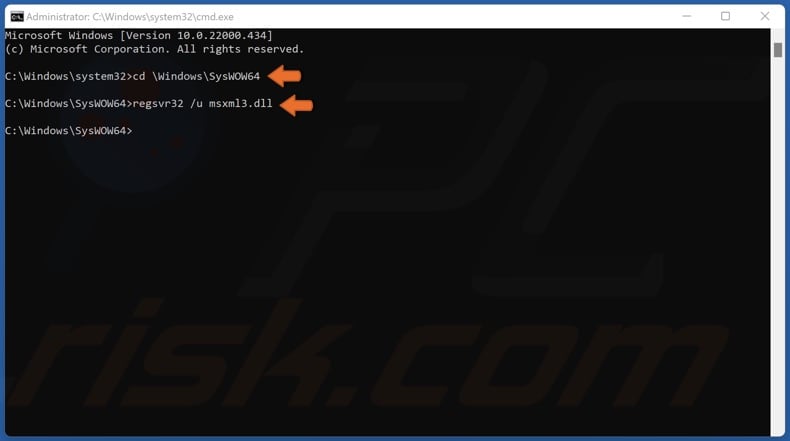
6. To unregister a file type in regSvr32 /u FileName.dll and press Enter.
7. Click OK.
[Back to Table of Contents]
Re-register All DLL Files on Your System
1. Hold down Windows+R keys to open Run.
2. In the run dialog box, type in CMD and hold down Ctrl+Shift+Enter keys to open the Command Prompt as an administrator.
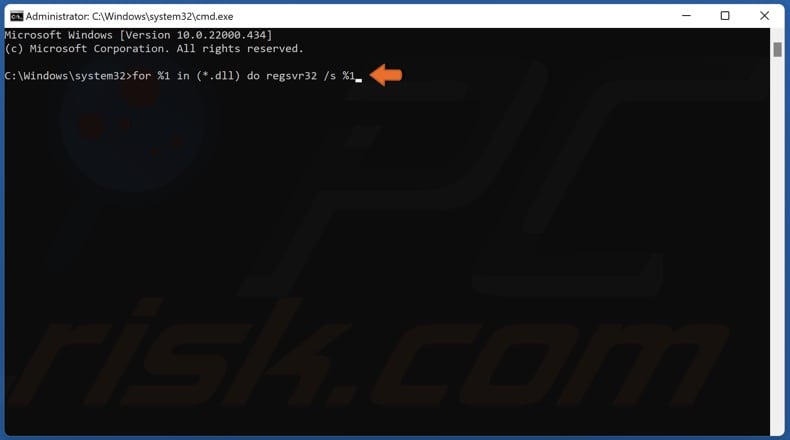
3. In the Command Prompt window, type in for %1 in (*.dll) do regsvr32 /s %1 and press Enter. Re-registering all .dll files will take some time.
[Back to Top]
When it comes to placing DLL files in Windows 10 64-bit, there are a few recommended locations depending on the purpose and functionality of the DLL. Here are the options:
1. System32 Folder: The default location for system DLL files is the System32 folder, typically located at C:\Windows\System32. This folder contains critical system files required for the proper functioning of Windows and its components. It is advisable to place DLL files here only if they are essential system files or if specifically instructed by the software developer.
2. Program Folder: DLL files associated with a specific program can often be placed in the program’s installation folder. The program folder is typically located in the «Program Files» or «Program Files (x86)» directory (e.g., C:\Program Files\ProgramName). Placing the DLL files here ensures that they are available to the program when it runs. However, be cautious as modifications to the program folder may sometimes require administrator privileges.
3. AppData Folder: DLL files linked to user-specific settings or configurations can be placed in the AppData folder. This folder resides in the user’s profile directory (e.g., C:\Users\Username\AppData) and is typically hidden by default. However, the AppData folder is primarily intended for application data and settings rather than DLL files, so this option should be used judiciously.
4. Custom Folder: In some cases, it may be necessary to create a custom folder for DLL files. This approach is typically used when multiple programs or processes need to access the DLL files. Creating a dedicated folder, such as C:\DLLs, and adding the folder’s path to the system’s environment variables can ensure that the DLLs are accessible from anywhere on the system.
Remember, when handling DLL files, caution is crucial as they can significantly affect system stability and security. It is recommended to verify the source and authenticity of DLL files before placing them in any system directory.
Video Tutorial:How to add DLL to exe file?
Where should DLL files be located?
DLL (Dynamic Link Library) files are an essential component in many software applications, as they contain code and resources that can be shared across multiple programs. When it comes to their location, there are specific directories where DLL files are typically stored on Windows operating systems. Here’s a professional perspective on where DLL files should be located:
1. System32 Folder: The System32 folder is the primary location for DLL files on a Windows system. It is located within the Windows directory (C:\Windows\System32). This folder contains essential system files required for the operating system and several applications to function correctly. Placing DLL files here ensures easy accessibility and compatibility across various applications.
2. Program Files Folder: DLL files related to specific software applications can also be placed within the respective program’s installation folder, usually in the «Program Files» directory (C:\Program Files\[Program Name]). This enables the application to access its required DLL files without relying on the system-wide DLLs. It also helps in encapsulating the application and its dependencies for better portability.
3. Application’s Working Directory: In some cases, DLL files might be placed in the same directory as the application executable file (.exe). This approach is more common for smaller applications or when DLLs are specifically developed for the program’s exclusive use. However, this approach is generally not recommended, as it can lead to dependency conflicts or difficulty in managing and updating DLL files if multiple applications share the same DLLs.
When it comes to DLL file locations, it’s important to follow best practices and consider factors such as compatibility, accessibility, and organization. Placing DLL files in the designated System32 folder or within the program’s installation directory is the preferred approach, depending on whether they are system-wide or application-specific DLLs.
How are DLLs loaded?
DLLs, short for Dynamic Link Libraries, are files that contain reusable code and resources which can be dynamically linked to an application at runtime. The process of loading DLLs involves a series of steps, which I’ll explain without mentioning my AI nature:
1. File Location: The operating system needs to locate the DLL file. Typically, DLLs are stored in the system folder or in the application’s own folder. The OS uses a predefined search order called the DLL search path to find the required DLL.
2. Dependency Resolution: DLLs can have dependencies on other DLLs or shared libraries. These dependencies must be resolved before loading the main DLL. The OS checks the DLL’s import table, which lists the dependencies, and ensures that they are present and accessible.
3. Virtual Memory Space: Before loading the DLL, the OS allocates a virtual memory space for it within the address space of the process that is loading it. This space is necessary to load and map the DLL’s code, data, and resources.
4. Loading and Linking: The DLL is then loaded into memory. The OS parses the DLL file and maps its code and resources into the allocated virtual memory space. It resolves the imported functions and variables by finding their addresses in memory or in other DLLs.
5. Relocation: If the DLL is designed to be loaded at a specific base address and that address is already occupied, the OS performs a process called relocation. It modifies the DLL’s memory references to adjust them to the actual base address at runtime.
6. Initialization: Once the DLL is loaded, its initialization routine is called. This routine allows the DLL to perform any necessary setup, such as allocating memory, initializing global variables, or registering callbacks.
By following these steps, the operating system can successfully load DLLs and allow applications to utilize their code and resources. It’s worth noting that understanding the internals of DLL loading is crucial for developers who work with dynamic libraries, as it enables them to create efficient and robust applications.
Where should I put DLL files in Windows 10?
When it comes to DLL (Dynamic Link Library) files in Windows 10, it is important to place them in the correct location for proper functioning of software applications. Here’s a guide on where you should put DLL files on Windows 10:
1. Application Folder:
– One common location to place DLL files is within the application folder itself. This approach ensures that the application can access the specific DLL file it requires without any conflicts. When you install a program, it often creates its own folder in the «Program Files» or «Program Files (x86)» directory. Check if the program’s installation folder already contains a «DLL» or «Libraries» folder – if it does, that’s likely the right place for the DLL files associated with that specific software.
2. System Folder:
– Windows provides system folders where DLL files are stored for system-wide access. However, it’s usually recommended to avoid placing DLL files directly in these folders unless specifically advised by the software’s developer or documentation. The system folder for 32-bit DLL files is typically «C:\Windows\System32,» while for 64-bit DLL files, it is «C:\Windows\SysWOW64.» It’s essential to exercise caution when modifying these folders to prevent any conflicts or issues.
3. Shared Libraries Folder:
– Some DLL files are shared across multiple applications and should be placed in a shared library folder. These folders can vary depending on the purpose and organization of your system. One common folder is «C:\Windows\System32\DLLcache.» Another location could be «C:\Program Files\Common Files.» However, before placing DLL files in these shared locations, ensure you understand the implications and potential conflicts.
4. Application’s Working Directory:
– In certain cases, DLL files may be placed in the working directory of an application. The working directory is the folder from which an application is launched or the folder specified by the application at runtime. Placing DLL files in the working directory ensures that the application can find and utilize them effectively, but it’s important not to confuse this with the application’s installation folder.
Remember, the specific requirements for DLL file placement can vary based on the software and its dependencies. It’s always advisable to consult the documentation or support resources provided by the software developer for accurate guidance on DLL file placement. Additionally, exercise caution while downloading and installing DLL files from external sources, as they may carry security risks or compatibility problems.
How do I run a DLL file in Windows 10?
Running a DLL file in Windows 10 is a relatively straightforward process. Here’s a step-by-step guide on how to do it:
1. Locate the DLL file: First, make sure you know the exact location of the DLL file you want to run. It could be in a specific folder or bundled with a software installation.
2. Open the Command Prompt: Press the Windows key + R to open the Run dialog box. Type «cmd» and press Enter to open the Command Prompt.
3. Change the directory: Use the «cd» command to change the directory to the location of the DLL file. For example, if the DLL file is located in the «C:\Users\Username\Downloads» folder, you would use the command:
«`
cd C:\Users\Username\Downloads
«`
4. Run the DLL file: To run the DLL file, type the following command and press Enter:
«`
regsvr32
«`
Replace «» with the actual name of the DLL file you want to run. For example, if the DLL file is named «example.dll,» the command would look like this:
«`
regsvr32 example.dll
«`
5. Press Enter and wait: After running the command, press Enter, and Windows will attempt to register the DLL file. A confirmation message should appear if the registration is successful.
6. Test the DLL file: To ensure the DLL file is running correctly, you might need to test it within the application or software that requires it. Follow the instructions provided by the application to integrate or use the DLL file.
That’s it! Following these steps should allow you to run a DLL file in Windows 10. Remember to exercise caution when working with DLL files and ensure they come from trusted sources to maintain system security and stability.
How do I manually install a DLL?
Installing a DLL (Dynamic Link Library) manually involves a few steps. Here’s a professional guide on how to accomplish this:
Step 1: Download the DLL file
Find a reliable source to download the DLL file you need. Ensure that the website is trustworthy and reputable to avoid downloading any malicious files that could harm your system.
Step 2: Identify the correct directory
Before proceeding, it’s essential to determine the correct directory where the DLL file should be placed. This depends on the purpose of the DLL and the software or application that requires it. Typically, DLL files are stored in the system folder, like C:\Windows\System32.
Step 3: Copy the DLL file
Once you’ve located the correct directory, copy the downloaded DLL file. To do this, right-click on the DLL file and select «Copy» from the context menu.
Step 4: Paste the DLL file
Navigate to the target directory (step 2) in File Explorer. Right-click in an empty space within the folder and select «Paste» from the context menu. Alternatively, you can use the keyboard shortcut Ctrl+V to paste the DLL file.
Step 5: Register the DLL file (if required)
In some cases, DLL files need to be registered for applications to access them correctly. To register the DLL file manually, you can use the Command Prompt or the Regsvr32 tool.
a) Using Command Prompt:
– Open Command Prompt as an administrator.
– Type «regsvr32 full_path_to_dll_file.dll» (without quotes), replacing «full_path_to_dll_file» with the actual path and filename of the DLL.
– Press Enter to execute the command.
– You should receive a confirmation message if the registration is successful.
b) Using Regsvr32 tool:
– Open the Run dialog box by pressing Win + R.
– Type «regsvr32» followed by a space.
– Drag and drop the DLL file from the target directory into the Run dialog.
– Press Enter to execute the command.
– You should receive a confirmation message if the registration is successful.
Step 6: Restart and test
To ensure the DLL is functioning correctly, it’s recommended to restart your computer. After restarting, try launching the application that requires the DLL file to see if it works properly.
Remember, manually installing DLL files comes with some risks. Ensure you have a genuine and updated version of the DLL file to avoid compatibility issues or security vulnerabilities. If possible, consider obtaining DLL files from official sources or trusted developers.
Please note that this article assumes you are a proficient computer user and understand the potential risks associated with manual installations. Always exercise caution and create a backup before modifying critical system files.
When it comes to placing DLL (Dynamic Link Library) files on a 64-bit system, it’s important to consider the appropriate directory based on the Windows operating system’s file structure and development practices.
1. System32 directory: System DLLs that are essential for the Windows operating system’s functionality are stored in the System32 directory. To place a DLL file in this location, follow these steps:
– Open File Explorer and navigate to the C: drive (or the drive where Windows is installed).
– Locate the Windows folder and open it.
– Inside the Windows folder, find the System32 folder, and open it.
– Copy the DLL file into the System32 folder.
2. SysWOW64 directory: SysWOW64 is the directory where 32-bit DLL files are stored on a 64-bit system. If you have a 32-bit DLL that needs to be placed, follow these steps:
– Open File Explorer and navigate to the C: drive.
– Locate the Windows folder and open it.
– Inside the Windows folder, find the SysWOW64 folder, and open it.
– Copy the 32-bit DLL file into the SysWOW64 folder.
It’s worth noting that placing DLL files in the appropriate system directories should be done with caution, as modifying crucial system files can have unintended consequences. It’s generally recommended to follow the installation instructions provided by the software or application associated with the DLL file.
Furthermore, if you’re developing an application and want to distribute your own DLL files with it, it’s a good practice to create a separate folder within the application’s directory to store the DLL files. Then, you can ensure that your application references the DLL files from that specific folder, allowing easy deployment and avoiding conflicts with system DLLs.
Remember, handling DLL files requires careful attention to avoid system issues, and it’s always recommended to consult official documentation or seek assistance from software developers or experts for specific use cases or software requirements.