
Некоторые пользователи Windows 11 пожаловались на исчезновение встроенного приложения «Ножницы». Об этом сообщает издание The Verge.
Предназначенная для создания скриншотов программа исчезла на ряде компьютеров под управлением актуальной ОС от Microsoft. По словам специалистов, это произошло из-за просроченного сертификата операционной системы 31 октября. Кроме «Ножниц» у многих пользователей исчезла сенсорная клавиатура и ряд эмодзи.
В Microsoft уже отреагировали на проблему. В компании заявили о патче KB4006746, который можно установить через «Центр обновления Windows». Количество пользователей, которые столкнулись с подобной проблемой, не раскрывается. Встроенное в ОС приложение «Ножницы» впервые появилось в системах от Microsoft в Windows Vista в 2007 году.
По словам журналистов, некоторые обладатели лицензионных копий Windows не получили возможность установить патч. В этом случае пользователям предложили временно изменить системную дату на устройстве на 30 октября или воспользоваться для создания скриншотов функцией Print Screen.
В начале ноября энтузиасты обнаружили в Windows 11 ошибку, из-за которой в ОС появлялись тысячи пустых папок. У некоторых пользователей Windows 10 также появляются пустые каталоги.
Получите 10 эффективных и работоспособных решений 100%, чтобы исправить неработающий инструмент для ножниц в Windows 11:
- Перезапустите ножницы – простой способ решить застрявшую проблему
- Сброс ножниц – устраните проблему приложения в один клик
- Измените время и дату – обновите настройки до нужных.
- Обновите Windows 11: избегайте просроченного цифрового сертификата Microsoft
- Включить фоновые разрешения – снять ограничения
- Изменить настройки. Убедитесь, что копирование и вставка скриншота работает правильно.
- AnyRec Screen Recorder — лучшая альтернатива для создания снимков экрана в Windows 11/10
Когда Ножницы Windows 11 не работают после нажатия кнопок Windows+Shift+S вы не сможете использовать встроенный инструмент для захвата экрана для работы или учебы в обычном режиме. К счастью, в этом посте подготовлены 10 простых и быстрых решений, как исправить «Ножницы», которые не работают в Windows 11. Так что вам больше не о чем беспокоиться! Все, что вам нужно сделать, это положиться на приведенные ниже решения и посмотреть, какое решение подойдет вам.
9 решений, как исправить неработающий инструмент «Ножницы» в Windows 11
Если вы ищете решение, которое не доставит вам проблем с ремонтом вашего Snipping Tool, вы находитесь в идеальном месте! В этом разделе вы познакомитесь с шестью простыми и эффективными решениями, которые помогут исправить Snipping Tool, не работающий в Windows 11.
Решение #1. Перезапустите приложение Snipping Tool.
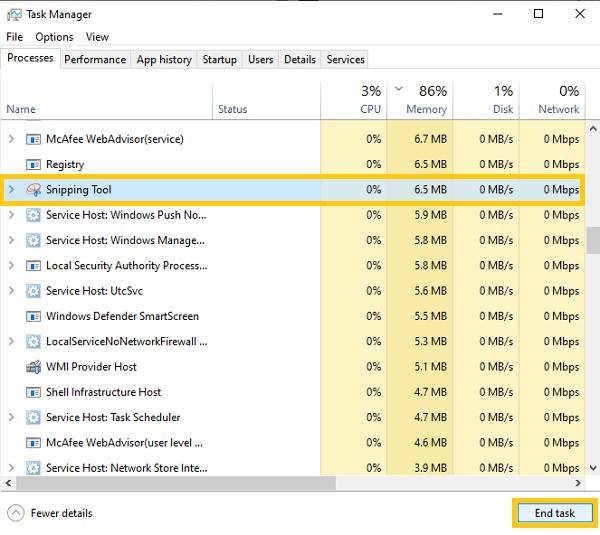
Если ножницы Windows 11 не работают, вы можете перезапустить приложение, чтобы исправить это. Все, что вам нужно сделать, это зайти в диспетчер задач. Вы можете выполнить поиск или просто нажать комбинацию клавиш «Crtl + Shift + Esc», чтобы открыть диспетчер задач. Оттуда нажмите кнопку «Ножницы», затем нажмите кнопку «Завершить задачу». После этого вы можете еще раз запустить «Ножницы» и посмотреть, будет ли он работать.
Решение #2. Сброс приложения для обрезки
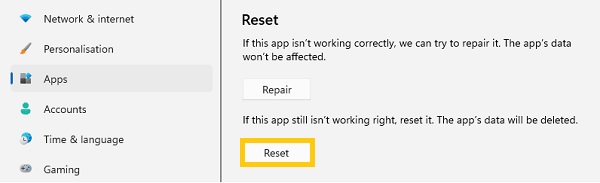
Проблемы или ошибки в некоторых приложениях являются нормальным явлением. Их просто нужно сбросить, чтобы большую часть времени снова работать без сбоев. А чтобы исправить «Ножницы», которые не работают в Windows 11, вы можете перезагрузить приложение. Нажмите комбинацию клавиш «Windows + I» на клавиатуре, затем откройте кнопку «Настройки». После этого нажмите кнопку «Приложения» и нажмите кнопку «Приложения и функции». Затем найдите приложение «Ножницы», щелкните три точки и нажмите кнопку «Дополнительно», чтобы открыть приложение. Наконец, отметьте кнопку «Сброс», чтобы сбросить приложение.
Решение #3. Измените время и дату
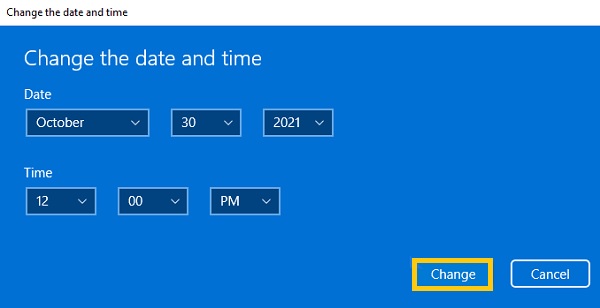
Неправильные настройки даты и времени иногда могут привести к проблемам с ножницами. Временное изменение этих настроек вручную, а затем возврат к автоматическому режиму может решить проблему. Вам нужно зайти в «Настройки» и изменить дату вашего компьютера на «30 октября 2021 года». Затем попробуйте использовать комбинацию клавиш «Windows + Shift + S» и посмотрите, сможете ли вы теперь сделать снимок экрана. Затем вы можете изменить время и дату на самую позднюю дату.
Решение #4. Загрузите обновление KB5008295 для Windows 11.
Microsoft исправила неработающий инструмент «Ножницы» в Windows 11, обновив его до KB5008295. Есть некоторые проблемы, связанные с тем, что срок действия цифрового сертификата Microsoft истек после 31 октября 2021 г.; вот почему ножницы перестали работать. Но чтобы устранить проблему, установите новое обновление «KB5008295». Зайдите в «Настройки» или нажмите комбинацию клавиш «Windows + I» на клавиатуре. Затем перейдите в раздел «Центр обновления Windows» и нажмите кнопку «Проверить наличие обновлений». Затем вы увидите обновление «KB5008295». Вам просто нужно скачать и запустить его на своем компьютере с Windows 11.

Решение #5. Запустите Snipping Tool из папки «Windows.old».
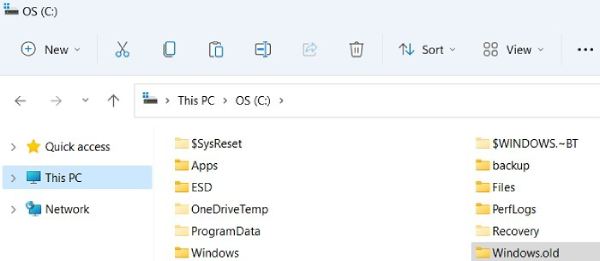
Для тех, кто обновился до Windows 11 с Windows 10, папка «Windows.old» может содержать классический инструмент «Ножницы». Запуск этой более старой версии может обойти проблемы с последней версией Snipping Tool. Найдите папку «Windows.old» на диске C. Найдите файл приложения с именем «Ножницы» в меню поиска файлов и папок Windows 11. Откройте его, чтобы использовать классический инструмент «Ножницы». При желании закрепите «Ножницы» в меню «Пуск» или на панели задач для быстрого доступа.
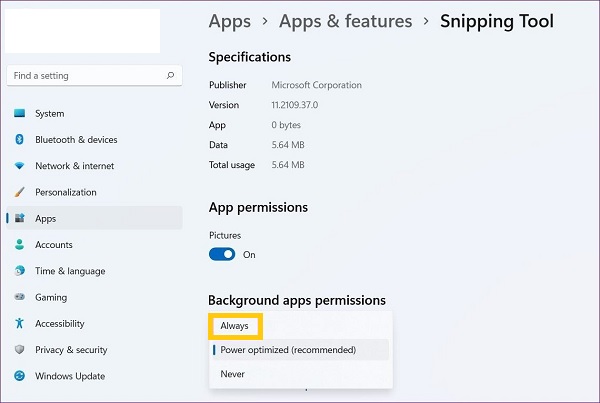
Решение #6. Разрешите запуск Snipping Tool в фоновом режиме.
Наконец, если инструмент «Ножницы» по-прежнему не работает в Windows 11, возможно, у вашего приложения нет необходимых разрешений, необходимых для работы в фоновом режиме. При этом вам необходимо перейти в «Настройки» или нажать «Windows + I», чтобы открыть настройки. Оттуда нажмите кнопку «Приложения», а затем кнопку «Приложения и функции». Затем вы можете использовать панель поиска для поиска «Ножницы» и нажать кнопку «Настройки» со значком «три точки», чтобы нажать кнопку «Дополнительно». Наконец, щелкните раскрывающийся список «Разрешение фоновых приложений» и нажмите кнопку «Всегда».
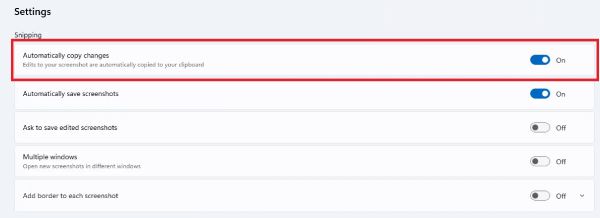
Решение #7. Включите «Автоматическое копирование изменений» в настройках ножниц.
Если ваши ножницы открываются, но не копируют и вставляют изображения, настройка параметра «Автоматически копировать изменения» может решить проблему. Этот параметр гарантирует сохранение изменений в буфере обмена. Откройте «Ножницы» и нажмите меню «Дополнительно». Выберите «Настройки» и убедитесь, что параметр «Автоматически копировать изменения» включен. При желании включите кнопку «Несколько окон», чтобы сохранить несколько снимков экрана. Убедитесь, что ножницы теперь работают должным образом.
Решение #8. Установите клавишу Print Screen для ножниц.
Для пользователей, сталкивающихся с проблемами с ошибочными обновлениями, обходным путем является установка клавиши PrtScr на клавиатуре в качестве кнопки запуска по умолчанию для ножниц. Откройте «Ножницы» и выберите меню «Дополнительно». Выберите «Сочетание клавиш Print Screen» и «Изменить настройки Windows». Включите параметр «Использовать кнопку Print Screen, чтобы открыть фрагмент экрана». Выберите параметры захвата снимков экрана непосредственно с помощью кнопки «PrtScn» на клавиатуре. Проверьте, правильно ли запускается и работает инструмент «Ножницы» в Windows 11 с новым ярлыком.

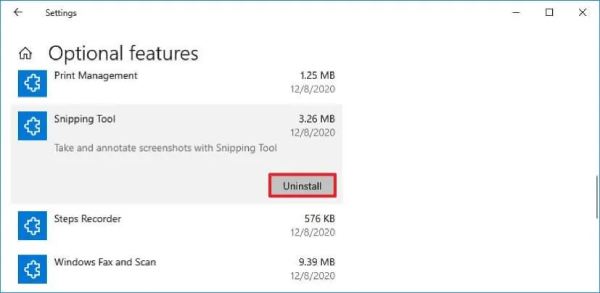
Решение #9. Удалите и переустановите ножницы.
Если работа Snipping Tool прерывается при запуске, возможно, виновата неправильная установка. Удаление и повторная установка инструмента может решить эту проблему. В меню поиска «Пуск» или «Панель управления» выберите «Установка и удаление программ». Прокрутите вниз, чтобы найти приложение «Ножницы», и выберите «Удалить» в меню «Дополнительно». После удаления переустановите Snipping Tool из Microsoft Store. Затем вы можете проверить, решена ли проблема с неработающим в Windows 11 инструментом «Ножницы».
Лучший альтернативный способ делать снимки экрана в Windows 11/10/8/7
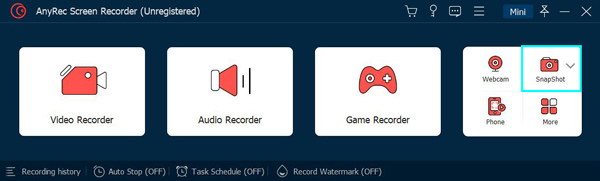
Предположим, ваш Windows 11 Snipping Tool все еще не работает; вы можете загрузить сторонний инструмент в качестве решения. И нет другого лучшего и совершенного решения, чем иметь AnyRec Screen Recorder на вашем компьютере с Windows 11. Этот инструмент для обрезки позволит вам сделать снимок экрана в полноэкранном режиме или в пользовательском размере изображения. Кроме того, вы можете добавить текст, рисунки, стрелки, линии и фигуры на захваченный экран, если хотите что-то подчеркнуть. Вы также можете использовать его для запись экрана на Windows 10/11.

Действия, которые необходимо выполнить:
Шаг 1.Прежде всего, скачайте AnyRec Screen Recorder на вашем устройстве Windows. Затем запустите программу и нажмите кнопку «Снимок». Без инструмента для обрезки изображений в Windows 11 вы также можете легко сделать снимок экрана.
Шаг 2.После этого вы можете использовать мышь в качестве курсора, чтобы захватить экран, который вы хотите сделать скриншотом. Затем вы можете свободно регулировать стороны захваченного экрана, пока не достигнете желаемой области.
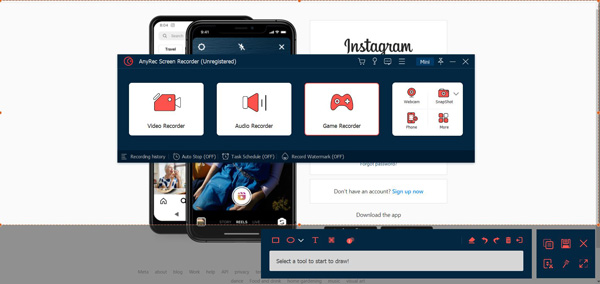
Шаг 3.К снимкам можно добавлять рисунки, текст, линии, фигуры и стрелки. После всех изменений вы можете сохранить снимок. Нажмите кнопку «Сохранить», и все готово!

Часто задаваемые вопросы о том, что ножницы в Windows 11 не работают
-
1. Какая лучшая альтернатива, если Windows 11 Snipping Tool не работает?
Лучший инструмент, который мы можем предложить, если вы ищете альтернативу своему Snipping Tool, это AnyRec Screen Recorder. Это приложение не только позволит вам делать скриншоты, но и поможет вам записывать важные события на ваш экран. Кроме того, вы можете сохранять снимки в различных форматах изображений, таких как PNG, JPG, TIFF, BMP или GIF.
-
2. Как использовать Snipping Tool в Windows 11?
Перейдите в раздел «Пуск» и найдите Snipping Tool. Затем откройте его и выберите нужный режим снимка экрана. Затем вы можете захватить экран с помощью мыши. Наконец, вы можете добавлять рисунки и тексты, а затем сохранять их в свои файлы.
-
3. Где сохраняются мои скриншоты в Windows 11?
После того, как вы устраните проблему с неработающим инструментом Windows 11, вы должны знать куда деваются скриншоты в виндовс 11. На самом деле скриншоты еще не сохранены, и их нужно вставить из буфера обмена и сохранить в локальную папку.
Заключение
Отличная работа! Теперь вы можете исправить неработающий инструмент Windows 11 Snipping Tool. Помимо решений по умолчанию, вы также можете положиться на AnyRec Screen Recorder легко делать снимки. Пожалуйста, поделитесь этим сообщением, чтобы помочь своим друзьям и близким исправить их неработающий инструмент Windows 11 Snipping Tool.
Другие связанные статьи
As you enjoy the new features and advanced improvements added by Windows 11, you also need to suffer from the problems it brings. For instance, the issues with Snipping Tool, accounts page and landing page in the Settings app (S mode only), and touch keyboard. Here, I’ll mainly focus on Snipping Tool missing or not working Windows 11.
Lots of Windows 11 users complained about the same issue: they find the old Snipping Tool is missing or not working on the computer. When users search for the Snip & Sketch app in Windows 11, they get no result; they’re not able to open or use this old screenshot tool. Actually, the reason for Snipping Tool missing Windows 11 is that Microsoft decided to combine the old Snip & Sketch and Snipping Tool into one application, which is also called Snipping Tool.
However, users are not satisfied with the new Snipping Tool. Some people think it doesn’t offer as much functionality as the old tool and others even encounter the “This app can’t open” error. Besides, there is a lot of confusion among Windows 11 users about this change.
- The Snip and Sketch is still available in Microsoft Store as a stand-alone application.
- The icon of the new Windows 11 Snipping Tool is the same as that of the old Windows 10 Snip and Sketch.
- A Snip & Sketch option will appear after users clicked on the new Snipping Tool.
Tip: You should prepare a powerful data recovery tool for Windows 11 (like the one provided by MiniTool Solution) before your important files are lost. In this way, you’re able to get missing data back as soon as possible and avoid other unnecessary troubles.
Download the recovery software directly here:
MiniTool Power Data Recovery TrialClick to Download100%Clean & Safe
How to Troubleshoot Snipping Tool Missing Windows 11
Can you restore old Snipping Tool in Windows 11? Certainly, yes.
- Open File Explorer by pressing Windows + E.
- Navigate to C:\Windows.old\Windows\System32. (If you don’t have Windows.old, please find a Windows 10 computer and go to C:\Windows\System32.)
- Copy the SnippingTool.exe file by pressing Ctrl + C.
- Create a new folder within C:\Windows\System32\ and paste the executable file into it by pressing Ctrl + V.
- Create another folder there and name it en-US (or another language you use).
- Copy SnippingTool.exe.mui from C:\Windows.old\Windows\System32\en-US (go to C:\Windows\System32\en-US if you don’t have Windows.old) and paste it into the new folder.
- Now, you can double click on the SnippingTool.exe file to experience the old Snipping Tool in Windows 11.
Also, you can copy the SnippingTool.exe & SnippingTool.exe.mui files and paste them to any other folder on D:, E:, or another drive. Besides, you can pin the Snipping Tool to taskbar for quick access the next time.

Please don’t worry when your Snipping Tool does not work in Windows 11. There are several effective ways to help you out when your Snipping Tool won’t work Windows 11.
How to Fix Snipping Tool Not Working Windows 11
Update System or Uninstall the Recent Updates
How to update Windows 11:
- Press Windows + I.
- Select Windows Update.
- Click Check for updates and wait.
How to uninstall recent updates Windows 11:
- Go to Settings -> Windows Update.
- Click Update history.
- Click Uninstall updates under Related settings.
- Select the target updates and click on Uninstall.
- Wait.
Turn on Clipboard History
- Go to Settings -> System.
- Click Clipboard.
- Locate Clipboard history and toggle its switch to On.
- Restart your computer.

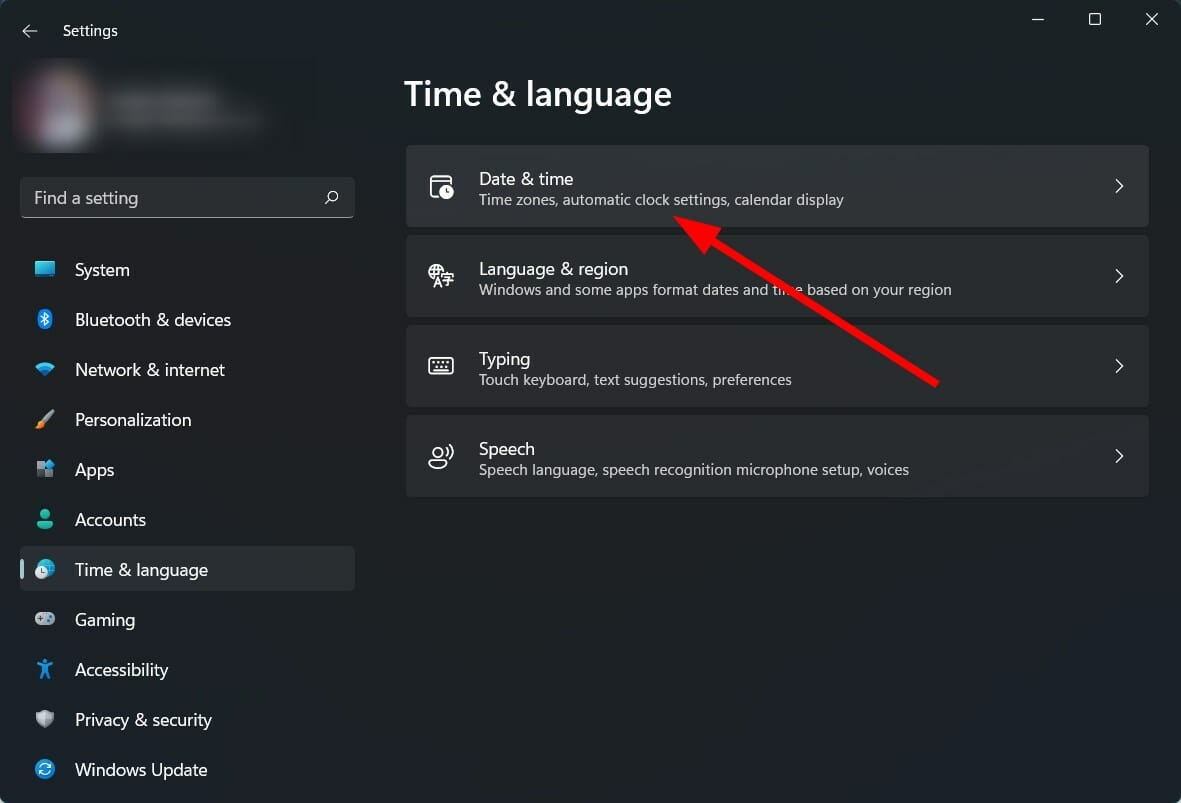
Change & Revert Date
- Open Settings.
- Select Time & language.
- Click Date & time.
- Turn Off Set time automatically.
- Click Change after Set the date and time manually.
- Change the date to 30 October 2021 or another day.
- Click Change to confirm.
- Repeat this process to turn On Set time automatically again.
Run SFC or DISM Scan
How to perform a SFC scan:
- Press Windows + S.
- Type CMD.
- Select Run as administrator.
- Type sfc /scannow and press Enter.
How to do DISM scan:
- Run Command Prompt as administrator.
- Type DISM.exe /Online /Cleanup-image /Restorehealth and press Enter.
Reset or Repair the Snipping Tool
- Open Settings -> select Apps -> click Apps & features.
- Find Snipping Tool and click on the three-dot icon.
- Select Advanced options.
- Click Repair or Reset.
Also, you can try to uninstall and reinstall the Snipping Tool.

If your Snipping Tool is still missing or not working, you can try to download it manually or use another screenshot tool.
[Updated 2022] Top 5 Snipping Tools For Mac You Should Try.
Multiple Windows 11 users are unable to open Snipping Tool in order to take screenshots. There are 2 ways to launch the utility using Keyboard Shortcut and through Search; sadly both of these do not work to launch this built-in screen capturing app. If you are facing Snipping Tool not working in Windows 11 issue then here you will find the solutions. The methods in this post will be effective in all cases whether the app is not working after installing the Windows version or in normal situations.
Snipping tool not working in Windows 11 usually occurs after installing this version. After upgrading to Windows 11, when you press the shortcut keys Ctrl + Shift + S the tool doesn’t open. Furthermore, using search also fails to launch the program. Sometimes, you might find that the program opens but doesn’t work properly. The issue might happen because of buggy Windows update, incorrect settings configuration for the Screenshot capturing tool, corrupted system files, and other.
Snipping Tool not working in Windows 11
Here is how to fix Snipping Tool not working in Windows 11 –
Way-1: When the utility doesn’t work after upgrading
If Windows 11 Snipping Tool missing problem occurs just after installing or upgrading to Windows 11 then this might be due to a bug. Here, you can find a discussion about this issue – Techcommunity. You may assume in this case that Microsoft will soon take notice of the issue and come with a resolution. Until then you can run the app with a tweak that includes restoring Snipping Tool from the Windows.old folder. Installation of the Windows operating system commonly stores the antecedent data and files are in a folder called Windows.old. Many users delete the folder because this folder occupies a large amount of space just after upgradation. So make sure that you haven’t done this then follow the steps –
- Press – Windows and E.
- Click on This PC from the right navigation pane.
- Double click on – Local Disk (C:).
- This will have a Windows.old directory. Double click on it.
- Go to Windows folder in this directory.
- Once reached, double click on System32.
- Here you will find Snippingtool.exe.
- Double click on this.
- The shortcut path to the location of this tool is C: /Windows.old/Windows/System32/SnippingTool.exe.
- After the tool is launched we recommend to pin it to the Taskbar so that you can further open the app easily.
- For this, right-click on the shortcut of the Snipping tool on the taskbar.
- Select – Pin to taskbar.
See – How to Pin Snipping Tool to Start and Taskbar in Windows 11 or 10
Way-2: Reset Snipping Tool
Windows 11 offers to reset any app if it is causing any problem and provides an option in Settings for this purpose. Once you use this option the Snipping tool will restore the default configurations. Therefore, in case, the problem started after changes in settings or installing a third party program then follow the steps –
- Click the – Start.
- Select- Settings.
- When Settings appears, click on- Apps.
- Go to the right and select – Apps & features.
- Let the page load to see the list of all programs installed on your PC.
- Locate Snipping Tool.
- From this section, click on 3 dots menu.
- Select – Advanced options.
- From the next page, click on – Reset.
- You will come across a tiny pop up.
- Again click on ‘Reset’.
- Restart the computer and check if the utility is working now.
Way-3: Download Snipping tool
Snipping tool is a built-in screenshot-taking utility and has been available since Windows XP. However, commonly it comes through installation files and is not downloadable. We have managed somehow the MSU file of the utility using which you will be able to install the utility on Windows 11.
- Click this link.
- Download the Snipping tool.
- Double click Setup file Snipping_Tool_5.2.0.0 (1).msi and follow the instructions on the screen to complete the installation.
Way-4: Uninstall recent updates
Many times, Snipping Tool problem occurs after updating Windows 11. This case indicates that the patch or build you have received is having some bugs. The simplest method to fix the screenshot utility error would be to uninstall the update. Further, install the update after the bug is fixed because it is essential for the protection of your operating system. However, follow the guidelines to uninstall now –
- Click the – Search.
- Type – update history.
- Hit – Enter.
- When the Settings app appears, scroll down to the bottom and click on – Uninstall updates.
- A window from Control panel will open soon; find the patch installed recently. This will be in KB…… form.
- Right-click on this one and select – Uninstall.
- You may notice a confirmation dialog, click – Yes.
- The update will be uninstalled in a while. See if the utility works now.
Way-5: Repair the app
You are getting troubles like Snipping Tool not popping up in Windows 11 then using Repair from the Settings app can work. This will work as a troubleshooter to fix the screenshot utility. Here are the steps –
- Press – Win+I.
- Select – Apps from Settings.
- Click on Apps & features.
- In the list of installed apps click on 3 dots from the Snipping Tool section.
- Select – Advanced options.
- From the coming page, click on – Repair.
Way-6: Use the Shortcut key to launch the Tool
Using Shortcut keys is the handiest way to launch apps on Windows operating system. You can see a complete list of Windows 11 Keyboard shortcuts with downloadable PDF in this concern. Give a try to use these keys as they may easily invoke the Snipping Tool.
- Press Windows + Shift + S on the keyboard.
Way-7: Install the pending Windows updates
When any mishap occurs because of Windows updates sent from Microsoft then you may get a resolution. The only matter is time for this situation so try checking updates at a regular interval. However, the updates are installed automatically but sometimes you may need to follow some manual action as below –
- Press – Winkey+I.
- Select – Windows update.
- Click on – Check for updates.
- Windows will start scanning for updates and in case anyone is pending it will download automatically.
- When the downloading is completed you will get a notification pop up. Click on Restart now on that pop up.
- Now open the app and work with it.
Way-8: Let the app run in background
Some apps require permission in Windows 11 or in the earlier versions for running in the background. The activities in the background commonly help the apps to send and receive notifications, sync information and keep them updated. Lacking permission might prevent the Snipping tool from opening on the desktop. So change the Setting by following steps –
- Press – Winkey + I.
- Select – Apps.
- Click on Apps & features.
- Move down in the next Settings page and reach Snipping Tool.
- Click on the three dots icon in that section and select – Advanced options.
- Now, click the drop-down under Background apps permissions.
- Select – Always.
Way-9: Run SFC aka System file checker
There might be third-party utilities or antivirus programs interfering with the functionality of Windows 11 if you find Snipping Tool not working problem. These programs corrupt the system files and create different types of messes on the PC. But fortunately, System file checker diagnoses all the issues and repair them by running on cmd command prompt. Here is the method –
- Click the Search located on the taskbar.
- Type – cmd.
- Select – Run as administrator.
- A user account control dialog will appear; click on – Yes.
- Once Command prompt opens up, type SFC /Scannow.
- Press – Enter.
- You will see Beginning system scan on the prompt. Once it reaches 100 percent reboot the PC.
Way-10: Run Store app troubleshooter
Store app troubleshooter, being a built-in utility, diagnoses problems with the applications installed through Microsoft Store and repairs them. When Snipping Tool not opening error occurs this utility may be a great help. Follow the instructions –
- Press – Windows logo key+I.
- On the Settings app, click on – Troubleshoot.
- Click on – Other troubleshooters.
- Move down to Store apps and click on Run.
- The tool will scan for issues and then suggest you follow some steps. Go along with them to fix the issue.
Way-11: Run DISM tool
Deployment image servicing and management aka DISM is a command-line utility to detect any messes in WIndows image and rectify them. Once running on Command prompt, the tool repairs the issues which may cause the tool not working in Windows 11. Follow –
- Right-click on Start from the taskbar.
- Select – Windows Terminal (Admin).
- Once User account control pop up prompts, click on Yes.
- Click on ‘Open a new tab’ drop down and select – Command prompt.
- type –
DISM.exe /Online /Cleanup-image /Restorehealth. - Press – Enter.
- Reboot your device and hopefully, the app should work now.
Still, the Snipping Tool couldn’t be opened and you are desperately needing to run it then you can Join Windows Insider Program and switch to receiving builds.
Methods list:
Way-1: When the tool doesn’t work after upgrading to Windows 11
Way-2: Reset Snipping Tool
Way-3: Download Snipping tool
Way-4: Uninstall recent updates
Way-6: Repair the app
Way-7: Use the Shortcut key to launch the Tool
Way-8: Install the pending Windows updates
Way-9: Let the app run in background
Way-10: Run SFC aka System file checker
Way-11: Run Store app troubleshooter
Way-12: Run DISM
That’s all!!
Readers help support Windows Report. We may get a commission if you buy through our links.
Read our disclosure page to find out how can you help Windows Report sustain the editorial team. Read more
XINSTALL BY CLICKING THE DOWNLOAD
FILE
Have you recently upgraded to Windows 11 only to see the Snipping Tool missing or not working on your PC? Many reported the problem, but strangely, others seemed to have the tool running just fine.
There are various reasons the Windows 11 Snipping Tool is not working. But there are some quite strange solutions, as you will later find out. So, let’s find out all about the problem.
Here are some of the reasons the Windows 11 Snipping Tool is missing:
- A bug in the OS – Users who reported the problem early on when Windows 11 was released found a bug in the OS itself that caused the problem, and an update for it was released.
- Corrupt system files – If the system files are corrupt, chances are that Snipping Tool and a bunch of other pre-installed apps would fail to work.
- Misconfigured settings – There are certain settings that, when disabled, will affect the tool’s functioning.
Before we try the slightly complex solutions, here are a few quick ones that might work:
- Restart the computer and check if you can access the Snipping Tool.
- Update the OS to the latest available version since a patch was released for a bug that led to the Snipping Tools not running in Windows 11.
- Scan your PC for malware and viruses using the built-in Windows Security. Also, you could use a reliable and effective antivirus. These are generally up-to-date with the recent bugs and threats and help seamlessly eliminate them.
If none of these work, head to the fixes listed next.
1. Open it from Windows.old folder
- Press Windows + E to open File Explorer, navigate to the C: drive, and then open Windows.old directory.

- Select the Windows folder, and then open the System32 folder.
- Search for Snippingtool.exe and launch the program.

If you recently upgraded to Windows 11, there must be a Windows.old folder with the Snipping Tool shortcut. And you can run it directly from here. If the folder doesn’t exist or you deleted it, head to the next fix.
2. Turn on notifications
- Press Windows + I to open Settings, and click on Notifications in the System tab.

- Now, make sure the toggle for Snipping Tool is enabled.


3. Change the date and time
- Press Windows + I to open Settings, and select Time & language from the navigation pane.

- Choose Date & time.
- Toggle off the switch for Set time automatically.
- Click on the Change button next to the Set the date and time manually option.
- Set the time to anything before October 30, 2021.

- Click Change and check if this fixes the problem or not.


There is another temporary solution provided by the Microsoft tech community. If the Snipping Tool isn’t working on your Windows 11 PC, change the date on your PC to anything before October 31, 2021.
This specific date is advised because of the app’s digital certificate, which was valid till October 31, 2021. However, a new update solved the problem, but if you are still experiencing it, then changing the date and time would be worth a try.
- Recent Windows 11 update lets you disable profanity filter in voice typing
- Microsoft wants Windows 10 users to upgrade to Windows 11 or Copilot + PCs
- Windows 11 KB5055627 update makes File Explorer more fluid
- A few keyboard settings are moving from Control Panel to Settings app in Windows 11
- Details of Windows 11 25H2 spotted in the wild; likely to be a smaller update
4. Modify the Group Policy Settings
- Press Windows + R to open Run, type gpedit.msc in the text field, and hit Enter.

- Under User Configuration, expand Administrative Templates, select Windows Components, and then choose Tablet PC on the right.

- Select Accessories.
- Now, double-click on the Do not allow Snipping Tool to run policy.
- Next, choose Disabled from the options at the top, and click on OK to save the changes.


That’s it! If nothing had worked and Snipping Tool was still missing in Windows 11, it could have been a misconfigured policy to blame. But the problem will be fixed by now.
5. Reinstall Snipping Tool in Windows 11 via PowerShell
- Press Windows + S to open Search, type PowerShell in the text field, and click on Run as administrator.

- Click Yes in the UAC prompt.
- Paste the following command and hit Enter:
get-appxpackage Microsoft.ScreenSketch | remove-appxpackage
- Once done, execute the following command:
Get-AppXPackage Microsoft.ScreenSketch -AllUsers | Foreach {Add-AppxPackage -DisableDevelopmentMode -Register “$($_.InstallLocation)\AppXManifest.xml”}
- Once done, restart the computer for the changes to come into effect.


You can also install Snipping Tool in Windows 11 using PowerShell when missing, a method that has worked for many users.
6. Download from Microsoft Store
- Press Windows + S to open Search, type Microsoft Store, and click on the relevant search result.

- Search for Snipping Tools, and click on Install to get it.
- Once the installation is complete, you can easily open and access Snipping Tool.


Also, if you can’t find Snipping Tool, search for Snip and Sketch, though the two have been integrated and go by the former’s name in Windows 11.
If nothing works, we recommend you wait for an update from Microsoft. Until then, use effective screenshot-capturing software.
Do not forget to share other solutions that fixed the issue in the comments section and help fellow Windows 11 users.
Vlad Turiceanu
Windows Editor
Passionate about technology, Windows, and everything that has a power button, he spent most of his time developing new skills and learning more about the tech world.
Coming from a solid background in PC building and software development, with a complete expertise in touch-based devices, he is constantly keeping an eye out for the latest and greatest!